A ratchet with 10mm Socket or standard wrench, drill & drill bits, stud finder for wall and floor screws insertion
Allen wrench (i.e., hex key) for safe plate removal and re-attaching
For your safety and satisfaction, please note!
To ensure safe, risk-free operation of your new Stanley Biometric Safe, please read all directions and tips contained in this User Guide first. Also, be sure to keep this User Guide in a reliable place for future reference.
Your Stanley Biometric Safe is intended for household use only. Any use that does not conform to the guidelines described in this User Guide may void the limited warranty.
Your Stanley Biometric Safe is covered by a limited one-year warranty. Coverage is subject to limits and exclusions as detailed in the enclosed One-Year Limited Warranty Card.
Set up your new Stanley Biometric Safe
To make using your new safe as easy and reliable as possible, please complete each direction in order:
1. To unlock the safe for the first time, use an Allen wrench to remove the logo plate on the front of the safe; you will now see the emergency lock. Insert the emergency key into the keyhole and rotate to the right (clockwise) to unlock and open your safe. (See Figure 1 a & 1 b)
Remember, after opening the safe with the emergency key, reinstall the logo plate and do not keep the emergency keys inside of the safe
2. Grab the four AA batteries that came with your safe and insert them into the battery compartment. The battery compartment is located inside the safe on the inside part of the door. (See Figure 1 d) To open battery compartment, gently press on the left side clip, pushing inward towards the middle of the door, while gently pulling that clip outward to open. (See Figure 1c) DO NOT try to slide the battery compartment door to open it; it won't work and you might break it. Once the batteries are installed, the safe should not be shaken or excessively moved for risk of the batteries falling out. If this happens, the key will be the only way to access the safe.
3. To prepare your Stanley Biometric Safe for your fingerprints you need to reset it first to factory default settings:
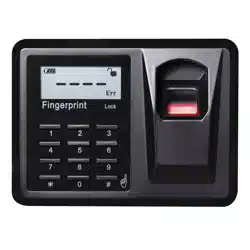
Look inside the safe and find the RED button. The red button is located on the inside edge of the door, nearest the hinge (see Figure 2a). To access it, fully open the safe door and reach In towards the door hinge.
PRESS and HOLD down the red button for 10 seconds (see Figure 2a) "INIT" will flash on the LCD display (see Figure 2b) on the outside of the door, followed by "OK" (see Figure 2c).
Your safe is now reset to factory default settings and all prior data is deleted.
Register your fingerprints on the fingerprint scanner
1. Make sure your fingers are dry, clean and blemish-free before touching the scanner.
2. To register a fingerprint, press the red button briefly (see Figure 2a). As soon as the red light comes on, press your fingertip on the glass fingerprint scanner located on the safe door (see Figure 2e).
The LCD screen will display "OK," and the battery indicator and data count indicator will display "ld--01" for the first registered scan (see Figure 2f).
Should the registration fail, "Err" will display on the LCD screen.
If you get the "Err" display, repeat Steps 1 and 2 to register the same fingerprint.
3. Repeat Step 2 with the same fingertip but place it at a different angle on the glass; i.e., on its left side. Repeat, using your fingertip's right side, then move it up then down (see Figures 2e and 2f).
Important! Register multiple variations of your fingertip. The more variations you program, the more readily you will open your safe quickly, especially in an emergency.
4. Now register a second fingertip by repeating Steps 1 through 3 (Possibly scan your right and left index fingers). Remember, complete multiple scans of your second fingertip to ensure reliable biometric safe opening.
Create your unique PIN code
For your peace of mind, your Stanley Biometric Safe comes with an additional backup means of entry, a unique PIN you can enter on your safe's control pad.
Using the keypad located on the safe door, enter the factory default PIN "1234" and then hold down the star button (*) until the underscore (J is displayed on the LCD screen (See Figure 3b).
1. Immediately enter your new PIN code, of 4 to 6 digits, and then press the star button (*).
2. Enter your new PIN again and press the star button (*) again.
An "OK" will display on the LCD screen after your new PIN is entered twice (See Figure 3b).
If an error (ERR) appears, start over with (1.)
3. Your new PIN is registered! Be sure to test your new PIN by unlocking your safe with it. Testing is further discussed in tips below.
4. Remember, a NEW PIN MUST BE SET before continued use of your safe.
How to unlock and lock your new safe
Using fingerprint recognition
1. Unlock: Press pound button (#). When the red light comes on, press your finger onto the glass fingerprint scanner. The battery indicator and data count indicator "ld--01" will display on the LCD screen.
Safe will unlock.
2. Lock: Close the door. Press either the star button (*) or the pound button (#).
Using your PIN
1. Unlock: Enter your registered PIN code and press the star button (*).
2. Lock: Close the door. Press either the star button (*) or pound button (#).
Using an emergency key
1. Unlock: Remove the logo plate using a screw driver or Allen wrench. Insert the emergency key into the keyhole and rotate to the right (clockwise) to unlock.
2. Lock: Turn the emergency key back to the starting/lock position to lock the safe. Replace the logo plate and return the key to a secure place (not inside the safe).
How to adjust sounds
Your new safe is factory set to beep upon opening and closing. These operational sounds can be turned on and off. However, the unlocked-door warning beep cannot be turned off. For your protection and to protect your valuables, this warning beep will sound to alert you if the safe is left UNLOCKED for longer than 1 minute. To stop the sound, close the safe door and lock.
Turn operational sounds on and off
1. Turn sound on: Press 1 and the star button (*); a beep will sound (See Figure 4a).
2. Turn sound off: Press 0 and the star button (*) (See Figure 4b).
For smooth operation observe these essential tips
Operating Tips
Your Stanley Biometric Safe's fingerprint sensitivity (the readability of your fingertip on the scan pad) is affected by the quality of your registered fingerprint and placement of your fingertip on the scan pad. To ensure the best possible fingertip scan and to establish easy, quick access into your safe:
Wash your hands with soap and water prior to touching the scan pad because dirt, dust and cuts on your finger and other factors can affect quality of the scan.
When registering your fingerprints, ALWAYS scan multiple prints of each fingertip from different angles and positions.
Remember, if your safe is in or reset to factory default mode, any fingerprint and the factory "1234" default PIN can open the safe. To ensure the integrity of your Stanley Biometric Safe:
Your fingerprints MUST be registered and you MUST set your unique PIN before your safe can be securely used.
After programming, test your safe by using non-registered fingerprints and PINs. If the safe opens, it's still in factory default mode. Should this happen, refer to directions above to correctly register your fingerprints and PIN.
If multiple incorrect fingerprints or PINs are entered, your safe will lock for a 2-minute "time-out" period. The LCD will read "HOLD-Err." After 2 minutes you will be allowed to try again.
Your two emergency keys should be stored in a secure, private place.
Do NOT store your emergency keys inside the safe!
If you open your safe using an emergency key, immediately replace the logo plate after relocking your safe.
When placing items into your safe, allow room for the door to close fully. Do not over stuff the safe or you might jam the locking mechanism. The safe door should be closed slowly and only when the locking bars are retracted.
If your safe is in the locked state, but the door is open and the locking bars are protruding, the red button will not function. In this state, you cannot erase fingerprint data, program the safe, or perform other operations.
When the safe's touch pad screen shows the low battery symbol, change all four AA batteries. Note that your registered fingerprints and PIN will be saved, even should the batteries die.
Fire and Water Resistance
Your Stanley Biometric Safe is not guaranteed to be fire - or waterproof. It should not be used to withstand such conditions.
In the event of an emergency, only if you have ample time to SAFELY open your safe should you consider removing its contents.
DO NOT store firearms in this or any safe that could be exposed to fire or placed in risky environments.
Mounting instructions
For extra security, your Stanley Biometric Safe can be mounted to a wall or floor. Confirm proper load bearing;
WARNING: failure to assure proper load bearing can result in personal injury and/or damage to property. Use appropriate tools when mounting your safe and always use eye protection.
IMPORTANT FOR WALL AND FLOOR MOUNTING: Before beginning, check your town building department for local building code rules and/or consult or engage a licensed professional to mount your safe.
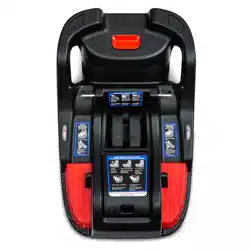
Wall Mounting (See Figure 5a)
Do not mount your safe to a wall without anchoring it properly
Find the studs in the wall using a stud finder. Most studs are 16 inches or 24 inches apart. Consult a professional in your area.
Check the wall for concealed wires or pipes.
Measure the location of the preset drill holes of the safe. Mark their exact position onto the wall to ensure that the studs or anything else behind the wall will not interfere or be harmed.
Drill the appropriate size holes for the anchors you are using.
Carefully press the anchors into the holes drilled into the wall.
Run screws through washers and from the preset drill holes inside the safe into the anchors in the wall. Make sure that the safe is mounted securely.
Floor Mounting (See Figure 5b)
Use the proper tools depending on the type of floor you are drilling; e.g., wood, tile, concrete.
Measure the location of the preset drill holes of the safe. Mark their exact position onto the floor.
Drill the appropriate size holes for the anchors you are using.
Carefully press the anchors into the holes drilled into the floor.
Run screws through washers and from inside the safe into the anchors in the floor. Make sure that the safe is mounted securely.
Care and maintenance
To maximize the security and performance of your Stanley Biometric Safe, keep the glass fingerprint scanner surface dry and clean.
Use a soft, dry cloth to remove any smudges or prints from the scanner after each use. You may wish to use a special cloth or gentle cleaning agent made for touchscreens to clean the scanner.
To clean the exterior of the safe, use a gentle cleaner that's safe for painted metal surfaces. Use a dry cloth or soft brush to clean the interior.
Test registered fingerprints and your PIN every 6 months. You may wish to reset your PIN every 3 months for extra security.
WARNING: Keep liquids away from the control panel. Spills on the control panel will cause damage and possibly electric shock.
Secure your safe to prevent it from falling and causing damage or injury.
Frequently asked questions
Q: How do I reset my registered fingerprint scans?
A: Refer to Page 3 of the Manual and see the directions with photographic directional images.
Q: How do I authorize another person to use my safe?
A: Register their fingerprint, same as you did yours per the instructions on page 3, or simply provide them with the PIN code.
Q: Should I keep the two emergency keys separate; e.g, put one in a safe deposit box?
A: It's up to you but its important that the keys be unmarked and kept outside of the safe itself.
Q: Can I make duplicate emergency keys or get replacements if I lost them?
A: Emergency keys should not be duplicated.
Q: Should I get a professional to check my bearing loads and mount my safe?
A: Great idea if light construction of any type isn't your thing! To stay safe and ensure you don't accidentally touch or damage any wires or plumbing when mounting your safe, call a reliable professional.
Q: Are rechargeable AA batteries a good idea for my safe?
A: If they are fully charged, yes. The battery life will depend on frequency of use. It is best to use fully charged premium batteries.
Q: How do I know if an intruder won't simply bypass my fingerprints and just use the keypad to guess my PIN?
A: We suggest making the PIN at least 4 digits, preferably 6. Which means the intruder or unauthorized visitor will have to spend LOTS of time guessing.
Q: Is the safe armor plated?
A: No.
Troubleshooting tips
1. Noise: Safe is making a grinding noise when closing and opening.
This is normal. The bars are self lubricating and after repeat use, the noise will reduce
2. How do I know if my finger print was registered?
Try to unlock with one of the finger prints you used to register.
if it unlocks then it registered, if it states "NULL" registration failed and you
need to try and register again (See page 3 for more details).
3. What to do if water or dirt spilled on the finger print scanner?:
Clean the pad with a wet nap and then dry immediately. Allow 10-15 minutes before use. Rely on the pin pad in the interim. There are several ways to open the safe. (See Page 4 for 3 options in opening the safe)
4. Can the safe be moved after install?
YES. We recommend removing batteries during movement to reduce risk of them falling out. (If batteries fall out then all electronic function will cease).
5. What to do in cases where the keypad and the finger print scanner are not working?
Use the emergency keys to access the safe. Replace batteries, reset the safe and try again.