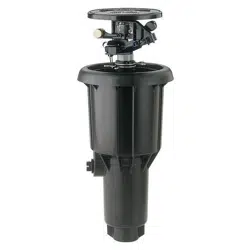
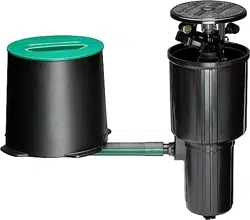
Flush the piping system thoroughly before installing the sprinklers. Use only teflon tape on the connecting pipes or fittings. Do not use PVC cement or other glues as they may chemically damage the threads. Install the AG-5/Maxi-Paw sprinklers so that the flanged area is positioned level with the ground (see Fig. #1). The AG-5/Maxi-Paw has both side and bottom inlets. The side inlet may be used with 1 /2 connectors and the bottom inlet may be used with either 3 /4” or 1 /2” connectors. Use a screwdriver or the tip of Rain Bird wrench #42064 shown in Fig. #2 (sold separately) to unscrew the plug. Install it in the inlet you are not using.
SPACING AND POSITIONING
Your Rain Bird pop-up impulse sprinklers should be spaced so that the area watered by every sprinkler head extends to each sprinkler head around it (see fig.#3). The result is a 100% overlap at all points of the watered area, providing optimum water distribution and even coverage. Refer to Rain Bird's Free Sprinkler Design Service guide (available at most dealers or by calling the Expert Advice hotline at 1-800-RAIN-BIRD) for specific instructions on measuring your water system's pressure and flow rate and calculating the correct number of sprinklers and valves needed. Are your sprinklers throwing water too far? Simply adjust the radius reduction screw (Fig. #4) to decrease the watering pattern's borders by up to 25%.
NOZZLE SELECTION
Given the same size nozzle, a sprinkler watering in a quarter circle pattern will water at a faster rate than a sprinkler watering in a half or full circle pattern. This is because the area of the half or full circle pattern is larger and requires a longer watering time. Many conventional sprinklers do not account for this difference in water requirement. As a result, to adequately water half or full circle areas, too much water is applied in quarter circle areas. This results in puddling and wasted water
Your AG-5/Maxi-Paw sprinkler comes with 5 nozzles to expertly match your irrigation system's specifications. It gives you the ability to water an area evenly without puddles. This feature is called "matched precipitation" and is achieved by correctly using the 5 colored nozzles. Provided below are two typical examples of the way you would match your precipitation rate:
*Don't forget to change the sprinkler's arm spring position (see fig. #7 on the following page). Shown below is a performance chart for the AG-5/Maxi-Paw that may help you select the correct nozzle based on your system's pressure and flow. If you have any questions about nozzle selection, please call us
RAIN BIRD Nozzle Selection Chart
ACCESSING THE INTERNAL ASSEMBLY
To Change the nozzle or set the arc on your sprinkler, you will have to lift the cover to be able to access the internal assembly (Fig. #5). There are two ways to do this: you may find it easiest to use the Rain Bird wrench shown in Fig. #2 to lift and hold up the internal assembly; however, it is also possible to use your hands. You may prefer to use your hands when you set the arc because the wrench can get in the way - just be careful to not let the top of the sprinkler pop down on your fingers!
CHANGING THE NOZZLE
The AG-5/Maxi-Paw comes complete with a blue nozzle installed. To change it, first use the Rain Bird wrench shown in Fig. #2 to lift and hold up the sprinkler's internal assembly. With one hand hold the sprinkler's arm out of the way and with the other use your thumb and finger to turn the tab of the nozzle counterclockwise (to the left). It will rotate about 1 /4 turn and then you may pull it out (see Fig. #6). Insert the new nozzle into the opening. Turn it clockwise (to the right) until you hear a click indicating it has locked into position.
SPRING PLACEMENT
The red and black nozzles require adjusting the arm spring. Your AG-5/Maxi-Paw is shipped with the tip of the spring in the "A" position. If you use the red or black nozzles, you will need to change it to the "B" position (see Fig. #7). The lighter tension of the spring in the "B" position will permit better operation of the sprinkler's arm and tripping mechanisms in low-flow situations.
SETTING THE WATERING PATTERN
Rain Bird's AG-5/Maxi-Paw sprinkler may be set to water a full or a part circle with a few simple adjustments. After installation, lift the lid and locate the two pattern adjusters, or trip collars, and the trip lever.To water full circle: flip the trip lever up, allowing the head to rotate in a complete circle (Fig. #8).
To water a part circle: flip the trip lever down, then slowly move the two pattern adjusters (Fig. #9). The sprinkler will water the angle you set with the pattern adjusters (on the opposite side of the trip lever).
NOTE: You will need to fine-tune the arc with the pattern adjusters while the sprinkler is operating.
MAINTENANCE TIPS
Do not use oil, grease, or pipe dope on the sprinkler; it is water lubricated. If the AG-5/Maxi-Paw sprinkler fails to operate, check the nozzle for obstructions, verify that your irrigation timer works properly, and that the valve(s) open correctly to provide water to the sprinkler. In cold climates, it is recommended that you purge your irrigation system with an air compressor when you shut the system off for the winter; this will blow out any water remaining in the sprinklers that might damage them upon freezing. Refer to Rain Bird's Winterization Guide for the correct procedure-call us for a free copy. Please call our Expert Advice hotline if you have questions or require assistance installing your AG-5/Maxi-PAW.
TROUBLESHOOTING GUIDE
USE AND OPERATION
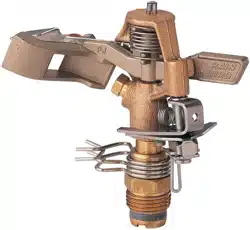
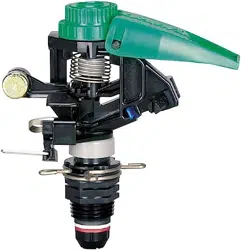
The diagrams below depict typical Rain Bird sprinklers with all available controls. Your particular model may have only some of these features.
Diffuser screw:
Breaks up the stream of water for more close-in watering. Shortens distance of the stream (throw) up to 25% of total throw. Screw clockwise into the stream to produce misting and shorten throw. Turn counterclockwise until totally out of stream for maximum distance (unadjusted throw).
Distance control flap:
Reduces length of the stream and redistributes water. Tilt downward into stream to deflect water. May be used in conjunction with diffuser screw for maximum throw reduction.
Distance control dial:
Some plastic models have a dial on top marked for minimum and maximum distance. Turning the dial will cause modification of the stream of water and distance of throw as indicated on the dial. This feature serves the same purpose as the distance control flap found on other models.
Arc Adjusters (Trip collar):
Used to adjust degree of arc sprinkler will rotate. Position one arc adjuster for each side of the desired arc. Several types of arc adjusters are available depending on the model of your sprinkler. Generally, plastic models move by just a push of the thumb. To adjust the metal models, pinch the ends of each metal adjuster together before sliding into position.
Trip Pin:
Used to determine part or full circle operation. Flip or bend the trip pin upward so it does not hit the trip collar for full circle operation. Pin should be downward for part circle operation (then slide arc adjusters into position to set degree of arc).
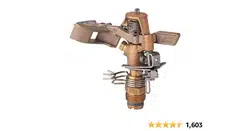
IMPACT SPRINKLER TROUBLESHOOTING
Through many years of experience, we have found that conditions which most often interfere with the proper operation of impact sprinklers are the use of any lubricants (other than water), low water pressure, foreign materials in the irrigation water, and excessive damage or wear to sprinkler parts. Any one or a combination of these factors can cause the sprinkler to stop rotating completely or rotate to one side and fail to return.
If your sprinkler stops working:
DON'T....Spray it with lubricant!
DON'T....Drill out the nozzle!
DO..........Disassemble and clean the unit thoroughly.
DO..........Check for sources of reduction in water pressure.
Impact Sprinkler Troubleshooting Guide
Problem
Cause
Remedy
A. Sprinkler does not rotate back and forth
1. Insufficient water pressure. Requirements vary from model to model.
a. Remove sprinkler head and attach pressure gauge to riser. Check operating pressure with line running. If pressure is low. check for breaks in the line or water running elsewhere which could drain pressure.
Most popular models need at least 25 psi at the last sprinkler head, and should have an unadjusted throw of at least 36'.
b. Pop-up Models: Check for water coming out around the guide seal below the sprinkler head. This is a pressure activated seal. if pressure is insufficient, water will leak around this seal causing the unit to stall and pop up only part way. If the unit is new or others on the line have same problem, it is probably related to pressure. If the unit is older, clean or replace the guide nut seal if necessary.
c. Try switching with another sprinkler closer to water source. If it works, then pressure could be the problem.
d. If the sprinkler stopped working within a month or two of installation, the system may not have been designed to accommodate the normal operating pressure of the type of sprinklers installed. If metal sprinklers are being used, try switching to plastic. If plastic sprinklers are being used, try a lower gallonage variety.
e. If measures above do not provide enough pressure boost, system may have to be rerouted to include less sprinkler heads per line.
2. Debris in nozzle or other parts of sprinkler.
Build up of water deposits causing friction.
a. Remove sprinkler and check for debris in nozzle, swivel bearing, and inlet. Sometimes, a wire pushed gently into the nozzle will loosen debris so it can be rinsed out. Do not drill or alter nozzles as this may permanently hinder the sprinkler performance.
Metal models only: If sand is caught in vane inside of nozzle, it will need to be removed. Loosen nozzle with wrench and unscrew.
b. Thoroughly wash sprinkler to remove dirt and oil. A vinegar and water solution will help remove water deposits.
c. Replace bearing washers if oil has been used on the sprinkler.
3. Worn or damaged parts.
a. If arm or body of sprinkler is bent or damaged, replace sprinkler or part if available.
b. Arm spring tension may need increasing. Metal models: Unhook spring from arm with needle-nosed pliers. Bend slightly to shorten and re-hook. Plastic Models: Unhook spring from arm with needle-nosed pliers, re-hook to next adjoining protrusion on arm.
c. Replace bearing washers if less than 2/3 of original thickness, if mineral deposits are a problem, or if oil based products have been used.
B. Sprinkler rotates to one side and stops.
1. Check points for non-rotation in Section A, 1-3
2. Excessive water pressure. Just as each sprinkler has a lower pressure limit for proper operation, there is also an upper limit. For most sprinklers the limit is 80 psi at the head. The optimum operating pressure is around 50 psi. Pressure that is too high will, at the worst, cause the sprinkler to stall, and at the least, cause the premature wear of the sprinkler parts. If the sprinkler rotates or reverses very fast, this a forewarning of excessive pressure.
a. Put more heads on your line or try making adjustments in the flow at the valve. In some cases, installing a pressure regulator ahead of your main shutoff valve is a good idea and will protect your entire system.
3. Trip spring broken or other trip mechanism parts damaged.
a. Metal models: Replace with trip assembly repair kit for your model.
b. Plastic models: Only trip spring is replaceable. Call our toll free hotline for replacement springs. 1-800-RAIN-BIRD
4. Trip collar missing.
a. Metal models: Replace with repair kit for your specific model.
b. Plastic models: Call our toll free hotline for replacement plastic arc adjusters. 1-800-RAIN-BIRD
5. Trip pin missing or not in downward position.
a. Call our toll free hotline for replacement trip pins for most models. 1- 800-RAIN-BIRD
6. Pop-up models: debris in case
a. Check for debris or water in case which could restrict movement of sprinkler head.
C. Special problems with Pop Up sprinklers in cases (rotors).
1. Unit will not pop up or down.
a. Check for insufficient water pressure to fully pop up unit or seal internal assembly.
b. Remove dirt or debris from case which may be obstructing pop up/down action.
c. Check that internal assembly is properly screwed into case.
d. Rock or debris trapped in retract spring or spring is damaged.
e. Remove internal assembly from case using wrench available for your model. Disassemble, inspect for damage or foreign materials, clean and reassemble.
2. Case fills up with water.
a. Check as in Section C-1 a and c above. If water is coming out around seal. there may be dirt lodged between the seal and pop up shaft preventing sealing, or seal may need replacing.
b. Internal assembly may not be properly screwed into case.
c. Case installed too low without sufficient gravel drainage below sprinkler. Try enlarging the drain holes with a screwdriver.
d. Dense, clay soil may not allow swift drainage of sprinkler even with gravel drainage area.
D. Water continues to leak out of sprinkler when system is turned off.
1. This is not a problem with the sprinkler, but rather with one of the two points at right.
a. Water continues to drain out of the lowest sprinkler head on the line for a period of time when system is shut off. The less the angle of slope and the longer the length of pipe, the longer it takes for all the water to drain. Consult your local Rain Bird contractor about sprinklers which contain a built-in check valve to prevent water in the pipe from draining out of the sprinkler head.
b. Valve controlling sprinkler line is not shutting off all the way and allowing water to continue seeping through. If water continues to leak from the sprinkler head when area has not been watered within the last day, a faulty valve is most likely the cause.
POP UP UNITS IN A CASE
For Metal or Plastic sprinklers, remove unit from case using special Rain Bird wrench for your unit. Wrenches are available where Rain Bird underground sprinklers arc sold. Sprinkler portion of unit is detachable from pop-up stem using a 1/2" hex wrench with a 6" extension.
To remove and replace cover on top of sprinkler:
Metal models - Unscrew cover retainer screw and remove damaged cover. Replace cover and screw.
Plastic models - Pry out the center button with a screwdriver and, using needle-nosed pliers, carefully pinch together the retaining bracket on top of the sprinkler.
Remove old cover. Snap on new cover and replace center button.
DISASSEMBLY OF METAL SPRINKLER HEAD
To replace the trip collar and bearing washers, lock the body of sprinkler in a vise, making sure the sprinkler arm is not touching the vise. Insert a file into nipple slot (figure A) or use a bearing wrench. Rotate file counterclockwise to unscrew nipple. Clean nipple in a solvent if necessary, to remove corrosion and dirt before installing washer.
To replace the arm or arm spring, you will need to disassemble the top portion of the sprinkler. Grasp the pin at the top of the sprinkler with a pair of large diagonals or side cutting pliers and pry out (See Figure B). Take note of the way the arm spring is held in place. Use a pair of needle-nosed pliers to remove the spring.
To replace trip assembly, grasp trip shaft (See Figure C) with a pair of pliers and remove. Attach the "E" ring to the end of the new trip shaft that does not have vertical grooves. Install the lower trip and the upper trip on the trip shaft. Insert the bent end of the new trip spring into the small hole in the upper trip, and slip the other end of the spring into the small "U" notch in the lower trip. Insert new trip shaft into the sprinkler (Figure C). Gently tap in until there is a small clearance between the trips. When finished, the lower trips should "click" when pushed back and forth.