Loading ...
Loading ...
Loading ...
5
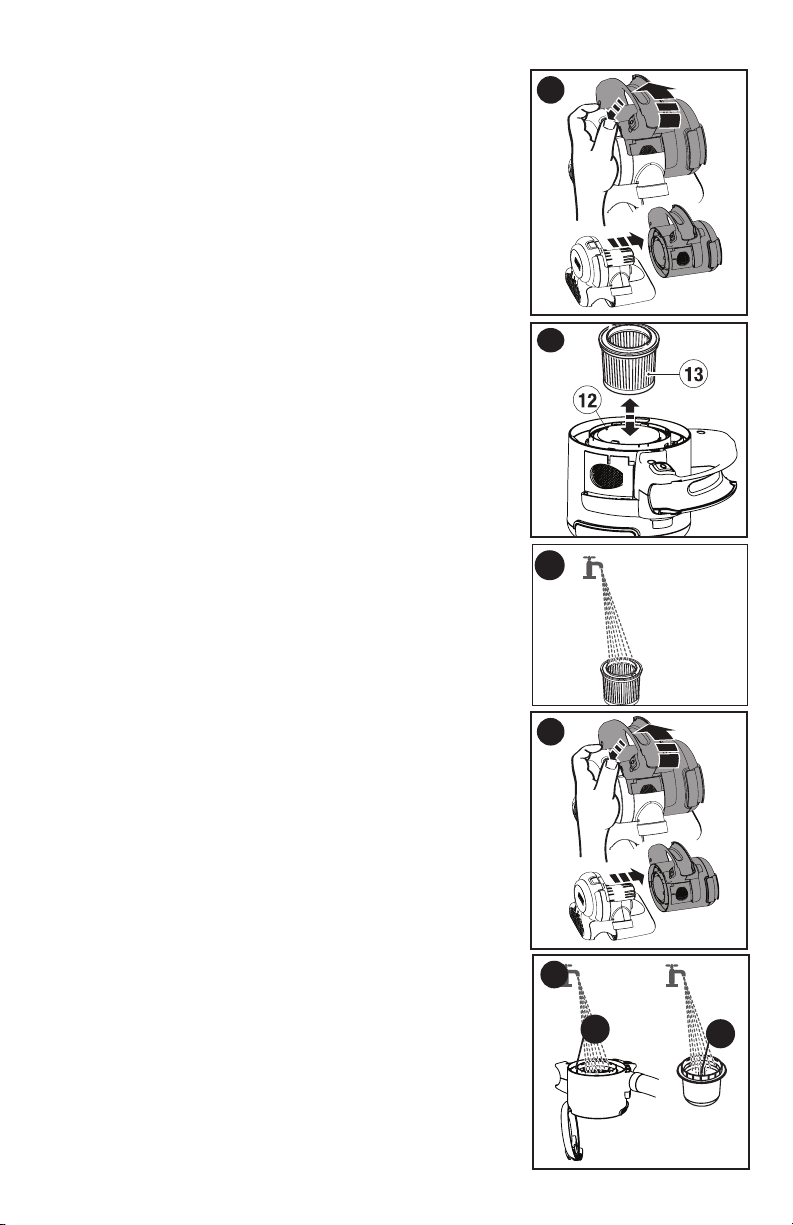
CLEANING FILTERS (FIGURES E - G)
Both the plastic pre-filter (12) and the pleated filter (13)
are re-usable and should be cleaned regularly.
• Unwrap the hose (4) and handle (2) from the main part
of the appliance.
• Pull the door latch (5) and open the dust container door
(11)
and empty contents into a waste basket.
• Push and hold the release button on the opposite side of
the handle from the dust container door (11).
• Rotate the handle toward the back of the appliance
as
shown in figure E
.
• Pull the dust container to the side, away from the base
of the appliance.
• Remove the pleated filter from the pre-filter by pulling
firmly
as shown in figure F
.
• Tap the filters vigorously to remove loose dust.
• If necessary, wash the filter (13) in warm, soapy
water
as shown in figure G
.
• Make sure that the filter is dry before refitting it to the
appliance.
• Refit the pleated filter into the plastic pre-filter.
T
O REPLACE THE DUST CONTAINER
• Slide the container back onto the base and rotate the handle
toward the front of the appliance until an audible click is heard.
Ensure that the container is fully fastened back onto the base.
• Close the container door and make sure it clicks into place.
CLEANING THE DUST CONTAINER (FIGURE H - I)
• Unwrap the hose (4) and handle (2) from the main part
of the appliance.
• Push and hold the release button on the opposite side of
the handle from the dust container door (5).
• Rotate the handle toward the back of the appliance
as
shown in figure H
.
• Pull the dust container to the side, away from the base of
the appliance.
• Remove the pre-filter (12) and filter (13) from the
appliance by twisting the filter to the right and pulling it
from the appliance.
• Once filters are removed, wipe the dust container (14) and
pre-filter (12) with a damp cloth, or rinse with warm soapy
water and allow to dry as shown in figure I.
T
O REPLACE THE DUST CONTAINER
• Slide the container back onto the base and rotate the
handle toward the front of the appliance until an audible
click is heard. Ensure that the container is fully fastened
back onto the base.
TROUBLESHOOTING
If the product does not work, follow the instructions below.
If this does not solve the problem, please contact your
local BLACK+DECKER repair facility.
• Make sure the vehicle adaptor (9) is plugged into the
socket correctly.
• Make sure your vehicle battery system is of the 12 V
negative ground type.
E
F
G
H
I
14
12
Loading ...
Loading ...
Loading ...