1
EN
BERTAZZONI
INSTALLATION AND USER MANUAL
BUILT-IN COMBINATION MICROWAVE OVENS
3100533
WWW.BERTAZZONI.COM
IT
BERTAZZONI
ISTRUZIONI PER L’INSTALLAZIONE ED USO
FORNI DA INCASSO COMBINATI A MICROONDE
3100533
WWW.BERTAZZONI.COM

2
IT
/ Indice
INDICE
AVVERTENZE ___________________________________________________________________
RESPONSABILITÀ DEL PRODUTTORE _____________________________________________
TUTELA DELL’AMBIENTE ________________________________________________________
IMBALLI IN PLASTICA __________________________________________________________
TARGHETTA DI IDENTIFICAZIONE ________________________________________________
AVVERTENZE GENERALI DI SICUREZZA____________________________________________
AVVERTENZE PER L’UTILIZZO ___________________________________________________
AVVERTENZE PER L’APPARECCHIO______________________________________________
MANUALE TECNICO PER L’INSTALLATORE__________________________________________
INSERIMENTO DEL FORNO______________________________________________________
AVVERTENZE IMPORTANTI ______________________________________________________
INSTALLAZIONE SOTTO PIANO COTTURA_________________________________________
INSTALLAZIONE A COLONNA ___________________________________________________
FISSAGGIO FORNO______________________________________________________________
COLLEGAMENTO ELETTRICO_____________________________________________________
MANUTENZIONE________________________________________________________________
USO___________________________________________________________________________
PANNELLO COMANDI __________________________________________________________
COMANDI FORNO 2 MANOPOLE__________________________________________________
COMANDI FORNO FULL TOUCH__________________________________________________
FUNZIONI FORNO______________________________________________________________
PRIMA ACCENSIONE___________________________________________________________
PRIMA DEL PRIMO UTILIZZO______________________________________________________
INSTALLAZIONE PIATTO GIREVOLE_______________________________________________
RAFFREDDAMENTO ___________________________________________________________
PRERISCALDAMENTO__________________________________________________________
LUCE FORNO__________________________________________________________________
UTILIZZO FORNO 2 MANOPOLE____________________________________________________
UTILIZZO FRON TOUCH__________________________________________________________
MODI DI COTTURA______________________________________________________________
USO COTTURE TRADIZIONALI ____________________________________________________
CONDENSA____________________________________________________________________
CONSIGLI PER LA COTTURA_____________________________________________________
RISPARMIO ENERGETICO________________________________________________________
USO COTTURE MICROONDE______________________________________________________
SCONGELAMENTO_____________________________________________________________
CONSIGLI PER LA COTTURA_____________________________________________________
RISPARMIO ENERGETICO________________________________________________________
TABELLA INDICATIVA PER LA COTTURA_____________________________________________
UTILIZZO DEL DISPLPAY TOUCH __________________________________________________
SCHERMATA HOME_____________________________________________________________
GESTIONE DELLE FUNZIONI TEMPO________________________________________________
ASSISTANT____________________________________________________________________
STOVIGLIE____________________________________________________________________
COTTURE MICROONDE_________________________________________________________
COTTURE TRADIZIONALI _______________________________________________________
COTTURE COMBINATE_________________________________________________________
PULIZIA DELL’APPARECCHIO______________________________________________________
SEMPLICI MANUTENZIONI________________________________________________________
SOSTITUZIONE LAMPADA FORNO_________________________________________________
MALFUNZIONAMENTI____________________________________________________________
GARANZIA _____________________________________________________________________
4
4
4
4
4
5
6
6
7
7
7
8
8
9
9
10
11
11
11
11
11
12
12
12
12
12
12
13
13
13
14
14
14
14
15
15
15
15
16
18
18
19
20
21
21
21
21
21
23
23
24
24

3
IT
/ Dalla scrivania del presidente
DALLA SCRIVANIA DEL PRESIDENTE
Gentile Cliente,
grazie per aver scelto per la tua casa la qualità degli elettrodomestici Bertazzoni.
E’ dal lontano 1882 che la mia famiglia costruisce cucine e si è dunque
conquistata una solida reputazione per l’eccellenza della sua ingegneria, nata
dalla passione per la buona tavola.
Oggi i nostri prodotti vantano un esclusivo design, tipicamente italiano e una
tecnologia d’alto livello. La nostra missione è quella di costruire elettrodomestici
dal funzionamento perfetto, che soddisfi no pienamente chi li usa.
Creando prodotti di elevata qualità estetica, rispondiamo alle esigenze dei
nostri clienti. I nostri elettrodomestici sono inoltre versatili e maneggevoli, perciò
cucinare diventa un vero piacere.
Questo manuale ti aiuterà ad utilizzare e a prenderti cura di un prodotto
Bertazzoni nel modo più sicuro ed effi ciente, affi nché ti possa dare la massima
soddisfazione per molti anni a venire.
Spero che sia di tuo completo gradimento!
Paolo Bertazzoni
Presidente

4
IT
/ Avvertenze
AVVERTENZE
LEGGERE IL LIBRETTO D’ISTRUZIONI
PRIMA DI INSTALLARE ED UTILIZZARE
L’APPARECCHIO.
Queste istruzioni sono valide solamente per i
paesi di destinazione i cui simboli di identifi cazione
fi gurano sulla copertina del libretto istruzione e
sull’etichetta dell’apparecchio.
Il costruttore non può essere considerato
responsabile per eventuali danni a cose od a
persone, derivanti da una installazione non corretta
o da una sbagliata utilizzazione dell’apparecchio.
Il costruttore non è responsabile delle eventuali
inesattezze, dovute ad errori di stampa o di
trascrizione, contenute nel presente libretto.
L’estetica delle fi gure riportate è puramente
indicativa.
Il costruttore si riserva di eff ettuare modifi che ai
propri prodotti quando ritenuto necessario ed utile,
senza venire meno alle essenziali caratteristiche
di sicurezza e di funzionalità.
QUESTO APPARECCHIO E’ STATO CONCEPITO
PER UN USO DI TIPO NON PROFESSIONALE
ALL’INTERNO DI ABITAZIONI.
Questo manuale d’uso costituisce parte integrante
dell’apparecchio e deve essere conservato integro
e a portata di mano dell’utente per tutto il ciclo di
vita dell’apparecchio.
Prima di utilizzare l’apparecchio leggere il
manuale.
RESPONSABILITA’ DEL PRODUTTORE
Il costruttore declina ogni responsabilità per
danni subiti da persone e cose causati da:
• uso dell’apparecchio diverso da quello
previsto;
• inosservanza delle prescrizioni del manuale
d’uso;
• manomissione anche di una singola parte
dell’apparecchio;
• utilizzo di ricambi non originali
• Questo apparecchio è destinato alla cottura di
alimenti in ambiente domestico. Ogni altro uso
è improprio.
• L’apparecchio non è concepito per funzionare
con temporizzatori esterni o con sistemi di
comando a distanza.
ATTENZIONE : Inserendo la marcatura
su
questo prodotto, si dichiara, sotto la propria re-
sponsabilità, la conformità a tutte le normative eu-
ropee sulla sicurezza ,la salute e i requisiti ambi-
entali stabiliti dalla legislazione di questo prodotto.
TUTELA DELL’AMBIENTE
Questo apparecchio dispone di contrassegno
ai sensi della direttiva europea 2012/19/UE in
materia di apparecchi elettrici ed elettronici (waste
electrical and electronic equipment -WEEE).
Questa direttiva defi nisce le norme per la raccolta
e il riciclaggio degli apparecchi dismessi valide su
tutto il territorio dell’Unione Europea.
L’imballaggio dell’apparecchio è costituito dagli
elementi strettamente necessari a garantire una
effi cace protezione durante il trasporto. I materiali
di imballaggio sono totalmente riciclabili e ridotto,
quindi, è il loro impatto ambientale. La invitiamo
a contribuire alla salvaguardia dell’ambiente
tenendo conto anche dei seguenti consigli:
• smaltire gli elementi dell’imballaggio nei
corrispondenti contenitori di riciclaggio,
• prima di consegnare il vecchio apparecchio alla
piattaforma di raccolta, renderlo inutilizzabile
presso i competenti uffi ci locali, informarsi
sul più vicino centro di raccolta di materiali
riciclabili per conferire il proprio apparecchio,
• non buttare l’olio usato nel lavandino.
Conservarlo in un recipiente chiuso e
consegnarlo a un centro di raccolta o, se
questo non fosse possibile, gettarlo nella
spazzatura (in tal modo, verrà smaltito in una
discarica controllata; pur non trattandosi della
migliore soluzione, si evita in questo modo la
contaminazione dell’acqua).
IMBALLI IN PLASTICA
Pericolo di soff ocamento
• Non lasciare incustodito l’imballaggio o parti
di esso.
• Non permettere che bambini giochino con i
sacchetti di plastica dell’imballaggio.
TARGHETTA DI IDENTIFICAZIONE
La targhetta di identifi cazione riporta i dati tecnici,
il numero di matricola e la marcatura. La targhet-
ta di identifi cazione si trova sul lato della facciata
forno e non deve mai essere rimossa (una copia
della stessa è riportata nel manuale).
Si prega di smaltire le confezioni nel
rispetto dell’ambiente.

5
IT
/ Avvertenze
AVVERTENZE
AVVERTENZE GENERALI DI SICUREZZA
• Questo apparecchio e le sue parti accessibili
diventano molto calde durante l’uso.
• Non toccare gli elementi riscaldanti durante
l’uso.
• Tenere lontani i bambini inferiori agli 8 anni se
non continuamente sorvegliati.
• I bambini non devono giocare con
l’apparecchio.
• L’uso di questo apparecchio è consentito
ai bambini a partire dagli 8 anni di età e alle
persone con ridotte capacità fi siche, sensoriali
o mentali oppure con mancata esperienza
e conoscenza, supervisionati o istruiti da
persone adulte e responsabili per la loro
sicurezza.
• Tenere i bambini e gli animali domestici lontano
dall’apparecchiatura durante il funzionamento
o raff reddamento. Le parti accessibili sono
incandescenti.
• Spegnere l’apparecchio dopo l’uso.
• Le operazioni di pulizia e manutenzione non
devono essere eff ettuate dai bambini senza
sorveglianza.
• Assicurarsi che le superfi ci si siano
raff reddate prima di procedere con la pulizia
dell’apparecchio.
• Far eseguire l’installazione e gli interventi
di assistenza da personale qualifi cato nel
rispetto delle norme vigenti. Non tentare
mai di riparare l’apparecchio da soli o senza
l’intervento di un tecnico qualifi cato.
• Non modifi care l’apparecchio.
• Non inserire oggetti nelle feritoie.
• Non ostruire le aperture, le fessure di
ventilazione e di smaltimento del calore.
• Se il cavo di alimentazione elettrica è
danneggiato, contattare subito il servizio di
assistenza tecnica che provvederà a sostituire
il cavo.
• Sulle parti in vetro non utilizzare detergenti
abrasivi o corrosivi (es. prodotti in polvere,
smacchiatori e spugnette metalliche).
• Non sedersi o appoggiarsi sulla porta del
forno.
• Non utilizzare getti di vapore per pulire
l’apparecchio.
• Non usare in nessun caso l’apparecchio per
riscaldare l’ambiente.
• In caso di rottura incrinatura e crepe del
vetro, spegnere immediatamente il forno, e
scollegarlo dalla rete elettrica. Rivolgersi al
servizio assistenza.
• Gli sbalzi termici possono provocare la rottura
del vetro, durante l’uso non versare liquidi
freddi sulla porta forno.
• L’uso del forno genera calore, umidità, ventilare
bene l’ambiente durante il funzionamento.
• Non riporre oggetti infi ammabili nel forno
• Non aprire la porta del forno quando fuoriesce
del fumo. Disattivare l’apparecchio e
scollegare il forno dalla rete elettrica.
• il forno è dotato di elementi elettronici che
potrebbero interagire con impianti elettronici
medicali quali pacemaker o pompe d’insulina.
Questi impianti devono stare a distanza di
almeno 10cm dal forno.
• Controllare che non rimangano oggetti
incastrati che pregiudichino la chiusura della
porta forno.
• Il forno non è concepito per funzionare
con temporizzatori o sistemi di comando a
distanza.
• Recipienti in plastica non adatti ad alte
temperature possono fondersi danneggiando
il forno o prendendo fuoco.
• Barattoli chiusi possono scoppiare se
riscaldati, non usare il forno per preparazione
e riscadamento di barattoli o vasi.
• Servirsi sempre degli appositi guanti da forno
per estrarre o inserire accessori o pentole
resistenti al calore
• Prima di eseguire qualsiasi intervento di
manutenzione, scollegare l’apparecchiatura
dalla rete elettrica.
• Non utilizzare l’apparecchio se la porta non si
chiude correttamente o se le
le cerniere della
porta sono danneggiate,
• Non utilizzare l’apparecchio se le superfi ci
di contatto tra la porta e la facciata del forno
sono danneggiate
• Non utilizzare l’apparecchio se il vetro della
porta è danneggiato
• Non utilizzare l’apparecchio se nel vano
cottura si creano spesso scintille senza che
siano presenti oggetti metallici.
• Non accendere mai il forno a microonde se
vuoto.
• Le superfi ci di contatto della porta con
la facciata devono essere mantenute
sempre pulite, al fi ne di garantire il perfetto
funzionamento del forno.
• Non rimuovere la copertura di mica dal cielo
forno. Questa copertura evita che grasso e
resti di cottura danneggino il generatore di
microonde

6
IT
/ Avvertenze
AVVERTENZE
AVVERTENZE PER L’UTILIZZO
• Per cotture con funzioni microonde utilizzare
solo stoviglie adatte alle microonde
(porcellana, vetro o plastica idonea).
• Assicurarsi che il perno, l’anello di scorrimento
e il relativo piatto girante si trovino nel vano
cottura prima di mettere in funzione il forno
• L’apparecchio funziona solo quando lo
sportello è perfettamente chiuso.
• Prestare particolare attenzione quando si
cucinano cibi con elevate quantità di alcool,
perchè potrebbero incendiarsi.
• Rimuovere residui di cibo dall’interno del forno
prima di utilizzare l’apparecchio, per evitare
che prendano fuoco.
• Non appoggiare alcun oggetto o carta da forno
sul fondo della cavità forno.
• Dopo la cottura il raff reddamento deve avvenire
a porta chiusa per evitare il danneggiamento
dei mobili adiacenti.
• Il succo della frutta causa formazione di
macchie indelebili, utilizzare recipienti profondi
per evitarne la fuoriuscita.
• I recipienti danneggiati, o di dimensioni
inadeguate, possono causare gravi lesioni.
• All’apertura della porta forno prestare
attenzione alla fuoriuscita di vapore caldo,
potrebbe ustionare.
• Non versare acqua nel forno caldo per evitare
formazione di vapore.
• Mantenere la guarnizione pulita per evitare
fuoriuscite di calore che possono danneggiare
mobili adiacenti.
• Infi lare gli accessori forno fi no alla posizione
di arresto per evitare il danneggiamento della
porta in chiusura.
• Non mettere in funzione l’apparecchiatura con
le mani umide o quando c’è un contatto con
l’acqua.
• Non esercitare pressione sulla porta aperta.
• Non utilizzare la porta come superfi cie di
lavoro o come piano di appoggio
• Non appoggiare o tenere liquidi infi ammabili,
né oggetti facilmente incendiabili
sull’apparecchiatura, al suo interno o nelle
immediate vicinanze.
• Riscaldare le pappe per neonati sempre in
biberon o bottiglie senza coperchio e senza
tettarella. Dopo aver riscaldato il cibo del
bambino, mescolarlo o agitarlo bene in modo
che il calore si distribuisca uniformemente.
• Non selezionare tempi di riscaldamento o
livelli di potenza troppo elevati per riscaldare
piccole quantità di cibo.
• Utilizzare la funzione grill soltanto per
gratinare.
• Estrarre con attenzione dal forno alimenti
liquidi per evitare il rischio di traboccamento.
• Utilizzare solo recipienti adatti al microonde.
• Prima di utilizzare stoviglie e recipienti nel
forno, verifi carne l’idoneità
• Non riscaldare uova con guscio o uova
sode intere nel forno a microonde, perché
potrebbero esplodere.
• Non utilizzare il forno per friggere in olio, perché
non è possibile controllare la temperatura
dell’olio sotto l’infl usso delle microonde.
• Il piatto girevole e le griglie possono resistere
ad un carico massimo di 8 kg.
AVVERTENZE PER L’APPARECCHIO
• Non appoggiare la pellicola di alluminio
direttamente sulla superfi cie inferiore del
forno.
• Non mettere direttamente acqua all’interno
del forno caldo.
• Non tenere piatti umidi e cibo all’interno del
forno dopo aver terminato la fase di cottura
• Prestare attenzione quando si tolgono o
inseriscono gli accessori.
• Lo scolorimento dell’acciaio non infl uisce sulle
prestazioni del forno
• Per le torte molto umide, usare una leccarda.
I succhi di frutta provocano macchie che
possono essere permanenti.
• Il forno è destinato solo alla cottura. Non deve
essere utilizzato per altri scopi, come per
esempio il riscaldamento di un ambiente.
7
IT
/ Installazione
L’installazione, le regolazioni, le trasformazioni e
le manutenzioni elencate in questa parte devono
essere eseguite esclusivamente da personale
qualifi cato (come da normativa vigente). Un’er-
rata installazione può causare danni a persone,
animali o cose, nei confronti dei quali il costruttore
non può essere considerato responsabile. I dis-
positivi di sicurezza o di regolazione automatica
degli apparecchi durante la vita dell’impianto pot-
ranno essere modifi cati solamente dal costruttore
o dal fornitore debitamente autorizzato.
Procedere all’installazione solo dopo aver in-
dossato i dispositivi individuali di protezione
INSERIMENTO DEL FORNO
Dopo aver tolto le varie parti mobili dai loro im-
balli interni ed esterni, assicurarsi che il forno sia
integro. Non rimuovere la copertura di mica appli-
cata sulla superfi cie superiore del vano cottura.
Questa copertura evita che il grasso e i resti di
cottura possano danneggiare il generatore del mi-
croonde.
Non utilizzare l’apparecchio in caso di dubbio e
contattare il centro assistenza.
Considerando le dimensioni critiche dell’apparec-
chio, verifi care che il mobile sia adatto all’incasso
del forno.
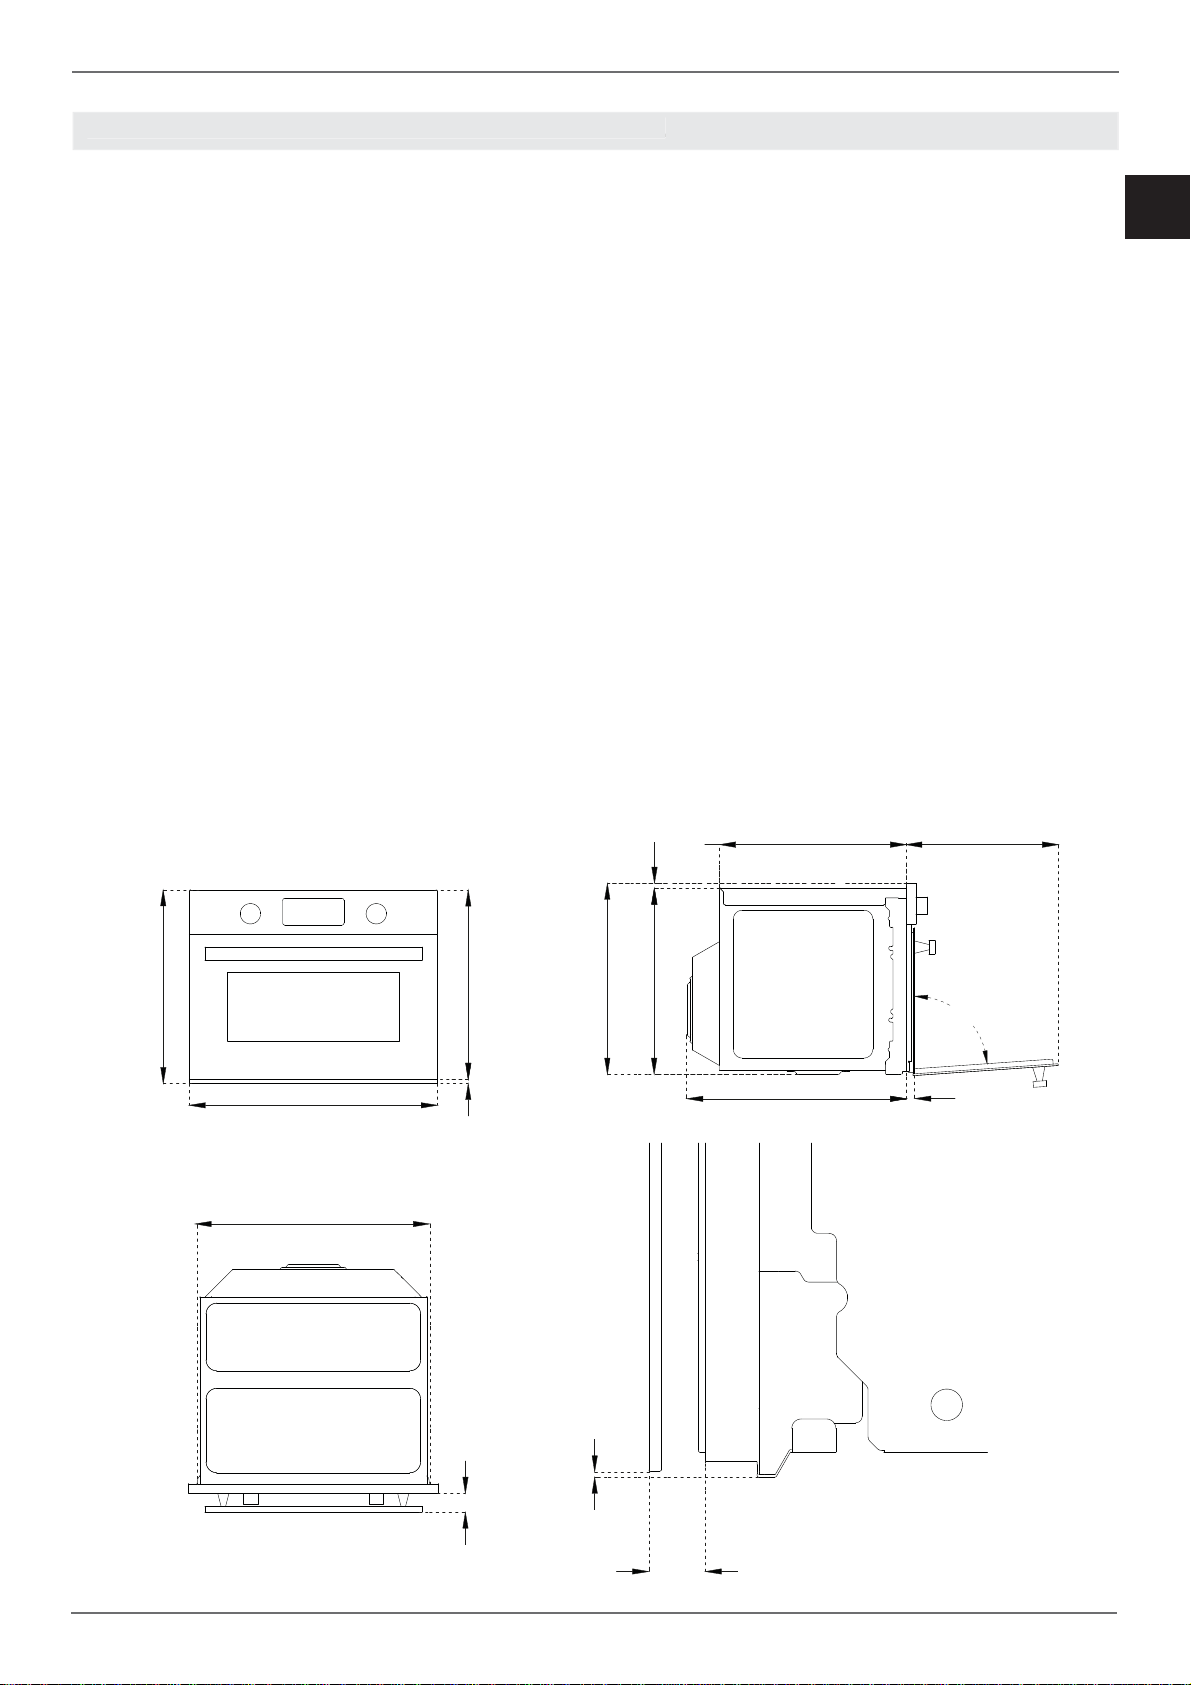
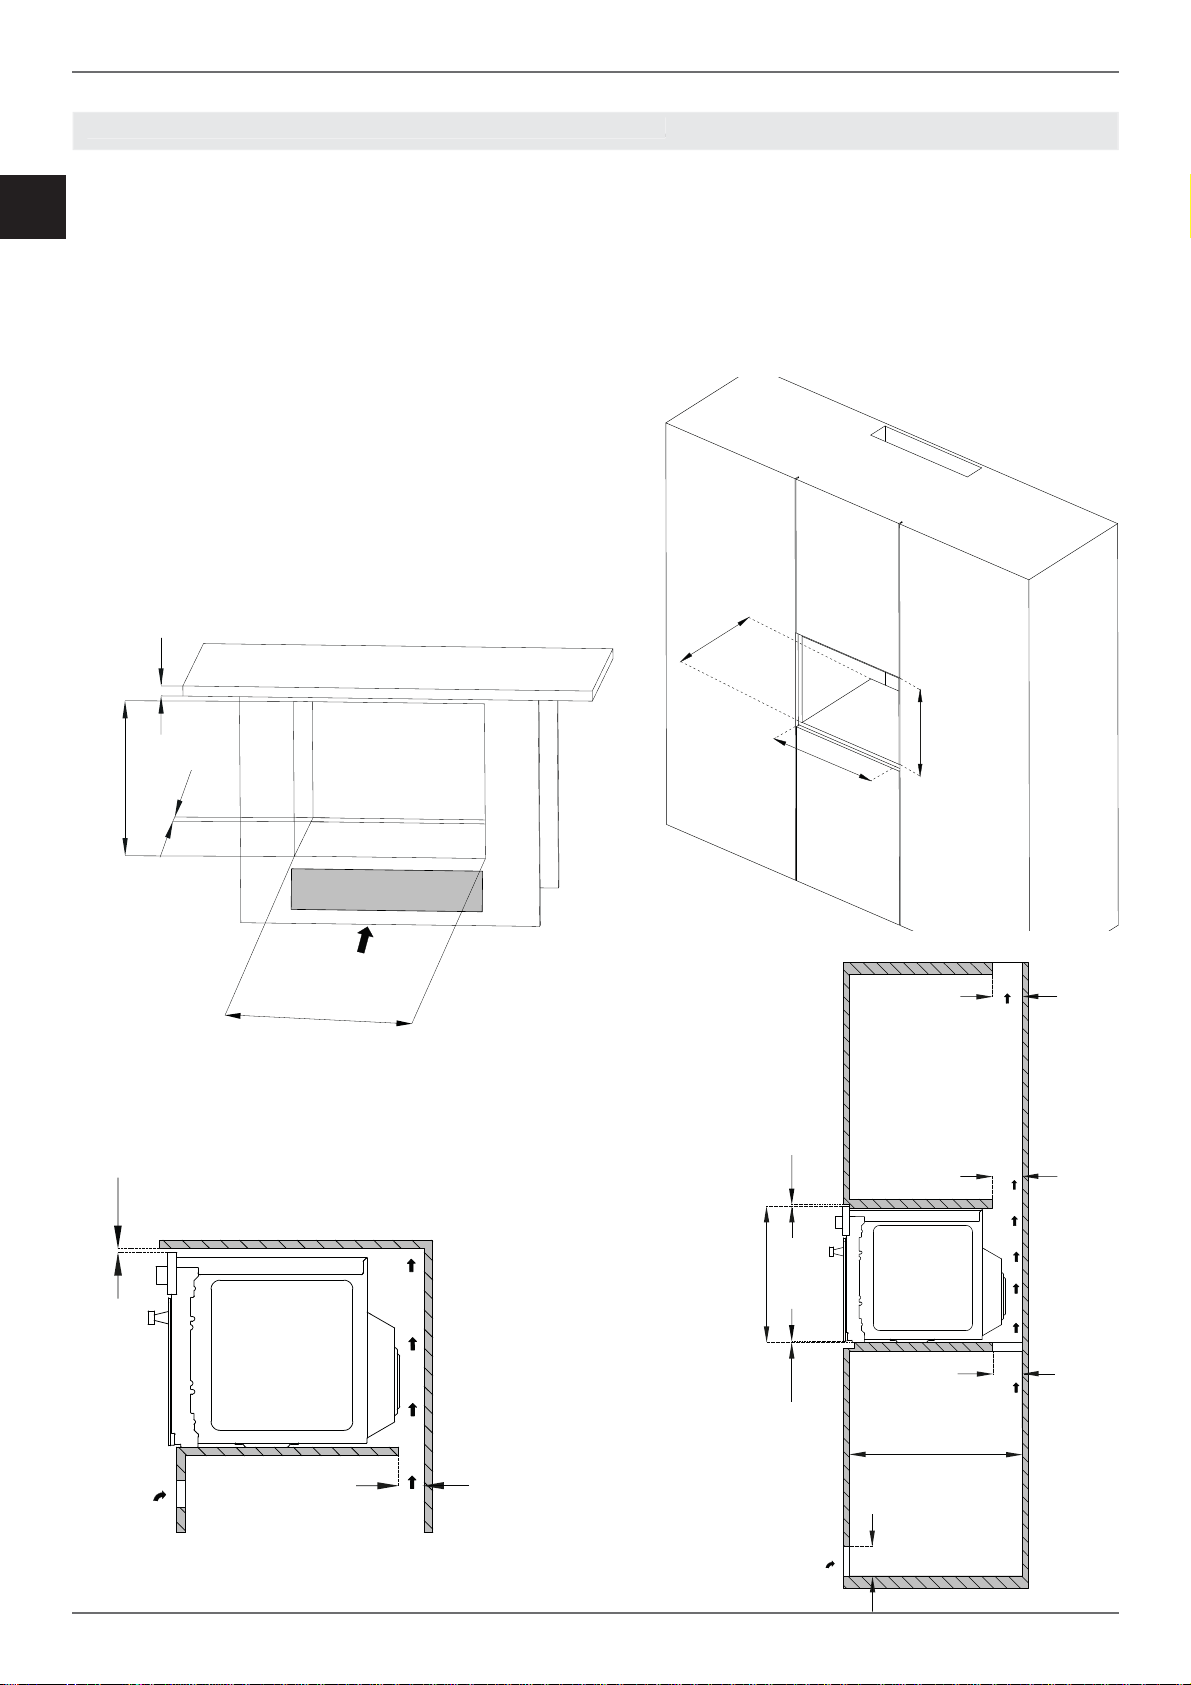
AVVERTENZE IMPORTANTI
Il forno può essere installato solo incassato. Le
pareti e le superfi ci circostanti devono resistere
almeno ad una temperatura di 90°C.
Eff ettuare l’installazione dell’apparecchio con-
formemente a quanto prescritto dalla normativa
vigente.
Prevedere nella parte posteriore del mobile
un’apertura per l’areazione del forno come indi-
cato in fi gura.
L’assenza di una corretta ventilazione potrebbe
compromettere le prestazioni del forno.
Inserire il perno al centro del vano cottura ed ap-
poggiare l’anello di scorrimento e il piatto girevole
in modo che scatti.
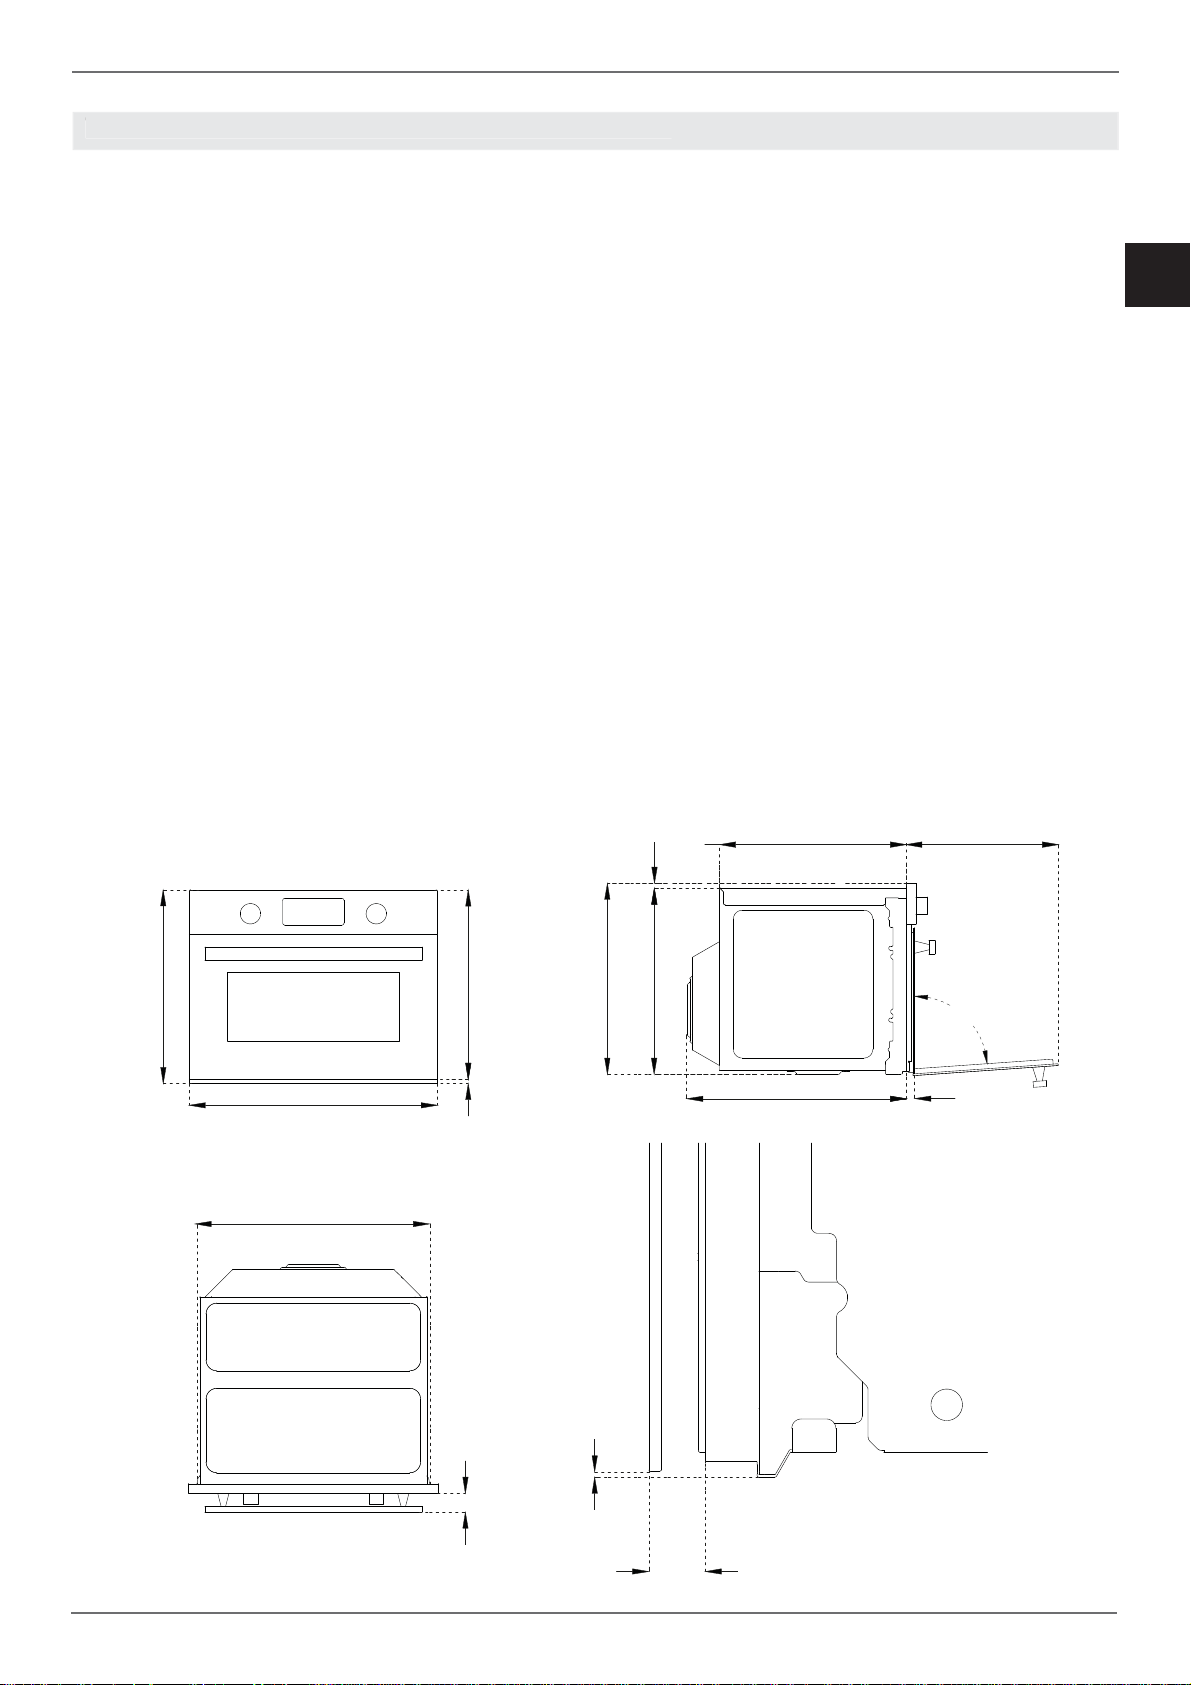
MANUALE TECNICO PER L’INSTALLATORE
M
ANUALE TECNICO PER L’INSTALLATOR
E
595
453.51.5
455
446
455
450 350
86°
520 22
11
556
65
1.5
A
A = 20 MOD
A = 22 HER
A = 23 PRO
8
IT
/ Installazione
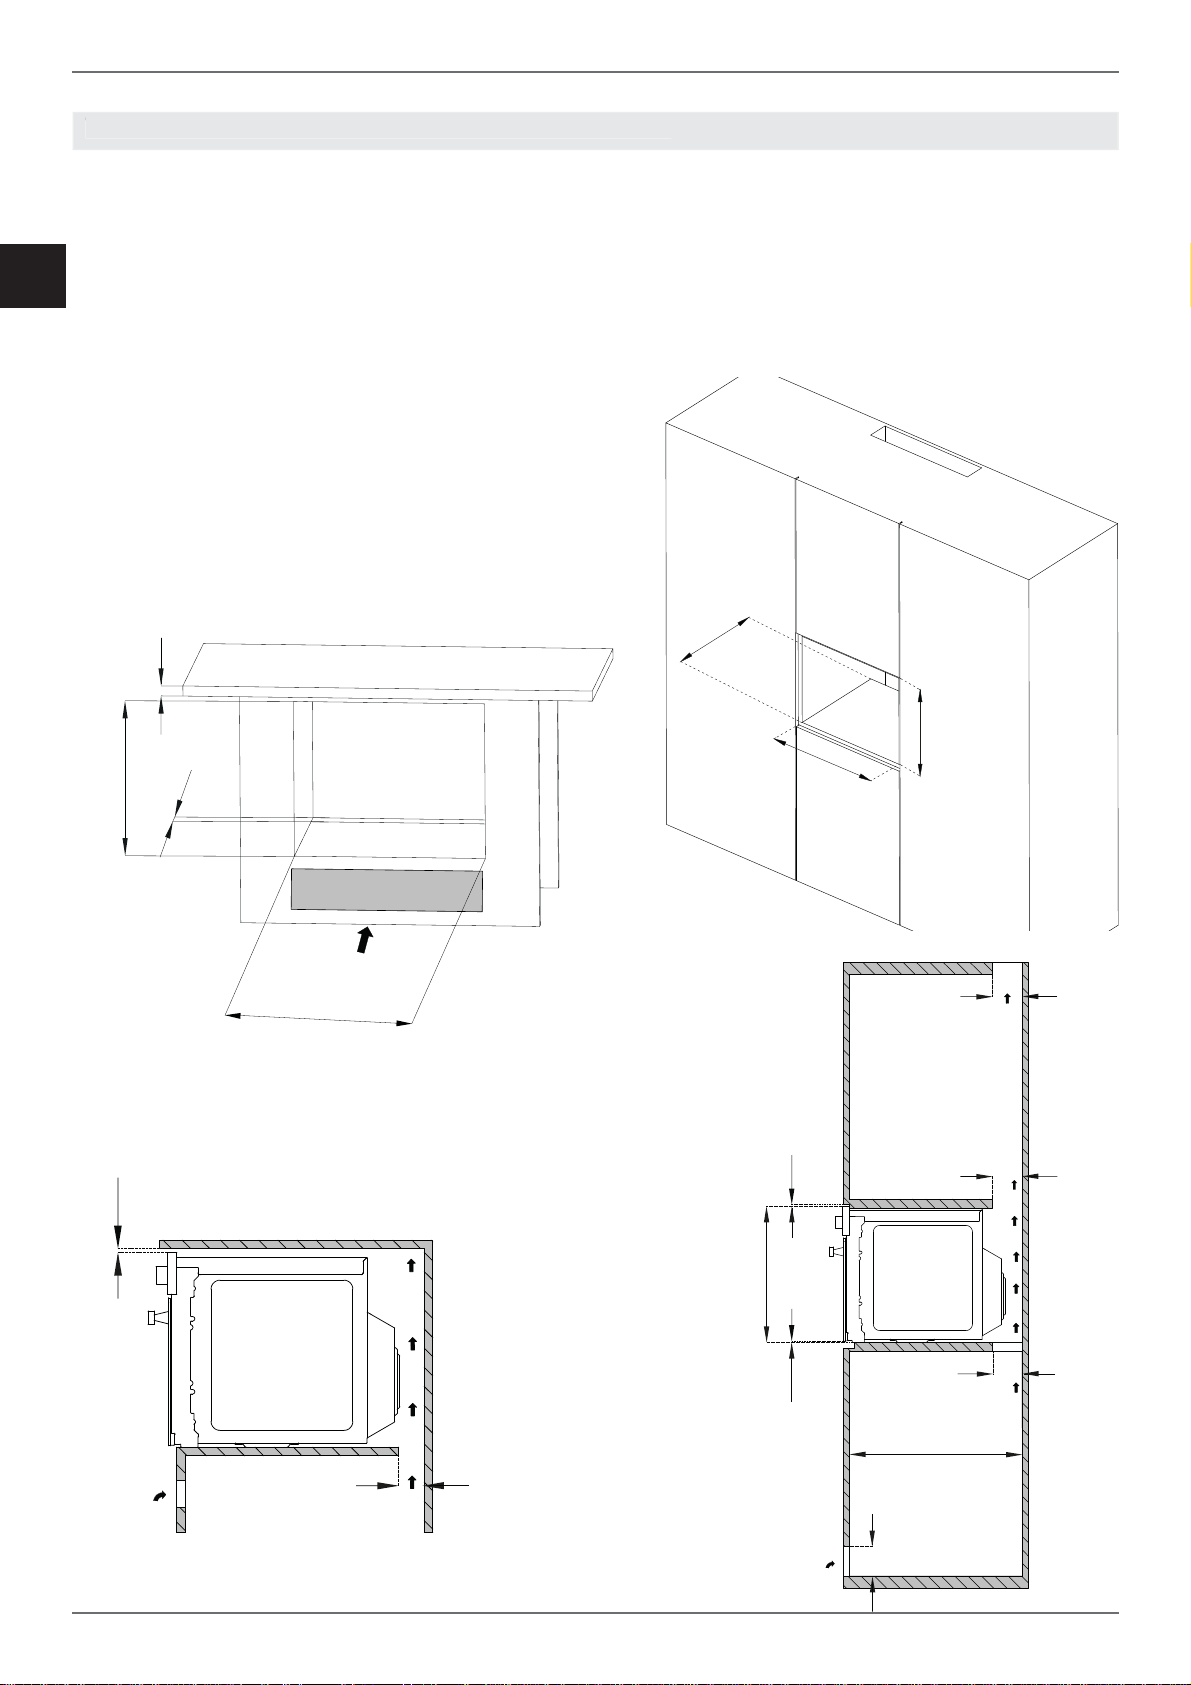
INSTALLAZIONE SOTTO PIANO INCASSO
La distanza tra il forno e i mobili da cucina o gli
apparecchi da incasso deve essere tale da garan-
tire una suffi ciente ventilazione ed un suffi ciente
scarico dell’aria.
Se installato sotto un piano cottura è necessario
lasciare uno spazio tra il fondo del piano cottura e
la parte superiore del forno e garantire la ventilazi-
one di tutto il vano (come da fi gura).
Eventuali aperture di areazione richieste per il pi-
ano cottura sono da sommare a quelle richieste
per il forno.
Il costruttore declina ogni responsabilità nel caso
in cui venga installato un piano cottura di un’altra
marca.
INSTALLAZIONE A COLONNA
La distanza tra il forno e i mobili da cucina deve
essere tale da garantire una suffi ciente ventilazi-
one ed un suffi ciente scarico dell’aria. Assicurarsi
che nella parte superiore o posteriore il mobile ab-
bia un’ apertura come indicato in fi gura.
MANUALE TECNICO PER L’INSTALLATORE
M
ANUALE TECNICO PER L’INSTALLATOR
E
60
560-568
455
MIN 5
1.5
60
60
60
60
5
MIN 30
MIN 460
60
558-568
250 cm²
448-452
min.550
560-568
9
IT
/ Installazione
• Posizionare l’apparecchio nel mobile con l’ai-
uto di una seconda persona.
• Non usare la porta o la maniglia per posizion-
are il forno.
• Controllare il corretto allineamento del forno
con i mobili.
• Controllare che l’apertura della porta avvenga
correttamente.
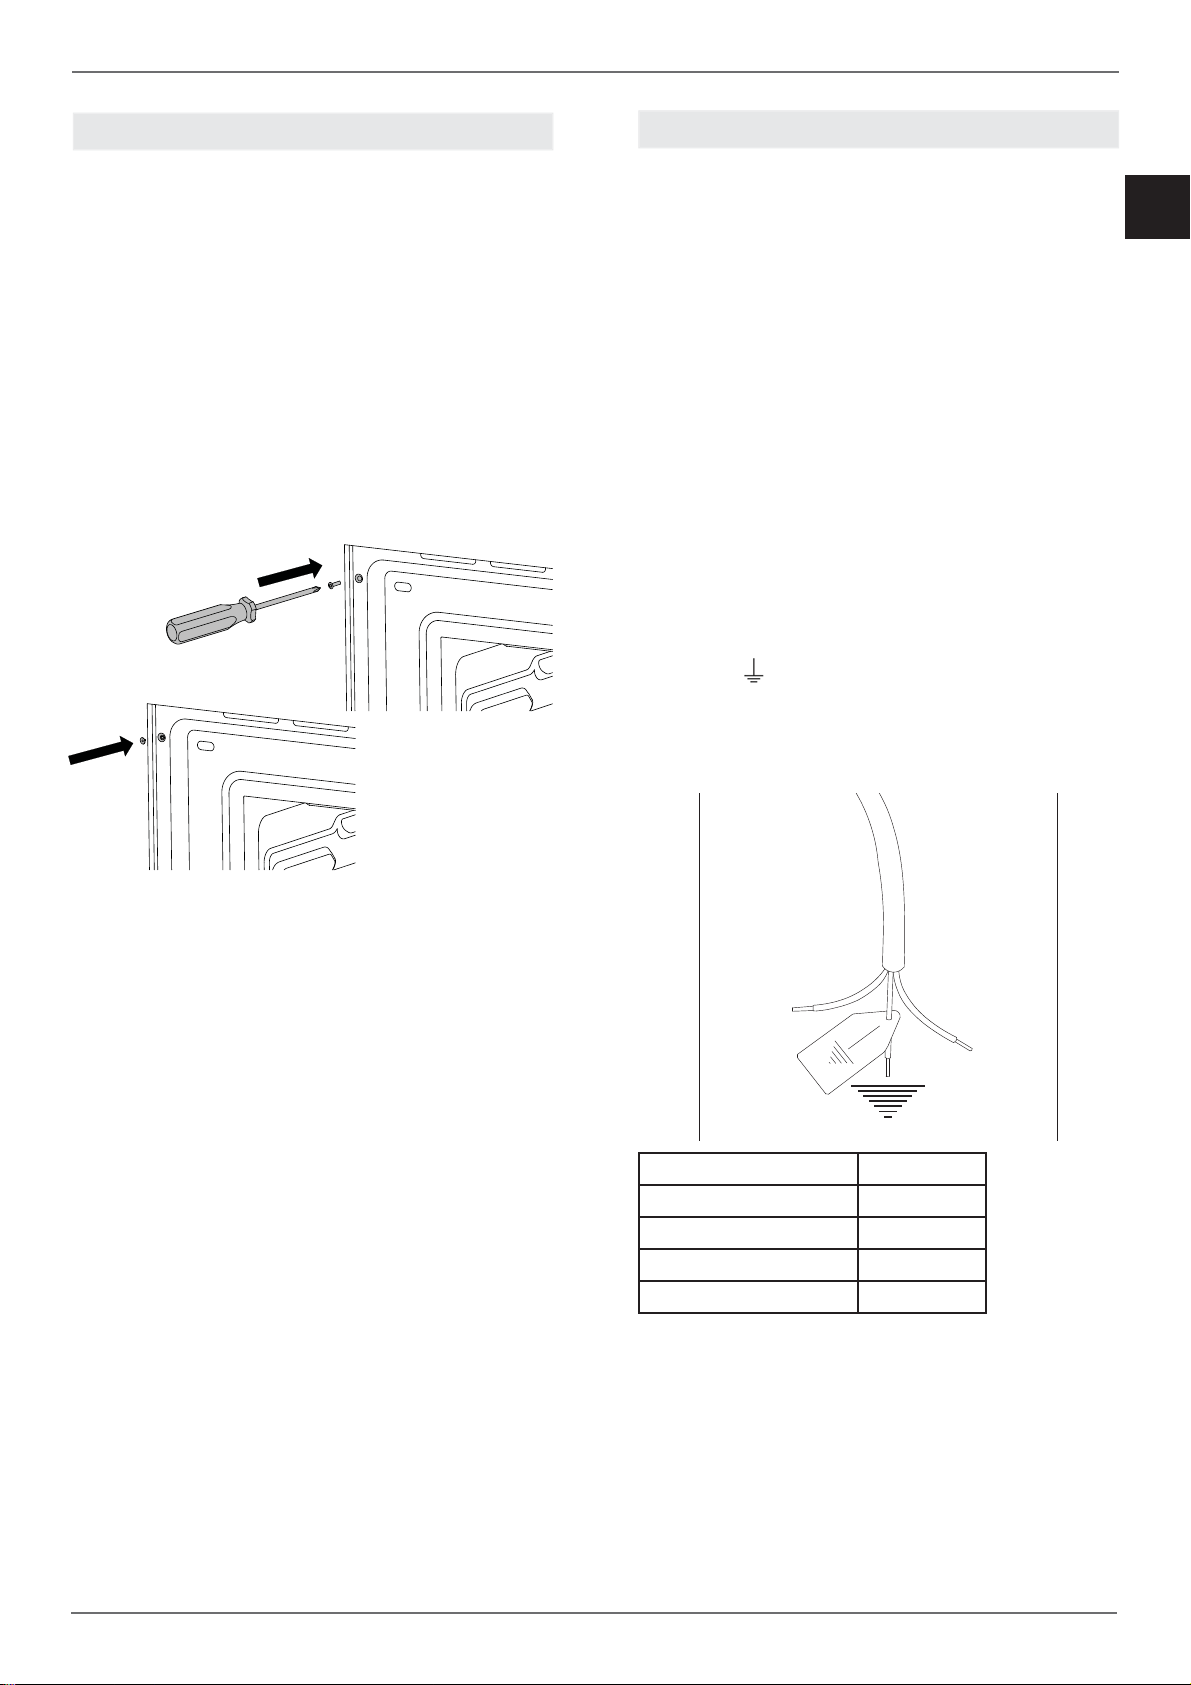
• Fissare il forno al mobile con le viti date in
dotazione prestando attenzione che il forno
rimanga centrato.
• Coprire le viti con i coprivite.
Il collegamento elettrico deve essere eseguito in
conformità con le norme e le disposizioni di legge
in vigore.
Prima di eff ettuare l’allacciamento, verifi care che:
• Le caratteristiche della rete elettrica siano
adatte ai dati riportati sull’etichetta di identifi -
cazione (posizionata sulla facciata forno).
• La presa e l’impianto siano muniti di collega-
mento a terra secondo le normative vigenti.
Collegamento alla rete di alimentazione è eff ettu-
ato tramite presa:
• Applicare al cavo di alimentazione una spina
normalizzata adatta al carico indicato sull’et-
ichetta segnaletica. Allacciare i cavetti sec-
ondo lo schema della Figura avendo cura di
rispettare le sottonotate rispondenze:
lettera L (fase) = cavetto colore marrone;
lettera N (neutro) = cavetto colore blu;
simbolo”
” terra = cavetto colore giallo-verde;
Tensione 220-240 V
Frequenza 50 Hz
Potenza Max 3400 W
Assorbimento Max 15A
Sezione cavo 3x1,5mm²
FISSAGGIO FORNO
COLLEGAMENTO ELETTRICO
COLLEGAMENTO ELETTRICO
N
L

10
IT
• Posizionare il cavo di alimentazione in modo
che non sia appoggato al posteriore del forno,
che non sia a contatto con bordi taglienti e che
non raggiunga in nessun punto una temper-
atura di 90°C.
• Non utilizzare per il collegamento riduzioni,
adattatori o derivatori in quanto potrebbero
provocare falsi contatti con conseguenti per-
icolosi surriscaldamenti.
Collegamento è eff ettuato direttamente alla rete
elettrica:
• Interporre tra l’apparecchio e la rete un in-
terruttore onnipolare, dimensionato al carico
dell’apparecchio.
• Il cavo di terra non deve essere interrotto
dall’interruttore e fi ssato all’impianto di terra.
• In alternativa il collegamento elettrico può es-
sere anche protetto con un interruttore diff er-
enziale
SOSTITUZIONE DEI COMPONENTI
Prima di eff ettuare qualsiasi operazione di
manutenzione, disinserire l’apparecchio dalla rete
elettrica.
Per la sostituzione di componenti funzionali,
rivolgersi ad un centro assistenza autorizzato.
ATTENZIONE: Nel caso di sostituzione del
cavo di alimentazione, l’installatore/tecnico
dovrà utilizzare un cavo H05VV-F e tenere
il conduttore di terra più lungo rispetto ai
conduttori di fase di circa 2 cm. Inoltre devono
essere rispettate le avvertenze riguardanti
l’allacciamento elettrico.
/ installazione
MANUTENZIONE
M
ANUTENZION
E
COLLEGAMENTO ELETTRICO

11
IT
/ Uso
COMANDI FORNO 2 MANOPOLE
1 Selettore funzioni
2 Display con touch control
3 Selettore temperatura
FUNZIONI TEMPO menu di tempo
ANNULLA/MENU’ PRECEDENTE annullare o tornare al menù precedente
CONFERMA confermare o proseguire
IMPOSTAZIONI menù impostazioni
COMANDI FORNO FULL TOUCH
1 Display con touch control
Nota: per impostare temperatura e funzioni toc-
care l’icona sul display.
ACCESO/SPENTO attivare o disattivare il forno
ANNULLA/MENU’ PRECEDENTE annullare o tornare al menù precedente
CONFERMA confermare o proseguire
IMPOSTAZIONI menù impostazioni
FUNZIONI FORNO
PANNELLO COMANDI
P
ANNELLO COMANDI
SIMBOLO DESCRIZIONE
microonde
microonde combinato
ventilato plus
Grill
Grill ventilato
Grill + microonde
Assistente
Specials
12
IT
Per scorrere il menù spostare il dito sul display.
Per attivare una funzione del menù toccare il dis-
play all’altezza della funzione desiderata e tenere
premuto per almeno 2 secondi. La funzione scelta
si seleziona non appena si solleva il dito dal dis-
play.
Toccare un paramentro sul display per modifi car-
lo.
Per ora, luminosità e audio confermare l’im-
postazione con il tasto play.
PRIMA ACCENSIONE
Collegato il forno alla rete elettrica entrare nel
menù impostazioni ( ) e settare:
• lingua
• ora
• formato ora
• unità di misura
PRIMA DEL PRIMO UTILIZZO
• Rimuovere pellicole ed eventuali residui di im-
ballaggio dall’interno ed esterno del forno.
• Rimuovere e lavare tutti gli accessori.
• Far funzionare il forno per 30 min. alla tem-
peratura di 250°C senza inserire cibo all’inter-
no (durante questa operazione è normale che
residui di lavorazione producano odori e fumi).
• Lasciare raff reddare il forno.
• Aprire la porta forno e lasciare areare per 15
minuti.
• Pulire la cavità forno con panno umido e de-
tergente neutro ( no polveri abrasive).
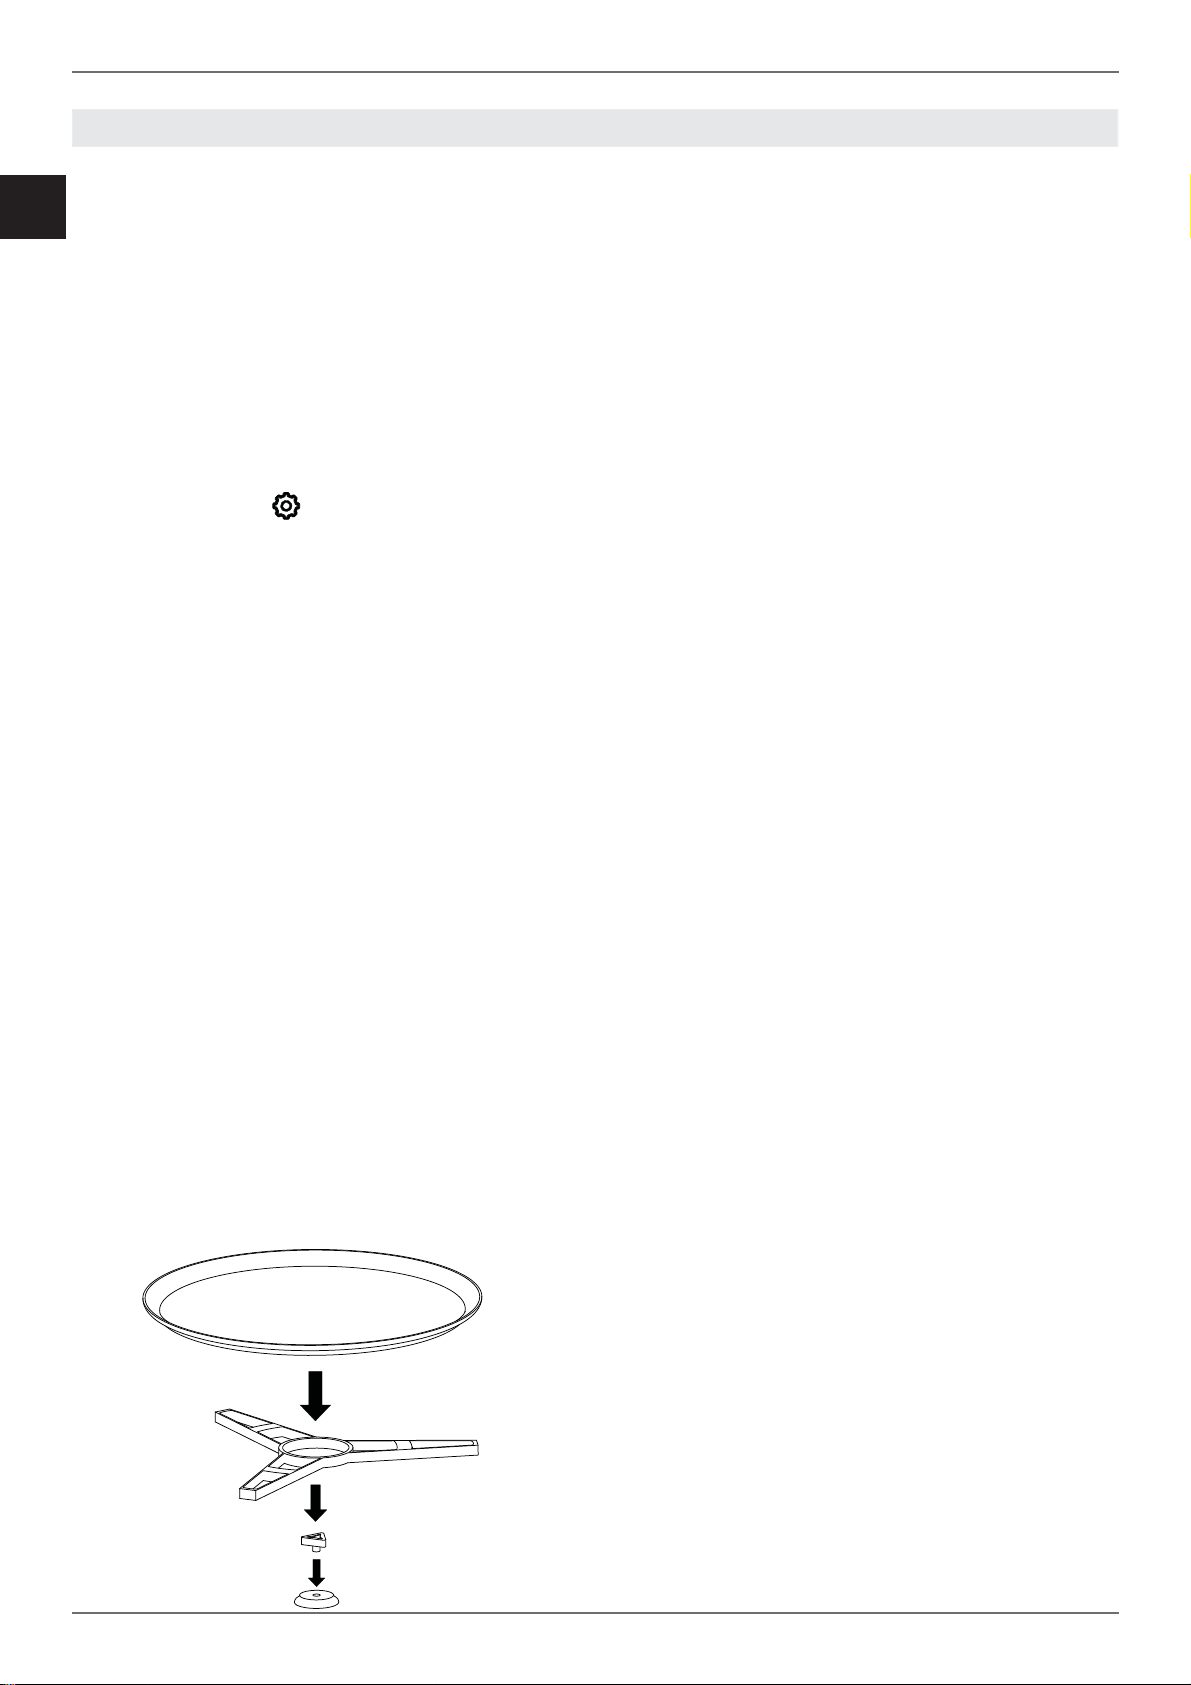
INSTALLAZIONE PIATTO GIREVOLE.
Non utilizzare il forno in funzionalità microonde
senza piatto girevole installato.
• Inserire il perno al centro del vano cottura.
• Agganciare l’anello di scorrimento ed il piatto
girevole in modo che scatti.
Il piatto girevole può ruotare in entrambe le direzi-
oni.
RAFFREDDAMENTO
Il forno è equipaggiato di un sistema di raff red-
damento che entra in funzione durante la cottura.
Un fl usso d’aria tra pannello comandi e porta for-
no permette di mantenere i comandi a temper-
atura di utilizzo.
Il sistema di raff reddamento si accende e si
spegne automaticamente (è normale che continui
a funzionare anche dopo lo spegnimento del for-
no)
PRERISCALDAMENTO
Per le funzioni con microonde il forno non va pre-
riscaldato ma la cottura va eff ettuata partendo da
forno freddo.
Per le altre funzioni Il tempo di preriscaldamento
dipende dalla temperatura impostata e dal nume-
ro di accessori presenti nel forno.
Nelle funzioni combinate le microonde e il piatto
girevole partono solo al raggiungimento della tem-
peratura selezionata.
LUCE FORNO
La luce forno si accende automaticamente all’ap-
ertura della porta e rimane accesa durantre le fun-
zioni standard di cottura.
/ Uso
USO

13
IT
/ Uso
UTILIZZO FORNO 2 MANOPOLE
1. Inserire la griglia nel livello desiderato
2. Selezionare la funzione forno ruotando la ma-
nopola
3. Impostare la temperatura ruotando la manop-
ola in senso orario o il livello di potenza del
microonde tramite il DISPLAY CON TOUCH
CONTROL.
4. Se necessario impostare la cottura temporiz-
zata tramite il DISPLAY CON TOUCH CON-
TROL.
Un segnale acustico e un messaggio visivo indica-
no il raggiungimento della temperatura impostata.
In qualsiasi momento per interrompere la cottura
riportare la manopola funzioni sulla posizione di
zero
UTILIZZO FORNO TOUCH
Per scorrere il menù spostare il dito sul dis-
play.
Per attivare una funzione del menù toccare
il display all’altezza della funzione desiderata
e tenere premuto per almeno 2 secondi. La
funzione scelta si seleziona non appena si
solleva il dito dal display.
Toccare un parametro sul display per modifi -
carlo.
1. Inserire la griglia nel livello desiderato
2. Toccare 2 volte il tasto power per accendere il
forno (1 volta con forno già acceso)
3. Scorrere il menù funzioni e scegliere il modo
di cottura desiderato
4. Scorrere la temperatura o il livello di potenza e
scegliere quella desiderata
5. Se necessario impostare la cottura temporiz-
zata tramite il DISPLAY CON TOUCH CON-
TROL.
6. Toccare il tasto Play per avviare la cottura op-
pure attendere (15 secondi) l’avvio automati-
co.
Un segnale acustico e un messaggio visivo indica-
no il raggiungimento della temperatura impostata.
In qualsiasi momento per interrompere la cottura
toccare il tasto power.
MODI DI COTTURA
Il forno è equipaggiato con diversi elementi riscal-
danti che attivati singolarmente o in combinazione
creano i vari modi di cottura.
Attenzione: tutte le cotture devono essere
fatte a porta forno chiusa.
La porta forno può essere aperta in qualsiasi
momento. Il forno si spegne automaticamente.
Il forno rinizia a funzionare dopo che si è richi-
usa la porta; se si è selezionata la funzione mi-
croonde, è necessario toccare conferma
per far ripartire la funzione.
Microonde
Calore tramite microonde
Cottura rapida.
• Piatto girevole
Per cotture che non richiedono la rotazione, fer-
mare il piatto toccare l’apposita icona sul dilplay;
per riattivarlo toccare la stessa icona.
Microonde combinato
Calore tramite microonde distribuito dalla ventola.
Cottura ideale per arrosti
• Livello inferiore
Ventilato plus
Calore dalla resistenza posteriore e distribuito
dalla ventola.
Cottura su più livelli ideale per qualsiasi tipo di pi-
etanza che richieda calore uniforme.
• Livello inferiore
Grill
Calore dal grill superiore.Max temperatura consi-
gliata 200°C
Cottura su un solo livello ideale per grigliare sal-
sicce, costine, bacon, pesce o toast.
Doratura superfi ciale a fi ne cottura.
• Livello superiore
Grill ventilato
Calore dal grill superiore e distribuito dalla vento-
la. Max temperatura consigliata 175°C
Cottura su un solo livello ideale per grigliare ali-
menti di grosso spessore.
La circolazione del calore contribuisce alla cottura
ottimale del cibo mantenendo la grigliatura supe-
riore.
• Livello superiore
USO

14
IT
Grill + microonde
Calore tramite microonde e dal grill superiore
Cottura in tempi rapidi con doratura superfi ciale
• Livello superiore
Assistente
vedi capitolo dedicato
Specials
Essicazione
Funzione con circolazione forzata dell’aria e tem-
peratura di 37°C per l’essicazione di cibi, fi ori, ver-
dure.
Scongelamento automatico in base al peso
Funzione con utilizzo di microonde per accelerare
il processo di scongelamento dei cibi impostando
il peso dell’alimento.
Scongelamento manuale in base al tempo
• Funzione con utilizzo di microonde per accel-
erare il processo di scongelamento dei cibi im-
postando il tempo.
Sabbath
Metodo di riscaldamento da utilizzare durante i
periodi di osservanza religiosa.
Eco
Funzione per la cottura ventilata con basso con-
sumo di energia ( luce disattivata durante la cot-
tura).
CONDENSA
E’ normale che durante la cottura di cibi particolar-
mente ricchi di acqua si formi condensa sul vetro
interno della porta forno e sul pannello di control-
lo. Durante la cottura la condensa evaporerà au-
tonomamente.
CONSIGLI PER LA COTTURA
La temperatura impostata e il tempo di cottura
possono variare leggermente da un forno all’al-
tro. Potrebbero essere necessari piccoli aggi-
ustamenti rispetto alla ricetta.
• Aumentare la temperatura non diminuisce i
tempi di cottura.
• I tempi di cottura dipendono dal peso, dallo
spessore e dalla qualità del cibo.
• Si raccomanda di disporre il cibo al centro del-
la griglia.
• Scegliere il livello di cottura seguendo la ricet-
ta ed in base all’esperienza personale.
• Voltare e mescolare le pietanze affi nchè si
riscaldino in modo uniforme.
• Per nuove ricette, scegliere la temperatura più
bassa tra quelle indicate e il minor tempo do-
podichè valutare il grado di cottura ed eventu-
alente prolungarla.
RISPARMIO ENERGETICO
• Aprire la porta forno solo se strettamente nec-
essario in modo da evitare dispersioni di ca-
lore.
• Mantenere pulita la cavità forno.
• Rimuovere le dotazioni non utilizzate per la
cottura.
• Arrestare la cottura qualche minuto prima
del tempo normalmente impiegato: la cottura
proseguirà per i restanti minuti con il calore
accumulato.
/ Uso
USO
USO COTTURE TRADIZIONALI

15
IT
/ Uso
SCONGELAMENTO
• La durata dello scongelamento dipende dalla
quantità e dalla spessore dell’alimento.
• I pezzi più spessi devono essere girati più
volte.
• Gli alimenti ricchi di grassi, come p.e. il burro,
il formaggio morbido o la panna, non devono
essere scongelati completamente.
• Togliere gli alimenti surgelati dalla loro con-
fezione e non dimenticarsi di rimuovere le clip
metalliche.
• Il liquido che si forma, soprattutto durante lo
scongelamento di pollame, deve essere but-
tato via e non deve assolutamente entrare in
contatto con gli altri alimenti.
• Non dimenticarsi che la funzione di sconge-
lamento prevede anche un tempo di riposo
durante il quale l’alimento si scongela comple-
tamente.
CONSIGLI PER LA COTTURA
• Prima di riscaldare o cucinare alimenti con
buccia o pelle (p.e. mele, pomodori, patate,
salsicce), bucherellarli affi nché non scoppino.
• Per la cottura di piatti pronti attenersi alle istru-
zioni fornite dal produttore.
• Se si vogliono mettere nel forno più conten-
itori, p.e. delle tazze, disporli uniformemente
sul piatto girevole.
• Non chiudere mai i sacchetti di plastica con
clip di metallo, utilizzare quelle di plastica. Bu-
cherellare più volte il sacchetto per permettere
al vapore di uscirne.
• Assicurarsi che gli alimenti raggiungano una
temperatura di almeno 70°C durante la loro
cottura o riscaldamento.
• Quando si riscaldano liquidi, utilizzare con-
tenitori con grandi aperture che permettano la
fuoriuscita del vapore.
• Si consiglia di modifi care i tempi di cottura e i
livelli di potenza in base alle singole necessità.
• Quanto maggiore la quantità di alimen-
ti, tanto più lungo sarà il tempo di cottura.
doppia quantità = durata raddoppiata mezza
quantità = durata dimezzata
• Gli alimenti liquidi si riscaldano più veloce-
mente.
• La maggior parte degli alimenti deve essere
protetta con un coperchio, per poterne man-
tenere il livello di umidità e il sapore tipico. Il
coperchio deve essere adatto alle microonde
ed avere dei fori che permettano la fuoriuscita
del vapore.
• La temperatura impostata e il tempo di cottu-
ra possono variare leggermente da un forno
all’altro. Potrebbero essere necessari piccoli
aggiustamenti rispetto alla ricetta.
• Aumentare la temperatura non diminuisce i
tempi di cottura.
• I tempi di cottura dipendono dal peso, dallo
spessore e dalla qualità del cibo.
• Si raccomanda di disporre il cibo al centro del-
la griglia.
• Scegliere il livello di cottura seguendo la ricet-
ta ed in base all’esperienza personale.
• Voltare e mescolare le pietanze affi nchè si
riscaldino in modo uniforme.
• Per nuove ricette, scegliere la temperatura più
bassa tra quelle indicate e il minor tempo do-
podichè valutare il grado di cottura ed eventu-
alente prolungarla.
RISPARMIO ENERGETICO
• Aprire la porta forno solo se strettamente nec-
essario in modo da evitare dispersioni di ca-
lore.
• Mantenere pulita la cavità forno.
• Rimuovere le dotazioni non utilizzate per la
cottura.
• Arrestare la cottura qualche minuto prima
del tempo normalmente impiegato: la cottura
proseguirà per i restanti minuti con il calore
accumulato.
U
SO COTTURE TRADIZIONALI
USO COTTURE MICROONDE

16
IT
/ Uso
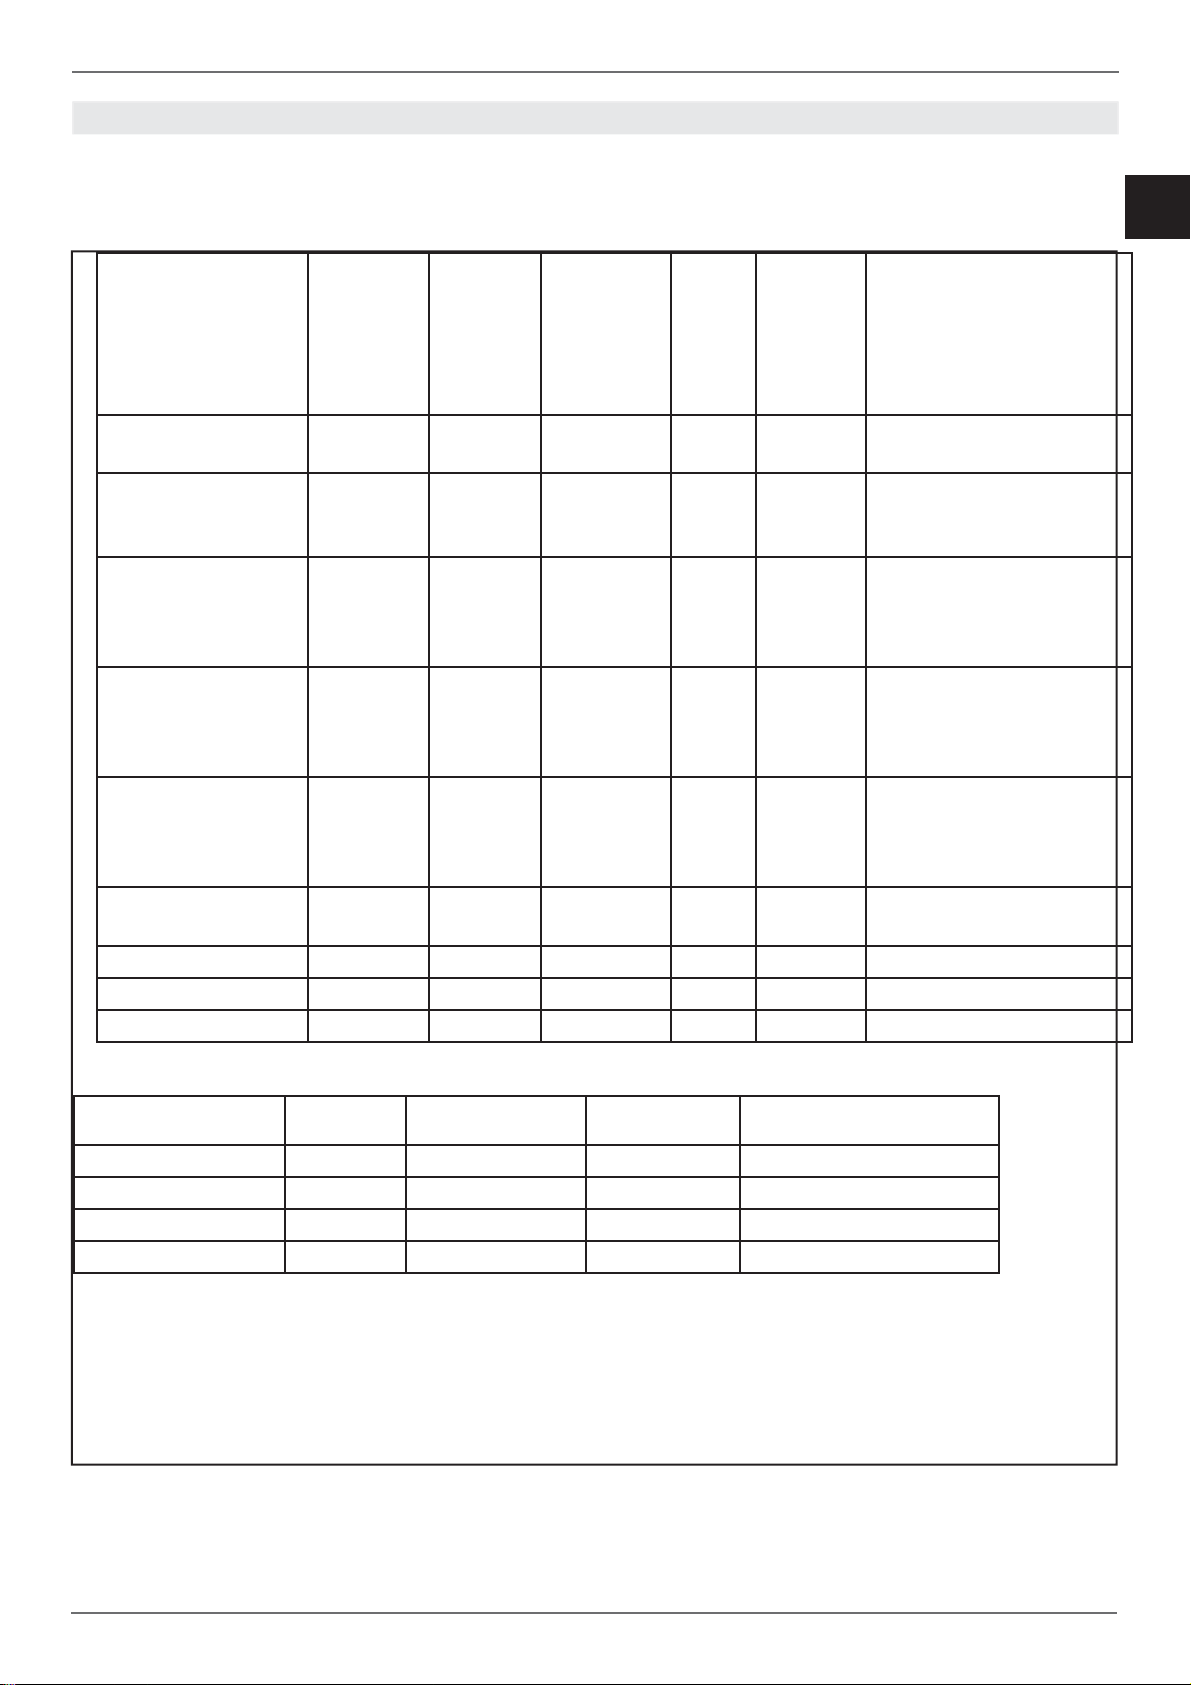
TABELLA INDICATIVA PER LA COTTURA
T
ABELLA INDICATIVA PER LA COTTUR
A
Alimenti Peso (g) tempo di scongela-
mento (min.)
Tempo di riposo
(min.)
Consigli
Pezzo di carne intera,
maiale, manzo, vitello,
selvaggina
100 2-3 5-10 girare una volta
200 4-5 5-10 girare una volta
500 10-12 10-15 girare 2 volte
1000 21-23 20-30 girare 2 volte
1500 32-34 20-30 girare 2 volte
2000 43-45 25-35 girare 3 volte
Pollame intero o a pezzi 250 5-6 5-10 girare una volta
Pollo 1000 20-24 20-30 girare 2 volte
Filetto di pesce 200 4-5 5-10 girare una volta
Trota 250 5-6 5-10 girare una volta
Pane
200 4-5 5-10 girare una volta
500 10-12 10-15 girare una volta
800 15-17 10-20 girare 2 volte
CUCINEARE CON LE MICROONDE
Alimenti Peso
(g)
Quantità
liquido da
aggiungere
potenza
( watt)
tempo
(min.)
tempo di
riposo
(min.)
suggerimenti
Cavolfi ore
Broccoli
Funghi
500
300
250
100 ml
50 ml
25 ml
800
800
800
9-11
6-8
6-8
2-3
2-3
2-3
Dividere in rosette.
Tagliare a fette.
Con coperchio
Piselli e carote,
carote surgelate
300
250
100 ml
25 ml
800
800
7-9
8-10
2-3
2-3
Tagliare a fette o a dadini.
Con coperchio
Patate 250 25 ml 800 5-7 2-3 Pelare e tagliare a pezzi di
uguale dimensioni.
Con coperchio
Peperoni 250 25 ml 800 5-7 2-3 Tagliare a pezzi o a listarelle.
Con coperchio
Filetto di pesce 500 - 600 10-12 3 Con coperchio. A metà del
tempo di cottura girare.
Pesce intero 800 -
800
400
2-3
7-9
2-3
Con coperchio. A metà del
tempo di cottura girare.
I tempi indicati in tabella non comprendono i tempi di preriscaldamento e sono indicativi
SCONGELAMENTO MICROONDE
17
IT
/ Uso
TABELLA INDICATIVA PER LA COTTURA
T
ABELLA INDICATIVA PER LA COTTUR
A
Alimenti Peso /
diametro
stampo
Potenza
( watt)
Temper-
atura °C
tempo
(min.)
tempo di
riposo
(min.)
suggerimenti
Roastbeef 1-1,5 Kg 400 200 30-40 20
recipiente senza coper-
chio girare una volta
Lombata di maiale
Costoletto od ossa
Maiale arrosto
0,8-1 Kg 200 180-190 50-60 20
recipiente senza coper-
chio girare una volta
Pollo intero 1/1,2 Kg 400 200 30-40 10
recipiente senza co-
perchio parte del petto
verso il basso, girare una
volta
Pollo a pezzi 0,5-1 Kg 400 200 25-35 10
recipiente senza coper-
chio. Siatemare i pezzi
con la pelle verso il bas-
so, girare una volta
Vitello arrosto 1,5-2 Kg 200 180 60-65 20
Recipiente con coper-
chio, girare 1 -2 volte,
dopo aver girato continu-
are senza coperchio.
Carne di manzo
arrosto
1,5-1,8 Kg 200 200 80-90 20
Recipiente con coper-
chio, girare 1 -2 volte,
Torta al cioccolato 28 cm 200 200 30 5-10 Piatto girevole
Crostata di mele 28 cm 200 185 40-45 5-10 Piatto girevole
Cheesecake 28 cm 400 180 40-45 5-10 Piatto girevole
CUCINARE CON MICROONDE E GRILL
Alimenti Peso Potenza ( watt) tempo (min.) tempo di riposo (min.)
Sformato di pasta 500 400 12-17 3-5
Sformato di patate 800 600 20-22 3-5
Lasagne 800 600 15-20 3-5
Pollo 1000 400 35-40 3-5
I tempi indicati in tabella non comprendono i tempi di preriscaldamento e sono indicativi
CUCINARE CON MICROONDE COMBINATO
18
IT
/ Uso
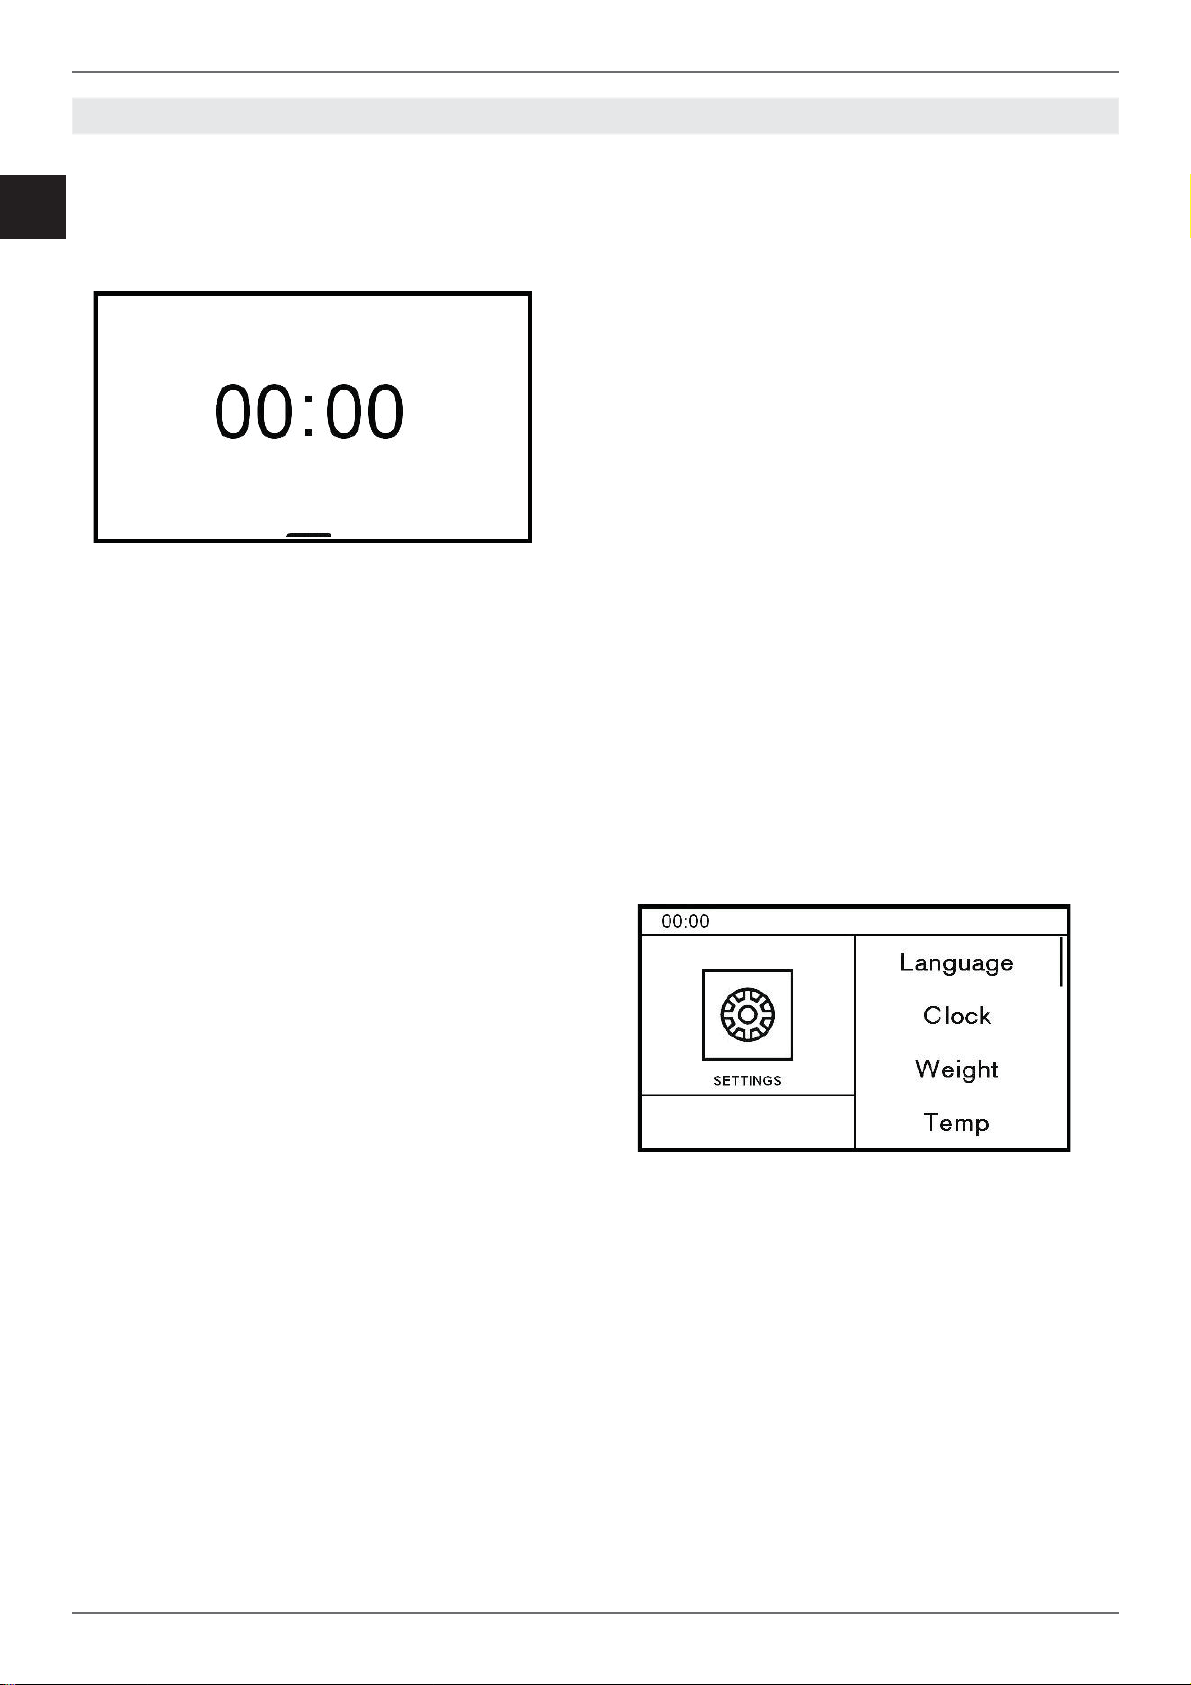
SCHERMATA HOME
Menu tendina
Nel menù a tendina sono presenti alcune funzio-
ni attivabili a forno spento.
Scorrere verso l’alto il simbolo FLAP _ per apri-
re, scorrere verso il basso il simbolo FLAP _ per
chiudere.
Timer
Conto alla rovescia al termine del quale viene
emesso un segnale acustico e un messaggio visi-
vo. Il timer non interrompe la cottura.
Scorrere per impostare; il timer parte automatica-
mente.
Luce
Per accendere e spegnere la luce del forno a por-
ta chiusa.
Preriscaldamento forno
Funzione per preriscaldare il forno alla temper-
atura desiderata in breve tempo.
Questa funzione è studiata solo per il riscalda-
mento del forno e non per la cottura dei cibi.
Luminosità schermo.
Per impostare o variare la luminosità del display.
Menu impostazioni
Toccare il tasto impostazioni per entrare nel menù.
Luminosità
Per impostare o variare la luminosità del display.
Audio
Per impostare o variare l’intensità sonora.
Lingua
Per selezionare la lingua preferita ( la lingua pre-
settata è l’inglese).
Ora
Per impostare o variare l’ora
Showroom mode
Per espositori, disattiva gli elementi riscaldanti
Unità di peso
Per impostare o variare l’unità di misura del peso
Unità di temperatura
Per impostare o variare l’unità di misura della tem-
peratura.
Modalità ECO
Per ridurre il consumo energetico.
UTILIZZO DEL DISPLAY TOUCH
19
IT
/ Uso
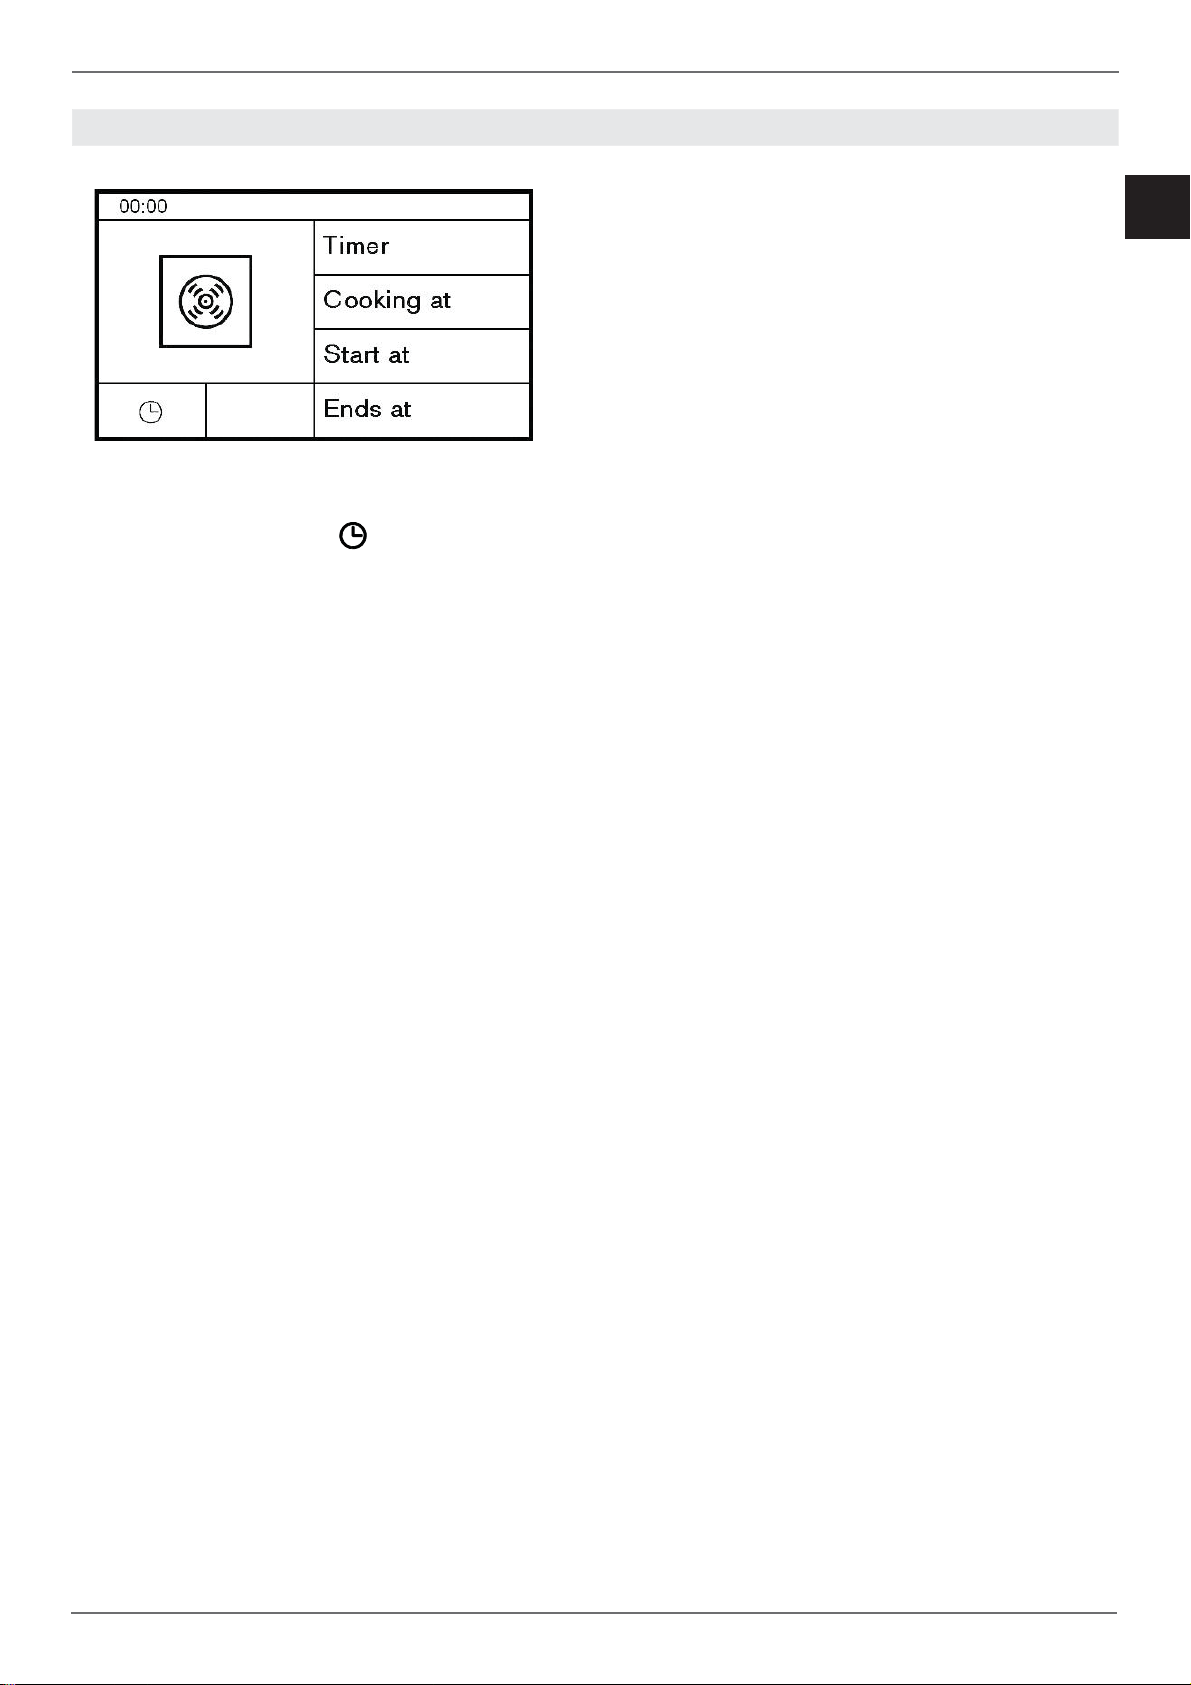
GESTIONE DELLE FUNZIONI TEMPO
La funzione tempo permette di gestire la durata
della cottura.
Dopo aver impostato funzione e temperatura,
premere l’icona orologio ( ) e scegliere una
funzione tempo.
Timer
Per impostare il conto alla rovescia al termine
del quale viene emesso un segnale acustico e
mostrato un messaggio visivo. Il timer non inter-
rompe la cottura.
Scorrere per impostare; il timer parte automatica-
mente.
Tempo cottura
Per impostare il conto alla rovescia al termine del
quale viene interrotta la cottura, emesso un seg-
nale acustico e mostrato un messaggio visivo.
Scorrere per impostare; il tempo cottura parte au-
tomaticamente.
Inizio cottura
Per impostare l’avvio della cottura e la sua durata.
Allo scoccare dell’orario impostato viene emesso
un segnale acustico che indica l’inizio cottura. Al
termine della durata impostata viene interrotta la
cottura, emesso un segnale acustico e mostrato
un messaggio visivo.
Scorrere per impostare;prima l’orario di inizio e
poi il tempo cottura.
Fine cottura
Per impostare l’orario di fi ne cottura e la sua du-
rata (l’orario di inizio cottura viene calcolato dal
forno).
Un segnale acustico indica l’inizio cottura. All’orar-
io fi ne cottura impostato viene interrotta la cottura,
emesso un segnale acustico e mostrato un mes-
saggio visivo.
Scorrere per impostare;prima l’orario di fi ne e poi
il tempo cottura.
Per interrompere la cottura in qualsiasi momento
toccare il tasto Power, o riportare il selettore nella
posizione di spento.
Per modifi care la durata della cottura in corso toc-
care l’icona orologio.
Importante: se non vengono gestite le funzioni
tempo, la durata della cottura va gestita manual-
mente.
UTILIZZO DEL DISPLAY TOUCH

20
IT
/ Uso
ASSISTANT
La funzione assistant permette la gestione di una
gamma di funzioni cottura, temperature e tempi
per ogni tipo di cibo.
Il sistema non fornisce ricette ma pilota il forno per
ricavare il meglio dalle proprie.
E’ possibile creare nuove sequenze e memoriz-
zarle per usi futuri
Gestione ricette
Sequenze di cottura preimpostate.
1. Scegliere la categoria di cibo desiderata.
• carne
• pollame
• pesce
• dolci
• pane
• pizza
• pasta
• verdure
2. Scegliera la pietanza desiderata.
3. Eventualmente selezionare il peso e il grado
di cottura.
4. Premere play.
Al termine della cottura viene emesso un segnale
acustico e mostrato un messaggio visivo.
Per interrompere la cottura premere il tasto power.
My cookbook
Sequenze di cottura personali salvate
1. Scegliere la ricetta desiderata tra quelle sal-
vate.
2. Premere play.
Al termine della cottura viene emesso un segnale
acustico e mostrato un messaggio visivo.
Per interrompere la cottura premere il tasto power.
Per cancellare una ricetta salvata, posizionarsi sul
nome e trascinarlo da destra a sinistra e confer-
mare.
Set
Per impostare profi li di cottura complessi e mem-
orizzarli. E’ possibile selezionare fi no a 3 funzioni
in sequenza.
1. Selezionare funzione 1
2. Impostare funzione cottura, temperatura e du-
rata.
3. Se necessario ripetere per le funzioni 2 e 3.
4. Premere play per eseguire la ricetta.
5. Prima di attivare la cottura è possibile salvare
o meno la ricetta; nel caso del salvataggio ap-
parirà la schermata con tastiera per nominarla
e salvarla.
6. Una volta salvata, toccare il tasto play per far
partire la cottura.
Per richiamare la ricetta salvata utilizzare la funzi-
one My Cookbook.
UTILIZZO DEL DISPLAY TOUCH

21
IT
/ Pulizia /Malfunzionamenti
COTTURE MICROONDE
• Non utilizzare con le microonde pentole e
stoviglie di metallo o recipienti con elementi o
decorazioni metalliche.
• Le stoviglie o i recipienti ideali per la cottura
nel forno a microonde sono il vetro pirofi lo, la
porcellana o la terraglia, così come la plastica
termoresistente.
• Utilizzare coperchi di vetro, plastica o pellicola
trasparente, per evitare:
fuoriuscita di vapore
accelerare il processo di cottura;
impedire che gli alimenti si essicchino;
conservare l’aroma delle pietanze.
I coperchi non devono essere a tenuta stagna, per
evitare che si formi qualsiasi tipo di pressione.
Test stoviglie
Sistemare le stoviglie per 20 secondi nel forno
e accenderlo alla massima potenza. Se le
stoviglie rimangono fredde o si riscaldano solo
leggermente, signifi ca che sono adatte alle
microonde. Se invece si dovessero riscaldare
troppo o dovessero formarsi scintille, signifi ca che
non sono adatte.
COTTURE TRADIZIONALI
• Per le funzioni tradizionali usare stoviglie re-
sistenti a temperature di almeno 300°C. Le
stoviglie di plastica non sono adatte.
COTTURE COMBINATE
• Per le funzioni combinate usare stoviglie
adatte ad entrambe le due modalità di cottura.
Prima di eff ettuare qualsiasi operazione di pulizia
manuale, attendere che tutte le parti si siano
raff reddate e scollegare il forno dalla rete elettrica.
Una cura scrupolosa del forno contribuisce a
mantenerlo a lungo in buone condizioni.
Pulizia delle parti smaltate o verniciate:
Per mantenere le caratteristiche delle parti
smaltate è necessario pulire frequentemente con
acqua saponata. Non usare mai polveri abrasive.
Evitare di lasciare sulle parti smaltate sostanze
acide o alcaline (aceto, succo di limone, sale,
succo di pomodoro ecc.) e di lavare quando le
parti smaltate sono ancora calde.
Pulizia delle parti in acciaio inox:
Pulire i particolari con acqua saponata e poi
asciugarli con panno morbido, seguendo la
direzione di satinatura. La brillantezza viene
mantenuta mediante ripassatura periodica
con prodotti appositi normalmente reperibili in
commercio. Non usare detersivi aggressivi come:
• anticalcare /disincrosatnte
• candeggina
• acido muriatico
• ammoniaca
• polveri o spugne abrasive.
Rimuovere immediatamente le macchie di calcare,
grasso, amido o albume.
Pulizia del vetro:
Per sgrassare usare del detersivo per piatti e
aceto, e poi risciacquare, oppure pulire con del
detersivo per piatti, risciacquare, passare con lo
straccio umido e asciugare.
Per togliere le incrostazioni mettere sopra la zona
interessata dell’acqua saponata oppure detersivo
per piatti. Dopo alcuni minuti risciacquare ed
asciugare con un panno morbido.
Evitare gli anticalcare, prodotti abrasivi e multiuso
perché con il tempo imbruttiscono il vetro.
Pulizia delle griglie:
Non lavare le griglie in lavastoviglie.
Immergerle in una soluzione calda di acqua e
sapone per i piatti e passare con una spugna non
abrasiva, risciacquare e asciugare con panno
morbido
Pulizia delle parti prensili:
Pulire i particolari con acqua saponata e poi
asciugarli con panno morbido, seguendo la
direzione di satinatura. Non usare mai polveri o
spugne abrasive.
Guarnizione:
Pulire con panno umido.
STOVIGLIE
PULIZIA DELL’APPARECCHIO
22
IT
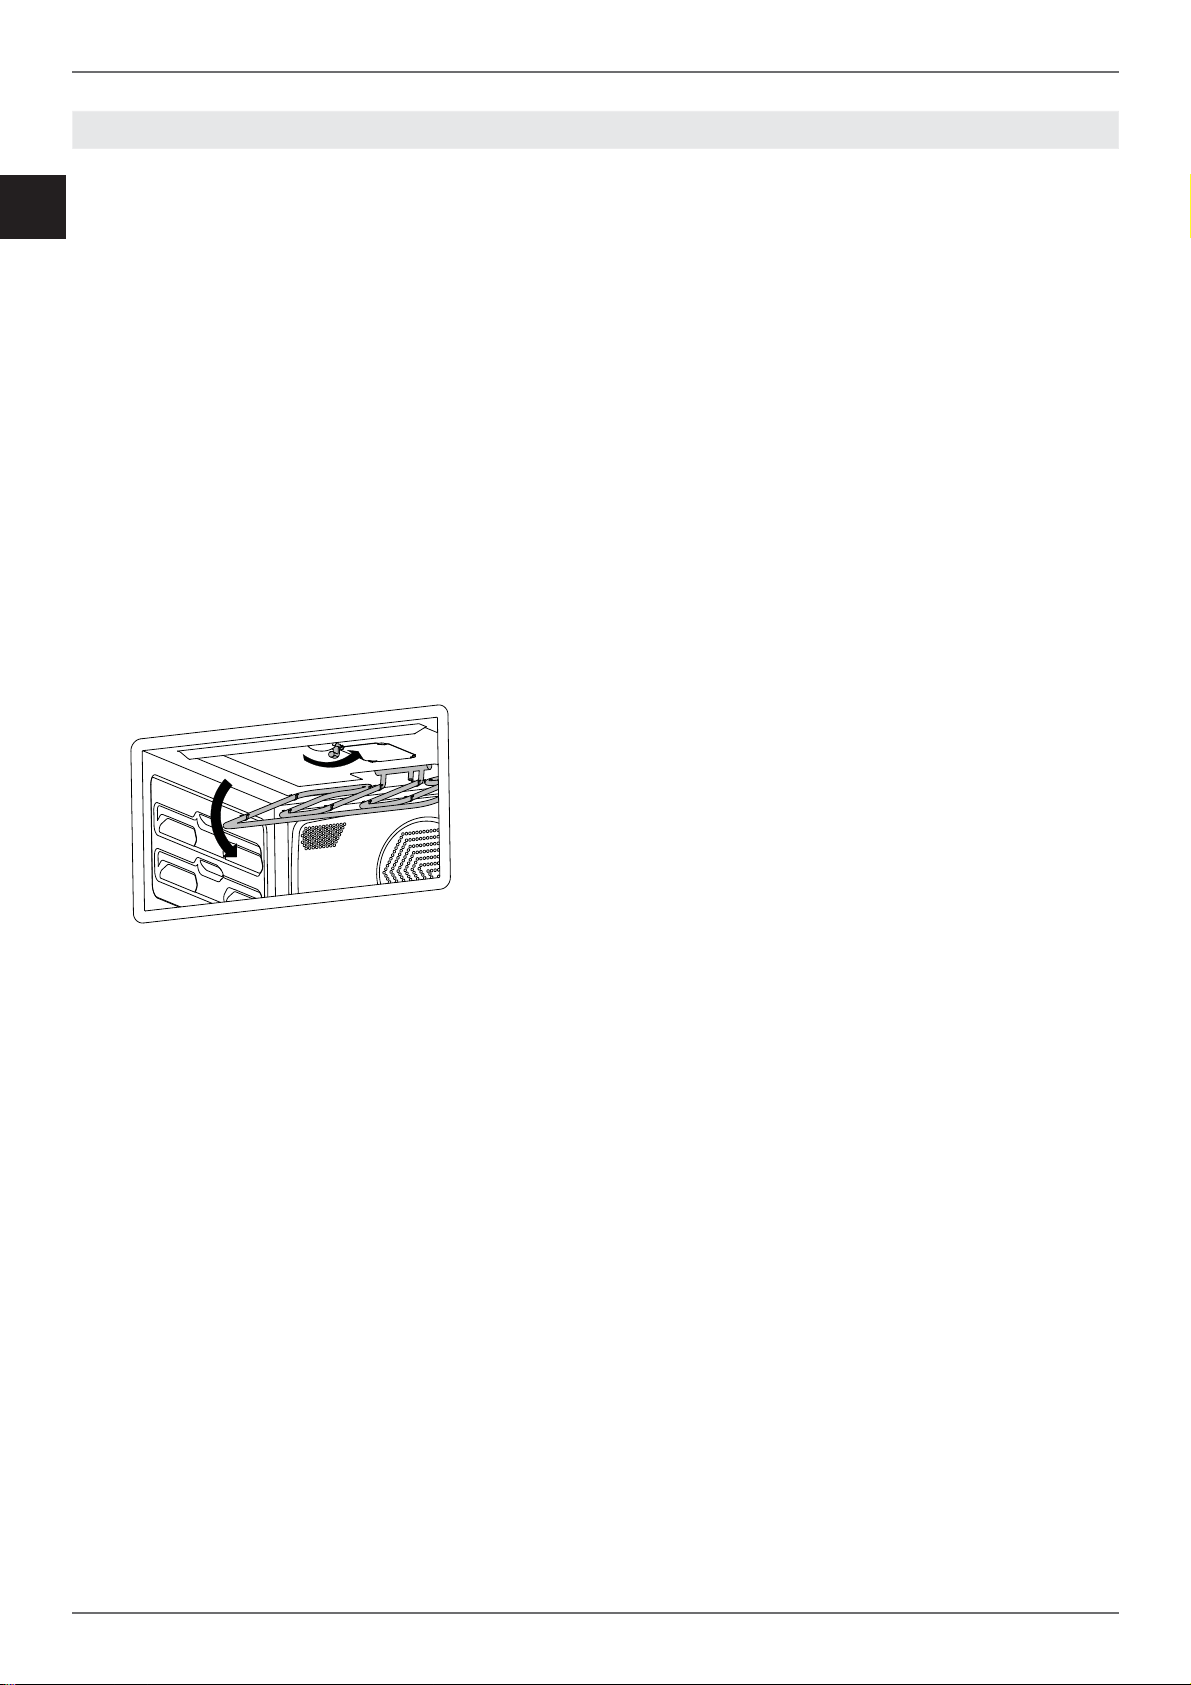
Pulizia superfi cie superiore del vano for-
no.
Attenzione!
Scollegare l’alimentazione elettrica prima di
eff ettuare la pulizia, ed attendere che il forno
sia freddo.
• Ruotare di 180° il supporto del grill (ruotato di
90° il supporto potrebbe sfi larsi; reinserirlo e
riposizionarlo correttamente).
• Abbassare delicatamente la resistenza grill.
• Pulire con acqua saponata e asciugare con un
panno morbido ( non usare polvere o deter-
genti abrasivi o aggressivi)
• Ripetere le operazioni in ordine inverso per ri-
assemblare il grill .
Pulizia del piatto rotante e accessori
Assicurarsi che il piatto rotante ed il suo supporto
siano sempre puliti.
in caso di accumulli di sporco mettere il piatto in
ammollo e lavarlo con una spazzola.
Gli accessori possono essere lavati in lavas-
toviglie.
Pulizia cavità forno
• Appoggiare un bicchiere con acqua sul piatto
rotante.
• Aggiungere qualche goccia di limone o di ace-
to in caso di sgradevoli odori.
• Attivare la funzione microonde alla massima
potenza per 2/3 minuti.
• Rimuovere con un panno morbido i residui di
sporco.
/ Manutenzione
PULIZIA DELL’APPARECCHIO
23
IT
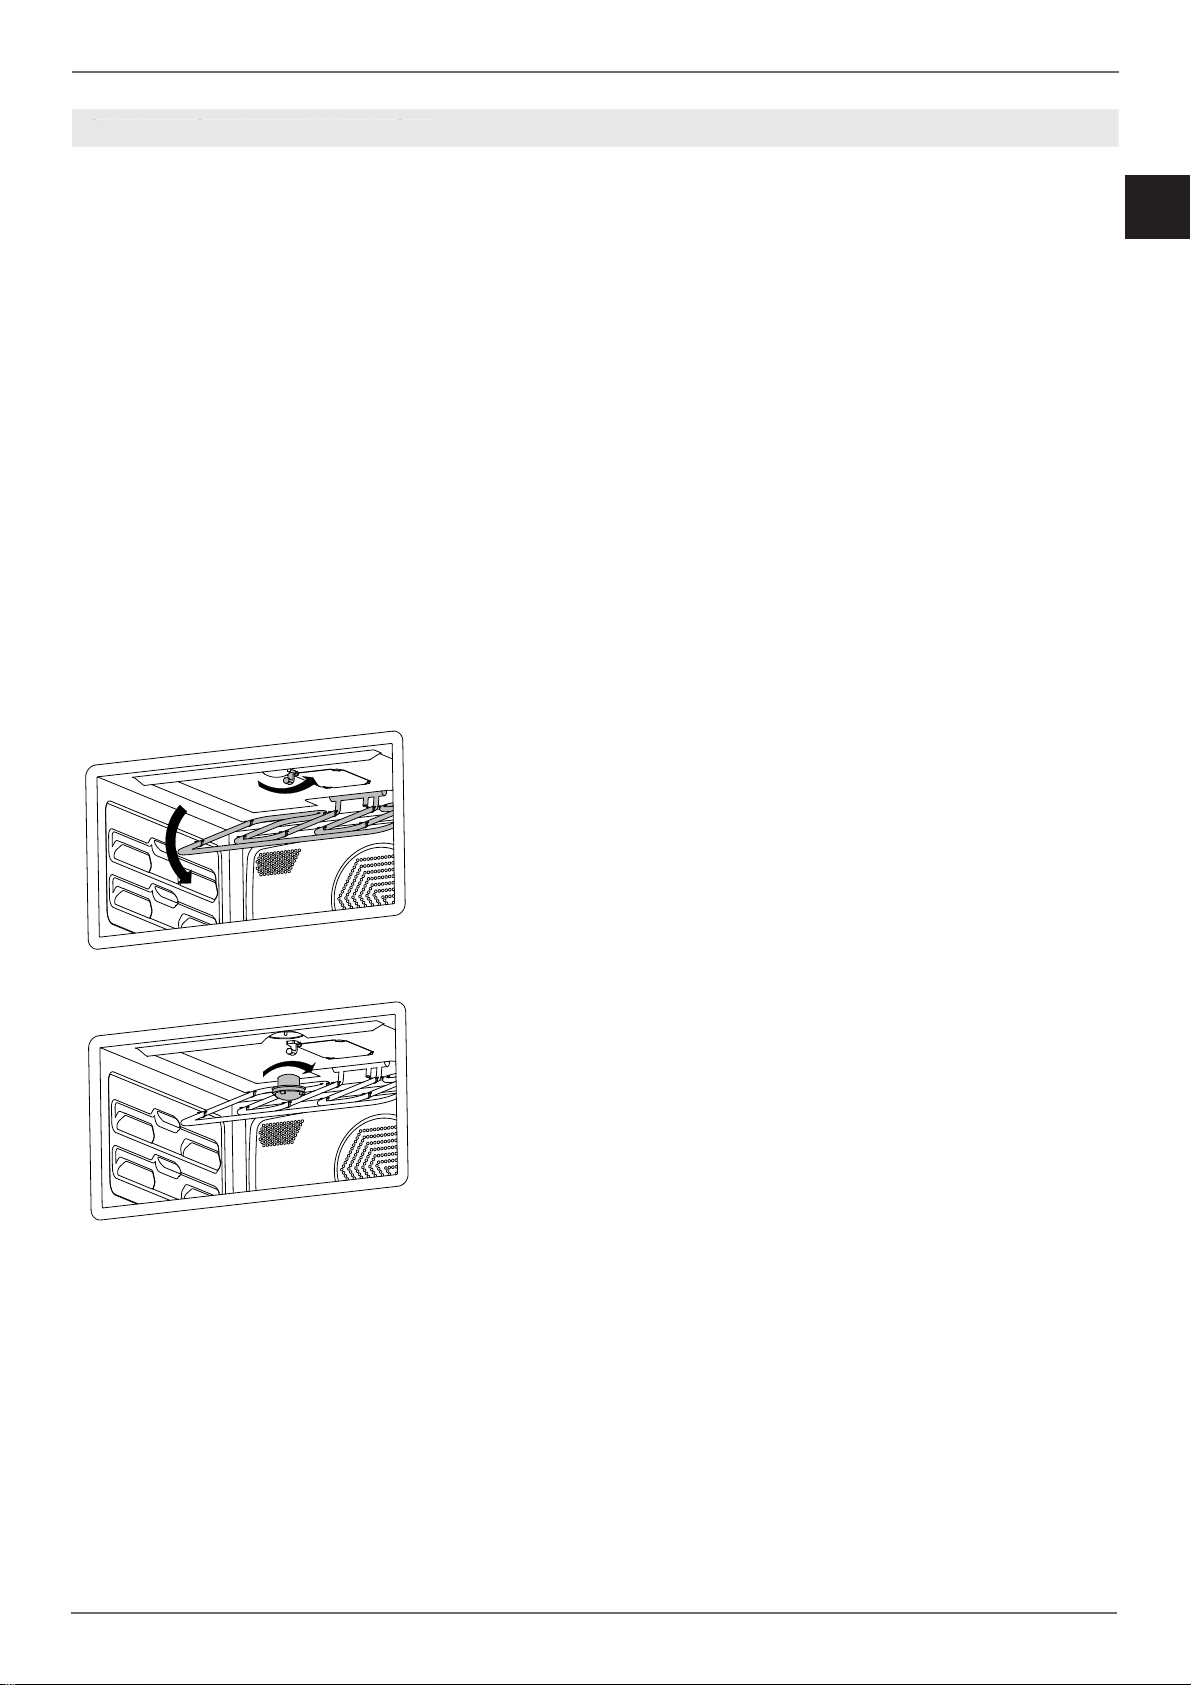
SOSTITUZIONE LAMPADA FORNO
Attenzione!
Scollegare l’alimentazione elettrica prima di
eff ettuare la pulizia, ed attendere che il forno
sia freddo.
Tipo di lampadina: alogena da 12V / 10W.
• Ruotare di 180° il supporto del grill (ruotato di
90° il supporto potrebbe sfi larsi; reinserirlo e
riposizionarlo correttamente).
• Abbassare delicatamente la resistrena grill.
• Svitare il coperchio di vetro e rimuovere la
lampadina alogena.
• Inserire una nuova lampadina alogena nel-
la sua fessura. NON toccare la lampadina a
mani nude
• Riavvitare il coperchio di vetro in posizione.
• Ricollegare il forno all’alimentazione elettrica.
/ Manutenzione
SEMPLICI MANUTENZIONISEMPLICI MANUTENZIONI

24
IT
GARANZIA
Il forno non funziona
Al forno arriva corrente? controllare l’interruttore o
il fusibile. Staccare per 1 minuto circa il forno dalla
rete elettrica disinserendo la spina o l’interruttore.
La porta forno è chiusa correttamente? assicurar-
si che non ci siano impedimenti alla chiusura e la
porta scatta quando si chiude.
Il forno non scalda
Verifi care che non sia attiva la showroom mode.
Verifi care che non sia attiva una funzione di tem-
po. Staccare per 1 minuto circa il forno dalla rete
elettrica disinserendo la spina o l’interruttore.
Dopo utilizzi prolungati del grill, le sue resistenze
vengono momentaneamente disattivate dal ter-
mostato di sicurezza, attendere qualche minuto il
raff reddamento del forno e rprovare.
La manopola non rimane in posizione.
La clip della manopola è rotta, chiamare l’as-
sistenza per la sostituzione.
I comandi sono molto caldi.
E’ normale in caso di apertura prolungata della
porta a forno acceso.
Verifi care che la porta chiuda correttamente e sia
in funzione il sistema di raff reddamento.
Il cibo è troppo cotto
Con una funzione ventilata ricordarsi di diminuire
la temperatura di 20°C.
Con funzione microonde diminuire la potenza o il
tempo di cottura.
Il cibo è poco cotto
Per cucinare grandi quantità di cibo il tempo di
cottura va aumentato in modo proporzionale.
Verifi care che ci sia abbastanza spazio attorno
alla pirofi la per assicurare una giusta circolazione
del calore.
Verifi care che la porta si chiuda correttamente.
Verifi care con un tecnico specializzato l’eff ettiva
tensione di rete.
Si forma condensa sul vetro forno.
E’ normale che durante la cottura di cibi particolar-
mente ricchi di acqua si formi condensa sul vetro
interno della porta forno e sul pannello di control-
lo. Durante la cottura la condensa evaporerà au-
tonomamente.
Pre-riscaldare il forno per ridurre la formazione di
condensa.
Si forma fumo durante la cottura.
E’ normale che durante la cottura di cibi partico-
larmente grassi si formi fumo all’interno del forno.
Durante la cottura con grill il fumo è normale.
GARANZIA E SERVIZIO CLIENTI:
WWW.BERTAZZONI .COM
/ Malfunzionamenti /Garanzia
MALFUNZIONAMENTO

1
EN
BERTAZZONI
INSTALLATION AND USER MANUAL
BUILT-IN COMBINATION MICROWAVE OVENS
3100533
WWW.BERTAZZONI.COM

2
EN
/ Contents
CONTENTS
INTRODUCTION AND WARNINGS __________________________________________________
MANUFACTURER LIABILITY _____________________________________________________
ENVIRONMENTAL PROTECTION __________________________________________________
PLASTIC PACKAGING __________________________________________________________
APPLIANCE DATA PLATE ________________________________________________________
GENERAL SAFETY INSTRUCTIONS ________________________________________________
USAGE INSTRUCTIONS _________________________________________________________
APPLIANCE WARNINGS ________________________________________________________
TECHNICAL INSTALLATION INSTRUCTIONS _________________________________________
INSTALLING THE OVEN IN THE UNIT ______________________________________________
IMPORTANT INFORMATION ______________________________________________________
INSTALLING THE OVEN BELOW A HOB ____________________________________________
INSTALLING THE OVEN IN A TALL APPLIANCE HOUSING _____________________________
OVEN FASTENING _______________________________________________________________
ELECTRICAL CONNECTION _______________________________________________________
MAINTENANCE _________________________________________________________________
USING THE APPLIANCE __________________________________________________________
CONTROL PANEL _____________________________________________________________
TWO-KNOB OVEN CONTROLS ___________________________________________________
FULL-TOUCH OVEN CONTROLS _________________________________________________
OVEN FUNCTIONS _____________________________________________________________
FIRST USE ____________________________________________________________________
BEFORE FIRST USE ____________________________________________________________
TURNTABLE INSTALLATION _____________________________________________________
COOLING _____________________________________________________________________
PRE-HEATING _________________________________________________________________
OVEN LIGHT __________________________________________________________________
USING TWO-KNOB OVENS _______________________________________________________
USING TOUCHSCREEN OVENS ___________________________________________________
COOKING MODES ______________________________________________________________
USING CONVENTIONAL COOKING FUNCTIONS ______________________________________
CONDENSATION _______________________________________________________________
COOKING TIPS _________________________________________________________________
SAVING ENERGY _______________________________________________________________
USING MICROWAVE COOKING FUNCTIONS _________________________________________
DEFROSTING __________________________________________________________________
COOKING TIPS _________________________________________________________________
SAVING ENERGY _______________________________________________________________
COOKING GUIDELINES ___________________________________________________________
USING THE TOUCHSCREEN DISPLAY ______________________________________________
HOME SCREEN _________________________________________________________________
MANAGING THE TIME FUNCTIONS ________________________________________________
ASSISTANT ____________________________________________________________________
DISHES _______________________________________________________________________
MICROWAVE COOKING PROGRAMS _______________________________________________
CONVENTIONAL COOKING PROGRAMS ___________________________________________
COMBINATION COOKING PROGRAMS _____________________________________________
CLEANING THE APPLIANCE ______________________________________________________
BASIC MAINTENANCE ___________________________________________________________
REPLACING THE OVEN LIGHT BULB ______________________________________________
TROUBLESHOOTING ___________________________________________________________
WARRANTY ____________________________________________________________________
4
4
4
4
4
5
6
6
7
7
7
8
8
9
9
10
11
11
11
11
11
12
12
12
12
12
12
13
13
13
14
14
14
14
15
15
15
15
16
18
18
19
20
21
21
21
21
21
23
23
24
24

3
EN
/ From the desk of our president
FROM THE DESK OF OUR PRESIDENT
Dear Customer,
Thank you for choosing a quality Bertazzoni appliance for your home.
It was way back in 1882 that my family began manufacturing cookers, and
our company has since built up a solid reputation for the excellence of its
engineering, born of a passion for good food.
Today, our products feature exclusive Italian design combined with the latest
technology. Our mission is to build domestic appliances which work perfectly
and fully meet the requirements of their users.
To create products of the highest quality also in aesthetic terms, which meet all
of our customers’ requirements. Our appliances are also versatile and easy to
use, turning the potential chore of cooking into a genuine pleasure.
This manual will help you to use and take care of your Bertazzoni product in
the safest and most effi cient manner, so that it can provide you with the utmost
satisfaction for many years to come.
I really hope you like it!
Paolo Bertazzoni
President

4
EN
/ Introduction
INTRODUCTION
READ THESE INSTRUCTIONS CAREFULLY
BEFORE INSTALLING AND USING THE
APPLIANCE.
These instructions are valid only for the countries
whose identifying symbols are included on the
cover of this manual and on the appliance label.
The manufacturer shall not be held liable for
property damage or personal injury resulting
from incorrect installation or improper use of the
appliance.
The manufacturer shall also not be held liable for
any imprecisions due to printing or transcription
errors in this booklet.
The appearance of the fi gures included herein is
only for guidance.
The manufacturer reserves the right to make
modifi cations to its products when it considers this
necessary or benefi cial, however the essential
safety and performance characteristics shall not
be aff ected.
THIS APPLIANCE IS DESIGNED FOR NON-
PROFESSIONAL, DOMESTIC USE.
This user manual is an integral part of the appliance
and must therefore be kept in its entirety in a place
accessible to the user for the entire lifetime of the
appliance.
Read this manual before using the appliance.
MANUFACTURER LIABILITY
The manufacturer shall bear no liability for
property damage or personal injury due to:
• Use of the appliance other than that specifi ed.
• Failure to comply with the instructions in the
user manual.
• Tampering with/unauthorised modifi cations to
any part of the appliance.
• The use of non-original spare parts.
• This appliance is intended for cooking food in
the home environment. Any other use shall be
considered improper.
• The appliance is not designed to operate
with external timers or with remote-control
systems.
WARNING: The
marking on this product is
a declaration, under the manufacturer’s full
responsibility, that the product complies with
all European health, safety and environmental
requirements laid out in the legislation covering
this product type.
ENVIRONMENTAL PROTECTION
This appliance is marked in accordance with
European Community Directive 2012/19/EU
on waste electrical and electronic equipment
(WEEE).
This directive defi nes the standards for the
collection and recycling of waste electrical and
electronic equipment applicable throughout the
European Union.
The packaging of this appliance is composed of
the elements strictly necessary to ensure suffi cient
protection during transport. The packaging
materials are completely recyclable, thus reducing
their environmental impact. Please help to protect
the environment by taking the following tips into
consideration:
• Sort the packaging materials for recycling.
• Render the old appliance unusable before
taking it to the collection facility. Ask the
competent local authorities for details of the
nearest recycling centre you can take the old
appliance to.
• Do not dispose of used oil down the drain.
Keep it in a closed container and take it to a
recycling centre; if this is not possible, dispose
of it in mixed waste (in this manner it will be
disposed of at a monitored facility – although
this is not the best solution, it at least prevents
contamination of the sewage/water systems).
PLASTIC PACKAGING
Danger of suff ocation
• Do not leave the packaging or any part thereof
unattended.
• Do not let children play with the plastic bags.
APPLIANCE DATA PLATE
The data plate bears the technical data, serial
number and brand name of the appliance. The
appliance data plate is located on the side of
the front of the oven, and must not be removed
at any time. A copy is provided in this manual for
reference.
Please think of the environment
when disposing of the packaging.

5
EN
/ Introduction
INTRODUCTION
GENERAL SAFETY INSTRUCTIONS
• During use, the appliance and its accessible
parts become very hot.
• Never touch the heating elements during use.
• Keep children under the age of eight at a
safe distance unless they are constantly
supervised.
• Children must not play with the appliance.
• This appliance may only be used by children
over the age of eight, and by people with
reduced physical, sensory or mental capacity,
or lacking in experience in the use of electrical
appliances, provided that they are supervised
or instructed by adults who are responsible for
their safety.
• Keep children and animals away from the
appliance while it is running or cooling down.
Accessible parts become red hot during use.
• Switch off the appliance after use.
• Cleaning and maintenance must not be carried
out by children without adequate supervision.
• Ensure that hot surfaces are allowed to cool
before proceeding to clean the appliance.
• Have installation and servicing carried out
by qualifi ed personnel in compliance with
applicable standards and legislation. Do not
try to repair the appliance yourself or without
the assistance of a qualifi ed technician.
• Do not modify this appliance.
• Do not insert anything in the slots.
• Do not obstruct ventilation openings and heat
dispersal slots.
• If the power supply cable is damaged, contact
technical support immediately and they will
arrange for it to be replaced.
• Do not use abrasive or corrosive detergents
(e.g. scouring powders, stain removers and
metallic sponges) on glass parts.
• Do not sit or put any weight on the oven door.
• Do not use steam jets to clean the appliance.
• Do not use the appliance as a space heater
for any reason.
• In the event of breakage or cracking in the
glass, shut off the oven immediately and
disconnect it from the power supply. Contact
technical support.
• Sudden and extreme changes in temperature
can cause the glass to break – never pour
cold liquids onto the oven door.
• Using the oven generates heat and moisture –
keep the area well ventilated during operation.
• Never place fl ammable objects in the oven
• Do not open the door if smoke is coming
out of the oven. Shut the appliance off and
disconnect its power supply.
• The oven contains electronic components
which could interact with electronic medical
equipment such as pacemakers or insulin
pumps. Equipment of this type must be kept
at least 10 cm from the oven.
• Ensure that there are no trapped objects which
could prevent the oven door from shutting.
• The oven is not designed to operate with
timers or remote control systems.
• Plastic containers not designed for high
temperatures could melt, damaging the oven
or even catching fi re.
• Closed tins and jars could burst or even
explode if heated: never use the oven for
preparing or heating tins or jars.
• Always use specifi c oven gloves for removing
or inserting heat-resistant cookware or
accessories.
• Isolate the appliance’s power supply before
performing any maintenance.
• Do not use the appliance if the door does
not close correctly or if
the door hinges are
damaged.
• Do not use the appliance if the contact
surfaces between the door and the face of the
oven are damaged.
• Do not use the appliance if the door glass is
damaged.
• Do not use the appliance if it frequently
generates sparks without metal objects being
present inside it.
• Never run the microwave oven empty.
• The contact surfaces between the door and
the front of the oven must always be kept
clean in order to ensure correct operation.
• Do not remove the mica cover from the ceiling
of the oven. This cover prevents grease and
food scraps from damaging the microwave
generator.

6
EN
/ Introduction
INTRODUCTION
INSTRUCTIONS FOR USE
• Use only microwave-safe dishes with
microwave cooking functions (porcelain, glass
or suitable plastic).
• Ensure that the pin, the sliding ring and the
corresponding turntable are positioned inside
the appliance before operating the oven.
• The appliance will operate only when the door
is fully closed.
• Take great care when cooking food with a high
alcohol content, as this could cause a fi re.
• Remove any food residue from inside the oven
before using the appliance in order to prevent
fi res and smoking.
• Do not place any objects or baking paper on
the bottom of the oven.
• After cooking, keep the door closed while the
oven is cooling down to prevent damaging
adjacent kitchen units.
• Fruit juice can cause indelible staining; use
deep dishes to prevent leakage.
• Damaged containers, or those which are
unsuitably small, can lead to serious injuries.
• When opening the oven door, be very careful
of escaping steam: burn hazard!
• Do not pour water into a hot oven: this would
create steam, and thus a burn hazard!
• Keep the door seal clean to prevent heat
escaping and damaging adjacent units.
• Insert oven racks and trays all the way into
their guides to prevent damage to the door
when closing.
• Do not operate the appliance with wet hands
or when it is in contact with water.
• Do not apply pressure to the open door.
• Do not use the door as a work surface or shelf.
• Do not place or store fl ammable objects
or those which could ignite easily on the
appliance, inside it or in its immediate vicinity.
• Always heat baby milk in bottles with the cap
and teat removed. After heating the baby
milk, mix or shake well to allow the heat to be
uniformly distributed.
• Never select excessively high heating times or
power levels to heat small quantities of food.
• Use the grill function only for gratinating
dishes.
• Remove liquids from the appliance with care
to avoid the risk of spillage.
• Use only microwave-safe containers.
• Check suitability before placing dishes and
other containers in the appliance.
• Do not heat whole eggs (raw or hard-boiled) in
the microwave, as they could explode.
• Do not use the appliance for frying, as it would
not be possible to control the temperature of
the oil with microwave cooking.
• The turntable and racks can support a
maximum load of 8 kg.
APPLIANCE WARNINGS
• Do not place sheets of aluminium foil directly
onto the oven's interior surface.
• Do not place water directly inside the hot oven.
• Do not store moist dishes and food inside the
oven after completing cooking.
• Take care when removing or inserting
accessories.
• Any discolouration of the steel will not aff ect
the oven’s performance.
• For very wet cake batters, use a dripping pan.
Fruit juice can cause permanent stains.
• The oven is designed only for cooking. It must
not be used for other purposes, such as space
heating.
7
EN
/ Installation
The installation, adjustments, transformations and
maintenance listed in this section must only be
performed by qualifi ed technicians (in accordance
with applicable legislation). Incorrect installation
can cause property damage and injury to people
or pets; the manufacturer shall not be held liable
in this event. The appliance’s automatic regulation
or safety devices may only be modifi ed by the
manufacturer or a duly authorised supplier during
the appliance’s lifetime.
Ensure all necessary PPE is used when
carrying out the installation
INSTALLING THE OVEN IN THE UNIT
Ensure that the oven is fully present and
undamaged after removing all loose parts from
their inner and outer packaging. Do not remove the
mica cover on the ceiling of the microwave cavity.
This cover prevents grease and food scraps from
damaging the microwave generator.
In the event of any uncertainty, do not use the
appliance and contact technical support.
Check that the kitchen unit is suitable for installation
of the oven, referring to the dimensions given in
this guide.
IMPORTANT INFORMATION
The oven is only suitable for installation inside
a fi tted kitchen unit or carcase. The sides and
surrounding surfaces must be able to withstand
temperatures of up to 90°C.
Installation of the appliance must be performed
in accordance with the provisions of applicable
legislation.
Provide for an opening in the rear of the carcase to
allow for oven ventilation, as shown in the fi gure.
Lack of suffi cient ventilation could compromise
oven performance.
Insert the pin in the middle of the microwave cavity
and place the sliding ring and turntable on it until
they click into place.
TECHNICAL INSTALLATION INSTRUCTIONS
T
ECHNICAL INSTALLATION INSTRUCTION
S
595
453.51.5
455
446
455
450 350
86°
520 22
11
556
65
1.5
A
A = 20 MOD
A = 22 HER
A = 23 PRO
8
EN
/ Installation
INSTALLATION UNDERNEATH A BUILT-IN
HOB
The clearance between the oven and the kitchen
units or other installed appliances must be enough
to ensure suffi cient ventilation and air discharge.
If installed under a hob, space must be left between
the bottom of the hob and the top of the oven to
allow for ventilation of the entire compartment
(see fi gure).
Any ventilation openings required for the hob are
to be added to those required by the oven.
The manufacturer shall bear no liability in the
event of the oven being installed in combination
with a hob from another manufacturer.
INSTALLING THE OVEN IN A TALL
APPLIANCE HOUSING
The clearance between the oven and the kitchen
units must be enough to ensure suffi cient
ventilation and air discharge. Ensure there is an
opening in the top or rear of the carcase as shown
in the fi gure.
TECHNICAL INSTALLATION INSTRUCTIONS
T
ECHNICAL INSTALLATION INSTRUCTION
S
60
560-568
455
MIN 5
1.5
60
60
60
60
5
MIN 30
MIN 460
60
558-568
250 cm²
448-452
min.550
560-568
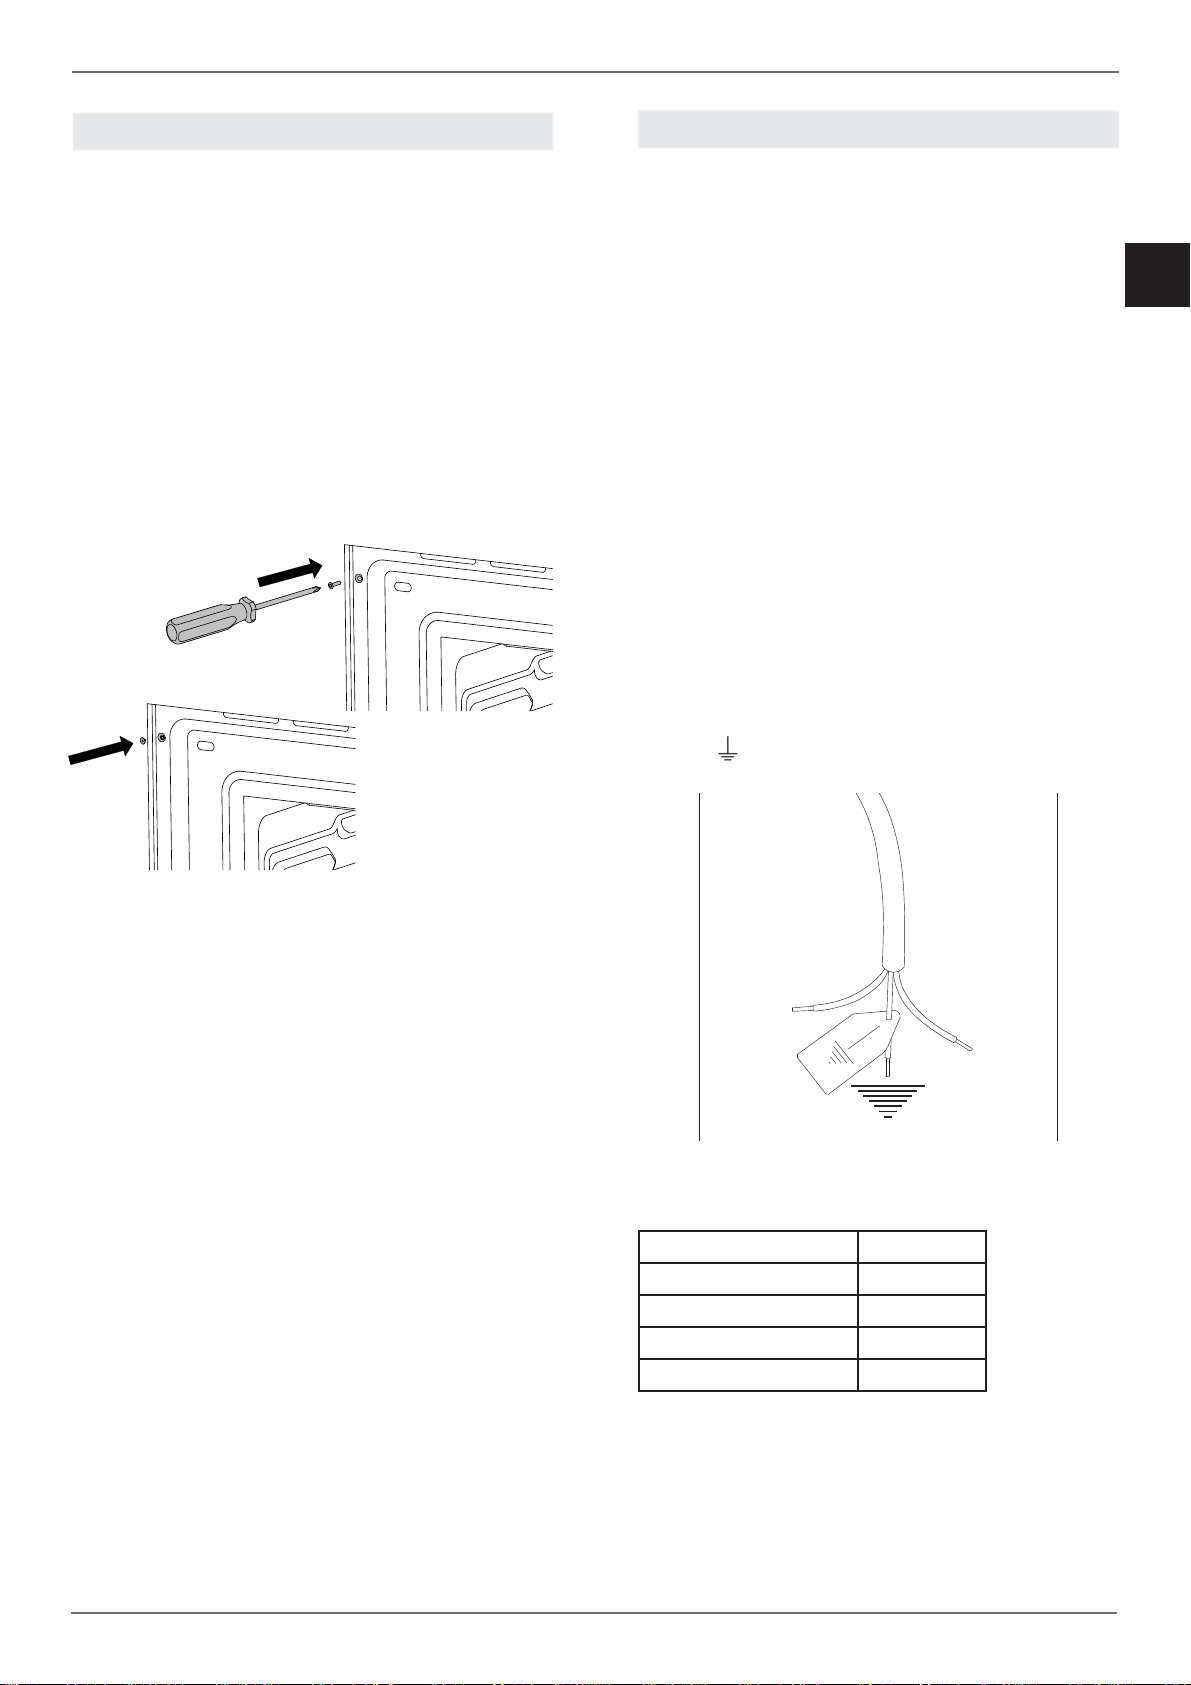
9
EN
/ Installation
• Position the appliance into the carcase with
the help of a second person.
• Do not use the door or handle to position the
oven.
• Check that the oven is correctly aligned with
the units.
• Check that the door opens correctly.
• Fasten the oven to the carcase with the
supplied screws, ensuring that the oven
remains centred.
• Cover the screws with the caps.
The electrical connection must be made in
accordance with applicable standards and
legislation.
Before connecting up the appliance, check that:
• The mains electricity supply matches the
characteristics indicated on the appliance data
plate (positioned on the front of the oven).
• The circuit wiring and outlet are equipped with
a compliant earth connection.
Connection to the mains power supply via a
socket:
• Wire a plug onto the power cable which
must comply with applicable standards in the
country of use; the plug (and its fuse, where
applicable) must be suitable for the rated load
specifi ed on the appliance data plate. Connect
the cores of the cable in accordance with the
fi gure, ensuring you follow the harmonised
wiring colour scheme:
L (live/hot/phase) = brown wire
N (neutral) = blue wire
earth “
” symbol = yellow/green wire
Voltage 220-240 V
Frequency 50 Hz
Max. power 3400 W
Max current draw 15 A
Cable type 3x1.5 mm²
OVEN FASTENING
ELECTRICAL CONNECTION
E
LECTRICAL CONNECTIO
N
N
L

10
EN
• Position the power supply cable in such a way
that it is not resting against the rear of the
oven, that it is not in contact with sharp edges
and will not reach a temperature of 90°C at
any point.
• Do not use adapters, extension leads, gang
sockets etc. as these could cause loose
contacts and overheat.
Hard-wired to the mains circuit:
• The circuit must be fi tted with a omnipolar
circuit breaker of suitable capacity for the
appliance's rated load.
• The earth conductor must not be switched
by the breaker and must be connected to the
earthing system.
• As an alternative, an RCBO may also be used,
or RCD protection in addition to or instead of
a fuse or MCB, depending on the applicable
electrical code.
REPLACING COMPONENTS
Isolate the appliance’s power supply before
performing any maintenance.
Contact an authorised service centre if functional
components require replacement.
WARNING: If the power cable requires
replacement, the installer/maintenance
technician must use H05VV-F cable and leave
the earth conductor around 2 cm longer than
the live and neutral wires. They must also
comply with the instructions given for the
electrical connection.
/ Installation
MAINTENANCE
M
AINTENAN
CE
ELECTRICAL CONNECTION
11
EN
/ Use
TWO-KNOB OVEN CONTROLS
1 Function selector
2 Touchscreen display
3 Temperature selector
TIME FUNCTIONS time menu
CANCEL/PREVIOUS MENU cancels or returns to the previous menu
CONFIRM confi rm or continue
SETTINGS settings menu
FULL-TOUCH OVEN CONTROLS
1 Touchscreen display
N.B.: for temperature settings and functions,
touch the icon on the display.
ON/OFF turns the oven on or off
CANCEL/PREVIOUS MENU cancels or returns to the previous menu
CONFIRM confi rm or continue
SETTINGS settings menu
OVEN FUNCTIONS
CONTROL PANELCONTROL PANEL
SYMBOL DESCRIPTION
Microwave
Combination microwave
Convection
Grill
Fan with grill
Grill + microwave
Assistant
Specials
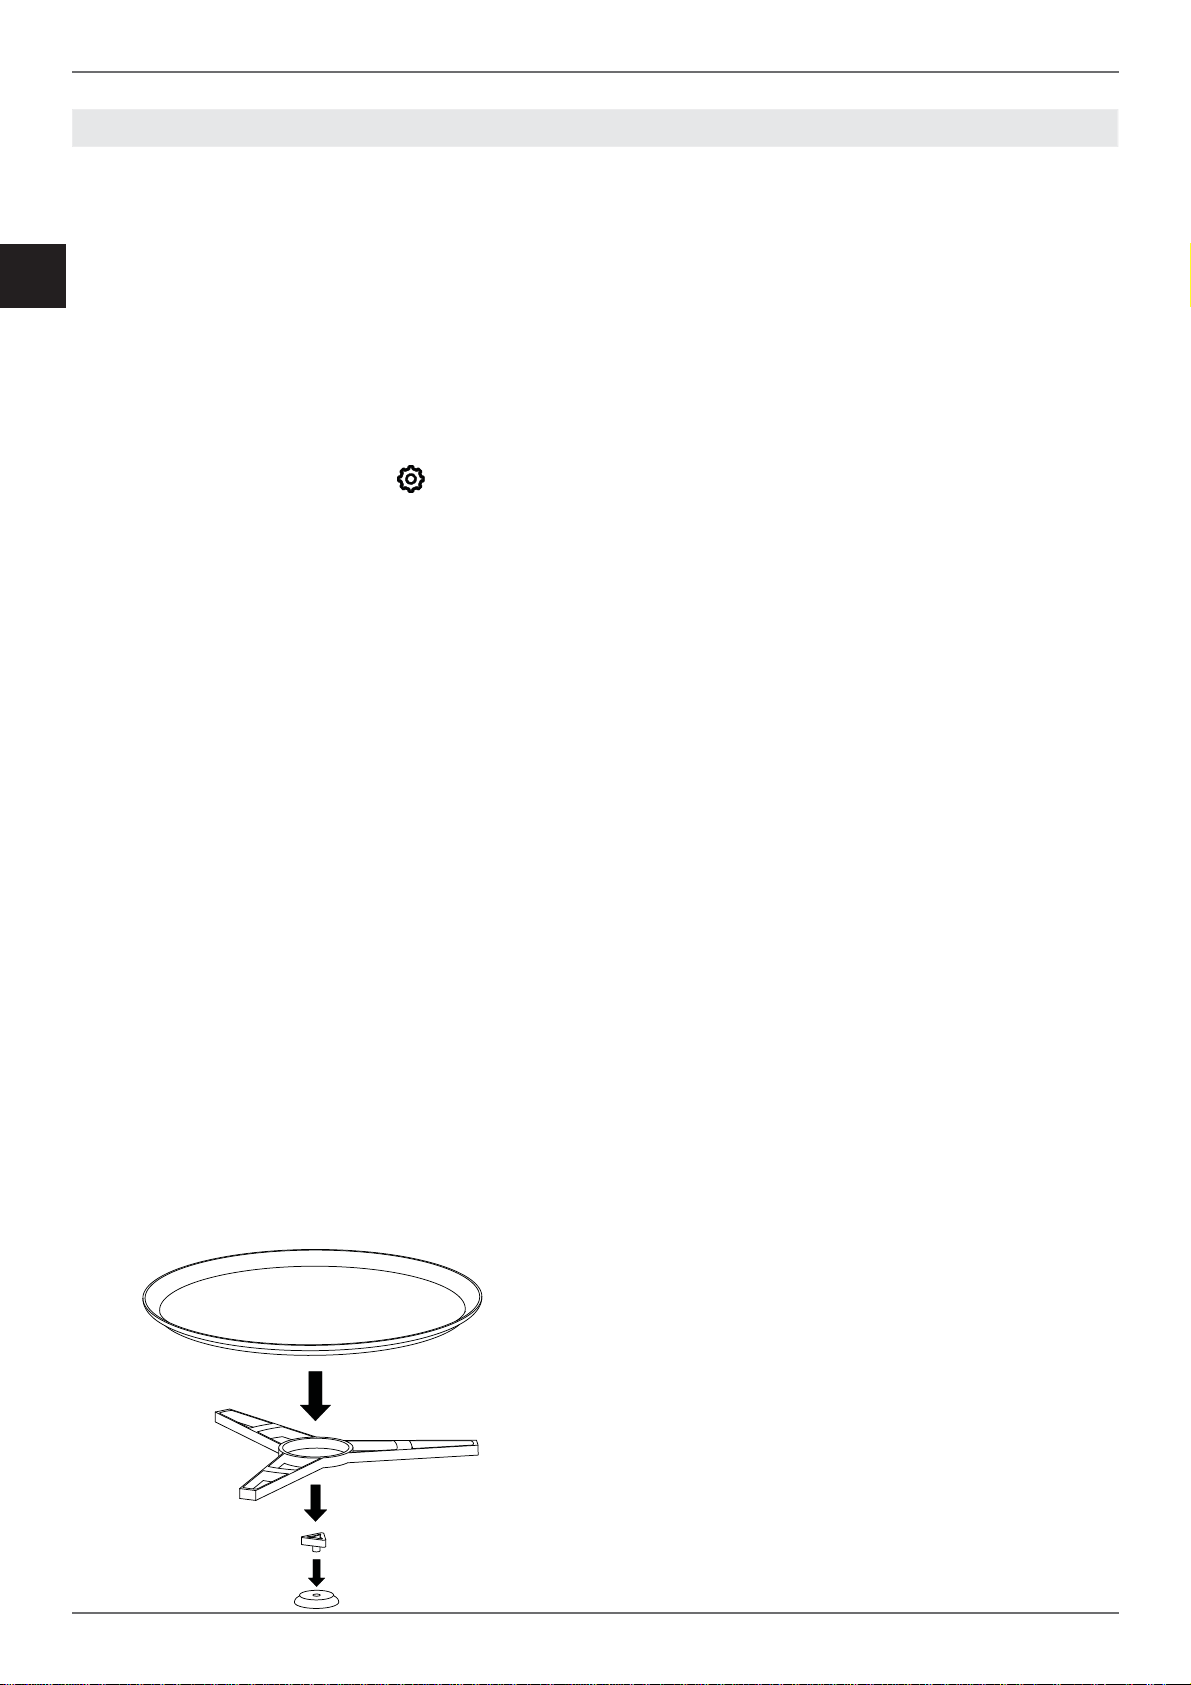
12
EN
Run your fi nger up and down the display to scroll
through the menu.
To activate a menu function, press and hold the
required function for at least two seconds. The
chosen function will be selected as soon as you
remove your fi nger from the display.
Touch a parameter on the display to modify it.
For time, brightness and audio settings, confi rm
with the play button.
FIRST USE
Once the oven has been connected to the power
supply, enter the settings menu ( ) and set the
following:
• Language
• Clock
• Clock Format
• Measurement Units
BEFORE FIRST USE
• Remove any fi lm and other packaging residue
from the inside and outside of the oven.
• Remove and wash all accessories.
• Run the oven for 30 min. at 250°C without
placing any food inside (during this operation
it is normal for manufacturing residue to
produce some smoke and odours).
• Let the oven cool down.
• Open the door and air the oven out for 15
minutes.
• Clean the inside of the oven with a moist cloth
and neutral detergent (do not use scouring
powders).
TURNTABLE INSTALLATION
Do not use the oven in microwave mode without
the turntable installed.
• Insert the pin in the centre of the oven cavity.
• Attach the sliding ring and the turntable: they
should click into place.
The turntable can rotate in both directions.
COOLING
The oven is equipped with a cooling system which
operates during cooking.
Air fl ow between the control panel and door allows
the controls to be kept at a usable temperature.
The cooling system turns on and off automatically
(it is normal for this to continue running after the
oven is switched off ).
PRE-HEATING
The appliance does not require pre-heating for
microwave functions: cooking begins with a cold
oven.
For the other functions, the pre-heating time will
depend on the temperature set and the number of
accessories present in the oven.
In combination functions, the microwave and
turntable will start up only when the set temperature
is reached.
OVEN LIGHT
The oven light comes on automatically when the
door is opened and remains on during standard
cooking functions.
/ Use
USE

13
EN
/ Use
USING TWO-KNOB OVENS
1. Insert the rack at the required level
2. Select the oven function by rotating the knob
3. Set the temperature by turning the knob
clockwise, or set the microwave power level
via the TOUCHSCREEN DISPLAY.
4. If necessary, set timed cooking via the
TOUCHSCREEN DISPLAY.
An audible warning and visual message indicate
when the set temperature is reached.
Return the function knob to the zero position at
any time to stop cooking.
USING TOUCHSCREEN OVENS
Run your fi nger up and down the display to
scroll through the menu.
To activate a menu function, press and hold
the required function for at least two seconds.
The chosen function will be selected as soon
as you remove your fi nger from the display.
Touch a parameter on the display to modify it.
1. Insert the rack at the required level.
2. Touch the power button twice to turn the oven
on (once if the appliance is already on).
3. Scroll through the functions menu and choose
the required cooking method.
4. Scroll to select the required temperature or
power level and select it.
5. If necessary, set timed cooking via the
TOUCHSCREEN DISPLAY.
6. Touch the Play button to start cooking, or wait
(15 seconds) for it to start automatically.
An audible warning and visual message indicate
when the set temperature is reached.
Touch the power button at any time to stop
cooking.
COOKING MODES
The oven is equipped with various heating
elements which create the various cooking modes
when activated individually or in combination.
Warning: all cooking operations must take
place with the door closed.
The oven door can be opened at any time.
The oven will shut off automatically. The oven
will resume operation once the door is closed
again; if the microwave function has been
selected, it will be necessary to touch confi rm
to resume the function.
Microwave
Heating with microwave energy
Rapid cooking.
• Turntable
When cooking foodstuff s which do not require
rotation, stop the turntable by pressing the
corresponding icon on the display; press the same
icon to reactivate it.
Combination Microwave
Heating with microwave energy distributed by the
fan.
Ideal cooking for roasts.
• Lower level
Convection
Heat from the rear element with fan assist.
Cooking on multiple levels, ideal for any type of
food which requires even heat.
• Lower level
Grill
Heat from the grill (broiler) element.Max
recommended temperature: 200°C
.
Cooking on a single level, ideal for grilling
sausages, chops, bacon, fi sh or toast.
Browning or gratinating food at the end of cooking.
• Upper level
Fan with grill
Heat from the grill (broiler) element with fan assist.
Max recommended temperature 175°C.
Cooking on a single level, ideal for grilling thick
foods.
The circulation of the heat aids optimum cooking
of the food while grilling from above.
• Upper level
USE

14
EN
Grill + microwave
Heating with microwave energy and from the grill
element
Fast cooking with surface browning.
• Upper level
Assistant
see specifi c chapter
Specials
Dehydrate
Function with forced air circulation and a
temperature of 37°C for drying foods, fl owers and
vegetables.
Automatic defrosting by weight
Function with the use of microwave energy to
accelerate the defrosting process for foodstuff s by
setting their weight.
Manual defrosting by time
• Function with the use of microwave energy to
accelerate the defrosting process for foods by
setting the time.
Sabbath
Heating method for use during periods of religious
observance.
Eco
Fan-assisted cooking function with low power
consumption (light deactivated during cooking).
CONDENSATION
When cooking foods with a high water content, it
is normal for condensation to form on the inside
of the oven door and on the control panel. This
condensation will evaporate by itself during
cooking.
COOKING TIPS
The set temperature and cooking time may
vary slightly from one oven to another. Slight
adjustments to recipes may be necessary.
• Increasing the temperature does not decrease
cooking times.
• Cooking times depend on the weight, thickness
and quality of the food.
• We recommend placing the food at the centre
of the rack.
• Choose the level of cooking in accordance
with the recipe and personal experience.
• Turn and mix dishes so that they heat through
evenly.
• For new recipes, choose the lowest
temperature from those given along with the
shortest time; then assess how well cooked
the dish is, prolonging the cooking if necessary.
SAVING ENERGY
• Open the oven door only when necessary to
avoid wasting heat.
• Keep the inside of the oven clean.
• Remove any accessories not currently being
used.
• Shut off the oven a few minutes before the
time normally used, allowing the residual heat
of the oven to fi nish cooking.
/ Use
USE USING CONVENTIONAL COOKING
FUNCTIONS

15
EN
/ Use
DEFROST
• The time required to defrost foodstuff s will
depend on their quantity and on the thickness
of the foodstuff .
• Thicker pieces will need to be turned multiple
times.
• Foods rich in fat, such as butter, soft cheese,
cream etc. should not be completely defrosted.
• Remove frozen foods from their packages
and ensure that any metal elements, clips etc.
have been removed.
• Any liquid which forms, above all when
defrosting poultry, must be disposed of and
must not under any circumstances come into
contact with other foodstuff s.
• Do not forget that the defrost function requires
a rest period during which the item will be
defrosted completely.
COOKING TIPS
• When heating or cooking items with a skin
or peel (e.g. apples, tomatoes, potatoes,
sausages), make holes in them to prevent
them from bursting.
• When cooking ready meals, follow the
instructions on the pack.
• If you wish to place multiple containers, such
as cups, in the appliance, arrange them evenly
on the turntable.
• Never close plastic bags with metal clips or
twist ties with a wire core – use plastic clips.
Make small holes in the top of the bag to allow
steam to escape.
• Ensure that foodstuff s reach a minimum
temperature of 70°C when cooking or
reheating.
• When heating liquids, use containers with
large openings to allow steam to escape.
• Cooking times and power levels should be
adapted to individual requirements.
• The greater the quantity of food, the longer the
cooking time will be.
Double quantity = twice the cooking time
Half quantity = half the cooking time
• Liquids heat up more quickly.
• Most foodstuff s will need to be protected
with a lid in order to maintain their moisture
levels and intrinsic fl avour. The lid used must
be microwave safe and have holes to allow
steam to escape.
• The set temperature and cooking time may
vary slightly from one oven to another. Slight
adjustments to recipes may be necessary.
• Increasing the temperature does not decrease
cooking times.
• Cooking times depend on the weight, thickness
and quality of the food.
• We recommend placing the food at the centre
of the rack.
• Choose the level of cooking in accordance
with the recipe and personal experience.
• Turn and mix dishes so that they heat through
evenly.
• For new recipes, choose the lowest
temperature from those given along with the
shortest time; then assess how well cooked
the dish is, prolonging the cooking if necessary.
SAVING ENERGY
• Open the oven door only when necessary to
avoid wasting heat.
• Keep the inside of the oven clean.
• Remove any accessories not currently being
used.
• Shut off the oven a few minutes before the
time normally used, allowing the residual heat
of the oven to fi nish cooking.
U
SING CONVENTIONAL COOKING FUNCTION
S
USING MICROWAVE COOKING FUNCTIONS
16
EN
/ Use
COOKING GUIDELINESCOOKING GUIDELINE
S
Foodstuff Weight
(g)
Defrosting time
(min.)
Rest time (min.) Tips
Whole pieces of meat,
pork, beef, veal, game
100 2-3 5-10 turn once
200 4-5 5-10 turn once
500 10-12 10-15 turn twice
1000 21-23 20-30 turn twice
1500 32-34 20-30 turn twice
2000 43-45 25-35 turn three times
Whole or jointed poultry 250 5-6 5-10 turn once
Chicken 1000 20-24 20-30 turn twice
Fish fi llet 200 4-5 5-10 turn once
Trout 250 5-6 5-10 turn once
Bread
200 4-5 5-10 turn once
500 10-12 10-15 turn once
800 15-17 10-20 turn twice
MICROWAVE COOKING
Foodstuff Weight
(g)
Quantity of
liquid to add
Power
(watts)
Time
(min.)
Rest
time
(min.)
Tips
Caulifl ower
Broccoli
Mushrooms
500
300
250
100 ml
50 ml
25 ml
800
800
800
9-11
6-8
6-8
2-3
2-3
2-3
Divide into fl orets.
Slice.
With lid.
Peas and
carrots,
frozen carrots
300
250
100 ml
25 ml
800
800
7-9
8-10
2-3
2-3
Cut into slices or dice.
With lid.
Potatoes 250 25 ml 800 5-7 2-3 Peel and cut potatoes into
equal sized pieces.
With lid.
Bell peppers 250 25 ml 800 5-7 2-3 Cut into pieces or slices.
With lid.
Fish fi llet 500 - 600 10-12 3 With lid.
Turn halfway through
cooking.
Whole fi sh 800 -
800
400
2-3
7-9
2-3
With lid.
Turn halfway through
cooking.
The times given in the table do not include preheating times and are provided only as a guide.
MICROWAVE DEFROSTING

17
EN
/ Use
COOKING GUIDELINESCOOKING GUIDELINE
S
Foodstuff Weight/
tin
diameter
Power
(watts)
Temperature
(°C)
Time
(min.)
Rest
time
(min.)
Tips
Roast beef 1-1.5 kg 400 200 30-40 20
Container without
cover.
Turn once.
Pork loin
Pork chop (bone-in)
Roast pork
0.8-1 kg 200 180-190 50-60 20
Container without
cover.
Turn once.
Whole chicken 1-1.2 kg 400 200 30-40 10
Container without
cover.
Breast down, turn once.
Jointed chicken 0.5-1 kg 400 200 25-35 10
Container without
cover.
Place the pieces skin
down, turn once.
Roast veal 1.5-2 kg 200 180 60-65 20
Container with cover;
turn once or twice, after
turning continue without
cover.
Roast beef 1.5-1.8 kg 200 200 80-90 20
Container with cover,
turn once or twice.
Chocolate cake 28 cm 200 200 30 5-10 Turntable
Apple pie 28 cm 200 185 40-45 5-10 Turntable
Cheesecake 28 cm 400 180 40-45 5-10 Turntable
COOKING WITH MICROWAVE + GRILL FUNCTION
Foodstuff Weight Power (watts) Time (min.) Rest time (min.)
Baked pasta 500 400 12-17 3-5
Gratinated potatoes 800 600 20-22 3-5
Lasagne 800 600 15-20 3-5
Chicken 1000 400 35-40 3-5
The times given in the table do not include preheating times and are provided only as a guide.
COOKING WITH COMBINATION MICROWAVE FUNCTIONS
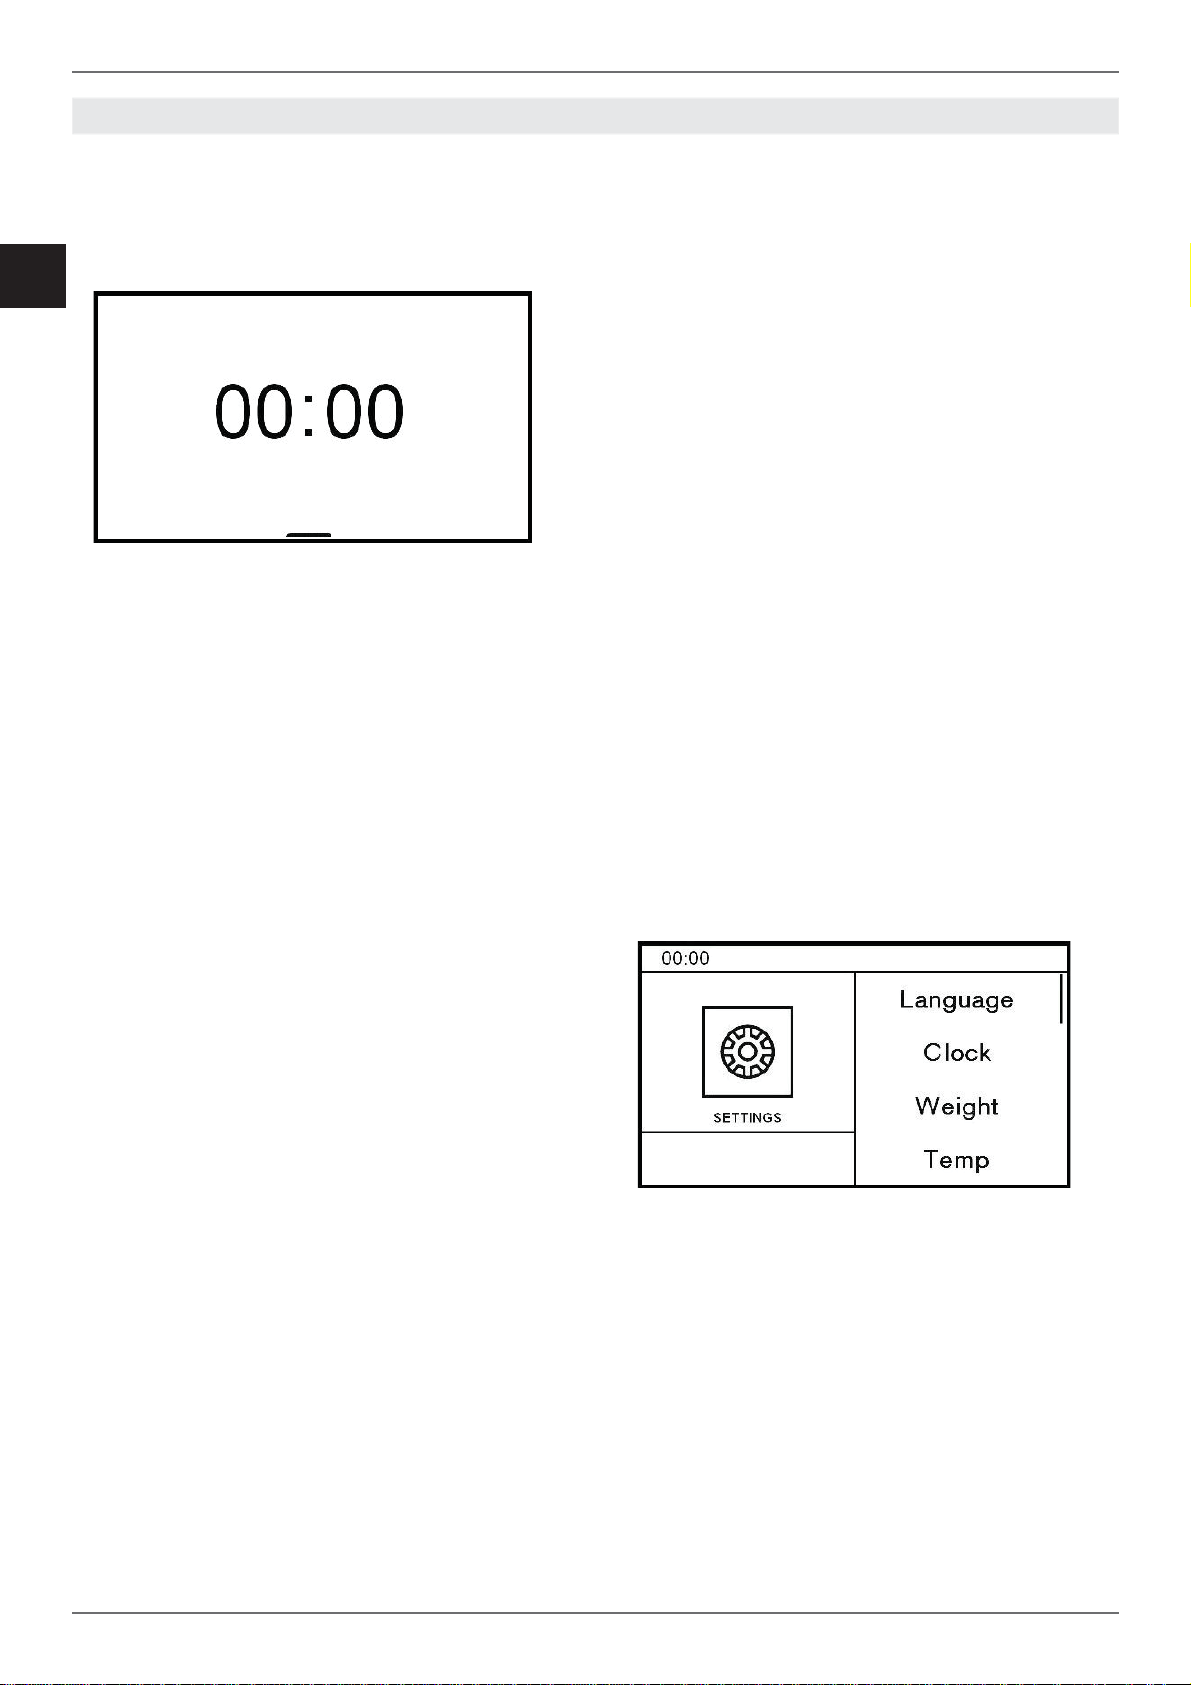
18
EN
/ Use
HOME SCREEN
Drop-Down Menu
The drop-down menu contains some functions
which can be activated with the oven off .
Scroll the FLAP _ symbol upwards to open; scroll
the FLAP _ symbol downwards to close.
Timer
Countdown timer: when it fi nishes, an audible
warning will sound and a message will be
displayed. The timer does not stop the cooking
operation.
Scroll to set; the timer starts automatically.
Light
To turn the oven light on and off with the door
closed.
Oven Preheating
Function to bring the oven to the required
temperature in a short period of time.
This function is designed only for pre-heating the
oven, and not for cooking food.
Screen Brightness
To set or change the display brightness.
Settings Menu
Touch the settings button to enter the menu.
Brightness
To set or change the display brightness.
Audio
To set or change the volume of the sounds.
Language
To select the preferred appliance language (the
default is English).
Clock
To set or change the time.
Showroom Mode
Deactivates the heating elements for showrooms
use.
Weight Unit
To set or change the unit of measurement used
for weight.
Temp Unit
To set or change the unit of measurement used for
temperature.
ECO Mode
To reduce energy consumption.
USING THE TOUCHSCREEN DISPLAY

19
EN
/ Use
MANAGING THE TIME FUNCTIONS
The time function allows you to manage cooking
times.
After setting the function and temperature, press
the clock icon ( ) and choose a time function.
Timer
To set a countdown timer, at the end of which an
audible warning will sound and a message will be
displayed. The timer does not stop the cooking
operation.
Scroll to set; the timer starts automatically.
Cooking Time
To set a countdown timer, at the end of which
cooking will be stopped, an audible warning will
sound and a message will be displayed.
Scroll to set; the cooking time timer starts
automatically.
Start at
To set the start time and duration of cooking.
When the set time arrives, an audible warning will
sound indicating the start of cooking. When the
set duration has elapsed, cooking will stop, an
audible warning will sound and a message will be
displayed.
Scroll to set fi rst the start time and then the
cooking time.
Ends at
To set the cooking end time and duration (the start
time will be calculated by the appliance).
An audible warning will sound when cooking
begins. At the set cooking end time, cooking will
stop, an audible warning will sound and a message
will be displayed.
Scroll to set fi rst the end time and then the cooking
time.
Touch the Power button, or else return the selector
to the off position, to stop cooking at any point.
Touch the clock icon to modify the duration of the
current cooking program.
Important: if the time functions are not managed,
the duration of the cooking must be managed
manually.
USING THE TOUCHSCREEN DISPLAY

20
EN
/ Use
ASSISTANT
The assistant function helps you manage a range
of cooking, temperature and time functions for
each type of food.
The system does not provide recipes, but helps
the oven get the best out of yours.
It is possible to create new sequences and store
them for future use.
Recipe Management
Preset cooking sequences.
1. Choose the required food category.
• Meat
• Poultry
• Fish
• Dessert
• Bread
• Pizza
• Pasta
• Vegetables
2. Choose the required dish.
3. Select the weight and level of cooking, where
required.
4. Press play.
At the end of cooking, an audible warning will
sound and a message will be displayed.
To stop cooking, press the power button.
My cookbook
Saved personal cooking sequences
1. Select the required recipe from the saved
ones.
2. Press play.
At the end of cooking, an audible warning will
sound and a message will be displayed.
To stop cooking, press the power button.
To delete a saved recipe, select the name and
drag it from the right to the left-hand side and
confi rm.
Set
To set complex cooking profi les and store them.
Up to three functions in sequence can be selected.
1. Select function 1
2. Set cooking function, temperature and
duration.
3. Repeat for functions 2 and 3, where necessary.
4. Press play to run the recipe.
5. Before activating cooking, you can decide
whether or not to save the recipe; if saving, an
on-screen keyboard will be displayed to name
and save it.
6. Once saved, touch the play button to start
cooking.
Use the My Cookbook function to bring up the
saved recipe.
USING THE TOUCHSCREEN DISPLAY

21
EN
/ Cleaning / Troubleshooting
MICROWAVE COOKING FUNCTIONS
• Do not use metal pans or dishes, or other
containers with metal elements or decoration,
with microwave functions.
• The most suitable materials for microwave
cooking are Pyrex, porcelain or earthenware,
as well as microwave-safe plastic containers.
• Use glass or plastic lids, or else a layer of cling
fi lm, in order to:
Prevent steam from escaping
Accelerate the cooking process
Prevent food from drying out
Preserve the fl avour and aroma of dishes
Covers must not be airtight in order to prevent
pressure from building up.
Testing Containers
Place the container to be tested in the oven and
heat at maximum power for 20 seconds. If the
container remains cold or heats up only slightly,
this means it is suitable for microwave cooking. If,
on the other hand, it should heat up signifi cantly,
or else sparks are generated, this means it is not
suitable.
CONVENTIONAL COOKING FUNCTIONS
• For conventional cooking functions, use heat-
resistant containers which can withstand
temperatures of at least 300°C. Plastic
containers are not suitable.
COMBINATION COOKING FUNCTIONS
• For combination cooking functions, use
containers suitable for both cooking methods.
Before performing any manual cleaning operation,
wait for all parts to cool down and isolate the oven
from the electrical supply.
Scrupulous care of your oven will help keep it in
excellent condition for many years to come.
Cleaning enamelled or painted parts:
To maintain the characteristics of the enamelled
components, they should be cleaned frequently
with soapy water. Never use scouring powders.
Do not leave acidic or basic substances (vinegar,
lemon juice, salt, tomato juice etc.) sitting on
enamelled parts, and do not wash enamelled
parts when they are still hot.
Cleaning Stainless-Steel Parts:
Clean the components with soapy water and then
dry them with a soft cloth, following the direction of
the brushed fi nish. The shine can be maintained
by periodic use of commonly available products.
Do not use harsh/aggressive detergents such as:
• Limescale removers
• Bleach
• Hydrochloric acid
• Ammonia
• Scouring pads or powders
Immediately remove limescale, grease, starch or
egg-white stains.
Cleaning the Door Glazing:
To degrease, use washing-up liquid and vinegar,
then rinse; otherwise, clean with washing-up
liquid, rinse, then pass over with a moist cloth
before drying.
To remove encrusted food, soak with soapy water
or washing-up liquid for a few minutes. After a few
minutes, rinse off then dry with a soft cloth.
Avoid anti-limescale, abrasive and multi-purpose
products, as they will aff ect the look of the glass
after a while.
Cleaning the Oven Racks:
Do not wash the racks in the dishwasher.
Immerse them in hot soapy water, then wipe with
a non-abrasive sponge before rinsing and drying
with a tea towel.
Cleaning Handles:
Clean the components with soapy water and then
dry them with a soft cloth, following the direction
of the brushed fi nish. Never use scouring powders
or pads.
Seal:
Wipe with a damp cloth.
DISHES
CLEANING THE APPLIANCE
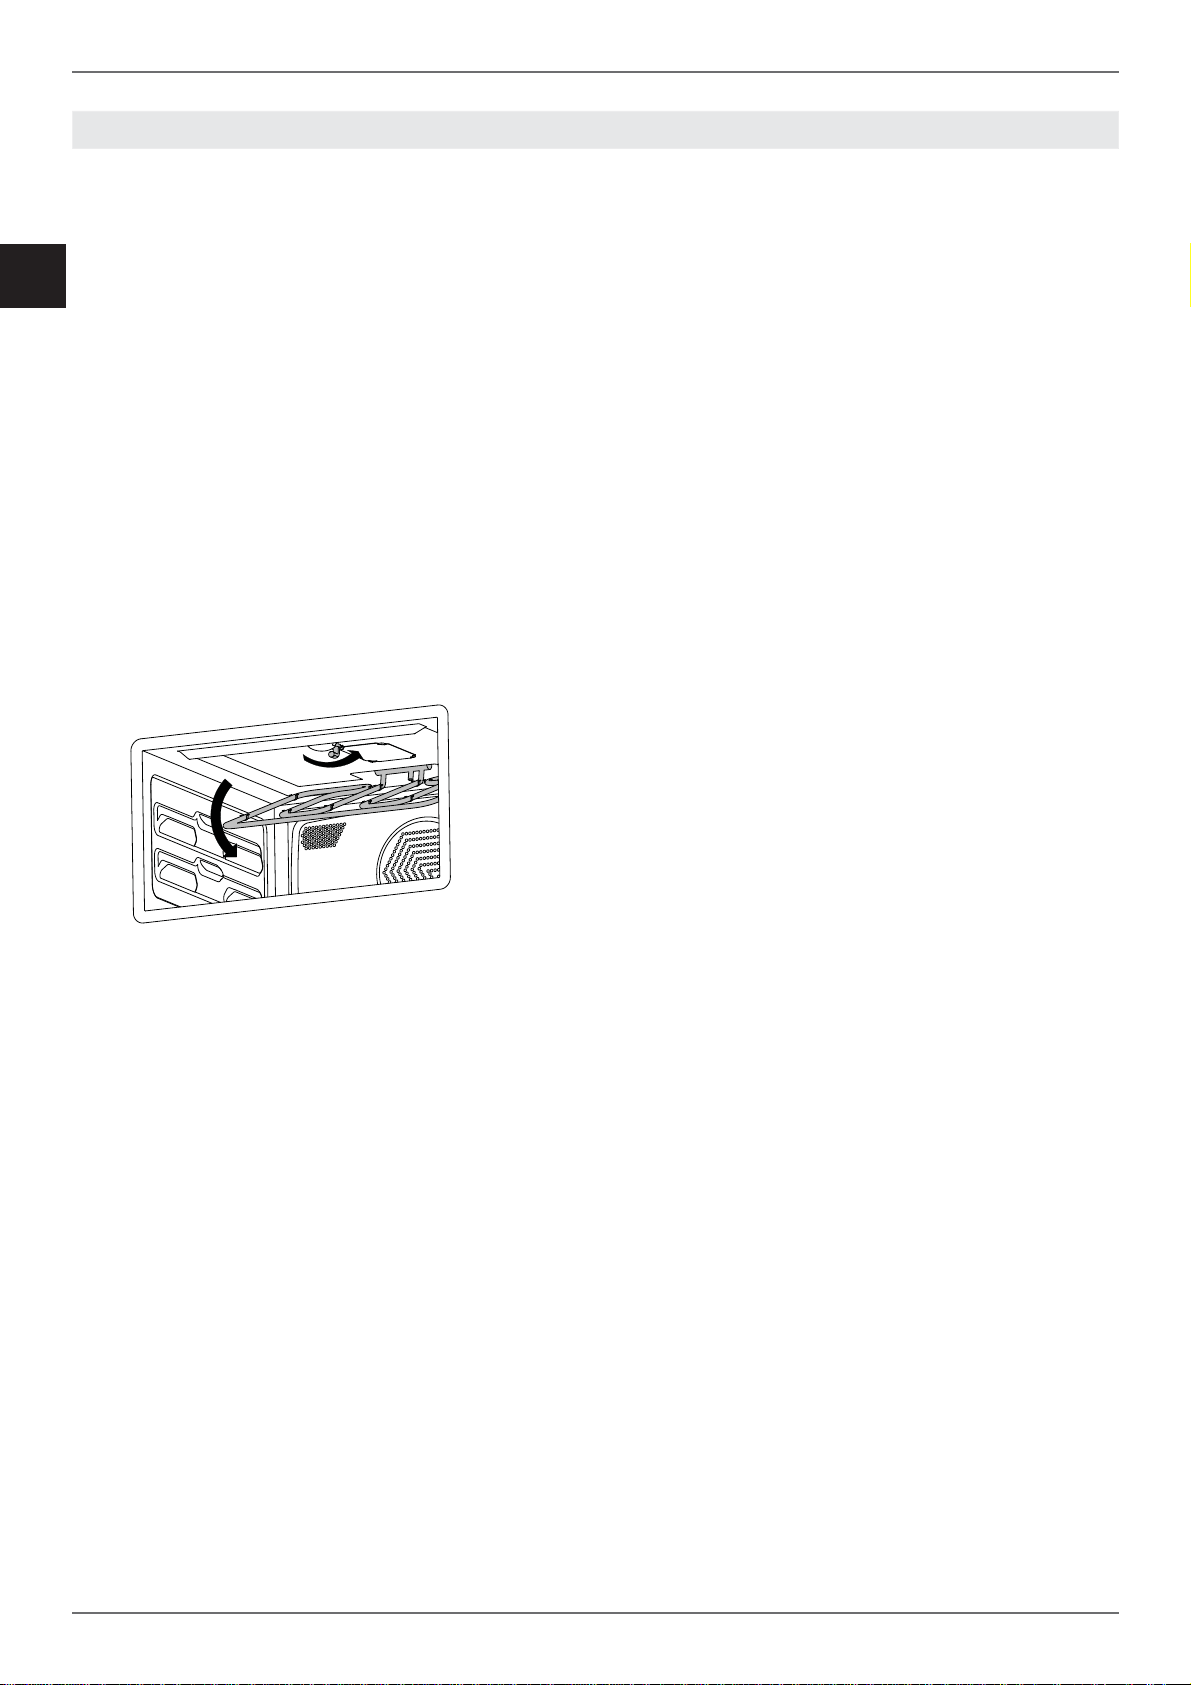
22
EN
Cleaning the roof of the oven cavity.
Warning!
Disconnect the power supply and wait until the
appliance has cooled down before cleaning.
• Turn the grill support 180° (the support may
come out when turned to 90°; reinsert it and
reposition correctly if this occurs).
• Gently lower the grill heating element.
• Clean with soapy water and dry with a soft
cloth (do not use scouring powders or similar).
• Repeat the operations above in reverse to
reassemble the grill.
Cleaning the Turntable and Accessories
Ensure that the turntable and its support are kept
clean at all times.
In the event of encrusted dirt building up, leave
the plate to soak and clean with a brush.
The accessories can be washed in the dishwasher.
Cleaning the Oven Cavity
• Place a glass of water on the turntable.
• Add a few drops of lemon or vinegar if
unpleasant odours have formed inside the
appliance.
• Run the appliance in microwave mode at
maximum power for 2-3 minutes.
• Remove any residue with a soft cloth.
/ Maintenance
CLEANING THE APPLIANCE
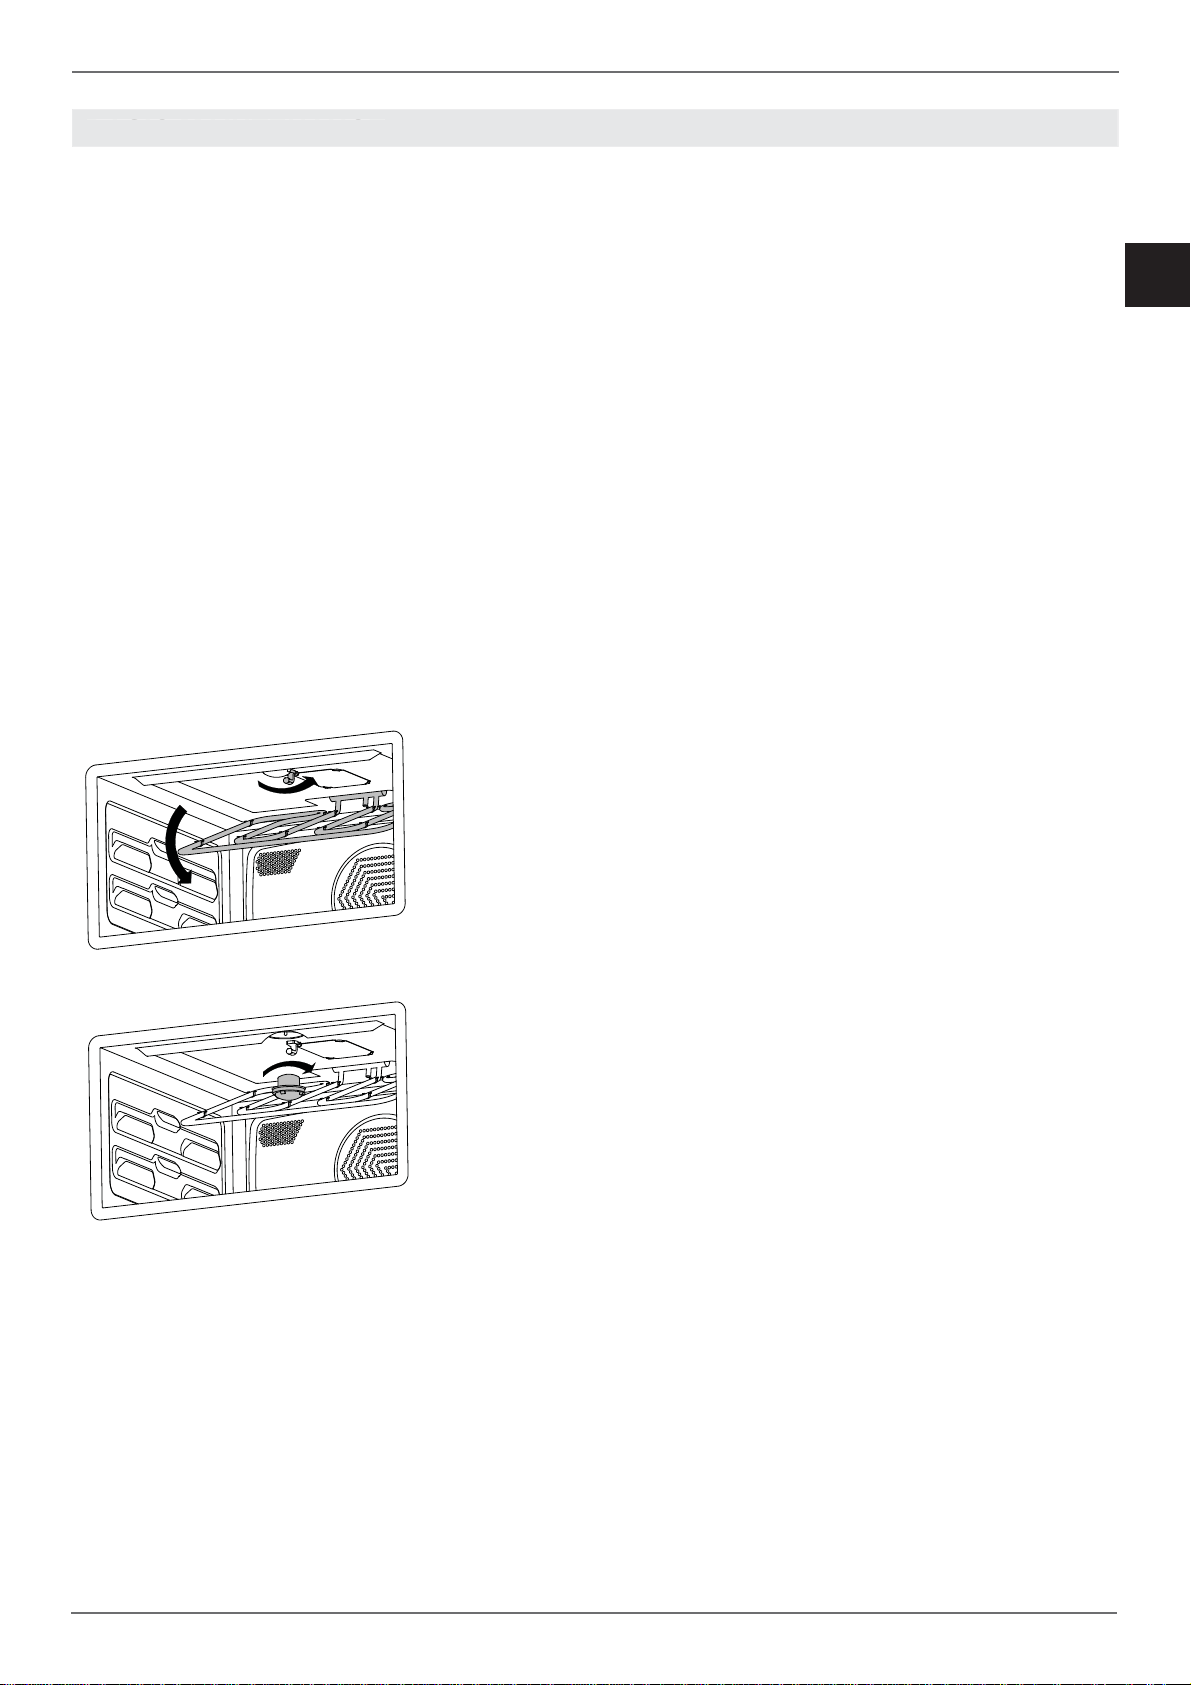
23
EN
REPLACING THE OVEN LIGHT
Warning!
Disconnect the power supply and wait until the
appliance has cooled down before cleaning.
Bulb type: 12 V / 10 W halogen.
• Turn the grill support 180° (the support may
come out when turned to 90°; reinsert it and
reposition correctly if this occurs).
• Gently lower the grill heating element.
• Unscrew the glass cover and take out the old
halogen bulb.
• Insert a new halogen bulb in the holder. DO
NOT touch the bulb with your bare hands.
• Screw the glass cover back on.
• Reinstate the power supply.
/ Maintenance
BASIC MAINTENANCEBASIC MAINTENANC
E

24
EN
WARRANTY
The oven is not working
Is the oven power supply active? Check the circuit
breaker, switch or fuse. Disconnect the oven
from the power supply for around one minute by
unplugging it or turning it off at the circuit breaker.
Is the oven door correctly closed? Ensure that
there is nothing preventing it from closing and the
door clicks when closed.
The oven does not heat up
Check that showroom mode is not enabled.
Check that a time function is not active. Disconnect
the oven from the power supply for around one
minute by unplugging it or turning it off at the
circuit breaker.
After extended use of the grill, the heating
elements are momentarily switched off by the
safety thermostat; wait a few moments while the
oven cools down, then try again.
The knob will not stay in place
The knob clip is broken: call customer service for
a replacement.
The controls are very hot
This is normal if the door is left open for a prolonged
period of time with the oven running.
Check that the door closes correctly and that the
cooking system is operational.
Food is overcooked
When using a fan-assisted function, remember to
lower the cooking temperature by 20°C.
When using a microwave cooking function,
decrease the power level or cooking time.
Food is undercooked
When cooking large quantities of food, the cooking
time must be increased proportionally.
Check that there is suffi cient space around the
oven dish to allow heat to circulate correctly.
Check that the door closes correctly.
Have a technician check the actual mains voltage.
Condensation forms on the oven door glass
When cooking foods with a high water content, it
is normal for condensation to form on the inside
of the oven door and on the control panel. This
condensation will evaporate by itself during
cooking.
Pre-heat the oven to reduce condensation build-
up.
Smoke forms during cooking
It is normal for smoke to form inside the oven
when cooking particularly fatty foods. When
cooking with the grill, a certain quantity of smoke
is normal.
WARRANTY AND CUSTOMER SERVICE:
WWW.BERTAZZONI.COM
/ Troubleshooting / Warranty
TROUBLESHOOTING