If cleaning an entire room, consider moving your furniture to another area.
Use a dry vacuum cleaner over area before using your carpet cleaner.
Pretreat stains with BISSELL® Pretreat to improve performance on coffee stains and ground-in dirt.
Assembly
WARNING: Do not plug in your deep cleaner until you are familiar with all instructions and operating procedures.
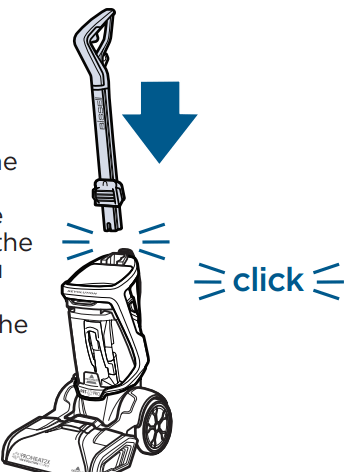
A Phillips-head screwdriver is required for assembly in Step 3.
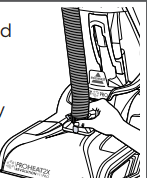
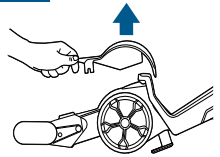
1. First, insert the (aluminum) Upper Handle at the top of the base until you hear a “click”. Do NOT put the Clean Water Tank on the machine until Step 5.
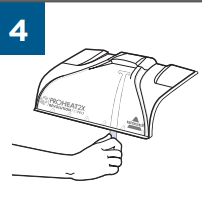
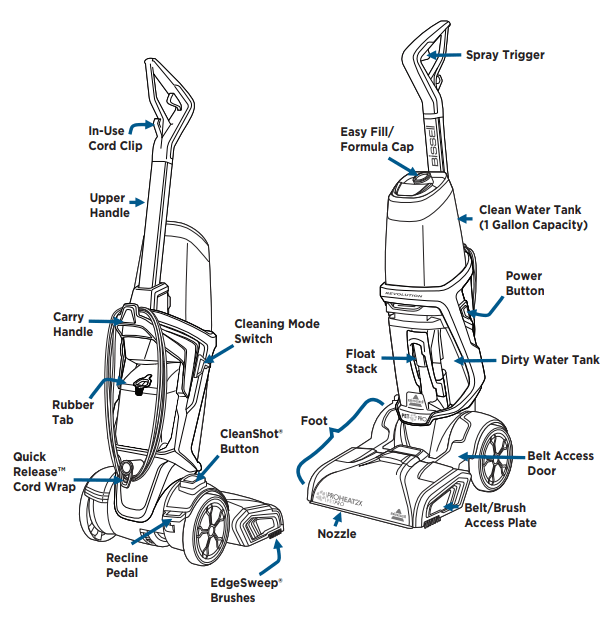
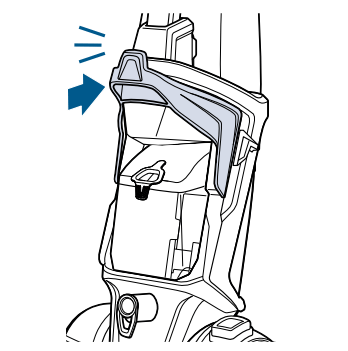
2. Next, align the Carry Handle with the slots on either side of the base (behind the Power Button and Cleaning Mode Switch). The Carry Handle will “click” into place.
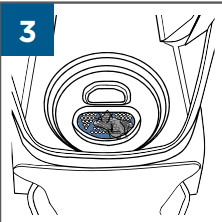
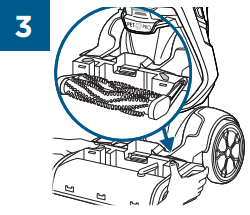
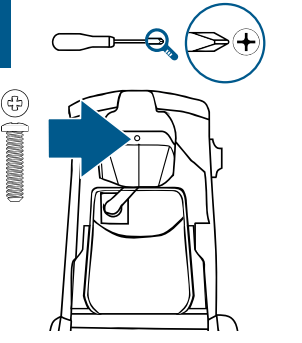
3. Use a Phillips-head screwdriver to secure the screw (found taped to Upper Handle) into the Carry Handle.
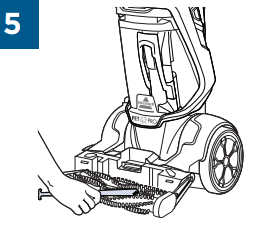
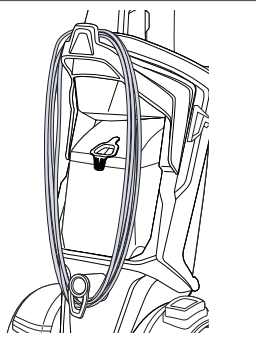
4. Wrap the cord around the Carry Handle and Quick Release™ Cord Wrap hooks.
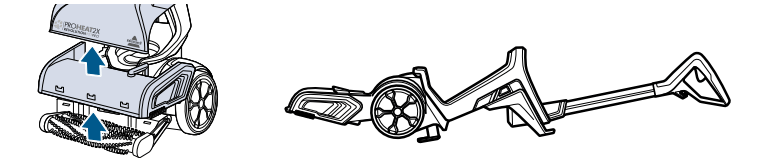
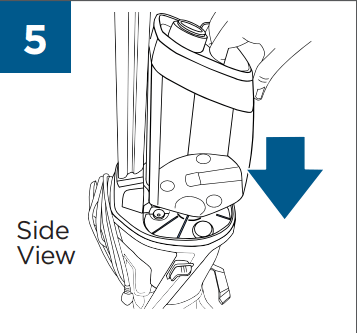
5. At the bottom of the Upper Handle, align the Clean Water Tank with the grooves and slide the tank into place.
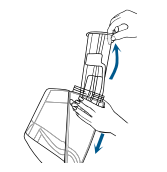
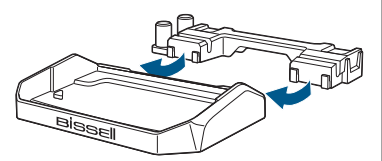
6. Press Part B (the larger piece) down, onto Part A of the Rinse & Storage Tray. (There are 2 hooks on each side of Part A that hook under Part B.)
7. Your tray is assembled and ready for use.
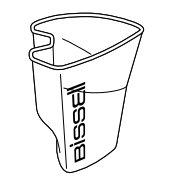
8. The tools and Water Rinse Cup can also be stored on the Rinse & Storage Tray.
Cleaning Formula
WARNING
To reduce the risk of fi re and electric shock due to internal component damage, use only BISSELL® cleaning formula intended for use with this machine.
To reduce the risk of fi re and electric shock when cleaning a hard fl oor, the BISSELL Hard Floor Tool must be used and is only to be used with BISSELL Hard Floor Solutions formula intended for use with this appliance.
Keep plenty of BISSELL® cleaning formulas on hand so you can clean whenever it fits your schedule.
NOTE: Always use genuine BISSELL cleaning formulas for portable carpet and upholstery cleaners in your machine.
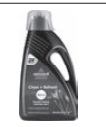
1. Clean + Refresh: Powerful cleaning and odor elimination with Febreze freshness
2. PET Stain & Odor: Removes tough pet stains Includes StainProtect™ to protect against future stains
3. PRO MAX Clean + Protect: Our most powerful formula for tough, ground-in dirt & stains Includes StainProtect to protect against future stains
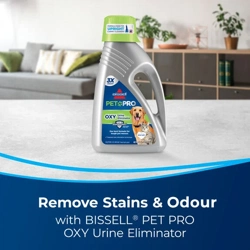
4. PET PRO OXY: Urine Eliminator Our best formula for pet urine stains & odors Includes StainProtect to protect against future stains
5. Pet Stain & Odor + Antibacterial: Cleans and controls odor causing bacteria
Certain trademarks used under license from The Procter & Gamble Company or its affiliates.
Pretreat
Pretreat spots and stains to improve carpet cleaning performance.
PET Stain Pretreat Removes tough pet stains & odors with Enzyme Action
PET PRO OXY Stain Destroyer Removes tough pet stains & odors with OXY
PET Pretreat + Sanitize Penetrates to sanitize and loosen tough stains
Boost
Add Boost carpet cleaning formula enhancers to any formula to increase its effectiveness.
OXY Boost: Removes old, set-in stains
PRO MAX: Boost Add to formula for 2X deep cleaning power
PET OXY: Boost Removes pet stains and odors
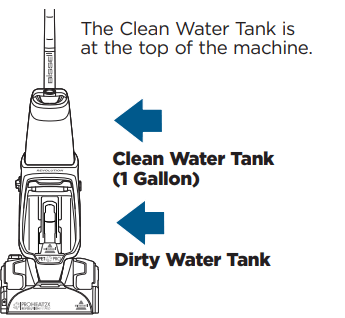
Filling Your Clean Water Tank
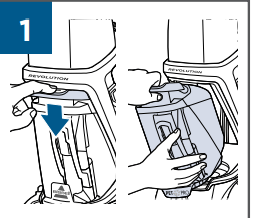
1. The Clean Water Tank is at the top of the machine
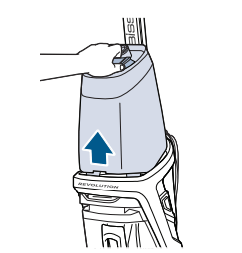
2. Lift the tank straight up to remove from the machine.
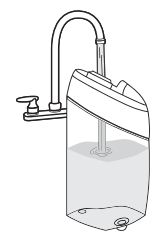
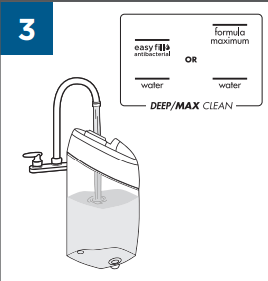
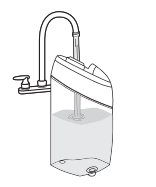
3. With Formula: Unscrew the cap from the tank. Add hot tap water to the water fill line. Next, reference the chart below for formula amounts to add to the tank. Twist cap back into place.
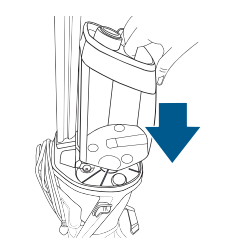
4. At the bottom of the Upper Handle, align the tank with the grooves and slide the tank into place.
FORMULA FILLING INSTRUCTIONS
1. BISSELL Formulas
DEEP CLEAN & MAX CLEAN MODE
Fill water to the Water Fill Line next to the DEEP/MAX CLEAN mode on the Clean Water Tank.
Fill tank with 2.5 oz. of formula.
For extra cleaning power, fi ll the formula until it reaches the “Maximum Formula” line (5 oz). Note: When using BISSELL PRO MAX Clean + Protect Formula, only add 2.5 oz. to the tank.
EXPRESS CLEAN MODE
Fill water to the Water Fill Line next to the EXPRESS CLEAN mode on the Clean Tank.
Fill tank with 1.25 oz. of formula.
2. BISSELL Boost Formula Enhancers (Optional)
DEEP CLEAN & MAX CLEAN MODE
Add 2 oz. of BISSELL Boost formula to the tank for enhanced cleaning results.
EXPRESS CLEAN MODE
Add 1 oz. of BISSELL Boost formula to the tank for enhanced cleaning results
NOTE: Fill with hot (140°F/60°C MAX) tap water and add the appropriate BISSELL formula. DO NOT USE BOILING WATER. DO NOT HEAT WATER OR TANK IN MICROWAVE. Do not substitute BISSELL Formula cleaning formula with other household cleaning products.
For Future Use if selecting Antibacterial Formula with EasyFill
1. The Clean Water Tank is at the top of the machine.
2. Lift the tank straight up to remove from the machine.
3. Unscrew the cap from the tank. Add hot tap water to the water fill line.
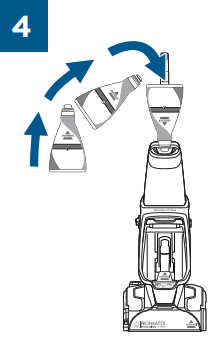
4. After filling the tank with hot tap water, twist the yellow cap back onto the tank. Firmly insert the full-size formula bottle into the cap on the tank and squeeze until formula reaches the EasyFill line. With Trial-Size Antibacterial Formula: Pour into the clean tank up to the EasyFill line. Twist cap back on to tank.
5. At the bottom of the Upper Handle, align the tank with the grooves and slide the tank into place.
A few notes about fi lling the Clean Water Tank:
Fill with hot (140°F/60°C MAX) tap water and add the appropriate BISSELL® formula. DO NOT USE BOILING WATER. DO NOT HEAT WATER OR TANK IN MICROWAVE.
When using BISSELL Antibacterial formula: Only fi ll your Clean Water Tank with the recommended amount of water and formula to achieve antibacterial benefits.
NOTICE: BISSELL Antibacterial formula is only for BISSELL machines with EasyFill System.
NOTICE: Do not overwet carpet. Be careful not to run over loose objects or edges of area rugs. Stalling the brush may result in premature belt failure.
Cleaning Your Carpet - How to Use
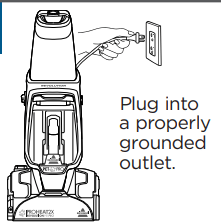
1. Plug into a properly grounded outlet.
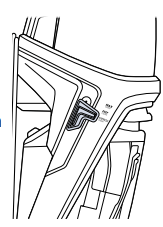
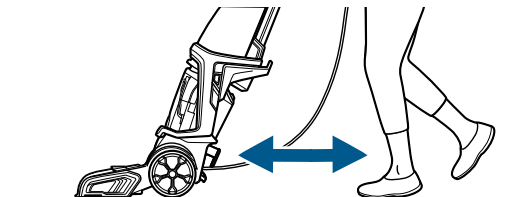
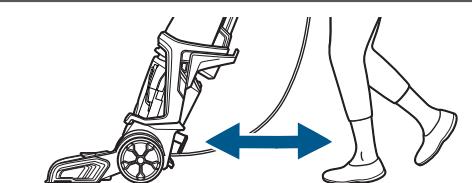
2. Select cleaning mode: Max Clean - Provides a heavy cleaning for your dirtiest carpets. After cleaning, it’s estimated the carpets will need 8 hours to dry. Deep Clean - Delivers a deep clean to your carpet. Express Clean - Provides a lighter Clean with about a 30-minute dry time. Recommended Cleaning Pace: 12 inches per second.
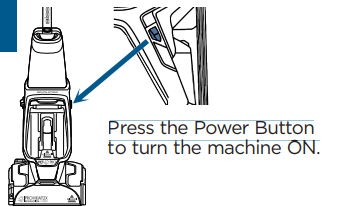
3. Press the Power Button to turn the machine ON.
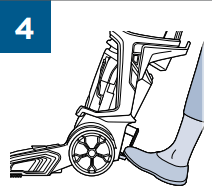
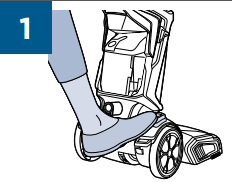
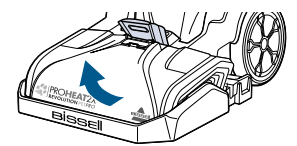
4. To recline your machine for use, press the Recline Pedal with your foot.
NOTICE: To prevent damage to Berber carpets, avoid repeated strokes in the same area.
Express Clean Mode:
Press the Spray Trigger to apply solution while making 2 wet passes - 1 forward and 1 back.
Release the trigger.
Make 2 dry passes - 1 forward, 1 back to suck up the dirty solution. (Do not hold down the trigger for this step.) Recommended Cleaning Pace: 12 inches per second
Max Clean & Deep Clean Modes:
Press the Spray Trigger to apply solution while making 2 slow wet passes - 1 forward and 1 back.
Release the trigger.
Make 2 slow dry passes - 1 forward and 1 back to suck up the dirty solution. (Do not hold down the trigger for this step.)
Antibacterial Cleaning (Deep Clean Mode Only)
Press the Spray Trigger to apply solution while making 3 slow wet passes - 1 forward, 1 back, and 1 forward again.
Release the trigger.
Make 1 slow dry pass back, to suck up the dirty solution. (Do not hold down the trigger for this step.)
Max Clean Mode is intended for your dirtiest carpeted areas. Please note that your carpets will need an estimated 8 hours to dry. To expedite the drying process, place a fan in the room or near the carpet.
In Express Clean Mode, the Dirty Water Tank will not get as full as when cleaning with Deep or Max Clean Mode.
It is common to refill the Clean Water Tank and empty the Dirty Water Tank multiple times throughout your cleaning process. Room size and the speed at which you clean
Cleaning with Hose & Tool
Keep hair, loose clothing, fingers, and all parts of body away from openings and moving parts. Brush Roll continues to rotate when in the upright position.
Brush Roll continues to turn while product is turned ON and handle is in upright position. To avoid damage to carpet, rugs, furniture, and flooring, avoid tipping cleaner or setting it on furniture, fringed area rugs, or carpeted stairs during tool use.
The Brush Roll remains on while cleaning with the hose and tool. Do not allow cleaner to sit in one location for an extended period of time, as damage to floor can result.
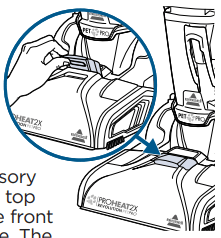
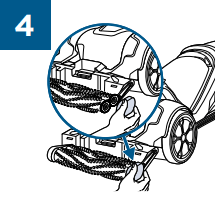
Lift the Accessory Hose Door on top of Foot on the front of the machine. The door flips toward the machine to open.
Insert the hose and 4 snap into place. Be sure the red hose release clip is facing out, away from machine.
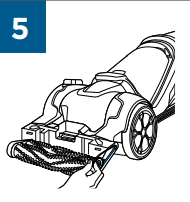
Attach the tool to the end of the hose. (Tools may vary by model.) Press the Power Button to turn machine ON.
Press the Spray Trigger to spray the soiled area, then slowly move tool back and forth over the area. Release the trigger to suck up the dirty solution. Work in small sections until the area is clean. When finished cleaning, turn the machine ON to suction up warm clean water to rinse the inside of the hose and tool. Detach the hose and tool and close the Accessory Hose Door. Let the hose and tool air dry before storing.
NOTE: If using the Deep Reach Tool or Pet Stain Tool be sure the needles of the tool are pressed down into the carpet so the spray gets into the carpet fibers.
Cleaning with CleanShot®
Press the CleanShot Button with your foot. The window of the button will be green and show an “I” symbol when it is on.
Spray will continue until you turn it off. To turn CleanShot off, press the button with your foot. The window of the button will be red and show an “O” symbol when it is off.
Completely cover the stain with CleanShot spray. Allow the stain to soak. To extract, maneuver the Foot of the machine over the stain to scrub and remove. Continue to clean over the area multiple times for extra scrubbing and suction.
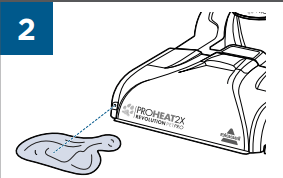
Using the 2-in-1 Pet Upholstery Tool
Make sure your Clean Water Tank has water & formula to use the tool in wet mode.
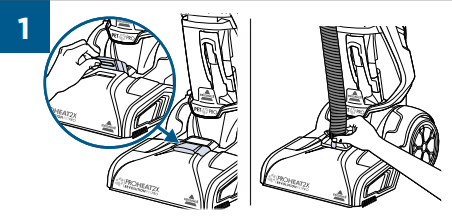
1. Follow hose plug-in instructions
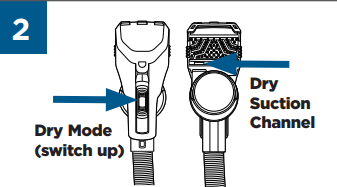
2. Attach the tool and select dry mode to first pick up dry debris and pet hair. The suction will be at the lower part of the tool, near the dry cup.
DRY MODE NOTE: Use a “raking” motion to clean. Start with the tool farthest away and rake in small increments as you bring the tool toward you. The rubber nubs will help attract hair to the suction channel.
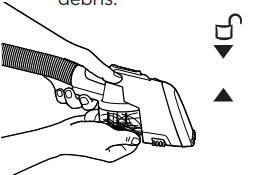
3. Empty the cup when it fills with hair and debris. Turn OFF the machine. Hold the cup and twist counter-clockwise line up the arrow with the unlock symbol and remove.
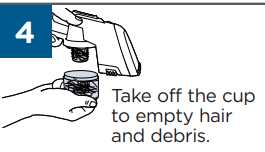
4. Take off the cup to empty hair and debris.
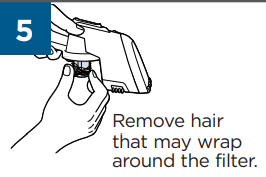
5. Remove hair that may wrap around the filter.
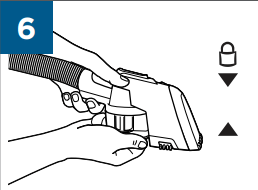
6. To reattach the cup, line up the cup to the tool indents, and rotate clockwise. The arrow will line up with the locked icon when secured.
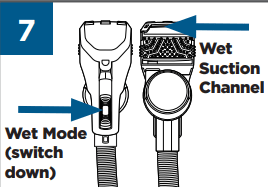
7. To deep clean, move the switch to wet mode. Press the trigger to spray your water and formula; use the top of the Nozzle to extract stains and odors.
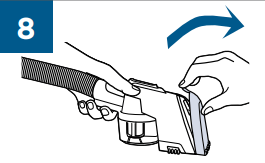
8. To remove any hair or trapped debris from the Nozzle, first turn OFF the machine. Pull the Nozzle tab away from the tool to remove and rinse under running water.
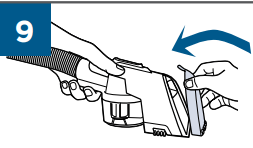
9. Replace on the tool by lining up the Nozzle edge and snap into place. Before storing, make sure all hair is removed from the dry cup and Nozzle has been rinsed under running water.
WET MODE NOTE: Start from the area farthest away. Hold the trigger down, and pull the tool toward you. Keep the tool in contact with the surface as you pull. You will see extraction through the Nozzle.
Cleaning Area Rugs
Regularly clean your high-traffic area rugs in Express Clean Mode:
Check the manufacturer’s tag.
Select Express Clean Mode.
When cleaning area rugs, place the rug on a sealed surface to test for colorfastness in an inconspicuous area. Your cleaner should not be used on unsealed surfaces.
Important: Keep the Foot of the deep cleaner perpendicular to the rug’s edge with each cleaning pass to prevent damage.
Recommended Cleaning Pace: 12 inches per second
IMPORTANT: Please check manufacturer’s tag before cleaning area rugs for any specialized cleaning instructions. We do not recommend deep cleaning delicate, silk, wool, antique, or area rugs without a manufacturer’s tag.
Emptying the Dirty Water Tank
WARNING: To reduce the risk of fire, electric shock or injury, turn power OFF and disconnect plug from electrical outlet before performing maintenance or troubleshooting.
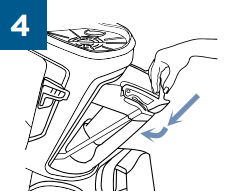
1. To release Dirty Water Tank, press the colored tank handle down and tilt the tank towards you. Pull the tank up and off the machine.
2. For quick empty: Pull the Rubber Tab and tilt to pour. When closing the Rubber Tab, make sure all edges are sealed tight.
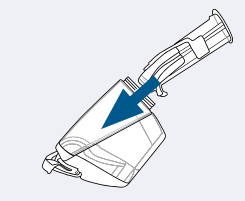
For final clean and rinse: Unscrew the ring at the bottom of the tank. Gently remove and clean the Float Stack. Return the Float Stack by lining up the arrows so it fits into the tank and locks into place. Return the ring so it twists and locks into place, this keeps water from leaking.
3. Clean the red filter below the tank by wiping off any remaining dirt or debris.
4. To return the tank: Angle the tank and insert bottom first. Then tilt the tank toward the machine and push the top in until it clicks into place
Did You Know? The Float Stack is what prevents your dirty tank from overflowing.
Storing Your Machine
When finished using the product, wrap cord around cord wrap for storage. Store your machine in a protected, dry area.
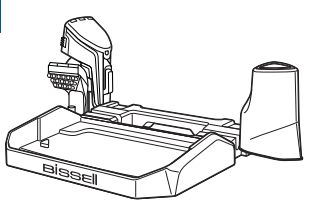
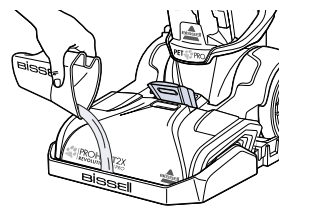
The Rinse & Storage Tray offers on-board tool storage to help organize your deep cleaning supplies.
Your machine sits snug on the Rinse & Storage Tray while not being used. Make sure both tanks are dry and emptied, and everything is stored in a protected, dry place.
Cleaning Machine After Use
WARNING: To reduce the risk of electric shock, turn power OFF and disconnect plug from electrical outlet before performing maintenance or troubleshooting checks.
First, fill the Clean Water Tank with warm tap water and then empty it all to rinse. Then fill again with warm tap water and return the tank to the machine. Twist cap back on tightly.
To flush and rinse the machine: Turn the machine ON and press the trigger for 15 seconds while making back and forth passes on a section of carpet. Finally, release the trigger and extract the water. See page 15 to clean the Dirty Water Tank from the water that was just extracted.
Rinsing the Brush Roll & Nozzles
Set your machine on the Rinse & Storage Tray and OPEN the Accessory Hose Door. Make sure the machine is not reclined. The machine should be in its upright position to prevent water from splashing.
Fill the Water Rinse Cup with fresh tap water to the fill line on the cup.
Fill the tray with water using the Water Cup. ONLY ADD WATER when using the tray. If the tray is over-filled, the water could splash out of the tray when the machine is turned ON.
Turn the machine ON. This will begin to wash and rinse the Brush Rolls. After 6-8 seconds CLOSE the Accessory Hose Door to extract the water from the tray. After using the tray, clean any water that may have escaped the tray while in use.
Cleaning the Brush Roll & Nozzle
WARNING: To reduce the risk of electric shock, turn power OFF and disconnect plug from electrical outlet before performing maintenance or troubleshooting checks.
NOTE: Be sure to clean the Brush Rolls and Nozzle before storing your machine. Follow these steps if your Nozzle becomes clogged with hair or debris.
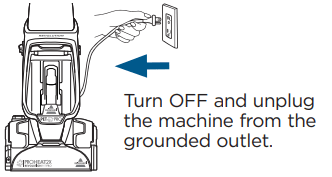
1. Turn OFF and unplug the machine from the grounded outlet.
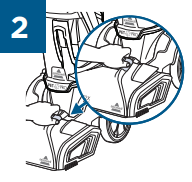
2. Remove the Nozzle from the Foot: scoop and grip the Accessory Hose Door. Pull up to remove the Nozzle
3. Next, remove the next layer, the Brush Roll cover, to reveal the Brush Rolls. Press on the two release buttons and lift straight up.
4. At this point, the Nozzle and Brush Roll cover can be rinsed under running water and the Nozzle Clean Out Tool can be inserted to unclog hair or debris.
5. Use the comb to brush out the debris or hair from the Brush Rolls.
6. When finished, return the Brush Roll cover by pushing it straight down. You will hear a “click” from each push button when the cover is pushed down into place. Line up the Nozzle from the edge near the floor and rotate to snap back into place.
NOTICE: To reduce the risk of a leaking condition, do not store machine where freezing may occur. Damage to internal components may result.
Replacing the Belts & Brush Rolls
WARNING: To reduce the risk of electric shock, turn power OFF and disconnect plug from electrical outlet before performing maintenance or troubleshooting checks.
What you will need: 1 Phillips-head screwdriver & 1 flathead screwdriver
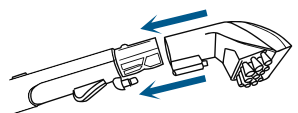
1. While the machine is upright, unplug and remove both tanks. Remove the Nozzle and Brush Roll cover (see steps in Brush Roll & Nozzle Care). Press the Recline Pedal and lay the machine on its back.
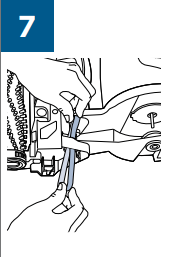
2. Use a flathead screwdriver and press it into the slot at the back and then front of the Belt Access Door. Lift to remove the door.
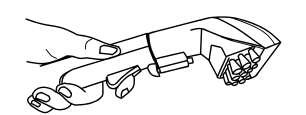
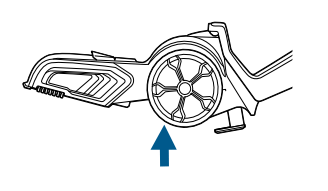
3. Turn the machine on its side and use a Phillips-head screwdriver to remove the screw just underneath the wheel. Slide the wheel down to remove.
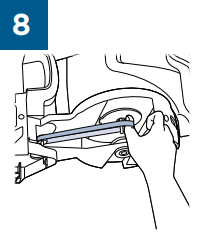
4. Lay the machine back down on its back. Use a Phillips-head screwdriver to remove the screw on the Brush Roll endcap.
5. If the gear belt is broken, gently remove it. If you are replacing your Brush Rolls, gently remove the belt.
6. There are washers at the ends of the Brush Rolls, be careful that these do not fall off or get lost.
7. Align Brush Rolls with belt at other end. To ensure alignment, hold the end of one Brush Roll and twist. The other Brush Roll rotates with it. Check that washers are in place. Reassemble the belt and end cap, securing with screws you removed.
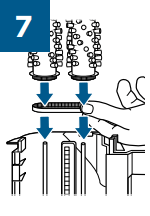
NOTE: To replace Brush Rolls, remove them from the metal posts and replace. Make sure the metal post goes completely through the end of the Brush Roll. The bristles should be aligned in a ‘V’ pattern as pictured.
If the flat belt is broken, gently remove it. If it needs replacing for any reason, the gear belt should already be removed before removing the flat belt. Rotate the machine back to its side. Feed the new flat belt through the opening so that it wraps around the red pulley.
8. Keep it wrapped on the red pulley and adjust the machine so it is laying on its back again. Use your thumb to stretch the flat belt back to wrap around the metal axle.
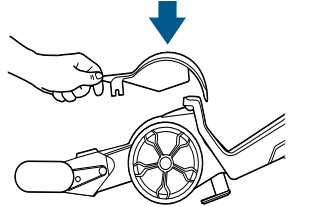
9. Resecure the Wheel and Belt Access Door: Slide the wheel up back into the slot and secure with the screw that was removed.
10. Snap the Belt Access Door back down into place.
NOTE: See Step 6 on page 15 for how to put the Brush Roll Cover and Nozzle back in place.
NOTE: Other maintenance or service not included in this user guide should be performed by an authorized service representative.
Troubleshooting
WARNING: To reduce the risk of electric shock, turn power OFF and disconnect plug from electrical outlet before performing maintenance or troubleshooting checks.
1. Reduced or No Spray Through Foot of Machine
Clean Water Tank may be empty. Refill tank.
Clean Water Tank may not be seated completely. Turn power OFF. Remove and reseat tank.
2. No Spray Through Hose & Tool
The hose to your machine is not primed or may have lost prime.
With the machine OFF and unplugged, remove Nozzle from the Foot. Place a ballpoint pen in the black cylinder next to the screw. When water bubbles up, remove the pen. Reassemble the Nozzle and hose.
Hold end of hose below water level in tank to prime.
With the Clean Water Tank full of water, the machine OFF and reclined, press the CleanShot button ON and wait for the CleanShot to drain for a few seconds; This will re-prime the machine.
Clean Water Tank may be empty. Refill the Clean Water Tank.
Clean Water Tank may not be seated properly. Turn power OFF. Remove and reseat the tank.
3. No Spray Through CleanShot®
Clean Water Tank may be empty. Refill the tank.
Clean Water Tank may not be seated properly. Turn power OFF. Remove and reseat the tank.
The machine is not reclined. Press the Recline Pedal and bring handle down to recline the machine.
Pump may have lost prime. With the machine OFF and unplugged, remove the Nozzle from the Foot. Place a ballpoint pen in the black cylinder next to the screw. When water bubbles up, remove the pen. Reassemble the nozzle before cleaning again.
4. CleanShot Continues Spray When Machine is OFF
CleanShot button is not in the off position. Press the CleanShot button to turn it off. The button window will show the color red and a “O” symbol when it is in the off position.
5. Loss of Suction Power
Dirty Water Tank may not be seated properly. Pick up tank and reseat so it fits in the machine.
Dirty Water Tank has picked up max amount of dirty water and reached full line. Empty tank.
Rubber Tab on Dirty Water Tank is not sealed tight. Check the Rubber Tab on the Dirty Water Tank and press firmly on all edges to secure it tightly (see step 2 on page 12 for detail).
Accessory Hose Door may not be closed tightly in place. Check the Accessory Hose Door and make sure it is closed tightly – it should be locked into place.
Nozzle may be clogged from pet hair or debris. Use the Nozzle Clean Out Tool and follow steps on page 15 for “Cleaning the Brush Rolls and Nozzle”.
Brush Roll cover not fully snapped into place. Remove the Nozzle and Brush Roll cover. Follow step 6 from page 15 and make sure you hear both buttons click into place.
6. No Power
Cleaning Mode Switch mistaken for Power Button. Press the red Power Button on the left side of the machine to turn the machine ON.
Outlet may not be active. Try plugging in a different device that uses a grounded outlet to test for power from the outlet.
7. Leaking Tank
Tank may have been overfilled
Water may be caught in space between the tank and the tank’s handle.
Make sure your tank has the water and formula that you’ve prepared.
With the cap twisted ON tightly, hold your tank at an angle, over a sink or drain, so any extra water can pour out of the space.
- The Clean Water Tank is at the top of the machine. - Lift the tank straight up to remove from the machine. - Unscrew the cap from the tank. Add hot tap water to the water fill line. Next, reference the chart below for formula amounts to add to the tank. Twist cap back into place. - At the bottom of the Upper Handle, align the tank with the grooves and slide the tank into place.


 Clean + Refresh: Powerful cleaning and odor elimination with Febreze freshness
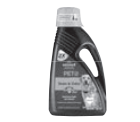 PET Stain & Odor: Removes tough pet stains Includes StainProtect™ to protect against future stains
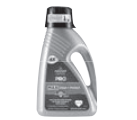 PRO MAX Clean + Protect: Our most powerful formula for tough, ground-in dirt & stains Includes StainProtect to protect against future stains
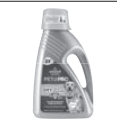 PET PRO OXY: Urine Eliminator Our best formula for pet urine stains & odors Includes StainProtect to protect against future stains
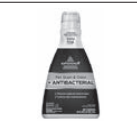 Pet Stain & Odor + Antibacterial: Cleans and controls odor causing bacteria
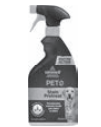 PET Stain Pretreat Removes tough pet stains & odors with Enzyme Action
 PET PRO OXY Stain Destroyer Removes tough pet stains & odors with OXY
 PET Pretreat + Sanitize Penetrates to sanitize and loosen tough stains
 OXY Boost: Removes old, set-in stains
 PRO MAX: Boost Add to formula for 2X deep cleaning power
 PET OXY: Boost Removes pet stains and odors