5-014-744-01(1)
SELC1635G
E-mount
©2020 Sony Corporation
Printed in Thailand
FE C 16-35mm
T3.1 G
交換レンズ
Interchangeable Lens
Objectif interchangeable
取扱説明書
Operating Instructions
Mode d’emploi
Manual de instrucciones
a
2
1
20
21
12
1 3 4
56
2
10 11
9
8
7
13 14 15 16 17
19 18
a
(2)
(1)
(1)
(2)
•レンズを取り付けてカメラを持ち運ぶときは、カメラと
レンズの両方をしっかり持ってください。
•本機は防じん、防滴性に配慮して設計されていますが、防
水性能は備えていません。雨中使用時などは、水滴がか
からないようにしてください。
•AF補助光がレンズで遮られることがあります。AF補助
光をOFFにすることをおすすめします。
•動画撮影時、カメラあるいは撮影条件によっては、ズーム
動作音が記録されることがあります。外部マイクをお使
いいただくことで、記録されるズーム動作音を軽減する
ことができます。
•レンズサポート受けをお使いになる場合は、カメラも三
脚などに固定してください。
周辺光量について
•レンズは原理的に画面周辺部の光量が中心部に比べ低下
します。周辺光量の低下が気になる場合は、開放絞りか
ら1~2段絞り込んでご使用ください。
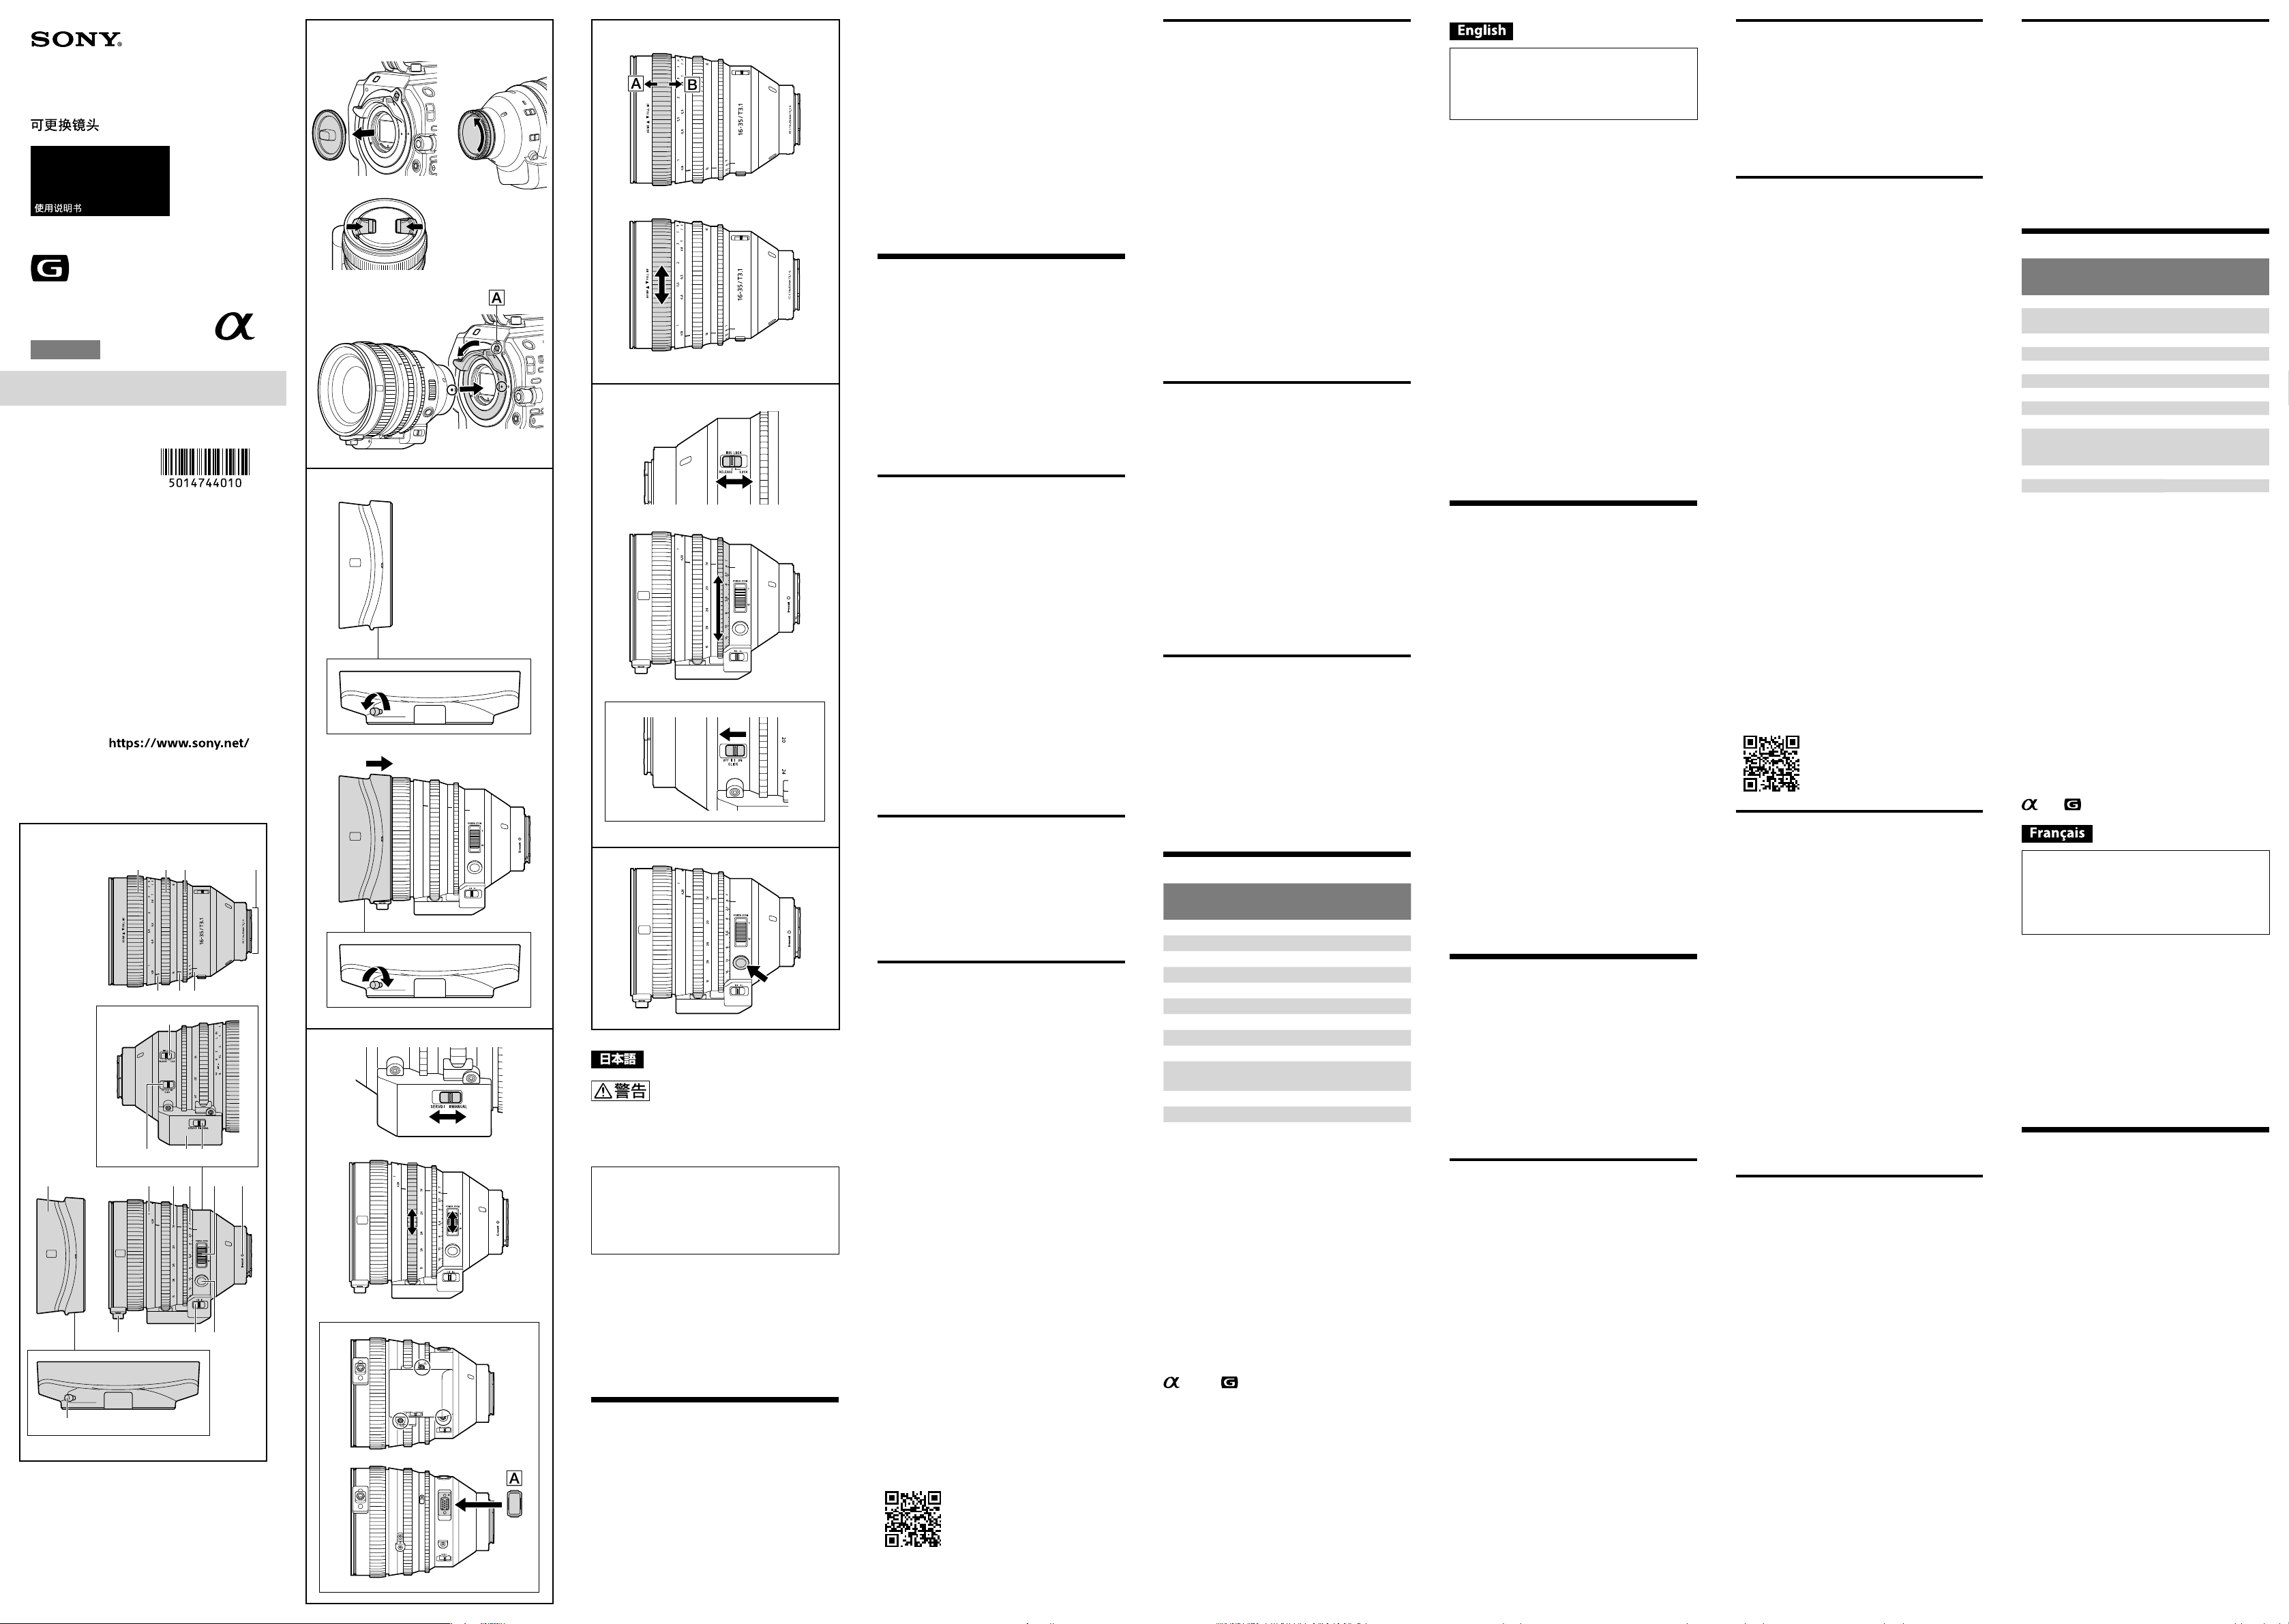
各部のなまえ
1フォーカスリング 2ズームリング
3アイリスリング 4レンズ信号接点*¹
5絞り指標 6焦点距離指標
7距離指標 8IRISLOCKスイッチ
9アイリスリングクリック切り替えスイッチ
10サーボズームユニット 11ZOOMスイッチ
12レンズフード 13距離目盛 14焦点距離目盛
15絞り目盛 16POWERZOOMレバー
17マウント標点 18フォーカスホールドボタン
19ズームスピードスイッチ
20レンズサポート受け*² 21フード着脱ノブ
*¹直接手で触れないでください。
*²1/4-20UNCねじに対応したレンズサポート(別売)を取
り付けることができます。
レンズの取り付けかた/取りはず
しかた
下記手順は一例です。詳しい手順については、お使い
のカメラの取扱説明書やヘルプガイド(Web取扱説明
書)をご覧ください。
取り付けかた
1 前後のレンズキャップとカメラのボディ
キャップをはずす。
2 レンズとカメラの白の点(マウント標点)を
合わせて、レンズを軽くカメラに押し付けな
がら、レンズロックリングを反時計方向に
ゆっくり回して、レンズをしっかり締め付け
装着する。
•レンズを斜めに差し込まないでください。
取りはずしかた
1 レンズロックリングストッパー(
)を解除
し、レンズをしっかりと支えながらレンズ
ロックリングを時計方向に回す。
2 レンズを前方に引き抜く。
レンズフードを取り付ける
画面外にある光が描写に影響するのを防ぐために、レ
ンズフードの使用をおすすめします。
レンズフードにあるフード着脱ノブをゆるめ(1)、
レンズフードをまっすぐレンズ先端に取り付け
る(2)。レンズフードが斜めになっていないか、
奥まで差し込まれているかを確認し、フード着
脱ノブをしっかり締める。
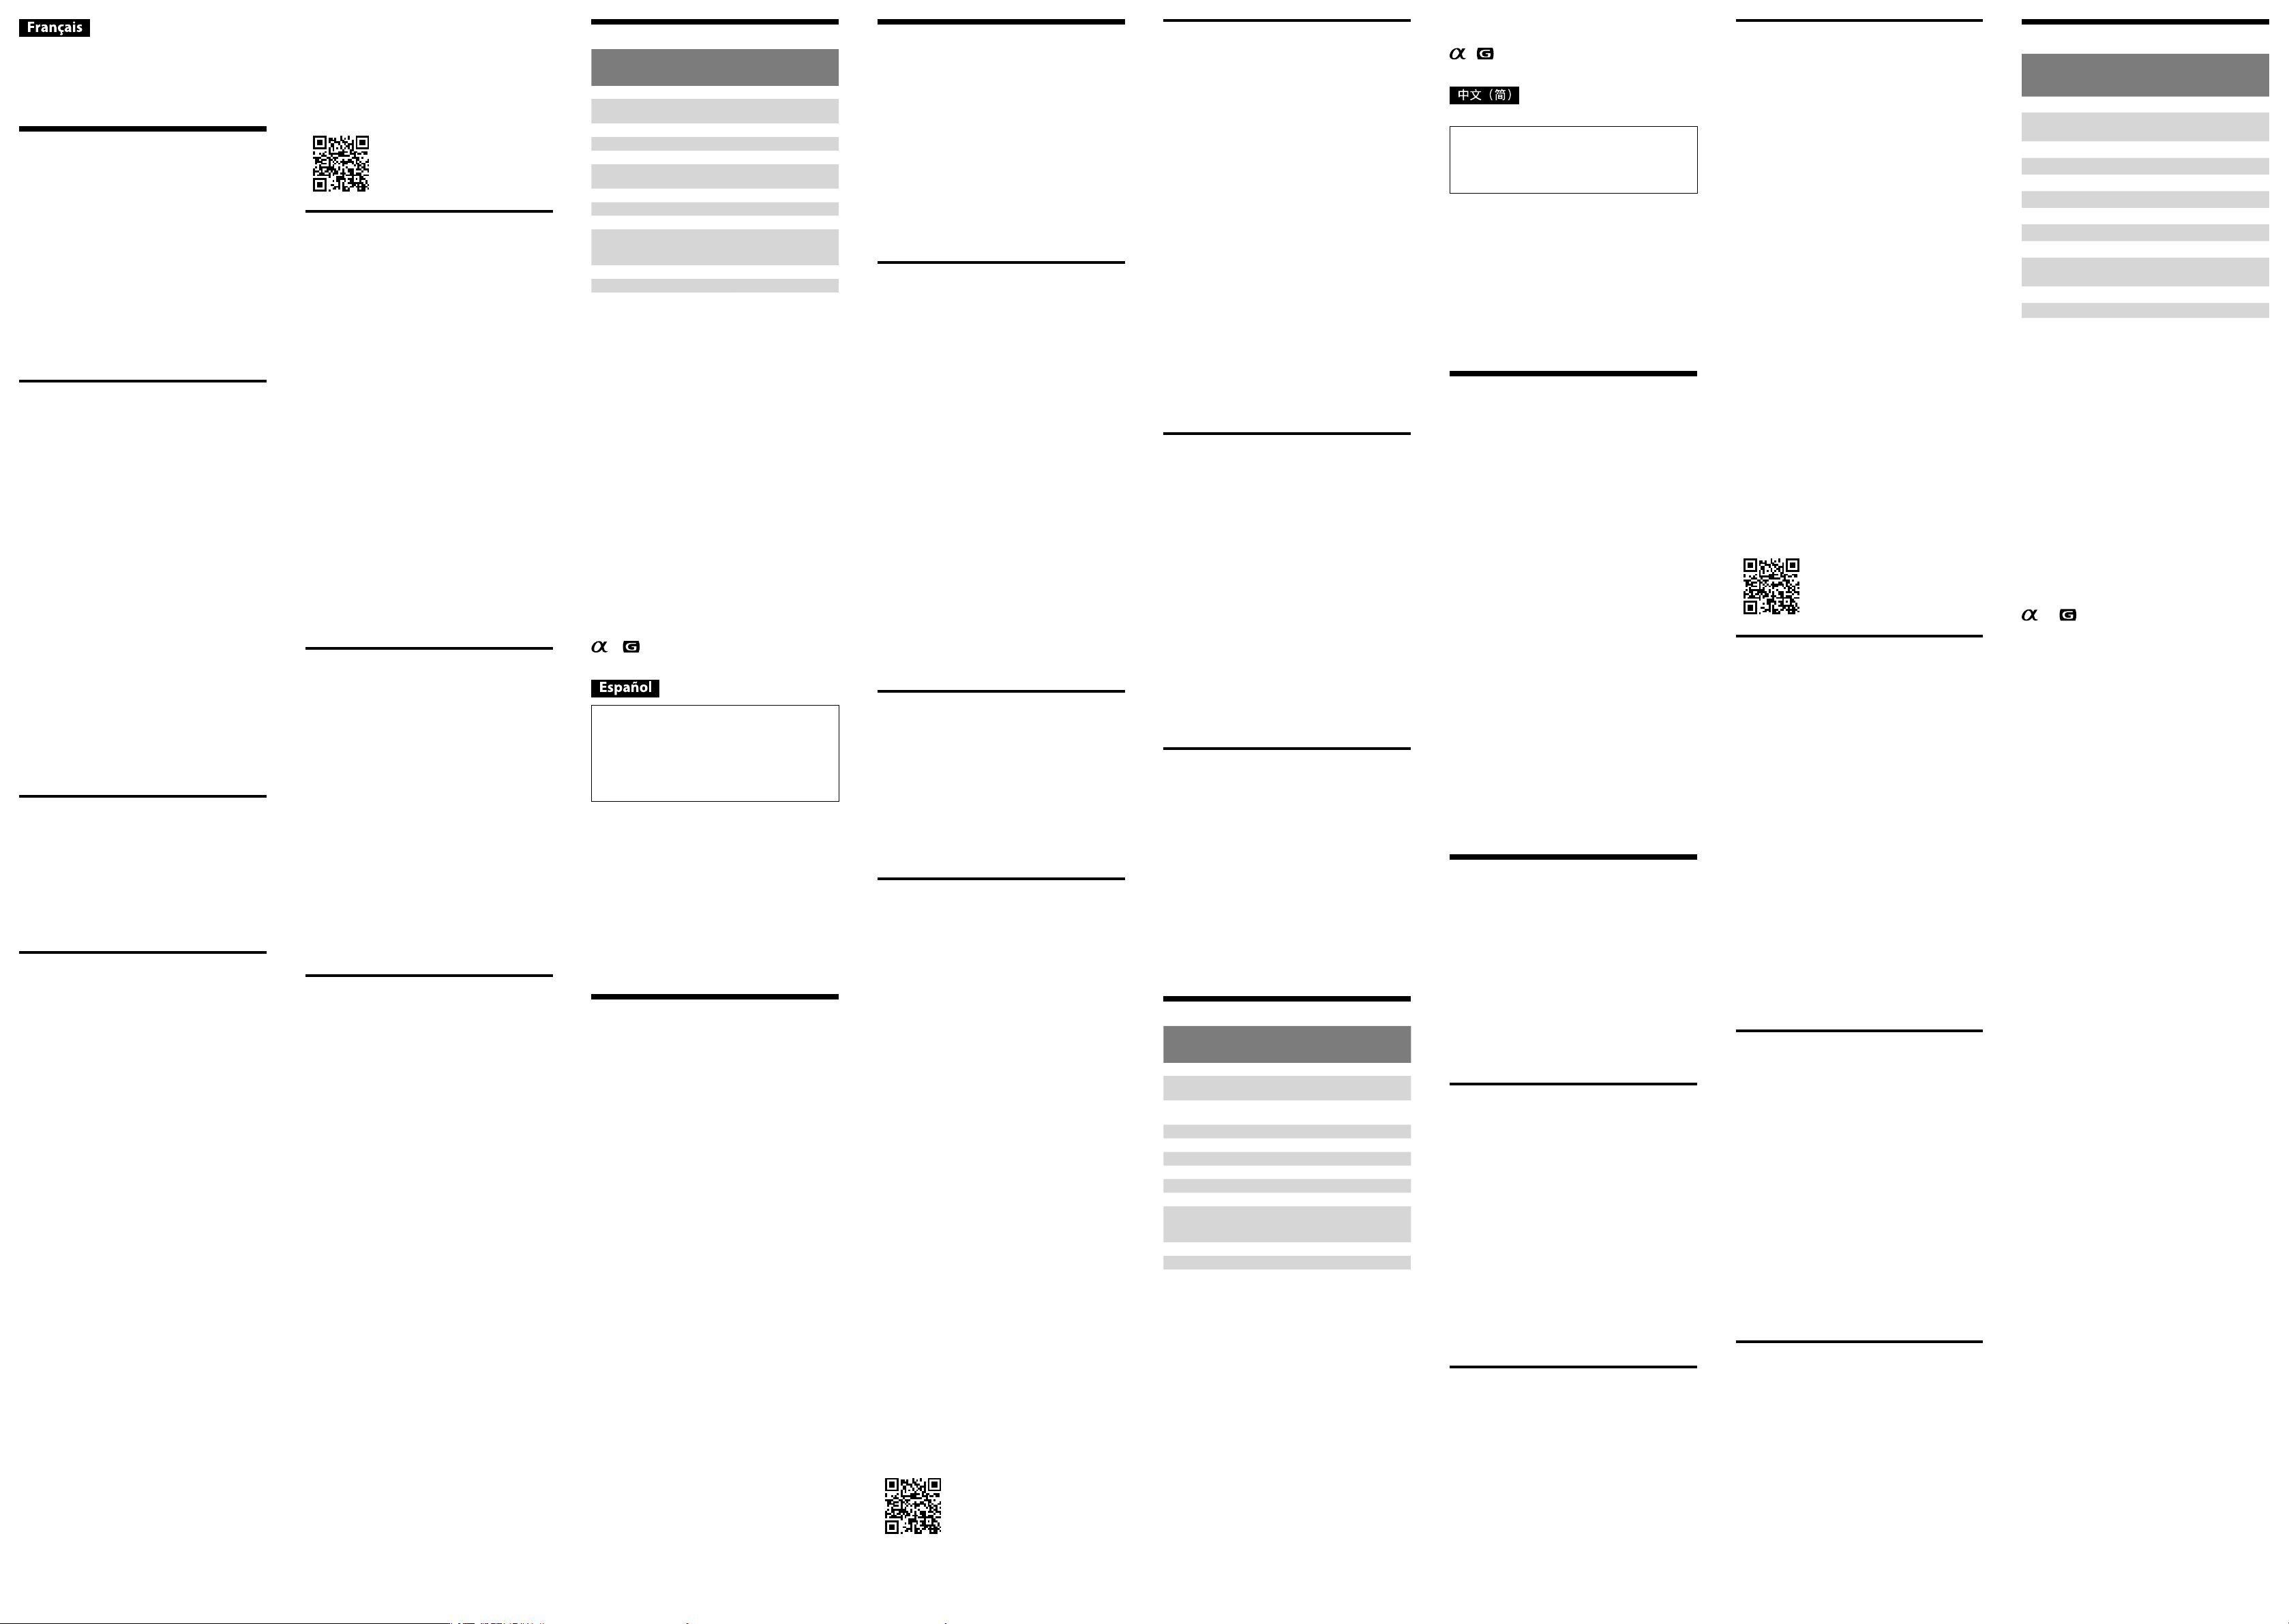
ズームする
POWER ZOOMレバーを使う
1 ZOOMスイッチを「SERVO」にする。
2 POWERZOOMレバーを動かして、希望の焦
点距離(ズームの位置)に合わせる。
•POWERZOOMレバーをT側に動かすと望遠
(Telephoto)に、W側に動かすと広角(Wide)にな
ります。
3 レンズのPOWERZOOMレバー操作による
ズームの最高速度設定を切り替えるには、
ズームスピードスイッチを「H」(高速)または
「L」(低速)に切り替える。
ズームリングを使う
1 ZOOMスイッチを「MANUAL」にする。
2 ズームリングを回して、希望の焦点距離
(ズームの位置)に合わせる。
POWERZOOMレバーを使用しない場合は、サーボ
ズームユニットをレンズから取りはずすこともできま
す。市販の六角レンチ(2.5mm)を使用して、3か所
のねじを取りはずしてください。サーボズームユニッ
トの取りはずし後、端子部分を保護するため、付属の
サーボズームユニット端子カバー()を取り付ける
ことをおすすめします。再度取り付けるときは、サー
ボズームユニットとレンズ両方のラベルにあるシリア
ルナンバーが一致していることを確認し、3か所のね
じ穴の位置を合わせるようにして取り付けてくださ
い。ねじを締める際は、指定の締め付けトルク(0.15 ~
0.25Nm)で締めてください。(イラスト
-
a
参照)
ズームリングの操作方向を変更する
ズームリングの操作方向を変更するサービスをご利用
いただけます。
詳しくは、以下のサイトをご覧ください。
https://www.sony.net/dics/c1635g/
ピントを合わせる
AF/MFモード
レンズをAF/MFモードに設定するには、フォーカスリ
ングをの位置にセットしてください。
レンズをAF/MFモードに設定し、カメラをAFモードに
設定すると、オートフォーカス撮影が行えます。
カメラをMFモードに設定するとマニュアルフォーカス
になります。
•オートフォーカスを使用する場合、被写体の状況によっ
ては、フォーカス時の画角変動(ブリージング)が目立つ
場合があります。その場合は、マニュアルフォーカスを
ご使用ください。
FULL MFモード
レンズをFULLMFモードに設定するには、フォーカス
リングをの位置にセットしてください。
FULLMFモードでは、ピントを手動で調節できます。
カメラのAF/MFモード設定にかかわらず、マニュアル
フォーカスになります。
フォーカスリングの回転範囲が制限され、距離目盛に
合わせてピントが調整されます。
•距離目盛は目安となります。
•フォーカスリングをAF/MFモード位置
からFULLMF
モード位置に動かすと、そのときの距離目盛の撮影距
離にピントが調整されます。
絞りを調節する
IRIS LOCKスイッチ
LOCK: アイリスリングを絞り目盛の「A」で固定、
またはT3.1 ~ T25の間で動かすことができ
ます。
RELEASE:アイリスリングを絞り目盛の「A」~ T25の
間で動かすことができます。
絞り指標に絞り目盛「A」を合わせると、オートアイリ
スモードになり、カメラ本体で明るさを調節できます。
また、アイリスリングを回すことで、光量をT3.1 ~ T25
にマニュアル調節できます。
カメラの絞り値表示はF値となります。
ご注意
動画撮影時にアイリスリングを操作するときは、アイ
リスリングクリック切り替えスイッチを「OFF」にして
ください。(イラスト-
a
参照)アイリスリングクリッ
ク切り替えスイッチを「ON」にしたまま動画撮影中に
絞りを変更すると、操作音が記録されます。
フォーカスホールドボタンを
使用する
AF中にフォーカスホールドボタンを押すと、押してい
る間AFの駆動が止まり、ピントを固定することができ
ます。フォーカスホールドボタンを離すと、AFが再開
します。
•お使いのカメラによっては、アサイナブルボタン/カス
タムボタンとしても使用できます。詳しくは、カメラの
取扱説明書をご覧ください。
•本製品のフォーカスホールドボタンは、一部のカメラ本
体においてお使いになれません。
カメラ本体との互換情報については専用サポートサイト
でご確認ください。
主な仕様
商品名(型名)
FE C 16-35mm
T3.1 G
SELC1635G
焦点距離(mm)
16-35
焦点距離イメージ*¹(mm)
24-52.5
レンズ群一枚
13-16
画角1*²
107°-63°
画角2*²
83°-44°
最短撮影距離*³(m)
0.28
最大撮影倍率(倍)
0.19
最小絞り
T25 (F22)
フィルター径(mm)
-
外形寸法(最大径×長さ)
(約:mm)
118.5 × 147
質量(約:g)
1,390
手ブレ補正機能 なし
*¹撮像素子がAPS-Cサイズ相当のレンズ交換式デジタル
カメラ装着時の35mm判換算値を表します。
*²画角1は35mm判カメラ、画角2はAPS-Cサイズ相当の撮
像素子を搭載したレンズ交換式デジタルカメラでの値
を表します。
*³最短撮影距離とは、撮像素子面から被写体までの距離を
表します。
•レンズの機構によっては、撮影距離の変化に伴って焦点
距離が変化する場合があります。記載の焦点距離は撮影
距離が無限遠での定義です。
同梱物(()内の数字は個数)
レンズ(1)、レンズフロントキャップ(1)、
レンズリヤキャップ(1)、レンズフード(1)、
レンズケース(1)、サーボズームユニット端子カバー(2)、
サーボズームユニット予備ねじ(3)、印刷物一式
仕様および外観は、改良のため予告なく変更すること
がありますが、ご了承ください。
および はソニー株式会社の商標です。
This instruction manual explains how to use
lenses. Precautions common to all lenses such
as notes on use are found in the separate
“Precautions before using”. Be sure to read both
documents before using your lens.
This lens is designed for E-mount cameras. You
cannot use it on A-mount cameras.
The FE C 16-35mm T3.1 G is compatible with the
range of a 35mm format image sensor.
A camera equipped with a 35mm format image
sensor can also be set to shoot at APS-C size.
For details on how to set your camera, refer to its
instruction manual.
For further information on compatibility, visit the
web site of Sony in your area, or consult your dealer
of Sony or local authorized service facility of Sony.
For Customers in the U.S.A.
For question regarding your product or for the
SonyService Center nearest you,
call 1-800-222-SONY (7669).
Supplier’s Declaration of Conformity
Trade Name : SONY
Model : SELC1635G
Responsible Party : Sony Electronics Inc.
Address : 16535 Via Esprillo, San Diego, CA 92127
U.S.A.
Telephone Number : 858-942-2230
This device complies with part 15 of the FCC rules.
Operation is subject to the following two conditions:
(1) This device may not cause harmful interference,
and (2) this device must accept any interference
received, including interference that may cause
undesired operation.
Notes on Use
• Do not leave the lens exposed to the sun or a bright
light source. Internal malfunction of the camera body
and lens, smoke, or a fire may result due to the effect
of light focusing. If circumstances necessitate leaving
the lens in sunlight, be sure to attach the lens caps.
• When shooting against the sun, keep the sun
completely out of the angle of view. Otherwise, solar
rays may be concentrated at a focal point inside
the camera, causing smoke or a fire. Keeping the
sun slightly out of the angle of view may also cause
smoke or a fire.
• This lens contains and comes with some small
components. Be sure to keep them out of reach
of small children to avoid accidental swallowing. If
swallowed, immediately seek medical advice.
• When carrying a camera with the lens attached,
always firmly hold both the camera and the lens.
• This lens is not water-proof, although designed with
dust-proofness and splash-proofness in mind. If using
in the rain etc., keep water drops away from the lens.
• AF illuminator of the camera may be blocked by the
lens. We recommend that you set the AF illuminator
to OFF.
• When recording movies, zoom operation sound may
be recorded depending on the camera or shooting
conditions. Use of an external microphone can help
reducing the zoom operation sound being recorded.
• When using the lens support bracket, secure the
camera with a tripod or an equivalent as well.
Vignetting
• When using the lens, the corners of the screen
become darker than the center. To reduce these
phenomena (called vignetting), close the aperture by
1 to 2 stops.
Identifying the Parts
1 Focusing ring 2 Zoom ring 3 Iris ring
4 Lens contacts*¹ 5 Aperture index
6 Focal-length index 7 Distance index
8 IRIS LOCK switch 9 Iris click switch
10 Servo zoom unit 11 ZOOM switch 12 Lens hood
13 Distance scale 14 Focal-length scale
15 Aperture scale 16 POWER ZOOM lever
17 Mounting index 18 Focus hold button
19 Zoom speed switch 20 Lens support bracket*²
21 Hood-locking knob
*¹ Do not touch the lens contacts.
*² The lens support (not supplied) compatible with the
1/4-20 UNC screw can be attached.
Attaching/Detaching the Lens
The following procedure is provided as an example.
For detailed instructions, refer to the instruction
manual provided with your camera or its Help Guide
(online instruction manual).
To attach the lens
1 Remove the rear and front lens caps and
the camera body cap.
2 Align the white dot on the lens barrel
with the white dot on the camera
(mounting index), carefully insert the
lens, and slowly turn the lens lock ring
counterclockwise to secure the lens.
• Do not mount the lens at an angle.
To remove the lens
1 Release the lens lock ring stopper (),
and turn the lens lock ring clockwise
while firmly supporting the lens.
2 Pull the lens out in the forward direction.
Attaching the Lens Hood
It is recommended that you use a lens hood to
reduce flares and ensure the maximum image
quality.
Loosen the hood-locking knob on the lens
hood (1), and then put the lens hood over
the front of the lens (2). Make sure that
the lens hood is not slanted and is fully
engaged, and then tighten the hood-locking
knob.
Zooming
Using the POWER ZOOM lever
1 Set the ZOOM switch to “SERVO.”
2 Move the POWER ZOOM lever to adjust
the focal distance (zoom position).
• Move the POWER ZOOM lever toward
T(Telephoto) to zoom in.
Move the POWER ZOOM lever toward W (Wide)
to zoom out.
3 To change the maximum zoom speed by
operating the POWER ZOOM lever on the
lens, set the zoom speed switch to “H”
(High speed) or “L” (Low speed).
Using the zoom ring
1 Set the ZOOM switch to “MANUAL.”
2 Rotate the zoom ring to adjust the focal
distance (zoom position).
When you do not intend to use the POWER ZOOM
lever, you can choose to remove the servo zoom
unit from the lens.
Use a commercially available hex key (2.5 mm) to
remove the three screws. After you remove the
servo zoom unit, it is recommended that you attach
the supplied servo zoom unit receptacle cover ()
for protection. When attaching the servo zoom unit
back into place, make sure that the serial numbers
on both the servo zoom unit and the lens are
identical, and then fit the servo zoom unit aligning
the three screw holes together. When tightening
the screws, apply the specified tightening torque
(0.15 - 0.25 Nm). (See illustration -a.)
To change the rotation direction of
the zoom ring operation
You can use the service for changing the rotation
direction of the zoom ring operation.
For details, visit the web site at:
https://www.sony.net/dics/c1635g/
Focusing
AF/MF mode
To place the lens into AF/MF mode, set the focusing
ring to the position .
While the lens is in AF/MF mode and the camera is
in AF mode, autofocus shooting is available.
While the camera is in MF mode, you must manually
adjust the focus.
• When autofocusing is used, image angle variation
(breathing) may be apparent during focusing
depending on the state of the subject. In such a case,
adjust the focus manually.
FULL MF mode
To place the lens into FULL MF mode, set the
focusing ring to the position .
While the lens is in FULL MF mode, you can
manually adjust the focus apart from whether the
camera is in AF or MF mode.
The rotation range of the focusing ring is limited
and the focus is adjusted in accordance with the
distance scale movement.
• The distance scale is only a rough guide.
• When you move the focus ring from AF/MF mode
to FULL MF mode , focus is adjusted to the distance
indicated on the distance scale.
Adjusting the Aperture
IRIS LOCK switch
LOCK: You can lock the iris ring at “A” on the
aperture scale, or rotate it between t/3.1
and t/25.
RELEASE: You can rotate the iris ring between “A”
and t/25 on the aperture scale.
When you align “A” on the aperture scale to the
aperture index, the camera is set to auto iris mode
and the exposure is set by the camera. And you can
adjust the amount of light manually between t/3.1
and t/25 by rotating the iris ring.
The aperture values indicated on the camera are F
values.
Notes
Set the iris click switch to “OFF” when shooting
movies. (See illustration -a.)
If you change the aperture value while shooting
a movie with the iris click switch set to “ON,” the
sound of the iris ring will be recorded.
Using the Focus Hold Button
By pressing and holding the focus hold button
during an AF operation, you can suspend the
operation, while you hold the button, to fix the
focus. Release the focus hold button to start AF
again.
• Depending on the camera in use, the focus hold
button can also be used as the assignable button or
the custom button. For details, refer to the instruction
manual provided with your camera.
• The focus hold button of this lens does not function
with some camera models.
For further information on compatibility, visit the web
site of Sony in your area, or consult your dealer of
Sony or local authorized service facility of Sony.
Specifications
Name (Model name)
FE C 16-35mm
T3.1 G
SELC1635G
Focal length (mm) 16-35
35mm equivalent
focal length*¹ (mm)
24-52.5
Lens groups-elements 13-16
Angle of view 1*² 107°-63°
Angle of view 2*² 83°-44°
Minimum focus*³ (m (feet)) 0.28 (0.92)
Maximum magnification (×) 0.19
Minimum aperture t/25 (f/22)
Filter diameter (mm) -
Dimensions
(maximum diameter × height)
(approx., mm (in.))
118.5 × 147
(4 3/4 × 5 7/8)
Mass (approx., g (oz)) 1,390 (49.1)
SteadyShot No
*¹ This is the equivalent focal length in 35mm format
when mounted on an Interchangeable Lens Digital
Camera equipped with an APS-C sized image sensor.
*² Angle of view 1 is the value for 35mm cameras, and
angle of view 2 is the value for Interchangeable Lens
Digital Cameras equipped with an APS-C sized image
sensor.
*³ Minimum focus is the distance from the image
sensor to the subject.
• Depending on the lens mechanism, the focal length
may change with any change in shooting distance.
The focal lengths given above assume the lens is
focused at infinity.
Included items
(The number in parentheses indicates the number
of pieces.)
Lens (1), Front lens cap (1), Rear lens cap (1),
Lens hood (1), Lens case (1),
Servo zoom unit receptacle cover (2),
Spare screws for the servo zoom unit (3),
Set of printed documentation
Design and specifications are subject to change
without notice.
and are trademarks of Sony Corporation.
Cette notice explique comment se servir des
objectifs. Les précautions communes à tous
les objectifs, par exemple les remarques sur
l’emploi, se trouvent sur la feuille « Précautions
avant toute utilisation ». Veuillez lire les deux
documents avant d’utiliser votre objectif.
Cet objectif est conçu pour les appareils photo
à monture E. Il ne peut pas être utilisé pour les
appareils photo pourvus d’une monture A.
Le FE C 16-35mm T3.1 G est compatible avec la plage
d’un capteur d’image de format 35 mm.
Un appareil photo équipé d’un capteur d’image de
format 35 mm peut être réglé pour la prise de vue
en APS-C.
Pour les détails sur la manière de régler l’appareil
photo, reportez-vous à son mode d’emploi.
Pour plus d’informations sur la compatibilité,
consultez le site de Sony de votre pays, ou
adressez-vous à un revendeur Sony ou à un service
après-vente agréé Sony.
Remarques sur l’emploi
• Ne laissez pas la lentille orientée vers le soleil ou une
source de lumière intense. Cela risque de provoquer
un problème de fonctionnement interne du boîtier
de l’appareil photo et de l’objectif, de dégager de la
fumée, voire de provoquer un incendie. Si toutefois
vous ne pouvez pas faire autrement, veillez à fixer les
capuchons sur l’objectif.
• Lors d'une prise de vue en direction du soleil, veillez
à ce que le soleil ne soit pas dans l'angle de vue.
Dans le cas contraire, les rayons solaires peuvent être
concentrés vers le point focal dans l'appareil photo,
et provoquer un incendie ou dégager de la fumée.
Vous pouvez provoquer un incendie ou dégager de la
fumée même si le soleil est légèrement en dehors de
l'angle de vue.
• Afin d’éviter d’avaler accidentellement les éléments
fournis, ne les mettez pas dans votre bouche.
• Lorsque vous portez un appareil photo sur lequel est
installé l’objectif, tenez toujours fermement l’appareil
photo et l’objectif.
• Cet objectif n’est pas étanche bien qu’il soit conçu
pour résister à la poussière et aux éclaboussures. Si
vous l’utilisez sous la pluie, etc., veillez à ce que de
l’eau ne tombe pas dessus.
• L’illuminateur AF de l’appareil photo peut être bloqué
par l’objectif. Nous conseillons de régler la position de
l’illuminateur AF sur OFF.
• Lors de l'enregistrement de films, le son du
mouvement du zoom risque d'être enregistré selon
l'appareil photo ou les conditions de prise de vue.
L'utilisation d'un microphone externe peut aider à
éviter d'enregistrer le son du mouvement du zoom.
• Lors de l’utilisation du support d’objectif, fixez
l’appareil photo sur un trépied ou un objet de même
nature.
電気製品は、安全のための注意事項を守らな
いと、人身への危害や火災などの財産への損
害を与えることがあります。
この取扱説明書には、事故を防ぐための重要な注意事項と製品
の取り扱いかたを示しています。この取扱説明書をよくお読
みの上、製品を安全にお使いください。お読みになったあとは、
いつでも見られる所に必ず保管してください。
この「取扱説明書」ではレンズの使いかたを説明し
ています。使用上のご注意など、レンズに共通した
ご注意や説明については別冊の「使用前のご注意」
でご覧頂けます。
必ずご使用の前に、本書と合わせてよくお読みのう
えでご使用ください。
本機はEマウントカメラ専用のレンズです。Aマウン
トカメラにはお使いになれません。
本機は35mm判相当の撮像素子範囲に対応しています。
35mm判相当の撮像素子搭載機種ではカメラ設定に
よってAPS-Cサイズでも撮影が可能です。
カメラの設定方法については、カメラの取扱説明書を
ご覧ください。
カメラ本体との互換情報については専用サポートサイ
トでご確認ください。
https://www.sony.jp/support/ichigan/
使用上のご注意
•レンズを絶対に太陽や強い光源に向けたままにしないで
ください。レンズの集光作用により、発煙や火災、ボディ・
レンズ内部の故障の原因になります。やむを得ず太陽光
下等におく場合は、前後レンズキャップを取り付けてく
ださい。
•逆光撮影時は、太陽を画角から充分にずらしてください。
太陽光がカメラ内部で焦点を結び、発煙や火災の原因と
なることがあります。また、太陽を画角からわずかには
ずしても発煙や火災の原因となることがあります。
•本機と同梱物には小さい部品がありますので乳幼児の手
の届くところに置かないようにしてください。誤って飲
み込むおそれがあります。万一飲み込んだ場合は、直ち
に医師に相談してください。
(Suite à la page arrière)
Vignetage
• Lorsque l’objectif est utilisé, les coins de l’écran
deviennent plus sombres que le centre. Pour réduire
ce phénomène (appelé vignetage), fermez l’ouverture
d’un ou de deux crans.
Identification des éléments
1 Bague de mise au point 2 Bague de zoom
3 Bague d’iris 4 Contacts d’objectif*¹
5 Repère d’ouverture 6 Repère de focale
7 Indice de distance 8 Commutateur IRIS LOCK
9 Commutateur d’encliquetage de l’iris
10 Unité de zoom automatique
11 Commutateur ZOOM 12 Pare-soleil
13 Échelle des distances 14 Échelle de focale
15 Échelle d’ouverture 16 Levier POWER ZOOM
17 Repère de montage
18 Bouton de maintien de la mise au point
19 Commutateur de vitesse de zoom
20 Support d’objectif*²
21 Molette de blocage du pare-soleil
*¹ Ne touchez pas les contacts d’objectif.
*² Le support d'objectif (non fourni) compatible avec
une vis 1/4-20 UNC peut être fixé.
Pose et dépose de l’objectif
La procédure ci-dessous est fournie à titre
d’exemple.
Pour de plus amples instructions, reportez-vous au
mode d’emploi fourni avec votre appareil photo ou
à son Guide d’aide (mode d’emploi en ligne).
Pour poser l’objectif
1 Déposez les capuchons d’objectif avant
et arrière et le capuchon de l’appareil
photo.
2 Alignez le repère blanc du barillet
d’objectif sur le repère blanc de l’appareil
photo (repère de montage), puis posez
avec précaution l’objectif sur la monture
de l’appareil photo et tournez lentement
la bague de verrouillage de l’objectif
dans le sens contraire des aiguilles d’une
montre pour fixer correctement l’objectif.
• Ne posez pas l’objectif de biais.
Pour déposer l’objectif
1 Déverrouillez la butée de la bague de
verrouillage de l’objectif () et tournez
la bague de verrouillage de l’objectif
dans le sens des aiguilles d’une montre
en tenant fermement l’objectif.
2 Tirez l’objectif vers l’avant pour l’extraire.
Fixation du pare-soleil
Il est conseillé d’utiliser un pare-soleil pour réduire
la lumière parasite et obtenir la meilleure image
possible.
Desserrez la molette de blocage du pare-
soleil de l’objectif (1), puis placez le pare-
soleil sur l’avant de l’objectif (2). Assurez-
vous que le pare-soleil n’est pas penché
et qu’il est enclenché à fond, puis serrez la
molette de blocage du pare-soleil.
Zoom
Utilisation du levier POWER ZOOM
1 Positionnez le commutateur ZOOM sur la
position «SERVO».
2 Déplacez le levier POWER ZOOM pour
régler la distance focale (position de
zoom).
• Déplacez le levier POWER ZOOM vers T
(téléobjectif) pour vous rapprocher du sujet.
Déplacez le levier POWER ZOOM vers W (grand
angle) pour vous éloigner du sujet.
3 Pour modifier la vitesse de zoom
maximale avec le levier POWER ZOOM
sur l'objectif, réglez le commutateur de
vitesse de zoom sur « H » (vitesse rapide)
ou sur « L » (vitesse lente).
Utilisation de la bague de zoom
1 Positionnez le commutateur ZOOM sur la
position «MANUAL».
2 Déplacez la bague de zoom pour régler
la distance focale (position de zoom).
Lorsque vous ne prévoyez pas d’utiliser le levier
POWER ZOOM, vous pouvez choisir de déposer
l’unité de zoom automatique de l’objectif.
Utilisez une clé hexagonale (2,5 mm) disponible
dans le commerce pour retirer les trois vis. Une
fois l’unité de zoom automatique déposée, il
est conseillé de fixer le couvercle du logement
de l’unité de zoom automatique fourni () en
guise de protection. Pour reposer l'unité de zoom
automatique, assurez-vous que les numéros
de série de l'unité de zoom automatique et de
l'objectif sont identiques, puis alignez l'unité de
zoom automatique sur les trois trous de vis. Lors
du serrage des vis, appliquez le couple de serrage
indiqué (0,15 - 0,25 N m). (Voir l’illustration -a.)
Pour changer le sens de rotation
du fonctionnement de la bague de
zoom
Vous pouvez utiliser le service pour modifier le
sens de rotation du fonctionnement de la bague de
zoom.
Pour plus d'informations, consultez le site :
https://www.sony.net/dics/c1635g/
Mise au point
Mode AF/MF
Pour placer l’objectif en mode AF/MF, réglez la
bague de mise au point sur la position .
Lorsque l’objectif se trouve en mode AF/MF et
l’appareil photo en mode AF, la prise de vue en
mise au point automatique est disponible.
Lorsque l’appareil photo se trouve en mode
MF, vous devez effectuer la mise au point
manuellement.
• Avec la mise au point automatique, la variation
de l’angle de l’image (respiration) peut devenir
apparente pendant la mise au point en fonction de
l’état du sujet. Si c’est le cas, effectuez la mise au
point manuellement.
Mode FULL MF
Pour placer l’objectif en mode FULL MF, réglez la
bague de mise au point sur la position .
Lorsque l’objectif est en mode FULL MF vous
pouvez effectuer manuellement la mise au point,
que l’appareil photo se trouve en mode AF ou en
mode MF.
La plage de rotation de la bague de mise au point
est limitée et la mise au point est corrigée en
fonction du mouvement de l’échelle des distances.
• L’échelle des distances doit uniquement être utilisée
comme guide sommaire.
• Lors du déplacement de la bague de mise au point
du mode AF/MF au mode FULL MF , la mise au
point est réglée sur la distance indiquée par l’échelle
des distances.
Réglage de l’ouverture
Commutateur IRIS LOCK
LOCK : vous pouvez bloquer la bague d’iris sur
«A» sur l’échelle d’ouverture, ou la
tourner de t/3.1 à t/25.
RELEASE : vous pouvez tourner la bague d’iris de
«A» à t/25 sur l’échelle d’ouverture.
Lorsque vous alignez « A » de l’échelle d’ouverture
sur le repère d’ouverture, l’appareil photo est réglé
en mode iris automatique et l’exposition est réglée
par l’appareil photo. Vous pouvez régler la quantité
de lumière manuellement entre t/3.1 et t/25 en
tournant la bague d’iris.
Les valeurs de l'ouverture indiquées sur l'appareil
photo sont des valeurs F.
Remarques
Réglez le commutateur d’encliquetage de l’iris sur
«OFF» lors de l’enregistrement de vidéos. (Voir
l’illustration -a.)
Si vous changez la valeur d’ouverture pendant
l’enregistrement d’une vidéo avec le commutateur
d’encliquetage de l’iris réglé sur «ON», le bruit
émis par la bague d’ouverture sera enregistré.
Utilisation du bouton de
maintien de la mise au point
En appuyant et maintenant enfoncé le bouton de
maintien de la mise au point pendant une opération
AF, vous pouvez interrompre l’opération pendant
que le bouton est enfoncé, pour régler la mise au
point. Relâchez le bouton de maintien de la mise au
point pour relancer l’opération AF.
• Selon l’appareil photo utilisé, le bouton de maintien
de la mise au point peut également être utilisé par
le biais d’un bouton attribuable ou personnalisable.
Pour plus d’informations, reportez-vous au mode
d’emploi fourni avec l’appareil photo.
• Le bouton de maintien de la mise au point de cet
objectif ne fonctionne pas sur certains modèles
d’appareils photo.
Pour plus d’informations sur la compatibilité,
consultez le site de Sony de votre pays, ou adressez-
vous à un revendeur Sony ou à un service après-vente
agréé Sony.
Spécifications
Nom (Nom de modèle)
FE C 16-35mm
T3.1 G
SELC1635G
Longueur focale (mm)
16-35
Longueur focale équivalente à
35 mm*¹ (mm)
24-52,5
Éléments-groupes de lentilles
13-16
Angle de champ 1*²
107°-63°
Angle de champ 2*²
83°-44°
Mise au point minimale*³
(m (pieds))
0,28 (0,92)
Grossissement maximal (×)
0,19
Ouverture minimale
t/25 (f/22)
Diamètre d’objectif (mm)
-
Dimensions
(diamètre maximal × hauteur)
(environ, mm (po.))
118,5 × 147
(4 3/4 × 5 7/8)
Poids (environ, g (oz))
1 390 (49,1)
SteadyShot
Non
*¹ Longueur focale équivalente en format 35 mm
lorsque installé sur un appareil photo à objectif
interchangeable avec capteur d’image de taille
APS-C.
*² L’angle de champ 1 est la valeur correspondant aux
appareils photo 35 mm et l’angle de champ 2 est la
valeur corrspondant aux appareils photo à objectif
interchangeable équipés d’un capteur d’image
APS-C.
*³ La mise au point minimale est la distance du capteur
d’image au sujet.
• Selon le mécanisme de l’objectif, la focale peut
changer lorsque la distance de prise de vue change.
Les focales indiquées ci-dessus présupposent que
l’objectif est réglé sur l’infini.
Articles inclus
(Le chiffre entre parentheses indique le nombre
d’unites.)
Objectif (1), Capuchon d’objectif avant (1),
Capuchon d’objectif arrière (1), Pare-soleil (1),
Étui pour objectif (1), Couvercle du logement de
l’unité de zoom automatique (2),
Vis de rechange de l'unité de zoom automatique (3),
Jeu de documents imprimés
La conception et les spécifications peuvent être
modifiées sans préavis.
et sont des marques commerciales de Sony
Corporation.
En este manual se explica cómo utilizar
objetivos. Las precauciones comunes a todos
los objetivos, como notas sobre la utilización,
se encuentran en las “Precauciones previas a
la utilización del producto” suministradas por
separado. Cerciórese de leer ambos documentos
antes de utilizar su objetivo.
Este objetivo está diseñado para cámaras con
montura E. No podrá utilizarse con cámaras con
montura A.
El FE C 16-35mm T3.1 G es compatible con la gama
de un sensor de imágenes de formato de 35 mm
Una cámara equipada con un sensor de imágenes
de formato de 35 mm puede establecerse para
fotografiar con tamaño APS-C.
Con respecto a los detalles sobre cómo configurar
su cámara, consulte su manual de instrucciones.
Para más información sobre compatibilidad, visite
el sitio Web de Sony de su área, o consulte a su
proveedor Sony o a un centro de servicio local
autorizado por Sony.
Notas sobre la utilización
• No deje el objetivo expuesto al sol o a fuentes de
luz intensas. Es posible que se produzcan fallos de
funcionamiento interno del cuerpo de la cámara y del
objetivo, humo, o un incendio como efecto de la luz
directa. Si las circunstancias exigen dejar el objetivo
expuesto a la luz solar, asegúrese de colocar las tapas
del objetivo.
• Cuando fotografíe contra el sol, mantenga el sol
completamente fuera del ángulo de visión. De lo
contrario, los rayos solares podrían concentrarse en
un punto en el interior de la cámara, causando humo
o un incendio. Mantener el sol ligeramente fuera del
ángulo de visión también puede causar humo o un
incendio.
• Para evitar la ingestión accidental de los elementos
incluidos, no se los ponga en la boca.
• Cuando transporte una cámara con el objetivo fijado,
sujete siempre firmemente tanto la cámara como el
objetivo.
• Este objetivo no es impermeable, aunque se ha
diseñado teniendo en cuenta la resistencia al polvo
y a las salpicaduras. Si se utiliza bajo la lluvia, etc.,
mantenga las gotas de agua alejadas del objetivo.
• El iluminador de AF de la cámara puede bloquearse
mediante el objetivo. Recomendamos que ajuste el
iluminador de AF a OFF.
• Cuando se graben películas, dependiendo de la
cámara o las condiciones de grabación, es posible
que se grabe el ruido de operación del zoom. La
utilización de un micrófono externo puede ayudar
a reducir el sonido de operación del zoom que esté
grabándose.
• Cuando utilice la ménsula de soporte del objetivo,
asegure también la cámara con un trípode o algo
equivalente.
Viñeteado
• Si utiliza el objetivo, las esquinas de la pantalla se
vuelven más oscuras que el centro. Para reducir este
fenómeno (llamado viñeteado), cierre la apertura de
1 a 2 puntos.
Identificación de las partes
1 Anillo de enfoque 2 Anillo de zoom
3 Anillo de iris 4 Contactos del objetivo*¹
5 Índice de apertura 6 Índice de distancia focal
7 Índice de distancia 8 Interruptor IRIS LOCK
9 Interruptor de chasqueo del iris
10 Unidad de servo zoom 11 Selector ZOOM
12 Parasol de objetivo 13 Escala de distancias
14 Escala de distancia focal 15 Escala de apertura
16 Palanca POWER ZOOM 17 Índice de montaje
18 Botón mantener-enfoque
19 Selector de velocidad del zoom
20 Ménsula de soporte del objetivo*²
21 Mando de bloqueo del parasol
*¹ No toque los contactos del objetivo.
*² Se puede fijar un soporte de objetivo (no
suministrado) compatible con el tornillo 1/4-20 UNC.
Colocación/extracción del
objetivo
El procedimiento siguiente se ofrece a modo de
ejemplo.
Para las instrucciones detalladas, consulte el
manual de instrucciones suministrado con la cámara
o su Guía de ayuda (manual de instrucciones en
línea).
Para colocar el objetivo
1 Extraiga las tapas posterior y frontal
del objetivo y la tapa del cuerpo de la
cámara.
2 Alinee el punto blanco del barril del
objetivo con el punto blanco de la
cámara (índice de montaje), inserte
cuidadosamente el objetivo, y gire
lentamente el anillo de bloqueo del
objetivo hacia la izquierda para asegurar
el objetivo.
• No monte el objetivo de forma inclinada.
Para extraer el objetivo
1 Suelte la pieza de cierre del anillo de
bloqueo del objetivo (
), y gire el anillo
de bloqueo del objetivo hacia la derecha
mientras sujeta con firmeza el objetivo.
2 Tire del objetivo hacia afuera en
dirección de avance.
Colocación del parasol de
objetivo
Es recomendable utilizar un parasol de objetivo para
reducir los reflejos y garantizar la máxima calidad
de la imagen.
Afloje el mando de bloqueo del parasol del
parasol de objetivo (1), y después coloque el
parasol de objetivo sobre la parte delantera
del objetivo (2). Asegúrese de que el parasol
de objetivo no esté inclinado y de que esté
totalmente enganchado, y después apriete
el mando de bloqueo del parasol.
Utilización del zoom
Utilizando la palanca POWER ZOOM
1 Ajuste el selector ZOOM a “SERVO”.
2 Mueva la palanca POWER ZOOM para
ajustar la distancia focal (posición de
zoom).
• Mueva la palanca POWER ZOOM hacia T
(Telefoto) para acercar.
Mueva la palanca POWER ZOOM hacia W (Gran
angular) para alejar.
3 Para cambiar la velocidad máxima del
zoom accionando la palanca POWER
ZOOM del objetivo, ajuste el selector de
velocidad del zoom a “H” (alta velocidad)
o “L” (baja velocidad).
Utilizando el anillo de zoom
1 Ajuste el selector ZOOM a “MANUAL”.
2 Gire el anillo de zoom para ajustar la
distancia focal (posición de zoom).
Cuando no tenga intención de utilizar la palanca
POWER ZOOM, puede optar por retirar la unidad de
servo zoom del objetivo.
Utilice una llave hexagonal (2,5 mm) disponible en
el mercado para quitar los tres tornillos. Después
de retirar la unidad de servo zoom, se recomienda
colocar la cubierta del receptáculo de la unidad de
servo zoom suministrada () para su protección.
Para volver a colocar la unidad de servo zoom a su
lugar, asegúrese de que los números de serie tanto
de la unidad de servo zoom como del objetivo sean
idénticos, y después fije la unidad de servo zoom
alineando los tres orificios roscados. Cuando apriete
los tornillos, aplique el par de apriete especificado
(0,15 - 0,25 N m). (Consulte la ilustración
-a.)
Para cambiar la dirección de rotación
de operación del anillo de zoom
Puede utilizar el servicio para cambiar la dirección
de rotación de la operación del anillo de zoom.
Para los detalles, visite el sitio web en:
https://www.sony.net/dics/c1635g/
Enfoque
Modo AF/MF
Para colocar el objetivo en el modo AF/MF, ponga el
anillo de enfoque en la posición
.
Mientras el objetivo esté en modo AF/MF y la
cámara en modo AF, estará disponible la toma con
enfoque automático.
Mientras la cámara esté en modo MF, tendrá que
ajustar manualmente el enfoque.
• Cuando se utiliza el enfoque automático, la variación
del ángulo de la imagen (respiración) puede ser
evidente durante el enfoque, dependiendo del
estado del motivo. En tal caso, ajuste el enfoque
manualmente.
Modo FULL MF
Para colocar el objetivo en el modo FULL MF, ponga
el anillo de enfoque en la posición
.
Mientras el objetivo esté en modo FULL MF,
podrá ajustar manualmente el enfoque,
independientemente de si la cámara está en modo
AF o MF.
El margen de rotación del anillo de enfoque es
limitado y el enfoque se ajusta de acuerdo con el
movimiento de la escala de distancia.
• La escala de distancia solamente deberá utilizarse
como guía aproximada.
• Cuando mueva el anillo de enfoque del modo AF/MF
al modo FULL MF , el enfoque se ajustará a la
distancia indicada en la escala de distancias.
Ajuste de la apertura
Interruptor IRIS LOCK
LOCK: Puede bloquear el anillo de iris en “A” de
la escala de apertura, o girarlo entre t/3.1
y t/25.
RELEASE: Puede girar el anillo de iris entre “A” y
t/25 de la escala de apertura.
Cuando alinee “A” de la escala de apertura con el
índice de apertura, la cámara se establece en el
modo de iris automático y la exposición se ajusta
mediante la cámara. Y puede ajustar manualmente
la cantidad de luz que entra en el objetivo entre
t/3.1 y t/25 girando el anillo de iris.
Los valores de apertura indicados en la cámara son
valores F.
Notas
Cuando filme películas, ajuste el interruptor de
chasqueo del iris a “OFF”. (Consulte la ilustración
-a.)
Si cambia el valor de apertura mientras filme una
película con el interruptor de chasqueo del iris en
“ON”, se grabará el sonido del anillo de apertura.
Utilización del botón mantener-
enfoque
Si mantiene pulsado el botón mantener-enfoque
durante una operación de AF, podrá suspender la
operación, mientras mantenga pulsado el botón,
para fijar el enfoque. Para reanudar AF, suelte el
botón mantener-enfoque.
• Dependiendo de la cámara que use, el botón
mantener-enfoque también podrá utilizarse como
botón asignable o como botón personalizado.
Con respecto a los detalles, consulte el manual de
instrucciones suministrado con su cámara.
• El botón mantener-enfoque de este objetivo no
funcionará con ciertos modelos de cámaras.
Para más información sobre compatibilidad, visite
el sitio Web de Sony de su área, o consulte a su
proveedor Sony o a un centro de servicio local
autorizado por Sony.
Especificaciones
Nombre (Nombre del modelo)
FE C 16-35mm
T3.1 G
SELC1635G
Distancia focal (mm)
16-35
Distancia focal equivalente a
35mm*¹ (mm)
24-52,5
Grupos y elementos del
objetivo
13-16
Ángulo de visión 1*²
107°-63°
Ángulo de visión 2*²
83°-44°
Enfoque mínimo*³ (m)
0,28
Ampliación máxima (×)
0,19
Apertura mínima
t/25 (f/22)
Diámetro del filtro (mm)
-
Dimensiones
(diámetro máximo × altura)
(aprox., mm)
118,5 × 147
Peso (Aprox., g)
1 390
SteadyShot
No
*¹ Esta es la distancia focal equivalente al formato de
35 mm cuando se monta en una cámara digital de
lentes intercambiables equipada con un sensor de
imágenes de tamaño APS-C.
*² El ángulo de visión 1 es el valor para cámaras de
formato de 35 mm y el ángulo de visión 2 es el valor
para cámaras digitales de lentes intercambiables
equipadas con un sensor de imágenes de tamaño
APS-C.
*³ El enfoque mínimo es la distancia desde el sensor de
imágenes al motivo.
• En función del mecanismo del objetivo, es posible
que la distancia focal varíe si la distancia de toma
de imagen también lo hace. Las distancias focales
indicadas arriba asumen que el objetivo está
enfocado al infinito.
Elementos incluidos
(El número entre paréntesis indica el número de
piezas.)
Objetivo (1), Tapa delantera de objetivo (1),
Tapa trasera de objetivo (1), Parasol de objetivo (1),
Estuche para objetivo (1), Cubierta del receptáculo
de la unidad de servo zoom (2), Tornillos de
repuesto para la unidad de servo zoom (3),
Juego de documentación impresa
El diseño y las especificaciones están sujetos a
cambios sin previo aviso.
y son marcas comerciales de Sony
Corporation.
保留备用
本说明书介绍镜头的用法。有关所有镜头
的一般注意事项(如使用须知)可以在另
外的“使用前注意事项”中找到。务必在使
用镜头前阅读以上两份文件。
本镜头是专为 E 卡口系统相机而设计的。 不能
将其用于 A 卡口系统相机。
FE C 16-35mm T3.1 G 与 35mm 规格的图像传
感器系列兼容。
配备 35mm 规格图像传感器的相机可设定为
以 APS-C 尺寸进行拍摄。
有关如何设定相机的详情,请参阅相机的使用
说明书。
有关兼容性的详细信息,请访问所在地区的
Sony 网站,或者咨询您的 Sony 经销商或当地
的 Sony 授权服务机构。
使用须知
• 请勿将镜头置于阳光或强光下,由于光线
聚集的结果可能会导致相机机身和镜头的内
部故障,或引起冒烟或者火灾。如果在必须
将镜头置于阳光的情况下,请务必盖上镜头
盖。
• 对着阳光方向拍摄时,不要让太阳进入视
角中。否则,阳光可能会在相机的焦点上聚
集,从而引起冒烟或者火灾。即便是在让太
阳略微偏出视角的情况下,仍可能会引起冒
烟或者火灾。
• 为防止意外吞下所含物品,请勿将它们放入
口中。
• 当在装有镜头的情况下携带相机时,请务必
同时握紧相机和镜头。
• 尽管本镜头采用了防尘和防溅水设计,但不
具备防水性能。在雨中等环境下使用时,应
确保镜头远离水滴。
• 相机的 AF 照明器可能会被镜头遮挡。 建议
您将 AF 照明器设为 OFF。
• 拍摄电影时,取决于相机或拍摄条件,有时
会记录下变焦操作音。使用外部麦克风将有
助于弱化所记录的变焦操作音。
• 使用镜头支架时,请同时用三脚架或类似设
备将相机固定好。
晕影
• 使用镜头时,屏幕的角落要比其中心暗。为
避免这种现象(周边暗角),请将光圈缩小
1 ~ 2 级。
部件识别
1 对焦环 2 变焦环 3 光圈环 4 镜头接点*¹
5 光圈标记 6 焦距标记 7 距离标记
8 IRIS LOCK 开关 9 光圈点按开关
10 伺服变焦单元 11 ZOOM 开关
12 镜头遮光罩 13 距离刻度 14 焦距刻度
15 光圈刻度 16 POWER ZOOM 杆
17 安装标记 18 对焦锁定按钮
19 变焦速度开关 20 镜头支架*²
21 遮光罩锁定旋钮
*¹
请勿触摸镜头接点。
*² 可安装与 1/4-20 UNC 螺丝兼容的镜头支架
(未随附)。
安装/拆下镜头
以下步骤仅作为示例。
有关详细说明,请参阅相机随附的使用说明书
或其“帮助指南”(在线使用说明书)。
安装镜头
1 拆下前、后镜头盖和相机机身罩。
2 将镜筒上的白点与相机上的白点(安装
标记)对准,小心地插入镜头,然后逆
时针缓慢转动镜头锁定环以固定镜头。
• 请勿倾斜安装镜头。
拆下镜头
1 松开镜头锁定环止动块(
),牢牢
稳固住镜头,顺时针转动镜头锁定环。
2 向前拉出镜头。
安装镜头遮光罩
建议使用镜头遮光罩以减少反光,从而确保最
佳画质。
松开镜头遮光罩上的遮光罩锁定旋钮(1),
然后将镜头遮光罩放在镜头的前端(2)。确
保镜头遮光罩未倾斜并已完全卡接就位,然
后拧紧遮光罩锁定旋钮。
变焦
使用 POWER ZOOM 杆
1 将ZOOM开关设定为“SERVO”。
2 移动POWERZOOM杆,调整焦距
(变焦位置)。
• 向 T(增距)方向移动 POWER ZOOM 杆
将放大。
向 W(广角)方向移动 POWER ZOOM 杆
将缩小。
3 要通过操作镜头上的POWERZOOM杆
来改变最大变焦速度,请将变焦速度开
关设为“H”(高速)或“L”(低速)。
使用变焦环
1 将ZOOM开关设定为“MANUAL”。
2 旋转变焦环,调整焦距(变焦位置)。
不想使用 POWER ZOOM 杆时,可以选择从镜
头上拆下伺服变焦单元。
请使用市售的六角扳手(2.5 mm)拆下三颗
螺丝。拆下伺服变焦单元后,建议安装随附的
伺服变焦单元插口盖()以进行保护。将
伺服变焦单元装回原位时,请确保伺服变焦单
元与镜头上的序列号相同,然后安放伺服变焦
单元,让三个螺丝孔对齐。拧紧螺丝时,请施
以规定的拧紧扭矩 (0.15 - 0.25 N m)。(参见
图 -a。)
改变变焦环操作的旋转方向
您可以通过相关的服务机构来改变变焦环操作
的旋转方向。
有关详情,请访问以下网站:
https://www.sony.net/dics/c1635g/
对焦
AF/MF 模式
要将镜头置于 AF/MF 模式,请将对焦环设置
在位置 。
当镜头处于 AF/MF 模式且相机处于 AF 模式
时,可以进行自动对焦拍摄。
当相机处于 MF 模式时,必须手动调整对焦。
• 使用自动对焦功能时,视拍摄对象的状态而
定,在对焦期间可能会出现明显的像角变化
(呼吸效应)。在这种情况下,请手动调整
对焦。
FULL MF 模式
要将镜头置于 FULL MF 模式,请将对焦环设置
在位置 。
当镜头处于 FULL MF 模式时,不管相机是处于
AF 还是 MF 模式,都可以手动调整对焦。
此时,对焦环的旋转范围会受到限制,而且将
根据距离刻度的移动来调整对焦。
• 距离刻度只能用作粗略指示。
• 当将对焦环从 AF/MF 模式 移至 FULL MF
模式 时,将调整为距离刻度上所示的对
焦距离。
调整光圈
IRIS LOCK 开关
LOCK: 可将光圈环锁定在光圈刻度
“A”,也可在 t/3.1 和 t/25 之间旋转
光圈环。
RELEASE: 可在光圈刻度“A”和 t/25 之间旋转光
圈环。
当将光圈刻度上的“A”与光圈标记对准时,相
机被设为自动光圈模式,此时曝光由相机设
定。通过旋转光圈环,可以在 t/3.1 和 t/25 之
间手动调整进光量。
相机上指示的光圈值为 F 值。
注意
拍摄电影时,请将光圈点按开关设定为“OFF”。
(参见插图 -a。)
在光圈点按开关设定为“ON”的情况下拍摄电
影时,如果改变光圈值,就会录下光圈环的
声音。
使用对焦锁定按钮
通过在 AF 操作期间按住对焦锁定按钮,可以
暂停操作(按住按钮不放)以锁定焦点。松开
对焦锁定按钮将再次启动 AF。
• 视所用的相机而定,对焦锁定按钮也可用作
可分配按钮或自定义按钮。有关详情,请参
阅相机随附的使用说明书。
• 对于某些型号的相机而言,本镜头的对焦锁
定按钮无效。
有关兼容性的详细信息,请访问所在地区的
Sony 网站,或者咨询您的 Sony 经销商或当
地的 Sony 授权服务机构。
规格
名称(型号名称)
FEC16-35mm
T3.1G
SELC1635G
焦距(mm)
16-35
相当于35mm规格
焦距*¹
(mm)
24-52.5
镜头组-片
13-16
视角1*²
107°-63°
视角2*²
83°-44°
最小对焦*³
(m)
0.28
最大放大倍数(×)
0.19
最小光圈
t/25(f/22)
滤光镜直径(mm)
-
尺寸(最大直径×高)
(约mm)
118.5×147
质量(约g)
1390
SteadyShot 无
*¹
此为当镜头安装在配备 APS-C 尺寸图像传
感器的可更换镜头数码相机上时,相当于
35mm 规格的焦距。
*²
视角 1 的值针对 35mm 相机,而视角 2 的值
针对配备 APS-C 尺寸图像传感器的可更换镜
头数码相机。
*³
最小对焦是从图像传感器至物体的距离。
• 视镜头结构而异,焦距可能会随拍摄距离的
改变而变化。 假设镜头对焦在无限远处。
所含物品
(括号中的数字代表件数。)
镜头 (1)、镜头盖 (1)、镜头后盖 (1)、
镜头遮光罩 (1)、镜头袋 (1)、
伺服变焦单元插口盖 (2)、
伺服变焦单元备用螺丝 (3)、
成套印刷文件
设计或规格如有变动,恕不另行通知。
和 是 Sony Corporation 的商标。
(Suite de la page précédente)