Loading ...
Loading ...
Loading ...
17 GB
2.8 CLEANING AND MAINTENANCE
Never use abrasive cleaners, wire wool or sharp objects to clean the
glass oven door.
Clean the stainless steel and enamelled surfaces with warm, soapy
water or with suitable brand products. On no account use abrasive
powders that may damage surfaces and ruin the oven’s appearance.
It is very important to clean the oven each time that it is used. Melted
fat is deposited on the sides of the oven during cooking. The next time
the oven is used this fat could cause unpleasant odours and might
even jeopardise the success of the cooking. Use hot water and
detergent to clean; rinse out thoroughly.
To make this chore unnecessary all models can be lined with catalytic
self-cleaning panels: these are supplied as an optional extra (see the
section SELF-CLEANING OVEN WITH CATALYTIC LINING).
Use detergents and abrasive metal pads like «brillo pads» for the
stainless steel grills.
The glass surfaces as the top, oven door and warming compartment
door must be cleaned when they are cold. Damage that occurs to
them because this rule was not adhered to are not covered by the
guarantee.
To replace the interior light:
switch off the mains power supply and unscrew bulb. Replace with an
identical bulb that can withstand very high temperatures
•
2.9 SERVICE CENTRE
Before calling the Service Centre
If the oven is not working, we recommend that:
you check that the oven is properly plugged into the power supply.
If the cause of the fault cannot be detected:
disconnect the oven from the mains, do not touch the oven and call the
after sales service.
Before calling the Service Centre remember to make a note of the
serial number on the specifications plate (see fig. On last page).
The oven is supplied with a guarantee certificate that ensures that it
will be repaired free of charge by the Service Centre
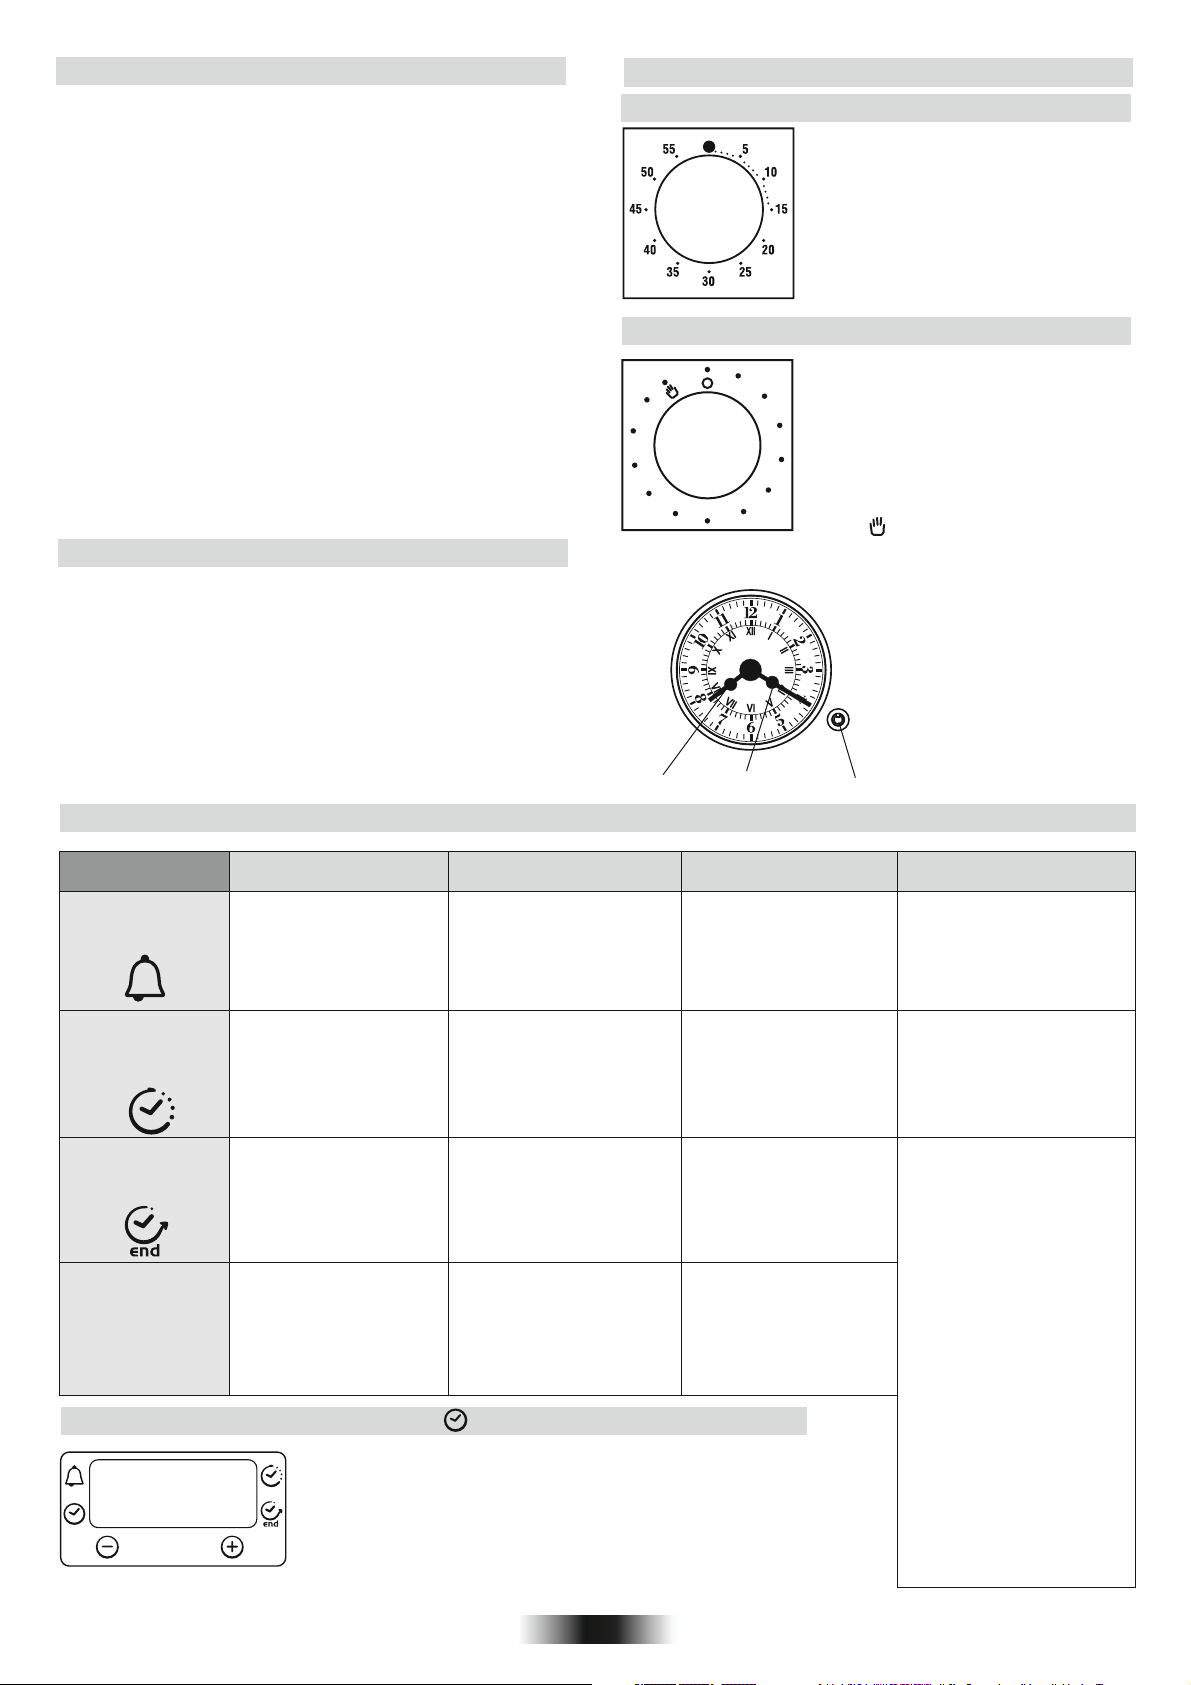
To set the cooking time, turn dial one
complete revolution and then position the
index to the required time. When the time
has lapsed, the signal will ring for a few
seconds.
3.1 USING THE MINUTE TIMER
3.2 USING THE END OF COOKING TIMER
10
20
30
40
50
60
70
80
90
100
110
120
This control enables to set the desired
cooking time (max. 120 min.) the oven will
automatically switch off at the end of the set
time.
The timer will count down from the set time
return to the O position and switch off
automatically.
For normal use of oven set the timer to the
position.
To set the oven ensure the timer is not on the
O position.
Analog Timer Setting
When you push the knob, the
minute arrow goes one minute
forward. If you keep the knob
pressed, the arrows move quickly
forward.
Hours hand Minutes hand Push Knob
3. TIMER
3.3 USE OF TOUCH CONTROL CLOCK PROGRAMMER
FUNCTION
HOW TO ACTIVATE IT
MINUTE
MINDER
COOKING
TIME
END OF
COOKING
HOWTO SWITCH ITOFF WHAT IT DOES WHAT IT IS FOR
•Push the central button
1 times
•Press the buttons " "
to set the required time
•Release all the buttons
"" -+
•When the set time as elapsed
an audible alarm is activated
(this alarm will stop on its own,
however it can be stopped
immediately by pressing the
button) SELECT.
•Sounds an alarm at the
end of the set time.
•During the process, the
display shows the
remaining time.
•Allows to use the oven as
alarm clock (could be
activated either with
operating the oven or with
out operating the oven)
•
•Press the buttons to set
the lenght of cooking required
•Release all buttons
•Set the cooking function with the
oven function selector
Push the central button2 times
"-" or "+"
•When the time is elapsed the
oven will switch off automatically.
Should you wish to stop cooking
earlier either turn the function
selector to 0, or set time to 0:00
(SELECT and buttons)"-" "+"
•It allows to preset the cooking
time required for the recipe chosen
•To check how long is left to run
press the SELECT button 2 Times.
•To alter/change the preset time
press SELECT and buttons"-" "+"
•Push any button to stop
the signal. Push the central
button to return to the clock
function
•
•Press the buttons
to set the time at which you
wish the oven to switch off
•Release the buttons
•Set the cooking function with
the oven function selector
Push the central button 3 times
"-" "+"
•Push the central button 4 times
•Set time with buttons.
•Release all buttons.
"-" "+"
ATTENTION: The oven will only operate providing the clock is set.
•At the time set, the oven
will switch off. To switch
off manually, turn the oven
function selector to
position O.
•Enables you to set the end of
cooking time
•To check the preset time p
•To modify the preset time press
buttons SELECT +
ush
the central button 3 times
"-" "+"
WARNING : the first operation to carry out after the oven has
been installed or following the interruption of power supply
(this is recognizable the display pulsating and showing ) is
setting the correct time. This is achieved as follows.
12:00
3.4 SETTING THE CORRECT TIME
•This function is typically used with
“cooking time” function. For example
if the dish has to be cooked for 45
minutes and needs to be ready by
12:30, simply select the required
function, set the cooking time to 45
minutes and the end of cooking time
to 12:30.
•At the end of the cooking set time,
the oven will switch off automatically
and an audible alarm will ring.
•Cooking will start automatically at
11:45 (12:30 minus 45 mins) and will
continue until the pre-set end-of-
cooking-time, when the oven will
switch itself off automatically.
WARNING.
If the END of cooking is selected
without setting the length of
cooking time, the oven will start
cooking immediately and it will
stop at the END of cooking time
set.
KEY LOCK
•Child Lock function is activated
by touching Set (+) for a minimum
of 5 seconds. From this moment
on all other function are locked
and the display will flash STOP
and preset time intermittently.
•Child Lock function is deactivated
by touching touchpad Set (+) again
for a minimum of 5 seconds. From
this moment on all functions are
selectable again.
00:00
select
Loading ...
Loading ...
Loading ...