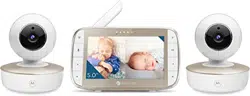
User’s Guide
Digital Video Baby Monitor
Models: MBP50, MBP50-2, MBP50-3, MBP50-4
The features described in this User’s Guide are subject to modifications without prior notice.

Welcome...
to your new Motorola Digital Video Baby Monitor!
Thank you for purchasing your new Motorola Digital Video Baby Monitor.
Now you can see and hear your baby sleeping in another room or you can
monitor your older children in their playroom.
Please retain your original dated sales receipt for your records.
For warranty service of your Motorola product, you will need to provide a
copy of your dated sales receipt to confirm warranty status. Registration is
not required for warranty coverage.
For product related questions, please call:
This User's Guide provides you with all the information you need to get the
most from your product.
Before you can use the Baby Monitor, we recommend you fully charge the
battery in the Parent Unit, so that it continues to work if you disconnect it
from the power supply to carry it to another location. Please read the
Safety Instructions on pages 7-9 before you install the units.
Got everything?
• 1 x Parent Unit
• 1 x Baby Unit (Camera)
• 1 x Power adapter for the Parent Unit
• 1 x Power adapter for the Baby Unit
In multi-camera packs, you will find one or more additional camera and
power adapter units.
+491805 938 802 in Europe
Email: [email protected]
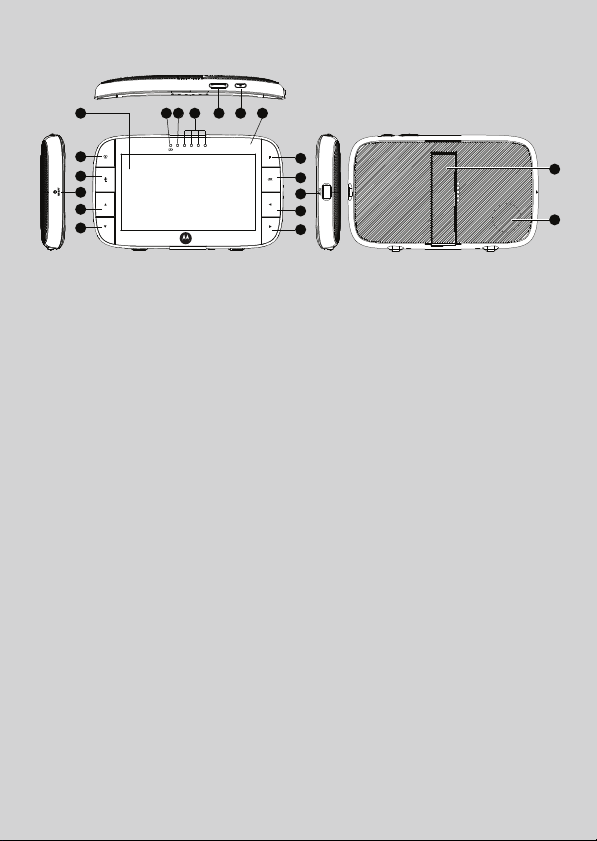
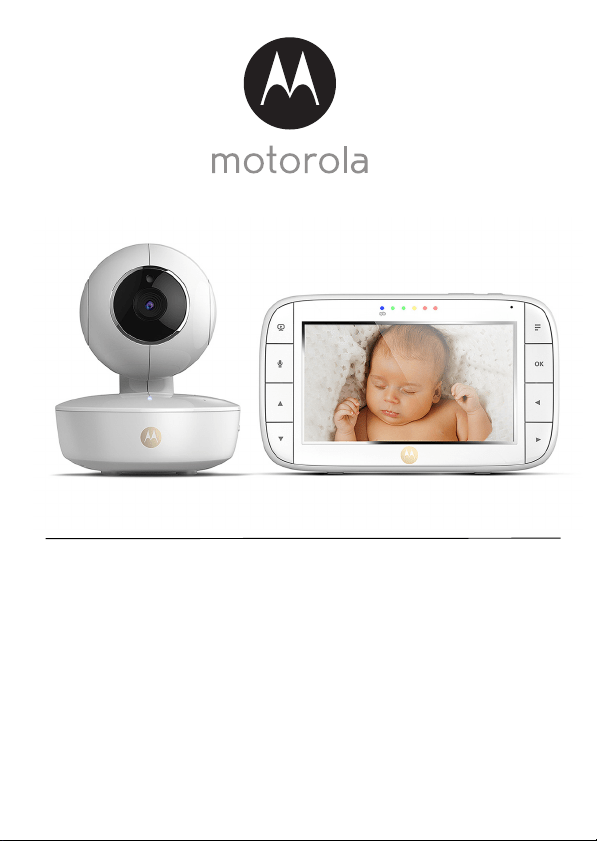
Overview of the Parent Unit
1. Display (LCD screen)
2. VIDEO ON/OFF button V
Press to turn the LCD screen
ON/OFF
3. TALK button T
Press and hold to speak to your baby
4. RESET button (recessed - use
small pin)
5. UP button +
Normal Mode: Tilt camera Up
Menu Mode: Move Up menu
options
6. DOWN button -
Normal Mode: Tilt camera Down
Menu Mode: Move Down menu
options
7. MENU button M
Press to open / close the Menu
options
8. OK button O
9. Micro USB power adapter socket
10. LEFT button <
Normal Mode: Pan camera Left
Menu Mode: Move Left along menu
options
11. RIGHT button >
Normal Mode: Pan camera Right
Menu Mode: Move Right along
menu options
12. Charging LED:
BLUE when mains power
connected.
13. Parent Unit ON/OFF LED (Green)
14. Audio Level LEDs (Green, Amber,
Red, Red)
15. Volume buttons
Press -/+ to decrease/increase
Volume level on Parent Unit
16. Power button 0
Press and Hold to turn the Parent
Unit ON/OFF
17. Microphone
18. Stand
19. Speaker
7
10
8
9
11
12 13 14 15 16 171
2
5
3
6
4
18
19

Safety Instructions 9
ENGLISH
• Only use the chargers and power adapters provided. Do not use other
chargers or power adapters as this may damage the device and battery
pack.
• Do not touch the plug contacts with sharp or metal objects.
CAUTION
The Parent Unit includes a built-in, lithium-ion rechargeable battery pack, which
is not a user-accessible item. If you think the battery needs replacing, please
contact the helpline. Do not try to replace it yourself.
Risk of explosion if battery is replaced by an unapproved battery type.
Dispose of used batteries according to their instructions.
The Unit should be set up and used so that parts of the user's body other than the
hands are maintained at a distance of approximately 8 inches (20 cm) or more.

14 Using the Baby Monitor
3.6 Temperature Display (HH °C / °F or LL °C / °F)
The temperature reading from the temperature sensor at the back of the Baby
Unit will be displayed at the top of the LCD screen in °C or °F (see 4.7
Temperature for how to change). The readings will turn RED if the temperature
goes above 29°C / 84°F or below 14°C / 57°F. The reading will change to HH
°C / °F if the temperature goes above 36°C / 97°F. The reading will change to
LL °C / °F if the temperature goes below 1°C / 34°F.

Parent Unit Menu Options 15
ENGLISH
4. Parent Unit Menu Options
4.1 Volume
1. Press the Volume button - or + to adjust the volume level, the icon will
pop up and you can select the desired volume level from level 0~8. (The
default volume level setting is level 5, and level 0 is OFF .)
4.2 Brightness
1. Press the M button and the menu bar will pop up.
2. Press the
< LEFT button or > RIGHT button until is highlighted.
3. Press the
+ UP button or - DOWN button to select the desired brightness
level from level 1 ~ 8. (The default brightness level setting is level 4.)
4.3 Lullaby Sounds
1. Press the M button and the menu bar will pop up.
2. Press the
< LEFT button or > RIGHT button until is highlighted.
3. Press the
+ UP button or - DOWN button to select from the 5 sounds
available. If a sound is selected, it will repeat continually until it is
unselected or the TALK button is pressed. (The default setting is lullaby
OFF.)
4.4 Zoom
1. Press the M button and the menu bar will pop up with highlighted.
2. Press the
+ UP button or - DOWN button to select the
1X
or
2X
Zoom.
(The default setting is 1X.)
4.5 Alarm
1. Press the M button and the menu bar will pop up.
2. Press the
< LEFT button or > RIGHT button until is highlighted.
3. Press the
+ UP button or - DOWN button to select the alarm time (
6h
,
4h
,
2h
), and the will turn on. (The default setting is Alarm OFF.)
4. If an alarm time is selected, the Parent Unit will beep for about 1 minute
after every 6, 4 or 2 hour period, and the will flash. Press any button to
stop the alarm.

16 Parent Unit Menu Options
4.6 Camera Control
4.6.1 Add (pair) a camera
1. Press the M button and the menu bar will pop up.
2. Press the
< LEFT button or > RIGHT button until is highlighted, and
the
del/ add/ view/ scan
menu will pop up.
3. Press the
+ UP button or - DOWN button to select
add
, and press the
O button to confirm.
4. Camera will pop up, press the
+ UP button or - DOWN
button to select the desired Camera, and press the
O button to start
searching for a camera unit.
Note: If a camera is currently paired with the Parent Unit, its camera
location (with a * against it) cannot be selected for a new registration.
5. Press and hold the PAIR button on the underside of the Baby Unit until the
Parent Unit finds the camera, beeps and PAIR OK appears on the screen.
The video from the camera will then appear.
NOTE
A camera can only be registered to one Parent Unit at any one time.
4.6.2 View a camera
1. Press the M button and the menu bar will pop up.
2. Press the
< LEFT button or > RIGHT button until is highlighted and
the
del/ add/ view/ scan
menu pops up.
3. Press the
+ UP button or - DOWN button to select
view
, and press the
O button to confirm.
4. Camera will pop up, press the
+ UP button or - DOWN
button to select the desired camera, and press the
O button to view the
picture from that camera.
Note: Only camera locations with a * can selected.
TIP
Quick Method to View Cameras instead of entering into the menu bar.
Directly press the
O button repeatedly to select the available Camera
options from , , , , .
/ / /
/ / /

18 Parent Unit Menu Options
4.8 Power Saving mode
1. Press the M button and the menu bar will pop up.
2. Press the
< LEFT button or > RIGHT button until V is highlighted.
3. Press the
+ UP button or - DOWN button to select auto video off after
5 mins, 30 mins or 60 mins if operating on batteries only.
Note:
The audio will stay on and you can press any key to switch the video back on.
4.9 View multiple cameras on screen
This function is only available when you have more than 1 Baby Unit (Camera).
When the Split Screen function is On, you can view multiple cameras on the
screen, although only hear audio from one screen at a time.
1. Press the
M button and the menu bar will pop up.
2. Press the
< LEFT button or > RIGHT button until is highlighted.
3. Press
+ UP button or - DOWN button to select Split Screen On / Off .
4. When the Split Screen function is On, you can press the
< LEFT button/
> RIGHT button/ + UP button/ - DOWN button to switch between
cameras to hear the audio from the selected camera, indicated by the red
frame.
Note:
When in multi-screen mode the TALK button operates with the selected camera.
If you want to play a lullaby sound through a camera, you must set this before
selecting the multi-screen mode.
Zoom does not work in multi-screen mode.
Disposal of The Device (environment) 19
ENGLISH
5. Disposal of The Device (environment)
At the end of the product lifecycle, you should not dispose of
this product with normal household waste. Take this product to
a collection point for the recycling of electrical and electronic
equipment. The symbol on the product, user's guide and/or
box indicates this.
Some of the product materials can be reused if you take them to
a recycling point. By reusing some parts or raw materials from used products
you make an important contribution to the protection of the environment.
Please contact your local authorities in case you need more information on the
collection points in your area.
The internal battery should be disposed of with the Parent unit in an
environmentally-friendly manner according to your local regulations.

20 Cleaning
6. Cleaning
Clean the Baby Monitor with a slightly damp cloth or with an anti-static cloth.
Never use cleaning agents or abrasive solvents.
Cleaning and care
• Do not clean any part of the product with thinners or other solvents and
chemicals – this may cause permanent damage to the product which is not
covered by the warranty.
• Keep the Baby Monitor away from hot, humid areas or strong sunlight, and
don't let it get wet.
• Every effort has been made to ensure high standards of reliability for your
Baby Monitor. However, if something does go wrong, please do not try to
repair it yourself – contact Customer Service for assistance.
General Information 25
ENGLISH
Exclusions
Normal Wear and Tear. Periodic maintenance, repair and replacement of parts
due to normal wear and tear are excluded from coverage.
Batteries. Only batteries whose fully charged capacity falls below 80% of their
rated capacity and batteries that leak are covered by this Warranty.
Abuse & Misuse. Defects or damage that result from: (a) improper operation,
storage, misuse or abuse, accident or neglect, such as physical damage (cracks,
scratches, etc.) to the surface of the product resulting from misuse; (b) contact
with liquid, water, rain, extreme humidity or heavy perspiration, sand, dirt or the
like, extreme heat, or food; (c) use of the Products or Accessories for
commercial purposes or subjecting the Product or Accessory to abnormal
usage or conditions; or (d) other acts which are not the fault of MOTOROLA or
BINATONE, are excluded from coverage.
Use of Non-Motorola branded Products and Accessories. Defects or damage
that result from the use of Non-Motorola branded or certified Products or
Accessories or other peripheral equipment are excluded from coverage.
Products Covered Length of Coverage
Consumer Products Two (2) ye ars from the date of the
products original purchase by the first
consumer purchaser of the product.
Consumer Accessories Ninety (90) days from the date of the
accessories original purchase by the first
consumer purchaser of the product.
Consumer Products and Accessories
that are Repaired or Replaced
The balance of the original warranty or
for Ninety (90) days from the date
returned to the consumer, whichever is
longer.

Manufactured, distributed or sold by Binatone Electronics
International LTD., official licensee for this product. MOTOROLA
and the Stylized M Logo, are trademarks or registered trademarks
of Motorola Trademark Holdings, LLC. and are used under
license. All other trademarks are the property of their respective
owners. © 2016 Motorola Mobility LLC. All rights reserved.
EN_EU Version 2.0
Printed in China