Loading ...
Loading ...
Loading ...
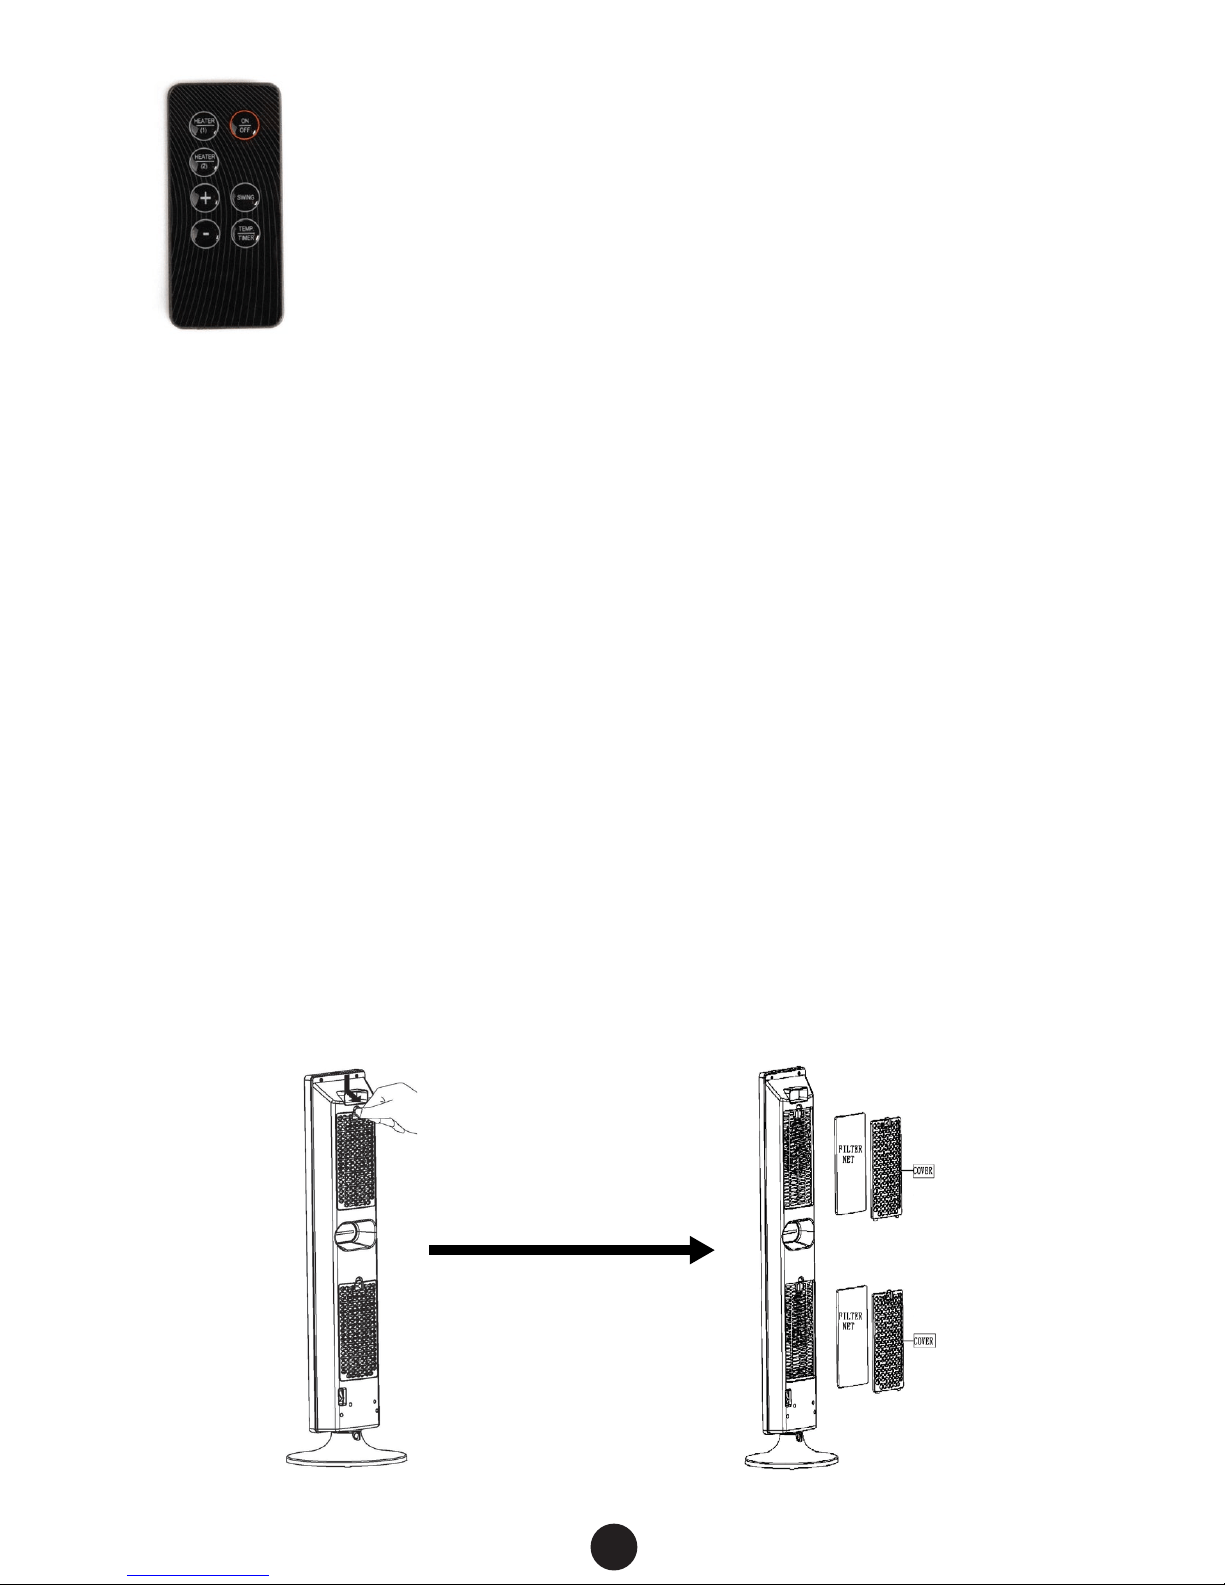
The device can also be controlled via the included remote control. The
remote control has 7 buttons that perform the same function as the
main control panel. When using the remote control, point it towards to
the control panel in the middle of the heater.
MAINTENANCE
This devices features 2 removable air lters. The air lters are designed to capture dust
and airborne dirt, and should be inspected and cleaned once a month, or as needed
on a periodic basis. The accumulation of excess dust and dirt in the air lters can nega-
tively affect the performance of this device. Before attempting to clean, always turn
off the device by switching the master switch off on the back of the device rst. Then
unplug the device’s power cord from the wall outlet.
1. Ensure that the above instructions were followed by turning off the fan and
unplugging it from the outlet rst.
2. Wipe the surface and outside of the device by using a damp soft cloth. Do not
immerse in water and never use thinners or other cleaning solutions as these may
damage the fan’s surface appearance.
3. Remove and clean the lter covers rst with a duster and then wipe away any
excess dust with a damp soft cloth. Ensure that the lter covers are completely dry
when nished.
4. Remove the air lters as shown in the following illustration. Clean the air lters by
immersing them in clean water for several minutes. Ensure that the air lters are
allowed to dry completely when nished.
5. Once thoroughly dried, place the cleaned air lters back into the device and
assemble securely with the lter covers, as shown in the illustration below.
9
Unpack the heater and check that you have main heater, the glass base, and remote
control unit. Place the main heater at on the ground (laying on its side) and remove
the locking nut from the bottom end. Connect the glass base onto the bottom, and
secure together with the locking nut.
Note: Ensure the locking nut is rmly secured before standing the heater up on
its base.
REPLACING BATTERY
Your remote control is powered by an included
CR2032 Lithium battery. To replace the battery,
pull out the battery holder and insert a new
battery. Ensure that the polarity is correct and
then insert the battery holder back into the
remote control (Fig 3).
When the heater’s power is on, the remote
control can be used to operate the heater from up
to 20 feet away. Note: if there are two or more
heaters within this distance, both will be
operated by the same remote control. If the
remote control will not be used for a long
period of time, remove the batteries from the
battery compartment.
OPERATING THE HEATER
This heater and fan can be operated via the built-in touch control panel, and via the
remote control device. Before using this device, read through and follow all safety
warnings printed in this manual.
Control Panel Overview:
To use the built-in control panel, rst press the master power switch located behind
the fan towards the bottom (see point 9 on page 5). A deep sound will conrm that
the master switch has been engaged. Then press the power button located at the top
of the device (see point 3 on page 5). The following touch control buttons will illumi-
nate on the control panel:
The following indicator icons will illuminate immediately above the control panel’s
touch buttons. The indicators icons will activate based on the settings you choose via
the touch buttons.
Continue to press each to cycle through each heater’s off, low and high settings. The
following icons will appear:
Indicates the heater will release air at the low speed setting.
Indicates the heater will release air at the high speed setting.
To activate the heater’s thermostat, press the Temp/Timer icon:
The room temperature display will ash on the screen. Press the press
buttons to set the thermostat to your desired heating temperature. The heater will
remain until it detects the room temperature equals the thermostat temperature.
To activate the fan without the heating element, press the minus to the lowest
possible setting of 59°F, and then press the minus button one more time. The
screen will show the following icon to conrm that it is in fan mode.
For maximum fan performance, ensure the Heater (1) and (2) are set to their high
speed settings.
To activate the fan’s timer, press the press the Temp/Timer icon again:
In timer mode, instead of displaying the temperature, 0 H will ash on the LCD,
indicating zero hours. Press the press buttons to increase or decrease the
timer in units of 1 hour, up to a maximum of 12 hours. The timer will stop ashing to
indicate it is programmed, and keep the heater on until the number of hours chosen
has passed. Note, changing the timer once it has started will reset it.
To engage the heater and fan’s oscillation, press the SWING button on the far
right side of the control panel. The following icon will appear to conrm that
the device is in oscillation mode.
Downloaded from www.ManualsFile.com manuals search engine
Loading ...