Loading ...
Loading ...
Loading ...
23
ñàîêéÇéâ ÑàëèãÖâ
ÑËÒÔÎÂÈ Ó„‡ÌËÁÓ‚‡Ì Ú‡ÍËÏ
Ó·‡ÁÓÏ, ˜ÚÓ·˚ ‚˚ ‚Ò„‰‡ ÏÓ„ÎË
ÚÓ˜ÌÓ Á̇ڸ, ˜ÚÓ ÔÓËÒıÓ‰ËÚ Ò
‚‡¯ÂÈ Ï‡¯ËÌÓÈ:
1) íÖåèÖêÄíìêÄ ÇéÑõ
èÓÒΠ‚˚·Ó‡ ÔÓ„‡ÏÏ˚ ÒÚËÍË
Á‡„Ó‡ÂÚÒfl ÒÓÓÚ‚ÂÚÒÚ‚Û˛˘ËÈ
Ë̉Ë͇ÚÓ, ÍÓÚÓ˚È Û͇Á˚‚‡ÂÚ
ÂÍÓÏẨÛÂÏÛ˛ ÚÂÏÔ‡ÚÛÛ
ÒÚËÍË.
ÖÒÎË ‚‡Ï Ú·ÛÂÚÒfl ‰Û„‡fl
ÚÂÏÔ‡ÚÛ‡ ÒÚËÍË, ‚˚·ÂËڠ Ò
ÔÓÏÓ˘¸˛ ÍÌÓÔÍË Â„ÛÎËÓ‚ÍË
ÚÂÏÔ‡ÚÛ˚. Ç˚·‡Ì̇fl ‚‡ÏË
ÚÂÏÔ‡ÚÛ‡ ·Û‰ÂÚ ÓÚÓ·‡Ê‡Ú¸Òfl
̇ ‰ËÒÔÎÂÂ.
2) àçÑàäÄíéê ÅãéäàêéÇäà
ãûäÄ
èÓÒΠ̇ʇÚËfl ̇ Í·‚˯Û
"èìëä/èÄìáÄ" (‡Ì„Î. Start/Pausa)
Ë̉Ë͇ÚÓ Ò̇˜‡Î‡ ÔÓÏË„‡ÂÚ, ‡
ÔÓÚÓÏ ·Û‰ÂÚ „ÓÂÚ¸ ÌÂÔÂ˚‚ÌÓ ‰Ó
ÍÓ̈‡ ÒÚËÍË. à ¢ 2 ÏËÌÛÚ˚.
óÂÂÁ 2 ÏËÌÛÚ˚ ÔÓÒΠÓÍÓ̘‡ÌËfl
Ë̉Ë͇ÚÓ ÔÓ„‡ÒÌÂÚ, Ë Î˛Í
‡Á·ÎÓÍËÛÂÚÒfl.
3) ëäéêéëíú éíÜàåÄ
äÓ„‰‡ ‚˚ ‚˚·ÂÂÚ ÌÛÊÌÛ˛
ÔÓ„‡ÏÏÛ, ÒÓÓÚ‚ÂÚÒÚ‚Û˛˘ËÈ
Ë̉Ë͇ÚÓ Ì‡ ‰ËÒÔΠÔÓ͇ÊÂÚ
χÍÒËχθÌÛ˛ ‚ÓÁÏÓÊÌÛ˛
ÒÍÓÓÒÚ¸ ‚‡˘ÂÌËfl ·‡‡·‡Ì‡ ÔË
ÓÚÊËÏÂ. èË Ê·ÌËË ‚˚ ÏÓÊÂÚÂ
ÒÌËÁËÚ¸ ÒÍÓÓÒÚ¸. ÑÎfl ˝ÚÓ„Ó ÂÒÚ¸
Í·‚˯‡ ÓÚÊËχ. èÓÒΠ͇ʉӄÓ
̇ʇÚËfl ̇ Ì ÒÍÓÓÒÚ¸
ÛÏÂ̸¯‡ÂÚÒfl ̇ 100 Ó·./ÏËÌ.
åËÌËχθÌÓ ‰ÓÔÛÒÚËχfl ÒÍÓÓÒÚ¸
400 Ó·./ÏËÌ. åÂ̸¯Â Ì ÔÓÎÛ˜ËÚÒfl.
á‡ÚÓ ÏÓÊÌÓ ‚ÓÓ·˘Â ÓÚÍβ˜ËÚ¸
ÓÚÊËÏ, ‰Îfl ˜Â„Ó ˝ÚÛ Ò‡ÏÛ˛
Í·‚Ë¯Û Ì‡‰Ó ̇ʇڸ ÌÂÒÍÓθÍÓ
‡Á.
4) àçÑàäÄíéê éíãéÜÖççéÉé
áÄèìëäÄ
à̉Ë͇ÚÓ ÏË„‡ÂÚ, ÂÒÎË ‚Íβ˜ÂÌ
ÓÚÎÓÊÂÌÌ˚È Á‡ÔÛÒÍ.
RU
EN
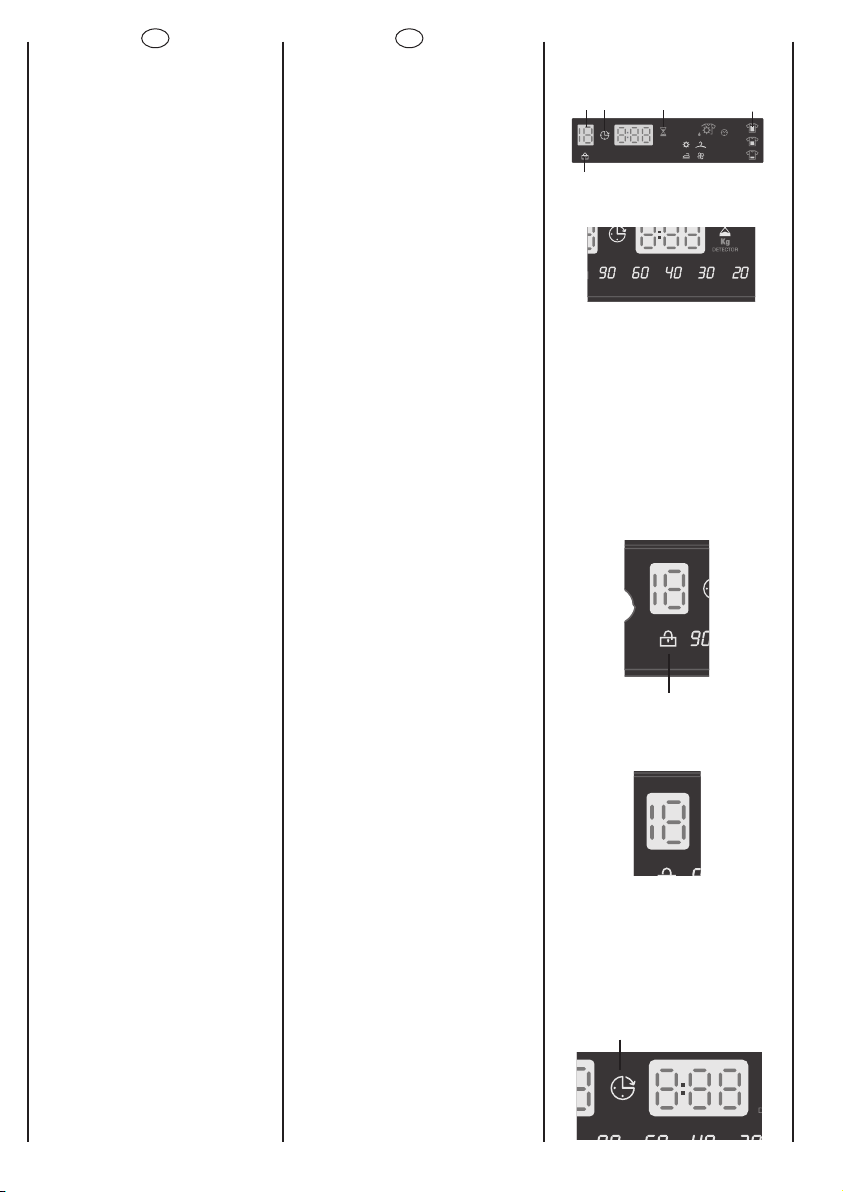
“DIGITAL” DISPLAY
The display’s indicator system
allows you to be constantly
informed about the status of
the machine:
1) WASH TEMPERATURE
When a programme is
selected the relevant
indicator will light up to show
the recommended wash
temperature.The
Temperature button can be
used to decrease or increase
the temperature of your
chosen wash cycle. Each
time the button is pressed, the
new temperature level is
shown on the Wash
Temperature Indicator
2) DOOR LIGHT
Once the START/PAUSE button
has been pressed the light
first flashes then stops flashing
and remains on until the end
of the wash.
2 minutes after the end of the
wash the light goes off to
show that the door can now
be opened.
3) SPIN SPEED
Once the programme has
been selected, the maximum
spin speed allowed for that
programme appears on the
display. Pressing the spin
button will reduce the speed
by 100 rpm each time the
button is pressed. The
minimum speed allowed is
400 rpm, or it is possible to
omit the spin by pressing the
spin button repeatedly.
4) DELAY START LIGHT
This flashes when delay start
has been set.
3
{
4
{
1
2
O
3
1
2
6
5
{
{
8
{
4
7
If you want carry out a cold
wash all the indicators must be
off.
Если вы хотите выполнить стирку
в холодной воде, все индикаторы
должны быть выключены.
4) àçÑàäÄíéê éíãéÜÖççéÉé
áÄèìëäÄ
à̉Ë͇ÚÓ ÏË„‡ÂÚ, ÂÒÎË ‚Íβ˜ÂÌ
ÓÚÎÓÊÂÌÌ˚È Á‡ÔÛÒÍ.
4) DELAY START LIGHT
This flashes when delay start
has been set.
2) àçÑàäÄíéê ÅãéäàêéÇäà
ãûäÄ
èÓÒΠ̇ʇÚËfl ̇ Í·‚˯Û
"èìëä/èÄìáÄ" (‡Ì„Î. Start/Pausa)
Ë̉Ë͇ÚÓ Ò̇˜‡Î‡ ÔÓÏË„‡ÂÚ, ‡
ÔÓÚÓÏ ·Û‰ÂÚ „ÓÂÚ¸ ÌÂÔÂ˚‚ÌÓ ‰Ó
ÍÓ̈‡ ÒÚËÍË. à ¢ 2 ÏËÌÛÚ˚.
óÂÂÁ 2 ÏËÌÛÚ˚ ÔÓÒΠÓÍÓ̘‡ÌËfl
Ë̉Ë͇ÚÓ ÔÓ„‡ÒÌÂÚ, Ë Î˛Í
‡Á·ÎÓÍËÛÂÚÒfl.
3) ëäéêéëíú éíÜàåÄ
äÓ„‰‡ ‚˚ ‚˚·ÂÂÚ ÌÛÊÌÛ˛
ÔÓ„‡ÏÏÛ, ÒÓÓÚ‚ÂÚÒÚ‚Û˛˘ËÈ
Ë̉Ë͇ÚÓ Ì‡ ‰ËÒÔΠÔÓ͇ÊÂÚ
χÍÒËχθÌÛ˛ ‚ÓÁÏÓÊÌÛ˛
ÒÍÓÓÒÚ¸ ‚‡˘ÂÌËfl ·‡‡·‡Ì‡ ÔË
ÓÚÊËÏÂ. èË Ê·ÌËË ‚˚ ÏÓÊÂÚÂ
ÒÌËÁËÚ¸ ÒÍÓÓÒÚ¸. ÑÎfl ˝ÚÓ„Ó ÂÒÚ¸
Í·‚˯‡ ÓÚÊËχ. èÓÒΠ͇ʉӄÓ
̇ʇÚËfl ̇ Ì ÒÍÓÓÒÚ¸
ÛÏÂ̸¯‡ÂÚÒfl ̇ 100 Ó·./ÏËÌ.
åËÌËχθÌÓ ‰ÓÔÛÒÚËχfl ÒÍÓÓÒÚ¸
400 Ó·./ÏËÌ. åÂ̸¯Â Ì ÔÓÎÛ˜ËÚÒfl.
á‡ÚÓ ÏÓÊÌÓ ‚ÓÓ·˘Â ÓÚÍβ˜ËÚ¸
ÓÚÊËÏ, ‰Îfl ˜Â„Ó ˝ÚÛ Ò‡ÏÛ˛
Í·‚Ë¯Û Ì‡‰Ó ̇ʇڸ ÌÂÒÍÓθÍÓ
‡Á.
3) SPIN SPEED
Once the programme has
been selected, the maximum
spin speed allowed for that
programme appears on the
display. Pressing the spin
button will reduce the speed
by 100 rpm each time the
button is pressed. The
minimum speed allowed is
400 rpm, or it is possible to
omit the spin by pressing the
spin button repeatedly.
3
{
2
4
{
1
Auto
’
’
’
’
30
90
60
120
90 60 40 30 20
DETECTOR
Kg
{
1
7
3
5
{
8
{
6
2
4
2) DOOR LIGHT
Once the START/PAUSE button
has been pressed the light
first flashes then stops flashing
and remains on until the end
of the wash.
2 minutes after the end of the
wash the light goes off to
show that the door can now
be opened.
Loading ...
Loading ...
Loading ...