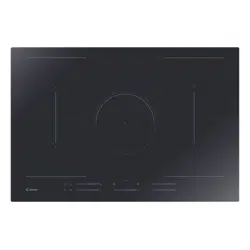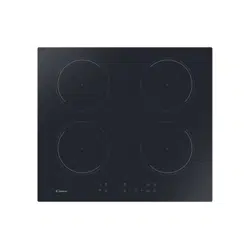
PIANO INDUZIONE 2 IN
Installazione - Uso - Manutenzione
IT
INDUCTION HOB 2 IN
Installation - Use - Maintenance
GB
TABLE À INDUCTION 2 IN
Installation - Emploi - Entretien
FR
INDUKTIONSKOCHFELD 2 IN
Installation - Gebrauch - Wartung
DE
PLACA INDUCCION 2 IN
Installación - Uso - Mantenimiento
ES
INDUCTIE-KOOKPLAAT 2 IN
Installatie - Gebruik - Onderhound
NL
PLANO A INDUÇAO 2 IN
Instalação - Uso - Manutenção
PT
BASIC
G4

2
&# "(
'"((!"(
&"&-!#
#"&() !#$&
' (((
)'(#")#*#
$&##((#
)&(!"(
$&#(((##'(&)(#
#"!(&
$&!''!%) (04
'((#)&(!"(
# )(#$&$#(&
'#'&()(( )
'"-)"
$&((#(()&
$&!#$&("(#
&&'$((&
'(&)-#"
$&!((&""#
&)"& "(
&') (('"
$&!)( ---#"
#"%)'(#!#&"#
$$&#
#&!) !#"#'(&$
**))&
"/ 201,*"/
"1%+(6,2+!
,+$/12)1"6,2,+6,2/
%,& "
%&0+"4 /"#2))6
!"0&$+"!-/,!2 1
*+2# 12/"!4&1%1%"
%&$%"01.2)&16*1"/&)0
%0""+ /"#2))61"01"!
1,01&0#6))6,2/
,,(&+$!"*+!0
"4,2)!1%"/"#,/"
/".2"016,21,/"!+!
#,)),41%"0""06
&+01/2 1&,+04%& %4&))
)),46,21,,1&+
"5 "))"+1/"02)10/&$%1
#/,*1%"01/1
64"4&0%6,2))1%"
3"/6"014&1%6,2/
*,!"/+--)&+ "
! !
& "(
!&('"4&'
3 ((#"'$#)&
#+%)*#)'*-
(
"#)*)$&#)(
3* #$$3*'#"(
&%)3*'
!(4&'(#)(
$&!4&%) (33(3
'#")'!"(
$#)&'('&(#)('
#'+"':)"
)''#"$&(
) - &
(("(*!"( '
"'(&)(#"''!$ '
$#&(3'')&(("#(
%)*#)'$&!((&#"(
:#("&:+ "('
&3') (('4'
$&!4&)( '(#"
#)'*#)''#)(#"'
)""(4&($ "
'('(#"%)"(0
:)( '(#"(
$$& !#&"
# )$*":( )
$
&"$
#"(#""!"(
"'(&)(#"'
$#)& :)'&
"'(&)(#"'
$#)& :"'( ()&
76<-6<;
-$"
-"/1&+$
/&+ &-)"
0"/:0
+01/2 1&,+0
+01))"/:0
+01/2 1&,+0
&$$("&
$"
&"$#
)"-#"!"(#
"'(&)-#"
$& :)("(
"'(&)-#"
$& :"'( (#&
IT GB FR
42 42 42
THIS APPLIANCE IS CONCEIVED
FOR DOMESTIC USE ONLY. THE
MANUFACTURER SHALL NOT IN
ANY WAY BE HELD RESPONSIBLE
FOR WHATEVER INJURIES OR DAMAGES ARE
CAUSED BY INCORRECT INSTALLATION OR
BY UNSUITABLE, WRONG OR ABSURD USE.
THIS APPLIANCE IS NOT
INTENDED FOR USE BY
PERSONS (INCLUDING
CHILDREN) WITH REDUCED
PHYSICAL, SENSORY OR MENTAL
CAPABILITIES, OR LACk OF
ExPERIENCE AND kNOWLEDGE,
UNLESS THEY HAVE BEEN GIVEN
SUPERVISION OR INSTRUCTION
CONCERNING USE OF THE APPLIANCE
BY A PERSON RESPONSIBLE FOR
THEIR SAFETY. CHILDREN SHOULD BE
SUPERVISED TO ENSURE THAT THEY
DO NOT PLAY WITH THE APPLIANCE.
QUESTO PRODOTTO È STATO
CONCEPITO PER UN IMPIEGO DI
TIPO DOMESTICO. IL
COSTRUTTORE DECLINA OGNI
RESPONSABILITÀ NEL CASO DI EVENTUALI
DANNI A COSE O PERSONE DERIVANTI DA
UNA NON CORRETTA INSTALLAZIONE O DA
USO IMPROPRIO, ERRONEO OD ASSURDO.
L’APPARECChIO NON DEVE
ESSERE USATO DA PERSONE
(COMPRESI BAMBINI) CON
RIDOTTE CAPACITÀ fISIChE,
SENSORIALI O MENTALI, O DA PERSONE
ChE MANCANO DELL’ESPERIENZA E DELLE
CONOSCENZE NECESSARIE SE NON SOTTO
LA SUPERVISIONE O DIETRO ISTRUZIONI
SULL’USO DELL’APPARECChIO DA PARTE DI
UNA PERSONA RESPONSABILE PER LA
LORO SICUREZZA. I BAMBINI DEVONO
ESSERE CONTROLLATI PER ASSICURARSI
ChE NON GIOChINO CON L’APPARECChIO.
CE PRODUIT EST CONÇU
EXCLUSIVEMENT POUR USAGE
DOMESTIQUE. LE CONSTRUCTEUR
DÉCLINE TOUTE RESPONSABILITÉ
POUR DOMMAGES ET BLESSURES CAUSÉES
PAR UNE INSTALLATION INCORRECTE OU PAR
UN USAGE IMPROPRE, ERRONÉ OU ABSURDE.
L’APPAREIL NE DOIT PAS êTRE
UTILISÉ PAR DES PERSONNES
(ENfANTS INCLUS) DISPOSANT DE
CAPACITÉS PhySIQUES,
SENSORIELLES OU MENTALES RÉDUITES, OU
PAR DES PERSONNES N’AyANT PAS
L’EXPÉRIENCE OU LES CONNAISSANCES
REQUISES, SI CE N’EST SOUS LA SURVEILLANCE
D’UNE PERSONNE RESPONSABLE DE LEUR
SÉCURITÉ OU APRÈS AVOIR REÇU DE CELLE-CI
LES INSTRUCTIONS RELATIVES À L’UTILISATION
DE L’APPAREIL. LES ENfANTS DOIVENT êTRE
SURVEILLÉS, AfIN DE S’ASSURER QU’ILS NE
jOUENT PAS AVEC L’APPAREIL.

3
"%/$""%/1"/2+!"
4&/!+("+%+"+2+!
"$) (4+0 %"+2+0#/
%/"%)
&"0"0+"2"/,!2(1
0,/$#8)1&$"+14,/#"+2+!
*&1"/01()00&$"+
1"/&)&"+%"/$"01"))1
42/!"$"+2$"-/#12*
))"%/",/!"/2+$"++
"&+-"/#"(1"0, %"+72
"/#))"+
&/&11"+&"!"0%)!&"
"&+# %"++4"&02+$"+
72)"0"+2+!"&+72%)1"+
!*&13,+!"/"/01"+
+4"+!2+$+20$"
7"& %+"1"/$"+&00"
"//"& %14"/!"+(9++"+
&1!&"0"**,!"/+"+
--/14+0 %"+4&/
%+"+!0"01"
'(!# "(
&!#'!)#
, (!#'$#&')
7"
'(")*#$&#)(#
)#'!"(
'()#,#"'(&)#
#"!(& '
$&!&
'#$&##
'!&!"($&
$#&'('&(#'
')'+"')"
$&(#7"
#& #("(#
&#!#' ,&'$(
'/ '
"'(&)#"'%)
$&!(&/" &
&') (#'+ "('
' $&!&
)( -7"
#"'(!#&"#
$&(# +$&'!#'
")'(&'!#&'
(#"'
" %1"()+1
4&'!+("+2"+#")& &1"/"+
,+0*"1!"!,,/2$"!+"
("27"
&1+&"24"-/,!2(1
7,/$32)!&$,+14,/-"+"+
$" ,+01/2""/!2&1
*1"/&)"+3+!"
))"/"01"(4)&1"&1&0
$"!"$"+2&1$"1"01,*)
24"&0"+3,,/""+-"/#" 1
(,,(/"02)111"(2++"+
"3/"!&$"+
&'3"/7,"("+2!/,*
!"""+3,2!&$"&+01/2 1&"0
1")"7"+"+1"/"0-" 1"/"+
!"4")("%"121,"72))"+
01+,*)3+#%"1
""/01"$"/2&(2&101"("+!"
/"02)11"+1""/"&("+
"1!&1*,!"/+"--/1
!,"+4&'2,+7"
4")$"*""+!"
$")2(4"+0"+1,"(,*"+
+!#& "(
&!#'!)(#
'"&!"(')'
# $&#*(!#'
#'1#$&#
(&
'("#*#$&#)(#%)
#$&#(##!
&"("21#
#"'(&)6##!#'
! #&'!(&'#
*&#$&#*#
!"&&
!"''('21#$&
)!#-"#$&(#
#&#"')"($
!#'%) ''
/'"'(&)29'%)
$&!(&1# "
2&+ "('
&') (#''#
"6#'))( -21#
)"(!"(#!'(
!#&"#$& #
$&#*(!#'$&
"*&#'"#''#'
! #&')!$&!"
(#'
+$4("&
$/"
&"6$#
)"#"!"(#
"'(&)29'
$&#)("(
"'(&)29'
$&#"'( #&
607=,
)7
"/(&+$
"/2&(0+4&'7&+$
3,,/!"()+1
"/2&(0+4&'7&+$
3,,/!"1" %+& 20
+$("&
$/"
&"$#
)"#"!"(#
"'(&)#"'
$& )')&#
"'(&)#"'
$& "'( #&
60)4<;)6/)*-
"&1"
/"&104"&0"
+)"&12+$
#/!"+"+217"/
+)"&12+$
#/!"++01))1"2/
ES NL PTDE
43
43 43
43
DIT PRODUkT IS ALS
HUISHOUDELIJk APPARAAT
GEDACHT. VOOR BESCHADIGINGEN
AAN SPULLEN OF PERSONEN DIE
AAN VERkEERDE INSTALLATIE, MISBRUIk OF
VERkEERDE GEBRUIk ZIJN TE WIJTEN, NEEMT
DE FABRIkANT GEEN
VERANTWOORDELIJkHEID OP ZICH.
DIT APPARAAT IS NIET BEDOELD
VOOR GEBRUIk DOOR PERSONEN
(MET INBEGRIP VAN kINDEREN) MET
VERLAAGDE FYSIEkE, SENSORISCHE
OF MENTALE VERMOGENS, OF MET GEBREk
AAN ERVARING EN kENNIS, TENZIJ ZIJ LEIDING
OF INSTRUCTIES HEBBEN ONTVANGEN
BETREFFENDE HET GEBRUIk VAN HET APPARAAT
DOOR MIDDEL VAN EEN PERSOON DIE VOOR
HUN VEILIGHEID VERANTWOORDELIJk IS.
kINDEREN MOETEN WORDEN GECONTROLEERD
OM TE GARANDEREN DAT ZIJ NIET MET HET
APPARAAT SPELEN.
ESTE PRODUCTO fUE CONCEBIDO
PARA UN USO DE TIPO DOMÉSTICO.
EL CONSTRUCTOR DECLINA
CUALQUIER RESPONSABILIDAD
EN EL CASO DE DAÑOS EVENTUALES A COSAS
O PERSONAS QUE DERIVEN DE UNA
INSTALACIÓN INCORRECTA O DE UN USO
IMPROPIO, ERRADO O ABSURDO.
NO PUEDEN UTILIZAR EL APARATO
PERSONAS (INCLUIDOS NIÑOS) CON
CAPACIDADES fíSICAS, SENSORIALES
O MENTALES REDUCIDAS, NI
PERSONAS QUE NO DISPONGAN DE LA
EXPERIENCIA y DE LOS CONOCIMIENTOS
NECESARIOS, A MENOS QUE ESTÉN BAjO LA
SUPERVISIÓN DE UNA PERSONA RESPONSABLE
DE SU SEGURIDAD O hAyAN RECIBIDO LAS
INSTRUCCIONES NECESARIAS SOBRE LA
UTILIZACIÓN DEL APARATO. LOS NIÑOS TIENEN
QUE ESTAR CONTROLADOS PARA ASEGURARSE
DE QUE NO jUEGAN CON EL APARATO.
ESTE PRODUTO fOI CONCEBIDO
PARA UMA UTILIZAÇÃO DE TIPO
DOMÉSTICA. O fABRICANTE
DECLINA TODAS AS
RESPONSABILIDADES NO CASO DE EVENTUAIS
DANOS A COISAS OU PESSOAS DERIVADOS DE
UMA INSTALAÇÃO INCORRECTA OU DE USO
IMPRÓPRIO, ERRÓNEO OU ABSURDO.
O APARELhO NÃO DEVE SER USADO
POR PESSOAS (INCLUSIVE
CRIANÇAS) COM CAPACIDADES
fíSICAS, SENSORIAIS OU MENTAIS
REDUZIDAS, OU POR PESSOAS QUE NÃO
TENhAM EXPERIêNCIAS NEM CONhECIMENTO
NECESSáRIO A NÃO SER QUE SEjAM
SUPERVISIONADAS E INSTRUíDAS, SOBRE O
USO DO APARELhO, POR UMA PESSOA
RESPONSáVEL PELA SEGURANÇA DAS MESMAS.
AS CRIANÇAS DEVEM SER CONTROLADAS PARA
CONTROLADAS PARA SE TER CERTEZA DE QUE
NÃO BRINQUEM COM O APARELhO.
DIESES PRODUkT IST ALS
HAUSHALTSGERÄT GEDACHT. FÜR
SCHADEN AN SACHEN ODER
PERSONEN, DIE AUF FALSCHE
INSTALLATION BZW. UNGEEIGNETEN
GEBRAUCH ODER MISSBRAUCH
ZURÜCkZUFÜHREN SIND, ÜBERNIMMT DER
HERSTELLER kEINERLEI VERANTWORTUNG.
DAS GERÄT DARF NICHT VON
PERSONEN (EINSCHLIESSLICH
kINDERN) MIT EINGESCHRÄNkTER
köRPERLICHER ODER GEISTLICHER
kAPAZITÄT ODER PERSONEN OHNE
ERFAHRUNG UND DIE NOTWENDIGEN
kENNTNISSE BENUTZT WERDEN, ES SEI DENN,
DIES GESCHIEHT UNTER DER AUFSICHT ODER
NACH UNTERWEISUNG IM GEBRAUCH DES
GERÄTS DURCH EINER FÜR DEREN SICHERHEIT
VERANTWORTLICHEN PERSON. kINDER SIND
ZU BEAUFSICHTIGEN, UM SICHERZUSTELLEN,
DASS SIE NICHT MIT DEM GERÄT SPIELEN.

4
("%"'"&"
!+%,"&%$ %*&
:'(#')
$&#$&(0
((&#!"(
!#&$&(
&$"($&
#(()&
&)(# ((&#"#
#*&" )"-#"
!"(# #"
")((#&&"()"
!$#!"(#
#&4(&'!''#
#'(''#&$"(
#
#(()&**"
#!'#((#'&((#
!"!'$&'#"
(#&"!"(#
&(&# $"(#
'( '# #
'# *!"(#$&#*#
)(#!(!"(
:&&'(# ''(!
''(! ((&#"#
$&!(( !''!
'' (0"--
&# -#"
8-:)<16/
:16+184-
&$
1"5-),&101%"")" 1/,
*$+"1& -/,-"/1&"0,#
*,01 ,,(&+$3"00")0
%" ,&)&+!2 1,/
4%& %-/,!2 "01%"
")" 1/,*$+"1& #&")!&0
,-"/1"!+! ,+1/,))"!
61%"")" 1/,+& &/ 2&1
%"%"1&01/+0*&11"!1,
#,,!61%" ,,(&+$
3"00")&10")#
%" ,,(&+$-/, "00
1("0-) "0!"0 /&"!
"),4
),00,#%"1&0
*&+&*2*%&$%
"##& &"+ 6
1%"0601"*01,-0
21,*1& ))64%"+1%"
3"00")&0/"*,3"!,/
"3"+'201)"!#/,*1%"
%,
1%"")" 1/,+& &/ 2&1
$2/+1""0*5&*2*
#)"5&&)&16+!#&+"
!'201*"+10
("%"'
!&%*"&%% $ %*
''')& '
$&#$&3(3'
3 (&#!"3(%)'
$ )$&('
&3$"(')''#"
&)(3 (&#"%)
#"(&8 #"(#"
"!"( #"
")()&%)&3)"
!$!"3(%)
:'( &3$"(
)''#"!5!%)
(&"'!( )&
)+ !"('
)''#" )
#!!3&(
''#)'
3$&(#"!"!
)(&"!"(
','(4!':&&5(
)(#!(%)!"('
:#"&(&#)')
!"('#) 4*
''&#
','(4!
3 (&#"%)&"((
!+!)!
+ (3(
$&3'#"&3

5
:*-1<;?-1;-
0"/2%12#!"+
")"(1/,*$+"1&0 %"+
&$"+0 %#1"+!"0
/,1"&)0!"/
, %$"#800"
"/1/,*(/"&001"2"/1!"+
"1/&"!"//,00")0-2)"
+!2(1,/!&""&+
$+"1#")!2#21
&"8/*"4&/!3,*
,-#0")01+!&"-"&0"
"/1/$"+
"/, %3,/$+$
3,))7&"%10& %4&"2+1"+
"0 %/&""+
*&+&*)"/"/)201%,%"/
&/(2+$0$/!
!0"$+"%*"+!"0
,-#"0"0$"+$1!0
+%""+#%/172/
+1"//" %2+$!"0
601"*0
!0")"(1/,+&0 %"601"*
"/)21$/91")"5&&)&181
2+!"+2&$("&1&+!"/
"$2)&"/2+$
#-:316/
#
"1"/201,-!"
")"(1/,*$+"1&0 %"
"&$"+0 %--"+3+""+
$/,,1!"")3+!"-++"+
"101/,,* &/ 2&1/"$")1!"
4"/(&+$3+!"
0*,,/0-,")&+!2 1,/!&"
""+*$+"1&0 %3")!
,-,241
"4/*1"4,/!1!,,/!"
-+7")#+!"0-&'0
,3"/$"!/$"+
"1(,("+3,)1/"(17& %
7,)0"+"!"+"0 %/"3"+
*&+&*)4/*1"3"/)&"0
%,$"//"+!"*"+1
%"1#+"*"+3+!"-+
%"1,-1&))"+&0$"+,"$
)"&!11,1!"21,*1&0 %"
,+!"//"(&+$3+%"1
0601""*
%"1")"(1/,+&0 %"
0601""*&"!12&1"/01"
#)"5&&)&1"&1"+
+24("2/&$%"&!3+
&+01"))&+$
("%='"&
!+%"&%$ %*&
.'#"'
$&#$&' (&#
!"3('!#&
$&(#'&$"('
$&#-)&
&)(# (&7"#
!"'(&#
)"#"!"(#
#"")(#&%)
&)!!$#
!"3(#
#&3(&"'!(#
$ #$&7$&#&$"(
# !"(#
#-)&#"(
#!'&(#+#
!6"!'$&'1#
(#&"!"(#
#&(&#$"
'('7 *21#
$&#*#
)(#!(!"(
$&!#''(!
#''(! (&7"#
$&!(!/+!
+
-
&) 21#
("%"'"&
!+%"&%$" %*&
'" '
$&#$' (&#
!"3(' !,#&
$&( #'&$"('
$& #7"
&)(# (&7"#
#&"
)"#"!"(#
#"")(#&%)
&)"!$#
!"3(#
#&'(&"'!(
' !'!#
&$"( !"(#
#7"#)&&
#!##'
'&
!6"!'$&'7"
(#&"!"(#
&(&# # #
)"%)'7 #')
*7"$&#*#
)(#!/(!"(
#%)# ''(!
''(! (&7"#
$&!( +
!/+!, "-
&) 7"
6
IT GB FR
IMPORTANTE
Questo apparecchio
non è adatto per essere
utilizzato da persone
(bambini incusi) con
ridotte capacità mentali e
fisiche o con mancanza di
esperienza e conoscenza
se preventivamente
non abbiano ricevuto
adeguate istruzioni
per l’uso da persone
responsabili per la loro
sicurezza.
I bambini devono essere
controllati per assicurarsi
che non giochino con
l’apparecchio
IMPORTANT
L’emploi de cet appareil
ne doit pas être confié à
des personnes (enfants
compris) dont les capacités
mentales et physiques
sont réduites ou qui
manquent d’expérience et
de connaissance, si elles
n’ont pas reçu au préalable
les instructions d’emploi
adéquates concernant
leur sécurité de la part de
personnes responsables.
Les enfants doivent être
surveillés afin d’être sûr
qu’ils ne jouent pas avec
l’appareil.
IMPORTANT
This apparatus is
not suitable for use
by persons (children
included) with
reduced mental and
physical capacity or
with lack of experience
and knowledge unless
having previously
received suitable
training for its use by
persons responsible
for their safety.
It must be ensured that
children do not play
with the apparatus

7
ES NL PTDE
IMPORTANTE
Este aparato no es
apto para personas
(niños incluidos) con
capacidades mentales
y físicas reducidas
o sin experiencia
y conocimientos si
previamente no han
recibido las instrucciones
adecuadas para su
utilización por parte de
personas responsables
para su seguridad.
Los niños tienen que
mantenerse bajo control
para asegurarse de que no
juegan con el aparato
IMPORTANTE
Este aparelho não
é indicado para ser
utilizado por pessoas
(inclusive crianças) com
capacidades mentais
e físicas reduzidas ou
com falta de experiência
e conhecimento, sem
terem recebido antes
instruções adequadas
para o uso fornecidas
por pessoas responsáveis
pela sua segurança.
As crianças devem ser
controladas para que não
brinquem com o aparelho.
BELANGRIJK
Dit apparaat is niet geschikt
voor gebruik door personen
(inclusief kinderen) met
beperkte mentale en
fysieke capaciteiten of
met gebrek aan ervaring
en kennis, indien zij van
tevoren geen passende
gebruiksaanwijzingen
ontvangen hebben
van de personen die
verantwoordelijk zijn voor
hun veiligheid.
Kinderen moeten
gecontroleerd worden om er
zeker van te zijn dat ze niet
met het apparaat spelen.
WICHTIG
Dieses Gerät darf
nicht von Personen
(einschließlich Kindern)
mit eingeschränkten
geistigen oder körperlichen
Fähigkeiten oder Mangel
an Erfahrung und Kenntnis
benutzt werden, wenn diese
zuvor keine angemessene
Gebrauchunterweisung
durch für deren Sicherheit
verantwortliche Personen
erhalten haben.
Kinder nicht
unbeaufsichtigt lassen, um
sicherzustellen, dass sie
nicht mit dem Gerät spielen

8
IT GB FR
Accensione/
spegnimento del
Touch Control
(Fig. 2 e 2a)
L’elettronica Touch
Control viene
attivata azionando il tasto
ON/OFF e commuta
dalla modalità OFF alla
modalità di attesa. A tale
scopo occorre azionare il
tasto ON/OFF come tasto
unico e per la durata di 1
s. Si sentirà un breve bip.
Nella modalità di attesa
sul display della zona di
cottura viene visualizzato
staticamente “0”.
Eventualmente questa
visualizzazione può
andare in secondo piano a
causa di una segnalazione
di calore residuo oppure
di errore.
Se entro il tempo della
modalità di attesa (10 s)
viene attivata una zona
di cottura, il controllo
commuta nella modalità
attiva.
Se entro 10 s non viene
effettuata nessuna
introduzione, il controllo
commuta automaticamente
con un breve bip nella
modalità OFF.
Nella modalità attivo o
nella modalità di attesa,
l’elettronica può venire
commutata in ogni
momento nella modalità
OFF azionando il tasto
ON/OFF. La funzione
di spegnimento ha
sempre priorità durante
il funzonamento; vale
a dire che il controllo
si spegne, anche
attivando più tasti
contemporaneamente.
Mise en marche /
arrêt du Touch
Control
(Fig. 2 et 2a)
L’électronique
Touch Control
s’enclenche en actionnant
la touche ON/OFF et en
commutant le mode OFF
en mode d’attente. Pour
ce faire, il faut enclencher
la touche ON/OFF en
touche unique durant 1
sec. On percevra un bip
rapide.
En mode d’attente,
l’afficheur du foyer
de cuisson affiche
statiquement “0”.
Eventuellement, cet
affichage peut passer au
second plan à cause d’un
signalement de chaleur
résiduelle ou d’erreur.
Si un foyer est
enclenché durant le
délai de mode d’attente
(10 sec), le contrôle
passe en mode actif.
Si aucune commande
n’advient dans
les 10 sec, le
contrôle commute
automatiquement en
mode OFF avec un bip
rapide.
En mode actif ou
en mode d’attente,
l’électronique peut
être commutée à tout
moment en mode OFF
à l’aide de la touche
ON/OFF. La fonction
d’arrêt a toujours
priorité durant le
fonctionnement, ce qui
signifie que le contrôle
s’éteint même en
enclenchant plusieurs
touches simultanément.
On/off
of the Touch
Control
(Fig. 2 e 2a)
The electronic
Touch Control
is activated by means
of the ON/OFF
button and switches
from the OFF mode
to the Standby mode.
To do so it is
necessary to press
the ON/OFF button
for 1 second. A short
Beep will be heard.
When in standby,
“0” is displayed on
the display of the
cooking zone.
This display may go
into background due
to a residual heat or
error signal.
If a cooking zone
is activated during
the standby time
(10 sec.), the control
switches over to the
On mode.
If no introduction
is made within the
10 sec., the control
automatically
switches to OFF with
a short beep.
The electronics can
be switched to the
OFF mode at any time
during the ON mode
or the Standby mode
by pressing the ON/
OFF button. The Off
function has priority
when operating,
meaning that the
control switches off
even by activating
several buttons at the
same time.

9
ES NL PTDE
Encendido/
apagado del Touch
Control
(Fig. 2 y 2a)
La electrónica Touch
Control se activa
accionando la tecla ON/
OFF y conmuta de la
modalidad OFF a la
modalidad de espera. Con
esta finalidad es necesario
accionar la tecla ON/OFF
como tecla única y
durante 1 s. Se oirá un bip
breve.
En la modalidad de espera,
en el display de la zona de
cocción se visualizará “0”
de forma estática.
Eventualmente esta
visualización pasará a un
segundo plano a causa de
un aviso de calor residual
o de error.
Si antes de que pase el
tiempo de la modalidad de
espera (10 s) se activa una
zona de cocción, el control
conmutará a la modalidad
activa.
Si antes de que pasen 10
s no se efectúa ninguna
introducción, el control
conmutará de forma
automática con un breve
bip a la modalidad OFF.
En la modalidad activa o
en la modalidad de espera,
la electrónica se puede
conmutar en cualquier
momento a la modalidad
OFF accionando la tecla
ON/OFF. La función de
apagado tendrá siempre
la prioridad durante
el funcionamiento; es
decir, que el control
se apagará incluso
activando varias teclas
contemporáneamente.
Activação/
Desactivação do
Touch Control
(Fig. 2 e 2a)
A electrónica Touch
Control activa-se
accionando a tecla ON/
OFF e comuta a
modalidade OFF para a
modalidade de espera. Para
tal finalidade é necessário
accionar a tecla ON/OFF
como tecla única e por um
tempo de 1 seg. Ouvir-se-á
um breve bip.
Na modalidade de espera,
no display da zona de
cozedura, visualiza-se
estaticamente “0”.
Eventualmente esta
visualização pode ser posta
em segundo plano por
causa de uma sinalização de
calor residual ou de erro.
Se dentro do tempo da
modalidade de espera (10
s) for activada uma zona
de cozedura, o controlo
comuta para modalidade
activa.
Se dentro de 10 seg. não
for efectuada nenhuma
introdução, o controlo
comuta automaticamente,
com um breve bip, para a
modalidade OFF.
Na modalidade activa
ou na modalidade de
espera, a electrónica
pode ser comutada em
qualquer momento
para a modalidade
OFF accionando a tecla
ON/OFF. A função de
desactivação tem sempre
prioridade durante o
funcionamento; quer
dizer que o controlo
se desactiva, mesmo
activando várias teclas
simultaneamente.
Inschakeling/
uitschakeling van
Touch Control
(Fig. 2 en 2a)
De elektronische
Touch Control wordt
geactiveerd door te drukken
op de toets ON/OFF en gaat
over van de OFF-modus op
de wachtmodus. Daarvoor
dient u de ON/OFF-toets
als enige toets te activeren
gedurende 1 sec. U hoort
een korte piep.
In de wachtmodus wordt
op het display van de
kookzone statisch “0”
weergegeven.
Deze weergave kan
eventueel naar de
achtergrond worden
verschoven vanwege de
signalering van restwarmte
of van een fout.
Als binnen de tijd van
de wachtmodus (10
sec.) een kookzone
wordt geactiveerd, gaat
de besturing over op
de actieve modus.
Als er binnen 10 sec.
niets wordt ingevoerd,
schakelt de besturing
met een korte piep
automatisch om op de
OFF-modus.
In de actieve modus
of in de wachtmodus,
kan de elektronica
op ieder moment
worden omgeschakeld
op de OFF-modus
door te drukken op
de toets ON/OFF. De
uitschakelingsfunctie
heeft altijd voorrang
tijdens de werking;
dat wil zeggen dat de
besturing uitgaat, ook
bij het activeren van
meerdere toetsen tegelijk.
Einschalten/Ausschalten
des Bedienfelds Touch
Control
(Abb. 2 und 2a)
Die Touch Control
Elektronik wird
aktiviert, indem die ON/
OFF-Taste betätigt wird
und schaltet sich von der
Betriebsart OFF in den
Wartemodus um. Dazu
müssen Sie die ON/OFF-
Taste als einzige Taste über
einen Zeitraum von 1 s
drücken. Es ertönt ein
kurzer Piepton.
Im Wartemodus erscheint
auf dem Display des
Kochfeldes die fixe
Anzeige “0”.
Diese Anzeige kann in den
Hintergrund treten, wenn
noch Restwärme oder ein
Fehler angezeigt wird.
Wenn innerhalb der
Dauer des Wartemodus
(10 s) eines Kochfeldes
aktiviert wird, schaltet die
Bedienung auf die aktive
Betriebsart um.
Wenn innerhalb von 10 s
keine Eingabe erfolgt, dann
schaltet die Bedienung
mit einem kurzen Piepton
automatisch auf die
Betriebsart OFF um.
In der aktiven Betriebsart
oder im Wartemodus
kann die Elektronik
mit der ON/OFF-Taste
jederzeit in die Betriebsart
OFF umgeschaltet werden.
Die Ausschaltfunktion
hat immer Vorrang
während des Betriebs.
Dies bedeutet, dass
die Bedienung sich
ausschaltet, auch
wenn mehrere Tasten
gleichzeitig gedrückt
werden.

10
IT GB FR
Accensione di una
zona di cottura
Nella modalità di attesa
o in quella attiva, una
zona di cottura può venire
attivata mediante i tasti
Più/Meno, a Meno che
la zona di cottura non si
trovi in quel momento nella
programmazione timer
(vedi capitolo timer).
Se s’inizia con il tasto “+”,
il livello di cottura passa da
“0” a “6/4”. Se s’inizia con il
tasto “-”, il livello di cottu-
ra passa da “0” a “12/9”.
Spegnimento di una
zona di cottura
a) Azionando contem-
poraneamente il tasto
“+” e “-” della zona di
cottura desiderata
b) Selezionando il livello
di cottura “0” della
zona di cottura deside-
rata con il tasto “-”
Se si spegne l’ultima zona di
cottura, il controllo commuta
nella modalità OFF dopo 10 s
se non ci sono altre attivazioni.
Tutte le zone di cottura
vengono spente con effetto
immediato azionando il tasto
ON/OFF.
Livelli di cottura e
di potenza
I livelli di cottura e di
potenza delle zone di cottura
vengono visualizzati trami-
te un display a 7 segmenti
assegnato. Secondo stan-
dard vengono visualizzati
i livelli di potenza con i
numeri da “1” a “12”.
Mise en marche
d’un foyer
En mode d’attente ou en
mode actif, un foyer peut être
enclenché à l’aide des touches
Plus/Moins, à moins que la
zone de cuisson ne se trouve
en programmation minuterie
à ce moment-là (voir chapitre
minuterie).
Si on commence avec la touche
“+”, le niveau de cuisson
passe de “0 » à « 6/4 ». Si on
commende avec la touche “-”,
le niveau de cuisson passe de
“0 » à « 12/9 ».
Arrêt d’un foyer
a) En actionnant
simultanément la
touche “+” et “-” du
foyer voulu
b) en sélectionnant le
niveau de cuisson «
0 » du foyer voulu à
l’aide de la touche “-”
Si on éteint le dernier foyer,
le contrôle commute en mode
OFF après 10 sec s’il n’y a
pas d’autres commandes.
Tous les foyers s’éteignent
immédiatement en
enclenchant la touche
ON/OFF.
Niveaux de cuisson
et de puissance
Les niveaux de cuisson
et de puissance des foyers
de cuisson sont affichés à
l’aide d’un afficheur spécial
à 7 segments. Selon les
standard, les niveaux de
puissance sont affichés avec
des numéros de “1” à “12”.
Switching on a
cooking zone
When in the Standby or On
mode, a cooking zone can be
switched on by means of the
Plus/Minus button, as long
as the cooking zone is not
in the timer programming
mode at that moment (see
Timer chapter).
If starting with the “+”
button, the cooking level
changes from “0” to “6 /4". If
starting with the “-“ button,
the cooking level changes
from “0” to “12/9”.
Switching off a
cooking zone
a) Pressing the “+” and
“-” buttons of the
desired cooking zone
at the same time
b) Selecting cooking
level “0” of the
desired cooking zone
with the “-” button
If the last cooking zone is
switched off, the control
switches to the OFF mode
after 10 sec. if nothing else is
switched on.
All cooking zones are
switched off immediately by
pressing the ON/OFF button.
Cooking and
power levels
The cooking and power
levels of the cooking
zones are shown on the
display with 7 allotted
segments. In accordance
with standards, the power
levels are displayed with
numbers from “1” to “12”.

11
ES NL PTDE
Encendido de una
zona de cocción
En la modalidad de espera o
en la modalidad activa, una
zona de cocción se puede
activar mediante las teclas
Más/Menos, siempre que
la zona de cocción no se
encuentre en ese momento en
la programación temporizador
(véase capítulo temporizador).
Si se inicia con la tecla “+”, el
nivel de cocción pasará de “0”
a “6/4”. Si se inicia con la tecla
“-”, el nivel de cocción pasará
de “0” a “12/9”.
Apagado de una
zona de cocción
a) Accionando
contemporáneamente
la tecla “+” y “-” de la
zona de cocción deseada.
b) Seleccionando el nivel
de cocción “0” de la
zona de cocción deseada
con la tecla “-”.
Si se apaga la última zona de
cocción, el control conmutará
a la modalidad OFF después
de 10 s si no se efectúan otras
activaciones.
Todas las zonas de cocción se
apagan con efecto inmediato
accionando la tecla ON/OFF.
Niveles de cocción
y de potencia
Los niveles de cocción y
de potencia de las zonas
de cocción se visualizan
mediante un display de
7 segmentos. Según los
estándares se visualizan los
niveles de potencia con los
números de “1” a “12”.
Activação de uma
zona de cozedura
Na modalidade de espera
ou na activa, uma zona
de cozedura pode ser
activada através das teclas
mais/menos, a não ser que
a zona de cozedura não
esteja, naquele momento,
na selecção Timer (ver o
capítulo Timer).
Ao iniciar com a tecla “+”,
o nível de cozedura passa de
“0” a “6/4”. Ao iniciar com a
tecla “-”, o nível de cozedura
passa de “0” a “12/9”.
Desactivação de uma
zona de cozedura
a) Accionando
simultaneamente a tecla
“+” e “-” da zona de
cozedura desejada
b) Seleccionando o nível de
cozedura “0” da zona de
cozedura desejada com a
tecla “-”
Ao apagar a última zona de
cozedura, o controlo comuta para
modalidade OFF após 10 seg. se
não houverem outras activações.
Todas as zonas de cozedura
desactivam-se, com efeito
imediato, accionando a tecla
ON/OFF.
Níveis de cozedura
e de potência
Os níveis de cozedura e
de potência das zonas de
cozedura visualizam-se
através de um display com
7 segmentos. Segundo o
standard visualizam-se os
níveis de potência de “1”
a “12”.
Inschakeling van
een kookzone
In de wachtmodus of in
de actieve modus kan
een kookzone worden
geactiveerd door middel van
de toetsen Plus/Min, mits
de kookzone zich op dat
moment niet in de timer-
programmering bevindt (zie
hoofdstuk timer).
Als u begint met de “+”-
toets, gaat het kookniveau
van “0” tot “6/4”. Als u begint
met de “-”-toets, gaat het
kookniveau van “0” tot “12/9”.
Uitschakeling van
een kookzone
a) Door tegelijkertijd de
toets “+” en “-” van de
gewenste kookzone te
activeren;
b) door het kookniveau
“0”van de gewenste
kookzone te selecteren
met de “-“-toets.
Als de laatste kookzone uitgaat,
gaat de besturing na 10 sec.
op de OFF-modus over, als
er geen andere activeringen
plaatsvinden.
Alle kookzones worden
onmiddellijk uitgeschakeld door
te drukken op de ON/OFF-toets.
Kook- en vermo-
gensniveaus
De kook- en vermogensniveaus
van de kookzones worden
weergegeven met behulp van
een toegewezen display met
7 segmenten. Daar worden
standaard de vermogensniveaus
weergegeven met de nummers
van “1” tot “12”.
Einschalten eines
Kochfeldes
Im Wartemodus oder in
der aktiven Betriebsart
kann ein Kochfeld mit den
Tasten Plus/Minus aktiviert
werden, es sei denn, dieses
Kochfeld befindet sich zu
dem Zeitpunkt in der Timer-
Programmierung (siehe
Kapitel Timer).
Wenn man mit der Taste “+”
beginnt, geht die Kochstufe
von “0” auf “6/4”. Wenn man mit
der Taste “-” beginnt, geht die
Kochstufe von “0” auf “12/9”.
Ausschalten einer
Kochfeldes
a) Durch gleichzeitiges
Betätigen der Taste “+”
und “-” des betroffenen
Kochfeldes
b) Durch Auswahl der
Kochstufe “0” des
betroffenen Kochfeldes
mit der Taste “-”
Wenn das letzte Kochfeld
ausgeschaltet wird, dann schaltet
die Bedienung nach 10s in die
Betriebsart OFF um, wenn keine
anderen Betätigungen vorliegen.
Alle Kochfelder werden
umgehend mit der ON/OFF-
Taste ausgeschaltet.
Koch- und
Leistungsstufen
Die Koch- und
Leistungsstufen der
Kochfelder werden mit ihrem
jeweiligen 7-stelligen Display
angezeigt. Lt. Standard
werden die Leistungsstufen
mit den Nummern von “1”
bis “12” angezeigt.

12
IT GB FR
Indicatore di calore
residuo
Serve a indicare all’utente
che il vetro è ad una
temperatura pericolosa in
caso di contatto con tutta
l’area sovrastante la zona
cottura. La temperatura
viene determinata seguendo
un modello matematico e
un eventuale calore residuo
viene indicato con una “H”
dal corrispondente display
a sette segmenti.
Il riscaldamento e il
raffreddamento sono
calcolati in relazione a:
- Il livello si potenza
selezionato (da “0” a “12/9”);
- Il periodo di attivazione
dei relè dopo aver spento la
zona cottura.
Il corrispondente display
mostra “H” fino a che la
temperatura della zona non
scende al di sotto del livello
critico (< 60 °C) secondo il
modello matematico.
Indicateur de chaleur
résiduelle
Sert à indiquer à
l’utilisateur que le verre est à
une température dangereuse
en cas de contact avec
toute la surface au-dessus
du foyer. La température
est définie en suivant un
modèle mathématique et une
chaleur résiduelle éventuelle
est indiquée par un « H »
sur l’afficheur correspondant
à sept segments.
Le chauffage et le
refroidissement sont calculés
en fonction :
- du niveau de puissance
sélectionné (de “0” à “12/9”).
- la période d’enclenchement
des relais après avoir éteint
le foyer.
L’afficheur correspondant
affiche « H » jusqu’à ce que
la température du foyer
descende sous le niveau
critique (< 60 °C) selon le
modèle mathématique.
Residual heat
indicator
Indicates to the user
that the glass is at a
dangerous temperature
if in contact with the
area over the cooking
zone. The temperature is
determined by means of a
mathematical model and
possible residual heat is
indicated by “H” on the
corresponding 7 segment
display.
Heating and cooling are
calculated based on:
- The selected power level
(from “0” to “12/9”);
- The relay activation time
after the cooking zone
has been switched off.
The corresponding
display shows “H” until
the zone temperature
drops below the critical
level (< 60 °C) according
to the mathematical
model.

13
ES NL PTDE
Indicador de calor
residual
Sirve para indicar al usuario
que el cristal se encuentra a
una temperatura peligrosa
en caso de contacto con toda
el área cercana a la zona de
cocción. La temperatura
se determina siguiendo un
modelo matemático y un
eventual calor residual se
indica con una “H” mediante
el correspondiente display de
siete segmentos.
El calentamiento y el
enfriamiento se calculan en
relación con:
- el nivel de potencia
seleccionado (de “0” a “12/9”);
- el periodo de activación de
los relés después de haber
apagado la zona de cocción.
El correspondiente display
muestra “H” hasta que la
temperatura de la zona no
desciende por debajo del nivel
crítico (< 60 °C) según el
modelo matemático.
Indicador de calor
residual
Serve para indicar ao
utilizador que o vidro está
com uma temperatura
perigosa, em caso de contacto
com toda a área em cima
da zona de cozedura. A
temperatura é determinada
seguindo um modelo
matemático e, um eventual
calor residual, será indicado
com um “H” pelo respectivo
display de sete segmentos.
O aquecimento e o
arrefecimento são calculados
em relação:
- ao nível de potência
seleccionado (da “0” a “12/9”);
- ao período de activação dos
relés após ter desactivado a
zona de cozedura.
O respectivo display mostra
“H” até a temperatura da
zona não descer abaixo
do nível crítico (< 60
°C), conforme o modelo
matemático.
Restwarmte-indicator
Deze dient ertoe de gebruiker
aan te geven dat het glas een
gevaarlijke temperatuur heeft in
geval van contact met het hele
gebied boven de kookzone. De
temperatuur wordt bepaald
door het volgen van een
mathematisch model en een
eventuele restwarmte wordt
aangegeven met een “H” door
het overeenkomstige display
met zeven segmenten.
De verwarming en de koeling
worden berekend met
betrekking tot:
- het geselecteerde
vermogensniveau (van “0” tot
“12/9”);
- de activeringstijd van de
relais na het uitzetten van de
kookzone.
Het overeenkomstige display
toont “H” totdat de temperatuur
van de zone onder het kritisch
niveau (< 60 °C) daalt volgens
het mathematisch model.
Restwärmeanzeiger
Dieser zeigt Ihnen an,
dass das Glas eine bei
Berührung des gesamten
Bereichs über dem Kochfeld
gefährliche Temperatur hat.
Die Temperatur wird nach
einem mathematischen
Modell bestimmt und ggf.
vorhandene Restwärme
wird mit einem “H” auf dem
entsprechenden 7-stelligen
Display angezeigt.
Erhitzen und Abkühlen
werden berechnet bezogen
auf:
- die gewählte Leistungsstufe
(von “0” bis “12/9”);
- die Aktivierungszeit der
Relais nach dem Ausschalten
der Kochfläche.
Das entsprechende Display
zeigt “H” bis die Temperatur
der Fläche nicht gemäß dem
mathematischen Modell
unter den kritischen Wert (<
60 °C) absinkt.

14
IT GB FR
Funzione Timer
La funzione Timer può
venire utilizzata come
timer per la zona di
cottura o come sveglia
indipendente, però mai
per entrambe le funzioni.
I due display a 7
segmenti della rispettiva
zona di cottura servono
per la visualizzazione
del tempo rimanente in
minuti, fino a quando
non viene fatto scattare
l’allarme del timer.
Selezione timer
- Per programmare un
timer, il touch deve
trovarsi nella modalità
di attesa o nella
modalità attiva.
- L’azionamento del
tasto timer serve per la
selezione della funzione
timer per una zona di
cottura.
- La segnalazione della
programmazione di
un timer mediante
i tasti Più/Meno
avviene attraverso il
led 8. Ol led del timer
lampeggiante segnala
che il valore dei display
a 7 segmenti si riferisce
al timer e può venire
modificato. Quando
un contatore continua
a funzionare nella
modalità OFF, il led
del timer s’illumina
staticamente. Ciò
indica che il valore
raffigurato sui display
appartiene al timer,
ma non può venire
mmentaneamente
modificato
direttamente; a tale
scopo occorrerebbe
Fonction minuterie
La fonction minuterie
peut être utilisée comme
minuterie pour le
foyer ou comme réveil
indépendant mais
jamais pour les deux
fonctions. Les deux
afficheurs à 7 segments
du foyer respectif
servent à afficher
le temps restant en
minutes, jusqu’à ce que
retentisse l’alarme de la
minuterie.
Sélection de la
minuterie
- Pour programmer la
minuterie, la touche
doit se trouver en
mode d’attente ou en
mode actif.
- L’enclenchement de
la touche minuterie
sert à sélectionner la
fonction minuterie
pour un foyer de
cuisson.
- La programmation
d’une minuterie par
les touches Plus/
Moins est signalée
par le voyant 8. Le
voyant clignotant
de la minuterie
signale que la valeur
des afficheurs à 7
segments se rapporte
à la minuterie et peut
être modifiée. Quand
un compteur continue
à fonctionner en mode
OFF, le voyant de la
minuterie s’éclaire
statiquement. Ceci
indique que la valeur
sur les afficheurs se
réfère à la minuterie,
mais ne peut être
directement modifiée
momentanément. Pour
Timer function
The Timer function
can be used as a
cooking zone timer
or independent alarm
but never for both
functions. The two
7 segment displays
of the respective
cooking zones are
used to view the
remaining time in
minutes up until
the timer alarm is
activated.
Timer selection
- To program a
timer, the touch
control must be in
the Standby or On
mode.
- The timer button
is pressed in order
to select a timer
function for the
cooking zone.
- LED 8 signals
the timer
programming
by means of the
+/- buttons. The
flashing timer LED
signals that the 7
segment display
value refers to the
timer and can be
modified. When a
timer continues to
function in the OFF
mode, the timer
LED remains on.
This indicates that
the value on the
display is related
to the timer, but
cannot be directly
modified at that
particular moment;
to do so, the
control must be

15
Función Temporizador
La función Temporizador
se puede utilizar como
temporizador para la
zona de cocción o como
despertador independiente,
pero nunca para ambas
funciones. Los dos
display de 7 segmentos
de la respectiva zona de
cocción sirven para la
visualización del tiempo
sobrante en minutos, hasta
que no salta la alarma del
temporizador.
Selección
temporizador
- Para programar un
temporizador, el touch
tiene que encontrarse en
la modalidad de espera o
en la modalidad activa.
- El accionamiento de la
tecla temporizador sirve
para la selección de la
función temporizador
para una zona de cocción.
- El aviso de la
programación de un
temporizador mediante
las teclas Más/Menos se
produce a través del led
8. El led del temporizador
intermitente señala que
el valor de los display
de 7 segmentos se
refiere al temporizador
y se puede modificar.
Cuando un contador
continúa funcionando
en la modalidad OFF,
el led del temporizador
se ilumina de forma
estática. Esto indica que
el valor representado
en los display pertenece
al temporizador, pero
momentáneamente
no se puede modificar
directamente; para hacerlo
sería necesario reactivar el
Função Timer
A função Timer pode ser
utilizada como Timer
para a zona de cozedura
ou como despertador
independente, porém
nunca para ambas
as funções. Os dois
displays de 7 segmentos,
da respectiva zona de
cozedura, servem para
visualizar o tempo
restante em minutos,
até quando o alarme do
Timer não disparar.
Selecção do Timer
- Para seleccionar um
Timer, o touch deve
estar na modalidade
de espera ou na
modalidade activa.
- O accionamento da
tecla Timer serve para
seleccionar a função
Timer para uma zona de
cozedura.
- A sinalização da
selecção de um Timer,
através das teclas
mais/menos, realiza-se
através do led 8. O led
do Timer intermitente
sinaliza que o valor dos
displays de 7 segmentos
refere-se ao Timer e
pode ser modificado.
Quando um contador
continua a funcionar
na modalidade OFF, o
led do Timer ilumina-
se estaticamente. Isto
indica que o valor
representado nos
displays pertence ao
Timer, ma não pode
ser momentaneamente
modificado
directamente; para
tal finalidade seria
necessário reactivar o
Timer-functie
De timer-functie kan
gebruikt worden
als timer voor de
kookzone of als aparte
wekker, maar niet
voor beide functies.
De twee displays met
7 segmenten van de
betreffende kookzone
dienen voor de weergave
van de resterende tijd
in minuten, totdat het
alarm van de timer
afgaat.
Selectie timer
- Om een timer te
programmeren,
moet touch zich in
de wachtmodus of
in de actieve modus
bevinden.
- De activering van de
timer-toets dient voor
de selectie van de
timer-functie voor een
kookzone.
- De signalering van de
programmering van een
timer door middel van
de toetsen Plus/Min
vindt plaats via led 8. De
led van de knipperende
timer signaleert dat de
waarde van de displays
met 7 segmenten naar
de timer verwijst en
gewijzigd kan worden.
Wanneer een teller
blijft functioneren in de
OFF-modus, blijft de
led van de timer statisch
verlicht. Hiermee wordt
aangegeven dat de
afgebeelde waarde op
de displays tot de timer
behoort, maar tijdelijk
niet rechtstreeks kan
worden gewijzigd;
daarvoor zou de
Timer-Funktion
Die Timer-Funktion
kann als Timer des
Kochfeldes oder als
unabhängiger Wecker,
nie aber für beide
Funktionen benutzt
werden. Die beiden 7-
stelligen Displays des
jeweiligen Kochfeldes
dienen zur Anzeige
der verbleibenden
Zeit in Minuten, bis
der Alarm des Timers
ausgelöst wird.
Timer-Auswahl
- Um einen Timer
programmieren zu
können, muss sich die
Touch-Bedienung in
dem Wartemodus oder
der aktiven Betriebsart
befinden.
- Das Betätigen der
Timer-Taste dient zur
Auswahl der Timer-
Funktion für ein
Kochfeld.
- Die Anzeige der
Programmierung eines
Timers mit den Tasten
Plus/Minus erfolgt
mit der LED 8. Die
blinkende LED des
Timers weist darauf hin,
dass sich der Wert des
7-stellign Display auf
den Timer bezieht und
bearbeitet werden kann.
Wenn ein Zähler in der
Betriebsart OFF weiter
funktioniert, dann
leuchtet die Timer-LED
kontinuierlich. Dies
weist darauf hin, dass
der auf den Displays
angezeigte Wert zum
Timer gehört aber
derzeit nicht direkt
bearbeitet werden kann.
ES NL PTDE

16
IT GB FR
riattivare il controllo.
- L’azionamento del
tasto timer dipende
dalle condizioni
di funzionamento
precedentemente
impostate:
a) La zona di cottura
corrispondente al timer
è attivata (livello di
cottura > 0):
Il timer viene
programmato in
riferimento alla zona
di cottura; quando
si azzera, spegne
automaticamente la
zona di cottura; non
è possibile selezionare
un contatore
indipendente. Un
ulteriore azionamento
del tasto timer
commuta direttamente
all’impostazione del
livello di cottura.
b) La zona di cottura
corrispondente al timer
è disattivata (livello di
cottura = 0):
Il timer viene
progtammato
indipendentemente e
continua a funzionare
anche nello stato
di OFF. Finchè il
contatore funziona, non
è possibile attivare la
zona di cottura.
Impostazione del
valore di timer
- In seguito alla selezione
del timer avvenuta, il
led assegnato lampeggia
come sopra descritto.
Con i tasti Più/Meno
è possibile impostare il
tempo di count down
del timer desiderato.
- Iniziando con il tasto
Più, il primo valore
visualizzato salta
ce faire, il faudrait
réenclencher le
contrôle.
- L’enclenchement de la
touche de minuterie
dépend des conditions
de fonctionnement
programmées auparavant.
a) Le foyer
correspondant à la
minuterie est enclenché
(niveau de cuisson > 0):
La minuterie est
programmée en
référence au foyer.
Quand elle est remise
à zéro, elle éteint
automatiquement
le foyer. Il n’est pas
possible de sélectionner
un compteur
indépendant. Une
nouvelle remise à zéro
de la touche minuterie
commute directement
à la programmation du
niveau de cuisson.
b) Le foyer
correspondant à la
minuterie est déclenché
(niveau de cuisson = 0):
La minuterie
est programmée
indépendamment et
continue à fonctionner
même en OFF. Tant que
le compteur fonctionne,
il n’est pas possible
d’enclencher le foyer.
Programmation de la
valeur de la minuterie
- Suite à la sélection de
la minuterie, le voyant
attribué clignote comme
décrit ci-dessus. Avec
les touches Plus/Moins,
on peut programmer
le temps de compte à
rebours de la minuterie.
- En commençant pas la
touche Plus, la première
valeur affichée saute
reactivated.
- The activation of
the timer button
depends on the
conditions of the
previously set
function:
a) The cooking zone
corresponding to the
timer is on (cooking
level > 0):
The timer is
programmed in
reference to the
cooking zone;
the cooking zone
automatically
switches off
when reset; an
independent timer
cannot be selected.
The cooking level
setting is accessed
when the timer
button is pressed
again.
b) The cooking zone
corresponding to the
timer is off (cooking
level = 0):
The timer is
independently
programmed
and continues to
function even in
OFF. The cooking
zone cannot be
activated until the
timer is functioning.
Setting of the
Timer value
- Following the
selection of the
time, the related
LED flashes as
described above.
The countdown time
of the desired timer
can be set by means
of the +/- buttons.
- Starting with
the plus button,

17
control.
- El accionamiento de
la tecla temporizador
depende de las condiciones
de funcionamiento
configuradas
precedentemente:
a) La zona de cocción
correspondiente al
temporizador está
activada (nivel de cocción
> 0):
El temporizador se
programa de acuerdo con
la zona de cocción; cuando
se pone a cero se apaga de
forma automática la zona
de cocción; no es posible
seleccionar un contador
independiente. Un
accionamiento ulterior
de la tecla temporizador
conmuta directamente a
la configuración del nivel
de cocción.
a) La zona de cocción
correspondiente al
temporizador está
desactivada (nivel de
cocción = 0):
El temporizador
se programa
independientemente y
continúa funcionando
incluso en la posición
de OFF. Mientras el
contador funciona no es
posible activar la zona de
cocción.
Configuración del
valor del temporizador
- Después de la selección
del temporizador, el
led asignado parpadea
tal como se ha descrito
anteriormente. Con las
teclas Más/Menos es
posible configurar el
tiempo de count down del
temporizador deseado.
- Iniciando con la tecla
Más, el primer valor
controlo.
- O accionamento da
tecla Timer depende
das condições de
funcionamento
anteriormente
seleccionadas:
a) A zona de cozedura
correspondente ao
Timer está activada
(nível de cozedura > 0):
O Timer é seleccionado
com referência na zona
de cozedura; quando
se reseta, desactiva
automaticamente a
zona de cozedura; não
é possível seleccionar
um contador
independente.
Um sucessivo
accionamento da
tecla Timer comuta
directamente para a
selecção do nível de
cozedura.
b) A zona de cozedura
correspondente ao
Timer está desactivada
(nível de cozedura = 0):
O Timer é seleccionado
independentemente e
continua a funcionar
mesmo no estado
de OFF. Enquanto
o contador estiver
a funcionar, não é
possível activar a zona
de cozedura.
Selecção do valor de
Timer
- Após ter seleccionado
o Timer, o respectivo
led pisca como acima
descrito. Com as teclas
mais/menos é possível
seleccionar o tempo de
contagem regressiva do
Timer desejado.
- Iniciando com a tecla
“mais”, o primeiro
valor visualizado pula
besturing opnieuw
geactiveerd moeten
worden.
- De activering van de
timer-toets hangt af van
de eerder ingestelde
werkingscondities:
a) de kookzone die
overeenkomt met de
timer is geactiveerd
(kookniveau > 0):
de timer wordt
geprogrammeerd
met betrekking
tot de kookzone;
wanneer de timer op
nul wordt gesteld,
wordt de kookzone
automatisch uitgezet;
het is niet mogelijk een
onafhankelijke teller te
selecteren; door nog een
keer op de timer-toets te
drukken, wordt direct
omgeschakeld naar
de instelling van het
kookniveau;
b) de kookzone die
overeenkomt met de
timer is gedeactiveerd
(kookniveau = 0):
de timer wordt
onafhankelijk
geprogrammeerd
en blijft ook in de
OFF-status werken; zo
lang de teller werkt,
is het niet mogelijk de
kookzone te activeren.
Instelling van de
timerwaarde
- Nadat de timer is
geselecteerd, knippert
de toegewezen led zoals
hierboven beschreven.
Met de toetsen Plus/
Min is het mogelijk de
countdown-tijd van de
gewenste timer in te
stellen.
- Beginnend met de Plus-
toets, springt de eerste
Dazu müssen Sie die
Bedienung neu starten.
- Die Betätigung der
Timer-Taste hängt von
den zuvor eingestellten
Funktionsbedingungen
ab:
a) Das dem Timer
entsprechende Kochfeld
ist aktiviert (Kochstufe
> 0):
Der Timer wird bezogen
auf das Kochfeld
programmiert. Wenn
er auf Null gesetzt
wird, wird automatisch
auch das Kochfeld
ausgeschaltet. es ist
nicht möglich, einen
Zähler unabhängig
auszuwählen. Ein
weiteres Drücken
der Timer-Taste
schaltet direkt auf
die Einstellung der
Kochstufe uj.
b) Das dem Timer
entsprechende Kochfeld
ist nicht aktiviert
(Kochstufe = 0):
Der Timer wird
unabhängig
programmiert und
funktioniert auch
im Zustand OFF. So
lange der Zähler läuft,
kann das Kochfeld
nicht aktiviert
werden.
Einstellung des
Timer-Werts
- Nach erfolgter Timer-
Auswahl blinkt die
entsprechende LED
wie oben genannt. Mit
den Tasten Plus/Minus
können Sie jetzt die Zeit
für den Countdown des
gewünschten Timers
einstellen.
- Wenn Sie mit der
Taste Plus beginnen,
ES NL PTDE

18
su “01” e aumenta
progressivamente da 1
fino a un massimo di
“99” (limite superiore).
- Iniziando con il
tasto Meno, il
valore visualizzato
sull’indicazione salta
su “30” e diminuisce in
passi da 1 fino allo “01”
(primo limite inferiore).
Al suo raggiungimento
viene emesso un
segnale acustico. Per
raggiungere lo “00”,
occorre prima rilasciare
il tasto Meno e poi
riattivarlo. Azionando
ulteriormente il
tasto Meno, la
visualizzazione “00”
non verrà modificata
(secondo limite
inferiore).
- L’impostazione
può avvenire anche
tramite azionamenti
permanenti dei
tasti Più o Meno o
tramite azionamenti
singoli (selezionare:
azionamento tasto,
rilascio, azionamento,
rilascio, ecc.).
- In caso di azionamento
permanente del
tasto, si verifica
un’accelerazione
automatica della
velocità di regolazione,
vale a dire che il tempo
tra un passo e quello
successivo si riduce,
finchè il tasto rimane
premuto.
- Se entro 10 s
(parametro) il tasto
Più o il tasto Meno
non viene nuovamente
premuto, dopo aver
selezionato il timer della
zona di cottura corrente
(il display rimane su
“00”), l’indicazione e
sur “01” et augmente
progressivement de 1
jusqu’à un maximum
de « 99 » (limite
supérieure).
- En commençant par la
touche Moins, la valeur
affichée sur l’indication
saute à “30” et diminue
de un cran jusqu’à «
01 » (première limite
inférieure). Une fois
atteinte, un signal
acoustique retentit.
Pour atteindre le “00”,
il faut d’abord lâcher
la touche Moins,
puis la réenclencher.
En appuyant encore
sur la touche Moins,
l’affichage « 00 » ne sera
pas modifié (seconde
limite inférieure).
- La programmation
peut se faire par
enclenchements
permanents des touches
Plus ou Moins ou
par enclenchements
individuels (sélectionner
: enclenchement de la
touche, déclenchement,
enclenchement,
déclenchement, etc.)
- En cas d’enclenchement
permanent de la
touche, on constate
une accélération
automatique de la
vitesse de réglage, cela
signifie que le temps
entre une étape et la
suivante se réduit,
jusqu’à ce que la touche
reste enfoncée.
- Si dans les 10 sec
(paramètre), la touche
Plus ou la touche Moins
n’est pas à nouveau
sollicitée, après avoir
sélectionné la minuterie
du foyer utilisé
(l’affichage reste sur «
00 »), l’indication et
the first value
displayed is “01”
and progressively
increases from 1 to a
maximum value of
“99” (upper limit).
- Starting with the
minus button, the
value displayed on
the indication is
“30” and diminishes
to “01” (first lower
limit). When this
value is reached, an
acoustic signal is
emitted. By pressing
the minus button
again, the display
“00” will not be
modified (second
lower limit).
- Setting can be
performed by
permanently
pressing the plus
or minus buttons
or by intermittently
pressing them
(selection: press
button, release,
press button,
release, etc).
- If the button is
permanently
pressed, the
regulation speed
automatically
accelerates,
meaning that the
time between one
step and the next is
reduced, until the
button is released.
- If the Plus or Minus
buttons are not
pressed within 10
sec. (parameter),
after having selected
the timer of the
current cooking
zone (the display
remains on “00”),
the indication
and allocation of
IT GB FR

19
visualizado pasa a “01”
y aumenta de forma
progresiva de 1 hasta un
máximo de “99” (límite
superior).
- Iniciando con la
tecla Menos, el valor
visualizado pasa a “30”
y disminuye con pasos de
1 hasta el “01” (primer
límite inferior). Cuando
alcanza el valor deseado
emite una señal acústica.
Para llegar al “00” es
necesario soltar primero
la tecla Menos y luego
reactivarla. Accionando
ulteriormente la tecla
Menos, la visualización
“00” no se modificará
(segundo límite inferior).
- La configuración se
puede efectuar también
mediante accionamientos
permanentes de las
teclas Más o Menos o
mediante accionamientos
individuales (seleccionar:
accionamiento
tecla, desactivación,
accionamiento,
desactivación, etc.).
- En caso de accionamiento
permanente de la tecla, se
verifica una aceleración
automática de la
velocidad de ajuste, es
decir, que el tiempo entre
un paso y el sucesivo
se reducirá, mientras
la tecla permanezca
pulsada.
- Si antes de que pasen
10 s (parámetro) la
tecla Más o la tecla
Menos no se pulsa
de nuevo, después de
haber seleccionado el
temporizador de la zona
de cocción corriente (el
display se queda en el
“00”), la indicación y la
asignación de las teclas
Más/Menos conmutan
para “01” e aumenta
progressivamente de 1,
até um máximo de “99”
(limite superior).
- Iniciando com a tecla
“menos”, o valor
visualizado na indicação
pula para “30” e
diminui em passos de
1 até alcançar “01”
(primo limite inferior).
No seu alcance emite-
se um sinal sonoro.
Para alcançar “00”, é
necessário antes soltar a
tecla “menos” e depois
accioná-la outra vez.
Accionando mais uma
vez a tecla “menos”,
a visualização “00”
não será modificada
(segundo limite
inferior).
- A selecção pode
ser realizada
também através
de accionamentos
permanentes das
teclas “mais” ou
“menos” ou através
de accionamentos
individuais (seleccionar:
accionamento da tecla,
largada, accionamento,
largada, etc.).
- Em caso de
accionamento
permanente da
tecla, realiza-se uma
aceleração automática
da velocidade de
regulagem, quer dizer
que o tempo entre um
passo e o sucessivo se
reduz, enquanto a tecla
permanecer pressionada.
- Se dentro de 10 seg.
(parâmetro) a tecla
“mais” ou a tecla
“menos” não for
novamente pressionada,
após ter seleccionado
o Timer da zona de
cozedura em questão (o
weergegeven waarde
op “01” om progressief
toe te nemen van 1 tot
een maximum van “99”
(bovenste limiet).
- Beginnend met de
Min-toets, springt de
waarde weergegeven
op de aanduiding op
“30” om in stappen af te
nemen tot “01” (eerste
onderste limiet). Bij het
bereiken hiervan wordt
er een akoestisch signaal
afgegeven. Om de “00”
te bereiken, dient u
eerst de Min-toets los te
laten om deze daarna
te heractiveren. Door
nog een keer op de
Min-toets te drukken,
wordt de weergave “00”
niet gewijzigd (tweede
onderste limiet).
- De instelling kan
ook gebeuren door
permanente activeringen
van de toetsen Plus
of Min door middel
van afzonderlijke
activeringen (selecteren:
activering toets, loslaten,
activering, loslaten, etc.).
- In geval van permanente
activering van de
toets, wordt er een
automatische versnelling
waargenomen van
de afstelsnelheid, dat
wil zeggen de tijd die
verstrijkt tussen een stap
en de daaropvolgende
wordt verlaagd, zo lang
de toets blijft ingedrukt.
- Als binnen 10 sec.
(parameter) de Plus-
toets of de Min-toets
niet opnieuw wordt
ingedrukt, nadat de
timer van de huidige
kookzone geselecteerd
is (het display blijft
op “00”), schakelen
de aanduiding en
dann springt der
erste angezeigte Wert
auf “01” und steigt
allmählich bis auf einen
Höchstwert von “99”
(obere Grenze).
- Wenn Sie mit der Taste
Minus beginnt, dann
springt der angezeigte
Wert auf “30” und
verringert sich in 1-er
Schritte bis auf “01”
(erste untere Grenze).
Bei Erreichen dieses
Grenzwerts ertönt ein
Signalton. Um “00” zu
erreichen, müssen Sie
erst die Taste Minus
loslassen und dann
erneut aktivieren. Bei
erneutem Drücken der
Taste Minus ändert
sich die Anzeige “00”
nicht (zweiter unterer
Grenzwert).
- Die Einstellung kann
auch durch dauerhaftes
Drücken der Tasten
Plus oder Minus
oder durch einzelnes
Drücken erfolgen
(Auswählen: Taste
drücken, loslassen,
drücken loslassen usw.).
- Bei ständigem
Drücken der Taste
beschleunigt sich die
Einstellgeschwindigkeit
automatisch, d.h. die
Zeit zwischen zwei
Schritten verringert
sich, so lange die Taste
gedrückt wird.
- Wenn innerhalb von 10
s (Parameter) die Taste
Plus oder Minus nicht
wieder gedrückt wird
nachdem der Timer des
aktuellen Kochfeldes
gewählt wurde (das
Display bleibt auf “00”),
schaltet die Anzeige
der Tasten Plus/Minus
automatisch auf das
ES NL PTDE

20
IT GB FR
l’assegnazione dei tasti
Più/Meno commutano
automaticamente alla
zona di cottura.
- Quando un timer
viene utilizzato come
contatore (sveglia),
l’indicazione e
l’assegnazione dei tasti
non commutano alla
zona di cottura, dato
che essa non può venire
attivata.
- Un timer parte in
genere con il count
down, se quest’ultimo è
stato programmato con
dei valori non uguali
a 0. Esempio: il timer
parte con il rilascio del
tasto Più dopo aver
impostato il valore
timer “01”.
- Le impostazioni
di timer sono
prioritarie rispetto alla
delimitazione del tempo
di funzionamento
in presenza di
impostazioni di livelli
alti di cottura.
- Se viene programmata
solo una sveglia, il
controllo dapprima
rimane nella modalità
di attesa (nessun’altra
zona di cottura è
attivata). Se non
vengono introdotti
altri valori nuovi, il TC
si comporta come sopra
descritto e commuta
nella modalità di OFF.
Scadere del timer/
allarme del timer
e conferma
- Gli ultimi 10 s prima
dello scadere del timer
vengono visualizzati
sul display (count
down fino all’allarme).
- Una volta scaduto il
l’attribution des touches
Plus/Moins commutent
automatiquement sur le
foyer.
- Quand une minuterie
est utilisée comme
compteur (réveil),
l’indication et
l’attribution des touches
ne commutent pas sur le
foyer, puisqu’il ne peut
être enclenché.
- Une minuterie part en
général avec le compte
à rebours si ce dernier
a été programmé avec
des chiffres non égaux
à 0. Exemple : la
minuterie démarre avec
le déclenchement de la
touche Plus après avoir
programmé la valeur
minuterie de “01”.
- Les programmations
de minuterie sont
prioritaires par rapport à
la délimitation du temps
de fonctionnement
en présence de
programmations de
niveaux élevés de
cuisson.
- On programme
uniquement un réveil, le
contrôle reste de prime
abord en mode d’attente
(aucun autre foyer
n’est enclenché). Si on
n’introduit pas d’autres
valeurs, la minuterie se
comporte comme décrit
plus haut et commute en
mode OFF.
Déclenchement de la
minuterie/alarme de la
minuterie et confirmation
- Les 10 dernières sec.
avant l’échéance de la
minuterie sont affichées
sur l’afficheur (compte
à rebours jusqu’à
l’alarme).
the +/- buttons
automatically switch
to the cooking zone.
- When a timer is
used as an alarm,
the indication
and allocation of
the buttons does
not switch to the
cooking zone, being
that this cannot be
activated.
- The timer
normally starts
in countdown, if
programmed with
two values that are
not 0. For example:
the timer starts
when the Plus
button is released
after the timer value
has been set at “01”.
- The timer settings
have priority over
the delimitation of
the operating time if
high cooking levels
have been set.
- If only one
alarm has been
programmed, the
control remains at
first in the standby
mode (no other
cooking zone is
on). If no other
new values are
introduced, the
TC behaves as
described above
and switches to the
OFF mode.
Timer laps/
timer alarm and
confirmation
- The last 10
sec. before the
timer lapses
are displayed
(countdown up to
alarm).

21
de forma automática a la
zona de cocción.
- Cuando un temporizador
se utiliza como
contador (despertador),
la indicación y la
asignación de las teclas
no conmutan a la zona
de cocción, puesto que
la zona de cocción no se
puede activar.
- Un temporizador
normalmente se pone
en marcha con el
count down si se ha
programado con valores
distintos de 0. Ejemplo: el
temporizador se pone en
marcha cuando se suelta
la tecla Más después
de haber configurado el
valor temporizador “01”.
- Las configuraciones
del temporizador son
prioritarias respecto a la
delimitación del tiempo
de funcionamiento
en presencia de
configuraciones de
niveles altos de cocción.
- Si se programa sólo un
despertador, el control
permanece primero en
la modalidad de espera
(ninguna otra zona de
cocción está activada).
Si no se introducen
otros valores nuevos,
el TC se comporta tal
como se ha descrito
anteriormente y
conmuta a la modalidad
de OFF.
Tiempo del temporizador/
alarma del temporizador y
confirmación
- Los últimos 10 s antes
de que termine el tiempo
del temporizador se
visualizan en el display
(count down hasta la
alarma).
display permanece em
“00”), a indicação e a
designação das teclas
mais/menos comutam
automaticamente para a
zona de cozedura.
- Quando um Timer é
utilizado como contador
(despertador), a
indicação e a designação
das teclas não comutam
para a zona de cozedura,
dado que a mesma não
pode ser activada.
- Um Timer parte
geralmente com a
contagem regressiva, se
esta última tiver sido
seleccionada com valores
diferentes de 0. Por
exemplo: o Timer parte
largando a tecla “mais”
após ter seleccionado o
valor Timer “01”.
- As selecções do Timer
são prioritárias em
relação à delimitação do
tempo de funcionamento
em presença de selecções
de níveis altos de
cozedura.
- Se for seleccionado
só um despertador, o
controlo inicialmente
permanece na
modalidade de espera
(nenhuma outra zona de
cozedura é activada). Se
não forem introduzidos
outros valores novos, o
TC comporta-se como
acima descrito e comuta
para modalidade de OFF.
Vencimento do Timer/
alarme do Timer e
confirmação
- Os últimos 10 seg.,
antes do vencimento do
Timer, visualizam-se
no display (contagem
regressiva até o alarme).
- Uma vez vencido o
de toewijzing van
de toetsen Plus/Min
automatisch op de
kookzone om.
- Wanneer een timer
wordt gebruikt als teller
(wekker), schakelen
de aanduiding en de
toewijzing van de
toetsen niet om op de
kookzone, aangezien
deze niet kan worden
geactiveerd.
- Een timer start over
het algemeen met de
countdown, als deze
is geprogrammeerd
met waarden die
niet gelijk zijn aan 0.
Voorbeeld: de timer
start bij het loslaten van
de Plus-toets nadat de
timerwaarde “01” is
ingesteld.
- De instellingen van de
timer hebben voorrang
op de afbakening
van de werkingstijd
in aanwezigheid van
instellingen van hoge
kookniveaus.
- Als er slechts één wekker
wordt geprogrammeerd,
blijft de besturing eerst
in de wachtmodus (er is
geen andere kookzone
geactiveerd). Als er geen
andere nieuwe waarden
worden ingevoerd,
reageert de TC zoals
hierboven beschreven
en gaat deze over op de
OFF-modus.
Aflopen timer/
timeralarm en
bevestiging
- De laatste 10 sec. voor
het aflopen van de timer
worden op het display
weergegeven (countdown
tot het alarm).
- Als de ingestelde tijd van
Kochfeld um.
- Wenn ein Timer als
Zähler (Wecker) benutzt
wird, dann schalten
die Anzeige und die
Zuordnung der Tasten
nicht auf das Kochfeld
um, da dieses nicht
aktiviert werden kann.
- Ein Timer startet
normalerweise mit
dem Countdown,
wenn dieser mit
anderen Werten
als 0 programmiert
wurde. Beispiel: Der
Timer startet mit
Loslassen der Taste
Plus, nachdem ein
Timer-Wert von “01”
eingestellt wurde..
- Die Timereinstellungen
sind vorrangig
bezogen auf die
Begrenzung der
Betriebszeit in
Anwesenheit von
Einstellungen hoher
Kochstufen.
- Wenn nur ein Wecker
programmiert wird,
dann bleibt die
Bedienung zunächst
im Wartemodus
(es ist kein anderes
Kochfeld aktiv). Wenn
keine anderen neuen
Werte eingegeben
werden, verhält sich
das Bedienfeld wie
oben beschrieben
und schaltet auf die
Betriebsart OFF um.
Ablauf des Timers/
Alarmton des Timers
und Bestätigung
- Die letzten 10 s vor
dem Ablauf des Timers
werden auf dem Display
angezeigt (Countdown
bis zum Alarmton).
- Nach Ablauf der
ES NL PTDE

22
tempo impostato di un
timer, scatta l’allarme
del timer, la zona di
cottura assegnata viene
subito spenta.
- Il display, insieme al led
del timer selezionato,
lampeggia alternando il
livello di cottura “00”
con “H”, in caso di
calore residuo.
- La segnalazione
dell’allarme dura al
massimo 2 minuti, se
l’utente non interviene
prima.
- Al termine dei 2
minuti o azionando
un tasto qualsiasi,
la segnalazione
dell’allarme viene
sospesa.
Il segnalino acustico
(cicalino) nonchè la spia
di controllo del timer
vengono disattivati.
Spegnimento del
timer/Modifica
delle impostazioni
del timer
- E’ possibile modificare
il valore impostato del
timer, nella modalità
di attesa o attiva, in
ogni momento dopo
selezione avvenuta,
attivando il tasto Più o
Meno.
- E’ possibile spegnere il
timer, portandolo sul
valore “00” premendo il
tasto Meno o premendo
un’unica volta
contemporaneamente i
tasti Più o Meno.
- Une fois que le temps
programmé est
écoulé, l’alarme de la
minuterie se déclenche,
le foyer en question est
immédiatement éteint.
- L’afficheur et le
voyant de la minuterie
clignotent en alternant
le niveau de cuisson « 00
» avec « H » en cas de
chaleur résiduelle.
- Le signalement de
l’alarme dure au
maximum 2 minutes, si
l’utilisateur n’intervient
pas avant.
- A la fin des 2 minutes
ou en actionnant une
touche quelconque, le
signalement de l’alarme
est suspendu.
Le signal acoustique
(sonnerie) et le voyant de
contrôle de la minuterie
sont déclenchés.
Arrêt de la minuterie
/Modification des
programmations de la
minuterie
- Il est possible de modifier
la valeur programmée
sur la minuterie, en
mode d’attente ou actif,
à tout moment après la
sélection, en enclenchant
la touche Plus ou Moins.
- Il est possible d’éteindre
la minuterie en
l’amenant sur la valeur
“00” en appuyant sur
la touche Moins ou en
appuyant une seule fois
simultanément sur les
touches Plus ou Moins.
- Once the set time
of the timer has
lapsed, the timer
alarm is activated
and the assigned
cooking zone is
switched off.
- The display and the
selected timer LED
flash alternating the
cooking level from
“00” to “H”, if there
is residual heat.
- The warning alarm
lasts for at least 2
minutes if the user
does not switch it
off before.
- The alarm signal
switches off after
the 2 minutes is up
or if any button is
pushed.
The buzzer and the
timer control light
are switched off.
Timer off
/Modification
of the timer
setting
- The timer settings
can be modified in
the Standby or On
mode at any time
after the selection
has been made by
pressing the Plus or
Minus buttons.
- The timer can be
switched off, setting
it to value “00”, by
pressing the Minus
button or by pressing
the Plus and Minus
buttons together.
IT GB FR

23
- Cuando el tiempo
configurado de un
temporizador ha
terminado, salta la
alarma del temporizador
y la zona de cocción
asignada se apaga
enseguida.
- El display, junto con
el led del temporizador
seleccionado, parpadea
alternando el nivel de
cocción “00” con “H”, en
caso de calor residual.
- El aviso de la alarma dura
al máximo 2 minutos si
el usuario no interviene
antes.
- Al final de los 2 minutos
o accionando una tecla
cualquiera, el aviso de la
alarma se detiene.
La señal acústica (timbre
eléctrico) y el piloto de
control del temporizador
se desactivan.
Apagado del teporizador/
Modificación de las
configuraciones del
temporizador
- Es posible modificar
el valor configurado
del temporizador, en
la modalidad de espera
o activa, en cualquier
momento después de haber
efectuado la selección,
activando la tecla Más o
Menos.
- Es posible apagar el
temporizador, situarlo en
el valor “00” pulsando
la tecla Menos o
pulsando una única vez
contemporáneamente las
teclas Más o Menos.
tempo seleccionado de
um Timer, o alarme do
Timer dispara, a zona
de cozedura designada
apaga-se logo.
- O display, junto
com o led do Timer
seleccionado, pisca
alternando o nível de
cozedura “00” com
“H”, em caso de calor
residual.
- A sinalização do alarme
dura no máximo 2
minutos, se o utilizador
não intervier antes.
- Passado os 2 minutos
ou accionando uma
tecla qualquer, a
sinalização do alarme é
suspendida.
O sinal sonoro
(campainha) como
também o indicador
de controlo do Timer
desactivam-se.
Desligar o Timer/
Modificar as
selecções do Timer
- É possível modificar o
valor seleccionado do
Timer, na modalidade
de espera ou activa, em
qualquer momento após
a ter realizado a selecção,
activando a tecla “mais”
ou “menos”.
- É possível desligar o
Timer, posicionando-o no
valor “00” pressionando
a tecla “menos” ou
pressionando, uma única
vez, simultaneamente
as teclas “mais” e
“menos”.
een timer eenmaal verlopen
is, gaat het alarm van de
timer af, de toegewezen
kookzone wordt
onmiddellijk uitgeschakeld.
- Het display, samen met de
led van de geselecteerde
timer, knippert waarbij het
kookniveau “00” wordt
afgewisseld met “H” in
geval van restwarmte.
- De signalering van het
alarm duurt maximaal 2
minuten, als de gebruiker
niet eerder ingrijpt.
- Aan het einde van
de 2 minuten of door
te drukken op een
willekeurige toets, wordt
de signalering van het
alarm stopgezet.
Het akoestische signaal
(piepend geluid) alsook
het verklikkerlichtsignaal
van de timer worden
gedeactiveerd.
Uitschakeling
van de timer/
Wijziging van de
timerinstellingen
- Het is mogelijk de
ingestelde waarde van
de timer te wijzigen,
in de wacht- of actieve
modus, op ieder moment
nadat de selectie heeft
plaatsgevonden, door te
drukken op de Plus- of
Min-toets.
- Het is mogelijk de timer
uit te schakelen door de
waarde ervan op “00” te
zetten, door op de Min-
toets te drukken of in één
keer tegelijkertijd de Plus-
of Min-toets in te drukken.
für einen Timer
eingestellten Zeit
ertönt der Timer-Alarm
und das zugewiesene
Kochfeld wird sofort
ausgeschaltet.
- Das Display blinkt
zusammen mit der
LED des gewählten
Timers und wechselt die
Anzeige der Kochstufe
“00” mit “H”, im Falle
von Restwärme.
- Der Alarm ertönt
maximal 2 Minuten,
wenn Sie diesen nicht
früher abschalten.
- Nach Ablauf der 2
Minuten oder bei
Drücken einer beliebigen
Taste wird der Alarm
unterbrochen.
Der Signalton (Pieper)
sowie das Kontrolllicht
des Timers werden
ausgeschaltet.
Timer ausschalten/
Veränderung
der Timer-
Einstellungen
- Sie können den
eingestellten Timewert
im Wartemodus oder
der aktiven Betriebsart
jederzeit nach der
erfolgten Auswahl durch
Aktivieren der Taste Plus
oder Minus verändern.
- Sie können den Timer
ausschalten, indem Sie
diesen durch Drücken
der Taste Minus oder ein
einziges gleichzeitiges
Drücken der Tasten Plus
oder Minus auf “00”
setzen.
ES NL PTDE

24
IT GB FR
Key Lock
(sicurezza bambini)
Bloccaggio/
attivazione Key
Lock
L’azionamento del tasto
Key-Lock nella modalità di
attesa o attiva, comporta
il bloccaggio della tastiera;
il led Key-Lock “9” si
illumina in modo statico.
Il controllo continua a
lavorare nella modalità
precedentemente impostata,
ma non può più essere
comandato da altri tasti,
tranne che dal tasto Key-
Lock o dal tasto ON/OFF.
Lo spegnimento con il tasto
ON/OFF è possibile anche
in stato di bloccaggio. Il led
corrispondente del tasto
key lock si spegne quando
si disattiva il touch e la
funzione Key-Lock. Il led
è nuovamente attivo in
caso di riaccensione (entro
10 s) fino a quando verrà
disattivata azionando
nuovamente il tasto
Key-Lock. L’attivazione/
disattivazione della funzione
Key-Lock nella modalità di
OFF non è possibile.
Sbloccaggio/
disattivazione Key
Lock
Il nuovo azionamento
del tasto Key-Lock
nella modalità di attesa
o attiva comporta lo
sbloccaggio della tastiera
e lo spegnimento del led
Key-Lock assegnato. Tutti i
tasti sensore possono venire
nuovamente azionati.
Verrouillage des
touches Key Lock
(sicurezza bambini)
Blocage/enclenchement
du Verrouillage des
touches
L’enclenchement de la touche
Key-Lock (verrouillage des
touches) en mode d’attente ou
actif implique le blocage du
clavier, le voyant Key-Lock «
9 » s’allume en mode statique.
Le contrôle continue
à travailler en mode
programmé mais ne peut plus
être commandé par d’autres
touches, sauf par la touche
Key-Lock ou par la touche
ON/OFF.
L’arrêt avec la touche
ON/OFF est possible même
en état de blocage. Le voyant
correspondant à la touche
Key-Lock s’éteint quand
on déclenche la touche et
la fonction Key-Lock. Le
voyant est à nouveau actif
en cas de remise en marche
(dans les 10 sec) jusqu’à
ce qu’il soit déclenché à
nouveau à l’aide de la touche
Key-Lock. L’enclenchement/
déclenchement de la fonction
Key-Lock en mode OFF n’est
pas possible.
Déblocage/déclenchement
du Verrouillage des
touches Key-Lock
Le nouvel enclenchement
de la touche Key-Lock en
mode d’attente ou actif
implique le déblocage
du clavier et l’arrêt du
voyant Key-Lock attribué.
Toutes les touches capteurs
peuvent être à nouveau
enclenchées.
Key Lock
(child safety)
Locking/
unlocking of the
Key Lock
The keypad is blocked
when the Key Lock
button is pressed in the
Standby or On mode; the
Key-Lock LED “9” lights
permanently.
The control continues to
operate in the previously
set mode but can no
longer be controlled by
other buttons, except by
the Key-Lock button or
the ON/OFF button.
Switching off with the
ON/OFF button is also
possible when locked.
The Key-lock button
LED switches off when
the Touch control and
Key-Lock function are
switched off. The LED
lights again if reactivated
(within 10 sec.) until it is
deactivated by pressing
the Key-Lock button once
again. The activation/
deactivation of the
Key-Lock function is not
possible in the OFF mode.
Unlocking/
deactivation of the
Key Lock
The keypad is
unlocked and the Key-
Lock LED is switched
off when the Key-Lock
button is pressed again
in the Standby or
On mode. All sensor
buttons can once again
be activated.
BASIC BASIC
BASIC
- BASIC - BASIC - BASIC

25
ES NL PTDE
Key Lock
(seguridad niños)
Bloqueo/activación
Key Lock
El accionamiento de la tecla
Key-Lock en la modalidad
de espera o activa, comporta
el bloqueo del teclado; el led
Key-Lock “9” se ilumina en
modalidad estática.
El control continúa
trabajando en la modalidad
configurada precedentemente,
pero no se puede controlar
mediante otras teclas, sólo
con la tecla Key-Lock o con la
tecla ON/OFF.
El apagado con la tecla
ON/OFF es posible incluso
en estado de bloqueo. El led
correspondiente de la tecla
key lock se apaga cuando
se desactiva el teclado y la
función Key-Lock. El led se
encuentra de nuevo activo
en caso de que se encienda de
nuevo (antes de que pasen
10 s) hasta que se desactiva
accionando de nuevo la tecla
Key-Lock. La activación/
desactivación de la función
Key-Lock en la modalidad de
OFF no es posible.
Desbloqueo/
desactivación Key Lock
El nuevo accionamiento
de la tecla Key-Lock en
la modalidad de espera
o activa comporta el
desbloqueo del teclado y el
apagado del led Key-Lock
asignado. Todas las teclas
sensores se pueden accionar
de nuevo.
Key Lock
(dispositivo de segurança
para as crianças)
Bloqueio/activação
Key Lock
O accionamento da tecla Key-
Lock na modalidade de espera
ou activa, provoca o bloqueio
do teclado; o led Key-Lock “9”
ilumina-se de modo estático.
O controlo continua a
trabalhar na modalidade
anteriormente seleccionada,
ma não pode mais ser
comandado por outras teclas,
excepto pela tecla Key-Lock ou
pela tecla ON/OFF.
A desactivação com a
tecla ON/OFF pode
ser feita também em
estado de bloqueio. O led
correspondente da tecla
key lock apaga-se quando
se desactivam o touch e a
função Key-Lock. O led fica
novamente activo em caso
de reacendimento (dentro de
10 seg.) até quando não for
desactivado o reacendimento
accionando novamente a tecla
Key-Lock. A activação/
desactivação da função Key-
Lock na modalidade de OFF
não é possível.
Desbloqueio/
desactivação Key Lock
O novo accionamento
da tecla Key-Lock na
modalidade de espera
ou activa provoca o
desbloqueio do teclado e a
desactivação do led Key-
Lock designado. Todas as
teclas sensoras podem ser
novamente accionadas.
Key Lock
(kinderveilig)
Blokkering/
activering Key Lock
De activering van de toets Key-
Lock in de wacht- of actieve
modus, brengt de blokkering
van het toetsenbord met zich
mee; de led Key-Lock “9”
wordt statisch verlicht.
De besturing blijft werken in
de eerder ingestelde modus,
maar kan niet door andere
toetsen bestuurd worden, met
uitzondering van de toets
Key-Lock of de ON/OFF-toets.
Uitschakeling van de
ON/OFF-toets is ook mogelijk
tijdens de blokkeringstoestand.
De led die overeenkomt
met de toets key lock gaat
uit, wanneer de touch en
de functie Key-Lock wordt
gedeactiveerd.. De led is
opnieuw actief in geval van
herinschakeling (binnen
10 sec.) totdat hij weer
gedeactiveerd wordt door
opnieuw op de toets Key-Lock
te drukken. De activering/
deactivering van de functie
Key-Lock in de OFF-modus is
niet mogelijk.
Deblokkering/
deactivering Key Lock
Het opnieuw activeren van
de toets Key-Lock in de
wacht- of actieve modus,
brengt de deblokkering van het
toetsenbord en de uitschakeling
van de toegewezen led
Key-Lock met zich mee. Alle
sensortoetsen kunnen opnieuw
geactiveerd worden.
Key Lock
(Kindersicherung)
Key Lock sperren/
aktivieren
Bei Drücken der Taste Key-
Lock im Wartemodus oder in
der aktiven Betriebsart wird
das Bedienfeld gesperrt. Die
LED Key-Lock “9” leuchtet
fix.
Die Bedienung arbeitet
weiter in der zuvor
eingestellten Betriebsart,
kann aber nicht von anderen
Tasten gesteuert werden als
von der Taste Key-Lock oder
der ON/OFF-Taste.
Das Ausschalten mit der
ON/OFF-Taste kann auch
im gesperrten Zustand
erfolgen. Die LED der Taste
Key Lock geht aus, wenn das
Bedienfeld und die Funktion
Key Lock deaktiviert werden.
Die LED leuchtet wieder
bei erneutem Einschalten
(innerhalb von 10 s) bis sie
durch erneutes Drücken der
Taste Key-Lock ausgeschaltet
wird. Das Ein-/Ausschalten
der Funktion Key-Lock ist
in der Betriebsart OFF nicht
möglich.
Key Lock freigeben/
ausschalten
Das erneute Drücken der Taste
Key-Lock im Wartemodus
oder in der aktiven
Betriebsart hat die Freigabe
des Bedienfelds und das
Ausschalten der zugeordneten
LED Key-Lock zur Folge. Alle
Sensortasten können erneut
betätigt werden.
BASIC BASIC BASIC
BASIC
BASIC BASIC BASIC BASIC

IT GB FR
Key-Lock
(sicurezza
bambini)
G4
Aivazione e
disaivazione
L’azionamento del
tasto key-lock nella
modalità di aesa o
aiva comporta il
disinserimento della
potenza in entrambi
i fuochi. Sul display
compare il simbolo “11”.
È possibile solo il totale
spegnimento con il tasto
ON/OFF o lo sblocco
azionando il simbolo
key-lock e dopo il bip il
simbolo “+” o “-”.
Per bloccare in sicurezza
la regolazione di
un fuoco, azionare
contemporaneamente
il simbolo TIMER e
il simbolo “-” relativi
al fuoco stesso. Il led
key-lock “9” si accende.
Il controllo continua a
lavorare nella modalità
precedentemente
impostata e non può
essere comandata da
altri tasti, tranne
lo spegnimento con
il tasto key-lock.
Lo sblocco avviene
azionando di nuovo
contemporaneamente
il simbolo TIMER e il
simbolo “-”
Key-Lock
(child safety)
G4
Activation and
deactivation
The activation of the
key-lock in the pause
or active mode causes
the deactivation of the
power to both burners.
The symbol “11”
appears on the display.
It can only be totally
turned off with the
ON/OFF buon or the
release by activating
the key-lock symbol
and then the “+” o “-”
symbol aer the beep.
To block the
regulation of a burner
in safety, activate
the TIMER symbol
and the “-” symbol
related to the burner
at the same time. The
key-lock “9” LED will
light. The control will
continue to operate
in the previously set
mode and cannot be
controlled by other
buons, except for
switching off with the
key-lock buon. The
release is performed
by activating again
the TIMER symbol
and the “-” symbol
together.
Key-Lock
(sécurité enfants)
G4
Activation et
désactivation
L’actionnement de
la touche key-lock en
mode d’aente ou actif
entraîne la désactivation
de la puissance au
niveau des deux
flammes. L’afficheur
indique « 11 ». La touche
ON/OFF ne permet
que l’extinction totale
ou le déverrouillage en
actionnant le symbole
key-lock et, après le Bip,
le symbole « + » ou « - ».
Pour verrouiller en
toute sécurité le réglage
d’une flamme, actionner
simultanément le
symbole TIMER et le
symbole « - » relatifs à
la flamme en question.
La LED key-lock
« 9 » s’allume. Le
contrôle continue à
travailler dans le mode
sélectionné et ne peut
pas être commandé
par d’autres touches
; seule l’extinction
est possible au moyen
de la touche key-lock.
Pour le déverrouillage,
actionner de nouveau
simultanément le
symbole TIMER et le
symbole « - ».
26

ES NL PTDE
Key-Lock
(kinderveilig)
G4
Activering en
deactivering
De activering van de
toets key-lock in de
wachtmodus of actief
brengt de uitschakeling
van het vermogen in
beide branders met
zich mee. Op het
display verschijnt
het symbool “11”. De
totale uitschakeling
is alleen mogelijk met
de ON/OFF-toets, of
de deblokkering door
het symbool key-lock
te activeren en na de
pieptoon het symbool
“+” of “-”.
Om de afstelling van
een brander veilig te
blokkeren, tegelijkertijd
het symbool TIMER
en het symbool “-”
met betrekking tot de
brander zelf activeren.
De led key-lock “9”
gaat aan. De besturing
blij werken in de
eerder ingestelde
modus en kan niet
door andere toetsen
bestuurd worden,
behalve het uitzeen
met de toets key-lock.
De deblokkering
vindt plaats door
opnieuw tegelijkertijd
het symbool TIMER
en het symbool “-” te
activeren.
Key-Lock
(dispositivo de segurança
para as crianças)
G4
Activação e
desactivação
O accionamento do botão
key-lock, na modalidade
de espera ou activa,
comporta o desligamento
da potência em ambos
os fogos. No display
aparece o símbolo “11”.
É possível só o total
desligamento com o
botão ON/OFF ou o
desbloqueio accionando o
símbolo key-lock e, após o
bip, o símbolo “+” o “-”
Para bloquear com
segurança a regulação
de um fogo, accionar
simultaneamente o
símbolo TIMER e o
símbolo “-”, relativos
ao próprio fogo. O led
key-lock “9” acende-se.
O controlo continua a
trabalhar na modalidade
anteriormente
seleccionada e não pode
ser comandada por
outros botões, excepto o
desligamento com o botão
key-lock. O desbloqueio
realiza-se accionando de
novo simultaneamente
o símbolo TIMER e o
símbolo “-”
Key-Lock
(Kindersicherung)
G4
Aktivierung und
Deaktivierung
Das Betätigen der
Taste key-lock in der
Betriebsart Warten oder
der aktiven Betriebsart
hat das Ausschalten der
Leistungszufuhr beider
Herdstellen zur Folge. Auf
dem Display erscheint das
Zeichen “11”. Jetzt können
Sie den Herd nur komple
mit der Taste ON/OFF
ausschalten oder durch
Betätigen des Symbols key-
lock und anschließendes
Drücken des Zeichens “+”
oder “-” nach dem Piepton
freigeben.
Um die Einstellung
einer Herdstelle sicher
zu sperren, betätigen
Sie gleichzeitig das
Zeichen TIMER und
das Zeichen “-” der
betroffenen Herdstelle.
Die LED key-lock “9”
leuchtet. Die Steuerung
läu weiter in der
zuvor eingestellten
Betriebsart und kann
nicht von anderen
Tasten angesteuert
werden, außer das
Ausschalten mit
der Taste key-lock.
Die Freigabe erfolgt
durch erneutes und
gleichzeitiges Betätigen
des Zeichens TIMER
und des Zeichens “-”
Key-Lock
(seguridad niños)
G4
Activación y
desactivación
El accionamiento de
la tecla Key-Lock en la
modalidad de espera
o activa, comporta
la desactivación de
la potencia en ambos
fogones. En la pantalla de
visualización aparece el
símbolo “11”, es posible
el apagado total sólo con
la tecla ON/OFF o el
desbloqueo accionando
el símbolo key-lock y
después del bip el símbolo
“+” o “-”.
Para bloquear con
seguridad el ajuste de un
fogón, accionar de forma
contemporánea el símbolo
TEMPORIZADOR
y el símbolo “-”
correspondientes al fogón.
El led key-lock “9” se
encenderá. El control
continúa trabajando
en la modalidad
configurada previamente
y no se puede controlar
mediante otras teclas,
menos el apagado que
se controla con la tecla
Key-Lock. El desbloqueo
se produce accionando
de nuevo de forma
contemporánea el símbolo
TEMPORIZADOR y el
símbolo “-”.
27

28
IT GB FR
Booster e Gestione
della potenza per
l’induzione - G4
(Fig. 2a)
Tutte le zone di cottura
ad induzione “G4”
dispongono di una funzione
Booster. Il generatore, con
Booster attivato, mette a
disposizione della zona
di cottura una potenza
significativamente
superiore alla potenza
nominale. Il Booster
permette un riscaldamento
particolarmente rapido
del cibo e permette quindi
all’utente di risparmiare
del tempo.
La funzione Booster può
essere attivata nel seguente
modo:
- La zona cottura deve
trovarsi sul livello
massimo possibile;
- Azionando ulteriormente
il tasto “+”, si attiva
la funzione Booster.
Sull’indicazione della
zona di cottura viene
visualizzato in modo
statico una “P”.
1 - da 1400 a 1800 W
2 - da 2300 a 3200 W
Per motivi di sicurezza, la
funzione Booster per ogni
zona di cottura può essere
attivata solo per una durata
limitata di 10 minuti. Se
durante il tempo Booster
la pentola viene tolta dalla
zona di cottura, la funzione
Booster rimane attivata e
anche il tempo Booster non
viene disattivato.
Con il Booster attivato,
l’azionamento del tasto “-”
comporta il disinserimento
della funzione Booster.
L’azionamento del tasto “+”
non comporta alcuna reazione.
Booster et gestion
de la puissance pour
l’induction – G4
(Fig. 2a)
Tous les foyers à
induction “G4” sont
munis d’une fonction
Booster. Lorsque le
Booster est enclenché,
le générateur produit
une puissance
nettement supérieure à
la puissance nominale
pour le foyer. Le Booster
permet un chauffage
particulièrement
rapide des aliments et
permet à l’utilisateur
d’économiser du temps.
La fonction Booster peut
être enclenchée comme
suit :
- Le foyer doit se
trouver au niveau le
plus élevé,
- En enclenchant
encore la touche
“+”, on enclenche
la fonction Booster.
L’indication du foyer
affiche un « P » en
mode statique.
1 -
de 1400 à
1800 W
2 - de 2300
à
3200 W
Pour des raisons de sécurité,
la fonction Booster ne peut
être enclenchée pour chaque
foyer que durant une durée
maximum de 10 minutes. Si
durant le temps Booster, on
retire la casserole du foyer,
la fonction Booster reste
enclenchée et le temps de
Booster n’est pas déclenché.
Lorsque le Booster est
enclenché, l’enclenchement
de la touche “-”implique le
déclenchement de la fonction
Booster. L’enclenchement de
la touche « + » n’entraîne
aucune réaction.
Booster and
induction power
management - G4
(Fig. 2a)
All “G4” induction
and cooking zones
have a Booster
function. The
generator, with
Booster On, gives
the cooking zone
power that is
significantly greater
than the rated
output. The booster
allows a particularly
rapid heating of the
food thereby saving
the user time.
The Booster function
can be activated as
follows:
- The cooking zone
must be at the
maximum possible
level;
- The Booster function is
activated by pressing
the “+” button again. A
fixed “P” is displayed
on the indication of the
cooking zone.
1 -
from 1400 to
1800 W
2 - from 2300 to 3200 W
For safety reasons,
the Booster function
for each cooking zone
can only be activated
for a limited time of
10 minutes. If the pan
is removed from the
cooking zone during
the Booster time,
the Booster function
remains on and also
the Booster time is not
deactivated.
The Booster is switched
off by pressing the “-“
button. The “+” has no
effect whatsoever.

29
ES NL PTDE
Booster y Gestión de
la potencia para la
inducción - G4
(Fig. 2a)
Todas las zonas de cocción
por inducción “G4”
disponen de una función
Booster. El generador, con
el Booster activado, pone
a disposición de la zona
de cocción una potencia
significativamente
superior a la potencia
nominal. El Booster
permite un calentamiento
particularmente rápido
de los alimentos y, por
lo tanto, permite que el
usuario ahorre tiempo.
La función Booster
se puede activar de la
siguiente forma:
- la zona de cocción tiene
que encontrarse en el
nivel máximo posible;
- accionando ulteriormente
la tecla “+”, se activa
la función Booster. En
la indicación de la zona
de cocción se visualiza
una “P” en modalidad
estática.
1 - de 1400 a 1800 W
2 - de 2300 a 3200 W
Por motivos de seguridad,
la función Booster para cada
zona de cocción sólo se puede
activar durante un tiempo
límite de 10 minutos. Si
durante el tiempo Booster la
cacerola se saca de la zona de
cocción, la función Booster
permanece activa y tampoco
se desactiva el tiempo Booster.
Con el Booster activado, el
accionamiento de la tecla “-”
comporta la desactivación
de la función Booster. El
accionamiento de la tecla
“+” no comporta ninguna
reacción.
Booster e Gestão
da potência para a
indução - G4
(Fig. 2a)
Todas as zonas de
cozedura por indução
“G4” dispõem de
uma função Booster.
O gerador, com
Booster activado, põe à
disposição da zona de
cozedura uma potência
significativamente
superior à potência
nominal. O Booster
permite um aquecimento
particularmente rápido
do alimento e permite que
o utilizador poupe tempo.
A função Booster pode
ser activada do seguinte
modo:
- A zona de cozedura
deve estar no máximo
nível possível;
- Accionando mais uma
vez a tecla “+”, activa-
se a função Booster. Na
indicação da zona de
cozedura visualiza-se
de modo estático um
“P”.
1 - da 1400 a 1800 W
2 - da 2300 a 3200 W
Por motivos de segurança,
para cada zona de cozedura,
a função Booster pode ser
activada só por um tempo
limitado de 10 minutos. Se
durante o tempo Booster o
recipiente for retirado da zona
de cozedura, a função Booster
permanece activada como
também o tempo Booster.
Com o Booster activado,
o accionamento da tecla
“-” comporta a desactivação
da função Booster. O
accionamento da tecla “+”
não comporta nenhuma
reacção.
Booster en Beheer van
het inductievermogen
- G4
(Afb. 2a)
Alle inductie-kookzones
“G4” beschikken over
een Booster-functie.
De generator, met
geactiveerde Booster,
stelt een vermogen ter
beschikking van de
kookzone dat aanzienlijk
hoger is dan het nominaal
vermogen. De Booster
maakt een bijzonder
snelle verwarming van
het voedsel mogelijk,
waardoor de gebruiker
dus tijd kan besparen.
De Booster-functie kan als
volgt worden geactiveerd:
- de kookzone moet zich
op het maximumniveau
bevinden;
- door nog een keer te
drukken op de “+”-
toets, wordt de Booster-
functie geactiveerd.
Op de aanduiding
van de kookzone
wordt statisch een “P”
weergegeven.
1 - van 1400 tot 1800 W
2 - van 2300 tot 3200 W
Om veiligheidsredenen kan
de Booster-functie voor iedere
kookzone alleen worden
geactiveerd voor een beperkte
tijdsduur van 10 minuten. Als
de pan tijdens de Booster-
tijd van de kookzone wordt
verwijderd, blijft de Booster-
functie geactiveerd en wordt
ook de Booster-functie niet
gedeactiveerd.
Bij geactiveerde Booster zorgt
het drukken op de “-”-toets
voor uitschakeling van de
Booster-functie. De activering
van de “+”-toets brengt geen
enkele reactie teweeg.
Booster und Steuerung
der Induktionsleistung
- G4
(Abb. 2a)
Alle
Induktionskochfelder
“G4” verfügen über
eine Booster-Funktion.
Der Generator stellt
bei aktiviertem
Booster dem Kochfeld
eine deutlich über der
Nennleistung liegende
Leistung bereit. Mit
dem Booster können
Sie Gerichte besonders
schnell erhitzen und
von daher Zeit sparen.
Die Booster-Funktion
kann folgendermaßen
aktiviert werden:
- Das Kochfeld muss
sich auf der höchsten
Stufe befinden;
- Bei weiteren Drücken
der Taste “+”
wird die Booster-
Funktion aktiviert.
Auf der Anzeige des
Kochfeldes erscheint
ein fix leuchtendes “P”.
1 - von 1400 bis 1800 W
2 - von 2300 bis 3200 W
Aus Sicherheitsgründen
kann die Booster—
Funktion für jedes Kochfeld
nur maximal 10 Minuten
aktiviert werden. Wenn
der Topf während der
Booster-Zeit vom Kochfeld
genommen wird, bleibt die
Booster-Funktion weiterhin
aktiv und auch die Booster-
Zeit wird nicht deaktiviert.
Bei aktiviertem Booster
führt das Drücken der
Taste “-” zum Ausschalten
der Booster-Funktion. Das
Drücken der Taste “+” hat
keine Reaktion zur Folge.

30
IT GB FR
Funzione manteni-
mento della tempe-
ratura (Lo Temp)
La funzione manteni-
mento della temperatura
serve per mantenere
riscaldati i cibi pronti
su una zona di cottura.
A tale scopo, la zona di
cottura prescelta viene
alimentata con una
potenza bassa.
La funzione di manteni-
mento della temperatura
viene attivata impostan-
do il livello di cottura
tra 0 e 1; su entrambe
le indicazioni delle zone
di cottura viene quindi
visualizzato il simbolo
“Lo” (vedi sopra).
Abbassando i gradi
di cottura con il tasto
Meno premuto, ci
si ferma al livello di
cottura di mantenimen-
to della temperatura;
per commutare a livello
0 occorre un nuovo
azionamento.
Fonction de maintien
de la température
(Lo Temp)
La fonction de
maintien de la
température sert à
garder au chaud les
aliments prêts sur
un foyer. Pour ce
faire, le foyer choisi
est alimenté par une
faible puissance.
La fonction de maintien
de la température
est enclenchée en
programmant le niveau
de cuisson entre 0 et 1.
Sur les deux indications
des foyers, le symbole
« Lo » s’affiche (voir
ci-dessus).
En diminuant les
degrés de cuisson avec
la touche Moins, on
s’arrête au niveau de
cuisson de maintien de
la température. Pour
commuter au niveau
O, il faut appuyer à
nouveau.
Keep- warm
function (Lo Temp)
The keep-warm
function serves
to keep the food
on a cooking
zone warm. To do
so, the selected
cooking zone is
supplied with a
lower power.
The keep-warm
function is activated
by setting the
cooking level
between 0 and 1.
The “Lo” symbol is
thereby indicated on
both cooking zone
displays (see above).
Lowering the
cooking temperature
with the “-“ button
pressed, the
temperature stops
on the keep-warm
cooking level. Push
the button again to
switch to “0”.

31
ES NL PTDE
Función
mantenimiento de la
temperatura (Lo Temp)
La función de
mantenimiento de la
temperatura sirve para
mantener calientes los
alimentos que ya están listos
sobre una zona de cocción.
Con esta finalidad, la zona de
cocción escogida se alimenta
con una potencia baja.
La función de
mantenimiento de la
temperatura se activa
configurando el nivel de
cocción entre 0 y 1; por
lo tanto, sobre ambas
indicaciones de las zonas
de cocción se visualiza
el símbolo “Lo” (véase
encima).
Reduciendo los grados
de cocción con la tecla
Menos pulsada, se detiene
en el nivel de cocción
de mantenimiento de la
temperatura; para conmutar
al nivel 0 es necesario un
nuevo accionamiento.
Função de manutenção
da temperatura
(Lo Temp)
A função de manutenção
da temperatura serve
para manter os alimentos
prontos, aquecidos numa
zona de cozedura. Para
tal finalidade, a zona de
cozedura pré-escolhida
é alimentada com uma
potência baixa.
A função de manutenção
da temperatura activa-se
programando o nível
de cozedura entre 0 e
1; logo, em ambas as
indicações das zonas de
cozedura visualiza-se o
símbolo “Lo” (ver acima).
Abaixando os graus
de cozedura com
a tecla “menos”
pressionada, para-se
no nível de cozedura
de manutenção da
temperatura; para
comutar para o nível 0 é
necessário efectuar um
novo accionamento.
Functie
temperatuurbehoud
(Lo Temp)
De functie
temperatuurbehoud
dient voor het warm
houden van gereed
voedsel op een
kookzone. Daarvoor
wordt de gekozen
kookzone gevoed met
een laag vermogen.
De functie
temperatuurbehoud
wordt geactiveerd door
het kookniveau in te
stellen tussen 0 en 1; op
alletwee de aanduidingen
van de kookzones wordt
dus het symbool “Lo”
weergegeven (zie boven).
Door de kookgraden
te verlagen met
ingedrukte Min-toets,
wordt er gestopt op
het kookniveau voor
temperatuurbehoud;
voor omschakeling naar
niveau 0 is een nieuwe
activering nodig.
Warmhaltefunktion
(Lo Temp)
Die Warmhaltefunktion
dient dazu, fertige
Gerichte auf einem
Kochfeld warm zu
halten. Zu diesem
Zweck wird das
gewählte Kochfeld
mit einer niedrigen
Leistung gespeist.
Die Warmhaltefunktion
wird aktiviert, indem
die Kochstufe auf
zwischen 0 und 1
eingestellt wird. Auf
beiden Anzeigen der
Kochfelder wird dann
das Zeichen “Lo” (siehe
oben) angezeigt.
Bei Herabsetzen
der Kochgrade mit
gedrückter Minustaste
wird auf der
Warmhaltetemperatur
gestoppt. Um auf Stufe
0 umzuschalten müssen
Sie erneut die Taste
drücken.

3
IT GB FR
;$;!&; ;'%
%#;%;!'
$$;&'!;
; &%&
%;$$
%%;$
; '%;$;!'%%
%;$$%
%
$;%P$
;; ;
&#;$$;
;%%;'&;;!$;
;$$'%;;
;
;$
%;$$'%
%;
&'$;%
;;$$;'$
$$$;!#
;'
#;;#;%%
%;&&;&;&'$$
&'!; $;
%;
;#;&;&$ %
;%$$;
';%;
%;;!%
% %;&%;
; ;% %
$;$%'$;
;&$ %;;'%
; ';%'
;$;'; ;
$%
%;% %; ;
&'$;!% ;%;
%
;%;;
'%;&$%
!'%%
; ;$'&;&%;%
$&; &&
%;
&%;;;
%%;!;!! %;&'$
$; ;%$
*$H#-,%)(+
A;R-;#1%;7.3;$%2%#2;
#0#+;(.5%4%0;1,;R-
2(%;(.";130&#%
R,,%$R2%7;$R1#.--%#2
2(%;.5%0;137
A;5(%-;2(%;(.";R1;R-;31%
+%%;;,-%2R8"%
."*%#21;57;#0%$R2
#0$1;&.7;$R1+1
##32.01;-$;1.;.-
A;$.;-.2;31%;-7
3,R-R3,;&.R;.0;
#%
-7;&..$123&&1;50%$;R-
3,R-R3,;&.R;$R0%#27
.-;2(%;(."
A;$.;-.2;#%;-7;,%2
."*%#21;13#(;1;+-R4%1
&.0+1;1..-1;-$;R$1;.-
2(%;(.";130&#%;1;2(%7
5R;(%2;3
A;5(%-;#..+R-;R-;;-.-A
12R#+;-;5R2(.32
1%1.-R-;
$.;-.2;%6#%%$
A
;+R,21%0@;./%A(%!1R,'
1R+%
A;4(%,;#--*R,';&--$;1(!1
+!5;%!0R5;01R
#*;01!/1;!1;!
-4;.-4%/;-21.21;%3%
!,$;1(%,;0-45;R,#/%!0%
4(R%;/%'2!/5;01R//R,'
A;!&1%/;#--*R,';R0
&R,R0(%$;04R1#(;-&&;20R,'
1(%;#-,1/-;./-3R$%$
;12/,
$-4,;1-;78;!
,$;$-;,-1
/%5;-,;1(%;.!,;0%,0-/
;&;'&;%&;$
%; '%;!&&';0
$/1;&';$;&'!; '
$%; ;'&&%; /P%#
/ %;$$
;% %;$$;/$%
';/
$;%/&P$
$;';&; ;/ ; &
'&;$'$&;
;%'$&;&; ;
$'%';%;$
%;
$%&
%$
/&; %&;$;
$'%';&';$;$%;
'&&%
;%';&; P&
/$$'&;$&;';'
';!'#&;'$$
&;
'$&;&';$;&'
!; '
$%; ;'&&%;';/
'$&;&;#
'!!%
;&;'&;!!';$;'&&%
';%; ;&&$&
% #/&&;;&%&;&&
&%%%;$;$;
&
;#'!!;,;'%;'; '
%'&
;$&; ;$;'&&%; $
%&;';'%
#;&'
;$;!% ; ;$
&&$;
%;,
'&&%;%$;
'%;
&&%
';%;'%;&'%
%;!%; '$&%;/%
%;%%
%;&';$; &&
!;/';,;;!!; //
%;'&',;;;%;
&
&;!;'; /'; ;
&
2

3
DE ES NL PT
)*+%H",+'#X(#"'$(
A;"%R+;2&1/%1%,;!2#(;$%0
*%R,01%,;R00%0;$%/
!0*%/!+R*-"%/&z#(;0-&-/1
$R%;1/-+62&2(/
2,1%/"/%#(%,E
A;4z(/%,$;$%0; %1/R%"0;0R,$
+!',%1R0R%/"!/%;%'%,01z,$%
4R%;/%$R1*!/1%,A;R0*%11%,A
!0#(%,/%#(,%/;204;&%/,;62
(!1%,E
A;,R%+!0;2+R,R2+&-R%
"%,216%,;-$%/;R,;2+R,R2+
3%/.!#*1%;/-$2*1%
;$R/%*1
!2&;$R%;z#(%;%'%,E
A;*%R,%;%1!'%'%,01z,$%
4R%;%00%/;!"%,;z&&%
2,$;%#*%;!2&;$R%
-#(&!#(%;%
'%,;$!+R1;0R%
,R#(1;(%Rg;4%/$%,
A;"%R+;-#(%,;+R1;z.&%,
+R1;,1R(!&1"%0#(R#(12,'
-(,%;2'!"%;3-,;%11;R01;$R%
%3%,12%%;-/4z
/+6%R
1;!2&
%R,%;-$%/;64%R;R,21%,;62
"%0#(/z,*%,E
A;$!0;-#(%,;3-,;62+
,0%16%,;,%R'%,$%,
%"%,0+R11%,;!2&;*%R,01%/
12&%;"%'R,,%,;2+;$!,,
2,1%/;(z2&R'%+;z(/%,;!2&
(z(%/%;12&%,;62;0#(!1%,
A;,!#(;$%+;%"/!2#(;z"%/
$R%;3-/'%0%(%,%;-//R#(12,'
!200#(!1%,;%/+R,$%/2,'
"R0;!2&;78;-(,%
;0R#(;!2&
$%,;
-.&0%,0-/;62;3%/!00%,
))*U)*K+'##,*$K$&$(
A;!0;%/;%%,;--*;*%R,01%
0#(%2/;R,;$%;-..%/3!*1%;2R1
'!0#%/!+R%*;*-+1;-,+R$A
$%R)*;$%;01/--+1-%3-%/
-,$%/"/%*%,E
A;1R)$%,0;$%;4%/*R,';6R),
+!',%1R0%%/"!/%;3--/4%/.%,
6-!0;#/%$R1#!/$0;&-..5
$R0*0;6!*/%*%,+!#(R,%0
%63;-.;%%,;!&01!,$;1%
(-2$%,E
A;,--R1;!2+R,R2+&-R%
'%"/2R*%,
;-&;R,;"!$A
!2+R,R2+;3%/.!*1%
./-$2*1%,;$R/%*1;-.;$%;3!*1%
%''%,E
A;'%%,;+%1!%,;3--/4%/.%,
6-!0;+%00%,;3-/*%,;%.
%0
%,;$%*0%0;-.;$%;*--*3!*1%
.!!10%,;-.$!1;6%;,R%1;(%%1
4-/$%,E
A;"R);(%1;*-*%,;+%1;.!,,%,
+%1;%%,;!,1R(%#(1!!'
6-,$%/;'%"/2R*;3!,;3%1;R0;$%
%3%,12%%;-.4!/+R,'1R
)$;1-1
ff,;-&;14%%;+R,21%,;1%
"%.%/*%,E
A;(%1;*-*%,;3!,;%3%,0A
+R$$%%,;$R%;'!24;!!,6%11%,
-.;*%R,01%;01!,$;"%'R,,%,
-+;$!!/,!;3!!*;/-%/%,$;-.
%%,;(-'%/%;01!,$;1%
0#(!*%%,
A;0#(!*%;(%1;*--*3!*;,!
'%"/2R*;2R1;+%1;$%
"%$R%,R,'0*,-
.;!&,!+%;1-1
78;%,;3%/1/-24;,
R%1;-.;$%
.!,(%/*%,,R,'
;'% ;&;!;'%'
&;&2$;'%;!';z%
;$;&'!; ;
+; &%
% %;$;&'
%&;$/
; '%;$;!'%%%
$;$;$;';&
' ;%;
&; ;/ ; &&
$'$ &;
;%'%;'&;#&; ;$
;$'
%
;;
'&;%'$&;%
$'%; %;&P
$;$%
;$&;P&;+$&;
'#$$&;% &
'#&;;&;%; P%
&
;
'&&;&P;$;&'
!; $;$%;;
';&;$%%
; '%;$;2%;%
%&; ;!% ;%
#%;&%;% %
&
&;$;$;
;$%%;;'%;
&;%'&
;$;2%; ;$%&;
%
% %;;&;%;$
!% ;%;;%
z%
;
;$';'%
$% ;!'%%
;&'/&; $;'&;'
%;$; &&;&%
%; &%'2%;#&
34;;%;%!z;%;
$;
; ;$$&
_
;;!&;&;'
z%;!';
&'!z; ; s
&$; %;
$%.-;$/
; '%;;!'%%%
!
&;$
%+$;;}&
;/ &'&
$$ &
;%-;'&;%'%;!$#&;
$;;$'z%;';
'&;%$ &;
$'z%;
%;%
$%
;&;P&;+$&;&
;!&;!&;$#&
;0&&;%-; ;&
$ &;%;&'!z
;
$%
;;;'
;&
&'%
;%; ';
%&;;;P&;%
0%;&;
%P'.-; ;
$;;%'$;
;
/'%;;';
'
&;%'&
;; '; ;$%&
;% 0%;
%'&
.}&;%;!'%
.;;;0%
z%;; &
'%;%
!'%%
;2&;;'&;
'$;
&&; ;
&$; &%;/
34H;%-;%!;%;
;%$&
3
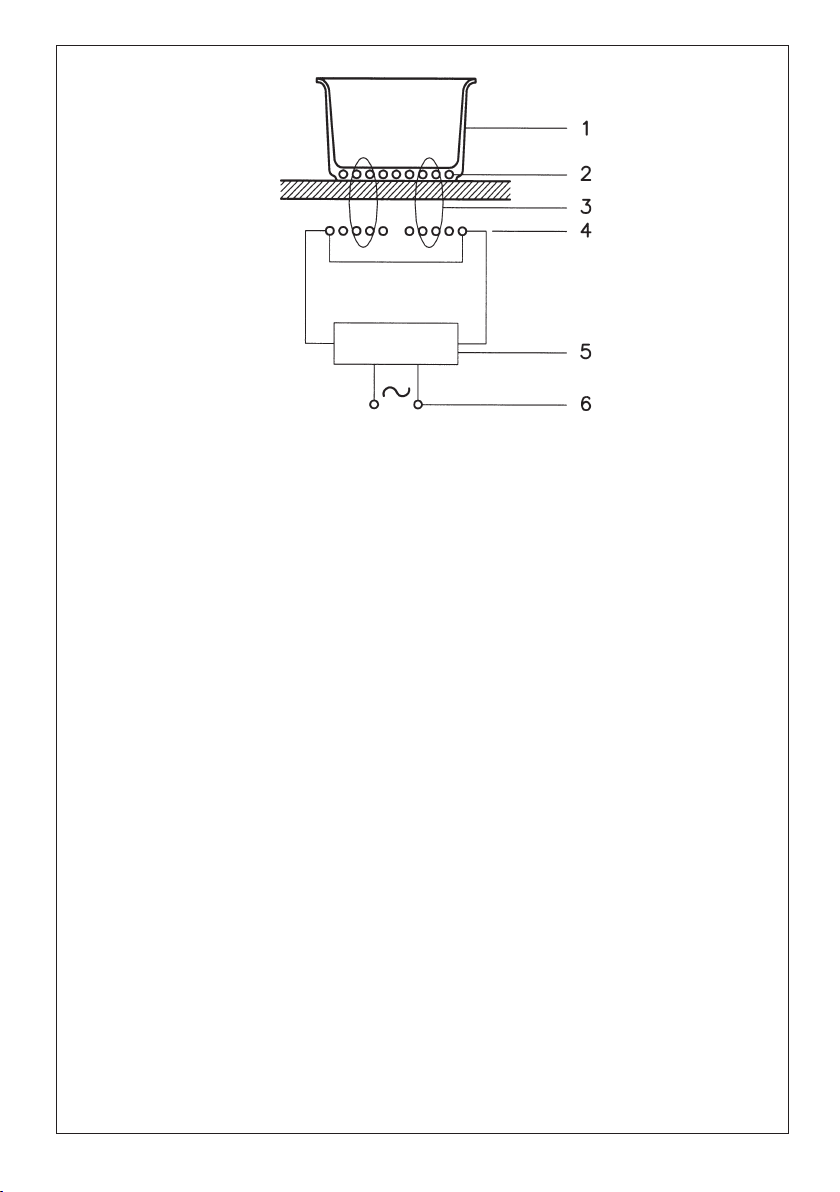
34
UHFLSLHQWHYHVVHOFDVVHUROH*HIlHUHFLSLHQWHSDQUHFLSLHQWH
FRUUHQWHLQGRWWDLQGXFHGFXUUHQWFRXUDQWLQGXLW,QGXNWLRQVVWURPFRUULHQWHLQGXFLGDLQGXFWLHVWURRP
FRUUHQWHLQGX]LGD
FDPSRPDJQHWLFRPDJQHWLFILHOGFKDPSPDJQpWLTXH0DJQHWIHOGFDPSRPDJQpWLFRPDJQHWLVFKYHOG
FDPSRPDJQpWLFR
LQGXWWRUHLQGXFWRULQGXFWHXU,QGXNWRULQGXFWRULQGXFWRULQGXWRU
FLUFXLWRHOHWWURQLFRHOHFWURQLFFLUFXLWFLUFXLWpOHFWURQLTXH6WURPNUHLVFLUFXLWRHOHFWUyQLFRVWURRPFLUFXLW
FLUFXLWRHOHFWUyQLFR
DOLPHQWD]LRQH HOHWWULFD SRZHU VXSSO\ DOLPHQWDWLRQ pOHFWULTXH 6WURP]XIXKU VXPLQLVWUR HOpFWULFR
VWURRPWRHYRHUDOLPHQWDomRHOpFWULFD
)LJ$EE$IE
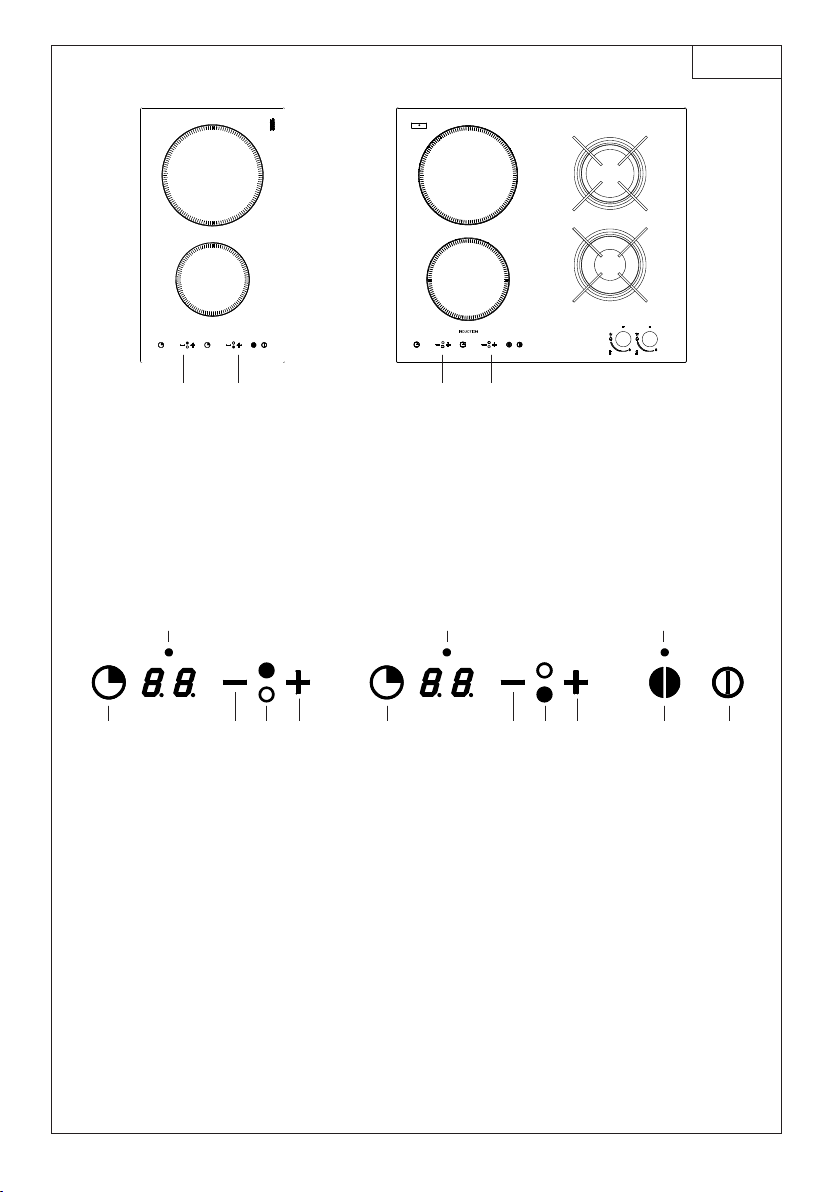
35
C2INB1 dEC2G2INBA; dEC2G2INBA-S
INDUCTION
2
1
21
2
1
21
1. zona cottura Ø 160/1400W - cooking zone Ø 160/1400W - zone de cuisson Ø 160/1400W - Kochzone Ø
160/1400W - zona de cocción Ø 160/1400W - kookplaat Ø 160/1400W - zona de cozimento Ø 160/1400W
2. zona cottura Ø 200/2300W - cooking zone Ø 200/2300W - zone de cuisson Ø 200/2300W - Kochzone Ø
200/2300W - zona de cocción Ø 200/2300W - kookplaat Ø 200/2300W - zona de cozimento Ø 200/2300W
53b74 53a6421
889
1. accensione/spegnimento - On/Off - mise en marche/arrêt - Ein-/Ausschalten - encendido/apagado -
inschakeling/uitschakeling - activação/desactivação
2. sicurezza bambini (key lock) - Child safety (key lock) - sécurité enfants (key-lock) - Kindersicherung
(Key Lock) - seguridad niños (key lock) - kinderveilig (key lock) - dispositivo de segurança para as
crianças (key lock)
3. indicazione zona cottura - Cooking zone indication - indication du foyer - Kochfeldanzeige - indicación
zona de cocción - aanduiding kookzone - indicação da zona de cozedura
4. incremento potenza - Power increase - augmentation de la puissance - Leistung steigern - aumento
potencia - verhoging vermogen - incremento da potência (0-9)
5. decremento potenza - Power Decrease - diminution de la puissance - Leistung mindern - reducción
potencia - afname vermogen - decremento da potência (9-0)
6. Timer/a - Timer/a - Minuterie/a - Timer/a - Temporizador/a - Timer/a - Timer/a
7. Timer/b - Timer/b - Minuterie/b - Timer/b - Temporizador/b - Timer/b - Timer/b
8. Led timer - Timer Led - voyant de minuterie - LED Timer - Led temporizador - Led timer - Led Timer
9. Led key lock - Key lock Led - Voyant key-lock - LED Key Lock - Led key lock - Led key lock - Led key lock
Fig. 2 - Abb. 2 - Afb. 2
BASIC
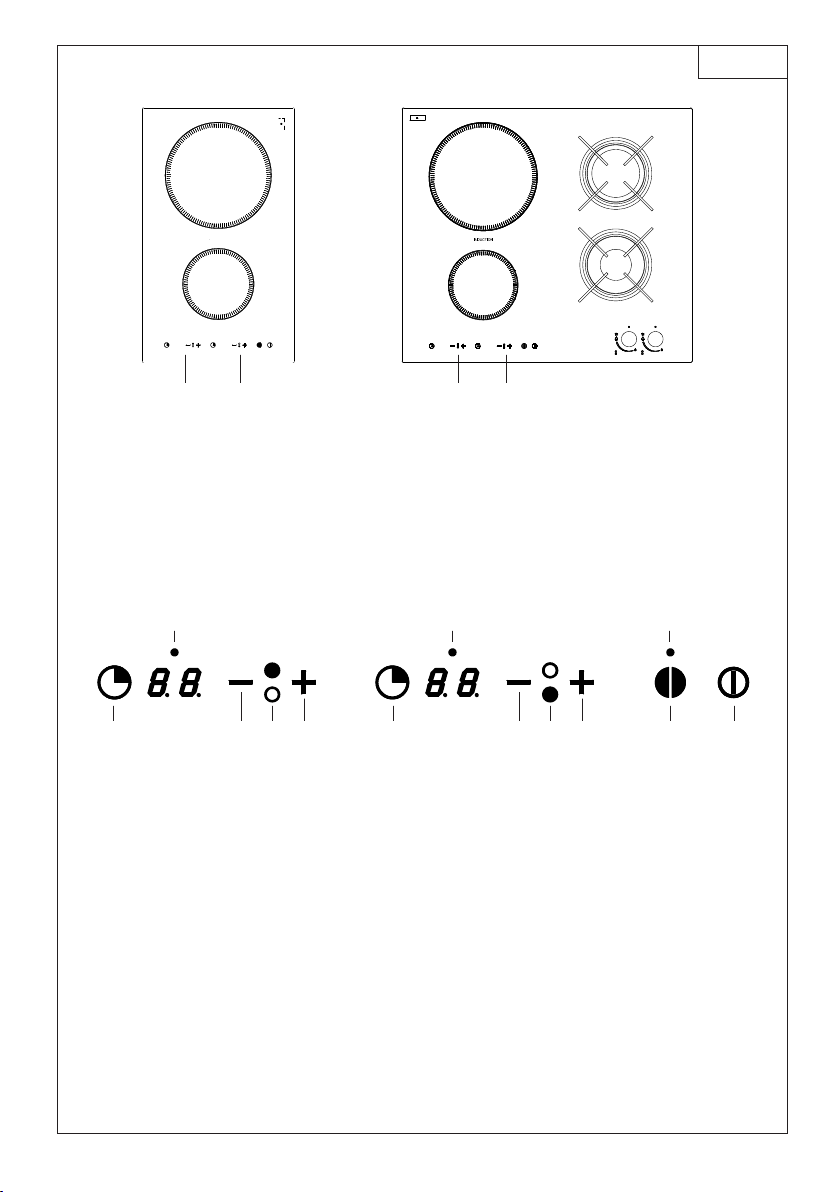
36
C2IN41 dEC2G2ING4; dEC2G2ING4-S
INDUCTION
2
1
21
2
1
21
1. zona cottura Ø 145/1400W - cooking zone Ø 145/1400W - zone de cuisson Ø 145/1400W - Kochzone Ø
145/1400W - zona de cocción Ø 145/1400W - kookplaat Ø 145/1400W - zona de cozimento Ø 145/1400W
2. zona cottura Ø 210/2300W - cooking zone Ø 210/2300W - zone de cuisson Ø 210/2300W - Kochzone Ø
210/2300W - zona de cocción Ø 210/2300W - kookplaat Ø 210/2300W - zona de cozimento Ø 210/2300W
53b74 53a6421
889
1. accensione/spegnimento - On/Off - mise en marche/arrêt - Ein-/Ausschalten - encendido/apagado -
inschakeling/uitschakeling - activação/desactivação
2. sicurezza bambini (key lock) - Child safety (key lock) - sécurité enfants (key-lock) - Kindersicherung
(Key Lock) - seguridad niños (key lock) - kinderveilig (key lock) - dispositivo de segurança para as
crianças (key lock)
3. indicazione zona cottura - Cooking zone indication - indication du foyer - Kochfeldanzeige - indicación
zona de cocción - aanduiding kookzone - indicação da zona de cozedura
4. incremento potenza - Power increase - augmentation de la puissance - Leistung steigern - aumento
potencia - verhoging vermogen - incremento da potência (0-12)
5. decremento potenza - Power Decrease - diminution de la puissance - Leistung mindern - reducción
potencia - afname vermogen - decremento da potência (12-0)
6. Timer/a - Timer/a - Minuterie/a - Timer/a - Temporizador/a - Timer/a - Timer/a
7. Timer/b - Timer/b - Minuterie/b - Timer/b - Temporizador/b - Timer/b - Timer/b
8. Led timer - Timer Led - voyant de minuterie - LED Timer - Led temporizador - Led timer - Led Timer
9. Led key lock - Key lock Led - Voyant key-lock - LED Key Lock - Led key lock - Led key lock - Led key lock
Fig. 2a - Abb. 2a - Afb. 2a
G4

37

38
IT GB FR
3HQWRODPH
)LJ
VHXQDFDODPLWD
DYYLFLQDWDDOIRQGRGL
XQUHFLSLHQWHULPDQH
DWWUDWWDTXHVWDSXzJLj
HVVHUHXQDSHQWROD
DGDWWDDOODFRWWXUDDG
LQGX]LRQH
SUHIHULUHSHQWRODPH
GLFKLDUDWRDQFKHSHU
FRWWXUDDGLQGX]LRQH
SHQWRODPHDIRQGR
SLDWWRHVSHVVR
XQDSHQWRODGLFP
GLGLDPHWURSHUPHWWHGL
VIUXWWDUHODPDVVLPD
SRWHQ]D
XQDSHQWRODSL
SLFFRODULGXFHOD
SRWHQ]DPDQRQ
FDXVHUjGLVSHUVLRQH
G·HQHUJLD
(·FRPXQTXH
VFRQVLJOLDELOHO·XWLOL]]R
GLUHFLSLHQWLGL
GLDPHWURLQIHULRUHD
FP
UHFLSLHQWLLQR[FRQ
IRQGRPXOWLVWUDWRR
LQR[IHUULWLFRVH
SUHFLVDWRVXOIRQGR
SHULQGXFWLRQ
UHFLSLHQWLLQJKLVD
PHJOLRVHFRQIRQGR
VPDOWDWRSHUHYLWDUH
JUDIILDWXUHDOSLDQR
YHWURFHUDPLFR
VRQRVFRQVLJOLDWLH
QRQFRQYHQJRQR
UHFLSLHQWLLQYHWUR
FHUDPLFDWHUUDFRWWD
UHFLSLHQWLLQDOOXPLQLR
UDPHRLQR[QRQ
PDJQHWLFR
DXVWHQLWLFR
&RRNLQJYHVVHOV
)LJ
DPDJQHWDWWUDFWLQJ
YHVVHOPD\EHDVXLWDEOH
YHVVHOIRULQGXFWLRQ
FRRNLQJ
SUHIHUYHVVHOVZKLFKDUH
HVSHFLDOO\GHFODUHGWREH
VXLWDEOHIRULQGXFWLRQ
FRRNLQJ
IODWDQGWKLFN
ERWWRPHGYHVVHOV
DYHVVHOZLWKD
FHQWLPHWHUGLDPHWHU
HQVXUHVWKHPD[LPXP
H[SORLWDWLRQRISRZHU
DVPDOOHUYHVVHOUHGXFHV
SRZHUH[SORLWDWLRQEXW
GRHVQRWFDXVHDQ\
HQHUJ\ORVV
:HZRXOGDQ\KRZQRW
UHFRPPHQGWKHXVHRI
YHVVHOVZLWKGLDPHWHUV
VPDOOHUWKDQFP
VWDLQOHVVVWHHOYHVVHOV
ZLWKPXOWLOD\HURU
IHUULWLFVWDLQOHVVVWHHO
ERWWRPVZKHQVSHFLIL
FDOO\VXLWHGIRULQGXFWLRQ
FRRNLQJ
FDVWLURQSUHIHUDEO\
HQDPHOERWWRPHGYHVVHOV
WRDYRLGVFUDWFKLQJWKH
S\URFHUDPVXUIDFH
ZHGRQRWUHFRPPHQG
WKHXVHRIDQ\JODVV
FHUDPLFHDUWKHQZDUH
DOOXPLQLXPFRSSHURU
QRQPDJQHWLFDXVWHQLWLF
VWDLQOHVVVWHHOYHVVHOV
&DVVHUROHV
)LJ
XQHFDVVHUROHGRQWOH
IRQGDWWLUHO·DLPDQW
VHUDLWGpMjXQD
FDVVHUROHDGDSWpHjOD
FXLVVRQjLQGXFWLRQ
HPSOR\H]SOXW{WGHV
FDVVHUROHVJDUDQWLHV
SRXUODFXLVVRQj
LQGXFWLRQ
FDVVHUROHVDXIRQG
SODWHWpSDLV
XQHFDVVHUROHGH
FPGHGLDPqWUHYRXV
SHUPHWWUDG·H[SORLWHU
ODSXLVVDQFHGXSODQGH
FXLVVRQDXPD[LPXP
XQHFDVVHUROHSOXV
SHWLWHUpGXLWOD
SXLVVDQFHPDLVQH
FDXVHUDSDVGH
GpSHUGLWLRQG·pQHUJLH
1RXVFRQVHLOORQV
TXDQGPrPHGHQHSDV
XWLOLVHUGHUpFLSLHQWV
DYHFXQGLDPqWUH
LQIpULHXUjFP
UpFLSLHQWVHQDFLHU
LQR[\GDEOHSRXUYXV
G·XQIRQGjFRXFKHV
PXOWLSOHVRXHQDFLHU
LQR[\GDEOHIHUULWLTXHVL
VSpFLILTXHPHQW
SURGXLWVSRXUFXLVVRQ
jLQGXFWLRQ
UpFLSLHQWVHQIRQWHGH
SUpIpUHQFHDXIRQG
pPDLOOpTXLQHUD\HSDV
OHSODQYLWURFpUDPLTXH
QRXVGpFRQVHLOORQV
OHVUpFLSLHQWVHQYHUUH
HQFpUDPLTXHHQWHUUH
FXLWHHQDOXPLQLXPHQ
FXLYUHRXHQDFLHU
LQR[\GDEOHQRQ
PDJQpWLTXH
DXVWpQLWLTXH

39
DE ES NL PT
.RFKJHIlH
$EE
:LUGHLQ0DJQHWGHUDQ
GHQ%RGHQHLQHV*HIlHV
DQJHQlKHUWZLUGYRQ
GLHVHPDQJH]RJHQVRLVW
GLHVHLQ]XP,QGXNWLRQV
NRFKHQJHHLJQHWHU7RSI
9RU]LHKHQYRQ
.RFKJHIlHQGLHDXFKIU
GDV,QGXNWLRQVNRFKHQ
DXVJHZLHVHQVLQG
XQGYRQ.RFKJHIlHQ
PLWIODFKHPXQGGLFNHP
%RGHQ
(LQ7RSIPLWFP
'XUFKPHVVHUQXW]WGLH
/HLVWXQJDPEHVWHQDXV
HLQNOHLQHUHU7RSI
YHUULQJHUWGLH/HLVWXQJ
YHUXUVDFKWDEHUNHLQHQ
(QHUJLHYHUOXVW
(VZLUGWURW]GHPYRP
*HEUDXFKYRQ*HIlHQ
DEJHUDWHQGHUHQ
'XUFKPHVVHUNOHLQHUDOV
FPLVW
(PSIRKOHQZLUGGDV
$QZHQGHQYRQ
URVWIUHLHQ*HIlHQPLW
PHKUIDFKEHVFKLFKWHWHP
%RGHQRGHUDXVURVWIUHLHP
)HUULWZHQQDXIGHP
%RGHQDQJHJHEHQLVWSHU
LQGXFWLRQ
JXHLVHUQHQ*HIlHQ
EHVVHUPLWHPDLOOLHUWHP
%RGHQXP9HUNUDW]XQJHQ
GHU*ODVNHUDPLNIOlFKH]X
YHUPHLGHQ
(VZLUGDEJHUDWHQYRQ
*HIlHQDXV*ODV
.HUDPLN7HUUDFRWWD
$OXPLQLXP.XSIHURGHU
QLFKWPDJQHWLVFKHP
DXVWHQLWLVFKHP
URVWIUHLHP6WDKO
.RRNSDQQHQ
$IE
$OVHUHHQPDJQHHWWRWGH
ERGHPYDQHHQSDQ
QDGHUELMJHEUDFKWZRUGW
HQKLMGRRUGH]H
DDQJHWURNNHQEOLMIW]RLV
GH]HSDQJHVFKLNWRPYRRU
LQGXFWLHNRNHQJHEUXLNWWH
ZRUGHQ
'HYRRUNHXUJHYHQDDQ
SDQQHQGLHRRNYRRU
LQGXFWLHNRNHQEHVWHPG
]LMQ
HQDDQSDQQHQPHW
YODNNHHQGLNNHERGHP
'RRUJHEUXLNYDQHHQ
SDQPHWHHQPLGGHOOLMQ
YDQFPNXQWXKHW
YHUPRJHQKHWEHVWH
EHQXWWHQ
HHQNOHLQHUHSDQ
YHUPLQGHUWGHVWHUNWHYDQ
KHWNRRNWRHVWHOPDDU
YHURRU]DDNWJHHQ
HQHUJLHYHUOLHV
+HWJHEUXLNYDQ
NRRNSRWWHQZDDUGH
PLGGHOOLMQYDQNOHLQHULV
GDQFPLVLQLHGHUJHYDO
DIWHUDGHQ
'HYRRUNHXUJHYHQDDQ
SDQQHQXLWURHVWYULMVWDDO
PHWPHHUYRXGLJH
ERGHPODDJRIXLWURHVWYULM
IHUULHWDOV]HRSGHERGHP
KHWRSVFKULIWGUDJHQSHU
LQGXFWLRQ
JLHWLM]HUHQSDQQHQEHWHU
PHWJHsPDLOOHHUGHERGHP
RPGHRSSHUYODNWHXLW
JODVFHUDPLHNGRRUNUDVVHQ
QLHWWHEHVFKDGLJHQ
(UZRUGWDIJHUDGHQYDQ
SDQQHQXLWJODVFHUDPLHN
WHUUDFRWWDDOXPLQLXP
NRSHURIURHVWYULMQLHW
PDJQHWLVFKDXVWHQLWLVFK
VWDDO
2OODV
)LJ
6LDFHUFDQGRXQLPiQ
DOIRQGRGHXQ
UHFLSLHQWHSHUPDQHFH
DWUDtGRHVWDROOD
SXHGHVHUDSWDSDUDOD
FRFFLyQSRULQGXFFLyQ
SUHIHULUROODV
GHFODUDGDVLGyQHDV
SDUDODFRFFLyQSRU
LQGXFFLyQ
ROODVFRQIRQGRSODQR
\HVSHVR
XQDROODGHFPGH
GLiPHWURSHUPLWH
DSURYHFKDUODPi[LPD
SRWHQFLD
XQDROODPiVSHTXHxD
UHGXFHODSRWHQFLD
SHURQRFDXVDUi
GLVSHUVLyQGHHQHUJtD
'HWRGDVPDQHUDVQR
HVDFRQVHMDEOHHOXVR
GHUHFLSLHQWHVFRQ
GLiPHWURLQIHULRUD
FP
UHFLSLHQWHVLQR[FRQ
HOIRQGRDFDSDV
P~OWLSOHVRLQR[
IHUUtWLFRVLVREUHHO
IRQGRVHSUHFLVDSDUD
LQGXFFLyQ
UHFLSLHQWHVHQKLHUUR
IXQGLGRPHMRUVL
WLHQHQHOIRQGR
HVPDOWDGRSDUDHYLWDU
UD\DGXUDVDOSODQRGH
YLGULRFHUiPLFD
QRVHDFRQVHMDQ\QR
FRQYLHQHQUHFLSLHQWHV
HQYLGURFHUiPLFD
EDUURFRFLGRUHFL
SLHQWHVHQDOXPLQLR
FREUHRLQR[QR
PDJQpWLFRDXVWHQtFR
3DQHODV
)LJ
VHXPtPDQDSUR[LPDGR
DRIXQGRGHXPUHFLSLHQWH
ILFDDWUDLGRHVWDMiSRGH
VHUXPDSDQHODDGHTXDGD
jFR]HGXUDDLQGXomR
SUHIHULUWDPEpPSDQHODV
GHFODUDGDVSDUDD
FR]HGXUDDLQGXomR
SDQHODVFRPRIXQGROLVR
HJURVVR
XPDSDQHODFRPFP
GHGLkPHWURSHUPLWHGH
H[SORUDUDPi[LPD
SRWrQFLD
XPDSDQHODPDLV
SHTXHQDUHGX]DSRWrQFLD
PDVQmRFDXVDUi
GLVSHUVmRGHHQHUJLD
1RHQWDQWRp
GHVDFRQVHOKiYHOD
XWLOL]DomRGHUHFLSLHQWHV
FRPGLkPHWURLQIHULRUD
FP
UHFLSLHQWHVLQR[FRP
IXQGRGHGLYHUVRVFDPDGDV
RXLQR[IHUUtIHURVH
HYLGHQFLDGRQRIXQGR
SDUDLQGXomR
UHFLSLHQWHVHPIHUUR
FRDGRPHOKRUVHFRPR
IXQGRHVPDOWDGRSDUD
HYLWDUDUUDQKDGXUDVDR
SODQRGHYLGURFHUkPLFD
VmRGHVDFRQVHOKDGDVH
QmRFRQYrPUHFLSLHQWHVHP
YLGURFHUkPLFDEDUUR
UHFLSLHQWHVHPDOXPtQLR
FREUHRXLQR[QmR
PDJQpWLFRDXVWHQLWLFR
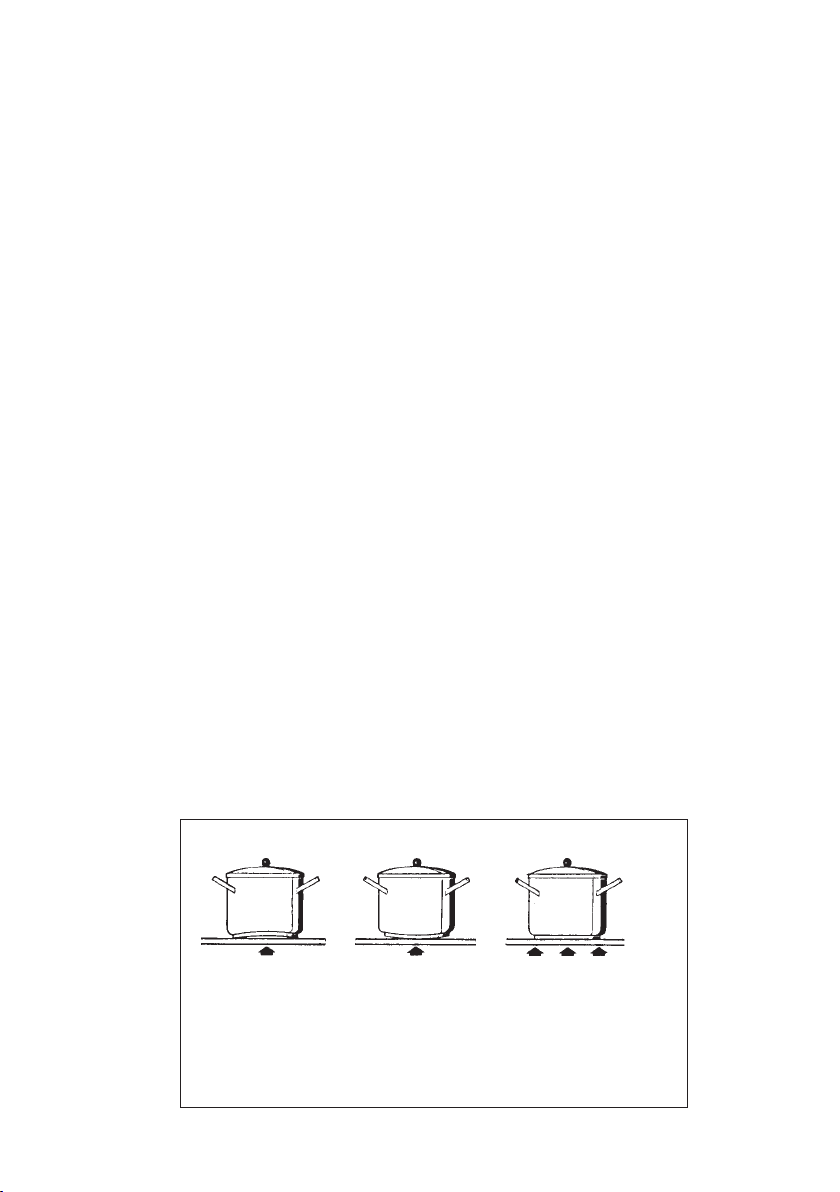
40
IT GB FR
Manutenzione
(Fig. 4)
Tracce di fogli di
alluminio, residui di
cibo spruzzi di grasso,
zucchero o cibi
fortemente saccariferi
devono essere
immediatamente
rimossi dal piano di
cottura con un
raschietto per evitare
possibili danni alla
superficie del piano.
Successivamente pulire
con SIDOL o STANFIX
e carta da cucina, indi
risciacquare con acqua
e asciugare con uno
straccio pulito.
In nessun caso usare
spugne o strofinacci
abrasivi; evitare anche
lÊuso di detersivi
chimici aggressivi
come FORNOSPRAY o
SMACCHIATORI.
-AINTENANCE
(Fig. 4)
By means of a scraper
immediately remove any
alluminium foil bits,
food spills, grease
splashes, sugar marks
and other high sugar-
content food from the
surface in order to avoid
damaging the hob.
Subsequently clean the
surface with some paper
towel and SIDOL or
STANFIX, rinse with
water and dry by means
of a clean cloth.
Under no circumstance
should sponges or
abrasive cloths be used;
also avoid using
aggressive chemical
detergents such as oven
sprays and spot
removers.
Entretien
(Fig. 4)
Enlevez aussitôt du
plan de cuisson tout
fragment de papier en
aluminium, tout résidu
de nourriture, toute
éclaboussures de
graisse, de sucre ou
dÊautres aliments
fortement riches en
saccharine à lÊaide
dÊune raclette à fin
dÊéviter dÊendommager
la surface du plan.
Ensuite nettoyez avec
papier absorbant de
cuisine du SIDOL ou
du STANFIX, rincez et
essuyez au moyen dÊun
chiffon propre.
NÊutilisez jamais
dÊéponges ni de
chiffons abrasifs;
éviter en outre
dÊemployer des
détergents aggressifs
tels que les sprays à
four ou les détachants.
&IG!BB!FB
no
NO
non
NEIN
no
NEEN
não
no
NO
non
NEIN
no
NEEN
não
sì
YES
oui
JA
sì
JA
sìm
NON UTILIZZARE
PULITORI A VAPORE
DO NOT USE STEAM
CLEANERS
NE PAS UTILISER DE
NETTOYEURS À
VAPEUR

41
DE ES NL PT
)NSTANDHALTUNG
(Abb. 4)
Spuren von Aluminium-
folie, Essensresten,
Fettspritzern, Zucker oder
stark zuckerhaltigen
Speisen müssen sofort mit
einem Schaber von der
Kochfläche entfernt
werden um mögliche
Schäden an der Fläche zu
vermeiden.
Danach mit SIDOL oder
ählichem und Küchen-
papier saubermachen, mit
Wasser abspülen und mit
einem sauberen Lappen
trockenwischen.
Auf keinen Fall kratzende
Schwämme oder Lappen
verwenden; ebenso den
Gebrauch von chemisch
aggressiven Reinigungs-
mitteln wie Ofenspray
oder Fleckenentferner
vermeiden.
/NDERHOUD
(Afb. 4)
Stukken van bladalu-
minium, overblijfsels van
levensmiddelen, scheuten
van vet, suiker, of sterk
suikerhoudende spijzen
moeten met een schraper
van de kookvlakte
onmiddellijk verwijderd
worden om mogelijke
beschadiging van de
bladoppervlakte te
voorkomen. Vervolgens
met SIDOL of dergelijke
en keukenpapier
schoonmaken, met water
afspoelen en met een
schone vaatdoek
droogmaken. In geen
geval schurende sponzen o
lappen gebruiken; evenzo
het gebruik van agressieve
chemische reinigings-
middelen zoals ovensprays
of vlekkenmiddelen
vermijden.
Mantenimiento
(Fig. 4)
Restos de hojas de
aluminio, residuos de
alimentos,
salpicaduras de grasa,
azúcar o alimentos
fuertemente sacaríficos
deben ser
inmediatamente
removidos del plano de
cocción con un
raspador para evitar
daños posibles a la
superficie del plano.
Sucesivamente limpiar
con SIDOL o STANFIX
y papel de cocina,
luego enjuagar con
agua y secar con un
paño limpio.
De ninguna manera
usar esponjas o
estropajos abrasivos;
evitar también el uso
de detergentes
químicos agresivos
como Fornospray o
quitamanchas.
Manutenção
(Fig. 4)
Marcas de papeis de
alumínio, resíduos de
alimentação salpicadelas
de gordura, açúcar ou
alimentos fortemente
sacaríferos devem ser
tirados imediatamente do
plano de cozedura com um
raspador para evitar
possíveis danos à
superfície do plano.
Sucessivamente limpar
com SIDOL ou STANFIX e
papel de cozinha, portanto
enxaguar com água e
enxugar com um pano
limpo.
Em nenhum caso usar
esponjas ou esfregões
abrasivos; evitar também
o uso de detergentes
químicos agressivos como
FORNOSPRAY ou TIRA-
NŁDAS.
&IG!BB!FB
NO UTILIZAR
LIMPIADORES A
VAPOR
GEEN STOOMREINI-
GERS GEBRUIKEN
KEINE
HOCHDRUCKREINI-
GER VERWENDEN
NÃO UTILIZAR
LIMPADORES A
VAPOR

4
)*(+,"&%"' (
#X"%)*##*&(
%)*##,"&%
$&'"('(&)-#"'#"#
&*# ( :"'( (#&
%) (#%) )
:"'( -#"
&# -#"!")
("-#"'#"#
"#&!(*"*#&
@ "(&*"(*#"#
'!$&''&(()(
$$&()&
'"'&( ((&!"(
&)","&%$ %*&
:$$$&*'(#
$&''&"''(#")"
$"##! )'(&(#
" :$$#'()&
&'$#&&')()((#
$&!(&# $"#
' "(#&&#
:'#"'
:"'( -#"'#$&)"
#&"##"(&&!"(
&(&'
#&"#'!)"(#)"
''(!
&&!"(#
"#"**""
"'')"'#$''#
& #&"#*&'#
$"#
$&*&$''
:&#!"(#"
)&
&## J$ %*& # **("&
&!(()&
: !"(# ((&#
&(&'
&((&'(
:!$"(#'"#(
'#'&%)"(#
"(#') (&
!(&# $$ (')
#"# $"#
:!$"(#'!)"(#
6;<)44-:V;
6;<:=+<176;
6;<)44)<176
%"0"+01/2 1&,+0/"#,/1%"
.2)&#&"!1" %+& &+0
$2&!"1,&+01))1&,+
!'201*"+1+!*&+1"++ "
,/!&+$1,1%")40+!
01+!/!0&+#,/ "%"0"
,-"/1&,+0*201)460"
//&"!,214%"+1%"
--)&+ "%0""+
!&0 ,++" 1"!#/,*1%"")" 1/&
0601"*
7;1<17616/&${
%"#&512/"&0"0-" &))6
!"0&$+"!#,/#&11&+$&+1,
4,/(1,-00%,4+&+1%"
,//"0-,+!&+$#&$2/"
) "1%"02--)&"!0")&+$
$"+1),+$1%"%,
-"/&*"1"/
,+,1&+01))1%"%,,3"/+
,3"+&+ 0"6,2!,*("
02/",#1%"#,)),4&+$x
1%",3"+&0".2&--"!4&1%+
--,-/&1" ,,)&+$0601"*
1%"/"&0+,4/*&/)"($"
#/,*1%",3"+1,4/!01%"
%,
02&1)"&/&+)"10/"
-/,3&!"!00%,4+&+1%"
#&$2/"
//6&+$,211%"")" 1/& )
,++" 1&,+-)"0""+02/"
1%1x
1%"-)+1 %/ 1"/&01& 0/"
02 %01,#,)),44%1&0
&+!& 1"!,+1%"*1/&5-)1"
-) "!11%",11,*,#1%"
4,/(&+$/"
1%11%"-)+1&0#&11"!4&1%
+"##& &"+1"/1% ,++" 1&,+
%)*(+*"&%)'&+(
#X"%)*##* +(
%)*##*"&%
'"'(&)(#"''#"(
('$#)& (""
'$3 '3#!!)0
:"'( (#")&3
0 :"(&("')*"( '
#'( '"#&!'"
*))&
'"(&*"(#"'#*"(
(#)#)&'5(&()3'
%)" :$$& '(
3&"3
&)"*"&%% $ %*
:$$& '($&3*)$#)&
5(&""'(&3"')"
$ "(&* #!!
)'(&3"' )&
#&&'$#""(
C((& &)"3'
*&3* :$$& )
#")$#)&(#)&)$ "
#)'3#"' #"'
:"'(&!"()'')'
:)"#)&)'
#"(&&*3&-%)
')(
#)&'(!)":)"
','(4!
&&#''!"(
":,))"$''
:&))#)&)
$ ")''#"
,'#)*&()&'
$#)& *"( (#"#!!
"%)3"' )&
(%K $ %*
# *("N+
*"(:()&
&"!"(
3 (&%)':'')&&%)
'&(&'(%)'
:"'( (#"'#"(
"()&0'('&(#)('
'"(#"'$#&(3'')&
$ %)'" 3(%)
'()3'#)' :$$&
%) :"'( (#"
'$#':)"
Electrical connection
2

4
6?-1;=6/-6`:
,-66;<)44)<-=:
6;<)44)<176
&"+$"$""+"+
+4"&02+$"+0&+!+!"+
72$")00"+"++01))1"2/)0
& %1)&+&"#/!&"+01))1&,+
"$")2+$2+!
+01+!%)12+$$"*8!"+
$")1"+!"+"0"17"+2+!
,/*"+$"/& %1"1&"
&+$/&##"!/#"++2/"&
20$"0 %)1"1"*--/1
3,/$"+,**"+4"/!"+
=;<-44=6/{
0"/81&01!#/
3,/$"0"%"+&+"&+"
/"&10#)8 %"4&"&+!"/
&)!2+$!/$"01"))1
"&+$"#$1724"/!"+&"
$"0*1")8 %"!"0
, %$"/810/2+!%"/2**&1
!"/&*&1"#&+!)& %"+
& %12+$0*00"3"/0&"$")+
04&/!3,+!"*2#2
"/"&+"*#"+$"/1"+
0,+01$"$""+"+#))0
3"/0& %"/+
!!"/#"+*&1"&+"*
4&/(0*"+%)0601"*
20$"0111"1&01
!2#("&+"+))%"&"
B2#13,*#"+&+& %12+$
!"/)8 %"2#01"&$1
!B2#1!2/ %)800"4&"&+
!"/&)!2+$+$"$""+
3,/$"0"%"+4"/!"+
4-3<:1;+0-:6;+04=a
w
,/!"*+0 %)2+!0
")"(1/&0 %"
"170& %!3,+
"/7"2$"+!x
!&"&$"+0 %#1"+!"/
+)$"*&1!"+"+2#!"*
2+1"/!"/#"+-)11"
+$"/ %1"+B"&012+$00 %&)!
"/"&+01&**"+
!&"+)$"*&1"&+"*
4&/(0*"+/!+0 %)2
6;<:=+<1-;
!77:,-16;<)44)<-=:
6;<)44)<1-
",+!"/01+!"&+01/2 1&"0
7&'+"!,")!3,,/!"
$"(4)&#& ""/!"&+01))1"2/
!&"!"&+01))1&"/"$")&+$"+
%"1,+!"/%,2!2&13,"/1
3,)$"+0!"$")!"+!"4"11"+"+
+,/*"+"-/1&"0*,"1"+
)1&'!4,/!"+2&1$"3,"/!
1"/4&'')!"01/,,*3,,/7&"+&+$
3+%"1--/1&0
,+!"//,("+
4))<;16/#{
"1(,,(1,"01")&0$"*(1,*
&+""++/" %1&+$",24!1"
4,/!"+7,)0+$"$"3"+&+
!"#"")!&+$
"$"%")",*1/"(3+%"1
(,,(1,"01")*,"13"/7"$")!
4,/!"+*"1&'$+!
!& %1&+$0*1"/&)!10*"+
*"1%"11,"01")4,/!1$")"3"/!
/4,/!13+!"&+01))1&",-
""+,3"+#$"/!"++!"/0
&+!&"++,!&$7& %3"/7"("/"+x
!1!",3"+3+""+$,"!
(,")&+$0601""*&03,,/7&"+
!1&+$""+$"3)%"1")2 %1
2&1!",3"++/!"(,,(3)(1"
,*%,,$01&'$1
!1"/3+)2 %1!,,/)1"+
7,)0+$"$"3"+&+!"
#"")!&+$4,/!13,,/7&"+
)3,/"+0!"")"(1/&0 %"
+0)2&1&+$1"3"//& %1"+
3"/7"("/1*"+7& %"/3+!1x
!"(/(1"/&01&"("+3+%"1
01/,,*3,,/7&"+"+!"--/1
3,)!,"++%"1$""+&0
3"/*")!,-!"/"$&01/1&"-)1
,+!"/,-!"(,,(-)1
!1%"101/,,*3,,/7&"+"+!"
--/13,,/7&"+&03+""+
"##" 1&"3"/!"3"/&+!&+$
%)*(+"&% )
'( #"%)*#&(
%)*#"U%
'$&'"('"'(&)
#"''(/"&'
"'( #&#!#)6$&
"'( 7"&) 7"
,!"("!"(#'^" '
,', '"#&!'
*"(''"(&
*"#"'(""%)'&
()''!$&#"
$&(#'")#
&#&"U%
$&(#'(/$&*'(#
$&'&"#")"
$ "##!#' )'(&"
)&
&'$#"&'#&(##
$&6!(&# $ "#
' #&"#(7"
#'#"'
"'( 7"'#&)"
#&"##$#& #"(&&#
*&&%)
#&"#(")"-
''(!"&!"(#
%)"#'$&#)-
""^"!## $'
& "('
#&"# $ "#
$&*&$''&
#!#'""
)&
&% Q"U% #*("
"('()&
#"+7" 3(&
#!$&#&%)
'&(&6'('
"'( 7"'('"
)"(#"#"
$ !(&6) # #
'#& #"#
')$"
%) "'( 7"("
%)*(+oV )
'(&"%)*#&(
%)*#o&
'('"'(&)29''1#
'$&() &!"(
$&#"'( #&
%) #$&'&!
)( -'#!#)0
"'( 21#&) 21#
!")("21#')"#' '
"#&!'!*#&'
"(&*"29'(&1#'&
'!$&()'%)"##
$& #'(*&' #
#&&"( 3(&
&)""&%$ %*&
$& #'(/$&*'(#
$&'&"+#")!
$ "##!# )'(&#"
)&$&#$&
&'$#&'#&(###
$&6!(&##$ "##
$&#)(#$& &&!
#(21#
.'#"' /*
"'( 21#$#&!)!
#&"#'##"(&/&#
&(&'%)
##&"#'(#(#
)!''(!&&!"(#
-
%)"1#'*&%)!
"")!'#$''!
&%)"(##&"#$&#
$ "#
$&#*&$''"'&
#!#"#")&
&% Q& #*("
"('()&#"+1#
3(&'&/$&'#
'')&&%)
'&(&6'('
"'( 21#'!#%)'(/
"#'#&$
!(&-$ "#)"#
$#-!"(#
"'( 21#'(!)"
)!#"+1#0(&&
(Abb. 6-7-8)
4-3<:1;+0-))6;4=1<16/
(Afb. 6-7-8)
3

IT GB FR
44
DE ES NL PT
45
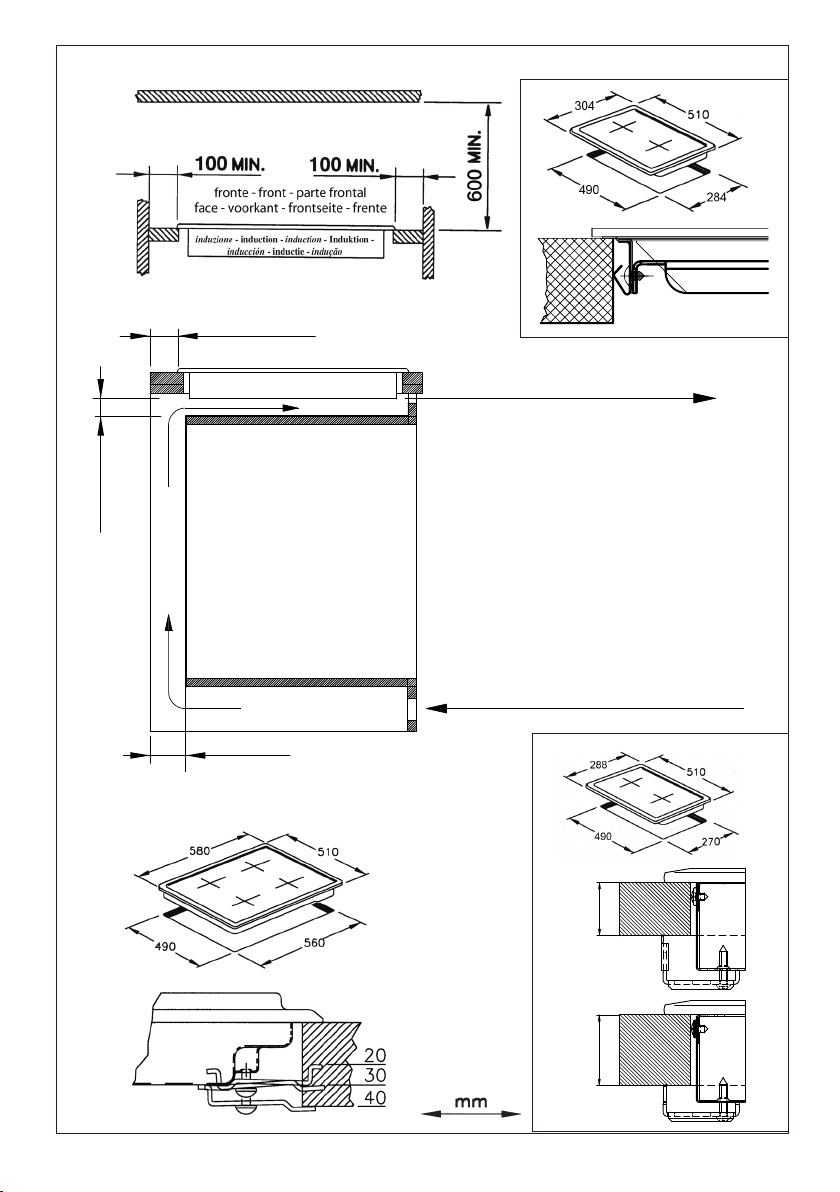
46
INDUZIONEINDUCTIONINDUCTION)NDUKTION
INDUCCIØNINDUCTIEINDUÎÍO
Fig. 5 - Abb. 5 - Afb. 5
BASIC
G4
40 mm.
30 mm.
aria - air - air - Luft - aire - lucht - ar
100 cm
2
MIN.
induzione - induction - induction - Induktion
- inducción - inductie - indução
aria - air - air - Luft - aire - lucht - ar
100 cm
2
MIN.
ZONA FORNO O ARMADIETTO
OVEN ZONE OR CUPBOARD
ZONE FOUR OU PLACARD
OFENBEREICH ODER SCHRANK
ZONA HORNO O ARMARIO
OVENRUIMTE OF KASTJE
ZONA DO FORNO OU ARMÁRIO
LATOSIDECÙTÏLADOZIJKANTSEITE
50 MIN.
50 MIN.
20 MIN.
(2 x 500)
47
dEC2G2IN...
G4
Fig. 6 - Abb. 6 - Afb. 6
LN
230V
~
H05 RR–F 3x2.5
H05 VV–F 3x2.5
C2IN41
MONOFASE ~ 230V (cavo incorporato)
SINGLE-PHASE ~ 230V (cable incorporated)
MONOPHASE ~ 230V (câble incorporé)
EINPHASIG ~ 230V (integriertes Kabel)
MONOFÁSICA ~ 230V (cable incorporado)
EENFASIG ~ 230V (geïntegreerde kabel)
MONOFÁSICO ~ 230 V (cabo incorporado)
G4
Fig. 7 - Abb. 7 - Afb. 7
C2INB1
BASIC
Fig. 8 - Abb. 8 - Afb. 8
LN
230V
~
H05 V2V2–F 3x2.5

O Fabricante não assume nenhuma responsabilidade acerca de eventuais inexactidões contidas na
presente publicação, devidas a erros de impressão ou de transcrição. Reserva-se o direito de efectuar
nos próprios produtos as eventuais modificações que considerar necessárias ou úteis, sem prejudicar
as características essenciais.
El constructor declina toda responsabilidad por las posibles inexactitudes contenidas
en el presente
documento, imputables a errores de impresión o relacionadas. El constructor se reserva
el derecho de
aportar a sus propios productos aquellas modificaciones que se considere necesarias
o útiles, sin
perjudicar las características esenciales.
De Fabrikant wijst iedere verantwoordelijkheid af voor enige onjuistheden in deze brochure welke
geweten kunnen worden aan copie - of drukfouten. Hij behoudt zich het recht voor aan zijn eigen
produkten wijzigingen aan te brengen die hij voor noodzakelijk of nuttig houdt zonder dat de wezenlijke
kenmerken erdoor benadeeld worden.
La Casa costruttrice declina ogni responsabilità per le possibili inesattezze contenute nel presente
opuscolo, imputabili ad errori di stampa o di trascrizione. Si riserva il diritto di apportare ai propri
prodotti quelle modifiche che ritiene necessarie o utili, senza pregiudicare le caratteristiche essenziali.
The manufacturer declines all responsibility for possible inaccuracies contained in this pamphlet, due
to printing or copying errors. We reserve the right to make on our own products those changes to be
considered necessary or useful, without jeopardizing the essential characteristics.
Dans un souci constant dÊamélioration qualitative, le constructeur se réserve la possibilité dÊapporter
à ses produits les modifications utiles, sans compromettre ses caractéristiques essentielles.
Le
constructeur décline toutes responsabilité pour dÊeventuelles inexactitudes contenues dans cette
notice, imputables à des erreurs dÊimpression ou de transcription.
Die Herstellerfirma übernimmt keinerlei Verantwortung für eventuell in dieser Broschüre enthaltene
Ungenauigkeiten, die auf Druckfehler zurückzuführen sind und behält sich das Recht vor an ihren
Produkten alle für notwendig erachteten Änderungen anzubringen, ohne die wesentlichen Eigenschaften
zu beeinflussen.
COD. 1.005.10.0 4'ed.