Search
Troubleshooting
How to Use
Parts Description
Setup
Network / Internet
Connections
Settings
Playback
Backup / Recovery
Security
Other Operations
Notifications
VAIO User Guide
VPCEG2/VPCEH2/VPCEJ2/VPCEK2/VPCEL2
Series
Use this manual if you encounter any problems, or have any questions about your VAIO
computer.
Read This First
© 2011 Sony Corporation

Table Of Contents
VAIO User GuideVPCEG2/VPCEH2/VPCEJ2/VPCEK2/VPCEL2Series i........................................
Parts Description 1............................................................................................................................
VAIO computer 15.......................................................................................................................
Parts and Controls on the Front 113......................................................................................
Parts and Controls on the Sides 115.....................................................................................
Parts and Controls on the Bottom 117...................................................................................
Checking Supplied Items 118................................................................................................
Notes on Adding and Removing Memory Modules 119........................................................
Adding and Removing Memory Modules 121........................................................................
Setting Up an Appropriate Work Environment 123................................................................
Booting Your VAIO Computer from ExternalDevices 125.....................................................
Customizing Your VAIO Computer 126.................................................................................
Viewing the System Information 127.....................................................................................
Using VAIO Update 128........................................................................................................
Keeping Your VAIO Computer in OptimumCondition (VAIO Care) 129................................
Updating Your VAIO Computer 130......................................................................................
About the ASSIST Button 131...............................................................................................
Setup 2..............................................................................................................................................
Battery 16....................................................................................................................................
Installing/Removing the Battery Pack 132.............................................................................
Charging the Battery Pack 134..............................................................................................
Notes on Using the Battery Pack 135....................................................................................
Using Sleep Mode 137..........................................................................................................
Using Hibernate Mode 138....................................................................................................
Notes on Sleep Mode 139.....................................................................................................
Selecting a Power Plan 140...................................................................................................
Extending the Battery Life 141...............................................................................................
Charge Indicator Status List 142...........................................................................................
About Power Saving Mode 143.............................................................................................
Power 17.....................................................................................................................................
Installing/Removing the Battery Pack 132.............................................................................
Charging the Battery Pack 134..............................................................................................
Connecting a Power Source 144...........................................................................................
Turning on Your VAIO Computer 145....................................................................................
Shutting Down Your VAIO Computer 146.............................................................................
Using Sleep Mode 137..........................................................................................................
Using Hibernate Mode 138....................................................................................................
Notes on Using the Power Source 147..................................................................................
TOC-1

Notes on Sleep Mode 139.....................................................................................................
Selecting a Power Plan 140...................................................................................................
Restarting Your VAIO Computer 148....................................................................................
Charge Indicator Status List 142...........................................................................................
About Power Saving Mode 143.............................................................................................
VAIO computer 18.......................................................................................................................
Checking Supplied Items 118................................................................................................
Notes on Adding and Removing Memory Modules 119........................................................
Setting Up an Appropriate Work Environment 123................................................................
Parts and Controls on the Front 113......................................................................................
Parts and Controls on the Sides 115.....................................................................................
Parts and Controls on the Bottom 117...................................................................................
Booting Your VAIO Computer from ExternalDevices 125.....................................................
Customizing Your VAIO Computer 126.................................................................................
Viewing the System Information 127.....................................................................................
Using VAIO Update 128........................................................................................................
Keeping Your VAIO Computer in OptimumCondition (VAIO Care) 129................................
Updating Your VAIO Computer 130......................................................................................
About the ASSIST Button 131...............................................................................................
Memory module 19......................................................................................................................
Notes on Adding and Removing Memory Modules 119........................................................
Adding and Removing Memory Modules 121........................................................................
Viewing the System Information 127.....................................................................................
Supplied items 20........................................................................................................................
Checking Supplied Items 118................................................................................................
Network / Internet 3...........................................................................................................................
Button 21.....................................................................................................................................
Using the Internet without Starting Windows 149..................................................................
Changing the Button Assignment (VAIO Button) 151............................................................
About the ASSIST Button 131...............................................................................................
LAN 22.........................................................................................................................................
About the Internet Connection Services 152.........................................................................
About the Network (LAN) 153................................................................................................
Connecting to the Internet with a WiredConnection 154.......................................................
About the Wireless LAN Standards 155................................................................................
Internet 23...................................................................................................................................
About the Internet Connection Services 152.........................................................................
About the Network (LAN) 153................................................................................................
Connecting to the Internet with a WiredConnection 154.......................................................
Using the Antivirus Software for Your VAIOComputer 156...................................................
TOC-2

About the Wireless LAN Standards 155................................................................................
Before Using the Wireless LAN 157......................................................................................
Starting Wireless LAN Communications 158.........................................................................
Stopping Wireless LAN Communications 160.......................................................................
Notes on Using the Wireless LAN Function 161....................................................................
About a Security Key for a Wireless LAN 163.......................................................................
Using the Internet without Starting Windows 149..................................................................
Wireless LAN 24..........................................................................................................................
About the Internet Connection Services 152.........................................................................
About the Wireless LAN Standards 155................................................................................
Before Using the Wireless LAN 157......................................................................................
Starting Wireless LAN Communications 158.........................................................................
Stopping Wireless LAN Communications 160.......................................................................
Notes on Using the Wireless LAN Function 161....................................................................
About a Security Key for a Wireless LAN 163.......................................................................
Connections 4....................................................................................................................................
Audio 25......................................................................................................................................
Connecting External Speakers or Headphones 164..............................................................
Connecting an External Microphone 165...............................................................................
Changing the Sound Output Device 166...............................................................................
Connecting a High-Quality Digital Sound Output 167............................................................
Battery 26....................................................................................................................................
Installing/Removing the Battery Pack 132.............................................................................
Headphones 28...........................................................................................................................
Connecting External Speakers or Headphones 164..............................................................
LAN 29.........................................................................................................................................
About the Internet Connection Services 152.........................................................................
About the Network (LAN) 153................................................................................................
Connecting to the Internet with a WiredConnection 154.......................................................
About the Wireless LAN Standards 155................................................................................
Optical digital output 30...............................................................................................................
Changing the Sound Output Device 166...............................................................................
Connecting a High-Quality Digital Sound OutputDevice between Your
VAIO Computer and a TV 167...............................................................................................
Power 31.....................................................................................................................................
Installing/Removing the Battery Pack 132.............................................................................
Connecting a Power Source 144...........................................................................................
USB 32........................................................................................................................................
Connecting a USB Device 180..............................................................................................
BLUETOOTH 33..........................................................................................................................
TOC-3

About the BLUETOOTH(R) Function <BLUETOOTHequipped models> 181.......................
Communicating with Another BLUETOOTH(R)Device such as a Mouse <
BLUETOOTH equippedmodels> 182....................................................................................
Stopping BLUETOOTH(R) Communications<BLUETOOTH equipped
models> 184..........................................................................................................................
Notes on Using the BLUETOOTH(R) Function<BLUETOOTH equipped
models> 185..........................................................................................................................
About BLUETOOTH(R) Security <BLUETOOTHequipped models> 187..............................
CD/DVD/BD 34............................................................................................................................
Connecting an External DVD Drive 188................................................................................
HDMI 35......................................................................................................................................
Connecting a TV with an HDMI Input Port 172......................................................................
Changing the Resolution (Size) of the ScreenImage on an HDMI-
Connected Device 177..........................................................................................................
Internet 36...................................................................................................................................
About the Internet Connection Services 152.........................................................................
About the Network (LAN) 153................................................................................................
Connecting to the Internet with a WiredConnection 154.......................................................
Using the Antivirus Software for Your VAIOComputer 156...................................................
About the Wireless LAN Standards 155................................................................................
Before Using the Wireless LAN 157......................................................................................
Starting Wireless LAN Communications 158.........................................................................
Stopping Wireless LAN Communications 160.......................................................................
Notes on Using the Wireless LAN Function 161....................................................................
About a Security Key for a Wireless LAN 163.......................................................................
Microphone 37.............................................................................................................................
Connecting an External Microphone 165...............................................................................
Adjusting the Microphone Volume 170..................................................................................
Peripheral device 38....................................................................................................................
Connecting an External Microphone 165...............................................................................
Changing the Sound Output Device 166...............................................................................
Connecting a High-Quality Digital Sound Output 167............................................................
Using the Multiple Monitor Function 171...............................................................................
Connecting a TV with an HDMI Input Port 172......................................................................
Connecting an External Display or Projector 174..................................................................
Notes on the LCD screen 175...............................................................................................
Selecting Display Modes 176................................................................................................
Speakers 39................................................................................................................................
Connecting External Speakers or Headphones 164..............................................................
Adjusting the Speakers Volume 168......................................................................................
TOC-4

Wireless LAN 40..........................................................................................................................
About the Internet Connection Services 152.........................................................................
About the Wireless LAN Standards 155................................................................................
Before Using the Wireless LAN 157......................................................................................
Starting Wireless LAN Communications 158.........................................................................
Stopping Wireless LAN Communications 160.......................................................................
Notes on Using the Wireless LAN Function 161....................................................................
About a Security Key for a Wireless LAN 163.......................................................................
Settings 5...........................................................................................................................................
Audio 41......................................................................................................................................
Battery 42....................................................................................................................................
CD/DVD/BD 43............................................................................................................................
Display 44....................................................................................................................................
Keyboard 45................................................................................................................................
Microphone 46.............................................................................................................................
Password 47................................................................................................................................
Power 48.....................................................................................................................................
Service and support 49................................................................................................................
Touch pad 50...............................................................................................................................
BIOS 51.......................................................................................................................................
Button 52.....................................................................................................................................
Camera 53...................................................................................................................................
HDMI 54......................................................................................................................................
Memory module 55......................................................................................................................
Optical digital output 56...............................................................................................................
Peripheral device 57....................................................................................................................
Security 58...................................................................................................................................
Speakers 59................................................................................................................................
VAIO computer 60.......................................................................................................................
Playback 6.........................................................................................................................................
CD/DVD/BD 61............................................................................................................................
Playing Blu-ray 3D(TM) Disc Media on a 3D TV 189............................................................
Inserting/Removing a Disc 190..............................................................................................
Supported Discs 191.............................................................................................................
About Region Codes 193.......................................................................................................
Peripheral device 62....................................................................................................................
Playing Blu-ray 3D(TM) Disc Media on a 3D TV 189............................................................
HDMI 63......................................................................................................................................
Playing Blu-ray 3D(TM) Disc Media on a 3D TV 189............................................................
Backup / Recovery 7.........................................................................................................................
TOC-5

BIOS 64.......................................................................................................................................
Booting Your VAIO Computer from ExternalDevices 125.....................................................
Built-in storage device 65............................................................................................................
Creating Other Drives (modifying partitions) 208...................................................................
Creating Partitions during Recovery 209...............................................................................
Creating Partitions in Windows 210.......................................................................................
Removing Recovery Contents to Free up Disk 211...............................................................
Checking the Volume of the Recovery Area 212...................................................................
CD/DVD/BD 66............................................................................................................................
Booting Your VAIO Computer from External 125..................................................................
Recovery 67................................................................................................................................
VAIO computer 68.......................................................................................................................
Booting Your VAIO Computer from External 125..................................................................
About the ASSIST Button 131...............................................................................................
Keeping Your VAIO Computer in Optimum 129....................................................................
Backup 69....................................................................................................................................
About Backup 220.................................................................................................................
About Types of Backup 221...................................................................................................
Creating a Restore Point 222................................................................................................
Backing Up Your Data when You cannot Start 223...............................................................
Restoring System Files Using the Restore Point 225............................................................
Restoring Your Data with VAIO Data Restore Tool 226........................................................
Button 70.....................................................................................................................................
About the ASSIST Button 131...............................................................................................
Partition 71..................................................................................................................................
Creating Other Drives (modifying partitions) 208...................................................................
Creating Partitions during Recovery 209...............................................................................
Creating Partitions in Windows 210.......................................................................................
Service and support 72................................................................................................................
Keeping Your VAIO Computer in OptimumCondition (VAIO Care) 129................................
Security 8...........................................................................................................................................
BIOS 73.......................................................................................................................................
Setting/Changing the Power-on Password 197.....................................................................
Removing the Power-on Password 199................................................................................
Password 74................................................................................................................................
Setting/Changing the Power-on Password 197.....................................................................
Removing the Power-on Password 199................................................................................
Creating/Changing/Removing Your WindowsPassword 200.................................................
VAIO computer 75.......................................................................................................................
Using VAIO Update 128........................................................................................................
TOC-6

Keeping Your VAIO Computer in OptimumCondition (VAIO Care) 129................................
Internet 76...................................................................................................................................
Using the Antivirus Software for Your VAIOComputer 156...................................................
Service and support 77................................................................................................................
Using VAIO Update 128........................................................................................................
Keeping Your VAIO Computer in OptimumCondition (VAIO Care) 129................................
Other Operations 9............................................................................................................................
Battery 78....................................................................................................................................
Charging the Battery Pack 134..............................................................................................
Extending the Battery Life 141...............................................................................................
Charge Indicator Status List 142...........................................................................................
About Power Saving Mode 143.............................................................................................
Using Sleep Mode 137..........................................................................................................
Using Hibernate Mode 138....................................................................................................
Button 79.....................................................................................................................................
Using the Internet without Starting Windows 149..................................................................
Camera 80...................................................................................................................................
Using the Built-in Camera <Built-in camera 206....................................................................
Notes on the Built-in Camera <Built-in camera 207...............................................................
Keyboard 81................................................................................................................................
Combinations and Functions with the Fn Key 196................................................................
Memory module 82......................................................................................................................
Notes on Adding and Removing Memory Modules 119........................................................
Adding and Removing Memory Modules 121........................................................................
Power 83.....................................................................................................................................
USB 84........................................................................................................................................
Connecting a USB Device 180..............................................................................................
Built-in storage device 85............................................................................................................
Creating Other Drives (modifying partitions) 208...................................................................
Creating Partitions during Recovery 209...............................................................................
Creating Partitions in Windows 210.......................................................................................
CD/DVD/BD 86............................................................................................................................
Inserting/Removing a Disc 190..............................................................................................
Internet 87...................................................................................................................................
Using the Internet without Starting Windows (Quick Web Access)(the
Webbutton) 87.......................................................................................................................
Memory card 88...........................................................................................................................
Partition 89..................................................................................................................................
Creating Other Drives (modifying partitions) 208...................................................................
Creating Partitions during Recovery 209...............................................................................
TOC-7

Creating Partitions in Windows 210.......................................................................................
Touch pad 90...............................................................................................................................
Using the Touch Pad 202......................................................................................................
VAIO computer 91.......................................................................................................................
Notes on Adding and Removing Memory Modules 119........................................................
Adding and Removing Memory Modules 121........................................................................
Notifications 10..................................................................................................................................
CD/DVD/BD 92............................................................................................................................
Handling Discs 194................................................................................................................
Notes on Using Discs 195.....................................................................................................
Supported Discs 191.............................................................................................................
About Region Codes 193.......................................................................................................
Important notice 93......................................................................................................................
About the Software License 238............................................................................................
Safety Information 239...........................................................................................................
Trademarks 240.....................................................................................................................
About the International ENERGY STAR(R)Program 242......................................................
Read this first 94..........................................................................................................................
Read This First 12.................................................................................................................
Service and support 95................................................................................................................
Updating Your VAIO Computer 130......................................................................................
About Online Support Website 111.......................................................................................
Solving Common Problems with Your VAIOComputer 201...................................................
VAIO computer 96.......................................................................................................................
Checking Supplied Items 118................................................................................................
Updating Your VAIO Computer 130......................................................................................
Setting Up an Appropriate Work Environment 123................................................................
Care and maintenance 97...........................................................................................................
Cleaning Your VAIO computer/LCD screen 243...................................................................
Product registration 98................................................................................................................
About Online Support Website 111.......................................................................................
Security 99...................................................................................................................................
Updating Your VAIO Computer 130......................................................................................
Supplied items 100......................................................................................................................
Checking Supplied Items 118................................................................................................
TOC-8
Search
VAIO User Guide VPCEG2/VPCEH2/VPCEJ2/VPCEK2/VPCEL2 Series Back | Back to Top
Battery
Power
VAIO computer
Memory module
Supplied items
Troubleshooting
How to Use
Parts Description
Setup
Network / Internet
Connections
Settings
Playback
Backup / Recovery
Security
Other Operations
Notifications
Setup
© 2011 Sony Corporation
2

Search
VAIO User Guide VPCEG2/VPCEH2/VPCEJ2/VPCEK2/VPCEL2 Series Back | Back to Top
Button
LAN
Internet
Wireless LAN
Troubleshooting
How to Use
Parts Description
Setup
Network / Internet
Connections
Settings
Playback
Backup / Recovery
Security
Other Operations
Notifications
Network / Internet
© 2011 Sony Corporation
3

Search
VAIO User Guide VPCEG2/VPCEH2/VPCEJ2/VPCEK2/VPCEL2 Series Back | Back to Top
Audio
Battery
Display
Headphones
LAN
Optical digital output
Power
USB
BLUETOOTH
CD/DVD/BD
HDMI
Internet
Microphone
Peripheral device
Speakers
Wireless LAN
Troubleshooting
How to Use
Parts Description
Setup
Network / Internet
Connections
Settings
Playback
Backup / Recovery
Security
Other Operations
Notifications
Connections
© 2011 Sony Corporation
4

Search
VAIO User Guide VPCEG2/VPCEH2/VPCEJ2/VPCEK2/VPCEL2 Series Back | Back to Top
Audio
Battery
CD/DVD/BD
Display
Keyboard
Microphone
Password
Power
Service and support
Touch pad
BIOS
Button
Camera
HDMI
Memory module
Optical digital output
Peripheral device
Security
Speakers
VAIO computer
Troubleshooting
How to Use
Parts Description
Setup
Network / Internet
Connections
Settings
Playback
Backup / Recovery
Security
Other Operations
Notifications
Settings
© 2011 Sony Corporation
5


Search
VAIO User Guide VPCEG2/VPCEH2/VPCEJ2/VPCEK2/VPCEL2 Series Back | Back to Top
BIOS
Built-in storage device
CD/DVD/BD
Recovery
VAIO computer
Backup
Button
Partition
Service and support
Troubleshooting
How to Use
Parts Description
Setup
Network / Internet
Connections
Settings
Playback
Backup / Recovery
Security
Other Operations
Notifications
Backup / Recovery
© 2011 Sony Corporation
7

Search
VAIO User Guide VPCEG2/VPCEH2/VPCEJ2/VPCEK2/VPCEL2 Series Back | Back to Top
BIOS
Password
VAIO computer
Internet
Service and support
Troubleshooting
How to Use
Parts Description
Setup
Network / Internet
Connections
Settings
Playback
Backup / Recovery
Security
Other Operations
Notifications
Security
© 2011 Sony Corporation
8

Search
VAIO User Guide VPCEG2/VPCEH2/VPCEJ2/VPCEK2/VPCEL2 Series Back | Back to Top
Battery
Button
Camera
Keyboard
Memory module
Power
USB
Built-in storage device
CD/DVD/BD
Internet
Memory card
Partition
Touch pad
VAIO computer
Troubleshooting
How to Use
Parts Description
Setup
Network / Internet
Connections
Settings
Playback
Backup / Recovery
Security
Other Operations
Notifications
Other Operations
© 2011 Sony Corporation
9

Search
VAIO User Guide VPCEG2/VPCEH2/VPCEJ2/VPCEK2/VPCEL2 Series Back | Back to Top
CD/DVD/BD
Important notice
Read this first
Service and support
VAIO computer
Care and maintenance
Product registration
Security
Supplied items
Troubleshooting
How to Use
Parts Description
Setup
Network / Internet
Connections
Settings
Playback
Backup / Recovery
Security
Other Operations
Notifications
Notifications
© 2011 Sony Corporation
10
Search
VAIO User Guide VPCEG2/VPCEH2/VPCEJ2/VPCEK2/VPCEL2 Series Back | Back to Top
Troubleshooting
How to Use
Parts Description
Setup
Network / Internet
Connections
Settings
Playback
Backup / Recovery
Security
Other Operations
Notifications
Read This First
Congratulations on your purchase of this VAIO(R) computer and welcome to the on-screen
User Guide.
About your VAIO computer’s configuration
To find out about the configuration of your VAIO computer, follow these steps and visit the
Sony online support website.
1. Click
(Start), All Programs, VAIO Care, and Contact Sony.
About configuration differences in your VAIO computer
Some features, options, and supplied items may not be available on your VAIO computer.
Features
Available features vary depending on the model or options you selected.
Not all features described in this manual are available depending on your model.
Illustrations
Illustrations, photos, or screenshots in this manual may look slightly different depending on
the model or options you selected.
Software
The preinstalled software may vary depending on the model or options you selected. The
software described in this manual may not be preinstalled on your VAIO computer.
Supplied manuals
The following manuals are supplied with your VAIO computer.
On-screen documentation
User Guide - Introduction version
A preinstalled manual with limited information of your VAIO computer focused on
support and internet connection. The User Guide - Introduction version is
replaced with a complete version of the User Guide (this manual) after update.
[Details]
User Guide (this manual)
General information and operation instruction about your VAIO computer including
support and troubleshooting information
Printed documentation
Quick Start Guide
An overview of components connection, set-up information, etc.
Recovery, Backup and Troubleshooting Guide
12
Information on how to recover and back up your VAIO computer, as well as
troubleshooting information
Safety Information
Read carefully before activating the wireless functions such as the wireless LAN and
BLUETOOTH technology.
Other references
Help and Support
General information and technical assistance for your VAIO computer.
To access Help and Support, click
(Start) and Help and Support.
Choose from the following categories to find the answers you need.
Get started
with my
VAIO
Get help with Internet and wireless setup, security setup, personalizing
your VAIO computer, creating Recovery Media, and more.
Use my
VAIO
Get assistance with your VAIO computer by accessing useful information
such as interactive VAIO tutorials, how-to articles, the VAIO technology
page, specifications, and system and software information. The available
information varies depending on the model you purchased.
You can find useful documentation such as general and model specific
user guide on the computer.
Troubleshoot
my VAIO
Maintain and troubleshoot your VAIO computer with VAIO Care,
system restore, backup and recovery, and contact Sony support.
Software help files
Software help files may be included with the preinstalled software on your VAIO
computer. You may be able to access the help files from the help menu.
Notice
Copyright 2011 Sony Corporation. All rights reserved.
This manual and the software described herein, in whole or in part, may not be
reproduced, translated, or reduced to any machine-readable form without prior written
approval.
Sony Corporation provides no warranty with regard to this manual, the software, or other
information contained herein and hereby expressly disclaims any implied warranties or
merchantability or fitness for any particular purpose with regard to this manual, the
software, or such other information. In no event shall Sony Corporation be liable for any
incidental, consequential, or special damages, whether based on tort, contract, or
otherwise, arising out of or in connection with this manual, the software, or other
information contained herein or the use thereof.
In the manual, the (TM) or (R) marks are not specified.
Sony Corporation reserves the right to make any modification to this manual or the
information contained herein at any time without notice. The software described herein
is governed by the terms of a separate user license agreement.
Sony Corporation is not liable and will not compensate for any lost recordings made to
your VAIO computer, external recording media, or recording devices or any relevant
losses, including when recordings are not made due to reasons including the computer
failure, or when the contents of a recording are lost or damaged as a result of the
computer failure or repair undertaken to the computer. Sony Corporation will not restore,
recover, or replicate the recorded contents made to the computer, external recording
media, or recording devices under any circumstances.
Features and specifications are subject to change without notice.
13


Search
VAIO User Guide VPCEG2/VPCEH2/VPCEJ2/VPCEK2/VPCEL2 Series Back | Back to Top
Troubleshooting
How to Use
Parts Description
Setup
Network / Internet
Connections
Settings
Playback
Backup / Recovery
Security
Other Operations
Notifications
VAIO computer
Parts and Controls on the Front
Describes the features on the front of the VAIO computer, such as buttons and indicator
lights.
Parts and Controls on the Sides
Describes the features on the sides of the VAIO computer, such as connection ports.
Parts and Controls on the Bottom
Describes the features on the bottom of the VAIO computer.
You might be looking for the following topics:
Checking Supplied Items
Notes on Adding and Removing Memory Modules
Adding and Removing Memory Modules
Setting Up an Appropriate Work Environment
Booting Your VAIO Computer from External Devices
Customizing Your VAIO Computer
Viewing the System Information
Using VAIO Update
Keeping Your VAIO Computer in Optimum Condition (VAIO Care)
Updating Your VAIO Computer
About the ASSIST Button
© 2011 Sony Corporation
15

Search
VAIO User Guide VPCEG2/VPCEH2/VPCEJ2/VPCEK2/VPCEL2 Series Back | Back to Top
Troubleshooting
How to Use
Parts Description
Setup
Network / Internet
Connections
Settings
Playback
Backup / Recovery
Security
Other Operations
Notifications
Battery
Installing/Removing the Battery Pack
Install the battery pack into the battery compartment on the bottom of your VAIO computer.
Charging the Battery Pack
The battery pack can be charged even while you are using your VAIO computer when the
computer is connected to a power source.
You might be looking for the following topics:
Notes on Using the Battery Pack
Using Sleep Mode
Using Hibernate Mode
Notes on Sleep Mode
Selecting a Power Plan
Extending the Battery Life
Charge Indicator Status List
About Power Saving Mode
© 2011 Sony Corporation
16

Search
VAIO User Guide VPCEG2/VPCEH2/VPCEJ2/VPCEK2/VPCEL2 Series Back | Back to Top
Troubleshooting
How to Use
Parts Description
Setup
Network / Internet
Connections
Settings
Playback
Backup / Recovery
Security
Other Operations
Notifications
Power
Installing/Removing the Battery Pack
Install the battery pack into the battery compartment on the bottom of your VAIO computer.
Charging the Battery Pack
The battery pack can be charged even while you are using your VAIO computer when the
computer is connected to a power source.
Connecting a Power Source
Connect your VAIO computer to an AC power source.
Turning on Your VAIO Computer
Turn on your VAIO Computer to start Windows.
Shutting Down Your VAIO Computer
Shut down your VAIO computer properly to avoid losing unsaved data.
You might be looking for the following topics:
Using Sleep Mode
Using Hibernate Mode
Notes on Using the Power Source
Notes on Sleep Mode
Selecting a Power Plan
Restarting Your VAIO Computer
Charge Indicator Status List
About Power Saving Mode
© 2011 Sony Corporation
17

Search
VAIO User Guide VPCEG2/VPCEH2/VPCEJ2/VPCEK2/VPCEL2 Series Back | Back to Top
Troubleshooting
How to Use
Parts Description
Setup
Network / Internet
Connections
Settings
Playback
Backup / Recovery
Security
Other Operations
Notifications
VAIO computer
Checking Supplied Items
Check all items packed with the product before use.
Notes on Adding and Removing Memory Modules
Before adding or removing memory modules, read the following precautions thoroughly.
Adding and Removing Memory Modules
If you want to increase computer speed, or to improve computer performance when running
programs simultaneously, increase the amount of memory by installing optional memory
modules.
Setting Up an Appropriate Work Environment
This topic describes where to or not to place your VAIO computer and ergonomic
instructions.
You might be looking for the following topics:
Parts and Controls on the Front
Parts and Controls on the Sides
Parts and Controls on the Bottom
Booting Your VAIO Computer from External Devices
Customizing Your VAIO Computer
Viewing the System Information
Using VAIO Update
Keeping Your VAIO Computer in Optimum Condition (VAIO Care)
Updating Your VAIO Computer
About the ASSIST Button
© 2011 Sony Corporation
18

Search
VAIO User Guide VPCEG2/VPCEH2/VPCEJ2/VPCEK2/VPCEL2 Series Back | Back to Top
Troubleshooting
How to Use
Parts Description
Setup
Network / Internet
Connections
Settings
Playback
Backup / Recovery
Security
Other Operations
Notifications
Memory module
Notes on Adding and Removing Memory Modules
Before adding or removing memory modules, read the following precautions thoroughly.
Adding and Removing Memory Modules
If you want to increase computer speed, or to improve computer performance when running
programs simultaneously, increase the amount of memory by installing optional memory
modules.
You might be looking for the following topics:
Viewing the System Information
© 2011 Sony Corporation
19

Search
VAIO User Guide VPCEG2/VPCEH2/VPCEJ2/VPCEK2/VPCEL2 Series Back | Back to Top
Troubleshooting
How to Use
Parts Description
Setup
Network / Internet
Connections
Settings
Playback
Backup / Recovery
Security
Other Operations
Notifications
Supplied items
Checking Supplied Items
Check all items packed with the product before use.
© 2011 Sony Corporation
20

Search
VAIO User Guide VPCEG2/VPCEH2/VPCEJ2/VPCEK2/VPCEL2 Series Back | Back to Top
Troubleshooting
How to Use
Parts Description
Setup
Network / Internet
Connections
Settings
Playback
Backup / Recovery
Security
Other Operations
Notifications
Button
Using the Internet without Starting Windows (Quick Web Access)(the Web
button)
The Quick Web Access function enables you to access the Internet without starting
Windows.
You might be looking for the following topics:
Changing the Button Assignment (VAIO Button)
About the ASSIST Button
© 2011 Sony Corporation
21

Search
VAIO User Guide VPCEG2/VPCEH2/VPCEJ2/VPCEK2/VPCEL2 Series Back | Back to Top
Troubleshooting
How to Use
Parts Description
Setup
Network / Internet
Connections
Settings
Playback
Backup / Recovery
Security
Other Operations
Notifications
LAN
About the Internet Connection Services
The following types of Internet connection services are available.
About the Network (LAN)
The network (LAN) enables you to connect your VAIO computer to the Internet and transfer
data between the computer and other devices.
Connecting to the Internet with a Wired Connection
Before using the Internet, you need to sign up with an Internet Service Provider (ISP) and
set up devices required for connecting your VAIO computer to the Internet.
About the Wireless LAN Standards
The Wireless Local Area Network (WLAN) allows your VAIO computer to connect to a
network through a wireless connection.
© 2011 Sony Corporation
22

Search
VAIO User Guide VPCEG2/VPCEH2/VPCEJ2/VPCEK2/VPCEL2 Series Back | Back to Top
Troubleshooting
How to Use
Parts Description
Setup
Network / Internet
Connections
Settings
Playback
Backup / Recovery
Security
Other Operations
Notifications
Internet
About the Internet Connection Services
The following types of Internet connection services are available.
About the Network (LAN)
The network (LAN) enables you to connect your VAIO computer to the Internet and transfer
data between the computer and other devices.
Connecting to the Internet with a Wired Connection
Before using the Internet, you need to sign up with an Internet Service Provider (ISP) and
set up devices required for connecting your VAIO computer to the Internet.
Using the Antivirus Software for Your VAIO Computer
Protect your VAIO computer against computer viruses by using the antivirus software.
About the Wireless LAN Standards
The Wireless Local Area Network (WLAN) allows your VAIO computer to connect to a
network through a wireless connection.
Before Using the Wireless LAN
You first need to establish wireless LAN communications between your VAIO computer and
an access point (not supplied) before connecting the computer to the Internet using the
wireless LAN.
Starting Wireless LAN Communications
You can establish wireless LAN communications between your VAIO computer and an
access point (not supplied) using VAIO Smart Network.
Stopping Wireless LAN Communications
Stop wireless LAN communications using VAIO Smart Network.
Notes on Using the Wireless LAN Function
Before using the wireless LAN function, read the following precautions for correct use.
About a Security Key for a Wireless LAN
A security key is a security protocol for a wireless LAN that encrypts data transmitted on the
wireless LAN.
Using the Internet without Starting Windows (Quick Web Access)(the Web
button)
The Quick Web Access function enables you to access the Internet without starting
Windows.
© 2011 Sony Corporation
23
Search
VAIO User Guide VPCEG2/VPCEH2/VPCEJ2/VPCEK2/VPCEL2 Series Back | Back to Top
Troubleshooting
How to Use
Parts Description
Setup
Network / Internet
Connections
Settings
Playback
Backup / Recovery
Security
Other Operations
Notifications
Wireless LAN
About the Internet Connection Services
The following types of Internet connection services are available.
About the Wireless LAN Standards
The Wireless Local Area Network (WLAN) allows your VAIO computer to connect to a
network through a wireless connection.
Before Using the Wireless LAN
You first need to establish wireless LAN communications between your VAIO computer and
an access point (not supplied) before connecting the computer to the Internet using the
wireless LAN.
Starting Wireless LAN Communications
You can establish wireless LAN communications between your VAIO computer and an
access point (not supplied) using VAIO Smart Network.
Stopping Wireless LAN Communications
Stop wireless LAN communications using VAIO Smart Network.
Notes on Using the Wireless LAN Function
Before using the wireless LAN function, read the following precautions for correct use.
About a Security Key for a Wireless LAN
A security key is a security protocol for a wireless LAN that encrypts data transmitted on the
wireless LAN.
© 2011 Sony Corporation
24

Search
VAIO User Guide VPCEG2/VPCEH2/VPCEJ2/VPCEK2/VPCEL2 Series Back | Back to Top
Troubleshooting
How to Use
Parts Description
Setup
Network / Internet
Connections
Settings
Playback
Backup / Recovery
Security
Other Operations
Notifications
Audio
Connecting External Speakers or Headphones
You can connect external sound output devices (such as speakers or headphones) to your
VAIO computer.
Connecting an External Microphone
You can connect an external microphone to your VAIO computer and enjoy voice chat, etc.
Changing the Sound Output Device
If there is no sound from the device connected to your VAIO computer, you need to change
the device for sound output.
Connecting a High-Quality Digital Sound Output Device between Your VAIO
Computer and a TV
You can connect a high-quality home theater receiver or other surround sound decoder
devices between your VAIO computer and a TV using an HDMI connection.
You might be looking for the following topics:
Adjusting the Speakers Volume
Adjusting the Volume in Windows
Adjusting the Microphone Volume
© 2011 Sony Corporation
25
Search
VAIO User Guide VPCEG2/VPCEH2/VPCEJ2/VPCEK2/VPCEL2 Series Back | Back to Top
Troubleshooting
How to Use
Parts Description
Setup
Network / Internet
Connections
Settings
Playback
Backup / Recovery
Security
Other Operations
Notifications
Battery
Installing/Removing the Battery Pack
Install the battery pack into the battery compartment on the bottom of your VAIO computer.
You might be looking for the following topics:
Charging the Battery Pack
Notes on Using the Battery Pack
Using Sleep Mode
Using Hibernate Mode
Notes on Sleep Mode
Selecting a Power Plan
Extending the Battery Life
Charge Indicator Status List
About Power Saving Mode
© 2011 Sony Corporation
26

Search
VAIO User Guide VPCEG2/VPCEH2/VPCEJ2/VPCEK2/VPCEL2 Series Back | Back to Top
Troubleshooting
How to Use
Parts Description
Setup
Network / Internet
Connections
Settings
Playback
Backup / Recovery
Security
Other Operations
Notifications
Display
Using the Multiple Monitor Function
The Multiple Monitor function allows you to distribute portions of your desktop across
separate displays. For example, if you have an external display connected to the monitor
port, the computer screen and the external display can function as a single desktop.
Connecting a TV with an HDMI Input Port
You can connect a TV with an HDMI input port to your VAIO computer with an HDMI cable
(not supplied).
Connecting an External Display or Projector
You can connect an external display (such as a computer display or a projector) to your
VAIO computer with a display cable (not supplied). Refer to the manual that came with your
external display or projector for more information on installation and use.
Notes on the LCD screen
Read the following precautions for correct use of the LCD screen.
Selecting Display Modes
You can switch the display output between the computer screen and an external display
connected to your VAIO computer.
Changing the Resolution (Size) of the Screen Image on an HDMI-Connected
Device
You can change the screen resolution or size of your VAIO computer’s screen image
displayed on an external display, such as a TV, connected to the computer with an HDMI
cable (not supplied).
You might be looking for the following topics:
Changing the Resolution (Size) of the Screen Image
Changing the LCD Brightness
© 2011 Sony Corporation
27

Search
VAIO User Guide VPCEG2/VPCEH2/VPCEJ2/VPCEK2/VPCEL2 Series Back | Back to Top
Troubleshooting
How to Use
Parts Description
Setup
Network / Internet
Connections
Settings
Playback
Backup / Recovery
Security
Other Operations
Notifications
Headphones
Connecting External Speakers or Headphones
You can connect external sound output devices (such as speakers or headphones) to your
VAIO computer.
© 2011 Sony Corporation
28

Search
VAIO User Guide VPCEG2/VPCEH2/VPCEJ2/VPCEK2/VPCEL2 Series Back | Back to Top
Troubleshooting
How to Use
Parts Description
Setup
Network / Internet
Connections
Settings
Playback
Backup / Recovery
Security
Other Operations
Notifications
LAN
About the Internet Connection Services
The following types of Internet connection services are available.
About the Network (LAN)
The network (LAN) enables you to connect your VAIO computer to the Internet and transfer
data between the computer and other devices.
Connecting to the Internet with a Wired Connection
Before using the Internet, you need to sign up with an Internet Service Provider (ISP) and
set up devices required for connecting your VAIO computer to the Internet.
About the Wireless LAN Standards
The Wireless Local Area Network (WLAN) allows your VAIO computer to connect to a
network through a wireless connection.
© 2011 Sony Corporation
29

Search
VAIO User Guide VPCEG2/VPCEH2/VPCEJ2/VPCEK2/VPCEL2 Series Back | Back to Top
Troubleshooting
How to Use
Parts Description
Setup
Network / Internet
Connections
Settings
Playback
Backup / Recovery
Security
Other Operations
Notifications
Optical digital output
Changing the Sound Output Device
If there is no sound from the device connected to your VAIO computer, you need to change
the device for sound output.
Connecting a High-Quality Digital Sound Output Device between Your VAIO
Computer and a TV
You can connect a high-quality home theater receiver or other surround sound decoder
devices between your VAIO computer and a TV using an HDMI connection.
© 2011 Sony Corporation
30
Search
VAIO User Guide VPCEG2/VPCEH2/VPCEJ2/VPCEK2/VPCEL2 Series Back | Back to Top
Troubleshooting
How to Use
Parts Description
Setup
Network / Internet
Connections
Settings
Playback
Backup / Recovery
Security
Other Operations
Notifications
Power
Installing/Removing the Battery Pack
Install the battery pack into the battery compartment on the bottom of your VAIO computer.
Connecting a Power Source
Connect your VAIO computer to an AC power source.
You might be looking for the following topics:
Charging the Battery Pack
Turning on Your VAIO Computer
Shutting Down Your VAIO Computer
Using Sleep Mode
Using Hibernate Mode
Notes on Using the Power Source
Notes on Sleep Mode
Selecting a Power Plan
Restarting Your VAIO Computer
Charge Indicator Status List
About Power Saving Mode
© 2011 Sony Corporation
31
Search
VAIO User Guide VPCEG2/VPCEH2/VPCEJ2/VPCEK2/VPCEL2 Series Back | Back to Top
Troubleshooting
How to Use
Parts Description
Setup
Network / Internet
Connections
Settings
Playback
Backup / Recovery
Security
Other Operations
Notifications
USB
Connecting a USB Device
You can connect a Universal Serial Bus (USB) device such as a mouse, floppy disk drive,
speaker or printer to your VAIO computer.
© 2011 Sony Corporation
32

Search
VAIO User Guide VPCEG2/VPCEH2/VPCEJ2/VPCEK2/VPCEL2 Series Back | Back to Top
Troubleshooting
How to Use
Parts Description
Setup
Network / Internet
Connections
Settings
Playback
Backup / Recovery
Security
Other Operations
Notifications
BLUETOOTH
About the BLUETOOTH(R) Function <BLUETOOTH equipped models>
You can establish wireless communications between your VAIO computer and other
BLUETOOTH devices such as another computer, a mobile phone, modem, PDA, digital still
camera, headset or mouse.
Communicating with Another BLUETOOTH(R) Device such as a Mouse
<BLUETOOTH equipped models>
You can connect BLUETOOTH devices to your VAIO computer.
Stopping BLUETOOTH(R) Communications <BLUETOOTH equipped models>
Stop BLUETOOTH communications using VAIO Smart Network.
Notes on Using the BLUETOOTH(R) Function <BLUETOOTH equipped
models>
Before using the BLUETOOTH function, read the following precautions for correct use.
About BLUETOOTH(R) Security <BLUETOOTH equipped models>
The BLUETOOTH wireless technology has an authentication function, which allows you to
control communication with other devices.
© 2011 Sony Corporation
33

Search
VAIO User Guide VPCEG2/VPCEH2/VPCEJ2/VPCEK2/VPCEL2 Series Back | Back to Top
Troubleshooting
How to Use
Parts Description
Setup
Network / Internet
Connections
Settings
Playback
Backup / Recovery
Security
Other Operations
Notifications
CD/DVD/BD
Connecting an External DVD Drive
Connect an external DVD drive or hard disk drive to a USB port on your VAIO computer.
You might be looking for the following topics:
Booting Your VAIO Computer from External Devices
Playing Blu-ray 3D(TM) Disc Media on a 3D TV<Intel Graphics or NVIDIA video controller
equipped models><Blu-ray Disc(TM) Drive equipped models>
Inserting/Removing a Disc<Optical disc drive equipped models>
Supported Discs<Optical disc drive equipped models>
About Region Codes<Optical disc drive equipped models>
Handling Discs<Optical disc drive equipped models>
Notes on Using Discs<Optical disc drive equipped models>
© 2011 Sony Corporation
34

Search
VAIO User Guide VPCEG2/VPCEH2/VPCEJ2/VPCEK2/VPCEL2 Series Back | Back to Top
Troubleshooting
How to Use
Parts Description
Setup
Network / Internet
Connections
Settings
Playback
Backup / Recovery
Security
Other Operations
Notifications
HDMI
Connecting a TV with an HDMI Input Port
You can connect a TV with an HDMI input port to your VAIO computer with an HDMI cable
(not supplied).
Changing the Resolution (Size) of the Screen Image on an HDMI-Connected
Device
You can change the screen resolution or size of your VAIO computer’s screen image
displayed on an external display, such as a TV, connected to the computer with an HDMI
cable (not supplied).
You might be looking for the following topics:
Playing Blu-ray 3D(TM) Disc Media on a 3D TV<Intel Graphics or NVIDIA video controller
equipped models><Blu-ray Disc(TM) Drive equipped models>
© 2011 Sony Corporation
35
Search
VAIO User Guide VPCEG2/VPCEH2/VPCEJ2/VPCEK2/VPCEL2 Series Back | Back to Top
Troubleshooting
How to Use
Parts Description
Setup
Network / Internet
Connections
Settings
Playback
Backup / Recovery
Security
Other Operations
Notifications
Internet
About the Internet Connection Services
The following types of Internet connection services are available.
About the Network (LAN)
The network (LAN) enables you to connect your VAIO computer to the Internet and transfer
data between the computer and other devices.
Connecting to the Internet with a Wired Connection
Before using the Internet, you need to sign up with an Internet Service Provider (ISP) and
set up devices required for connecting your VAIO computer to the Internet.
Using the Antivirus Software for Your VAIO Computer
Protect your VAIO computer against computer viruses by using the antivirus software.
About the Wireless LAN Standards
The Wireless Local Area Network (WLAN) allows your VAIO computer to connect to a
network through a wireless connection.
Before Using the Wireless LAN
You first need to establish wireless LAN communications between your VAIO computer and
an access point (not supplied) before connecting the computer to the Internet using the
wireless LAN.
Starting Wireless LAN Communications
You can establish wireless LAN communications between your VAIO computer and an
access point (not supplied) using VAIO Smart Network.
Stopping Wireless LAN Communications
Stop wireless LAN communications using VAIO Smart Network.
Notes on Using the Wireless LAN Function
Before using the wireless LAN function, read the following precautions for correct use.
About a Security Key for a Wireless LAN
A security key is a security protocol for a wireless LAN that encrypts data transmitted on the
wireless LAN.
You might be looking for the following topics:
Using the Internet without Starting Windows (Quick Web Access)(the Web button)
© 2011 Sony Corporation
36

Search
VAIO User Guide VPCEG2/VPCEH2/VPCEJ2/VPCEK2/VPCEL2 Series Back | Back to Top
Troubleshooting
How to Use
Parts Description
Setup
Network / Internet
Connections
Settings
Playback
Backup / Recovery
Security
Other Operations
Notifications
Microphone
Connecting an External Microphone
You can connect an external microphone to your VAIO computer and enjoy voice chat, etc.
You might be looking for the following topics:
Adjusting the Microphone Volume
© 2011 Sony Corporation
37

Search
VAIO User Guide VPCEG2/VPCEH2/VPCEJ2/VPCEK2/VPCEL2 Series Back | Back to Top
Troubleshooting
How to Use
Parts Description
Setup
Network / Internet
Connections
Settings
Playback
Backup / Recovery
Security
Other Operations
Notifications
Peripheral device
Connecting an External Microphone
You can connect an external microphone to your VAIO computer and enjoy voice chat, etc.
Changing the Sound Output Device
If there is no sound from the device connected to your VAIO computer, you need to change
the device for sound output.
Connecting a High-Quality Digital Sound Output Device between Your VAIO
Computer and a TV
You can connect a high-quality home theater receiver or other surround sound decoder
devices between your VAIO computer and a TV using an HDMI connection.
Using the Multiple Monitor Function
The Multiple Monitor function allows you to distribute portions of your desktop across
separate displays. For example, if you have an external display connected to the monitor
port, the computer screen and the external display can function as a single desktop.
Connecting a TV with an HDMI Input Port
You can connect a TV with an HDMI input port to your VAIO computer with an HDMI cable
(not supplied).
Connecting an External Display or Projector
You can connect an external display (such as a computer display or a projector) to your
VAIO computer with a display cable (not supplied). Refer to the manual that came with your
external display or projector for more information on installation and use.
Notes on the LCD screen
Read the following precautions for correct use of the LCD screen.
Selecting Display Modes
You can switch the display output between the computer screen and an external display
connected to your VAIO computer.
You might be looking for the following topics:
Playing Blu-ray 3D(TM) Disc Media on a 3D TV<Intel Graphics or NVIDIA video controller
equipped models><Blu-ray Disc(TM) Drive equipped models>
© 2011 Sony Corporation
38

Search
VAIO User Guide VPCEG2/VPCEH2/VPCEJ2/VPCEK2/VPCEL2 Series Back | Back to Top
Troubleshooting
How to Use
Parts Description
Setup
Network / Internet
Connections
Settings
Playback
Backup / Recovery
Security
Other Operations
Notifications
Speakers
Connecting External Speakers or Headphones
You can connect external sound output devices (such as speakers or headphones) to your
VAIO computer.
You might be looking for the following topics:
Adjusting the Speakers Volume
© 2011 Sony Corporation
39

Search
VAIO User Guide VPCEG2/VPCEH2/VPCEJ2/VPCEK2/VPCEL2 Series Back | Back to Top
Troubleshooting
How to Use
Parts Description
Setup
Network / Internet
Connections
Settings
Playback
Backup / Recovery
Security
Other Operations
Notifications
Wireless LAN
About the Internet Connection Services
The following types of Internet connection services are available.
About the Wireless LAN Standards
The Wireless Local Area Network (WLAN) allows your VAIO computer to connect to a
network through a wireless connection.
Before Using the Wireless LAN
You first need to establish wireless LAN communications between your VAIO computer and
an access point (not supplied) before connecting the computer to the Internet using the
wireless LAN.
Starting Wireless LAN Communications
You can establish wireless LAN communications between your VAIO computer and an
access point (not supplied) using VAIO Smart Network.
Stopping Wireless LAN Communications
Stop wireless LAN communications using VAIO Smart Network.
Notes on Using the Wireless LAN Function
Before using the wireless LAN function, read the following precautions for correct use.
About a Security Key for a Wireless LAN
A security key is a security protocol for a wireless LAN that encrypts data transmitted on the
wireless LAN.
© 2011 Sony Corporation
40

Search
VAIO User Guide VPCEG2/VPCEH2/VPCEJ2/VPCEK2/VPCEL2 Series Back | Back to Top
Troubleshooting
How to Use
Parts Description
Setup
Network / Internet
Connections
Settings
Playback
Backup / Recovery
Security
Other Operations
Notifications
Audio
Adjusting the Speakers Volume
You can change the volume level of the speakers and headphones.
Changing the Sound Output Device
If there is no sound from the device connected to your VAIO computer, you need to change
the device for sound output.
Adjusting the Volume in Windows
You can adjust the volume on each software application from the Control Panel window.
Connecting a High-Quality Digital Sound Output Device between Your VAIO
Computer and a TV
You can connect a high-quality home theater receiver or other surround sound decoder
devices between your VAIO computer and a TV using an HDMI connection.
Adjusting the Microphone Volume
You can adjust the microphone volume.
You might be looking for the following topics:
Connecting External Speakers or Headphones
Connecting an External Microphone
© 2011 Sony Corporation
41

Search
VAIO User Guide VPCEG2/VPCEH2/VPCEJ2/VPCEK2/VPCEL2 Series Back | Back to Top
Troubleshooting
How to Use
Parts Description
Setup
Network / Internet
Connections
Settings
Playback
Backup / Recovery
Security
Other Operations
Notifications
Battery
Notes on Using the Battery Pack
Before using the battery pack, read the following precautions for correct use.
Using Sleep Mode
In Sleep mode, all unnecessary devices of your VAIO computer are turned off, though some
devices stay turned on to retain the computer’s state including data you are working on.
Sleep mode is useful when you take a short rest, for example.
Using Hibernate Mode
In Hibernate mode, the current state of your VAIO computer is saved to the built-in storage
device, and then the computer is turned off. Hibernate mode is useful when you do not
intend to use the computer for an extended period of time.
Notes on Sleep Mode
Read the following precautions before using Sleep mode.
Selecting a Power Plan
Power management helps you set up power plans to suit your requirements for power
consumption.
You might be looking for the following topics:
Installing/Removing the Battery Pack
Charging the Battery Pack
Extending the Battery Life
Charge Indicator Status List
About Power Saving Mode
© 2011 Sony Corporation
42
Search
VAIO User Guide VPCEG2/VPCEH2/VPCEJ2/VPCEK2/VPCEL2 Series Back | Back to Top
Troubleshooting
How to Use
Parts Description
Setup
Network / Internet
Connections
Settings
Playback
Backup / Recovery
Security
Other Operations
Notifications
CD/DVD/BD
Booting Your VAIO Computer from External Devices
You can boot your VAIO computer from external devices, such as an optical disc drive or a
USB floppy disk drive, by using the BIOS function.
You might be looking for the following topics:
Connecting an External DVD Drive
Playing Blu-ray 3D(TM) Disc Media on a 3D TV<Intel Graphics or NVIDIA video controller
equipped models><Blu-ray Disc(TM) Drive equipped models>
Inserting/Removing a Disc<Optical disc drive equipped models>
Supported Discs<Optical disc drive equipped models>
About Region Codes<Optical disc drive equipped models>
Handling Discs<Optical disc drive equipped models>
Notes on Using Discs<Optical disc drive equipped models>
© 2011 Sony Corporation
43

Search
VAIO User Guide VPCEG2/VPCEH2/VPCEJ2/VPCEK2/VPCEL2 Series Back | Back to Top
Troubleshooting
How to Use
Parts Description
Setup
Network / Internet
Connections
Settings
Playback
Backup / Recovery
Security
Other Operations
Notifications
Display
Changing the Resolution (Size) of the Screen Image
You can change the screen resolution to adjust the size of the characters and images on the
computer screen.
Using the Multiple Monitor Function
The Multiple Monitor function allows you to distribute portions of your desktop across
separate displays. For example, if you have an external display connected to the monitor
port, the computer screen and the external display can function as a single desktop.
Connecting a TV with an HDMI Input Port
You can connect a TV with an HDMI input port to your VAIO computer with an HDMI cable
(not supplied).
Connecting an External Display or Projector
You can connect an external display (such as a computer display or a projector) to your
VAIO computer with a display cable (not supplied). Refer to the manual that came with your
external display or projector for more information on installation and use.
Notes on the LCD screen
Read the following precautions for correct use of the LCD screen.
Selecting Display Modes
You can switch the display output between the computer screen and an external display
connected to your VAIO computer.
Changing the Resolution (Size) of the Screen Image on an HDMI-Connected
Device
You can change the screen resolution or size of your VAIO computer’s screen image
displayed on an external display, such as a TV, connected to the computer with an HDMI
cable (not supplied).
Changing the LCD Brightness
You can adjust the LCD brightness.
© 2011 Sony Corporation
44
Search
VAIO User Guide VPCEG2/VPCEH2/VPCEJ2/VPCEK2/VPCEL2 Series Back | Back to Top
Troubleshooting
How to Use
Parts Description
Setup
Network / Internet
Connections
Settings
Playback
Backup / Recovery
Security
Other Operations
Notifications
Keyboard
Changing the Button Assignment (VAIO Button)
You can change the current task assigned to the VAIO button.
You might be looking for the following topics:
Combinations and Functions with the Fn Key
© 2011 Sony Corporation
45

Search
VAIO User Guide VPCEG2/VPCEH2/VPCEJ2/VPCEK2/VPCEL2 Series Back | Back to Top
Troubleshooting
How to Use
Parts Description
Setup
Network / Internet
Connections
Settings
Playback
Backup / Recovery
Security
Other Operations
Notifications
Microphone
Adjusting the Microphone Volume
You can adjust the microphone volume.
You might be looking for the following topics:
Connecting an External Microphone
© 2011 Sony Corporation
46

Search
VAIO User Guide VPCEG2/VPCEH2/VPCEJ2/VPCEK2/VPCEL2 Series Back | Back to Top
Troubleshooting
How to Use
Parts Description
Setup
Network / Internet
Connections
Settings
Playback
Backup / Recovery
Security
Other Operations
Notifications
Password
Setting/Changing the Power-on Password
You can set a password (power-on password) for booting up your VAIO computer, using the
BIOS function. Entry of the power-on password will be prompted after the VAIO logo appears
to start the computer.
Removing the Power-on Password
If power-on password input for booting up your VAIO computer is no longer necessary,
follow these steps to remove the machine password and user password.
Creating/Changing/Removing Your Windows Password
Setting the Windows password allows you to protect your VAIO computer from unauthorized
access by making the user enter the password when the computer is turned on or returns
from power saving mode to Normal mode.
© 2011 Sony Corporation
47

Search
VAIO User Guide VPCEG2/VPCEH2/VPCEJ2/VPCEK2/VPCEL2 Series Back | Back to Top
Troubleshooting
How to Use
Parts Description
Setup
Network / Internet
Connections
Settings
Playback
Backup / Recovery
Security
Other Operations
Notifications
Power
Using Sleep Mode
In Sleep mode, all unnecessary devices of your VAIO computer are turned off, though some
devices stay turned on to retain the computer’s state including data you are working on.
Sleep mode is useful when you take a short rest, for example.
Using Hibernate Mode
In Hibernate mode, the current state of your VAIO computer is saved to the built-in storage
device, and then the computer is turned off. Hibernate mode is useful when you do not
intend to use the computer for an extended period of time.
Notes on Using the Power Source
Read the following precautions before plugging your VAIO computer into an AC power
source.
Notes on Sleep Mode
Read the following precautions before using Sleep mode.
Selecting a Power Plan
Power management helps you set up power plans to suit your requirements for power
consumption.
You might be looking for the following topics:
Installing/Removing the Battery Pack
Charging the Battery Pack
Connecting a Power Source
Turning on Your VAIO Computer
Shutting Down Your VAIO Computer
Restarting Your VAIO Computer
Charge Indicator Status List
About Power Saving Mode
© 2011 Sony Corporation
48

Search
VAIO User Guide VPCEG2/VPCEH2/VPCEJ2/VPCEK2/VPCEL2 Series Back | Back to Top
Troubleshooting
How to Use
Parts Description
Setup
Network / Internet
Connections
Settings
Playback
Backup / Recovery
Security
Other Operations
Notifications
Service and support
Using VAIO Update
VAIO Update provides a service that informs you of available update information, such as
important notices or update programs, to keep your VAIO computer up to date.
Keeping Your VAIO Computer in Optimum Condition (VAIO Care)
With VAIO Care, you can regularly conduct performance checks and tune-ups on your VAIO
computer to keep it running at an optimum level. Launch VAIO Care whenever a problem
arises.
Updating Your VAIO Computer
Be sure to update your VAIO computer with the following software applications to enhance
the computer’s efficiency, security, and functionality.
You might be looking for the following topics:
About Online Support Website
Solving Common Problems with Your VAIO Computer
© 2011 Sony Corporation
49

Search
VAIO User Guide VPCEG2/VPCEH2/VPCEJ2/VPCEK2/VPCEL2 Series Back | Back to Top
Troubleshooting
How to Use
Parts Description
Setup
Network / Internet
Connections
Settings
Playback
Backup / Recovery
Security
Other Operations
Notifications
Touch pad
Using the Touch Pad
By sliding your finger on the touch pad, you can move the pointer on the computer screen.
Enabling/Disabling the Touch Pad
You can enable/disable the touch pad on your VAIO computer.
Disabling the Tapping Function on the Touch Pad
You can disable the tapping function to avoid unintentional movements of the pointer caused
by a light touch on the touch pad.
© 2011 Sony Corporation
50

Search
VAIO User Guide VPCEG2/VPCEH2/VPCEJ2/VPCEK2/VPCEL2 Series Back | Back to Top
Troubleshooting
How to Use
Parts Description
Setup
Network / Internet
Connections
Settings
Playback
Backup / Recovery
Security
Other Operations
Notifications
BIOS
Booting Your VAIO Computer from External Devices
You can boot your VAIO computer from external devices, such as an optical disc drive or a
USB floppy disk drive, by using the BIOS function.
Setting/Changing the Power-on Password
You can set a password (power-on password) for booting up your VAIO computer, using the
BIOS function. Entry of the power-on password will be prompted after the VAIO logo appears
to start the computer.
Removing the Power-on Password
If power-on password input for booting up your VAIO computer is no longer necessary,
follow these steps to remove the machine password and user password.
© 2011 Sony Corporation
51

Search
VAIO User Guide VPCEG2/VPCEH2/VPCEJ2/VPCEK2/VPCEL2 Series Back | Back to Top
Troubleshooting
How to Use
Parts Description
Setup
Network / Internet
Connections
Settings
Playback
Backup / Recovery
Security
Other Operations
Notifications
Button
Changing the Button Assignment (VAIO Button)
You can change the current task assigned to the VAIO button.
You might be looking for the following topics:
Using the Internet without Starting Windows (Quick Web Access)(the Web button)
About the ASSIST Button
© 2011 Sony Corporation
52

Search
VAIO User Guide VPCEG2/VPCEH2/VPCEJ2/VPCEK2/VPCEL2 Series Back | Back to Top
Troubleshooting
How to Use
Parts Description
Setup
Network / Internet
Connections
Settings
Playback
Backup / Recovery
Security
Other Operations
Notifications
Camera
Using the Built-in Camera <Built-in camera equipped models>
If your VAIO computer is equipped with a built-in camera, you can make a video call through
the Internet using communication software, such as Windows Live Messenger.
You might be looking for the following topics:
Notes on the Built-in Camera <Built-in camera equipped models>
© 2011 Sony Corporation
53

Search
VAIO User Guide VPCEG2/VPCEH2/VPCEJ2/VPCEK2/VPCEL2 Series Back | Back to Top
Troubleshooting
How to Use
Parts Description
Setup
Network / Internet
Connections
Settings
Playback
Backup / Recovery
Security
Other Operations
Notifications
HDMI
Connecting a TV with an HDMI Input Port
You can connect a TV with an HDMI input port to your VAIO computer with an HDMI cable
(not supplied).
Changing the Resolution (Size) of the Screen Image on an HDMI-Connected
Device
You can change the screen resolution or size of your VAIO computer’s screen image
displayed on an external display, such as a TV, connected to the computer with an HDMI
cable (not supplied).
You might be looking for the following topics:
Playing Blu-ray 3D(TM) Disc Media on a 3D TV<Intel Graphics or NVIDIA video controller
equipped models><Blu-ray Disc(TM) Drive equipped models>
© 2011 Sony Corporation
54

Search
VAIO User Guide VPCEG2/VPCEH2/VPCEJ2/VPCEK2/VPCEL2 Series Back | Back to Top
Troubleshooting
How to Use
Parts Description
Setup
Network / Internet
Connections
Settings
Playback
Backup / Recovery
Security
Other Operations
Notifications
Memory module
Viewing the System Information
You can view the system information of your VAIO computer.
You might be looking for the following topics:
Notes on Adding and Removing Memory Modules
Adding and Removing Memory Modules
© 2011 Sony Corporation
55

Search
VAIO User Guide VPCEG2/VPCEH2/VPCEJ2/VPCEK2/VPCEL2 Series Back | Back to Top
Troubleshooting
How to Use
Parts Description
Setup
Network / Internet
Connections
Settings
Playback
Backup / Recovery
Security
Other Operations
Notifications
Optical digital output
Changing the Sound Output Device
If there is no sound from the device connected to your VAIO computer, you need to change
the device for sound output.
Connecting a High-Quality Digital Sound Output Device between Your VAIO
Computer and a TV
You can connect a high-quality home theater receiver or other surround sound decoder
devices between your VAIO computer and a TV using an HDMI connection.
© 2011 Sony Corporation
56

Search
VAIO User Guide VPCEG2/VPCEH2/VPCEJ2/VPCEK2/VPCEL2 Series Back | Back to Top
Troubleshooting
How to Use
Parts Description
Setup
Network / Internet
Connections
Settings
Playback
Backup / Recovery
Security
Other Operations
Notifications
Peripheral device
Changing the Sound Output Device
If there is no sound from the device connected to your VAIO computer, you need to change
the device for sound output.
Connecting a High-Quality Digital Sound Output Device between Your VAIO
Computer and a TV
You can connect a high-quality home theater receiver or other surround sound decoder
devices between your VAIO computer and a TV using an HDMI connection.
Using the Multiple Monitor Function
The Multiple Monitor function allows you to distribute portions of your desktop across
separate displays. For example, if you have an external display connected to the monitor
port, the computer screen and the external display can function as a single desktop.
Connecting a TV with an HDMI Input Port
You can connect a TV with an HDMI input port to your VAIO computer with an HDMI cable
(not supplied).
Connecting an External Display or Projector
You can connect an external display (such as a computer display or a projector) to your
VAIO computer with a display cable (not supplied). Refer to the manual that came with your
external display or projector for more information on installation and use.
Notes on the LCD screen
Read the following precautions for correct use of the LCD screen.
Selecting Display Modes
You can switch the display output between the computer screen and an external display
connected to your VAIO computer.
You might be looking for the following topics:
Connecting an External Microphone
Playing Blu-ray 3D(TM) Disc Media on a 3D TV<Intel Graphics or NVIDIA video controller
equipped models><Blu-ray Disc(TM) Drive equipped models>
© 2011 Sony Corporation
57

Search
VAIO User Guide VPCEG2/VPCEH2/VPCEJ2/VPCEK2/VPCEL2 Series Back | Back to Top
Troubleshooting
How to Use
Parts Description
Setup
Network / Internet
Connections
Settings
Playback
Backup / Recovery
Security
Other Operations
Notifications
Security
Updating Your VAIO Computer
Be sure to update your VAIO computer with the following software applications to enhance
the computer’s efficiency, security, and functionality.
© 2011 Sony Corporation
58

Search
VAIO User Guide VPCEG2/VPCEH2/VPCEJ2/VPCEK2/VPCEL2 Series Back | Back to Top
Troubleshooting
How to Use
Parts Description
Setup
Network / Internet
Connections
Settings
Playback
Backup / Recovery
Security
Other Operations
Notifications
Speakers
Adjusting the Speakers Volume
You can change the volume level of the speakers and headphones.
You might be looking for the following topics:
Connecting External Speakers or Headphones
© 2011 Sony Corporation
59

Search
VAIO User Guide VPCEG2/VPCEH2/VPCEJ2/VPCEK2/VPCEL2 Series Back | Back to Top
Troubleshooting
How to Use
Parts Description
Setup
Network / Internet
Connections
Settings
Playback
Backup / Recovery
Security
Other Operations
Notifications
VAIO computer
Booting Your VAIO Computer from External Devices
You can boot your VAIO computer from external devices, such as an optical disc drive or a
USB floppy disk drive, by using the BIOS function.
Customizing Your VAIO Computer
VAIO Control Center allows you to access system information and to change settings of
various kinds of functions such as display and sounds.
Viewing the System Information
You can view the system information of your VAIO computer.
Using VAIO Update
VAIO Update provides a service that informs you of available update information, such as
important notices or update programs, to keep your VAIO computer up to date.
Keeping Your VAIO Computer in Optimum Condition (VAIO Care)
With VAIO Care, you can regularly conduct performance checks and tune-ups on your VAIO
computer to keep it running at an optimum level. Launch VAIO Care whenever a problem
arises.
Updating Your VAIO Computer
Be sure to update your VAIO computer with the following software applications to enhance
the computer’s efficiency, security, and functionality.
You might be looking for the following topics:
Parts and Controls on the Front
Parts and Controls on the Sides
Parts and Controls on the Bottom
Checking Supplied Items
Notes on Adding and Removing Memory Modules
Adding and Removing Memory Modules
Setting Up an Appropriate Work Environment
About the ASSIST Button
© 2011 Sony Corporation
60
Search
VAIO User Guide VPCEG2/VPCEH2/VPCEJ2/VPCEK2/VPCEL2 Series Back | Back to Top
Troubleshooting
How to Use
Parts Description
Setup
Network / Internet
Connections
Settings
Playback
Backup / Recovery
Security
Other Operations
Notifications
CD/DVD/BD
Playing Blu-ray 3D(TM) Disc Media on a 3D TV<Intel Graphics or NVIDIA
video controller equipped models><Blu-ray Disc(TM) Drive equipped models>
If your VAIO computer is equipped with the Blu-ray Disc Drive and the 3D graphics
controller, you can play Blu-ray 3D Disc media and view 3D images on a 3D-capable
display, such as a 3D TV, by connecting the display to the computer.
Inserting/Removing a Disc<Optical disc drive equipped models>
Insert/remove a disc to/from your VAIO computer that is turned on.
Supported Discs<Optical disc drive equipped models>
The following table lists media types that are playable/recordable on your VAIO computer.
About Region Codes<Optical disc drive equipped models>
The following table lists DVD region codes indicating playable region of DVD media.
You might be looking for the following topics:
Connecting an External DVD Drive
Booting Your VAIO Computer from External Devices
Handling Discs<Optical disc drive equipped models>
Notes on Using Discs<Optical disc drive equipped models>
© 2011 Sony Corporation
61

Search
VAIO User Guide VPCEG2/VPCEH2/VPCEJ2/VPCEK2/VPCEL2 Series Back | Back to Top
Troubleshooting
How to Use
Parts Description
Setup
Network / Internet
Connections
Settings
Playback
Backup / Recovery
Security
Other Operations
Notifications
Peripheral device
Playing Blu-ray 3D(TM) Disc Media on a 3D TV<Intel Graphics or NVIDIA
video controller equipped models><Blu-ray Disc(TM) Drive equipped models>
If your VAIO computer is equipped with the Blu-ray Disc Drive and the 3D graphics
controller, you can play Blu-ray 3D Disc media and view 3D images on a 3D-capable
display, such as a 3D TV, by connecting the display to the computer.
You might be looking for the following topics:
Connecting an External Microphone
Changing the Sound Output Device
Connecting a High-Quality Digital Sound Output Device between Your VAIO Computer and a
TV
Using the Multiple Monitor Function
Connecting a TV with an HDMI Input Port
Connecting an External Display or Projector
Notes on the LCD screen
Selecting Display Modes
© 2011 Sony Corporation
62

Search
VAIO User Guide VPCEG2/VPCEH2/VPCEJ2/VPCEK2/VPCEL2 Series Back | Back to Top
Troubleshooting
How to Use
Parts Description
Setup
Network / Internet
Connections
Settings
Playback
Backup / Recovery
Security
Other Operations
Notifications
HDMI
Playing Blu-ray 3D(TM) Disc Media on a 3D TV<Intel Graphics or NVIDIA
video controller equipped models><Blu-ray Disc(TM) Drive equipped models>
If your VAIO computer is equipped with the Blu-ray Disc Drive and the 3D graphics
controller, you can play Blu-ray 3D Disc media and view 3D images on a 3D-capable
display, such as a 3D TV, by connecting the display to the computer.
You might be looking for the following topics:
Connecting a TV with an HDMI Input Port
Changing the Resolution (Size) of the Screen Image on an HDMI-Connected Device
© 2011 Sony Corporation
63
Search
VAIO User Guide VPCEG2/VPCEH2/VPCEJ2/VPCEK2/VPCEL2 Series Back | Back to Top
Troubleshooting
How to Use
Parts Description
Setup
Network / Internet
Connections
Settings
Playback
Backup / Recovery
Security
Other Operations
Notifications
BIOS
Booting Your VAIO Computer from External Devices
You can boot your VAIO computer from external devices, such as an optical disc drive or a
USB floppy disk drive, by using the BIOS function.
You might be looking for the following topics:
Setting/Changing the Power-on Password
Removing the Power-on Password
© 2011 Sony Corporation
64

Search
VAIO User Guide VPCEG2/VPCEH2/VPCEJ2/VPCEK2/VPCEL2 Series Back | Back to Top
Troubleshooting
How to Use
Parts Description
Setup
Network / Internet
Connections
Settings
Playback
Backup / Recovery
Security
Other Operations
Notifications
Built-in storage device
Creating Other Drives (modifying partitions)
Partitions are divided areas on your built-in storage device. Dividing the built-in storage
device into more than one partition may have various advantages, such as separating the
system files from your data files.
Creating Partitions during Recovery
There are two ways to create partitions: using Windows and creating during recovery.
Creating Partitions in Windows
The Windows feature allows you to create a partition without recovering your VAIO computer
system.
Removing Recovery Contents to Free up Disk Space
Your built-in storage device contains the recovery area where the data for system recovery
is stored. If your VAIO computer includes a solid state drive (SSD), you might want to
minimize the recovery area by removing such data.
Checking the Volume of the Recovery Area
Your built-in storage device contains the recovery area where the data for the system
recovery is stored.
© 2011 Sony Corporation
65

Search
VAIO User Guide VPCEG2/VPCEH2/VPCEJ2/VPCEK2/VPCEL2 Series Back | Back to Top
Troubleshooting
How to Use
Parts Description
Setup
Network / Internet
Connections
Settings
Playback
Backup / Recovery
Security
Other Operations
Notifications
CD/DVD/BD
Booting Your VAIO Computer from External Devices
You can boot your VAIO computer from external devices, such as an optical disc drive or a
USB floppy disk drive, by using the BIOS function.
You might be looking for the following topics:
Connecting an External DVD Drive
Playing Blu-ray 3D(TM) Disc Media on a 3D TV<Intel Graphics or NVIDIA video controller
equipped models><Blu-ray Disc(TM) Drive equipped models>
Inserting/Removing a Disc<Optical disc drive equipped models>
Supported Discs<Optical disc drive equipped models>
About Region Codes<Optical disc drive equipped models>
Handling Discs<Optical disc drive equipped models>
Notes on Using Discs<Optical disc drive equipped models>
© 2011 Sony Corporation
66

Search
VAIO User Guide VPCEG2/VPCEH2/VPCEJ2/VPCEK2/VPCEL2 Series Back | Back to Top
Troubleshooting
How to Use
Parts Description
Setup
Network / Internet
Connections
Settings
Playback
Backup / Recovery
Security
Other Operations
Notifications
Recovery
Removing Recovery Contents to Free up Disk Space
Your built-in storage device contains the recovery area where the data for system recovery
is stored. If your VAIO computer includes a solid state drive (SSD), you might want to
minimize the recovery area by removing such data.
About Recovery
Recovery is the process of restoring your VAIO computer back to its original factory
condition.
Creating Recovery Media
Follow the instructions below to create Recovery Media.
Recovering from the Recovery Area
Recovery from the recovery area on the built-in storage device is faster than recovery using
Recovery Media.
Recovering from Recovery Media
If the recovery area data has been corrupted or erased, you can use Recovery Media to
recover your VAIO computer.
Notes on Recovery
Read the following notes thoroughly before recovering your VAIO computer.
Checking the Volume of the Recovery Area
Your built-in storage device contains the recovery area where the data for the system
recovery is stored.
About the ASSIST Button
Press the ASSIST button to perform regular maintenance of your VAIO computer or to solve
problems you might encounter when using the computer.
© 2011 Sony Corporation
67

Search
VAIO User Guide VPCEG2/VPCEH2/VPCEJ2/VPCEK2/VPCEL2 Series Back | Back to Top
Troubleshooting
How to Use
Parts Description
Setup
Network / Internet
Connections
Settings
Playback
Backup / Recovery
Security
Other Operations
Notifications
VAIO computer
Booting Your VAIO Computer from External Devices
You can boot your VAIO computer from external devices, such as an optical disc drive or a
USB floppy disk drive, by using the BIOS function.
About the ASSIST Button
Press the ASSIST button to perform regular maintenance of your VAIO computer or to solve
problems you might encounter when using the computer.
Keeping Your VAIO Computer in Optimum Condition (VAIO Care)
With VAIO Care, you can regularly conduct performance checks and tune-ups on your VAIO
computer to keep it running at an optimum level. Launch VAIO Care whenever a problem
arises.
You might be looking for the following topics:
Parts and Controls on the Front
Parts and Controls on the Sides
Parts and Controls on the Bottom
Checking Supplied Items
Notes on Adding and Removing Memory Modules
Adding and Removing Memory Modules
Setting Up an Appropriate Work Environment
Customizing Your VAIO Computer
Viewing the System Information
Using VAIO Update
Updating Your VAIO Computer
© 2011 Sony Corporation
68

Search
VAIO User Guide VPCEG2/VPCEH2/VPCEJ2/VPCEK2/VPCEL2 Series Back | Back to Top
Troubleshooting
How to Use
Parts Description
Setup
Network / Internet
Connections
Settings
Playback
Backup / Recovery
Security
Other Operations
Notifications
Backup
About Backup
The backup process creates a backup copy of your data stored on the built-in storage device
and saves it to another location.
About Types of Backup
You can use the Windows Backup and Restore feature to back up your valuable data.
Creating a Restore Point
A restore point enables you to restore your computer system files to a previous state,
depending on when the restore point was created.
Backing Up Your Data when You cannot Start Windows
If you cannot start Windows, back up your data with VAIO Care Rescue.
Restoring System Files Using the Restore Point when You cannot Start
Windows
When you cannot start Windows, follow these steps to restore computer system files.
Restoring Your Data with VAIO Data Restore Tool
If you backed up files previously using VAIO Care Rescue, use VAIO Data Restore Tool to
restore these files.
© 2011 Sony Corporation
69

Search
VAIO User Guide VPCEG2/VPCEH2/VPCEJ2/VPCEK2/VPCEL2 Series Back | Back to Top
Troubleshooting
How to Use
Parts Description
Setup
Network / Internet
Connections
Settings
Playback
Backup / Recovery
Security
Other Operations
Notifications
Button
About the ASSIST Button
Press the ASSIST button to perform regular maintenance of your VAIO computer or to solve
problems you might encounter when using the computer.
You might be looking for the following topics:
Using the Internet without Starting Windows (Quick Web Access)(the Web button)
Changing the Button Assignment (VAIO Button)
© 2011 Sony Corporation
70

Search
VAIO User Guide VPCEG2/VPCEH2/VPCEJ2/VPCEK2/VPCEL2 Series Back | Back to Top
Troubleshooting
How to Use
Parts Description
Setup
Network / Internet
Connections
Settings
Playback
Backup / Recovery
Security
Other Operations
Notifications
Partition
Creating Other Drives (modifying partitions)
Partitions are divided areas on your built-in storage device. Dividing the built-in storage
device into more than one partition may have various advantages, such as separating the
system files from your data files.
Creating Partitions during Recovery
There are two ways to create partitions: using Windows and creating during recovery.
Creating Partitions in Windows
The Windows feature allows you to create a partition without recovering your VAIO computer
system.
© 2011 Sony Corporation
71

Search
VAIO User Guide VPCEG2/VPCEH2/VPCEJ2/VPCEK2/VPCEL2 Series Back | Back to Top
Troubleshooting
How to Use
Parts Description
Setup
Network / Internet
Connections
Settings
Playback
Backup / Recovery
Security
Other Operations
Notifications
Service and support
Keeping Your VAIO Computer in Optimum Condition (VAIO Care)
With VAIO Care, you can regularly conduct performance checks and tune-ups on your VAIO
computer to keep it running at an optimum level. Launch VAIO Care whenever a problem
arises.
You might be looking for the following topics:
Using VAIO Update
Updating Your VAIO Computer
About Online Support Website
Solving Common Problems with Your VAIO Computer
© 2011 Sony Corporation
72

Search
VAIO User Guide VPCEG2/VPCEH2/VPCEJ2/VPCEK2/VPCEL2 Series Back | Back to Top
Troubleshooting
How to Use
Parts Description
Setup
Network / Internet
Connections
Settings
Playback
Backup / Recovery
Security
Other Operations
Notifications
BIOS
Setting/Changing the Power-on Password
You can set a password (power-on password) for booting up your VAIO computer, using the
BIOS function. Entry of the power-on password will be prompted after the VAIO logo appears
to start the computer.
Removing the Power-on Password
If power-on password input for booting up your VAIO computer is no longer necessary,
follow these steps to remove the machine password and user password.
You might be looking for the following topics:
Booting Your VAIO Computer from External Devices
© 2011 Sony Corporation
73

Search
VAIO User Guide VPCEG2/VPCEH2/VPCEJ2/VPCEK2/VPCEL2 Series Back | Back to Top
Troubleshooting
How to Use
Parts Description
Setup
Network / Internet
Connections
Settings
Playback
Backup / Recovery
Security
Other Operations
Notifications
Password
Setting/Changing the Power-on Password
You can set a password (power-on password) for booting up your VAIO computer, using the
BIOS function. Entry of the power-on password will be prompted after the VAIO logo appears
to start the computer.
Removing the Power-on Password
If power-on password input for booting up your VAIO computer is no longer necessary,
follow these steps to remove the machine password and user password.
Creating/Changing/Removing Your Windows Password
Setting the Windows password allows you to protect your VAIO computer from unauthorized
access by making the user enter the password when the computer is turned on or returns
from power saving mode to Normal mode.
© 2011 Sony Corporation
74

Search
VAIO User Guide VPCEG2/VPCEH2/VPCEJ2/VPCEK2/VPCEL2 Series Back | Back to Top
Troubleshooting
How to Use
Parts Description
Setup
Network / Internet
Connections
Settings
Playback
Backup / Recovery
Security
Other Operations
Notifications
VAIO computer
Using VAIO Update
VAIO Update provides a service that informs you of available update information, such as
important notices or update programs, to keep your VAIO computer up to date.
Keeping Your VAIO Computer in Optimum Condition (VAIO Care)
With VAIO Care, you can regularly conduct performance checks and tune-ups on your VAIO
computer to keep it running at an optimum level. Launch VAIO Care whenever a problem
arises.
You might be looking for the following topics:
Parts and Controls on the Front
Parts and Controls on the Sides
Parts and Controls on the Bottom
Checking Supplied Items
Notes on Adding and Removing Memory Modules
Adding and Removing Memory Modules
Setting Up an Appropriate Work Environment
Booting Your VAIO Computer from External Devices
Customizing Your VAIO Computer
Viewing the System Information
Updating Your VAIO Computer
About the ASSIST Button
© 2011 Sony Corporation
75

Search
VAIO User Guide VPCEG2/VPCEH2/VPCEJ2/VPCEK2/VPCEL2 Series Back | Back to Top
Troubleshooting
How to Use
Parts Description
Setup
Network / Internet
Connections
Settings
Playback
Backup / Recovery
Security
Other Operations
Notifications
Internet
Using the Antivirus Software for Your VAIO Computer
Protect your VAIO computer against computer viruses by using the antivirus software.
You might be looking for the following topics:
About the Internet Connection Services
About the Network (LAN)
Connecting to the Internet with a Wired Connection
About the Wireless LAN Standards
Before Using the Wireless LAN
Starting Wireless LAN Communications
Stopping Wireless LAN Communications
Notes on Using the Wireless LAN Function
About a Security Key for a Wireless LAN
Using the Internet without Starting Windows (Quick Web Access)(the Web button)
© 2011 Sony Corporation
76
Search
VAIO User Guide VPCEG2/VPCEH2/VPCEJ2/VPCEK2/VPCEL2 Series Back | Back to Top
Troubleshooting
How to Use
Parts Description
Setup
Network / Internet
Connections
Settings
Playback
Backup / Recovery
Security
Other Operations
Notifications
Service and support
Using VAIO Update
VAIO Update provides a service that informs you of available update information, such as
important notices or update programs, to keep your VAIO computer up to date.
Keeping Your VAIO Computer in Optimum Condition (VAIO Care)
With VAIO Care, you can regularly conduct performance checks and tune-ups on your VAIO
computer to keep it running at an optimum level. Launch VAIO Care whenever a problem
arises.
You might be looking for the following topics:
Updating Your VAIO Computer
About Online Support Website
Solving Common Problems with Your VAIO Computer
© 2011 Sony Corporation
77

Search
VAIO User Guide VPCEG2/VPCEH2/VPCEJ2/VPCEK2/VPCEL2 Series Back | Back to Top
Troubleshooting
How to Use
Parts Description
Setup
Network / Internet
Connections
Settings
Playback
Backup / Recovery
Security
Other Operations
Notifications
Battery
Charging the Battery Pack
The battery pack can be charged even while you are using your VAIO computer when the
computer is connected to a power source.
Extending the Battery Life
When your VAIO computer is running on battery power, you can extend the battery life using
the following methods.
Charge Indicator Status List
The charge indicator light turns on or blinks differently according to conditions.
About Power Saving Mode
Your VAIO computer has power saving modes to conserve power while you are not using
the computer in addition to the normal operating mode.
Using Sleep Mode
In Sleep mode, all unnecessary devices of your VAIO computer are turned off, though some
devices stay turned on to retain the computer’s state including data you are working on.
Sleep mode is useful when you take a short rest, for example.
Using Hibernate Mode
In Hibernate mode, the current state of your VAIO computer is saved to the built-in storage
device, and then the computer is turned off. Hibernate mode is useful when you do not
intend to use the computer for an extended period of time.
You might be looking for the following topics:
Installing/Removing the Battery Pack
Notes on Using the Battery Pack
Notes on Sleep Mode
Selecting a Power Plan
© 2011 Sony Corporation
78

Search
VAIO User Guide VPCEG2/VPCEH2/VPCEJ2/VPCEK2/VPCEL2 Series Back | Back to Top
Troubleshooting
How to Use
Parts Description
Setup
Network / Internet
Connections
Settings
Playback
Backup / Recovery
Security
Other Operations
Notifications
Button
Using the Internet without Starting Windows (Quick Web Access)(the Web
button)
The Quick Web Access function enables you to access the Internet without starting
Windows.
You might be looking for the following topics:
Changing the Button Assignment (VAIO Button)
About the ASSIST Button
© 2011 Sony Corporation
79

Search
VAIO User Guide VPCEG2/VPCEH2/VPCEJ2/VPCEK2/VPCEL2 Series Back | Back to Top
Troubleshooting
How to Use
Parts Description
Setup
Network / Internet
Connections
Settings
Playback
Backup / Recovery
Security
Other Operations
Notifications
Camera
Using the Built-in Camera <Built-in camera equipped models>
If your VAIO computer is equipped with a built-in camera, you can make a video call through
the Internet using communication software, such as Windows Live Messenger.
Notes on the Built-in Camera <Built-in camera equipped models>
© 2011 Sony Corporation
80

Search
VAIO User Guide VPCEG2/VPCEH2/VPCEJ2/VPCEK2/VPCEL2 Series Back | Back to Top
Troubleshooting
How to Use
Parts Description
Setup
Network / Internet
Connections
Settings
Playback
Backup / Recovery
Security
Other Operations
Notifications
Keyboard
Combinations and Functions with the Fn Key
Press and hold down the Fn key and another key simultaneously to perform a keyboard
shortcut action.
You might be looking for the following topics:
Changing the Button Assignment (VAIO Button)
© 2011 Sony Corporation
81

Search
VAIO User Guide VPCEG2/VPCEH2/VPCEJ2/VPCEK2/VPCEL2 Series Back | Back to Top
Troubleshooting
How to Use
Parts Description
Setup
Network / Internet
Connections
Settings
Playback
Backup / Recovery
Security
Other Operations
Notifications
Memory module
Notes on Adding and Removing Memory Modules
Before adding or removing memory modules, read the following precautions thoroughly.
Adding and Removing Memory Modules
If you want to increase computer speed, or to improve computer performance when running
programs simultaneously, increase the amount of memory by installing optional memory
modules.
You might be looking for the following topics:
Viewing the System Information
© 2011 Sony Corporation
82

Search
VAIO User Guide VPCEG2/VPCEH2/VPCEJ2/VPCEK2/VPCEL2 Series Back | Back to Top
Troubleshooting
How to Use
Parts Description
Setup
Network / Internet
Connections
Settings
Playback
Backup / Recovery
Security
Other Operations
Notifications
Power
Charging the Battery Pack
The battery pack can be charged even while you are using your VAIO computer when the
computer is connected to a power source.
Turning on Your VAIO Computer
Turn on your VAIO Computer to start Windows.
Shutting Down Your VAIO Computer
Shut down your VAIO computer properly to avoid losing unsaved data.
Restarting Your VAIO Computer
After changing the settings or installing software on your VAIO computer, you may be
required to restart the computer.
Charge Indicator Status List
The charge indicator light turns on or blinks differently according to conditions.
About Power Saving Mode
Your VAIO computer has power saving modes to conserve power while you are not using
the computer in addition to the normal operating mode.
Using Sleep Mode
In Sleep mode, all unnecessary devices of your VAIO computer are turned off, though some
devices stay turned on to retain the computer’s state including data you are working on.
Sleep mode is useful when you take a short rest, for example.
Using Hibernate Mode
In Hibernate mode, the current state of your VAIO computer is saved to the built-in storage
device, and then the computer is turned off. Hibernate mode is useful when you do not
intend to use the computer for an extended period of time.
You might be looking for the following topics:
Installing/Removing the Battery Pack
Connecting a Power Source
Notes on Using the Power Source
Notes on Sleep Mode
Selecting a Power Plan
© 2011 Sony Corporation
83

Search
VAIO User Guide VPCEG2/VPCEH2/VPCEJ2/VPCEK2/VPCEL2 Series Back | Back to Top
Troubleshooting
How to Use
Parts Description
Setup
Network / Internet
Connections
Settings
Playback
Backup / Recovery
Security
Other Operations
Notifications
USB
Connecting a USB Device
You can connect a Universal Serial Bus (USB) device such as a mouse, floppy disk drive,
speaker or printer to your VAIO computer.
© 2011 Sony Corporation
84

Search
VAIO User Guide VPCEG2/VPCEH2/VPCEJ2/VPCEK2/VPCEL2 Series Back | Back to Top
Troubleshooting
How to Use
Parts Description
Setup
Network / Internet
Connections
Settings
Playback
Backup / Recovery
Security
Other Operations
Notifications
Built-in storage device
Creating Other Drives (modifying partitions)
Partitions are divided areas on your built-in storage device. Dividing the built-in storage
device into more than one partition may have various advantages, such as separating the
system files from your data files.
Creating Partitions during Recovery
There are two ways to create partitions: using Windows and creating during recovery.
Creating Partitions in Windows
The Windows feature allows you to create a partition without recovering your VAIO computer
system.
You might be looking for the following topics:
Removing Recovery Contents to Free up Disk Space
Checking the Volume of the Recovery Area
© 2011 Sony Corporation
85

Search
VAIO User Guide VPCEG2/VPCEH2/VPCEJ2/VPCEK2/VPCEL2 Series Back | Back to Top
Troubleshooting
How to Use
Parts Description
Setup
Network / Internet
Connections
Settings
Playback
Backup / Recovery
Security
Other Operations
Notifications
CD/DVD/BD
Inserting/Removing a Disc<Optical disc drive equipped models>
Insert/remove a disc to/from your VAIO computer that is turned on.
You might be looking for the following topics:
Connecting an External DVD Drive
Booting Your VAIO Computer from External Devices
Playing Blu-ray 3D(TM) Disc Media on a 3D TV<Intel Graphics or NVIDIA video controller
equipped models><Blu-ray Disc(TM) Drive equipped models>
Supported Discs<Optical disc drive equipped models>
About Region Codes<Optical disc drive equipped models>
Handling Discs<Optical disc drive equipped models>
Notes on Using Discs<Optical disc drive equipped models>
© 2011 Sony Corporation
86

Search
VAIO User Guide VPCEG2/VPCEH2/VPCEJ2/VPCEK2/VPCEL2 Series Back | Back to Top
Troubleshooting
How to Use
Parts Description
Setup
Network / Internet
Connections
Settings
Playback
Backup / Recovery
Security
Other Operations
Notifications
Internet
Using the Internet without Starting Windows (Quick Web Access)(the Web
button)
The Quick Web Access function enables you to access the Internet without starting
Windows.
You might be looking for the following topics:
About the Internet Connection Services
About the Network (LAN)
Connecting to the Internet with a Wired Connection
Using the Antivirus Software for Your VAIO Computer
About the Wireless LAN Standards
Before Using the Wireless LAN
Starting Wireless LAN Communications
Stopping Wireless LAN Communications
Notes on Using the Wireless LAN Function
About a Security Key for a Wireless LAN
© 2011 Sony Corporation
87
Search
VAIO User Guide VPCEG2/VPCEH2/VPCEJ2/VPCEK2/VPCEL2 Series Back | Back to Top
Troubleshooting
How to Use
Parts Description
Setup
Network / Internet
Connections
Settings
Playback
Backup / Recovery
Security
Other Operations
Notifications
Memory card
About “Memory Stick”
“Memory Stick” is a compact, portable, and versatile IC recording media especially designed
for exchanging and sharing digital data with compatible products, such as digital cameras
and other devices. Because it is removable, it can be used for external data storage.
Compatible “Memory Stick”
The “Memory Stick Duo” slot on your VAIO computer can accommodate the following sizes
and types of media:
Inserting/Removing “Memory Stick”
You can use “Memory Stick” to save data or transfer images between a digital camera and
your VAIO computer. To insert/remove “Memory Stick”, follow these steps.
Formatting “Memory Stick”
“Memory Stick” is formatted in the specific FAT format by default and is ready for use. Be
sure to use the device that is designed to format the media and supports “Memory Stick”
when formatting the media.
Notes on Using “Memory Stick”
Before using “Memory Stick”, read the following precautions for correct use.
Inserting/Removing SD Memory Cards
Your VAIO computer is equipped with an SD memory card slot. You can use this slot to
transfer data among digital cameras, camcorders, music players, and other audio/video
devices.
Notes on Using SD Memory Cards
Before using SD memory cards, read the following precautions for correct use.
© 2011 Sony Corporation
88

Search
VAIO User Guide VPCEG2/VPCEH2/VPCEJ2/VPCEK2/VPCEL2 Series Back | Back to Top
Troubleshooting
How to Use
Parts Description
Setup
Network / Internet
Connections
Settings
Playback
Backup / Recovery
Security
Other Operations
Notifications
Partition
Creating Other Drives (modifying partitions)
Partitions are divided areas on your built-in storage device. Dividing the built-in storage
device into more than one partition may have various advantages, such as separating the
system files from your data files.
Creating Partitions during Recovery
There are two ways to create partitions: using Windows and creating during recovery.
Creating Partitions in Windows
The Windows feature allows you to create a partition without recovering your VAIO computer
system.
© 2011 Sony Corporation
89

Search
VAIO User Guide VPCEG2/VPCEH2/VPCEJ2/VPCEK2/VPCEL2 Series Back | Back to Top
Troubleshooting
How to Use
Parts Description
Setup
Network / Internet
Connections
Settings
Playback
Backup / Recovery
Security
Other Operations
Notifications
Touch pad
Using the Touch Pad
By sliding your finger on the touch pad, you can move the pointer on the computer screen.
You might be looking for the following topics:
Enabling/Disabling the Touch Pad
Disabling the Tapping Function on the Touch Pad
© 2011 Sony Corporation
90

Search
VAIO User Guide VPCEG2/VPCEH2/VPCEJ2/VPCEK2/VPCEL2 Series Back | Back to Top
Troubleshooting
How to Use
Parts Description
Setup
Network / Internet
Connections
Settings
Playback
Backup / Recovery
Security
Other Operations
Notifications
VAIO computer
Notes on Adding and Removing Memory Modules
Before adding or removing memory modules, read the following precautions thoroughly.
Adding and Removing Memory Modules
If you want to increase computer speed, or to improve computer performance when running
programs simultaneously, increase the amount of memory by installing optional memory
modules.
You might be looking for the following topics:
Parts and Controls on the Front
Parts and Controls on the Sides
Parts and Controls on the Bottom
Checking Supplied Items
Setting Up an Appropriate Work Environment
Booting Your VAIO Computer from External Devices
Customizing Your VAIO Computer
Viewing the System Information
Using VAIO Update
Keeping Your VAIO Computer in Optimum Condition (VAIO Care)
Updating Your VAIO Computer
About the ASSIST Button
© 2011 Sony Corporation
91

Search
VAIO User Guide VPCEG2/VPCEH2/VPCEJ2/VPCEK2/VPCEL2 Series Back | Back to Top
Troubleshooting
How to Use
Parts Description
Setup
Network / Internet
Connections
Settings
Playback
Backup / Recovery
Security
Other Operations
Notifications
CD/DVD/BD
Handling Discs<Optical disc drive equipped models>
Read the following to protect data stored on discs and take proper care of discs.
Notes on Using Discs<Optical disc drive equipped models>
Observe the following notes when using discs on your VAIO computer.
Supported Discs<Optical disc drive equipped models>
The following table lists media types that are playable/recordable on your VAIO computer.
About Region Codes<Optical disc drive equipped models>
The following table lists DVD region codes indicating playable region of DVD media.
You might be looking for the following topics:
Connecting an External DVD Drive
Booting Your VAIO Computer from External Devices
Playing Blu-ray 3D(TM) Disc Media on a 3D TV<Intel Graphics or NVIDIA video controller
equipped models><Blu-ray Disc(TM) Drive equipped models>
Inserting/Removing a Disc<Optical disc drive equipped models>
© 2011 Sony Corporation
92
Search
VAIO User Guide VPCEG2/VPCEH2/VPCEJ2/VPCEK2/VPCEL2 Series Back | Back to Top
Troubleshooting
How to Use
Parts Description
Setup
Network / Internet
Connections
Settings
Playback
Backup / Recovery
Security
Other Operations
Notifications
Important notice
About the Software License
This product contains software owned by Sony and licensed by third parties.
Safety Information
Refer to the supplied safety manual for detailed safety information.
Trademarks
About the International ENERGY STAR(R) Program
The following information is applicable to ENERGY STAR qualified products only.
© 2011 Sony Corporation
93
Search
VAIO User Guide VPCEG2/VPCEH2/VPCEJ2/VPCEK2/VPCEL2 Series Back | Back to Top
Troubleshooting
How to Use
Parts Description
Setup
Network / Internet
Connections
Settings
Playback
Backup / Recovery
Security
Other Operations
Notifications
Read this first
Read This First
Congratulations on your purchase of this VAIO(R) computer and welcome to the on-screen
User Guide.
© 2011 Sony Corporation
94

Search
VAIO User Guide VPCEG2/VPCEH2/VPCEJ2/VPCEK2/VPCEL2 Series Back | Back to Top
Troubleshooting
How to Use
Parts Description
Setup
Network / Internet
Connections
Settings
Playback
Backup / Recovery
Security
Other Operations
Notifications
Service and support
Updating Your VAIO Computer
Be sure to update your VAIO computer with the following software applications to enhance
the computer’s efficiency, security, and functionality.
About Online Support Website
The online support website provides information about frequently asked questions about
your VAIO computer.
Solving Common Problems with Your VAIO Computer
If you have any problem operating your VAIO computer, try these suggestions before
contacting an authorized Sony service/support center or your local Sony dealer directly.
You might be looking for the following topics:
Using VAIO Update
Keeping Your VAIO Computer in Optimum Condition (VAIO Care)
© 2011 Sony Corporation
95

Search
VAIO User Guide VPCEG2/VPCEH2/VPCEJ2/VPCEK2/VPCEL2 Series Back | Back to Top
Troubleshooting
How to Use
Parts Description
Setup
Network / Internet
Connections
Settings
Playback
Backup / Recovery
Security
Other Operations
Notifications
VAIO computer
Checking Supplied Items
Check all items packed with the product before use.
Updating Your VAIO Computer
Be sure to update your VAIO computer with the following software applications to enhance
the computer’s efficiency, security, and functionality.
Setting Up an Appropriate Work Environment
This topic describes where to or not to place your VAIO computer and ergonomic
instructions.
You might be looking for the following topics:
Parts and Controls on the Front
Parts and Controls on the Sides
Parts and Controls on the Bottom
Notes on Adding and Removing Memory Modules
Adding and Removing Memory Modules
Booting Your VAIO Computer from External Devices
Customizing Your VAIO Computer
Viewing the System Information
Using VAIO Update
Keeping Your VAIO Computer in Optimum Condition (VAIO Care)
About the ASSIST Button
© 2011 Sony Corporation
96

Search
VAIO User Guide VPCEG2/VPCEH2/VPCEJ2/VPCEK2/VPCEL2 Series Back | Back to Top
Troubleshooting
How to Use
Parts Description
Setup
Network / Internet
Connections
Settings
Playback
Backup / Recovery
Security
Other Operations
Notifications
Care and maintenance
Cleaning Your VAIO computer/LCD screen
Before cleaning your VAIO computer, read the following precautions for the correct cleaning
procedure.
© 2011 Sony Corporation
97

Search
VAIO User Guide VPCEG2/VPCEH2/VPCEJ2/VPCEK2/VPCEL2 Series Back | Back to Top
Troubleshooting
How to Use
Parts Description
Setup
Network / Internet
Connections
Settings
Playback
Backup / Recovery
Security
Other Operations
Notifications
Product registration
About Online Support Website
The online support website provides information about frequently asked questions about
your VAIO computer.
© 2011 Sony Corporation
98

Search
VAIO User Guide VPCEG2/VPCEH2/VPCEJ2/VPCEK2/VPCEL2 Series Back | Back to Top
Troubleshooting
How to Use
Parts Description
Setup
Network / Internet
Connections
Settings
Playback
Backup / Recovery
Security
Other Operations
Notifications
Security
Updating Your VAIO Computer
Be sure to update your VAIO computer with the following software applications to enhance
the computer’s efficiency, security, and functionality.
© 2011 Sony Corporation
99

Search
VAIO User Guide VPCEG2/VPCEH2/VPCEJ2/VPCEK2/VPCEL2 Series Back | Back to Top
Troubleshooting
How to Use
Parts Description
Setup
Network / Internet
Connections
Settings
Playback
Backup / Recovery
Security
Other Operations
Notifications
Supplied items
Checking Supplied Items
Check all items packed with the product before use.
© 2011 Sony Corporation
100

Search
VAIO User Guide VPCEG2/VPCEH2/VPCEJ2/VPCEK2/VPCEL2 Series Back | Back to Top
Audio
BLUETOOTH
CD/DVD/BD
Computer
Floppy disk
Keyboard
Memory card
Password
Software
USB
BIOS
Battery
Camera
Display
HDMI
LAN
Microphone
Power
Touch pad
Wireless LAN
How to Use
Troubleshooting
Hardware
Software
Network / Internet
Backup / Recovery
Security
Peripheral Devices
Hardware
© 2011 Sony Corporation
101


Welcome
Congratulations on the purchase of this VAIO(R) computer.
This User Guide - Introduction Version provides you with limited information about your VAIO computer. To update this file to the complete
version of the User Guide, see Updating the User Guide to the Latest Version for more information.
Contents
Updating the User Guide to the Latest Version
Connecting to the Internet
Updating Your VAIO Computer
Solving Problems on Your VAIO Computer Using VAIO Care
Finding Support Information
Trademarks
^ Go to top
Updating the User Guide to the Latest Version
The complete version of the User Guide is available online. Update this User Guide - Introduction Version to the complete version so that
you can access it anytime even if you are offline.
With the complete version of the User Guide you can view information about:
Parts description
Feature and operating instructions
Precautions
Troubleshooting information
Note
You will need to connect your VAIO computer to the Internet before updating to the complete version of the User Guide. See Connecting to
the Internet for more information on connecting the computer to the Internet.
To get the complete version of the User Guide
By updating this User Guide - Introduction Version, you can get the complete version of the User Guide with detailed information on your
VAIO computer.
1. Connect your VAIO computer to the Internet.
2. Close this window, and then click
(Start), All Programs, and VAIO Manual again.
3. A window prompting you to update the manual appears. Follow the on-screen instructions.
This file will automatically update to the complete version of the User Guide.
Hint
It may take some time to complete the update.
If the window prompting you to update the User Guide does not appear, make sure your VAIO computer is connected to the Internet and
repeat the above steps. If the update window still does not appear, launch VAIO Update so you can find and download the User Guide
manually. See Updating Your VAIO Computer for more information on VAIO Update.
To view help files for Windows OS and software operations
When you have trouble operating your VAIO computer, try referring to Windows Help and Support or help files included with your
applications.
107
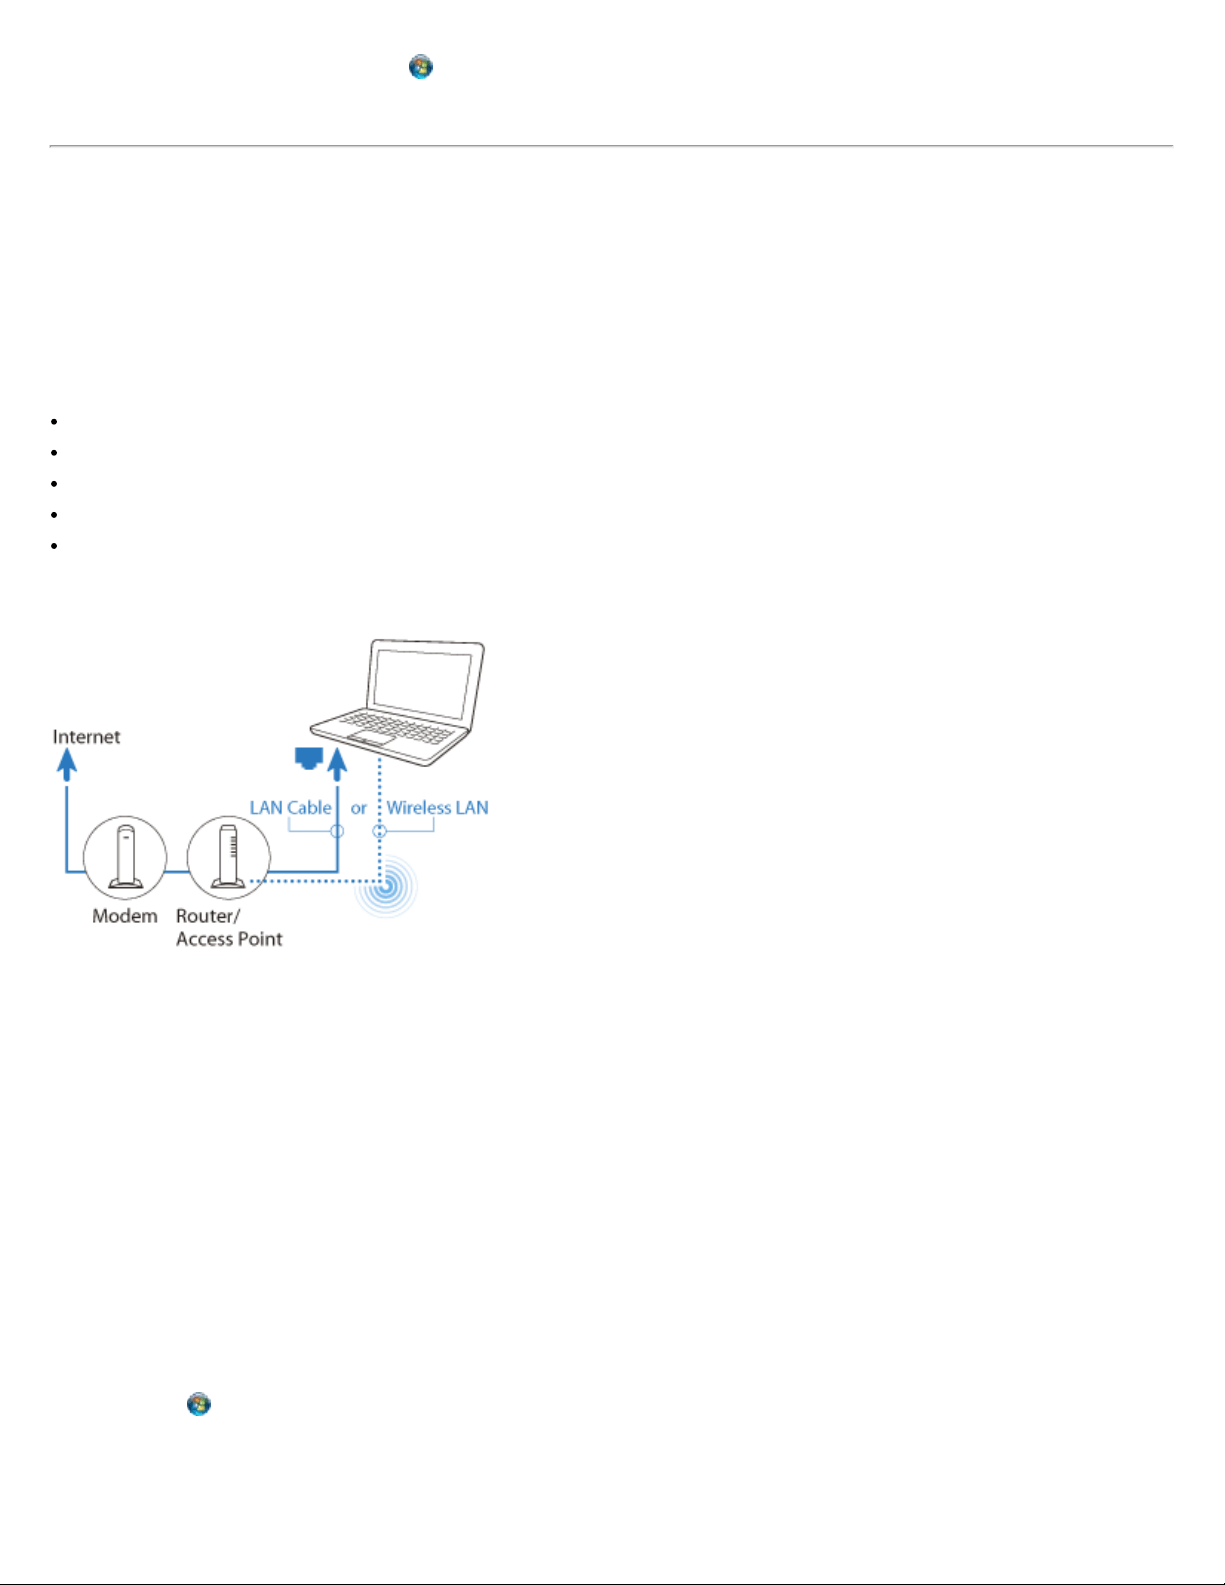
To access Windows Help and Support, click (Start) and Help and Support.
^ Go to top
Connecting to the Internet
You will need to connect your VAIO computer to the Internet before updating to the complete version of the User Guide.
Before connecting to the Internet
Before using the Internet, you will need to sign up with an Internet Service Provider (ISP) and set up devices required for connecting your VAIO
computer to the Internet.
The following types of Internet connection services may be available from your ISP:
Fiber to the Home (FTTH)
Digital Subscriber Line (DSL)
Cable modem
Satellite
Dial-up
For more information on devices required for Internet access and how to connect your VAIO computer to the Internet, ask your ISP.
The following is one of the Internet connection methods as an example.
To use the network (LAN)
You can connect your VAIO computer to networks with a LAN cable (not supplied). Connect one end of a LAN cable (not supplied) to the LAN
port on the computer and the other end to your network. For detailed settings and devices required for LAN access, ask your network
administrator.
Note
The connection, setting method, or required devices may vary depending on your network environment.
To use the wireless LAN network (Wi-Fi)
You first need to establish wireless LAN communications between your VAIO computer and an access point (not supplied). See Windows Help
and Support for more information.
To start wireless LAN communications with VAIO Easy Connect
You can easily set up wireless LAN communications by following the instructions in VAIO Easy Connect. VAIO Easy Connect supports you
especially when you first set up a wireless Internet connection at home or when you connect to a public wireless network (Wi-Fi hotspot).
1. Click
(Start), All Programs, VAIO Easy Connect, and Easy Internet Connection Setup.
2. Follow the on-screen instructions to setup wireless LAN communications.
108
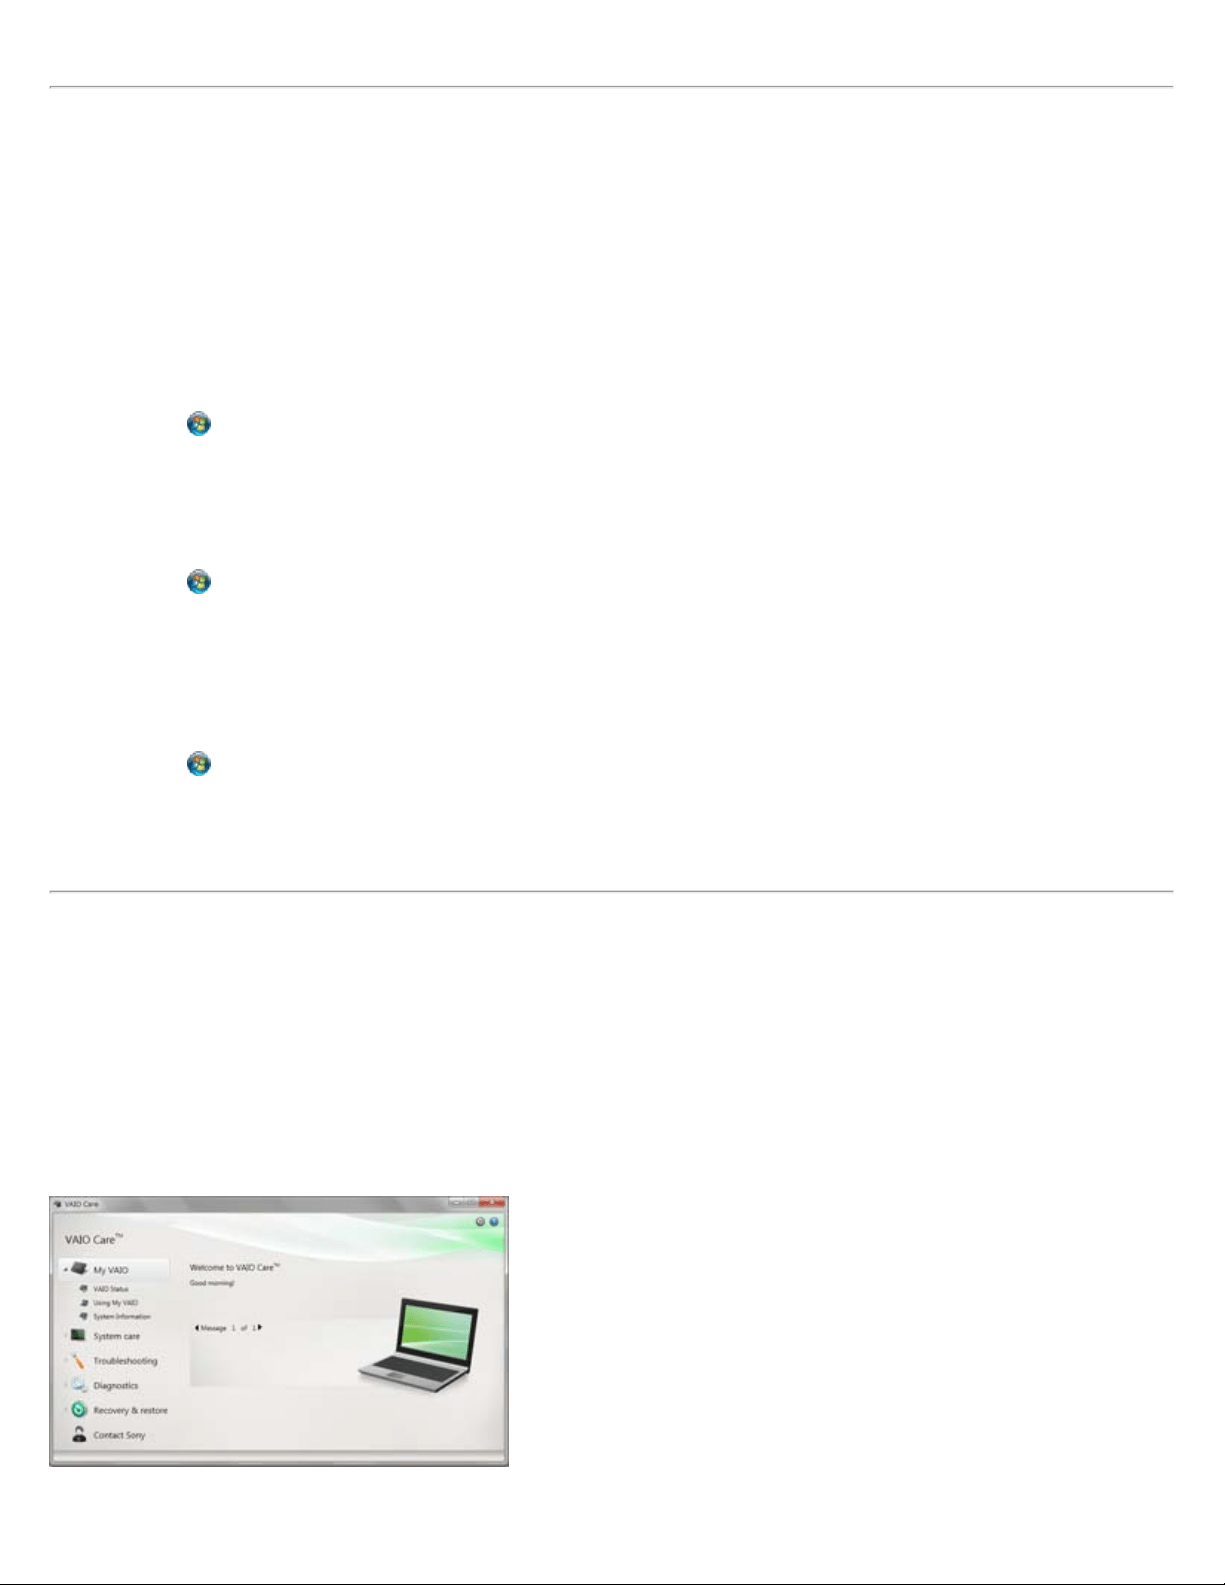
^ Go to top
Updating Your VAIO Computer
Be sure to update your VAIO computer with the following software applications to enhance the computer's efficiency, security, and
functionality.
Note
Your VAIO computer must be connected to the Internet to download the updates.
To use Windows Update
Windows Update enables you to make your VAIO computer more stable.
1. Click
(Start), All Programs, and Windows Update.
2. Follow the on-screen instructions.
To use VAIO Update
VAIO Update automatically notifies you of new updates available on the Internet then downloads and installs them on your VAIO computer.
1. Click
(Start), All Programs, and VAIO Update.
2. Follow the on-screen instructions.
To update antivirus software
Help protect your VAIO computer against security threats by keeping Internet security programs current with the latest updates. You can
download and install the updates from the website of the manufacturer.
1. Click
(Start), All Programs, and select the antivirus software.
2. Follow the on-screen instructions to complete the updates.
^ Go to top
Solving Problems on Your VAIO Computer Using VAIO Care
With VAIO Care, you can regularly conduct performance checks and system tune-ups on your VAIO computer to keep it running at optimum
level. Launch VAIO Care whenever a problem arises.
VAIO Care will provide appropriate measures and support information to solve the problem.
To launch VAIO Care
Press the ASSIST button while your VAIO computer is on.
Below is an example of the VAIO Care screenshot in English.
Note
109
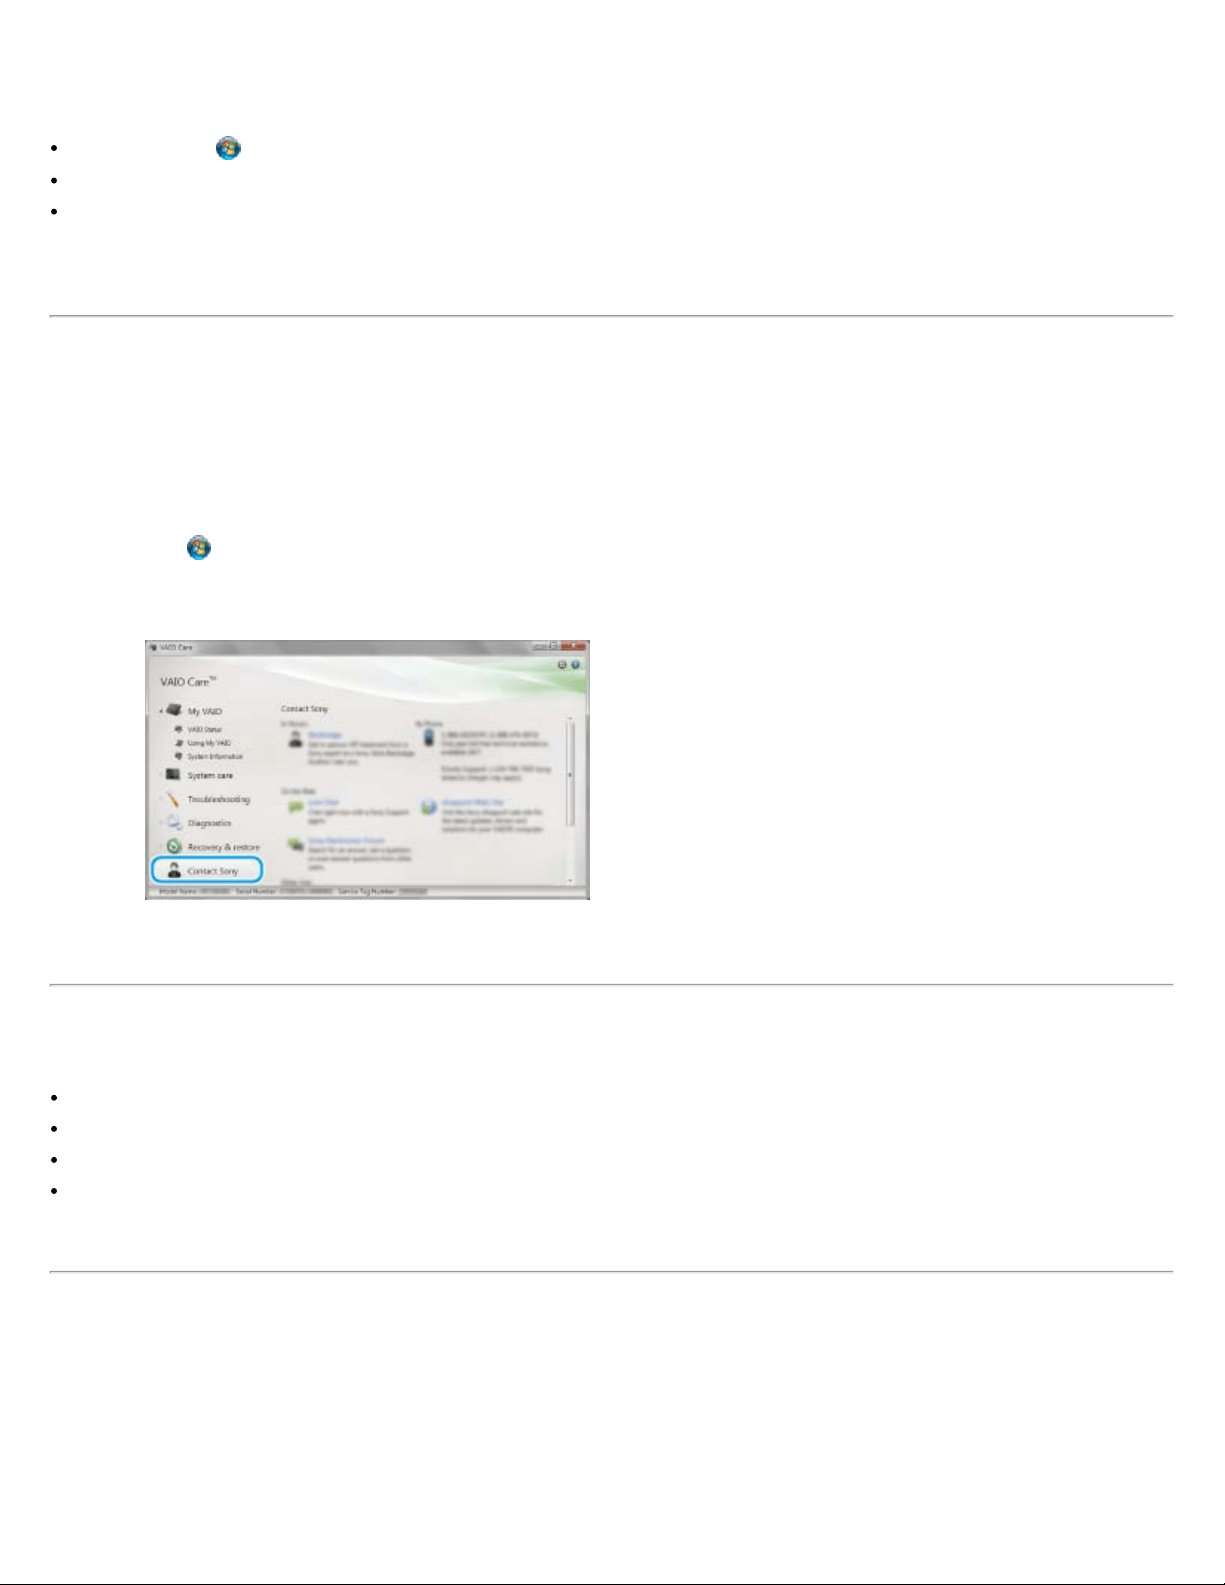
Do not press the ASSIST button while your VAIO computer is in Hibernate mode.
Hint
Alternatively, click (Start), All Programs, and VAIO Care to launch VAIO Care.
See the help file included with VAIO Care for more information.
Pressing the ASSIST button while your VAIO computer is off launches VAIO Care Rescue. VAIO Care Rescue can be used to recover the
computer in case of emergency, for example, when Windows does not start.
^ Go to top
Finding Support Information
The Sony online support website provides instant access to information on commonly encountered problems. You can find support
information such as the support website URL in VAIO Care or the supplied Quick Start Guide.
To access Sony online support website from VAIO Care
1. Click (Start), All Programs, and VAIO Care.
2. Click Contact Sony.
Below is an example of the VAIO Care screenshot in English.
^ Go to top
Trademarks
SONY and the SONY logo are registered trademarks of Sony Corporation.
VAIO, the VAIO logo, and other Sony product or service names are trademarks or registered trademarks of Sony Corporation.
All other names of system, products, and services are trademarks of their respective owners.
In the manual, the TM or (R) marks are not specified.
^ Go to top
Copyright 2011 Sony Corporation
110
Search
VAIO User Guide VPCEG2/VPCEH2/VPCEJ2/VPCEK2/VPCEL2 Series Back | Back to Top
Troubleshooting
How to Use
Parts Description
Setup
Network / Internet
Connections
Settings
Playback
Backup / Recovery
Security
Other Operations
Notifications
About Online Support Website
The online support website provides information about frequently asked questions about
your VAIO computer.
Sony online support website
USA
http://esupport.sony.com/EN/VAIO/
Canada
http://www.sony.ca/support/ (English)
http://fr.sony.ca/support/ (French)
Spanish-speaking Latin American countries or areas
http://esupport.sony.com/ES/VAIO/LA/
Brazil
http://esupport.sony.com/PT/VAIO/BR/
Hint
If you experience any problem and have a technical question about your VAIO
computer, launch VAIO Care first, which offers you various options to help you solve
the problem.[Details]
When you contact VAIO support, you may be asked for the serial number and the model
number of your VAIO computer. The serial number is a 15-digit number that can be
found:
in the VAIO Care window;
on the bottom or the back panel of the computer or inside the battery compartment;
on the original VAIO box.
The model number is located at the lower right corner of the display on the VAIO
computer.
Other websites
You can find other useful information from the following URL.
Other Sony products
http://www.sony.net/
Operating system online support website
For Microsoft Windows operating system support, visit the Microsoft customer support site.
http://support.microsoft.com/
In Store Service & Support (available in USA only)
Make an appointment with a Sony certified technician at a U.S. Sony Store and get
personalized service and support for your VAIO computer. Sony Technicians can assist with
the setup of your new VAIO computer, system optimization, data rescue, and any repair
service you might need.
http://www.sony.com/store/
Hint
You can find a link to register your computer online in VAIO Care. Click (Start),
111

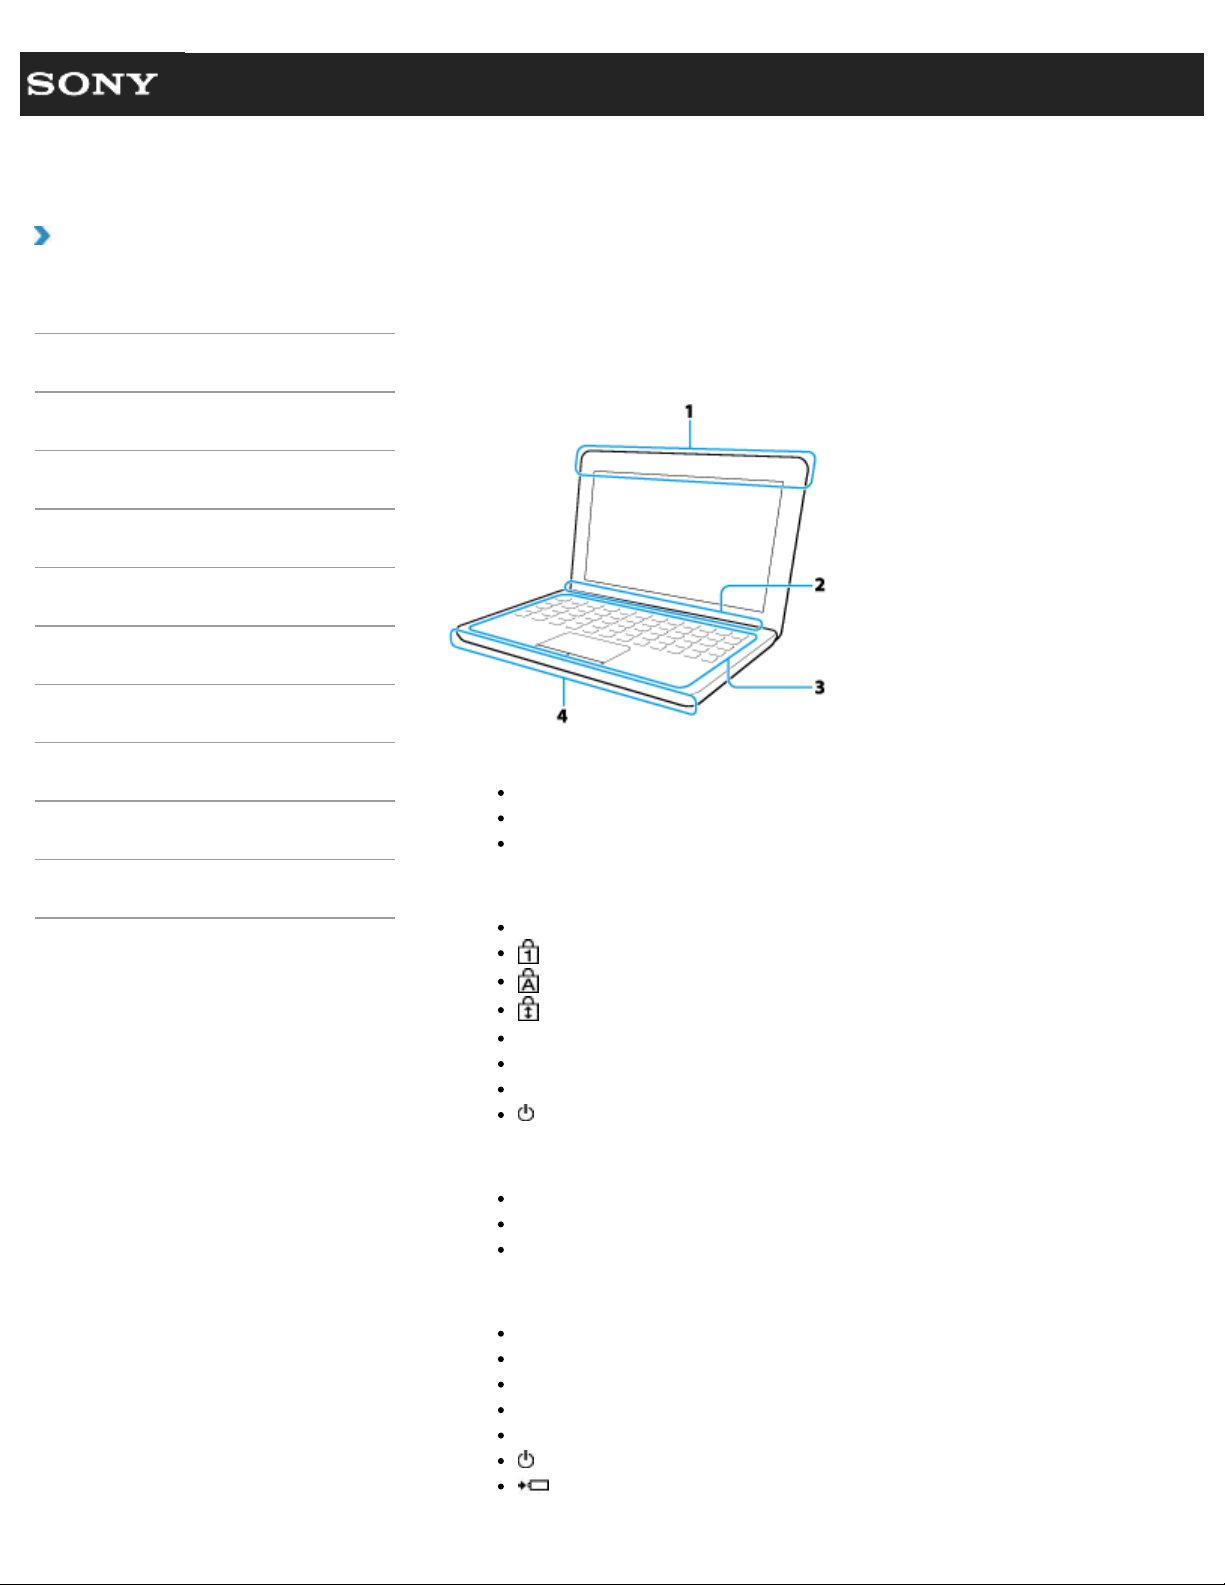
Search
VAIO User Guide VPCEG2/VPCEH2/VPCEJ2/VPCEK2/VPCEL2 Series Back | Back to Top
Troubleshooting
How to Use
Parts Description
Setup
Network / Internet
Connections
Settings
Playback
Backup / Recovery
Security
Other Operations
Notifications
Parts and Controls on the Front
Describes the features on the front of the VAIO computer, such as buttons and indicator
lights.
1.
Built-in microphone (monaural)
Built-in camera indicator [Details]
Built-in camera [Details]
2.
Built-in speakers (stereo)
Num lock indicator
Caps lock indicator
Scroll lock indicator
ASSIST button [Details]
WEB button [Details]
VAIO button [Details]
Power button [Details]
3.
Keyboard
Touch pad [Details]
Left/right buttons [Details]
4.
“Memory Stick Duo” slot [Details]
Media access indicator (“Memory Stick Duo” [Details], SD memory card [Details])
SD memory card slot [Details]
WIRELESS switch [Details]
WIRELESS indicator [Details]
Power indicator [Details]
Charge indicator [Details]
113

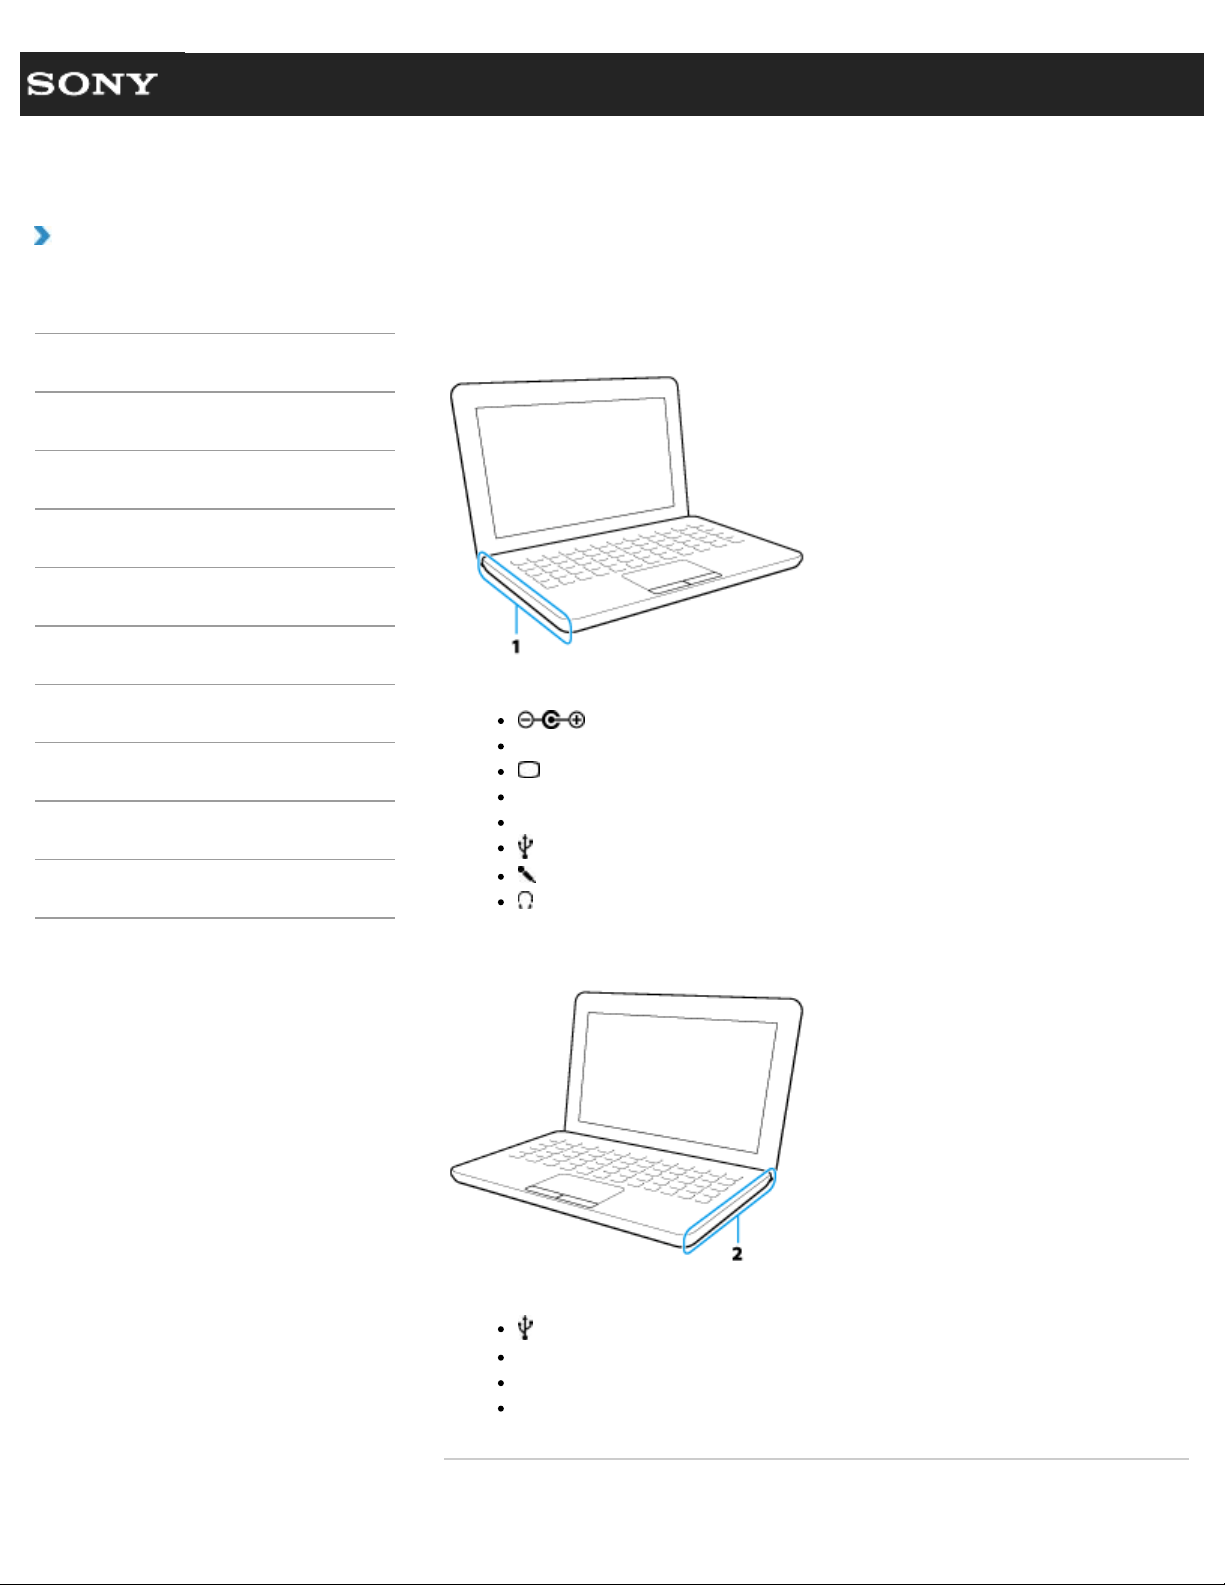
Search
VAIO User Guide VPCEG2/VPCEH2/VPCEJ2/VPCEK2/VPCEL2 Series Back | Back to Top
Troubleshooting
How to Use
Parts Description
Setup
Network / Internet
Connections
Settings
Playback
Backup / Recovery
Security
Other Operations
Notifications
Parts and Controls on the Sides
Describes the features on the sides of the VAIO computer, such as connection ports.
1.
DC IN port [Details]
LAN port [Details]
Monitor port [Details]
HDMI output port [Details]
Air exhaust vent
USB port [Details]
Microphone jack [Details]
Headphones jack [Details]
2.
USB ports × 3 [Details]
Optical disc drive [Details]
Drive eject button [Details], Manual eject hole
Security slot
Related Topic
115

Search
VAIO User Guide VPCEG2/VPCEH2/VPCEJ2/VPCEK2/VPCEL2 Series Back | Back to Top
Troubleshooting
How to Use
Parts Description
Setup
Network / Internet
Connections
Settings
Playback
Backup / Recovery
Security
Other Operations
Notifications
Parts and Controls on the Bottom
Describes the features on the bottom of the VAIO computer.
Air intake vents
Battery connector [Details]
Memory module compartment cover [Details]
Related Topic
Parts and Controls on the Front
Parts and Controls on the Sides
© 2011 Sony Corporation
117

Search
VAIO User Guide VPCEG2/VPCEH2/VPCEJ2/VPCEK2/VPCEL2 Series Back | Back to Top
Troubleshooting
How to Use
Parts Description
Setup
Network / Internet
Connections
Settings
Playback
Backup / Recovery
Security
Other Operations
Notifications
Checking Supplied Items
Check all items packed with the product before use.
AC adapter
Power cord
Battery pack
Hint
No recovery media is included because your VAIO computer can be recovered using
data stored in the hard disk drive or SSD. See Recovering from the Recovery
Area for more information.[Details]
© 2011 Sony Corporation
118
Search
VAIO User Guide VPCEG2/VPCEH2/VPCEJ2/VPCEK2/VPCEL2 Series Back | Back to Top
Troubleshooting
How to Use
Parts Description
Setup
Network / Internet
Connections
Settings
Playback
Backup / Recovery
Security
Other Operations
Notifications
Notes on Adding and Removing Memory Modules
Before adding or removing memory modules, read the following precautions thoroughly.
Your VAIO computer and memory modules use high precision components and
electronic connector technology. To avoid invalidation of the warranty during your
product warranty period, we recommend that:
You should contact your dealer to install a new memory module.
You should not install a memory module by yourself, if you are not familiar with
upgrading memory on a computer.
You should not touch the connectors or open the memory module compartment
cover.
For assistance, contact an authorized Sony service/support center. To find the nearest
center or agent, refer to online support website.[Details]
If you add or remove memory modules by yourself, your VAIO computer may result in
malfunction or accident caused by breakage of slot and module, or connection mistake.
In this case, repair fee will be charged.
Be careful not to injure your hands or fingers with sharp edges of the memory module,
inner components, or circuit boards of your VAIO computer.
Be careful not to catch your fingers on any inner cables of your VAIO computer, as the
cable may become loose or disconnected.
If your VAIO computer is turned on while liquid such as water or other foreign object
remain inside, it may cause a fire. Be sure to remove any foreign objects and attach the
memory module compartment cover before turning on your VAIO computer.
Sony does not guarantee that third party memory modules will work in your VAIO
computer. For information on third party memory modules, consult the respective sales
dealers.
Be sure to turn off your VAIO computer and peripherals and disconnect all attachments
and connection cables before adding or removing memory modules. Failure to do so
may cause damage to the memory module, your VAIO computer, or peripheral devices.
To prevent damage from electrostatic discharge to memory modules, follow the
instructions below:
Do not work at a place that produce static electricity easily, such as on a carpet.
Before adding or removing memory modules, touch an external metal object from
your VAIO computer to eliminate static electricity. Do not touch any metal parts inside
the computer.
Do not open the memory module package before you are ready to install the module.
The package protects the module from ESD (electrostatic discharge). To store the
module, cover it with an antistatic bag or a sheet of aluminum foil.
When holding a memory module, do not touch the chips or electrical terminal of the
module.
Do not insert a memory module into the slot facing in wrong direction. It may cause
damage to the module or slot, or cause the circuit board to catch fire.
Use a screwdriver that matches the size of the screw (such as a miniature screwdriver).
Do not remove or loosen screws that are not specified to be removed.
Related Topic
Adding and Removing Memory Modules
119

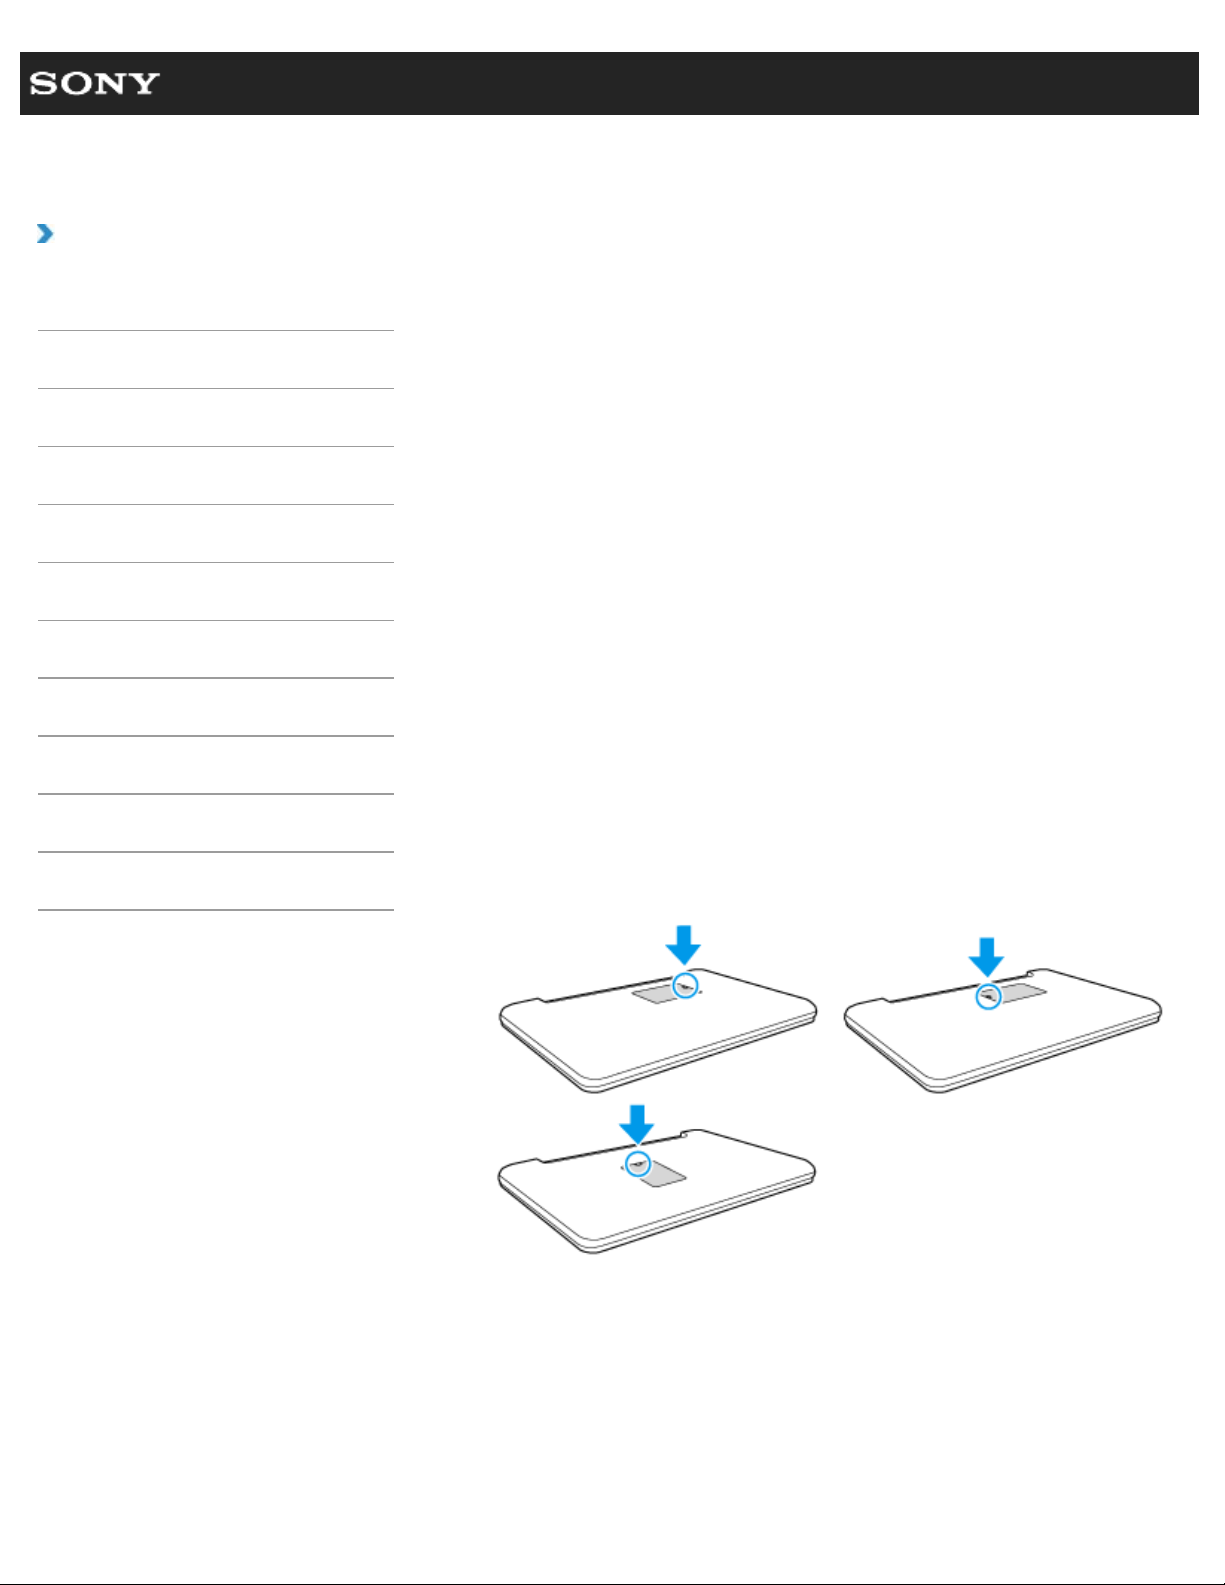
Search
VAIO User Guide VPCEG2/VPCEH2/VPCEJ2/VPCEK2/VPCEL2 Series Back | Back to Top
Troubleshooting
How to Use
Parts Description
Setup
Network / Internet
Connections
Settings
Playback
Backup / Recovery
Security
Other Operations
Notifications
Adding and Removing Memory Modules
If you want to increase your computer’s speed or improve performance when running
programs simultaneously, increase the amount of memory by installing optional memory
modules.
Before you upgrade your computer’s memory, see Notes on Adding and Removing
Memory Modules.[Details]
If you install memory modules into two or more slots, the dual-channel mode is enabled to
help improve performance. (VPCEG/VPCEH/VPCEJ Series)
The type of module and the amount of memory installed on your computer may differ
depending on the model.
1. Turn off your VAIO computer and peripheral devices, disconnect the power cord and
all connection cables, and remove the battery pack.
2. Wait for a while until your VAIO computer cools down.
The inner parts of your VAIO computer may be hot just after turning off. Be careful to
avoid burns while handling your VAIO computer in this state.
3. Lay a clean cloth on a level, flat surface, place your VAIO computer on it as illustrated
below. Remove the screws with a cross slot screwdriver to open the memory module
compartment cover.
The screw locations are indicated by the arrows in the illustration below.
On some models, captive screws are used on the memory module compartment cover
and cannot be detached from the cover.
The shape and location of the memory module compartment cover varies depending
on models. Look at the bottom of your VAIO computer for its location.
4. Touch an external metal object to discharge static electricity.
Do not touch any metal parts inside your VAIO computer.
5. If there is no free slot, remove the currently installed memory module. Pull the latches
in the direction of the arrows to release the module (1), then pull the module out in the
direction of the arrow (2).
121
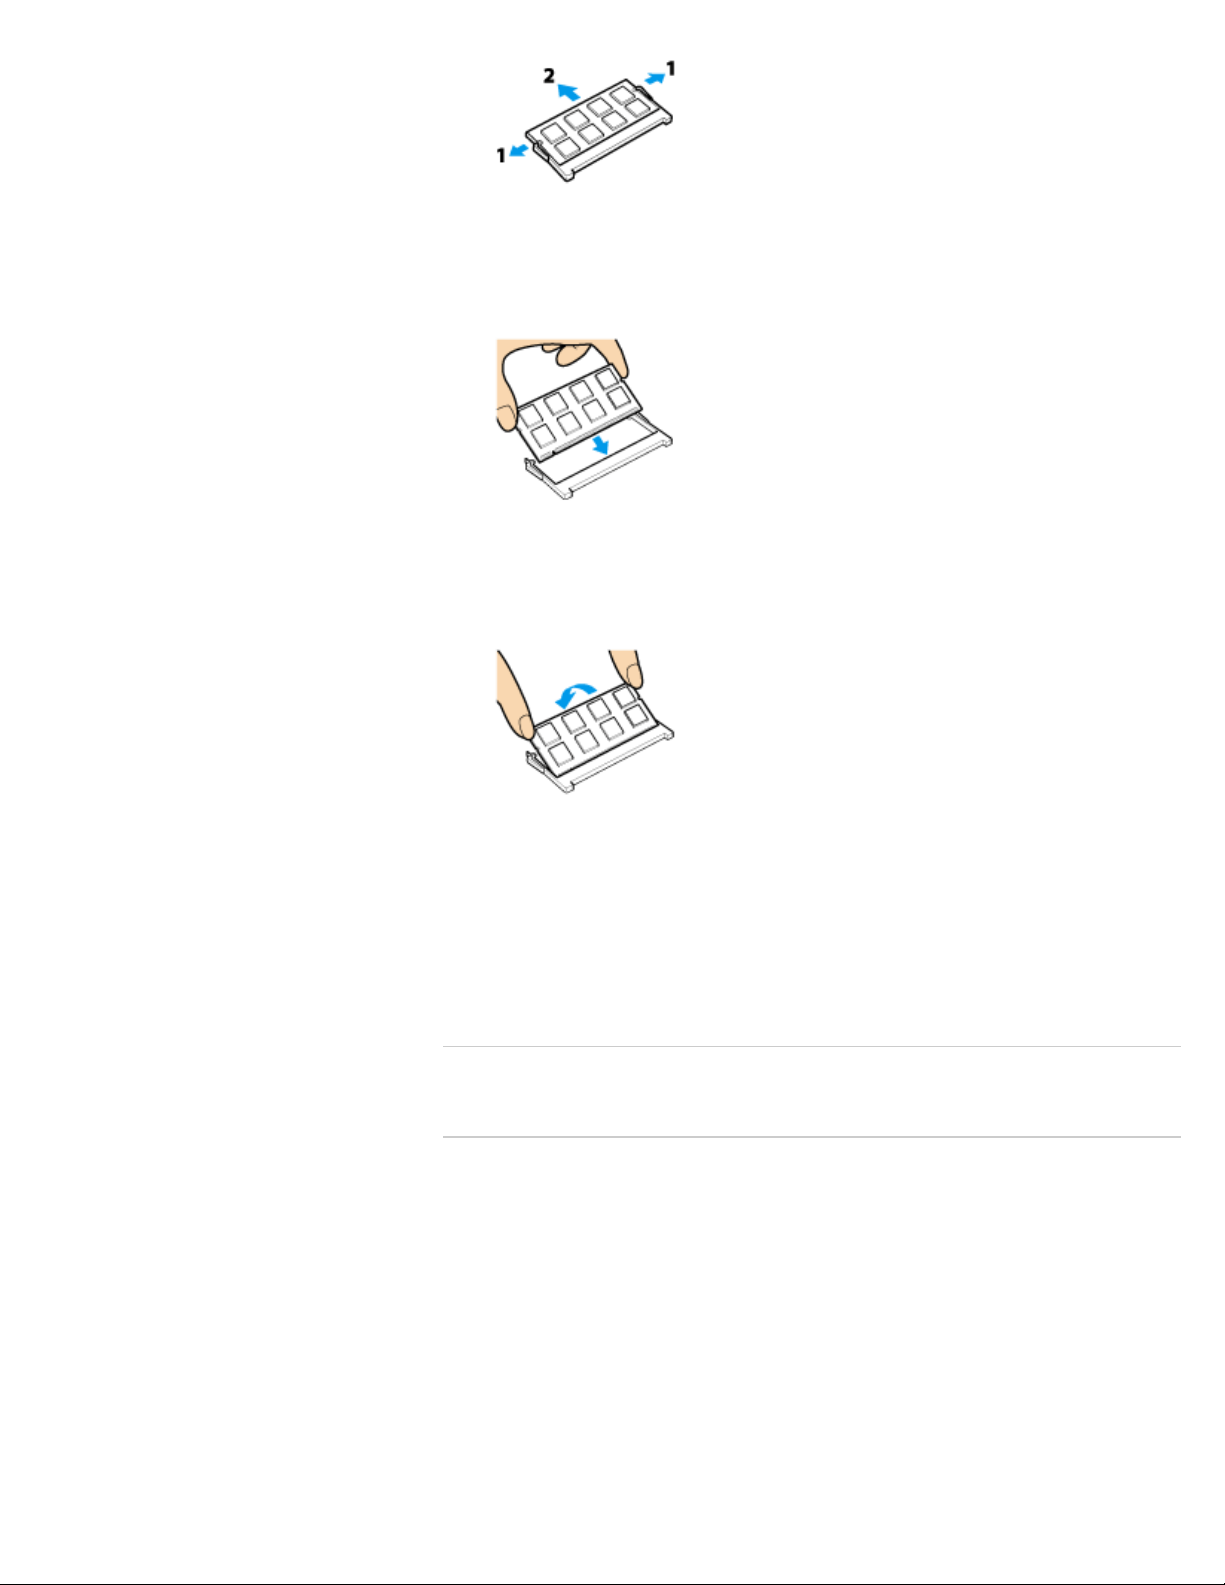
6. Remove the new memory module from its antistatic bag.
7. Hold the memory module by its edge and slide it into the memory module slot with its
end terminal facing downward while aligning the notch on the module with the small
projection in the slot.
8. Hold the memory module by its edge and push in until it clicks into place as shown in
the illustration.
The latches on both sides of the slot snap into place to secure the module. Do not
touch any ICs (black components) on the memory module.
9. Replace the memory module compartment cover and secure it with the screws you
removed in step 3.
10. Install the battery pack and connect all connection cables and peripherals that you
removed in Step 1, and turn on the computer.
11. Check that the amount of system memory has correctly changed. [Details]
If the amount of indicated system memory is correct, memory module installation was
successful.
Related Topic
Notes on Adding and Removing Memory Modules
© 2011 Sony Corporation
122

Search
VAIO User Guide VPCEG2/VPCEH2/VPCEJ2/VPCEK2/VPCEL2 Series Back | Back to Top
Troubleshooting
How to Use
Parts Description
Setup
Network / Internet
Connections
Settings
Playback
Backup / Recovery
Security
Other Operations
Notifications
Setting Up an Appropriate Work Environment
This topic describes where to or not to place your VAIO computer and ergonomic
instructions.
Where to place your VAIO computer
When placing your VAIO computer, ensure that:
You have easy access to a power source and necessary ports.
You leave enough space around the computer.
The computer is placed on a flat surface that is wide enough and you can face the
computer screen as you operate it.
You can place the computer in front of you where you can sit upright and keep your
forearms parallel to the floor.
Where not to place your VAIO computer
Placing your VAIO computer in an inappropriate location may cause damage or a
malfunction. Do not place the computer in a location subject to:
Direct sunlight
Magnetic items or sources
Heat sources, such as residential heating equipment
Excessive dust
High humidity
Poor ventilation
Note
The area around the air exhaust vent may become extremely hot while your VAIO
computer is on. Be careful before touching the area.
Do not place any object near the air exhaust vent that may block the vent.
Hint
Your VAIO computer uses high-frequency radio signals and may cause interference to
radio or TV reception. If this occurs, move the computer a suitable distance away from
the radio or TV.
Ergonomic considerations
Whenever possible, you should attempt to take account of the following ergonomic
considerations.
Furniture and posture
Sit in a chair with good back support. Adjust the level of the chair so your feet are flat on the
floor. A footrest may make you more comfortable.
Sit in a relaxed, upright posture and avoid slouching forward or leaning far backwards.
Viewing angle of the computer screen
Use the screen tilting feature to find the best position. Make sure the computer screen is at
123

or slightly below eye level when you are sitting in front of your VAIO computer. Adjust the
brightness level of the display as well.
You can reduce eye strain and muscle fatigue by adjusting the tilt and brightness level of the
computer screen to the proper position.
Lighting
Choose a location where windows and lights do not cause glare and reflection on the
computer screen. Use indirect lighting to avoid bright spots on the computer screen. Proper
lighting adds to your comfort and work efficiency.
Note
While adjusting the viewing angle, do not exert excessive pressure on your VAIO
computer to eliminate a risk of mechanical damage.
Hint
The same considerations apply when you use an external display.
Notes on handling your VAIO computer
Observe the following to avoid malfunctions and damage to your VAIO computer.
Place your VAIO computer gently on a flat surface to avoid a mechanical shock.
Be sure to turn off your VAIO computer before moving the computer. Moving the
computer that is turned on may cause a hard disk malfunction. Be sure to disconnect all
cables connected to the computer before moving it.
Do not drop or hit your VAIO computer. Even a slight shock or vibration may cause a
hard disk malfunction.
Do not place your VAIO computer in an unstable position.
© 2011 Sony Corporation
124

Search
VAIO User Guide VPCEG2/VPCEH2/VPCEJ2/VPCEK2/VPCEL2 Series Back | Back to Top
Troubleshooting
How to Use
Parts Description
Setup
Network / Internet
Connections
Settings
Playback
Backup / Recovery
Security
Other Operations
Notifications
Booting Your VAIO Computer from External
Devices
You can boot your VAIO computer from external devices, such as an optical disc drive or a
USB floppy disk drive, by using the BIOS function.
1. Connect an external device to your VAIO computer and turn on the computer.
2. Press the F11 key repeatedly until the VAIO logo disappears.
The booting process from the external device starts. If your VAIO computer does not
boot up, restart the computer and try again.
Note
Disconnect all devices from your VAIO computer except for the external device from
which you intend to boot up. Some devices cannot be used to boot the computer, or
cannot be used with the computer.
If an AC adapter is supplied with the external device, be sure to connect it to an AC
power source in advance.
© 2011 Sony Corporation
125

Search
VAIO User Guide VPCEG2/VPCEH2/VPCEJ2/VPCEK2/VPCEL2 Series Back | Back to Top
Troubleshooting
How to Use
Parts Description
Setup
Network / Internet
Connections
Settings
Playback
Backup / Recovery
Security
Other Operations
Notifications
Customizing Your VAIO Computer
VAIO Control Center allows you to access system information and to change settings of
various kinds of functions such as display and sounds.
1. Click
(Start), All Programs, and VAIO Control Center.
2. Select your desired item and change the settings.
Hint
Refer to the help file included with VAIO Control Center for more information on
each option.
Some of the items will not be visible if you log on as a user without administrative rights.
© 2011 Sony Corporation
126

Search
VAIO User Guide VPCEG2/VPCEH2/VPCEJ2/VPCEK2/VPCEL2 Series Back | Back to Top
Troubleshooting
How to Use
Parts Description
Setup
Network / Internet
Connections
Settings
Playback
Backup / Recovery
Security
Other Operations
Notifications
Viewing the System Information
You can view the system information of your VAIO computer. For example, after installing a
memory module, you can view the information to confirm system memory changes.
1. Click
(Start), All Programs, and VAIO Control Center.
2. Click System Information and System Information.
The system information of your VAIO computer is displayed.
Related Topic
Notes on Adding and Removing Memory Modules
Adding and Removing Memory Modules
© 2011 Sony Corporation
127

Search
VAIO User Guide VPCEG2/VPCEH2/VPCEJ2/VPCEK2/VPCEL2 Series Back | Back to Top
Troubleshooting
How to Use
Parts Description
Setup
Network / Internet
Connections
Settings
Playback
Backup / Recovery
Security
Other Operations
Notifications
Using VAIO Update
VAIO Update provides a service that informs you of available update information, such as
important notices or update programs, to keep your VAIO computer up to date. Through the
Internet, VAIO Update automatically detects the update programs that are necessary for
enhancing your computer’s performance or new software that is available, and let you
download and install with simple steps.
1. Double-click
(the VAIO Update icon) located in the Windows desktop notification
area in the bottom-right of the desktop.
When VAIO Update is launched for the first time, the initial settings window
appears. Follow the instructions in the window.
Hint
Refer to the help file included with VAIO Update for more information.
Related Topic
Keeping Your VAIO Computer in Optimum Condition (VAIO Care)
© 2011 Sony Corporation
128
Search
VAIO User Guide VPCEG2/VPCEH2/VPCEJ2/VPCEK2/VPCEL2 Series Back | Back to Top
Troubleshooting
How to Use
Parts Description
Setup
Network / Internet
Connections
Settings
Playback
Backup / Recovery
Security
Other Operations
Notifications
Keeping Your VAIO Computer in Optimum
Condition (VAIO Care)
With VAIO Care, you can regularly conduct performance checks and tune-ups on your
VAIO computer to keep it running at an optimum level. Launch VAIO Care whenever a
problem arises. VAIO Care will provide appropriate measures and support information to
solve the problem.
1. Press the ASSIST button while your VAIO computer is on.
VAIO Care starts.
Refer to the help file included with VAIO Care for more information.
Note
Do not press the ASSIST button while your VAIO computer is in Hibernate mode.
Hint
Alternatively, click (Start), All Programs, and VAIO Care to start VAIO Care.
Pressing the ASSIST button while your VAIO computer is off launches VAIO Care
Rescue. VAIO Care Rescue can be used to recover the computer in case of
emergency, for example, if Windows does not start.
Related Topic
Recovering from the Recovery Area
Backing Up Your Data when You cannot Start Windows
Restoring Your Data with VAIO Data Restore Tool
© 2011 Sony Corporation
129
Search
VAIO User Guide VPCEG2/VPCEH2/VPCEJ2/VPCEK2/VPCEL2 Series Back | Back to Top
Troubleshooting
How to Use
Parts Description
Setup
Network / Internet
Connections
Settings
Playback
Backup / Recovery
Security
Other Operations
Notifications
Updating Your VAIO Computer
Be sure to update your VAIO computer with the following software applications to enhance
the computer’s efficiency, security, and functionality.
Note
Your VAIO computer must be connected to the Internet to download the updates.
Windows Update
Windows Update enables you to make your VAIO computer more stable.
1. Click
(Start), All Programs, and Windows Update.
2. Follow the on-screen instructions.
VAIO Update
VAIO Update automatically notifies you of new updates available on the Internet, and
downloads and installs them on your VAIO computer.
1. Click
(Start), All Programs, and VAIO Update.
2. Follow the on-screen instructions.
Related Topic
Using VAIO Update
© 2011 Sony Corporation
130

Search
VAIO User Guide VPCEG2/VPCEH2/VPCEJ2/VPCEK2/VPCEL2 Series Back | Back to Top
Troubleshooting
How to Use
Parts Description
Setup
Network / Internet
Connections
Settings
Playback
Backup / Recovery
Security
Other Operations
Notifications
About the ASSIST Button
Press the ASSIST button to perform regular maintenance of your VAIO computer or to
solve problems you might encounter when using the computer.
While the computer is on, the ASSIST button starts VAIO Care.
While the computer is off, the ASSIST button starts VAIO Care Rescue.
VAIO Care Rescue can be used to recover the computer in case of emergency, for
example, when Windows does not start.
Note
Do not press the ASSIST button while your VAIO computer is in Hibernate mode.
Related Topic
Keeping Your VAIO Computer in Optimum Condition (VAIO Care)
Recovering from the Recovery Area
Backing Up Your Data when You cannot Start Windows
Restoring Your Data with VAIO Data Restore Tool
© 2011 Sony Corporation
131
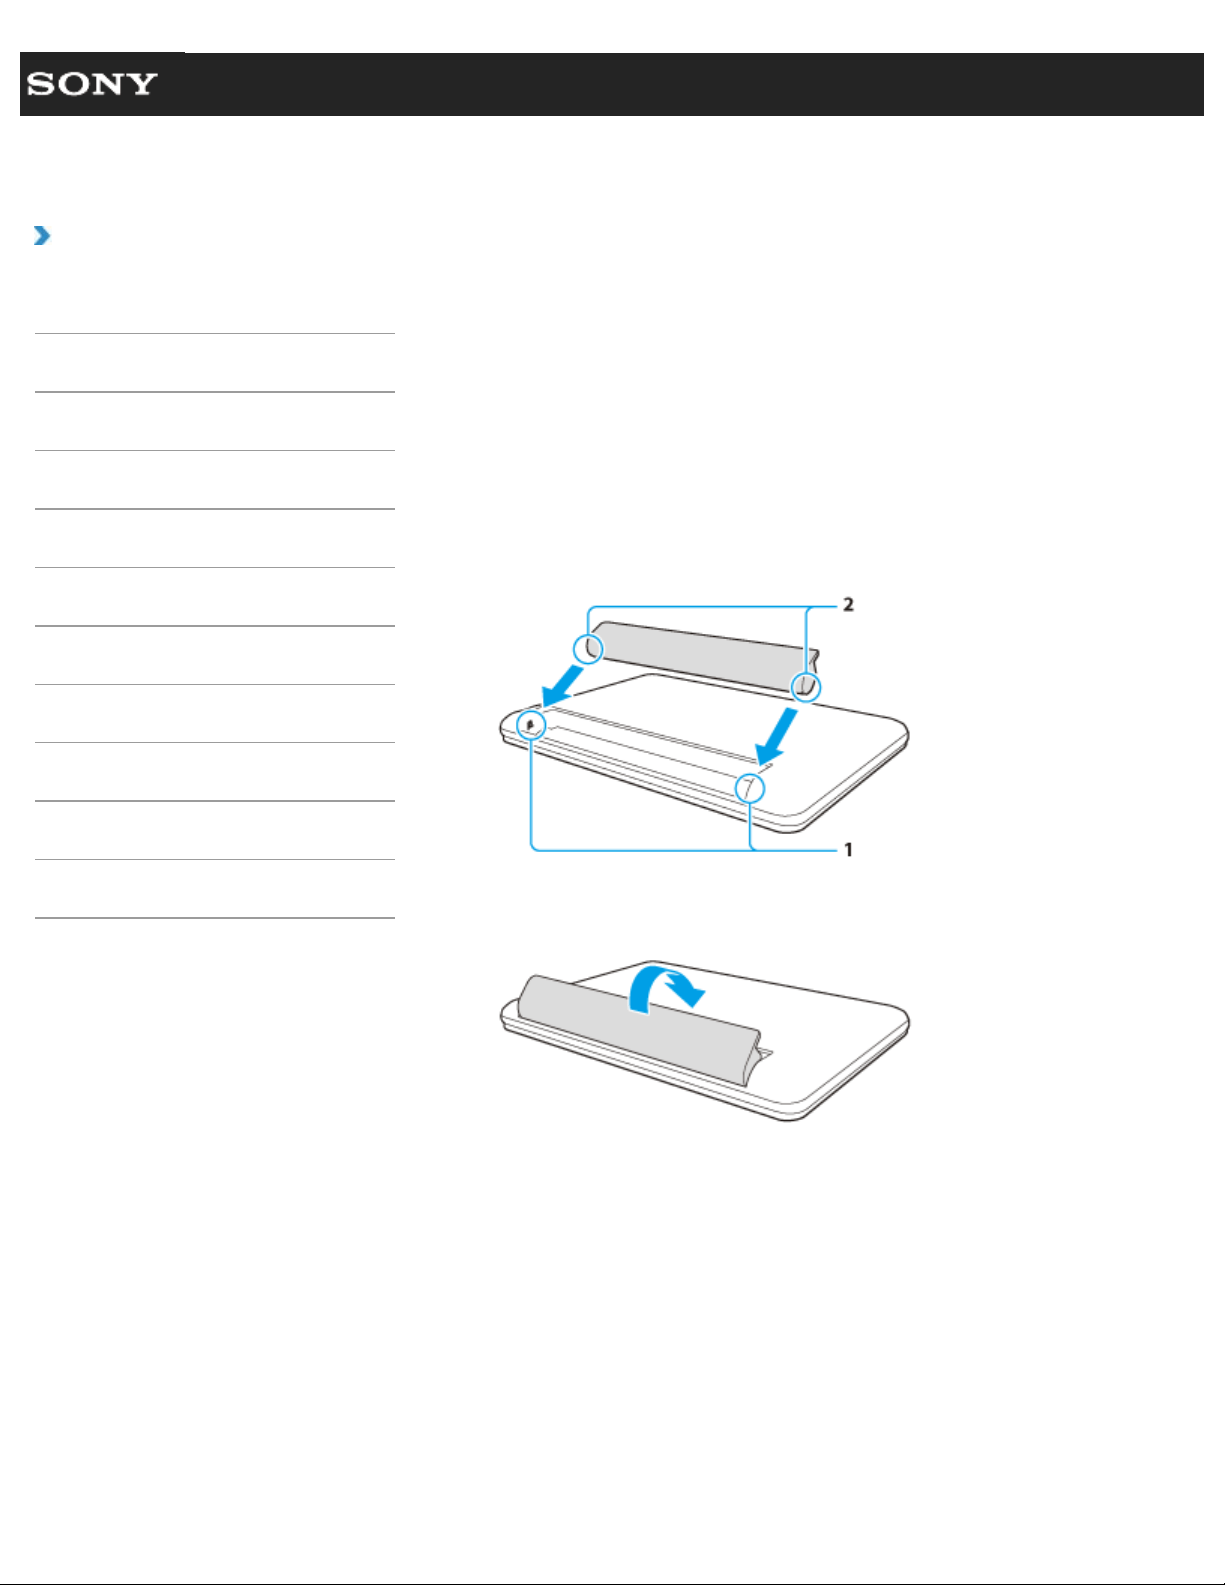
Search
VAIO User Guide VPCEG2/VPCEH2/VPCEJ2/VPCEK2/VPCEL2 Series Back | Back to Top
Troubleshooting
How to Use
Parts Description
Setup
Network / Internet
Connections
Settings
Playback
Backup / Recovery
Security
Other Operations
Notifications
Installing/Removing the Battery Pack
Install the battery pack into the battery compartment on the bottom of your VAIO computer.
To install the battery pack
1. Turn off your VAIO computer and close the LCD screen lid.
2. Slide the battery LOCK switch to the unlock position.
3. Slide the battery pack diagonally into the battery compartment until the projections (1)
on either side of the battery compartment fit into the grooves (2) on either side of the
battery pack.
4. Turn the battery pack in the direction of the arrow and push the battery pack down into
the compartment until it clicks into place.
5. Slide the battery LOCK switch to the LOCK position to secure the battery pack on
your VAIO computer.
To remove the battery pack
1. Turn off your VAIO computer and close the LCD screen lid.
2. Slide the battery LOCK switch to the unlock position.
3. Slide and hold the battery RELEASE latch, put your fingertip underneath the tab on
the battery pack, and lift the battery pack in the direction of the arrow.
132
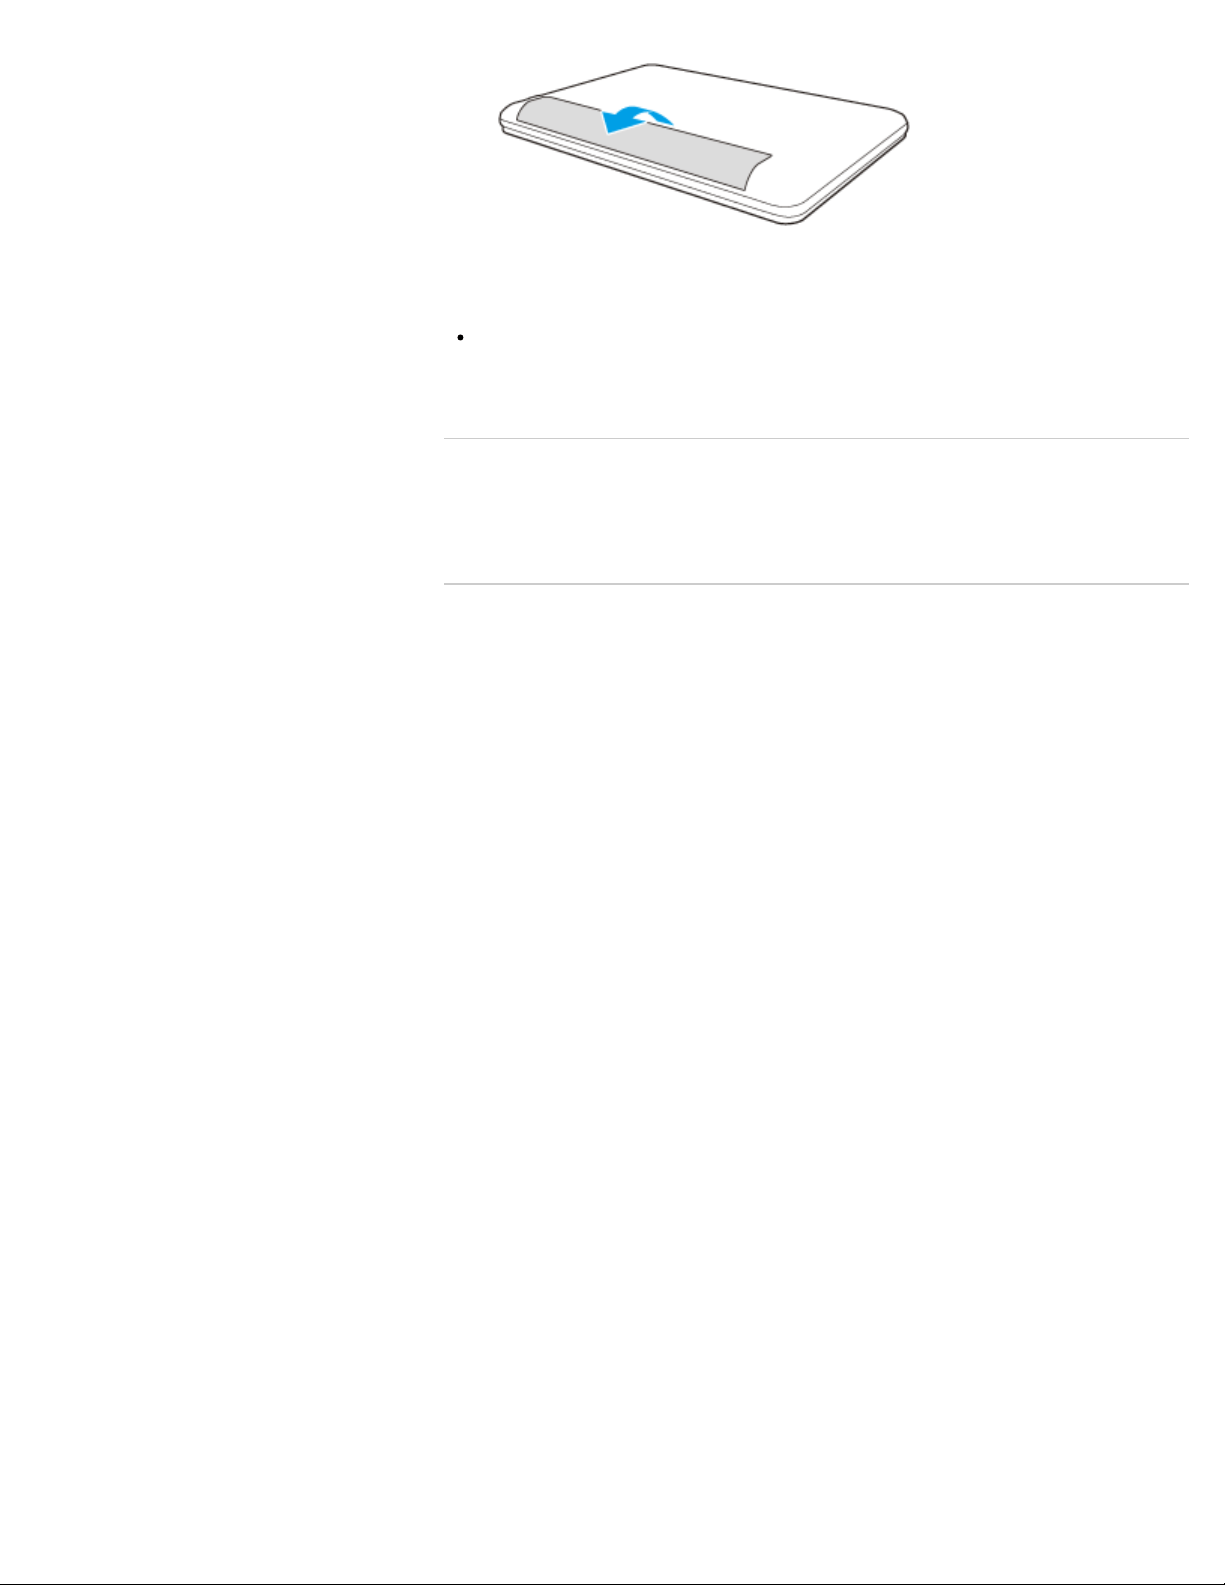
4. Slide the battery pack diagonally to take out from your VAIO computer.
Note
You will lose all unsaved data if you remove the battery pack while your VAIO computer
is on or in Sleep mode and not connected to the AC adapter.
Be sure to turn off the computer before removing the battery pack.
Related Topic
Charging the Battery Pack
Notes on Using the Battery Pack
Shutting Down Your VAIO Computer
© 2011 Sony Corporation
133
Search
VAIO User Guide VPCEG2/VPCEH2/VPCEJ2/VPCEK2/VPCEL2 Series Back | Back to Top
Troubleshooting
How to Use
Parts Description
Setup
Network / Internet
Connections
Settings
Playback
Backup / Recovery
Security
Other Operations
Notifications
Charging the Battery Pack
The battery pack can be charged even while you are using your VAIO computer when the
computer is connected to a power source. The charging time may vary depending on
operating conditions.
1. Install the battery pack into your VAIO computer. [Details]
2. Plug your VAIO computer into an AC outlet. [Details]
Hint
The charging time varies depending on ambient temperature.
Note that at a low ambient temperature, it takes longer time to charge the battery pack.
To check the battery status of your VAIO computer, click the battery icon, such as
(on battery) or (plugged in), in the desktop notification area.
Related Topic
Charge Indicator Status List
Extending the Battery Life
© 2011 Sony Corporation
134

Search
VAIO User Guide VPCEG2/VPCEH2/VPCEJ2/VPCEK2/VPCEL2 Series Back | Back to Top
Troubleshooting
How to Use
Parts Description
Setup
Network / Internet
Connections
Settings
Playback
Backup / Recovery
Security
Other Operations
Notifications
Notes on Using the Battery Pack
Before using the battery pack, read the following precautions for correct use.
About the battery pack
The supplied battery pack is designed specifically for your VAIO computer.
For your safety, only use the supplied battery pack or an optional battery pack that is
specified by Sony.
For safety reasons, battery charging may be suspended at higher or lower temperatures.
While your VAIO computer is connected to an AC outlet with the AC adapter, it runs on
AC power, even if the battery pack is installed.
The supplied battery pack is not fully charged at the time of delivery.
While the battery pack is in use or being charged, heat builds up in the battery pack.
This is normal and is not cause for concern.
Do not use your VAIO computer without installing the battery pack as it may cause the
computer to malfunction.
About battery discharge
After battery charge, the battery pack will gradually discharge over time even while not in
use. If it is left unused for an extended period of time, the battery power may be depleted. It
is recommended that you recharge the battery pack before use.
About battery life
Battery life varies depending on usage and settings.
About battery deterioration and replacement
The battery pack is consumable. The capacity gradually declines through repeated
cycles of recharging and discharging. As a result, the battery life becomes short even if it
is fully charged and eventually the battery pack reaches the end of its life. If the battery
life has become short, check the battery status and replace the battery pack with a new
one specified by Sony.
If the battery pack quickly runs out of power after being fully charged or it has reached
the end of its life, replace it with a new one.
When using the power saving mode
If the battery pack runs out during Sleep mode, all unsaved data before your VAIO computer
enters Sleep mode will be lost and cannot be restored. Be sure to save all data before
placing the computer into Sleep mode.
In Hibernate mode, all data and status (such as window position, size, etc.) are saved to the
built-in storage device, so no data will be lost even if the battery pack runs out. If you cannot
connect the computer to an AC power source for an extended period of time, place the
computer into Hibernate mode.
135

When the battery pack is running out of power
If the battery pack runs out during your absence, power will be cut off and any data you
are working on will be lost. While your VAIO computer is running on battery power, save
data frequently and manually place the computer into Hibernate mode if necessary.
Related Topic
Notes on Using the Power Source
© 2011 Sony Corporation
136
Search
VAIO User Guide VPCEG2/VPCEH2/VPCEJ2/VPCEK2/VPCEL2 Series Back | Back to Top
Troubleshooting
How to Use
Parts Description
Setup
Network / Internet
Connections
Settings
Playback
Backup / Recovery
Security
Other Operations
Notifications
Using Sleep Mode
In Sleep mode, all unnecessary devices of your VAIO computer are turned off, though some
devices stay turned on to retain the computer’s state including data you are working on.
Sleep mode is useful when you take a short rest, for example.
The power indicator light blinks in orange slowly while your VAIO computer is in this mode.
When the computer is running on battery power and a certain time has passed after the
computer enters Sleep mode, the computer will enter Hibernate mode at the default setting.
To activate Sleep mode
1. Click (Start), (arrow) next to the Shut down button, and Sleep.
Hint
The operations below also place your VAIO computer into Sleep mode.
Press the power button (at a default setting).
Note that if you press and hold down the power button for more than four seconds,
your VAIO computer will turn off automatically. Doing this will erase all unsaved data.
To return to Normal mode
1. Press any key on the keyboard.
Note
If you do not intend to use your VAIO computer for an extended period of time while the
computer is disconnected from an AC power source, place the computer into Hibernate
mode, or turn it off.
Hint
The operations below also restore your VAIO computer from Sleep mode to Normal
mode.
Press the power button.
Note that if you press and hold down the power button for more than four seconds,
your VAIO computer will turn off automatically. Doing this will erase all unsaved data.
By default, your VAIO computer enters Sleep mode automatically after about 30
minutes of inactivity while running on AC power.
Related Topic
About Power Saving Mode
Using Hibernate Mode
Notes on Using the Power Source
Notes on Sleep Mode
Extending the Battery Life
© 2011 Sony Corporation
137
Search
VAIO User Guide VPCEG2/VPCEH2/VPCEJ2/VPCEK2/VPCEL2 Series Back | Back to Top
Troubleshooting
How to Use
Parts Description
Setup
Network / Internet
Connections
Settings
Playback
Backup / Recovery
Security
Other Operations
Notifications
Using Hibernate Mode
In Hibernate mode, the current state of your VAIO computer is saved to the built-in storage
device, and then the computer is turned off. Hibernate mode is useful when you do not
intend to use the computer for an extended period of time.
To activate Hibernate mode
1. Click (Start), (arrow) next to the Shut down button, and Hibernate.
Hint
The following operation also places your VAIO computer into Hibernate mode.
Press the Fn+F12 keys.
The power indicator light is off while your VAIO computer is in Hibernate mode.
To return to Normal mode
1. Press the power button.
Note
Note that if you press and hold down the power button for more than four seconds, your
VAIO computer will turn off automatically. Doing this will erase all unsaved data.
By default, your VAIO computer automatically enters Hibernate mode when the battery
pack becomes weak. However, depending on the currently running software and
connected devices, Windows may not allow their tasks to be suspended, resulting in
failure to enter Hibernate mode. If this occurs and the battery pack is running out of
power, the computer will be turned off, resulting in loss of unsaved data.
While the computer is running on battery power, save data frequently and manually
place the computer into Hibernate mode, if necessary.
Before moving your VAIO computer, make sure that the power indicator light is off to
avoid impact or vibration to the running hard disk drive.
Hint
When the charge and power indicator lights blink concurrently, or a low battery message
appears, place your VAIO computer into Hibernate mode or plug it into an AC outlet.
Related Topic
About Power Saving Mode
Using Sleep Mode
Extending the Battery Life
© 2011 Sony Corporation
138

Search
VAIO User Guide VPCEG2/VPCEH2/VPCEJ2/VPCEK2/VPCEL2 Series Back | Back to Top
Troubleshooting
How to Use
Parts Description
Setup
Network / Internet
Connections
Settings
Playback
Backup / Recovery
Security
Other Operations
Notifications
Notes on Sleep Mode
Read the following precautions before using Sleep mode.
Some software applications may not support Sleep mode. When running such
applications, exit them before placing your VAIO computer into Sleep mode.
Some USB devices may not support Sleep mode. When your VAIO computer resumes
from Sleep mode, the computer may not recognize such USB devices, depending on the
type and number of connected USB devices.
If you cannot place the computer into Sleep mode, disconnect all USB devices before
placing the computer into Sleep mode.
If your VAIO computer enters Sleep mode when Windows or the computer is unstable, it
may not resume from Sleep mode. The following operations are recommended:
Before placing your VAIO computer into Sleep mode, save your files and close
running software.
Shut down your VAIO computer periodically.
Depending on the condition of Windows, your VAIO computer cannot enter Sleep mode.
If the battery pack runs out of power while your VAIO computer is in Sleep mode, you
will lose all unsaved data. Be sure to save data you are working on before placing the
computer into Sleep mode.
Related Topic
About Power Saving Mode
Using Sleep Mode
Notes on Using the Power Source
Notes on Using the Battery Pack
© 2011 Sony Corporation
139

Search
VAIO User Guide VPCEG2/VPCEH2/VPCEJ2/VPCEK2/VPCEL2 Series Back | Back to Top
Troubleshooting
How to Use
Parts Description
Setup
Network / Internet
Connections
Settings
Playback
Backup / Recovery
Security
Other Operations
Notifications
Selecting a Power Plan
Power management helps you set up power plans to suit your requirements for power
consumption.
1. Click
(Start), Control Panel, Hardware and Sound, and Power Options.
2. Select your desired power plan.
3. If you want to change the power plan settings, click Change plan settings on the
right of your desired power plan in the Power Options window.
By clicking Change advanced power settings, you can change the advanced
settings.
Refer to Windows Help and Support for more information on the power plan
settings.
Hint
The power status icon indicates what kind of power source your VAIO computer is
currently using, and you can see the computer’s power status by clicking this icon.
© 2011 Sony Corporation
140

Search
VAIO User Guide VPCEG2/VPCEH2/VPCEJ2/VPCEK2/VPCEL2 Series Back | Back to Top
Troubleshooting
How to Use
Parts Description
Setup
Network / Internet
Connections
Settings
Playback
Backup / Recovery
Security
Other Operations
Notifications
Extending the Battery Life
When your VAIO computer is running on battery power, you can extend the battery life using
the following methods.
Use the power saving mode. [Details]
When you do not need to use your VAIO computer temporarily, you can use either
Sleep mode or Hibernate mode.
To extend the battery life, use Sleep mode frequently. If you do not intend to use the
computer for an extended period of time, use Hibernate mode. For longer breaks, turn
off the computer.
Resuming the computer from Hibernate mode is faster than from booting up the
computer, and Sleep mode, even faster than Hibernate mode.
Decrease the LCD brightness of the computer screen. [Details]
Turn down the volume of the speakers and headphones. [Details]
Disconnect peripheral devices that are not in use.
Related Topic
Charging the Battery Pack
Notes on Using the Battery Pack
Using Sleep Mode
Using Hibernate Mode
© 2011 Sony Corporation
141
Search
VAIO User Guide VPCEG2/VPCEH2/VPCEJ2/VPCEK2/VPCEL2 Series Back | Back to Top
Troubleshooting
How to Use
Parts Description
Setup
Network / Internet
Connections
Settings
Playback
Backup / Recovery
Security
Other Operations
Notifications
Charge Indicator Status List
The charge indicator light turns on or blinks differently according to conditions.
Lit in orange
The battery pack is charging. (Turns off when charging is
completed.)
Blinks along with the green
power indicator
The battery pack is running out of power.
(Normal mode)
Blinks along with the orange
power indicator
The battery pack is running out of power.
(Sleep mode)
Blinks fast in orange
A battery error has occurred due to a failed battery pack
or an unlocked battery pack.
Related Topic
Charging the Battery Pack
Extending the Battery Life
© 2011 Sony Corporation
142

Search
VAIO User Guide VPCEG2/VPCEH2/VPCEJ2/VPCEK2/VPCEL2 Series Back | Back to Top
Troubleshooting
How to Use
Parts Description
Setup
Network / Internet
Connections
Settings
Playback
Backup / Recovery
Security
Other Operations
Notifications
About Power Saving Mode
Your VAIO computer has power saving modes to conserve power while you are not using
the computer in addition to the normal operating mode.
Sleep mode
In Sleep mode, all unnecessary devices of your VAIO computer are turned off, though some
devices stay turned on to retain the computer’s state including data you are working on.
Sleep mode is useful when you take a short rest, for example.
Hibernate mode
In Hibernate mode, the state of the current system is saved to the built-in storage device
and your VAIO computer is turned off. Hibernate mode is useful if you do not intend to use
the computer for a while.
About restart time and power consumption
The restart time from Sleep mode is the shortest, but your VAIO computer in Sleep mode
consumes power the most. When the computer is off, the time you take to start the computer
is longer than to resume it from power saving modes, but the computer can conserve power.
Note
By default, your VAIO computer automatically enters Hibernate mode when the battery
pack becomes weak. However, depending on the currently running software and
connected devices, Windows may not allow their tasks to be suspended, resulting in
failure to enter Hibernate mode. If this occurs and the battery pack is running out of
power, the computer will be turned off, resulting in loss of unsaved data.
While the computer is running on battery power, save data frequently and manually
place the computer into Hibernate mode, if necessary.
Related Topic
Using Sleep Mode
Using Hibernate Mode
Notes on Using the Power Source
Notes on Sleep Mode
© 2011 Sony Corporation
143
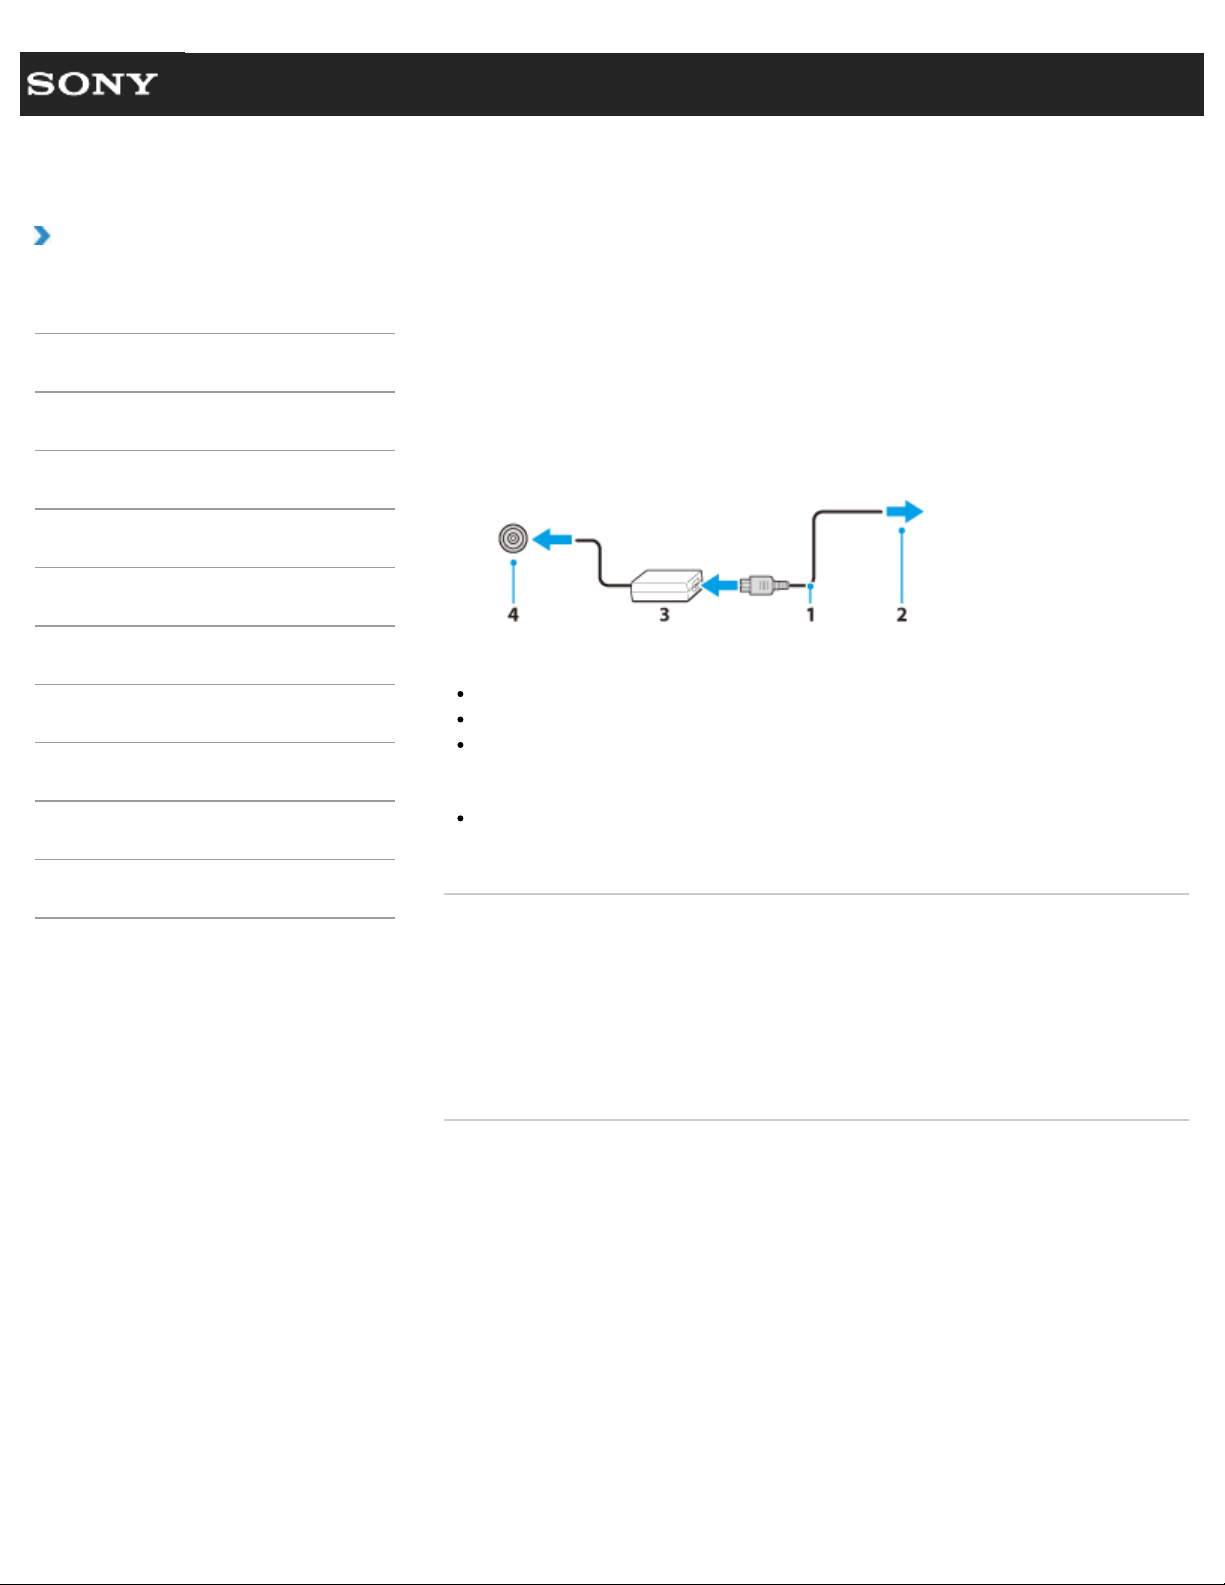
Search
VAIO User Guide VPCEG2/VPCEH2/VPCEJ2/VPCEK2/VPCEL2 Series Back | Back to Top
Troubleshooting
How to Use
Parts Description
Setup
Network / Internet
Connections
Settings
Playback
Backup / Recovery
Security
Other Operations
Notifications
Connecting a Power Source
Connect your VAIO computer to an AC power source. Carefully read the precautions in
Notes on Using the Power Source before connection. [Details]
1. Plug one end of the power cord (1) into the AC adapter (3).
2. Plug the other end of the power cord into an AC outlet (2).
3. Plug the cable from the AC adapter (3) into the DC IN port (4) on your VAIO computer.
Note
Do not plug more than one device into the same AC outlet.
The shape of the AC adapter varies depending on the model you purchased.
Make sure that the power plug is firmly plugged into your VAIO computer.
Hint
You can purchase a power strip with a surge protector to help prevent damage to your
VAIO computer caused by sudden power surges (in an electrical storm, for example).
Related Topic
Installing/Removing the Battery Pack
Charging the Battery Pack
Notes on Using the Battery Pack
Turning on Your VAIO Computer
Shutting Down Your VAIO Computer
Notes on Using the Power Source
© 2011 Sony Corporation
144

Search
VAIO User Guide VPCEG2/VPCEH2/VPCEJ2/VPCEK2/VPCEL2 Series Back | Back to Top
Troubleshooting
How to Use
Parts Description
Setup
Network / Internet
Connections
Settings
Playback
Backup / Recovery
Security
Other Operations
Notifications
Turning on Your VAIO Computer
Turn on your VAIO computer to start Windows. Carefully read the precautions in Notes on
Using the Power Source before turning on. [Details]
1. Install the battery pack on your VAIO computer [Details], and then connect to an AC
outlet. [Details]
2. Lift the LCD screen lid.
3. Press and hold down the power button until the power indicator light turns on in green.
Your VAIO computer is turned on, and Windows starts after a while.
Note
If you press and hold down the power button for more than four seconds, your VAIO
computer will not turn on.
Press the power button lightly, and release it immediately when the power indicator light
turns on.
Do not use your VAIO computer without installing the battery pack as it may cause the
computer to malfunction.
When opening the LCD screen lid, do not hold the built-in camera as it may cause your
VAIO computer to malfunction. (Built-in camera equipped models)
If you press the power button with the LCD screen lid closed, your VAIO computer will
not turn on.
Hint
By default, your VAIO computer automatically enters Sleep mode after a certain period
of inactivity while the computer is connected to an AC outlet. [Details]
Related Topic
Installing/Removing the Battery Pack
Charging the Battery Pack
Notes on Using the Battery Pack
Connecting a Power Source
Shutting Down Your VAIO Computer
Restarting Your VAIO Computer
Notes on Using the Power Source
© 2011 Sony Corporation
145

Search
VAIO User Guide VPCEG2/VPCEH2/VPCEJ2/VPCEK2/VPCEL2 Series Back | Back to Top
Troubleshooting
How to Use
Parts Description
Setup
Network / Internet
Connections
Settings
Playback
Backup / Recovery
Security
Other Operations
Notifications
Shutting Down Your VAIO Computer
Shut down your VAIO computer properly to avoid losing unsaved data.
1. Turn off any peripherals connected to your VAIO computer.
2. Save your data and close all running software applications.
3. Click
(Start) and the Shut down button.
After a short time, your VAIO computer automatically turns off and the green power
indicator light turns off.
Before closing the LCD screen lid, make sure the power indicator is off.
Note
An improper shutdown may cause loss of unsaved data or your VAIO computer to
malfunction.
To disconnect your VAIO computer completely from an AC power source, turn off the
computer and unplug the power cord from the AC outlet.
Related Topic
Turning on Your VAIO Computer
Restarting Your VAIO Computer
Using Sleep Mode
Using Hibernate Mode
Notes on Using the Power Source
© 2011 Sony Corporation
146

Search
VAIO User Guide VPCEG2/VPCEH2/VPCEJ2/VPCEK2/VPCEL2 Series Back | Back to Top
Troubleshooting
How to Use
Parts Description
Setup
Network / Internet
Connections
Settings
Playback
Backup / Recovery
Security
Other Operations
Notifications
Notes on Using the Power Source
Read the following precautions before plugging your VAIO computer into an AC power
source.
If you remove the battery pack while your VAIO computer is turned on or in Sleep mode
but it is disconnected from an AC power source, you will lose all unsaved data.
If you do not intend to use your VAIO computer for an extended period of time while it is
disconnected from an AC power source, place the computer into Hibernate mode or turn
it off.
Notes on the AC adapter
Use the AC adapter supplied with your VAIO computer or genuine Sony products. Do
not use any other AC adapter as it may cause a malfunction.
Do not connect the AC adapter to a power conversion device such as a travel power
converter. It may cause overheating or a malfunction.
If the AC adapter cable becomes damaged or broken, do not use it.
Notes on turning on your VAIO computer
Because your VAIO computer contains magnetic components, keep magnetic storage
media, such as floppy disks, away from the computer, as it may cause data corruption.
Your VAIO computer falsely recognizes that the LCD screen lid is closed when you
move magnetic devices closer to the computer and therefore will automatically enter
Sleep mode (with the default settings). Keep magnetic devices away from the computer.
Related Topic
Connecting a Power Source
Turning on Your VAIO Computer
Shutting Down Your VAIO Computer
Restarting Your VAIO Computer
© 2011 Sony Corporation
147
Search
VAIO User Guide VPCEG2/VPCEH2/VPCEJ2/VPCEK2/VPCEL2 Series Back | Back to Top
Troubleshooting
How to Use
Parts Description
Setup
Network / Internet
Connections
Settings
Playback
Backup / Recovery
Security
Other Operations
Notifications
Restarting Your VAIO Computer
After changing the settings or installing software on your VAIO computer, you may be
required to restart the computer.
1. Save your data and close all running software applications.
2. Click
(Start), (arrow) next to the Shut down button, and Restart.
Your VAIO computer will restart.
Related Topic
Turning on Your VAIO Computer
Shutting Down Your VAIO Computer
© 2011 Sony Corporation
148
Search
VAIO User Guide VPCEG2/VPCEH2/VPCEJ2/VPCEK2/VPCEL2 Series Back | Back to Top
Troubleshooting
How to Use
Parts Description
Setup
Network / Internet
Connections
Settings
Playback
Backup / Recovery
Security
Other Operations
Notifications
Using the Internet without Starting Windows
(Quick Web Access)(the Web button)
The Quick Web Access function enables you to access the Internet without starting
Windows.
1. Press the WEB button on your VAIO computer while the computer is off. [Details]
2. Follow the instructions in the initial setup wizard.
Once completed the initial setup, you can start the web browser used with the Quick
Web Access function just by pressing the WEB button from the next time.
For more information on how to use the Quick Web Access function, click
(Help)
located at the lower right corner of the computer screen.
Note
The WEB button is not functional while your VAIO computer is in Sleep mode or
Hibernate mode.
Hint
While your VAIO computer is on and you are logging onto Windows, the WEB button
starts the web browser assigned to the button by default.
To exit the Quick Web Access function
1. Click (Power) located at the lower left corner of the computer screen.
Note
To start Windows, you need to exit the Quick Web Access function.
Hint
Alternatively, you can exit the Quick Web Access function by pressing the WEB button
or (Power) on your VAIO computer.
Notes on using the Quick Web Access function
While the Quick Web Access function is activated, you cannot use:
Any function key, except the F2, F3, and F4 keys, in combination with the Fn key for
shortcuts
The Scr LK key in combination with the Fn key for shortcut
The ASSIST button
The VAIO button
Any port, jack, and memory card slots except the LAN port, the headphones jack, the
USB ports, and the DC IN port
The Intel(R) Wireless Display (installed on selected models only)
Note
Some USB devices may not work with the USB ports on your VAIO computer.
149

© 2011 Sony Corporation
150

Search
VAIO User Guide VPCEG2/VPCEH2/VPCEJ2/VPCEK2/VPCEL2 Series Back | Back to Top
Troubleshooting
How to Use
Parts Description
Setup
Network / Internet
Connections
Settings
Playback
Backup / Recovery
Security
Other Operations
Notifications
Changing the Button Assignment (VAIO Button)
You can change the current task assigned to the VAIO button. [Details]
To change the button assignment, you need to log onto your VAIO computer as a user with
administrative rights, such as a computer administrator.
1. Press and hold down the VAIO button.
The settings window appears.
2. Change the current task to your desired one.
You can select a task from the list.
3. Click OK.
© 2011 Sony Corporation
151

Search
VAIO User Guide VPCEG2/VPCEH2/VPCEJ2/VPCEK2/VPCEL2 Series Back | Back to Top
Troubleshooting
How to Use
Parts Description
Setup
Network / Internet
Connections
Settings
Playback
Backup / Recovery
Security
Other Operations
Notifications
About the Internet Connection Services
The following types of Internet connection services are available. You can select from among
the services according to your preference, for example, communication speed or a usage
fee. For detailed information on a variety of connection services, contact Internet Service
Providers (ISPs).
Fiber to the Home (FTTH)
Cable modem
Digital Subscriber Line (DSL)
Satellite
Dial-up
Related Topic
Connecting to the Internet with a Wired Connection
Starting Wireless LAN Communications
© 2011 Sony Corporation
152

Search
VAIO User Guide VPCEG2/VPCEH2/VPCEJ2/VPCEK2/VPCEL2 Series Back | Back to Top
Troubleshooting
How to Use
Parts Description
Setup
Network / Internet
Connections
Settings
Playback
Backup / Recovery
Security
Other Operations
Notifications
About the Network (LAN)
The network (LAN) enables you to connect your VAIO computer to the Internet and transfer
data between the computer and other devices.
You can connect your VAIO computer to 1000BASE-T/100BASE-TX/10BASE-T type
networks with a LAN cable (not supplied). Connect one end of a LAN cable to the LAN port
on the computer and the other end to your network.
For information on peripheral devices required for LAN access, ask your Internet Service
Provider (ISP) or refer to the manual that came with your modem.
For information on how to connect your VAIO computer to the network, refer to your ISP’s
instructions or the manual that came with the modem and other peripheral devices. If you
require information on the network settings at your workplace, ask the network administrator.
Related Topic
About the Internet Connection Services
Starting Wireless LAN Communications
© 2011 Sony Corporation
153
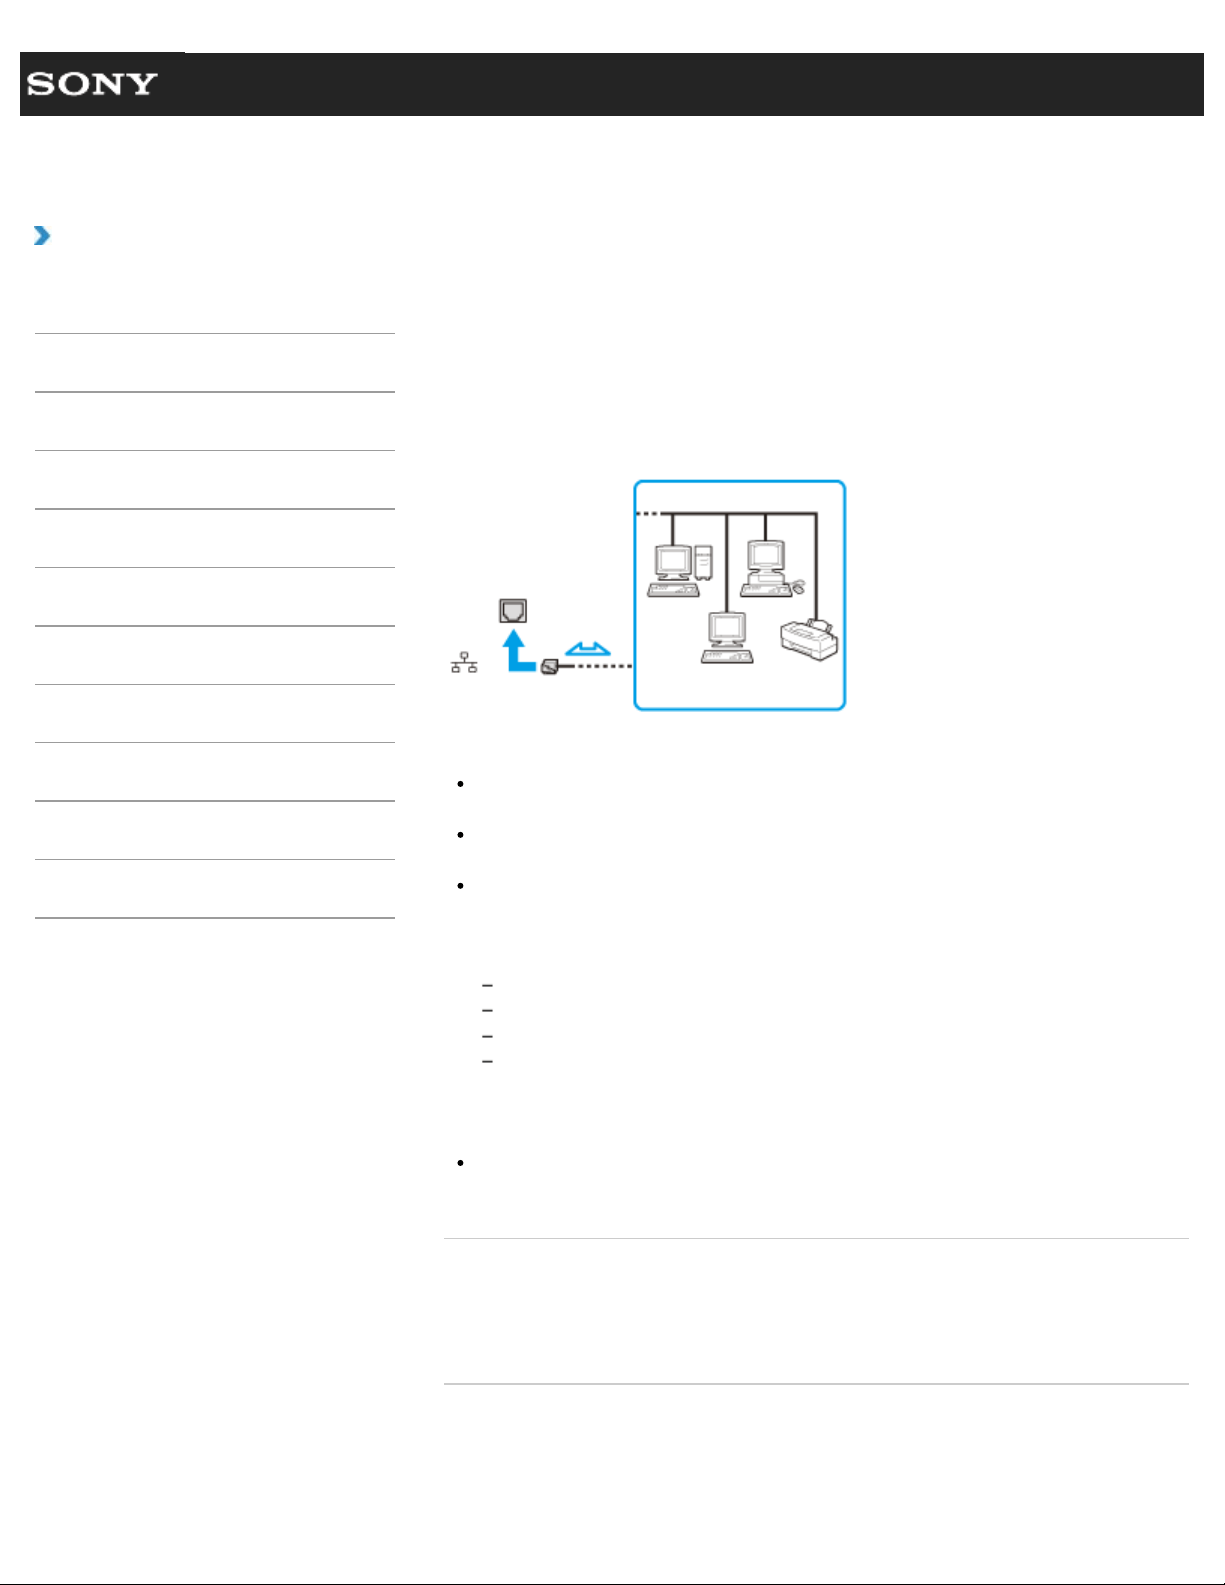
Search
VAIO User Guide VPCEG2/VPCEH2/VPCEJ2/VPCEK2/VPCEL2 Series Back | Back to Top
Troubleshooting
How to Use
Parts Description
Setup
Network / Internet
Connections
Settings
Playback
Backup / Recovery
Security
Other Operations
Notifications
Connecting to the Internet with a Wired
Connection
Before using the Internet, you need to sign up with an Internet Service Provider (ISP) and
set up devices required for connecting your VAIO computer to the Internet.
Connect one end of a LAN cable (not supplied) to the LAN port on your VAIO computer and
the other end to your network.
Note
For detailed information on devices required for Internet access and how to connect
your VAIO computer to the Internet, ask your ISP.
When connecting your VAIO computer to the Internet, be sure to use a cable with
network or Ethernet printed on it.
Do not plug a telephone cable into the LAN port on your VAIO computer.
If the computer is connected to the one of the networks or the LAN port is connected to
the telephone lines mentioned below, high electric current to the port may cause
damage, overheating, or fire.
Any network, except 1000BASE-T/100BASE-TX/10BASE-T type networks
Public telephone subscriber line
Private branch exchange (PBX)
Home (intercom speakerphone) or business-use telephone lines (multi-line business
telephone)
Hint
To connect your VAIO computer to the Internet using the wireless LAN function, you
need to set up the wireless LAN network. [Details]
Related Topic
About the Internet Connection Services
About the Network (LAN)
Starting Wireless LAN Communications
© 2011 Sony Corporation
154
Search
VAIO User Guide VPCEG2/VPCEH2/VPCEJ2/VPCEK2/VPCEL2 Series Back | Back to Top
Troubleshooting
How to Use
Parts Description
Setup
Network / Internet
Connections
Settings
Playback
Backup / Recovery
Security
Other Operations
Notifications
About the Wireless LAN Standards
The Wireless Local Area Network (WLAN) allows your VAIO computer to connect to a
network through a wireless connection.
The WLAN uses the following IEEE 802.11a/b/g/n standard, which specifies the type of
technology used.
Refer to the specifications to find out about the configuration of the computer.
WLAN standard Frequency band Remarks
IEEE 802.11a 5 GHz
Exclusive to models compliant with the IEEE
802.11a/b/g/n standard.
IEEE 802.11b/g 2.4 GHz
The IEEE 802.11g standard provides higher-
speed communications than the IEEE 802.11b.
IEEE 802.11n 5 GHz/2.4 GHz
For models compliant with the IEEE 802.11b/g/n
standard, only 2.4 GHz band can be used.
Related Topic
Before Using the Wireless LAN
Starting Wireless LAN Communications
Stopping Wireless LAN Communications
Notes on Using the Wireless LAN Function
© 2011 Sony Corporation
155
Search
VAIO User Guide VPCEG2/VPCEH2/VPCEJ2/VPCEK2/VPCEL2 Series Back | Back to Top
Troubleshooting
How to Use
Parts Description
Setup
Network / Internet
Connections
Settings
Playback
Backup / Recovery
Security
Other Operations
Notifications
Using the Antivirus Software for Your VAIO
Computer
Protect your VAIO computer against computer viruses by using the antivirus software.
You can keep the antivirus software current with the latest updates by downloading and
installing the updates from the website of the software publisher. To update the antivirus
software, find the antivirus software installed on your VAIO computer from the following and
follow these steps.
Trend Micro:
1. Make sure your VAIO computer is connected to the Internet, click
(Start), All
Programs, Trend Micro Titanium Maximum Security, and Trend Micro
Titanium Maximum Security.
2. Follow the on-screen instructions.
McAfee:
1. Make sure your VAIO computer is connected to the Internet, click
(Start), All
Programs, McAfee, and McAfee Internet Security or McAfee Total
Protection.
2. Follow the on-screen instructions.
Norton Internet Security:
1. Make sure your VAIO computer is connected to the Internet, click
(Start), All
Programs, Norton Internet Security, and LiveUpdate or Norton Internet
Security.
2. Follow the on-screen instructions.
Note
The actual procedure may be different from the above depending on the version of the
software installed on your VAIO computer. In such a case, follow the on-screen
instructions.
Hint
Refer to the help file included with your software for more information.
© 2011 Sony Corporation
156
Search
VAIO User Guide VPCEG2/VPCEH2/VPCEJ2/VPCEK2/VPCEL2 Series Back | Back to Top
Troubleshooting
How to Use
Parts Description
Setup
Network / Internet
Connections
Settings
Playback
Backup / Recovery
Security
Other Operations
Notifications
Before Using the Wireless LAN
You first need to establish wireless LAN communications between your VAIO computer and
an access point (not supplied) before connecting the computer to the Internet using the
wireless LAN. Refer to Windows Help and Support and the manual that came with
your access point for more information.
For a quick and easy connection to the wireless LAN
When the first time you connect your VAIO computer to the Internet using the wireless LAN
at home or connect the computer to a public wireless network (hotspot), use VAIO Easy
Connect that helps you establish a connection to the wireless LAN quickly and easily.
1. Set the WIRELESS switch [Details] to ON.
2. Click
(Start), All Programs, VAIO Easy Connect, and follow the on-screen
instructions in the Easy Internet Connection Setup window.
Related Topic
About the Wireless LAN Standards
Starting Wireless LAN Communications
Stopping Wireless LAN Communications
Notes on Using the Wireless LAN Function
About a Security Key for a Wireless LAN
© 2011 Sony Corporation
157

Search
VAIO User Guide VPCEG2/VPCEH2/VPCEJ2/VPCEK2/VPCEL2 Series Back | Back to Top
Troubleshooting
How to Use
Parts Description
Setup
Network / Internet
Connections
Settings
Playback
Backup / Recovery
Security
Other Operations
Notifications
Starting Wireless LAN Communications
You can establish wireless LAN communications between your VAIO computer and an
access point (not supplied) using VAIO Smart Network. Before using the wireless LAN,
make sure your access point is on and operating.
Read the instructions in Before Using the Wireless LAN for correct use. [Details]
1. Set the WIRELESS switch [Details] to ON.
2. Click
(Start), All Programs, and VAIO Smart Network or click (the
VAIO Smart Network icon) in the desktop notification area.
3. Make sure the switch next to Wireless LAN or Wi-Fi is toggled to On.
If it is set to Off, click it to toggle to On.
Hint
Make sure the WIRELESS indicator light [Details] is on.
4. In the VAIO Smart Network window, select a mode that suits your wireless LAN.
Refer to the help file included with VAIO Smart Network for more information
about operations.
5. Click
or (the Network icon) in the desktop notification area.
6. Select the desired access point and click Connect.
After the connection is established, Connected appears in the selected wireless
access point field.
If you cannot find the desired access point, click
(Refresh).
If a security key [Details] entry window appears, enter the security key as required and
click OK. Note that security keys are case-sensitive.
Note
On IEEE 802.11a/b/g/n equipped models, when only the 2.4 GHz wireless LAN function
is enabled, your VAIO computer cannot connect to a 5 GHz wireless LAN access point.
Also, when only the 5 GHz wireless LAN function is enabled, the computer cannot
connect to a 2.4 GHz wireless LAN access point.
On IEEE 802.11b/g/n or IEEE 802.11b/g equipped models, when the 2.4 GHz wireless
LAN function is disabled, the computer cannot connect to an access point. Also, the
computer cannot connect to a 5.0 GHz wireless LAN access point.
It may take some time to find and connect to a wireless LAN access point before
starting communications via the wireless LAN.
Hint
Once you connect your VAIO computer to the access point by entering the security key,
the access point will be registered in the computer. You do not have to enter the security
key for subsequent connections.
To check wireless LAN connection status
You can move the mouse pointer over or (the Network icon) in the desktop
notification area to check the wireless LAN connection status, such as the access point
currently connected to your VAIO computer.
158


Search
VAIO User Guide VPCEG2/VPCEH2/VPCEJ2/VPCEK2/VPCEL2 Series Back | Back to Top
Troubleshooting
How to Use
Parts Description
Setup
Network / Internet
Connections
Settings
Playback
Backup / Recovery
Security
Other Operations
Notifications
Stopping Wireless LAN Communications
Stop wireless LAN communications using VAIO Smart Network.
1. Click the switch next to Wireless LAN or Wi-Fi to toggle it to Off in the VAIO
Smart Network window.
The wireless LAN function is turned off and the WIRELESS indicator light turns off.
Note
Turning off the wireless LAN function while accessing remote documents, files, or
resources may result in data loss.
Hint
When another wireless communication function is turned on in the VAIO Smart
Network window, the WIRELESS indicator light on your VAIO computer stays on.
Related Topic
About the Wireless LAN Standards
Starting Wireless LAN Communications
Notes on Using the Wireless LAN Function
© 2011 Sony Corporation
160

Search
VAIO User Guide VPCEG2/VPCEH2/VPCEJ2/VPCEK2/VPCEL2 Series Back | Back to Top
Troubleshooting
How to Use
Parts Description
Setup
Network / Internet
Connections
Settings
Playback
Backup / Recovery
Security
Other Operations
Notifications
Notes on Using the Wireless LAN Function
Before using the wireless LAN function, read the following precautions for correct use.
In some countries or regions, using the Wireless LAN products may be restricted by the
local regulations.
Wireless LAN devices work on the 2.4 GHz band, which is used by a variety of devices.
Wireless LAN devices use the technology to minimize radio interference from other
devices that use the same band; however, radio interference may still slow
communication speeds, reduce communication range, or cause communication failure.
If both the BLUETOOTH function and the 2.4 GHz wireless LAN function of your VAIO
computer are enabled, interference may occur and cause slower communication speeds
or other problems.
To communicate via a wireless LAN while you are on the road, you may need to
contract with a wireless LAN connection service provider.
If your VAIO computer is equipped with the IEEE 802.11a/b/g/n standard, outdoor use of
the 5 GHz wireless LAN function is prohibited by law.
The communication speed and range may vary depending on the following conditions:
Distance between devices
Existence of obstacles between devices
Device configuration
Radio conditions
Ambient environment (including wall material, etc.)
Software in use
Communications may be cut off depending on radio conditions.
The data transfer rate specified in the specification is the theoretical maximum, and may
not reflect actual data transfer rate.
Actual communication speed may not be as fast as the one displayed on your VAIO
computer.
The 2.4 GHz Wireless LAN and 5 GHz Wireless LAN frequency bands are not
communicable with one another.
The data transfer rate of IEEE 802.11g and IEEE 802.11n (2.4 GHz) may be affected by
interference when used with an IEEE 802.11b product. Also, IEEE 802.11g and IEEE
802.11n automatically lower the transfer rate to maintain compatibility with an IEEE
802.11b product. The transfer rate may be regained by changing the channel settings of
your access point.
The IEEE 802.11a standard and the IEEE 802.11n standard are not available on ad-hoc
networks.
To stop the wireless LAN function abruptly, set the WIRELESS switch to OFF.
The WLAN standard includes the encryption methods: Wired Equivalent Privacy (WEP),
which is a security protocol, Wi-Fi Protected Access 2 (WPA2), and Wi-Fi Protected
Access (WPA). Proposed jointly by the IEEE and Wi-Fi Alliance, both WPA2 and WPA
are specifications of standards based on interoperable security enhancements that
increase the level of data protection and access control for existing Wi-Fi networks.
WPA is designed to be forward compatible with the IEEE 802.11i specification. It utilizes
the enhanced data encryption Temporal Key Integrity Protocol (TKIP) in addition to user
authentication using 802.1X and Extensible Authentication Protocol (EAP). Data
encryption protects the vulnerable wireless link between clients and access points.
161

Besides that, there are other typical LAN security mechanisms to ensure privacy, such
as: password protection, end-to-end encryption, virtual private networks, and
authentication. WPA2, the second generation of WPA, provides stronger data protection
and network access control and is also designed to secure all versions of 802.11
devices, including 802.11b, 802.11a, 802.11g, and 802.11n standards, multi-band and
multi-mode. In addition, based on the ratified IEEE 802.11i standard, WPA2 provides
government grade security by implementing the National Institute of Standards and
Technology (NIST) FIPS 140-2 compliant AES encryption algorithm and 802.1X-based
authentication. WPA2 is backward compatible with WPA.
Related Topic
About the Wireless LAN Standards
Before Using the Wireless LAN
Starting Wireless LAN Communications
Stopping Wireless LAN Communications
Notes on Using the BLUETOOTH(R) Function <BLUETOOTH equipped models>
© 2011 Sony Corporation
162
Search
VAIO User Guide VPCEG2/VPCEH2/VPCEJ2/VPCEK2/VPCEL2 Series Back | Back to Top
Troubleshooting
How to Use
Parts Description
Setup
Network / Internet
Connections
Settings
Playback
Backup / Recovery
Security
Other Operations
Notifications
About a Security Key for a Wireless LAN
A security key is a security protocol for a wireless LAN that encrypts data transmitted on the
wireless LAN. It is also referred to as an encryption key or a WEP (Wired Equivalent Privacy)
key.
The security key allows wireless devices that have the same key, such as a wireless LAN
access point and a computer, to communicate with each other on the wireless LAN.
The security key is assigned to each access point by default. (Make sure the default security
key has been changed to protect data from unauthorized use.) If you cannot find the default
security key, refer to the manual that came with your access point.
If you enter a wrong security key, follow these steps to re-enter the security key.
1. Click
(Start) and Control Panel.
2. Click Network and Internet and Network and Sharing Center.
3. Click Manage wireless networks in the left pane.
4. Right-click the desired network in the Networks you can view and modify list,
and then click Properties.
5. Click the Security tab.
6. Enter a security key in the Network security key field and click OK.
Related Topic
About the Wireless LAN Standards
Before Using the Wireless LAN
Starting Wireless LAN Communications
Notes on Using the Wireless LAN Function
© 2011 Sony Corporation
163

Search
VAIO User Guide VPCEG2/VPCEH2/VPCEJ2/VPCEK2/VPCEL2 Series Back | Back to Top
Troubleshooting
How to Use
Parts Description
Setup
Network / Internet
Connections
Settings
Playback
Backup / Recovery
Security
Other Operations
Notifications
Connecting External Speakers or Headphones
You can connect external sound output devices (such as speakers or headphones) to your
VAIO computer.
1. Connect external speakers to the the headphones jack
[Details] with a speaker cable
(not supplied).
Note
Turn down the volume of the speakers before turning them on.
Hint
Refer to the manual that came with your speakers or headphones.
Related Topic
Adjusting the Speakers Volume
Connecting an External Microphone
Changing the Sound Output Device
Adjusting the Volume in Windows
© 2011 Sony Corporation
164
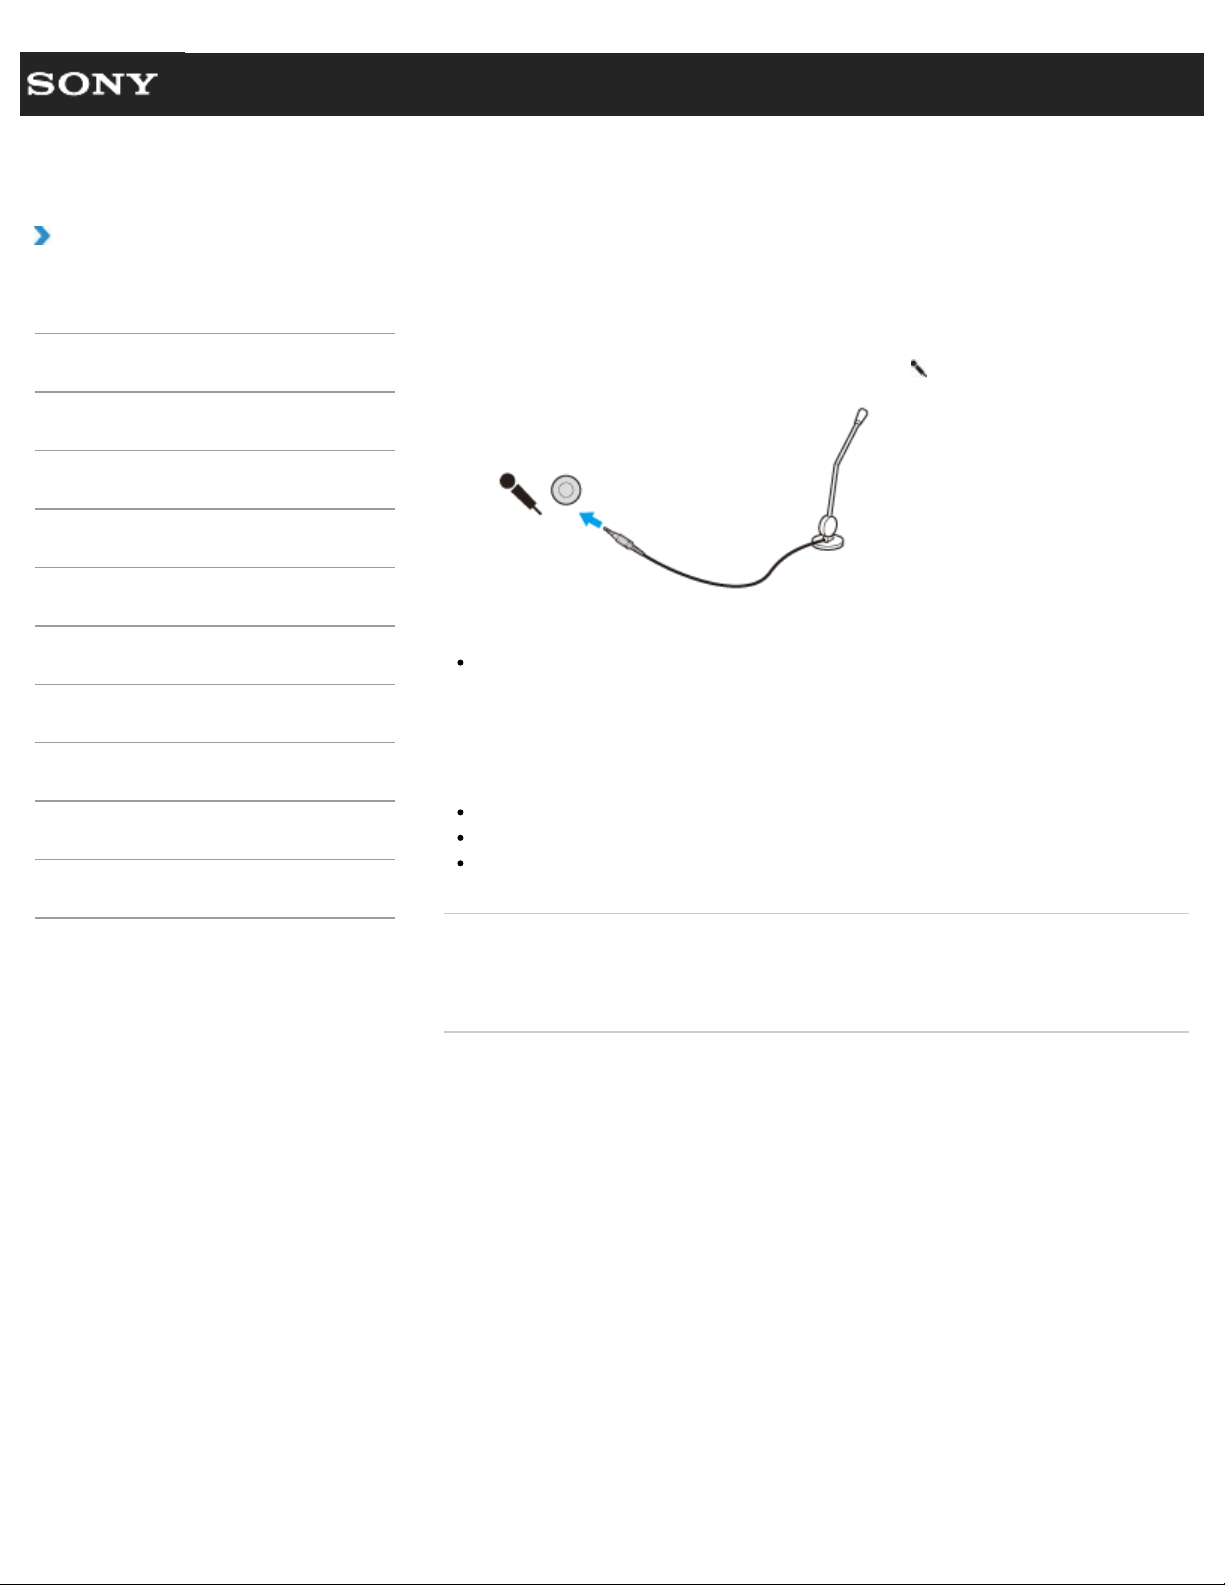
Search
VAIO User Guide VPCEG2/VPCEH2/VPCEJ2/VPCEK2/VPCEL2 Series Back | Back to Top
Troubleshooting
How to Use
Parts Description
Setup
Network / Internet
Connections
Settings
Playback
Backup / Recovery
Security
Other Operations
Notifications
Connecting an External Microphone
You can connect an external microphone to your VAIO computer and enjoy voice chat, etc.
1. Plug the microphone cable into the microphone jack
[Details].
Note
If you connect or disconnect the microphone to/from your VAIO computer while running
voice recording software, voice recording may fail or the software may exit.
Connect the microphone and select it as the sound recording device for Windows before
starting the software.
Hint
Use a plug-in-power microphone.
Refer to the manual that came with your microphone.
If microphone feedback occurs, move the microphone away from your speakers.
Related Topic
Adjusting the Microphone Volume
Connecting External Speakers or Headphones
© 2011 Sony Corporation
165
Search
VAIO User Guide VPCEG2/VPCEH2/VPCEJ2/VPCEK2/VPCEL2 Series Back | Back to Top
Troubleshooting
How to Use
Parts Description
Setup
Network / Internet
Connections
Settings
Playback
Backup / Recovery
Security
Other Operations
Notifications
Changing the Sound Output Device
If there is no sound from the device connected to your VAIO computer, you need to change
the device for sound output.
1. Click
(Start) and Control Panel.
2. Click Hardware and Sound.
3. Click Sound.
4. Click the Playback tab.
5. Ensure there is a check mark next to the icon of the device you intend to output
computer sound from.
If there is no check mark next to the icon, select it and click Set Default.
6. Click OK.
To change the sound rate and bit depth
The sound rate and bit depth of the digital audio output signal should be set according to
your digital audio device. Follow these steps.
1. Click
(Start) and Control Panel.
2. Click Hardware and Sound.
3. Click Sound.
4. Click the Playback tab.
5. Select the icon of your HDMI device or OPTICAL OUT (optical digital audio output)
and click Properties.
6. Click the Advanced tab.
7. Select the sample rate and bit depth (for example, 16 bit, 48000 Hz (DVD quality))
which the device supports.
8. Click OK.
Related Topic
Connecting External Speakers or Headphones
Connecting a High-Quality Digital Sound Output Device between Your VAIO Computer and a
TV
© 2011 Sony Corporation
166

Search
VAIO User Guide VPCEG2/VPCEH2/VPCEJ2/VPCEK2/VPCEL2 Series Back | Back to Top
Troubleshooting
How to Use
Parts Description
Setup
Network / Internet
Connections
Settings
Playback
Backup / Recovery
Security
Other Operations
Notifications
Connecting a High-Quality Digital Sound Output
Device between Your VAIO Computer and a TV
You can connect a high-quality home theater receiver or other surround sound decoder
devices between your VAIO computer and a TV using an HDMI connection.
1. Make sure the HDMI connection has been set up between the TV and the home
theater receiver or surround sound decoder device.
2. Change the device for sound output to the HDMI output. [Details]
3. Turn on the TV and set its input to the HDMI input.
4. Turn on the home theater receiver or surround sound decoder device and set its input
to the HDMI input.
5. Plug one end of an HDMI cable to the HDMI input port on the home theater receiver or
surround sound decoder device and the other end to the HDMI output port on your
VAIO computer.
Hint
You can adjust the screen resolution of the connected TV with your VAIO computer.
[Details]
With the HDMI connection, the volume can be adjusted by the connected audio device
only. Your VAIO computer has no control over the output volume of any connected
devices.
Related Topic
Changing the Sound Output Device
Changing the Resolution (Size) of the Screen Image
Connecting a TV with an HDMI Input Port
© 2011 Sony Corporation
167

Search
VAIO User Guide VPCEG2/VPCEH2/VPCEJ2/VPCEK2/VPCEL2 Series Back | Back to Top
Troubleshooting
How to Use
Parts Description
Setup
Network / Internet
Connections
Settings
Playback
Backup / Recovery
Security
Other Operations
Notifications
Adjusting the Speakers Volume
You can change the volume level of the speakers and headphones.
To reduce the volume using the Fn key
1. Press the F3 key while holding down the Fn key.
The volume is turned down.
To increase the volume using the Fn key
1. Press the F4 key while holding down the Fn key.
The volume is turned up.
Hint
You can press the Fn+F2 keys to turn off the speakers and headphones. Press the
Fn+F2 keys once more to turn on the volume.
You can also press the Fn+F4 keys to turn on the volume.
Related Topic
Adjusting the Volume in Windows
Adjusting the Microphone Volume
Connecting External Speakers or Headphones
© 2011 Sony Corporation
168
Search
VAIO User Guide VPCEG2/VPCEH2/VPCEJ2/VPCEK2/VPCEL2 Series Back | Back to Top
Troubleshooting
How to Use
Parts Description
Setup
Network / Internet
Connections
Settings
Playback
Backup / Recovery
Security
Other Operations
Notifications
Adjusting the Volume in Windows
You can adjust the volume on each software application from the Control Panel window.
1. Click
(Start) and Control Panel.
2. Click Hardware and Sound.
3. Click Adjust system volume under Sound.
4. Move a slider in Device up and down to your desired volume level.
When the volume is turned off (
), click (Deactivate muting) to turn on the
volume (
). When the volume has been minimized, turn the volume up with the
slider.
To turn off the Windows startup sound
1. Click (Start) and Control Panel.
2. Click Hardware and Sound.
3. Click Sound.
4. Click the Sounds tab.
5. Click to clear the Play Windows Startup sound check box.
6. Click OK.
Related Topic
Adjusting the Speakers Volume
Adjusting the Microphone Volume
Connecting External Speakers or Headphones
© 2011 Sony Corporation
169
Search
VAIO User Guide VPCEG2/VPCEH2/VPCEJ2/VPCEK2/VPCEL2 Series Back | Back to Top
Troubleshooting
How to Use
Parts Description
Setup
Network / Internet
Connections
Settings
Playback
Backup / Recovery
Security
Other Operations
Notifications
Adjusting the Microphone Volume
You can adjust the volume level of the microphone.
1. Click
(Start) and Control Panel.
2. Click Hardware and Sound.
3. Click Sound.
4. Click the Recording tab.
5. Double-click the microphone icon.
6. Click the Levels tab in the Microphone Properties window.
7. Move a slider in Microphone right and left to your desired volume level.
If the microphone volume is still not loud enough even at the maximum volume level,
move a slider in Microphone Boost right and left to adjust the volume level.
8. Click OK.
Related Topic
Connecting an External Microphone
Adjusting the Speakers Volume
Adjusting the Volume in Windows
© 2011 Sony Corporation
170

Search
VAIO User Guide VPCEG2/VPCEH2/VPCEJ2/VPCEK2/VPCEL2 Series Back | Back to Top
Troubleshooting
How to Use
Parts Description
Setup
Network / Internet
Connections
Settings
Playback
Backup / Recovery
Security
Other Operations
Notifications
Using the Multiple Monitor Function
The Multiple Monitor function allows you to distribute portions of your desktop across
separate displays. For example, if you have an external display connected to the monitor
port, the computer screen and the external display can function as a single desktop.
1. Right-click on the desktop and select Screen resolution.
2. Click the drop-down list next to Multiple Displays, select Extend these
displays, and click OK.
The setting options vary depending on the number of the connected external displays.
Note
If you set different colors on each display, do not expand a single window across two
displays, or your software may not work properly.
Your external display may not support the Multiple Monitor function.
Certain software applications may not be compatible with the Multiple Monitor settings.
High screen resolution and high color depth may not be displayed correctly. Set fewer
colors or a lower resolution for each display.
Do not change the display settings while using video/image software or playing DVDs,
as it may cause unsuccessful playback/display or unstable system operations.
Change the display settings after you exit the video/image software.
Hint
You can set the screen resolution for each display used for multi monitor.
Related Topic
Changing the Resolution (Size) of the Screen Image
Selecting Display Modes
Connecting a TV with an HDMI Input Port
Connecting an External Display or Projector
© 2011 Sony Corporation
171
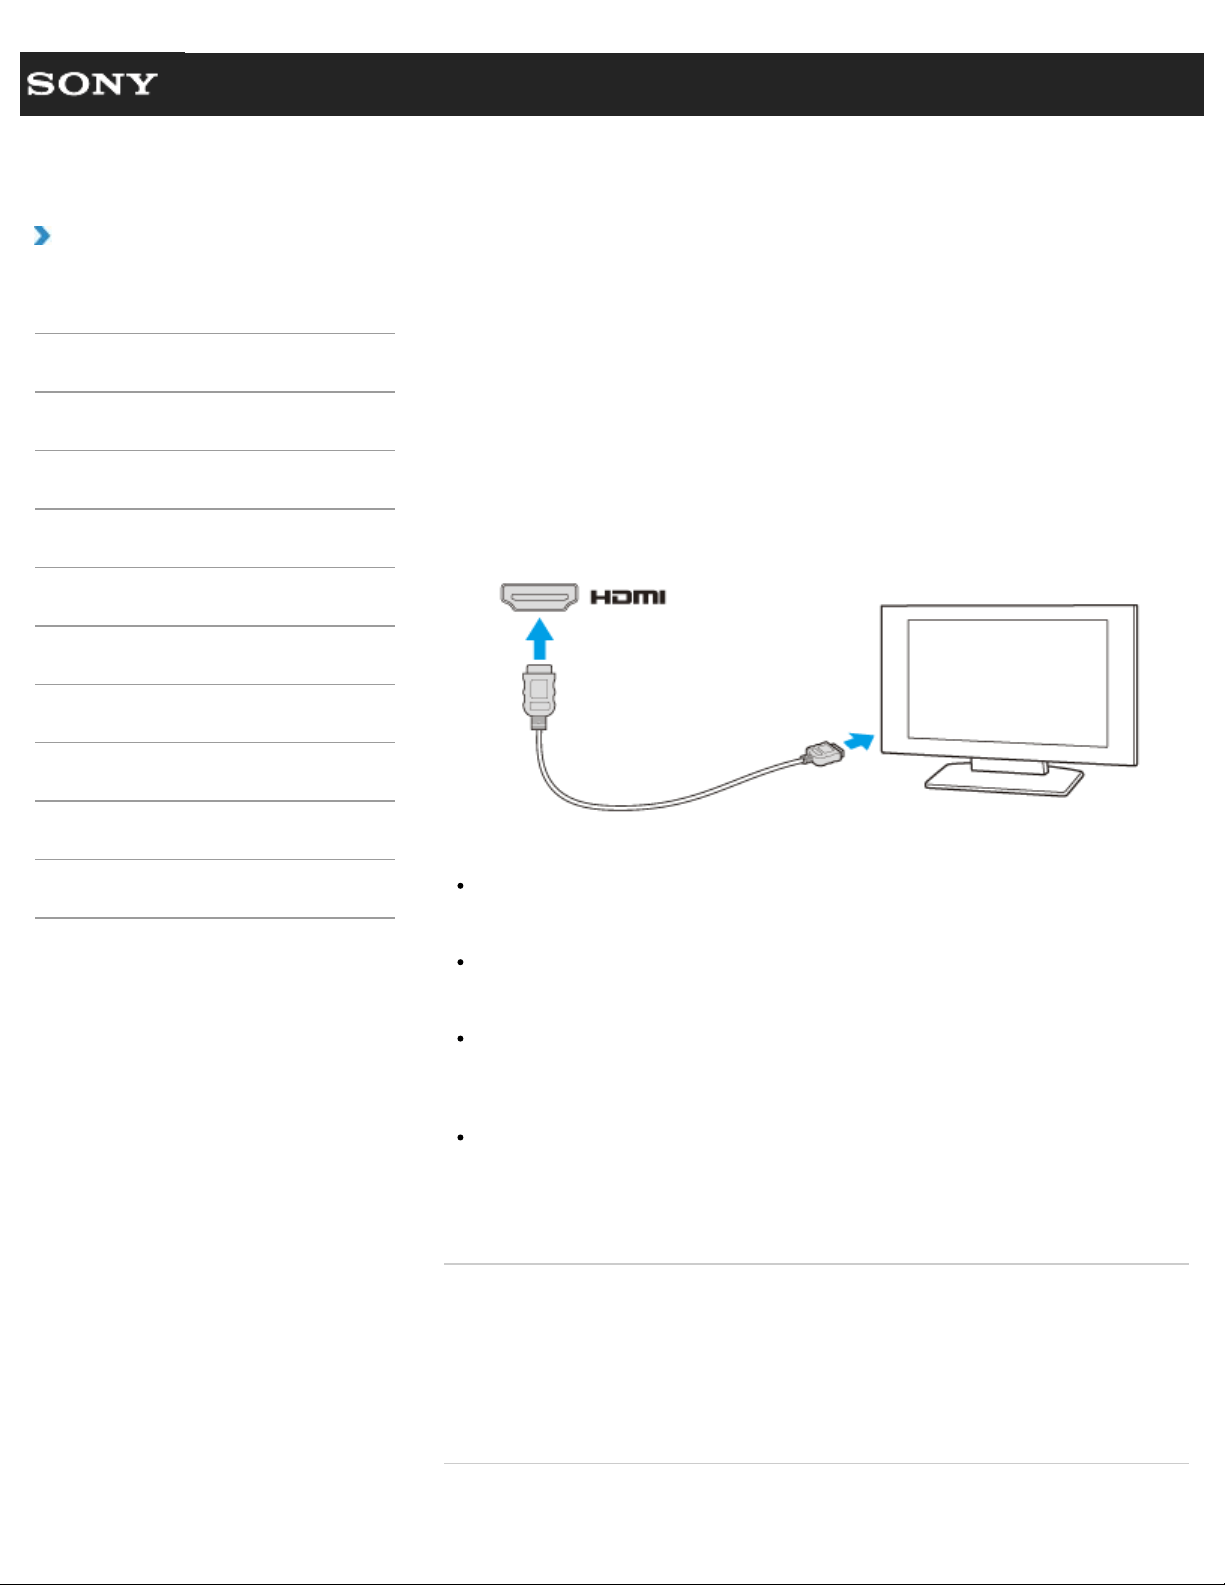
Search
VAIO User Guide VPCEG2/VPCEH2/VPCEJ2/VPCEK2/VPCEL2 Series Back | Back to Top
Troubleshooting
How to Use
Parts Description
Setup
Network / Internet
Connections
Settings
Playback
Backup / Recovery
Security
Other Operations
Notifications
Connecting a TV with an HDMI Input Port
You can connect a TV with an HDMI input port to your VAIO computer with an HDMI cable
(not supplied).
Refer to the manual that came with your TV for more information on installation and use.
1. Plug the power cord of your TV into an AC outlet.
2. Connect one end of an HDMI cable to the HDMI output port [Details] on your VAIO
computer and the other end to the TV.
3. Set the TV input to the external input.
The screen image of your VAIO computer is displayed on the TV.
Note
If a device driver other than the one provided by Sony is used, the image will not be
displayed and audio will not be heard. Always use the device driver provided by Sony
for updates.
To hear sound from a device connected to the HDMI output port, you need to change
the sound output device. For detailed instructions, see Changing the Sound
Output Device. [Details]
You cannot use the HDMI output port and the monitor port on your VAIO computer at
the same time.
Hint
Your VAIO computer is compliant with the High-bandwidth Digital Content Protection
(HDCP) standard and capable of encrypting the transmission channel of digital video
signals for the purpose of copyright protection, which enables you to view a wide variety
of copyright protected and high-quality content.
Related Topic
Selecting Display Modes
Using the Multiple Monitor Function
Changing the Resolution (Size) of the Screen Image
Changing the Resolution (Size) of the Screen Image on an HDMI-Connected Device
Connecting an External Display or Projector
172

© 2011 Sony Corporation
173
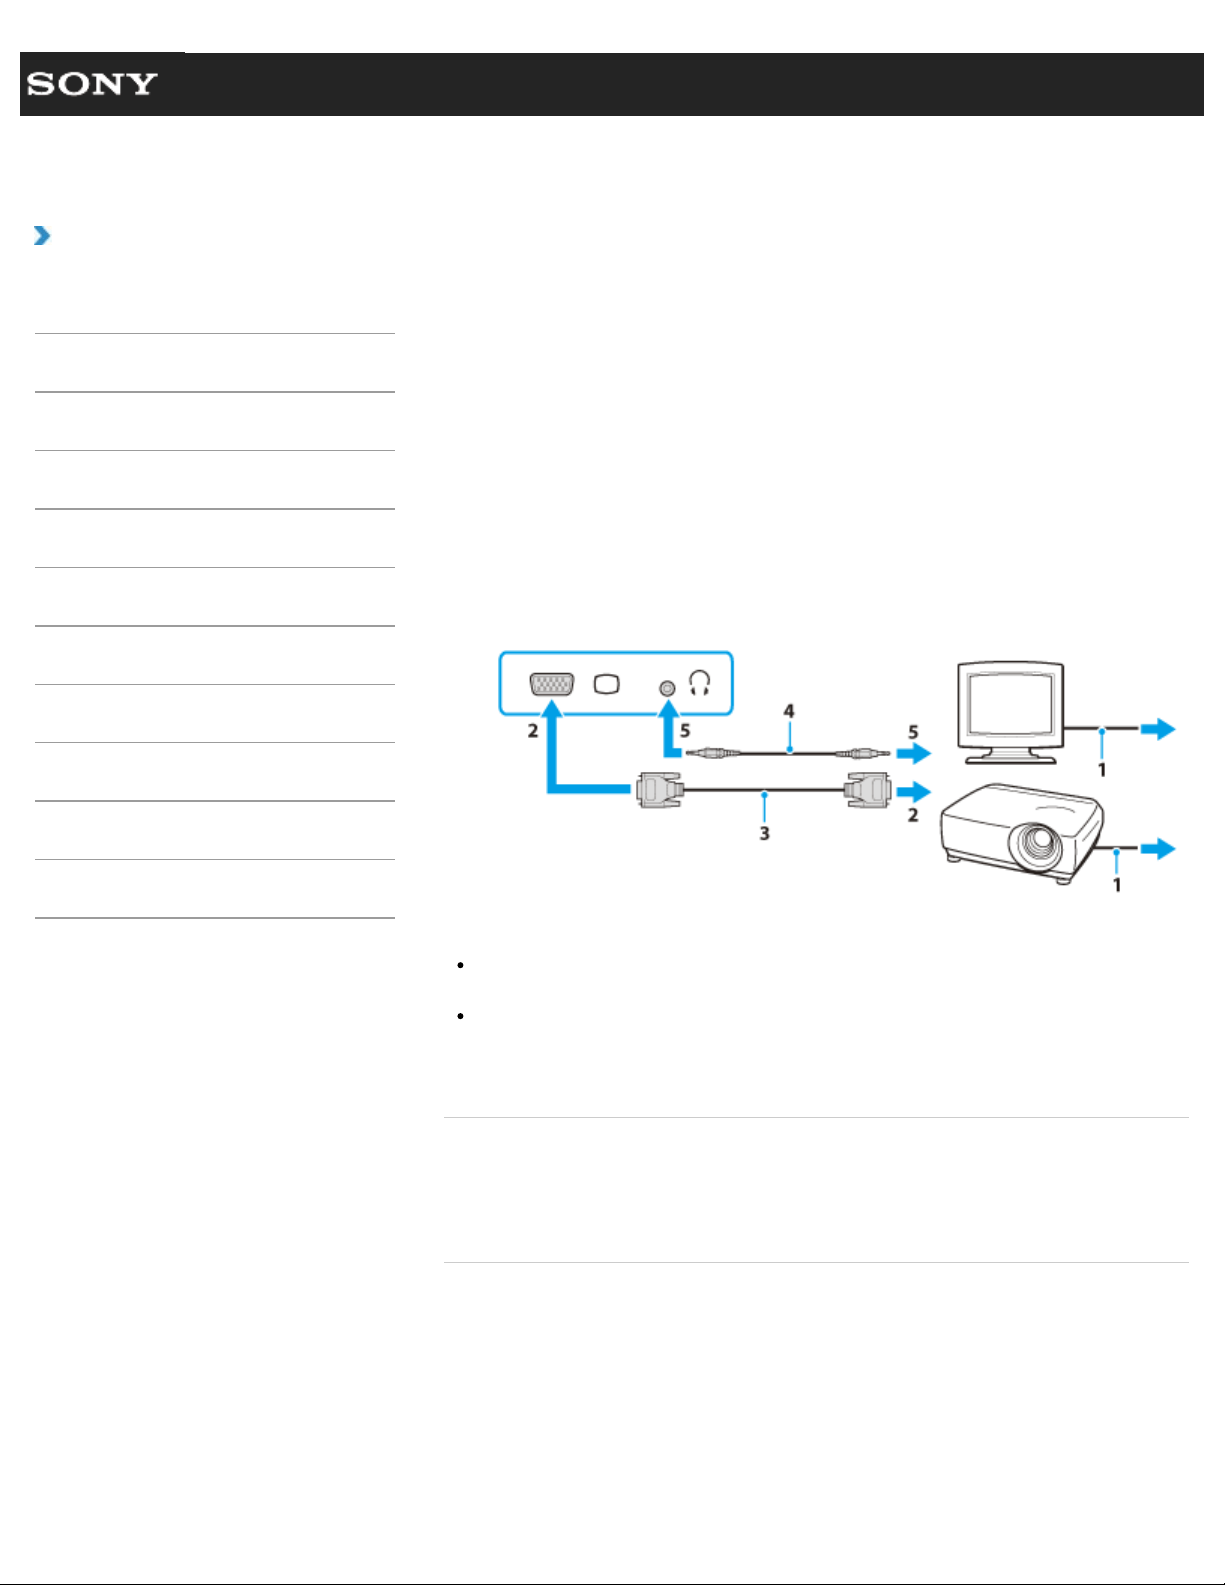
Search
VAIO User Guide VPCEG2/VPCEH2/VPCEJ2/VPCEK2/VPCEL2 Series Back | Back to Top
Troubleshooting
How to Use
Parts Description
Setup
Network / Internet
Connections
Settings
Playback
Backup / Recovery
Security
Other Operations
Notifications
Connecting an External Display or Projector
You can connect an external display (such as a computer display or a projector) to your
VAIO computer with a display cable (not supplied). Refer to the manual that came with your
external display or projector for more information on installation and use.
1. Plug the power cord (1) of your external display or the projector into an AC outlet and
turn it on.
2. Connect the external display or the projector to the monitor port [Details] on your VAIO
computer (2) with a display cable (3) (not supplied).
The screen image of your VAIO computer is displayed on the external display or the
projector.
3. If necessary, connect the external display or the projector to the headphones jack on
your VAIO computer (5) with a speaker cable (4) (not supplied).
Note
You cannot use the monitor port and the HDMI output port on your VAIO computer at
the same time.
Some external display and projector may not support some of the resolutions your VAIO
computer can use. If your computer display does not support the selected resolution,
lower the resolution setting of the computer [Details].
Related Topic
Selecting Display Modes
Using the Multiple Monitor Function
Connecting a TV with an HDMI Input Port
© 2011 Sony Corporation
174

Search
VAIO User Guide VPCEG2/VPCEH2/VPCEJ2/VPCEK2/VPCEL2 Series Back | Back to Top
Troubleshooting
How to Use
Parts Description
Setup
Network / Internet
Connections
Settings
Playback
Backup / Recovery
Security
Other Operations
Notifications
Notes on the LCD screen
Read the following precautions for correct use of the LCD screen.
The LCD screen is manufactured using high-precision technology. You may, however,
see tiny black points and/or bright points (red, blue, or green) that continuously appear
on the LCD screen. This is a normal result of the manufacturing process and does not
indicate a malfunction.
Do not scratch the surface of the LCD screen or exert pressure on it. This could cause
damage.
Do not exert pressure on the LCD screen lid with the lid closed as it may scratch the
LCD screen or soil it.
The LCD screen may become warm during operation. This is normal and does not
indicate a malfunction.
Do not leave the LCD screen facing the sun. This could damage the LCD screen. Be
sure to block direct sunlight when using your VAIO computer near a window.
Do not exert pressure on the LCD screen or its edges when opening the LCD screen lid
or lifting your VAIO computer. The LCD screen may be sensitive to pressure or added
stress, and exerting pressure may damage the screen or cause it to malfunction. When
opening the computer, hold the base with one hand and gently lift the LCD screen lid
with the other. To carry the computer with the lid open, be sure to hold the computer
with both hands.
Using your VAIO computer in low temperature conditions may produce a residual image
on the LCD screen. This does not indicate a malfunction. When the computer returns to
normal temperature, the screen returns to normal.
A residual image may appear on the LCD screen if the same image is displayed for an
extended period of time. The residual image disappears after a while. You can use a
screen saver to prevent residual images.
© 2011 Sony Corporation
175

Search
VAIO User Guide VPCEG2/VPCEH2/VPCEJ2/VPCEK2/VPCEL2 Series Back | Back to Top
Troubleshooting
How to Use
Parts Description
Setup
Network / Internet
Connections
Settings
Playback
Backup / Recovery
Security
Other Operations
Notifications
Selecting Display Modes
You can switch the display output between the computer screen and an external display
connected to your VAIO computer.
1. Turn on an external display.
2. Press the Fn+F7 keys several times to select your desired display output, and then
press the Enter key.
Note
If you disconnect a display cable (not supplied) from your VAIO computer while an
external display is selected as the display output, the computer screen goes blank. In
such a case, press the Fn+F7 keys twice, and then press the Enter key to switch the
display output to the computer screen.
The display switch may become unavailable or your VAIO computer may become
unstable during video playback. Exit the video playback software before switching the
display output.
The display switch may not be available depending on the type of external display or
projector.
Related Topic
Using the Multiple Monitor Function
Connecting a TV with an HDMI Input Port
Connecting an External Display or Projector
© 2011 Sony Corporation
176
Search
VAIO User Guide VPCEG2/VPCEH2/VPCEJ2/VPCEK2/VPCEL2 Series Back | Back to Top
Troubleshooting
How to Use
Parts Description
Setup
Network / Internet
Connections
Settings
Playback
Backup / Recovery
Security
Other Operations
Notifications
Changing the Resolution (Size) of the Screen
Image on an HDMI-Connected Device
You can change the screen resolution or size of your VAIO computer’s screen image
displayed on an external display, such as a TV, connected to the computer with an HDMI
cable (not supplied).
1. Connect your VAIO computer to an HDMI equipped TV with an HDMI cable. [Details]
2. Turn on the TV.
3. Double-click
(HDMI Resolution Settings) in the desktop notification area.
The settings window appears.
4. Click the Select Resolution tab to select the desired resolution, and then click
Apply.
After a few seconds, the selected resolution is applied.
5. If the computer image does not fit the displayable region of the TV, click the Adjust
Resolution tab to adjust the display size.
Note
Some resolution options may not be available, depending on the model or the HDMI-
connected device.
The function to adjust the screen resolution may be disabled depending on the selected
resolution.
Related Topic
Connecting a TV with an HDMI Input Port
Selecting Display Modes
© 2011 Sony Corporation
177

Search
VAIO User Guide VPCEG2/VPCEH2/VPCEJ2/VPCEK2/VPCEL2 Series Back | Back to Top
Troubleshooting
How to Use
Parts Description
Setup
Network / Internet
Connections
Settings
Playback
Backup / Recovery
Security
Other Operations
Notifications
Changing the Resolution (Size) of the Screen
Image
You can change the screen resolution to adjust the size of the characters and images on the
computer screen.
Refer to Windows Help and Support for more information.
1. Right-click on the desktop and select Screen resolution.
2. Click the current screen resolution next to Resolution and move the slider to change
the screen resolution.
Note
You may not be able to play high-resolution videos depending on the amount of video
memory on your VAIO computer. In such a case, lower the screen resolution.
Do not change the display resolution while using video/image software or playing DVDs,
as it may cause unsuccessful playback/display or unstable system operations.
Related Topic
Connecting an External Display or Projector
Connecting a TV with an HDMI Input Port
Notes on the LCD screen
© 2011 Sony Corporation
178

Search
VAIO User Guide VPCEG2/VPCEH2/VPCEJ2/VPCEK2/VPCEL2 Series Back | Back to Top
Troubleshooting
How to Use
Parts Description
Setup
Network / Internet
Connections
Settings
Playback
Backup / Recovery
Security
Other Operations
Notifications
Changing the LCD Brightness
You can adjust the LCD brightness.
1. Press the Fn+F5 key or Fn+F6 keys.
To decrease lighting intensity, keep pressing the Fn+F5 keys. To increase lighting
intensity, keep pressing the Fn+F6 keys.
When you press the keys, the brightness indicator is displayed for a few seconds.
Hint
The LCD brightness setting is retained even after your VAIO computer is turned off and
restarted.
Related Topic
Combinations and Functions with the Fn Key
© 2011 Sony Corporation
179
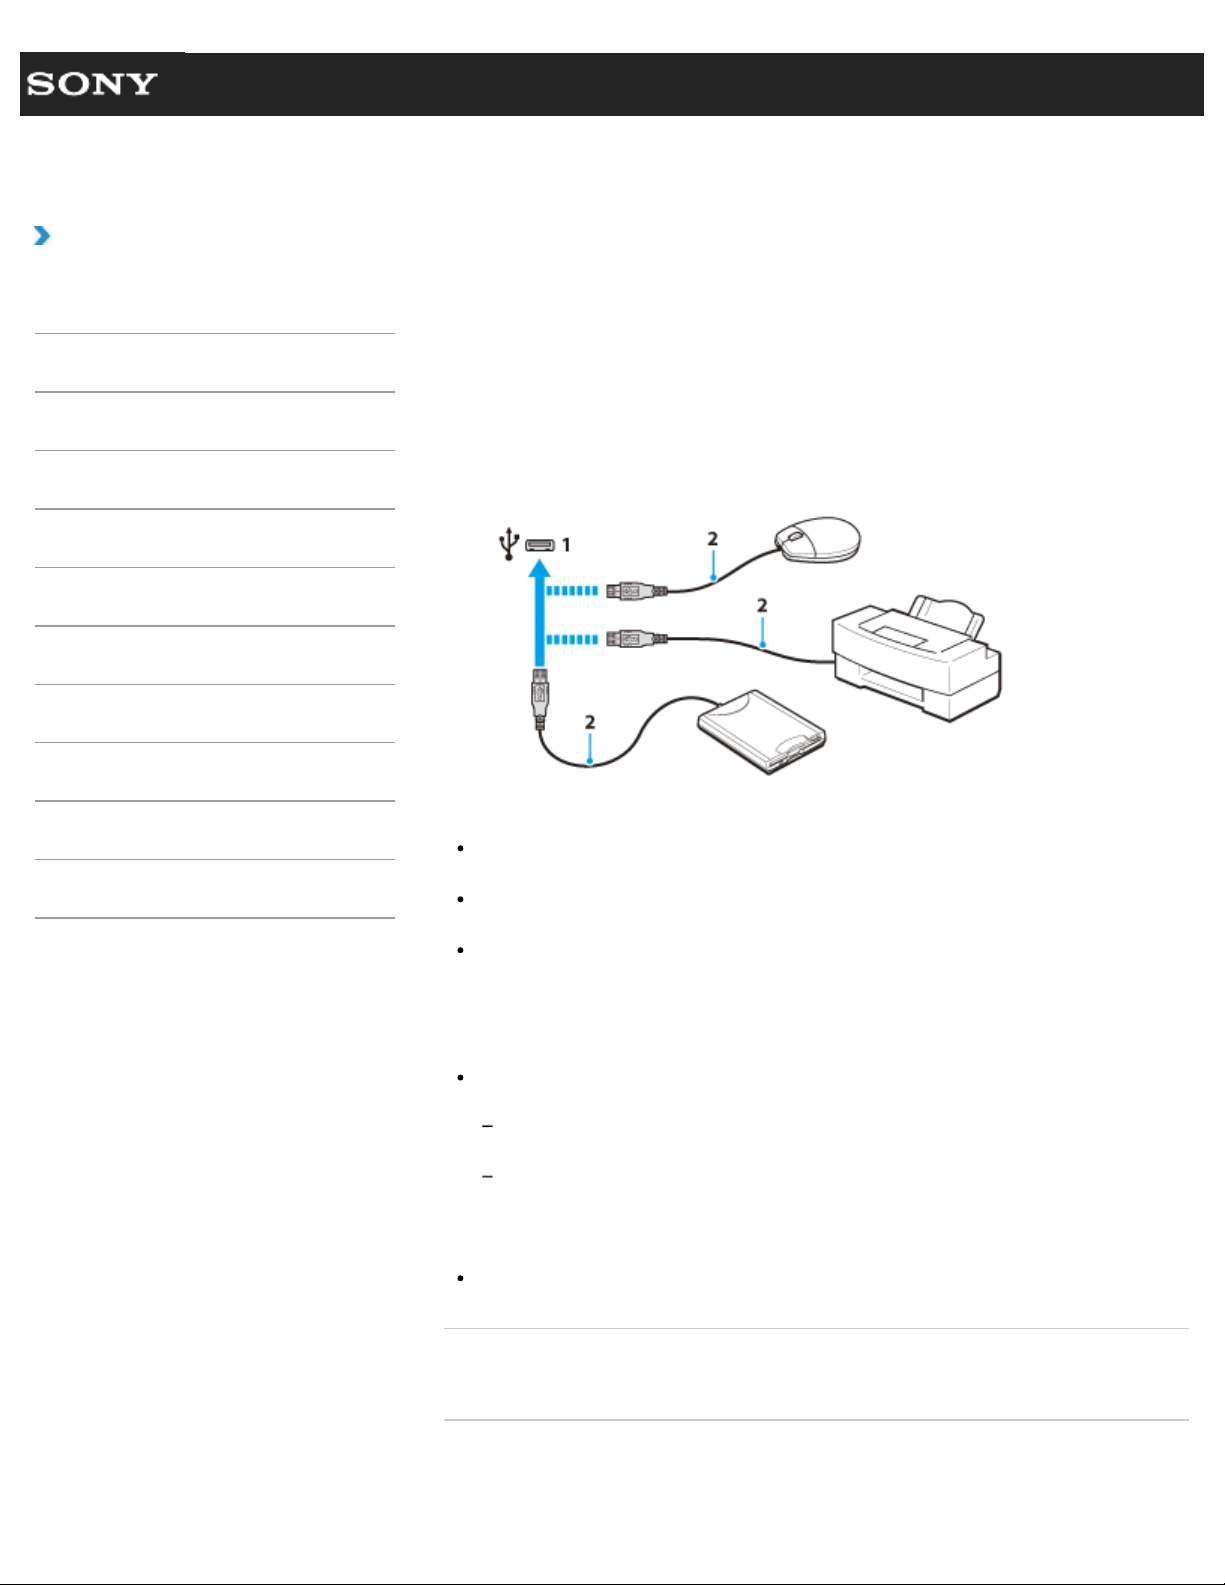
Search
VAIO User Guide VPCEG2/VPCEH2/VPCEJ2/VPCEK2/VPCEL2 Series Back | Back to Top
Troubleshooting
How to Use
Parts Description
Setup
Network / Internet
Connections
Settings
Playback
Backup / Recovery
Security
Other Operations
Notifications
Connecting a USB Device
You can connect a Universal Serial Bus (USB) device such as a mouse, floppy disk drive,
speaker or printer to your VAIO computer. Installation of the device driver software supplied
with the USB device may be required when connecting. Refer to the manual that came with
the device for more information.
1. Choose the USB port (1) you prefer to use.
2. Plug the USB device cable (2) (not supplied) into the USB port.
Note
You may need to install the driver software supplied with your USB device before use.
Refer to the manual that came with the USB device for more information.
In order to print documents, be sure the USB printer is compatible with your version of
Windows.
Before disconnecting USB speakers from your VAIO computer, stop DVD or music
playback or turn off the computer. If you disconnect the USB speakers during playback, it
may cause a malfunction.
For information on how to remove a USB device, refer to the manual that came with the
device.
To protect your VAIO computer and/or USB devices from damage, observe the
following:
When moving your VAIO computer with USB devices connected, avoid exposing the
USB ports to shock or impact.
Do not put your VAIO computer in a bag or carrying case with USB devices
connected.
Hint
The USB ports on your VAIO computer are compliant with the USB 2.0 standard.
Related Topic
Connecting an External DVD Drive
© 2011 Sony Corporation
180
Search
VAIO User Guide VPCEG2/VPCEH2/VPCEJ2/VPCEK2/VPCEL2 Series Back | Back to Top
Troubleshooting
How to Use
Parts Description
Setup
Network / Internet
Connections
Settings
Playback
Backup / Recovery
Security
Other Operations
Notifications
About the BLUETOOTH(R) Function <BLUETOOTH
equipped models>
You can establish wireless communications between your VAIO computer and other
BLUETOOTH devices such as another computer, a mobile phone, modem, PDA, digital still
camera, headset or mouse. You can transfer data between these devices without cables at a
range of up to 33 feet / 10 meters in an open area.
One BLUETOOTH device can connect with up to seven devices via wireless network to
exchange data.
When a device requires connection to another device, it sends out an inquiry to neighboring
BLUETOOTH devices. If any device responds to the inquiry, the two devices can connect
with each other.
Related Topic
Communicating with Another BLUETOOTH(R) Device such as a Mouse <BLUETOOTH
equipped models>
Stopping BLUETOOTH(R) Communications <BLUETOOTH equipped models>
Notes on Using the BLUETOOTH(R) Function <BLUETOOTH equipped models>
About BLUETOOTH(R) Security <BLUETOOTH equipped models>
© 2011 Sony Corporation
181
Search
VAIO User Guide VPCEG2/VPCEH2/VPCEJ2/VPCEK2/VPCEL2 Series Back | Back to Top
Troubleshooting
How to Use
Parts Description
Setup
Network / Internet
Connections
Settings
Playback
Backup / Recovery
Security
Other Operations
Notifications
Communicating with Another BLUETOOTH(R)
Device such as a Mouse <BLUETOOTH equipped
models>
You can connect BLUETOOTH devices to your VAIO computer.
For details on BLUETOOTH communication, see About the BLUETOOTH Function
(BLUETOOTH equipped models). [Details]
1. Set the WIRELESS switch [Details] to ON.
2. Click (Start), All Programs, and VAIO Smart Network or click (the
VAIO Smart Network icon) in the desktop notification area.
3. Make sure that the switch next to BLUETOOTH is toggled to On in the VAIO
Smart Network window.
If it is set to Off, click it to toggle to On.
Hint
If your VAIO computer supports the BLUETOOTH Core Specification Version 3.0 +
HS and you intend to use it, toggle the switch next to Wireless LAN or Wi-Fi to
On, too.
Make sure that the WIRELESS indicator light on your VAIO computer is on.
4. Click
(Start) and Devices and Printers.
5. When connecting a BLUETOOTH mouse, turn it on and press the button to connect
the mouse.
Hint
Refer to the manual that came with your BLUETOOTH device for the procedure to
have the device ready for connection.
6. Click Add a device.
Your VAIO computer searches for devices and displays a device list. Follow the on-
screen instructions to register your device.
Note
Depending on the BLUETOOTH device, it may take some time for your VAIO computer
to find the device. If your device does not appear in the list, repeat the procedure to
have the device ready for connection (for example, pressing the button for connection).
Depending on the BLUETOOTH device, the procedure to establish connection may
vary. Refer to the manual that came with the device for the procedure.
Hint
To connect a BLUETOOTH mouse, select it from the device list and click the Next
button. If the Select a paring option window appears, select Pair without using
a code and click the Next button. Click Close with the mouse you selected to close
the window.
For details on the operations, click (Start) and Help and Support to open
Windows Help and Support, and then enter “BLUETOOTH” in the search box.
A window appears for passkey input if a BLUETOOTH device is requesting
authentication to establish connection. Follow the on-screen instructions to share the
passkey between the BLUETOOTH device and your VAIO computer. If you do not wish
to connect, click the Cancel button in the window.
182

A passkey is a secret number that is entered by a user to use for the authentication
process to allow two BLUETOOTH devices to communicate with each other. Enter the
same alphanumeric string (case-sensitive) for both devices to allow them to
communicate with each other. You can change the passkey every time you perform
authentication, providing you enter the same passkey for both devices during the
authentication process. For details on the passkey of a BLUETOOTH device, refer to the
manual that came with the device. If no BLUETOOTH passkey is entered for a certain
time, the connection process will be terminated for security. In this case, try again.
Related Topic
About the BLUETOOTH(R) Function <BLUETOOTH equipped models>
Stopping BLUETOOTH(R) Communications <BLUETOOTH equipped models>
Notes on Using the BLUETOOTH(R) Function <BLUETOOTH equipped models>
About BLUETOOTH(R) Security <BLUETOOTH equipped models>
© 2011 Sony Corporation
183

Search
VAIO User Guide VPCEG2/VPCEH2/VPCEJ2/VPCEK2/VPCEL2 Series Back | Back to Top
Troubleshooting
How to Use
Parts Description
Setup
Network / Internet
Connections
Settings
Playback
Backup / Recovery
Security
Other Operations
Notifications
Stopping BLUETOOTH(R) Communications
<BLUETOOTH equipped models>
Stop BLUETOOTH communications using VAIO Smart Network.
1. Turn off the BLUETOOTH device that is communicating with your VAIO computer.
2. In the VAIO Smart Network window, click the switch next to BLUETOOTH to
toggle it to Off.
Hint
When another wireless communication function is turned on in the VAIO Smart
Network window, the WIRELESS indicator light on your VAIO computer stays on.
Related Topic
About the BLUETOOTH(R) Function <BLUETOOTH equipped models>
Communicating with Another BLUETOOTH(R) Device such as a Mouse <BLUETOOTH
equipped models>
Notes on Using the BLUETOOTH(R) Function <BLUETOOTH equipped models>
© 2011 Sony Corporation
184
Search
VAIO User Guide VPCEG2/VPCEH2/VPCEJ2/VPCEK2/VPCEL2 Series Back | Back to Top
Troubleshooting
How to Use
Parts Description
Setup
Network / Internet
Connections
Settings
Playback
Backup / Recovery
Security
Other Operations
Notifications
Notes on Using the BLUETOOTH(R) Function
<BLUETOOTH equipped models>
Before using the BLUETOOTH function, read the following precautions for correct use.
In some countries or regions, using the BLUETOOTH function may be restricted by the
local regulations.
The BLUETOOTH function may not work with some devices, depending on the
manufacturer or the software version employed by the manufacturer. Check the system
requirements of the BLUETOOTH device before purchasing.
For information on BLUETOOTH devices, visit the VAIO Support website.
Some BLUETOOTH devices require authentication (pairing) before establishing
connection with another device. Perform the authentication process before connecting to
such devices.
BLUETOOTH devices work on the 2.4 GHz band, which is used by a variety of devices.
BLUETOOTH devices use the technology to minimize radio interference from other
devices that use the same band; however, radio interference may still cause slower
communication speeds, reduce communication range or cause communication failure.
Communication speed and range may vary depending on the following conditions:
Distance between communication devices
Existence of obstacles between devices
Ambient environment that includes existence of walls and materials of such walls
Device configuration
Software in use
Radio conditions
Communications may be cut off depending on radio conditions.
When your VAIO computer is equipped with BLUETOOTH Core Specification Version
2.1 + EDR, if both the BLUETOOTH function and the 2.4 GHz wireless LAN function are
enabled, interference may occur which causes slower communication speeds or other
problems.
High-speed communications between your VAIO computer and BLUETOOTH devices
are available when they are compliant with BLUETOOTH Core Specification Version 3.0
+ HS. For high-speed communications, enable both the wireless LAN and BLUETOOTH
functions on the computer.
Large files may occasionally be corrupted during continuous transfer due to limitations of
the BLUETOOTH standard and electromagnetic interference in the environment.
Connecting multiple BLUETOOTH devices to your VAIO computer may cause channel
congestion, resulting in poor device performance. This is normal with BLUETOOTH
technology and does not indicate a malfunction.
Video and audio may not be synchronized if you play videos on your VAIO computer
with audio output from a connected BLUETOOTH device. This is a frequent occurrence
with BLUETOOTH technology and does not indicate a malfunction.
All BLUETOOTH devices must be certified through the procedure stipulated by
Bluetooth SIG to ensure that they comply with BLUETOOTH specification.
Even if the BLUETOOTH specification is met, individual device performance,
specifications, and operation procedures can vary. Data exchange may not be possible
in all situations.
Not all BLUETOOTH devices are guaranteed of compatibility with your VAIO computer.
To stop the BLUETOOTH function abruptly, set the WIRELESS switch to OFF.
185

Related Topic
About the BLUETOOTH(R) Function <BLUETOOTH equipped models>
Communicating with Another BLUETOOTH(R) Device such as a Mouse <BLUETOOTH
equipped models>
Stopping BLUETOOTH(R) Communications <BLUETOOTH equipped models>
About BLUETOOTH(R) Security <BLUETOOTH equipped models>
Notes on Using the Wireless LAN Function
© 2011 Sony Corporation
186
Search
VAIO User Guide VPCEG2/VPCEH2/VPCEJ2/VPCEK2/VPCEL2 Series Back | Back to Top
Troubleshooting
How to Use
Parts Description
Setup
Network / Internet
Connections
Settings
Playback
Backup / Recovery
Security
Other Operations
Notifications
About BLUETOOTH(R) Security <BLUETOOTH
equipped models>
The BLUETOOTH wireless technology has an authentication function, which allows you to
control communication with other devices.
The authentication function helps you prevent unwanted anonymous BLUETOOTH devices
from accessing your VAIO computer. The first time two BLUETOOTH devices communicate,
a common passkey (a password required for authentication) should be identified to register
both devices. Once a device is registered, there is no need to re-enter the passkey.
Your VAIO computer can prevent unauthorized BLUETOOTH devices from finding it and
control which devices are allowed to connect with it.
For details, click
(Start) and Help and Support to open Windows Help and
Support, and then enter “BLUETOOTH” in the search box.
Related Topic
About the BLUETOOTH(R) Function <BLUETOOTH equipped models>
Communicating with Another BLUETOOTH(R) Device such as a Mouse <BLUETOOTH
equipped models>
Stopping BLUETOOTH(R) Communications <BLUETOOTH equipped models>
Notes on Using the BLUETOOTH(R) Function <BLUETOOTH equipped models>
Notes on Using the Wireless LAN Function
© 2011 Sony Corporation
187
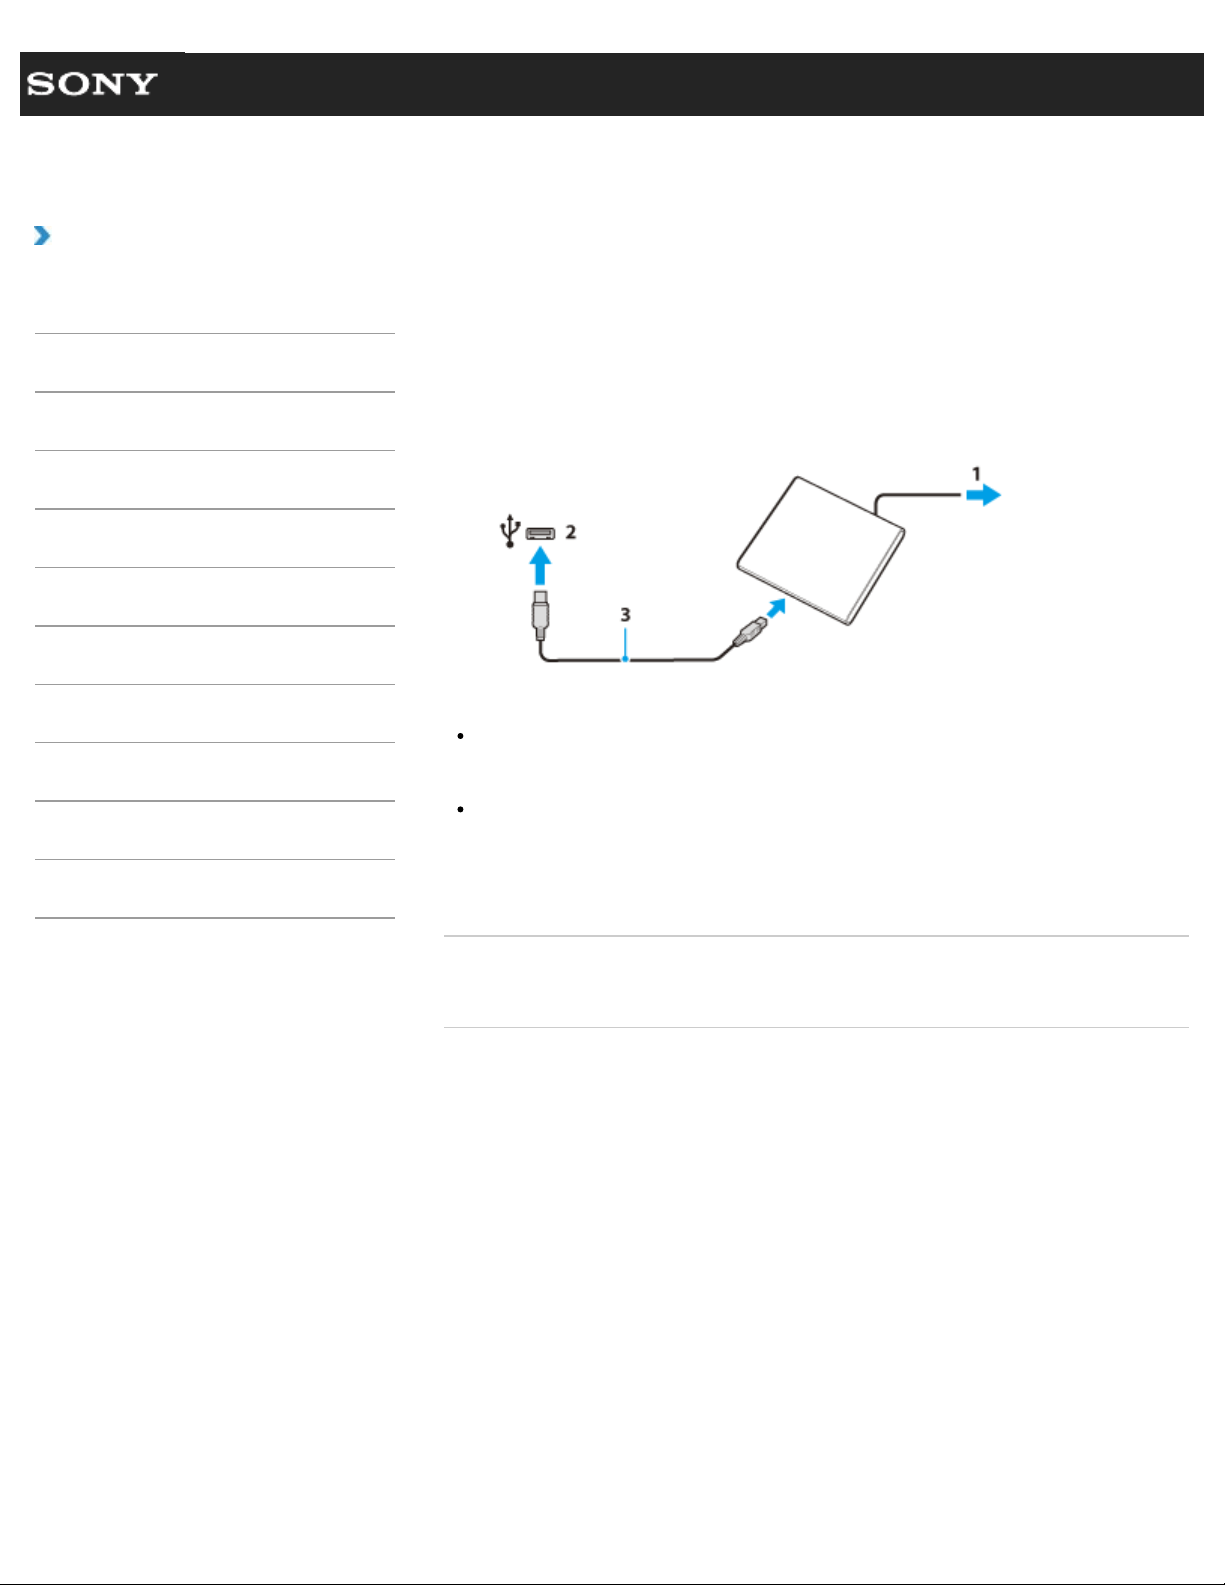
Search
VAIO User Guide VPCEG2/VPCEH2/VPCEJ2/VPCEK2/VPCEL2 Series Back | Back to Top
Troubleshooting
How to Use
Parts Description
Setup
Network / Internet
Connections
Settings
Playback
Backup / Recovery
Security
Other Operations
Notifications
Connecting an External DVD Drive
Connect an external DVD drive or hard disk drive to a USB port on your VAIO computer.
1. Plug the power cord of your external drive into an AC outlet (1).
2. Plug one end of a USB cable (3) (not supplied) into the USB port (2), and the other
end to the external drive. [Details]
Note
Be sure to connect an external drive to a power source with an AC adapter (if supplied).
Hint
You may need to install a software driver depending on the external drive you use.
In addition, procedures to connect and use an external drive vary depending on the
drive you use. Refer to the manual that came with your external drive for more
information.
Related Topic
Connecting a USB Device
© 2011 Sony Corporation
188

Search
VAIO User Guide VPCEG2/VPCEH2/VPCEJ2/VPCEK2/VPCEL2 Series Back | Back to Top
Troubleshooting
How to Use
Parts Description
Setup
Network / Internet
Connections
Settings
Playback
Backup / Recovery
Security
Other Operations
Notifications
Playing Blu-ray 3D(TM) Disc Media on a 3D TV
<Intel Graphics or NVIDIA video controller
equipped models>
<Blu-ray Disc(TM) Drive equipped models>
If your VAIO computer is equipped with the Blu-ray Disc Drive and the 3D graphics
controller*, you can play Blu-ray 3D Disc media and view 3D images on a 3D-capable
display, such as a 3D TV, by connecting the display to the computer.
Refer to the manual that came with your 3D TV for information on the 3D TV settings and
operations.
* Intel HD Graphics does not support 3D output for Blu-ray 3D Disc media.
1. Connect your 3D TV to your VAIO computer with an HDMI cable (not supplied) and
configure the 3D TV settings. [Details]
2. Press the Fn+F7 keys several times to switch the display output to an external
display. [Details]
3. Set the HDMI output resolution settings on your VAIO computer to 1920x1080 or
1280x720.
4. Start the Blu-ray Disc playback software.
5. Insert Blu-ray 3D Disc media into the optical disc drive. [Details]
Note
Be sure to follow the instructions in the manuals that came with your VAIO computer
when viewing 3D images.
Be sure to use the 3D glasses specified by the TV manufacturer while viewing 3D
images.
Refer to the manual that came with your 3D TV for detailed information on the 3D
function.
Related Topic
Connecting a TV with an HDMI Input Port
Changing the Resolution (Size) of the Screen Image on an HDMI-Connected Device
Selecting Display Modes
© 2011 Sony Corporation
189
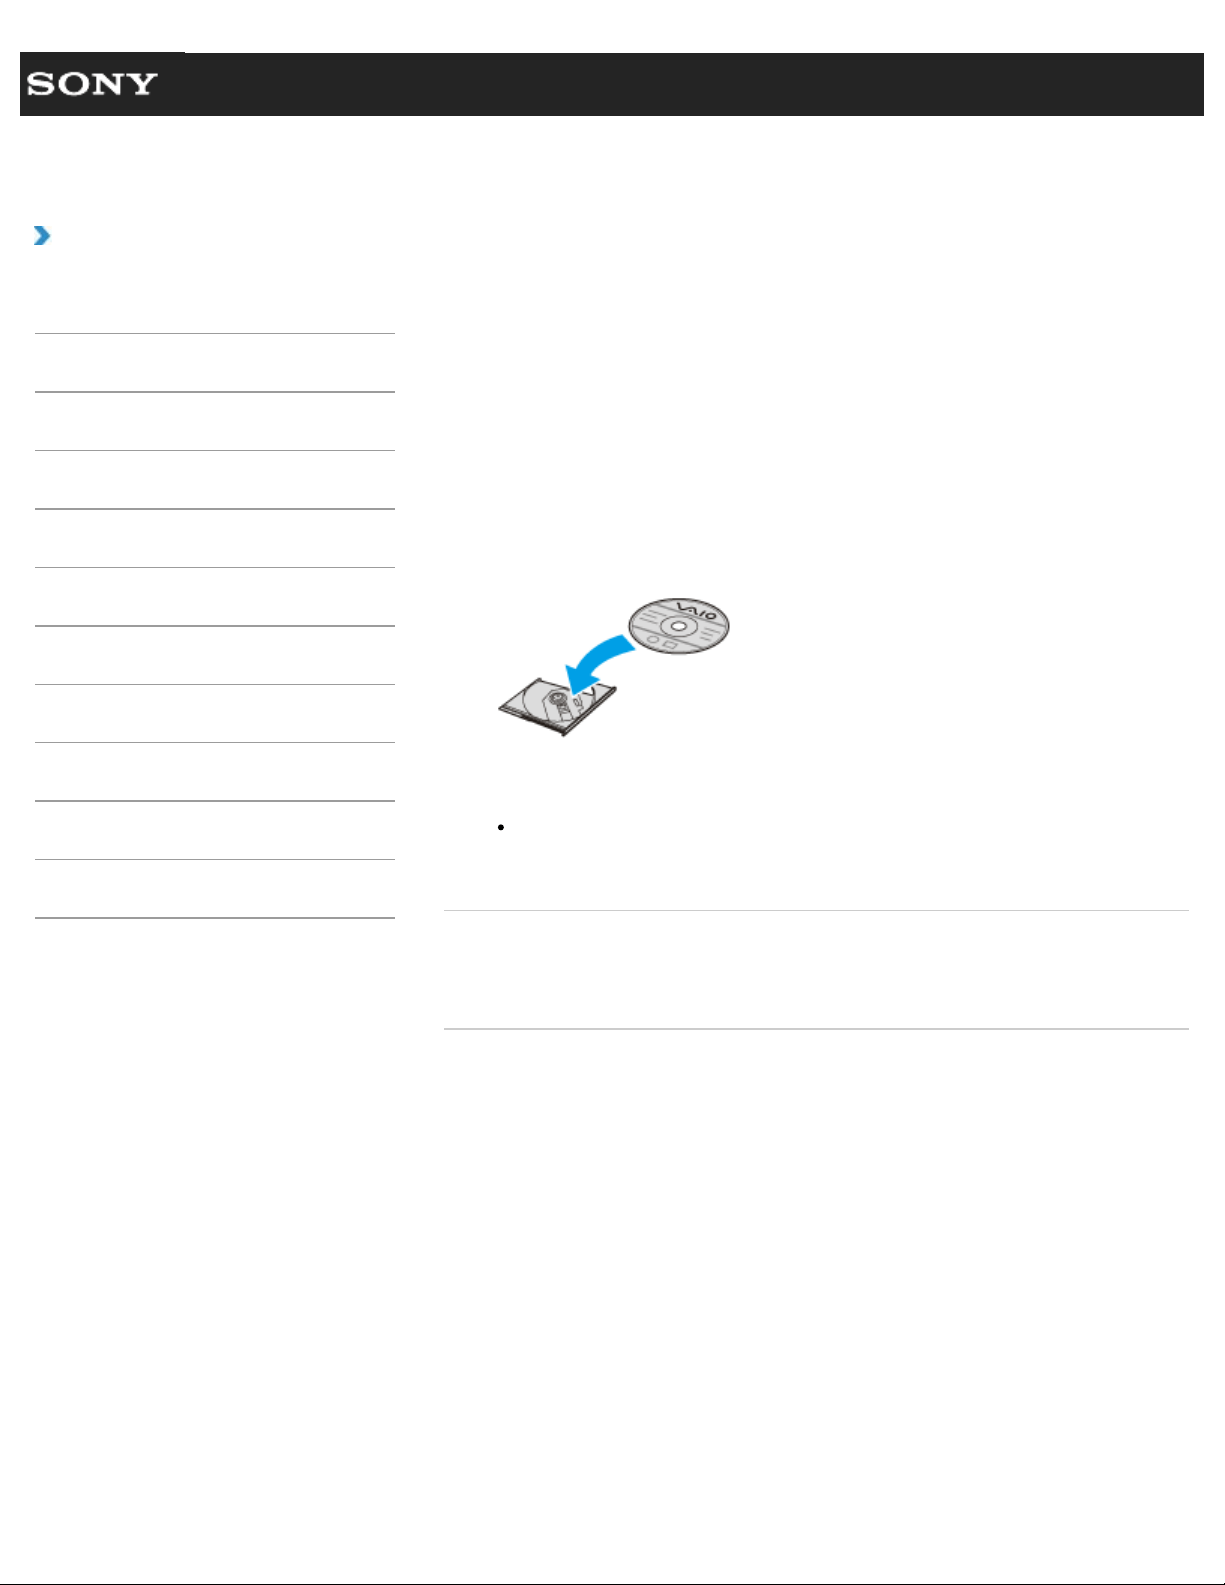
Search
VAIO User Guide VPCEG2/VPCEH2/VPCEJ2/VPCEK2/VPCEL2 Series Back | Back to Top
Troubleshooting
How to Use
Parts Description
Setup
Network / Internet
Connections
Settings
Playback
Backup / Recovery
Security
Other Operations
Notifications
Inserting/Removing a Disc
<Optical disc drive equipped models>
Insert/remove a disc to/from your VAIO computer that is turned on.
1. Press the drive eject button.
The drive tray slides out.
2. Insert/remove a disc to/from your VAIO computer.
When you insert a disc:
Hold the bottom of the drive tray with one hand, place a disc in the middle of the drive
tray, and gently push it down until the disc clicks into place. If the disc is not properly
placed when you close the drive tray, it may become unable to open.
Place the disc with the label side facing upward.
Note
Do not exert pressure on the drive tray when inserting a disc.
3. Close the drive tray by pushing it in gently.
Related Topic
Supported Discs<Optical disc drive equipped models>
About Region Codes<Optical disc drive equipped models>
© 2011 Sony Corporation
190
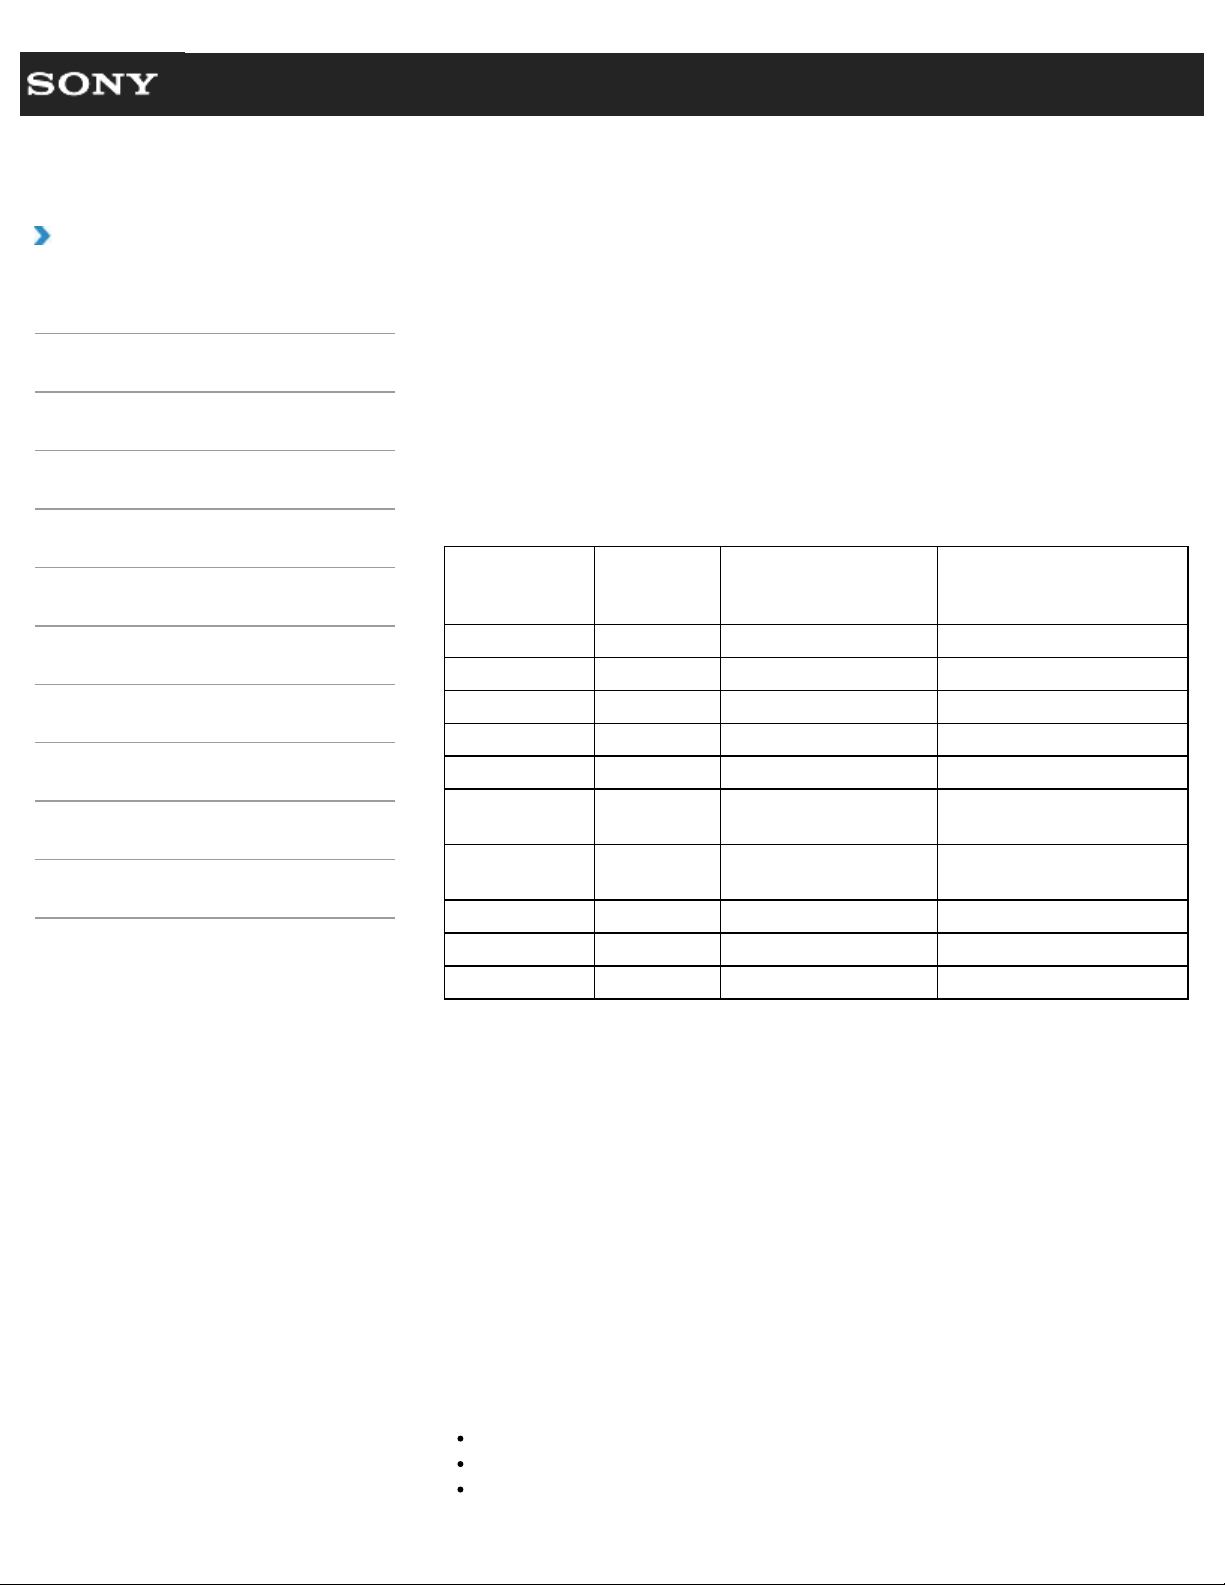
Search
VAIO User Guide VPCEG2/VPCEH2/VPCEJ2/VPCEK2/VPCEL2 Series Back | Back to Top
Troubleshooting
How to Use
Parts Description
Setup
Network / Internet
Connections
Settings
Playback
Backup / Recovery
Security
Other Operations
Notifications
Supported Discs
<Optical disc drive equipped models>
The following table lists media types that are playable/recordable on your VAIO computer.
The optical disc drive varies depending on the model you purchased. Find your optical disc
drive from the table.
PR: Playable and recordable
P: Playable but not recordable
-: Not playable or recordable
DVD
SuperMulti
Drive
Blu-ray Disc Drive with
DVD SuperMulti
Blu-ray Disc ROM Drive with
DVD SuperMulti
CD-ROM P P P
CD-R/RW PR *5 PR *5 PR *5
DVD-ROM P P P
DVD-R/RW PR PR PR
DVD+R/RW PR PR PR
DVD+R DL
(Double Layer)
PR PR PR
DVD-R DL (Dual
Layer)
PR PR PR
DVD-RAM *1*2 PR PR PR
BD-ROM - P P
BD-R/RE *3*6 - PR *4 P
*1 The optical disc drive does not support the DVD-RAM cartridge. Use non-cartridge discs
or discs with a removable cartridge.
*2 Writing data to single-sided DVD-RAM media (2.6 GB) compliant with DVD-RAM Version
1.0 is not supported.
DVD-RAM Version 2.2/12X-SPEED DVD-RAM Revision 5.0 media are not supported.
*3 BD-RE Disc media in Version 1.0 format and Blu-ray Disc media with a cartridge are not
supported.
*4 Writing data to BD-R Part1 Version 1.1/1.2/1.3 media (single-layer media with the
capacity of 25 GB, dual-layer media with the capacity of 50 GB) and BD-RE Part1 Version
2.1 media (single-layer media with the capacity of 25 GB, dual-layer media with the
capacity of 50 GB) is supported.
*5 Writing data to Ultra Speed CD-RW media is not supported.
*6 BDXL(TM) media are not supported.
Note
Your optical disc drive may not support writing or playback of some types of media
Your optical disc drive does not support 8 cm disc writing.
Your optical disc drive supports only circular discs. Do not use discs in any other shape
191

(star, heart, card, etc.) or damaged discs, as it may cause your VAIO computer to
malfunction.
DVD-Video format data can be written to DVD+R (single layer or dual layer),
DVD+RW/DVD-R (Single layer or dual layer), and DVD-RW media. DVD-Video
Recording format data can be written to DVD-R (single layer or dual layer), DVD-RW,
and DVD-RAM media. Writable media differ depending on the disc burning software you
use. Refer to the help file included with the software for more information.
It is recommended that you use Sony branded media: DVD+R, DVD+RW, DVD-R, DVD-
RW, CD-R, CD-RW, BD-R, or BD-RE.
You cannot write data to DVD-RW media (6x writing) unless your optical disc drive
supports at least 6x writing for DVD-RW media.
You cannot write data to DVD+RW media (8x writing) unless your optical disc drive
supports at least 8x writing for DVD+RW media.
Your VAIO computer is designed to playback discs that conform to the Compact Disc
(CD) standard. DualDiscs and some music discs encoded with copyright protection
technologies do not conform to the CD standard. Therefore, these discs may not be
compatible with the computer.
When you buy pre-recorded or blank discs for use with your VAIO computer, be sure to
read the notices on the disc package carefully to check both playback and recording
compatibility with your computer’s optical disc drives. Sony does NOT guarantee the
compatibility of VAIO optical disc drives with discs that are not compliant with the official
“CD,” “DVD,” or “Blu-ray Disc” standard. USING NON-COMPLIANT DISCS CAN
CAUSE FATAL DAMAGE
TO YOUR VAIO COMPUTER OR CREATE SOFTWARE CONFLICTS AND CAUSE
SYSTEM HANGING.
For inquiries about disc formats, contact the individual publisher of the pre-recorded disc
or the manufacturer of the recordable disc.
Your VAIO computer needs to be connected to the Internet to play DVD-RW, DVD-
RAM, and DVD-R (single layer or dual layer) media that are compliant with the Content
Protection for Recordable Media (CPRM) standard.
To record, edit, or play copyright protected content, Blu-ray Disc media employs the
Advanced Access Content System (AACS) technology. To use Blu-ray Disc media
continually, you need to update the AACS key.
You can update the AACS key through the Internet. Follow a message displayed on
recording, editing, or playback software you are using. Without updating the AACS key,
you may become unable to record, edit, or play copyright protected content.
To record, edit, or play content without copyright protection, you do not need to update
the AACS key. You can update the AACS key for the Blu-ray Disc recording or playback
software installed on your VAIO computer for five years after purchase. After that, we
will inform you about the update on the support website.
Region settings are required for some contents of DVD and BD-ROM Disc media. If the
region setting on the optical disc drive does not match the region coding on the disc,
playback is not possible.
Unless your external display is compliant with the High-bandwidth Digital Content
Protection (HDCP) standard, you cannot play or view the contents of copyright protected
Blu-ray Disc media through digital connections, such as an HDMI connection or a DVI
connection.
Some Blu-ray Disc content may restrict video output to standard definition or prohibit
analog video output.
Related Topic
About Region Codes<Optical disc drive equipped models>
© 2011 Sony Corporation
192

Search
VAIO User Guide VPCEG2/VPCEH2/VPCEJ2/VPCEK2/VPCEL2 Series Back | Back to Top
Troubleshooting
How to Use
Parts Description
Setup
Network / Internet
Connections
Settings
Playback
Backup / Recovery
Security
Other Operations
Notifications
About Region Codes
<Optical disc drive equipped models>
The following table lists DVD region codes indicating playable region of DVD media.
Region code Seller’s country/Region
1 USA, Canada
2 Europe, Middle East, South Africa, Japan
3 Southeast Asia, Taiwan, South Korea, Hong Kong
4 Central America, South America, Mexico, Australia, New Zealand
5 North Africa, Asia, Russia, Ukraine, Belarus, India
6 China
7 Reserved for future use
8
International aircraft, international cruise ship, international conference
hall, etc.
Region code indicators are labeled on the discs or packages to indicate in which region and
on what type of player you can play the disc. If the region code indicates “all,” you can play
this disc in most regions of the world. If the region code for your residence area is different
from the label, you cannot play the disc on your VAIO computer.
Related Topic
Supported Discs<Optical disc drive equipped models>
© 2011 Sony Corporation
193
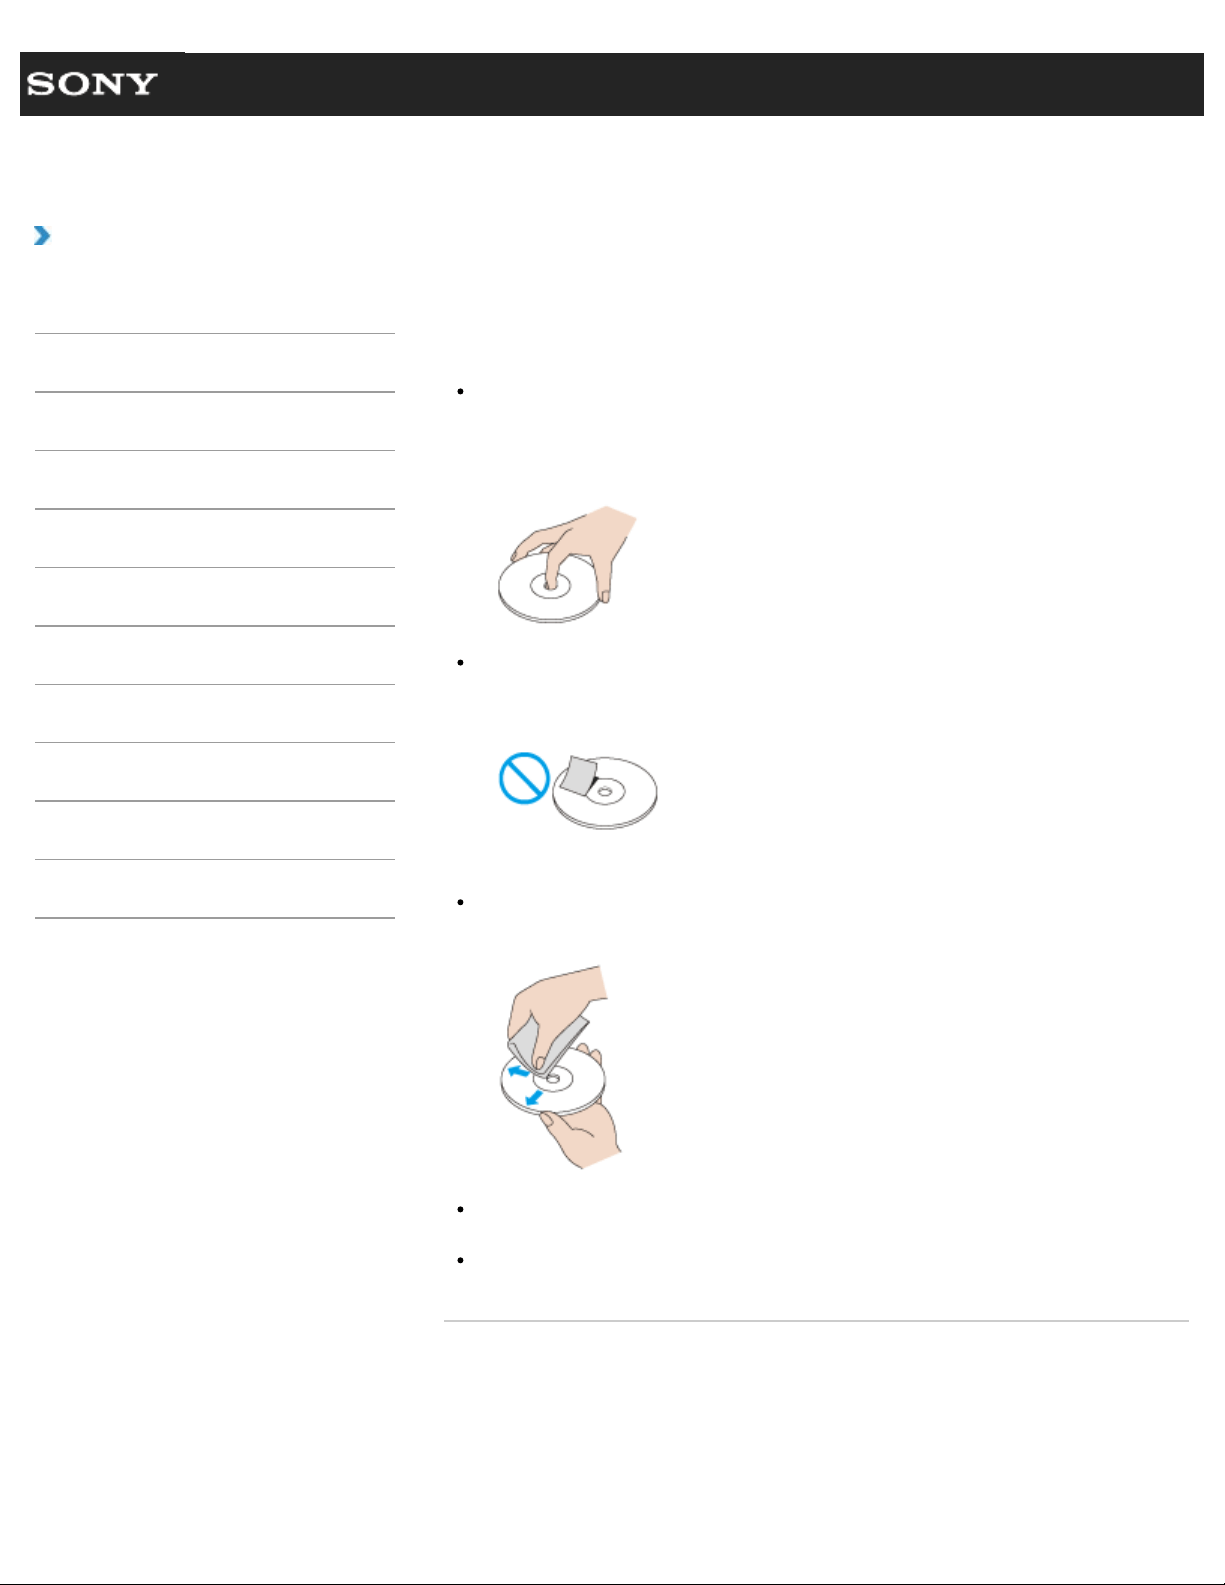
Search
VAIO User Guide VPCEG2/VPCEH2/VPCEJ2/VPCEK2/VPCEL2 Series Back | Back to Top
Troubleshooting
How to Use
Parts Description
Setup
Network / Internet
Connections
Settings
Playback
Backup / Recovery
Security
Other Operations
Notifications
Handling Discs
<Optical disc drive equipped models>
Read the following to protect data stored on discs and take proper care of discs.
Be sure to hold the disc by its edges and central hole without touching the recording
surface (playing surface), as shown below.
Fingerprints and dust on the surface of a disc may cause a read or write error. Be sure
to keep the disc clean.
Sony assumes no liability for any problems and damages to discs arising out of
adhesive labels affixed to discs. Refer to the manual carefully that came with the label
software or label paper, and use the labels under your responsibility.
To take proper care of discs
For normal cleaning, hold the disc by its edges and use a soft cloth to wipe the surface
from the center out, as shown below.
If the disc is badly soiled, moisten a soft cloth with water, wring it out well, and use it to
wipe the surface of the disc. Wipe off any remaining moisture with a dry soft cloth.
Do not use solvents such as benzine, thinner, commercially available cleaners, or anti-
static spray which may cause damage to the disc.
© 2011 Sony Corporation
194
Search
VAIO User Guide VPCEG2/VPCEH2/VPCEJ2/VPCEK2/VPCEL2 Series Back | Back to Top
Troubleshooting
How to Use
Parts Description
Setup
Network / Internet
Connections
Settings
Playback
Backup / Recovery
Security
Other Operations
Notifications
Notes on Using Discs
<Optical disc drive equipped models>
Observe the following notes when using discs on your VAIO computer.
Notes on playing discs
Depending on system environment, you may find sound interruptions and/or dropped
frames during DVD/BD/AVCHD playback. In addition, some discs may not be able to
play on your VAIO computer.
When playing discs:
Close other video related software applications.
Do not switch the display output between the computer screen and an external
display.
Your VAIO computer plays discs with playback software, which causes the CPU load.
Therefore, by closing all running software other than playback software, you can
enjoy more smooth playback.
Notes on playing recorded discs on other players
Some CD players may not be able to play audio CDs created with CD-R or CD-RW
media.
Some DVD players may not be able to play DVDs created with DVD+R DL, DVD-R DL,
DVD+R, DVD+RW, DVD-R, DVD-RW, or DVD-RAM media.
BD-R or BD-RE media created with your VAIO computer are not playable on a Blu-ray
Disc recorder that supports only BD-RE Ver.1.0. (Blu-ray Disc Drive with DVD
SuperMulti equipped models)
Tips for successful writing
Do not plug or unplug cables, such as the AC adapter or the power cord while the optical
disc drive is writing data to a disc.
The writing process may take longer to complete than theoretically predicted because
some software writes and verifies data simultaneously.
Sony assumes no liability for any loss or damage of any kind arising out of writing
failure.
© 2011 Sony Corporation
195
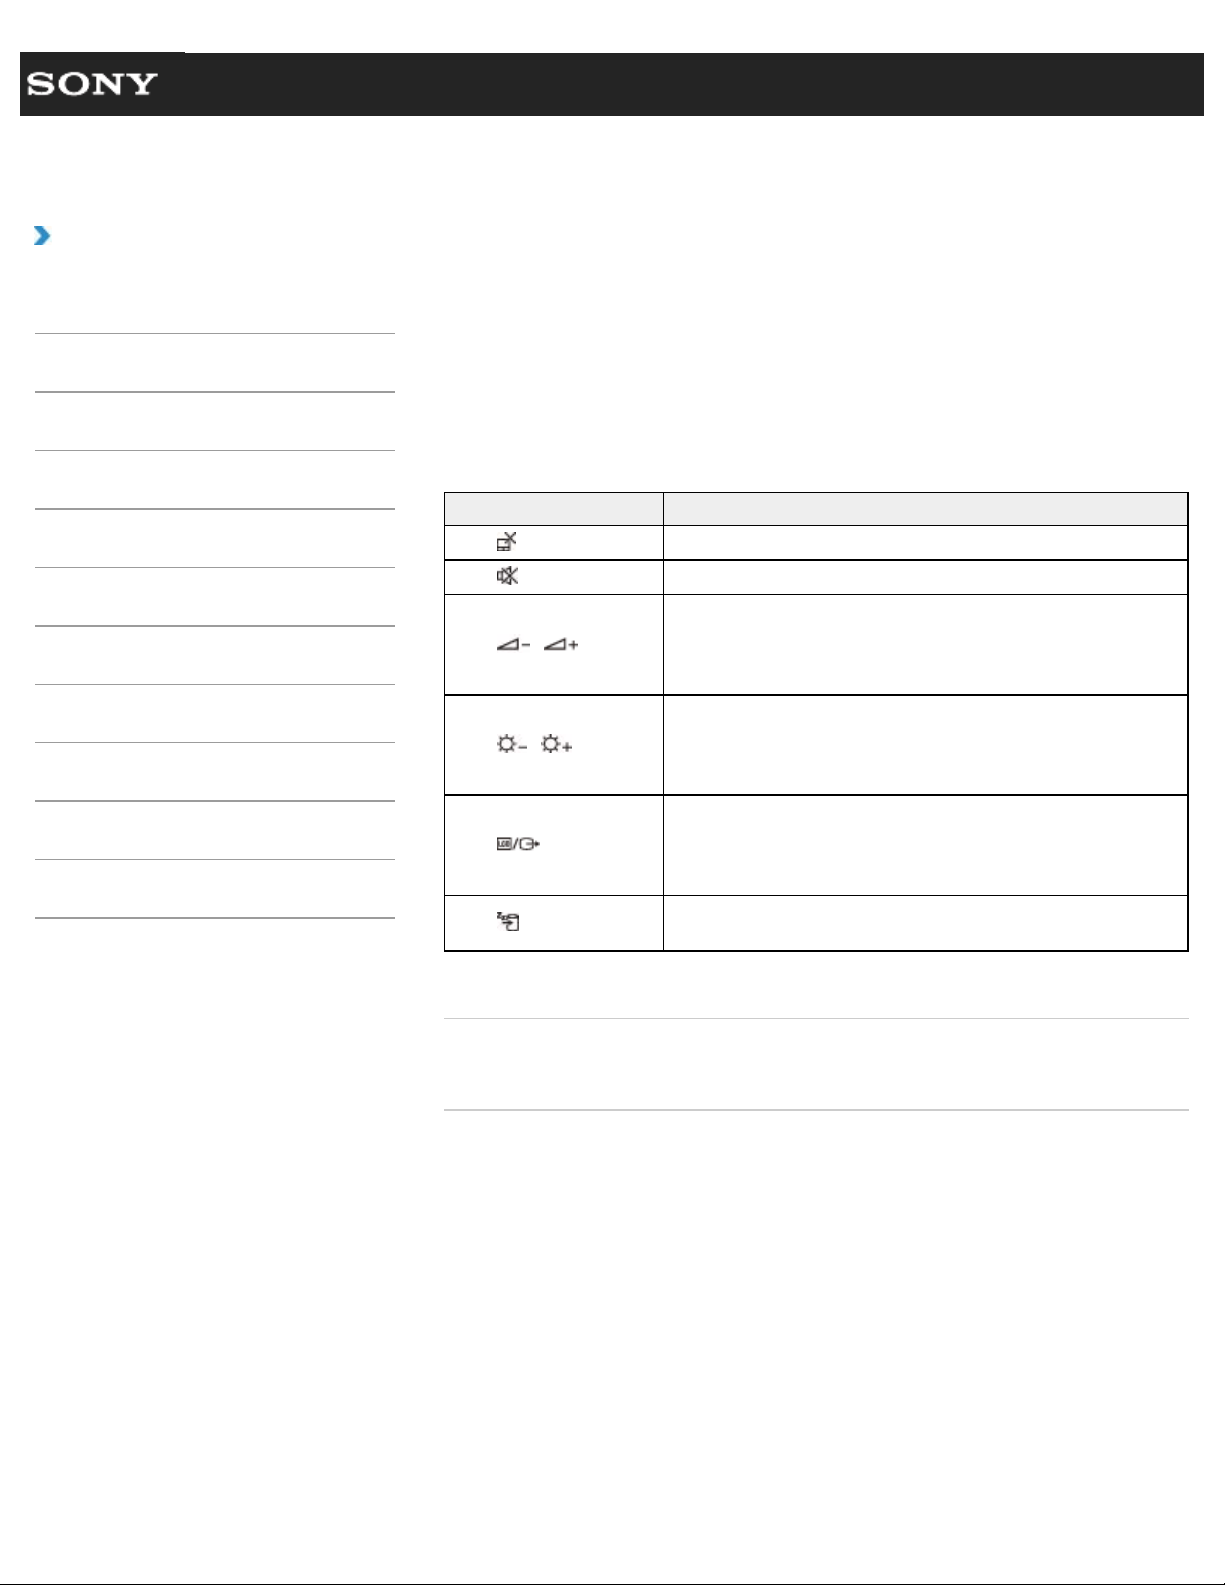
Search
VAIO User Guide VPCEG2/VPCEH2/VPCEJ2/VPCEK2/VPCEL2 Series Back | Back to Top
Troubleshooting
How to Use
Parts Description
Setup
Network / Internet
Connections
Settings
Playback
Backup / Recovery
Security
Other Operations
Notifications
Combinations and Functions with the Fn Key
Press and hold down the Fn key and another key simultaneously to perform a keyboard
shortcut action.
For example, to turn off the sound: Fn+F2 → Press and hold down the Fn key, then press
the F2 key.
Some keyboard functions can only be used while Windows is running.
Combination/Feature Function
Fn +
(F1) Disables and enables the touch pad. [Details]
Fn +
(F2) Turns on and off the built-in speakers or the headphones.
Fn +
/ (F3/F4)
Press the button repeatedly to adjust the volume level of the
built-in speakers and headphones. [Details]
To increase the volume, press the Fn+F4 keys.
To decrease the volume, press the Fn+F3 keys.
Fn +
/ (F5/ F6)
Press the button repeatedly to adjust the LCD brightness of
your computer screen. [Details]
To decrease lighting intensity, press the Fn+F5 keys.
To increase lighting intensity, press the Fn+F6 keys.
Fn +
(F7)
Switches the display output to an external display.
Press the Fn+F7 keys several times to select the desired
display output destination, and then press the Enter key to
confirm. [Details]
Fn +
(F12)
Cuts off power to most of your VAIO computer, including LCD
and CPU (Hibernate mode).
Related Topic
About Power Saving Mode
© 2011 Sony Corporation
196
Search
VAIO User Guide VPCEG2/VPCEH2/VPCEJ2/VPCEK2/VPCEL2 Series Back | Back to Top
Troubleshooting
How to Use
Parts Description
Setup
Network / Internet
Connections
Settings
Playback
Backup / Recovery
Security
Other Operations
Notifications
Setting/Changing the Power-on Password
You can set a password (power-on password) for booting up your VAIO computer, using the
BIOS function. Entry of the power-on password will be prompted after the VAIO logo appears
to start the computer.
There are two types of passwords. Set the machine password first.
Machine password (for administrators):
Allows users with administrative rights to change all the setup options in the BIOS setup
screen, as well as to start your VAIO computer.
User password (for users without administrative rights):
Allows standard users to change some of the BIOS setup options, as well as to start
your VAIO computer. To set the user password, you must first set the machine
password.
1. Turn on your VAIO computer and press the F2 key repeatedly until the VAIO logo
disappears.
Enter a password if it has already been set. If you intend to change the current
password, enter the password which you want to change. (For example, enter your
machine password to change a machine password.)
The BIOS setup screen appears. If the screen does not appear, restart the computer
and try again.
2. Press the
or key to select the Security tab, select Set Machine Password
or Set User Password, and then press the Enter key.
The password entry screen appears.
3. Enter the password and press the Enter key.
To change the password, enter the current password and a new password. The
password can be set up to 32 alphanumeric characters long (including spaces) and it
is case-sensitive.
4. Press the
or key to select Password when Power On, press the Enter key,
and select Enabled.
5. Press the
or key to select the Exit tab, select Exit Setup, and then press the
Enter key.
6. At the confirmation prompt, press the Enter key.
Note
Be sure to write down the password to avoid forgetting it.
If you forget the password, you cannot boot up your VAIO computer.
You can reset the user password at the BIOS setup screen by entering the machine
password.
If you forget the machine password, the password must be reset by authorized Sony
service/support center. (The reset fee will be charged.)
Related Topic
Removing the Power-on Password
Creating/Changing/Removing Your Windows Password
What should I do if I forget the power-on password to start my VAIO computer?
197

© 2011 Sony Corporation
198

Search
VAIO User Guide VPCEG2/VPCEH2/VPCEJ2/VPCEK2/VPCEL2 Series Back | Back to Top
Troubleshooting
How to Use
Parts Description
Setup
Network / Internet
Connections
Settings
Playback
Backup / Recovery
Security
Other Operations
Notifications
Removing the Power-on Password
If power-on password input for booting up your VAIO computer is no longer necessary,
follow these steps to remove the machine password and user password.
1. Turn on your VAIO computer and press the F2 key repeatedly until the VAIO logo
disappears.
Enter a password if it has already been set.
The BIOS setup screen appears. If the screen does not appear, restart the computer
and try again.
2. Press the
or key to select the Security tab, select Set Machine Password
or Set User Password, and then press the Enter key.
The password entry screen appears.
3. Leave the Enter New Password and Confirm New Password fields blank and
press the Enter key.
4. Press the
or key to select the Exit tab, select Exit Setup, and then press the
Enter key.
At the confirmation prompt, press the Enter key.
Related Topic
Setting/Changing the Power-on Password
What should I do if I forget the power-on password to start my VAIO computer?
© 2011 Sony Corporation
199
Search
VAIO User Guide VPCEG2/VPCEH2/VPCEJ2/VPCEK2/VPCEL2 Series Back | Back to Top
Troubleshooting
How to Use
Parts Description
Setup
Network / Internet
Connections
Settings
Playback
Backup / Recovery
Security
Other Operations
Notifications
Creating/Changing/Removing Your Windows
Password
Setting the Windows password allows you to protect your VAIO computer from unauthorized
access by making the user enter the password when the computer is turned on or returns
from power saving mode to Normal mode.
Refer to Windows Help and Support for more information on the Windows password.
1. Click
(Start) and Control Panel.
2. Click User Accounts and Family Safety or User Accounts.
3. Click User Accounts.
4. Click Create a password for your account, Change your password or
Remove your password.
5. Follow the on-screen instructions to enter your password, and then press the Enter
key.
Note
Do not forget your password. Write down the password and keep it in a secure place.
Hint
You can enter a hint, in order to recall your password should you forget it. You can also
create a password reset disk that can be used to create a new password. Refer to
Windows Help and Support for more information on the Windows password.
Related Topic
Setting/Changing the Power-on Password
© 2011 Sony Corporation
200

Search
VAIO User Guide VPCEG2/VPCEH2/VPCEJ2/VPCEK2/VPCEL2 Series Back | Back to Top
Troubleshooting
How to Use
Parts Description
Setup
Network / Internet
Connections
Settings
Playback
Backup / Recovery
Security
Other Operations
Notifications
Solving Common Problems with Your VAIO
Computer
If you have any problem operating your VAIO computer, try these suggestions before
contacting an authorized Sony service/support center or your local Sony dealer directly.
1. See other sections in this on-screen manual.
2. Start VAIO Care and perform necessary operations.
3. Visit the VAIO online support website and find necessary information.
Related Topic
Keeping Your VAIO Computer in Optimum Condition (VAIO Care)
Read This First
About Online Support Website
© 2011 Sony Corporation
201
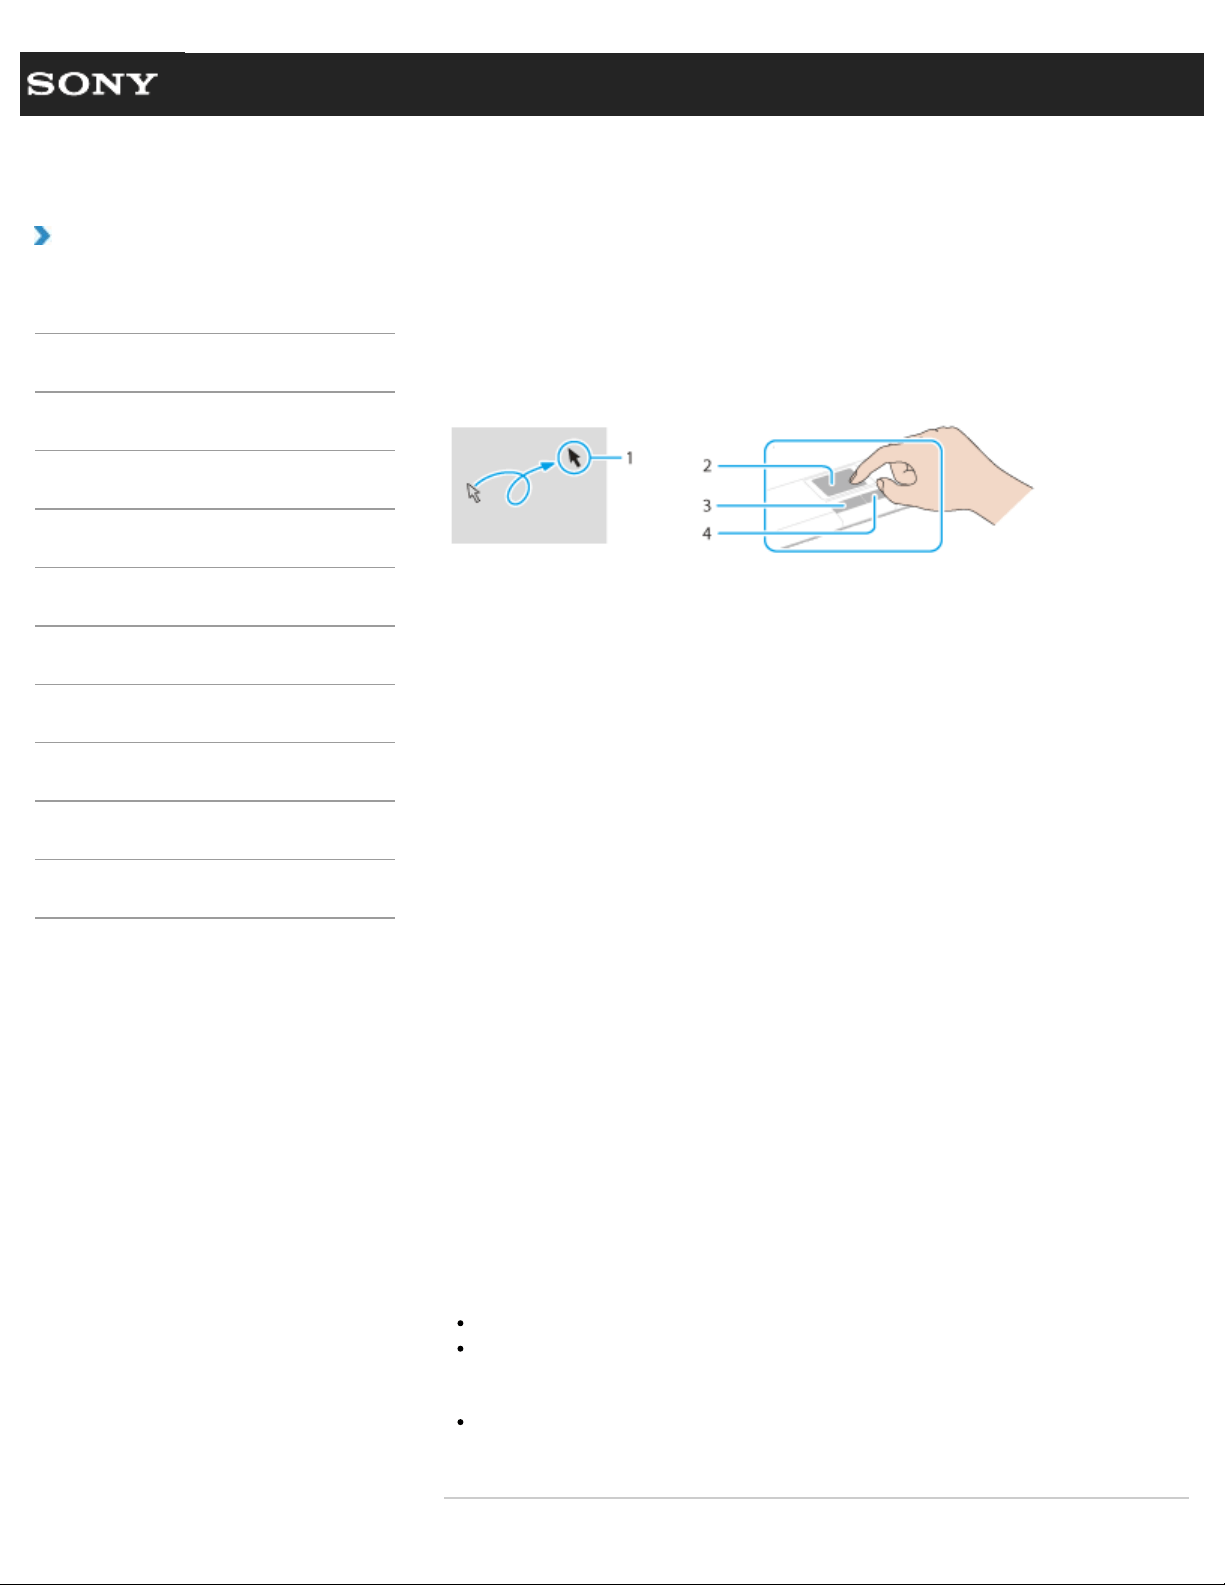
Search
VAIO User Guide VPCEG2/VPCEH2/VPCEJ2/VPCEK2/VPCEL2 Series Back | Back to Top
Troubleshooting
How to Use
Parts Description
Setup
Network / Internet
Connections
Settings
Playback
Backup / Recovery
Security
Other Operations
Notifications
Using the Touch Pad
By sliding your finger on the touch pad, you can move the pointer on the computer screen.
With the pointer on your desired item or object, press the left button or the right button to
execute various commands or display menus.
To click
With the pointer (1) on your desired item or object, press the left button (3) once.
Alternatively, tap on the touch pad (2) once.
To double-click
With the pointer on your desired item or object, press the left button twice in a row.
Alternatively, tap on the touch pad twice quickly.
To right-click
With the pointer on your desired item or object, press the right button (4) once.
Depending on the location of the pointer, you can display various shortcut menus.
To drag
With the pointer on your desired object, press the left button once, and while holding down
the button, slide your finger on the touch pad.
Alternatively, tap on the touch pad twice quickly, and on the second tap, slide your finger.
To drag and drop
Drag an icon, such as a file, to a folder, a window, or a software icon to your desired location
and release the left button.
Alternatively, tap the icon twice quickly, and on the second tap, slide your finger to your
desired location and lift the finger off the touch pad.
To scroll
Slide your finger along the right edge up and down to scroll vertically in the active window.
Slide your finger along the bottom edge from side to side to scroll horizontally in the active
window.
Note
The scroll function may not work depending on the software you are using.
The scroll function may be disabled by default.
Hint
Refer to the help file of the touch pad for detailed information on how to use the touch
pad.
202


Search
VAIO User Guide VPCEG2/VPCEH2/VPCEJ2/VPCEK2/VPCEL2 Series Back | Back to Top
Troubleshooting
How to Use
Parts Description
Setup
Network / Internet
Connections
Settings
Playback
Backup / Recovery
Security
Other Operations
Notifications
Enabling/Disabling the Touch Pad
You can enable/disable the touch pad on your VAIO computer.
1. Press and hold down the Fn key and press the F1 key.
Each time you press the keys, the touch pad is enabled/disabled.
Hint
Be sure to connect a mouse before disabling the touch pad. If you disable the touch pad
before connecting a mouse, you will be able to use only the keyboard for pointing
operations.
Related Topic
Using the Touch Pad
Disabling the Tapping Function on the Touch Pad
© 2011 Sony Corporation
204
Search
VAIO User Guide VPCEG2/VPCEH2/VPCEJ2/VPCEK2/VPCEL2 Series Back | Back to Top
Troubleshooting
How to Use
Parts Description
Setup
Network / Internet
Connections
Settings
Playback
Backup / Recovery
Security
Other Operations
Notifications
Disabling the Tapping Function on the Touch Pad
You can disable the tapping function to avoid unintentional movements of the pointer caused
by a light touch on the touch pad.
1. Click
(Start) and Control Panel.
2. Click Hardware and Sound.
3. Click Mouse under Devices and Printers.
4. Click the Tapping tab or the Device Settings tab.
When you click the Device Settings tab, click Settings and then Tap.
5. Click to clear the Tapping check box or the Enable Tapping check box.
6. Click OK.
Related Topic
Using the Touch Pad
Enabling/Disabling the Touch Pad
© 2011 Sony Corporation
205
Search
VAIO User Guide VPCEG2/VPCEH2/VPCEJ2/VPCEK2/VPCEL2 Series Back | Back to Top
Troubleshooting
How to Use
Parts Description
Setup
Network / Internet
Connections
Settings
Playback
Backup / Recovery
Security
Other Operations
Notifications
Using the Built-in Camera <Built-in camera
equipped models>
If your VAIO computer is equipped with a built-in camera, you can make a video call through
the Internet using communication software, such as Windows Live Messenger.
For detailed information on how to use the software, refer to the help file included with the
software.
The built-in camera indicator light is on while the built-in camera is in use.
Hint
The software installed on your VAIO computer varies depending on the computer’s
configurations.
To make a video call using Windows Live Messenger
1. Click (Start), All Programs, and Windows Live Messenger.
You need to sign in to Windows Live Messenger to make a video call.
To display images from the built-in camera
1. Click (Start), All Programs, ArcSoft Webcam Suite, and WebCam
Companion 4.
2. Click Capture.
Hint
If you cannot capture images properly, for example captured images are not displayed
smoothly, click the current resolution of the capturing image in the upper right of the
main window and lower the resolution.
Related Topic
Notes on the Built-in Camera <Built-in camera equipped models>
© 2011 Sony Corporation
206

Search
VAIO User Guide VPCEG2/VPCEH2/VPCEJ2/VPCEK2/VPCEL2 Series Back | Back to Top
Troubleshooting
How to Use
Parts Description
Setup
Network / Internet
Connections
Settings
Playback
Backup / Recovery
Security
Other Operations
Notifications
Notes on the Built-in Camera <Built-in camera
equipped models>
Do not scratch or soil the area on and around the built-in camera, as it may cause poor
quality images.
Do not let direct sunlight enter the lens of the built-in camera regardless of your VAIO
computer’s power state, as it may cause the camera to malfunction.
Care and cleaning of the built-in camera
If the area on and around the built-in camera is soiled, gently wipe it with a soft cloth, such
as a lens cleaning cloth. Do not rub the area too hard, as it can be easily scratched.
Related Topic
Using the Built-in Camera <Built-in camera equipped models>
© 2011 Sony Corporation
207

Search
VAIO User Guide VPCEG2/VPCEH2/VPCEJ2/VPCEK2/VPCEL2 Series Back | Back to Top
Troubleshooting
How to Use
Parts Description
Setup
Network / Internet
Connections
Settings
Playback
Backup / Recovery
Security
Other Operations
Notifications
Creating Other Drives (modifying partitions)
Partitions are divided areas on your built-in storage device. Dividing the built-in storage
device into more than one partition may have various advantages, such as separating the
system files from your data files.
Your VAIO computer has only one partition (C: drive) as the factory default setting.*
If you want to store data in another partition, such as D: drive, change the partition size and
create new partition.
There are two ways to create partitions: using Windows and creating during recovery.
For more information on how to create partitions, refer to Windows Help and Support
and Creating Partitions during Recovery. [Details]
* Some models may have D: drive as the factory default setting.
Related Topic
Creating Partitions in Windows
Creating Partitions during Recovery
Removing Recovery Contents to Free up Disk Space
© 2011 Sony Corporation
208
Search
VAIO User Guide VPCEG2/VPCEH2/VPCEJ2/VPCEK2/VPCEL2 Series Back | Back to Top
Troubleshooting
How to Use
Parts Description
Setup
Network / Internet
Connections
Settings
Playback
Backup / Recovery
Security
Other Operations
Notifications
Creating Partitions during Recovery
There are two ways to create partitions: using Windows and creating during recovery. This
topic describes how to create partitions during recovery.
1. Press the ASSIST button while your VAIO computer is turned off to start VAIO Care
Rescue.
2. Click Tools and Start advanced recovery wizard.
Follow the on-screen instructions until a screen to select recovery type appears.
3. Click Custom recovery - Resize C: and create D: drive.
4. Enter the C: drive size and click Next.
5. Follow the on-screen instructions.
Note
If you create partitions during recovery, all data on your built-in storage device will be
erased.
If you reduce the partition size of the C: drive, Recovery Media creation may fail due to
disk space shortage.
Related Topic
Creating Other Drives (modifying partitions)
Creating Partitions in Windows
Removing Recovery Contents to Free up Disk Space
© 2011 Sony Corporation
209

Search
VAIO User Guide VPCEG2/VPCEH2/VPCEJ2/VPCEK2/VPCEL2 Series Back | Back to Top
Troubleshooting
How to Use
Parts Description
Setup
Network / Internet
Connections
Settings
Playback
Backup / Recovery
Security
Other Operations
Notifications
Creating Partitions in Windows
The Windows feature allows you to create a partition without recovering your VAIO computer
system.
1. Click
(Start), Control Panel, System and Security, and Create and
format hard disk partitions under Administrative Tools.
If the User Account Control window appears, click YES.
Hint
If you are currently logged onto your VAIO computer as a standard user, you may
be prompted to enter an administrator name and password.
2. Right-click the C drive and select Shrink Volume.
3. Enter the size of the partition to be created in Enter the amount of space to
shrink in MB and click Shrink.
4. Right-click Unallocated and select New Simple Volume.
5. Follow the on-screen instructions.
Related Topic
Creating Other Drives (modifying partitions)
Creating Partitions during Recovery
Removing Recovery Contents to Free up Disk Space
© 2011 Sony Corporation
210
Search
VAIO User Guide VPCEG2/VPCEH2/VPCEJ2/VPCEK2/VPCEL2 Series Back | Back to Top
Troubleshooting
How to Use
Parts Description
Setup
Network / Internet
Connections
Settings
Playback
Backup / Recovery
Security
Other Operations
Notifications
Removing Recovery Contents to Free up Disk
Space
Your built-in storage device contains the recovery area where the data for system recovery
is stored. If your VAIO computer includes a solid state drive (SSD), you might want to
minimize the recovery area by removing such data.
The above procedure involves system recovery. The applications and data you added on the
storage device before removing the data for system recovery will all be lost.
Once you have removed the data for system recovery, you need the Recovery Media for
later system recovery.
1. Create Recovery Media if you have not yet created the Recovery media. [Details]
2. Insert the Recovery Media into the optical disc drive or connect a USB flash drive to
the USB port on your VAIO computer while the computer is in Normal mode.
3. Turn off your VAIO computer and turn it on once again.
If you are using the USB flash drive, restart your VAIO computer and press the F11
key repeatedly until the VAIO logo disappears.
4. Press the
or key to select VAIO Care Rescue and press the Enter key.
5. Click Tools and Start advanced recovery wizard.
When the “Do you need to rescue data?” message appears, make a backup copy of
your data, if needed.
6. Follow the on-screen instructions until the Select recovery type window appears.
7. Select Custom recovery - Remove recovery contents.
8. Follow the on-screen instructions.
Related Topic
Creating Other Drives (modifying partitions)
Creating Partitions in Windows
Creating Partitions during Recovery
© 2011 Sony Corporation
211

Search
VAIO User Guide VPCEG2/VPCEH2/VPCEJ2/VPCEK2/VPCEL2 Series Back | Back to Top
Troubleshooting
How to Use
Parts Description
Setup
Network / Internet
Connections
Settings
Playback
Backup / Recovery
Security
Other Operations
Notifications
Checking the Volume of the Recovery Area
Your built-in storage device contains the recovery area where the data for the system
recovery is stored. To check the volume of the recovery area, follow these steps:
1. Click
(Start), right-click Computer, and select Manage.
2. Click Disk Management under Storage in the left pane.
The volume of the recovery area and the total volume of the C: drive are displayed in
the Disk 0 row in the center pane.
© 2011 Sony Corporation
212

Search
VAIO User Guide VPCEG2/VPCEH2/VPCEJ2/VPCEK2/VPCEL2 Series Back | Back to Top
Troubleshooting
How to Use
Parts Description
Setup
Network / Internet
Connections
Settings
Playback
Backup / Recovery
Security
Other Operations
Notifications
About Recovery
Recovery is the process of restoring your VAIO computer back to its original factory
condition.
There are two ways to recover the computer:
From Recovery Media
From the recovery area
When do I have to perform recovery?
If your VAIO computer has become unstable
If your VAIO computer has been infected with a computer virus
If your VAIO computer is experiencing problems which cannot be solved through
troubleshooting
If you have formatted the C: drive by mistake
Which software should I use to maintain and recover my VAIO
computer?
Use the following software.
VAIO Care
Creating Recovery Media
Checking your computer hardware
VAIO Care Rescue
Rescuing (backing up) your data
Recovering your VAIO computer
Erasing all the data on your built-in storage device
Hint
Refer to the help file included with VAIO Care and VAIO Care Rescue for more
information.
What is a recovery area?
The recovery area on the built-in storage device contains data for system and application
recovery. Typically, you cannot modify or delete data in this area, however, there is
commercially available software designed for this purpose.
Why do I have to create Recovery Media?
Recovery Media are used to restore your VAIO computer back to its original factory
condition. If Windows does not start and you have deleted the recovery area, you will need
the Recovery Media to perform recovery.
Create the Recovery Media immediately after the computer is ready for use.
213

Search
VAIO User Guide VPCEG2/VPCEH2/VPCEJ2/VPCEK2/VPCEL2 Series Back | Back to Top
Troubleshooting
How to Use
Parts Description
Setup
Network / Internet
Connections
Settings
Playback
Backup / Recovery
Security
Other Operations
Notifications
Creating Recovery Media
Follow the instructions below to create Recovery Media.
To create Recovery Media
Hint
You can use optical discs and a USB flash drive as Recovery Media. However, it is
recommended that you use optical discs, such as DVD-R, since you may accidentally
delete the data on the USB flash drive.
The number of necessary discs, the types of media you can use, and the capacity of the
USB flash drive you need will be displayed during the Recovery Media creation process.
1. Connect your VAIO computer to the Internet, download and install the latest updates
using VAIO Update.
2. Click
(Start), All Programs, and VAIO Care.
If the User Account Control window appears, click Yes.
Hint
If you are currently logged onto your VAIO computer as a standard user, you may
be prompted to enter an administrator name and a password.
3. Click Recovery & restore, select Recovery, and then click Create Recovery
Media.
4. Read the on-screen instructions carefully, and then click Next.
5. Follow the on-screen instructions.
Note
It may take some time to display the current status of the procedure.
Do not eject or disconnect the media while creating Recovery Media, as doing so may
result in a failure of the process.
Keep the Recovery Media in a secure place.
Notes on creating Recovery Media
Recovery Media is specific to the computer on which it was created.
Create Recovery Media immediately after your VAIO computer is ready for use. In the
following cases, you may not be able to recover the computer from the recovery area
and Recovery Media will be necessary:
You have modified the recovery area with software designed for data modification.
You have installed an operating system different from the preinstalled operating
system on the computer.
You have formatted your built-in storage device without using VAIO Care Rescue.
Do not touch or soil the surface of the discs. Fingerprints or dust on the surface may
cause read/write errors.
Depending on the model you purchased, you may not be able to create Recovery Media
using optical discs except DVD-R due to disk space shortage.
Refer to the help file included with VAIO Care beforehand when you use a USB flash
drive as Recovery Media.
215


Search
VAIO User Guide VPCEG2/VPCEH2/VPCEJ2/VPCEK2/VPCEL2 Series Back | Back to Top
Troubleshooting
How to Use
Parts Description
Setup
Network / Internet
Connections
Settings
Playback
Backup / Recovery
Security
Other Operations
Notifications
Recovering from the Recovery Area
Recovery from the recovery area on the built-in storage device is faster than recovery using
Recovery Media.
See Notes on Recovery [Details] before recovery.
1. Press the ASSIST button while your VAIO computer is off to start VAIO Care
Rescue.
If the Edit Boot Options window is displayed, press the Enter key.
VAIO Care Rescue starts.
Hint
If the display language selection window appears, select your desired language
and click OK.
2. Click Start recovery wizard.
3. Follow the on-screen instructions.
Hint
To perform the custom recovery, select Tools and click Start advanced recovery
wizard.
Related Topic
About Recovery
Creating Recovery Media
Recovering from Recovery Media
Notes on Recovery
© 2011 Sony Corporation
217
Search
VAIO User Guide VPCEG2/VPCEH2/VPCEJ2/VPCEK2/VPCEL2 Series Back | Back to Top
Troubleshooting
How to Use
Parts Description
Setup
Network / Internet
Connections
Settings
Playback
Backup / Recovery
Security
Other Operations
Notifications
Recovering from Recovery Media
If the recovery area data has been corrupted or erased, you can use Recovery Media to
recover your VAIO computer. However, it takes longer time to recover using Recovery Media
than using the recovery area.
1. Insert the disc into the optical disc drive or connect a USB flash drive to the USB port
on your VAIO computer while the computer is in Normal mode.
2. Turn off your VAIO computer and turn it on once again.
If you are using the USB flash drive, press the F11 key repeatedly until the VAIO logo
screen disappears.
The Windows Boot Manager screen is displayed.
If the screen does not appear, restart the computer and try again.
3. Press the
or key to select Start VAIO Care Rescue and press the Enter key.
Hint
If the display language selection window appears, select your desired language
and click OK.
4. Select Start recovery wizard.
5. Follow the on-screen instructions.
Hint
To perform the custom recovery, select Tools and click Start advanced recovery
wizard.
If you cannot recover your VAIO computer using the USB flash drive, connect the drive
to another USB port on the computer and try recovering the computer again.
Related Topic
About Recovery
Creating Recovery Media
Recovering from the Recovery Area
Notes on Recovery
© 2011 Sony Corporation
218
Search
VAIO User Guide VPCEG2/VPCEH2/VPCEJ2/VPCEK2/VPCEL2 Series Back | Back to Top
Troubleshooting
How to Use
Parts Description
Setup
Network / Internet
Connections
Settings
Playback
Backup / Recovery
Security
Other Operations
Notifications
Notes on Recovery
Read the following notes thoroughly before recovering your VAIO computer.
Important notes on recovery
Recovering your VAIO computer will delete all the data on the built-in storage device
and restore all the settings to the original factory settings. Make sure you have a backup
copy of your valuable data.
Disconnect all peripherals from your VAIO computer except the power cord, the AC
adapter, or devices required for recovery before recovering the computer.
Do not stop the recovery process until the process is complete.
If you have forgotten the password and cannot start the recovery process, contact an
authorized Sony service/support center to reset it. A reset fee will be charged.
Notes on software
Recovering your VAIO computer can restore only the preinstalled software. The software
that has been installed on your own or the data you have created since purchase
cannot be restored. In addition, you cannot restore only Windows.
Certain preinstalled software includes options that allow the applications to uninstall or
install themselves. However, the software may not work properly on your VAIO computer
if such options are used.
Installing software to modify partition sizes may disable recovery or Recovery Media
creation.
Related Topic
About Recovery
Creating Recovery Media
Recovering from the Recovery Area
Recovering from Recovery Media
© 2011 Sony Corporation
219
Search
VAIO User Guide VPCEG2/VPCEH2/VPCEJ2/VPCEK2/VPCEL2 Series Back | Back to Top
Troubleshooting
How to Use
Parts Description
Setup
Network / Internet
Connections
Settings
Playback
Backup / Recovery
Security
Other Operations
Notifications
About Backup
The backup process creates a backup copy of your data stored on the built-in storage device
and saves it to another location.
Due to unexpected events or computer viruses, you might lose various data stored on your
built-in storage device. To restore the lost data, its backup copy is needed.
It is strongly recommended that you back up your data regularly.
If you can start Windows, back up and restore your data with the Windows feature.
To use the features, click
(Start), Control Panel, System and Security, and
Backup and Restore.
Related Topic
About Types of Backup
Backing Up Your Data when You cannot Start Windows
Restoring Your Data with VAIO Data Restore Tool
Creating a Restore Point
Restoring System Files Using the Restore Point when You cannot Start Windows
© 2011 Sony Corporation
220

Search
VAIO User Guide VPCEG2/VPCEH2/VPCEJ2/VPCEK2/VPCEL2 Series Back | Back to Top
Troubleshooting
How to Use
Parts Description
Setup
Network / Internet
Connections
Settings
Playback
Backup / Recovery
Security
Other Operations
Notifications
About Types of Backup
You can use the Windows Backup and Restore feature to back up your valuable data.
There are several types of backup to meet your needs, as described below.
Backing up files
You can select and back up folders and files stored on your VAIO computer to a DVD or an
external hard disk drive. For details on how to back up data, refer to Windows Help and
Support.
Backing up system images
You can create a backup copy of the whole system of your VAIO computer. If the built-in
storage device or the computer ever stops working, you can use the system image to restore
the computer as it was when backed up.
To create a system image, you need an optional hard disk drive formatted in NTFS format.
You can also back up a system image to optical discs such as Blu-ray Disc or DVD disc.
For details on how to create a system image, refer to Windows Help and Support.
Restore point
After installing new software or changing Windows settings, your VAIO computer may have
some problems (such as slow response, unable to launch software, etc.).
You can create a restore point before such an installation or setting change to restore your
system to an earlier point in time if it has a problem. For details on a restore point, see
Creating a Restore Point. [Details]
Note
We will not restore or compensate for any lost or damaged data under any
circumstances including failure of your VAIO computer.
Create recovery media soon after purchasing your VAIO computer. In the event of the
computer malfunctioning, and you cannot use the Windows operating system, you can
use the backup tool included in recovery media to back up your data.
For how to create recovery media, see Creating Recovery Media. [Details]
Hint
If your VAIO computer is equipped with no disk drive, you need to connect an external
hard disk drive or DVD drive to the computer before backup, or, you need to resize the
partition of your C: drive and create another partition before backup. [Details]
Related Topic
About Backup
Backing Up Your Data when You cannot Start Windows
Restoring Your Data with VAIO Data Restore Tool
Creating a Restore Point
Restoring System Files Using the Restore Point when You cannot Start Windows
© 2011 Sony Corporation
221

Search
VAIO User Guide VPCEG2/VPCEH2/VPCEJ2/VPCEK2/VPCEL2 Series Back | Back to Top
Troubleshooting
How to Use
Parts Description
Setup
Network / Internet
Connections
Settings
Playback
Backup / Recovery
Security
Other Operations
Notifications
Creating a Restore Point
A restore point enables you to restore your computer system files to a previous state,
depending on when the restore point was created.
Typically, restore points are created automatically, for example when you install a software
driver. However, we recommend that you create a new restore point manually, using
Control Panel, before installing any software or software drivers on your VAIO computer.
Refer to Windows Help and Support for information on creating a restore point.
Related Topic
About Backup
About Types of Backup
Backing Up Your Data when You cannot Start Windows
Restoring Your Data with VAIO Data Restore Tool
Restoring System Files Using the Restore Point when You cannot Start Windows
© 2011 Sony Corporation
222
Search
VAIO User Guide VPCEG2/VPCEH2/VPCEJ2/VPCEK2/VPCEL2 Series Back | Back to Top
Troubleshooting
How to Use
Parts Description
Setup
Network / Internet
Connections
Settings
Playback
Backup / Recovery
Security
Other Operations
Notifications
Backing Up Your Data when You cannot Start
Windows
If you cannot start Windows, back up your data with VAIO Care Rescue.
To rescue your data
1. Press the ASSIST button while your VAIO computer is off to start VAIO Care
Rescue.
Hint
If the display language selection window appears, select your desired language
and click OK.
2. Click Tools and Rescue Data.
3. Follow the on-screen instructions.
Hint
Alternatively, you can start VAIO Care Rescue with Recovery Media. [Details]
It is recommended that you select an external hard disk drive as a location to save
rescued files if you select Custom rescue.
Notes on using Rescue Data
Handle rescued files with care to protect from unauthorized access.
Disable the Windows hard disk drive encryption feature before using Rescue Data to
back up and restore your data.
However, rescued files which are not encrypted on the built-in storage device can be
easily accessed by unauthorized users using Recovery Media and this software.
Therefore, after using the software, be sure to set the power-on or hard disk password,
enable the Windows hard disk drive encryption feature, and keep the Recovery Media in
a secure place to protect rescued files from unauthorized access.
To restore copyright protected data, such as music files organized by digital media
playback software, use a backup tool specified by the software you used to import such
data. Sony does not guarantee the playback compatibility of data which is not restored
with the specified backup tool.
Using Rescue Data does not guarantee to back up all the data on your built-in
storage device.
Sony assumes no liabilities for any loss of your data arising out of the backup process.
Use the power cord or the AC adapter to power your VAIO computer while using this
software.
Rescued files may be divided into two or more files and saved in a specified location or
renamed, depending on the location you select. Use VAIO Data Restore Tool to
restore the rescued files. [Details]
If the external hard disk drive or optical disc drive does not support the USB connection,
you need to install a software driver.
Related Topic
223


Search
VAIO User Guide VPCEG2/VPCEH2/VPCEJ2/VPCEK2/VPCEL2 Series Back | Back to Top
Troubleshooting
How to Use
Parts Description
Setup
Network / Internet
Connections
Settings
Playback
Backup / Recovery
Security
Other Operations
Notifications
Restoring System Files Using the Restore Point
when You cannot Start Windows
When you cannot start Windows, follow these steps to restore computer system files.
1. Insert Recovery Media into the optical disc drive or connect a USB flash drive to the
USB port on your VAIO computer while the computer is in Normal mode.
2. Turn off your VAIO computer and turn it on once again.
If you are using the USB flash drive, press the F11 key repeatedly until the VAIO logo
screen disappears.
The Windows Boot Manager screen is displayed.
3. Press the
or key to select Repair Windows 7 and press the Enter key.
4. Select a keyboard layout and click Next.
If the appropriate keyboard layout is not selected, you may not be able to enter the
password correctly.
5. Select your operating system and click Next.
The system restore tool selection screen appears.
6. Click System Restore.
The System Restore window appears.
7. Click Next.
8. Select a restore point and click Next.
The confirmation window of the selected restore point appears.
9. Click Finish to confirm the restore point.
Restart your VAIO computer if the window prompts you to restart the computer.
Related Topic
About Backup
About Types of Backup
Backing Up Your Data when You cannot Start Windows
Restoring Your Data with VAIO Data Restore Tool
Creating a Restore Point
© 2011 Sony Corporation
225
Search
VAIO User Guide VPCEG2/VPCEH2/VPCEJ2/VPCEK2/VPCEL2 Series Back | Back to Top
Troubleshooting
How to Use
Parts Description
Setup
Network / Internet
Connections
Settings
Playback
Backup / Recovery
Security
Other Operations
Notifications
Restoring Your Data with VAIO Data Restore Tool
If you backed up files previously using VAIO Care Rescue, use VAIO Data Restore
Tool to restore these files.
For instructions on how to use the software, refer to the help file included with the software.
1. Click
(Start), All Programs, and VAIO Data Restore Tool.
The VAIO Data Restore Tool window appears.
2. Click Next.
If the User Account Control window appears, click Yes.
Hint
If you are currently logged onto your VAIO computer as a standard user, you may
be prompted to enter an administrator name and password.
3. Follow the on-screen instructions.
Note
To restore copyright protected data, such as music files organized by digital media
playback software, use a backup tool specified by the software you used to import such
data. Sony does not guarantee the playback compatibility of data which is not restored
with the specified backup tool.
Hint
If necessary, move the restored files to an original location.
Related Topic
About Backup
About Types of Backup
Backing Up Your Data when You cannot Start Windows
Creating a Restore Point
Restoring System Files Using the Restore Point when You cannot Start Windows
© 2011 Sony Corporation
226

Search
VAIO User Guide VPCEG2/VPCEH2/VPCEJ2/VPCEK2/VPCEL2 Series Back | Back to Top
Troubleshooting
How to Use
Parts Description
Setup
Network / Internet
Connections
Settings
Playback
Backup / Recovery
Security
Other Operations
Notifications
About “Memory Stick”
“Memory Stick” is a compact, portable, and versatile IC recording media especially designed
for exchanging and sharing digital data with compatible products, such as digital cameras
and other devices. Because it is removable, it can be used for external data storage.
For the latest information about “Memory Stick”, visit http://www.sony.net/memorycard/.
Related Topic
Compatible “Memory Stick”
Inserting/Removing “Memory Stick”
Formatting “Memory Stick”
Notes on Using “Memory Stick”
© 2011 Sony Corporation
227
Search
VAIO User Guide VPCEG2/VPCEH2/VPCEJ2/VPCEK2/VPCEL2 Series Back | Back to Top
Troubleshooting
How to Use
Parts Description
Setup
Network / Internet
Connections
Settings
Playback
Backup / Recovery
Security
Other Operations
Notifications
Compatible “Memory Stick”
The “Memory Stick Duo” slot on your VAIO computer can accommodate the following sizes
and types of media:
“Memory Stick Duo”
“Memory Stick PRO Duo”
“Memory Stick PRO-HG Duo”*
“Memory Stick Micro”
* The “Memory Stick Duo” slot on your VAIO computer does not support 8-bit parallel data
transfer (high-speed data transfer).
Note
Your VAIO computer supports only Duo-size “Memory stick”, and does not support
standard-size “Memory Stick”.
Before using “Memory Stick Micro” (“M2”), be sure to insert it into an “M2” Duo adaptor.
If you insert the media directly into the “Memory Stick Duo” slot without the adaptor, you
may not be able to remove it from the slot.
Your VAIO computer has been tested and found compatible with any Sony branded
“Memory Stick” of up to 32 GB, available as of January 2011. However, “Memory Stick”
compatibility is not guaranteed in all cases.
The “Memory Stick Duo” slot on your VAIO computer does not support the copyright
protection feature of “Memory Stick”.
If you use “Memory Stick” in a place subject to static electricity or electrical noise, stored
data may be lost.
The maximum possible size for a file on “Memory Stick PRO Duo” or “Memory Stick
PRO-HG Duo” is less than 4 GB, as defined in the file system specification.
Related Topic
About “Memory Stick”
Inserting/Removing “Memory Stick”
Formatting “Memory Stick”
Notes on Using “Memory Stick”
© 2011 Sony Corporation
228
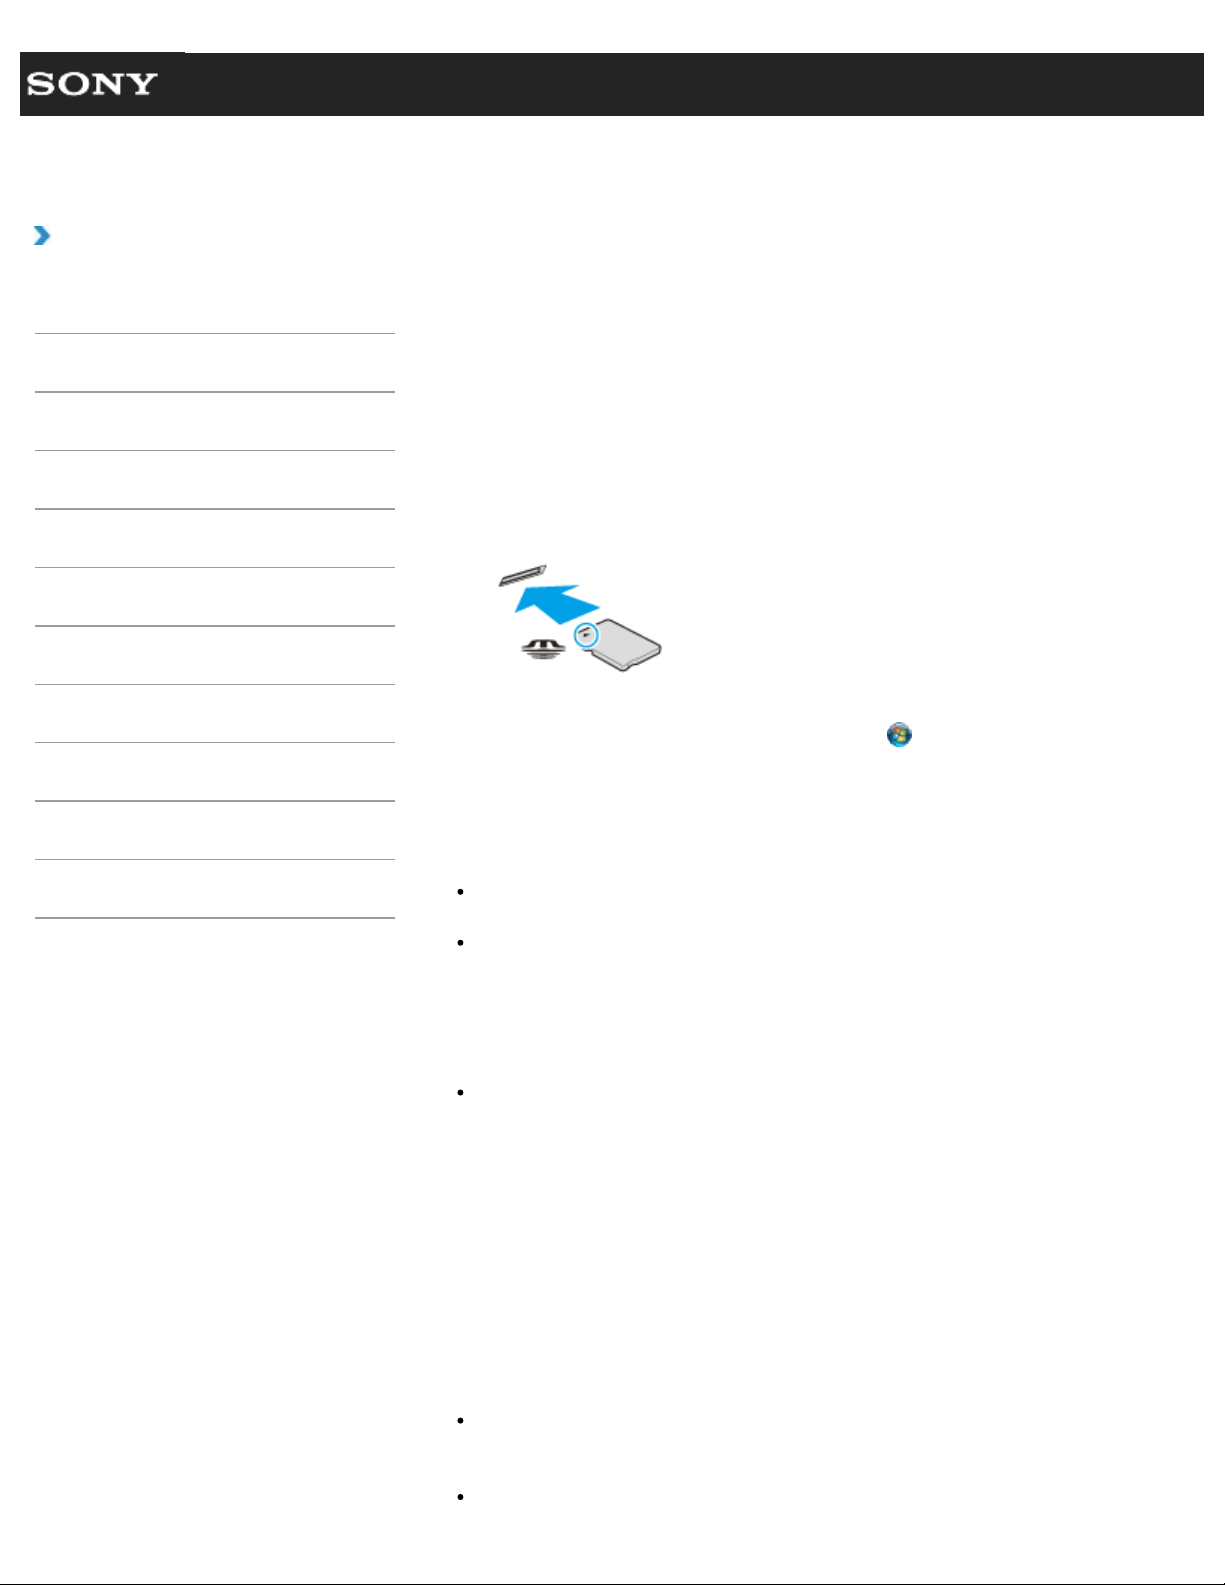
Search
VAIO User Guide VPCEG2/VPCEH2/VPCEJ2/VPCEK2/VPCEL2 Series Back | Back to Top
Troubleshooting
How to Use
Parts Description
Setup
Network / Internet
Connections
Settings
Playback
Backup / Recovery
Security
Other Operations
Notifications
Inserting/Removing “Memory Stick”
You can use “Memory Stick” to save data or transfer images between a digital camera and
your VAIO computer. To insert/remove “Memory Stick”, follow these steps.
To Insert “Memory Stick”
1. Locate the “Memory Stick Duo” slot.
2. Hold “Memory Stick” [Details] with the arrow pointing toward the slot, and carefully
slide it into the slot until it clicks into place.
“Memory Stick” is automatically detected by your system and the contents of “Memory Stick”
are displayed*. If nothing appears on the desktop, click
(Start) and Computer, and
double-click the “Memory Stick” icon*.
* The drive letter for the “Memory Stick” slot, such as “E:”, may vary depending on the
system configuration of your VAIO computer.
Note
The “Memory Stick” icon will appear in the Computer window after you insert “Memory
Stick” into the slot.
If “Memory Stick” cannot be inserted easily, remove it gently, and verify you are inserting
it in the proper direction. Be sure to hold “Memory Stick” with the arrow pointing in the
correct direction as you insert it into the slot. To avoid damaging your VAIO computer or
the media, do not force “Memory Stick” into the slot if you cannot insert it smoothly.
Hint
When you insert “Memory Stick” into the slot for the first time, you may be prompted to
install driver software. If prompted, follow the on-screen instructions to install the
software.
To remove “Memory Stick”
1. Locate the “Memory Stick Duo” slot.
2. Check that the Media Access indicator light is off.
3. Push in “Memory Stick” toward your VAIO computer and release.
4. Pull “Memory Stick” out of the slot.
Note
Do not remove “Memory Stick” while the Media Access indicator light is on. If you do,
you may lose data. Large volumes of data may take time to load, so make sure the
indicator light is off before removing “Memory Stick”.
Be sure to remove “Memory Stick” gently, or it may pop out unexpectedly.
229

Search
VAIO User Guide VPCEG2/VPCEH2/VPCEJ2/VPCEK2/VPCEL2 Series Back | Back to Top
Troubleshooting
How to Use
Parts Description
Setup
Network / Internet
Connections
Settings
Playback
Backup / Recovery
Security
Other Operations
Notifications
Formatting “Memory Stick”
“Memory Stick” is formatted in the specific FAT format by default and is ready for use.
Be sure to use the device that is designed to format the media and supports “Memory Stick”
when formatting the media.
If you want to reformat the media with your VAIO computer, follow these steps.
Note
Formatting “Memory Stick” erases the entire data stored on the media. Be sure to make
a backup copy of important data to avoid erasing it.
Do not remove “Memory Stick” from the slot while formatting. This could cause a
malfunction.
1. Locate the “Memory Stick Duo” slot.
2. Carefully slide “Memory Stick” into the slot until it clicks into place. [Details]
3. Click
(Start) and Computer.
4. Right-click the “Memory Stick” icon and select Format.
The Format Memory Stick window appears.
5. Click Restore device defaults.
The size of the allocation unit and file system will change to default settings.
Note
Do not select NTFS from the File system drop-down list as it may cause a
malfunction.
Hint
The formatting process will be completed more quickly if you select Quick
Format in Format options.
6. Click Start.
Follow the on-screen instructions.
Note
It may take time to format “Memory Stick” depending on the media type.
Related Topic
About “Memory Stick”
Compatible “Memory Stick”
Inserting/Removing “Memory Stick”
Notes on Using “Memory Stick”
© 2011 Sony Corporation
231
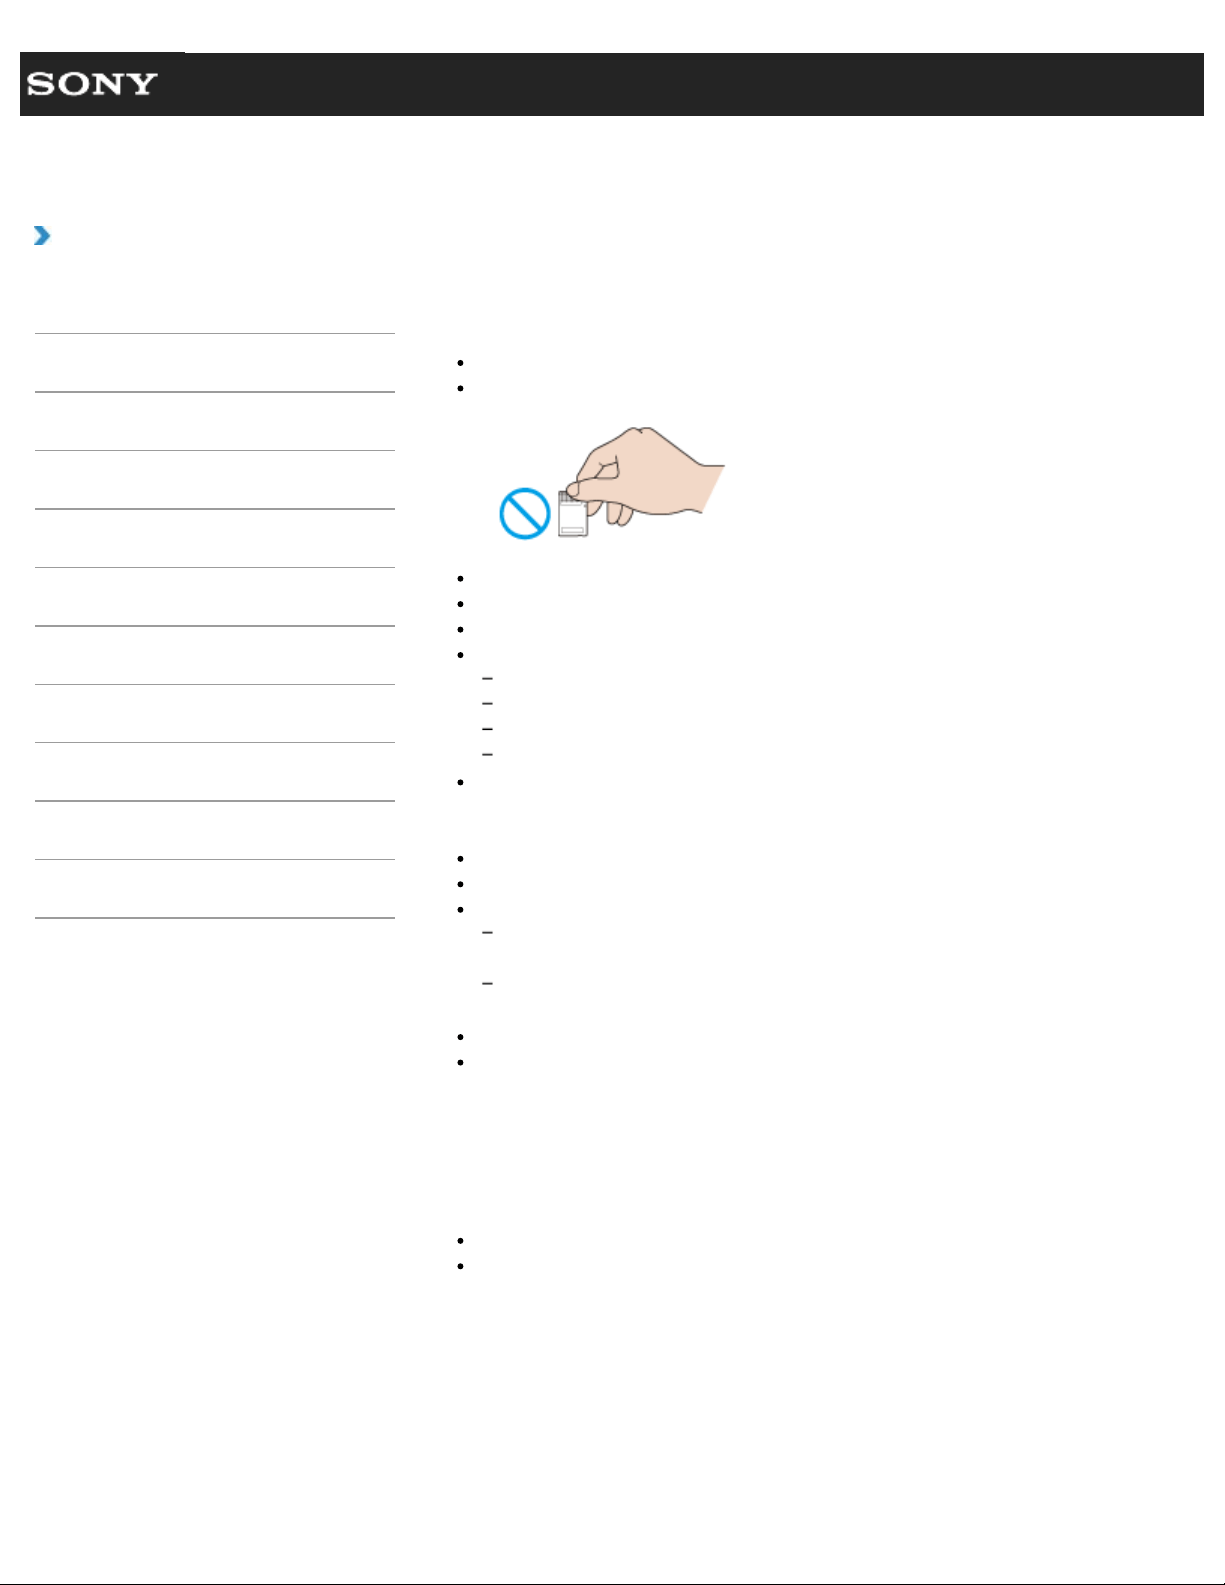
Search
VAIO User Guide VPCEG2/VPCEH2/VPCEJ2/VPCEK2/VPCEL2 Series Back | Back to Top
Troubleshooting
How to Use
Parts Description
Setup
Network / Internet
Connections
Settings
Playback
Backup / Recovery
Security
Other Operations
Notifications
Notes on Using “Memory Stick”
Before using “Memory Stick”, read the following precautions for correct use.
Keep “Memory Stick” out of reach of children. There is a risk of swallowing it.
Do not touch the “Memory Stick” connector with your finger or metal objects.
“Memory Stick” contains delicate electronic components. Do not impact, bend or drop it.
Do not disassemble or modify “Memory Stick”.
Do not wet “Memory Stick”.
Do not use or store in a location subject to:
Extremely high temperature, such as in a car parked in the sun
Direct sunlight.
High humidity or corrosive substances
Excessive dust
Be sure to use “Memory Stick” and adaptors that are compliant with the standards
supported by your VAIO computer. Incompatible cards and adaptors may get stuck in
the slot, causing damage to the computer.
You cannot write data to “Memory Stick” that is write-protected.
It is recommended that you make a backup copy of important data.
Stored data may be lost or corrupted if:
You remove “Memory Stick” or turn off your VAIO computer while the media access
indicator light is on.
You use “Memory Stick” at a place where static electricity or electrical noise may
disturb the card.
When carrying “Memory Stick”, be sure to put it in its case to avoid static electricity.
Before using “Memory Stick” with a device other than a computer, such as a digital
camera or a portable audio, format (initialize) “Memory Stick” using the device.
Some devices may not support the file format for computers and show you a message
that recommends you to format “Memory Stick”. In this case, copy data from “Memory
Stick” to your VAIO computer and format “Memory Stick” using the device. All data in
“Memory Stick” will be deleted when you format it.
Refer to the manual that came with the device for more information.
Do not insert foreign objects into the “Memory Stick” slot.
The “Memory Stick” slot can be used for reading/writing supported “Memory Stick” only,
and cannot be used for other purposes.
Notes on Using “Memory Stick Duo”
When using “Memory Stick Duo”, do not use a fine-tipped pen to write on the label adhered
to “Memory Stick Duo”. Exerting pressure on the media may damage internal components.
Notes on Using “Memory Stick Micro”
232

Before using “Memory Stick Micro” (“M2”), be sure to insert it into an “M2” Duo adaptor.
If you insert the media directly into the “Memory Stick Duo” slot without the adaptor, you
may not be able to remove it from the slot.
Keep “Memory Stick Micro” and “M2” Duo adaptors away from children. They are
harmful if swallowed.
Related Topic
About “Memory Stick”
Compatible “Memory Stick”
Inserting/Removing “Memory Stick”
Formatting “Memory Stick”
© 2011 Sony Corporation
233
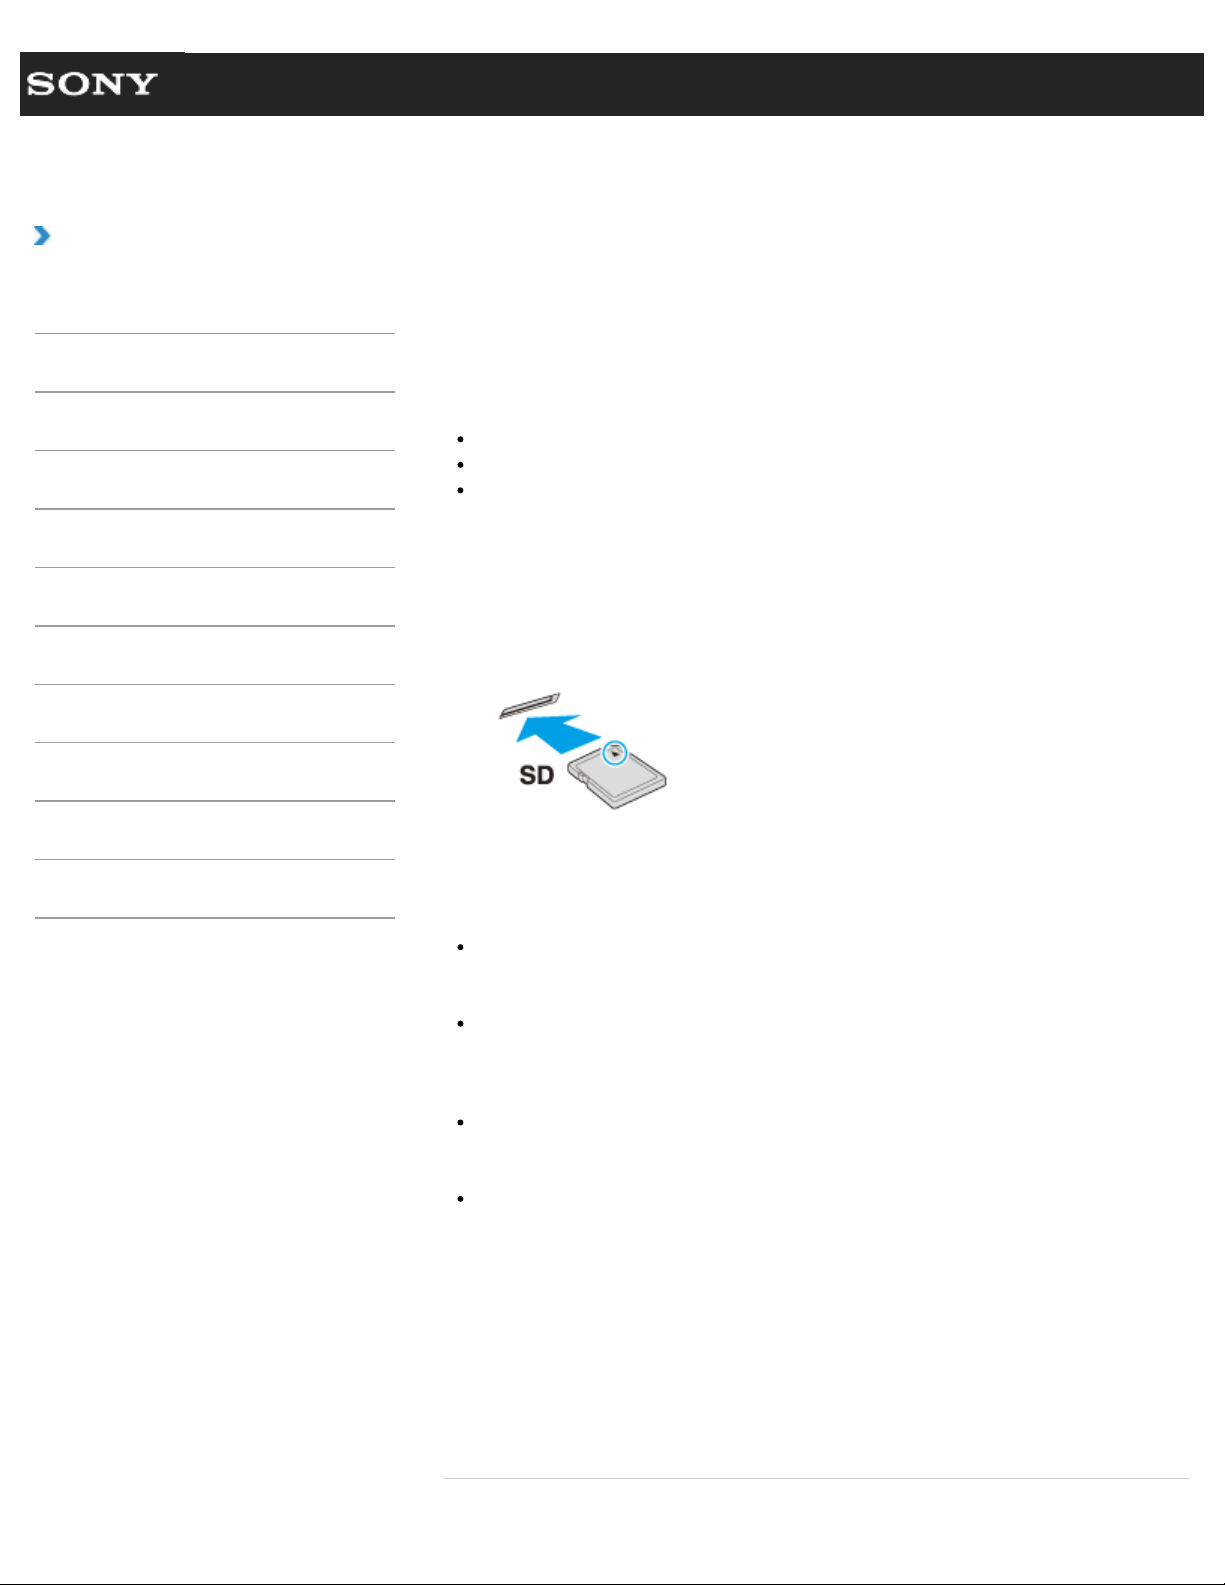
Search
VAIO User Guide VPCEG2/VPCEH2/VPCEJ2/VPCEK2/VPCEL2 Series Back | Back to Top
Troubleshooting
How to Use
Parts Description
Setup
Network / Internet
Connections
Settings
Playback
Backup / Recovery
Security
Other Operations
Notifications
Inserting/Removing SD Memory Cards
Your VAIO computer is equipped with an SD memory card slot. You can use this slot to
transfer data among digital cameras, camcorders, music players, and other audio/video
devices.
The SD memory card slot on the computer can accommodate the following memory cards:
SD memory card
SDHC memory card
SDXC memory card
To insert an SD memory card
1. Locate the SD memory card slot.
2. Hold the SD memory card with the arrow pointing toward the slot, and carefully slide it
into the slot until it clicks into place.
The SD memory card icon will appear in the Computer window after you insert the card
into the slot.
Note
Be careful not to insert an SD memory card with wrong orientation. If you force it into the
slot upside down, the slot may be damaged. Refer to the manual that came with the SD
memory card for more information.
The SD memory card icon will not appear in the Computer window until you insert the
card into the slot.
Hint
When you insert the SD memory card into the slot for the first time, you may be
prompted to install driver software. If prompted, follow the on-screen instructions to
install the software.
While data is being read from or written to the SD memory card, the media access
indicator light is on.
To remove an SD memory card
1. Locate the SD memory card slot.
2. Check that the media access indicator light is off.
3. Push in the SD memory card toward your VAIO computer and release.
4. Pull the SD memory card out of the slot.
Related Topic
234


Search
VAIO User Guide VPCEG2/VPCEH2/VPCEJ2/VPCEK2/VPCEL2 Series Back | Back to Top
Troubleshooting
How to Use
Parts Description
Setup
Network / Internet
Connections
Settings
Playback
Backup / Recovery
Security
Other Operations
Notifications
Notes on Using SD Memory Cards
Before using SD memory cards, read the following precautions for correct use.
Keep an SD memory card out of reach of children. There is a risk of swallowing it.
Do not touch the SD memory card connector with your finger or metal objects.
An SD memory card contains delicate electronic components. Do not impact, bend or
drop it.
Do not disassemble or modify an SD memory card.
Do not wet an SD memory card.
Do not use or store in a location subject to:
Extremely high temperature, such as in a car parked in the sun
Direct sunlight
High humidity or corrosive substances
Excessive dust
Be sure to use SD memory cards and adaptors that are compliant with the standards
supported by your VAIO computer. Incompatible cards and adaptors may get stuck in
the slot, causing damage to the computer.
You cannot write data to an SD memory card that is write-protected.
It is recommended that you make a backup copy of important data.
Stored data may be lost or corrupted if:
You remove an SD memory card or turn off your VAIO computer while the media
access indicator light is on.
You use an SD memory card at a place where static electricity or electrical noise may
disturb the card.
When carrying an SD memory card, be sure to put it in its case to avoid static electricity.
Before using an SD memory card with a device other than a computer, such as a digital
camera or a portable audio, format (initialize) the SD memory card using the device.
Some devices may not support the file format for computers and show you a message
that recommends you to format the SD memory card. In this case, copy data from the
card to your VAIO computer and format the card using the device. All data in the SD
memory card will be deleted when you format it.
Refer to the manual that came with the device for more information.
Do not insert foreign objects into the SD memory card slot.
The SD memory card slot can be used for reading/writing supported memory cards only,
and cannot be used for other purposes.
SD memory cards (up to 2 GB), SDHC memory cards (up to 32 GB) and SDXC memory
cards (up to 64 GB) available as of January 2011 have been tested and found
compatible with your VAIO computer. However, it is not guaranteed that all SD memory
cards, SDHC memory cards or SDXC memory cards will be compatible with the
computer.
The SD memory card slot on your VAIO computer does not support the copyright
protection feature of the SD memory card, the SDHC memory card, and the SDXC
memory card.
Do not attempt to insert a memory card or memory card adaptor of a different type into
the memory card slot. An incompatible memory card or memory card adaptor may get
stuck in the slot, causing damage to your VAIO computer.
Some types of SD memory cards, for example ones with the UHS (Ultra High Speed
data transfer feature), may become extremely hot due to continuous access to the
236


Search
VAIO User Guide VPCEG2/VPCEH2/VPCEJ2/VPCEK2/VPCEL2 Series Back | Back to Top
Troubleshooting
How to Use
Parts Description
Setup
Network / Internet
Connections
Settings
Playback
Backup / Recovery
Security
Other Operations
Notifications
About the Software License
This product contains software owned by Sony and licensed by third parties. Use of such
software is subject to the terms and conditions of license agreements enclosed with this
product.
Related Topic
Read This First
© 2011 Sony Corporation
238
Search
VAIO User Guide VPCEG2/VPCEH2/VPCEJ2/VPCEK2/VPCEL2 Series Back | Back to Top
Troubleshooting
How to Use
Parts Description
Setup
Network / Internet
Connections
Settings
Playback
Backup / Recovery
Security
Other Operations
Notifications
Safety Information
Refer to the supplied safety manual for detailed safety information.
Computer
If you drop a solid object or any liquid onto your VAIO computer, shut down the
computer, unplug it, and remove the battery pack. You may want to have the computer
checked by qualified personnel before operating it again.
Use only specified peripheral equipment and interface cables.
Keep small parts such as “Memory Stick” and “Memory Stick” adaptors out of reach of
children. There is a risk of swallowing them.
The temperature of the surface and the bottom of your VAIO computer, the AC adapter,
and the battery pack may rise due to the CPU load or an electric current generated
while the battery pack is being charged. This is normal and does not indicate a
malfunction. The amount of heat generation varies depending on external devices or
software in use.
If your VAIO computer or the AC adapter becomes extraordinarily hot, turn off the
computer, unplug the AC adapter, remove the battery pack, and then contact an
authorized Sony service/support center.
Power source
Do not place heavy objects on the power cord, or this could cause a fire.
To disconnect the power cord, pull it out by holding the plug. Never pull the cord itself.
Do not use cut or damaged connection cables.
Unplug your VAIO computer from the AC outlet if you are not planning to use the
computer for an extended period of time.
If you are not using your VAIO computer for an extended period of time, remove the
battery pack from the computer to prevent damage to the battery pack.
Headphones
Do not use headphones while driving, cycling, or operating any motorized vehicle. It may
create a traffic hazard and is illegal in some areas. It can also be potentially dangerous
to play loud music while walking, especially at pedestrian crossings.
Avoid using headphones at high volume. Hearing experts advise against continuous,
loud and extended play. If you experience a ringing in your ears, reduce the volume or
discontinue use.
© 2011 Sony Corporation
239

Search
VAIO User Guide VPCEG2/VPCEH2/VPCEJ2/VPCEK2/VPCEL2 Series Back | Back to Top
Troubleshooting
How to Use
Parts Description
Setup
Network / Internet
Connections
Settings
Playback
Backup / Recovery
Security
Other Operations
Notifications
Trademarks
© 2011 Sony Electronics Inc. All rights reserved. Reproduction in whole or in part
without written permission is prohibited.
Sony and the Sony logo are trademarks or registered trademarks of Sony Corporation.
VAIO, the VAIO logo and other Sony product or service names are trademarks or
registered trademarks of Sony Corporation or any of its affiliates.
i.LINK is a name to denote IEEE 1394.
Intel, Intel Inside, Intel Core, Pentium, Intel SpeedStep, and Atom are trademarks or
registered trademarks of Intel Corporation in the United States and/or other countries.
Microsoft, Windows, Windows Vista, BitLocker, Aero, and the Windows logo are either
registered trademarks or trademarks of Microsoft Corporation in the United States
and/or other countries.
Blu-ray Disc™, Blu-ray™, Blu-ray 3D™, the Blu-ray Disc logo, and the Blu-ray 3D logo
are trademarks of the Blu-ray Disc Association.
The BLUETOOTH word mark and logos are registered trademarks owned by Bluetooth
SIG, Inc. and any use of such marks by Sony Corporation is under license. Other
trademarks and trade names are those of their respective owners.
Roxio Easy Media Creator is a trademark of Sonic Solutions.
WinDVD is trademark of Corel Inc.
PowerDVD is trademark of CyberLink.Inc.
NVIDIA and 3D Vision are registered trademarks and/or trademarks of NVIDIA
Corporation in the United States and other countries.
ArcSoft and the ArcSoft logo are registered trademarks of ArcSoft, Inc. ArcSoft
WebCam Companion is a trademark of ArcSoft, Inc.
AMD, the AMD Arrow logo, ATI, and combinations thereof, Radeon, AMD Phenom, AMD
Turion, AMD Athlon, AMD Virtualization, AMD-V are trademarks of Advanced Micro
Devices, Inc.
SD Logo is a trademark.
SDHC Logo is a trademark.
SDXC Logo is a trademark.
The ExpressCard word mark and logos are owned by the PCMCIA and any use of such
marks by Sony Corporation is under license. Other trademarks and trade names are
those of their respective owners.
HDMI, the HDMI logo and High-Definition Multimedia Interface are trademarks or
registered trademarks of HDMI Licensing LLC.
CompactFlash® is a trademark of SanDisk Corporation.
“PlaceEngine” is a registered trademark of Koozyt, Inc.
“PlaceEngine” was developed by Sony Computer Science Laboratories, Inc. and is
licensed by Koozyt, Inc.
“AVCHD” is a trademark of Panasonic Corporation and Sony Corporation.
ENERGY STAR and the ENERGY STAR mark are registered U.S. marks.
All other names of systems, products, and services are trademarks of their respective
owners. In the manual, the ™ or ® marks are not specified.
Features and specifications are subject to change without notice.
All other trademarks are trademarks of their respective owners.
Not all the software listed above may be delivered with your model.
240

© 2011 Sony Corporation
241
Search
VAIO User Guide VPCEG2/VPCEH2/VPCEJ2/VPCEK2/VPCEL2 Series Back | Back to Top
Troubleshooting
How to Use
Parts Description
Setup
Network / Internet
Connections
Settings
Playback
Backup / Recovery
Security
Other Operations
Notifications
About the International ENERGY STAR(R)
Program
The following information is applicable to ENERGY STAR qualified products only.
As an ENERGY STAR Partner, Sony confirmed that this product meets the ENERGY STAR
standards for energy efficiency.
The International ENERGY STAR Office Equipment Program is an international program that
promotes energy saving through the use of computers and office equipment. The program
backs the development and dissemination of products with functions that effectively reduce
energy consumption.
For detailed information on the ENERGY STAR Program, visit the following web sites:
http://www.energystar.gov (USA)
http://www.eu-energystar.org (Europe)
This computer is designed in compliance with the ENERGY STAR standards and delivered
with the following power saving settings that apply to the computer running on AC power:
The LCD backlight is turned off automatically after no more than 15 minutes of inactivity.
The computer enters Sleep mode automatically after no more than 30 minutes of
inactivity.
Press any key to bring the computer back into Normal mode.
© 2011 Sony Corporation
242
Search
VAIO User Guide VPCEG2/VPCEH2/VPCEJ2/VPCEK2/VPCEL2 Series Back | Back to Top
Troubleshooting
How to Use
Parts Description
Setup
Network / Internet
Connections
Settings
Playback
Backup / Recovery
Security
Other Operations
Notifications
Cleaning Your VAIO computer/LCD screen
Before cleaning your VAIO computer, read the following precautions for the correct cleaning
procedure.
When cleaning your VAIO computer
Turn off your VAIO computer, unplug the AC adapter, and remove the battery pack
before cleaning the computer.
Use a soft, dry cloth to wipe debris and dust off your VAIO computer.
Be sure to use a soft, dry cloth when cleaning your VAIO computer. If your VAIO
computer is badly soiled, fog the surface of the computer with your breath and wipe off
the dirt, or clean off with a lightly wet cloth and then wipe remaining moisture away with
a dry cloth.
Do not use solvents such as benzine, acetone, alcohol, thinner, or commercially
available cleaners, as these may cause damage to the surface or coating of your VAIO
computer.
Use an air duster for precision equipment to blow off debris and dust underneath the
keys (keycaps). Do not remove any keycap from the keyboard.
Do not use a vacuum cleaner, as it may cause a malfunction.
When cleaning your LCD screen
Be sure to use a soft, dry cloth when cleaning your VAIO computer. If the LCD screen is
badly soiled, fog the surface of the LCD screen with your breath and wipe off the dirt, or
clean off with a lightly wet cloth and then wipe remaining moisture away with a dry cloth.
Do not use solvents such as benzine, acetone, alcohol, thinner, or commercially
available cleaners, as these may cause damage to the LCD screen.
© 2011 Sony Corporation
243
Search
VAIO User Guide VPCEG2/VPCEH2/VPCEJ2/VPCEK2/VPCEL2 Series Back | Back to Top
How to Use
Troubleshooting
Hardware
Software
Network / Internet
Backup / Recovery
Security
Peripheral Devices
Audio
What should I do if sound interruptions occur during video or audio playback?
What should I do if I do not hear sound from a digital audio device connected
to the digital output port?
What should I do if my microphone does not work?
What should I do if I hear microphone feedback from speakers when using my
microphone?
What should I do if I do not hear sound from speakers or headphones?
© 2011 Sony Corporation
244

Search
VAIO User Guide VPCEG2/VPCEH2/VPCEJ2/VPCEK2/VPCEL2 Series Back | Back to Top
How to Use
Troubleshooting
Hardware
Software
Network / Internet
Backup / Recovery
Security
Peripheral Devices
BLUETOOTH
What should I do if I cannot use the BLUETOOTH(R) function?
What should I do if other BLUETOOTH(R) devices cannot connect to my VAIO
computer?
What should I do if the BLUETOOTH(R) icon is not displayed in the desktop
notification area?
What should I do if I cannot find the BLUETOOTH(R) device I want to
communicate with?
Why is my BLUETOOTH(R) connection slow?
Why can’t I use the BLUETOOTH(R) function when I log onto my VAIO
computer as a user with a standard user account?
Why can’t I use BLUETOOTH(R) devices when I switch users?
Why can’t I exchange business card data with a mobile phone or PDA?
© 2011 Sony Corporation
245

Search
VAIO User Guide VPCEG2/VPCEH2/VPCEJ2/VPCEK2/VPCEL2 Series Back | Back to Top
How to Use
Troubleshooting
Hardware
Software
Network / Internet
Backup / Recovery
Security
Peripheral Devices
CD/DVD/BD
What should I do if the drive tray does not open?
Why does it take time to write data to DVD writable media?
What should I do if I cannot play a disc, or dropped frames and/or sound
interruptions occur during playback?
Why can’t I write data to a disc?
© 2011 Sony Corporation
246

Search
VAIO User Guide VPCEG2/VPCEH2/VPCEJ2/VPCEK2/VPCEL2 Series Back | Back to Top
How to Use
Troubleshooting
Hardware
Software
Network / Internet
Backup / Recovery
Security
Peripheral Devices
Computer
Why does the System Properties window display a slower CPU speed than the
maximum?
Why is my VAIO computer running slowly and the CPU clock frequency low
while the computer is running on battery power?
© 2011 Sony Corporation
247

Search
VAIO User Guide VPCEG2/VPCEH2/VPCEJ2/VPCEK2/VPCEL2 Series Back | Back to Top
How to Use
Troubleshooting
Hardware
Software
Network / Internet
Backup / Recovery
Security
Peripheral Devices
Floppy disk
What should I do if I cannot boot my VAIO computer from the floppy disk
drive?
You might be looking for the following topics:
What should I do if I cannot remove my floppy disk?
What should I do if my VAIO computer does not recognize the floppy disk?
What should I do if I cannot save data on my floppy disk?
© 2011 Sony Corporation
248

Search
VAIO User Guide VPCEG2/VPCEH2/VPCEJ2/VPCEK2/VPCEL2 Series Back | Back to Top
How to Use
Troubleshooting
Hardware
Software
Network / Internet
Backup / Recovery
Security
Peripheral Devices
Keyboard
What should I do if the pointer does not move?
What should I do if my VAIO computer screen freezes?
What should I do if I cannot enter certain characters with my keyboard?
What should I do if my keyboard configuration is wrong?
© 2011 Sony Corporation
249

Search
VAIO User Guide VPCEG2/VPCEH2/VPCEJ2/VPCEK2/VPCEL2 Series Back | Back to Top
How to Use
Troubleshooting
Hardware
Software
Network / Internet
Backup / Recovery
Security
Peripheral Devices
Memory card
Why doesn’t the “Memory Stick Duo” icon appear in the Computer window?
Why can’t I write data to a memory card?
Why doesn’t the memory card icon appear in the Computer window?
© 2011 Sony Corporation
250

Search
VAIO User Guide VPCEG2/VPCEH2/VPCEJ2/VPCEK2/VPCEL2 Series Back | Back to Top
How to Use
Troubleshooting
Hardware
Software
Network / Internet
Backup / Recovery
Security
Peripheral Devices
Password
What should I do if I forget the power-on password to start my VAIO
computer?
What should I do if I forget the Windows password?
What should I do if the Enter Onetime Password message appears and
Windows does not start after I enter a wrong power-on password three times
consecutively?
© 2011 Sony Corporation
251

Search
VAIO User Guide VPCEG2/VPCEH2/VPCEJ2/VPCEK2/VPCEL2 Series Back | Back to Top
How to Use
Troubleshooting
Hardware
Software
Network / Internet
Backup / Recovery
Security
Peripheral Devices
Software
Why do sound interruptions and/or dropped frames occur when I play high-
definition videos, such as those recorded with the AVCHD digital video
camcorder?
You might be looking for the following topics:
What should I do if my game software does not work or it keeps crashing?
© 2011 Sony Corporation
252

Search
VAIO User Guide VPCEG2/VPCEH2/VPCEJ2/VPCEK2/VPCEL2 Series Back | Back to Top
How to Use
Troubleshooting
Hardware
Software
Network / Internet
Backup / Recovery
Security
Peripheral Devices
USB
What should I do if I cannot boot my VAIO computer from the floppy disk
drive?
You might be looking for the following topics:
What should I do if I cannot print a document?
What should I do if I cannot remove my floppy disk?
What should I do if my VAIO computer does not recognize the floppy disk?
What should I do if I cannot save data on my floppy disk?
What should I do if my VAIO computer does not recognize the USB device?
© 2011 Sony Corporation
253


Search
VAIO User Guide VPCEG2/VPCEH2/VPCEJ2/VPCEK2/VPCEL2 Series Back | Back to Top
How to Use
Troubleshooting
Hardware
Software
Network / Internet
Backup / Recovery
Security
Peripheral Devices
Battery
What should I do if a message appears indicating that the battery pack is
incompatible or has been incorrectly installed, after which my VAIO computer
enters Hibernate mode?
Why can’t I fully charge my battery pack?
Why is my VAIO computer running slowly and the CPU clock frequency low
while the computer is running on battery power?
Why doesn’t my VAIO computer enter Hibernate mode when the battery pack
is running out of power?
© 2011 Sony Corporation
255

Search
VAIO User Guide VPCEG2/VPCEH2/VPCEJ2/VPCEK2/VPCEL2 Series Back | Back to Top
How to Use
Troubleshooting
Hardware
Software
Network / Internet
Backup / Recovery
Security
Peripheral Devices
Camera
Why does the viewfinder show no images or poor-quality images?
Why is the video input from the built-in camera suspended momentarily?
Why are captured images poor in quality?
What should I do if captured images contain dropped frames and audio
interruptions?
What should I do if captured images flicker?
© 2011 Sony Corporation
256

Search
VAIO User Guide VPCEG2/VPCEH2/VPCEJ2/VPCEK2/VPCEL2 Series Back | Back to Top
How to Use
Troubleshooting
Hardware
Software
Network / Internet
Backup / Recovery
Security
Peripheral Devices
Display
Why does the viewfinder show no images or poor-quality images?
What should I do if captured images contain dropped frames and audio
interruptions?
What should I do if captured images flicker?
What should I do if my VAIO computer screen freezes?
What should I do if my computer screen goes blank?
What should I do if I cannot see proper images on the computer screen?
What should I do if videos are not displayed on the computer screen?
What should I do if videos are not displayed smoothly?
What should I do if no image is displayed on my TV screen or external display
connected to the HDMI output port?
How do I change the LCD brightness?
What should I do if no image is displayed on my external display or TV
screen?
What should I do if some items do not fit on the computer screen?
What should I do if the top, bottom, and sides of images are not displayed
because they are too large to fit on the computer screen?
What should I do if black bars appear along the top, bottom, and sides of the
computer screen when I display images?
Why do sound interruptions and/or dropped frames occur when I play high-
definition videos, such as those recorded with the AVCHD digital video
camcorder?
What should I do if 3D images are not displayed on my 3D TV connected to
the HDMI output port?
© 2011 Sony Corporation
257

Search
VAIO User Guide VPCEG2/VPCEH2/VPCEJ2/VPCEK2/VPCEL2 Series Back | Back to Top
How to Use
Troubleshooting
Hardware
Software
Network / Internet
Backup / Recovery
Security
Peripheral Devices
HDMI
What should I do if no image is displayed on my TV screen or external display
connected to the HDMI output port?
What should I do if 3D images are not displayed on my 3D TV connected to
the HDMI output port?
© 2011 Sony Corporation
258

Search
VAIO User Guide VPCEG2/VPCEH2/VPCEJ2/VPCEK2/VPCEL2 Series Back | Back to Top
How to Use
Troubleshooting
Hardware
Software
Network / Internet
Backup / Recovery
Security
Peripheral Devices
LAN
What should I do if I cannot find (the VAIO Smart Network icon) in the desktop
notification area?
What should I do if I cannot use the wireless LAN function?
What should I do if I do not know the SSID or security key for the access
point?
What should I do if I cannot connect my VAIO computer to an access point (or
the Internet)?
What should I do if I cannot play back movies or audio tracks received via
wireless LAN, or their playback is interrupted? Why is the data transfer speed
slow?
How can I find the physical address (MAC address) of the built-in wireless
network interface of my VAIO computer?
© 2011 Sony Corporation
259

Search
VAIO User Guide VPCEG2/VPCEH2/VPCEJ2/VPCEK2/VPCEL2 Series Back | Back to Top
How to Use
Troubleshooting
Hardware
Software
Network / Internet
Backup / Recovery
Security
Peripheral Devices
Microphone
What should I do if my microphone does not work?
What should I do if I hear microphone feedback from speakers when using my
microphone?
© 2011 Sony Corporation
260

Search
VAIO User Guide VPCEG2/VPCEH2/VPCEJ2/VPCEK2/VPCEL2 Series Back | Back to Top
How to Use
Troubleshooting
Hardware
Software
Network / Internet
Backup / Recovery
Security
Peripheral Devices
Power
Why doesn’t my computer screen turn off after the automatic turn-off time has
passed?
What should I do if my VAIO computer does not turn on (the power indicator
light does not turn on in green)?
What should I do if my VAIO computer does not turn on or the power button
does not work (the power indicator light blinks fast)?
What should I do if the power indicator light turns on in green when I press the
power button but the screen remains blank?
What should I do if I cannot turn off my VAIO computer?
Why does my VAIO computer automatically turn off?
What should I do if my VAIO computer does not enter Hibernate mode?
Why doesn’t my VAIO computer enter Hibernate mode when the battery pack
is running out of power?
What should I do if my VAIO computer does not enter Sleep mode?
© 2011 Sony Corporation
261

Search
VAIO User Guide VPCEG2/VPCEH2/VPCEJ2/VPCEK2/VPCEL2 Series Back | Back to Top
How to Use
Troubleshooting
Hardware
Software
Network / Internet
Backup / Recovery
Security
Peripheral Devices
Touch pad
Why can’t I use the touch pad?
How do I disable the touch pad?
How do I avoid unintentional clicks caused by a light touch on the touch pad?
What should I do if the pointer does not move?
What should I do if my VAIO computer screen freezes?
© 2011 Sony Corporation
262

Search
VAIO User Guide VPCEG2/VPCEH2/VPCEJ2/VPCEK2/VPCEL2 Series Back | Back to Top
How to Use
Troubleshooting
Hardware
Software
Network / Internet
Backup / Recovery
Security
Peripheral Devices
Wireless LAN
What should I do if I cannot find (the VAIO Smart Network icon) in the desktop
notification area?
What should I do if I cannot use the wireless LAN function?
What should I do if I do not know the SSID or security key for the access
point?
What should I do if I cannot connect my VAIO computer to an access point (or
the Internet)?
What should I do if I cannot play back movies or audio tracks received via
wireless LAN, or their playback is interrupted? Why is the data transfer speed
slow?
How can I find the physical address (MAC address) of the built-in wireless
network interface of my VAIO computer?
© 2011 Sony Corporation
263

Search
VAIO User Guide VPCEG2/VPCEH2/VPCEJ2/VPCEK2/VPCEL2 Series Back | Back to Top
How to Use
Troubleshooting
Hardware
Software
Network / Internet
Backup / Recovery
Security
Peripheral Devices
Display
Why do sound interruptions and/or dropped frames occur when I play high-
definition videos, such as those recorded with the AVCHD digital video
camcorder?
You might be looking for the following topics:
Why does the viewfinder show no images or poor-quality images?
What should I do if captured images contain dropped frames and audio interruptions?
What should I do if captured images flicker?
What should I do if my VAIO computer screen freezes?
What should I do if my computer screen goes blank?
What should I do if I cannot see proper images on the computer screen?
What should I do if videos are not displayed on the computer screen?
What should I do if videos are not displayed smoothly?
What should I do if no image is displayed on my TV screen or external display connected to
the HDMI output port?
How do I change the LCD brightness?
What should I do if no image is displayed on my external display or TV screen?
What should I do if some items do not fit on the computer screen?
What should I do if the top, bottom, and sides of images are not displayed because they are
too large to fit on the computer screen?
What should I do if black bars appear along the top, bottom, and sides of the computer
screen when I display images?
What should I do if 3D images are not displayed on my 3D TV connected to the HDMI output
port?
© 2011 Sony Corporation
264

Search
VAIO User Guide VPCEG2/VPCEH2/VPCEJ2/VPCEK2/VPCEL2 Series Back | Back to Top
How to Use
Troubleshooting
Hardware
Software
Network / Internet
Backup / Recovery
Security
Peripheral Devices
Software
Why do sound interruptions and/or dropped frames occur when I play high-
definition videos, such as those recorded with the AVCHD digital video
camcorder?
What should I do if my game software does not work or it keeps crashing?
© 2011 Sony Corporation
265


Search
VAIO User Guide VPCEG2/VPCEH2/VPCEJ2/VPCEK2/VPCEL2 Series Back | Back to Top
How to Use
Troubleshooting
Hardware
Software
Network / Internet
Backup / Recovery
Security
Peripheral Devices
BLUETOOTH
What should I do if I cannot use the BLUETOOTH(R) function?
What should I do if other BLUETOOTH(R) devices cannot connect to my VAIO
computer?
What should I do if the BLUETOOTH(R) icon is not displayed in the desktop
notification area?
What should I do if I cannot find the BLUETOOTH(R) device I want to
communicate with?
Why is my BLUETOOTH(R) connection slow?
Why can’t I use the BLUETOOTH(R) function when I log onto my VAIO
computer as a user with a standard user account?
Why can’t I use BLUETOOTH(R) devices when I switch users?
Why can’t I exchange business card data with a mobile phone or PDA?
© 2011 Sony Corporation
267

Search
VAIO User Guide VPCEG2/VPCEH2/VPCEJ2/VPCEK2/VPCEL2 Series Back | Back to Top
How to Use
Troubleshooting
Hardware
Software
Network / Internet
Backup / Recovery
Security
Peripheral Devices
Wireless LAN
What should I do if I cannot find (the VAIO Smart Network icon) in the desktop
notification area?
What should I do if I cannot use the wireless LAN function?
What should I do if I do not know the SSID or security key for the access
point?
What should I do if I cannot connect my VAIO computer to an access point (or
the Internet)?
What should I do if I cannot play back movies or audio tracks received via
wireless LAN, or their playback is interrupted? Why is the data transfer speed
slow?
How can I find the physical address (MAC address) of the built-in wireless
network interface of my VAIO computer?
© 2011 Sony Corporation
268
Search
VAIO User Guide VPCEG2/VPCEH2/VPCEJ2/VPCEK2/VPCEL2 Series Back | Back to Top
How to Use
Troubleshooting
Hardware
Software
Network / Internet
Backup / Recovery
Security
Peripheral Devices
LAN
What should I do if I cannot find (the VAIO Smart Network icon) in the desktop
notification area?
What should I do if I cannot use the wireless LAN function?
What should I do if I do not know the SSID or security key for the access
point?
What should I do if I cannot connect my VAIO computer to an access point (or
the Internet)?
What should I do if I cannot play back movies or audio tracks received via
wireless LAN, or their playback is interrupted? Why is the data transfer speed
slow?
How can I find the physical address (MAC address) of the built-in wireless
network interface of my VAIO computer?
© 2011 Sony Corporation
269
Search
VAIO User Guide VPCEG2/VPCEH2/VPCEJ2/VPCEK2/VPCEL2 Series Back | Back to Top
How to Use
Troubleshooting
Hardware
Software
Network / Internet
Backup / Recovery
Security
Peripheral Devices
Floppy disk
What should I do if I cannot boot my VAIO computer from the floppy disk
drive?
You might be looking for the following topics:
What should I do if I cannot remove my floppy disk?
What should I do if my VAIO computer does not recognize the floppy disk?
What should I do if I cannot save data on my floppy disk?
© 2011 Sony Corporation
270

Search
VAIO User Guide VPCEG2/VPCEH2/VPCEJ2/VPCEK2/VPCEL2 Series Back | Back to Top
How to Use
Troubleshooting
Hardware
Software
Network / Internet
Backup / Recovery
Security
Peripheral Devices
USB
What should I do if I cannot boot my VAIO computer from the floppy disk
drive?
You might be looking for the following topics:
What should I do if I cannot print a document?
What should I do if I cannot remove my floppy disk?
What should I do if my VAIO computer does not recognize the floppy disk?
What should I do if I cannot save data on my floppy disk?
What should I do if my VAIO computer does not recognize the USB device?
© 2011 Sony Corporation
271

Search
VAIO User Guide VPCEG2/VPCEH2/VPCEJ2/VPCEK2/VPCEL2 Series Back | Back to Top
How to Use
Troubleshooting
Hardware
Software
Network / Internet
Backup / Recovery
Security
Peripheral Devices
Recovery
What should I do if my VAIO computer becomes unstable (Windows starts)?
What should I do if my VAIO computer becomes unstable (Windows does not
start)?
What should I do if I cannot complete the recovery process?
What should I do if I cannot create Recovery Media?
How do I create Recovery Media?
What should I do if I cannot recover my VAIO computer from the recovery
area?
How can I restore my VAIO computer system to its factory default settings?
How can I reinstall the original software and drivers?
© 2011 Sony Corporation
272

Search
VAIO User Guide VPCEG2/VPCEH2/VPCEJ2/VPCEK2/VPCEL2 Series Back | Back to Top
How to Use
Troubleshooting
Hardware
Software
Network / Internet
Backup / Recovery
Security
Peripheral Devices
Password
What should I do if I forget the power-on password to start my VAIO
computer?
What should I do if I forget the Windows password?
What should I do if the Enter Onetime Password message appears and
Windows does not start after I enter a wrong power-on password three times
consecutively?
© 2011 Sony Corporation
274

Search
VAIO User Guide VPCEG2/VPCEH2/VPCEJ2/VPCEK2/VPCEL2 Series Back | Back to Top
How to Use
Troubleshooting
Hardware
Software
Network / Internet
Backup / Recovery
Security
Peripheral Devices
Floppy disk
What should I do if I cannot boot my VAIO computer from the floppy disk
drive?
What should I do if I cannot remove my floppy disk?
What should I do if my VAIO computer does not recognize the floppy disk?
What should I do if I cannot save data on my floppy disk?
© 2011 Sony Corporation
275
Search
VAIO User Guide VPCEG2/VPCEH2/VPCEJ2/VPCEK2/VPCEL2 Series Back | Back to Top
How to Use
Troubleshooting
Hardware
Software
Network / Internet
Backup / Recovery
Security
Peripheral Devices
USB
What should I do if I cannot print a document?
What should I do if I cannot boot my VAIO computer from the floppy disk
drive?
What should I do if I cannot remove my floppy disk?
What should I do if my VAIO computer does not recognize the floppy disk?
What should I do if I cannot save data on my floppy disk?
What should I do if my VAIO computer does not recognize the USB device?
© 2011 Sony Corporation
276


Search
VAIO User Guide VPCEG2/VPCEH2/VPCEJ2/VPCEK2/VPCEL2 Series Back | Back to Top
How to Use
Troubleshooting
Hardware
Software
Network / Internet
Backup / Recovery
Security
Peripheral Devices
What should I do if I forget the power-on
password to start my VAIO computer?
If you forget the password [Details], you cannot start your VAIO computer.
When you forget your user password:
Enter the machine password to reset the user password at the BIOS setup screen.
When you forget your machine password:
The password needs to be reset and a fee will be charged. To reset the password,
contact an authorized Sony service/support center.
© 2011 Sony Corporation
278

Search
VAIO User Guide VPCEG2/VPCEH2/VPCEJ2/VPCEK2/VPCEL2 Series Back | Back to Top
How to Use
Troubleshooting
Hardware
Software
Network / Internet
Backup / Recovery
Security
Peripheral Devices
What should I do if sound interruptions occur
during video or audio playback?
Sound interruptions may occur when the CPU load is high. In this case, reduce the CPU
load by exiting all running software other than playback software, or by disabling
unnecessary audio effects applied to playback.
© 2011 Sony Corporation
279

Search
VAIO User Guide VPCEG2/VPCEH2/VPCEJ2/VPCEK2/VPCEL2 Series Back | Back to Top
How to Use
Troubleshooting
Hardware
Software
Network / Internet
Backup / Recovery
Security
Peripheral Devices
What should I do if I do not hear sound from a
digital audio device connected to the digital
output port?
To output sound from a digital audio device connected to the digital output port on your
VAIO computer, you need to change the sound output to the digital audio device.
[Details]
© 2011 Sony Corporation
280

Search
VAIO User Guide VPCEG2/VPCEH2/VPCEJ2/VPCEK2/VPCEL2 Series Back | Back to Top
How to Use
Troubleshooting
Hardware
Software
Network / Internet
Backup / Recovery
Security
Peripheral Devices
What should I do if my microphone does not
work?
Check if your microphone is selected as a recording device.
Click Hardware and Sound in the Control Panel window, select the Recording
tab in the Sound window, and check if there is a check mark on your desired
microphone icon. If not, select the icon and click Set Default. If the icon is not
displayed, make sure the microphone is properly connected to your VAIO computer.
If you are using an external microphone, use a plug-in power microphone.
© 2011 Sony Corporation
281

Search
VAIO User Guide VPCEG2/VPCEH2/VPCEJ2/VPCEK2/VPCEL2 Series Back | Back to Top
How to Use
Troubleshooting
Hardware
Software
Network / Internet
Backup / Recovery
Security
Peripheral Devices
What should I do if I hear microphone feedback
from speakers when using my microphone?
Microphone feedback may occur when your microphone receives the sound from a sound
output device, such as speakers.
Keep the microphone away from a sound output device.
Turn down the volume of the speakers and the microphone.
© 2011 Sony Corporation
282

Search
VAIO User Guide VPCEG2/VPCEH2/VPCEJ2/VPCEK2/VPCEL2 Series Back | Back to Top
How to Use
Troubleshooting
Hardware
Software
Network / Internet
Backup / Recovery
Security
Peripheral Devices
What should I do if I do not hear sound from
speakers or headphones?
Check if the volume from speakers or headphones is not minimized.
Keep pressing the Fn+F4 keys to turn up the volume loud enough to hear sound.
[Details]
Check if the volume in Windows is not turned off or minimized. [Details]
When the volume is turned off (
), click (Deactivate muting) to turn on the volume
(
). When the volume is minimized, turn up the volume.
When connecting external speakers or headphones, check the following:
Make sure external speakers or headphones are properly connected to your VAIO
computer. [Details]
If external speakers require external power, make sure the speakers are securely
connected to an AC outlet.
Make sure external speakers are turned on.
Make sure the volume from external speakers is not minimized.
Make sure the sound output device is correctly selected. [Details]
Check the volume on the playback software you are using.
© 2011 Sony Corporation
283
Search
VAIO User Guide VPCEG2/VPCEH2/VPCEJ2/VPCEK2/VPCEL2 Series Back | Back to Top
How to Use
Troubleshooting
Hardware
Software
Network / Internet
Backup / Recovery
Security
Peripheral Devices
What should I do if I cannot use the
BLUETOOTH(R) function?
Make sure the WIRELESS indicator light on your VAIO computer is on.
When the WIRELESS indicator light is off, you cannot use the BLUETOOTH function.
Set the WIRELESS switch on the computer to ON and open the VAIO Smart
Network settings window to make sure that the switch next to BLUETOOTH in the
window is toggled to On.
Check whether the BLUETOOTH function is enabled.
Click
(Start), All Programs, and VAIO Smart Network or click (the VAIO
Smart Network icon) in the desktop notification area to open the VAIO Smart
Network settings window. Make sure that the switch next to BLUETOOTH in the
window is toggled to On.
© 2011 Sony Corporation
284
Search
VAIO User Guide VPCEG2/VPCEH2/VPCEJ2/VPCEK2/VPCEL2 Series Back | Back to Top
How to Use
Troubleshooting
Hardware
Software
Network / Internet
Backup / Recovery
Security
Peripheral Devices
What should I do if other BLUETOOTH(R) devices
cannot connect to my VAIO computer?
See What should I do if I cannot find the BLUETOOTH device I want to
communicate with?. [Details]
Make sure that the authentication (pairing) between the device and your VAIO computer
has been properly performed.
Some BLUETOOTH devices require authentication (pairing) before establishing
connection with another device. Perform the authentication process before connecting to
such devices.
Make sure that your VAIO computer allows BLUETOOTH devices to find the computer.
Click
(arrow) in the desktop notification area, right-click (the BLUETOOTH icon),
and click Open Settings to open the settings window. Click the Options tab and
make sure that the Allow Bluetooth devices to find this computer check box is
selected.
© 2011 Sony Corporation
285
Search
VAIO User Guide VPCEG2/VPCEH2/VPCEJ2/VPCEK2/VPCEL2 Series Back | Back to Top
How to Use
Troubleshooting
Hardware
Software
Network / Internet
Backup / Recovery
Security
Peripheral Devices
What should I do if the BLUETOOTH(R) icon is not
displayed in the desktop notification area?
Make sure that the switch next to BLUETOOTH is set to On in the VAIO Smart
Network window.
Follow these steps to open the Bluetooth Settings window and check the settings:
Click
(Start) and Devices and Printers. Right-click the BLUETOOTH device icon
and click Bluetooth settings. Click the Options tab and select the Show the
Bluetooth icon in the notification area check box.
© 2011 Sony Corporation
286

Search
VAIO User Guide VPCEG2/VPCEH2/VPCEJ2/VPCEK2/VPCEL2 Series Back | Back to Top
How to Use
Troubleshooting
Hardware
Software
Network / Internet
Backup / Recovery
Security
Peripheral Devices
What should I do if I cannot find the
BLUETOOTH(R) device I want to communicate
with?
Shorten the distance between your VAIO computer and the BLUETOOTH device within
33 feet/10 meters.
If the computer is more than 33 feet/10 meters away from the BLUETOOTH device,
communication will not be possible.
The computer may not be able to communicate with the BLUETOOTH device even within
33 feet/10 meters due to obstacles between the devices, radio wave quality, ambient
environment that includes existence of walls and materials of such walls, or software in
use. In such a case, move the computer away from obstructions or closer to the device.
Check that the BLUETOOTH function of the device you want to communicate with is on,
and the device is not in the power saving mode.
Check that the BLUETOOTH function of the device you want to communicate with is
enabled.
Refer to the manual that came with the device for more information.
If the device you want to communicate with is already communicating with another
BLUETOOTH device, it may not be found or it may not be able to communicate with your
VAIO computer.
© 2011 Sony Corporation
287

Search
VAIO User Guide VPCEG2/VPCEH2/VPCEJ2/VPCEK2/VPCEL2 Series Back | Back to Top
How to Use
Troubleshooting
Hardware
Software
Network / Internet
Backup / Recovery
Security
Peripheral Devices
Why is my BLUETOOTH(R) connection slow?
Data transfer speed depends on obstructions and/or the distance between the two
devices, radio wave quality, and the device configuration or software in use.
Move your VAIO computer and BLUETOOTH device closer to each other.
If a version of a BLUETOOTH standard employed on the BLUETOOTH device with which
you want to communicate is not the same version as the one employed on your VAIO
computer, the communication speed may become slower.
When your VAIO computer is equipped with BLUETOOTH Core Specification Version 2.1
+ EDR, if both the BLUETOOTH function and the wireless LAN function are enabled,
interference may occur resulting in slower communication speed or other problems.
Your VAIO computer and BLUETOOTH devices need to be compliant with BLUETOOTH
Core Specification Version 3.0 + HS for high-speed communication between them.
Furthermore, enable both the wireless LAN and BLUETOOTH functions on the computer
beforehand. Some BLUETOOTH profiles do not support high-speed communication.
© 2011 Sony Corporation
288

Search
VAIO User Guide VPCEG2/VPCEH2/VPCEJ2/VPCEK2/VPCEL2 Series Back | Back to Top
How to Use
Troubleshooting
Hardware
Software
Network / Internet
Backup / Recovery
Security
Peripheral Devices
Why can’t I use the BLUETOOTH(R) function
when I log onto my VAIO computer as a user with
a standard user account?
The BLUETOOTH function may not be available to a user with a standard user account
on your VAIO computer.
Log onto the computer as a user with administrative rights.
© 2011 Sony Corporation
289

Search
VAIO User Guide VPCEG2/VPCEH2/VPCEJ2/VPCEK2/VPCEL2 Series Back | Back to Top
How to Use
Troubleshooting
Hardware
Software
Network / Internet
Backup / Recovery
Security
Peripheral Devices
Why can’t I use BLUETOOTH(R) devices when I
switch users?
If you switch users without logging off your system, BLUETOOTH devices will not work.
Be sure to log off before switching users.
© 2011 Sony Corporation
290

Search
VAIO User Guide VPCEG2/VPCEH2/VPCEJ2/VPCEK2/VPCEL2 Series Back | Back to Top
How to Use
Troubleshooting
Hardware
Software
Network / Internet
Backup / Recovery
Security
Peripheral Devices
Why can’t I exchange business card data with a
mobile phone or PDA?
The business card exchange function is not supported.
© 2011 Sony Corporation
291

Search
VAIO User Guide VPCEG2/VPCEH2/VPCEJ2/VPCEK2/VPCEL2 Series Back | Back to Top
How to Use
Troubleshooting
Hardware
Software
Network / Internet
Backup / Recovery
Security
Peripheral Devices
What should I do if the drive tray does not open?
The drive tray may not open with the drive eject button depending on your VAIO
computer status.
Exit all running software and press the drive eject button.
If the drive tray still does not open, restart the computer and press the drive eject button
again.
The drive tray does not open while your VAIO computer is in a power saving mode.
[Details]
Resume the computer from a power saving mode and then restart the computer.
© 2011 Sony Corporation
292

Search
VAIO User Guide VPCEG2/VPCEH2/VPCEJ2/VPCEK2/VPCEL2 Series Back | Back to Top
How to Use
Troubleshooting
Hardware
Software
Network / Internet
Backup / Recovery
Security
Peripheral Devices
Why does it take time to write data to DVD
writable media?
In disc-at-once mode, it may take about 20 to 40 minutes to complete the writing process
after the progress bar reaches 100%. This is normal and does not indicate a malfunction,
so wait until the process is complete.
Because disc-at-once mode writes all the data to a disc at one time, the optical disc
drive writes 1 GB of dummy data to a disc even when the actual data size is less than 1
GB to ensure playback compatibility.
Some players can play only discs that are created in disc-at-once mode. When you play
the created disc on a player other than your VAIO computer, make sure if the player
supports disc writing mode you selected.
© 2011 Sony Corporation
293
Search
VAIO User Guide VPCEG2/VPCEH2/VPCEJ2/VPCEK2/VPCEL2 Series Back | Back to Top
How to Use
Troubleshooting
Hardware
Software
Network / Internet
Backup / Recovery
Security
Peripheral Devices
What should I do if I cannot play a disc, or
dropped frames and/or sound interruptions occur
during playback?
Exit all running software other than playback software.
Try using other playback software, such as DVD playback software.
Change the theme to Windows 7 Basic from Control Panel if the current theme is
Windows Aero.
To play DVD media with Content Protection for Recordable Media (CPRM), you need to
install a CPRM pack for playback software on your VAIO computer.
Uninstall playback or writing software installed on your VAIO computer after purchase.
For instructions on how to uninstall the software, refer to the help file included with the
software or Windows Help and Support.
© 2011 Sony Corporation
294

Search
VAIO User Guide VPCEG2/VPCEH2/VPCEJ2/VPCEK2/VPCEL2 Series Back | Back to Top
How to Use
Troubleshooting
Hardware
Software
Network / Internet
Backup / Recovery
Security
Peripheral Devices
Why can’t I write data to a disc?
DVD+R DL, DVD+R, DVD-R DL, or DVD-R media are not rewritable. You can write data
to such media only once and cannot delete data on the media.
See Supported Discs for more information. [Details]
© 2011 Sony Corporation
295

Search
VAIO User Guide VPCEG2/VPCEH2/VPCEJ2/VPCEK2/VPCEL2 Series Back | Back to Top
How to Use
Troubleshooting
Hardware
Software
Network / Internet
Backup / Recovery
Security
Peripheral Devices
Why does the System Properties window display
a slower CPU speed than the maximum?
This is normal. Because your VAIO computer’s CPU utilizes a type of CPU speed
controlling technology for power conservation purposes, the System Properties
window may display the current CPU speed instead of the maximum speed.
© 2011 Sony Corporation
296

Search
VAIO User Guide VPCEG2/VPCEH2/VPCEJ2/VPCEK2/VPCEL2 Series Back | Back to Top
How to Use
Troubleshooting
Hardware
Software
Network / Internet
Backup / Recovery
Security
Peripheral Devices
Why is my VAIO computer running slowly and the
CPU clock frequency low while the computer is
running on battery power?
While your VAIO computer is running on battery power, the CPU clock frequency is
reduced for power conserving purposes, which causes the computer to run slowly. This is
normal and does not indicate a malfunction.
© 2011 Sony Corporation
297

Search
VAIO User Guide VPCEG2/VPCEH2/VPCEJ2/VPCEK2/VPCEL2 Series Back | Back to Top
How to Use
Troubleshooting
Hardware
Software
Network / Internet
Backup / Recovery
Security
Peripheral Devices
What should I do if I cannot boot my VAIO
computer from the floppy disk drive?
Turn on your VAIO computer and press the F11 key repeatedly until the VAIO logo
disappears.
If the computer does not boot, restart the computer and try again.
© 2011 Sony Corporation
298

Search
VAIO User Guide VPCEG2/VPCEH2/VPCEJ2/VPCEK2/VPCEL2 Series Back | Back to Top
How to Use
Troubleshooting
Hardware
Software
Network / Internet
Backup / Recovery
Security
Peripheral Devices
What should I do if I cannot remove my floppy
disk?
Close open file(s), make sure the indicator light on the USB floppy disk drive is off, and
then remove your floppy disk from the drive.
© 2011 Sony Corporation
299

Search
VAIO User Guide VPCEG2/VPCEH2/VPCEJ2/VPCEK2/VPCEL2 Series Back | Back to Top
How to Use
Troubleshooting
Hardware
Software
Network / Internet
Backup / Recovery
Security
Peripheral Devices
What should I do if my VAIO computer does not
recognize the floppy disk?
Make sure the floppy disk is properly inserted in the USB floppy disk drive connected to
your VAIO computer.
Make sure the floppy disk is right-side up before inserting it into the drive.
Make sure the USB floppy disk drive is securely connected to your VAIO computer.
Remove the floppy disk from the drive and then insert it again.
© 2011 Sony Corporation
300

Search
VAIO User Guide VPCEG2/VPCEH2/VPCEJ2/VPCEK2/VPCEL2 Series Back | Back to Top
How to Use
Troubleshooting
Hardware
Software
Network / Internet
Backup / Recovery
Security
Peripheral Devices
What should I do if I cannot save data on my
floppy disk?
Make sure your floppy disk is properly inserted in the USB floppy disk drive connected to
your VAIO computer.
Make sure the floppy disk is right-side up before inserting it into the drive.
If a message indicating that your floppy disk is full appears, your floppy disk does not
have enough free space.
Change the floppy disk to another with enough free space and then save data again.
If a message indicating that your floppy disk is write-protected appears, slide a write-
protect tab on the floppy disk to disable the write-protect feature.
Sliding the write-protect tab to the open position enables the write-protect feature.
© 2011 Sony Corporation
301
Search
VAIO User Guide VPCEG2/VPCEH2/VPCEJ2/VPCEK2/VPCEL2 Series Back | Back to Top
How to Use
Troubleshooting
Hardware
Software
Network / Internet
Backup / Recovery
Security
Peripheral Devices
What should I do if the pointer does not move?
When the pointer does not move because your finger reached an edge of the touch pad,
take the finger off the touch pad and put the finger on the touch pad around the center of
the touch pad.
The pointer may not move as intended depending on the software you are using.
In such a case, wait for a while before moving the pointer again.
If the pointer still does not move, press the Ctrl+Alt+Delete keys and click
(shut
down) located at the lower right corner of your VAIO computer screen to turn off the
computer.
If the problem persists, press and hold the power button or slide the power switch to the
right for more than four seconds.
Turning off the computer with the Ctrl+Alt+Delete keys, the power button, or the
power switch may cause loss of unsaved data.
© 2011 Sony Corporation
302

Search
VAIO User Guide VPCEG2/VPCEH2/VPCEJ2/VPCEK2/VPCEL2 Series Back | Back to Top
How to Use
Troubleshooting
Hardware
Software
Network / Internet
Backup / Recovery
Security
Peripheral Devices
What should I do if my VAIO computer screen
freezes?
Restart your VAIO computer.
Press the Ctrl+Alt+Delete keys and click
(arrow) and Restart.
If the problem persists, press and hold the power button for more than four seconds, or
slide the power switch to the right for more than four seconds.
© 2011 Sony Corporation
303

Search
VAIO User Guide VPCEG2/VPCEH2/VPCEJ2/VPCEK2/VPCEL2 Series Back | Back to Top
How to Use
Troubleshooting
Hardware
Software
Network / Internet
Backup / Recovery
Security
Peripheral Devices
What should I do if I cannot enter certain
characters with my keyboard?
Check if the Caps lock indicator light is on or off.
If the indicator light is on, characters appear in uppercase when you press a key without
holding down the Shift key. Press the Shift+Caps Lock keys to turn off the indicator
light, and then you can type characters in lowercase. [Details]
Check if the Num lock indicator light is on or off.
If the indicator light is on, you can type numeric characters printed on each key on the
keyboard.
If the indicator light is off, you can type alphanumeric characters printed on each key on
the keyboard.
Press the Num Lk key to turn on the indicator light. Press the key again to turn off the
indicator light. [Details]
© 2011 Sony Corporation
304

Search
VAIO User Guide VPCEG2/VPCEH2/VPCEJ2/VPCEK2/VPCEL2 Series Back | Back to Top
How to Use
Troubleshooting
Hardware
Software
Network / Internet
Backup / Recovery
Security
Peripheral Devices
What should I do if my keyboard configuration is
wrong?
The language layout of your keyboard is labeled on the packaging box. If you choose a
different regional keyboard when you complete the Windows setup, the key configuration
will be mismatched. To change the keyboard configuration, refer to Windows Help
and Support.
© 2011 Sony Corporation
305

Search
VAIO User Guide VPCEG2/VPCEH2/VPCEJ2/VPCEK2/VPCEL2 Series Back | Back to Top
How to Use
Troubleshooting
Hardware
Software
Network / Internet
Backup / Recovery
Security
Peripheral Devices
Why doesn’t the “Memory Stick Duo” icon appear
in the Computer window?
The icon does not appear when no “Memory Stick Duo” is inserted into the slot.
© 2011 Sony Corporation
306

Search
VAIO User Guide VPCEG2/VPCEH2/VPCEJ2/VPCEK2/VPCEL2 Series Back | Back to Top
How to Use
Troubleshooting
Hardware
Software
Network / Internet
Backup / Recovery
Security
Peripheral Devices
Why can’t I write data to a memory card?
Some types of memory cards are equipped with an erasure prevention switch to protect
data from unintentional erasure or overwriting. Make sure the erasure prevention switch is
off.
© 2011 Sony Corporation
307

Search
VAIO User Guide VPCEG2/VPCEH2/VPCEJ2/VPCEK2/VPCEL2 Series Back | Back to Top
How to Use
Troubleshooting
Hardware
Software
Network / Internet
Backup / Recovery
Security
Peripheral Devices
Why doesn’t the memory card icon appear in the
Computer window?
The icon will not appear if no memory card is inserted in the slot.
© 2011 Sony Corporation
308

Search
VAIO User Guide VPCEG2/VPCEH2/VPCEJ2/VPCEK2/VPCEL2 Series Back | Back to Top
How to Use
Troubleshooting
Hardware
Software
Network / Internet
Backup / Recovery
Security
Peripheral Devices
What should I do if I forget the Windows
password?
The Windows password is case-sensitive. Check your password and enter again.
Log on using a user account that has system administrator privileges to reset your
password.
If you forget all passwords for system administrator accounts, you cannot reset any
Windows passwords. You need to perform system recovery. [Details]
© 2011 Sony Corporation
309

Search
VAIO User Guide VPCEG2/VPCEH2/VPCEJ2/VPCEK2/VPCEL2 Series Back | Back to Top
How to Use
Troubleshooting
Hardware
Software
Network / Internet
Backup / Recovery
Security
Peripheral Devices
What should I do if the Enter Onetime Password
message appears and Windows does not start
after I enter a wrong power-on password three
times consecutively?
Press and hold down the power button for more than four seconds and check if the power
indicator light is off. Then, restart your VAIO computer and enter the correct password.
The password is case-sensitive, so be sure to check letters for the current case before
you enter the password.
If you forget the power-on password, you cannot start your VAIO computer. [Details]
© 2011 Sony Corporation
310

Search
VAIO User Guide VPCEG2/VPCEH2/VPCEJ2/VPCEK2/VPCEL2 Series Back | Back to Top
How to Use
Troubleshooting
Hardware
Software
Network / Internet
Backup / Recovery
Security
Peripheral Devices
Why do sound interruptions and/or dropped
frames occur when I play high-definition videos,
such as those recorded with the AVCHD digital
video camcorder?
Playing high-definition videos requires substantial hardware resources, such as CPU,
GPU, or system memory performance on your VAIO computer. During the video
playback, some operations and/or functions may become unavailable, and sound
interruptions, dropped frames, and playback failure may occur depending on the
configuration of the computer.
© 2011 Sony Corporation
311

Search
VAIO User Guide VPCEG2/VPCEH2/VPCEJ2/VPCEK2/VPCEL2 Series Back | Back to Top
How to Use
Troubleshooting
Hardware
Software
Network / Internet
Backup / Recovery
Security
Peripheral Devices
What should I do if my game software does not
work or it keeps crashing?
Check the website of the game if there are any patches or updates to download.
Make sure you have installed the latest video driver software.
On some VAIO computer models, the graphics memory is shared with the system. The
optimal graphic performance in such a case is not guaranteed.
© 2011 Sony Corporation
312

Search
VAIO User Guide VPCEG2/VPCEH2/VPCEJ2/VPCEK2/VPCEL2 Series Back | Back to Top
How to Use
Troubleshooting
Hardware
Software
Network / Internet
Backup / Recovery
Security
Peripheral Devices
What should I do if I cannot print a document?
Make sure the printer settings are correctly configured.
For information on the printer settings, refer to the manual that came with your printer.
Make sure your printer is on.
Refer to the manual that came with your printer for more information.
Make sure the connections between the printer’s power cord and AC adapter and
between the AC adapter and an AC outlet are securely made.
Make sure the appropriate printer driver is installed.
When you connect a new printer, you first need to set up the printer driver. For
information on how to set up the printer driver, refer to the manual that came with your
printer, or visit the website of the manufacturer.
Make sure the status of your printer is displayed as online or ready. Then, make sure the
printer settings are correctly configured as instructed in the manual that came with the
printer.
Make sure your printer is set to Set as Default Printer. Refer to Windows Help
and Support for more information.
Make sure your printer is compatible with Windows installed on your VAIO computer.
Make sure your printer is connected to your network (LAN).
If the printer is directly connected to the network (LAN), make sure a router or a hub is
on.
If the printer is connected to a printer server, make sure an error message is not
displayed on the printer server.
Make sure your software is working properly.
The software may not support your document format. In such a case, your document will
not be printed properly. Contact the software publisher or the manufacturer of your
printer.
Make sure the correct printer port for your printer is selected.
For more information on the printer port settings, refer to the manual that came with the
printer, or contact the manufacturer.
© 2011 Sony Corporation
313
Search
VAIO User Guide VPCEG2/VPCEH2/VPCEJ2/VPCEK2/VPCEL2 Series Back | Back to Top
How to Use
Troubleshooting
Hardware
Software
Network / Internet
Backup / Recovery
Security
Peripheral Devices
What should I do if my VAIO computer does not
recognize the USB device?
Check if the USB device is on and using its own power supply.
If you are using a digital camera, check if the battery is charged.
If you are using a printer, check if the power cable is connected properly to an AC
outlet.
You may need to install a USB driver for the USB device before connecting the device.
Refer to the manual that came with the USB device for more information.
Try using another USB port on your VAIO computer. The USB driver could be installed to
the specific port you used the first time you connected the device.
USB hubs may prevent the USB device from working because of a power distribution
failure. We recommend you connect the device directly to your VAIO computer without a
hub.
© 2011 Sony Corporation
314

Search
VAIO User Guide VPCEG2/VPCEH2/VPCEJ2/VPCEK2/VPCEL2 Series Back | Back to Top
How to Use
Troubleshooting
Hardware
Software
Network / Internet
Backup / Recovery
Security
Peripheral Devices
What should I do if a message appears indicating
that the battery pack is incompatible or has been
incorrectly installed, after which my VAIO
computer enters Hibernate mode?
This problem could be due to the battery pack not being installed properly. To solve this
problem, turn off your VAIO computer and remove the battery pack, then reinstall it.
[Details]
If the problem persists, it is likely the installed battery pack cannot be used with your
VAIO computer, or may have failed. Turn off the computer, remove the battery pack and
replace it with a new one specified by Sony.
© 2011 Sony Corporation
315

Search
VAIO User Guide VPCEG2/VPCEH2/VPCEJ2/VPCEK2/VPCEL2 Series Back | Back to Top
How to Use
Troubleshooting
Hardware
Software
Network / Internet
Backup / Recovery
Security
Peripheral Devices
Why can’t I fully charge my battery pack?
If ambient temperature is outside the specified range or the power consumption of your
VAIO computer is high when you charge the battery pack, the charge current may be
reduced.
© 2011 Sony Corporation
316

Search
VAIO User Guide VPCEG2/VPCEH2/VPCEJ2/VPCEK2/VPCEL2 Series Back | Back to Top
How to Use
Troubleshooting
Hardware
Software
Network / Internet
Backup / Recovery
Security
Peripheral Devices
Why doesn’t my VAIO computer enter Hibernate
mode when the battery pack is running out of
power?
This problem occurs when Windows does not allow a task to be suspended, depending
on the running software or the connected external device.
© 2011 Sony Corporation
317

Search
VAIO User Guide VPCEG2/VPCEH2/VPCEJ2/VPCEK2/VPCEL2 Series Back | Back to Top
How to Use
Troubleshooting
Hardware
Software
Network / Internet
Backup / Recovery
Security
Peripheral Devices
Why does the viewfinder show no images or poor-
quality images?
The built-in camera cannot be shared by more than one software application. Exit the
current application before starting another.
On models with Media Gallery, you cannot use another camera application that uses
the built-in camera while using the gesture function of Media Gallery.
The viewfinder may show some noise, for example horizontal streaks, when you are
viewing a rapid-moving object. This is normal and does not indicate a malfunction.
If the problem persists, restart your VAIO computer.
© 2011 Sony Corporation
318

Search
VAIO User Guide VPCEG2/VPCEH2/VPCEJ2/VPCEK2/VPCEL2 Series Back | Back to Top
How to Use
Troubleshooting
Hardware
Software
Network / Internet
Backup / Recovery
Security
Peripheral Devices
Why is the video input from the built-in camera
suspended momentarily?
The video input may be suspended momentarily if:
A shortcut key with the Fn key is used.
The CPU load increases.
© 2011 Sony Corporation
319

Search
VAIO User Guide VPCEG2/VPCEH2/VPCEJ2/VPCEK2/VPCEL2 Series Back | Back to Top
How to Use
Troubleshooting
Hardware
Software
Network / Internet
Backup / Recovery
Security
Peripheral Devices
Why are captured images poor in quality?
Images captured under fluorescent light may contain light reflections.
A dark portion in captured images may contain noise.
The area on and around the built-in camera is soiled. Clean the area. [Details]
© 2011 Sony Corporation
320

Search
VAIO User Guide VPCEG2/VPCEH2/VPCEJ2/VPCEK2/VPCEL2 Series Back | Back to Top
How to Use
Troubleshooting
Hardware
Software
Network / Internet
Backup / Recovery
Security
Peripheral Devices
What should I do if captured images contain
dropped frames and audio interruptions?
The effect settings on your software application may cause dropped frames. Refer to the
help file included with your software application for more information.
There may be more software applications running than your VAIO computer can handle.
Exit the applications that you are not currently using.
This problem may occur while your VAIO computer is running on the power saving plan,
which reduces the CPU performance. Check the current power plan. [Details]
© 2011 Sony Corporation
321

Search
VAIO User Guide VPCEG2/VPCEH2/VPCEJ2/VPCEK2/VPCEL2 Series Back | Back to Top
How to Use
Troubleshooting
Hardware
Software
Network / Internet
Backup / Recovery
Security
Peripheral Devices
What should I do if captured images flicker?
This problem occurs when you use the built-in camera under fluorescent lights due to a
mismatch between the lighting output frequency and the shutter speed.
To reduce flicker noise, change the direction of your VAIO computer so that you can
adjust the direction of the built-in camera. Some software applications offer adjustable
parameters, such as brightness, to eliminate flicker noise.
© 2011 Sony Corporation
322

Search
VAIO User Guide VPCEG2/VPCEH2/VPCEJ2/VPCEK2/VPCEL2 Series Back | Back to Top
How to Use
Troubleshooting
Hardware
Software
Network / Internet
Backup / Recovery
Security
Peripheral Devices
What should I do if my computer screen goes
blank?
Make sure your VAIO computer is on and not in a power saving mode. [Details]
Make sure your VAIO computer is securely plugged into an AC outlet [Details] and the
power indicator light is on.
The computer screen may be off.
Press any key on the keyboard.
The display output may be set to an external display.
Press the Fn+F7 keys several times to select your desired display output, and then
press the Enter key. [Details]
If your VAIO computer is running on battery power, make sure the battery pack is
installed properly and is charged. [Details]
If you wait for a while and the computer screen remains blank, follow the procedures
below:
Press and hold down the power button for more than four seconds, check if the power
indicator light is off, and then turn on your VAIO computer.
If the problem persists, press and hold down the power button for more than four
seconds and check if the power indicator light is off. Disconnect all cables and
peripheral devices, such as the power cord and the USB device, and wait about five
minutes. Then, put them back in place and turn on your VAIO computer again. For
notebooks, remove the battery pack before restarting the computer.
© 2011 Sony Corporation
323

Search
VAIO User Guide VPCEG2/VPCEH2/VPCEJ2/VPCEK2/VPCEL2 Series Back | Back to Top
How to Use
Troubleshooting
Hardware
Software
Network / Internet
Backup / Recovery
Security
Peripheral Devices
What should I do if I cannot see proper images
on the computer screen?
Make sure the screen color setting is set to True Color (32 bit). Refer to Windows
Help and Support for more information on how to change the setting.
© 2011 Sony Corporation
324

Search
VAIO User Guide VPCEG2/VPCEH2/VPCEJ2/VPCEK2/VPCEL2 Series Back | Back to Top
How to Use
Troubleshooting
Hardware
Software
Network / Internet
Backup / Recovery
Security
Peripheral Devices
What should I do if videos are not displayed on
the computer screen?
The video memory of your VAIO computer may be insufficient for displaying high
resolution videos. In such a case, lower the resolution of the LCD screen. [Details]
If the external display is selected as the display output with the Fn+F7 keys and is
disconnected from your VAIO computer, the computer screen may become unable to
display a video.
In such a case, stop video playback, press the Fn+F7 keys to select the computer
screen as the display output, and then press the Enter key. Then, restart video
playback.
© 2011 Sony Corporation
325

Search
VAIO User Guide VPCEG2/VPCEH2/VPCEJ2/VPCEK2/VPCEL2 Series Back | Back to Top
How to Use
Troubleshooting
Hardware
Software
Network / Internet
Backup / Recovery
Security
Peripheral Devices
What should I do if videos are not displayed
smoothly?
It is recommended you disable your screen saver.
If the screen saver is enabled, it may be activated during DVD playback and prevent the
playback from running successfully. Some screen savers have been found to even
change the display resolution and colors.
If you have set the display output to both the computer and an external display, change
the display output to either of them.
If you are running aero, change the current theme.
Refer to Windows Help and Support for information on how to change the theme.
Some videos may not be displayed smoothly depending on the type or bit rate of the
videos. Lowering the screen resolution may improve video playback performance.
[Details]
© 2011 Sony Corporation
326

Search
VAIO User Guide VPCEG2/VPCEH2/VPCEJ2/VPCEK2/VPCEL2 Series Back | Back to Top
How to Use
Troubleshooting
Hardware
Software
Network / Internet
Backup / Recovery
Security
Peripheral Devices
What should I do if no image is displayed on my
TV screen or external display connected to the
HDMI output port?
Reconnect the HDMI cable (not supplied). [Details]
Make sure you are using an HDCP-compliant display. The copyright protected content is
not displayed on a non-HDCP compliant display.
© 2011 Sony Corporation
327

Search
VAIO User Guide VPCEG2/VPCEH2/VPCEJ2/VPCEK2/VPCEL2 Series Back | Back to Top
How to Use
Troubleshooting
Hardware
Software
Network / Internet
Backup / Recovery
Security
Peripheral Devices
How do I change the LCD brightness?
Press the Fn+F5 or Fn+F6 keys to adjust the LCD brightness of your VAIO computer.
[Details]
To adjust the LCD brightness of the connected external display, such as a computer
display or a TV, use the brightness control on the external display.
© 2011 Sony Corporation
328
Search
VAIO User Guide VPCEG2/VPCEH2/VPCEJ2/VPCEK2/VPCEL2 Series Back | Back to Top
How to Use
Troubleshooting
Hardware
Software
Network / Internet
Backup / Recovery
Security
Peripheral Devices
What should I do if no image is displayed on my
external display or TV screen?
Press the Fn+F7 keys several times to select your desired display output, and then
press the Enter key. [Details]
© 2011 Sony Corporation
329

Search
VAIO User Guide VPCEG2/VPCEH2/VPCEJ2/VPCEK2/VPCEL2 Series Back | Back to Top
How to Use
Troubleshooting
Hardware
Software
Network / Internet
Backup / Recovery
Security
Peripheral Devices
What should I do if some items do not fit on the
computer screen?
Check that the text size is set to 100%. If not, some items, for example a software menu,
may not be displayed correctly, depending on the software you are using.
Refer to Windows Help and Support for more information on how to change the
text size.
© 2011 Sony Corporation
330

Search
VAIO User Guide VPCEG2/VPCEH2/VPCEJ2/VPCEK2/VPCEL2 Series Back | Back to Top
How to Use
Troubleshooting
Hardware
Software
Network / Internet
Backup / Recovery
Security
Peripheral Devices
What should I do if the top, bottom, and sides of
images are not displayed because they are too
large to fit on the computer screen?
Change the resolution (size) of the screen image. [Details]
Adjust the screen resolution in the HDMI output resolution settings. [Details]
© 2011 Sony Corporation
331

Search
VAIO User Guide VPCEG2/VPCEH2/VPCEJ2/VPCEK2/VPCEL2 Series Back | Back to Top
How to Use
Troubleshooting
Hardware
Software
Network / Internet
Backup / Recovery
Security
Peripheral Devices
What should I do if black bars appear along the
top, bottom, and sides of the computer screen
when I display images?
Change the resolution (size) of the screen image. [Details]
Adjust the screen resolution in the HDMI output resolution settings. [Details]
© 2011 Sony Corporation
332

Search
VAIO User Guide VPCEG2/VPCEH2/VPCEJ2/VPCEK2/VPCEL2 Series Back | Back to Top
How to Use
Troubleshooting
Hardware
Software
Network / Internet
Backup / Recovery
Security
Peripheral Devices
What should I do if 3D images are not displayed
on my 3D TV connected to the HDMI output port?
Check if the Blu-ray Disc playback software settings are correctly configured.
If your VAIO computer is connected to your 3D TV through an AV amplifier, make sure
the AV amplifier supports 3D playback.
Check the HDMI output resolution settings on your VAIO computer. If the resolution is not
set to 1920x1080 or 1280x720, images are not displayed in 3D.
You should also refer to the manual that came with your 3D TV for more information on
3D playback.
© 2011 Sony Corporation
333

Search
VAIO User Guide VPCEG2/VPCEH2/VPCEJ2/VPCEK2/VPCEL2 Series Back | Back to Top
How to Use
Troubleshooting
Hardware
Software
Network / Internet
Backup / Recovery
Security
Peripheral Devices
What should I do if I cannot find (the VAIO
Smart Network icon) in the desktop notification
area?
Click (arrow) in the desktop notification area to view all the icons.
© 2011 Sony Corporation
334

Search
VAIO User Guide VPCEG2/VPCEH2/VPCEJ2/VPCEK2/VPCEL2 Series Back | Back to Top
How to Use
Troubleshooting
Hardware
Software
Network / Internet
Backup / Recovery
Security
Peripheral Devices
What should I do if I cannot use the wireless LAN
function?
Make sure the WIRELESS switch is set to ON. [Details]
To use the wireless LAN function on your VAIO computer, you need to set up the
function. Check the wireless LAN settings of the computer. [Details]
If connection utility software supplied with a third-party wireless LAN product is installed,
uninstall it.
If connection utility software is installed, Windows may fail to configure the wireless LAN
settings. Be sure to take a note of your settings, (such as security keys) before
uninstalling.
© 2011 Sony Corporation
335

Search
VAIO User Guide VPCEG2/VPCEH2/VPCEJ2/VPCEK2/VPCEL2 Series Back | Back to Top
How to Use
Troubleshooting
Hardware
Software
Network / Internet
Backup / Recovery
Security
Peripheral Devices
What should I do if I do not know the SSID or
security key for the access point?
You can find the key in the setting screen of your access point.
Refer to the manual that came with your access point for more information.
© 2011 Sony Corporation
336
Search
VAIO User Guide VPCEG2/VPCEH2/VPCEJ2/VPCEK2/VPCEL2 Series Back | Back to Top
How to Use
Troubleshooting
Hardware
Software
Network / Internet
Backup / Recovery
Security
Peripheral Devices
What should I do if I cannot connect my VAIO
computer to an access point (or the Internet)?
See What should I do if I cannot use the wireless LAN function?. [Details]
Make sure power to the access point is on.
Check the access point settings.
In the following settings, your VAIO computer may fail to connect to an access point, or
the connection may be unstable.
When the access point is set to refuse communication with a device whose SSID is
set to “ANY,” and the SSID of your VAIO computer or the access point is set to “ANY.”
When the access point is in stealth mode.
For more information, refer to the manual that came with your access point, or consult
your wireless LAN service provider.
Make sure your VAIO computer and access point are connected to one another. [Details]
Connection capability is affected by distance, obstructions, device configuration, radio
wave strength/interference, wall materials, running software, etc.
Move your VAIO computer away from obstructions or closer to any access point you may
be using.
Check that your access point is displayed in the Currently connected to window.
Click
(Start), Control Panel, Network and Internet, Network and
Sharing Center, and Connect to a network, and then check that your access
point is displayed in the Currently connected to window.
Make sure the security key is correct.
The security key is displayed as “•” for security reasons. Enter once more. [Details]
Make sure that the wireless LAN function settings of your VAIO computer correspond
with the settings of your access point. [Details]
Make sure your VAIO computer is properly configured for Internet access.
If your antivirus software or firewall function of the Windows operating system imposes
restrictions on Internet access, your VAIO computer may not connect to the Internet.
Check the settings.
Make sure Maximum Performance is selected for Wireless Adapter Settings in
the Power Options window.
Click
(Start), Control Panel, System and Security and Power Options.
Click Change plan settings for the current power plan and Change advanced
power settings. Select the Advanced settings tab and double-click Wireless
Adapter Settings and Power Saving Mode, and then select Maximum
Performance.
© 2011 Sony Corporation
337

Search
VAIO User Guide VPCEG2/VPCEH2/VPCEJ2/VPCEK2/VPCEL2 Series Back | Back to Top
How to Use
Troubleshooting
Hardware
Software
Network / Internet
Backup / Recovery
Security
Peripheral Devices
What should I do if I cannot play back movies or
audio tracks received via wireless LAN, or their
playback is interrupted? Why is the data transfer
speed slow?
Move your VAIO computer away from obstructions, or closer to any access point you
may be using.
Connection capability is affected by distance, obstructions, device configuration, radio
wave strength/interference, wall materials, running software, etc.
If you are using an access point, the device may be temporarily overloaded depending on
how many other devices are communicating via the access point.
Wait for a while and try again.
Change the channel setting of your access point. By changing the channel, interference
on your wireless network may be reduced and data transfer speed may improve.
If access point channel interference occurs, data transfer speed may be reduced.
If your access point interferes with other access points, change the access point channel.
Refer to the manual that came with your access point for more information.
Make sure that a microwave oven is not operating near your wireless LAN devices.
The 2.4 GHz frequency band, on which the wireless LAN operates, is used by various
devices and apparatus. If you use a microwave oven while communicating via wireless
LAN, data transfer rate may slow down, communication range may narrow, or
communication may be interrupted.
Make sure Maximum Performance is selected for Wireless Adapter Settings in
the Power Options window. [Details]
© 2011 Sony Corporation
338
Search
VAIO User Guide VPCEG2/VPCEH2/VPCEJ2/VPCEK2/VPCEL2 Series Back | Back to Top
How to Use
Troubleshooting
Hardware
Software
Network / Internet
Backup / Recovery
Security
Peripheral Devices
How can I find the physical address (MAC
address) of the built-in wireless network interface
of my VAIO computer?
If MAC address filtering of your access point is enabled, register the MAC address of
your VAIO computer in the setup screen of the access point. Otherwise, the computer
cannot connect to the access point.
Click
(Start), All Programs, Accessories, Command Prompt, and then
enter “ipconfig /all” and press the Enter key. You can find the physical address (MAC
address) in the Physical Address field under Wireless LAN adapter Wireless
Network Connection:. Enter the address in the setup screen of the access point.
© 2011 Sony Corporation
339

Search
VAIO User Guide VPCEG2/VPCEH2/VPCEJ2/VPCEK2/VPCEL2 Series Back | Back to Top
How to Use
Troubleshooting
Hardware
Software
Network / Internet
Backup / Recovery
Security
Peripheral Devices
Why doesn’t my computer screen turn off after
the automatic turn-off time has passed?
Some software applications or screen savers are designed to temporarily disable the
feature of Windows that turns off the computer screen or places your VAIO computer into
Sleep mode after a certain period of inactivity. To solve this problem, exit the running
software application(s) or change the current screen saver.
© 2011 Sony Corporation
340

Search
VAIO User Guide VPCEG2/VPCEH2/VPCEJ2/VPCEK2/VPCEL2 Series Back | Back to Top
How to Use
Troubleshooting
Hardware
Software
Network / Internet
Backup / Recovery
Security
Peripheral Devices
What should I do if my VAIO computer does not
turn on (the power indicator light does not turn
on in green)?
Make sure all cables are securely connected to devices, such as between your VAIO
computer and the AC adapter; the AC adapter and the power cord; and the power cord
and an AC outlet. [Details]
If you plug the power cord of your VAIO computer into a power strip with a switch, make
sure the switch is turned on and the power cord of the power strip is securely plugged
into an AC outlet.
If you do not turn off your VAIO computer through the normal procedure, the power
controller may be suspended due to a program error.
Disconnect all cables and peripheral devices, such as the power cord and the USB
device, remove the battery pack, and wait about five minutes. Then, put them back in
place and turn on the computer again.
Before using your VAIO computer for the first time, you need to connect the computer to
a power source with the AC adapter.
Check that you are using the supplied Sony AC adapter. For your safety, use only the
genuine Sony rechargeable battery pack and AC adapter, which are supplied by Sony for
your VAIO computer.
Make sure the battery pack is installed properly.
The battery pack may have run out of power.
Make sure your VAIO computer is not in Hibernate mode by pressing the power button
on the computer. Note that if you press and hold down the power button for more than
four seconds, the computer will turn off.
If you bring your VAIO computer directly from a cold location to a warm one, or use it in a
high humidity location, moisture may condense inside the computer.
In such a case, allow at least one hour before turning on the computer.
Do not use the computer in a high humidity location (a relative humidity of more than 80
%), as it may cause the computer to malfunction.
© 2011 Sony Corporation
341

Search
VAIO User Guide VPCEG2/VPCEH2/VPCEJ2/VPCEK2/VPCEL2 Series Back | Back to Top
How to Use
Troubleshooting
Hardware
Software
Network / Internet
Backup / Recovery
Security
Peripheral Devices
What should I do if my VAIO computer does not
turn on or the power button does not work (the
power indicator light blinks fast)?
The battery pack may not be installed properly.
Remove the battery pack and reinstall it properly. [Details]
If the problem persists, it means the installed battery is not compatible with your VAIO
computer.
Remove the battery pack.
© 2011 Sony Corporation
342
Search
VAIO User Guide VPCEG2/VPCEH2/VPCEJ2/VPCEK2/VPCEL2 Series Back | Back to Top
How to Use
Troubleshooting
Hardware
Software
Network / Internet
Backup / Recovery
Security
Peripheral Devices
What should I do if the power indicator light turns
on in green when I press the power button but
the screen remains blank?
Make sure the brightness and contrast controls are adjusted correctly.
An external display may be selected as the display output.
Press the Fn+F7 keys several times to select your desired display output, and then
press the Enter key.
If you are using an external display, make sure it is plugged into an AC outlet and is on.
Make sure the brightness and contrast controls are adjusted correctly.
Refer to the manual that came with your display for information on how to change the
settings.
Press the Alt+F4 keys several times to close the application window.
An application error may have occurred.
If you wait for a while and the computer screen remains blank, restart your VAIO
computer by following the procedures below in order. Note that following these
procedures may cause working data to become corrupted.
Disconnect all peripheral devices, such as a printer or a USB device, and your VAIO
computer from the network, if any.
Press and hold down the power button for more than four seconds and make sure the
power indicator light is off. Then, turn on your VAIO computer again.
If the problem persists, press and hold down the power button for more than four
seconds and make sure the power indicator light is off. Disconnect all cables
connected to your VAIO computer, such as the AC adapter, remove the battery pack,
and wait more than five minutes. Then, put all cables, peripheral devices, and the
battery pack back in place and turn on the computer again.
If an extra memory module is not installed properly, your VAIO computer may not turn on.
Use of memory modules not specified by Sony or improper installation of memory
modules may cause the computer to fail to boot or to become unstable.
In such a case, reinstall the memory module.
If you use a memory module other than the Sony branded memory module, contact the
sales dealer or the manufacturer of the memory module.
If you bring your VAIO computer directly from a cold location to a warm one, or use it in a
high humidity location, moisture may condense inside the computer.
In such a case, allow at least one hour before turning on the computer.
Do not use the computer in a high humidity location (a relative humidity of more than 80
%), as it may cause the computer to malfunction.
© 2011 Sony Corporation
343
Search
VAIO User Guide VPCEG2/VPCEH2/VPCEJ2/VPCEK2/VPCEL2 Series Back | Back to Top
How to Use
Troubleshooting
Hardware
Software
Network / Internet
Backup / Recovery
Security
Peripheral Devices
What should I do if I cannot turn off my VAIO
computer?
Follow any of these procedures to exit all running software and then turn off your VAIO
computer again.
Click the close button in the window of the running software.
Press the Alt+F4 keys.
If there is unsaved data, a message prompting you to save data appears. Click the
button to save data.
Press the Alt+F4 keys until the Shut Down Windows window appears, select
Shut down from the drop-down list, and click OK.
If you have installed new software on your VAIO computer, check if the software is
working properly, its data is normal, and you have operated it correctly.
Contact the software publisher or designated provider for technical support.
If you connect peripheral devices, such as a printer or a USB device, to your VAIO
computer or connect the computer to your network, disconnect all peripheral devices or
the computer’s network connection and then turn off the computer.
While the computer is communicating with a peripheral device or the network, Windows
does not allow you to turn off the computer. In addition, some peripheral device drivers
for the peripheral devices do not support the feature to force the computer to shut down.
If the computer screen freezes, press the Ctrl+Alt+Delete keys and click (Shut
down) in the lower right corner of the computer screen.
If your VAIO computer freezes with a message indicating the settings are being saved or
the computer is shutting down displayed, follow these procedures in order.
Press the Enter key.
Wait for a while.
If the problem persists, press the Ctrl+Alt+Delete keys.
Wait for a while.
If you still cannot turn off your VAIO computer even after you follow all the above
procedures in this topic, perform the following operations.
Note that performing these operations may cause working data to become corrupted. Be
sure to disconnect the computer from the network before performing the following
operations.
Press the Ctrl+Alt+Delete keys and click (Shut down) in the lower right
corner of the computer screen.
Press and hold the power button for more than four seconds.
Unplug the AC adapter and remove the battery pack from your VAIO computer.
© 2011 Sony Corporation
344

Search
VAIO User Guide VPCEG2/VPCEH2/VPCEJ2/VPCEK2/VPCEL2 Series Back | Back to Top
How to Use
Troubleshooting
Hardware
Software
Network / Internet
Backup / Recovery
Security
Peripheral Devices
Why does my VAIO computer automatically turn
off?
When the battery pack is running out of power, your VAIO computer automatically enters
Hibernate mode and eventually turns off.
Connect the AC adapter to the computer or charge the battery pack.
© 2011 Sony Corporation
345

Search
VAIO User Guide VPCEG2/VPCEH2/VPCEJ2/VPCEK2/VPCEL2 Series Back | Back to Top
How to Use
Troubleshooting
Hardware
Software
Network / Internet
Backup / Recovery
Security
Peripheral Devices
What should I do if my VAIO computer does not
enter Hibernate mode?
If the utility program, such as a printer utility program, is running, exit the program or
temporarily disable it.
If the problem persists, click Change advanced power settings and check if
Allow hybrid sleep under Sleep is set to Off. If it is set to On, change it to Off and
then click OK. [Details]
Your VAIO computer may not enter Hibernate mode if you execute a task on the
computer before the computer completely enters Hibernate mode.
© 2011 Sony Corporation
346

Search
VAIO User Guide VPCEG2/VPCEH2/VPCEJ2/VPCEK2/VPCEL2 Series Back | Back to Top
How to Use
Troubleshooting
Hardware
Software
Network / Internet
Backup / Recovery
Security
Peripheral Devices
What should I do if my VAIO computer does not
enter Sleep mode?
If the utility program, such as a printer utility program, is running, exit the program or
temporarily disable it.
Depending on the type of your screen saver, your VAIO computer may not enter Sleep
mode while the screen saver is activated.
Your VAIO computer may not enter Sleep mode if you execute a task on the computer
before completely entering Sleep mode.
© 2011 Sony Corporation
347
Search
VAIO User Guide VPCEG2/VPCEH2/VPCEJ2/VPCEK2/VPCEL2 Series Back | Back to Top
How to Use
Troubleshooting
Hardware
Software
Network / Internet
Backup / Recovery
Security
Peripheral Devices
Why can’t I use the touch pad?
The touch pad is disabled.
Press the Fn+F1 keys to enable the touch pad. [Details]
Alternatively, you can click
(Start), All Programs, and VAIO Control
Center, and then enable the touch pad in the VAIO Control Center window.
Disconnect a mouse from your VAIO computer, if it is connected.
© 2011 Sony Corporation
348
Search
VAIO User Guide VPCEG2/VPCEH2/VPCEJ2/VPCEK2/VPCEL2 Series Back | Back to Top
How to Use
Troubleshooting
Hardware
Software
Network / Internet
Backup / Recovery
Security
Peripheral Devices
How do I disable the touch pad?
Press the Fn+F1 keys to disable the touch pad. [Details]
Alternatively, you can change the touch pad settings to disable the touch pad in the
VAIO Control Center window. Click
(Start), All Programs, and VAIO
Control Center to display the window.
© 2011 Sony Corporation
349

Search
VAIO User Guide VPCEG2/VPCEH2/VPCEJ2/VPCEK2/VPCEL2 Series Back | Back to Top
How to Use
Troubleshooting
Hardware
Software
Network / Internet
Backup / Recovery
Security
Peripheral Devices
How do I avoid unintentional clicks caused by a
light touch on the touch pad?
Disable the tapping function. [Details]
© 2011 Sony Corporation
350

Search
VAIO User Guide VPCEG2/VPCEH2/VPCEJ2/VPCEK2/VPCEL2 Series Back | Back to Top
How to Use
Troubleshooting
Hardware
Software
Network / Internet
Backup / Recovery
Security
Peripheral Devices
Why can’t I activate the Quick Web Access
function?
You cannot activate the Quick Web Access function if Windows is running.
If your VAIO computer is in Hibernate mode or Sleep mode, turn off the computer and
activate the Quick Web Access function.
© 2011 Sony Corporation
351
Search
VAIO User Guide VPCEG2/VPCEH2/VPCEJ2/VPCEK2/VPCEL2 Series Back | Back to Top
How to Use
Troubleshooting
Hardware
Software
Network / Internet
Backup / Recovery
Security
Peripheral Devices
What should I do if my VAIO computer becomes
unstable (Windows starts)?
Try the suggestions below:
Start VAIO Care to search for a solution. [Details]
Restore computer system files. [Details]
Use the restore point that you created before your VAIO computer becomes unstable.
Uninstall software or a software driver if your VAIO computer has become unstable
after you installed the software or the software driver.
Reinstall the preinstalled software or software drivers on your VAIO computer if such
software or software drivers have not been working properly. [Details]
Restore your VAIO computer from a system image backup if you have created the
backup. Refer to Windows Help and Support for more information.
If the problem persists, follow the instructions in Recovering from the Recovery
Area to recover your VAIO computer. [Details]
If you have not yet created Recovery Media, create the Recovery Media. [Details]
Be sure to make a backup copy of your valuable data before recovering your VAIO
computer. Refer to Windows Help and Support for more information.
Note
Recovering your VAIO computer will delete all the data on the built-in storage
device.
© 2011 Sony Corporation
352

Search
VAIO User Guide VPCEG2/VPCEH2/VPCEJ2/VPCEK2/VPCEL2 Series Back | Back to Top
How to Use
Troubleshooting
Hardware
Software
Network / Internet
Backup / Recovery
Security
Peripheral Devices
What should I do if my VAIO computer becomes
unstable (Windows does not start)?
Try the suggestions below:
Restore computer system files. [Details]
Use the restore point that you created before your VAIO computer becomes unstable.
Restore your VAIO computer from a system image backup if you have created the
backup. Refer to Windows Help and Support for more information.
Any file you have created or changed after you created the system image backup will
not be restored. You need to back up such a file with VAIO Care Rescue. [Details]
Use VAIO Hardware Diagnostics to identify problems on your VAIO computer
With the software, you can check if the computer hardware (a CPU, a memory module,
and a built-in storage device) needs to be replaced. To start VAIO Hardware
Diagnostics, click Tools and VAIO Hardware Diagnostics in VAIO Care
Rescue.
Follow the instructions in Recovering from the Recovery Area to recover your
VAIO computer. [Details]
If you have not backed up your data, be sure to make a backup copy of your valuable
data using VAIO Care Rescue before recovering your VAIO computer. [Details]
If you have a backup created with the Windows backup feature before your VAIO
computer becomes unstable, but you have created or changed the file after that, back
up such a file with VAIO Care Rescue.
Note
Recovering your VAIO computer will delete all the data on the built-in storage
device.
© 2011 Sony Corporation
353

Search
VAIO User Guide VPCEG2/VPCEH2/VPCEJ2/VPCEK2/VPCEL2 Series Back | Back to Top
How to Use
Troubleshooting
Hardware
Software
Network / Internet
Backup / Recovery
Security
Peripheral Devices
What should I do if I cannot complete the
recovery process?
Disconnect all unnecessary external devices from your VAIO computer.
Try the suggestions below:
Check the condition of Recovery Media. If you are using optical discs, check the discs
for dirt or damage. If the discs are not clean, clean them and try recovering your VAIO
computer again.
If you cannot recover your VAIO computer from the recovery area, restart the
computer and recover the computer from the recovery area again, or use Recovery
Media.
If you cannot recover your VAIO computer using a USB flash drive, connect the drive
to another USB port on the computer and try recovering the computer again.
If the problem persists, visit the VAIO online support website for further assistance.
© 2011 Sony Corporation
354
Search
VAIO User Guide VPCEG2/VPCEH2/VPCEJ2/VPCEK2/VPCEL2 Series Back | Back to Top
How to Use
Troubleshooting
Hardware
Software
Network / Internet
Backup / Recovery
Security
Peripheral Devices
What should I do if I cannot create Recovery
Media?
Try the suggestions below:
Restart your VAIO computer. And then, try to create Recovery Media again.
Download and install the latest updates using VAIO Update.
If you use an external DVD drive that comes with an AC adapter, plug the AC adapter
into a power source.
Try other reliable media.
If the problem persists, visit the VAIO online support website for further assistance.
© 2011 Sony Corporation
355


Search
VAIO User Guide VPCEG2/VPCEH2/VPCEJ2/VPCEK2/VPCEL2 Series Back | Back to Top
How to Use
Troubleshooting
Hardware
Software
Network / Internet
Backup / Recovery
Security
Peripheral Devices
What should I do if I cannot recover my VAIO
computer from the recovery area?
Recover your VAIO computer from Recovery Media if you have used software to modify
the recovery area, installed a different operating system from the preinstalled one, or
formatted the built-in storage device without using VAIO Care Rescue.
If the problem persists, visit the VAIO online support website for further assistance.
© 2011 Sony Corporation
357

Search
VAIO User Guide VPCEG2/VPCEH2/VPCEJ2/VPCEK2/VPCEL2 Series Back | Back to Top
How to Use
Troubleshooting
Hardware
Software
Network / Internet
Backup / Recovery
Security
Peripheral Devices
How can I restore my VAIO computer system to
its factory default settings?
There are two ways to recover your VAIO computer system: from Recovery Media
[Details] and from the recovery area [Details].
© 2011 Sony Corporation
358

Search
VAIO User Guide VPCEG2/VPCEH2/VPCEJ2/VPCEK2/VPCEL2 Series Back | Back to Top
How to Use
Troubleshooting
Hardware
Software
Network / Internet
Backup / Recovery
Security
Peripheral Devices
How can I reinstall the original software and
drivers?
You can restore the preinstalled software and drivers using VAIO Care. To restore
them, start VAIO Care [Details] and then click Recovery & restore, Recovery,
and Reinstall Applications and Drivers.
Refer to the help file included with VAIO Care for more information.
© 2011 Sony Corporation
359