
Loading ...
Loading ...
Loading ...
70
DV/Digital8 Dubbing
Before DV/Digital8 Dubbing
This section explains dubbing with a digital video
camera via the DV IN jack on the front panel. If
you want to dub by way of the LINE IN jacks, see
“Recording from connected equipment without a
timer” on page 50.
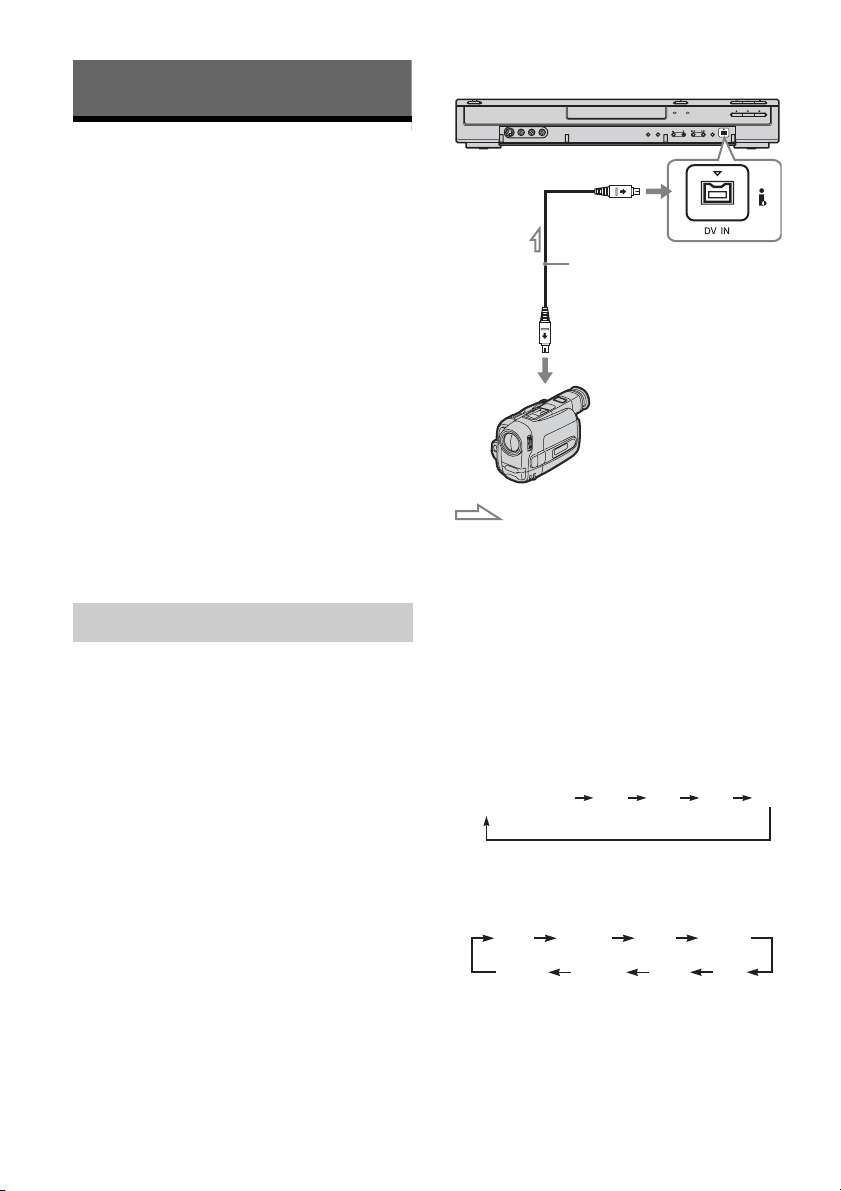
To record from the DV IN jack
The DV IN jack on this recorder conforms to the
i.LINK standard. You can connect any other
equipment that has an i.LINK (DV) jack, and
record digital signals.
Follow the instructions in “Preparing for DV/
Digital8 dubbing,” and then move on to the
section on dubbing. For more information about
i.LINK, see “About i.LINK” on page 92.
z Hint
If you plan to do additional editing on a disc after the
initial dub, use the DV IN jack and record on a DVD-RW
(VR mode).
You can connect a digital video camera to the DV
IN jack on the recorder to record or edit from a
DV/Digital8 format tape. Operation is
straightforward because the recorder will fast
forward and rewind the tape for you – you do not
need to operate your digital video camera. Do the
following to start using the “DV Edit” functions of
this recorder.
See the instruction manual supplied with the
digital video camera as well before connecting.
b Notes
• The DV IN jack is for input only. It will not output
signals.
• You cannot use the DV IN jack when:
– your digital video camera does not work with this
recorder. Connect the camera to the LINE IN jack
and follow the instructions of “Recording from
connected equipment without a timer” on page 50.
– the input signal is not in DVC-SD format. Do not
connect a MICRO MV format digital video camera
even if it has an i.LINK jack.
– the images on the tape contain copy protection
signals, which limit recording.
• If you want to play the disc on other DVD equipment,
finalize the disc (page 38).
Hookups
1 Insert a disc.
See “Inserting a Disc” on page 29.
2 Insert the source DV/Digital8 format tape
into your digital video camera.
For the recorder to record or edit, your digital
video camera must be set to video playback
mode.
3 Press INPUT SELECT on the remote
repeatedly to select “DV.”
The front panel display changes as follows:
4 Press REC MODE on the remote repeatedly
to select the recording mode.
The recording mode changes as follows:
For details about the recording mode, see
page 40.
Preparing for DV/Digital8 dubbing
DVD recorder
to DV IN
i.LINK cable (not supplied)
DV output
Digital video camera
: Signal flow
L2L1 L3 DV
Channel number
HQ SPHSP
LSP
SEP EPSLP
LP
Loading ...
Loading ...
Loading ...