Loading ...
Loading ...
Loading ...
6
Ducting Options
Closely follow the instructions set out in this manual.
All responsability, for any eventual inconveniences, damages or fires caused by not complying with the instructions in this
manual, is declined.
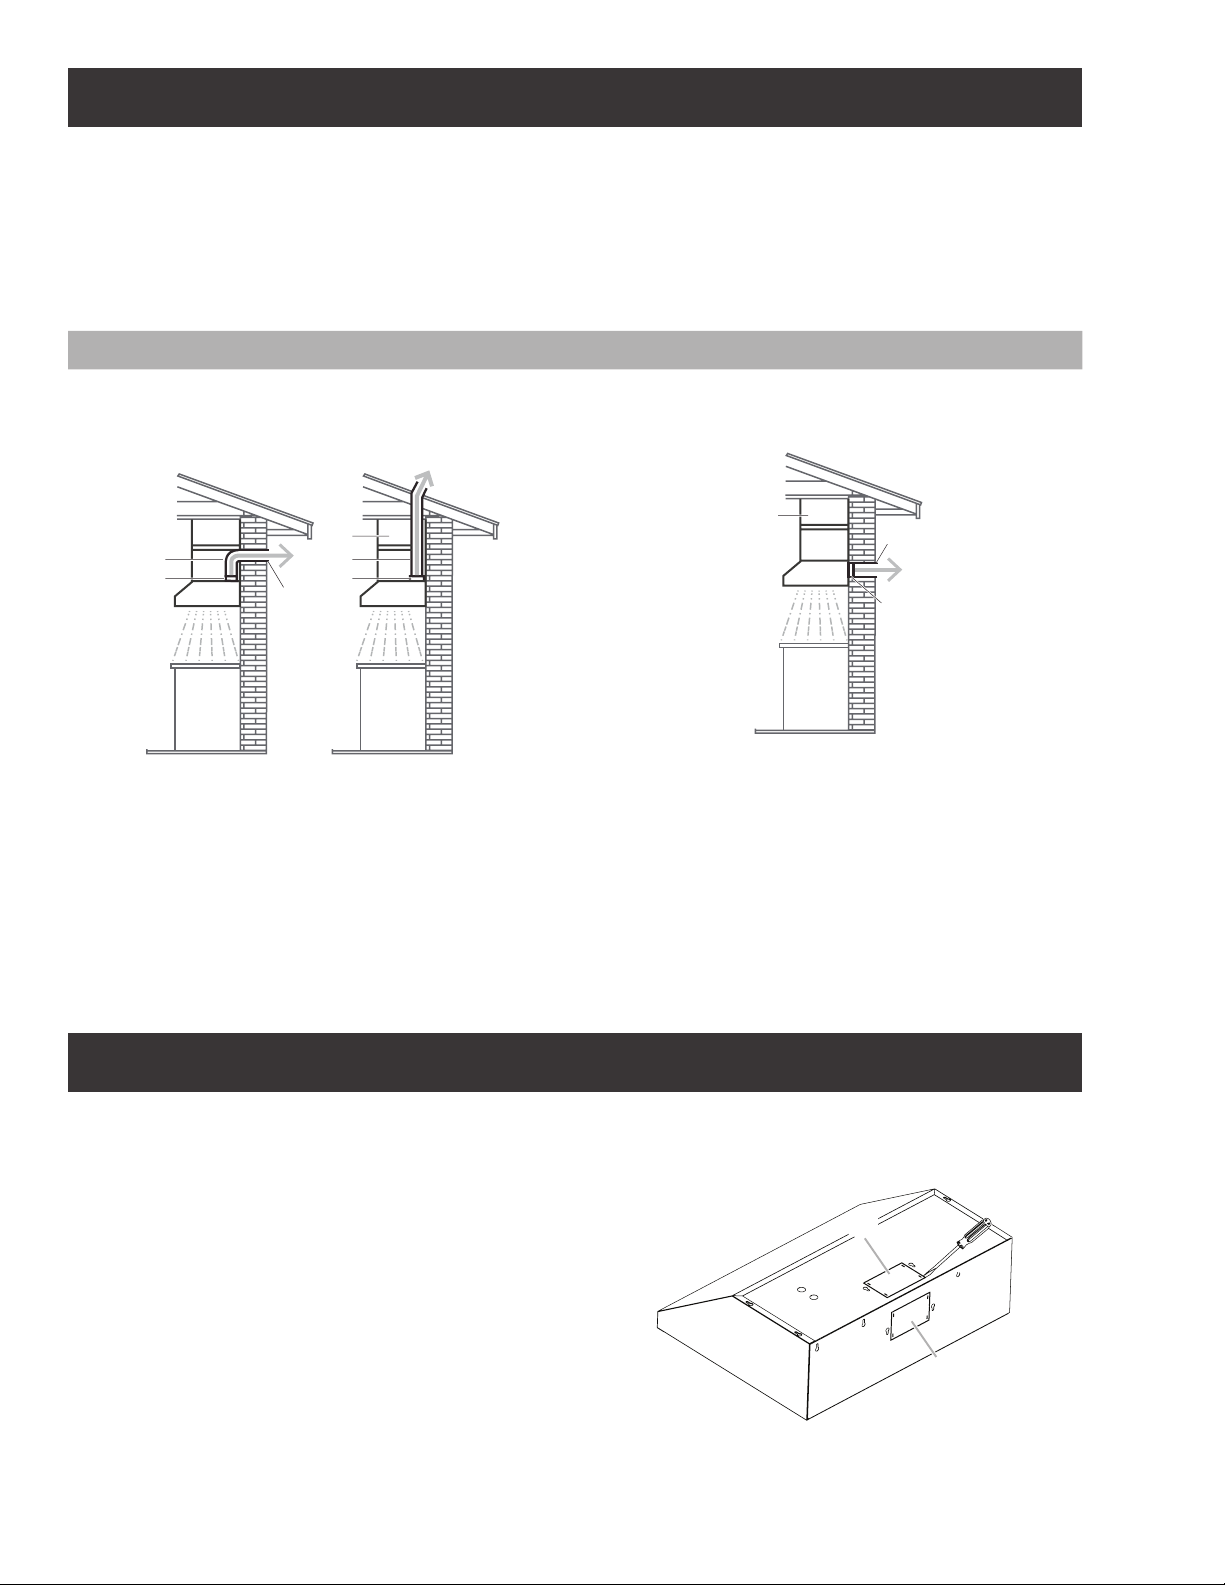
This hood is factory set for venting through the roof (vertical discharge) or wall (horizontal discharge). A 3
1
⁄4” x 10” (8.3 x 25.4
cm) rectangular duct system is needed for installation (not included). The hood exhaust opening is 3
1
⁄4” x 10” (8.3 x 25.4 cm).
NOTE: Flexible vent is not recommended. Flexible vent creates back pressure and air turbulence that greatly reduce performan-
ce. Vent system can terminate either through the roof or wall. To vent through a wall, a 90° elbow is needed.
Vertical Discharge Horizontal Discharge
Use a rectangular duct 3
1
⁄4” x 10” (8.3 x 25.4 cm) and a 3
1
⁄4”
x 10” (8.3 x 25.4 cm) rectangular transition for discharge of
fumes to the outside.
A
B
D
A
B
C
Use a rectangular duct 3
1
⁄4”x10” (8.3x25.4 cm) for discharge
of fumes to the outside.
C
A
B
A. 3
1
⁄4” x 10” (8.3 x 25.4 cm)
rectangular transition
B. 3
1
⁄4” x 10” (8.3 x 25.4 cm) duct
C. Cabinet
D. 90° elbow
A. 3
1
⁄4” x 10” (8.3 x 25.4 cm) rectangular transition
B. 3
1
⁄4” x 10” (8.3 x 25.4 cm) duct
C. Cabinet
Preparation
Do not cut a joist or stud unless absolutely necessary. If a joist
or stud must be cut, then a supporting frame must be
constructed.
Fittings material is provided to secure the hood to most types
of walls/ceilings.
However, a qualified technician must verify suitability of the
materials in accordance with the type of wall/ceiling.
Before making cutouts, make sure there is proper clearance
within the ceiling or wall for exhaust vent.
I CAUTION
Mount this hood so that the bottom edge is at 30” (76.2 cm)
minimum or 36” (91.4 cm) maximum above the cooking surfa-
ce. Household use, please, read installation manual for specific
application. Check your ceiling height and the hood height
maximum before you select your hood.
Installation- Ducting Version
After having chosen the vent option, proceed as follows:
• Prepare duct and conduit cut outs as needed.
• If possible, disconnect and move freestanding or slide-in
range from cabinet opening to provide easier access to
rear wall.
Otherwise put a thick, protective covering over countertop,
cooktop or range to protect from damage and debris.
Select a flat surface for assembling the unit. Cover that
surface with a protective covering and place all canopy
hood parts and hardware in it.
• Determine and mark the centerline on the wall where the
canopy hood will be installed. Select a mounting height
comfortable for the user and mark on wall.
• Prepare duct and conduit cut outs as needed.
• Remove the duct knockouts using a flat blade screwdriver
and a small hammer.
• Use the screwdriver by knocking out the pannel in similar
fashion to a scalpel.
• Take care of sharp edges.
B
A
A. Vertical discharge
B. Horizontal discharge
Loading ...
Loading ...
Loading ...