EN
FR

!
2
Thank you for choosing this product.
We are proud to offer the ideal product for
you and the best complete range of home
appliances for your daily routine.
Carefully read this manual for correct and
safe appliance use and for helpful tips on
efficient maintenance.
Only use the washing machine after
carefully reading these instructions. We
recommend you always keep this manual on
hand and in good condition for any future
owners.
Each product is identified by a unique 16-
character code, also called the “serial
number”, printed on the sticker. This can be
found inside the door opening. This code is
a unique code for your product that you will
need to register the product warranty, or if
you need to contact the Customer Service
Centre.
This appliance is marked according to
the European directive 2012/19/EU
on Waste Electrical and Electronic
Equipment (WEEE).
WEEE contains both polluting substances (which
can cause negative consequences for the
environment) and basic components (which can
be re-used). It is important to have WEEE
subjected to specific treatments, in order to
remove and dispose properly all pollutants, and
recover and recycle all materials. Individuals can
play an important role in ensuring that WEEE
does not become an environmental issue; it is
essential to follow some basic rules:
! WEEE should not be treated as household
waste;
! WEEE should be handed over to the relevant
collection points managed by the municipality or
by registered companies. In many countries, for
large WEEE, home collection could be present.
In many countries, when you buy a new
appliance, the old one may be returned to the
retailer who has to collect it free of charge on a
one-to-one basis, as long as the equipment is of
equivalent type and has the same functions as
the supplied equipment.
1. GENERAL SAFETY RULES
2. INSTALLATION
3. DETERGENT DRAWER
4. PRACTICAL HINTS
5. CLEANING AND MAINTENANCE
6. QUICK USER GUIDE
7. CONTROLS AND PROGRAMS
8.
TROUBLESHOOTING AND WARRANTY
FOR U.K. ONLY
On receipt of your appliance please
check it carefully for damage. Any
damage found must be reported
to the
delivery driver immediately.
Alternatively damage found must be
reported to the retailer within 2 days of
receipt.
Environmental conditions
Contents

!
EN
3
1. GENERAL SAFETY
RULES
! This appliance is intended to
be used in household and
similar applications such as:
- Staff kitchen areas in shops, offices
and other working environments;
- Farm houses;
- By clients in hotels, motels and
other residential type environments;
- Bed and breakfast type environments.
A different use of this appliance
from household environment
or from typical housekeeping
functions, as commercial use by
expert or trained users, is excluded
even in the above applications. If
the appliance is used in a manner
inconsistent with this it may reduce
the life of the appliance and may
void the manufacturer’s warranty.
Any damage to the appliance or
other damage or loss arising
through use that is not consistent
with domestic or household use
(even if located in a domestic or
household environment) shall not
be accepted by the manufacturer to
the fullest extent permitted by law.
! This appliance can be used by
children aged from 8 years and
above and persons with reduced
physical, sensory or mental
capabilities or lack of experience
and knowledge if they have been
given supervision or instruction
concerning use of the appliance
in a safe way and understand the
hazards involved.
Children shall not play with the
appliance. Cleaning and user
maintenance shall not be made
by children without supervision.
! Children should be supervised
to ensure that they do not play
with the appliance.
! Children of less than 3 years
should be kept away unless
continuously supervised.
! If the supply cord is damaged, it
must be replaced by a special
cord or assembly available from
the manufacturer or its service
agent.
! Only use the hose-sets
supplied with the appliance for
the water supply connection
(do not reuse old hose-sets).
! Water pressure must be between
0.05 MPa and 0.8 MPa.
! Make sure carpets or rugs do
not obstruct the base or any of
the ventilation openings.
! After installation, the appliance
must be positioned so that the
plug is accessible.
! The maximum load capacity of
dry clothes depends on the
model used (see control panel).
! To consult the product technical
specification please refer to the
manufacturer website.

!
4
! The technical details (supply
voltage and power input) are
indicated on the product rating
plate
! Make sure that the electrical
system is earthed, complies
with all applicable law and that
the (electricity) socket is
compatible with the plug of the
appliance. Otherwise, seek
qualified professional assistance.
! The use of converters, multiple
sockets or extension cords is
strongly advised against
! Before cleaning or maintaining
the washing machine, unplug
the appliance and turn off the
water tap.
! Do not pull on the power cord
or appliance to unplug the
machine.
! Make sure there is no water in
the drum before opening the
door.
! Do not expose the washing
machine to rain, direct sunlight
or other weather elements.
Protect from possible freezing.
! When moving, do not lift the
washing machine by the knobs
or detergent drawer; during
transport, never rest the door on
the trolley. We recommend two
people lift the washing machine.
! In the event of fault and/or
malfunction, turn off the
washing machine, close the
water tap and do not tamper
with the appliance.
Immediately contact the
Customer Service Centre and
only use original spare parts.
Failure to observe these
instruction may jeopardise
appliance safety.
Electrical connections and
safety instructions
WARNING:
water may reach very high
temperatures during the
wash cycle.

!
EN
5
2. INSTALLATION
! Remove the 2 or 4 transportation
screws (A) on the back and
remove the 2 or 4 flat washers,
rubber bungs and plastic spacer
tubes (B) as illustrated in figure 1.
! If the washing machine is built-in,
unscrew the 3 or 4 transportation
screws (A) and remove the 3 or 4
flat washers, rubber bungs and
plastic spacer tubes (B).
!
During the removal of the screws
occasionally spacer tubes fall
inside the product, these can be
remove by tilting the product forward
and recovering them from the floor or
inside the base of the machine.
! Cover the open transportation screw
holes with the 2 or 4 plastic caps
included in the instruction bag.
! Place the corrugated plastic sheet,
found on top of the appliance during
the unpacking process, into the base
of the appliance as shown in figure 2
(according to the model, consider
version A, B or C).
A
A
A
A
B
B
B
B
1
3
2
1
3
1
2
A
C
B
2
WARNING:
keep packaging materials
away from children.
In some models this operation
will not be necessary, because
the corrugated plastic sheet
will be already placed on the
bottom of the appliance.

!
6
! Connect the water hose to the water
supply tap (fig. 3) only using the hose
supplied with the appliance (do not
reuse old hose-sets).
! SOME MODELS may include one or
more of the following features:
! HOT&COLD (fig. 4):
water mains connection settings with hot
and cold water for higher energy savings.
Connect the grey tube to the cold water
tap and the red one to the hot water
tap. The machine can be connected to
the cold water tap only: in this case, some
programs may start a few minutes later.
! AQUASTOP (fig. 5):
a device located on the supply tube that
stops water flow if the tube deteriorates;
in this case, a red mark will appear in the
window “A” and the tube must be
replaced. To unscrew the nut, press the
one-way lock device "B".
! AQUAPROTECT – SUPPLY TUBE WITH
GUARD (fig. 6):
Should water leak from the primary
internal tube "A", the transparent
containment sheath "B" will contain water
to permit the washing cycle to complete.
At the end of the cycle, contact the
Customer Service Centre to replace the
supply tube.
3
1
4
B
A
5
B
A
6
Hydraulic connections
!
EN
7
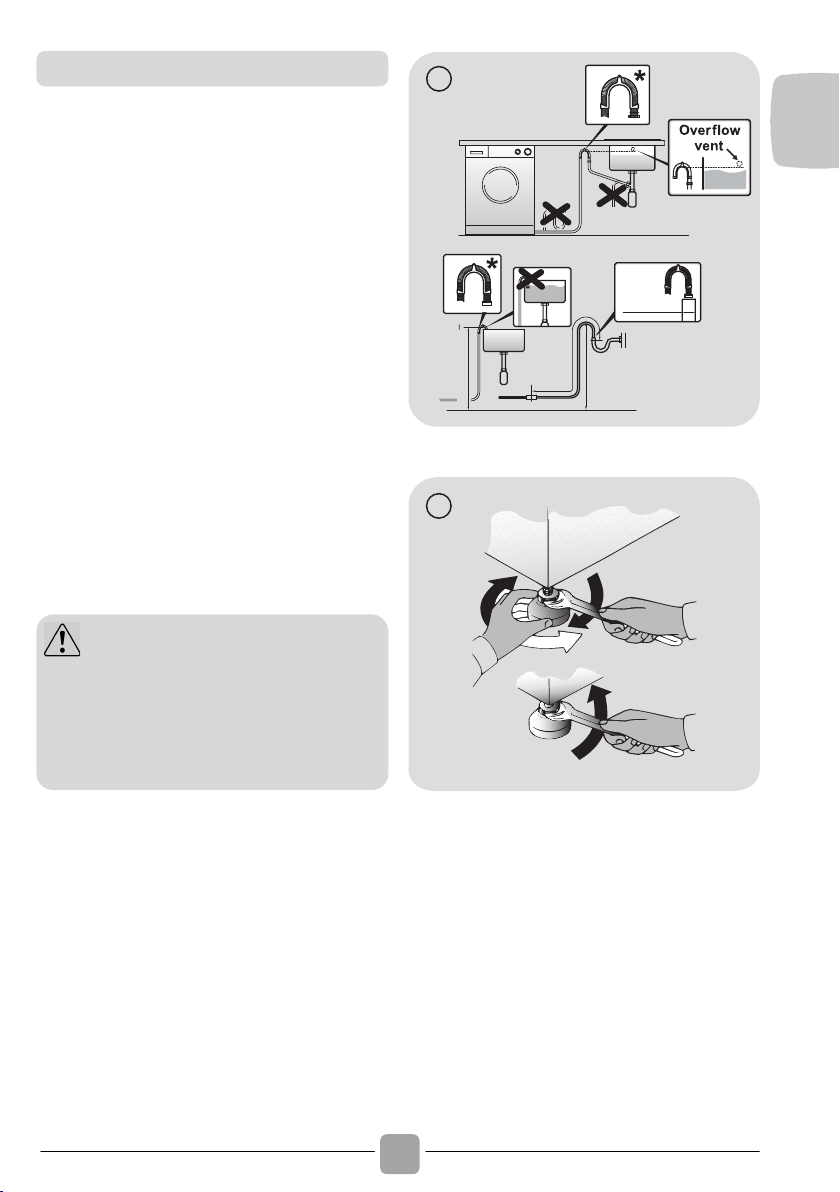
! The washing machine should be installed in
its final position such that the water fill hose
is not kinked or trapped. The corrugated
drain hose should be inserted into suitable
drain pipe of between 50 cm and 85 cm
height above the floor using the curved drain
hose support. If an under sink connection is
used the drain hose must be routed above
the sink overfill opening to prevent back
siphoning. Care must be taken to avoid
kinking or trapping the drain hose (fig. 7).
! Level the appliance using the feet as
illustrated in figure 8:
a. turn the nut clockwise to release the
screw;
b. rotate the foot to raise or lower it until it
touches to the floor;
c. lock the foot, screwing in the nut, until it
tightens against to the bottom of the
washing machine.
! Plug in the appliance.
min 50 cm
max 85 cm
2,5 mt
max
max 100 cm
min 4 cm
7
* ACCESSORY SOLD SEPARATELY
A
B
C
8
Setting
WARNING:
contact the Customer Service Centre
should the power cord need
replacement.
Installation faults are not covered by
the manufacturers warranty.

!
8
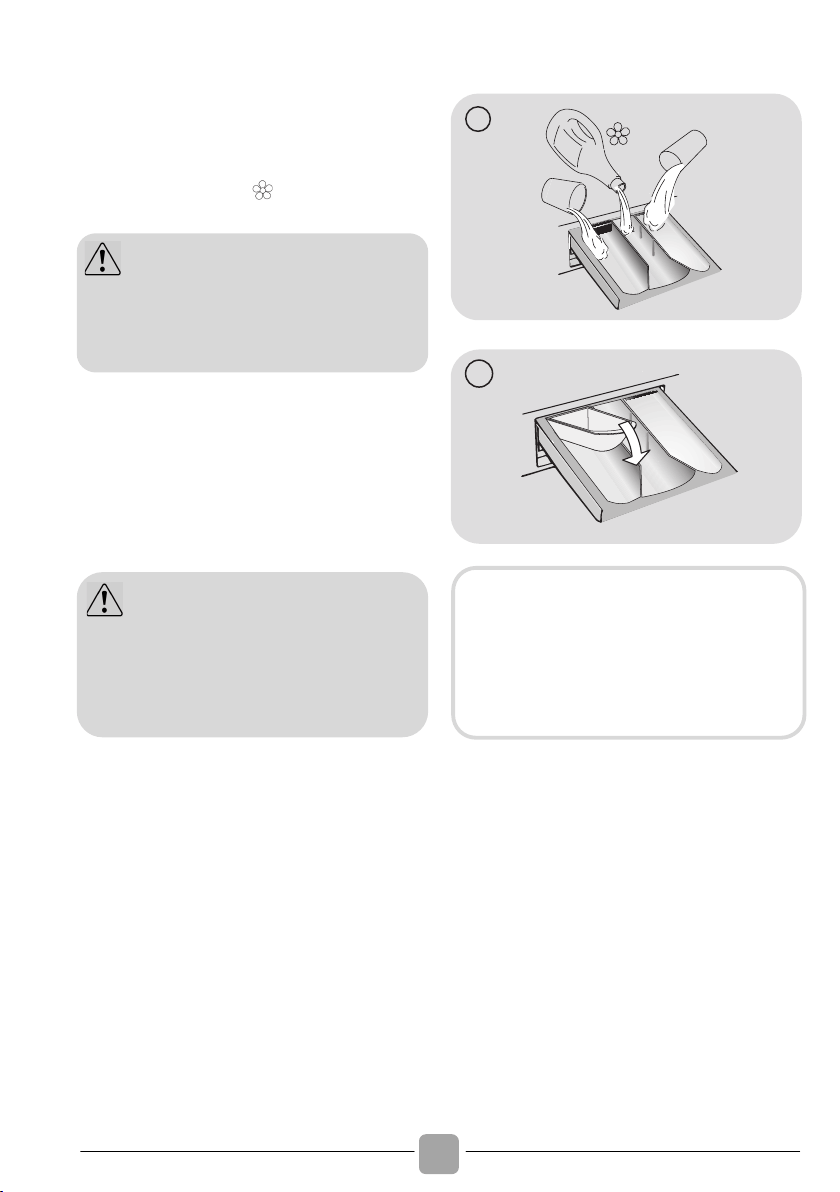
3. DETERGENT DRAWER
The detergent draw is split into 3
compartments as illustrated in figure 9:
! compartment "1": for prewash detergent;
! compartment “ ”: for special additives,
softeners, starch fragrances, etc.;
! compartment "2": for washing
detergent.
A liquid detergent cup is also included IN
SOME MODELS (fig. 10). To use it, place it
in compartment "2". This way, liquid
detergent will only enter the drum at the
right time. The cup can also be used for
bleach when the “Rinse” program is
selected.
2
1
9
10
WARNING:
only use liquid products; the washing
machine is set to automatically dose
additives at each cycle during the last
rinse.
WARNING:
some detergents are not designed for
use in the dispenser drawer but are
supplied with their own dispenser that
is placed in the drum directly.
SOME MODELS are provided with the
automatic dosage, this carries out a
precise measurement of detergent and
softener.
In this case, refer to the
specific section in the CONTROLS
AND PROGRAMS chapter for details.

!
EN
9
4. PRACTICAL HINTS
When sorting laundry, make sure:
- have eliminated metallic objects such as
hair clips, pins, coins, from laundry;
- to have buttoned pillow cases, closed
zips, tied loose belts and long robe
ribbons;
- to have removed rollers, hooks or clips
from curtains;
- to have carefully read clothing washing
labels;
- to have removed any persistent stains
using specific detergents.
! When washing rugs, bedcovers or other
heavy clothing, we recommend you avoid
the spinning cycle.
! To wash wool, make sure the item can be
machine washed. Check the fabric label.
! Leave the appliance’s door slightly open
between washes, to prevent possible bad
smells developing inside the machine.
Tips on how to save money and not
damage the environment when using your
appliance.
! Load the machine to the highest capacity
shown in the programme table for each
programme - this will allow you to SAVE
energy and water.
! Noise and residual laundry moisture are
affected by spin speed: a faster spin is
associated with greater noise and lower
residual moisture in the laundry.
! The most efficient programmes in terms
of combined use of water and energy are
usually the longer-lasting ones with lower
temperature.
Maximise the load size
! Achieve the best use of energy, water,
detergent and time by using the
recommended maximum load size.
Save up to 50% energy by washing a full
load instead of 2 half loads.
Do you need to pre-wash?
! For heavily soiled laundry only!
SAVE detergent, time, water and
between 5 to 15% energy consumption
by NOT selecting Prewash for slight to
normally soiled laundry.
Is a hot wash required?
! Pretreat stains with stain remover or soak
dried in stains in water before washing to
reduce the necessity of a hot wash
programme. Save energy by using a low
temperature wash programme.
Before using a drying programme
(WASHER-DRYERS)
! SAVE energy and time by selecting a
high spin speed to reduce the water
content in laundry before using a drying
programme.
Below is a short guide with tips and advice
on the use of detergent.
! Only use detergents suitable for machine
washing.
! Select your detergent according to the
type of fabric (cotton, delicates,
synthetics, wool, silk, etc.), the colour, the
type and level of soiling and the
programmed washing temperature.
! To use the right amount of detergent,
softener or any other additives, carefully
follow the manufacturer’s instructions
every time: correctly using the
appliance with the right dose allows
you to avoid waste and to reduce the
environmental impact.
Load tips
Useful advice for saving
Dosing the detergent

!
10
! Too much detergent leads to excessive
foam, which prevents the cycle being
carried out correctly. It could also affect
the quality of the washing and rinsing.
The use of ecological detergents without
phosphates may cause the following
effects:
- cloudier rinse drain water: This effect is
tied to the suspended zeolites which do
not have negative effects on rinse
efficiency.
- white powder (zeolites) on laundry at
the end of the wash: this is normal, the
powder is not absorbed by fabric and does
not change its colour.
To remove the zeolites, select a rinse
programme. In the future consider using
slightly less detergent.
- foam in the water at last rinse: this does
not necessary indicate poor rinsing.
Consider using less detergent in future
washes.
- abundant foam: This is often due to the
anionic surfactants found in the detergents
which are hard to eliminate from laundry.
In this case, do not re-rinse to eliminate
these effects: it will not help at all.
We suggest conducting a maintenance
wash using a proprietary cleaner.
If the problem persists or if you suspect a
malfunction, immediately contact an
Authorised Customer Service Centre.
When washing heavily soiled whites,
we recommend using cotton programs
of
60°C or above and a normal washing
powder (heavy duty) that contains
bleaching agents that at medium/high
temperatures provide excellent results.
For washes between 40°C and 60°C
the type of detergent used needs to be
appropriate for the type of fabric and
level of soiling. Normal powders are
suitable for “white” or colour fast fabrics
with high soiling, while liquid detergents
or “colour protecting” powders are
suitable for coloured fabrics with light
levels of soiling.
For washing at temperatures below
40°C we recommend the use of liquid
detergents or detergents specifically
labeled as suitable for low temperature
washing.
For washing wool or silk, only use
detergents specifically formulated for
these fabrics.
!
EN
11
5. CLEANING AND
MAINTENANCE
Looking after your appliance correctly can
extend its lifespan.
! Disconnect the machine from the power
supply.
! Clean the appliance’s external cabinet,
using a damp cloth and AVOIDING
ABRASIVES, ALCOHOL AND/OR
DILUENTS.
! It is advisable to regularly clean the
detergent drawer to avoid the
accumulation of detergent and additive
residues.
! Remove the drawer gently but firmly.
! Clean the drawer under running water
and put it back into its compartment.
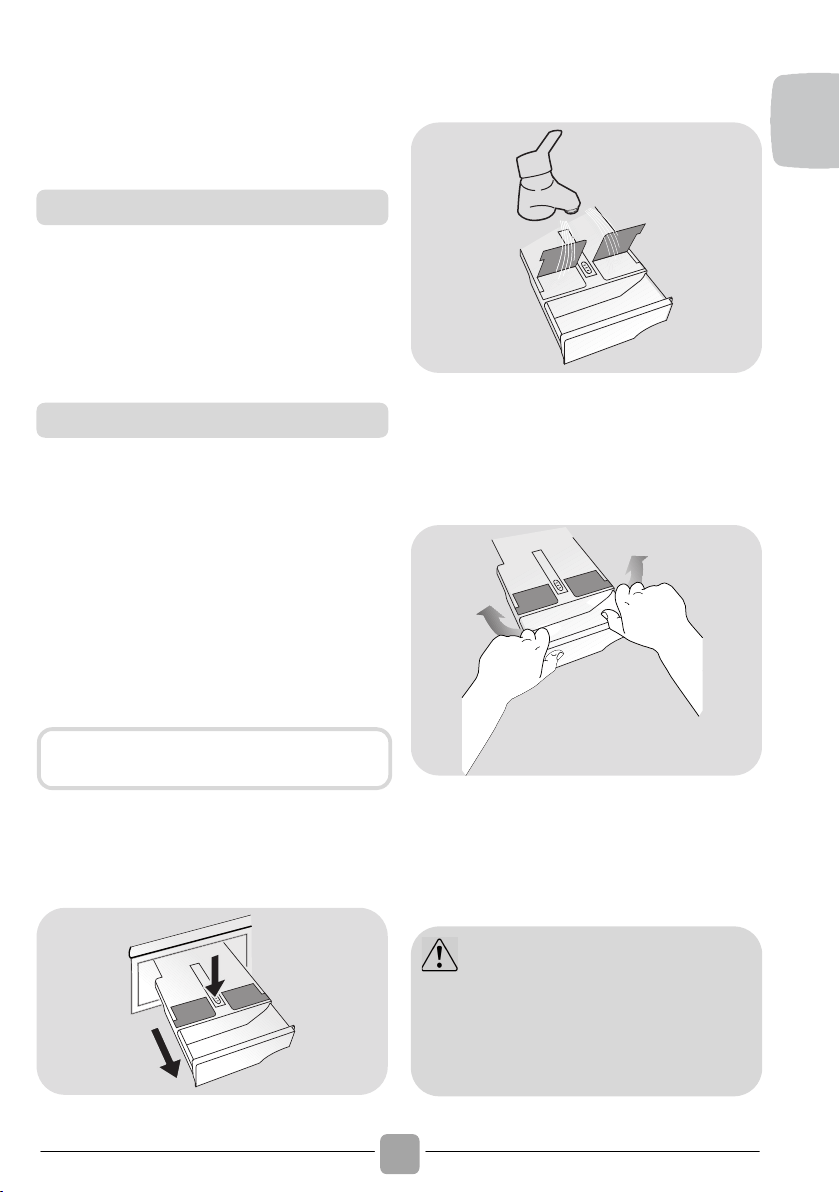
FOR MODELS WITH AUTOMATIC LIQUID
DETERGENT AND SOFTENER DOSING
SYSTEM:
! Pull out the drawer completely by
pressing the release button, paying
attention to the leakage of detergent
residues.
1
2
! Fill the drawer with hot water.
! Shake the drawer in order to let the water
flow in all the compartments.
! Empty the drawer from excess water and
reinsert it completely.
Cleaning the appliance’s exterior
Drawer cleaning
Before proceeding with cleaning, all
the compartments must be empty.
WARNING:
DO NOT use acid products (for example
vinegar) or aggressive detergents to
clean the drawer, in order to avoid
damaging the seals and/or internal
parts of the appliance.

!
12
! The appliance has a special filter that
traps larger residues that could block the
draining system, such as buttons or coins
(depending on the model, consider
version A or B).
We recommend checking and cleaning
the filter 5 or 6 times a year.
! Disconnect the machine from the power
supply.
! Ensure all the water has been emptied
from the drum.
! Before unscrewing the filter, we
recommend you place an absorbent cloth
under it to keep the floor dry. A small
amount of water will come out of the filter
as you remove it - this is normal.
! Turn the filter counter-clockwise to the
limit stop.
! Remove and clean the filter; when
finished, replace it turning it clockwise.
The filter handle will be locked when it is
not possible to turn any further and the
handle is horizontal. Smearing a small
amount of liquid soap on the filter seal will
help refitting.
! Repeat the previous steps in reverse
order to reassemble all parts.
B
A
! If the appliance is kept in a non-heated
room for long periods of time, all water
residues must be completely removed
from the pipes.
! Disconnect the machine from the power
supply socket.
! Detach the tube from the drainage system
and clip on the rear of the machine and
lower it, fully draining water into a bowl.
! Secure the drain tube with the drainage
system and clip on the rear of the
machine when finished.
! Keep the door glass and gasket clean.
Cleaning the pump filter
Suggestions for moves or
prolonged disuse
FOR MODELS WITH AUTOMATIC
LIQUID DETERGENT AND SOFTENER
DOSING SYSTEM:
should you need to tilt or move the
machine, remove the detergent drawer
before proceeding, keeping it
horizontal so as to avoid any leakage.

!
EN
13
6. QUICK USER GUIDE
This washing machine automatically adjusts
the level of the water to the type and
quantity of washing. This system gives a
reduction in energy consumption and a
saving in washing times.
! Turn on the washing machine and select
the required program.
! Adjust the washing temperature if
necessary and press the required "option"
buttons.
! Press the START/PAUSE button to start
washing.
If there is a break in the power supply
whilst the machine is operating, when
the power is restored, the machine will
restart from the beginning of the phase it
was in when the power was lost.
! At the end of the programme, the
message "End" will appear on the display
or, on some models, all wash stage
indicator lights will turn on.
! Turn off the washing machine.
For any type of wash, see the program
table and follow the operating sequence
as indicated.
Water pressure:
min 0.05 Mpa / max 0.8 Mpa
(0.05 MPa dispenses approximately 1 litre
of water in 10 seconds)
Spin r.p.m.: See rating plate.
Power input / Power current fuse amp /
Supply voltage: See rating plate.
7. CONTROLS AND
PROGRAMS
A
DC E FG B
H
L
Q
I MNO P
A
Programme selector with OFF
position
B
START/PAUSE button
C
DELAY START button
D
OPTIONS button
E
RAPID / STAIN LEVEL button
F
TEMPERATURE SELECTION
button
G
SPIN SPEED button
F+G
KEY LOCK
H
Digital display
I
OPTIONS indicator lights
L
DOOR LOCKED indicator light
M
KG DETECTOR indicator light
N
KEY LOCK indicator light
O
TEMPERATURE SELECTION
indicator lights
P
SPIN SPEED indicator lights
Q
SMART TOUCH area
Program selection
Wait until the DOOR LOCKED light has
gone out before opening the door.
Technical data

!
14
! Press the START/PAUSE button to start
the selected cycle.
! Once a programme is selected the
programme selector remains stationary on
the selected programme till cycle ends.
! Switch off the washing machine by
turning the selector to OFF.
! Press to start the selected cycle.
PAUSING THE MACHINE
! Keep the START/PAUSE button pressed
for about 2 seconds (some light indicators
and the residual time display will flash,
showing that the machine is paused).
! Press the START/PAUSE button again to
re-start the programme from the point it
had been paused at.
CANCELLING THE PROGRAMME
! To cancel the programme, set the
selector to the OFF position.
! This button allows you to pre-programme
the wash cycle to delay the start of the
cycle for up to 24 hours.
! To delay the start use the following
procedure:
- Select the required programme.
- Press the delay start button once to
activate it (h00 appears on the display)
and then press it again to set a 1 hour
delay (h01 appears on the display). The
pre-set delay increases by 1 hour each
Opening the door
A special safety device prevents the
door from being opened immediately
after the end of the cycle.
Wait for 2 minutes after the wash
cycle has finished and the "Door
Security" light has gone out before
opening the door.
PROGRAMME selector with OFF
position
When the programme selector is turned
the display lights up to show the settings
for the programme selected.
For energy saving, at the end of the
cycle or with an inactivity period, the
display level contrast will decrease.
N.B.: To switch the machine off, turn
the programme selector to the OFF
position.
The programme selector must be
returned to the OFF position at the end
of each cycle or when starting a
subsequent wash cycle prior to the next
programme being selected and started.
START/PAUSE button
Close the door BEFORE selecting the
button START/PAUSE.
When the START/PAUSE button has
been pressed, the appliance can take
few seconds before it starts working.
For safety reasons, in some wash
cycle phases, the door can be opened
only if the level of the water is below
its lower edge and if the temperature
is less than 45°C. If these conditions
are met, wait for the DOOR LOCKED
light to switch off before opening the
door.
DELAY START button

15
EN
time the button is pressed, until h24
appears on the display, at which point
pressing the button again will reset the
delay start to zero.
- Confirm by pressing the START/PAUSE
button. The delay countdown will begin
and when it has finished the programme
will start automatically.
It is possible to cancel the delay start by
turning the programme selector to OFF.
If there is a break in the power supply
whilst the machine is operating, when
the power is restored, the machine will
restart from the beginning of the phase it
was in when the power was lost.
This button allows you to choose between
three different options:
- EXTRA RINSE
This option allows you to add one rinse at
the end of the washing cycle and is useful
for people with delicate and sensitive
skin, for which a small amount of
detergent residue can cause irritations or
allergies.
It is advisable to also use this function for
the children clothes and for the washing
of heavily soiled items, which requires a
lot of detergent to be used, or for the
washing of toweling items whose fibres
mostly have the tendency to hold the
detergent.
- HYGIENE +
Activated when you set 60°C of
temperature. This option allows deep
cleaning of your clothes by maintaining the
same temperature for the whole wash.
- EASY IRON
This function allows you to minimizes
creases as much as possible, eliminating
the intermediate spins or reducing the
intensity of the last one.
This button allows you to choose between
two different options, depending on the
selected programme.
- RAPID
The button becomes active when you
select the
RAPID
(14/30/44 Min.)
programme
on the knob and allows you to select one
of three durations indicated.
- STAIN LEVEL button
Once the programme has been selected
the wash time set for that programme will
be automatically shown.
This option allows you to choose between
3 levels of wash intensity modifying the
length of the programme, depending on
how much the fabrics are soiled (can only
be used on some programmes as shown
in the table of programmes).
This button allows you to change the
temperature of the wash cycles.
It is not possible to raise the temperature
over the maximum allowed for the
programme, in order to protect the
fabrics.
If you want carry out a cold wash all the
indicators must be off.
TEMPERATURE SELECTION
button
RAPID / STAIN LEVEL button
If an option is selected that is not
compatible with the selected
programme then the option indicator
light first flashes and then goes off.
OPTIONS button
The option buttons should be selected
before pressing the S
TART/PAUSE
button.
!
16
! By pressing this button, it is possible to
reduce the maximum speed, and if you
wish, the spin cycle can be cancelled.
! If the label does not indicate specific
information, it is possible to use the
maximum spin expected in the program.
! To reactivate the spin cycle press the
button until you reach the spin speed you
would like to set.
! It is possible to modify the spin speed
without pausing the machine.
! Pressing simultaneously the buttons
TEMPERATURE SELECTION and SPIN
SPEED for about 3 seconds, the
machine allows you to lock the keys. In
this way, you can avoid making
accidental or unwanted changes if a
button on the display is pressed
accidently during a cycle.
! The key lock can be simply cancelled by
pressing the two buttons simultaneously
again or turning off the appliance.
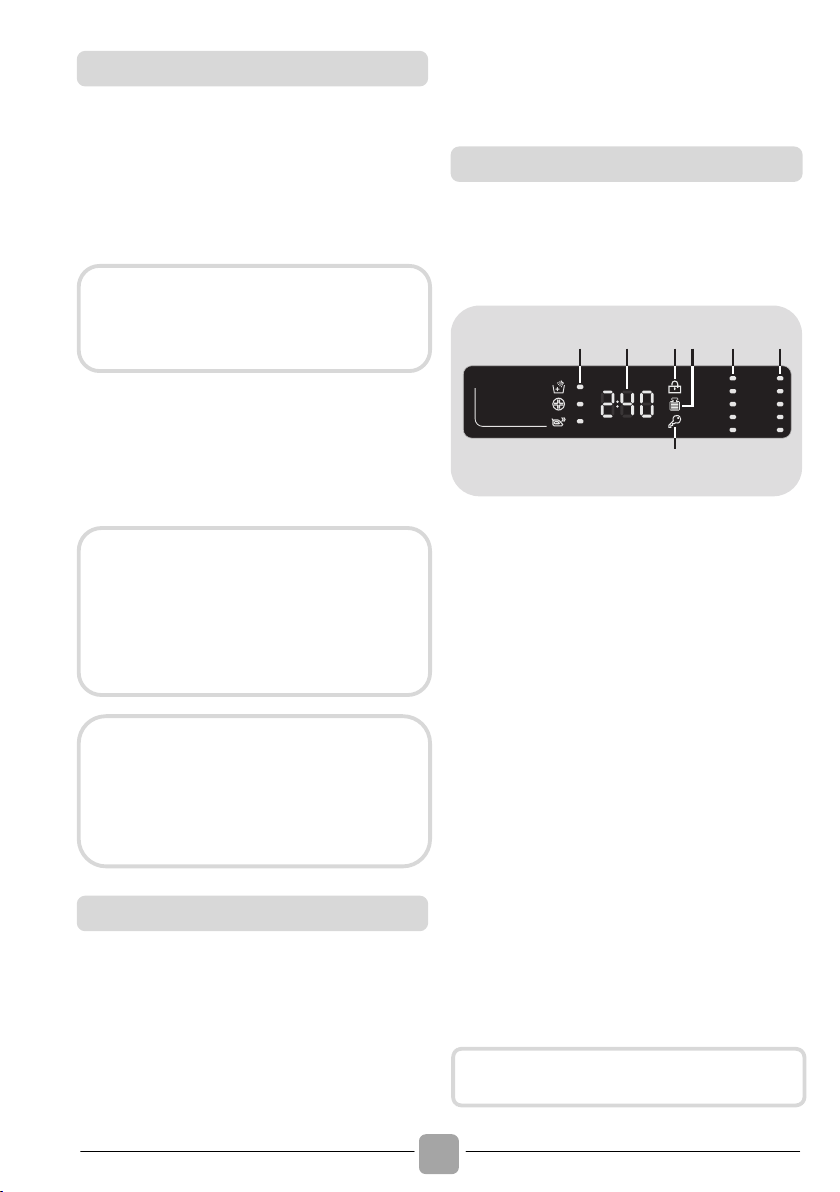
The display’s indicator system allows you to
be constantly informed about the status of
the machine.
1
5
2 3 4 6 7
1) OPTIONS INDICATOR LIGHTS
The indicator lights show the options that
can be selected by the relevant button.
2) CYCLE DURATION
! When a programme is selected the
display automatically shows the cycle
duration, which can vary, depending on
the options selected.
! During the initial filling phase of the cycle
the machine calculates the actual cycle
time needed based on the load size,
content and options selected. The real
time of the wash will then be displayed.
This time can recaulculate during the
wash depending on detergent levels and
load balancing.
3) DOOR LOCKED INDICATOR LIGHT
! The indicator light is illuminated when the
door is fully closed.
SPIN SPEED button
To prevent damage to the fabrics, it is
not possible to increase the speed
over the maximum allowed for the
programme.
An over dosing of detergent can
cause excessive foaming. If the
appliance detects the presence of
excessive foam, it may exclude the
spinning phase or extend the duration
of the program and increase water
consumption.
The machine is fitted with a special
electronic device, which prevents the
spin cycle should the load be
unbalanced. This reduces the noise
and vibration in the machine and so
prolongs the life of your machine.
KEY LOCK
Digital Display
Close the door BEFORE selecting the
START/PAUSE button.

!
EN
17
! When START/PAUSE is pressed on
the machine with the door closed, the
indicator will flash momentarily and then
illuminate.
! A special safety device prevents the door
from being opened immediately after the
end of the cycle. Wait for 2 minutes after
the wash cycle has finished and the
DOOR LOCKED light has gone out before
opening the door. At the end of the cycle
turn the programme selector to OFF.
4) Kg Detector INDICATOR LIGHT
(function active only on Cotton and
Synthetics programmes)
! During the first minutes of the cycle, the
"Kg Detector" indicator will remain on
while the intelligent sensor will weigh the
laundry and adjust the cycle time, water
and electricity consumption accordingly.
! Through every wash phase "Kg Detector"
allows to monitor information on the wash
load in the drum and in the first minutes of
the wash it:
- adjusts the amount of water required;
- determines the length of the wash cycle;
- controls rinsing according to the type of
fabric selected to be washed it;
- adjusts the rhythm of drum rotation for
the type of fabric being washed;
- recognises the presence of too much
soap suds, and if necessary, adjust the
amount of rinse water.
- adjusts the spin speed according to the
load, thus avoiding any imbalance.
5) KEY LOCK INDICATOR LIGHT
The indicator light show that the keys are
locked.
6) WASH TEMPERATURE INDICATOR
LIGHTS
This show the washing temperature of the
selected programme that can be changed
(where allowed) by the relevant button.
If you want carry out a cold wash all the
indicators must be off.
7) SPIN SPEED INDICATOR LIGHTS
This show the spin speed of the selected
programme, you can reduce or omit by the
relevant button.
If the door is not properly closed,
the light will continue to flash for
about 7 seconds, after which the
start command will be automatically
cancelled. In this case, close the
door in the proper way and press
the START/PAUSE button.

!
18
This appliance is equipped with Smart
Touch technology that allows you to
interact, via the App, with smartphones
based on Android operating system and
equipped with NFC (Near Field
Communication) function.
! Download on your smartphone the
Candy simply-Fi App.
FUNCTIONS
The main functions available using the App
are:
! Voice Assistant – A guide to help you
choose the ideal cycle with only three
voice inputs (clothes/fabrics, color, stain
level).
! Cycles – To download and launch new
washing programmes.
! Smart Care – Smart Check-up and Auto-
Clean cycles and a troubleshooting guide.
! My Statistics – Washing statistics and
tips for a more efficient use of your
machine.
HOW TO USE SMART TOUCH
FIRST TIME - Machine registration
! Enter the "Settings" menu of your
Android smartphone and activate the
NFC function inside the "Wireless &
Networks" menu.
! Turn the knob to the Smart Touch
position to enable the sensor on the
dashboard.
! Open the App, create the user profile and
register the appliance following the
instructions on the phone display or the
"Quick Guide" attached on the machine.
SMART TOUCH
The Candy simply-Fi App is available
for devices running both Android and
iOS, both for tablets and for
smartphones. However, you can
interact with the machine and take
advantage of the potential offered
by Smart Touch only with Android
smartphones equipped with NFC
technology, according to following
functional scheme:
Android smartphone
with NFC technology
Interaction with the
machine + contents
Android smartphone
without NFC technology
Contents only
Android Tablet
Contents only
Apple iPhone
Contents only
Apple iPad
Contents only
Get all the details of the Smart Touch
functions, browsing the App in DEMO
mode or go to:
www.candysmarttouch.com
Depending on the smartphone model
and its Android OS version, the
process of the NFC activation may be
different. Refer to the smartphone
manual for more details.
More information, F.A.Q. and the
video for an easy registration are
available on:
www.candysmarttouch.com/how-to

!
EN
19
NEXT TIME – Regular usage
! Every time you want to manage the
machine through the App, first you have
to enable the Smart Touch mode by
turning the knob to the Smart Touch
indicator.
! Make sure you have unlocked your phone
(from stand-by mode) and you have
activated the NFC function; following the
steps mentioned earlier.
! If you want to start a washing cycle, load
the laundry, the detergent and close the
door.
! Select the desired function in the App
(e.g.: starting a programme, the Smart
Check-up cycle, update statistics, etc…).
! Follow the instructions on the phone
display, KEEPING IT ON the Smart
Touch logo on the machine dashboard,
when requested to do so by the App.
NOTES:
Place your smartphone so that the
NFC antenna on its back matches
the position of the Smart Touch logo
on the appliance (as illustred below).
If you do not know the position of
your NFC antenna, slightly move the
smartphone in a circular motion over
the Smart Touch logo until the App
confirms the connection. In order for
the data transfer to be successful, it is
essential TO KEEP THE SMARTPHONE
ON THE DASHBOARD DURING THESE
FEW SECONDS OF THE PROCEDURE;
a message on the device will inform
about the correct outcome of the
operation and advise you when it is
possible to move the smartphone
away.
Thick cases or metallic stickers on
your smartphone could affect or
prevent the transmission of data
between machine and telephone. If
necessary, remove them.
The replacement of some components of
the smartphone (e.g. back cover, battery,
etc...) with non-original ones, could result
in the NFC antenna removal, preventing
the full use of the App.
The management and the control of the
machine via App is only possible "by
proximity": it is therefore not possible to
perform remote operations (e.g.:
from
another room
; outside of the house).
!
20
PROGRAMME
(MAX.) *
1)
2
1
(see control panel)
(MAX.)
2
1
2)
5
6
7
8
9
10
11
12
90°
2)
5
6
7
8
9
10
11
12
60°
2)
5
6
7
8
9
10
11
12
60°
2)
5
6
7
8
9
10
11
12
20°
2)
2,5
3
3,5
4
4,5
5
5,5
6
60°
-
-
-
-
-
-
-
-
-
-
-
-
-
-
-
-
-
-
3
3
3
3
3
3
3
3
40°
3,5
4
4,5
5,5
6
6,5
7
8
60°
1
1
1
2
2
2
2
2,5
30°
2
2
2,5
2,5
2,5
2,5
2,5
3
40°
5
6
7
8
9
10
11
12
40°
14'
1
1
1
1,5
1,5
1,5
1,5
2
30°
30'
1,5
2
2,5
2,5
2,5
2,5
2,5
3
30°
44'
3
3
3,5
3,5
3,5
3,5
3,5
4
40°
2,5
3
3,5
4
4,5
5
5,5
6
40°
Customizable setting that interacts with the App on your smartphone and to
download the cycles (see the dedicated section). The factory sets the default
programme Auto-Clean, which will sanitize the machine.
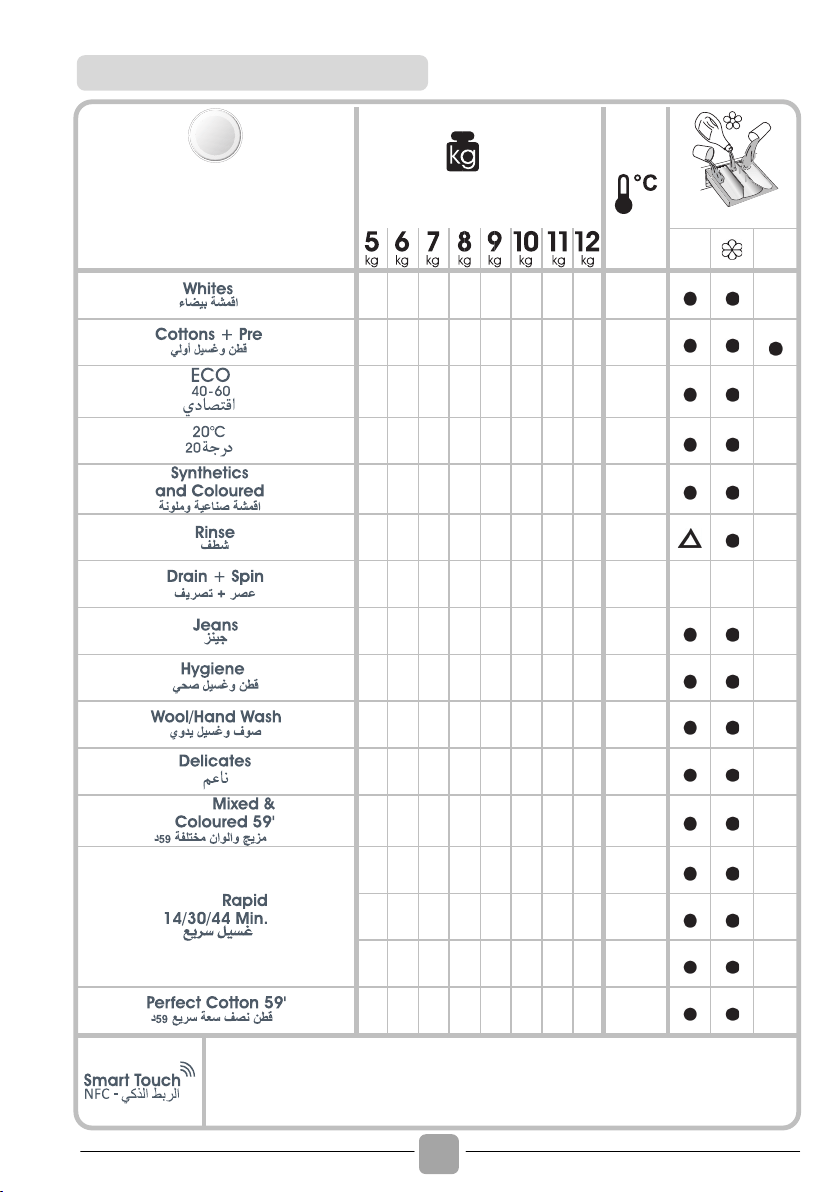
Table of programmes

!
EN
21
Please read these notes:
* Maximum load capacity of dry clothes,
according to the model used (see control
panel).
(Only for models with liquid
detergent compartment)
When only a limited number of
articles have stains which require
treatment with liquid bleaching
agents, preliminary removal of
stain can be carried out in the
washing machine.
Pour the bleach into the liquid
bleach container, inserted into the
compartment marked "2" in the
detergent drawer, and set the
special programme RINSE.
When this phase has terminated,
switch off the appliance, add
the rest of the fabrics and
proceed with a normal wash on
the most suitable programme.
1)
When a programme is selected,
on the display is shown the
display shows the recommended
wash temperature that can be
reduced (where allowed) by the
relevant button.
2)
For the programmes shown you
can adjust the duration and
intensity of the wash using the
STAIN LEVEL button.
3)
Selecting the RAPID program on
the knob, it will be possible to
select with the RAPID button, one
of the three rapid programs
available among 14’, 30’ and 44’.
INFORMATION FOR THE TEST
LABORATORIES
STANDARD PROGRAMMES
ACCORDING TO
(EU) No 1015/2010 e No 1061/2010
ECO 40-60 PROGRAMME
SETTING THE TEMPERATURE TO
40°C
ECO 40-60 PROGRAMME
SETTING THE TEMPERATURE TO
60°C
________________________________________
STANDARD PROGRAMME
ACCORDING TO
(EU) No 2019/2023
ECO 40-60 PROGRAMME

22
To clean different types of fabrics and
various levels of dirt, the washing machine
has specific programs to meet every need
of washing (see table of programmes).
Smart Touch
Customizable setting of the knob that you
have to select
when you would like to
transfer a command from the App to the
machine and to download/start a cycle (see
the dedicated section and the user manual
of the App for more info).
In the
Smart Touch
option the factory sets
as a default the
"Auto-Clean" cycle, m
ade
to clean the drum, remove bad smells and
extend the life of the washing machine.
Make sure there is no load in the drum
before starting the
"Auto-Clean"
cycle, use
a proprietary washing machine cleaning
agent or powder detergent. Leave the door
of the machine open at the end of the cycle
to allow the drum to dry.
Recommended every 50 washes.
Whites
This programme is suitable for washing
coloured cotton garments at 40°C or for
ensuring the highest degree of cleanliness for
cotton resistant laundry washing at 60°C or
90°C. The final spin is at maximum speed that
ensures excellent water removal.
Cottons + Prewash
This programme has been designed to
remove the stronger stains from cotton
white clothes. The prewash guarantees the
tough dirt removal. Add into compartment
"1"
a quantity of detergent equal to 20% of
that used for main wash.
ECO 40
-60
The
ECO 40-60
programme is able to clean
normally soiled cotton laundry declared to
be washable at 40°C or 60°C, together in
the same cycle. This programme is used to
assess the compliance with the EU
Ecodesign legislation (environmentally
friendly products design).
20°C
This innovative programme, allows you to
wash different fabrics and colours together,
such as cottons, synthetics and mixed
fabrics at only 20°C and provides an
excellent cleaning performance. Consumption
on this program is about 40% of a
conventional 40°C cottons wash.
Synthetics and Coloured
This programme allows you to wash
different type’s fabrics and different colours
all together. The rotation movement of the
drum and the water levels are optimized,
both during the washing the rinsing phase.
The accurate spin action, ensures a
reduced form
ation of creases in the fabrics.
Rinse
This program performs 3 rinses with an
intermediate spin (which can be reduced or
excluded by using the appropriate button). It
is used for rinsing any type of fabric, for
example after a wash carried out by hand.
D
rain + Spin
The program completes the drain and a
maximum spin. It is possible to delete or
reduce the spin through the SPIN
SELECTION button.
WARNING:
IMPORTANT WASH PERFORMANCE
ADVICE.
New, coloured garments should be
washed separately for at least 5 or 6
washes.
Certain large dark items such as
jeans and towels should always be
washed separately.
Never mix NON COLOURFAST fabrics.
Choose programme in accordance
with the laundry instructions appearing
on labels, especially the maximum
recommended temperature.
Description of programmes

23
EN
Jeans
This programme has been designed to have
the highest quality cleaning of fabrics such as
denim: ideal for removing dirt without affecting
the elasticity of the fibers.
Hygiene
Program for durable fabrics it allows you to
sanitize the laundry. We recommend the use
of powder detergents to increase the
effectiveness of sanitizing.
Wool/Hand Wash
This programme performs a wash cycle
dedicated to the wool fabrics that can be
washed in a washing machine, the articles
to be washed by hand or laundry items
made from silk or specified as "Wash as
Silk
" on the fabric label.
Delicates
This programme has reduced periods of
drum rotation during the cycle and is
particularly suitable or washing delicate
fabrics. The wash cycle and rinses are
carried out with a high level of water to
ensure the best perform
ance.
Mixed & Coloured 59'
This programme offers you the freedom to
wash all kinds of fabrics and non
-
fading
colours together, with a full load, obtaining
excellent results in only 59 minutes. With
washing at medium temperature, this
programme is recommended for laundry
that is not particularly dirty.
Rapid
(14/30/44 Min.)
Saving without compromising! This new
programme may be used to obtain excellent
results while saving water, energy,
detergent and time.
This option washes at a medium
temperature suitable for any kind of fabric.
Recommended for small loads and lightly
soiled items.
Perfect Cotton 59'
This programme guarantees excellent
results for cotton laundry. This option was
designed to cut washing time at medium
temperatures for medium
-
soiled cotton
laundry. Fill the machine only halfway for
best results.

!
24
8. TROUBLESHOOTING AND WARRANTY
If you believe the washing machine is not working correctly, consult the quick guide
provided below which includes some practical tips on how to fix the most common
problems.
ERROR CODE FORMAT
Error shown
Possible causes and practical solutions
E2 (with display)
2 flashes of the LEDs
(without display)
The machine cannot load water.
Make sure the water supply tap is open.
Make sure the water supply hose isn’t bent, kinked or trapped.
Make sure the drain pipe is at the proper height (see installation section).
Close the water supply tap, unscrew the filler hose from the back of
the washing machine and make sure the “anti-sand” filter is clean
and not blocked.
Check that the filter is not clogged or that there are no foreign bodies
inside the filter compartment that can obstruct the proper flow of water.
E3 (with display)
3 flashes of the LEDs
(without display)
The washing machine does not drain water.
Check that the filter is not clogged or that there are no foreign bodies
inside the filter compartment that can obstruct the proper flow of water.
Make sure the drain hose isn’t bent, kinked or trapped.
Make sure the home drainage system is not blocked and is allowing
water to flow through without obstruction. Try to drain the water in the sink.
E4 (with display)
4 flashes of the LEDs
(without display)
There is too much foam and/or water.
Ensure the correct amount of detergent is being used and the
detergent is designed for use in a washing machine.
E7 (with display)
7 flashes of the LEDs
(without display)
Door problem.
Make sure the door is correctly closed.
Make sure the clothes inside the drum are not preventing the door
from closing fully.
If the door is locked, turn off and unplug the washing machine from
the electrical supply socket, wait 2-3 minutes and reopen the door.
Any other code
Turn off and unplug the washing machine, wait a minute. Turn on the
machine and restart a program. If the error occurs again contact an
Authorised Customer Service Centre directly.
FOR SMART TOUCH MODELS
The Candy simply-Fi app has a Smart Check-up function that allows you to confirm
the functionality and status of the product at any time. To use the Candy simply-Fi app you
will need an Android smartphone with NFC technology. More info can be found on the App.
If the display of the machine is showing an error (by a code or blinking LEDs), you
should turn on the App on your Android smartphone, with NFC on.
Place your smart phone against the Smart Touch logo on the control panel. You should
now be able to read the fault directory to solve the issue.
! Models with a display: the error is shown by a number preceded by the letter “E”
(example: E2 = Error 2).
! Models without display: an error is shown by a sequence of flashes of every LED.
The error code is shown by the number of flashes followed by a pause of 5 seconds
(example: two flashes – pause 5 seconds – two flashes – repeating = Error 2).

!
EN
25
OTHER ANOMALIES
Problem
Possible causes and practical solutions
The washing machine
does not work / start
Make sure the product is plugged into a working supply socket.
Make sure power is on.
Make sure the wall socket is working, testing it with another
appliance such as a lamp.
The door may not be correctly closed: open and close it again.
Check whether the required program was correctly selected and the
start button pressed.
Make sure the washing machine is not in pause or time delay mode.
Water leaked on the
floor near the
washing machine
This may be due to a leak from the seal between the tap, supply
hose and fill valve; in this case, replace it and tighten the hose
connections correctly.
Make sure the front filter is correctly closed.
The washing machine
does not spin
The machine is fitted with a detection system that protects the load
and product from damage if the load is not balanced before spinning.
This may result in:-
• The machine attempts to balance the load, increasing the time of
spin.
• Reduction of the speed of spin to decrease vibrations and noise.
• The spin cycle aborting to protect the machine and load.
If this is experienced remove the load de-tangle it, reload it and
restart the spin program.
This could be due to the fact that water has not been completely
drained: wait a few minutes. If the problem persists, see Error 3
section.
Some models include a "no spin" function: make sure it is not
selected.
Check which options are selected and their effect on the spin cycle.
Excessive detergent can impede the spin cycle, ensure the correct
amount of detergent is being used.
Strong vibrations /
noises are heard
during the spin cycle
The washing machine may not be fully levelled: if necessary, adjust
the feet as indicated in the specific section.
Make sure transport screws, rubber bungs and spacer tubes were
removed.
Make sure there are no foreign objects inside the drum (coins,
hinges, buttons, etc…).
The standard manufacturer warranty covers faults caused by electrical or
mechanical faults in the product due to an act or omission of the manufacturer. If
a fault is found to be caused by factors outside the product supplied, miss-use or
as a result of the instructions on use not being followed, a charge may be
applied.

!
26
It is always recommended to use original
spare parts, that are available at our
Authorised Customer Service Centres.
By placing the mark on this
product, we are confirming compliance
to all relevant European safety, health
and environmental requirements which
are applicable in legislation for this
product.
The manufacturer declines all
responsibility for any printing errors in
the booklet included with this product.
Moreover, it also reserves the right to
make any changes deemed useful to its
products without changing their
essential characteristics.
Warranty
The product is guaranteed under the
terms and conditions stated on the
certificate included with the product. The
certificate has to be stored so as to be
shown to the Authorized Customer
Service Centre in case of need. You can
also check the warranty conditions on
our web site. To obtain assistance,
please fill in the form on-line or contact
us at the number indicated on the
support page of our web site.

!
FR
27

!
28
Merci d'avoir choisi ce produit.
Nous sommes fiers d’offrir le produit idéal
pour vous et la meilleure gamme complète
d’électroménagers pour votre routine
quotidienne.
Lisez attentivement ce manuel pour une
utilisation de votre produit en toute sécurité
et bénéficier de conseils pratiques pour
l’entretenir efficacement.
Nous vous recommandons de
toujours garder ce manuel à portée de main
et dans de bonnes conditions afin qu’il
puisse également servir aux éventuels
futurs propriétaires.
Chaque produit est identifié par un code à
16 caractères unique également appelé
«numéro de série», imprimé sur l’étiquette
apposée sur l’appareil ou dans l’enveloppe
du document se trouvant à l’intérieur du
produit.
Ce code est nécessaire pour inscrire le
produit ou bien pour prendre contact avec
notre service clientèle.
Cet appareil est commercialisé
en accord avec la directive
européenne 2012/19/EU sur
les déchets des équipements
électriques et électroniques (DEEE).
Les déchets des équipements électriques et
électroniques (DEEE) contiennent des
substances polluantes (ce qui peut
entraîner des conséquences négatives pour
l’environnement) et des composants de
base (qui peuvent être réutilisés). Il est
important de traiter ce type de déchets de
manière appropriée afin de pouvoir éliminer
correctement tous les polluants et de
recycler les matériaux. Les particuliers
peuvent jouer un rôle important en veillant à
ce que les DEEE ne deviennent pas un
problème environnemental. Il est essentiel
de suivre quelques règles simples:
! Les DEEE ne doivent pas être traités
comme les déchets ménagers;
! Les DEEE doivent être remis aux points
de collecte enregistrés. Dans de
nombreux pays, la collecte des produits
gros électroménagers peut être effectuée
à domicile.
Dans de nombreux pays, lorsque vous
achetez un nouvel appareil, l’ancien peut
être retourné au détaillant qui doit collecter
gratuitement sur la base un contre un.
L’équipement repris doit être équivalent
ou bien avoir les mêmes fonctions que le
produit acquis.
1. RÈGLES GÉNÉRALES DE SÉCURITÉ
2. INSTALLATION
3. TIROIR A DETERGENT
4. CONSEILS PRATIQUES
5. ENTRETIEN ET NETTOYAGE
6. GUIDE D'UTILISATION RAPIDE
7. CONTRÔLES ET PROGRAMMES
8. DÉPANNAGE ET GARANTIES
Règles environnementales
Index

!
FR
29
1. RÈGLES GÉNÉRALES
DE SÉCURITÉ
! Le produit est conçu pour être
utilisé dans un foyer domestique,
comme:
- Le coin cuisine dans des
magasins ou des lieux de
travail,
- Employés et clients dans
un hôtel, un motel ou
résidence de ce type,
- Dans des bed and
breakfast,
- Service de stock ou
similaire, mais pas pour de
la vente au détail.
La durée de vie de l’appareil
peut être réduite ou la garantie
du fabricant annulée si
l’appareil n’est pas utilisée
correctement. Tout dommage
ou perte résultant d'un usage qui
n'est pas conforme à un usage
domestique (même s'ils sont
situés dans un environnement
domestique ou un ménage) ne
sera pas acceptée par le
fabricant dans toute la mesure
permise par la loi.
! Cet appareil peut être utilisé
par des enfants âgés de 8 ans
et plus, ou des personnes
présentant un handicap physique,
moteur ou mental, et manquant
de connaissance sur l’utilisation
de
l’appareil, si elles sont sous la
surveillance d’une personne, donnant
des instructions pour une utilisation
en toute sécurité de l’appareil.
Les enfants ne doivent pas
jouer avec l'appareil.
Le nettoyage et l’entretien de
l’appareil ne doit pas être fait par
des enfants sans surveillance
d’un adulte.
! Les enfants doivent être
surveillés pour être sûr qu’ils
ne jouent pas avec l’appareil.
! Les enfants de moins de 3 ans
doivent être tenus à l’écart ou
bien être sous surveillance de
manière continue.
! Si le câble d'alimentation
est endommagé, il doit
impérativement être remplacé
par un câble spécifique qui peut
être fourni par le fabricant ou son
agent de service compétent.
! N’utilisez que les colliers
fournis avec l’appareil pour la
connexion de l’alimentation en
eau.
! La pression hydraulique doit être
comprise d'un minimum de 0,05
MPa à un maximum de 0,8 MPa.
! Assurez-vous qu’aucun tapis
n’obstrue la base de la
machine et les ventilations.
! Le positionnement de l’appareil
doit permettre un accès facile à
la prise de courant après
installation.

!
30
! Capacité de chargement maximale
de vêtements secs selon le
modèle utilisé (voir le bandeau de
commande).
! Consulter le site web du
fabricant pour plus d’informations.
! Les détails techniques (voltage
et puissance) sont indiqués sur
l’étiquette du produit
! Assurez-vous que le système
électrique est bien connecté à
la terre, qu’il respecte toutes
les lois applicables et que les
prises de courant sont bien
compatibles avec la prise
électrique de l’appareil. Dans le
cas contraire, veuillez contacter
un professionnel qualifié.
! L’utilisation de transformateurs,
de multiprises ou de rallonges
électriques et fortement déconseillé
! Eteignez la machine avant
nettoyage: débranchez l’appareil
et fermer l’arrivée d’eau.
! Ne tirez pas sur le cordon
d’alimentation pour débrancher
l’appareil.
! Assurez-vous qu’il n’y a pas
d’eau dans le tambour avant
d’ouvrir le hublot.
! N’exposez pas la machine à la
pluie, au soleil ou aux
intempéries.
! Lors d’un déplacement, ne
soulevez pas la machine à
laver par les boutons ou par le
tiroir à détergent, ne jamais
faire reposer l’appareil sur le
hublot.
Nous recommandons d’être 2
personnes pour soulever la
machine.
! En cas de panne ou de
dysfonctionnement: éteindre la
machine, fermer le robinet
d’eau et ne pas toucher la
machine. Appelez immédiatement
le service client et n’utilisez que
des pièces de rechange d’origine.
Le non-respect de ces consignes
peut compromettre la sécurité de
l’appareil.
Connexions électriques et
instructions de sécurité
ATTENTION:
l’eau peut atteindre des
températures très élevées
pendant le lavage.

!
FR
31
2. INSTALLATION
! Dévissez les 2 ou 4 vis (A) sur
le dos de l’appareil et retirer les
2 ou 4 cales (B) comme illustré
sur la figure 1.
! Fermez les 2 ou 4 trous en utilisant
les connecteurs inclus dans
l'enveloppe ou se trouve la notice.
! Si la machine à laver est
intégrée, dévisser les 3 ou 4
vis (A) et retirer 3 ou 4 cales
(B).
! Dans certains modèles, une ou
plusieurs cales vont tomber
à l'intérieur de la machine:
inclinez la machine à laver
avant de les enlever. Bouchez
les trous à l'aide des
fiches
trouvées dans l'enveloppe.
! Placer le panneau "polionda"
sur le bas comme indiqué sur la
figure 2 (selon le modèle,
référez-vous à la version A, B
ou C).
A
A
A
A
B
B
B
B
1
3
2
1
3
1
2
A
C
B
2
ATTENTION:
maintenez les matériaux
d'emballage hors de portée
des enfants.
Dans certains modèles cette
opération n'est pas nécessaire
car le panneau "polionda" sera
déjà placé sous l'appareil.

!
32
! Brancher le tuyau d’eau au robinet (fig.3).
Utiliser uniquement le tuyau fournit avec
l’appareil (ne pas réutiliser un tuyau d’une
ancienne installation).
! CERTAINS MODELES peuvent inclure une
ou plusieurs des caractéristiques suivantes:
! CHAUD ET FROID (fig. 4): conduites
d’eau avec connexion eau chaude et eau
froide pour réaliser des économies
d’énergie.
Connectez le tuyau gris au robinet d'eau
froide et le rouge au robinet d'eau
chaude. L'appareil peut être connecté au
robinet d'eau froide: dans ce cas, certains
programmes peuvent démarrer quelques
minutes plus tard..
!
AQUASTOP
(fig. 5):
un dispositif situé sur
le tube d'alimentation qui arrête le débit
d'eau si le tube se détériore; dans ce cas,
une marque rouge apparaît dans la
fenêtre "A" et le tube doit être remplacé.
Pour dévisser l'écrou, appuyez sur le
sens unique dispositif de verrouillage "B".
!
AQUAPROTECT–TUBE D’ALIMENTATION
AVEC PROTECTION (fig. 6):
si de l’eau fuit
à partir du tuyau "A", la gaine de
confinement transparent "B" va contenir
de l'eau pour permettre le cycle de lavage
de se terminer. À la fin du cycle,
contactez le service à la clientèle pour
remplacer le tuyau d'alimentation.
3
1
4
B
A
5
B
A
6
Raccordement à l’eau

!
FR
33
! Au niveau du mur, faîtes attention à ce
que le tuyau ne soit pas plié ou écrasé.
Connectez-le de préférence à une
évacuation murale d’au moins 50 cm de
haut avec un diamètre plus grand que le
tuyau de la machine à laver (fig. 7).
! Utilisez les pieds comme en figure 8
pour régler la hauteur de l’appareil:
a. Tournez dans le sens horaire pour
libérer la vis;
b. Faire pivoter le pied pour élever ou
abaisser jusqu'à ce qu'elle adhère au sol;
c. Verrouillez le pied en revissant l’écrou dans
le sens inverse des aiguilles d’une montre et
le faire adhérer au fond de la machine.
! Branchez l'appareil.
min 50 cm
max 85 cm
2,5 mt
max
max 100 cm
min 4 cm
7
* ACCESSOIRE VENDU SÉPARÉMENT
A
B
C
8
Positionnement
ATTENTION:
contactez l’assistance technique si le
cordon d’alimentation doit être changé.
Les défauts d'installation ne sont pas
couverts par la garantie du fabricant.
!
34
3. TIROIR A DETERGENT
Le tiroir est divisé en 3 compartiments
comme illustré en figure 9:
! compartiment « 1 »: pour la lessive
destinée au prélavage;
! compartiment « »: des additifs
spéciaux: adoucisseurs, parfums, etc… ;
! compartiment « 2 » sert pour la lessive
destinée au lavage..
Un récipient pour détergent liquide est
également inclus DANS CERTAINS
MODELES (fig. 10). Pour l'utiliser, placez-
le dans le compartiment "2". Grâce à ce
système, la lessive s’écoulera dans le
tambour seulement au bon moment.
2
1
9
10
ATTENTION:
utilisez uniquement des produits
liquides; la machine est programmée
pour doser les additifs à chaque cycle
durant le dernier rinçage.
ATTENTION:
Certains détergents ne sont pas conçus
pour être introduit dans le compartiment
à lessive mais sont fournis avec
leur propre distributeur qui est placé
directement dans le tambour.
CERTAINS MODÈLES sont pourvus
du dosage automatique, qui permet
un dosage précis du détergent et
de l’assouplissant. Dans ce cas,
consultez la section spécifique du
chapitre CONTROLES ET PROGRAMMES
pour en savoir davantage.

!
FR
35
4. CONSEILS PRATIQUES
Lorsque vous triez le linge, assurez-
vous:
- avoir éliminé objets métalliques tels que
barrettes, épingles, pièces de monnaie;
- avoir boutonné les taies d’oreiller, fermez
les fermetures éclair, accrochez les œillets
et crochets, nouez les ceintures et les
cordes des peignoirs de bain;
- avoir enlevé les crochets de rideaux;
- avoir lu attentivement les étiquettes
d’entretien;
- d’avoir enlevé les tâches tenaces pendant
le tri du linge à l’aide d’un détergent ou
d’un détachant spécial.
! Lors du lavage des tapis, des couvertures
ou des vêtements lourds, nous vous
recommandons d’éviter l’essorage.
! Pour laver des vêtements en laine,
assurez-vous qu’ils peuvent bien être
lavés en machine. Vérifiez.
!
Laissez la porte de l’appareil entrouverte
entre les lavages, afin d'éviter le
développement éventuel de mauvaises
odeurs à l’intérieur de la machine.
Astuces pour faire des économies et ne pas
polluer l’environnement lorsque vous
utilisez votre appareil.
! Chargez la machine à la capacité
maximale indiquée dans le tableau pour
chaque programme - cela vous permettra
d'ÉCONOMISER de l'énergie et de l'eau.
! La vitesse d’essorage a un impact sur le
bruit et sur l'humidité résiduelle de votre
linge: un essorage plus rapide signifie un
bruit plus fort et une humidité résiduelle
plus faible pour votre linge.
! Les programmes les plus efficaces en
termes d'utilisation combinée de l'eau et
de l'énergie sont généralement ceux qui
durent plus longtemps à des
températures plus basses.
Maximisez le volume de chargement
! Utilisez la capacité maximale de
chargement de votre appareil.
Economisez jusqu'à 50% d'énergie en
lavant une charge complète au lieu de 2
demi-charges.
Avez-vous besoin d’effectuer un prélavage?
! Pour le linge très sale seulement!
Economisez du temps, de l’eau et de
l’énergie jusqu’à 15% en ne sélectionnant
pas le prélavage pour un linge
normalement sale.
Un lavage à l’eau chaude est-il nécessaire?
! Pré-traitez les tâches avec un détachant
ou bien mettez le vêtement tâché sec à
tremper dans de l’eau avant le lavage afin
d’en réduire la température.
Economisez de l’énergie en utilisant un
programme à basse température.
Avant d’utiliser un programme de séchage
(LAVANTE-SECHANTE)
! Economisez de l’énergie et du temps en
sélectionnant une vitesse d’essorage
élevée et ainsi réduire l’eau résiduelle
contenue dans les textiles avant un
programme de séchage.
Vous trouverez ci-dessous un petit guide
contenant des conseils et des astuces sur
l'utilisation de la lessive.
! Utilisez uniquement des lessives
adaptées au lavage en machine.
! Choisissez votre lessive en fonction du
type de tissu (coton, délicat, synthétique,
laine, soie, etc.), de la couleur, du type et
du niveau de salissure et de la
température de lavage programmée.
Conseils de chargement
Conseils utiles pour faire des
économies
Dosage de la lessive

!
36
! Pour utiliser la quantité correcte de
lessive, d'adoucissant ou tout autre
produit supplémentaire, suivez attentivement
les instructions du fabricant à chaque
lavage : en utilisant correctement
l’appareil avec la dose appropriée,
vous évitez tout gaspillage et vous
réduisez l’impact sur l'environnement.
! Une quantité trop importante de lessive
entraîne un excès de mousse, ce qui
empêche un déroulement correct du
cycle. Cela peut également affecter la
qualité du lavage et du rinçage.
L'utilisation de détergents écologiques sans
phosphates (voir les informations qui
figurent sur le paquet) peut provoquer les
effets suivants:
- Les eaux sales du rinçage peuvent être
plus opaques à cause de la présence
d’une poudre blanche (zéolithes)
maintenue en suspension, sans toutefois
que la performance de rinçage ne soit
affectée.
- Présence d’une poudre blanche sur le
linge après le lavage, qui n’est pas
absorbée par les tissus et qui ne changent
pas la couleur des tissus.
- Mousse dans l’eau au dernier rinçage.
- Mousse abondante: ceci est le plus
souvent dû à des agents présents dans la
lessive qui sont difficiles à éliminer.
Dans ces cas, il est inutile de
recommencer les cycles de rinçage.
Si le problème persiste ou si vous détectez
une anomalie contactez immédiatement un
service client agréé.
Lorsque vous lavez des blancs très
sales, nous vous recommandons
d’utiliser le programme coton à 60°C
ou au-dessus et d’utiliser une lessive
en poudre contenant des agents blanchissants.
Pour les lavages entre 40°C et 60°C, le
type de détergent utilisé doit être adapté
au type de tissu et au degré de salissure.
Poudres normales sont adaptés pour
des "blancs" à forte salissures, alors que
les détergents liquides ou "protection des
couleurs" sont adaptés pour les tissus
colorés avec des niveaux faibles de
salissures.
Pour le lavage à des températures
inférieures à 40°C, nous recommandons
l'utilisation de détergents ou de détergents
liquides spécifiquement étiquetés comme
approprié pour lavage de basse température.
Pour lavage de la laine ou de la soie,
utilisez uniquement des produits de lavage
spécialement formulés pour ces tissus.

!
FR
37
5. ENTRETIEN ET
NETTOYAGE
Un entretien approprié de votre appareil
peut prolonger sa durée de vie.
! Débranchez la machine de l’alimentation
électrique.
! Nettoyez la partie externe de l’appareil, à
l’aide d’un chiffon humide, EN ÉVITANT
LES ABRASIFS, L’ALCOOL ET/OU LES
DILUANTS.
! Nous vous conseillons de nettoyer
régulièrement le tiroir à lessive pour éviter
l’accumulation de lessive et de résidus
d'adoucissant.
! Retirez le tiroir avec douceur et fermeté.
! Nettoyez le tiroir à l’eau courante et
remettez-le en place dans son
compartiment.
POUR LES MODELES AVEC SYSTEME
AUTOMATIQUE DE DOSAGE DU
DETERGENT ET DE L'ADOUCISSANT
LIQUIDES:
! Sortez complètement le tiroir en
apppuyant sur le bouton de déblocage,
en faisant attention aux fuites de
résidus de détergent.
1
2
! Remplir le tiroir d'eau chaude.
! Secouer le tiroir pour faire circuler l'eau
dans tous les compartiments.
! Vider l'excédent d'eau du tiroir et le
remettre en place.
Nettoyage de l’extérieur de
l’appareil
Nettoyage des bacs
Avant de procéder au nettoyage, tous
les compartiments doivent être vides.
ATTENTION:
N'utilisez PAS de produits acides (par
exemple du vinaigre) ni de détergents
agressifs pour nettoyer le tiroir, afin de
ne pas endommager les joints et/ou les
parties internes de l'appareil.

!
38
! L'appareil est équipé d'un filtre spécial qui
capture les résidus de grande taille
susceptibles de boucher le système de
vidange, tels que des boutons ou des
pièces de monnaie (en fonction du
modèle, prenez en compte la version A
ou B).
Nous vous recommandons de vérifier et
de nettoyer le filtre 5 à 6 fois par an.
! Débranchez la machine de l’alimentation
électrique.
! Avant de dévisser le filtre, nous vous
recommandons de disposer un chiffon
absorbant sur le sol afin de garder le sol
sec.
! Tournez le filtrer dans le sens antihoraire
jusqu’à la limite en position verticale.
! Retirez et nettoyez le filtre; lorsque vous
avez terminé, repositionnez le filtre en
tournant dans le sens horaire.
! Répétez les étapes précédentes dans
l’ordre inverse pour remonter les pièces.
B
A
! Si les appareils sont entreposés dans une
pièce non chauffée pendant de longues
périodes, tous les résidus d’eau doivent
être entièrement évacués des tuyaux.
! Débranchez la machine de la prise
d'alimentation électrique.
! Enlevez la bague sur le tuyau et le plier
vers le bas afin de vider le reste d’eau.
! Fixez le tuyau de vidange à l’aide de
l’attache lorsque vous avez terminé.
Nettoyage du filtre de la pompe
Suggestions lors d’un déménagement
ou une absence prolongée
POUR LES MODELES AVEC SYSTEME
AUTOMATIQUE DE DOSAGE DU
DETERGENT ET DE L'ADOUCISSANT
LIQUIDES :
si vous devez basculer la machine ou
la déplacer, retirez au préalable le
tiroir du détergent, en le maintenant
aussi horizontal que possible pour
éviter les fuites.

!
FR
39
6. GUIDE D'UTILISATION
RAPIDE
Cette machine adapte automatiquement le
niveau de l'eau en fonction du type et de la
quantité de linge. Ce système permet de
diminuer la consommation d'énergie et
réduit nettement les temps de lavage.
! Mettez le lave-linge en fonction et
sélectionnez le programme souhaité.
! Ajustez la température de lavage si besoin et
sélectionnez les options nécessaires.
! Pressez le bouton DEPART/PAUSE pour
commencer le cycle de lavage.
Si une panne de courant se produit
pendant que la machine est en marche,
lorsque le courant revient la machine
redémarre à partir du début de la phase
au cours de laquelle la panne a eu lieu.
! A la fin du programme, le message "End"
apparaitra sur l’interface, sur certains
modèles tous les voyants lumineux des
étapes de lavage seront allumés.
! Mettez la machine à l’arrêt.
Pour tout type de lavage, voir le tableau
des programmes et suivez la séquence
de fonctionnement comme indiqué.
Pression de l’eau:
min 0,05 Mpa / max 0,8 Mpa
Essorage (Tours par minute):
voir la plaque signalétique.
Puissance / Ampérage / Tension
d’alimentation:
voir la plaque signalétique.
7. CONTRÔLES ET
PROGRAMMES
A
DC E FG B
H
L
Q
I MNO P
A
Sélecteur de programmes
avec position OFF
B
Touche DEPART/PAUSE
C
Touche DEPART DIFFERE
D
Touche OPTIONS
E
Touche RAPIDES ou DEGRE
DE SALISSURE
F
Touche SELECTION
TEMPERATURE
G
Touche SELECTION ESSORAGE
F+G
VERROUILLAGE DES
COMMANDES
H
Afficheur digital
I
Indicateurs OPTIONS
L
Indicateur PORTE SECURISEE
M
Indicateur KG DETECTOR
N
Indicateur VERROUILLAGE
DES COMMANDES
O
Indicateurs
SELECTION
TEMPERATURE
P
Indicateurs
SELECTION
ESSORAGE
Q
Zone SMART TOUCH
Sélection du programme
Pour ouvrir la porte, l'indicateur
PORTE SECURISEE doit être éteint.
Caractéristiques techniques

!
40
! Pressez la touche DEPART/PAUSE pour
démarrer le cycle sélectionné.
! Une fois le programme sélectionné, le
sélecteur de programmes reste positionné
sur le programme sélectionné jusqu’ à la fin
du cycle.
! Positionnez le sélecteur sur OFF pour
éteindre la machine.
! Appuyez sur cette touche pour démarrer
le programme sélectionné.
METTRE LA MACHINE EN PAUSE
! Maintenez la touche DEPART/PAUSE
enfoncée pendant 2 secondes environ
(certains voyants et l’affichage du temps
restant se mettront à clignoter, montrant
ainsi que la machine est en pause).
! Appuyez à nouveau sur la touche
DEPART/PAUSE avant de redémarrer le
programme à partir du point où il a été
mis en pause.
ANNULATION DU PROGRAMME
! Pour annuler le programme, positionnez
le sélecteur sur OFF.
! Cette touche vous permet de différé le
départ du cycle choisi jusqu’à 24h.
! Voici comment retarder le départ du
cycle:
- Sélectionnez le programme.
Ouverture de la porte
Un dispositif de sécurité empêche
d’ouvrir la porte immédiatement après
la fin du cycle.
Il faut attendre 2 minutes après que
celui-ci soit terminé et attendre que
l’indicateur lumineux s’éteigne pour
pouvoir ouvrir la porte.
Sélecteur de programmes avec
position OFF
Lorsque le sélecteur de programme est
activé, l’affichage s’allume pour
visualiser les réglages de chacun des
programmes. Pour des raisons
d’économie d’énergie, à la fin du cycle
ou lors d’une période d’inactivité, le
niveau de contraste de l’afficheur
diminue.
N.B.:Pour éteindre la machine, il faut
positionner le sélecteur sur la position
OFF.
Le sélecteur de programmes doit être
positionné sur OFF à l’issue de chaque
cycle ou avant le début du cycle
suivant pour sélectionner un nouveau
programme.
Touche DEPART/PAUSE
Fermez la porte avant d’appuyer sur la
touche DEPART/PAUSE.
Lorsque la touche DEPART/PAUSE a
été enfoncée, le démarrage du cycle
peut prendre quelques secondes.
Pour des raisons de sécurité, durant
certaines étapes du cycle de lavage,
la porte ne peut être ouverte que si le
niveau de l’eau se trouve en dessous
du bord inférieur et si la température
est inférieure à 45°C. Si ces conditions
sont réunies, attendez que le voyant
PORTE SECURISEE s’éteigne avant
d’ouvrir la porte.
Touche DEPART DIFFERE

41
FR
- Appuyez sur la touche DEPART
DIFFERE pour activer la fonction puis
appuyez de nouveau pour définir un délai de
1
heure
. Chaque pression supplémentaire
retarde d’une heure jusqu’à 24h. Au
delà, le retardateur se réinitialise.
- Validez en appuyant sur la touche
DEPART/PAUSE
. Le programme débutera
à l’issue du compte à rebours.
Il est possible d’annuler le départ
différé en positionnant le sélecteur de
programme sur OFF.
Si une panne de courant se produit
pendant que la machine est en marche,
lorsque le courant revient la machine
redémarre à partir du début de la phase
au cours de laquelle la panne a eu lieu.
Ce bouton vous permet de choisir trois
options différentes:
- RINÇAGE INTENSE
Cette option vous permet d’ajouter un
rinçage supplémentaire à la fin du cycle de
lavage, elle a été conçue spécialement
pour les personnes à peau sensible pour
lesquelles des traces de lessive peuvent
causer des irritations ou des allergies.
Il est aussi recommandé d’utiliser cette
option pour le linge des enfants, pour le
lavage de linge très sale, en cas de forte
dose de lessive, ou encore en cas de
tissus qui ont tendance à garder la lessive
(Serviette, Peignoir, Sweat Shirt etc.).
- HYGIENE +
Vous pouvez l’activer seulement quand
vous avez réglé la température à 60°C.
Cette option permet de purifier vos
vêtements en maintenant la même
température durant tout le lavage.
- REPASSAGE FACILE
Cette fonction vous permet de réduire les
plis, autant que possible, en éliminant les
essorages intermédiaires ou en réduisant
l’intensité de l’essorage final.
Cette touche vous permet de choisir entre
ces deux options différentes en fonction du
programme sélectionné:
- RAPIDES
Le témoin lumineux s’allume quand vous
sélectionnez le programme RAPIDES
(14/30/44 Min.) avec le sélecteur
bidirectionnel
et vous pouvez ensuite
choisir l’une des trois durées indiquées.
- DEGRE DE SALISSURE
Une fois le programme sélectionné, le
temps de lavage requis pour ce
programme sera affiché automatiquement.
Cette option vous permet de choisir 3
intensités de lavage en fonction de l’état
de vos vêtements.
A noter, l’intensité de lavage modifie la
durée du programme. Ce programme
peut être utilisé seulement pour certains
programmes comme indiqué dans la
table des programmes.
Cette touche vous permet de changer la
température du cycle de lavage.
Afin de préserver les tissus, il n’est pas
possible d’augmenter la température au-
delà de la température maximum
autorisée pour chaque programme.
Touche SELECTION TEMPERATURE
Touche RAPIDES ou DEGRE DE
SALISSURE
Si une option choisie n’est pas
compatible avec le programme
sélectionné, le voyant lumineux de
l’option clignotera puis s’éteindra.
Touche OPTIONS
Les options doivent être choisies
avant d’appuyer sur la touche
DEPART/PAUSE.
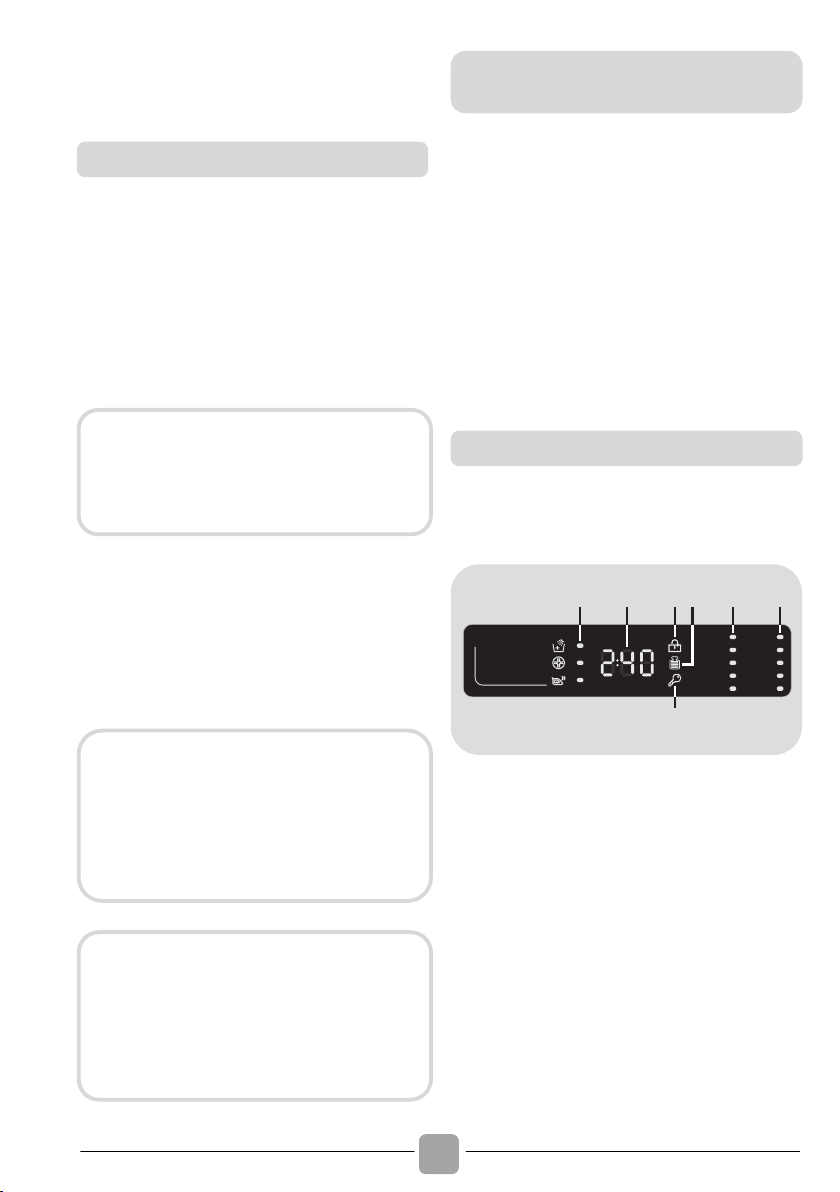
!
42
! Si vous souhaitez réaliser un lavage à
froid, tous les voyants lumineux doivent
être éteints.
! En appuyant sur cette touche, il est
possible de réduire la vitesse maximum
et si vous le souhaitez, vous pouvez
aussi faire un arrêt cuve pleine.
! Si l’étiquette de vos vêtements n’indique
pas d’information spécifique, vous pouvez
utiliser la vitesse d’essorage maximale
prévue pour le programme.
! Pour modifier le cycle d’essorage
appuyez sur la touche jusqu’à obtenir la
vitesse d’essorage que vous désirez.
! Il est possible de modifier la vitesse
d’essorage et de mettre en pause la
machine.
! En appuyant simultanément sur les
touches SELECTION TEMPERATURE et
SELECTION ESSORAGE pendant 3
secondes, vous pouvez verrouiller les
commandes de la machine. Cela vous
permet d’éviter de modifier le programme
en cours si vous appuyez
accidentellement sur une touche.
! Le verrouillage des commandes peut
être annulé facilement en appuyant
simultanément à nouveau sur les deux
boutons ou en éteignant la machine.
L’affichage Digital vous permet de visualiser
en permanence l’état de la machine.
1
5
2 3 4 6 7
1) INDICATEURS OPTIONS
Les voyants indiquent les options qui
peuvent être sélectionnées à l’aide des
touches correspondantes.
2) DUREE DU CYCLE
! Lorsqu’un programme est sélectionné, la
durée du cycle est automatiquement
affichée sur l’écran. Elle peut varier en
fonction des options choisies.
! Une fois le programme démarré, l’écran
affiche le temps restant jusqu’à la fin de
ce dernier.
Touche SELECTION ESSORAGE
Afin d’éviter d’endommager vos
tissus, il n’est pas possible
d’augmenter la vitesse d’essorage
au-delà de la vitesse requise pour
chaque programme.
Un surdosage de lessive peut
entrainer un excès de mousse. Si
l’appareil détecte une importante
quantité de mousse, le cycle
d’essorage sera annulé ou le cycle de
lavage sera plus long et la
consommation d’eau augmentera.
La machine est équipée d’un
dispositif électronique spécial qui
maintient le tambour durant le cycle
d’essorage. Cela réduit les bruits et
les vibrations dans la machine ce qui
prolonge la durée de vie de votre
appareil.
VERROUILLAGE DES
COMMANDES
Afficheur digital

!
FR
43
! L’appareil calcule le temps restant sur la
base d’une charge “standard”. La
machine corrige le temps restant une fois
le poids et la composition de la charge
détectés.
3) INDICATEUR PORTE SECURISEE
! L’icône indique que la porte est
verrouillée.
! Lorsque la touche DEPART/PAUSE est
pressé sur la machine avec la porte
fermée, l’icône clignote temporairement
puis s’allume.
Un dispositif de sécurité empêche
l’ouverture immédiatement après la fin du
cycle. Il faut attendre 2 minutes à l’issue du
cycle de lavage avant d’ouvrir la porte. A la
fin du cycle, tournez le sélecteur de
programmes sur OFF.
4) INDICATEUR
Kg Detector (fonction
active
sur les programmes Coton et
Synthétique)
! Pendant les premières minutes du cycle,
l’indication "Kg Detector" reste allumé le
temps pour le capteur intelligent de peser
le linge et d’ajuster le temps du cycle, la
quantité d’eau et la consommation
d’électricité en conséquence.
! A chaque phase de lavage, la fonction
"Kg Detector" permet de contrôler les
informations sur la charge dans le
tambour et dans les premières minutes
du cycle:
- ajuste la quantité d’eau nécessaire;
- détermine la durée du cycle de lavage;
- contrôle du rinçage en fonction du type
de textile qui doit être lavé;
- ajuste le rythme de la rotation du
tambour en fonction du type de textile;
- reconnaît la présence de mousse,
augmentant la quantité d’eau au rinçage
au besoin;
- ajuste la vitesse d’essorage en fonction
de la charge, évitant ainsi tout
déséquilibre.
5) INDICATEUR VERROUILLAGE DES
COMMANDES
Le témoin lumineux signale que les
commandes sont verrouillées.
6)
INDICATEURS SELECTION TEMPERATURE
Ces témoins lumineux indiquent la
température de lavage du programme
sélectionné. La température peut être
modifiée à l’aide de la touche
correspondant (il n’est pas possible
d’augmenter la température au-delà de la
température maximum autorisée pour
chaque programme).
Si vous souhaitez réaliser un lavage à froid,
tous les voyants lumineux doivent être
éteints.
7)
INDICATEURS SELECTION ESSORAGE
Ces témoins lumineux indiquent la vitesse
d’essorage du programme sélectionné. Il
est possible de modifier la vitesse
d’essorage ou d’annuler le cycle d’essorage
en appuyant sur la touche correspondant.
Fermez la porte avant d’appuyer sur la
touche DEPART/PAUSE.
Si la porte n’est pas bien fermée, la
lumière continue à clignoter pendant
environ 7 secondes, ce après quoi
la commande de démarrage sera
supprimée automatiquement. Dans ce
cas, fermez la porte de manière
correcte puis appuyez de nouveau
sur la touche DEPART/PAUSE.

!
44
Cet appareil est équipé de la technologie
Smart Touch qui permet de nouvelles
interactions via son application, compatible
avec les Smartphones Android équipé de
la technologie NFC.
! Télécharger sur votre Smartphone
l’application Candy simply-Fi.
FONCTIONS
Les principals fonctions disponibles via
l’application sont:
! Assistant vocal SMART – Un guide qui
vous permet de choisir le programme le plus
adapté en trois échanges vocaux (type de
vêtements, couleur et degré de salissure).
! Cycles – Permet de télécharger et de
lancer de nouveaux programmes de
lavage.
! Entretient SMART– Permet de lancer un
diagnostic de l’appareil qui vous indiquera
les différentes possibilités d’entretien à
effectuer.
! Mes statistiques – Retrouvez toutes vos
consommations énergétiques ainsi que
des trucs & astuces pour une utilisation
plus efficace de votre appareil.
COMMENT UTILISER SMART
TOUCH
PREMIERE UTILISATION – Enregistrement
de votre appareil
! Entrez dans le menu "Configuration" de
votre Smartphone Android et activez la
fonction NFC dans sous-menu "Réseaux
Sans fil".
! Tournez le sélecteur bi-directionnel
jusqu’à la position Smart Touch pour
activer le capteur NFC.
! Lancez l’application simply-Fi, et créez
un profile en suivant les instructions
données sur le Smartphone ou sur le
"Guide Rapide" fournit avec l’appareil.
SMART TOUCH
L’application Candy simply-Fi est
disponible pour les tablettes,
smartphones équipés d’Ios et
d’Android. Cependant, pour
bénéficier de tout le potentiel de la
téchnologie Smart Touch, il est
nécessaire de posséder un
Smartphone équipé d’Android et de
la technologie NFC.
Smartphone
Android
équipé de la
technologie NFC
Interaction avec le
lave-linge +
contenus
Smartphone Android
sans la technologie
NFC
Contennus
uniquement
Tablette Android
Sans NFC
Contennus
uniquement
iPhone Apple
Sans NFC
Contennus
uniquement
iPad Apple
Sans NFC
Contennus
uniquement
Retrouvez tous les détails des
fonctions Smart Touch dans le mode
démo de l’application simply-Fi ou sur:
www.candysmarttouch.com
Selon le modèle de votre Smartphone et
de la version Android, le processus
d’activation du NFC peut être différent.
Référez-vous à la notice de votre
Smartphone pour plus de détails.
Plus d’informations ainsi qu’un guide
et des vidéos pour un enregistrement
facile sont disponibles sur:
www.candysmarttouch.com/how-to

!
FR
45
USAGES FRÉQUENTS
! Lorsque vous souhaitez utilisez votre
appareil via votre Smartphone, vous
devez systématiquement activer le mode
Smart Touch en choisissant la position
homonyme à l’aide du sélecteur bi-
diretionnel.
! Assurez-vous d’avoir débloqué l’écran de
votre Smartphone et que vous avez activé
la connectivité NFC. Autrement suiviez les
indications mentionnées précédemment.
! Si vous souhaitez lancer un cycle de
lavage, charger le tambour, ajoutez votre
lessive et fermez la porte.
! Sélectionnez la fonction désirée dans
l’application (exemple: lancer un
programme, lancer un auto-diagnostique,
mettre à jour les statistiques etc.).
! Suivez les instructions indiquées sur votre
Smartphone. APPOSEZ votre Smartphone
sur le logo Smart Touch lorsque
l’application simply-Fi vous le demande.
NOTES:
Placer votre Smartphone de telle manière
à ce que l’antenne, située à l’arrière du
telephone soit proche du logo Smart
Touch (cf image ci-dessous).
Si vous ne savez pas où se situe
l’antenne NFC sur votre Smartphone,
faites de lents mouvements
circulaires autour du logo Smart
Touch jusqu’à ce que l’application
simply-Fi confirme la connexion. Afin
de garantir une connexion stable, il
est important de GARDER LE
SMARTPHONE SUR LOGO Smart
Touch PENDANT LA PROCÉDURE
D’APPAIRAGE ET PENDANT LES
PHASES DE SYNCHRONISATION.
L’application simply-Fi vous avertira
lorsque vous pourrez retirer votre
Smartphone du logo Smart Touch.
Des housses de protection épaisse
ou des autocollants métalliques
peuvent altérer la transmission de
données entre le lave-linge et votre
Smartphone. Si cela est nécessaire,
retirez-les.
Le remplacement de certains
composants de votre Smartphone
(coque arrière, batterie etc) par
d’autres non certifié par la marque de
votre Smartphone peut entraîner un
dysfonctionnement de l’antenne NFC
altérant l’utilisation de l’application
simply-Fi.
Le contrôle et le lancement de cycle de
lavage est possible uniquement en étant
à proximité du lave-linge. Il n’est pas
possible d’effectuer ce type d’opérations
depuis une autre pièce.

46
PROGRAMME
(MAX.) *
1)
2
1
(voir tableau de commande)
(MAX.)
2
1
2)
5
6
7
8
9
10
11
12
90°
Coton +
Prelavage
2)
5
6
7
8
9
10
11
12
60°
ECO 40-60
2)
5
6
7
8
9
10
11
12
60°
20°C
2)
5
6
7
8
9
10
11
12
20°
Synthétique
2)
2,5
3
3,5
4
4,5
5
5,5
6
60°
Rinçage
-
-
-
-
-
-
-
-
-
Vidange +
Essorage
-
-
-
-
-
-
-
-
-
Jeans
3
3
3
3
3
3
3
3
40°
Hygiene
3,5
4
4,5
5,5
6
6,5
7
8
60°
Laine/
Lavage Main
1
1
1
2
2
2
2
2,5
30°
Délicats
2
2
2,5
2,5
2,5
2,5
2,5
3
40°
Mixtes &
Couleurs 59'
5
6
7
8
9
10
11
12
40°
14'
1
1
1
1,5
1,5
1,5
1,5
2
30°
Rapides
3)
30'
1,5
2
2,5
2,5
2,5
2,5
2,5
3
30°
44'
3
3
3,5
3,5
3,5
3,5
3,5
4
40°
Coton Parfait
59'
2,5
3
3,5
4
4,5
5
5,5
6
40°
Il s’agit de programmes supplémentaires que vous pouvez télécharger depuis
votre Smartphone grâce à l’application simply-Fi (pour plus d’information voir
la partie Smart Touch de la notice). Le programme Auto-nettoyage est installé
par défaut pour entretenir votre machine.
Table des programmes
Tabella programmi
Coton
Résistant

!
FR
47
Veuillez lire ces informations
* Capacité de chargement maximale de
vêtements secs selon le modèle utilisé
(voir le bandeau de commande).
(Seulement pour les modèles
équipés d’un compartiment
pour détergent liquide)
Lorsqu’un nombre limité d’articles
sont tâchés et qu’ils nécessitent un
traitement avec des agents de
blanchiment liquides, l’élimination
préalable de la tâche peut être
effectuée dans la machine.
Versez l’eau de javel dans le
récipient prévu à cet effet dans le
compartiment "2" et sélectionnez
le programme spécial RINÇAGE.
Lorsque cette phase est terminée,
éteignez l'appareil, ajoutez le
reste de linge et procédez au
lavage avec le programme le plus
approprié.
1)
Après avoir sélectionné un programme,
la température recommandée s’affiche
à l’écran. La température peut être
changée en appuyant sur la touche
correspondant (il n’est pas possible de
dépasser la température maximum
autorisée pour chaque programme).
2)
Pour les programmes présents,
vous pouvez ajuster la durée et
l’intensité du lavage à l’aide de la
touche DEGRE DE SALISSURE.
3)
En sélectionnant la position
RAPID avec le sélecteur et en
appuyant sur la touche RAPIDES,
il est possible de choisir une
durée parmi les trois disponibles:
14' 30' et 44'.
INFORMATIONS POUR LES
LABORATOIRES D’ESSAIS
PROGRAMMES STANDARD
CONFORMÉMENT À
(EU) No. 1015/2010 et No. 1061/2010
PROGRAMME ECO 40-60
RÉGLAGE DE LA TEMPÉRATURE À
40°C
PROGRAMME ECO 40-60
RÉGLAGE DE LA TEMPÉRATURE À
60°C
________________________________________
PROGRAMME STANDARD
CONFORMÉMENT À
(EU) No. 2019/2023
PROGRAMME ECO 40-60

48
Pour nettoyer différents types de tissu et
niveaux de salissure, le lave
-
linge dispose
de programmes spécifiques qui satisfont
tous les besoins de lavage (voir tableau des
programmes).
Smart Touch
Il s’agit de programmes supplémentaires
que vous pouvez télécharger depuis votre
Smartphone grâce à l’application
simply-Fi
.
Pour plus d’information sur l’application voir
la partie
Smart Touch
de la notice. Le
programme d’auto
-nettoyage
"Auto-
nettoyage"
est installé par défaut pour entretenir votre
machine, il purifie le tambour, élimine les
mauvaises odeurs et améliore ainsi la
longévité de votre appareil. Lors du
lancement du programme,
"Auto-nettoyage"
,
vérifie qu’il n’y ait pas de vêtement dans le
tambour et utilisez uniquement de la
lessive en poudre. A la fin du cycle de
nettoyage laisser la porte du hublot
ouverte afin de permettre le séchage du
tambour. Il est recommandé de lancer le
cycle de nettoyage tous les 50 lavages.
Coton Résistant
Ce programme est adapté au lavage des
vêtements colorés en coton à 40°C ou pour
garantir le plus haut degré de propreté pour
le linge en coton résistant lavable à 60°C ou
90°C. L’essorage final se fait à vitesse
maximale pour assurer l’élimination de l’eau
restante.
Coton + Prélavage
Ce programme a été conçu pour éliminer
les tâches tenaces sur les vêtements
blancs en coton grâce à un prélavage avant
le cycle de lavage. Il convient d’ajouter
dans le compartiment
"1"
une dose de
lessive équivalente à 20% de la dose
utilisée pour un lavage.
ECO 40
-60
Le programme
ECO 40-60
permet de laver
le linge en coton normalement sale, lavable
à 40°C ou à 60°C, ensemble durant le
même cycle. Ce programme est utilisé pour
évaluer la conformité avec la législation
Ecodesign (conception de produits
respectueux de l'environnement).
20°C
Ce programme innovant vous permet de
laver ensemble différents tissus et couleurs,
par exemple du coton, du synthétique et des
tissus mixtes, à seulement 20°C, et offre
une excellente performance de nettoyage.
Ce programme consomme l'équivalent
d'environ 40% d’un lavage standard pour le
coton à 40°C.
Synthétique
Ce programme vous permet de laver
ensemble du linge de tissus et couleurs
différents. Le mouvement rotatif du tambour
et les niveaux d’eau sont optimisés à la fois
lors du lavage et du rinçage. L’action
d’essorage précise assure une formation
minime de pli
s sur les tissus.
Rinçage
Ce programme effectue 3 rinçages avec un
essorage intermédiaire (que vous pouvez
réduire ou annuler à l’aide du bouton
correspondant). Il convient au rinçage de
tout type de tissu, par exemple après un
lavage à la main.
ATTENTION:
CONSEILS IMPORTANTS SUR LES
PERFORMANCES DE LAVAGE.
Les vêtements de couleur neufs
doivent être lavés séparément
pendant au moins 5 à 6 lavages.
Certains grands articles foncés
comme les jeans et le
s serviettes de
toilette doivent toujours être lavés
séparément.
Ne mélangez jamais les tissus qui
NE SONT PAS GRAND TEINT.
Choisissez le programme en fonction
des instructions de lavage figurant
sur les étiquettes, en particulier la
température maximale recommandée.
Description des programmes

49
FR
Vidange + Essorage
Ce programme réalise la vidange et un
essorage maximal. Vous pouvez supprimer
ou réduire l’essorage à l’aide du bouton
SÉLECTION DE L’ESSORAGE.
Jeans
Ce programme a été conçu pour obtenir des
résultats de lavage impeccables sur des
tissus résistants tels que les Jeans. Ideal
pour ôter la saleté sans affecter l’élasticité
des fibres.
Hygiene
Ce programme vous permet de désinfecter le
linge (pour les ti
ssus durables).
Nous
recommandons d’utiliser un détergent en
poudre avec ce programme.
Laine/Lavage Main
Ce programme effectue un cycle de lavage
spécialement pensé pour les tissus en laine
qui peuvent être lavés en machine, les
articles à laver à la main ou bien le linge en
soie ou dont l’étiquette précise «À laver
comme de la soie».
Délicats
Ce programme alterne des périodes de
lavage avec des pauses. Il est particulièrement
adapté pour le lavage des tissus délicats.
Le lavage et le rinçage sont effectués avec
un niveau d’eau élevé.
Mixtes & Couleurs 59'
Ce programme vous offre la liberté de laver
ensemble tous les types de tissus et les
couleurs qui ne décolorent pas, à pleine
charge, en obtenant d’excellents résultats
en 59 minutes seulement. Avec un lavage à
une température moyenne, ce programme
est recommandé pour le linge qui n’est pas
particulièrement sale.
Rapides
(14/30/44 Min.)
Des économies sans compromis! Ce
nouveau programme peut être utilisé pour
obtenir d’excellents résultats tout en faisant
des économies en eau, énergie, lessive et
temps. Cette option lave à une température
moyenne adaptée à n’importe quel type de
tissu. Recommandé pour les petites
charges et les articles légèrement sales.
Coton Parfait 59'
Ce programme garantit des résultats
sensationnels pour le linge en coton. Cette
option est conçue pour réduire le temps de
lavage à des températures moyennes pour
le linge en coton plutôt sale. Ne remplissez
la machine qu’à moitié pour de meilleurs
résultats.

!
50
8. DÉPANNAGE ET GARANTIES
Si vous constatez que votre lave-linge fonctionne mal, consultez le mini-guide ci-dessous
qui vous indiquera commun les résoudre les problèmes communs.
RAPPORTS D’ERREURS
Type d’erreur
Causes probables et résolutions
E2 (pour l’affichage digital)
2 clignotements
(affichage LED)
La machine ne peut pas se charger en eau.
Assurez-vous que le robinet lié au tuyau de raccordement est bien ouvert.
Assurez-vous que le raccordement n’est pas coudé ou obstrué.
Le raccordement d’écoulement n’est pas à la bonne taille (cf
chapitre installation).
Fermez le robinet d’arrivée d’eau. Dévissez le tuyau et assurez-
vous que le filtre n’est pas obstrué.
Vérifiez si le filtre n'est pas colmaté ou s'il n'y a pas de corps étrangers
dans le compartiment du filtre, qui peuvent obstruer le flux d'eau correct.
E3 (pour l’affichage digital)
3 clignotements
(affichage LED)
Le lave-linge ne draine pas l’eau.
Vérifiez si le filtre n'est pas colmaté ou s'il n'y a pas de corps étrangers
dans le compartiment du filtre, qui peuvent obstruer le flux d'eau correct.
Assurez-vous que le tuyau d’arrivée d’eau n’est pas plié.
Assurez-vous que le système de drainage n’est pas obstrué et que
l’eau s’écoule normalement. Vérifier que l’eau s’écoule correctement
en plaçant le tuyau dans l’évier.
E4 (pour l’affichage digital)
4 clignotements
(affichage LED)
Il y a trop de mousse ou d’eau dans la cuve.
Assurez-vous de ne pas avoir trop mis de lessive ou que le produit
est bien conçu pour votre lave-linge.
E7 (pour l’affichage digital)
7 clignotements
(affichage LED)
Problème de porte.
Assurez-vous que la porte est bien fermée et que des vêtements
n’obstruent pas la fermeture de la porte.
Si la porte est bloquée, débranchez la prise électrique du lave-linge
puis rebranchez-la. Attendez 2-3 minutes et ouvrez la porte.
Autres codes
Eteignez l'appareil et débranchez la pise électrique du lave-linge.
Attendez une minute. Rebranchez le lave-linge et lancer un
programme. Si le problème persiste, contactez un service client agrée.
UNIQUEMENT POUR LES MODELS SMART TOUCH
Grâce à la fonction Smart Touch de votre application simply-Fi, vous pouvez à
n’importe quel moment vérifier le bon fonctionnement de votre lave-linge. Vous devez
avoir un Smartphone équipé de la technologie NFC. Plus d’informations sont
disponibles sur l’application.
Si l’affichage de votre lave-linge montre une erreur (l’aide d’un code ou en clignotant)
vous pouvez lancer l’application et approcher votre Smartphone du bandeau du lave-
linge. Vous pouvez dès lors lancer un auto-diagnostique pour résoudre le problème.
! Affichage Digital: le code d’erreur s’affiche avec la letter "E" (exemple: Erreur 2 = E2).
! Autres affichages (LED): les erreurs sont affichées par l’appareil sur toutes les LED
en clignotant. Le nombre de clignotement indique le type d’erreur, et sont répétées à
un intervalle de 5 secondes (exemple: erreur 2 = deux clignotements, une pause de
5 secondes, deux clignotements etc).
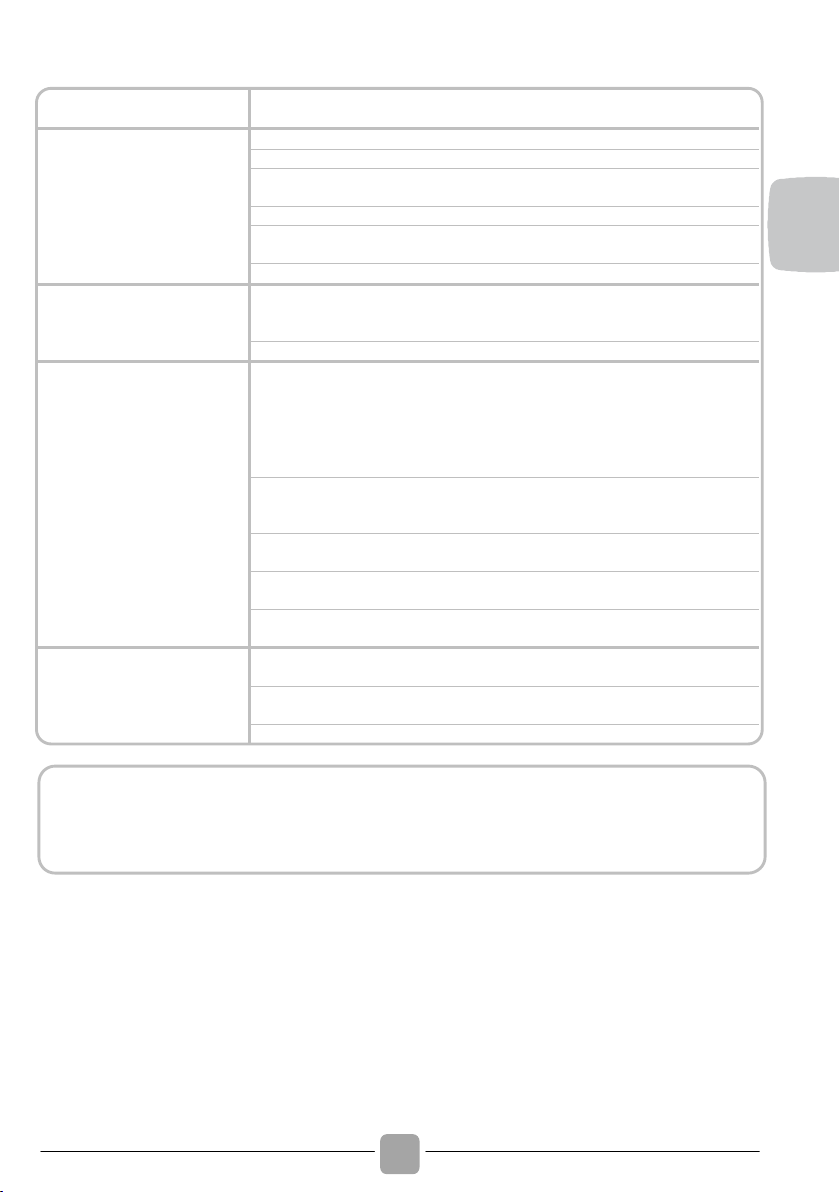
!
FR
51
AUTRES ANOMALIES
Type d’anomalies
Causes probables et résolutions
Le lave-linge ne lance
pas de cycle de
lavage.
Assurez-vous que votre lave-linge est bien branché.
Vérifiez que le produit est sous tension.
Assurez-vous que la prise de courant est bien sous tension en
branchant un autre appareil électrique.
La porte peut-être mal fermée. Ouvrez-la puis refermez-la.
Vérifier que vous avez sélectionné le bon programme et que vous
avez bien appuyé sur le bouton "Démarrage".
Assurez-vous que le lave-linge n’est pas en pause.
Le lave-linge fuit
La fuite peut être causée par le joint d’étanchéité situé entre le tuyau
et le robinet. Dans ce cas, remplacez le joint d’étanchéité et fixez de
nouveau le tuyau d’alimentation.
Vérifiez que le filtre est bien fermé.
Le lave-linge n’essore
pas
A Cause d’un bourrage du tambour, la machine peut:
• Equilibrer le chargement du tambour et accroitre le cycle
d’essorage
• Réduire sa vitesse de rotation pour limiter les vibrations et le bruit.
• Ne pas essorer le chargement du tambour afin de préserver
l’intégrité du lave-linge.
Cela peut être due à une vidange incomplète de l’eau. Dans ce cas,
attendez quelques minutes. Si le problème persiste, reportez-vous à
la section "Erreur 3".
Certains modèles possèdent une fonction “Sans essorage”. Assurez-
vous que cette dernière n’est pas activée.
Assurez-vous que certaines options de lavages qui pourraient
changer le cycle d’essorage ne sont pas activées.
Un surplus de lessive peut entraver le lancement d’un cycle
d’essorage.
Le lave fait un bruit
étrange / beaucoup de
bruit pendant
l’essorage
Le niveau du lave-linge n’est peut-être pas bon. Si c’est le cas, faites
le niveau à l’aide des pieds ajustables.
Vérifiez que les vis de transports, les tubes d’écartements ont bien
été enlevé.
Vérifiez que des objets oubliés ne sont pas le tambour.
La garantie constructeur couvre les dommages ayant pour origine un
phénomène électrique, électronique ou mécanique interne au produit. Si un
dommage est consécutif à un usage, à une installation et/ou à un branchement
qui ne respectent par la notice, la garantie du fabricant ne saurait s’appliquer.

!
52
Il est recommandé d’utiliser des pièces
détachées originales disponibles/vendues
dans nos centres de service client agréés.
En utilisant le symbol
sur ce
produit, nous déclarons sur notre
propre responsabilité que ce produit est
conforme à toutes les normes
Européennes relatives à la sécurité, la
santé et à l’environnement.
Le fabricant décline toute responsabilité
pour les erreurs d'impression dans le
livret fourni avec ce produit. En outre,
elle se réserve également le droit
d'apporter toute modification jugée utile
à ses produits sans modifier leurs
caractéristiques essentielles.
Garantie
Le produit est garanti selon les termes et
conditions énoncées dans le certificat
fourni avec le produit.
Le certificat de garantie doit être dûment
rempli et conservé, de façon à être
montré en cas de besoin.

hldsk

hldsk

hldsk

- CS 2D E - LB -
21.03 - 43040362 - IDM s.r.l.

