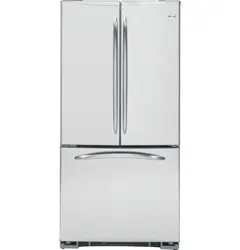
Owner 's Manual for GE Profile PFSS2MIYSS
Table of Contents
- Safety Instructions
- Operating Instructions
- Additional Features
- Automatic Icemaker
- Care and Cleaning
- Controls
- Crispers and Pans
- Freezer
- Replacing the Light Bulbs
- Shelves and Bins
- Water Filter
- Installation Instructions
- Installing the Refrigerator
- Installing the Water Line
- Preparing to Install Refrigerator
- Removing and Replacing
- Doors (Double Door Refrigerator Models only)
- Removing and Replacing the
- Freezer Drawer
- Reversing the Door Swing
- Single Door Refrigerator (Models only)
- Troubleshooting Tips
- Normal Operating Sounds
- Consumer Support
- Consumer Support
- Performance Data Sheet
- State of California Water
- Treatment Device Certificate
- Warranty for Canadian Customers
- Warranty for U.S. Customers
About the controls with temperature settings.
NOTE: The refrigerator is shipped with protective film covering the temperature controls.
If this film was not removed during installation, remove it now. The temperature controls are preset in the factory at 37°F for the refrigerator compartment and 0°F for the freezer compartment. Allow 24 hours for the temperature to stabilize to the preset recommended settings.
The temperature controls can display both the SET temperature as well as the actual temperature in the refrigerator and freezer. The actual temperature may vary slightly from the SET temperature based on usage and operating environment.
Setting either or both controls to OFF stops cooling in both the freezer and refrigerator compartments, but does not shut off electrical power to the refrigerator.
Changing the Temperature
For Controls-on-the-Door Models:
To change the temperature, press and release the WARMER or COLDER pad. The ACTUAL TEMP light will come on and the display will show the actual temperature. To change the temperature, tap either the WARMER or COLDER pad until the desired temperature is displayed.
For Controls Inside the Refrigerator:
Opening the door displays the actual temperature.
To change the temperature, press either the WARMER or COLDER touch pads until the desired temperature is displayed.
Once the desired temperature has been set, the temperature display will return to the actual refrigerator and freezer temperatures after 5 seconds. Several adjustments may be required.
Each time you adjust controls, allow 24 hours for the refrigerator to reach the temperature you have set.
To turn the cooling system off, tap the WARMER pad for either the refrigerator or the freezer until the display shows OFF. To turn the unit back on, press the COLDER pad for either the refrigerator or freezer.
Then press the COLDER pad again and it will go to the preset points of 0°F for the freezer and 37°F for the refrigerator. Setting either or both controls to OFF stops cooling in both the freezer and refrigerator compartments, but does not shut off electrical power to the refrigerator.
About TurboCool.TM (on some models)
How it Works
TurboCool rapidly cools the refrigerator compartment in order to more quickly cool foods. Use TurboCool when adding a large amount of food to the refrigerator compartment, putting away foods after they have been sitting out at room temperature or when putting away warm leftovers. It can also be used if the refrigerator has been without power for an extended period. Once activated, the compressor will turn on immediately and the fans will cycle on and off at high speed as needed for eight hours. The compressor will continue to run until the refrigerator compartment cools to approximately 34°F (1°C), then it will cycle on and off to maintain this setting. After 8 hours, or if TurboCool is pressed again, the refrigerator compartment will return to the original setting.
How to Use
Press TurboCool. The refrigerator temperature display will show . After TurboCool is complete, the refrigerator compartment will return to the original setting.
NOTES: The refrigerator temperature cannot be changed during TurboCool. The freezer temperature is not affected during TurboCool. When opening the refrigerator door during TurboCool, the fans will continue to run if they have cycled on.
About Door Alarm (on some models)
The door alarm will sound if any door is open for more than 2 minutes. The beeping stops when you close the door.
About Energy Saver (on some models)
This product is equipped with an Energy Saver feature. The refrigerator is shipped with the Energy Saver feature enabled. Over time, moisture can form on the front surface of the refrigerator cabinet and cause rust. If moisture does appear on the front surface of the refrigerator cabinet, turn off the Energy Saver feature by pressing and releasing the ENERGY SAVER pad on the control panel.
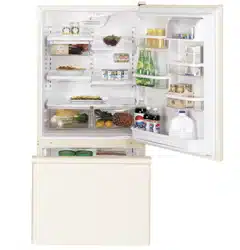
About the freezer.
Not all features are on all models.
Freezer Shelves and Baskets
- A shelf above the ice storage bin
- A half-width basket
- A shallow full-width basket
- A deep full-width basket
NOTE: Do not fill baskets higher than the rim of the basket. This may cause baskets to stick or jam when opening or closing.
Basket Removal
To remove the deep full-width basket on freezer drawer models:
- Open the freezer drawer until it stops.
- The freezer basket rests on the inside tabs on the drawer slides.
- Lift the basket so that it is out of all 6 slide bracket tabs.
- Tilt the basket and lift out of the drawer.
When replacing the deep full-width basket:
Tilt the basket back and lower it down into the drawer. Rotate the basket to a horizontal position and press it down into the 6 alignment tabs.
NOTE: Always be sure that the basket is seated in all 6 slide bracket tabs before sliding back into the freezer. The basket can be turned in either direction front to back and installed into the freezer.
To remove the half-width basket:
- Pull the basket out to the stop location.
- Lift the basket up at the front to release it from the slides.
- Lift the back up and out of the slide.
When replacing the basket, make sure that the wire tabs and wire hooks on the sides of the basket go into the slots in the top of the upper basket slides.
NOTE: Always be sure to fully close this basket.
To remove the shallow full-width basket:
- Pull the basket out to the stop location.
- Lift the front up and over the stop location.
- Lift the basket up and out.
About the automatic icemaker.
A newly installed refrigerator may take 12 to 24 hours to begin making ice.
Automatic Icemaker (on some models)
The icemaker will produce seven cubes per cycle— approximately 100–130 cubes in a 24-hour period, depending on freezer compartment temperature, room temperature, number of door openings and other use conditions.
See below for how to access ice and reach the power switch.
If the refrigerator is operated before the water connection is made to the icemaker, set the power switch in the O (off) position.
When the refrigerator has been connected to the water supply, set the power switch to the l (on) position. The icemaker power light will turn green when the freezer light switch is pressed in or when the freezer door is closed.
The icemaker will fill with water when it cools to 15 F (–10°C). A newly installed refrigerator may take 12 to 24 hours to begin making ice cubes.
You will hear a buzzing sound each time the icemaker fills with water.
Throw away the first few batches of ice to allow the water line to clear.
Be sure nothing interferes with the sweep of the feeler arm.
When the bin fills to the level of the feeler arm, the icemaker will stop producing ice. It is normal for several cubes to be joined together.
If ice is not used frequently, old ice cubes will become cloudy, taste stale and shrink.
NOTE: In homes with lower-than-average water pressure, you may hear the icemaker cycle multiple times when making one batch of ice.
NOTE: Set the power switch to the O (off) position if the water supply is shut off.