
www.lg.com
OWNER’S MANUAL
LED MONITOR
(LED TOUCH MONITOR)
23ET63V
Please read this manual carefully before operating
your set and retain it for future reference.
LED MONITOR(LED TOUCH MONITOR) MODEL LIST
ENGLISH

2
ENG
ENGLISH
TABLE OF CONTENTS
CONTENTS
3 LICENSE
4 ASSEMBLINGANDPREPAR-
ING
4 Unpacking
5 Partsandbuttons
6 MovingandLiftingtheMonitor
6 SettinguptheMonitor
6 - Mountingonatable
8 - Mountingonawall
9 USINGTHEMONITOR
9 ConnectingtoaPC
9 - D-SUBconnection
9 - HDMIconnection
11 - USBcable-PCconnection
11 - Headphoneportconnection
12 CUSTOMIZINGSETTINGS
13 CustomizingSettings
13 - MenuSettings
14 -Picture
15 -Color
16 -Display
16 -Audio
17 -Others
18 SUPERENERGYSAVING
19 PictureMode
20 TROUBLESHOOTING
23 SPECIFICATIONS
24 PresetModes(Resolution)
24 HDMITIMING
24 Indicator
25 PROPERPOSTURE
25 ProperPostureforUsingtheMonitor

3
ENG
ENGLISH
LICENSE
LICENSE
Eachmodelhasdifferentlicenses.Visitwww.lg.comformoreinformationonthelicense.
ThetermsHDMIandHDMIHigh-DefinitionMultimediaInterface,andthe
HDMIlogoaretrademarksorregisteredtrademarksofHDMILicensingLLC
intheUnitedStatesandothercountries.
*Touchdoesnotrespondwhenthedesktopisextendedtoasecondtouchmonitor.Formoreinformation.(Seep.22)
NOTE
OnlysupportWindows7andWindows8system.
Windows7Starter,Homebasicversionarenotsupportmulti-touchasdefaultoption.
PleasecheckthedetailsonthehomepageoftheMicrosoft.
Multitouchdoesnotwork.
4
ENG
ENGLISH
ASSEMBLING AND PREPARING
ASSEMBLINGANDPREPARING
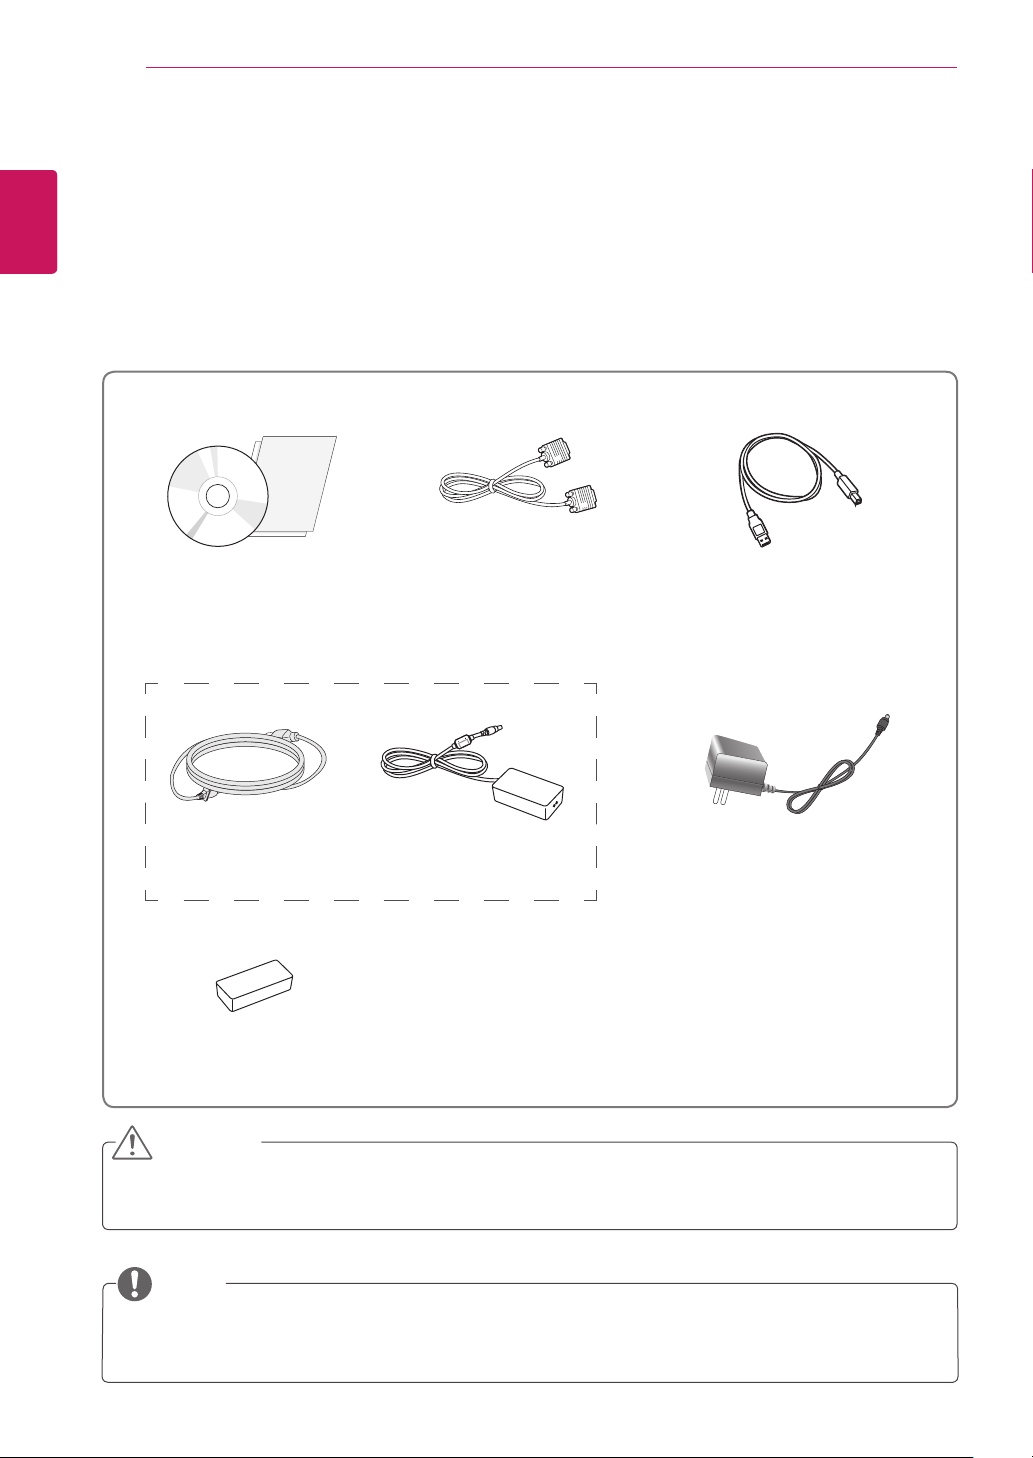
Unpacking
Checkyourproductboxforthefollowingitems.Ifthereareanymissingaccessories,contactthelocal
dealerwhereyoupurchasedyourproduct.Theillustrationsinthismanualmaydifferfromtheactualproduct
andaccessories.
Donotuseanyunapprovedaccessoriestoensurethesafetyandproductlifespan.
Anydamagesorinjuriesbyusingunapprovedaccessoriesarenotcoveredbythewarranty.
Theaccessoriessuppliedwithyourproductmayvarydependingonthemodel.
Productspecificationsorcontentsinthismanualmaybechangedwithoutpriornoticeduetoupgrade
ofproductfunctions.
CAUTION
NOTE
PowerCord
CD(Owner'sManual)/
Card
D-SUBCable
(Thiscableisnotincludedin
allcountries.)
(Dependingonthecountry)
AC-DCAdapter
AC-DCAdapter
(Dependingonthecountry)
or
A-BTypeUSB2.0Cable
Rubber(white)
5
ENG
ENGLISH
ASSEMBLING AND PREPARING
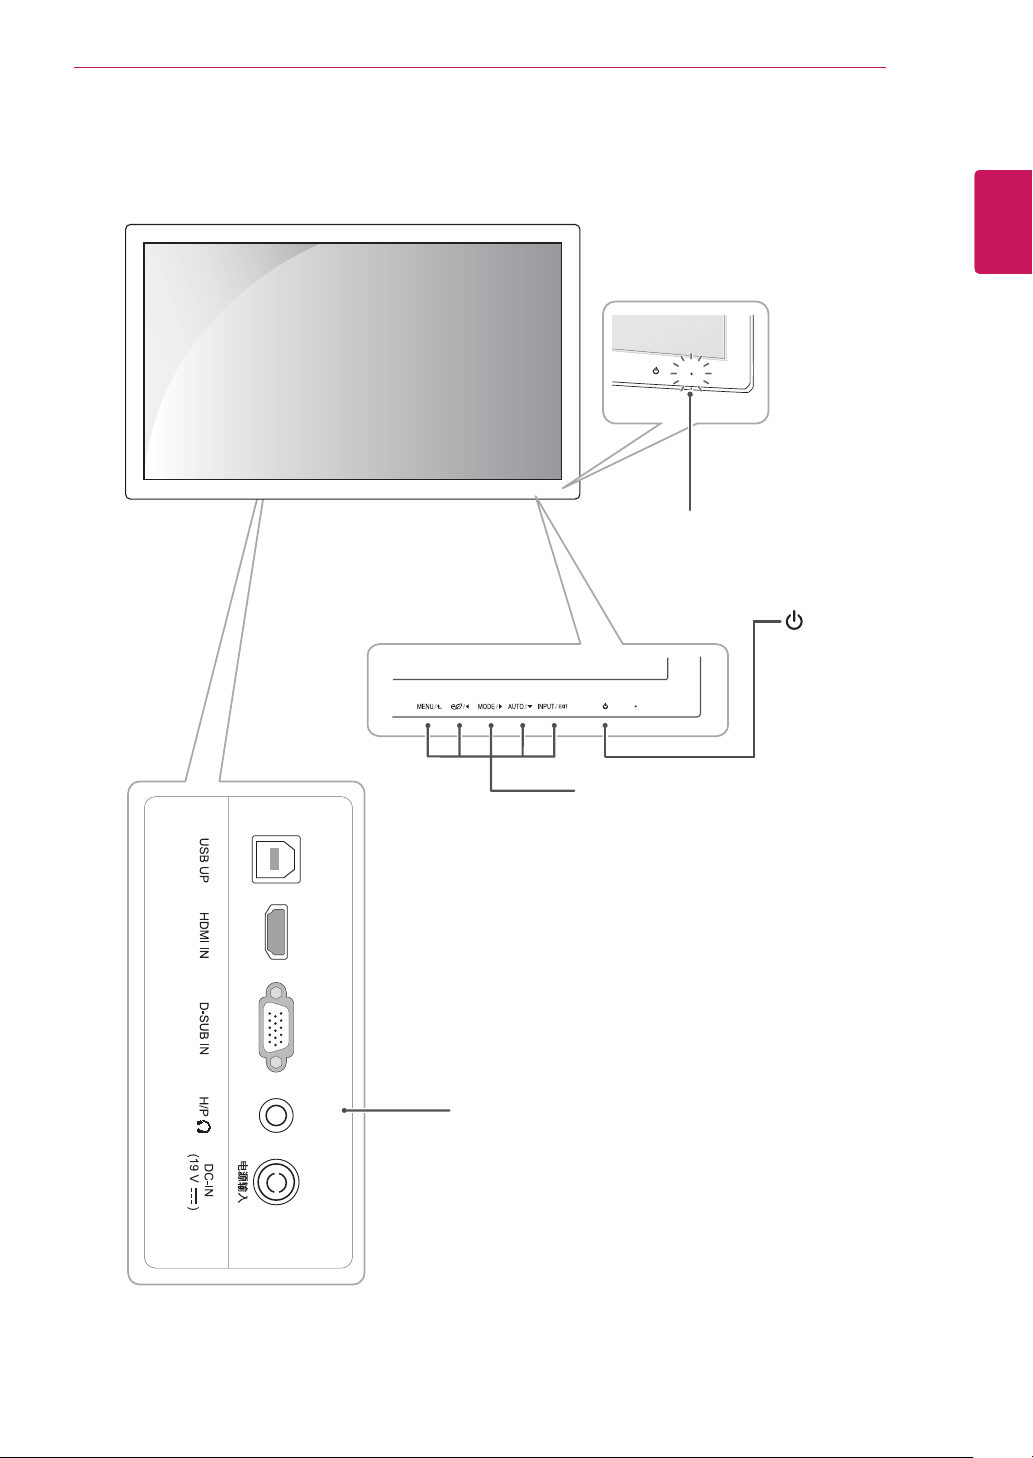
Partsandbuttons
PowerIndicator
LightingOn:Turnedon(Red)
LightingOff:Turnedoff
Connectionpanel
Button
(PowerButton)
6
ENG
ENGLISH
ASSEMBLING AND PREPARING
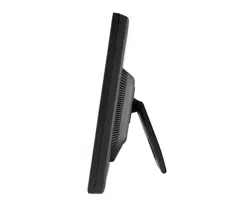
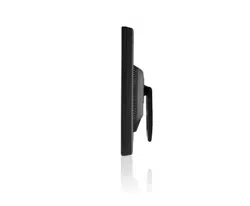
SettinguptheMonitor
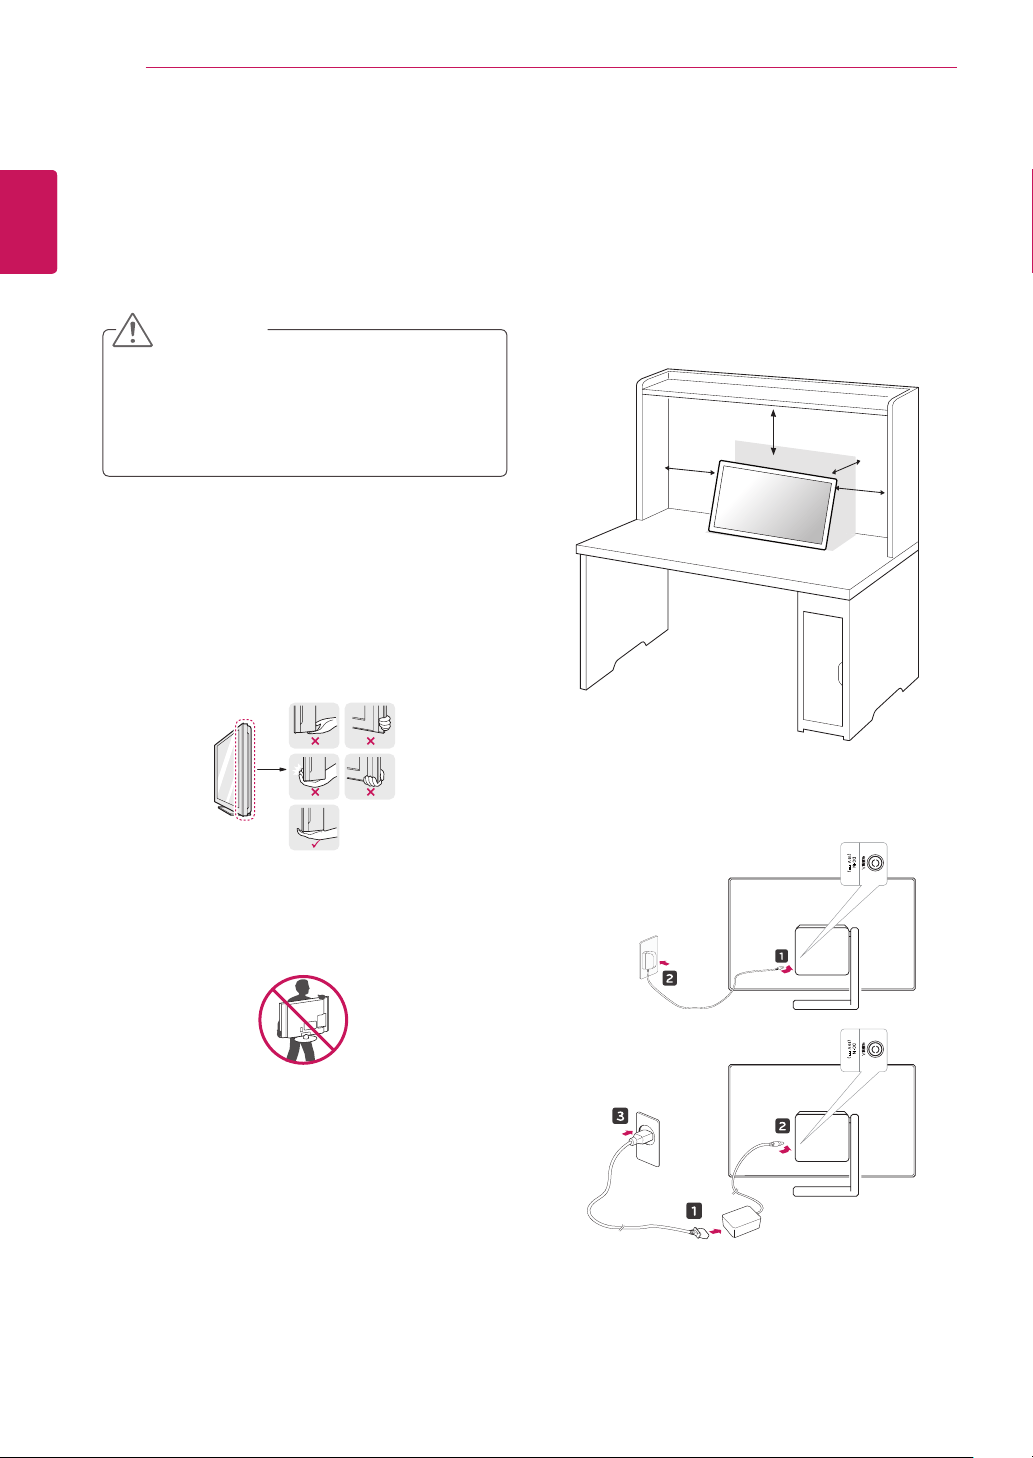
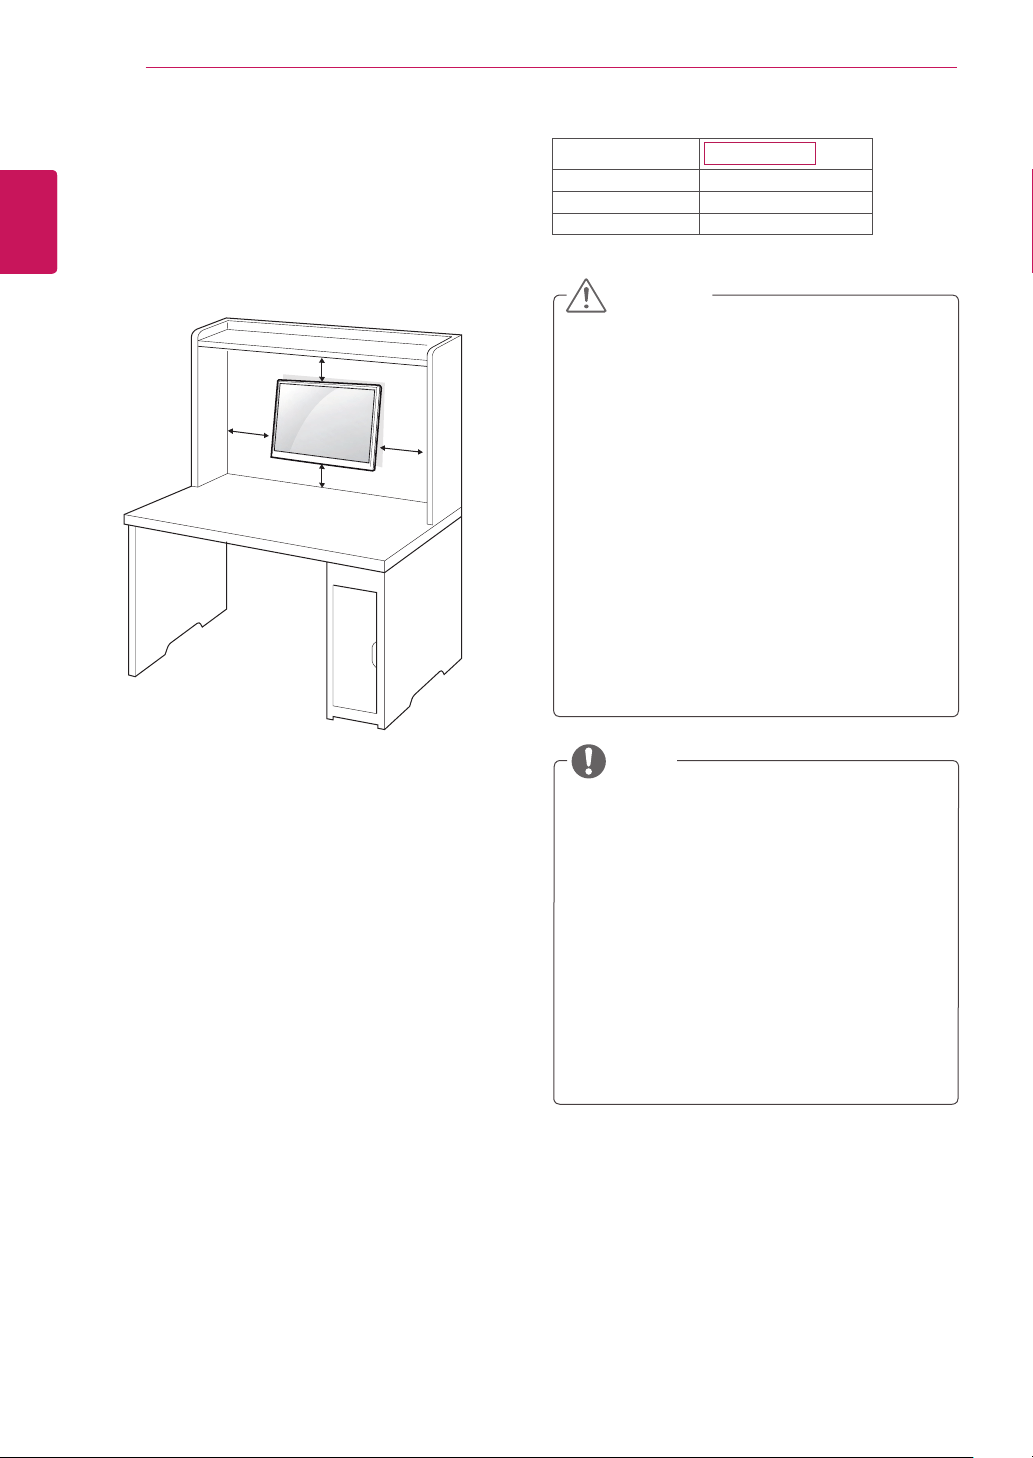
Mountingonatable
1
LiftandtilttheMonitorsetintoitsupright
positiononatable.
Leavea10cm(minimum)spacefromthewall
forproperventilation.
MovingandLiftingtheMonitor
Whenmovingorliftingthemonitor,followthese
instructionstopreventthemonitorfrombeing
scratchedordamagedandtoensuresafetrans-
portationregardlessofitsshapeorsize.
Asmuchaspossible,avoidtouchingthe
monitorscreen.Thismayresultindamage
tothescreenorsomeofthepixelsusedto
createimages.
CAUTION
Itisadvisabletoplacethemonitorinthe
originalboxorpackingmaterialbefore
attemptingtomoveit.
Beforemovingorliftingthemonitor,discon-
nectthepowercordandallcables.
Holdthetopandbottomofthemonitorframe
firmly.Donotholdthepanelitself.
Whenholdingthemonitor,thescreenshould
faceawayfromyoutopreventitbeing
scratched.
Whenmovingthemonitor,avoidanystrong
shockorvibrationstotheproduct.
Whenmovingthemonitor,keepitupright,
neverturnthemonitoronitssideortiltit
sideways.
2
ConnecttheAC-DCAdapterandPowerCord
toawalloutlet.
or
10 cm
10 cm
10 cm
10 cm
7
ENG
ENGLISH
ASSEMBLING AND PREPARING
3
Pressthe (Power)buttononthefrontpanel
toturnthepoweron.
Unplugthepowercordbeforemovingthe
Monitortoanotherlocation.Otherwiseelectric
shockmayoccur.
CAUTION
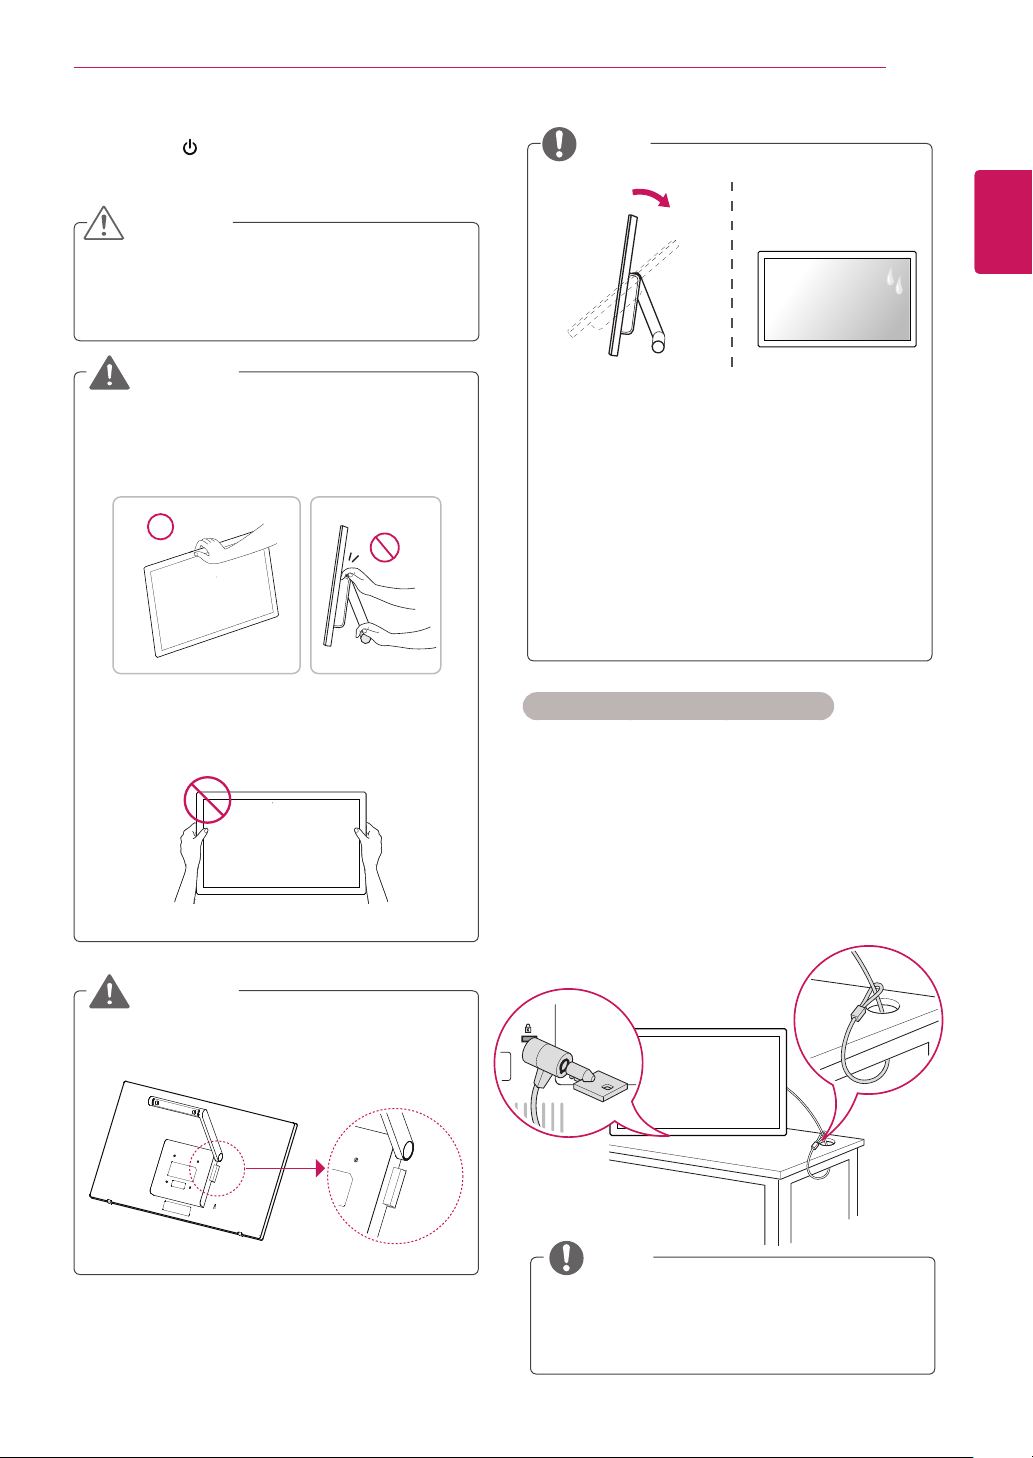
Donottouchorpressthescreenwhen
adjustingtheangleofthemonitor.
WARNING
NOTE
Toavoidinjurytothefingerswhenadjusting
thescreen,donotholdtheupperpartofthe
standasshownbelow.
Front Rear
Tiltfrom15to58degreesupordownto
adjusttheangleoftheMonitorsettosuit
yourview.
Avoidusingtheproductinahigh
temperatureandhighhumidityarea.Moving
themonitorfromaenvironmentlikethisto
anairconditionedareamaycausemoisture
formationinsidetheglass.Thismoisture
willbedissipateovertime,whichmayvary
dependingontheoperatingenvironment.
UsingtheKensingtonsecuritysystem
TheKensingtonsecuritysystemconnectoris
locatedatthebackoftheMonitorset.Formore
informationofinstallationandusing,refertothe
manualsuppliedwiththeKensingtonsecurity
systemorvisit
http://www.kensington.com
.
ConnecttheKensingtonsecuritysystemcable
betweentheMonitorsetandatable.
TheKensingtonsecuritysystemisoptional.
Youcanobtainitfrommostelectronicsstores.
NOTE
WARNING
Attachtherubberlikethebelowpicture.Ifnot,
thefingerscanbepinchedorgetdamaged.
8
ENG
ENGLISH
ASSEMBLING AND PREPARING
Mountingonawall
Forproperventilation,allowaclearanceof10cm
oneachsideandfromthewall.Detailed
instructionsareavailablefromyourdealer,seethe
optionalTiltWallMountingBracketInstallationand
SetupGuide.
IfyouintendtomounttheMonitorsettoawall,
attachWallmountinginterface(optionalparts)to
thebackoftheset.
WhenyouinstalltheMonitorsetusingawall
mountinginterface(optionalparts),attachit
carefullysoitwillnotdrop.
1
Please,Usethescrewandwallmountinterface
inaccordancewithVESAStandards.
2
Ifyouusescrewlongerthanstandard,the
monitormightbedamagedinternally.
3
Ifyouuseimproperscrew,theproductmightbe
damagedanddropfrommountedposition.In
thiscase,LGElectronicsisnotresponsiblefor
it.
4
VESAcompatible.
5
PleaseuseVESAstandardasbelow.
784.8mm(30.9inch)andunder
*WallMountPadThickness:2.6mm
*Screw:Φ4.0mmxPitch0.7mmx
Length10mm
787.4mm(31.0inch)andabove
*PleaseuseVESAstandardwallmountpad
andscrews.
10 cm
10 cm
10 cm
10 cm
Disconnectthepowercordfirst,andthen
moveorinstalltheMonitorset.Otherwise
electricshockmayoccur.
IfyouinstalltheMonitorsetonaceilingor
slantedwall,itmayfallandresultinsevere
injury.
UseonlyanauthorizedLGwallmount
andcontactthelocaldealerorqualified
personnel.
Donotovertightenthescrewsasthismay
causedamagetotheMonitorsetandvoid
yourwarranty.
Useonlyscrewsandwallmountsthat
meettheVESAstandard.Anydamages
orinjuriesbymisuseorusinganimproper
accessoryarenotcoveredbythewarranty.
UsethescrewsthatarelistedontheVESA
standardscrewspecifications.
Thewallmountkitwillincludeaninstallation
manualandnecessaryparts.
Thewallmountbracketisoptional.Youcan
obtainadditionalaccessoriesfromyourlocal
dealer.
Thelengthofscrewsmaydifferdepending
onthewallmount.Besuretousetheproper
length.
Formoreinformation,refertothe
instructionssuppliedwiththewallmount.
CAUTION
NOTE
Model
23ET63V
VESA(AxB) 75x75
Standardscrew M4
Numberofscrews 4
9
ENG
ENGLISH
USING THE MONITOR
USINGTHEMONITOR
ConnectingtoaPC
YourMonitorsupportsPlug&Play.When
connectedtoaPCandturnedon,thedevicewill
connectautomaticallywithoutconfigurationor
userintervention.
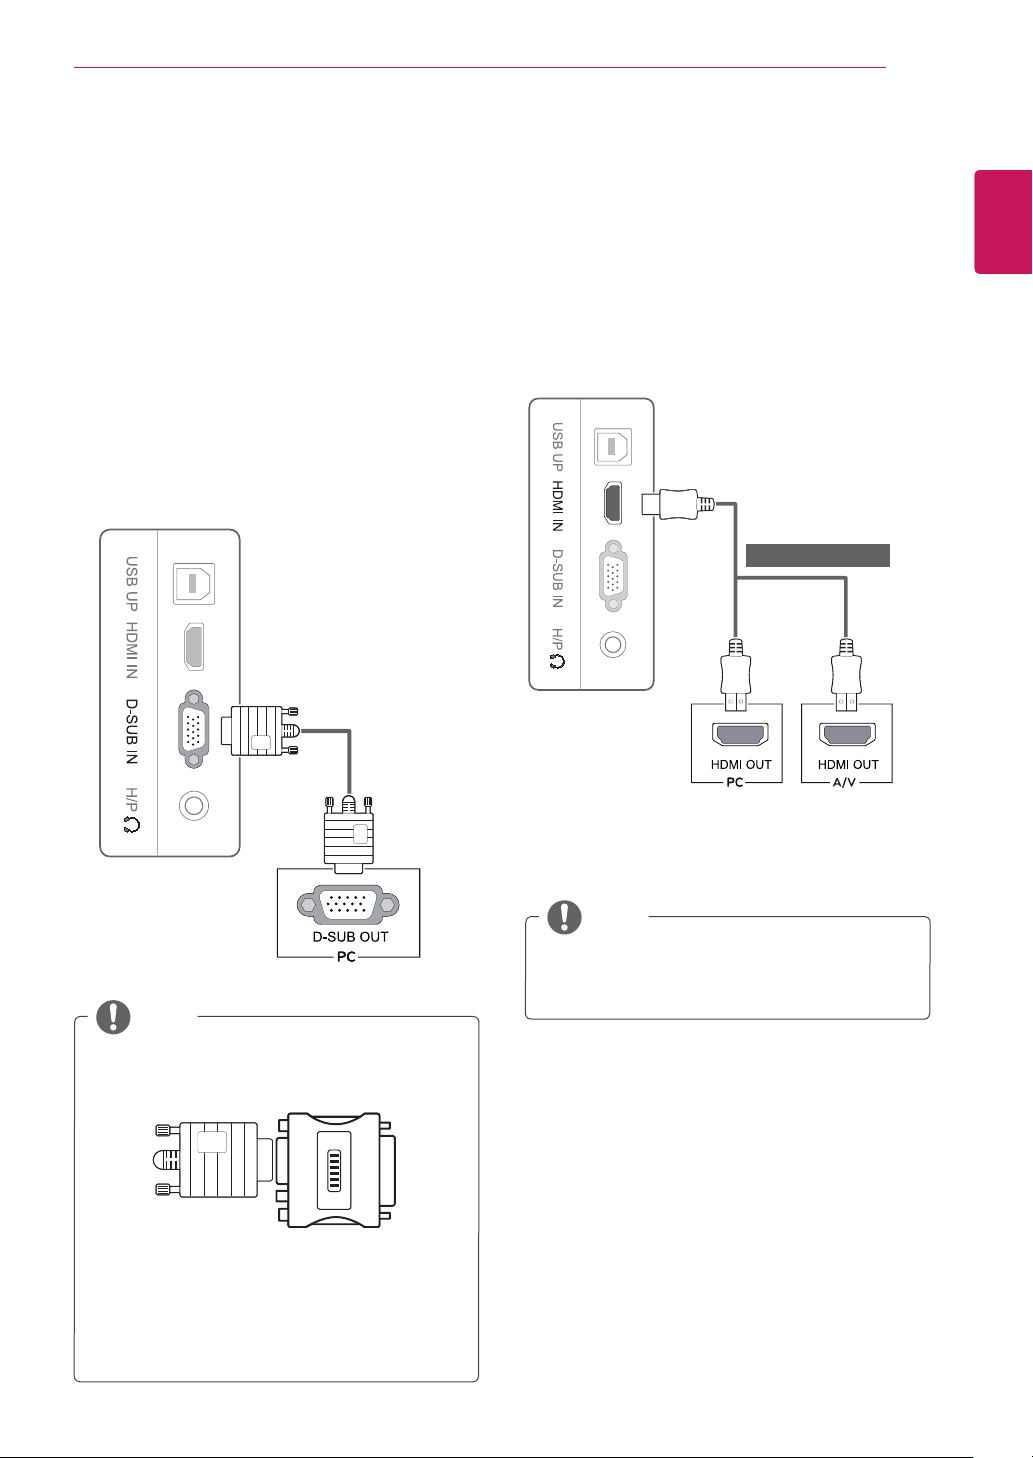
D-SUBconnection
TransmitsanalogvideofromyourPCtothe
Monitorset.ConnectthePCandtheMonitorwith
thesuppliedD-sub15pinsignalcableasshownin
thefollowingillustrations.
ThismonitorsupportPCinputviaHDMI,
butyoumayexperiencesomecompatibility
issues.
NOTE
HDMIconnection
Transmitsthedigitalvideoandaudiosignalsfrom
yourPCorA/VtotheMonitor.ConnectthePCor
A/VandtheMonitorwiththeHDMIcableasshown
inthefollowingillustrations.
Macadapter
ForAppleMacintoshuse,aseparateplug
adapterisneededtochangethe15pin
highdensity(3row)D-SUBVGAconnector
onthesuppliedcabletoa15pin2row
connector.
WhenusingaD-Subsignalinputcable
connectorforMacintosh
NOTE
(soldseparately)
10
ENG
ENGLISH
USING THE MONITOR
"SelfImageSetting"Function.
Thisfunctionprovidestheuserwithoptimal
displaysettings.Whentheuserconnects
themonitorforthefirsttime,thisfunction
automaticallyadjuststhedisplaytooptimal
settingsforindividualinputsignals.(Only
supportedinAnalogMode)
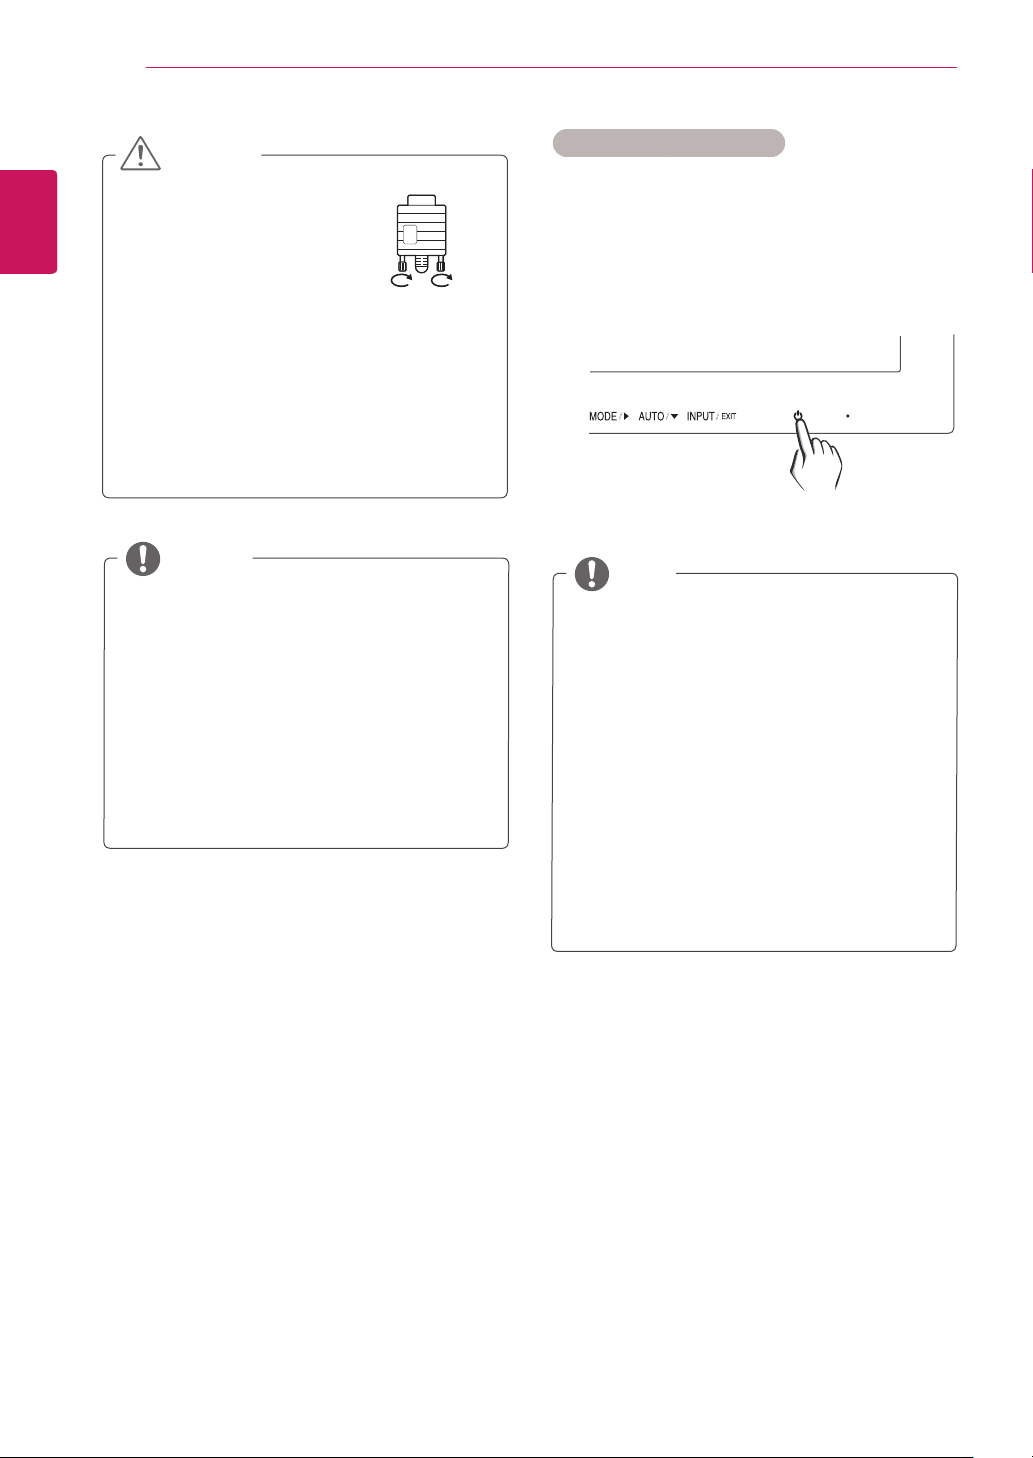
‘AUTO’Function.
Whenyouencounterproblemssuchas
blurryscreen,blurredletters,screenflicker
ortiltedscreenwhileusingthedeviceor
afterchangingscreenresolution,pressthe
AUTOfunctionbuttontoimproveresolution.
(OnlysupportedinAnalogMode)
NOTE
Connectthesignal
inputcableandtighten
itbyturningthescrews
clockwise.
Donotpressthescreenwithyourfingerfor
alongtimeasthismayresultintemporary
distortiononthescreen.
Avoiddisplayingafixedimageonthe
screenforalongperiodoftimetoprevent
imageburn.Useascreensaverifpossible.
CAUTION
SelfImageSettingFunction
Pressthepowerbuttontoturnonthemonitor.
Whenmonitorpoweristurnedon,the"
SelfImage
Setting
"Functionisexecutedautomatically.(Only
supportedinAnalogMode)
Whenconnectingthepowercordtotheout-
let,useagrounded(3-hole)multi-socketora
groundedpoweroutlet.
Themonitormayflickerwhenturnedoninan
areaoflowtemperature.Thisisnormal.
Sometimesred,green,orbluespotsmayap-
pearonthescreen.Thisisnormal.
UsingaDVItoHDMIcablemaycausecom-
patibilityissues.
NOTE
11
ENG
ENGLISH
USING THE MONITOR
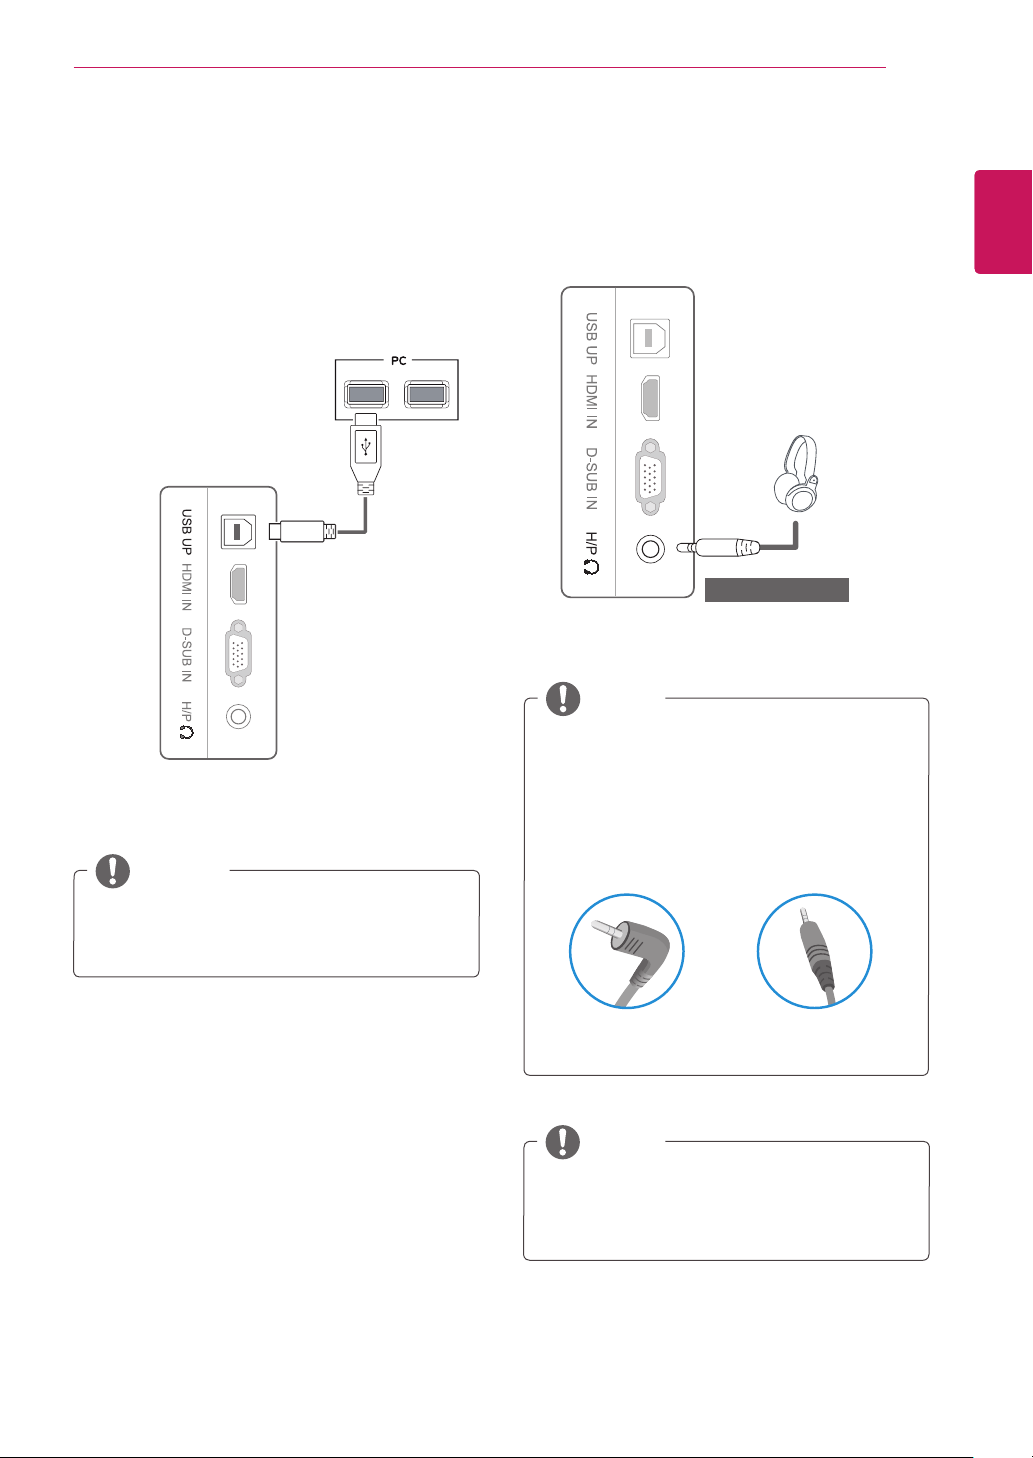
USBcable-PCconnection
Tousethetouchscreen,connecttheUSBportto
thePC.
UseaUSB2.0cablewithA-Btypetoconnectyour
PC.
(TheUSBportonthemonitorisonlyforthetouch
screenfeature.)
PleaseinstallthelatestWindowsservice
packbeforeuse.
NOTE
Headphoneportconnection
Usetheheadphoneporttoconnectaperipheral
devicetothemonitor.Connectasillustrated.
DependingontheaudiosettingsofthePC
andexternaldevice,headphoneandspeaker
functionsmaybelimited.
NOTE
Peripheraldevicesaresoldseparately.
TheUSBportcannotbeusedtoconnecta
keyboard,mouse,andotherUSBdevices.
Foranangleplugearphone,itisdifficult
connectitwithaperipheraldevice,sousea
straighttype.
NOTE
AngleType StraightType
(soldseparately)
12
ENG
ENGLISH
CUSTOMIZING SETTINGS
CUSTOMIZINGSETTINGS
1
PressthedesiredbuttononthebottomoftheMonitor.
2
ChangethevalueofthemenuitembypressingthebuttonsonthebottomoftheMonitor.
Toreturntotheuppermenuorsetothermenuitems,usetheuparrow( )button.
3
Select
EXIT
toleavetheOSDmenu.
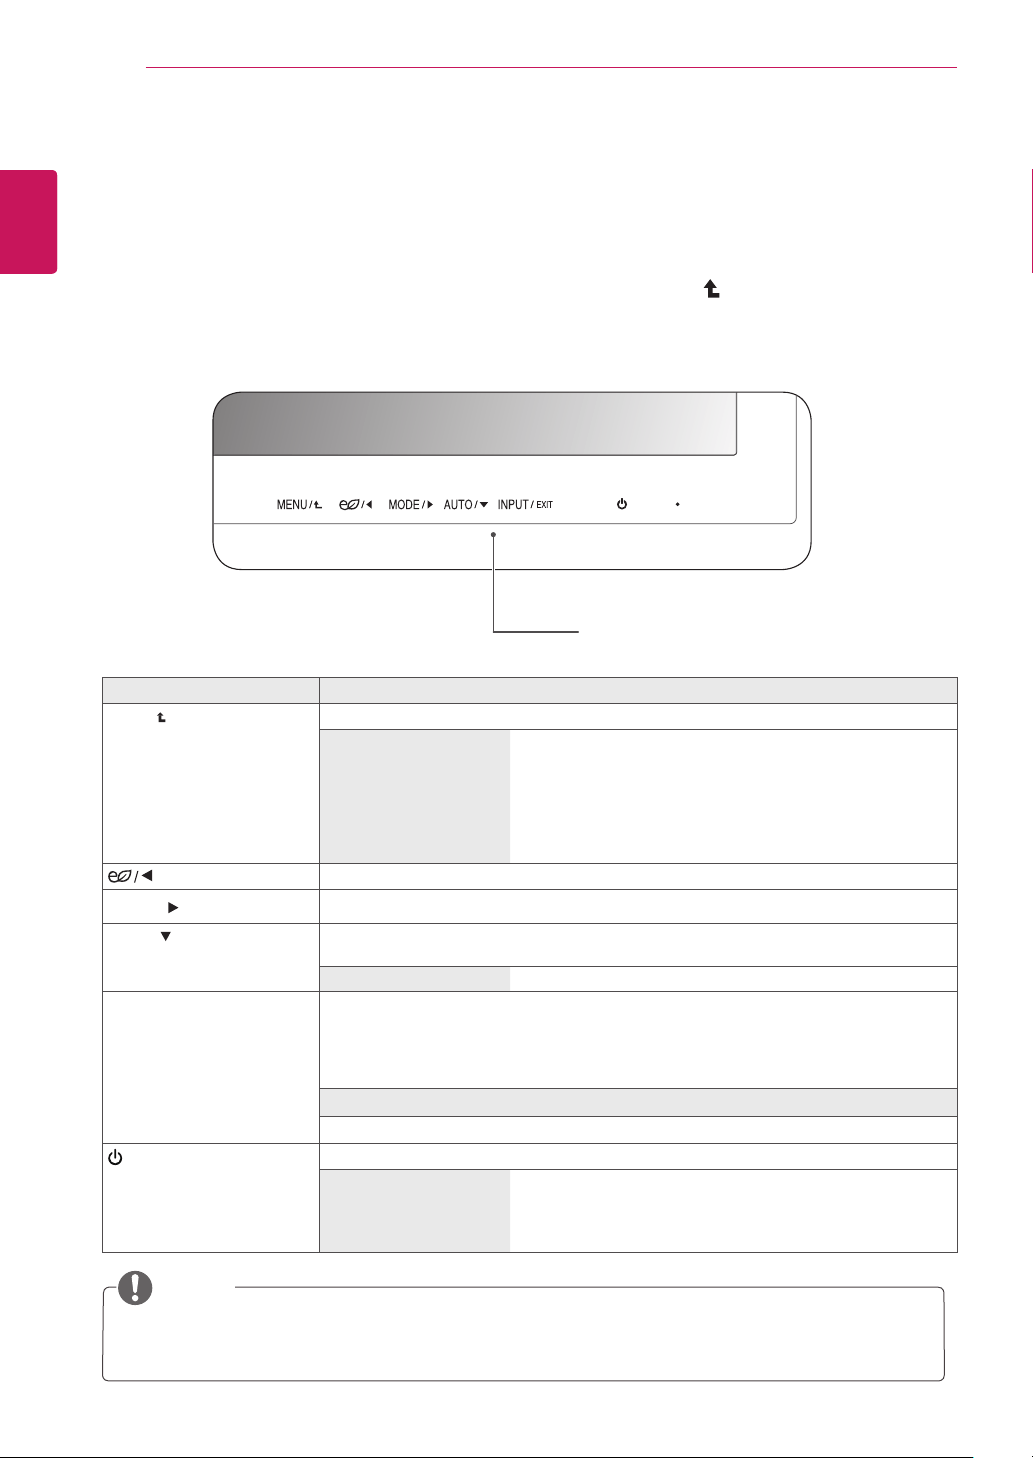
MonitorsetButtons
Button Description
MENU
Accessesthemainmenus.
OSDLOCKED/
UNLOCKED
Thisfunctionallowsyoutolockthecurrentcontrolsettings,
sothattheycannotbeinadvertentlychanged.
PressandholdtheMenubuttonforafewseconds.Then,
youwillbepromptedtosettheOSDLock.
YoucanunlocktheOSDcontrolsatanytimebypushing
theMENUbuttonforseveralseconds.Themessage"OSD
UNLOCKED"shouldappear.
EnablestheSUPERENERGYSAVINGfunction.
MODE/
GoestothePictureModemenu.
AUTO/
Whenadjustingyourdisplaysettings,alwayspresstheAUTObutton.(Onlysupportedin
AnalogMode)
Thebestdisplaymode
1920x1080
INPUT/EXIT
Youcanchoosetheinputsignal.
• Whentwoinputsignalsareconnected,youcanselecttheinputsignal(D-SUB/
HDMI)youwant.
• Whenonlyonesignalisconnected,itisautomaticallydetected.Thedefaultsettingis
D-SUB.
EXIT
ExittheOSD(OnScreenDisplay).
(PowerButton)
Turnsthepoweronoroff.
PowerIndicator
Whenthemonitorisinoperatingmode,thepowerindicator
willturnred(onmode).
Whenthemonitorisinpower-savingmode,thepowerindica-
torwillblinkred.
NOTE
Allofthebuttonsaretouchsensitiveandcanbeoperatedbysimplytouchingtheirlabelwithyour
finger.
13
ENG
ENGLISH
CUSTOMIZING SETTINGS
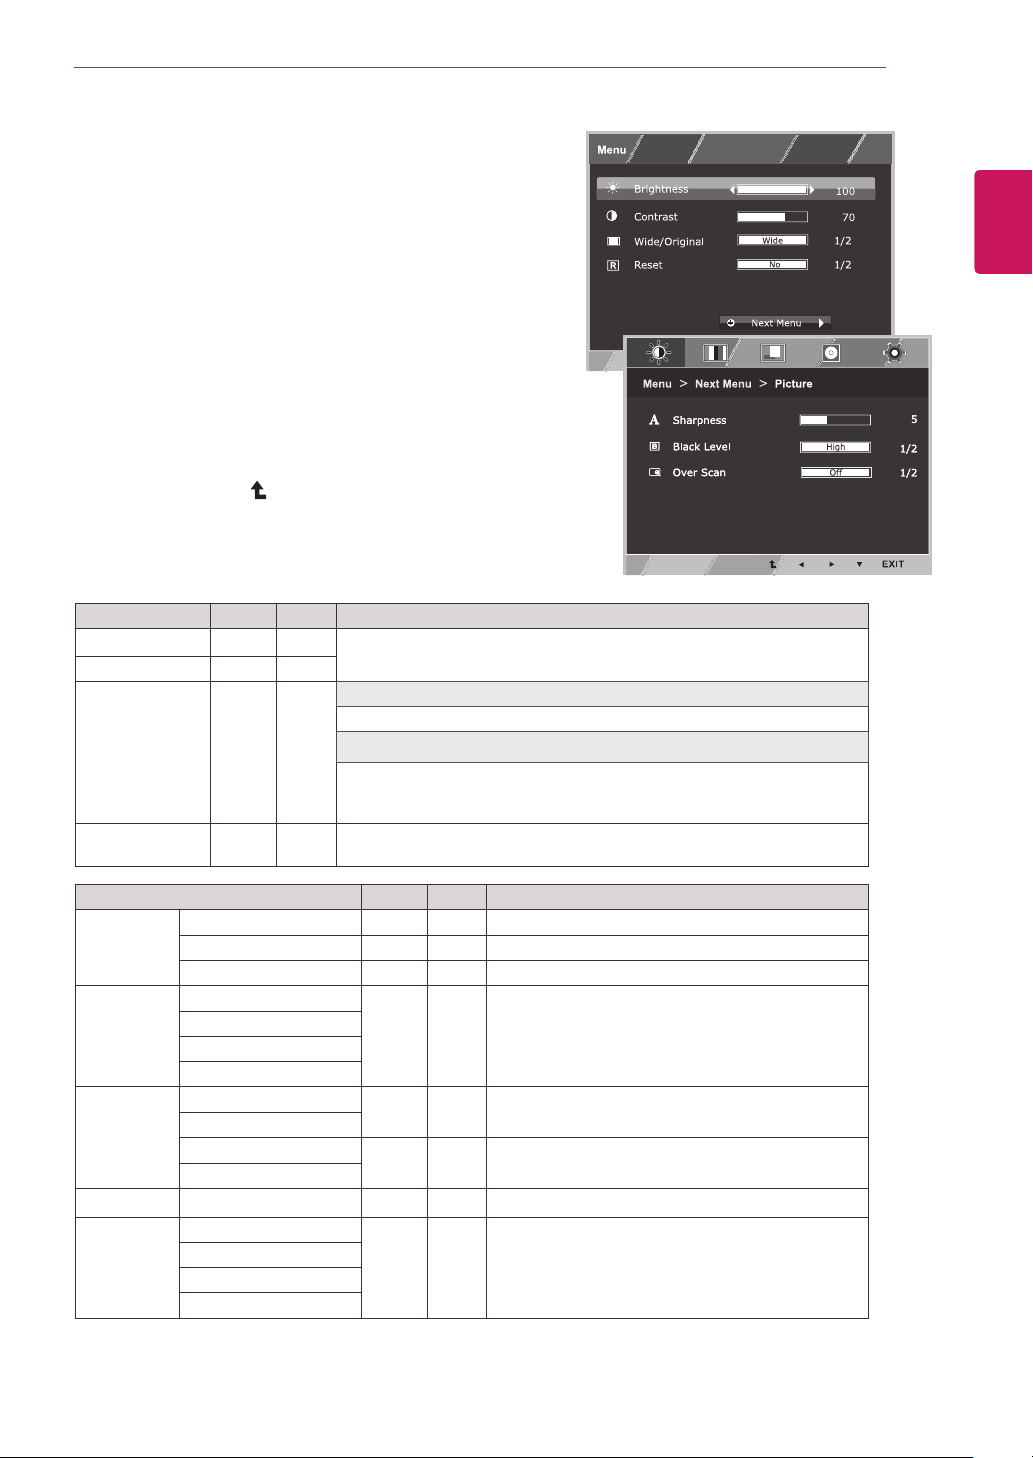
CustomizingSettings
MenuSettings
1
Press
MENU
buttononthebottomoftheMonitorset
todisplaythe
Menu
OSD.
2
Settheoptionsbypressingthe◄or►or▼
buttons.
3
Selectthe"
NextMenu
"buttontoenterthemore
optionsettings.
4
Select
EXIT
toleavetheOSDmenu.
Toreturntotheuppermenuorsetothermenuitems,
usetheuparrow( )button.
Eachoptionisexplainedbelow.
Menu>NextMenu Analog HDMI Description
Picture Sharpness ● ●
Toadjusttheclearnessofthescreen.
BlackLevel ●
Tosetoffsetlevel
OverScan ●
Toimprovetheclarityandstabilityofthescreen
Color Gamma
● ●
Tocustomizethecolorofthescreen
ColorTemp
SixColor
ColorReset
Display Horizontal
●
Toadjustthepositionofthescreen
Vertical
Clock
●
Toimprovetheclarityandstabilityofthescreen
Phase
Audio
●
ToadjusttheVolume
Others Language
● ●
Tocustomizethescreenstatusforauser's
operatingenvironment
PowerIndicator
AutomaticStandby
ResponseTime
Analog:
D-SUB(Analogsignal)input.
HDMI:
HDMI(Digitalsignal)input.
Menu Analog HDMI Description
Brightness
● ●
Toadjustthebrightness,contrastofthescreen
Contrast ● ●
Wide/Original
● ●
Wide
Switchtofullscreenmodeaccordingtoinputimagesignal.
Original
Changetheinputimagesignalratiotooriginal.
*ThisfunctionworksonlyifinputresolutionislowerthanMonitorsetratio
(16:9).
Reset
● ●
Restoreallfactorydefaultsettings.Pressthe
◄
,
►
buttonstoreset
immediately.
14
ENG
ENGLISH
CUSTOMIZING SETTINGS
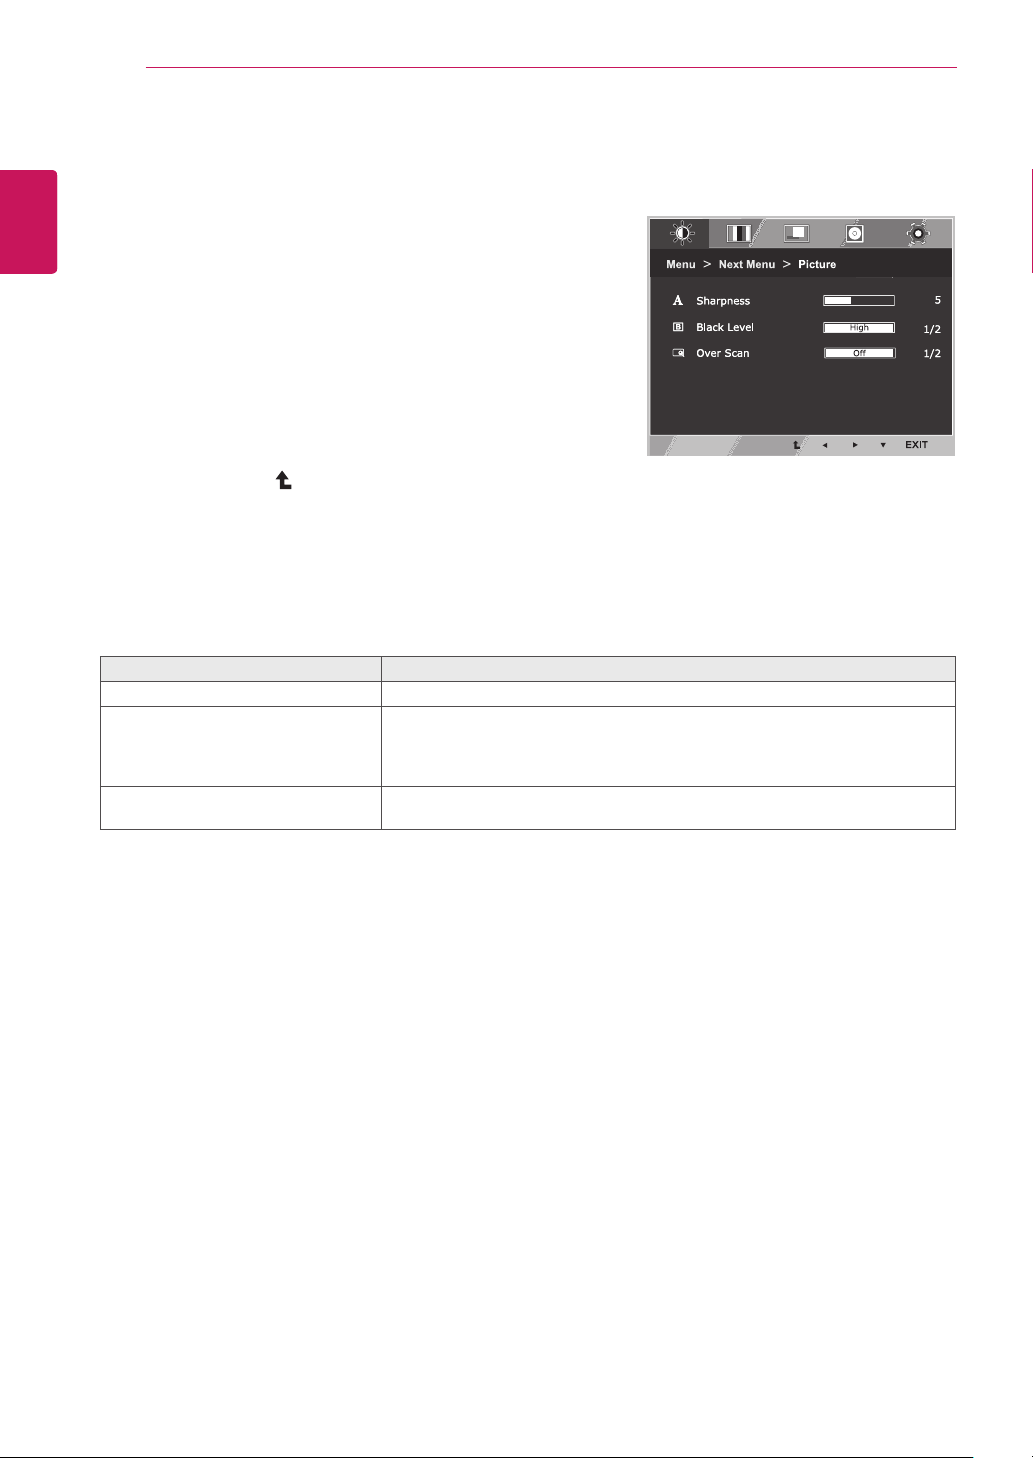
Picture
1
Press
MENU
buttononthebottomoftheMonitorset
todisplaythe
Menu
OSD.
2
Selectthe"
NextMenu
"buttontoenterthemore
optionsettings.
3
Enterto
Picture
bypressingthe▼button.
4
Settheoptionsbypressingthe◄or►or▼
buttons.
5
Select
EXIT
toleavetheOSDmenu.
Toreturntotheuppermenuorsetothermenuitems,
usetheuparrow( )button.
Eachoptionisexplainedbelow.
Menu>NextMenu>Picture Description
Sharpness Toadjusttheclearnessofthescreen.
BlackLevel Youcansettheoffsetlevel.Ifyouselect'High',thescreenwillbebrightandif
youselect‘Low’,thescreenwillbedark.(onlyforHDMIinput)
*Offset?Asthecriteriaforvideosignal,itisthedarkestscreenthemonitorcan
show.
OverScan ToselecttherangeofoutputimageforDTVtiminginHDMIinput.(onlyforHDMI
input)RecommendoverscanfunctiontoturnonwhenconnectAVequipment.
15
ENG
ENGLISH
CUSTOMIZING SETTINGS
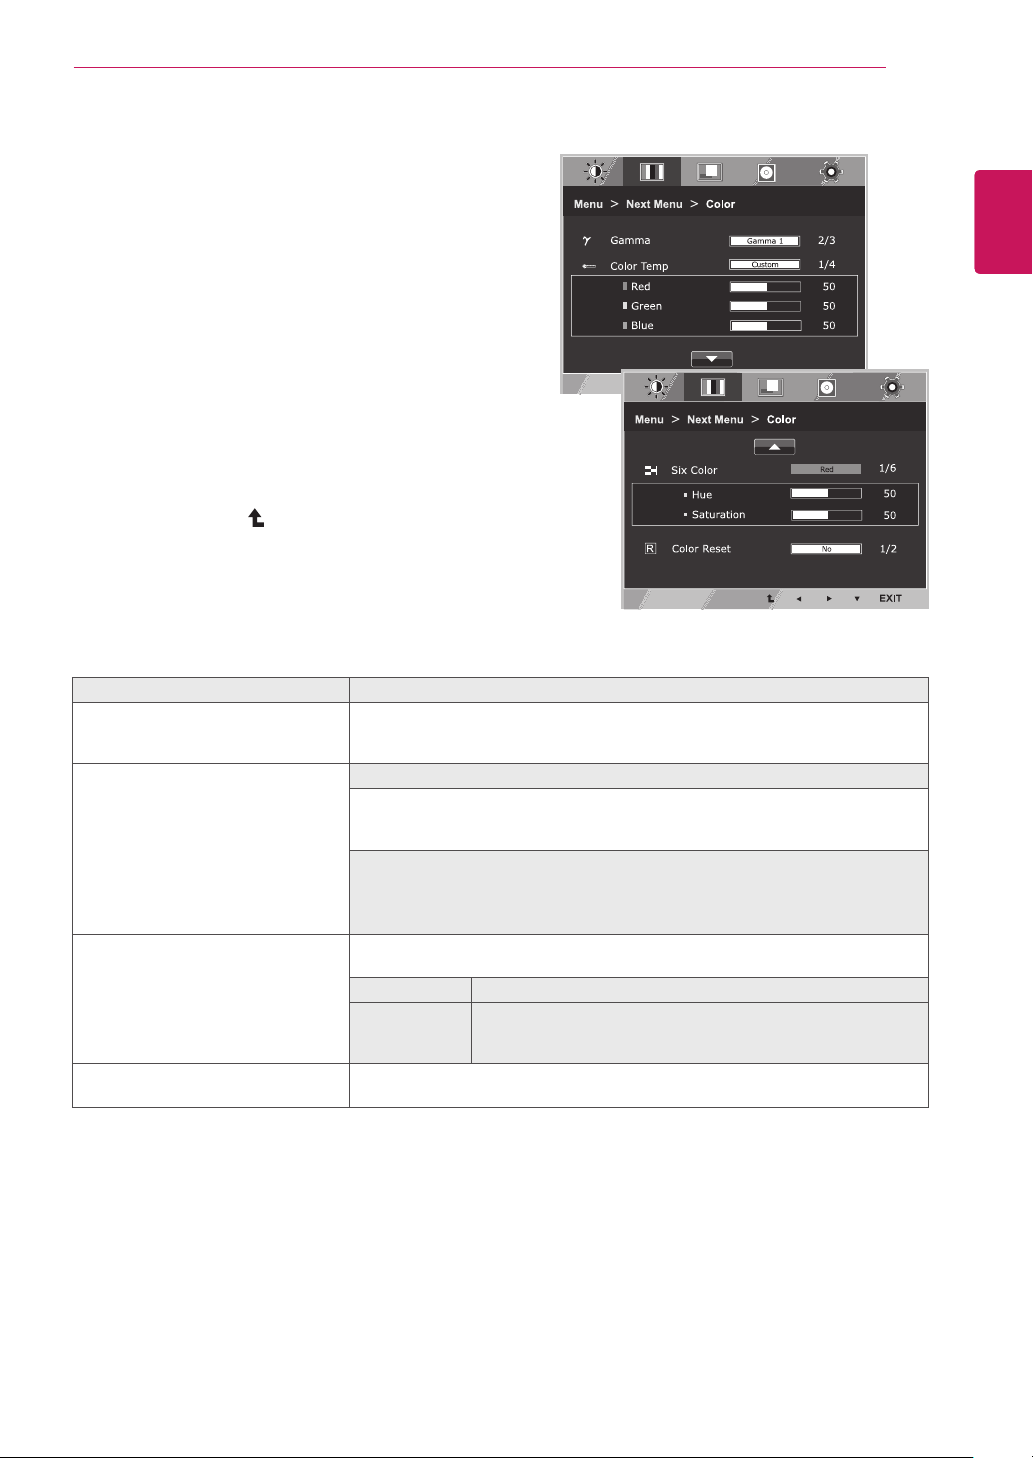
Color
1
Press
MENU
buttononthebottomoftheMonitorset
todisplaythe
Menu
OSD.
2
Selectthe"
NextMenu
"buttontoenterthemore
optionsettings.
3
Select
Color
bypressingthe►button.
4
Enterto
Color
bypressingthe▼button.
5
Settheoptionsbypressingthe◄or►or▼
buttons.
6
Select
EXIT
toleavetheOSDmenu.
Toreturntotheuppermenuorsetothermenuitems,
usetheuparrow( )button.
Eachoptionisexplainedbelow.
Menu>NextMenu>Color Description
Gamma Setyourowngammavalue.:Gamma0,Gamma1,Gamma2onthemonitor,
highgammavaluesdisplaywhitishimagesandlowgammavaluesdisplay
blackishimages.
ColorTemp Custom
•Red:
Setyourownredcolorlevels.
•Green:
Setyourowngreencolorlevels.
•Blue:
Setyourownbluecolorlevels.
Selectthescreencolor.
Warm:
Setthescreentowarmcolortemperature(morered).
Medium:
Setthescreentomediumcolortemperature.
Cool:
Setthescreentocoolcolortemperature(moreblue).
SixColor Setsandstoresthehueandsaturationforsixcolors(Red/Green/Blue/Cyan/
Magenta/Yellow)tosatisfythecolorrequirementsofauser.
Hue Adjuststhescreenhue.
Saturation Adjuststhecolorsharpnessonthescreen.Lowervaluesmake
thecolorsharpnessweakerandcolorslighterwhilehigher
valuesmakethecolorsharpnessstrongerandcolorsdark.
ColorReset Resetsthecolorsettingstothefactorydefaultsettingsforthecurrentinput
device.
16
ENG
ENGLISH
CUSTOMIZING SETTINGS
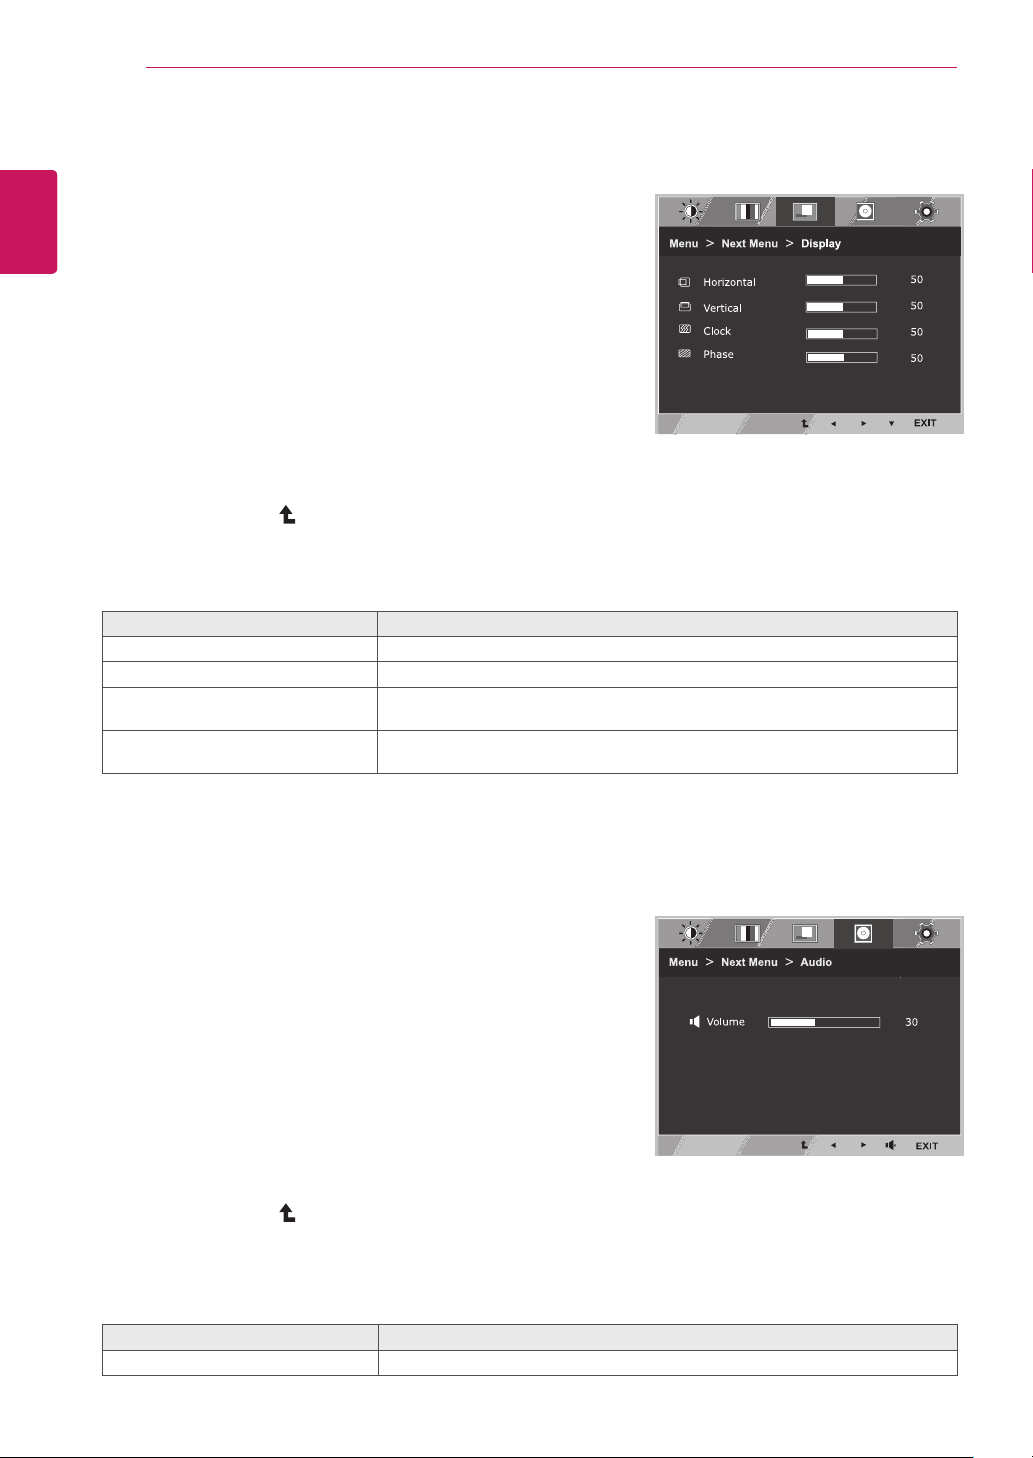
Display
1
Press
MENU
buttononthebottomoftheMonitorset
todisplaythe
Menu
OSD.
2
Selectthe"
NextMenu
"buttontoenterthemore
optionsettings.
3
Select
Display
bypressingthe►button.
4
Enterto
Display
bypressingthe▼button.
5
Settheoptionsbypressingthe◄or►or▼
buttons.
6
Select
EXIT
toleavetheOSDmenu.
Toreturntotheuppermenuorsetothermenuitems,
usetheuparrow( )button.
Eachoptionisexplainedbelow.
Audio
1
Press
MENU
buttononthebottomoftheMonitorset
todisplaythe
Menu
OSD.
2
Selectthe"
NextMenu
"buttontoenterthemore
optionsettings.
3
Select
Audio
bypressingthe►button.
4
Enterto
Volume
bypressingthe▼button.
5
Settheoptionsbypressingthe◄or►buttons.
6
Select
EXIT
toleavetheOSDmenu.
Toreturntotheuppermenuorsetothermenuitems,
usetheuparrow( )button.
Eachoptionisexplainedbelow.
Menu>NextMenu>Display Description
Horizontal Tomoveimageleftandright.
Vertical Tomoveimageupanddown.
Clock Tominimizeanyverticalbarsorstripesvisibleonthescreenbackground.The
horizontalscreensizewillalsochange.
Phase Toadjustthefocusofthedisplay.Thisitemallowsyoutoremoveanyhorizontal
noiseandclearorsharpentheimageofcharacters.
Menu>NextMenu>Audio Description
Volume ToadjusttheVolumeofheadphone/earphone.(OnlyforHDMIinput)
17
ENG
ENGLISH
CUSTOMIZING SETTINGS
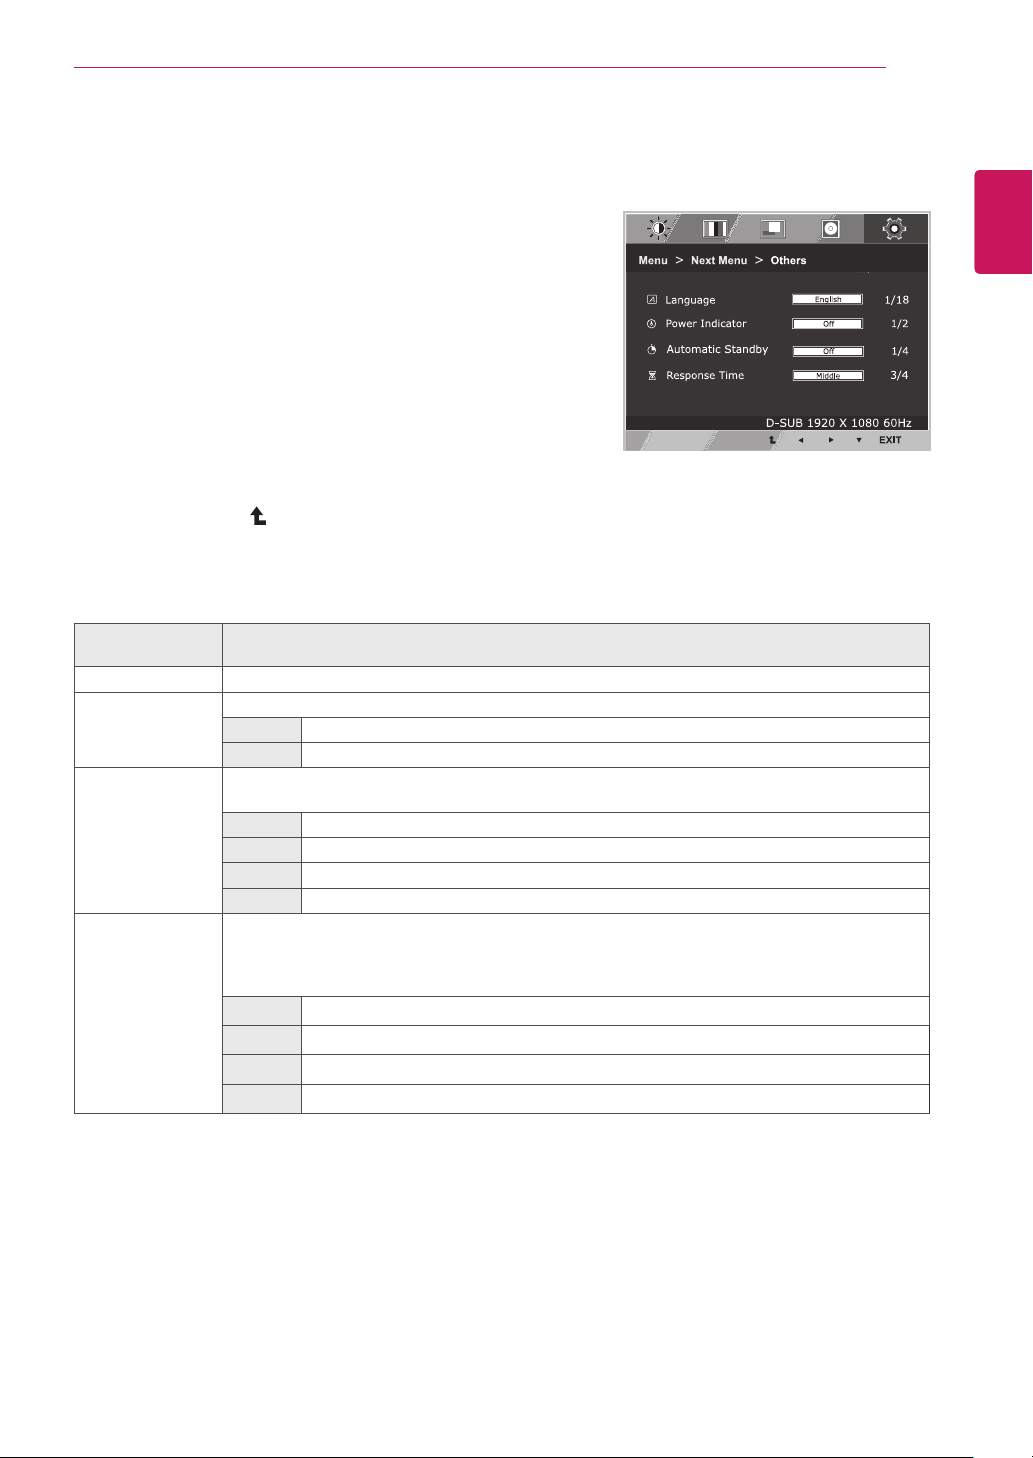
Eachoptionisexplainedbelow.
Menu>Next
Menu>Others
Description
Language
ChoosesthelanguageoftheOSD.
PowerIndicator
Activates/deactivatesthepowerindicatorLED.
On
Thepowerindicatorisautomaticallyturnedon.
Off
Thepowerindicatoristurnedoff.
Automatic
Standby
Oncethespecifiedstandbytimepasses,themonitorturnsoffautomatically.Pressinganybutton
orchangingtheresolutionwillinitializethestandbytime.
Off Theautomaticstandbyfunctionisturnedoff.
4H Themonitorisautomaticallyturnedoffafter4hours.
6H Themonitorisautomaticallyturnedoffafter6hours.
8H Themonitorisautomaticallyturnedoffafter8hours.
ResponseTime Youcansetaresponsetimefordisplayedpicturesbasedonthespeedofthescreen.Fora
normalenvironment,itisrecommendedthatyouuse'Middle'.Forafast-movingpicture,itis
recommendedthatyouuse'High'.
SettingtoHighmaycauseimagesticking.
Off Theresponsetimeisturnedoff.
High
SetstheresponsetimetoHigh.
Middle
SetstheresponsetimetoMiddle.
Low
SetstheresponsetimetoLow.
Others
1
Press
MENU
buttononthebottomoftheMonitorset
todisplaythe
Menu
OSD.
2
Selectthe"
NextMenu
"buttontoenterthemore
optionsettings.
3
Select
Others
bypressingthe►button.
4
Enterto
Others
bypressingthe▼button.
5
Settheoptionsbypressingthe◄or►or▼
buttons.
6
Select
EXIT
toleavetheOSDmenu.
Toreturntotheuppermenuorsetothermenuitems,
usetheuparrow( )button.
18
ENG
ENGLISH
CUSTOMIZING SETTINGS
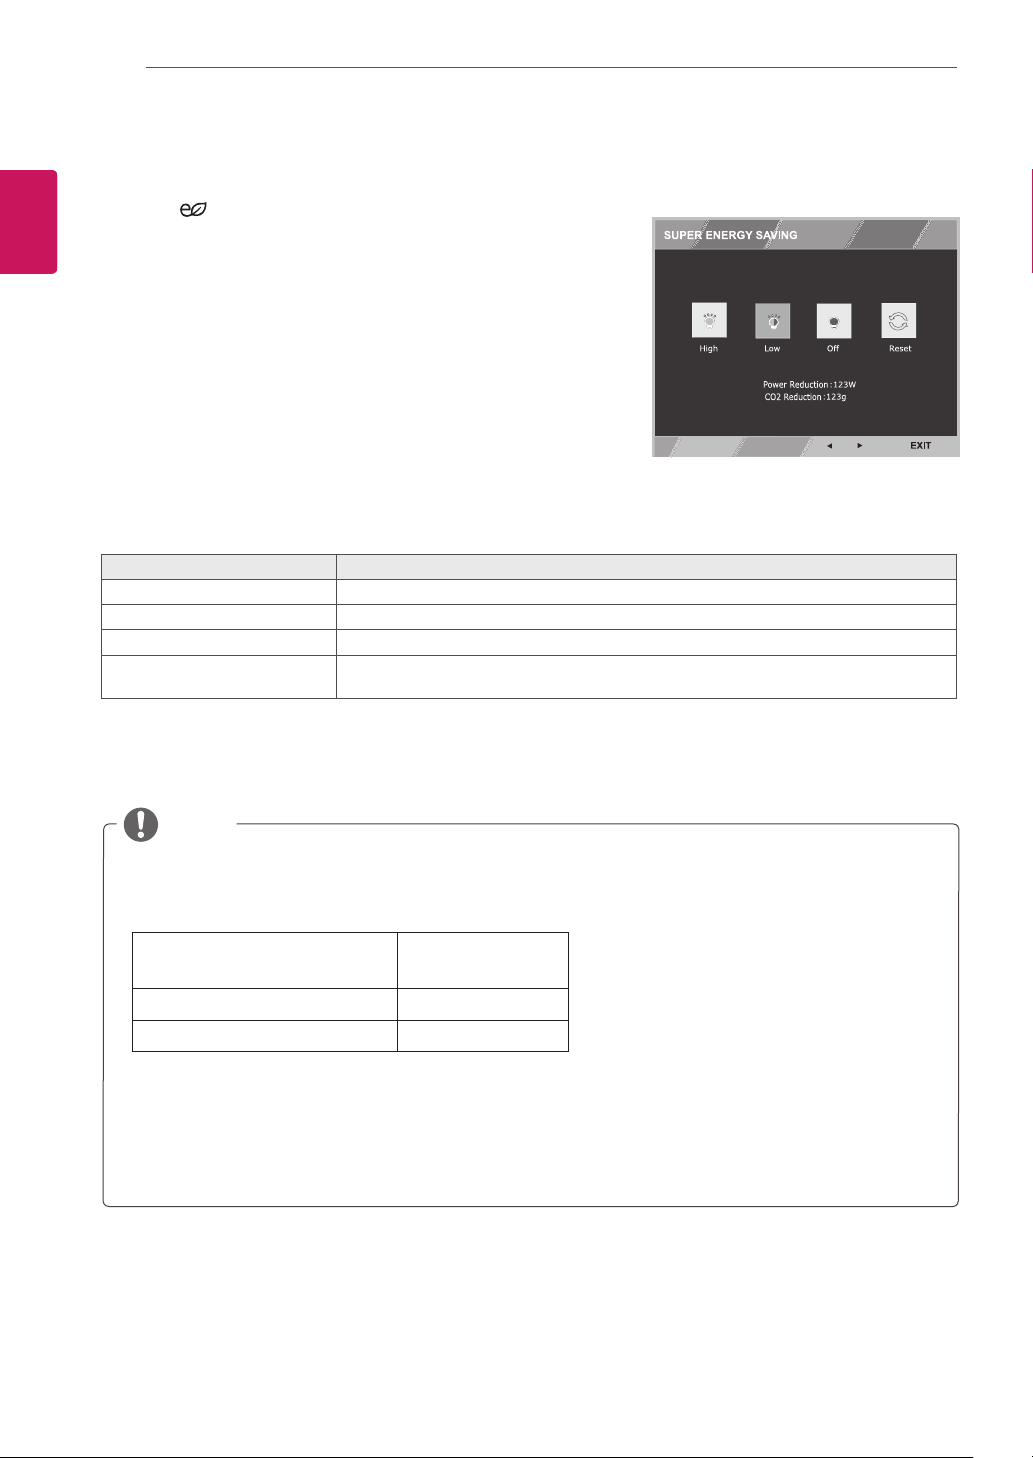
SUPERENERGYSAVING
1
Press
buttononthebottomoftheMonitortodisplaythe
SUPERENERGYSAVING
OSD.
2
Settheoptionsbypressingthe◄or►buttons.
3
Select
EXIT
toleavetheOSDmenu.
Eachoptionisexplainedbelow.
TOTALPOWERREDUCTION
:Howmuchpowerissavedwhileusingthemonitor.
TOTALCO2REDUCTION
:ChangetheTOTALPOWERREDUCTIONtoCO2.
SAVINGDATA(W/h)
584mm
(23inch)
SUPERSAVING(High)
6W/h
SUPERSAVING(Low) 3W/h
SavingDatadependsonthePanel.Valueswillbedifferentfromeachpanelandpanelvendor.
LGcalculatedthesevaluesbyusinga
“broadcastvideosignal”
(includingbroadcastvideo:IEC62087)
SUPERSAVINGreferstohowmuchpowercanbesavedusingtheSUPERENERGYSAVING
function.
NOTE
SUPERENERGYSAVING Description
High
EnablesSUPERENERGYSAVINGyoucansaveenergywiththisenergy-highefficientfunction.
Low
EnablesSUPERENERGYSAVINGyoucansaveenergywiththisenergy-lowefficientfunction.
Off DisablesSUPERENERGYSAVING.
Reset ResetsthevaluesoftotalenergyconsumptionreductionandCO2emissionreduction
estimates.
19
ENG
ENGLISH
CUSTOMIZING SETTINGS
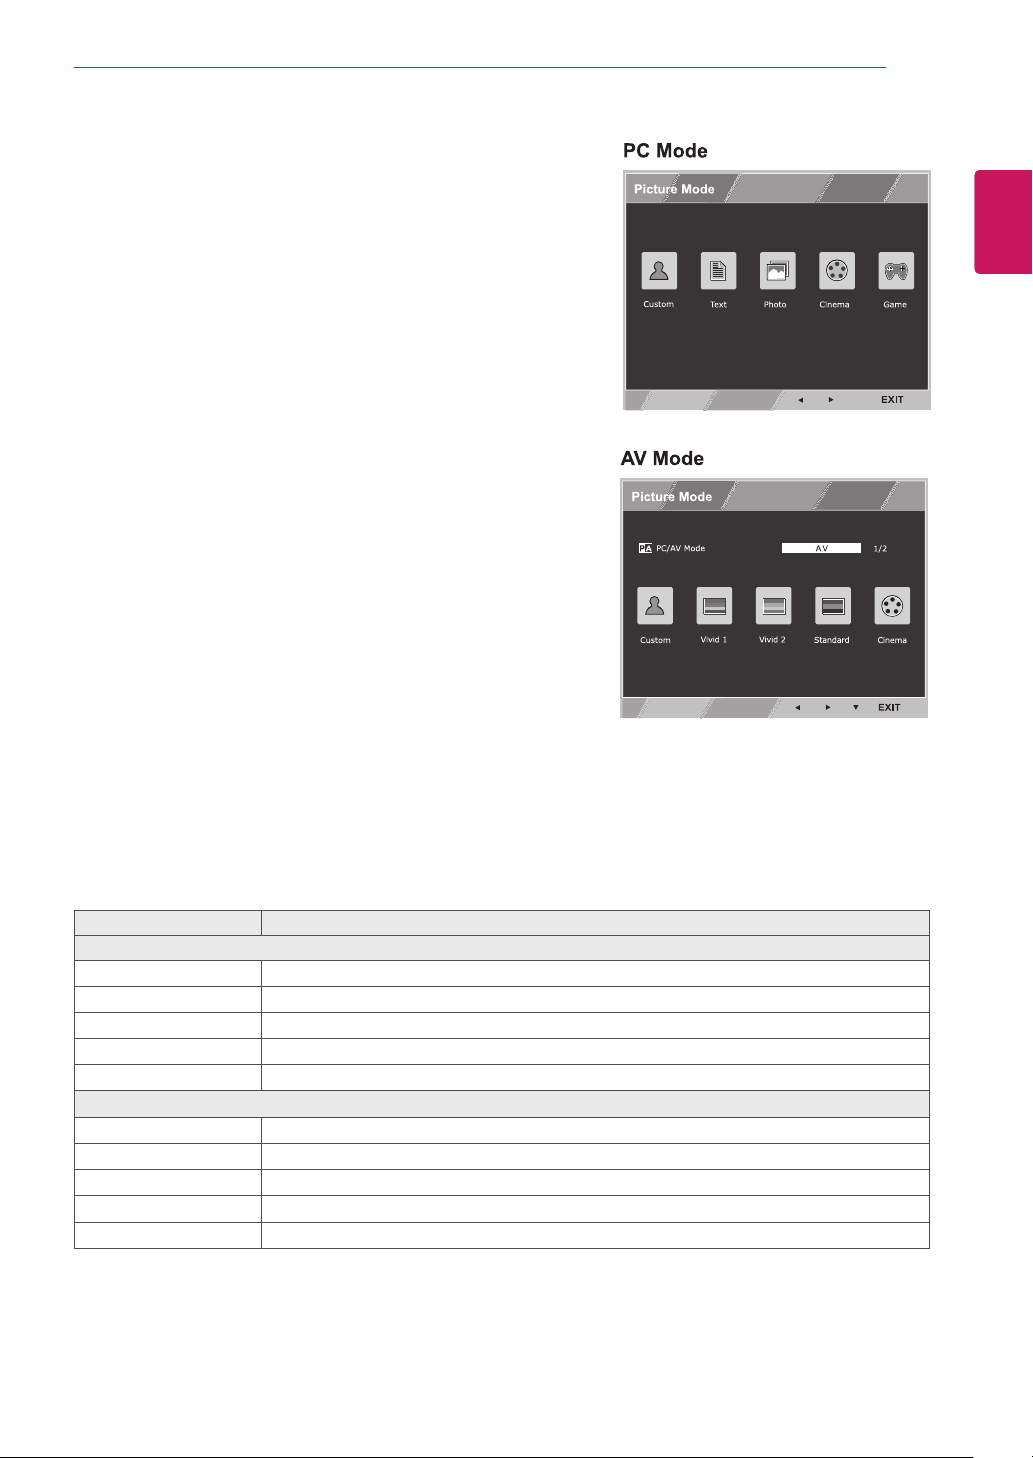
Eachoptionisexplainedbelow.
PictureMode Description
PCMode
Custom
Allowstheusertoadjusteachelement.Thecolormodeofthemainmenucanbeadjusted.
Text
Optimizesthescreenfordocumentprocessing.
Photo
Optimizesthescreentoviewphotos.
Cinema
Optimizesthescreentoimprovethevisualeffectsofavideo.
Game
Optimizesthescreenforgameplay.
AVMode(OnlyforHDMIinput)
Custom
Allowstheusertoadjusteachelement.Thecolormodeofthemainmenucanbeadjusted.
Vivid1
Optimizesthescreenforvividvisualeffects.
Vivid2
Optimizesthescreenformorevividvisualeffects.
Standard
Optimizesthescreentodisplaynormalpicturequality.
Cinema
Optimizesthescreentoimprovethevisualeffectsofavideo.
PictureMode
1
Press
MODE
buttononthebottomoftheMonitorsetto
displaythe
PictureMode
OSD.
2
Settheoptionsbypressingthe◄or►buttons.
3
Select
EXIT
toleavetheOSDmenu.
20
ENG
ENGLISH
TROUBLESHOOTING
TROUBLESHOOTING
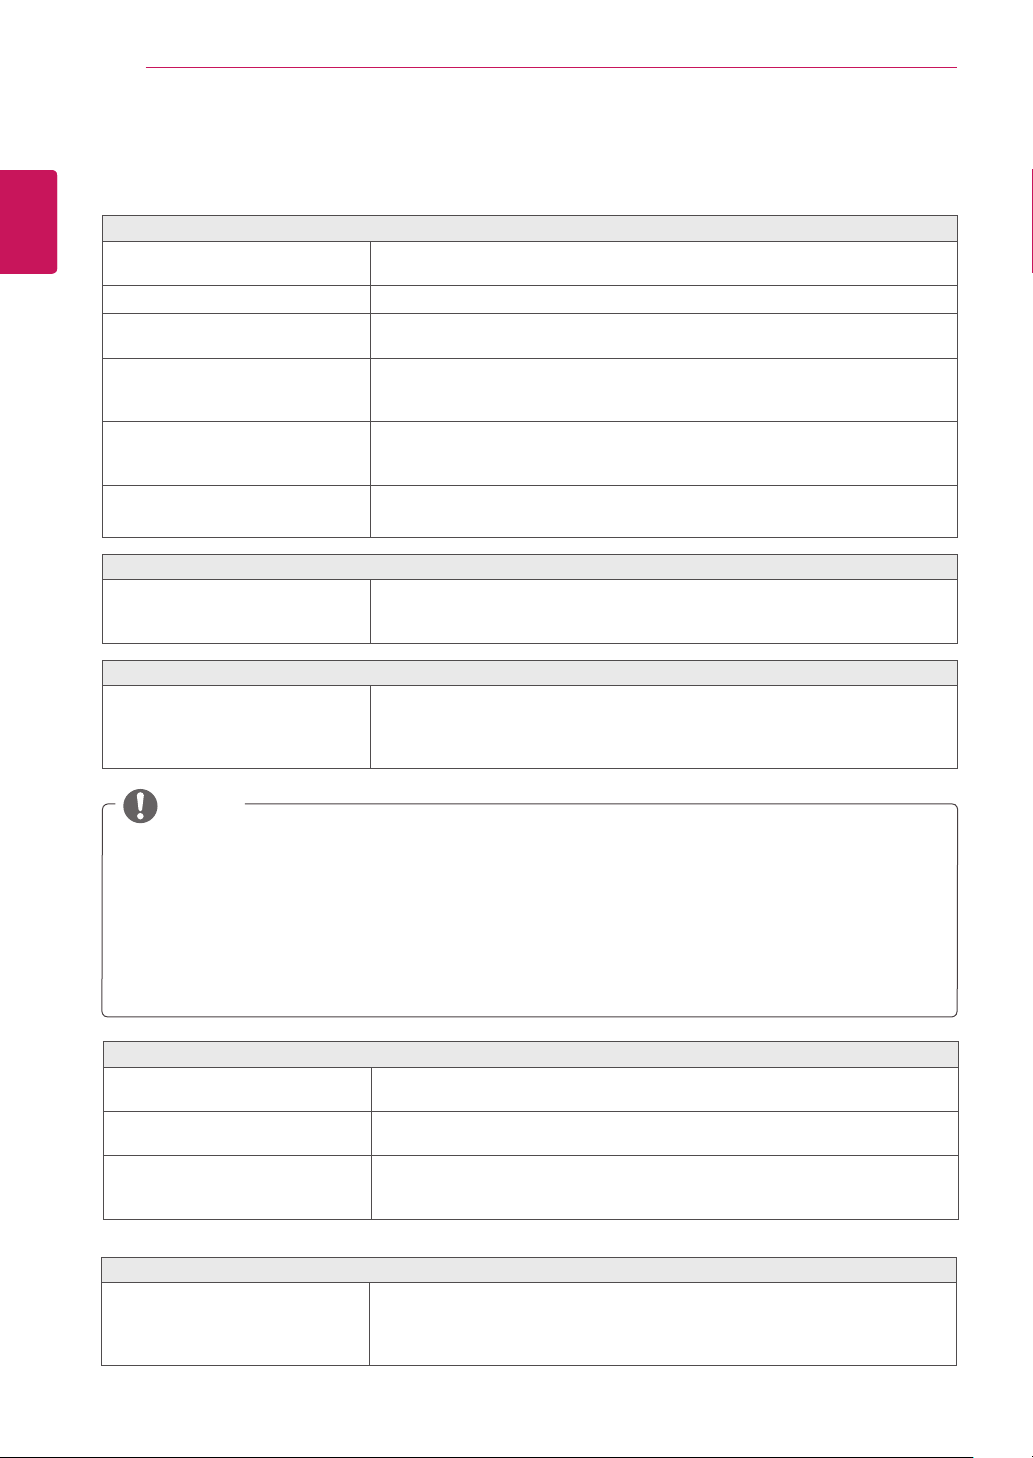
Nothingisdisplayedonthescreen.
Isthemonitor'spowercordplugged
in?
Checkifthepowercordiscorrectlypluggedintothepoweroutlet.
Isthepowerindicatoron?
Checkthepowercableconnectionandpressthepowerbutton.
Isthepowerindicatordisplaying
red?
Checkthattheconnectedinputisenabled(Menu-Input).
Isthepowerindicatorblinking?
Ifthemonitorisinpower-savingmode,movethemouseorpressanykeyon
thekeyboardtoswitchthedisplayon.
Checkifthecomputeristurnedon.
Isthe"OUTOFRANGE"message
displayed?
ThisoccurswhensignalstransferredfromthePC(videocard)areoutofthe
horizontalorverticalfrequencyrangeofthemonitor.Pleaseseethe"Product
Specification"sectionofthismanualtosettheappropriatefrequency.
Isthe"CHECKSIGNALCONNEC-
TION"messageisdisplayed?
ThisisdisplayedwhenthesignalcablebetweenthePCandthemonitoris
missingordisconnected.Checkthecableandreconnect.
Doyouseea"OSDLOCKED"messageonthescreen?
Doyousee“OSDLOCKED”when
youpushMENUbutton?
Youcansecurethecurrentcontrolsettings,sothattheycannotbeinadvertently
changed.YoucanunlocktheOSDcontrolsatanytimebypushingtheMENU
buttonforseveralseconds:themessage“OSDUNLOCKED”willappear.
Thescreenretainsanimage.
Doesimagestickingoccureven
whenthemonitoristurnedoff?
Displayingastillimageforaprolongedtimemaycausedamagetothescreen,
resultingintheretentionoftheimage.
Useascreensavertoprotectthescreenwhenusingthemonitorforapro-
longedperiodoftime.
VerticalFrequency:
Inordertodisplayanimage,thescreenmustberefresheddozensoftimespersecondlikea
fluorescentlamp.
Thenumberoftimesthescreenisrefreshedpersecondiscalledverticalfrequencyorrefreshrateandisrepre-
sentedbyHz.
HorizontalFrequency:
Thetimeittakestodisplayonehorizontallineiscalledthehorizontalcycle.Thenumber
ofhorizontallinesdisplayedinonesecondcanbecalculatedbydividingonebythehorizontalcycle.Thisiscalled
horizontalfrequencyandisrepresentedbykHz.
NOTE
Touchdoesnotworknormally.
Touchdoesnotworkatall.
CheckwhethertheUSBcableisproperlyconnectedtothePC.
(NoadditionalUSBtouchprograminstallationisrequired.)
Checkyouroperatingsystem.Thetouchfunctionissupportedonlyon
Windows7andWindows8.
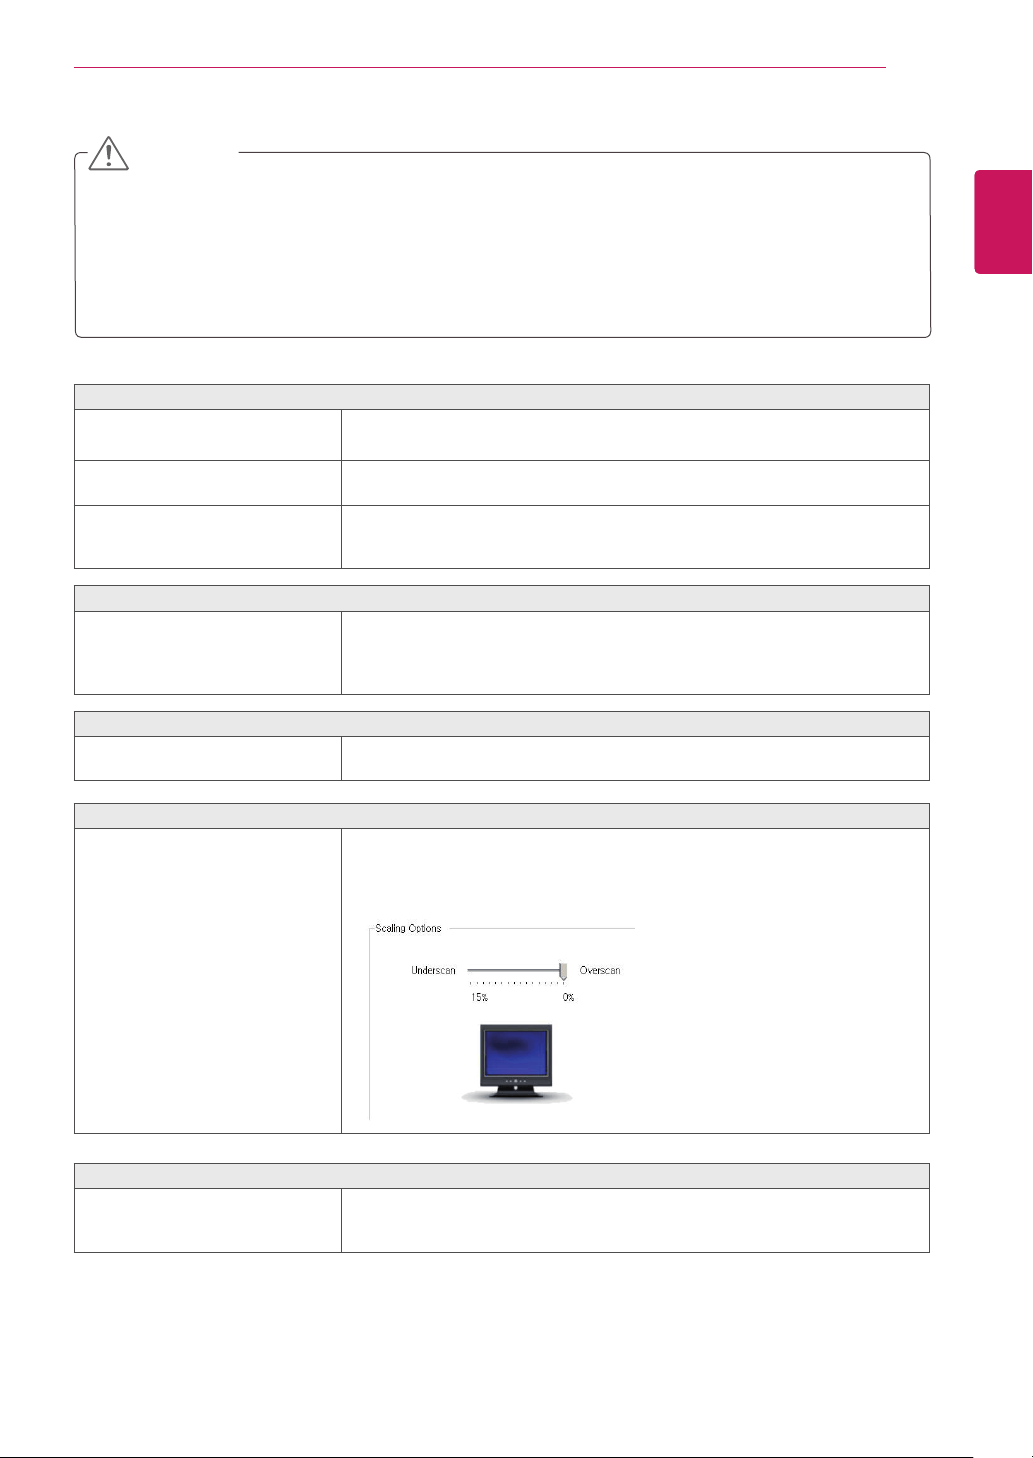
Theimageonthescreenlooksstrange.(Itworksonlyinanalogmode.)
Doesthescreenareaappearun-
centered?
PressingtheAUTObuttonwillautomaticallyoptimizethescreentothecurrent
displaymode.
Doyouseeverticallinesonthe
screen?
PressingtheAUTObuttonwillautomaticallyoptimizethescreentothecurrent
displaymode.
Doyouseehorizontalnoiselines
ordoestextappearblurredonthe
screen?
PressingtheAUTObuttonwillautomaticallyoptimizethescreentothecurrent
displaymode.
21
ENG
ENGLISH
TROUBLESHOOTING
Check
ControlPanel►Display►Settings
andseeifthefrequencyortheresolutionwerechanged.Ifyes,
readjustthevideocardtotherecommendresolution.
Iftherecommendedresolution(optimalresolution)isnotselected,lettersmaybeblurredandthescreenmaybe
dimmed,truncatedorbiased.Makesuretoselecttherecommendresolution.
SettingscandifferbetweencomputerandO/S(OperationSystem),andresolutionmentionedabovemaynotbe
supportedbyeveryvideocard.Forgraphicscardrelatedissuesortoobtainthenewestdriver,refertothemaker
ofyourgraphicscard.
CAUTION
Thedisplaycolorisabnormal.
Doesthedisplayappeardiscolored
(16color)?
Setthecolorto24bit(truecolor)orhigher.InWindows,gotoControlPanel>
Display>Settings>ColorQuality.
Doesthedisplaycolorappearun-
stableorinmonochrome?
Checkifthesignalcableisconnectedproperly.Reconnectthecableorreinsert
thePC'svideocard.
Aretherespotsonthescreen?
Whenusingthemonitor,pixilatedspots(red,green,blue,whiteorblack)may
appearonthescreen.ThisisnormalfortheLCDscreen.Itisnotanerrornor
isitrelatedtothemonitor'sperformance.
Doyouseean"Unrecognizedmonitor,Plug&Play(VESADDC)monitorfound"message?
Haveyouinstalledthedisplay
driver?
BesuretoinstallthedisplaydriverfromthedisplaydriverCD(ordiskette)that
comeswithyourdisplay.Or,youcanalsodownloadthedriverfromourweb
site:http://www.lg.com.
MakesuretocheckifthevideocardsupportsPlug&Playfunction.
Thescreenisflickering.
Didyouselecttherecommended
resolution?
IftheselectedresolutionisHDMI
1080i
60/50Hz,thescreenmaybeflickering.
Changetheresolutiontotherecommendedresolution
1080P
.
HDMI
Thepicturecannotbedisplayedin
fullscreeninHDMImode.
DidyouchangetheScalingOptionsforyourvideocard?
TheHDMIScalingOptionsoftheAMD/ATIvideocardissettoUnderscanby
defaultsothepicturecannotbedisplayedinfullscreen.
RunCatalystControlCenterandsettheScalingOptionsto0%Overscan.
WindowsTouchkeyboard
DoyouopenWindowsTouch
keyboard?
YoucanopenorclosetherelationsettinginWindowscontrolboard.
YoucanalsousekeyboardinputandhandwritingonTouchkeyboard.
PleaserefertothedetailinformationfromWindowsHelp.
22
ENG
ENGLISH
TROUBLESHOOTING
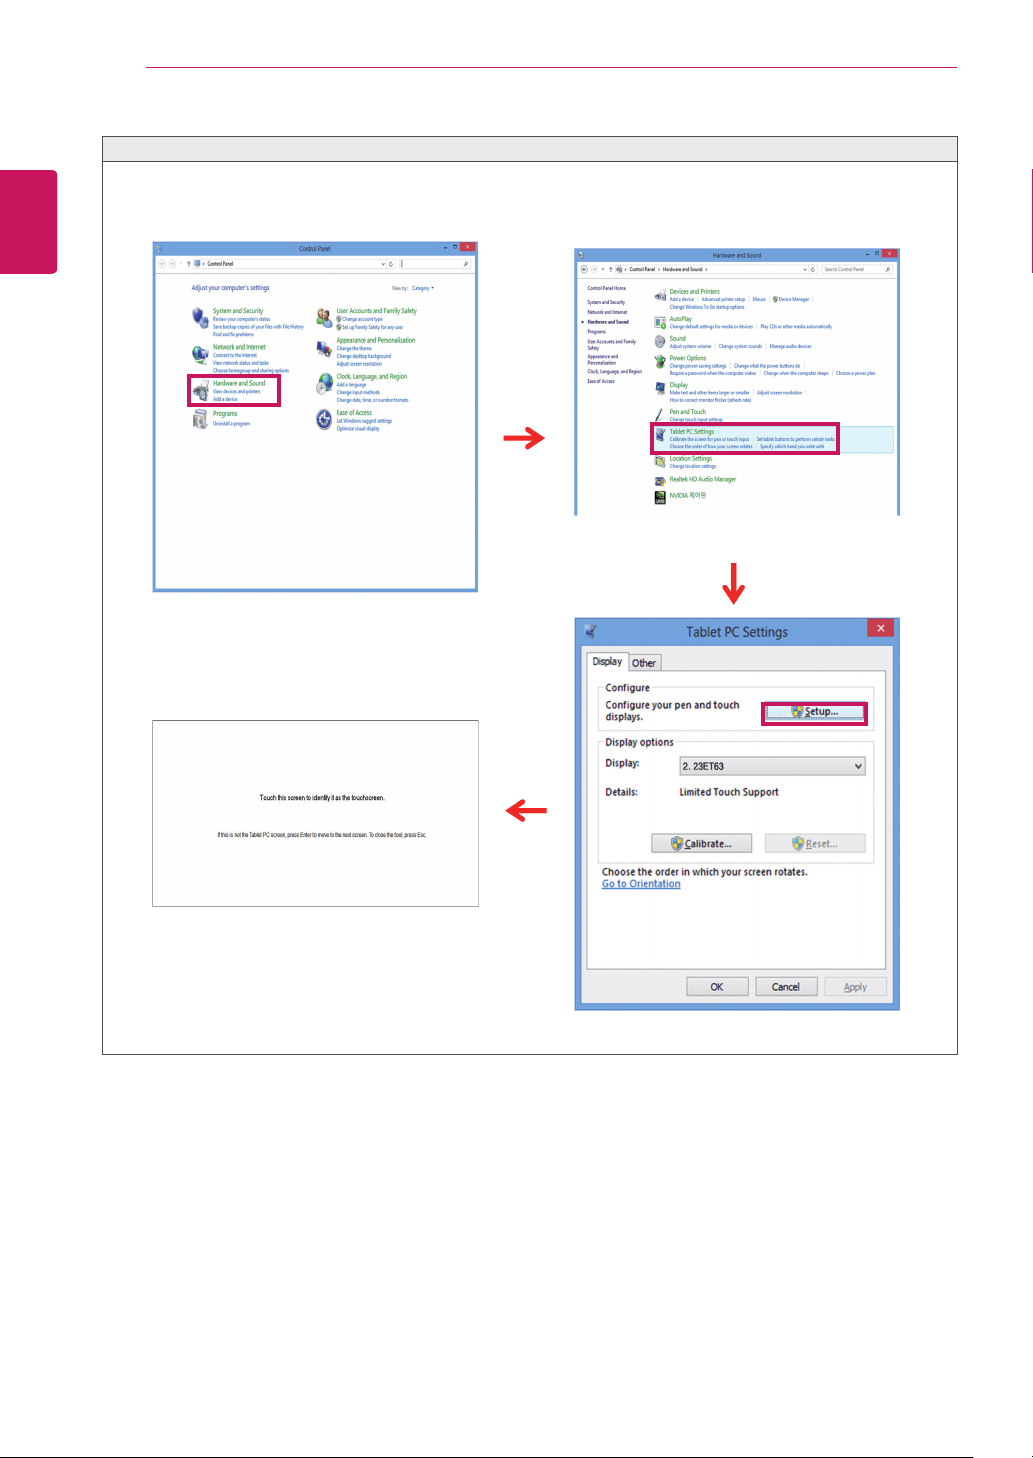
Touchdoesnotrespondwhenthedesktopisextendedtoasecondtouchmonitor.
InWindows7andWindows8,youcanconfigurethesecondmonitorasthetouchscreenasshownbelow.
(ControlPanel->HardwareandSound->TabletPCSettings->Setup->Setupandclickthescreenofthesecond
touchmonitor)
<ControlPanel->HardwareandSound>
<Setupandclickthescreenofthesecond
touchmonitor>
<TabletPCSettings>
<Setup>
23
ENG
ENGLISH
SPECIFICATIONS
SPECIFICATIONS
LCDScreen Type
58.4cmTFT(ThinFilmTransistor)
LCD(LiquidCrystalDisplay)Screen
Diagonallengthofthescreen:58.4cm
PixelPitch 0.2652mmx0.2652mm
Resolution MaximumResolution D-Sub(Analog):1920x1080@60Hz
HDMI:1920x1080@60Hz
RecommendedResolution 1920x1080@60Hz
VideoSignal
HorizontalFrequency 30kHzto83kHz
VerticalFrequency 56Hzto75Hz(D-Sub)
56Hzto61Hz(HDMI)
Synchronization SeparateSync./HDMI
InputConnector 15pinD-SUBConnector/HDMIConnector
Power Voltage
19V 1.2A
Powerconsumption(Typ.) Onmode:25W(Typ.)
PowerSavingMode≤0.3W
OffMode≤0.3W
AC/DCadaptor
TypeADS-40SG-19-319025G,manufacturedbySHENZHENHONORELECTRONIC
orTypeADS-40FSG-1919025GPG-1,manufacturedbySHENZHENHONORELECTRONIC
orTypeADS-40FSG-1919025GPBR-1,manufacturedbySHENZHENHONORELECTRONIC
orTypeADS-40FSG-1919025GPI-1,manufacturedbySHENZHENHONORELECTRONIC
orTypeADS-40FSG-1919025GPCU-1,manufacturedbySHENZHENHONORELECTRONIC
orTypeADS-40FSG-1919025GPB-2,manufacturedbySHENZHENHONORELECTRONIC
orTypeLCAP21,manufacturedbyLIENCHANGELECTRONICENTERPRISE
orTypeLCAP26-A,manufacturedbyLIENCHANGELECTRONICENTERPRISE
orTypeLCAP26-E,manufacturedbyLIENCHANGELECTRONICENTERPRISE
orTypeLCAP26-I,manufacturedbyLIENCHANGELECTRONICENTERPRISE
orTypeLCAP26-B,manufacturedbyLIENCHANGELECTRONICENTERPRISE
orTypePSAB-L203A,manufacturedbyLGInnotekCo.,Ltd
orTypePSAB-L202B,manufacturedbyLGInnotekCo.,Ltd
orTypePSAB-L202C,manufacturedbyLGInnotekCo.,Ltd
orTypePSAB-L202D,manufacturedbyLGInnotekCo.,Ltd
Output:19V 1.3A
Dimension/
Weight
MonitorSize(WidthxHeightxDepth)
55.5cmx33.8cmx5.3cm
Weight(WithoutPackag-
ing)
4.4kg
StandAngle
Adjustment
Forwards/Backwards:15°to58°(Head)
Environmental
Conditions
OperatingCondition Temperature:10°Cto35°C;Humidity:10%to80%
StoringCondition Temperature:-20°Cto60°C;Humidity:5%to90%
Thespecificationsaresubjecttochangewithoutnotice.

24
ENG
ENGLISH
SPECIFICATIONS
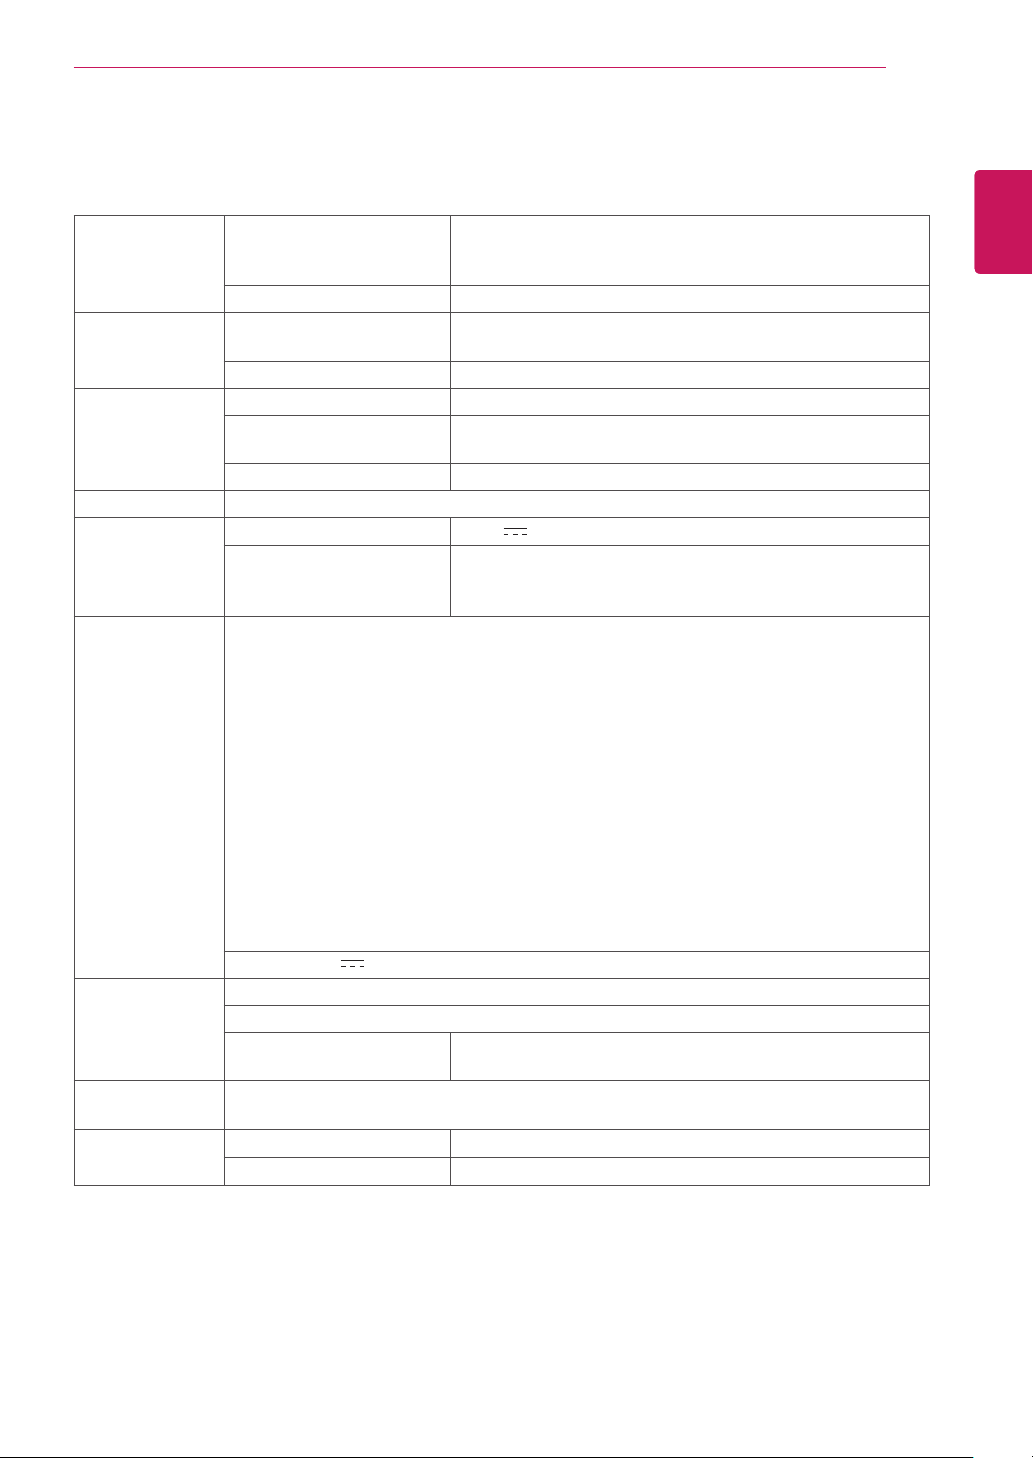
Preset Modes (Resolution)
Display Modes (Resolution)
Horizontal
Frequency(kHz)
Vertical
Frequency(Hz)
Polarity(H/V)
720 x 400 31.468 70 -/+
640 x 480 31.469 60 -/-
640 x 480 37.500 75 -/-
800 x 600 37.879 60 +/+
800 x 600 46.875 75 +/+
1024 x 768 48.363 60 -/-
1024 x 768 60.023 75 +/+
1152 x 864 67.500 75 +/+
1280 x 1024 63.981 60 +/+
1280 x 1024 79.976 75 +/+
1680 x 1050 65.290 60 -/+
1920 x 1080 67.500 60 +/+ Recommend Mode
HDMI TIMING
Display Modes (Resolution)
Horizontal
Frequency(kHz)
Vertical
Frequency(Hz)
HDMI
480P 31.50 60 O
576P 31.25 50 O
720P 37.50 50 O
720P 45.00 60 O
1080P 56.25 50 O
1080P 67.50 60 O (Recommend Mode)
Indicator
Mode LED Color
On Mode Red
Sleep Mode Blinking Red
Off Mode Off
25
ENG
ENGLISH
PROPER POSTURE
PROPERPOSTURE
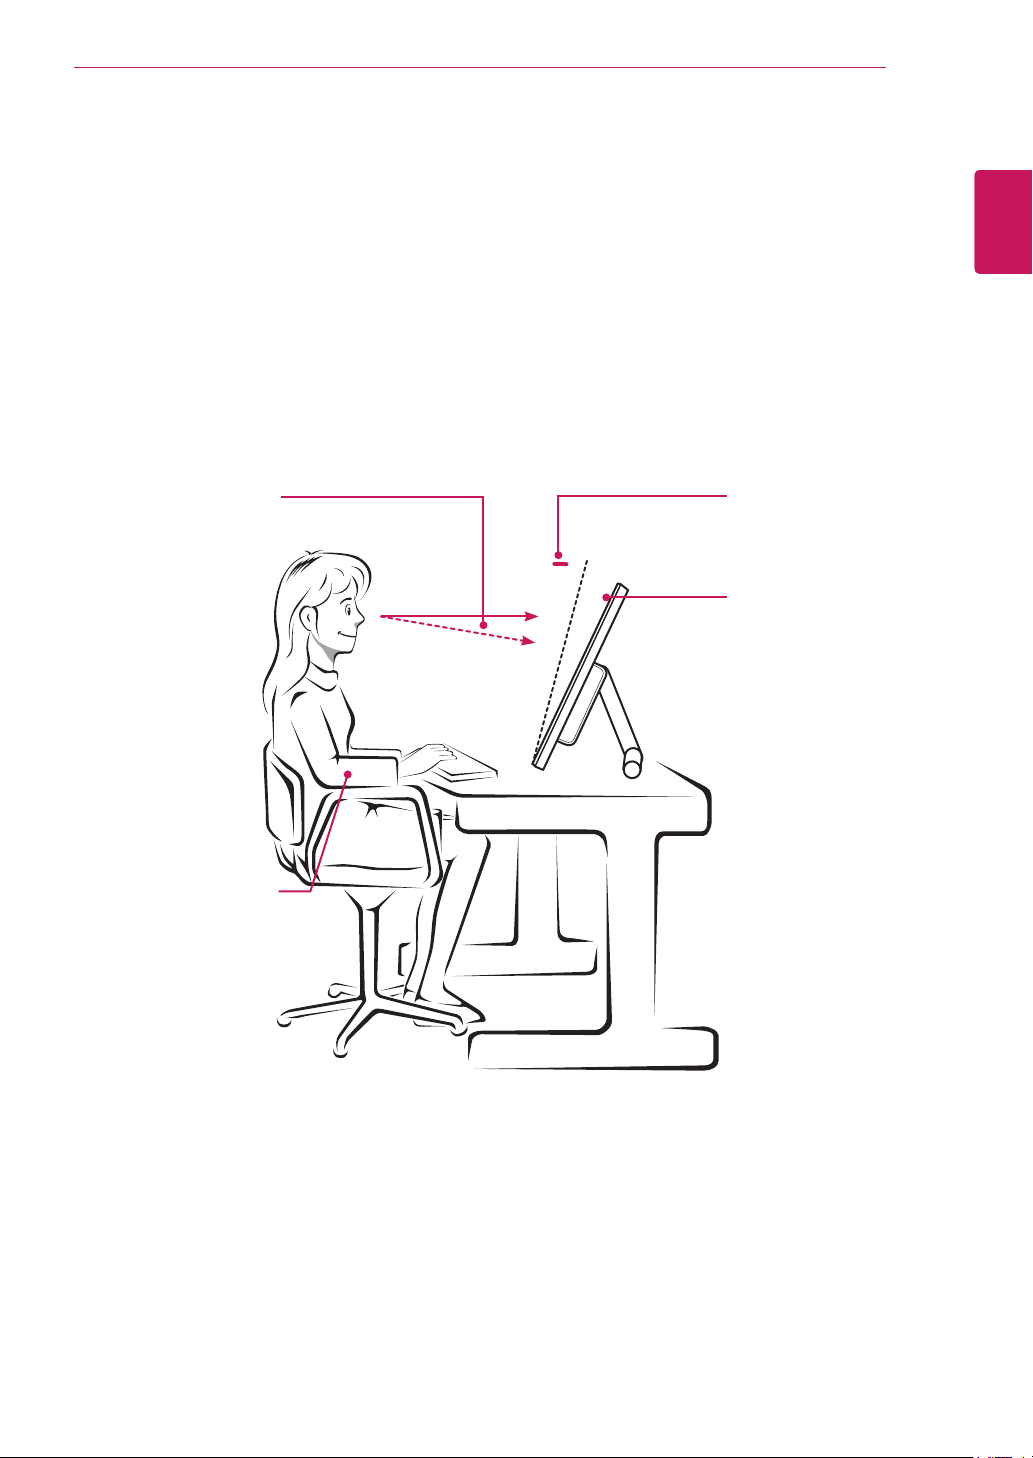
ProperPostureforUsingtheMonitor
Adjustthescreensothatyoucancomfortablyviewataslightdownwardanglefromyournaturaleyelevel.
Takeabreakforapproximatelytenminuteseveryhourtoreduceanyfatiguecausedbylong-timeus-
age.
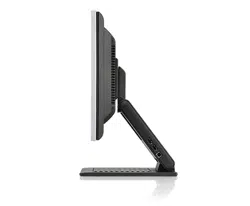
Thestandofthetouchmonitorallowstheproducttobeusedintheoptimumposition.
Adjustthestandanglefrom15°to58°toobtainthebestviewofthescreen.
Youshouldbelooking
slightlydownatthescreen.
Placeyourhandsgently
onthekeyboard,keep-keep-keep-
ingyourarmsbentat
theelbowsandextend-andextend-andextend-
edhorizontallyinfront
ofyou.
Adjusttheangle
15°to58°
Sothatthereisno
reflectionorglarefrom
thescreen.

Make sure to read the Safety Precautions before
using the product.
Keep the Owner’s Manual (CD) in an accessible
place for future reference.
The model and serial number of the SET is
located on the back and one side of the SET.
Record it below should you ever need service.
MODEL
SERIAL
*above information is only for USA FCC Regulatory
Declaration of Conformity
Trade Name: LG
Model : 23ET63VB
Responsible Party: LG Electronics Inc.
Address : 1000 Sylvan Ave. Englewood Cliffs
NJ 07632 U.S.A
TEL: 201-266-2534