Owners' Guide Washers and Dryers
FEATURES

OPERATING INSTRUCTIONS
Normal Operating Sounds
You may or may not hear the following sounds from your new washer:
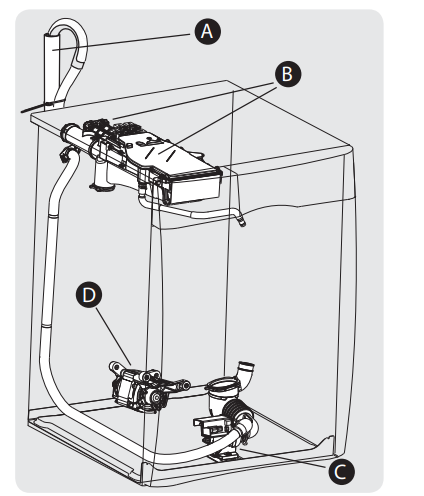
A. DRAIN HOSE The washer has a fl exible drain hose to carry water from the washer to the stand pipe of your home. You will hear water fl owing into your stand pipe. This is a normal part of the operation of the washer.
B. WATER VALVES/DISPENSER As water enters the dispenser system, it is common to hear a water fl owing sound. This normal sound will vary slightly based on the water pressure in your home.
C. DRAIN PUMP Your washer is equipped with a high velocity drain pump. It is normal to hear humming and gurgling sounds as water is pumped from the washer. Both of these sounds are normal and indicate that your pump is functioning correctly.
D. HIGH SPEED MOTOR A powerful motor is used to drive the drum to high spin speeds to extract water from your load. You will hear a sound associated with these higher spin speeds. This sound is normal and will vary slightly as the spin speed varies with load size and cycle selected.
CAUTION
Abnormal, on-going sounds may be an indication of a pending washer failure and should be investigated by a qualifi ed technician.
Operating Your Washer
WARNING
To reduce the risk of fi re, electric shock or injury to persons, read the IMPORTANT SAFETY INSTRUCTIONS in this Use and Care Guide before operating your washer.
- Sort laundry into loads that can be washed together.
• Sort items by recommended cycle and water temperature.
• Separate white, light and colorfast items from dark and non-colorfast items. • Separate items that shed lint from items that attract lint. Casual, synthetic, knit, and corduroy items will pick up lint from towels, rugs, and chenille bedspreads.
• Separate heavily soiled items from lightly soiled items.
• Separate lacy, sheer, loosely knit, or delicate items from durable items.
• Do not machine wash items containing fi berglass. Small particles of fi berglass left in the drum may transfer to fabrics in other loads and cause skin irritation.

- Prepare items for washing.
• Empty pockets.
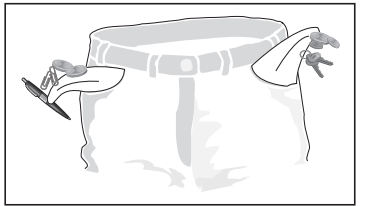
• Brush off lint and dirt. Shake out rugs and beach towels.
• Close zippers, fasten hooks, tie strings and sashes, and remove non-washable trims and ornaments.
• Mend rips and tears to prevent further damage during washing.
• Turn knit items inside out to prevent pilling.
• Place delicate and small items such as bras, hosiery and baby socks in a mesh bag

- Pretreat stains and heavy soil.
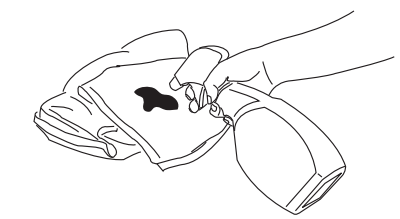
• See Stain Removal Guide in this guide for safe, successful stain removal instructions.
- Add laundry load to washer.
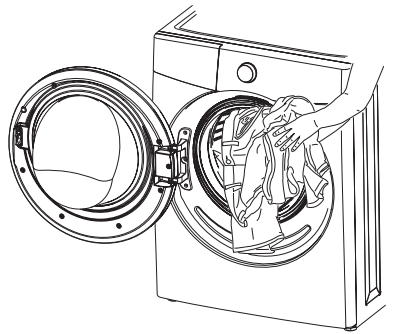
• Combine large and small items in a load.
• Load large items fi rst. Large items should not be more than half the total wash load.
• Washing single items such as a sweater, towel or jeans is ineffi cient and may cause an out-of-balance load. Add 1 or 2 similar items to help balance the load.
• Wash a single heavy item such as a king-sized comforter, bedspread or sleeping bag separately.
• The washer can be fully loaded, but the items should not be tightly packed. The door should close easily
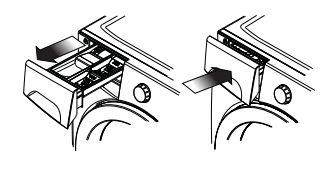
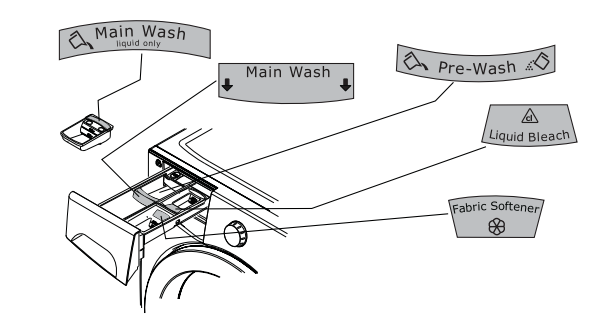
- Add laundry products to the dispenser.
Detergent, liquid chlorine bleach and liquid fabric softener will be dispensed at the proper times in the cycle.
IMPORTANT Open and close the dispenser drawer slowly. Closing the drawer too quickly could result in early dispensing of the bleach or fabric softener.
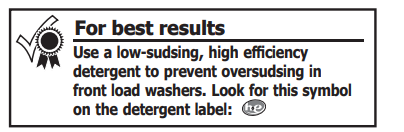
Use the cap or scoop provided by the detergent manufacturer to measure the amount recommended. Detergent dosage may need to be adjusted for water temperature, water hardness, load size and soil level.
Liquid Detergent 
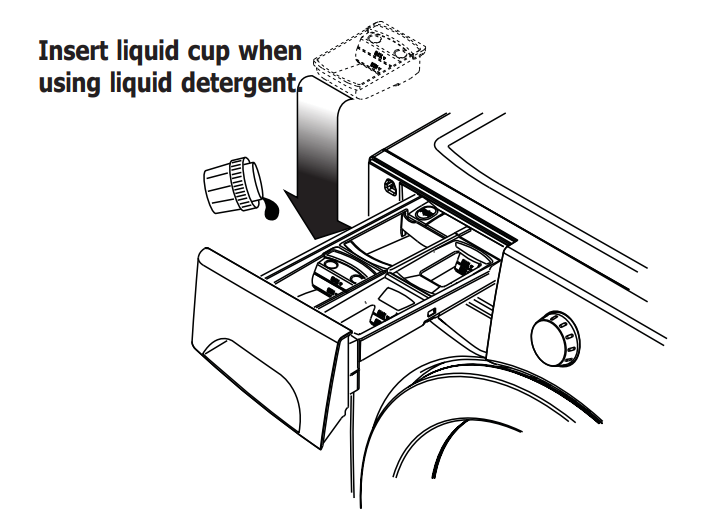
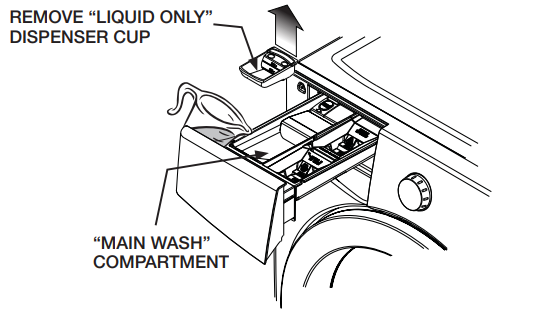
Add the recommended amount of a high effi ciency liquid detergent to the “Main Wash - liquid only” cup.
Do not exceed the MAX fi ll line.
Liquid detergent can also be added directly to the “Main Wash” chamber when not using the “PreWash” option.
NOTE From time to time you may see water in the “Main Wash - liquid only” chamber. This is part of the normal operation of the washer
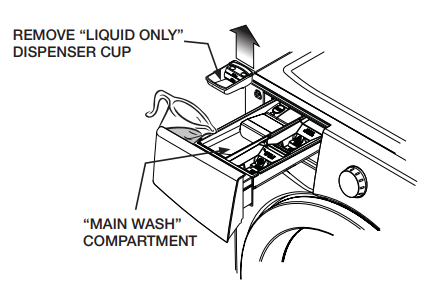
Powder Detergent 
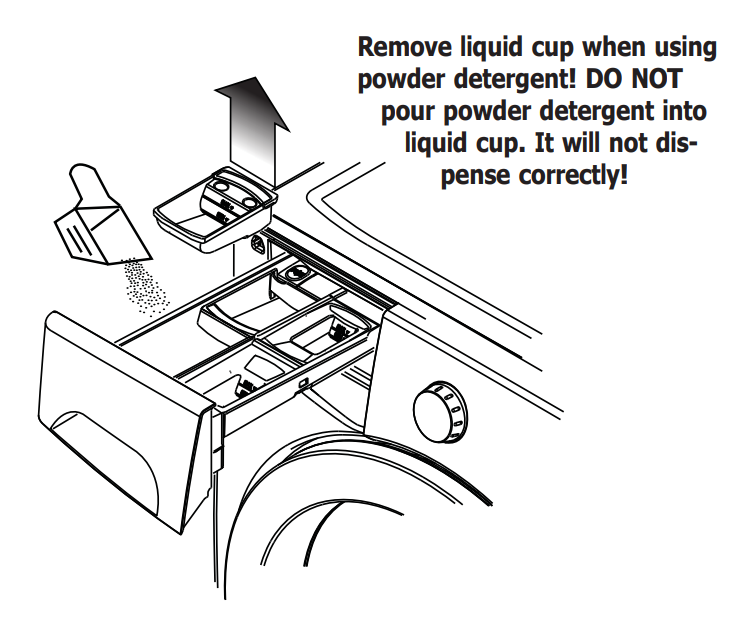
To use a high effi ciency powder detergent, remove the “Main Wash - liquid only” cup and add the powder directly to the “Main Wash” detergent chamber
IMPORTANT Save the liquid cup insert for future use. DO NOT discard it while you are using powder detergent.
Other Wash Products
Color-safe bleach, water conditioner, detergent booster and enzyme products may be added with the detergent.
Put liquid products with liquid detergent in the “Main Wash - liquid only” chamber or powder products with powder detergent in the “Main Wash” detergent chamber
IMPORTANT Do not mix liquids and powders.
Detergent for Prewash 
For heavily soiled or stained loads, select the Prewash option and add the recommended amount of detergent to the “Pre-Wash” detergent cup
NOTE From time to time you may see water in the “Main Wash - liquid only”, “Liquid Bleach” and “Fabric Softener” chambers. This is part of the normal operation of the washer.
Liquid Chlorine Bleach 
If desired, add liquid chlorine bleach to the chamber labeled “Liquid Bleach” and marked with this symbol: 
Fill to the MIN line for small loads or the MAX line for large loads. DO NOT fi ll above the maximum fill line
IMPORTANT To prevent fabric damage, do not overfi ll the “Liquid Bleach” chamber or pour liquid chlorine bleach directly onto the load.
Add color-safe bleach with the detergent. Liquid Fabric Softener 
If desired, pour the recommended amount of liquid fabric softener into the chamber labeled “Fabric Softener” and marked with this symbol: 
Fill to the MIN line for small loads or the MAX line for large loads.
DO NOT fi ll above the maximum fill line.
NOTE To prevent staining, do not overfi ll the “Fabric Softener” chamber or pour liquid fabric softener directly on the wash load.
Use of a fabric softener-dispensing ball is not recom�mended in tumble action washers.
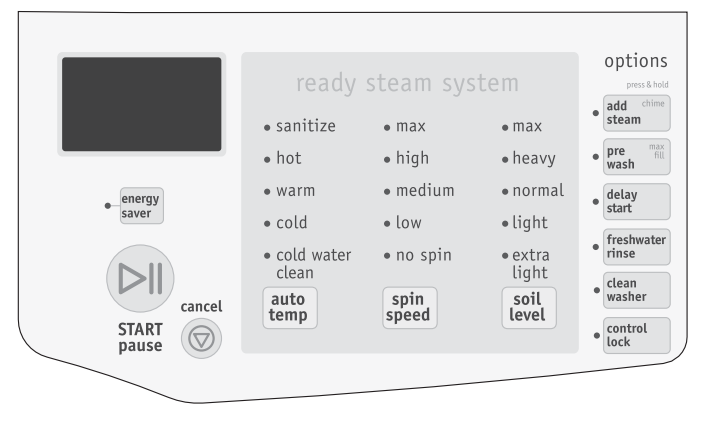
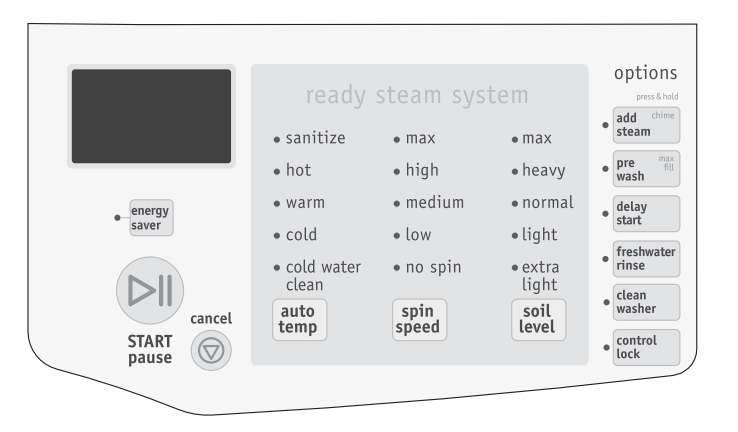
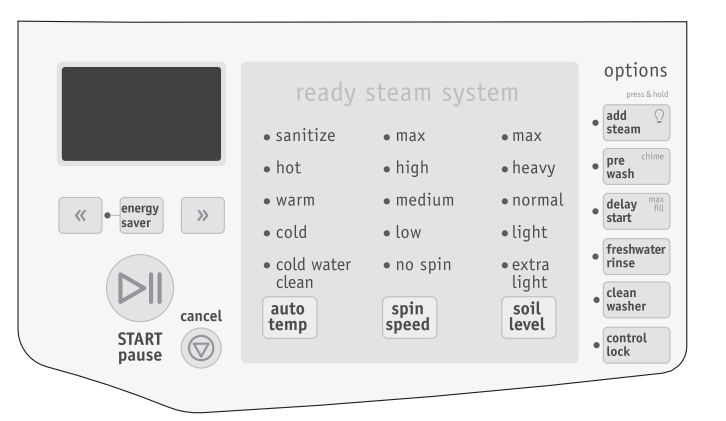
- Select the appropriate cycle and settings for the load.
• Turn the cycle selector knob in either direction to select the cycle desired. The indicator for that cycle will be illuminated.
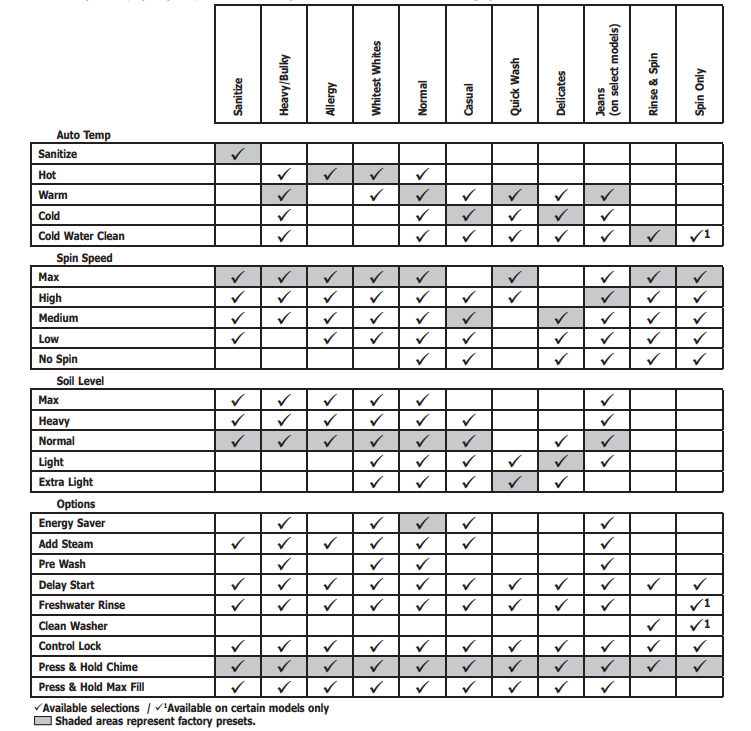
• The estimated cycle time, suitable wash and rinse water temperatures, fi nal spin speed, soil level, and options for each cycle will be indicated for the cycle selected. See the “Washer Settings Chart” for more details.
• To change the settings, press the Temp, Spin Speed and Soil Level buttons to scroll to the desired settings.
• To select or delete an option, press the button for that option. The indicator will be illuminated when the option has been selected. The indicator will no longer be lighted when the option has been deleted.
NOTE To provide the best care for your laundry, not every setting or option is available with every cycle. If a setting or option is not available for the cycle selected, the indicator will not light.
• Adjustments to a cycle will be remembered and re�called each time that cycle is selected in the future.
- Start the washer.
• Close the door and press Start. The washer will not operate with the door open. “DOOR OPEN” will be displayed as a reminder to close the door.
• Select Delay Start to delay the beginning of the cycle, if desired.
• As a safety measure, the door will automatically lock during the entire wash cycle.
• To add a forgotten item to the washer any time during the wash portion of the cycle, press Pause. When the door unlocks, open the door, add the item, close the door and press Start to resume the cycle
• If changes to the settings or options are attempted after the cycle starts, you will hear several beeps when the buttons are pressed. To change the settings or options, press Pause, make the new selections and press Start again.
• To change the cycle once the cycle has begun, press Cancel, select a new cycle, and press Start again. Just turning the cycle selector knob will not change the cycle.
• To stop the cycle, press Cancel.
NOTE If the cycle is interrupted during spin, it will take approximately 2-3 minutes for the door lock to release. DO NOT force open the door.
• A signal will sound at the end of the cycle if the Chime option has been selected.
• Remove items from the washer when the cycle ends and place in dryer, line dry or dry fl at as directed on the fabric care label.

• Excess wrinkling, color transfer or odors may develop in items left in the washer after the cycle has ended, if not removed promptly
CAUTION: ENTRAPMENT and TIP-OVER HAZARD
Do not leave the door open if there are small children or pets present. An open door could entice children to hang on the door or crawl inside the washer. If there are no small children present, you may leave the door ajar to prevent odor build up.
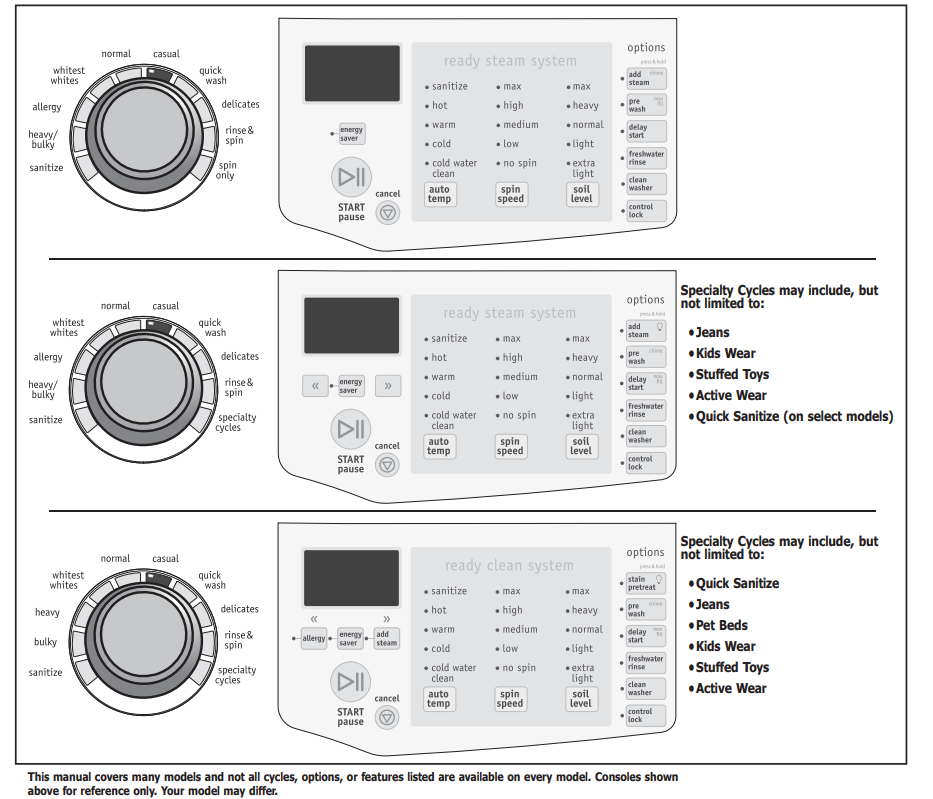
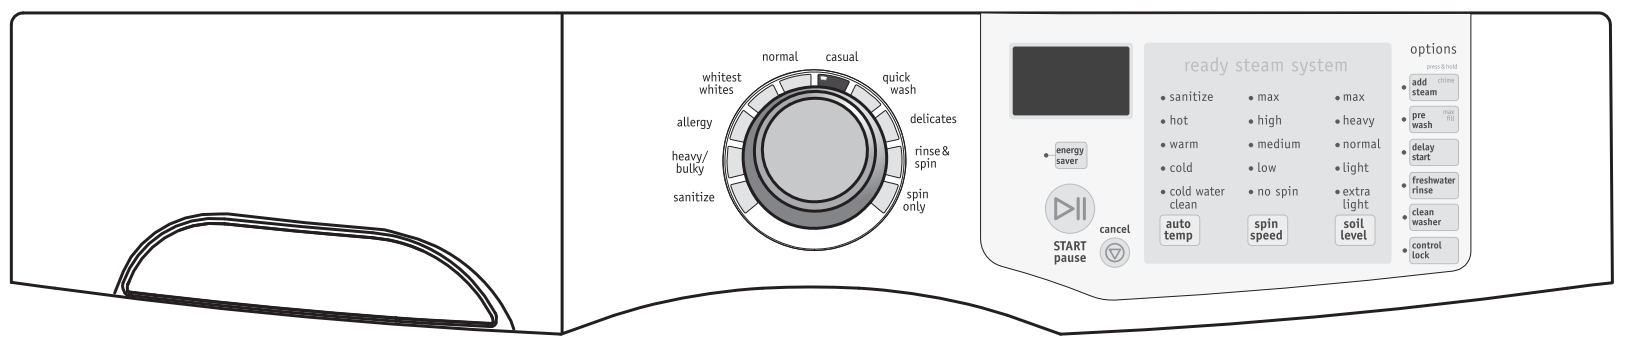
Cycle Selection
Turn the cycle selector in either direction to the cycle desired. The indicator for that cycle will be illuminated. To change the cycle once it has begun, press the cancel button before selecting a new cycle. Just turning the cycle selector knob to another selection will not change the cycle.
Sanitize
Use the Sanitize cycle to clean and sanitize heavily soiled, colorfast fabrics including towels, bedding, and children’s clothing. Very hot water, all spin speeds, all Soil Levels except light and extra light, and all options except Prewash, Energy Saver and Stain Pretreat (on select models) are available with this cycle. It is recommended that you set your water heater to 120° F (49° C) or higher to ensure proper performance during this cycle. If the setting is lower or the load is extra large, the cycle time will be extended by 30 minutes or more. The Sanitize cycle will kill 99.9% of bacteria with no carryover of bacteria between loads. No bleach or harsh chemicals are needed, but higher temperatures are required. Please check fabric care labels to prevent damage.
NOTE This cycle has been certifi ed by NSF International, an independent third party testing and certifi cation organization dedicated to public health, safety and environmental protection.

The wash water is heated by an internal boost heater to a maximum of 152° F (67° C) as the load tumbles. Cold water is added to cool down the load prior to drain and spin.
NOTE If the voltage at your outlet is under 110 v, the internal heater may not adequately heat the wash water. If the cycle is interrupted while the water is heating, the fi nal temperature of the wash water may be lower and sanitation may be reduced.
As a precaution, the washer door is locked once the water temperature reaches 130° F (55° C). If the cycle is cancelled during the wash phase and the water temperature is greater than 150° F (66° C), an automatic cool down and drain will occur before the door can be opened. Bulky (on select models) This cycle is designed for bulky items such as comforters, blankets, mattress pads, sleeping bags and similar items. Ten minutes of normal reversing tumble wash action are followed by 5 minutes of gentle tumbling, 2 rinses and a fi nal spin. Fresh Water Rinse and Stain Pretreat (on select models) are available with this cycle.
Heavy/Bulky (on select models) The Heavy/Bulky cycle provides 20 minutes of reversing tumble wash action for heavily soiled items. Hot water is recommended to remove heavy soil and most stains. Stain Pretreat (on select models), Fresh Water Rinse, and Energy Saver are available options.
Heavy (on select models) The Heavy cycle provides 20 minutes of reversing tumble wash action for heavily soiled items. Hot water is recommended to remove heavy soil and most stains. Stain Pretreat (on select models), Fresh Water Rinse, and Energy Saver are available options.
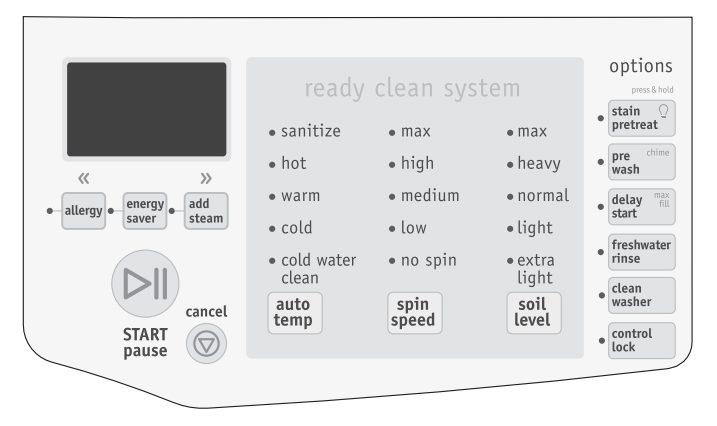
Allergy (on select models) If you have asthma or allergy sufferers in your home, use this cycle to combine hot water temperature (boosted with internal heater), fast speed tumbling and multiple rinses to help ensure the destruction of dust mites and removal of pet dander.
NOTE This cycle has been certifi ed by NSF International, an independent third party testing and certifi cation organization dedicated to public health, safety and environmental protection.

The Allergy cycle will kill all dust mites and eliminate at least 95% of pet dander. Since higher temperatures are required, please check fabric care labels to prevent damage.
Whitest Whites
The Whitest Whites cycle provides 15 minutes of tumble wash action followed by two rinses. Use this cycle to clean soiled white fabrics with the addition of bleach. Hot water is recommended to ensure optimal bleach activation. For peak rinsing performance and to avoid chlorine residues on your laundry add a Fresh Water Rinse to this cycle. All options except Sanitize wash and Light soil are available, including Energy Saver.
Normal
The Normal cycle provides 15 minutes of reversing tumble wash action for normally soiled loads. Stain Pretreat (on select models), Fresh Water Rinse, and Energy Saver are available options. All wash temperatures except Sanitize (on select models) and all soil levels are available.
Casual
Casual cycle provides 10 minutes of reversing tumble wash action for cottons and blends with a no-iron fi nish followed by a Cool Down rinse, 2 additional rinses and a fi nal spin. Fresh Water Rinse and Stain Pretreat (on select models) can be selected.
Quick Wash
The Quick Wash cycle provides 5 minutes of reversing tumble action to quickly wash small, lightly soiled loads in 20 minutes. A warm wash/cold rinse is available and you can choose between Max and High spin speeds.
Delicates
This cycle provides 10 minutes of gentle reversing wash action for knits and delicates. To protect your delicate items, Hot water wash and Heavy Soil options are not available. The Stain Pretreat (on select models) and Fresh Water Rinse options are available.
Jeans (on select models) Wash an entire load of denim jeans with the Jeans cycle. It provides 20 minutes of reversing tumble wash action with Auto Temp Cold water, Medium Spin Speed to reduce wrinkling and a Freshwater Rinse to remove excess dirt and detergent.
Rinse & Spin
Select Rinse & Spin for loads that need a cold water rinse or to add fabric softener that may have been omitted in a regular cycle. Add the fabric softener to the dispenser chamber. Select the spin speed appropriate for the load.
Spin Only (on select models)
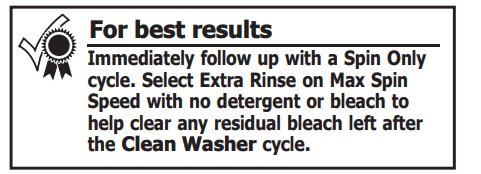
Use the Spin Only cycle anytime you want to drain water from the washer and spin out the load or as a follow-up to a No Spin selection. Select the spin speed appropriate to the load.
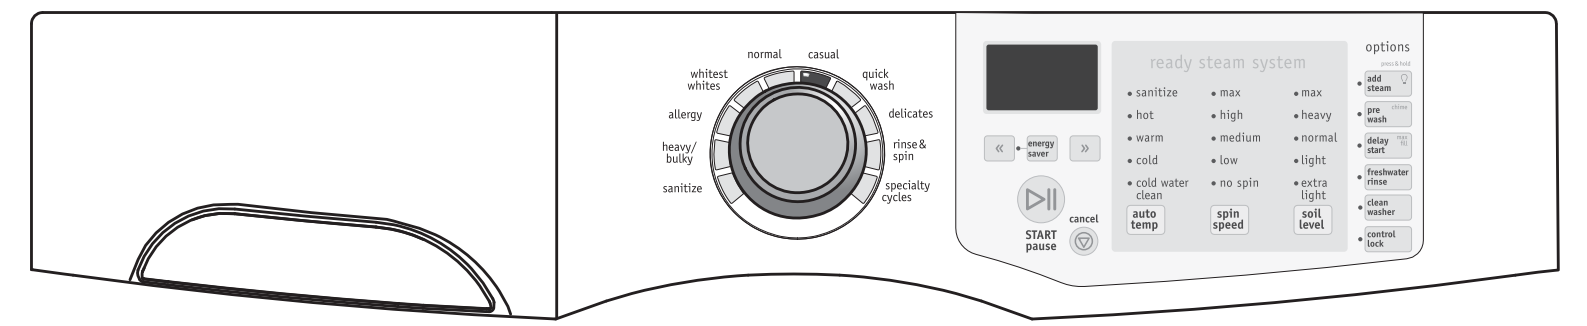
Specialty Cycle Selection
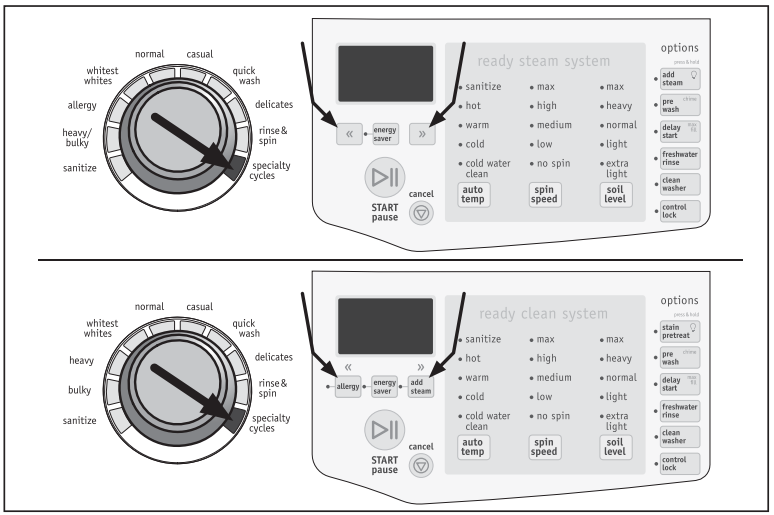
Specialty Cycles (on select models)
Turn the cycle selector to Specialty Cycles to access additional custom cycles. Scroll through the cycles by pressing the outer buttons under the LCD screen.
Jeans
Wash an entire load of denim jeans with the Jeans cycle. It provides 20 minutes of reversing tumble wash action with Auto Temp Cold water, Medium Spin Speed to reduce wrinkling and a Freshwater Rinse to remove excess dirt and detergent.
Quick Sanitize (on select models)
Use the Quick Sanitize cycle to quickly kill 99.9% of bacteria with no carryover of bacteria between loads. No bleach or harsh chemicals are needed, but higher temperatures are required. Please check fabric care labels to prevent damage.
NOTE This cycle has been certifi ed by NSF International, an independent third party testing and certifi cation organization dedicated to public health, safety and environmental protection.

Kids Wear
Wash normally-soiled kids wear and baby wear with this specialty cycle. Freshwater Rinse, High Spin Speed and Auto Temp Hot water are default presets. Allergy will also be selected as an option if available on your model.
Pet Beds (on select models)
Wash soft-sided pet beds, pet pillows or pet blankets with the Pet Beds cycle. The Allergy option will kill dust mites and eliminate 95% of pet dander with multiple rinses. Auto Temp Cold water to release protein stains, Freshwater Rinse and High Spin Speed to extract more water (reducing drying time) are preset selections. Not recommended for wool or fl eece fabrics.
IMPORTANT Remove as much of pet hair as possible with vacuum, pet hair roller or brush to prevent clogging washer drain pump.
Stuffed Toys
Wash stuffed animals and soft toys with the Stuffed Toys cycle. Wash temperature is Auto Temp Cold, with a mid-agitation injection of steam to release stubborn stains. Freshwater Rinse and Slow Spin Speed to prevent deformation of toys are also preset selections. Protect your washer drum fi nish and maximize toy life by placing it in a pillow case and tying the end closed before washing it.
Active Wear
The Active Wear cycle provides 5-17 minutes of reversing tumble wash action for lightweight, synthetic athletic apparel. All temperatures except Sanitize and hot and all spin speeds and soil levels are available with this cycle.
Cycle Settings

Appropriate wash temperature, spin speeds, soil level and options will automatically be displayed for each cycle. The settings can be changed before the cycle is started.
WASH WATER TEMPERATURE
To change the preset temperature, press the Temp button to scroll to the desired setting. Select a wash water temperature according to fi ber content, colorfastness and soil level. A cold water rinse saves energy and reduces wrinkling.
To protect your fabrics, not all temperatures are available with every cycle. The indicator will not light if the setting is not available with that cycle.
The temperature selected for the cycle will be remembered and recalled each time that cycle is selected in the future.
NOTE To change the temperature once the cycle has begun, press the Pause button, make the new selection and press Start again.
Auto Temp wash water temperatures are automatically regulated to maximize detergent effectiveness and improve washing performance. The water heater setting and its distance from the washer, water usage in other parts of the home, and seasonally low ground water temperature in some geographic areas can affect water temperature.
Sanitize
This setting sanitizes heavily soiled colorfast fabrics such as towels, bedding, and children’s clothing by killing 99.9% of bacteria using wash water heated with a boost heater to 152° F (67° C). Cold water is used to cool and rinse the load.
NOTE This setting has been certifi ed by NSF International, an independent third party testing and certifi cation organization dedicated to public health, safety and environmental protection.
Auto Temp Hot
Use this setting for heavily soiled white or colorfast cottons and blends.
Auto Temp Warm
Use this setting for normally soiled white or colorfast cottons or blends.
Auto Temp Cold
Some warm water will automatically blend with cold tap supply to achieve a precise Auto Temp Cold. Use this setting for lightly soiled non-colorfast items, knits, delicates, and hand washables.
Cold Water Clean
Wash and rinse temperatures are equivalent to temperature of cold tap supply. Use this selection for fabrics and colors that are prone to dye transfer. For use with cold water detergents.
SPIN SPEED
Max, High, Medium and Low spin speeds are available for each cycle. The spin speed and/or duration of fi nal spin vary from model to model and cycle to cycle.
Increasing the spin speed will extract more water, decrease drying time and conserve energy. Decreasing the spin speed will reduce wrinkling.
Select Low spin speed to gently spin items that should be line dried.
Use No Spin to omit the fi nal spin at the end of the cycle. The load will be very wet. Remove items from the wash drum to drip dry or select a Spin Only or Rinse and Spin cycle to remove excess water at a more convenient time.
SOIL LEVEL
Adjust the wash time in 3-minute increments based on the soil level of each load. Max, Heavy, Normal, Light and Extra Light soil levels are available.
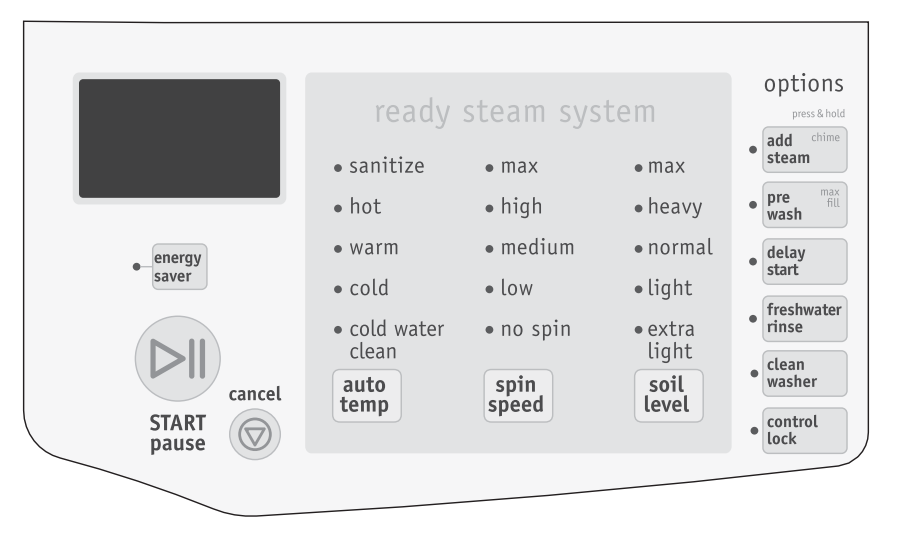
Cycle Options
To add options, press the corresponding options buttons to illuminate the selections desired. To delete options, press the options buttons again and the indicator lights will turn off. Some Options require a “Press & Hold” effort to activate or deactivate the secondary function.
Not all options are available on every model. To protect your fabrics, not all options are available with every cycle. If an option is not appropriate for the cycle, the indicator will not light. Occasionally, a setting and option in the same cycle will confl ict with each other, like Add Steam and Energy Saver. When this happens, the option selected fi rst will cause the confl icting option to not be selectable.
NOTE To change the Options after the cycle starts, press Pause, adjust the setting and press Start to resume the cycle.
Allergy (on select models)
If you have asthma or allergy sufferers in your home, add this option to combine hot water temperature (boosted with internal heater), fast speed tumbling and multiple rinses to help ensure the destruction of dust mites and removal of pet dander.

NOTE This option has been certifi ed by NSF International, an independent third party testing and certifi cation organization dedicated to public health, safety and environmental protection.
The Allergy option will kill all dust mites and eliminate at least 95% of pet dander. Since higher temperatures are required, please check fabric care labels to prevent damage.
Energy Saver
The Energy Saver option reduces the warm water temperature a few degrees to save energy and also extracts more water to reduce drying time. On some models, you may also notice after the cycle begins most lights and indicators will turn off. To turn those lights temporarily back on press Energy Saver during the cycle.

Add Steam
Select this option to add approximately 20 minutes of tumbling in steam during the wash cycle. It is recommended for heavily soiled loads to help enhance the release of tough stains from fabrics after initial agitation. It is available with all cycles except Delicates, Quick Wash, Rinse & Spin and Spin Only.
NOTE
- Steam may not necessarily be visible inside drum during a steam wash cycle.
- Steam may not be present during entire steam wash cycle.
IMPORTANT
- If steam is selected, rinse temperatures will be elevated.
- If washer is paused during a steam wash cycle, the door will remain locked due to higher temperature in drum. DO NOT force open - it will unlock upon cooling.
- During a steam cycle you may notice steam exiting from the rear vent of the washer - this is normal and not cause for alarm.

Drum Light ( Press & Hold on some models)
The drum light will come on whenever the door is opened to illuminate the drum during loading and unloading. Closing the door turns off the light. The drum light will automatically turn off if the door is left open more than 3 minutes.
On models with Press & Hold features, you can activate the drum light during a cycle by pressing and holding the button under Options with the  symbol. The light will stay on during the cycle for 3 minutes. To turn it off, press and hold the button again.
Stain Pretreat (on select models)
Stain Pretreat uses a special 10 minute soak/pretreat agitation before the main wash. It fi lls initially with detergent and cold water to prevent protein stains from setting, then the internal heater is activated to heat the wash water to remove non-protein based stains. Can be used with Prewash for the toughest stains.
Pre Wash
Select this option to add a short initial wash period to a cycle. Heavily soiled and stained loads will prewash for approximately 5 minutes. The water will drain and the load will automatically advance to the regular wash cycle. See step 5 in “Operating Your Washer” section in this guide for details on adding detergent to the dispenser.
Chime (Press & Hold)
A signal will sound at the end of the cycle if this option is selected.
Delay Start
Press Delay Start to select a wash time convenient to your schedule or during off peak energy hours. The delay time selected will be displayed and begin counting down when you select Start.
Max Fill (Press & Hold)
Increase the water fi ll level of the agitation portion of any wash cycle.
Freshwater Rinse
Use this option when additional rinsing is desired to remove excess dirt and detergent. It is recommended for heavily soiled loads or if household members have sensitive skin.
Clean Washer
To clean and freshen the washer, perform the Clean Washer cycle. If you wish to begin the cycle, press select when prompted. This maintenance cycle uses hot water and two rinses to remove residue that may cause odor. See “Inside Routine Cleaning (Preventative)” for detailed information about the Clean Washer cycle.

NOTE The washer will automatically prompt you to run the Clean Washer cycle every 50 cycles. You may press the Cancel button to manually perform the cycle at another time.
Control Lock
To lock the controls between cycles, press and hold the Control Lock button for 5 seconds. Repeat to unlock the controls when you are ready to operate the washer. Use this feature to reduce the likelihood of accidental operation by children.
Other Features
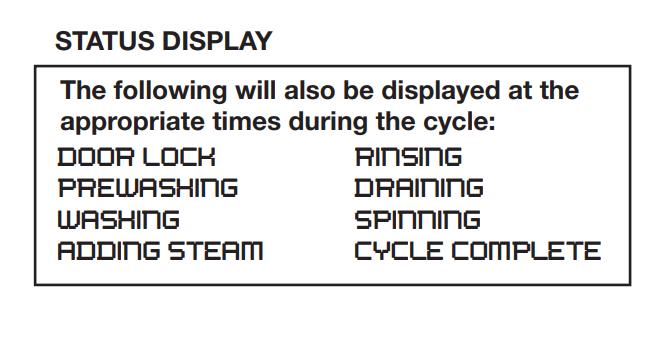
Status Display/Status Lights
The estimated total cycle time will be displayed when the cycle is selected. The time may increase if water pressure is low, oversudsing occurs or the load becomes unbalanced. The approximate time remaining will be displayed during the cycle.
A situation where oversudsing has been detected by the washer will result in the washer automatically adding up to 4 extra rinses to attempt to clear the suds. Each extra rinse the washer performs to clear the suds will add 5 minutes to the cycle display time. If an excessive amount of detergent has been added and additional rinsing has not corrected the issue, “TOO MUCH DETERGENT” will be displayed.
Vent Latch
Help prevent odor buildup and mildew between washes by utilizing your washer’s vent latch feature. To apply the vent lock, (1) open the door slightly, (2) lift the latch arm and then (3) press the arm down onto the plastic door strike, snapping it in place. The vent latch can be released either of two ways - by pulling door out and manually returning latch arm to lower position or by pushing door shut and allowing latch arm to continue its pivot upward.

IMPORTANT Do not attempt to close door if vent latch arm is disengaged and arm is in an outward position. Return latch arm to lower position before closing and latching the door.
NOTE The vent latch may become dislodged from hinge point if door closure is attempted while latch arm is not in an acceptable closing position. The latch arm can be snapped back in at the hinge location. Washer will still operate without latch arm installed.
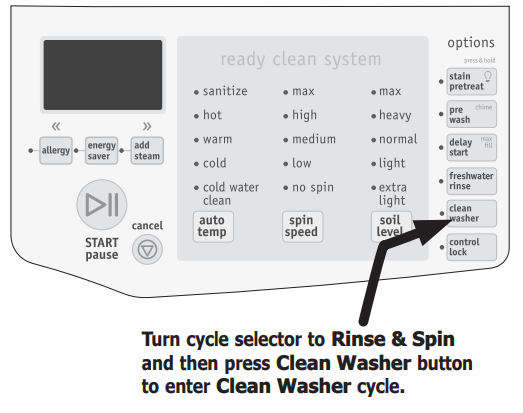
Clean Washer Cycle
TO REFRESH OR CLEAN INSIDE OF WASHER
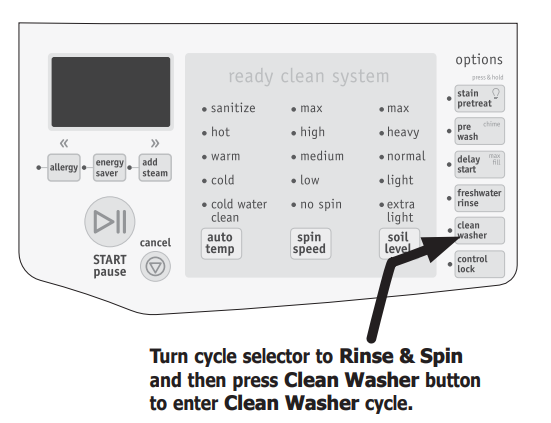
To clean and freshen the washer, perform the Clean Washer cycle. For best results use the Clean Washer cycle once a month. To begin the cycle, press Select when prompted during automated reminder mode or manually select the cycle by following these directions: Rotate cycle knob to Rinse & Spin (or Spin Only, if your models does not have Rinse & Spin cycle). Then press the Clean Washer option button. The LCD screen will display “SYSTEM CLEAN”.

NOTE The washer will automatically prompt you to run the Clean Washer cycle every 50 cycles. You may press the Cancel button to manually perform the cycle at another time.
IMPORTANT Items left in washer while performing the Clean Washer cycle will cause a severe out-of-balance situation that could damage the washing machine.
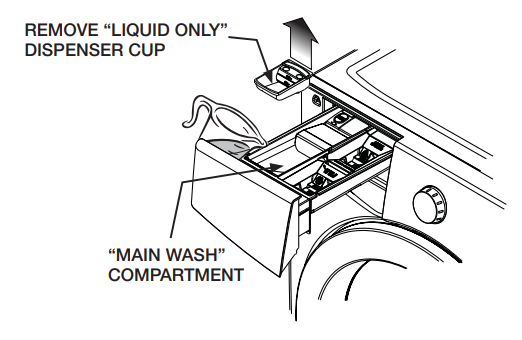
If installed, remove the “MAIN WASH - LIQUID ONLY” cup from the dispenser. REMOVE ALL ITEMS FROM WASH DRUM before fi lling the detergent chamber with one (1) cup of liquid chlorine bleach OR one (1) pouch of TIDE® WASHING MACHINE CLEANER. DO NOT use both. Press Start to begin.
NOTE If the Clean Washer cycle is cancelled or paused during the cycle, the washer will go through 2 rinse cycles to clean the drum of any residual bleach before unlocking the door.
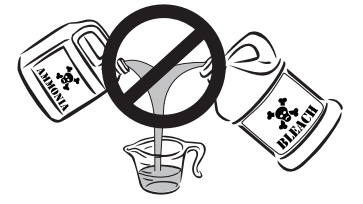
WARNING
HARMFUL VAPOR HAZARD
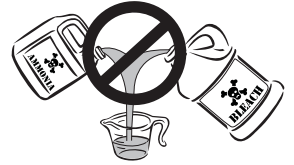
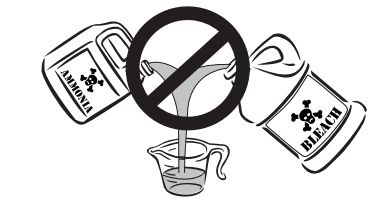
Do not use or mix liquid chlorine bleach with other household chemicals such as toilet cleaners, rust removers, acid or products containing ammonia. These mixtures can produce dangerous fumes which can cause serious injury or death.
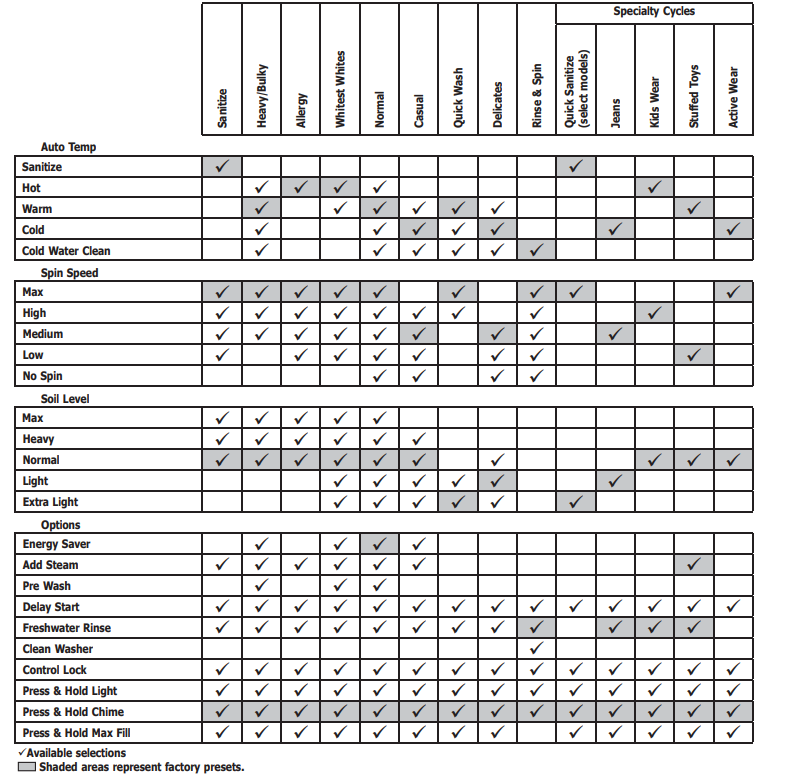
WASHER SETTINGS CHART
These Temperature, Spin Speeds, Soil Levels and Options are available with the following cycles:
These Temperature, Spin Speeds, Soil Levels and Options are available with the following cycles:

These Temperature, Spin Speeds, Soil Levels and Options are available with the following cycles:

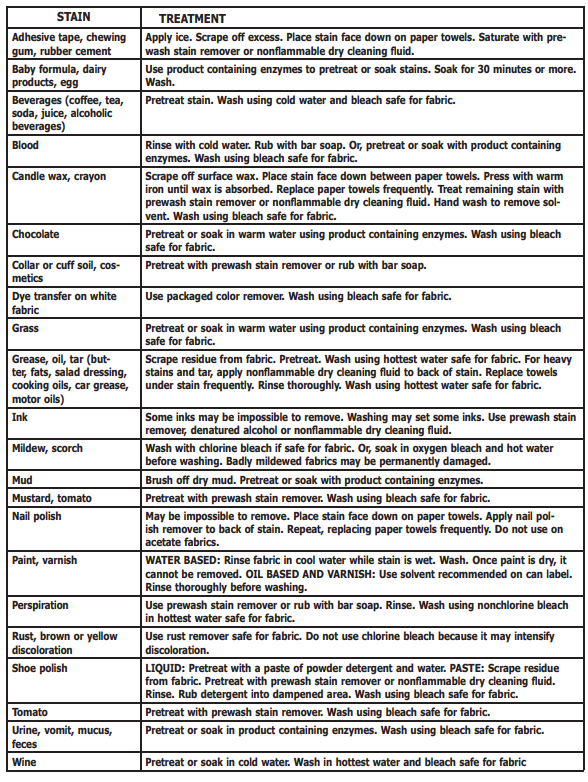
STAIN REMOVAL GUIDE
Safe Stain Removal Procedures
To reduce the risk of fi re or serious injury to persons or property, comply with the basic warnings listed below:
- Read and comply with all instructions on stain removal products.
- Keep stain removal products in their original labeled containers and out of children’s reach.
- Thoroughly wash any utensils used.
- Do not combine stain removal products, especially ammonia and chlorine bleach. Dangerous fumes can result.
- Never wash items which have been previously cleaned in, washed in, soaked in or spotted with gasoline, dry cleaning solvents or other fl ammable or explosive substances because they give off vapors that could ignite or explode.
- Never use highly fl ammable solvents, such as gasoline, inside the home. Vapors can explode on contact with fl ames or sparks.
For Successful Stain Removal:
- Remove stains promptly.
- Determine the kind of stain, then follow the recom�mended treatment in the stain removal chart on the next page.
- To pretreat stains, use a prewash product, liquid detergent, or a paste made from powder detergent and water.
- Use cold water on unknown stains because hot water can set stains.
- Consult care label instructions for treatments to avoid on specifi c fabrics.
- Check for colorfastness by testing stain remover products on an inside seam.
- Rinse and wash items after stain removal.
WARNING
HARMFUL VAPOR HAZARD
Do not use or mix liquid chlorine bleach with other household chemicals such as toilet cleaners, rust removers, acid or products containing ammonia. These mixtures can produce dangerous fumes which can cause serious injury or death.

Stain Removal Suggestions
CARE AND CLEANING
Inside Routine Cleaning (Preventative)
To help prevent odors, mold or mildew, leave the door open for a few hours after use or whenever the washer is not in use.
CAUTION
ENTRAPMENT and TIP-OVER HAZARD
Do not leave the door open if there are small children or pets present. An open door could entice children to hang on the door or crawl inside the washer. If there are no small children present, you may leave the door ajar to prevent odor build up.
TO REFRESH OR CLEAN INSIDE OF WASHER
To clean and freshen the washer, perform the Clean Washer cycle. For best results use the Clean Washer cycle once a month. To begin the cycle, press Select when prompted during automated reminder mode or manually select the cycle by following these directions:
Rotate cycle knob to Rinse & Spin (or Spin Only, if your models does not have Rinse & Spin cycle). Then press the Clean Washer option button. The LCD screen will display “SYSTEM CLEAN”.
IMPORTANT Items left in washer while performing the Clean Washer cycle will cause a severe out-of-balance situation that could damage the washing machine.
If installed, remove the “MAIN WASH - LIQUID ONLY” cup from the dispenser. REMOVE ALL ITEMS FROM WASH DRUM before fi lling the detergent chamber with one (1) cup of liquid chlorine bleach OR one (1) pouch of TIDE® WASHING MACHINE CLEANER. DO NOT use both. Press Start to begin.

NOTE If the Clean Washer Cycle is cancelled or paused during the cycle, the washer will go through 2 rinse cycles to clean the drum of any residual bleach before unlocking the door
WARNING
HARMFUL VAPOR HAZARD
Do not use or mix liquid chlorine bleach with other household chemicals such as toilet cleaners, rust removers, acid or products containing ammonia. These mixtures can produce dangerous fumes which can cause serious injury or death.
Other Inside Routine Cleaning (Preventative)
Cleaning Dispenser Drawer Area
NOTE Detergent and fabric softener may build up in the dispenser drawer. Residue should be removed once or twice a month.
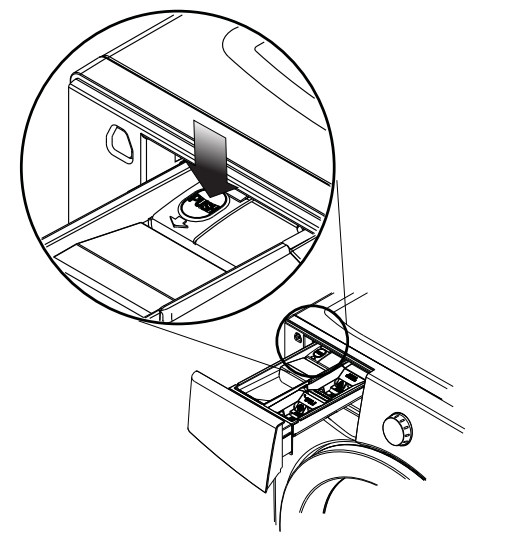
- Remove the drawer by pulling the drawer out until it stops.
- Reach back into the left rear corner of the drawer cavity and press down fi rmly on the lock tab. Pull out the drawer.
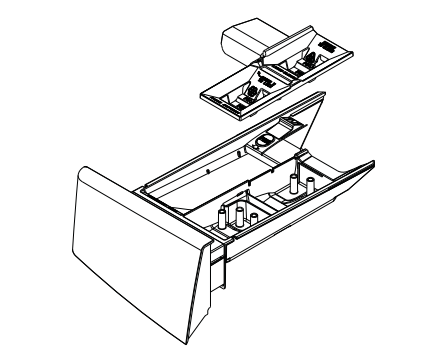
- Remove the insert from the bleach and fabric softener compartments.
- Rinse the drawer and inserts with a combination of ¾ cup liquid chlorine bleach and 1 gallon hot tap water to remove traces of accumulated powders and liquids. Large amounts of fabric softener residue may indicate improper dilution or more frequent cleaning is required. Rinse well with tap water.
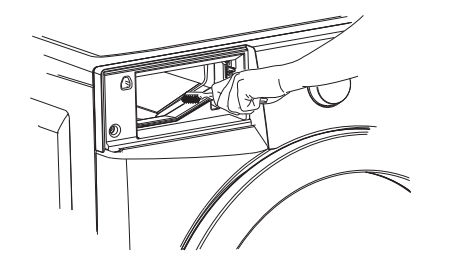
- To clean the drawer opening, use a small brush to clean the recess. Remove all residue from the upper and lower parts of the recess.
- Replace the insert by pressing it in place until you hear a slight click. Return the dispenser drawer
Daily Preventative Maintenance
- Remove items from the washer as soon as the cycle ends. Excess wrinkling, color transfer, and odors may develop in items left in the washer.
- If there are no small children or pets present, you may leave the door ajar when the washer is not in use.
- Leave the dispenser drawer open slightly at the end of the wash day.
- Dry around the washer door opening, fl exible gasket, and door glass. These areas should always be clean to ensure a water tight seal.
- When extremely soiled items have been washed, a dirty residue may remain on the drum. Remove this by wiping the drum with a nonabrasive household cleanser. Rinse thoroughly with water.
- Periodically, wipe dry the folds in the bottom of the fl exible gasket to remove lint and other debris.
Inside Cleaning (Aggressive)
In cases where the Clean Washer cycle along with care and cleaning of rubber gasket folds isn’t done, and severe odor, mold, mildew, or residue buildup have developed, follow the below cleaning procedure to help alleviate the problem.
CLEANING PROCEDURE - Washer Drum
Ensure the wash tub is empty (or no clothes load). Open the detergent drawer and pour eight (8) cups of bleach into the “MAIN WASH” detergent compartment. Select Clean Washer cycle as described previously in Inside Routine Cleaning (Preventative).
Upon cycle completion inspect the interior of the washer to see if the odor/residue has been eliminated. If any additional cleaning is required, repeat the above procedure. This may take several cycles depending on the severity of the odor/residue. You may observe some remaining discoloration due to the long term effects of this residue.
For especially contaminated areas visible inside the drum (including the front rubber seal), these areas might be more effectively cleaned by spraying a Bleach Cleaner on a scrub brush, soft sponge, or towel and scrubbing.
IMPORTANT Always wear rubber or latex gloves and protect fl oor and clothing from damage. If odor is still left after bleach cycle(s) and bleach cleaner, open the detergent drawer and pour one (1) pouch of TIDE® WASHING MACHINE CLEANER in detergent drawer. Select Clean Washer Cycle as above and start the washer.
IMPORTANT See Inside Routine Cleaning (Preventative) for future cleaning maintenance which is necessary to avoid repeating issues
NOTE If the Clean Washer cycle is cancelled or paused during the cycle, the washer will go through 2 rinse cycles to clean the drum of any residual bleach before unlocking the door
WARNING
HARMFUL VAPOR HAZARD
Do not use or mix liquid chlorine bleach with other household chemicals such as toilet cleaners, rust removers, acid or products containing ammonia. These mixtures can produce dangerous fumes which can cause serious injury or death
Outside Routine Cleaning
- When washing is completed, wipe top and sides of washer with a damp cloth. Turn water faucets off to prevent pres�sure build-up in the hoses.
- Clean the cabinet with mild soap and water. Never use harsh, gritty or abrasive cleansers
- If the cabinet becomes stained, clean with diluted chlo�rine bleach (1 part bleach to 8 parts water). Rinse several times with clear water.
- Remove glue residue from tape or labels with a mixture of warm water and mild detergent. Or, touch residue with the sticky side of tape.
- When cleaning chrome parts use a window cleaner with ammonia or mild soap and water.
- Before moving the washer, place a strip of cardboard or thin fi berboard under the front leveling legs to prevent damage to the floor
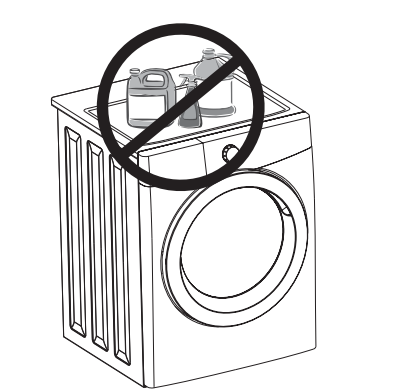
IMPORTANT Do not store or place laundry products on top of washer at any time. They can damage the fi nish or controls.
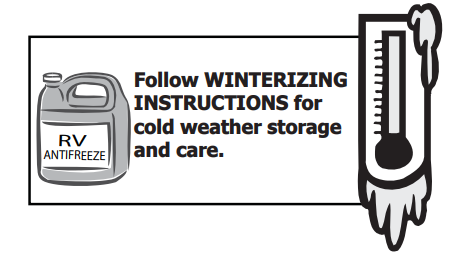
Winterizing Instructions
IMPORTANT If the washer is stored in an area where freezing can occur or moved in freezing temperatures, follow these winterizing instructions to prevent damage to the washer:
- Turn off water supply faucets.
- Disconnect hoses from water supply and drain water from hoses.
- Plug electrical cord into a properly grounded electrical outlet.
- Add 1 gallon (3.8 L) nontoxic recreational vehicle (RV) antifreeze to empty wash drum. Close door.
- Select the Spin Only cycle. Press Start and let the washer drain for 1 minute to drain out all the water. Not all of the RV antifreeze will be expelled.
- Press Cancel, unplug electrical power cord, dry off drum interior and close door.
- Remove dispenser drawer. Drain any water in compartments and dry compartments. Replace drawer.
- Store washer in an upright position.
- To remove antifreeze from washer after storage, perform Clean System Cycle as described earlier.
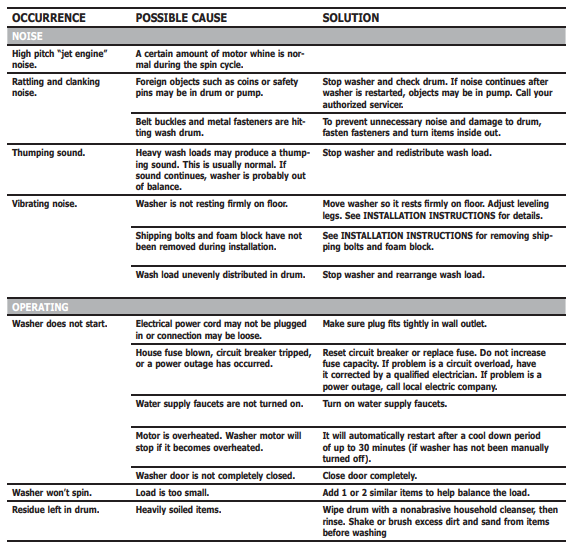
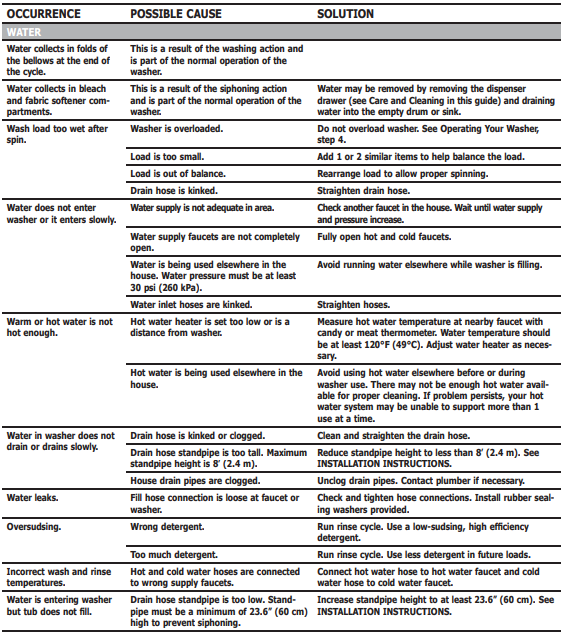
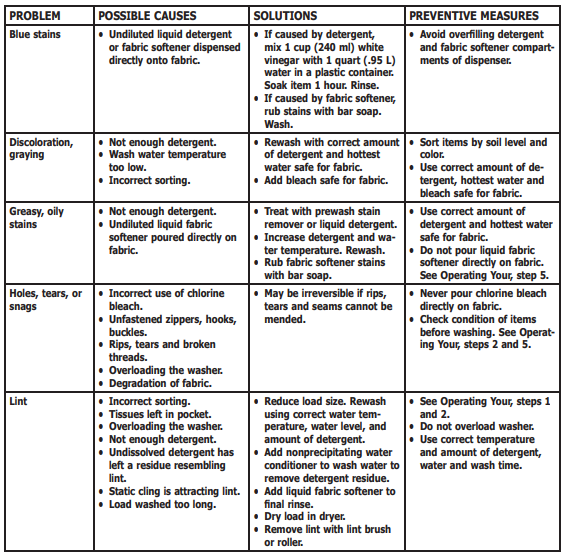
SOLUTIONS TO COMMON PROBLEMS
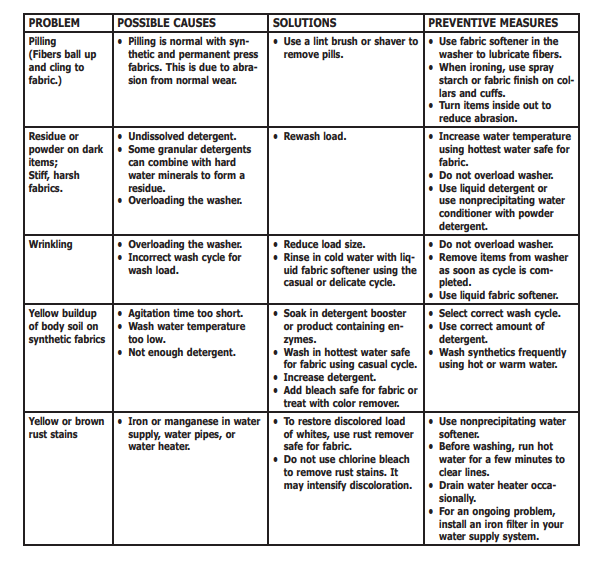
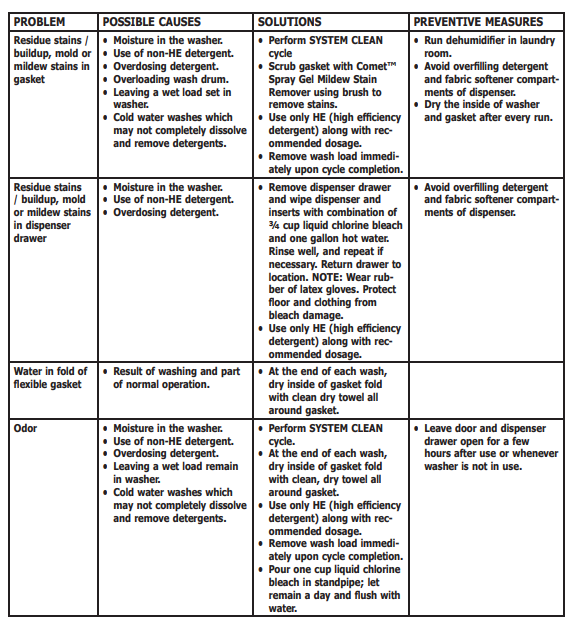
Common Washing Problems
Many washing problems involve poor soil and stain removal, residues of lint and scum, and fabric damage. For satisfactory washing results, follow these suggestions provided by The Soap and Detergent Association.
Service Prevention Checklist
Before calling for service, review this list. It may save both time and expense. The list includes common occurrences that are not the result of defective workmanship or materials in this washer.