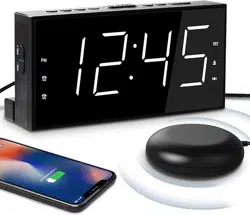
Bed Shaker Alarm Clock
User’s Guide
Getting Started
Step 1: Install Batteries or Plug In
Your can power your bed shaker alarm clock by
installing 3 AAA batteries (not included) or by plugging
the power adapter into a working power outlet.
To install batteries:
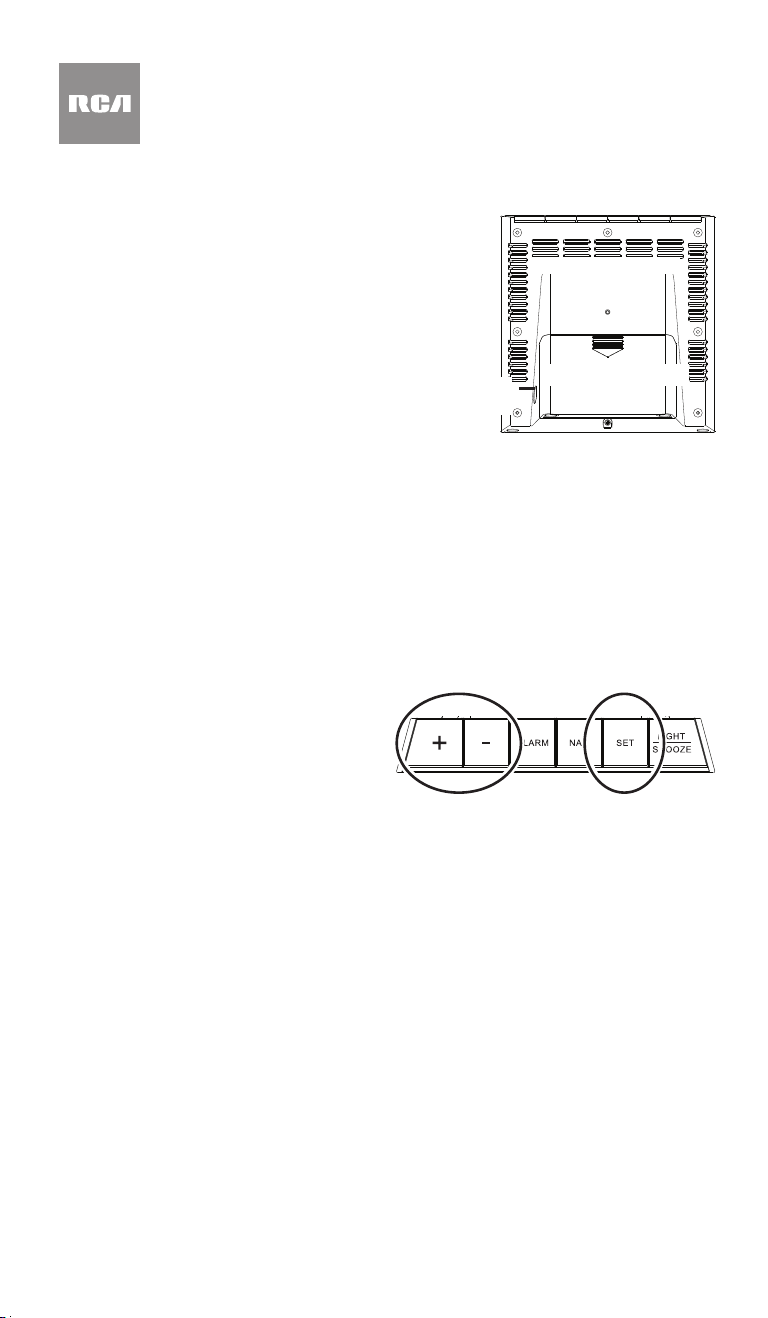
1. Open the battery compartment on the back
of the clock.
2. Insert three AAA batteries (not included). Follow the
+ and – indications printed on the compartment.
3. Close the battery compartment.
Note: When the bed shaker clock is running on batteries
alone (i.e., when it’s not plugged in), the display will
time out after 8 seconds to extend battery life. To turn the display back on, press the LIGHT-
SNOOZE button. The bed shaker and USB charging do not operate under battery power.
Battery Precaution: Always remove old, weak or worn-out batteries promptly and recycle or
dispose of them in accordance with Local and National Regulations.
To use the power adapter:
1. Plug the included power adapter into the DC 5V jack on the left side of the clock.
2. Plug the other end into a working power outlet.
TIP: Installing batteries is a good idea even if you’re plugging your clock in for power.
Batteries will make sure your settings (like time and alarm) are saved even if there’s a power
outage.
RCDV10 IB 02
Everyday Use
Setting the Alarms
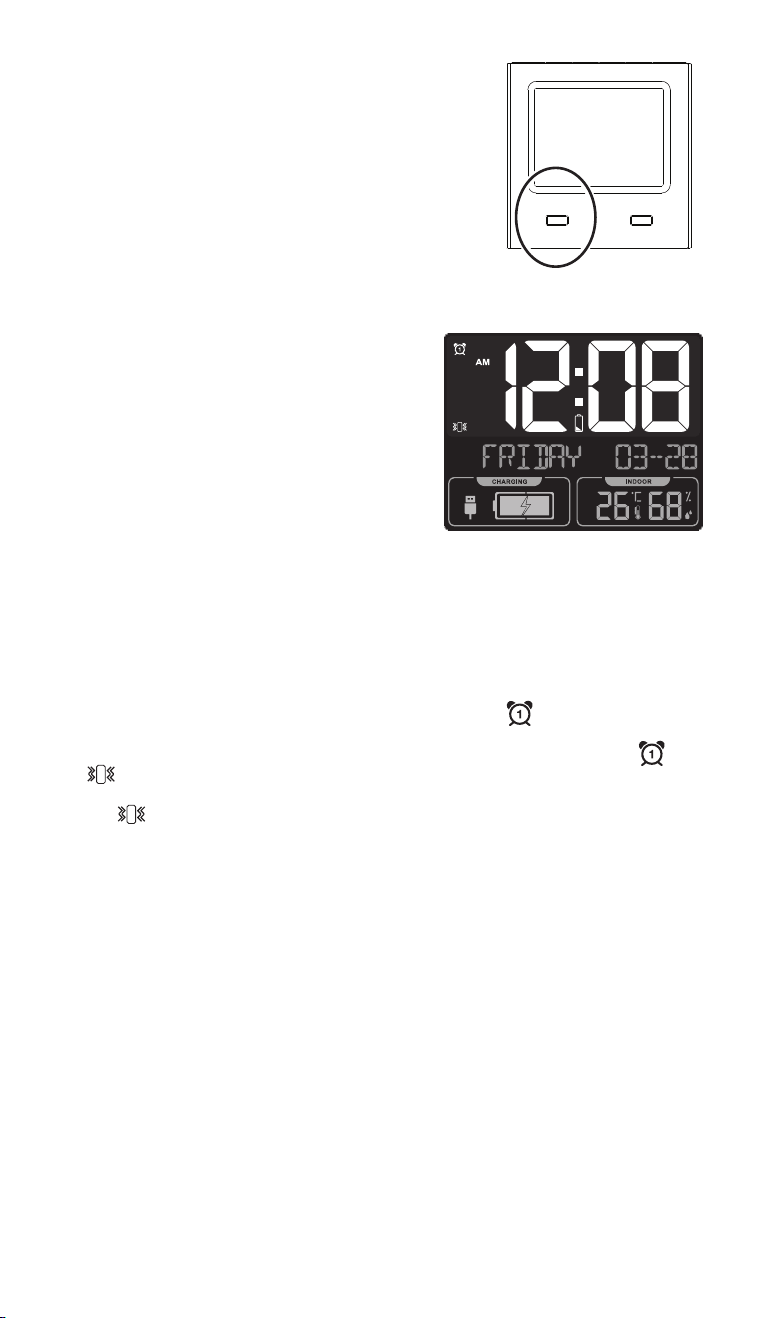
1. While the clock is displaying the time, press the
ALARM button on the top of the clock to go to the
Alarm 1 display. 6:30 ALARM 1 OFF appears on
the clock display.
2. Press and hold the ALARM button until the hour
digits start blinking.
3. Use the + and — buttons on the top of the clock
to adjust the hour for the alarm. Press the ALARM
button to set it and move to the minutes.
4. Use the + and — buttons to adjust the minutes for
the alarm. Press the ALARM button to set it.
5. To set Alarm 2, press ALARM twice in step one to view Alarm 2. Then repeat steps 2-4.
Turning On the Audible and Bed Shaker Alarms
1. While the clock is displaying the time, press the ALARM button on the top of the clock to
go to the Alarm 1 display.
2. Press the SET button on the top of the clock to choose the kind of alarm you want for
Alarm 1.
Press once to turn on the audible alarm on for Alarm 1. The
icon appears in the
display.
Press twice to turn on both the bed shaker and audible alarm for Alarm 1. The
and
icons appear in the display.
Press three times to turn on the bed shaker alarm only (no audible alarm) for Alarm 1.
The
icon appears in the display.
Press four times to turn Alarm 1 off completely.
3. To turn on Alarm 2, press ALARM twice in step one to view Alarm 2. Then repeat step 2.
Notes:
• The alarm sounds for one minute when activated.
• Press SNOOZE/LIGHT to activate snooze. The alarm indicator remains on the clock
display. Press any other key to turn the alarm off completely.
Adjusting Display Brightness
The clock display offers three levels of brightness: high, low, and off.
To adjust the display brightness: Press the LIGHT/SNOOZE button on the top of the clock.
Using the Nap Timer
The bed shaker clock offers a nap timer of 10 minutes, after which the alarm goes off. You
can also change the amount of time on the nap timer (between 5 minutes and 2 hours).
To turn the nap timer on/off: Press the NAP button on the top of the clock.
To change the nap timer time: Press and hold the NAP button on the top of the clock until
the nap timer minutes start ashing. Press the + or — buttons to increase or decrease the
timer by 5 minutes.
Clock , back
Battery compartment
DC 5V
jack
Step 2: Set the Date, Time, and
Clock Preferences
When you rst plug it in, the bed shaker
clock’s display shows 00:00.
1. Press the + button on the top of the
clock to switch between 12- and 24-hour
time formats (for example, 5:00 pm in 12-hour format would be 17:00 in 24-hour format).
By default, the clock uses the 24-hour format.
2. Press and hold the SET button on the top of the clock to enter time/date/preferences set
mode. The middle part of the display shows “English,” the default language for the clock
display. For each setting, use the + and — buttons to adjust. Then press SET to proceed.
These settings go in the following order:
Display language: Use + and — to adjust, SET to set it and proceed.
Audio feedback (beep): Use + and — to adjust, SET to set it and proceed.
Hour: Use + and — to adjust, SET to set it and proceed.
Minutes: Use + and — to adjust, SET to set it and proceed.
Year: Use + and — to adjust, SET to set it and proceed.
Month: Use + and — to adjust, SET to set it and proceed.
Date: Use + and — to adjust, SET to set it and proceed.
Temperature preference (Fahrenheit/Celsius): Use + and — to adjust, SET to set it and
proceed.
Snooze time: Use + and — to adjust, SET to set it and exit date/time/preference settings.
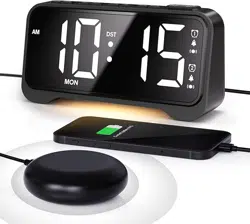
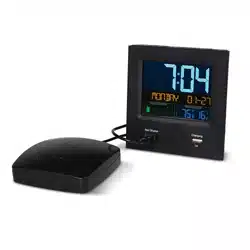
Step 3: Plug in and Place the Bed Shaker
1. Plug the bed shaker’s cable into the Bed Shaker port on
the front of the clock.
2. Place the bed shaker where you want to use it (for
example, between your mattress and box spring or under
your pillow).
Charging
1A
Bed Shaker
Clock , front
Tour of the Bed shaker Alarm Clock
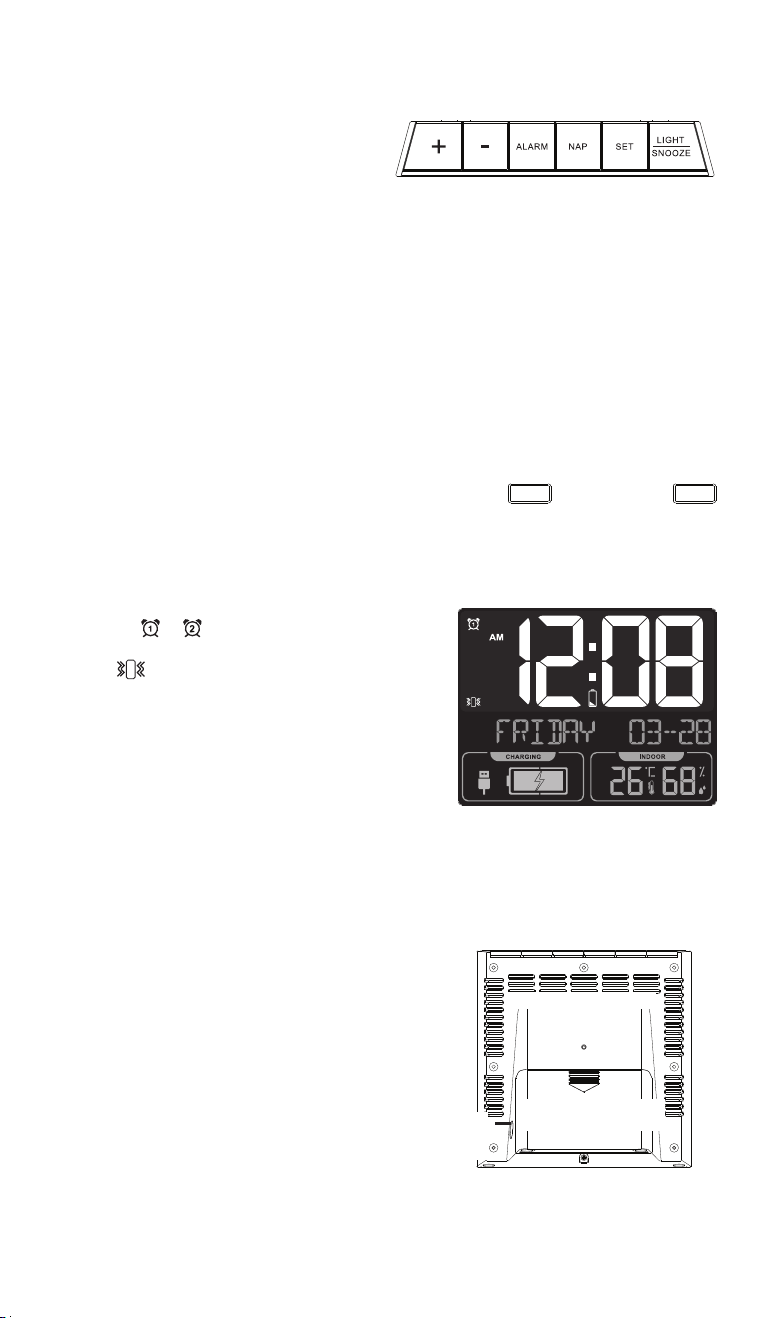
Top
+ and — buttons adjust the current parameter
when setting. + switches the time display
between 12- and 24-hour formats.
ALARM button accesses the alarm displays.
Press and hold when an alarm time is displayed to start adjusting it.
NAP button starts a nap timer for 10 minutes. Press and hold to adjust the nap timer time.
SET button lets you adjust the time and date, or turn audible and bed shaker alarms on or
off. Press and hold to adjust the currently displayed parameter in setup mode. Press when an
alarm time is displayed to turn the audible and bed shaker alarms on and off.
LIGHT/SNOOZE button snoozes the alarm when it’s sounding and activates the display
backlight when the clock is running on battery power. It cycles through the displays three
brightness settings when the clock is plugged in.
Front
Bed Shaker connects to the provided bed shaker
and allows the clock to send bed shaker alarms.
The clock must be plugged in to send bed shaker
alarms.
Charging provides USB charging power for your phone or other portable devices. The clock
must be plugged in to provide charging power.
Display
and icons indicate that audible Alarms 1 and/
or 2 are turned on.
icon indicates that a bed shaker alarm is turned
on for Alarm 1 and/or 2.
AM / PM shows that the time displayed is AM or PM
(does not apply to 24-hour format).
Time digits show the current time or alarm time (or
setting values when adjusting).
Day and Date indicator shows the day of the week
and the date. This area shows the Alarm number and status when setting alarm time. It shows
the Nap timer time when this timer is active.
CHARGING icons show when a device is charging from the clock’s charging port.
INDOOR shows the current ambient indoor temperature and humidity.
Clock , back
Battery compartment
DC 5V
jack
Back
Battery compartment holds 3 AAA
batteries (not included) to power the clock.
DC 5V jack connects to the provided power
adapter to power the bed shaker alarm
clock.
Clock, top panel
Clock, front panel
Charging
1A
Bed Shaker
Réveil vibrant
Guide de l’utilisateur
Guide de démarrage
Étape 1 : Installation des piles ou branchement
Il est possible d’alimenter le réveil vibrant en installant
3 piles AAA (non incluses) ou en branchant l’adaptateur
d’alimentation sur une prise secteur opérationnelle.
Installation des piles :
1. Ouvrir le compartiment à piles situé au dos du réveil.
2. Insérer les trois piles AAA (non incluses). Respecter les
indications + et - imprimées dans le compartiment.
3. Refermer le compartiment à piles.
Remarque : Lorsque le réveil vibrant fonctionne
uniquement sur piles (c’est-à-dire lorsqu’il n’est pas
branché), l’afchage s’éteint au bout de 8 secondes
pour prolonger la durée de vie des piles. Pour réactiver
l’afchage, appuyer sur le bouton LIGHT/SNOOZE. Le coussinet vibrant et le chargement
USB ne fonctionnent pas sur piles.
Précautions à propos des piles : Toujours enlever les piles anciennes, faibles ou usagées et les
recycler rapidement ou les mettre au rebut en conformité avec les réglementations locales et
nationales.
Pour utiliser l’adaptateur d’alimentation :
1. Brancher l’adaptateur d’alimentation inclus dans la prise DC 5V (5 V c.c.) située sur le côté
gauche du réveil.
2. Brancher l’autre extrémité sur une prise secteur opérationnelle.
CONSEIL : L’installation de piles est une bonne idée, même si le réveil est branché pour
l’alimenter. Les piles permettent de sauvegarder les réglages (comme l’heure et l’alarme)
même en cas de coupure de courant.
Arrière du réveil
Compartiment à
piles
Prise 5 V
c.c.
Étape 2 : Conguration de la date, de
l’heure et des préférences du réveil
Lorsqu’il est branché pour la première fois,
l’écran du réveil indique00:00.
1. Appuyer sur le bouton + sur le dessus
du réveil pour basculer entre les formats
horaires 12 heures et 24 heures (par exemple, 5:00 pm au format 12 heures correspond à
17:00 heures au format 24 heures). Par défaut, le réveil utilise le format 24 heures.
2. Appuyer sur le bouton SET sur le dessus du réveil et le maintenir enfoncé pour entrer en
mode de réglage de l’heure, de la date et autres préférences. La partie centrale de l’écran
afche « English », la langue par défaut d’afchage du réveil. Pour chaque paramètre,
utiliser les boutons + et — pour le réglage. Puis appuyer sur SET pour continuer. Ces
réglages s’effectuent dans l’ordre suivant :
Langued’afchage: Utiliser les boutons + et — pour le réglage, SET pour conrmer et
continuer.
Retour audio (bip) : Utiliser les boutons + et — pour le réglage, SET pour conrmer et
continuer.
Heure : Utiliser les boutons + et — pour le réglage, SET pour conrmer et continuer.
Minutes : Utiliser les boutons + et — pour le réglage, SET pour conrmer et continuer.
Année : Utiliser les boutons + et — pour le réglage, SET pour conrmer et continuer.
Mois : Utiliser les boutons + et — pour le réglage, SET pour conrmer et continuer.
Date : Utiliser les boutons + et — pour le réglage, SET pour conrmer et continuer.
Préférence de température (Fahrenheit/Celsius) : Utiliser les boutons + et — pour le
réglage, SET pour conrmer et continuer.
Durée de répétition : Utiliser les boutons + et — pour le réglage, SET pour conrmer et
quitter le mode de réglage de la date, de l’heure et autres préférences.
Utilisation quotidienne
Réglage des alarmes
1. Pendant que le réveil afche l’heure, appuyer sur le
bouton ALARM pour passer à l’afchage de l’alarme
1. 6:30 ALARM 1 OFF (Alarme 1 désactivée)
apparaît sur l’écran du réveil.
2. Appuyer et maintenir enfoncé le bouton ALARM
jusqu’à ce que les chiffres des heures commencent à
clignoter.
3. Utiliser sur les boutons + et — situés sur le dessus du
réveil pour régler l’heure de l’alarme. Appuyer sur le
bouton ALARM pour conrmer et passer au réglage
des minutes.
4. Utiliser les boutons + et — pour régler les minutes de l’alarme. Appuyer sur le bouton
ALARM pour conrmer.
5. Pour régler l’alarme 2, appuyer deux fois sur la touche ALARM à l’étape 1 pour visualiser
l’alarme 2. Ensuite, répéter les étapes 2 à 4.
Activation de l’alarme sonore et du coussinet vibrant
1. Pendant que le réveil afche l’heure, appuyer sur le bouton ALARM sur le dessus du
réveil pour passer à l’afchage de l’alarme 1.
2. Appuyer sur le bouton SET sur le dessus du réveil pour choisir le type d’alarme souhaitée
pour l’alarme 1.
Appuyer une fois pour activer l’alarme sonore pour l’alarme 1. L’icône apparaît sur
l’écran.
Appuyer deux fois pour activer à la fois le coussinet vibrant et l’alarme sonore de
l’alarme 1. Les icônes
et apparaissent sur l’écran.
Appuyer trois fois pour activer le coussinet vibrant seulement (pas d’alarme sonore) de
l’alarme 1. L’icône apparaît sur l’écran.
Appuyer quatre fois pour désactiver complètement l’alarme 1.
3. Pour activer l’alarme 2, appuyer deux fois sur la touche ALARM à l’étape 1 pour visualiser
l’alarme 2. Ensuite, répéter l’étape 2.
Remarques :
• L’alarme retentit pendant une minute lorsqu’elle est activée.
• Appuyer sur LIGHT/SNOOZE pour activer la répétition. L’indicateur d’alarme reste afché sur
l’écran du réveil. Un appui sur n’importe quel autre bouton désactive complètement l’alarme.
Réglage de la luminosité de l’afchage
L’écran du réveil offre trois niveaux de luminosité : élevé, bas et éteint.
Pour modier la luminosité de l’afchage : Appuyer sur le bouton LIGHT/SNOOZE situé
sur le dessus du réveil.
Utilisation de la minuterie de sieste
Le réveil vibrant offre une minuterie de 10 minutes pour la sieste, après quoi l’alarme se
déclenche. Il est possible aussi de modier la durée de la minuterie de sieste (entre 5
minutes et 2 heures).
Pour activer / désactiver la minuterie de sieste : Appuyer sur le bouton NAP (Sieste) situé
sur le dessus du réveil.
Pour modier la durée de la minuterie de sieste : Appuyer et maintenir enfoncé le
bouton NAP sur le dessus du réveil jusqu’à ce que les minutes de la minuterie de sieste
commencent à clignoter. Appuyer sur les boutons + ou – pour augmenter ou diminuer la
durée de la minuterie de 5 minutes.
Étape 3 : Brancher et placer le coussinet vibrant
1. Brancher le câble du coussinet vibrant dans le port du Bed
Shaker (Coussinet vibrant) à l’avant du réveil.
2. Placer le coussinet vibrant à l’endroit souhaité pour son
utilisation (par exemple, entre le matelas et le sommier ou
sous l’oreiller).
Charging
1A
Bed Shaker
Avant du
réveil
Bed Shaker Alarm Clock
User’s Guide
Getting Started
Step 1: Install Batteries or Plug In
Your can power your bed shaker alarm clock by
installing 3 AAA batteries (not included) or by plugging
the power adapter into a working power outlet.
To install batteries:
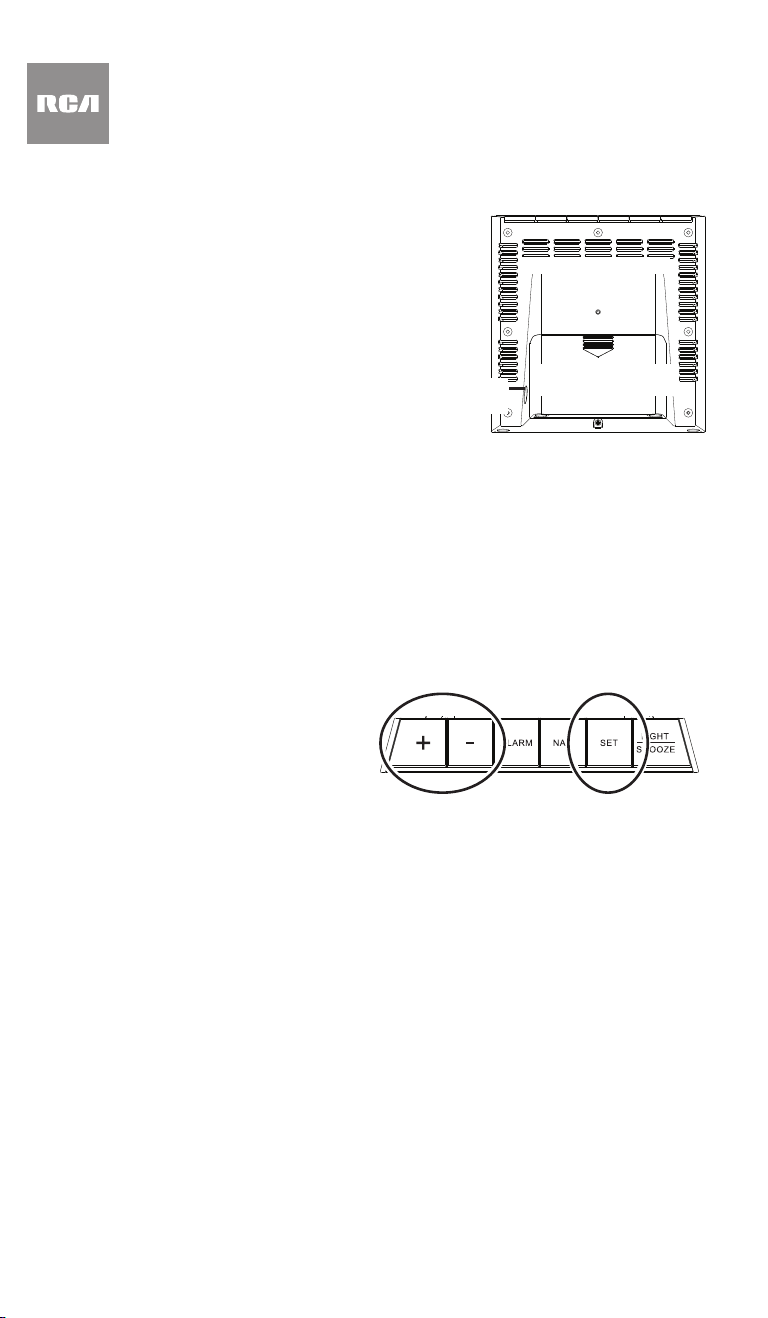
1. Open the battery compartment on the back
of the clock.
2. Insert three AAA batteries (not included). Follow the
+ and – indications printed on the compartment.
3. Close the battery compartment.
Note: When the bed shaker clock is running on batteries
alone (i.e., when it’s not plugged in), the display will
time out after 8 seconds to extend battery life. To turn the display back on, press the LIGHT-
SNOOZE button. The bed shaker and USB charging do not operate under battery power.
Battery Precaution: Always remove old, weak or worn-out batteries promptly and recycle or
dispose of them in accordance with Local and National Regulations.
To use the power adapter:
1. Plug the included power adapter into the DC 5V jack on the left side of the clock.
2. Plug the other end into a working power outlet.
TIP: Installing batteries is a good idea even if you’re plugging your clock in for power.
Batteries will make sure your settings (like time and alarm) are saved even if there’s a power
outage.
RCDV10 IB 02
Everyday Use
Setting the Alarms
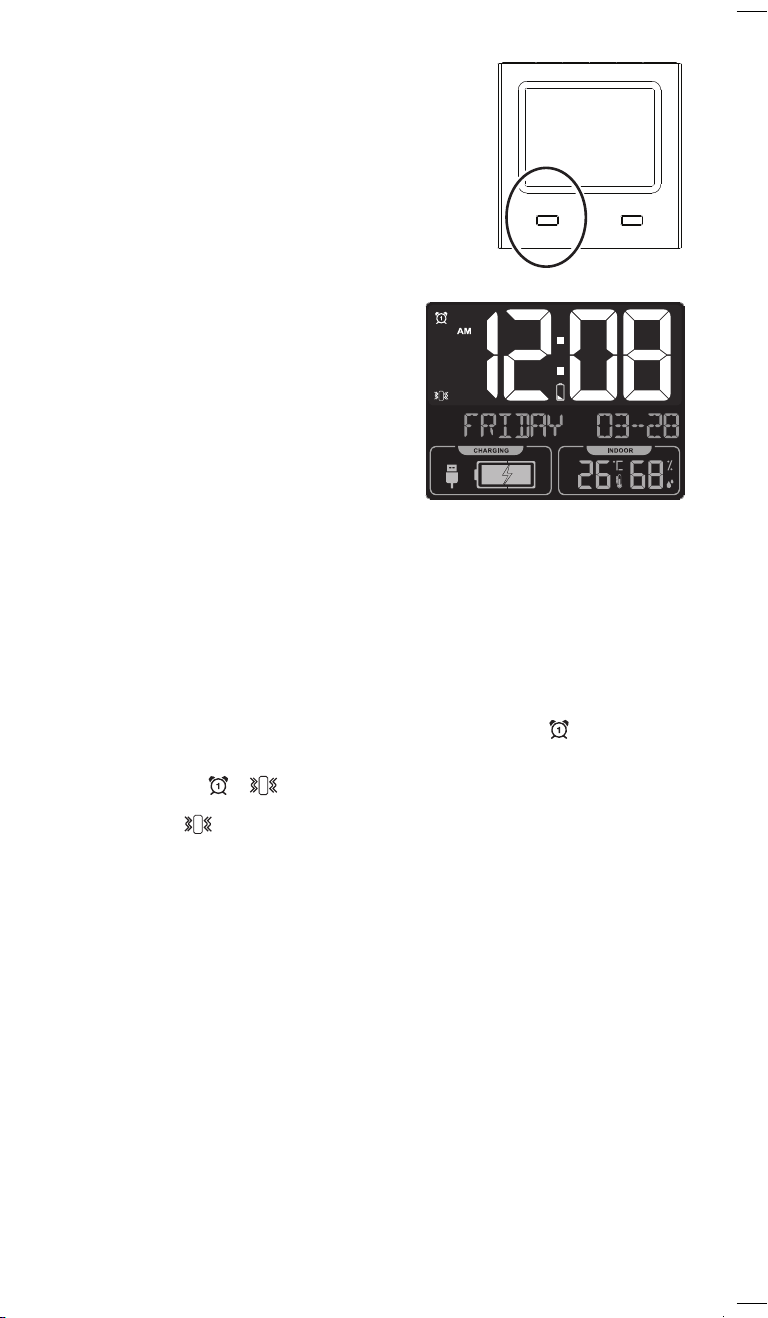
1. While the clock is displaying the time, press the
ALARM button on the top of the clock to go to the
Alarm 1 display. 6:30 ALARM 1 OFF appears on
the clock display.
2. Press and hold the ALARM button until the hour
digits start blinking.
3. Use the + and — buttons on the top of the clock
to adjust the hour for the alarm. Press the ALARM
button to set it and move to the minutes.
4. Use the + and — buttons to adjust the minutes for
the alarm. Press the ALARM button to set it.
5. To set Alarm 2, press ALARM twice in step one to view Alarm 2. Then repeat steps 2-4.
Turning On the Audible and Bed Shaker Alarms
1. While the clock is displaying the time, press the ALARM button on the top of the clock to
go to the Alarm 1 display.
2. Press the SET button on the top of the clock to choose the kind of alarm you want for
Alarm 1.
Press once to turn on the audible alarm on for Alarm 1. The
icon appears in the
display.
Press twice to turn on both the bed shaker and audible alarm for Alarm 1. The
and
icons appear in the display.
Press three times to turn on the bed shaker alarm only (no audible alarm) for Alarm 1.
The
icon appears in the display.
Press four times to turn Alarm 1 off completely.
3. To turn on Alarm 2, press ALARM twice in step one to view Alarm 2. Then repeat step 2.
Notes:
• The alarm sounds for one minute when activated.
• Press SNOOZE/LIGHT to activate snooze. The alarm indicator remains on the clock
display. Press any other key to turn the alarm off completely.
Adjusting Display Brightness
The clock display offers three levels of brightness: high, low, and off.
To adjust the display brightness: Press the LIGHT/SNOOZE button on the top of the clock.
Using the Nap Timer
The bed shaker clock offers a nap timer of 10 minutes, after which the alarm goes off. You
can also change the amount of time on the nap timer (between 5 minutes and 2 hours).
To turn the nap timer on/off: Press the NAP button on the top of the clock.
To change the nap timer time: Press and hold the NAP button on the top of the clock until
the nap timer minutes start ashing. Press the + or — buttons to increase or decrease the
timer by 5 minutes.
Clock , back
Battery compartment
DC 5V
jack
Step 2: Set the Date, Time, and
Clock Preferences
When you rst plug it in, the bed shaker
clock’s display shows 00:00.
1. Press the + button on the top of the
clock to switch between 12- and 24-hour
time formats (for example, 5:00 pm in 12-hour format would be 17:00 in 24-hour format).
By default, the clock uses the 24-hour format.
2. Press and hold the SET button on the top of the clock to enter time/date/preferences set
mode. The middle part of the display shows “English,” the default language for the clock
display. For each setting, use the + and — buttons to adjust. Then press SET to proceed.
These settings go in the following order:
Display language: Use + and — to adjust, SET to set it and proceed.
Audio feedback (beep): Use + and — to adjust, SET to set it and proceed.
Hour: Use + and — to adjust, SET to set it and proceed.
Minutes: Use + and — to adjust, SET to set it and proceed.
Year: Use + and — to adjust, SET to set it and proceed.
Month: Use + and — to adjust, SET to set it and proceed.
Date: Use + and — to adjust, SET to set it and proceed.
Temperature preference (Fahrenheit/Celsius): Use + and — to adjust, SET to set it and
proceed.
Snooze time: Use + and — to adjust, SET to set it and exit date/time/preference settings.
Step 3: Plug in and Place the Bed Shaker
1. Plug the bed shaker’s cable into the Bed Shaker port on
the front of the clock.
2. Place the bed shaker where you want to use it (for
example, between your mattress and box spring or under
your pillow).
Charging
1A
Bed Shaker
Clock , front
Tour of the Bed shaker Alarm Clock
Top
+ and — buttons adjust the current parameter
when setting. + switches the time display
between 12- and 24-hour formats.
ALARM button accesses the alarm displays.
Press and hold when an alarm time is displayed to start adjusting it.
NAP button starts a nap timer for 10 minutes. Press and hold to adjust the nap timer time.
SET button lets you adjust the time and date, or turn audible and bed shaker alarms on or
off. Press and hold to adjust the currently displayed parameter in setup mode. Press when an
alarm time is displayed to turn the audible and bed shaker alarms on and off.
LIGHT/SNOOZE button snoozes the alarm when it’s sounding and activates the display
backlight when the clock is running on battery power. It cycles through the displays three
brightness settings when the clock is plugged in.
Front
Bed Shaker connects to the provided bed shaker
and allows the clock to send bed shaker alarms.
The clock must be plugged in to send bed shaker
alarms.
Charging provides USB charging power for your phone or other portable devices. The clock
must be plugged in to provide charging power.
Display
and icons indicate that audible Alarms 1 and/
or 2 are turned on.
icon indicates that a bed shaker alarm is turned
on for Alarm 1 and/or 2.
AM / PM shows that the time displayed is AM or PM
(does not apply to 24-hour format).
Time digits show the current time or alarm time (or
setting values when adjusting).
Day and Date indicator shows the day of the week
and the date. This area shows the Alarm number and status when setting alarm time. It shows
the Nap timer time when this timer is active.
CHARGING icons show when a device is charging from the clock’s charging port.
INDOOR shows the current ambient indoor temperature and humidity.
Clock , back
Battery compartment
DC 5V
jack
Back
Battery compartment holds 3 AAA
batteries (not included) to power the clock.
DC 5V jack connects to the provided power
adapter to power the bed shaker alarm
clock.
Clock, top panel
Clock, front panel
Charging
1A
Bed Shaker
Réveil vibrant
Guide de l’utilisateur
Guide de démarrage
Étape 1 : Installation des piles ou branchement
Il est possible d’alimenter le réveil vibrant en installant
3 piles AAA (non incluses) ou en branchant l’adaptateur
d’alimentation sur une prise secteur opérationnelle.
Installation des piles :
1. Ouvrir le compartiment à piles situé au dos du réveil.
2. Insérer les trois piles AAA (non incluses). Respecter les
indications + et - imprimées dans le compartiment.
3. Refermer le compartiment à piles.
Remarque : Lorsque le réveil vibrant fonctionne
uniquement sur piles (c’est-à-dire lorsqu’il n’est pas
branché), l’afchage s’éteint au bout de 8 secondes
pour prolonger la durée de vie des piles. Pour réactiver
l’afchage, appuyer sur le bouton LIGHT/SNOOZE. Le coussinet vibrant et le chargement
USB ne fonctionnent pas sur piles.
Précautions à propos des piles : Toujours enlever les piles anciennes, faibles ou usagées et les
recycler rapidement ou les mettre au rebut en conformité avec les réglementations locales et
nationales.
Pour utiliser l’adaptateur d’alimentation :
1. Brancher l’adaptateur d’alimentation inclus dans la prise DC 5V (5 V c.c.) située sur le côté
gauche du réveil.
2. Brancher l’autre extrémité sur une prise secteur opérationnelle.
CONSEIL : L’installation de piles est une bonne idée, même si le réveil est branché pour
l’alimenter. Les piles permettent de sauvegarder les réglages (comme l’heure et l’alarme)
même en cas de coupure de courant.
Arrière du réveil
Compartiment à
piles
Prise 5 V
c.c.
Étape 2 : Conguration de la date, de
l’heure et des préférences du réveil
Lorsqu’il est branché pour la première fois,
l’écran du réveil indique00:00.
1. Appuyer sur le bouton + sur le dessus
du réveil pour basculer entre les formats
horaires 12 heures et 24 heures (par exemple, 5:00 pm au format 12 heures correspond à
17:00 heures au format 24 heures). Par défaut, le réveil utilise le format 24 heures.
2. Appuyer sur le bouton SET sur le dessus du réveil et le maintenir enfoncé pour entrer en
mode de réglage de l’heure, de la date et autres préférences. La partie centrale de l’écran
afche « English », la langue par défaut d’afchage du réveil. Pour chaque paramètre,
utiliser les boutons + et — pour le réglage. Puis appuyer sur SET pour continuer. Ces
réglages s’effectuent dans l’ordre suivant :
Langued’afchage: Utiliser les boutons + et — pour le réglage, SET pour conrmer et
continuer.
Retour audio (bip) : Utiliser les boutons + et — pour le réglage, SET pour conrmer et
continuer.
Heure : Utiliser les boutons + et — pour le réglage, SET pour conrmer et continuer.
Minutes : Utiliser les boutons + et — pour le réglage, SET pour conrmer et continuer.
Année : Utiliser les boutons + et — pour le réglage, SET pour conrmer et continuer.
Mois : Utiliser les boutons + et — pour le réglage, SET pour conrmer et continuer.
Date : Utiliser les boutons + et — pour le réglage, SET pour conrmer et continuer.
Préférence de température (Fahrenheit/Celsius) : Utiliser les boutons + et — pour le
réglage, SET pour conrmer et continuer.
Durée de répétition : Utiliser les boutons + et — pour le réglage, SET pour conrmer et
quitter le mode de réglage de la date, de l’heure et autres préférences.
Utilisation quotidienne
Réglage des alarmes
1. Pendant que le réveil afche l’heure, appuyer sur le
bouton ALARM pour passer à l’afchage de l’alarme
1. 6:30 ALARM 1 OFF (Alarme 1 désactivée)
apparaît sur l’écran du réveil.
2. Appuyer et maintenir enfoncé le bouton ALARM
jusqu’à ce que les chiffres des heures commencent à
clignoter.
3. Utiliser sur les boutons + et — situés sur le dessus du
réveil pour régler l’heure de l’alarme. Appuyer sur le
bouton ALARM pour conrmer et passer au réglage
des minutes.
4. Utiliser les boutons + et — pour régler les minutes de l’alarme. Appuyer sur le bouton
ALARM pour conrmer.
5. Pour régler l’alarme 2, appuyer deux fois sur la touche ALARM à l’étape 1 pour visualiser
l’alarme 2. Ensuite, répéter les étapes 2 à 4.
Activation de l’alarme sonore et du coussinet vibrant
1. Pendant que le réveil afche l’heure, appuyer sur le bouton ALARM sur le dessus du
réveil pour passer à l’afchage de l’alarme 1.
2. Appuyer sur le bouton SET sur le dessus du réveil pour choisir le type d’alarme souhaitée
pour l’alarme 1.
Appuyer une fois pour activer l’alarme sonore pour l’alarme 1. L’icône apparaît sur
l’écran.
Appuyer deux fois pour activer à la fois le coussinet vibrant et l’alarme sonore de
l’alarme 1. Les icônes
et apparaissent sur l’écran.
Appuyer trois fois pour activer le coussinet vibrant seulement (pas d’alarme sonore) de
l’alarme 1. L’icône apparaît sur l’écran.
Appuyer quatre fois pour désactiver complètement l’alarme 1.
3. Pour activer l’alarme 2, appuyer deux fois sur la touche ALARM à l’étape 1 pour visualiser
l’alarme 2. Ensuite, répéter l’étape 2.
Remarques :
• L’alarme retentit pendant une minute lorsqu’elle est activée.
• Appuyer sur LIGHT/SNOOZE pour activer la répétition. L’indicateur d’alarme reste afché sur
l’écran du réveil. Un appui sur n’importe quel autre bouton désactive complètement l’alarme.
Réglage de la luminosité de l’afchage
L’écran du réveil offre trois niveaux de luminosité : élevé, bas et éteint.
Pour modier la luminosité de l’afchage : Appuyer sur le bouton LIGHT/SNOOZE situé
sur le dessus du réveil.
Utilisation de la minuterie de sieste
Le réveil vibrant offre une minuterie de 10 minutes pour la sieste, après quoi l’alarme se
déclenche. Il est possible aussi de modier la durée de la minuterie de sieste (entre 5
minutes et 2 heures).
Pour activer / désactiver la minuterie de sieste : Appuyer sur le bouton NAP (Sieste) situé
sur le dessus du réveil.
Pour modier la durée de la minuterie de sieste : Appuyer et maintenir enfoncé le
bouton NAP sur le dessus du réveil jusqu’à ce que les minutes de la minuterie de sieste
commencent à clignoter. Appuyer sur les boutons + ou – pour augmenter ou diminuer la
durée de la minuterie de 5 minutes.
Étape 3 : Brancher et placer le coussinet vibrant
1. Brancher le câble du coussinet vibrant dans le port du Bed
Shaker (Coussinet vibrant) à l’avant du réveil.
2. Placer le coussinet vibrant à l’endroit souhaité pour son
utilisation (par exemple, entre le matelas et le sommier ou
sous l’oreiller).
Charging
1A
Bed Shaker
Avant du
réveil

Bed Shaker Alarm Clock
User’s Guide
Getting Started
Step 1: Install Batteries or Plug In
Your can power your bed shaker alarm clock by
installing 3 AAA batteries (not included) or by plugging
the power adapter into a working power outlet.
To install batteries:
1. Open the battery compartment on the back
of the clock.
2. Insert three AAA batteries (not included). Follow the
+ and – indications printed on the compartment.
3. Close the battery compartment.
Note: When the bed shaker clock is running on batteries
alone (i.e., when it’s not plugged in), the display will
time out after 8 seconds to extend battery life. To turn the display back on, press the LIGHT-
SNOOZE button. The bed shaker and USB charging do not operate under battery power.
Battery Precaution: Always remove old, weak or worn-out batteries promptly and recycle or
dispose of them in accordance with Local and National Regulations.
To use the power adapter:
1. Plug the included power adapter into the DC 5V jack on the left side of the clock.
2. Plug the other end into a working power outlet.
TIP: Installing batteries is a good idea even if you’re plugging your clock in for power.
Batteries will make sure your settings (like time and alarm) are saved even if there’s a power
outage.
RCDV10 IB 02
Everyday Use
Setting the Alarms
1. While the clock is displaying the time, press the
ALARM button on the top of the clock to go to the
Alarm 1 display. 6:30 ALARM 1 OFF appears on
the clock display.
2. Press and hold the ALARM button until the hour
digits start blinking.
3. Use the + and — buttons on the top of the clock
to adjust the hour for the alarm. Press the ALARM
button to set it and move to the minutes.
4. Use the + and — buttons to adjust the minutes for
the alarm. Press the ALARM button to set it.
5. To set Alarm 2, press ALARM twice in step one to view Alarm 2. Then repeat steps 2-4.
Turning On the Audible and Bed Shaker Alarms
1. While the clock is displaying the time, press the ALARM button on the top of the clock to
go to the Alarm 1 display.
2. Press the SET button on the top of the clock to choose the kind of alarm you want for
Alarm 1.
Press once to turn on the audible alarm on for Alarm 1. The
icon appears in the
display.
Press twice to turn on both the bed shaker and audible alarm for Alarm 1. The
and
icons appear in the display.
Press three times to turn on the bed shaker alarm only (no audible alarm) for Alarm 1.
The
icon appears in the display.
Press four times to turn Alarm 1 off completely.
3. To turn on Alarm 2, press ALARM twice in step one to view Alarm 2. Then repeat step 2.
Notes:
• The alarm sounds for one minute when activated.
• Press SNOOZE/LIGHT to activate snooze. The alarm indicator remains on the clock
display. Press any other key to turn the alarm off completely.
Adjusting Display Brightness
The clock display offers three levels of brightness: high, low, and off.
To adjust the display brightness: Press the LIGHT/SNOOZE button on the top of the clock.
Using the Nap Timer
The bed shaker clock offers a nap timer of 10 minutes, after which the alarm goes off. You
can also change the amount of time on the nap timer (between 5 minutes and 2 hours).
To turn the nap timer on/off: Press the NAP button on the top of the clock.
To change the nap timer time: Press and hold the NAP button on the top of the clock until
the nap timer minutes start ashing. Press the + or — buttons to increase or decrease the
timer by 5 minutes.
Clock , back
Battery compartment
DC 5V
jack
Step 2: Set the Date, Time, and
Clock Preferences
When you rst plug it in, the bed shaker
clock’s display shows 00:00.
1. Press the + button on the top of the
clock to switch between 12- and 24-hour
time formats (for example, 5:00 pm in 12-hour format would be 17:00 in 24-hour format).
By default, the clock uses the 24-hour format.
2. Press and hold the SET button on the top of the clock to enter time/date/preferences set
mode. The middle part of the display shows “English,” the default language for the clock
display. For each setting, use the + and — buttons to adjust. Then press SET to proceed.
These settings go in the following order:
Display language: Use + and — to adjust, SET to set it and proceed.
Audio feedback (beep): Use + and — to adjust, SET to set it and proceed.
Hour: Use + and — to adjust, SET to set it and proceed.
Minutes: Use + and — to adjust, SET to set it and proceed.
Year: Use + and — to adjust, SET to set it and proceed.
Month: Use + and — to adjust, SET to set it and proceed.
Date: Use + and — to adjust, SET to set it and proceed.
Temperature preference (Fahrenheit/Celsius): Use + and — to adjust, SET to set it and
proceed.
Snooze time: Use + and — to adjust, SET to set it and exit date/time/preference settings.
Step 3: Plug in and Place the Bed Shaker
1. Plug the bed shaker’s cable into the Bed Shaker port on
the front of the clock.
2. Place the bed shaker where you want to use it (for
example, between your mattress and box spring or under
your pillow).
Charging
1A
Bed Shaker
Clock , front
Tour of the Bed shaker Alarm Clock
Top
+ and — buttons adjust the current parameter
when setting. + switches the time display
between 12- and 24-hour formats.
ALARM button accesses the alarm displays.
Press and hold when an alarm time is displayed to start adjusting it.
NAP button starts a nap timer for 10 minutes. Press and hold to adjust the nap timer time.
SET button lets you adjust the time and date, or turn audible and bed shaker alarms on or
off. Press and hold to adjust the currently displayed parameter in setup mode. Press when an
alarm time is displayed to turn the audible and bed shaker alarms on and off.
LIGHT/SNOOZE button snoozes the alarm when it’s sounding and activates the display
backlight when the clock is running on battery power. It cycles through the displays three
brightness settings when the clock is plugged in.
Front
Bed Shaker connects to the provided bed shaker
and allows the clock to send bed shaker alarms.
The clock must be plugged in to send bed shaker
alarms.
Charging provides USB charging power for your phone or other portable devices. The clock
must be plugged in to provide charging power.
Display
and icons indicate that audible Alarms 1 and/
or 2 are turned on.
icon indicates that a bed shaker alarm is turned
on for Alarm 1 and/or 2.
AM / PM shows that the time displayed is AM or PM
(does not apply to 24-hour format).
Time digits show the current time or alarm time (or
setting values when adjusting).
Day and Date indicator shows the day of the week
and the date. This area shows the Alarm number and status when setting alarm time. It shows
the Nap timer time when this timer is active.
CHARGING icons show when a device is charging from the clock’s charging port.
INDOOR shows the current ambient indoor temperature and humidity.
Clock , back
Battery compartment
DC 5V
jack
Back
Battery compartment holds 3 AAA
batteries (not included) to power the clock.
DC 5V jack connects to the provided power
adapter to power the bed shaker alarm
clock.
Clock, top panel
Clock, front panel
Charging
1A
Bed Shaker
Réveil vibrant
Guide de l’utilisateur
Guide de démarrage
Étape 1 : Installation des piles ou branchement
Il est possible d’alimenter le réveil vibrant en installant
3 piles AAA (non incluses) ou en branchant l’adaptateur
d’alimentation sur une prise secteur opérationnelle.
Installation des piles :
1. Ouvrir le compartiment à piles situé au dos du réveil.
2. Insérer les trois piles AAA (non incluses). Respecter les
indications + et - imprimées dans le compartiment.
3. Refermer le compartiment à piles.
Remarque : Lorsque le réveil vibrant fonctionne
uniquement sur piles (c’est-à-dire lorsqu’il n’est pas
branché), l’afchage s’éteint au bout de 8 secondes
pour prolonger la durée de vie des piles. Pour réactiver
l’afchage, appuyer sur le bouton LIGHT/SNOOZE. Le coussinet vibrant et le chargement
USB ne fonctionnent pas sur piles.
Précautions à propos des piles : Toujours enlever les piles anciennes, faibles ou usagées et les
recycler rapidement ou les mettre au rebut en conformité avec les réglementations locales et
nationales.
Pour utiliser l’adaptateur d’alimentation :
1. Brancher l’adaptateur d’alimentation inclus dans la prise DC 5V (5 V c.c.) située sur le côté
gauche du réveil.
2. Brancher l’autre extrémité sur une prise secteur opérationnelle.
CONSEIL : L’installation de piles est une bonne idée, même si le réveil est branché pour
l’alimenter. Les piles permettent de sauvegarder les réglages (comme l’heure et l’alarme)
même en cas de coupure de courant.
Arrière du réveil
Compartiment à
piles
Prise 5 V
c.c.
Étape 2 : Conguration de la date, de
l’heure et des préférences du réveil
Lorsqu’il est branché pour la première fois,
l’écran du réveil indique00:00.
1. Appuyer sur le bouton + sur le dessus
du réveil pour basculer entre les formats
horaires 12 heures et 24 heures (par exemple, 5:00 pm au format 12 heures correspond à
17:00 heures au format 24 heures). Par défaut, le réveil utilise le format 24 heures.
2. Appuyer sur le bouton SET sur le dessus du réveil et le maintenir enfoncé pour entrer en
mode de réglage de l’heure, de la date et autres préférences. La partie centrale de l’écran
afche « English », la langue par défaut d’afchage du réveil. Pour chaque paramètre,
utiliser les boutons + et — pour le réglage. Puis appuyer sur SET pour continuer. Ces
réglages s’effectuent dans l’ordre suivant :
Langued’afchage: Utiliser les boutons + et — pour le réglage, SET pour conrmer et
continuer.
Retour audio (bip) : Utiliser les boutons + et — pour le réglage, SET pour conrmer et
continuer.
Heure : Utiliser les boutons + et — pour le réglage, SET pour conrmer et continuer.
Minutes : Utiliser les boutons + et — pour le réglage, SET pour conrmer et continuer.
Année : Utiliser les boutons + et — pour le réglage, SET pour conrmer et continuer.
Mois : Utiliser les boutons + et — pour le réglage, SET pour conrmer et continuer.
Date : Utiliser les boutons + et — pour le réglage, SET pour conrmer et continuer.
Préférence de température (Fahrenheit/Celsius) : Utiliser les boutons + et — pour le
réglage, SET pour conrmer et continuer.
Durée de répétition : Utiliser les boutons + et — pour le réglage, SET pour conrmer et
quitter le mode de réglage de la date, de l’heure et autres préférences.
Utilisation quotidienne
Réglage des alarmes
1. Pendant que le réveil afche l’heure, appuyer sur le
bouton ALARM pour passer à l’afchage de l’alarme
1. 6:30 ALARM 1 OFF (Alarme 1 désactivée)
apparaît sur l’écran du réveil.
2. Appuyer et maintenir enfoncé le bouton ALARM
jusqu’à ce que les chiffres des heures commencent à
clignoter.
3. Utiliser sur les boutons + et — situés sur le dessus du
réveil pour régler l’heure de l’alarme. Appuyer sur le
bouton ALARM pour conrmer et passer au réglage
des minutes.
4. Utiliser les boutons + et — pour régler les minutes de l’alarme. Appuyer sur le bouton
ALARM pour conrmer.
5. Pour régler l’alarme 2, appuyer deux fois sur la touche ALARM à l’étape 1 pour visualiser
l’alarme 2. Ensuite, répéter les étapes 2 à 4.
Activation de l’alarme sonore et du coussinet vibrant
1. Pendant que le réveil afche l’heure, appuyer sur le bouton ALARM sur le dessus du
réveil pour passer à l’afchage de l’alarme 1.
2. Appuyer sur le bouton SET sur le dessus du réveil pour choisir le type d’alarme souhaitée
pour l’alarme 1.
Appuyer une fois pour activer l’alarme sonore pour l’alarme 1. L’icône apparaît sur
l’écran.
Appuyer deux fois pour activer à la fois le coussinet vibrant et l’alarme sonore de
l’alarme 1. Les icônes
et apparaissent sur l’écran.
Appuyer trois fois pour activer le coussinet vibrant seulement (pas d’alarme sonore) de
l’alarme 1. L’icône apparaît sur l’écran.
Appuyer quatre fois pour désactiver complètement l’alarme 1.
3. Pour activer l’alarme 2, appuyer deux fois sur la touche ALARM à l’étape 1 pour visualiser
l’alarme 2. Ensuite, répéter l’étape 2.
Remarques :
• L’alarme retentit pendant une minute lorsqu’elle est activée.
• Appuyer sur LIGHT/SNOOZE pour activer la répétition. L’indicateur d’alarme reste afché sur
l’écran du réveil. Un appui sur n’importe quel autre bouton désactive complètement l’alarme.
Réglage de la luminosité de l’afchage
L’écran du réveil offre trois niveaux de luminosité : élevé, bas et éteint.
Pour modier la luminosité de l’afchage : Appuyer sur le bouton LIGHT/SNOOZE situé
sur le dessus du réveil.
Utilisation de la minuterie de sieste
Le réveil vibrant offre une minuterie de 10 minutes pour la sieste, après quoi l’alarme se
déclenche. Il est possible aussi de modier la durée de la minuterie de sieste (entre 5
minutes et 2 heures).
Pour activer / désactiver la minuterie de sieste : Appuyer sur le bouton NAP (Sieste) situé
sur le dessus du réveil.
Pour modier la durée de la minuterie de sieste : Appuyer et maintenir enfoncé le
bouton NAP sur le dessus du réveil jusqu’à ce que les minutes de la minuterie de sieste
commencent à clignoter. Appuyer sur les boutons + ou – pour augmenter ou diminuer la
durée de la minuterie de 5 minutes.
Étape 3 : Brancher et placer le coussinet vibrant
1. Brancher le câble du coussinet vibrant dans le port du Bed
Shaker (Coussinet vibrant) à l’avant du réveil.
2. Placer le coussinet vibrant à l’endroit souhaité pour son
utilisation (par exemple, entre le matelas et le sommier ou
sous l’oreiller).
Charging
1A
Bed Shaker
Avant du
réveil
Présentation du réveil vibrant
Dessus
Les boutons + et — permettent de régler le
paramètre actuel lors du réglage. Le bouton
+ permet de faire passer l’afchage de l’heure
aux formats 12 et 24 heures.
Le bouton ALARM permet d’accéder aux afchages de l’alarme. Appuyer sur le bouton et le
maintenir enfoncé lorsqu’une heure d’alarme est afchée pour commencer à la régler.
Le bouton NAP lance une minuterie de sieste de 10 minutes. Appuyer sur le bouton et le
maintenir enfoncé pour modier la durée de la minuterie de sieste.
Le bouton SET permet de régler l’heure et la date, ou d’activer ou de désactiver les alarmes
sonores et du coussinet vibrant. Appuyer et maintenir enfoncé ce bouton pour régler le
paramètre afché en mode de conguration. Appuyer sur ce bouton lorsqu’une heure
d’alarme est afchée pour activer ou désactiver l’alarme sonore et celle du coussinet vibrant.
Le bouton LIGHT/SNOOZE permet d’effectuer la répétition de l’alarme lorsqu’elle est
activée et d’activer le rétro-éclairage de l’afchage lorsque le réveil fonctionne sur piles. Il fait
déler les trois réglages de luminosité de l’afchage lorsque le réveil est branché.
Devant
La prise Bed Shaker (Coussinet vibrant) permet de con-
necter le coussinet vibrant fourni et permet au réveil de
lui envoyer les alarmes. Le réveil doit être branché pour
permettre l’envoi d’alarmes au coussinet vibrant.
La prise Charging (Chargement) procure une alimentation USB pour charger un téléphone
ou d’autres appareils portables. Le réveil doit être branché pour permettre une alimentation
de chargement.
Écran
Les icônes et indiquent que les alarmes son-
ores 1 et/ou 2 sont activées.
L’icône
indique qu’une alarme de coussinet
vibrant est activée pour l’alarme 1 et/ou 2.
L’indicateur AM/PM indiquent si l’heure afchée est
AM (Matin) ou PM (Après-midi) (ne s’applique pas au
format 24 heures).
Les chiffres de l’heure indiquent l’heure actuelle,
l’heure de l’alarme (ou les valeurs de réglage lors de
l’ajustement).
Les indicateurs de jours et de date indiquent le jour de la semaine et la date. Cette zone
indique le numéro et l’état de l’alarme lors du réglage de l’heure de l’alarme. Elle indique
l’heure de la sieste lorsque cette minuterie est active.
Les icônes CHARGING (Chargement) indiquent lorsqu’un appareil se charge à partir du
port de chargement du réveil.
INDOOR (Intérieur) indique la température et l’humidité intérieures actuelles.
Arrière du réveil
Compartiment à
piles
Prise 5 V
c.c.
Dos
Le compartiment à piles contient 3 piles
AAA (non incluses) pour alimenter le réveil.
La prise DC 5V (5 V c.c.) permet de connect-
er l’adaptateur d’alimentation fourni pour
alimenter le réveil vibrant.
Réveil, panneau supérieur
Réveil, panneau avant
Charging
1A
Bed Shaker
Reloj despertador con vibrador de cama
Guía de usuario
Primeros pasos
Paso 1: Instale las baterías o enchufe
Puede proporcionar alimentación al reloj despertador
con vibrador de cama colocando 3 baterías “AAA” (no
incluidas) o enchufando el adaptador de alimentación en
un tomacorriente de alimentación en funcionamiento.
Para instalar las baterías:
1. Abra el compartimiento de las baterías ubicado en la
parte posterior del reloj.
2. Inserte las 3 baterías “AAA” (no incluidas). Respete las
polaridades “+” y “–” impresas en el compartimiento.
3. Cierre el compartimiento de las baterías.
Nota: Cuando el reloj despertador con vibrador de cama
esté funcionando solo con las baterías (es decir, cuando no
esté enchufado), la pantalla se apagará luego de 8 segundos para extender la duración de
las baterías. Para volver a encender la pantalla, oprima el botón LIGHT/SNOOZE. El vibrador
de cama y la carga USB no funcionarán con la alimentación a baterías.
Precaución sobre las baterías: Extraiga siempre las baterías antiguas, con poca carga o agotadas
por completo y recíclelas o deséchelas de acuerdo con las regulaciones locales y nacionales.
Para utilizar el adaptador de alimentación:
1. Conecte el adaptador de alimentación incluido al conector de CC de 5 V ubicado en el
lado izquierdo del reloj.
2. Enchufe el otro extremo en un tomacorriente de alimentación en funcionamiento.
CONSEJO: La instalación de las baterías es una buena idea, incluso si enchufa el reloj para
su alimentación. Las baterías permitirán garantizar que se conserven sus ajustes (como la
hora y la alarma) incluso si existe un corte en el suministro eléctrico.
Reloj, parte posterior
Compartimiento de
las baterías
Conector
de CC de
5 V
Paso 2: Ajuste las preferencias de
fecha, hora y reloj
Cuando enchufe por primera vez el reloj con
vibrador de cama, el reloj mostrará 00:00.
1. Oprima el botón + ubicado en la parte
superior del reloj para cambiar entre los
formatos de hora de 12 y 24 horas (por ejemplo, las 5:00 p. m. en el formato de 12 horas
serán las 17:00 en el formato de 24 horas). De forma predeterminada, el reloj utiliza el
formato de 24 horas.
2. Mantenga oprimido el botón SET ubicado en la parte superior del reloj para ingresar en
el modo de hora/fecha/preferencias. La parte central de la pantalla muestra “English”,
el idioma predeterminado para la pantalla del reloj. Para cada conguración, utilice los
botones + y — para ajustar. A continuación, oprima SET para continuar. Estos ajustes
tendrán el siguiente orden:
Idioma de visualización: utilice + y — para ajustar y SET para establecer y continuar.
Respuesta con audio (pitido): utilice + y — para ajustar y SET para establecer y
continuar.
Hora: utilice + y — para ajustar y SET para establecer y continuar.
Minutos: utilice + y — para ajustar y SET para establecer y continuar.
Año: utilice + y — para ajustar y SET para establecer y continuar.
Mes: utilice + y — para ajustar y SET para establecer y continuar.
Fecha: utilice + y — para ajustar y SET para establecer y continuar.
Preferencia de temperatura (Fahrenheit/Celsius): utilice + y — para ajustar y SET para
establecer y continuar.
Tiempo de repetición de alarma: utilice + y — para ajustar y SET para establecer y salir
de la conguración de fecha/hora/preferencias.
Uso diario
Ajuste de las alarmas
1. Mientras el reloj esté mostrando la hora, oprima
el botón ALARM ubicado en la parte superior del
reloj para regresar a la pantalla de la alarma 1. 6:30
ALARM 1 OFF aparecerá en la pantalla del reloj.
2. Mantenga oprimido el botón ALARM hasta que los
dígitos de hora comiencen a parpadear.
3. Utilice los botones + y — ubicados en la parte
superior del reloj para ajustar la hora para la alarma.
Oprima el botón ALARM para establecer y moverse
a los minutos.
4. Utilice los botones + y — para ajustar los minutos para la alarma. Oprima el botón ALARM
para jar la alarma.
5. Para jar la alarma 2, oprima ALARM dos veces en el paso 1 para ver la alarma 2. A
continuación, repita los pasos 2 a 4.
Activación de las alarmas sonoras y del vibrador de cama
1. Mientras el reloj esté mostrando la hora, oprima el botón ALARM ubicado en la parte
superior del reloj para regresar a la pantalla de la alarma 1.
2. Oprima el botón SET ubicado en la parte superior del reloj para elegir el tipo de alarma
que desea para la alarma 1.
Oprima una vez para activar la alarma sonora para la alarma 1. Aparecerá en la pantalla
el icono
.
Oprima dos veces para activar el vibrador de cama y la alarma sonora para la alarma 1.
Aparecerán los iconos y .
Oprima tres veces para activar solo el vibrador de cama (sin alarma sonora) para la
alarma 1. Aparecerá en la pantalla el icono .
Oprima cuatro veces para desactivar por completo la alarma 1.
3. Para activar la alarma 2, oprima ALARM dos veces en el paso 1 para ver la alarma 2. A
continuación, repita los el paso 2.
Notas:
• La alarma suena durante 1 minuto cuando está activada.
• Oprima LIGHT/SNOOZE para activar la repetición de alarma. El indicador de alarma
seguirá apareciendo en la pantalla del reloj. Oprima cualquier otro botón para apagar por
completo la alarma.
Ajuste del brillo de la pantalla
La pantalla del reloj posee 3 niveles de brillo: alto, bajo y apagada.
Para ajustar el brillo de la pantalla: oprima el botón LIGHT/SNOOZE ubicado en la parte
superior del reloj.
Uso del temporizador de siesta
El reloj despertador con vibrador de cama ofrece un temporizador de siesta de 10 minutos,
después de que se apaga la alarma. También puede cambiar la cantidad de tiempo del
temporizador de siesta (entre 5 minutos y 2 horas).
Para activar/desactivar el temporizador de siesta: oprima el botón NAP (SIESTA) ubicado
en la parte superior del reloj.
Para cambiar el tiempo del temporizador de siesta: mantenga oprimido el botón NAP
ubicado en la parte superior del reloj hasta que los minutos del temporizador de sistema
comiencen a parpadear. Oprima los botones + o — para aumentar o reducir el temporizador
en 5 minutos.
Paso 3: Conecte y coloque el vibrador de cama
1. Conecte el cable del vibrador de cama en el puerto Bed
Shaker (Vibrador de cama) ubicado en la parte frontal del
reloj.
2. Coloque el vibrador de cama donde desea utilizarlo (por
ejemplo, entre el colchón y la caja de resortes o debajo de su
almohada).
Charging
1A
Bed Shaker
Reloj, parte
frontal
Recorrido por el reloj despertador con vibrador de cama
Parte superior
Los botones + y — permiten ajustar el
parámetro actual durante la conguración.
+ permite cambiar la visualización entre los
formatos de 12 y 24 horas.
El botón ALARM permite acceder a las
pantallas de alarma. Mantenga oprimido cuando se esté visualizando la hora de una alarma
para comenzar a realizar el ajuste.
El botón NAP permite activar un temporizador de siesta de 10 minutos. Mantenga oprimido
para cambiar el tiempo del temporizador de siesta
El botón SET le permite ajustar la fecha y hora, o activar y desactivar las alarmas sonoras
y del vibrador de cama. Manténgalo oprimido para ajustar el parámetro actualmente
visualizado en el modo de conguración. Pulse durante la visualización de la hora de una
alarma para activar y desactivar las alarmas sonoras y del vibrador de cama
El botón LIGHT/SNOOZE permite activa la función de repetición de alarma cuando está
sonando y activar la retroiluminación de la pantalla cuando el reloj está funcionando con la
alimentación de las baterías. Cuando el reloj está enchufado, permite cambiar entre las 3
conguraciones de brillo de la pantalla.
Parte frontal
Bed Shaker (Vibrador de cama) permite la conexión con
el vibrador de cama suministrado y permite al reloj enviar
alarmas del vibrador de cama. El reloj deberá estar ench-
ufado para poder enviar alarmas del vibrador de cama.
Charging (Carga) ofrece alimentación de carga USB para su teléfono u otros dispositivos
portátiles. El reloj deberá estar enchufado para poder ofrecer la funcionalidad de ali-
mentación de carga.
Pantalla
Los iconos y indican que las alarmas 1 y/o 2
están activadas.
El icono
indica que se activó el vibrador de cama
para la alarma 1 y/o 2.
AM/PM muestra que la hora visualizada corresponde
a AM o PM (no se aplica al formato de 24 horas).
Los dígitos de hora muestran la hora actual o la hora
de la alarma (o los valores de conguración al ajustar).
El indicador de día y fecha muestra el día de la sem-
ana y la fecha. Esta área muestra el número de alarma
y su estado al ajustar la hora de la alarma. Muestra el tiempo del temporizador de siesta
cuando está activado este temporizador.
Los iconos CHARGING (CARGANDO) aparecen cuando se está cargando un dispositivo en
el puerto de carga del reloj.
INDOOR (INTERIOR) muestra la temperatura y humedad interiores actuales.
Reloj, parte posterior
Compartimiento de
las baterías
Conector
de CC de
5 V
Parte posterior
El compartimiento de las baterías permite
colocar 3 baterías “AAA” (no incluidas) para
la alimentación del reloj.
El conector de CC de 5 V permite la conex-
ión con el adaptador de alimentación sumi-
nistrado para alimentar al reloj despertador
con vibrador de cama.
Reloj, panel superior
Reloj, panel frontal
Charging
1A
Bed Shaker
RCDV10 IB 02
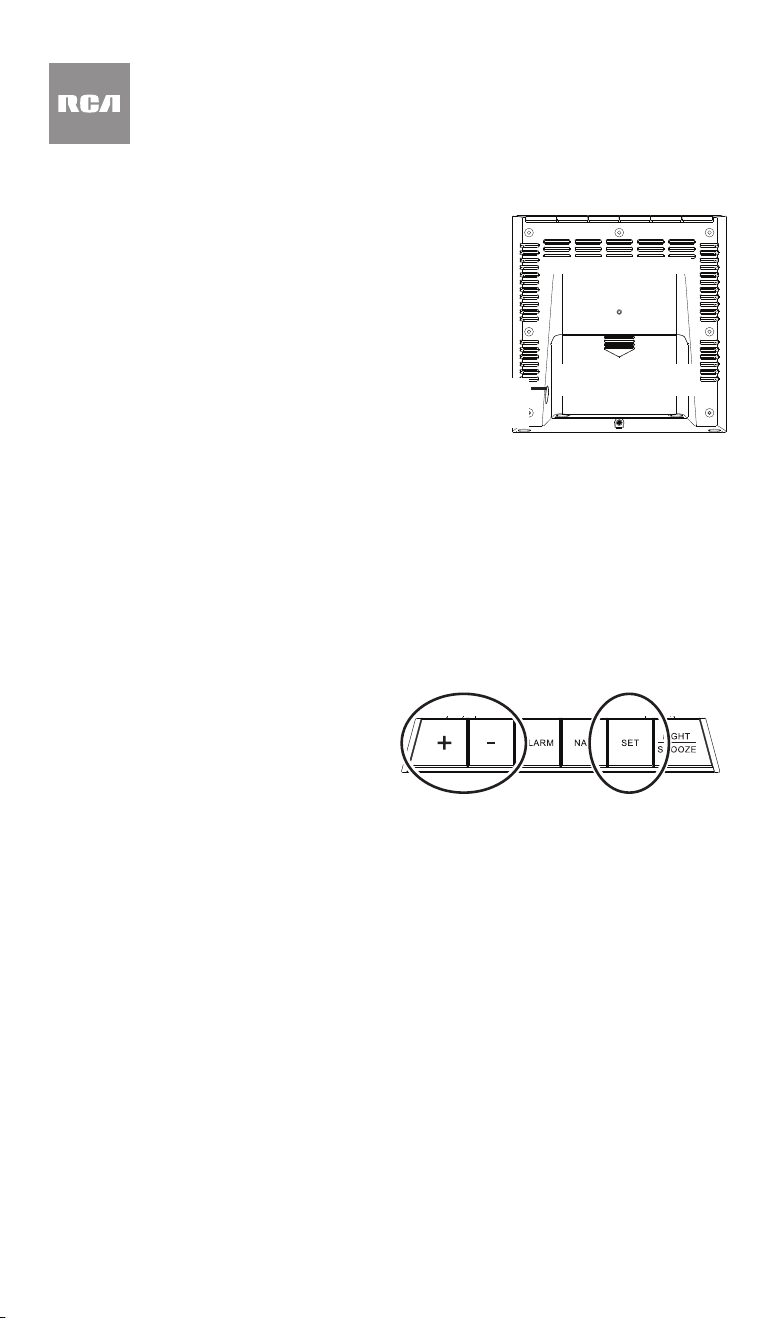
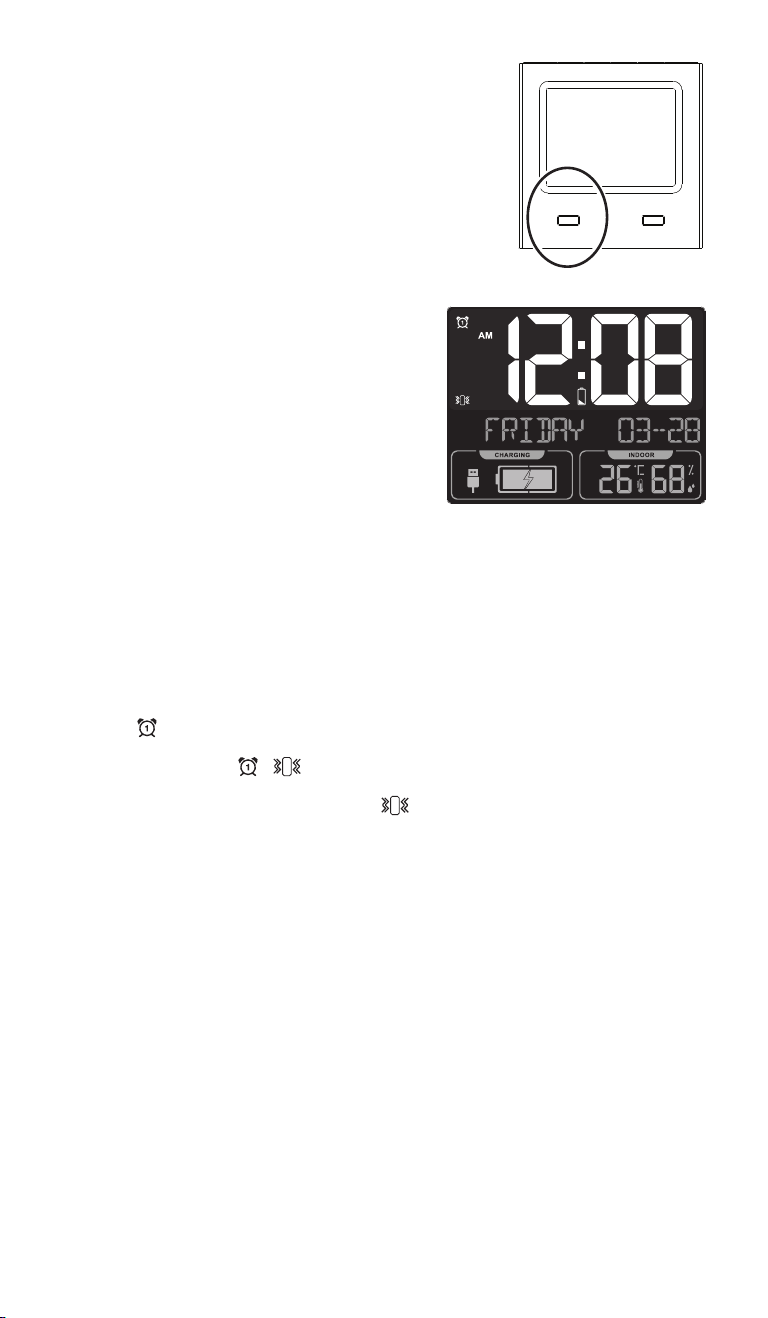
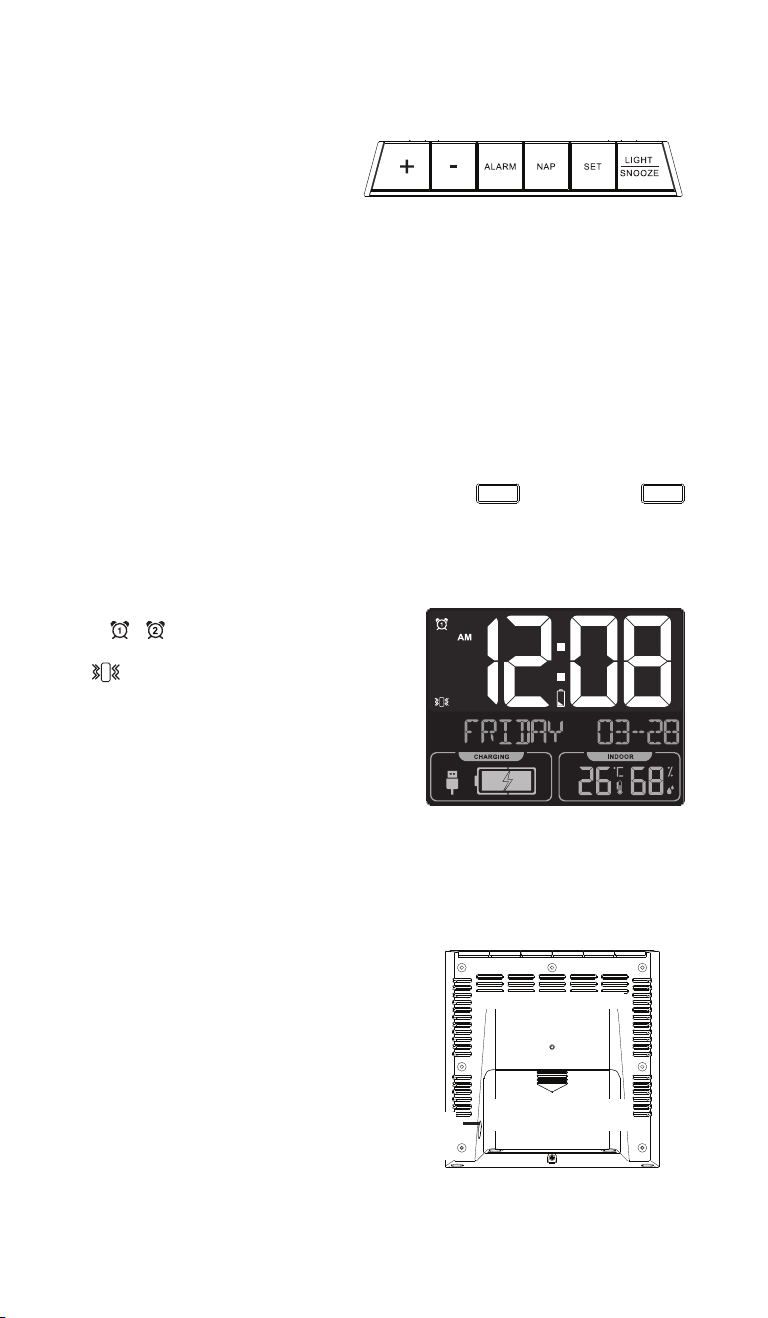