Use & Care Manual for Refrigerator
Features
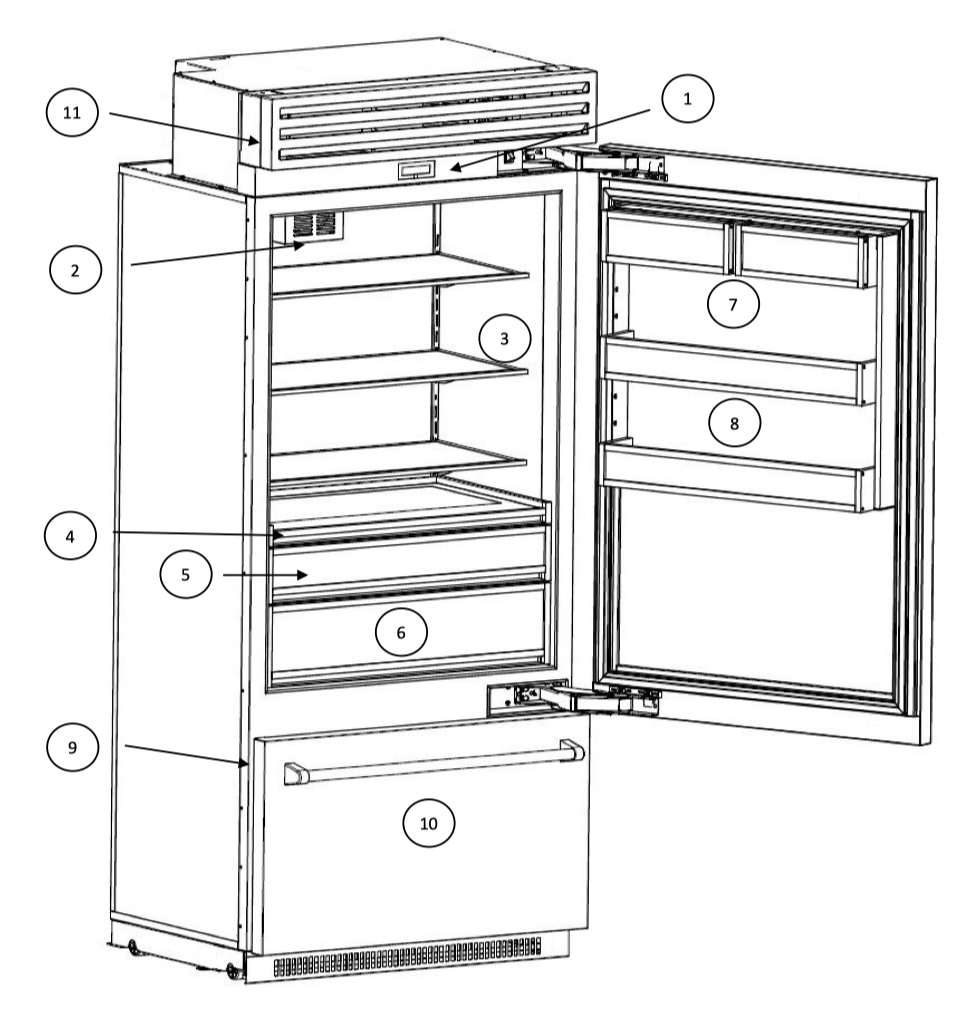
1 Electronic Control
2 Air Filter
3 Glass Shelves
4 Pull-out Tray
5 Deli Drawer
6 Crisper Drawer
7 Dairy Bins
8 Door Bins
9 Ice Maker
10 Freezer Bins
11 Water Filter (behind top grille)
Electronic Control
Home Screen
Displays the freezer and refrigerator temperatures.

Change Temperature Setting
Press and hold either the refrigerator or freezer temperature setting for two seconds. After two seconds, the control will display the temperature setting with up and down arrows. Press the up or down arrow to establish the new temperature setting. Press and hold the new setting for two seconds to confirm it. Once the new setting is confirmed, the control will default to the home screen.
Refrigerator

Freezer

Main Options
Swipe right or left to access the main options.
Max Ice
 Increases ice production by 50%. Returns to normal ice production after 24 hours. When Max Ice is activated, the icon is illuminated.
Water Filter
 Resets the water filter. Press and hold for two seconds to reset the filter. The remaining percentage is displayed to the right of the icon.
Sabbath Mode
 Enables or disables Sabbath mode. Press and hold for two seconds to enable Sabbath mode. When Sabbath mode is enabled, the home screen will display the icon. Press and hold for two seconds to disable Sabbath mode.
Settings
 Accesses the settings options.
Setting Options
Ice Maker
 Turns the ice maker off or on. The ice maker is shipped on with the bale arm on the ice maker in the on (lowest) position. When the ice maker is on, the icon is illuminated.
Alarm
 Turns the audible door and high temperature alarm off or on.
Fahrenheit or Celsius
 Changes the temperature scale. Press to toggle between Fahrenheit and Celsius. The selected scale is illuminated.
Alarms
Door Alarm
Sounds continuously when the refrigerator or freezer door is open for more than five minutes. Shut the refrigerator or freezer door to stop the alarm.
High Temperature Alarm
Sounds continuously when either the refrigerator temperature exceeds 50° or the freezer exceeds 20° for more than three hours. The home screen will flash a series of dashes in place of the refrigerator and/or freezer temperature until the temperature reaches the set temperature.
Service
The electronic control continually manages the refrigerator’s operating system. If there is an issue with the operating system, the home screen will display “Call for Service” and a series of dashes will flash in place of the refrigerator and freezer temperatures. Please call 877.427.3920 to schedule a service call.
Refrigerator Features
Important Information
Glass shelves and drawers are heavy as they are made of glass and metal. Use special care when removing them to avoid impact from dropping.
Glass Shelves
These spill proof shelves adjust to meet individual needs and create an invisible barrier to contain spills.
Important Information
Do not clean glass with warm water when it is cold. Glass may break if exposed to sudden temperature changes or impact, such as bumping. For your protection, tempered glass is designed to shatter into many small, pebble-size pieces, which is normal.
- Remove: Lift the front of the shelf with one hand while supporting the back with the other hand. Lift the back of the shelf out of the shelf support. Pull the shelf straight out.
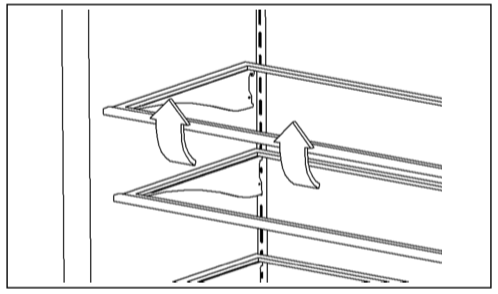
- Replace: Guide the rear shelf hooks into the shelf supports. Tilt the front of the shelf up until the rear shelf hooks drop in the shelf supports. Lower the front the of shelf and check to make sure that the shelf is securely in position.
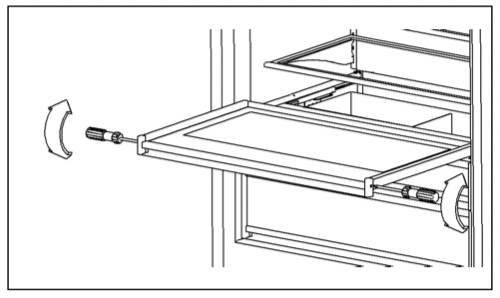
Pull-Out Tray
- Remove: Pull the tray forward until it stops. Remove the glass by lifting it from underneath the tray. Remove the Phillips screws from both sides of the tray (near the front). Slide the tray forward to release it from the rear hooks on the slides.
- Replace: Extend the slides. Align the tray on the slides and push back until the tray engages the rear hooks on the slides. Replace the Phillips screws on both sides of the tray (near the front). Do not over-tighten the screws. Set glass on top of the tray.
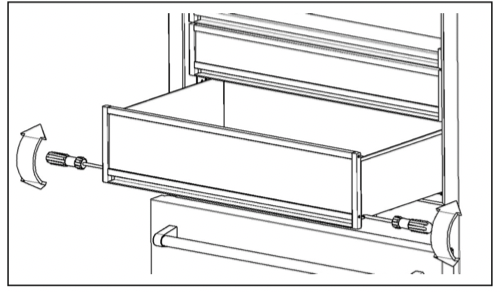
Deli and Crisper Drawers
- Remove: Pull the drawer forward until it stops. Remove the Phillips screws from both sides of the drawer (near the front). Slide the drawer forward to release it from the rear hooks on the slides.
- Replace: Extend the slides. Align the drawer on the slides and push back until the drawer engages the rear hooks on the slides. Replace the Phillips screws on both sides of the drawer (near the front). Do not over-tighten the screws.
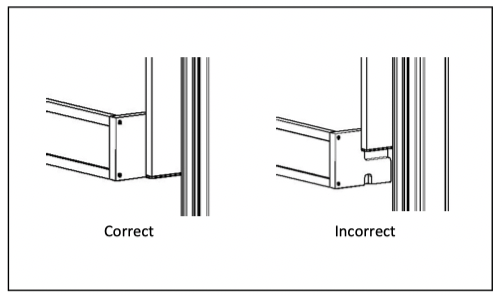
Dairy and Door Bins
- Remove: Lift the bin up and pull it out.
- Replace: Place the bin over the pegs in the door and lower it in place. Check to make sure the bin is securely in position.

If placing a door bin in the lowest position, confirm the two pegs are engaged on each side and the bottom of the door bin does not hang below the side walls.
Freezer Features
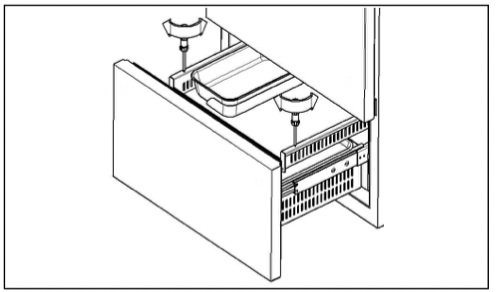
Upper Drawer
Important Information
Drawers are heavy as they are made of metal. Use special care when removing them to avoid impact from dropping.
- Remove: Pull the drawer forward until it stops. Remove the Phillips screws from both sides of the drawer (near the front). Slide the drawer forward to release it from the rear hooks on the slides.
- Replace: Extend the slides. Align the drawer on the slides and push back until the drawer engages the rear hooks on the slides. Replace the Phillips screws on both sides of the drawer (near the front). Do not over-tighten the screws.
Ice Maker
The ice maker will produce approximately 2 1/2 pounds of ice every 24 hours.
When the refrigerator is shipped, the ice maker setting in the electronic control is on and the bale arm on the ice maker is in the on (lowest) position. Both the electronic control and the bale arm must be on for the ice maker to produce ice.
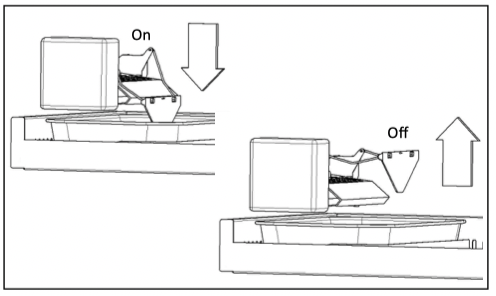
After initially connecting the ice maker to the water line, discard the first two full pans of ice as the ice may contain air or impurities from the water line.
Operation
Top Grille
The top grille lifts up for easy access to the power switch (on the right) and the water filter (on the left). Lift the top grille by pulling out the bottom edge of the grille and rotating it upwards.
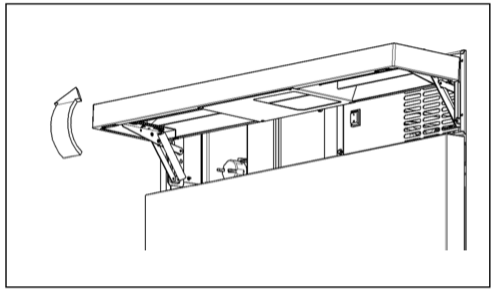
Power Switch
The power switch turns your refrigerator off or on.
Water Filter
WARNING
To reduce the risk associated with the ingestion of contaminants, DO NOT use with water that is microbiologically unsafe or of unknown quality without adequate disinfection before or after the system. Systems certified for cyst reduction may be used on disinfected water that may container filterable cysts.
EPA Establishment 070595-MEX-001.
The water filter, AP2-200G, supplies filtered water to the ice maker and is located behind the top grille. The filter is rated for 200 gallons or six months, whichever comes first.
A copy of the water filter data sheet is included with the filter and can also be found at bluestarcooking.com.
When using the water filter for the first time, discard the first two full pans of ice as the ice may contain air or impurities from the water line.
Replacement Filters
Important Information
Read and follow instructions before installation and use of this system. Change the water filter at the recommended interval; the water filter MUST be replaced every six months or sooner. Failure to replace the water filter at the recommended intervals may lead to reduced water filter performance and failure of the water filter, causing property damage from water leakage or flooding.
Replacement filters can be ordered at bluestarcooking.com or by calling customer service at 877.427.3920.
When the water filter needs to be replaced, the home screen will display the water filter icon until the water filter is reset.
1. Lift up the top grille to access the water filter.
2. Rotate the old filter counterclockwise a half turn and pull out. It is normal for a small amount of water to drip when the filter is removed. Wipe it up with a cloth or paper towel.
3. Remove the filter from the packaging.
4. Insert the new filter and rotate it clockwise a half turn.
5. Lower the top grille.
6. Press and hold the water filter icon on the main options screen for two seconds to reset the water filter.
7. Discard the first two full pans of ice as the ice may contain air or impurities from the water line.
If the water filter will not be used, a bypass plug is not necessary as there is an internal bypass circuit, which eliminates the need for a separate plug.
Air Filter
The air filter is located in the fan cover on the back wall of the refrigerator and is rated for six months.
- Remove: Pull the tab on the filter towards the right.
- Replace: Remove the filter from the packaging. Align the filter with the opening and slide it into the fan cover.
Replacement filters can be ordered at bluestarcooking.com or by calling customer service at 877.427.3920.
Lighting
Interior lighting in the refrigerator, deli and crisper drawers, and freezer is provided by LEDs. In the event one needs to be replaced, call 877.427.3920 to schedule a service call.
Sabbath Mode
Enable Sabbath mode on the electronic control.
- Swipe the display right or left to access the main options screen.
- Press and hold the Sabbath mode icon for two seconds. When Sabbath mode is enabled, the home screen will display the icon.
- Press and hold the Sabbath icon on the home screen for two seconds to disable Sabbath mode.
Vacation
For extended vacations, do the following:
- Turn the refrigerator off using the power switch, located behind the top grille on the right.
- Turn off the water supply to the refrigerator.
- Empty the refrigerator, including the ice pan.
- Block the doors open to let air circulate and keep the interior dry.
Care and Cleaning
Cleaning
Before cleaning, turn the refrigerator off using the power switch, located behind the top grille. When finished cleaning, turn the refrigerator on.
Stainless Steel Doors and Interior
Use a non-abrasive stainless steel cleaner and a soft cloth. Always follow the grain of the stainless steel.
Painted Doors and Other Surfaces
Use a mild solution of soap and water and a soft cloth.
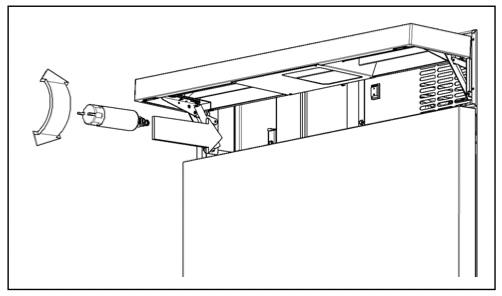
Condenser
CAUTION
Electrical Shock Hazard Turn power off before cleaning condenser. Vacuum in the direction of the fins to avoid damaging condenser fins. Failure to follow these instructions can result in death, electrical shock, or fire.
Clean the condenser every three to six months to ensure proper operation.
1. Lift up the top grille and turn the power off. The condenser is on the left.
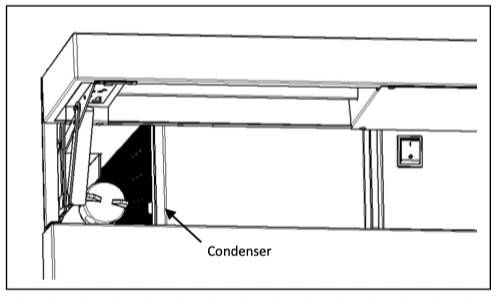
2. Use a soft bristle brush and vacuum to remove dust and lint from the condenser. Vacuum in the direction of the fins to avoid damaging the condenser.
3. Turn the power on and lower the top grille.
Troubleshooting
The refrigerator makes unusual noises.
- The following noises are normal:
- Buzzing when the water valve opens to fill the ice maker
- Clattering when ice is dropped from the ice maker into the stainless steel pan
- Whirring when the fans are operating
The refrigerator will not operate.
- Confirm the power switch, located behind the top grille, is on.
- Confirm the circuit breaker and electrical power to the refrigerator are on.
The lights are not working.
- Verify the doors are closed. If doors were left open, the lights turn off after ten minutes to eliminate excess heat.
The refrigerator seems to run too much or the temperature is too warm.
- If a large load of food was added, doors were opened frequently, or doors were left open, the compressors and fans will run to maintain the set temperature.
- Verify the doors are closed or closing properly.
- Confirm there are no tears in the gaskets. If there are tears in the gaskets, call service at 877.427.3290.
- Confirm whether the room temperature is hotter than normal. Increased ambient temperatures may cause compressors to run longer.
There is condensation, frost, or ice on the inside of the refrigerator and/or freezer.
- Verify the doors are closed.
- Confirm there are no tears in the gaskets. If there are tears in the gaskets, call service at 877.427.3290.
The ice maker is not making ice.
- Confirm the ice maker setting on the electronic control is on and the bale arm on the ice maker is in the on (lowest) position.
- Confirm the ice maker has been on for at least 24 hours.
- Verify the freezer temperature is 0°F.
- Confirm water to the refrigerator is turned on.
- Verify the water filter has been replaced and installed correctly.
The ice is sticking together in the ice bin.
- It is normal for ice to stick together if it has not been used frequently. Empty the ice bin.
The ice has a bad taste and/or odor.
- Throw away ice if it has not been used in a long time.
- Clean the freezer compartment.
- Verify the water filter has been replaced and installed correctly.
The refrigerator has an odor.
- Confirm food is adequately covered as uncovered food could create odors.
- Clean the refrigerator thoroughly.
If assistance is still required, please call service at 877.427.3290.