• The Waterbox will be pre-assembled to the base. To fill, pull open the plastic cap on top of the waterbox and fill with water or sand. Place the plastic cap back on top. You may find it easier to ill the waterbox prior to attaching wheels.
Step 2:
• Align holes in the wheel assembly with the holes in the base, then insert two small bolts through the holes and hand tighten. Make sure that the wheel assembly is parallel to the base, then tighten the bolts with the wrench.
Step 3:
• Align the holes in the bottom of the post support (I) and base, then secure with a small bolt (hand tighten). Repeat with the other two post supports, then tighten all bolts with the wrench.
Step 4:
• Align the holes in the lower post (G) with the holes in the tops of the post supports. Insert a large bolt through each hole, then secure with a small flange nut. Tighten with the wrench after all bolts have been inserted.
Step 5:
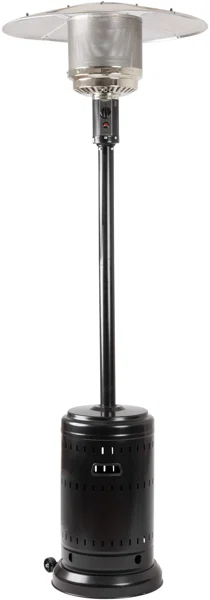
• Insert the tank housing (D) onto the upper post and lower it until it rests on the base.
Step 6:
• Screw the upper post (F) onto the lower post.
Step 7:
• Insert the reflector studs into the large flat washers, then push them into the holes on the top of the head assembly (C).
Step 8:
Small screw (4) Cap nut (4)
• Note: Make sure that you remove the protective plastic covering on the reflector pieces before assembly!
• Slide two of the reflector panels together, then insert one small screw and loosely screw on a cap nut. Add the third and fourth reflector panels to the assembly.
Small screw (8) Cap nut (8)
• Slide the reflector center cap (B) onto the assembled reflector panels. Insert one small screw and loosely screw on a cap nut. Repeat with two more small screws and cap nuts to complete reflector assembly. Fully tighten all screws and cap nuts.
• Assembly Tip: If the reflector sections aren't aligning, loosen each screw before further assembly and retighten after the sections are aligned.
Step 9:
• While supporting the heater, tilt the head assembly and slide three large flat washers over the reflector studs. Place the reflector assembly onto the reflector studs, then slide three more large flat washers over the reflector studs and onto the reflector assembly. Secure wfth three wing nuts.
Step 10:
• Attach head assembly (C) to upper post (F),
• Route the gas hose (0 down through the post assembly, then place the head assembly on the upper post, making sure that the screw holes on the head assembly align with the holes in the upper post (the control knob should be opposite side of the wheels).
• Insert the four small bolts and lock washers and tighten securely.
Step 11:
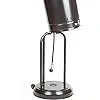
• Lift the tank housing up and rest a standard 20 lb. propane tank (sold separately) on the top of the assembled post supports.
• Screw the regulator onto the gas hose (be careful nottocross-thread) and hand-tighten securely, then tighten with a wrench.
• Attach the regulator to the valve on the propane tank and hand-tighten securely.
• Move the propane tank onto base of the heater. Secure the propane tank by attaching the chain to the post supports. Lower the tank housing.
NOTICE: Onlyuse a standard 20 lb. propane tank with this heater. Use this heater only with a propane vapor withdrawal supply system. See chapter 5 of the standard for storage and handling of liquefied petroleum gas, ANSI/NFPA 58. Your local library or fire department should have this book.
Step 12:
• Perform a leak test.
WARNING
Perform all leak tests outdoors.
Extinguish all open flames.
NEVER leak test when smoking.
Do not use heater until all connections have been leak tested and show no signs of leakage.
• Make 2-3 oz. of leak test solution by mixing one part liquid dishwashing detergent and three parts water.
• Apply several drops of solution where the hose attaches to the regulator and where the regulator connects to the propane tank.
• Make sure all patio heater valves are OFF, then turn the propane tank valve ON.
IF BUBBLES APPEAR AT ANY CONNECTION, THERE IS A LEAK. Do the following:
Turn the propane tank valve OFF.
If a leak is detected at the hose/regulator connection, tighten the connection and perform another leak test.
If a leak is detected at the regulator/cylinder valve connection, disconnect, then reconnect and perform another leak test. If you continue to see bubbles after several attempts, the propane tank valve is defective.
IF NO BUBBLES APPEAR AT ANY CONNECTION, THE CONNECTIONS ARE SECURE.
NOTICE Whenever gas connections are loosened or removed, you must perform a complete leak test.
WARNING FOR OUTDOOR USE ONLY.
CARBON MONOXIDE HAZARD
This appliance can produce carbon monoxide which has no odor. Using it in an enclosed space can kill you. Never use this appliance in an enclosed space such as a camper, tent or home.
Use of LP cylinder
This heater is shipped from the factory for l_P gas use onty.
Use only the Department of Transportation(DOT) approved 201b LP cylinder (standard 201b cylinder) with Type 1 - QCC safety valve.
The cylinder must provided wit a listed overfilling prevention device and provided with a cylinder connection device compatible with connection of the appliance.
The cylinder must provide with vapour withdrawal device.
The cylinder must include a collar to protect the cylinder valve.
Always check the leakage on the connections of the regulator, Never use a flame to check for leakage, use the soap only.
Do not store a spare LP cylinder under or near this appliance
Never fill the cylinder beyond 80 percent full.
Place the dust cap on the cylinder valve outlet when the cylinder is not in use.
If the information above is not followed exactly, a fire causing serious injury or death may occur.
Connect the LP cylinder
1. Preparation before lighting.
Make sure Control Knob is at OFF position.
2. Check Connection at Regulator/Cylinder for leaks. (See Rgure 1 and Figure 2)
3. Check and ensure the control knob is in the OFF position.
Place the Gas cylinder inside the Cylinder Cabinet and connect the Regulator to the cylinder valve.
Using Your Patio Heater
Caution: Do not attempt to operate this appliance until you have read and understand all of the safety Information In the manual, the assembly Is complete, and leak tests have been performed.
Before Turning the Gas Supply ON
Your heater was designed and approved for OUTDOOR use only. Do NOT use it inside a building, garage, or any other enclosed area.
Make sure that surrounding areas are free of combustible materials, gasoline, and other flammable vapors or liquids.
Make sure that there are no obstructions to air ventilation. Be sure all gas connections are tight and there are no leaks.
Make sure that the cylinder cover is clear of debris. Be sure any component removed during assembly or servicing is replaced and fastened prior to starting.
Before Lighting Your Heater
Your heater should be thoroughly inspected before each use, and by a qualified service person at least annually. Always wait at least five minutes if you are re-lighting a hot heater.
Inspect the hose assembly for evidence of excessive abrasion, cuts, or wear. Suspected areas should be leak-tested. If the hose leaks, it must be replaced prior to operation. Use only a replacement hose assembly specified by the manufacturer.
Lighting Your Heater
NOTICE When starting your heater for the first time, or after you change the propane tank, push and hold the control knob In for two minutes to remove air from the gas lines.
1. Push in the control knob and turn it OFF.
2. Fully open the propane tank valve.
3. Push the control knob in and rotate to HI.
4. While pushing in the control knob, press the red IGNITOR button repeatedly until the main burner lights. Continue to hold the control knob in for 30 more seconds, then release the it.
5. Turn the control knob to adjust the flame.
6. When you are finished, turn the control knob and propane tank OFF. Wait at least five minutes before re-lighting the heater.
If you experience any ignition problems, please see Troubleshooting".
Unit will operate at reduced efficiency below 40°F (4.4°C).
CAUTION Avoid inhaling the fumes emitted from the heater’s first use. Smoke and odor from the burning of oils used in the manufacturing may be present. The smoke and odor dissipates after approximately 30 minutes. The heater should NOT produce thick black smoke.
WARNING FOR YOUR SAFETY. Be careful when attempting to manually ignite this heater. Holding in the control knob for more than 10 seconds before igniting the gas will cause a ball of flame upon ignition.
For your safety
• Check the hose and regulator before each use.
• Inspect the visible hose portion of the regulator in proper and safe place. Check it completely at least annually.
• Replacements of the hose and regulator must be those specified by the manufacturer.
WARNING Certain materials or items, when stored under the heater, will be subjected to radiant heat and could be seriously damaged
When the Heater is ON
The emitter screen becomes bright red due to intense heat. The color is more visible at night. The burner displays tongues of blue and yellow flame. These flames should not be yellow or produce thick black smoke, indicating an obstruction of air flow through the burners. The flame should be blue with straight yellow tops. If excessive yellow flame is detected, turn off the heater and refer to "Troubleshooting”.
Re-lighting Your Heater
1. Push in the control knob and turn it OFF.
2. Wait at least five minutes to allow gas to dissipate before re-lighting. See "Lighting your heater" for instructions.
WARNING FOR YOUR SAFETY. Heater will be hot after use. Handle with extreme care.
Shutting Down Your Heater
1. Push in the control knob and turn it OFF. The burner may make a slight popping noise as it turns off.
2. Turn the propane tank valve off and disconnect the regulator when the heater is not in use.
NOTICE After use, some discoloration of the emitter screen is normal.
After Operating Your Heater
• The gas tank control knob should be in the OFF position.
• The gas tank valve should be OFF.
• Disconnect the gas line.
• The heater should be stored upright in a secure location.
WARNING
FOR YOUR SAFETY.
Do not touch or move heater for at least 45 minutes after use. Reflector is hot to the touch.
Allow reflector to cool before touching.
Operation Checklist
Perform these checks before each use:
Read the instruction manual to understand correct operation and precautions.
All components are properly assembled, intact and operable.
No alterations have been made.
All gas connections are secure and do not leak.
Wind velocity is below 10 mph.
Heater is for use outdoors (outside any enclosure).
There is adequate fresh air ventilation.
Heater is away from gasoline or other flammable liquids or vapors.
Heater is away from windows, air intake openings, sprinklers and other water sources.
Heater is situated at least 36 inches on top and 24 inches on sides from combustible materials.
Heater is on a hard and level surface.
There are no signs of spider or insect nests in the heater.
AII burner passages are clear.
All air circulation passages are clear.
Children and adults should stay a safe distance away from the heater to avoid burns or clothing ignition. If children are near the heater for any reason, they should be carefully supervised by an adult.
Clothing or other protective material should not be hung from the heater, or placed on or near the heater.
Any guard or other protective device removed for servicing the heater must be replaced prior to operating the heater.
Maintaining Your Heater
To enjoy years of outstanding performance from your heater, make sure you perform the following maintenance activities on a regular basis:
Keep exterior surfaces clean.
Use soapy water for cleaning. Never use flammable or corrosive cleaning agents.
While cleaning your unit, be sure to keep the area around the burner and control compartment dry at all times. Do not submerge the control valve assembly. If the gas control is submerged in water, do NOT use it. It must be replaced.
Installation and repair should be done by a qualified service person. The heater should be inspected before each use and at least annually by a qualified service person.
More frequent cleaning may be required as necessary. It is imperative that control compartment burner and circulating air passageways of the heater be kept clean and free of debris and/or spider or insect nests.
Air flow must be unobstructed. Keep controls, burner, and circulating air passageways clean. Signs of possible blockage include:
Gas odor with extreme yellow tipping of flame.
Heater does NOT reach the desired temperature.
Heater glow is excessively uneven.
Heater makes popping noise.
Spiders and insects can nest in burner or orifices. This dangerous condition can damage heater and render it unsafe for use. Clean burner holes by using a heavy-duty pipe cleaner. Compressed air may help clear away smaller particles.
Carbon deposits may create a fire hazard. Clean the dome and burner screen with warm soapy water if any carbon deposits develop.
Note: In a salt-air environment (such as near an ocean), corrosion occurs more quickly than normal. Frequently check for corroded areas and repair them promptly.
Tip (for stainless steel models): Use high-quality automobile wax to help maintain the appearance of your heater. Apply to exterior surfaces from the post down. DO NOT apply to the emitter screen or domes.
Storing Your Heater
Disconnect the propane tank.
Store the heater upright in an area sheltered from direct contact with inclement weather (such as rain, sleet, hail, snow, dust, and debris).
You can cover your heater to protect the exterior surfaces and to help prevent dirt build-up in air passages. Never leave the propane tank exposed to direct sunlight or excessive heat.
Note: Wait until heater is cool before covering.
Troubleshooting
Problem
Possible Cause
Solution
The main burner won’t light
• The gas valve may be OFF.
• Make sure that the gas valve is ON.
• The LP tank may be empty.
• Refill the propane tank.
• The burner orifice may be blocked.
• Clean or replace the burner orifice.
• You may have air in the system.
• Purge any air from the lines by opening the gas lines and depressing the control knob for two to three minutes.
• A loose connection.
• Make sure that all connections and fittings are tight.
• Igniter failure.
• Use a stick lighter or match to light the burner.
• The gas pressure is too low with the valve fully open.
• Replace the propane tank or the regulator.
• You are lighting a new tank for the first time.
• Purge any air from the lines by opening the gas lines and depressing the control knob for two to three minutes.
• The propane tank valve is on but no gas is flowing.
• Replace the hose/regulator assembly.
Low burner flame
• Low pressure.
• Replace the low propane tank with a full one.
• The propane tank is low on fuel.
• Replace the low propane tank with a full one.
• The gas hose is kinked.
• Check the hose and either straighten or replace it.
• Obstructions in the system.
• Check for obstructions at passageways and orifices.
Burner unit smoking
Carbon on the reflector and emitter screen.
Clean the components as needed.
Thick black smoke
Blockage in the burner assembly.
Thoroughly clean the burner.
Servicing Your Heater
Only a qualified service person should repair gas passages and associated components. Caution: Always allow heater to cool before attempting service.


 Cap nut (4)