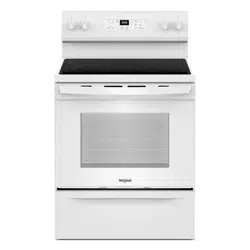
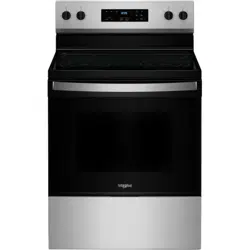
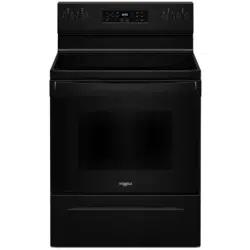
Use & Care Guide for Electric Range
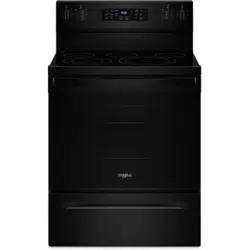
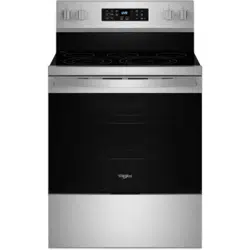
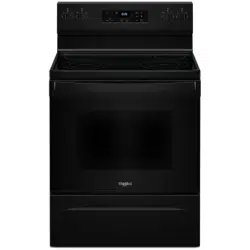
PARTS AND FEATURES
This manual covers several different models. The range you have purchased may have some or all of the parts and features listed. The location and appearance of the features shown here may not match those of your model.
Control Panels

A. Surface cooking area locator
B. Electronic oven control
C. Surface cooking area locator
D. Left front control knob
E. Left rear control knob
F. Warm zone push button (some models)
G. Right rear control knob
H. Right front control knob
A. Surface cooking area locator
B. Electronic oven control
C. Surface cooking area locator
D. Left front control knob
E. Left rear control knob
F. Right rear control knob
G. Right front control knob
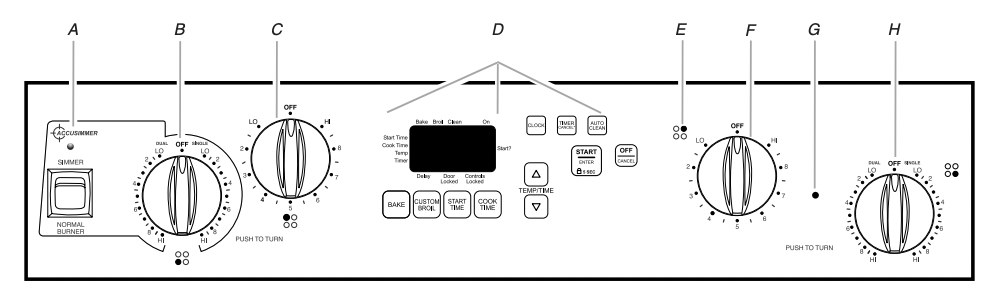
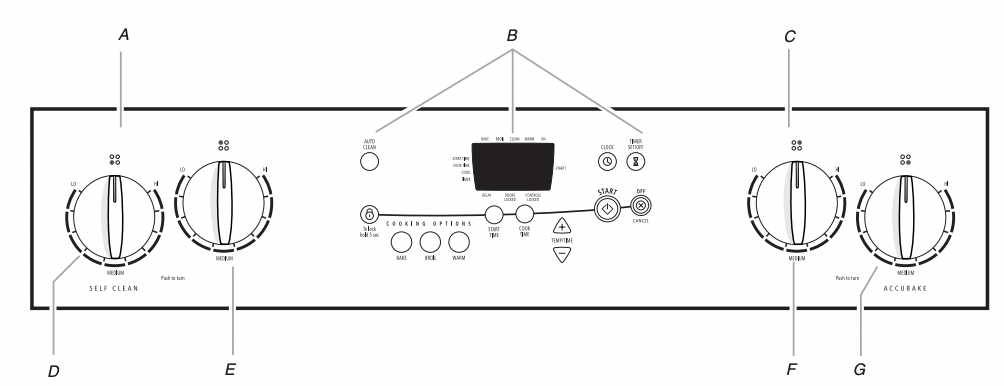
A. ACCUSIMMER® control switch
B. Left front control knob
C. Left rear control knob
D. Electronic oven control
E. Surface cooking area locator
F. Right rear control knob
G. Hot surface indicator light
H. Right front control knob
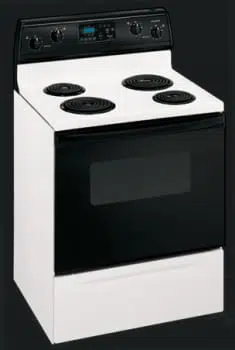
Range
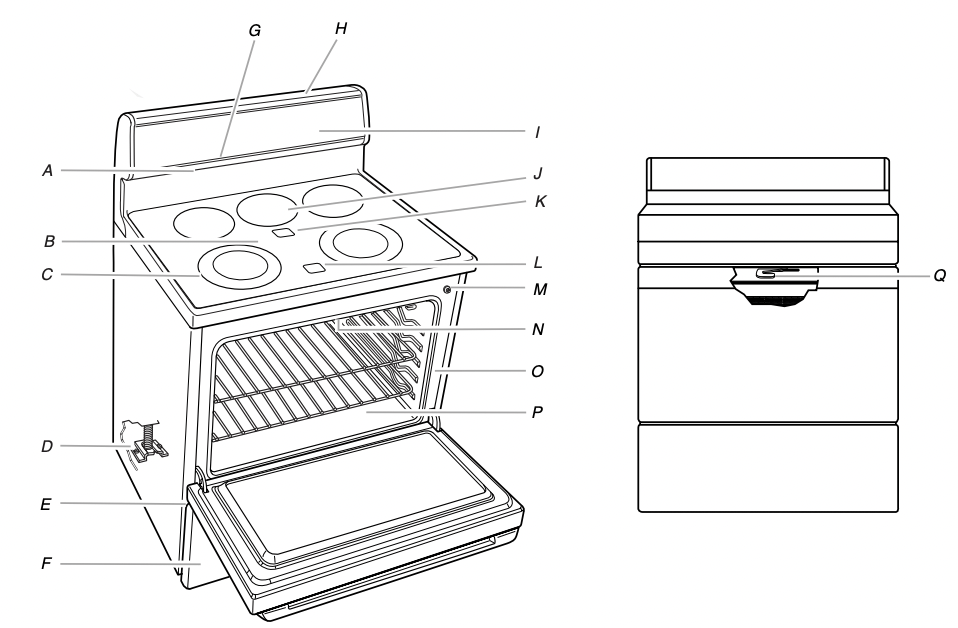
A. Oven vent (on ceramic glass models)
B. Ceramic glass (on some models)
C. Dual element (on some models)
D. Anti-tip bracket
E. Model and serial number plate (behind left side of storage drawer)
F. Storage drawer (on some models) or warming drawer (on some models)
G.Console night light (on some models)
H. Oven light switch (on some models)
I. Console panel
J. Warm zone element (on some models)
K. Warm zone indicator light (on some models)
L. Hot surface indicator light (on ceramic glass models)
M. Automatic oven light switch
N. Broil element (not shown)
O. Gasket
P. Bake element (hidden on some models)
Q. Self-clean latch
Parts and Features not shown
Coil elements (on some models)
Oven door window
Oven light
Broiler pan and grid (on some models)
Roasting rack (on some models)
Storage drawer liner (on some models)
COOKTOP USE
Cooktop Controls
WARNING Fire Hazard Turn off all controls when done cooking. Failure to do so can result in death or fire.
The control knobs can be set to anywhere between HI and LO. Push in and turn to setting. Use the following chart as a guide when setting heat levels.
| SETTING |
|
RECOMMENDED USE |
| HI |
|
■ Start food cooking.
■ Bring liquid to a boil.
|
| Medium High Between MEDIUM and HI |
|
■ Hold a rapid boil.
■ Quickly brown or sear food.
|
| MEDIUM |
|
■ Maintain a slow boil.
■ Fry or sauté foods.
■ Cook soups, sauces and gravies.
|
| Medium Low Between MEDIUM and LO |
|
■ Stew or steam food.
■ Simmer.
|
| LO |
|
■ Keep food warm.
■ Melt chocolate or butter.
|
| Warm Zone Element (on some ceramic glass models) |
|
■ Keep cooked foods warm. |
REMEMBER: When range is in use or (on some models) during the Self-Cleaning cycle, the entire cooktop area may become hot.
ACCUSIMMER® Feature (on some models)
The ACCUSIMMER® feature setting is an adjustable heat setting for more precise simmering. It is the left front surface cooking area or element. The indicator light will glow when the ACCUSIMMER® feature is in use.
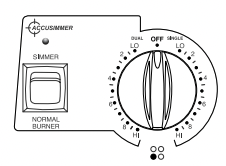
NOTE: Appearance may vary depending on your model.
The ACCUSIMMER® control switch has 2 settings: SIMMER and NORMAL BURNER. When the control is set on NORMAL BURNER, the left front surface cooking area or element will function as a single or dual element (on some models).
To use:
- Push the ACCUSIMMER® control switch to the SIMMER position. The indicator light will glow.
- Push in and turn the left front control knob to a setting anywhere between HI and LO. Select a knob position near medium or medium low (4 or 5) for a low simmer or when using lids. Select a knob position near medium-high (7 or 8) for a high simmer or when not using lids. On some models, select either the Single or Dual Zone settings. See “Dual Cooking Zone” section.
- Push the ACCUSIMMER® control switch back to the NORMAL BURNER setting when finished cooking. The indicator light will go out.
Dual Cooking Zone (on some models)
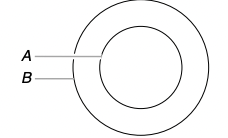
A. Single size (6" [15.24 cm])
B. Dual size (9" [22.86 cm])
The Dual Cooking Zone offers flexibility depending on the size of the cookware. Single size can be used in the same way as a regular element. The dual size combines both the single and outer element and is recommended for larger size cookware.
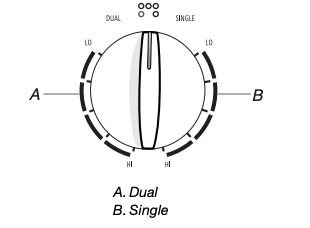
A. Dual
B. Single
To Use DUAL:
- Push in and turn the left front control knob counterclockwise to the DUAL zone anywhere between HI and LO.
- Push in and turn knob to vertical (off) when finished.
To Use SINGLE:
- Push in and turn the left front control knob clockwise to the SINGLE zone anywhere between HI and LO.
- Push in and turn knob to vertical (off) when finished.
Warm Zone Element (on some models)
WARNING Food Poisoning Hazard Do not let food sit for more than one hour before or after cooking. Doing so can result in food poisoning or sickness.
Use the Warm Zone element to keep cooked foods warm.
One hour is the recommended maximum time to maintain food quality.
Do not use it to heat cold foods.
The Warm Zone element can be used alone or when any of the other surface cooking areas are being used.
The Warm Zone element area will not glow red when cycling on. However, its indicator light will glow as long as the Warm Zone element area is too hot to touch.
- Use only cookware and dishes recommended for oven and cooktop use.
- Cover all foods with a lid or aluminum foil. When warming baked goods, allow a small opening in the cover for moisture to escape.
- Do not use plastic wrap to cover food. Plastic wrap may melt.
- Use pot holders or oven mitts to remove food.
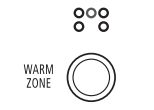
To Use: Push in WARM ZONE button to activate. Push again to turn off.
Ceramic Glass (on some models)
The surface cooking area will glow red when an element is on. It will cycle on and off, at all settings, to maintain the selected heat level.
It is normal for the surface of white or biscuit ceramic glass to appear to change color when surface cooking areas are hot. As the glass cools, it will return to its original color.
Wiping off the cooktop before and after each use will help keep it free from stains and provide the most even heating. On cooktops with white or biscuit ceramic glass, soils and stains may be more visible, and may require more cleaning and care. For more information, see “General Cleaning” section.
- Do not store jars or cans above the cooktop. Dropping a heavy or hard object onto the cooktop could crack the cooktop.
- Do not leave a hot lid on the cooktop. As the cooktop cools, air can become trapped between the lid and the cooktop, and the ceramic glass could break when the lid is removed.
- For foods containing sugar in any form, clean up all spills and soils as soon as possible. Allow the cooktop to cool down slightly. Then, while wearing oven mitts, remove the spills while the surface is still warm. If sugary spills are allowed to cool down, they can adhere to the cooktop and can cause pitting and permanent marks.
- Do not slide cookware or bakeware across the cooktop. Aluminum or copper bottoms and rough finishes on cookware or bakeware could leave scratches or marks on the cooktop.
- Do not cook popcorn in prepackaged aluminum containers on the cooktop. They could leave aluminum marks that cannot be removed completely.
- Do not allow objects that could melt, such as plastic or aluminum foil, to touch any part of the entire cooktop.
- Do not use the cooktop as a cutting board.
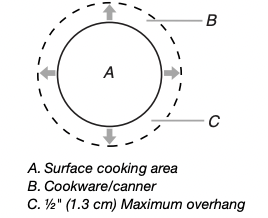
- Use cookware about the same size as the surface cooking area. Cookware should not extend more than ½" (1.3 cm) outside the area.
- Use flat-bottomed cookware for best heat conduction and energy efficiency. Cookware with rounded, warped, ribbed or dented bottoms could cause uneven heating and poor cooking results.
- Determine flatness by placing the straight edge of a ruler across the bottom of the cookware. While you rotate the ruler, no space or light should be visible between it and the cookware.
- Cookware designed with slightly indented bottoms or small expansion channels can be used.
- Make sure the bottoms of pots and pans are clean and dry before using them. Residue and water can leave deposits when heated.
- Do not cook foods directly on the cooktop.
Hot Surface Indicator Light (under ceramic glass)
The hot surface indicator light will glow as long as any surface cooking area is too hot to touch, even after the surface cooking area(s) is turned off.
Coil Elements and Burner Bowls (on some models)
Coil elements should be level for optimal cooking results. Burner bowls, when clean, reflect heat back to the cookware. They also help catch spills.
Cookware should not extend more than ½" (1.3 cm) over the coil element. If cookware is uneven or too large, it can produce excess heat, causing the burner bowl to change color. For more information, see the “General Cleaning” section.
NOTE: Before removing or replacing coil elements and burner bowls, make sure they are cool and the control knobs are in the Off position.
To Remove:
- Push in the edge of coil element toward the receptacle. Then lift it enough to clear the burner bowl.
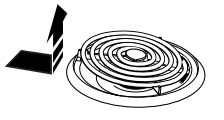
2. Pull the coil element straight away from the receptacle.
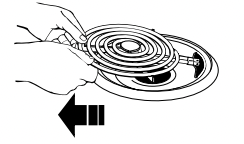
3. Lift out the burner bowl.
To Replace:
1. Line up openings in the burner bowl with the coil element receptacle.

2. Holding the coil element as level as possible, slowly push the coil element terminal into the receptacle.
3. When the terminal is pushed into the receptacle as far as it will go, push down the edge of the coil element opposite the receptacle.
Lift-up Cooktop (on some models)
The lift-up cooktop provides easy access for cleaning beneath. Do not drop the cooktop. Damage could occur to the finish and the cooktop frame. For more information, see the “General Cleaning” section.
To Lift:
Lift the cooktop by both front corners until the supports lock into place.
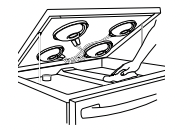
To Replace:
1. Lift the cooktop from both sides while pressing the support rods back to unlock them.
2. Slowly lower the cooktop into place.
Home Canning
When canning for long periods, alternate the use of surface cooking areas, elements or surface burners between batches.
This allows time for the most recently used areas to cool.
- Center the canner on the grate or largest surface cooking area or element. On electric cooktops, canners should not extend more than ½" (1.3 cm) beyond the surface cooking area or element.
- Do not place canner on 2 surface cooking areas, elements or surface burners at the same time.
- On ceramic glass models, use only flat-bottomed canners.
- On coil element models, the installation of a Canning Unit Kit is recommended. If a kit is not installed, the life of the coil element will be shortened. See “Assistance or Service” for instructions on ordering.
- For more information, contact your local U.S. Government Agricultural Department Extension Office. Companies that manufacture home canning products can also offer assistance.
Cookware
IMPORTANT: Do not leave empty cookware on a hot surface cooking area, element or surface burner.
Ideal cookware should have a flat bottom, straight sides and a well-fitting lid, and the material should be of medium-to-heavy thickness.
Rough finishes may scratch the cooktop or grates. Aluminum and copper may be used as a core or base in cookware. However, when used as a base they can leave permanent marks on the cooktop or grates.
Cookware material is a factor in how quickly and evenly heat is transferred, which affects cooking results. A nonstick finish has the same characteristics as its base material. For example, aluminum cookware with a nonstick finish will take on the properties of aluminum.
Cookware with nonstick surfaces should not be used under the broiler.
Use the following chart as a guide for cookware material characteristics.
| COOKWARE |
|
CHARACTERISTICS |
| Aluminum |
|
■ Heats quickly and evenly.
■ Suitable for all types of cooking.
■ Medium or heavy thickness is best for most cooking tasks.
|
| Cast iron |
|
■ Heats slowly and evenly.
■ Good for browning and frying.
■ Maintains heat for slow cooking.
|
| Ceramic or Ceramic glass |
|
■ Follow manufacturer’s instructions.
■ Heats slowly, but unevenly.
■ Ideal results on low to medium heat settings.
|
| Copper |
|
■ Heats very quickly and evenly. |
| Earthenware |
|
■ Follow manufacturer’s instructions.
■ Use on low heat settings.
|
| Porcelain enamel-onsteel or cast iron |
|
■ See stainless steel or cast iron. |
| Stainless steel |
|
■ Heats quickly, but unevenly.
■ A core or base of aluminum or copper on stainless steel provides even heating.
|
ELECTRONIC OVEN CONTROLS
Style 1 - Electronic Oven Control (on some models)
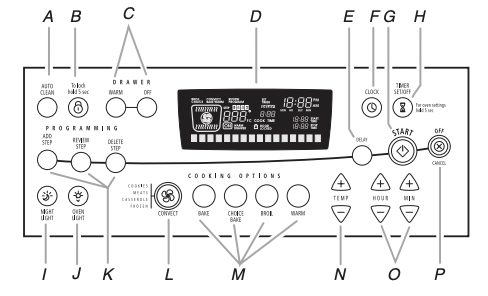
A. Auto clean
B. Control lock
C. Warming drawer (on some models)
D. Oven display
E. Delay
F. Clock
G. Start
H. Timer set/off
I. Night light
J. Oven light
K. Programming options
L. Convect
M. Oven settings
N. Temperature
O. Hour/minute
P. Off/cancel
Style 2 - Electronic Oven Control (on some models)
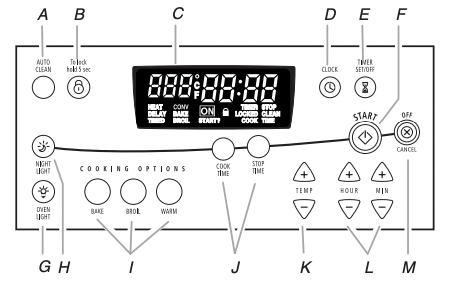
A. Auto clean
B. Control lock
C. Oven display
D. Clock
E. Timer set/off
F. Start
G. Oven light
H. Night light
I. Oven settings
J. Timed cooking (on some models)
K. Temperature
L. Hour/minute
M. Off/cancel
Style 3 - Electronic Oven Control (on some models)
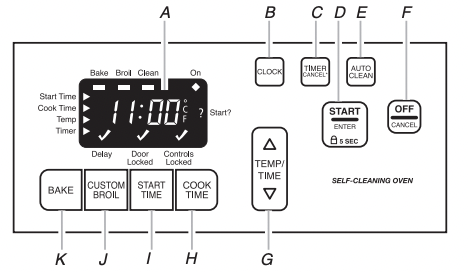
A. Oven display
B. Clock
C. Timer/cancel
D. Start/enter
E. Auto clean
F. Off/cancel
G. Temperature/time
H. Cook time
I. Start time
J. Custom broil
K. Bake
Style 4 - Electronic Oven Control (on some models)
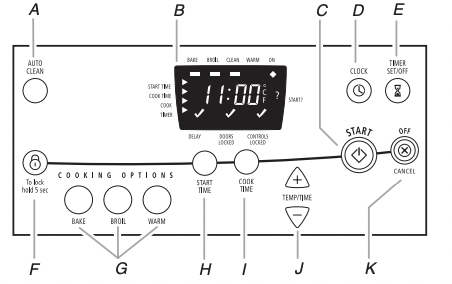
A. Auto clean
B. Oven display
C. Start
D. Clock
E. Timer set/off
F. Control lock
G. Oven settings
H. Start time
I. Cook time
J. Temperature
K. Off/cancel
Display
Style 1 - Electronic Oven Control
When power is first supplied to the appliance, “12:00 PM” will appear on the display. See “Clock” section to set time of day.
If “12:00 PM” appears at any other time, a power failure has occurred. Press OFF/CANCEL and reset the clock if needed.
When the oven is not in use, the display shows the time of day.
Styles 2, 3 & 4 - Electronic Oven Controls
When power is first supplied to the appliance, “PF” or a flashing time will appear on the display. Press OFF/CANCEL to clear the display.
If “PF” or a flashing time appears at any other time, a power failure has occurred. Press OFF/CANCEL and reset the clock if needed.
When the oven is not in use, the display shows the time of day.
When performing a timed cook function, the display will show either hours and minutes, or minutes and seconds.
Start
Style 1 - Electronic Oven Control
The Start pad begins any oven function. The display will show SET TEMP OR TIME OR PUSH START.
Styles 2, 3 & 4 - Electronic Oven Controls
The Start pad begins any oven function. If the Start pad is not pressed within 5 seconds after pressing a function pad, the "START?” or “?” indicator light will appear on the display (on some models).
If the Start pad is not pressed within 5 minutes after pressing a function pad, the oven display will return to the time of day mode and the programmed function will be canceled.
Off/Cancel
The Off/Cancel pad stops any function except the Clock, Timer, Control Lock or Warm Drawer (on some models).
Clock
On some models, this is a 12-hour clock that shows a.m. and p.m.
To Set:
Before setting, make sure the oven and Timer are off.
- Press CLOCK.
- Depending on your model, press the HR or MIN or TIME/TEMP “up” or “down” arrow pads to set the time of day, including a.m. or p.m.
- Press CLOCK.
Tones
Tones are audible signals, indicating the following:
Basic Functions
One tone
- Valid pad press
- Oven is preheating (long tone)
- Function has been entered
- Reminder (on some models), repeating each minute after the end-of-cycle tones
Three tones
Four tones
Style 1 - Electronic Oven Control
Reminder Tones: Reminder tones may be turned off. On some models, press and hold BAKE for 5 seconds. REMINDER TONES OFF will appear on the display. Repeat to turn reminder tones back on, and REMINDER TONES ON will appear on the display.
All Tones: All of the above tones are preset on.
To disable tones, press and hold CLOCK for 5 seconds. Repeat to turn tones back on.
To Turn Off/On: Press and hold CLOCK for 5 seconds. A tone will sound when changing tones from OFF to ON. ALL SOUNDS OFF will appear on the display. Repeat to turn tones on, and ALL SOUNDS ON will appear on the display.
Tone Pitch: The pitch is preset at high, but can be changed to low.
To Change: Press and hold BROIL for 5 seconds. A tone will sound, and TONE PITCH LOW will appear on the display. Repeat to change and TONE PITCH HIGH will appear on display.
End of Cycle Tones: Press and hold CONVECT for 5 seconds to turn END OF CYCLE TONES off. Press and hold CONVECT for seconds to turn END OF CYCLE TONES on.
Key Press Tone: Press and hold WARM (Cooking Options) for seconds, and KEY PRESS TONES OFF will appear on the display. Press and hold WARM for 5 seconds, and KEY PRESS TONES ON will appear on the display.
Style 2 - Electronic Oven Control
Reminder Tones: Reminder tones may be turned off. On some models, press and hold TIMER SET for 5 seconds. “rEP OFF” or "OFF” will appear in the display. Repeat to turn reminder tones back on, and “rEP ON” or “ON” will appear in the display.
All Tones: All of the above tones are preset on. All except the end-of-cycle tones can be turned off.
To Turn Off/On: Press and hold STOP TIME for 5 seconds. A tone will sound, and “Snd OFF” will appear on the display. Press and hold COOK TIME for 5 seconds to turn tones on, and “Snd ON” will appear on the display.
Tone Pitch: The pitch is preset at high, but can be changed to low.
To Change: Press and hold DELAY START for 5 seconds. A tone will sound, and “Snd LO” will appear on the display. Repeat to change, and “Snd HI” will appear on display.
Style 3 & 4 - Electronic Oven Control
Refer to Basic Functions in the “Tones” section.
Fahrenheit and Celsius
The temperature is preset at Fahrenheit, but can be changed to Celsius.
Style 1 - Electronic Oven Control
To change: Press and hold AUTO CLEAN for 5 seconds, and TEMPERATURE UNIT CELSIUS will appear in the display. Repeat to change back to Fahrenheit.
To exit mode, press OFF/CANCEL.
Styles 2, 3 & 4 - Electronic Oven Controls
To change: Press and hold BROIL for 5 seconds. Repeat to change back to Fahrenheit.
To exit mode, press OFF/CANCEL.
Timer
The Timer can be set in hours or minutes up to 12 hours and minutes, and counts down the set time. The Timer does not start or stop the oven.
To Set:
- Press TIMER SET/OFF or TIMER/CANCEL. The timer indicator light will light up on some models. If no action is taken after 5 minutes, the display will return to the time of day.
- Depending on your model, press the HR or MIN or TIME/ TEMP “up” or “down” arrow pads to set the length of time.
- Press START. When the set time ends, end-of-cycle tones will sound, then, if enabled, reminder tones will sound every minute on some models.
- Press TIMER SET/OFF or TIMER/CANCEL anytime to cancel the Timer and reminder tones.
NOTE: Do not press the OFF/CANCEL pad because the oven will turn off.
On some models, to display the time of day for 5 seconds when the timer is counting down, press CLOCK.
Control Lock
The Control Lock shuts down the control panel pads to prevent unintended use of the oven.
When the control is locked, only the CLOCK SET, OVEN LIGHT on some models) and TIMER pads will function.
To Lock/Unlock Control: Before locking, make sure the oven and Timer are off. Press and hold “Lock” key for 5 seconds. A single tone will sound, and “Loc” will appear on the display.
Repeat to unlock. “Loc” will disappear from the display.
12-Hour Shut-Off
Styles 1, 2, 3 & 4 - Electronic Oven Controls
The oven control is set to automatically shut off the oven hours after the oven turns on. This will not interfere with any timed or delayed cook function.
Style 1 - Electronic Oven Control
The 12 hour shutoff feature may be turned off on Style 1 electronic oven controls.
To Set: Press and hold DELAY for 5 seconds. 12 HR SHUT-OFF ON will appear on the display. Press and hold DELAY again for seconds to turn off.
Oven Temperature Control
IMPORTANT: Do not use a thermometer to measure oven temperature because opening the oven door may cause burner cycling to give incorrect readings.
The oven provides accurate temperatures; however, it may cook faster or slower than your previous oven, so the temperature calibration can be adjusted. It can be changed in Fahrenheit or Celsius.
A minus sign means the oven will be cooler by the displayed amount. The absence of a sign means the oven will be warmer by the displayed amount. Use the following chart as a guide.
ADJUSTMENT °F (ADJUSTMENT °C) COOKS FOOD
10°F (5°C). ...a little more
20°F (10°C) ...moderately more
30°F (15°C) ...much more
-10°F (-5°C). ...a little less
-20°F (-10°C) ...moderately less
-30°F (-15°C) ...much less
To Adjust Oven Temperature Calibration:
Style 1 - Electronic Oven Control
- Press and hold OVEN LIGHT for 5 seconds until the oven display shows the current calibration, for example, “0F” will appear on the display.
- Press the TEMP or TEMP/TIME “up” or “down” arrow pad(s) to increase or to decrease the temperature in 10°F (5°C) amounts. The adjustment can be set between 30°F (15°C) and -30°F (-15°C).
- Press START.
Styles 2, 3 & 4 - Electronic Oven Controls
- Press and hold BAKE for 5 seconds until the oven display shows the current calibration, for example “0°F CAL” or “00.”
- Press the TEMP or TEMP/TIME “up” or “down” arrow pad(s) to increase or to decrease the temperature in 10°F (5°C) amounts. The adjustment can be set between 30°F (15°C) and -30°F (-15°C).
- Press START.
OVEN USE
Odors and smoke are normal when the oven is used the first few times, or when it is heavily soiled.
IMPORTANT: The health of some birds is extremely sensitive to the fumes given off. Exposure to the fumes may result in death to certain birds. Always move birds to another closed and wellventilated room.
Aluminum Foil
IMPORTANT: Do not line the oven bottom with any type of foil, liners or cookware because permanent damage will occur to the oven bottom finish.
- Do not cover entire rack with foil because air must be able to move freely for best cooking results.
- To catch spills, place foil on rack below dish. Make sure foil is at least ½" (1.3 cm) larger than the dish and that it is turned up at the edges.
Positioning Racksand Bakeware
IMPORTANT: To avoid permanent damage to the porcelain finish, do not place food or bakeware directly on the oven door or bottom.
RACKS
NOTES:
- Position racks before turning on the oven.
- Do not position racks with bakeware on them.
- Make sure racks are level.
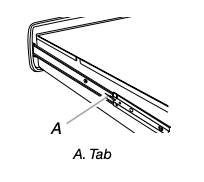
To move a rack, pull it out to the stop position, raise the front edge, and then lift out. Use the following illustration and charts as a guide.
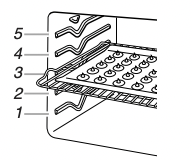
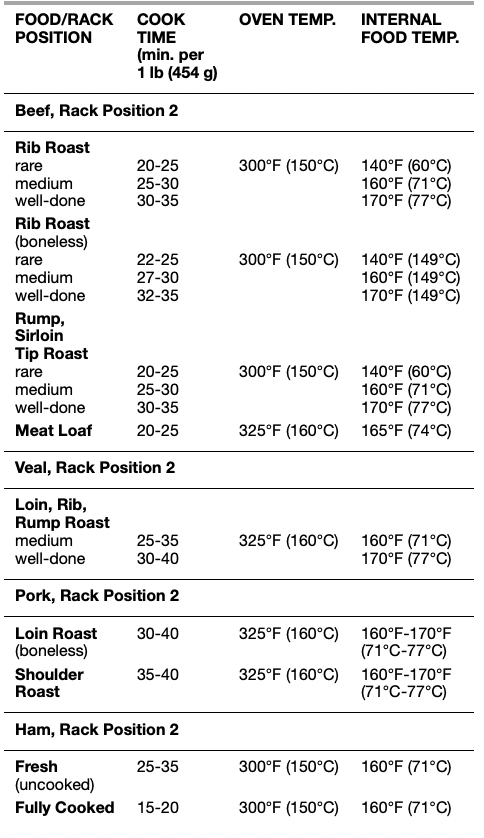
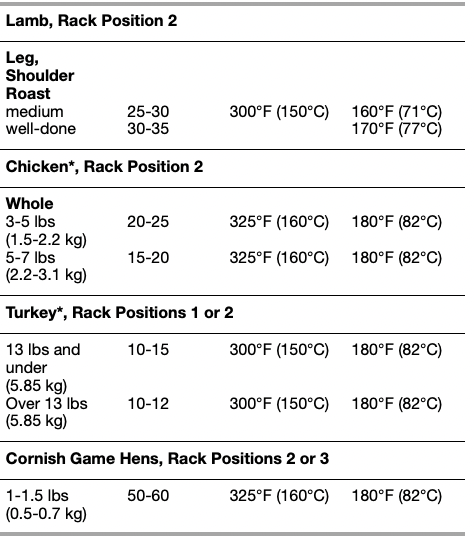
Traditional Cooking
| FOOD |
|
RACK POSITION |
| Frozen pies, large roasts, turkeys, angel food cakes |
|
1 or 2 |
| Bundt cakes, most quick breads, yeast breads, casseroles, meats |
|
2 |
| Cookies, biscuits, muffins, cakes, nonfrozen pies |
|
2 or 3 |
Baking and Roasting
ACCUBAKE® Temperature Management System (on some models)
The ACCUBAKE® system electronically regulates the oven heat levels during preheat and bake to maintain a precise temperature range for optimal cooking results. The bake and broil elements cycle on and off in intervals. The bake element will glow red when cycling on, the broil element will not. This feature is automatically activated when the oven is in use.
Before baking and roasting, position racks according to the “Positioning Racks and Bakeware” section. When roasting, it is not necessary to wait for the oven preheat conditioning time to end before putting food in unless it is recommended in the recipe.
To Bake or Roast:
1. Press BAKE. Press TEMP, TEMP/TIME or TEMP/HOUR “up” or “down” arrow pads to set a temperature other than 350°F (175°C) in 5° amounts. The bake range can be set between 170°F and 500°F (75°C and 260°C).
2. Press START. The temperature can be changed after this step. START does not need to be pressed again on styles 2 and 3 of Electronic Oven Controls.
3. Press OFF/CANCEL when finished.
Preheating
Style 1 - Electronic Oven Control
After START is pressed, the oven will enter a timed preheat conditioning. “Lo” will appear on the display until the temperature is above 170ºF (75ºC). Once 170ºF (75ºC) is reached, the display temperature will increase in 2° increments as the actual temperature of the oven increases. “PREHEATING” will appear in the display in the lower text line. When the preheat conditioning temperature is reached, a tone will sound, and the selected temperature will appear on the display.
Styles 2, 3 & 4 - Electronic Oven Controls
After START is pressed, the oven will enter a timed preheat conditioning. “PrE” and the time countdown will appear on the display (on some models). When the preheat conditioning time ends, a tone will sound and the selected temperature will appear on the display.
Preheat temperatures are affected by varying factors such as room temperature and peak energy usage times. It is normal for the temperature showing on the display and the actual oven temperature to differ.
Waiting an additional 10 minutes after the preheat conditioning time ends to put food in the oven is suggested when baking foods with leavening ingredients, such as yeast, baking powder, baking soda and eggs.
Choice Bake® Function (on some models)
The CHOICE BAKE® function reduces top heat in the oven during cooking. It is ideal when baking pies, breads and casseroles and when roasting meat and poultry.
During traditional baking and roasting, the bake and broil elements or burners cycle on and off at intervals. When CHOICE BAKE® is selected, the broil element or burner cycles on less frequently. This reduces top browning of foods and allows you more customized control of your cooking results.
To Use:
1. Press CHOICE BAKE® function. Press the TEMP “up” or “down” arrow pads to set a temperature other than 350°F (175°C) in 5° increments. The bake range can be set between 170°F and 500°F (75°C and 260°C).
2. Press START. The temperature can be changed after this step by pressing the TEMP “up” or “down” arrow pads and then pressing START.
3. Press OFF/CANCEL when finished cooking.
To use the CHOICE BAKE® function during a regular Bake cycle to achieve less top browning, press CHOICE BAKE® cycle, set the desired temperature and press START.
Broiling
Broiling uses direct radiant heat to cook food. Changing the temperature when Custom Broiling allows more precise control when cooking. The lower the temperature, the slower the cooking. Thicker cuts and unevenly shaped pieces of meat, fish and poultry may cook better at lower broiling temperatures.
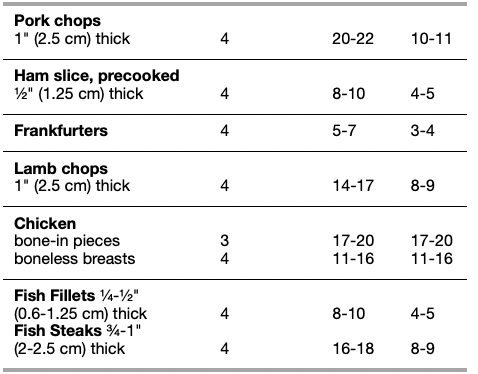
- For best results, use a broiler pan and grid (provided on some models). It is designed to drain juices and help avoid spatter and smoke.
If you would like to purchase a broiler pan, one may be ordered. See “Assistance or Service” section to order. Ask for Part Number 4396923.
- For proper draining, do not cover the grid with foil. The bottom of the pan may be lined with aluminum foil for easier cleaning.
- Trim excess fat to reduce spattering. Slit the remaining fat on the edges to avoid curling.
- Pull out oven rack to stop position before turning or removing food. Use tongs to turn food to avoid the loss of juices. Very thin cuts of fish, poultry or meat may not need to be turned.
- After broiling, remove the pan from the oven when removing the food. Drippings will bake on the pan if left in the heated oven, making cleaning more difficult.
Before broiling, position rack according to the Broiling Chart. It is not necessary to preheat the oven before putting food in unless recommended in the recipe. Position food on grid in the broiler pan, then place it in the center of the oven rack. Close the door to the broil stop position to ensure proper broiling temperature.
To Broil:
- Open door to broil stop position.
- Press BROIL.
- Press START.
- Press OFF/CANCEL when finished.
BROILING CHART
For best results, place food 3" (7 cm) or more from the broil element. Times are guidelines only and may need to be adjusted for individual tastes. Recommended rack positions are numbered from the bottom (1) to the top (5). For diagram, see the “Positioning Racks and Bakeware” section.
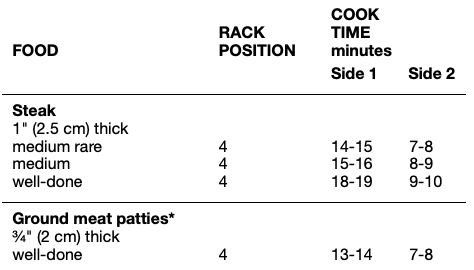
*Place up to 9 patties, equally spaced, on broiler pan grid.
Convection Cooking (Style 1- Electronic Oven Control)
During convection cooking, the fan provides increased hot air circulation continuously and more consistently throughout the oven. The movement of heated air around the food helps to speed up cooking by penetrating the cooler outer surfaces. Food cooks more evenly, browning and crisping outer surfaces while sealing moisture inside.
Many foods can be cooked by lowering cooking temperatures 25°F (10°C) and/or cooking time can be shortened by as much as 30 percent. By using multiple racks, you can cook more food at the same time.
- It is important not to cover foods so that surface areas remain exposed to the circulating air, allowing browning and crisping.
- Keep heat loss to a minimum by only opening the oven door when necessary.
- Choose cookie sheets without sides and roasting pans with lower sides to allow air to move freely around the food.
- Test baked goods for doneness a few minutes before the minimum cooking time with an alternative method such as using a toothpick.
- Use a meat thermometer to determine the doneness of meats and poultry. Check the temperature of pork and poultry in 2 or 3 different places.
- Before convection cooking, position the rack(s) according to the “Positioning Racks and Bakeware” section.
- When roasting poultry and meat, use the roasting rack on the top of the broiler pan and grid. It is not necessary to wait for the oven to preheat, unless recommended in the recipe.
Convection Baking and Roasting
During the CONVECT function, the ring element operates, along with the fan, to provide an indirect source of heat in the oven cavity. Use CONVECT for single or multiple rack baking and roasting.
- When using more than one rack, position bakeware/ cookware on the racks to allow movement of the fan circulated air around the food. See the “Positioning Racks and Bakeware” section.
- If the oven is full, extra cooking time may be needed.
During the CONVECT preheating cycle, the fan, and the bake and broil elements heat the oven cavity. When preheating is finished, the ring element cycles to maintain the oven temperature while the fan continues to constantly circulate the heated air.
If the oven door is opened during convection cooking or preheating, the ring element and fan will turn off immediately. Once the door is closed, they will come back on.
- For optimal cooking results, do not cover food with aluminum foil.
To Select Convection Settings
There are 5 convection presets for time and temperature. Each can be activated by sequentially pressing the CONVECT key. The temperatures and times can be changed for each of the following settings. This helps you to match the convection oven settings with package instructions or your favorite recipes.
CONVECTION SETTINGS
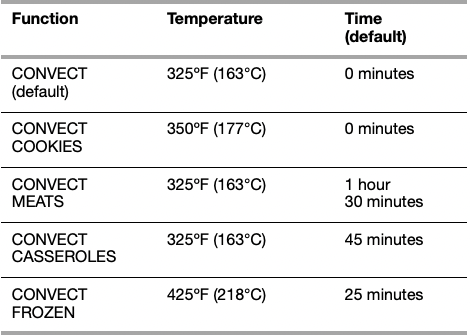
NOTE: Each temperature in this table is 25°F (10° to 15°C) lower than for a non-convection oven. At the end of each set time, the oven will turn off.
1. Press CONVECT keypad. The first setting in the display will show convection at 325°F (165°C), and scrolling text at the bottom of the screen will scroll in this order: “SET TEMP OR TIME” then “OR PUSH START” then “PUSH AGAIN” then “FOR NEXT.” Each time the CONVECT keypad is pressed, the display will move to the next preset (for Cookies, Meats, Casseroles or Frozen). The following instructions are applicable for each preset.
2. Press the TEMP “up” or “down” arrow pads to enter a temperature other than the preset convection temperature. The convection bake range can be set between 170°F and 500°F (75°C and 260°C).
3. Press the HOUR and/or MIN “up” or “down” arrow pads to enter the stop time.
4. Press START. The preheat display will show “Lo” in the temperature field until the temperature is above 170°F (75°C). Once 170°F (75°C) is reached, the display temperature will increase as the actual temperature of the oven increases, and it will display “PREHEATING” in the lower text line.
5. Press OFF/CANCEL to exit function when finished cooking.
CONVECTION ROASTING CHART
*Do not stuff poultry when convection roasting
RANGE CARE
Self-Cleaning Cycle (on some models)
WARNING Burn Hazard Do not touch the oven during the Self-Cleaning cycle. Keep children away from oven during Self-Cleaning cycle. Failure to follow these instructions can result in burns.
IMPORTANT: The health of some birds is extremely sensitive to the fumes given off during the Self-Cleaning cycle. Exposure to the fumes may result in death to certain birds. Always move birds to another closed and well-ventilated room.
Self-clean the oven before it becomes heavily soiled. Heavy soil results in longer cleaning and more smoke.
Keep the kitchen well-ventilated during the Self-Cleaning cycle to help get rid of heat, odors, and smoke.
Do not block the oven vent(s) during the Self-Cleaning cycle. Air must be able to move freely. Depending on your model, see “Oven Vent” or “Oven Vents” section.
Do not clean, rub, damage or move the oven door gasket. The door gasket is essential for a good seal.
Prepare Oven:
- Remove the broiler pan, grid, cookware and bakeware and, on some models, the temperature probe from the oven.
- Remove any foil from the oven because it may burn or melt, damaging the oven.
- Remove oven racks to keep them shiny and easy to slide. See “General Cleaning” section for more information.
- Hand clean inside door edge and the 1½" (3.8 cm) area around the inside oven cavity frame, being certain not to move or bend the gasket. This area does not get hot enough during self-cleaning to remove soil. Do not let water, cleaner, etc. enter slots on door frame. Use a damp cloth to clean this area.
- Wipe out any loose soil to reduce smoke and avoid damage. At high temperatures, foods react with porcelain. Staining, etching, pitting or faint white spots can result. This will not affect cooking performance.
Prepare Cooktop and Storage Drawer:
- Remove plastic items from the cooktop because they may melt.
- Remove all items from the storage drawer.
How the Cycle Works
IMPORTANT: The heating and cooling of porcelain on steel in the oven may result in discoloring, loss of gloss, hairline cracks and popping sounds.
The Self-Cleaning cycle uses very high temperatures, burning soil to a powdery ash.
Style 1 - Electronic Oven Control
The clean cycle can be set at one of two levels Maxi Clean (4 hours 30 minutes) or Quick Clean (2 hours 30 minutes).
Suggested clean times are 2 hours 30 minutes for light soil or 4 hours 30 minutes for average to heavy soil.
Once the oven has completely cooled, remove ash with a damp cloth. Do not wipe down any of the inside surfaces until the oven has completely cooled down. Applying a cool damp cloth to the inner door glass before it has cooled completely could result in the glass breaking.
The oven light will not work during the Self-Cleaning cycle.
The rear surface elements will not work during the Self-Cleaning cycle.
Styles 2, 3 & 4 - Electronic Oven Control
The oven is preset for a 3 hour 30 minute clean cycle, but the time can be changed. Suggested clean times are 2 hours minutes for light soil and between 3 hours 30 minutes and 4 hours 30 minutes for average to heavy soil.
Once the oven has completely cooled, remove ash with a damp cloth. Do not wipe down any of the inside surfaces until the oven has completely cooled down. Applying a cool, damp cloth to the inner door glass before it has cooled completely could result in the glass breaking.
The oven light will not work during the Self-Cleaning cycle
To Self-Clean:
Style 1 - Electronic Oven Control
Before self-cleaning, make sure the door is closed completely or it will not lock and the cycle will not begin.
1. Press AUTO CLEAN to set a clean time for Quick Clean (2 hours 30 minutes). To set the clean time on Maxi Clean press AUTO CLEAN again to set the time at 4 hours 30 minutes.
2. Press START. The oven door will automatically lock and DOOR LOCKED or LOCKED, the start time and stop time will appear on the oven display. On some models, the clean time will appear on the oven display. The door will not unlock until the oven cools. When the cycle is complete and the oven cools, DOOR LOCKED or LOCKED will disappear from the display.
3. Press OFF/CANCEL to clear the oven display
Styles 2, 3 & 4 - Electronic Oven Control
Before self-cleaning, make sure the door is closed completely or it will not lock and the cycle will not begin.
1. Press AUTO CLEAN.
2. Press the TEMP/TIME “up” or “down” arrow pad to set a clean time other than 3 hours 30 minutes. The clean time can be set between 2 hours 30 minutes and 4 hours 30 minutes.
3. Press START/ENTER. The oven door will automatically lock. The ON, CLEAN and DOOR LOCKED oven indicator lights will light up. The door will not unlock until the oven cools. When the cycle is complete and the oven cools, the oven display and the oven indicator lights will go off.
4. Press OFF/CANCEL to clear the oven display
To Delay Start Self-Clean:
Style 1 - Electronic Oven Control
Before delay of starting Self-Clean, make sure the clock is set to the correct time of day. See “Clock” section. Also, make sure the door is closed completely or it will not lock and the cycle will not begin.
1. Press AUTO CLEAN to set a clean time for 2 hours 30 minutes (Quick Clean). Press AUTO CLEAN again to set a clean time for 4 hours 30 minutes (MAXI CLEAN).
2. Press DELAY.
3. Press HR and MIN “up” and “down” pads to enter the time of day to stop.
4. Press START. The start time is automatically calculated and displayed. The door will automatically lock at the set start time, and DOOR LOCKED or LOCKED and DELAY and the stop time will also appear on the display (on some models). The door will not unlock until the oven cools. When the start time is reached, the oven will automatically turn on. When the cycle is complete and the oven cools, DOOR LOCKED or LOCKED will disappear from the display.
5. Press OFF/CANCEL to clear the oven display
Style 2 - Electronic Oven Control
Before delay starting Self-Clean, make sure the clock is set to the correct time of day. See “Clock” section. Also, make sure the door is closed completely or it will not lock and the cycle will not begin.
1. Press AUTO CLEAN to set a clean time to HI (4 hours 30 minutes). Press AUTO CLEAN again to change the setting to LO (2 hours 30 minutes).
2. Press STOP TIME.
3. Press START. The start time is automatically calculated. The door will automatically lock, and DOOR LOCKED or LOCKED and DELAY and the stop time will also appear on the display (on some models). The door will not unlock until the oven cools. When the start time is reached, the oven will automatically turn on. When the cycle is complete and the oven cools, “End” will appear on the oven display and DOOR LOCKED or LOCKED will disappear from the display.
4. Press OFF/CANCEL to clear the oven display.
Styles 3 & 4 - Electronic Oven Control
Delay Start Self-Clean is not available on Style 3 Oven Control.
To Stop Self-Clean anytime:
If the clean function is terminated while the oven cavity temperature is greater than 500ºF (260ºC), the oven door will remain latched until the oven cavity temperature is below this threshold.
Style 1 - Electronic Oven Control
Press OFF/CANCEL. If the oven temperature is too high, the door will remain locked. It will not unlock until the oven cools. If the oven temperature is too high after self-cleaning, then LOCKED will appear on the display until the oven completely cools.
Style 2 - Electronic Oven Control
Press OFF/CANCEL. If the oven temperature is too high, “cln,” TIMED, ON, “cool,” and LOCKED will appear on the display (on some models), and the door will remain locked. It will not unlock until the oven cools.
Styles 3 & 4 - Electronic Oven Control
Press OFF/CANCEL. If the oven temperature is too high, the door will remain locked. It will not unlock until the oven cools.
General Cleaning
IMPORTANT: Before cleaning, make sure all controls are off and the oven and cooktop are cool. Always follow label instructions on cleaning products. Soap, water and a soft cloth or sponge are suggested first unless otherwise noted.
EXTERIOR PORCELAIN ENAMEL SURFACES (on some models)
Food spills containing acids, such as vinegar and tomato, should be cleaned as soon as the entire appliance is cool. These spills may affect the finish.
Cleaning Method:
- Glass cleaner, mild liquid cleaner or nonabrasive scrubbing pad: Gently clean around the model and serial number plate because scrubbing may remove numbers.
- All-Purpose Appliance Cleaner Part Number 31662 (not included): See “Assistance or Service” section to order.
STAINLESS STEEL (on some models)
Cleaning Method:
Rub in direction of grain to avoid damaging.
- Stainless Steel Cleaner & Polish Part Number 31462 (not included): See “Assistance or Service” section to order.
- Liquid detergent or all-purpose cleaner: Rinse with clean water and dry with soft, lint-free cloth.
- Vinegar for hard water spots
To avoid damage to stainless steel, do not use soap-filled scouring pads, abrasive cleaners, Cooktop Polishing Creme, steel-wool pads, gritty washcloths or some paper towels.
CERAMIC GLASS (on some models)
Cleaning Method:
Always wipe with a clean, wet cloth or sponge and dry thoroughly to avoid streaking and staining.
Cooktop Cleaner Part Number 31464 is recommended regularly to help avoid scratches, pitting and abrasions and to condition the cooktop, and can be ordered as an accessory. See "Assistance or Service” section to order.
Cooktop Scraper Part Number 3183488 is also recommended for stubborn soils, and can be ordered as an accessory. See "Assistance or Service” section to order. The Cooktop Scraper uses razor blades. Store razor blades out of the reach of children.
Light to moderate soil
- Paper towels or clean damp sponge: Clean while the cooktop is still warm. You may want to wear oven mitts while cleaning the cooktop.
Sugary spills (jellies, candy, syrup)
- Cooktop Scraper: Clean while the cooktop is still warm. You may want to wear oven mitts while cleaning the cooktop.
- Cooktop Polishing Creme and clean damp paper towel: Clean as soon as cooktop has cooled down. Rub creme into surface with a damp paper towel or soft cloth. Continue rubbing until white film disappears.
Heavy soil, dark streaks, specks and discoloration
- Cooktop Polishing Creme or nonabrasive cleanser: Rub product into soil with a damp paper towel or soft cloth. Continue rubbing until white film disappears.
Burned-on soil
- Cooktop Cleaner and Cooktop Scraper: Rub creme into soil with damp paper towel. Hold scraper as flat as possible on surface and scrape. Repeat for stubborn spots. Polish entire cooktop with creme and paper towel.
Metal marks from aluminum and copper
- Cooktop Cleaner: Clean as soon as cooktop has cooled down. Rub creme into surface with a damp paper towel or soft cloth. Continue rubbing until white film disappears. The marks will not totally disappear, but after many cleanings they will become less noticeable.
Tiny scratches and abrasions
- Cooktop Cleaner: Rub creme into surface with a damp paper towel or soft cloth. Continue rubbing until white film disappears. Scratches and abrasions do not affect cooking performance, and after many cleanings they will become less noticeable.
Do not use steel wool, abrasive powder cleansers, chlorine bleach, rust remover or ammonia because damage may occur.
COOKTOP CONTROLS
Cleaning Method:
When replacing knobs, make sure knobs are in the Off position. On some models, do not remove seals under knobs.
- Soap and water or dishwasher: Pull knobs straight away from control panel to remove.
Do not use steel wool, abrasive cleansers or oven cleaner.
Do not soak knobs.
CONTROL PANEL
Cleaning Method:
- Glass cleaner and soft cloth or sponge: Apply glass cleaner to soft cloth or sponge, not directly on panel.
- All-Purpose Appliance Cleaner Part Number 31662 (not included): See “Assistance or Service” section to order. Do not use abrasive cleaners, steel-wool pads, gritty washcloths or some paper towels. Damage may occur.
COIL ELEMENTS (on some models)
Cleaning Method:
- Damp cloth: Make sure control knobs are off and elements are cool.
Do not clean or immerse in water. Soil will burn off when hot.
For more information, see “Coil Elements and Burner Bowls.”
STORAGE DRAWER (on some models)
Make sure drawer is cool and empty before cleaning.
For more information, see “Storage Drawer” section.
Cleaning Method:
Drawer Liner (on some models)
Remove all stored items from drawer and lift out drawer liner.
- Clean with mild detergent.
- All-Purpose Appliance Cleaner Part Number 31662 (not included): See “Assistance or Service” section to order.
WARMING DRAWER and TRAY (on some models)
Make sure drawer is cool and remove tray.
Cleaning Method:
- Mild detergent (for both)
- All-Purpose Appliance Cleaner Part Number 31662 (not included): See “Assistance or Service” section to order.
Oven Light
The oven light is a standard 40-watt appliance bulb. It will come on when the oven door is open. When the oven door is closed, press LIGHT to turn it on or off. It will not work during the SelfCleaning cycle.
To replace:
- Unplug range or disconnect power.
- Turn the glass bulb cover in the back of the oven counterclockwise to remove.
3. Turn bulb counterclockwise to remove from socket.
4. Replace bulb and bulb cover by turning clockwise.
5. Plug in range or reconnect power.
Oven Door
For normal range use, it is not suggested to remove the oven door. However, if removal is necessary, make sure the oven is off and cool. Then, follow these instructions. The oven door is heavy.
To Remove:
- Open oven door all the way.
- Flip up the hinge latch on each side.
3. Close the oven door as far as it will shut.
4. Lift the oven door while holding both sides. Continue to push the oven door closed and pull it away from the oven door frame.
To Replace:
1. Insert both hanger arms into the door.
2. Open the oven door. You should hear a “click” as the door is set into place.
3. Move the hinge levers back to the locked position. Check that the door is free to open and close. If it is not, repeat the removal and installation procedures.
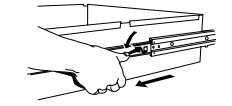
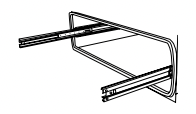
Storage Drawer
The storage drawer can be removed. Before removing, make sure drawer is cool and empty.
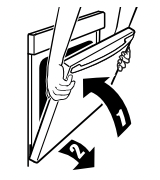
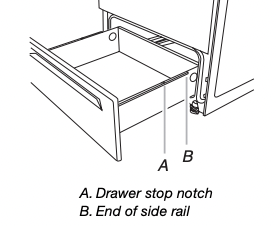
To Remove:
- Pull the storage drawer straight back past the drawer stop notch and the end of the side rails.
2. Lift up the back of the drawer and pull the drawer out
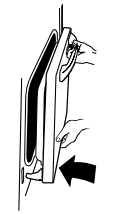
To Replace:
- Lift up the back of the drawer and place it inside the range in its fully forward position.
- Lift up the front of the drawer to a level position.
- Slowly push the drawer into the range until the drawer side rails engage with the gap in the drawer glides.
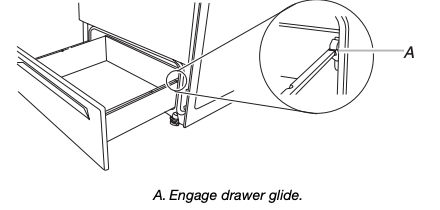
4. Once the drawer is fully engaged on both sides, slide the drawer back into the closed position.
NOTE: When you are removing and replacing the storage drawer, a slight push may be needed to move the drawer stop notch past the drawer glides.
Warming Drawer (on some models)
Remove all items from inside the warming drawer, and allow the unit to cool completely before attempting to remove the drawer.
To Remove:
- Open drawer to its fully open position.
- Locate the black triangle-shaped tabs on both sides of the drawer.
3. Press the tab down on the right side, and lift tab up on the left side at the same time, then pull drawer out another inch.
4. Holding the drawer by its sides, slowly pull it all the way out.
To Replace:
1. Align the drawer glides with the receiving guides.
2. Push drawer in all the way.
3. Gently open and close the drawer to ensure it is seated properly on the slides.
TROUBLESHOOTING
Try the solutions suggested here first in order to avoid the cost of an unnecessary service call.
Nothing will operate
- Is the power supply cord unplugged?
- Plug into a grounded outlet.
- Has a household fuse blown, or has a circuit breaker tripped?
- Replace the fuse or reset the circuit breaker. If the problem continues, call an electrician.
Cooktop will not operate
- Is the control knob set correctly?
- Push in knob before turning to a setting.
- On ceramic glass models, is the “Cooktop Lockout” set?
- See “Cooktop Lockout” section.
Excessive heat around cookware on cooktop
- Is the cookware the proper size?
- Use cookware about the same size as the surface cooking area, element or surface burner. Cookware should not extend more than ½" (1.3 cm) outside the cooking area.
Hot Surface indicator light stays on
- Does the Hot Surface indicator light stay on after control knob(s) have been turned off?
- See “Cooktop Controls” section.
Cooktop cooking results not what expected
- Is the proper cookware being used?
- Is the control knob set to the proper heat level?
- See “Cooktop Controls” section.
- Is the appliance level?
- Level the appliance. See the Installation Instructions.
Oven will not operate
- Is the electronic oven control set correctly?
- See “Electronic Oven Control” section.
- Has a delay start been set?
- See “Timed Cooking” section.
- On some models, is the Control Lock set?
- See “Control Lock” section.
Oven temperature too high or too low
- Does the oven temperature calibration need adjustment?
- See “Oven Temperature Control” section.
- On some models, does the cooling fan run during BAKE, BROIL or CLEAN?
- It is normal for the fan to automatically run when the oven is in use. These helps cool the electronic control.
Oven indicator lights flash
- Do the oven indicator lights flash?
- See the “Display” or “Oven Indicator Lights” section. If the indicator light(s) keeps flashing, call for service. See Assistance or Service” section.
Display shows messages
- Is the display showing “PF” or flashing a time?
- There has been a power failure. Clear the display. See "Display(s)” section. On some models, reset the clock, if needed. See “Clock” section.
- Is the display showing a letter followed by a number?
- Depending on your model, press OFF/CANCEL, OFF or CANCEL/OFF to clear the display. See “Display(s)” section. If it reappears, call for service. See “Assistance or Service” section.
Self-Cleaning cycle will not operate
- Is the oven door open?
- Close the oven door all the way.
- Has the function been entered?
- See “Self-Cleaning Cycle” section.
- On some models, has a delay start Self-Clean cycle been set?
- See “Self-Cleaning Cycle” section.
- Has a delay start been set?
- See “Timed Cooking” section.
Oven cooking results not what expected
- Is the appliance level?
- Level the appliance. See the Installation Instructions.
- Is the proper temperature set?
- Double-check the recipe in a reliable cookbook.
- Is the proper oven temperature calibration set?
- See “Oven Temperature Control” section.
- Was the oven preheated?
- See the “Baking and Roasting” and “Broiling” sections.
- Is the proper bakeware being used?
- Are the racks positioned properly?
- See “Positioning Racks and Bakeware” section.
- Is there proper air circulation around bakeware?
- See “Positioning Racks and Bakeware” section.
- Is the batter evenly distributed in the pan?
- Check that batter is level in the pan.
- Is the proper length of time being used?
- Has the oven door been opened while cooking?
- Oven peeking releases oven heat and can result in longer cooking times.
- Are baked items too brown on the bottom?
- Move rack to higher position in the oven.
- Are pie crust edges browning early?
- Use aluminum foil to cover the edge of the crust and/or reduce baking temperature.