User Manual WATERING SYSTEM
PRODUCT INCLUDES

(1) #14 Round Head Screw

(1) 7" Support Rod
TIMER FEATURES
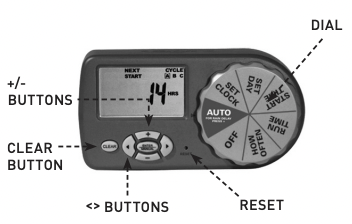
DIAL—Rotate the dial to customize your watering schedule
RESET—Press to clear all programming
ENTER/ MANUAL BUTTON—Press to water manually or to clear programming within a specific program < >
BUTTONS—Move cursor to different settings
AUTO—Timer waters according to your customized schedule
SET CLOCK—Set the time of day
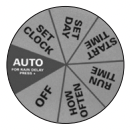
SET DAY—Set the day of the week
START TIME—Select what time you would like watering to start
HOW OFTEN—Choose how often you will water
OFF—Turn off all watering
INSTALLATION AND QUICK START
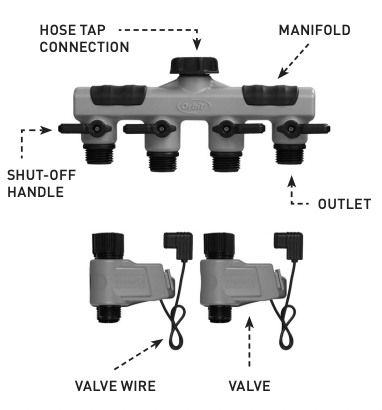
- 1. Attach manifold to an outdoor hose faucet.
- 2. Secure manifold to wall using the mounting hardware and instructions provided.
- 3. Attach up to 4 valves to the manifold outlets (the valves are electronically operated and must be attached to the timer for proper operation). Open fully each of the shut-offs with a valve attached.
- 4. Connect the wire from each valve to one of the numbered ports on the back of the timer. The numbers 1 through 4 are the “STATIONS” used while programming your timer.
- 5. Install two AA alkaline batteries into the battery tray (battery tray may be removed by pulling out to the left).
IMPORTANT: Please ensure that the valves are attached to the timer before installing batteries. Once the batteries are installed the timer will immediately begin a start-up sequence. A countdown from 150 down to 0 will begin on the display and will take a few minutes. Your timer can be programmed during the countdown, but the valves cannot be turned on until it is completed.
- 6. Create your timer program.
- 7. Slide timer onto a valve mounting bracket.
- 8. Turn on hose faucet.
MOUNTING THE MANIFOLD TO THE WALL
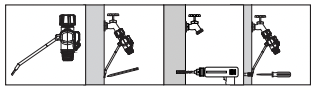
- 1. Attach support rod to manifold by inserting it into the two mounting holes on the back of the manifold.
- 2. Mark where support rod touches the wall.
- 3. Drill a pilot hole using a 1/4 in. drill bit.
- 4. Attach the support rod using the screw provided.
INSTALLING THE BATTERIES
- 1. Remove the tray on the side of the timer by sliding it out.
- 2. Insert two AA (1.5V) alkaline batteries (not included) and replace the tray. Low battery icon will appear when batteries need replacing. Replace batteries within 30 seconds or timer programming will be lost.
NOTE: Firmly replace the battery tray to ensure water resistance and increase battery life. You will know the battery tray is fully inserted if it locks in place and does not pull out easily. Used up or dead batteries must be removed from the timer and disposed of properly. Batteries should be removed from the timer at the end of the watering season and replaced with new ones at the beginning of the next watering season. Replace batteries when low battery icon appears on display
PROGRAMMING
Rotate the dial to positions indicated for setup.
SET CLOCK

- 1. Turn Dial to SET CLOCK
- 2. Press the + button to advance clock time (hold button for quick advance). Press the – button to reverse clock time (hold button for quick advance). *Keep in mind am/pm.
- 3. Press ENTER or turn the knob to accept clock time.
SET DAY
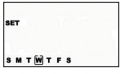
- 1. Turn Dial to SET DAY
- 2. Use the < and > buttons to move cursor (blinking line) over current day.
- 3. Press enter or turn dial to accept the day.
START TIME

- 1. Turn Dial to START TIME
Each start time cycles through all watering stations (1, 2, 3, and 4). Cycle A is for if you want to water once a day. Add Cycle B if you want to water two times a day (2 different start times). Add Cycle C if you want to water three times a day (3 different start times).
- 1. Use < and > buttons to select start time A, B, or C.
- 2. Press ENTER to edit start time.
- 3. Use the + and – buttons to set desired start time. * Keep in mind am/pm.
- 4. Press ENTER to accept the setting.
- 5. Repeat steps 1 through 4 for B and C if you want to water more than once a day.
TO CLEAR A START TIME:
- 1. Use the < and > buttons to move the cursor over cycle letter (A, B, C).
- 2. Press ENTER to select.
- 3. Press CLEAR. EXAMPLE: If cycle A is set for 6:00 am, then at 6:00 am your first valve will turn on and run for its duration, then it will turn off and the second station will automatically turn on and run for its duration.
RUN TIME
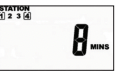
Set watering duration from 1 to 240 minutes for up to 4 stations.
- 1. Turn Dial to RUN TIME
- 2. Use the < and > buttons to select the run time for valves stations 1, 2, 3, or 4.
- 3. Press ENTER after each selected Station. [ ] will appear around the stations selected to water.
- 4. Press CLEAR to deselect a Station.
- Or
- 1. Use the + and – buttons to increase or decrease the number of minutes to water.
- 2. Press ENTER to accept the setting.
- 3. Repeat steps 1 and 2 for each station you would like to water.
HOW OFTEN
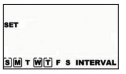
Select specific days to water or every 1 to 14 days. All stations and cycles will water on selected days.
- 1. Turn dial to HOW OFTEN
- 2. Use the < and > buttons to select which days to water Sunday through Saturday.
- 3. Press ENTER after each selected day. [_] will appear around days selected to water.
- 4. Press CLEAR to deselect a day. Or select INTERVAL.
NOTE: 1 is every day, 2 is every other day, ect. up to 14 days
- 1. Use the + and – buttons to increase and decrease the number of days.
- 2. Press ENTER to accept the setting.
AUTO
- 1. Turn Dial to AUTO Timer waters according to programmed start time(s), run time(s), on the programmed days or interval; this is where you want the dial to have your program run.
RAIN DELAY

Delay watering cycle during precipitation to conserve water.
- 1. With the dial on AUTO, press the + button to select a delay of 24 hrs, 48 hrs, or 72 hrs.
Screen will flash between clock and hours remaining before programmed cycle resumes. To remove rain delay, press CLEAR, or turn dial to OFF and then back to AUTO.
MANUAL WATERING
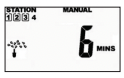
Allows you to water immediately without interrupting the set cycle(s).
- 1. Press the MANUAL button when dial is turned to AUTO
- 2. Press ENTER to run all stations once as previously programmed in RUN TIME section. Or Use the < and > buttons to select which station(s) to manually water.
- 3. Press ENTER when cursor is over desired watering station.
- 4. Use + and – buttons to set from 1 to 240 minutes.
* There will be a 6 second delay till your cycle will begin Screen will flash between clock and minutes remaining on cycle. To remove manual watering and resume programmed cycle press CLEAR
TROUBLESHOOTING
WATER DOES NOT COME ON AT DESIRED TIME. CHECK IF:
• Clock is set to correct time including AM and PM.
• Start time is set to desired time including AM and PM.
• Start times begin after previous watering cycle has run through all stations and set durations.
• Rain Delay is on (DELAY appears on left side of screen if on).
TIMER DOES NOT WATER. CHECK IF:
• Shut-off on the valve outlets are open.
• Timer is set to AUTO.
• Batteries are low.
• Clock is set to correct time including AM and PM.
• Rain Delay is on (DELAY appears on left side of screen if on).
• Valve plugs are inserted in the correct corresponding timer outlet.
WATER WON’T TURN OFF. CHECK IF:
• Watering duration is set to desired time. Start times begin after previous wateringcycle has runs through all stations and set duration.
NOTE: Turning the dial to the OFF position at any time during the day will reset the timer’s internal timing. This will cancel all scheduled watering times for the day until the next programmed START TIME. This means if you turn the dial back to AUTO the timer will not water until the next watering day; beginning at your desired programmed START TIME.
Example: You have a 6:00 AM START TIME with HOW OFTEN 6 hour intervals. If you turn the dial to OFF at 10:00 AM today the timer will not water until tomorrow at 6:00 AM. The 12:00 PM, 6:00 PM, and 12:00 AM watering times have been cancelled for the day.
WORKING WATER PRESSURE
- Minimum: 25 psi
- Maximum: 100 psi
WORKING TEMPERATURE
- Maximum: Do not exceed 120°F
- Minimum: Keep from freezing
WARNINGS For outdoor use with cold water only.
IMPORTANT INSTALLATION INSTRUCTIONS
Before turning on water:
1. Load batteries
2. Attach valves to timer and manifold
3. Allow the timer a few minutes to complete the automatic setup
About this item
- Fully automatic yard watering kit turns your hose faucet into a 4-Station sprinkler system
- No digging is required to easily install this watering system. MULTIPLE DURATIONS: Select from eight watering duration options from 1 to 240 minutes.
- One dial controls all basic programming
- Rain delay for 24-, 48- and 72-hour settings
- Orbit 58911 complete yard watering kit
Product Description
This fully automatic yard watering kit turns your hose faucet into a 4-station sprinkler system. No digging is required for installation. Connects to a standard hose faucet to provide 4 hose outlets with 4 independent controls. The kit comes with two programmable valves, and can be expanded up to four valves (additional valves sold separately).
Features and Benefits
- INCLUDES: Programmable timer, 4-port manifold adapter, and two automatic valves (expandable up to four valves).
- INTERVAL PROGRAMMING: Set your timer to water every 2 hours up to once per week.
- MULTIPLE DURATIONS: Select from eight watering duration options from 1 to 240 minutes.
- RAIN DELAY: Save water by skipping watering cycles after it rains without interrupting your set program. Delay watering from 1 to 3 days.
- EASY-TO-USE: The large dial and LCD screen are easy to see and operate.
- MANUAL WATERING: Temporarily bypass your program for quick faucet use.
- HIGH-QUALITY CONSTRUCTION: This product will last season after season without the worry or rust or corrosion.
- SWIVEL ATTACHMENT: Over-molded brass hose faucet swivel coupling for easy and quick connection without any need for tools.
- BATTERY OPERATED: Runs on 2 AA batteries (not included)