
GB
1
! This symbol reminds you to read this instruc-
tion manual.
Contents
Installation, 2-3
Unpacking and levelling
Connecting the electricity and water supplies
The first wash cycle
Technical data
Care and maintenance, 4
Cutting off the water or electricity supply
Cleaning the washer-dryer
Cleaning the detergent dispenser drawer
Caring for the door and drum of your appliance
Cleaning the pump
Checking the water inlet hose
Precautions and tips, 5
General safety
Disposal
Opening the porthole door manually
Description of the washer-dryer, 6-7
Control panel
Display
How to run a wash cycle or a drying cycle, 8
Wash cycles and functions, 9
Table of wash cycles
Wash functions
Detergents and laundry, 10
Detergent dispenser drawer
Preparing the laundry
Special wash cycles
Load balancing system
Troubleshooting, 11
Service, 12
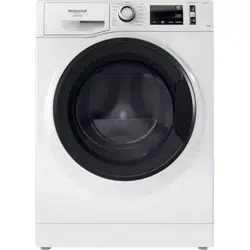
RDPD 107617 J
Instructions for use
WASHER-DRYER
English,1
GB
Polski,13
PL
Deutsch,25
DE
Français,37
FR
2
GB
Installation
! This instruction manual should be kept in a safe
place for future reference. If the washer-dryer is
sold, transferred or moved, make sure that the
instruction manual remains with the machine so
that the new owner is able to familiarise himself/
herself with its operation and features.
! Read these instructions carefully: they con-
tain vital information relating to the safe instal-
lation and operation of the appliance.
Unpacking and levelling
Unpacking
1. Remove the washer-dryer from its packa-
ging.
2. Make sure that the washer-dryer has not
been damaged during the transportation
process. If it has been damaged, contact the
retailer and do not proceed any further with
the installation process.
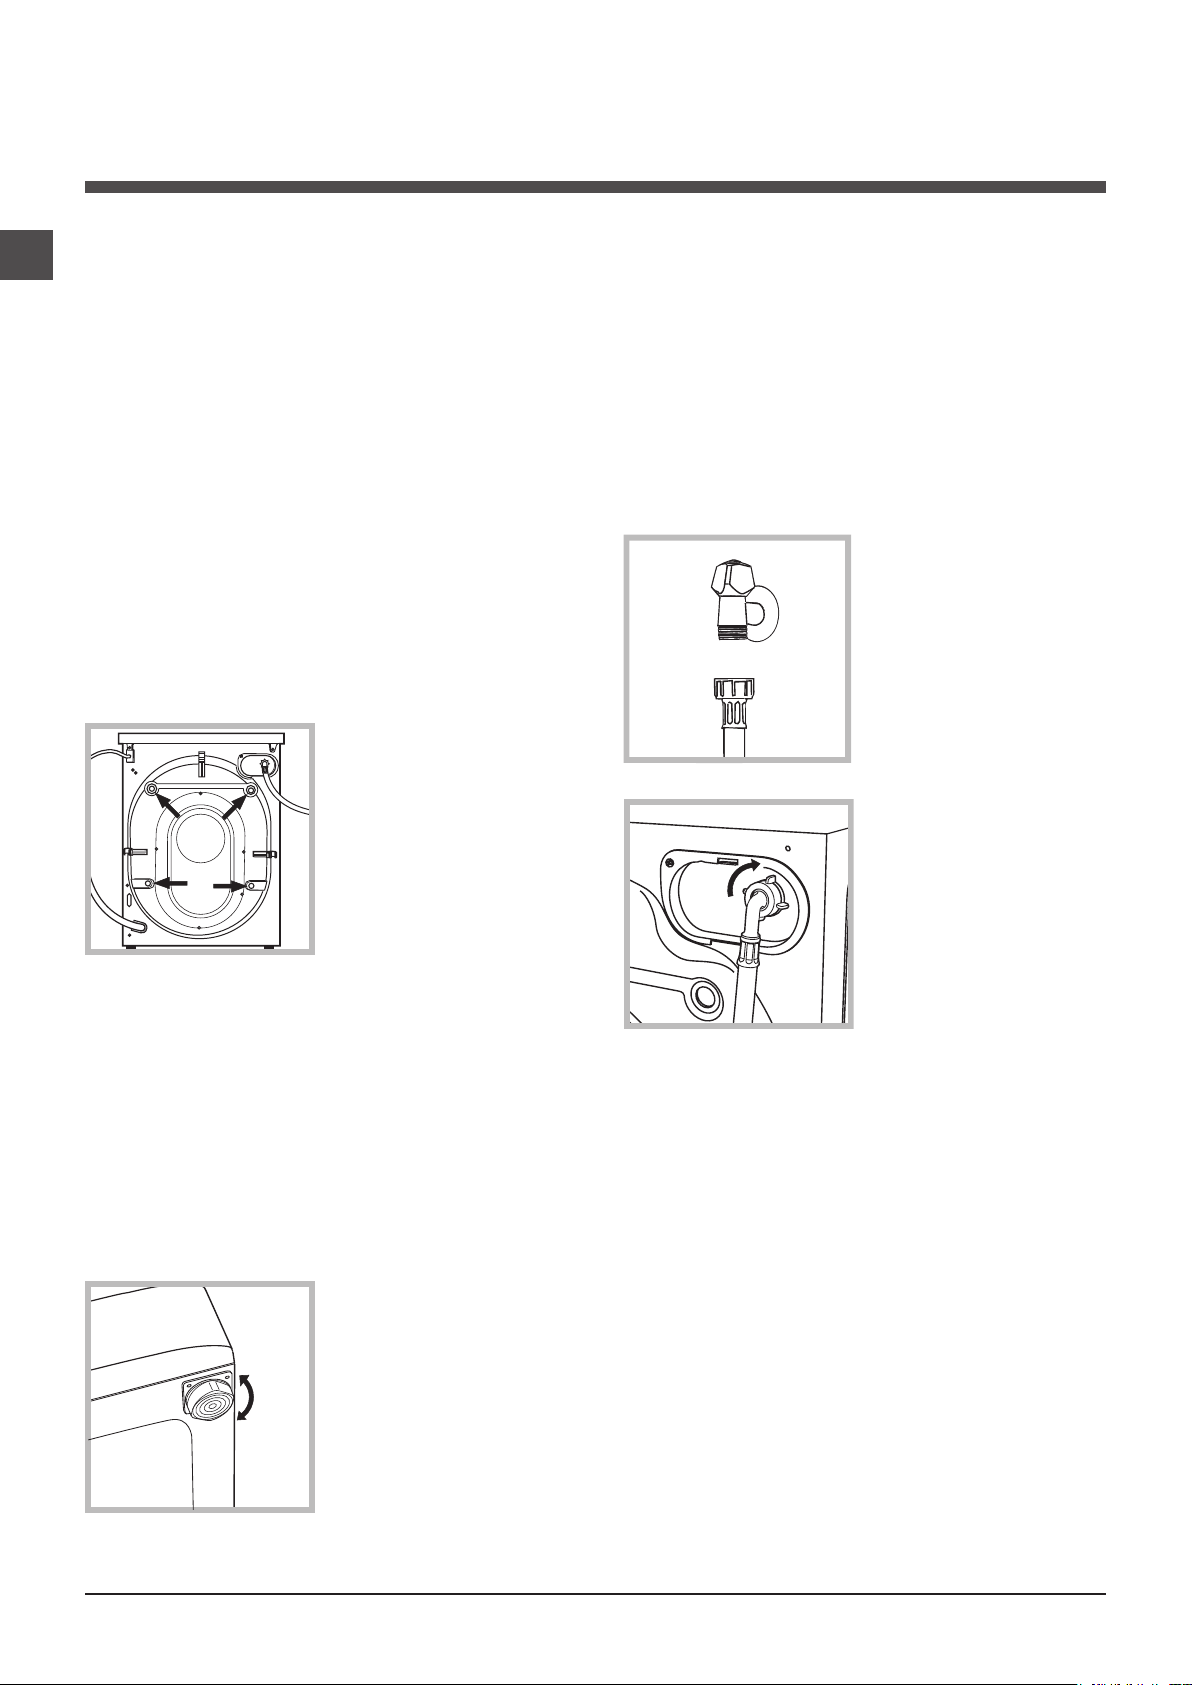
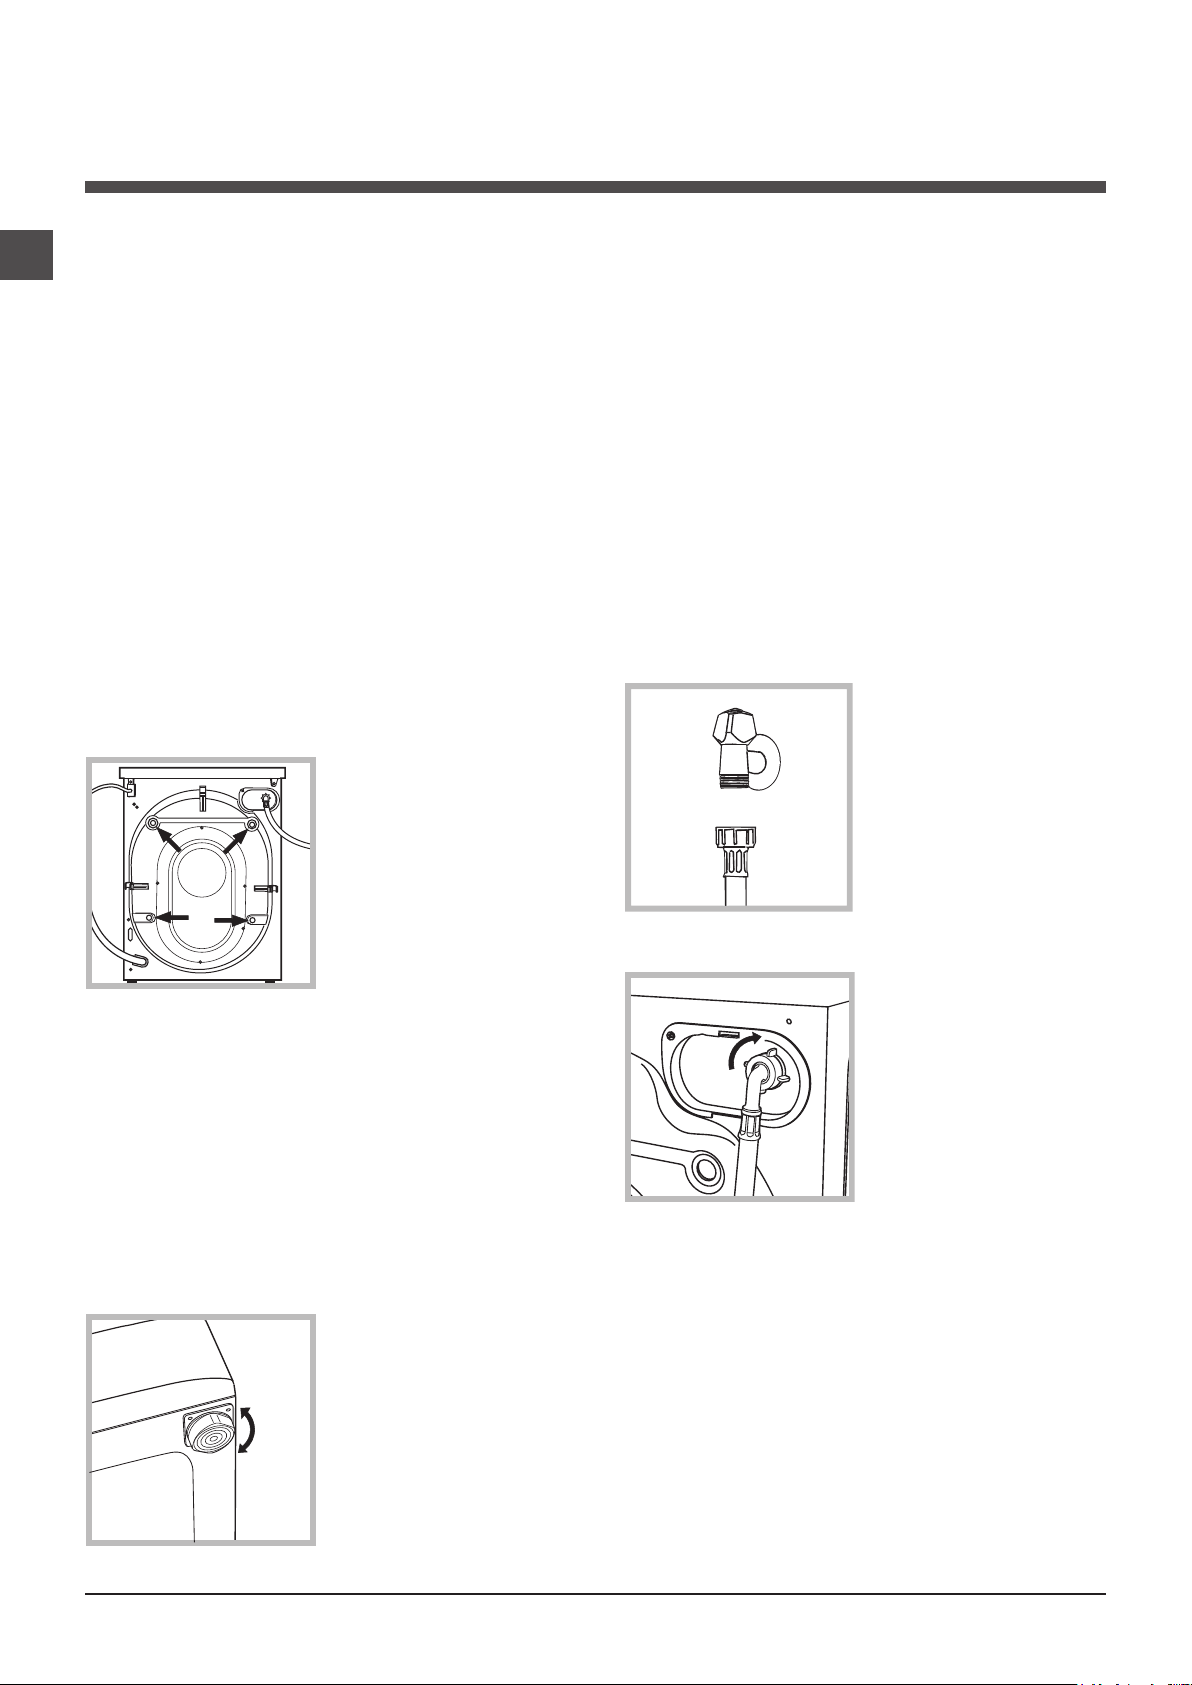
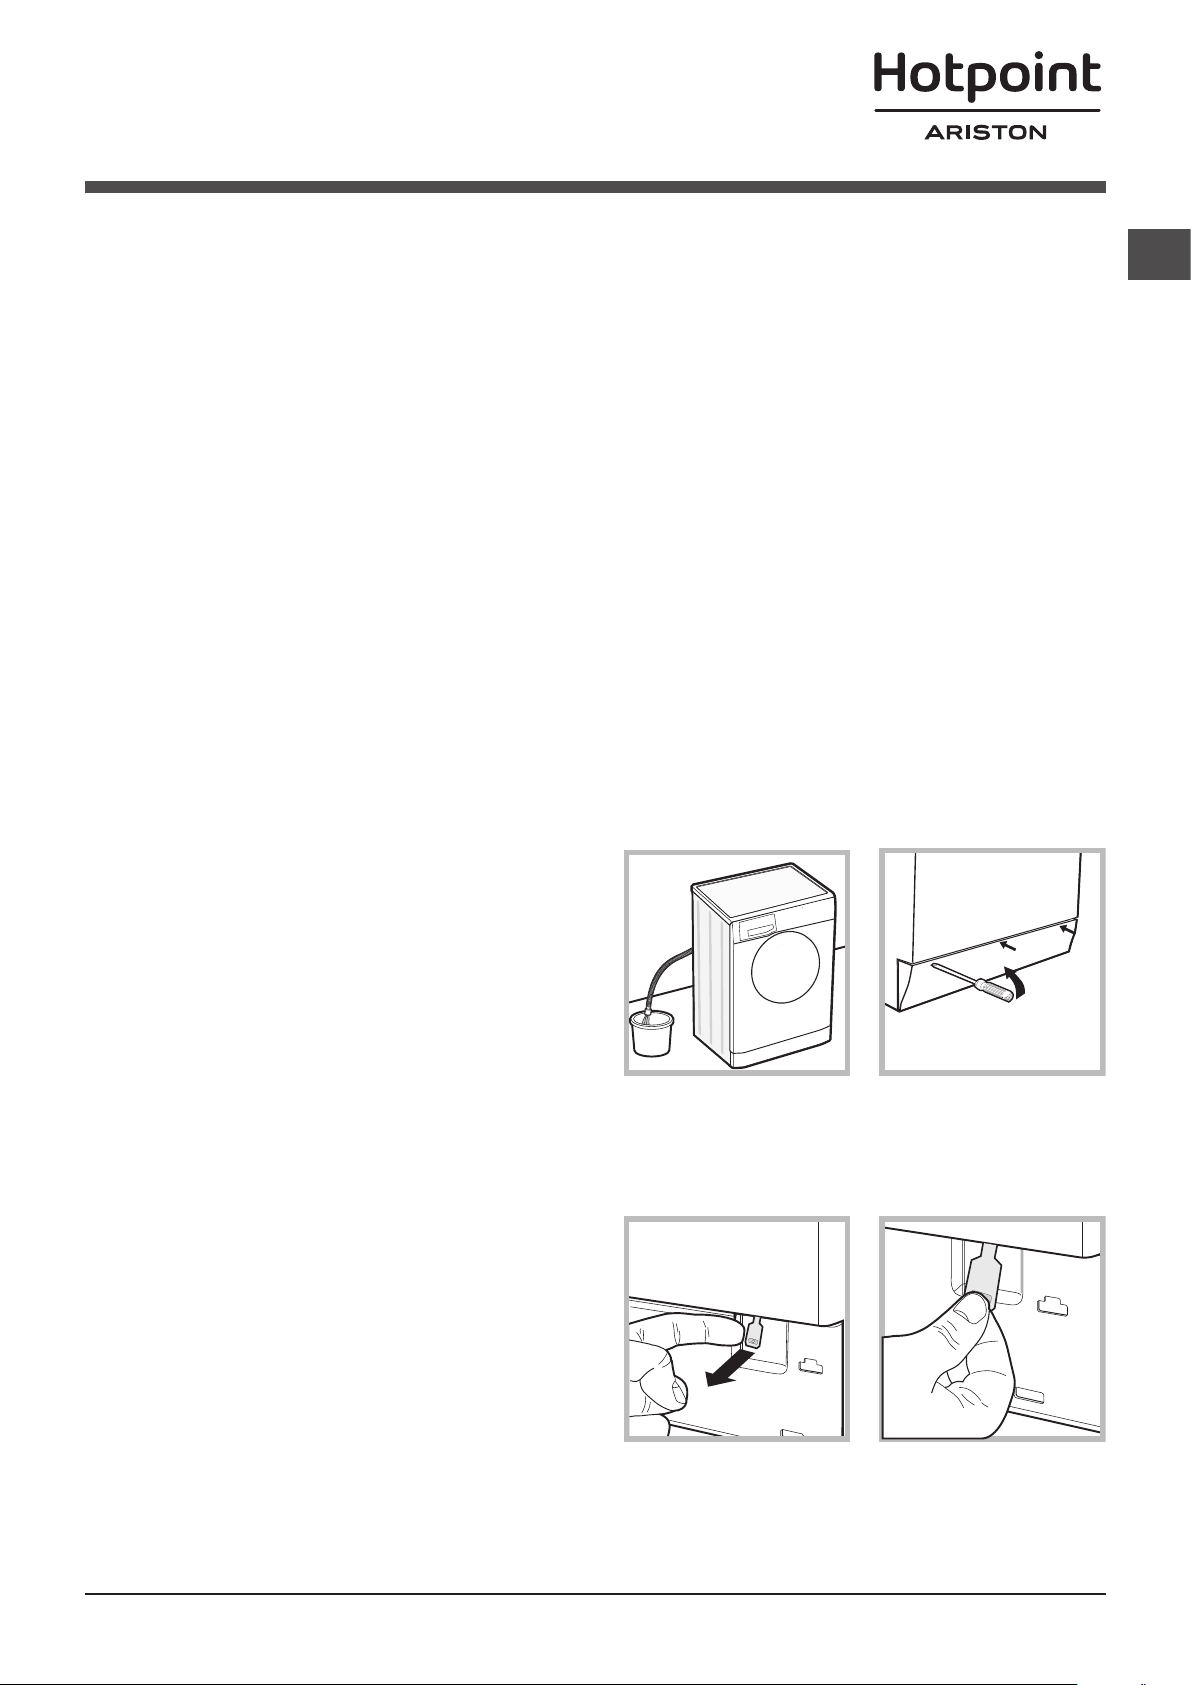
3. Remove the 4 pro-
tective screws (used
during transportation)
and the rubber wa-
sher with the cor-
responding spacer,
located on the rear
part of the appliance
(see figure).
4. Close off the holes using the plastic plugs
provided.
5. Keep all the parts in a safe place: you will
need them again if the washer-dryer needs to
be moved to another location.
! Packaging materials should not be used as
toys for children.
Levelling
1. Install the washer-dryer on a flat sturdy floor,
without resting it up against walls, furniture
cabinets or anything else.
2. If the floor is not
perfectly level, com-
pensate for any une-
venness by tightening
or loosening the
adjustable front feet
(see figure); the angle
of inclination, measu-
red in relation to the
worktop, must not
exceed 2°.
Levelling the machine correctly will provide
it with stability, help to avoid vibrations and
excessive noise and prevent it from shifting
while it is operating. If it is placed on carpet or
a rug, adjust the feet in such a way as to allow
a sufficient ventilation space underneath the
washer-dryer.
Connecting the electricity and
water supplies
Connecting the water inlet hose
1. Connect the inlet
hose by screwing it to
a cold water tap using
a 3/4 gas threaded
connection (see figu-
re).
Before performing the
connection, allow the
water to run freely un-
til it is perfectly clear.
2. Connect the inlet
hose to the washer-
dryer by screwing it
onto the correspon-
ding water inlet of the
appliance, which is
situated on the top
right-hand side of the
rear part of the ap-
pliance (see figure).
3. Make sure that the hose is not folded over
or bent.
! The water pressure at the tap must fall within
the range of values indicated in the Technical
data table (see next page).
! If the inlet hose is not long enough, contact a
specialised shop or an authorised technician.
! Never use second-hand hoses.
! Use the ones supplied with the machine.
GB
3
Technical data
Model
RDPD 107617 J
Dimensions
width 59.5 cm
height 85 cm
depth 60,5 cm
Capacity
from 1 to 10 kg for the wash
programme
from 1 to 7 kg for the drying
programme
Electrical
connections
please refer to the technical
data plate fixed to the machine
Water con-
nections
maximum pressure
1 MPa (10 bar)
minimum pressure
0.05 MPa (0.5 bar)
drum capacity 71 litres
Spin speed
up to 1600 rotations per
minute
Energy
rated
programmes
according to
regulation
EN 50229
Wash: programme 8; tem-
perature 60°C; using a load
of 10 kg.
Drying: the greater load (7kg)
must be dried by selecting
the “EXTRA” dryness level.
The remainder of the load
must be dried by selecting
the “EXTRA” dryness level:
the load must consist of 3
sheets, 2 pillowcases and
1 hand towel.
This appliance conforms to
the following EC Directives:
- EMC 2014/30/EU (Electro-
magnetic Compatibility)
- LVD 2014/35/EU (Low Voltage)
- 2012/19/EU (WEEE)
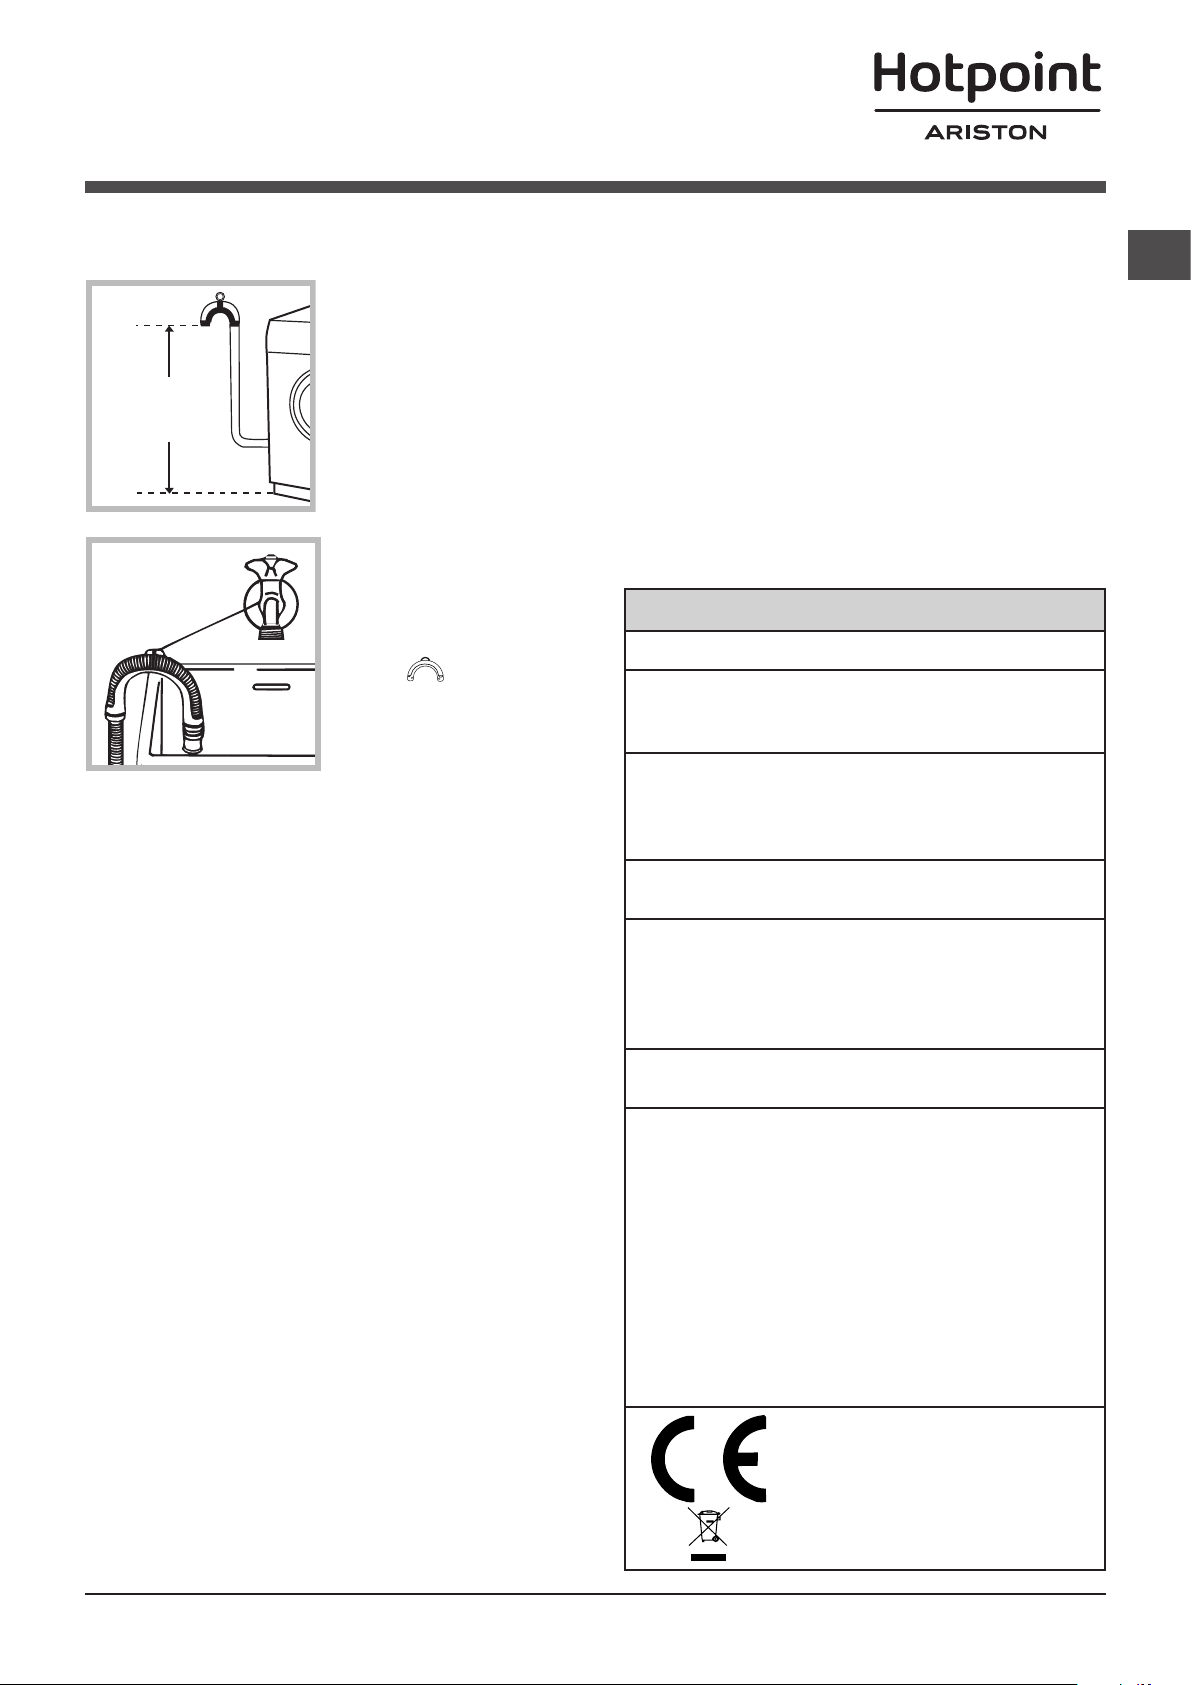
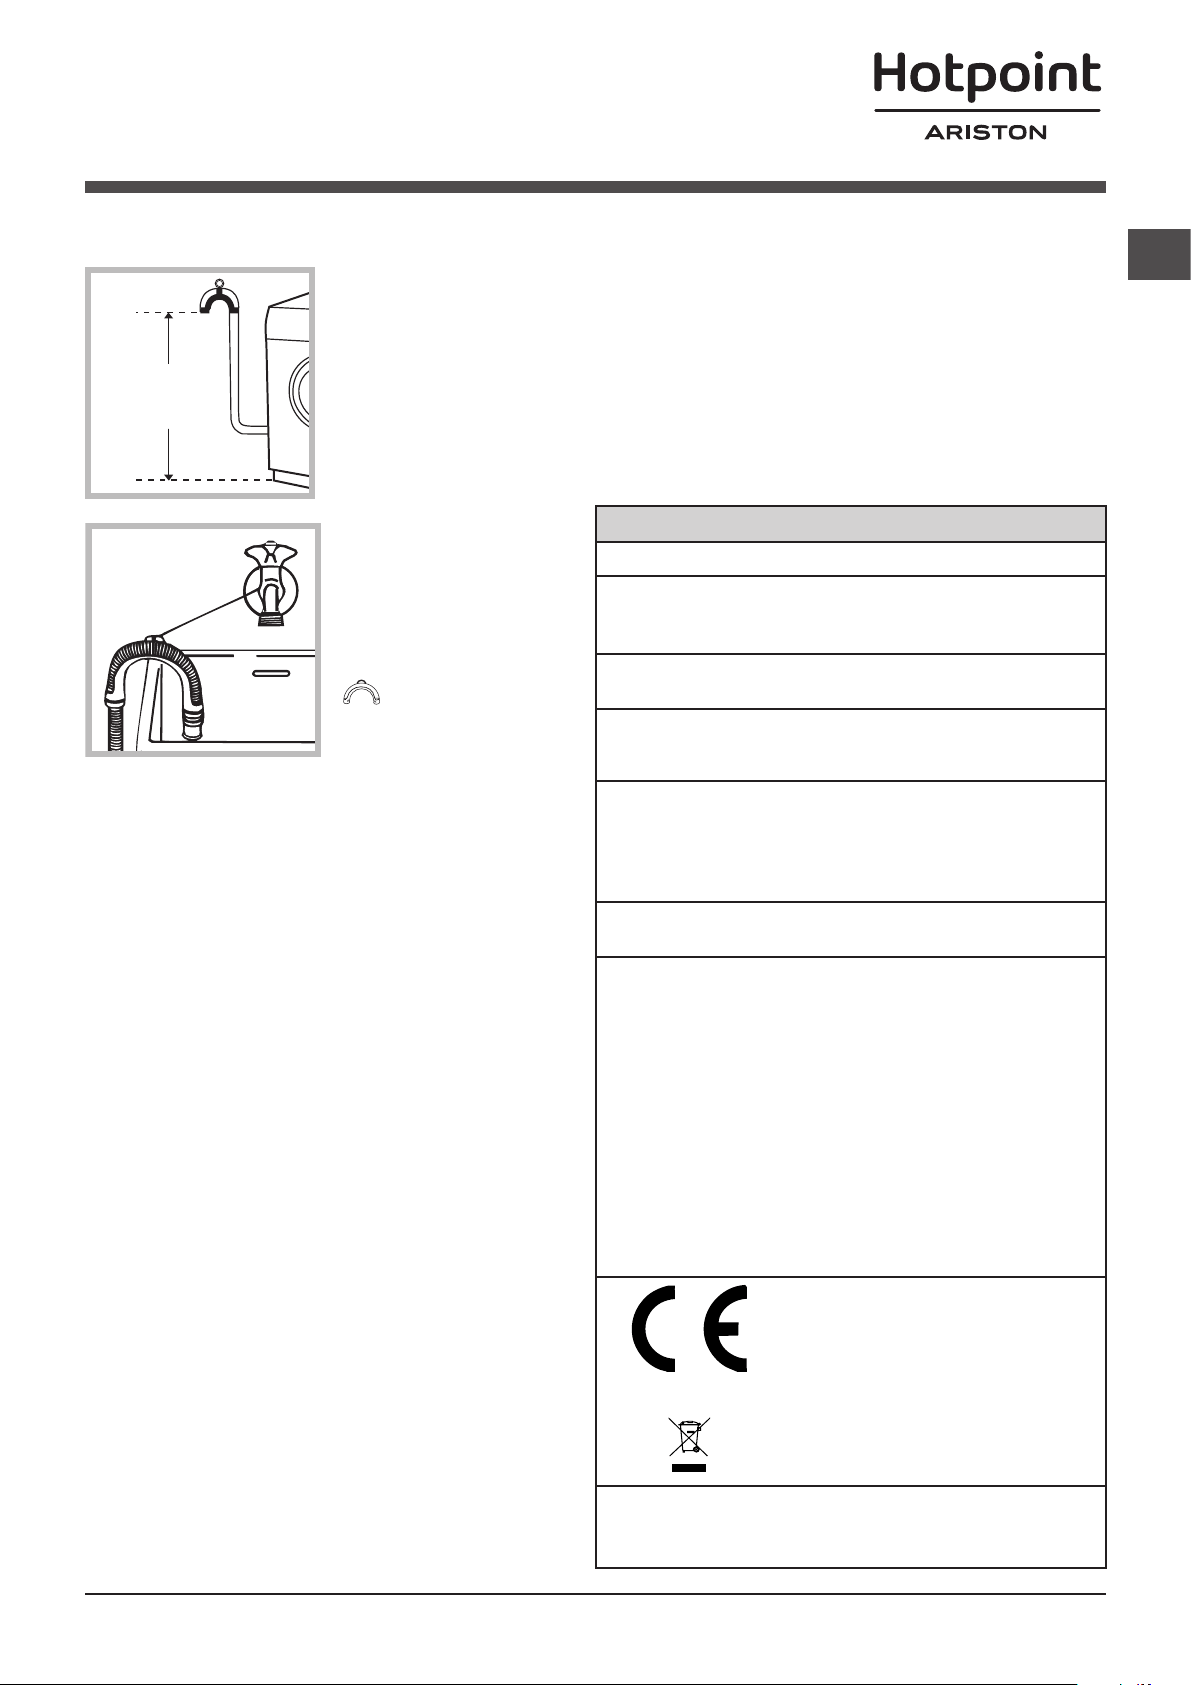
Connecting the drain hose
Connect the drain
hose, without bending
it, to a drain duct or
a wall drain situated
between 65 and 100
cm from the floor.
Alternatively, place
the drain hose over
the edge of a wa-
shbasin or bathtub,
by fastening the
guide (which
can be purchased at
the technical assi-
stance centre) to the
tap (see figure). The
free end of the hose
should not be underwater.
! We advise against the use of hose extensions;
if it is absolutely necessary, the extension must
have the same diameter as the original hose
and must not exceed 150 cm in length.
Electrical connections
Before plugging the appliance into the electri-
city socket, make sure that:
• thesocketisearthedandcomplieswithall
applicable laws;
• thesocketisabletowithstandthemaxi-
mum power load of the appliance as indicated
in the Technical data table (see opposite);
• thepowersupplyvoltagefallswithintheva-
lues indicated in the Technical data table (see
opposite);
• thesocketiscompatiblewiththeplugofthe
washing machine. If this is not the case, repla-
ce the socket or the plug.
! The washing machine must not be installed
outdoors, even in covered areas. It is extreme-
ly dangerous to leave the appliance exposed
to rain, storms and other weather conditions.
! When the washing machine has been instal-
led, the electricity socket must remain within
easy reach.
! Do not use extension cords or multiple sockets.
65 - 100 cm
! The cable should not be bent or compressed.
! The power supply cable must only be repla-
ced by authorised technicians.
Warning! The company shall not be held re-
sponsible in the event that these standards are
not observed.
The first wash cycle
Once the appliance has been installed, and
before you use it for the first time, run a wash
cycle with detergent and no laundry, using
wash cycle auto clean (see “Cleaning the wa-
shing machine”).

4
GB
Cleaning the pump
The washer-dryer is fitted with a self-cleaning
pump which does not require any maintenan-
ce. Sometimes, small items (such as coins or
buttons) may fall into the pre-chamber which
protects the pump, situated in its bottom part.
! Make sure the wash cycle has finished and
unplug the appliance.
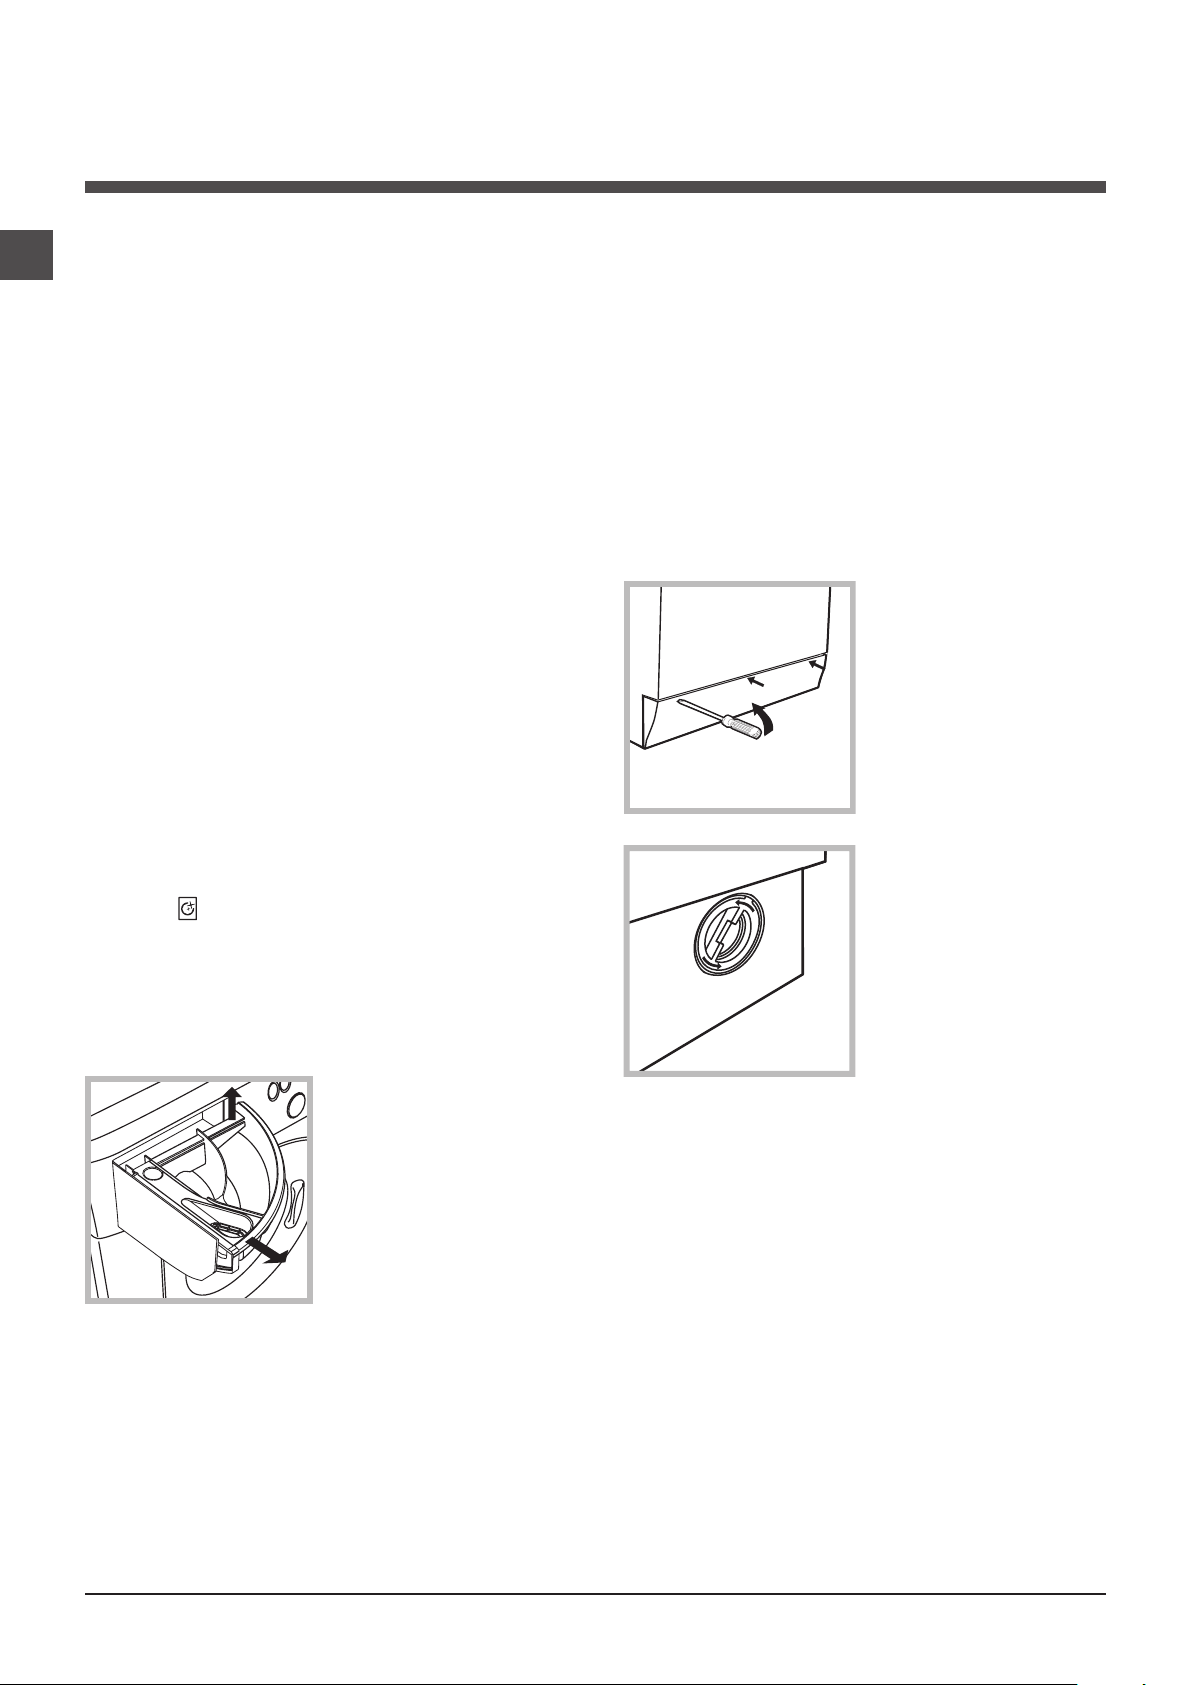
To access the pre-chamber:
1. using a screwdri-
ver, remove the
cover panel on the
lower front part of the
washer-dryer (see
figure);
2. unscrew the lid
by rotating it anti-
clockwise (see figu-
re): a little water may
trickle out. This is
perfectly normal;
3. clean the inside thoroughly;
4. screw the lid back on;
5. reposition the panel, making sure the hooks
are securely in place before you push it onto
the appliance.
Checking the water inlet hose
Check the inlet hose at least once a year. If
there are any cracks, it should be replaced
immediately: during the wash cycles, water
pressure is very strong and a cracked hose
could easily split open.
! Never use second-hand hoses.
Care and maintenance
Cutting off the water and electri-
city supplies
•Turnoffthewatertapaftereverywashcycle.
This will limit wear on the hydraulic system
inside the washer-dryer and help to prevent
leaks.
•Unplugthewasher-dryerwhencleaningit
and during all maintenance work.
Cleaning the washer-dryer
•Theouterpartsandrubbercomponents
of the appliance can be cleaned using a soft
cloth soaked in lukewarm soapy water. Do not
use solvents or abrasives.
•Thewasher-dryerhasaautocleanpro-
gramme for its internal parts that must be run
with no load in the drum.
To help the wash cycle you may want to use
either the detergent (i.e. a quantity 10% the
quantity specified for lightly-soiled garments)
or special additives to clean the washer-dryer.
We recommend running a cleaning program-
me every 40 wash cycles.
To activate the programme, press the but-
ton for 5 seconds then press START/PAUSE
to start the programme, which will last roughly
70 minutes.
Cleaning the detergent dispenser
drawer
Remove the dispen-
ser by raising it and
pulling it out (see
figure).
Wash it under running
water; this operation
should be repeated
frequently.
Caring for the door and drum of
your appliance
•Alwaysleavetheportholedoorajarinorder
to prevent unpleasant odours from forming.
1
2

GB
5
Precautions and tips
! This washer-dryer was designed and constructed in
accordance with international safety regulations. The fol-
lowing information is provided for safety reasons and must
therefore be read carefully.
General safety
• This appliance was designed for domestic use only.
•Thisappliancecanbeusedbychildrenaged
from 8 years and above and persons with
reduced physical, sensory or mental capabi-
lities or lack of experience and knowledge if
they have been given supervision or instruction
concerning use of the appliance in a safe way
and understand the hazards involved. Children
shall not play with the appliance. Cleaning and
user maintenance shall not be made by children
without supervision.
– Do not dry unwashed items in the tumble dryer.
– Items that have been soiled with substan-
ces such as cooking oil, acetone, alcohol,
petrol, kerosene, spot removers, turpentine,
waxes and wax removers should be washed
in hot water with an extra amount of deter-
gent before being dried in the tumble dryer.
– Items such as foam rubber (latex foam),
shower caps, waterproof textiles, rubber
backed articles and clothes or pillows fitted
with foam rubber pads should not be dried in
the tumble dryer.
– Fabric softeners, or similar products,
should be used as specified by the fabric
softener instructions.
– The final part of a tumble dryer cycle occurs
without heat (cool down cycle) to ensure that
the items are left at a temperature that ensures
that the items will not be damaged.
WARNING: Never stop a tumble dryer before
the end of the drying cycle unless all items
are quickly removed and spread out so that
the heat is dissipated.
•Do not touch the machine when barefoot or with wet or
damp hands or feet.
•Do not pull on the power supply cable when unplugging
the appliance from the electricity socket. Hold the plug
and pull.
•Do not open the detergent dispenser drawer while the
machine is in operation.
•Do not touch the drained water as it may reach extreme-
ly high temperatures.
•Never force the porthole door. This could damage the
safety lock mechanism designed to prevent accidental
opening.
•If the appliance breaks down, do not under any circum-
stances access the internal mechanisms in an attempt
to repair it yourself.
•Always keep children well away from the appliance while
it is operating.
•The door can become quite hot during the wash cycle.
•If the appliance has to be moved, work in a group of two
or three people and handle it with the utmost care. Never
try to do this alone, because the appliance is very heavy.
•Before loading laundry into the washer-dryer, make sure
the drum is empty.
• During the drying phase, the door tends to get quite hot.
• Donotusetheappliancetodryclothesthat
have been washed with flammable solvents
(e.g. trichlorethylene).
• Donotusetheappliancetodryfoamrubber
or similar elastomers.
• Make sure that the water tap is turned on during
the drying cycles.
• Childrenoflessthan3yearsshouldbekept
away from the appliance unless continuou-
sly supervised.
• Removeallobjectsfrompocketssuchas
lighters and matches.
Disposal
•Disposingofthepackagingmaterials:observelocal
regulations so that the packaging may be re-used.
• TheEuropeanDirective2012/19/EUonWaste
Electrical and Electronic Equipment, requires that
old household electrical appliances must not be
disposed of in the normal unsorted municipal waste
stream. Old appliances must be collected
separately in order to optimise the recovery and
recycling of the materials they contain and reduce
the impact on human health and the environment.
The crossed out “wheeled bin” symbol on the
product reminds you of your obligation, that when
you dispose of the appliance it must be separately
collected.
Consumers should contact their local authority or
retailer for information concerning the correct
disposal of their old appliance.
Opening the porthole door manually
In the event that it is not possible to open the porthole
door due to a powercut, and if you wish to remove the
laundry, proceed as follows:
1. remove the plug from the electrical socket.
2. make sure the water level inside the machine is lower
than the door opening; if it is not, remove excess water
using the drain hose, collecting it in a bucket as indicated
in the figure.
3. using a screwdriver, remove the cover panel on the
lower front part of the washer-dryer (see figure).
4. pull outwards using the tab as indicated in the figure,
until the plastic tie-rod is freed from its stop position; pull
downwards and open the door at the same time.
5. reposition the panel, making sure the hooks are securely
in place before you push it onto the appliance.
20
6
GB
Detergent dispenser drawer: used to dispense
detergents and washing additives (see “Detergents and
laundry”).
Programme Key: the Programme Key inside the deter-
gent dispenser shows all the available programmes toge-
ther with a graphical guide on how to use the individual
dispenser compartments.
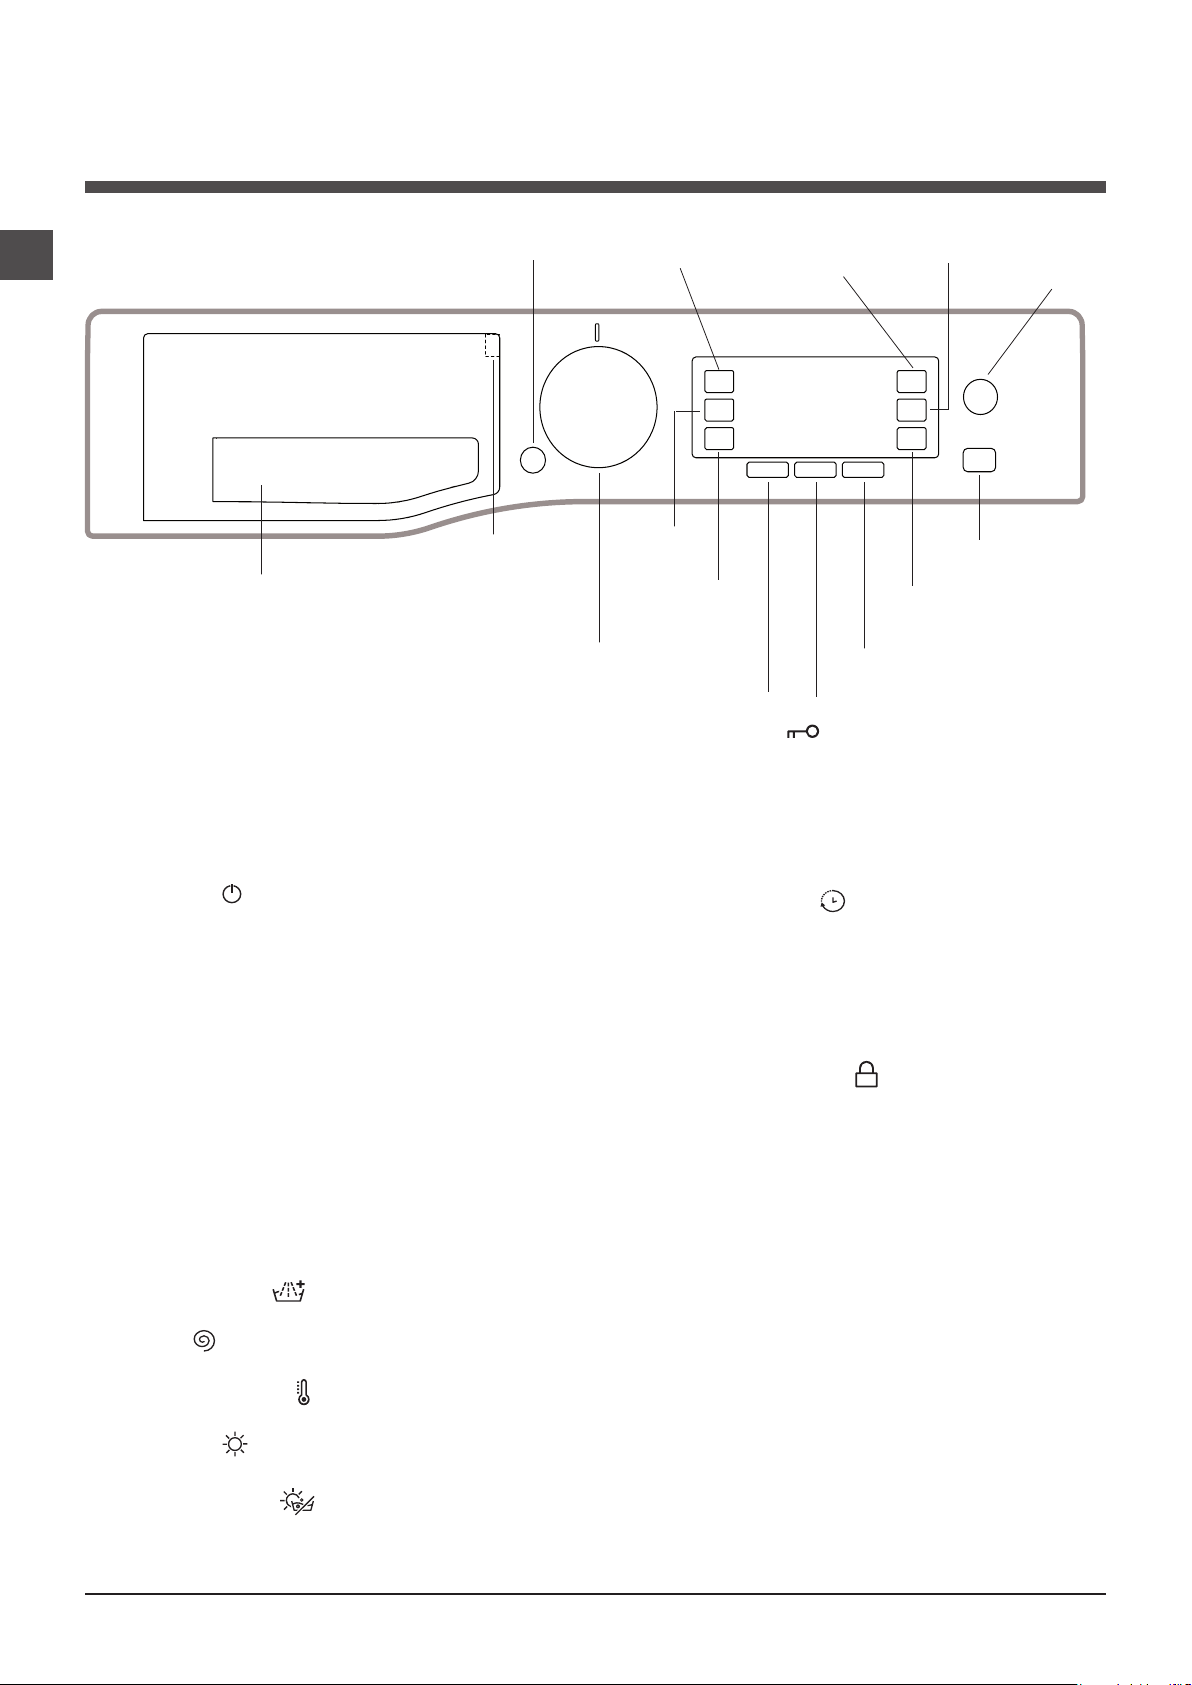
ON/OFF button : press this briefly to switch the ma-
chine on or off. The START/PAUSE indicator light, which
flashes slowly in a green colour shows that the machine
is switched on. To switch off the washer-dryer during the
wash cycle, press and hold the button for approximately 3
seconds; if the button is pressed briefly or accidentally the
machine will not switch off. If the machine is switched off
during a wash cycle, this wash cycle will be cancelled.
WASH CYCLE SELECTOR KNOB: used to set the desired
wash cycle (see “Table of programmes and wash cycles”).
FUNCTION button: press the button to select the desired
function. The corresponding indicator light on the display
will switch on.
AUTO CLEAN button: press to clean the machine’s inter-
nal parts (see “Cleaning the washer-dryer”).
DIRECT INJECTION button: press to select the DIRECT
INJECTION option.
MULTI RINSE button : press to select the desired
rinse type.
SPIN button : press to reduce or completely exclude
the spin cycle - the value is indicated on the display.
TEMPERATURE button : press to decrease the tempe-
rature: the value will be shown on the display.
DRYING button : press to decrease or exclude drying;
the selected drying level or time will appear on the display.
DRYING ONLY button : press to run the drying cycle
only.
KEY LOCK button : to activate the control panel
lock, press and hold the button for approximately 2
seconds. When the display visualises “KEY LOCK ON” the
control panel is locked (apart from the ON/OFF button).
This means it is possible to prevent wash cycles from
being modified accidentally, especially where there are
children in the home. To deactivate the control panel lock,
press and hold the button for approximately 2 seconds.
DELAY TIMER button : press to set a delayed start
time for the selected wash cycle. The delay time will be
shown on the display.
START/PAUSE button with indicator light: when the gre-
en indicator light flashes slowly, press the button to start a
wash cycle. Once the cycle has started the indicator light
will remain lit in a fixed manner. To pause the wash cycle,
press the button again; the indicator light will flash in an
orange colour. If the symbol is not illuminated, the door
may be opened. To start the wash cycle from the point at
which it was interrupted, press the button again.
Standby mode
This washer-dryer, in compliance with new energy saving
regulations, is fitted with an automatic standby system
which is enabled after about 30 minutes if no activity is
detected. Press the ON-OFF button briefly and wait for the
machine to start up again.
Consumption in off-mode: 0,5 W
Consumption in Left-on: 8 W
Description of the washer-dryer
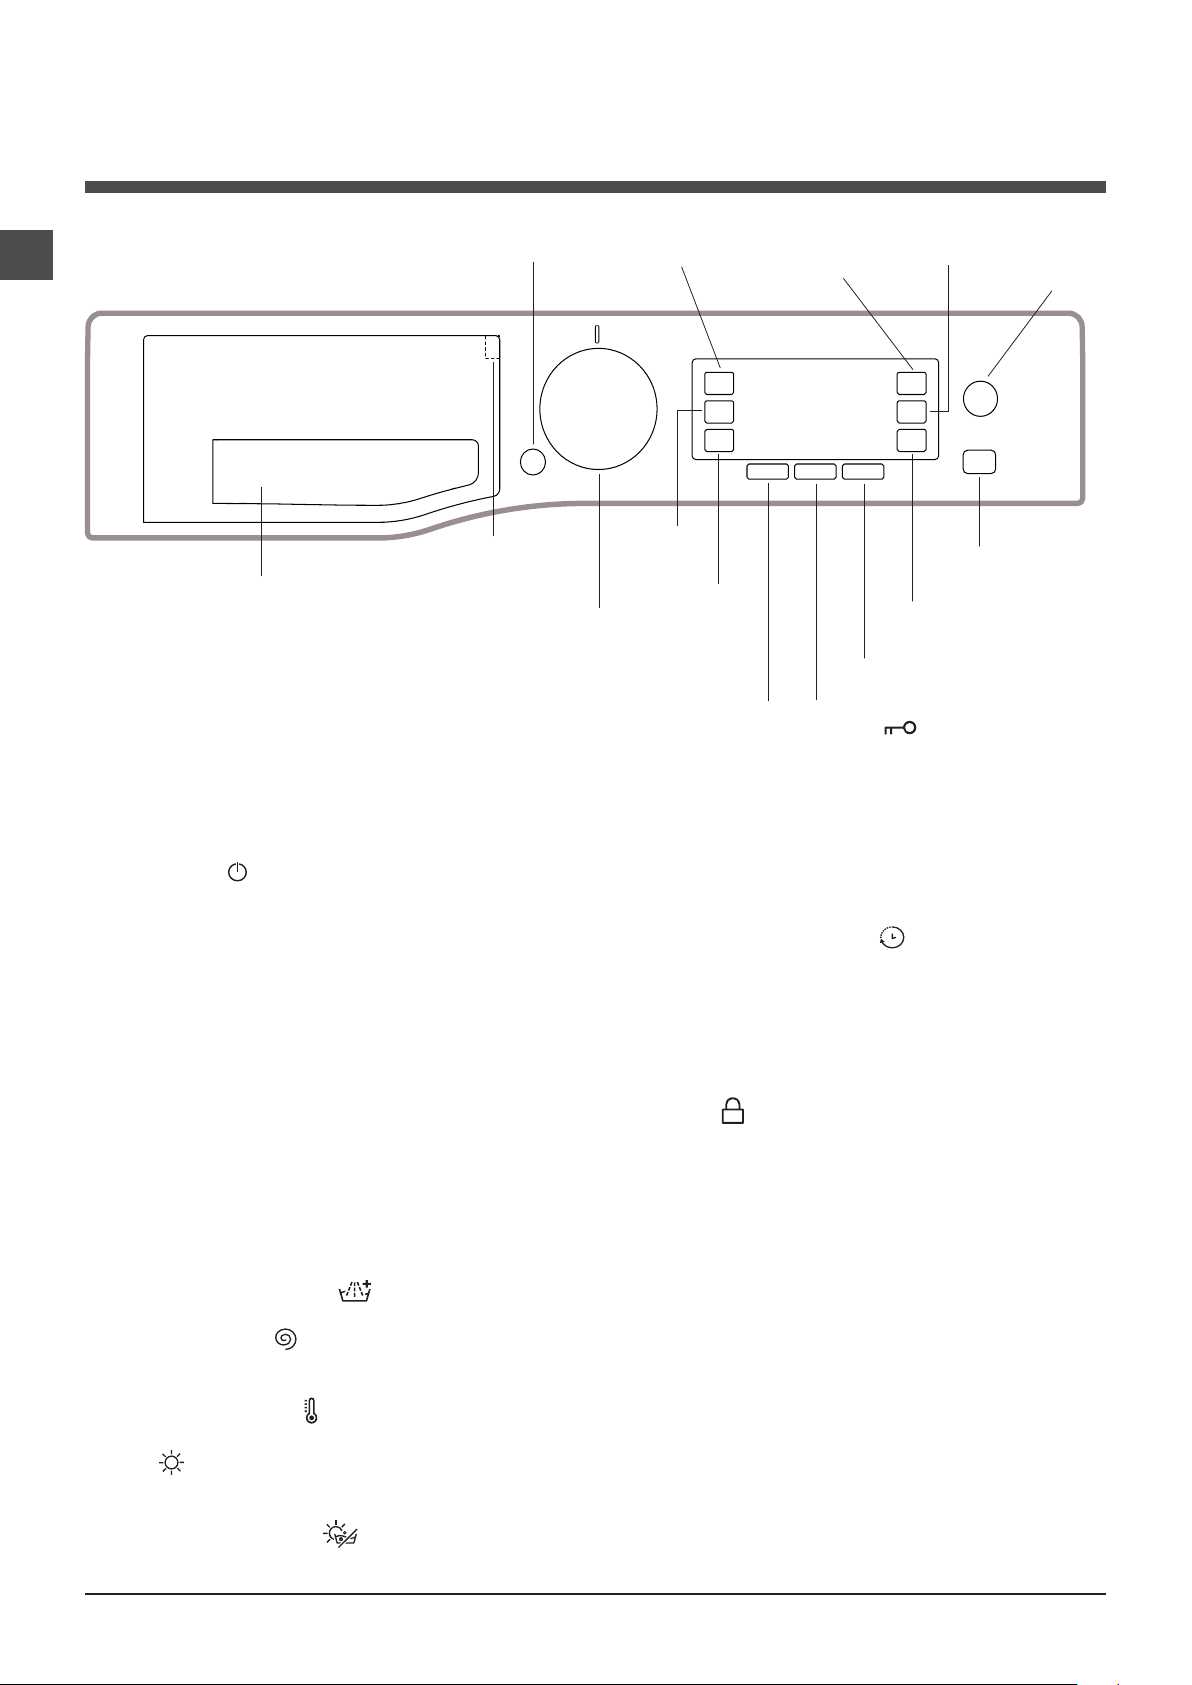
Control panel
TEMPERATURE
button
Detergent dispenser drawer
FUNCTION
button
ON/OFF
button
SPIN
button
START/PAUSE
button with indicator light
KEY LOCK
button
DELAY
TIMER
button
MULTI
RINSE
button
DISPLAY
AUTO
CLEAN
button
DIRECT
INJECTION
button
Programme
Key
WASH
CYCLE
SELECTOR
KNOB
DRYING ONLY
button
DRYING
button

GB
7
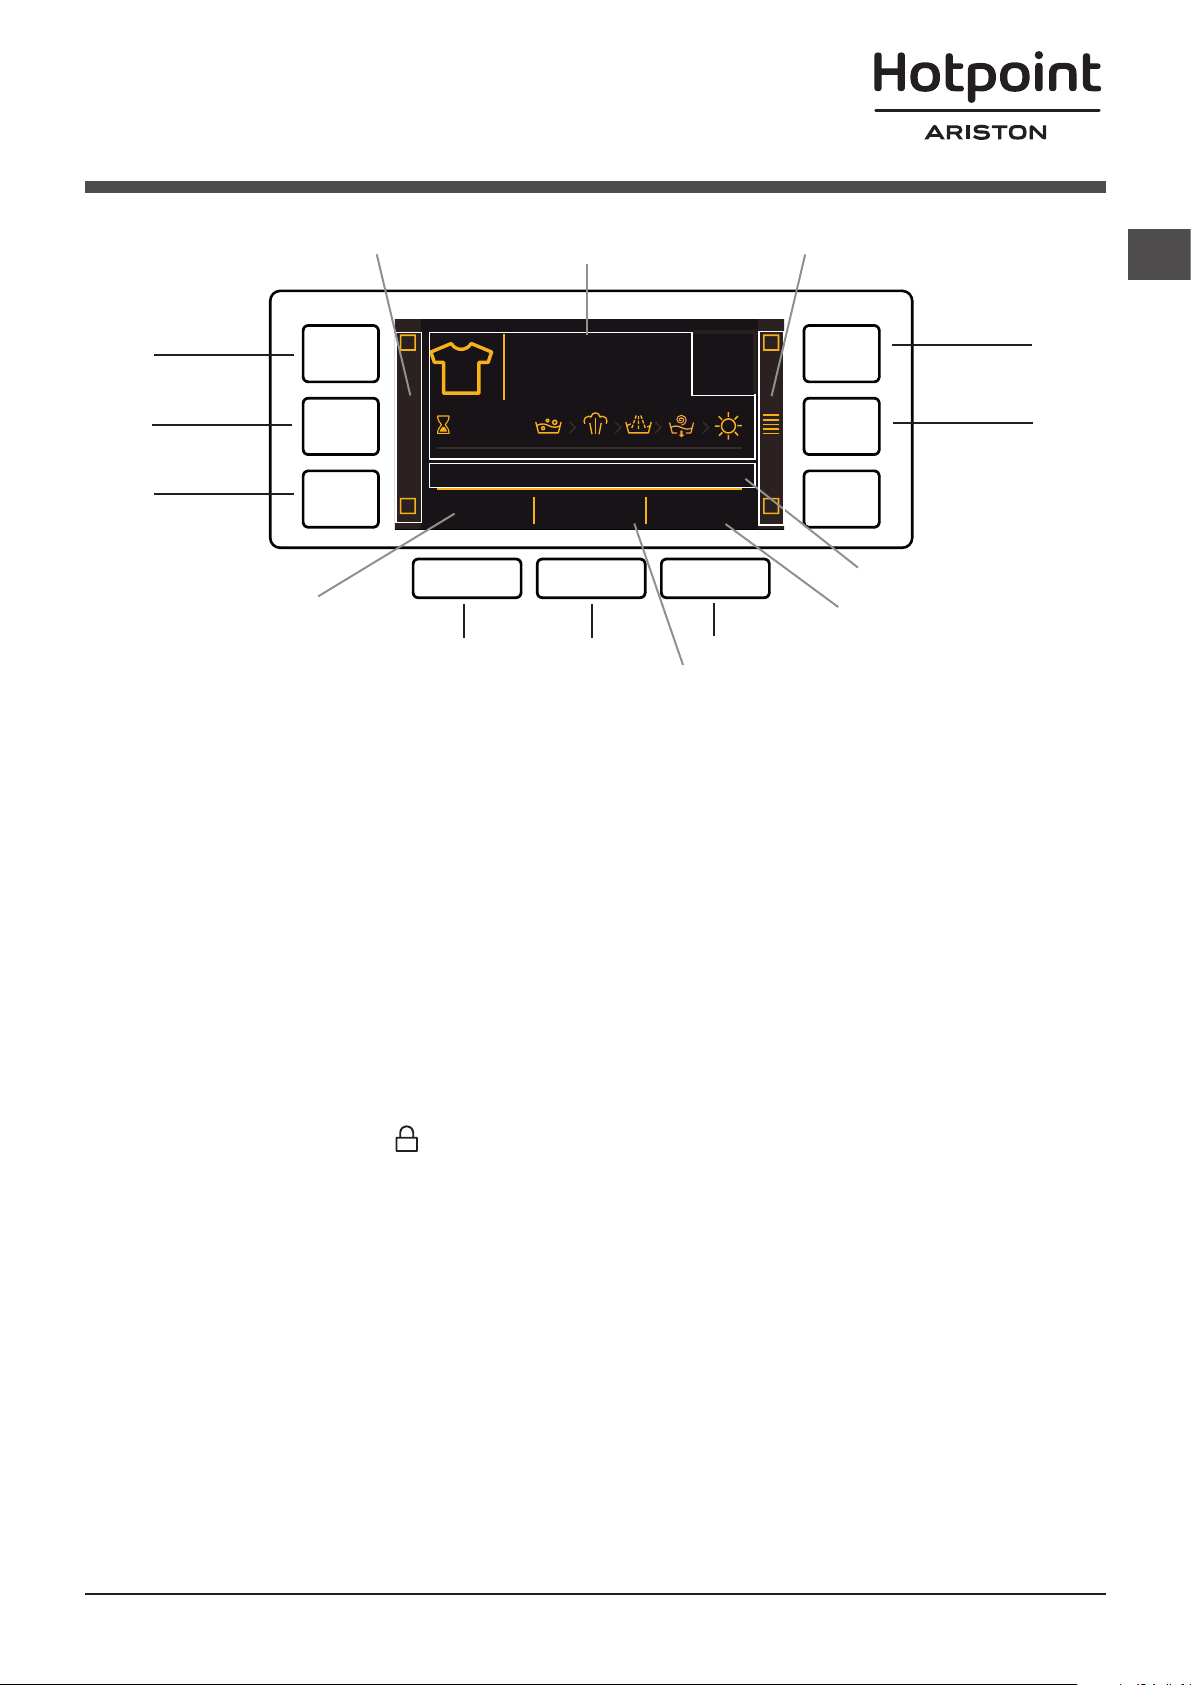
The display is useful when programming the machine and provides a great deal of information.
The following will appear in area A: the icon and programme selected, the washing and drying phases and time remaining to
the end of the cycle.
Area B will include the two intensity levels relative to the DIRECT INJECTION option.
The indicator lights relative to the available functions appear in area C.
Area D will have the time remaining to the start of the selected programme if the DELAY TIMER function was set.
String E shows the maximum spin speed value (this depends on the selected wash cycle); if the programme does not inclu-
de the spin cycle, the dimly lit “--” symbol will appear in the area.
Area F will visualise the temperature value selectable on the basis of the set programme; if the temperature of the program-
me cannot be set, the area will show the symbol “--” dimly lit.
Door locked symbol
If the symbol is lit, this indicates that the washer-dryer door is blocked to prevent it from being opened accidentally. To pre-
vent any damage from occurring, wait for the symbol to switch itself off before opening the appliance door.
N.B.: if the DELAY TIMER function has been activated, the door cannot be opened; pauses the machine by pressing the
START/PAUSE button if you wish to open it.
! The first time the machine is switched on, you will be asked to select the language and the display will automatically show
the language selection menu.
To select the desired language press the X and Y buttons; to confirm the selection press the Z button.
To change the language switch off the machine and press buttons G, H, I simultaneously until an alarm is heard: the
language-selection menu will be displayed again.
! To change the display luminosity, which by default is set to the highest value, switch the machine off then simultaneously
press buttons G, L and M until the buzzer sounds. Press buttons X and Y to choose the desired level of luminosity then
confirm by pressing button Z.
! During the wash cycle or when the DELAY TIMER function has been enabled, if the user does not interact with the display
for 1 minute the “SCREEN SAVER” activates. To return to the previous window, simply press any button.
Display
2:55
90°
1200
-- h
--
COTONE
H
G
Y
X Z
I
L M
A
B
C
C
D
E
C
F
8
GB
How to run a wash cycle or a
drying cycle
1. SWITCH THE MACHINE ON. Press the On/Off button ;
the text HOTPOINT will appear on the display and the START/
PAUSE indicator light will flash slowly in a green colour.
2. LOAD THE LAUNDRY. Open the porthole door. Load
the laundry, making sure you do not exceed the maximum
load value indicated in the table of programmes on the
following page.
3. MEASURE OUT THE DETERGENT. Open the
detergent dispenser drawer and pour the detergent into
the relevant compartments as described in “Detergents
and laundry”.
4. CLOSE THE DOOR.
5. SELECT THE WASH CYCLE. Use the WASH CYCLE
SELECTOR knob to select the desired wash cycle; the
name of the wash cycle will appear on the display. A
temperature and spin speed is set for each wash cycle;
these may be adjusted. The duration of the cycle will
appear on the display.
6. CUSTOMISE THE WASH CYCLE. Use the relevant
buttons:
Modifying the temperature and/or spin speed. The
machine automatically selects the maximum temperature
and spin speed set for the selected wash cycle; these
values cannot therefore be increased. The temperature
can be decreased by pressing the button, until the cold
wash (the display will visualise the “--” symbol) setting is
reached. The spin speed may be progressively reduced by
pressing the button, until it is completely excluded (the
display will visualise the “--” symbol). If these buttons are
pressed again, the maximum values are restored.
! Exception: if the 5 programme is selected, the
temperature can be increased up to a value of 40°C.
! Exception: if the 7 programme is selected, the
temperature can be increased up to a value of 90°C.
! Exception: if the 9 programme is selected, the
temperature can be increased up to a value of 60°C.
Setting a delayed start.
To set a delayed start for the selected programme, press
the corresponding button repeatedly until the required
delay period has been reached. To remove the delayed
start function press the button until the text
“-- h” appears on the display.
Setting the drying cycle.
The desired drying cycle type may be set by pressing the
DRYING button once or several times. Two options are
available:
A - Based on the how damp the clothes are once they
have been dried:
Iron: suitable for clothes which will need ironing afterwards.
the remaining dampness softens creases, making them
easier to remove.
Hanger: ideal for clothes which do not need to be dried fully.
Cupboard: suitable for laundry which can be put back in a
cupboard without being ironed.
Extra: suitable for garments which need to be dried
completely, such as sponges and bathrobes.
B - Based on a set time period: between 30 and 180 minutes.
To exclude the drying phase press the relevant button until
the text OFF appears on the display.
If your laundry load to be washed and dried is much greater
than the maximum stated load, perform the wash cycle, and
when the cycle is complete, divide the garments into groups
and put some of them back in the drum. At this point, follow
the instructions provided for a “Drying only” cycle. Repeat
this procedure for the remainder of the load. A cooling-down
period is always added to the end of each drying cycle.
Drying only
Press button to perform the drying-only cycle.
After selecting the desired cycle (compatible with the type
of garments), press button to exclude the washing
phase and start the drying phase at the maximum level for
the selected cycle. The drying level or time may be set and
changed by pressing the drying button . (Not compati-
ble with cycles 1-2-3-4 and 14).
Set the rinse type.
Option makes it possible to select the desired rinse
type for sensitive skin. Press the button once for the “Extra
+1” level, which makes it possible to select an additional
rinse after the standard cycle rinse and remove all traces
of detergent. Press the button again for the “Extra +2”
level, which makes it possible to select two additional
rinses to the standard cycle rinses; it is recommended
for very sensitive skin. When the button is pressed for the
third time, the “Extra +3” level is set, thus allowing the
selection of 3 rinses in addition to the standard cycle’s
rinses. The option - started with cycles at a temperature of
40°C - makes it possible to remove major allergens such
as pollen, cat and dog hair. With cycles at a temperature
higher than 40° a very good level of antiallergic protection
is achieved. Press the button again to go back to the
“Normal rinse” rinse type. If the current adjustment can
be neither set nor changed, the display will show “No
Selection” or “No Change”.
Modifying the cycle settings.
• Pressthebuttontoenablethefunction;therelevant
indicator light on the display will light up.
• Pressthebuttonagaintodisablethefunction;the
relevant indicator light on the display will switch off.
! If the selected function is incompatible with the set
programme, the relevant indicator light will appear dimly lit;
in addition, the incompatibility will be signalled by a buzzer
(3 beeps) and the wording “No Selection” will appear on
the display.
! If the selected function is incompatible with another
previously set function, the wording “No Selection” will
appear on the display and the function will not be enabled.
! The functions may affect the recommended load value
and/or the duration of the cycle.
7. START THE PROGRAMME. Press the START/PAUSE
button. The corresponding indicator light will become
green, remaining lit in a fixed manner, and the door will be
locked (the DOOR LOCKED symbol will be on). During
the wash cycle, the name of the phase in progress will
appear on the display. To change a wash cycle while it is in
progress, pause the washer-dryer using the START/PAUSE
button (the START/PAUSE indicator light will flash slowly in
an orange colour); then select the desired cycle and press
the START/PAUSE button again. To open the door while
a cycle is in progress, press the START/PAUSE button; if
the DOOR LOCKED symbol is switched off the door
may be opened. Press the START/PAUSE button again
to restart the wash cycle from the point at which it was
interrupted.
8. THE END OF THE WASH CYCLE. This will be indicated
by the text “CYCLE END” on the display; when the DOOR
LOCKED symbol switches off the door may be opened.
Open the door, unload the laundry and switch off the machine.
! If you wish to cancel a cycle which has already begun, press
and hold the button. The cycle will be stopped and the
machine will switch off.
Direct Injection
The washer-dryer is equipped with the innovative technology
«Direct Injection» which pre-mixes water and detergent, thus
immediately activating the detergent’s cleaning principles.
This active emulsion is directly introduced into the drum of the
washer-dryer and penetrates the fibres with more efficacy in
cleaning even heavily soiled garments at low temperatures,
fully preserving colours and fabrics.
The mode «Power» ensures the best cleaning performance
and the mode «EcoEnergy» allows more energy saving.
GB
9
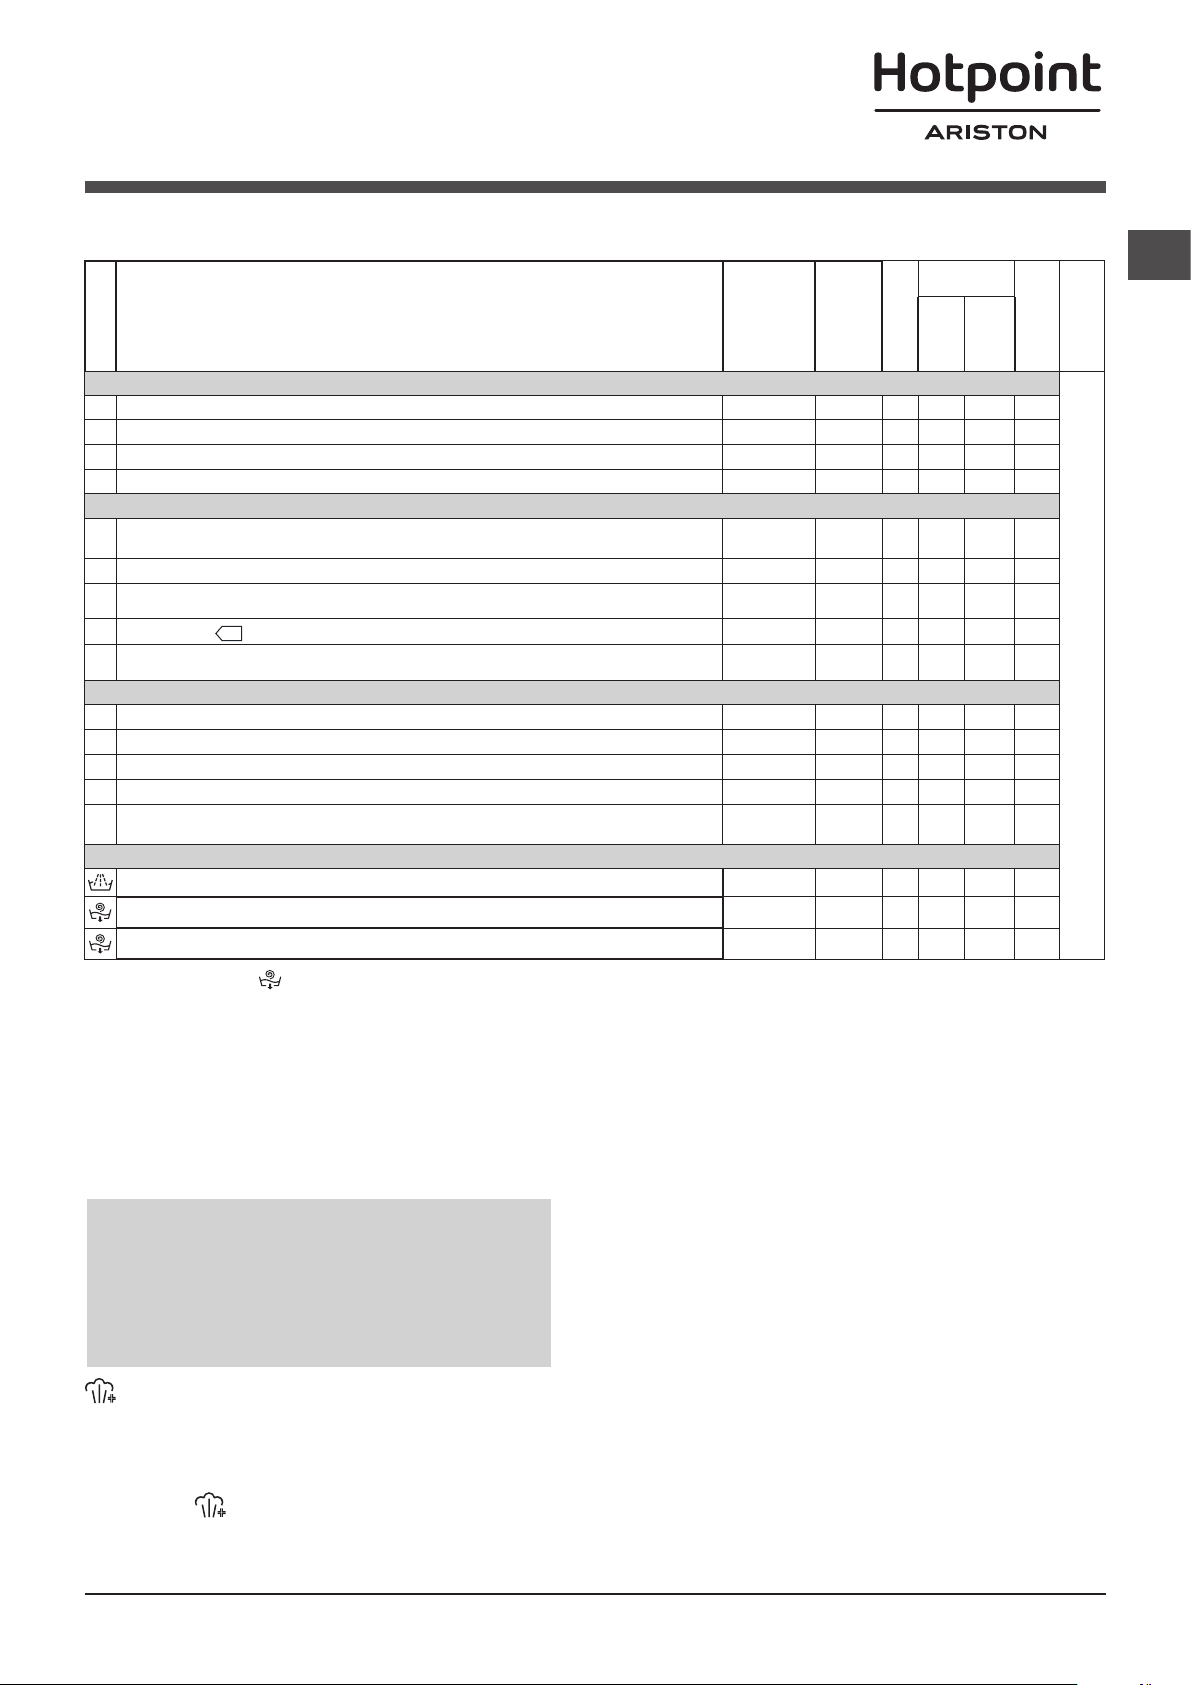
Wash cycles and functions
Table of wash cycles
Wash functions
! If the selected function is incompatible with the set pro-
gramme, the relevant indicator light will appear dimly lit; in
addition, the incompatibility will be signalled by a buzzer
(3 beeps) and the wording “No Selection” will appear on
the display.
! If the selected function is incompatible with another pre-
viously set function, the wording “No Selection” will appear
on the display and the function will not be enabled.
Steam Hygiene
This option enhances washing performance by generating
steam during the wash cycle to remove any bacteria from
the fibres, which are treated at the same time. Place the
laundry in the drum, choose a compatible programme and
select option .
! The steam generated during the operation of the washing
machine may cause the porthole door to become hazy.
1) Test wash cycle in compliance with regulation EN 50229: set wash cycle 8 with a temperature of 60°C.
2) Long wash cycle for cottons: set programme 8 at temperature 40°C and press the DIRECT INJECTION button under “Power” mode.
3) Long wash cycle for synthetics: set wash cycle 9 with a temperature of 40°C.
* If you select programme and exclude the spin cycle, the machine will drain only.
The length of cycle shown on the display or in this booklet is an estimation only and is calculated assuming standard working conditions. The actual duration can vary accor-
ding to factors such as water temperature and pressure, the amount of detergent used, the amount and type of load inserted, load balancing and any wash options selected.
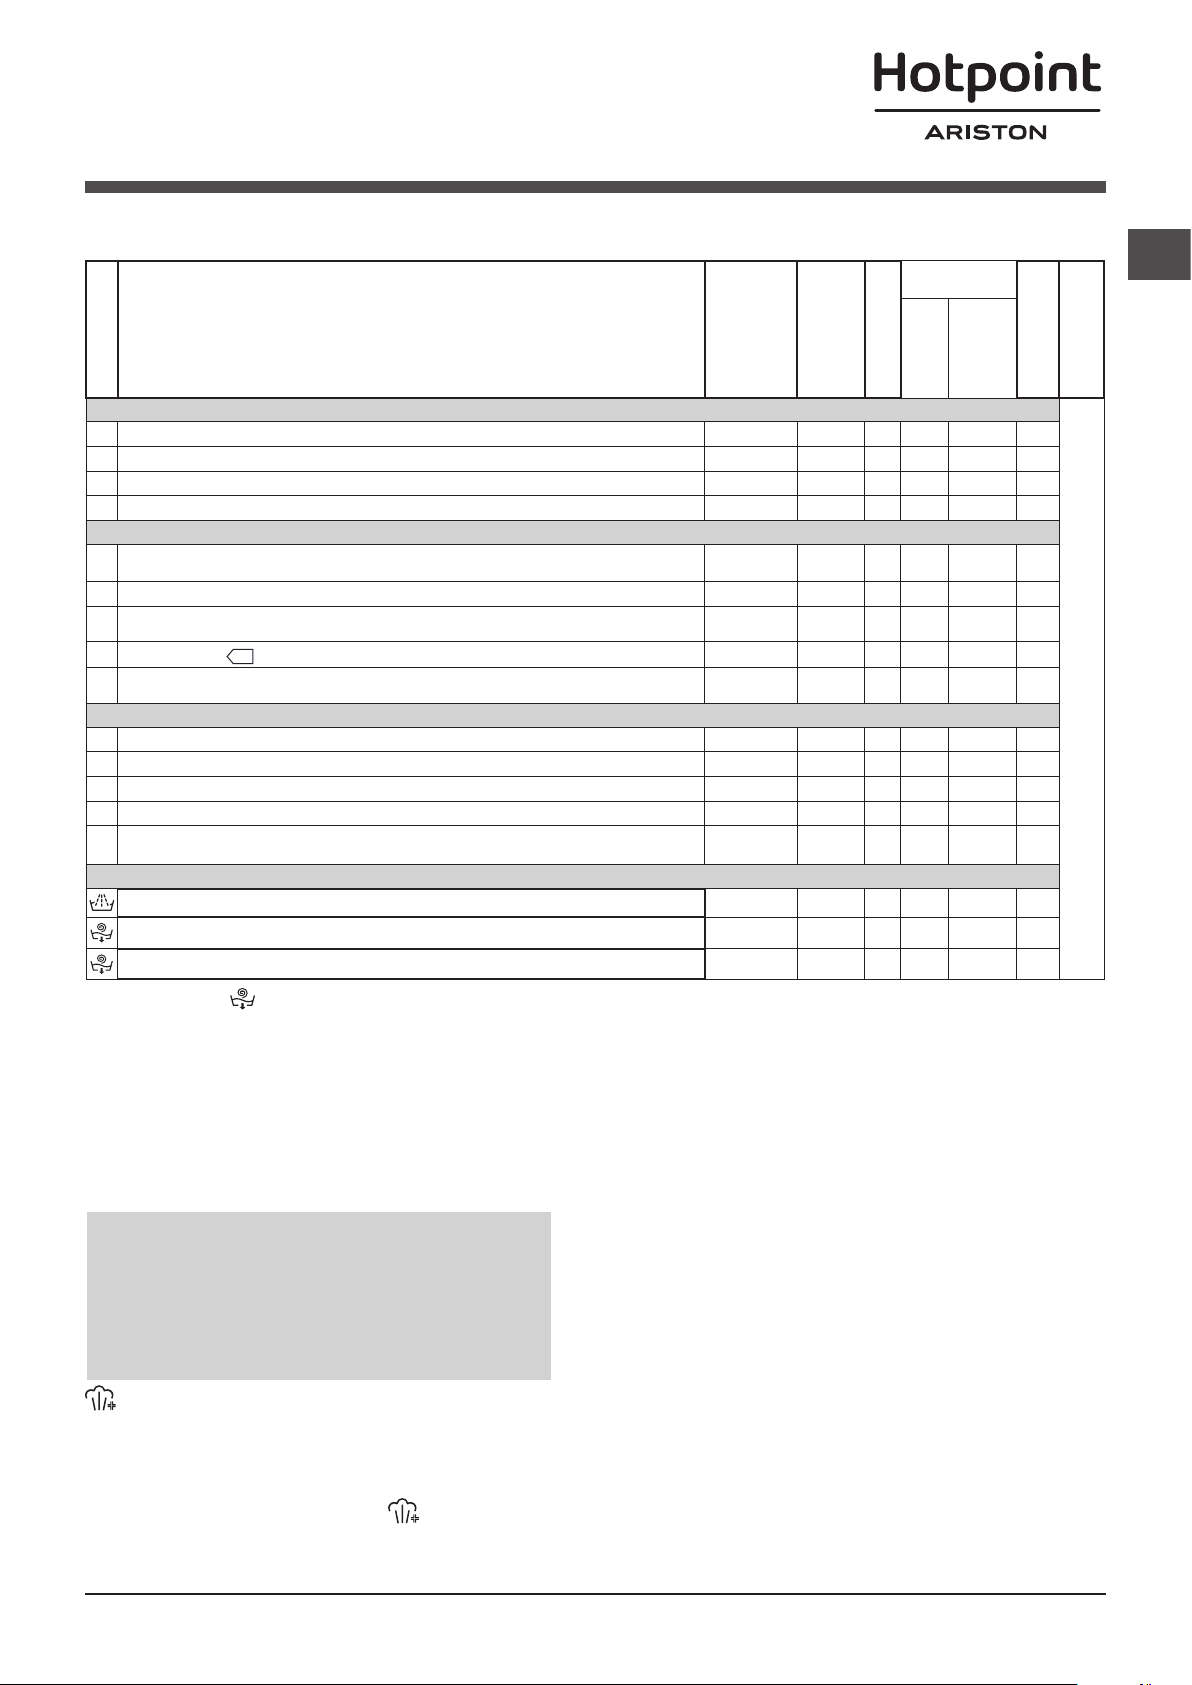
Wash cycles
Description of the wash cycle
Max.
temp.
(°C)
Max.
speed
(rpm)
Drying
Detergents
Max. load
(kg)
Cycle dura-
tion
Wash
Fabric
softener
ANTI CREASE
The duration of the wash cycle can be checked on the display.
1
Daily Mix Wash & Dry
40°
800
3
2
Shirts Wash & Dry
40°
1000
2
3
Pre Iron
- - - - - 1,5
4
Steam Refresh
- - - - - 2
DAILY CLEAN
5 Anti-Stain Turbo 45’
20°
(Max. 40°C)
1200
5,5
6 Anti-Stain Power 20°C
20°
1600
10
7
Cotton: lightly soiled resistant and delicate colours.
40°
(Max. 90°C)
1600
10
8
Eco Cotton
60°/40°
(1-2): heavily soiled whites and resistant colours.
60° 1600
10
9
Synthetics (3): lightly soiled resistant colours.
40°
(Max. 60°C)
1000
5
SPECIALS
10 Multi Colour
40° 1600
10
11
Ultra Delicates
30°
--
1
12
Wool: for wool, cashmere, etc.
40° 800
2,5
13
Sport
40° 600
4,5
14
Fast 30’ (**): to refresh lightly soiled garments quickly (not suitable for wool, silk and
clothes which require washing by hand).
30° 800
4
Partial Programmes
Rinse
- 1600
-
10
Spin + Pump out
- 1600
- - 10
Pump out only *
-
--
- - - 10
** If a drying cycle is also programmed, the machine will run a “wash+dry” programme lasting 45’ with maximum spin speed and a 1kg laundry load.
10
GB
Detergent dispenser drawer
Good washing results also depend on the correct dose of
detergent: adding too much detergent will not necessarily
result in a more efficient wash, and may in fact cause a
build up on the inside of your appliance and contribute to
environmental pollution.
! Use powder detergent for white cotton garments, for pre-
washing, and for washing at temperatures over 60°C.
! Follow the instructions given on the detergent packaging.
! Do not use hand washing detergents because these
create too much foam.
Open the detergent di-
spenser drawer and pour
in the detergent or washing
additive, as follows.
! Do not pour detergent into
the middle compartment (*).
compartment 1: Deter-
gent for the wash cycle
(powder or liquid)
If liquid detergent is used, it is recommended that the
removable plastic partition A (supplied) be used for proper
dosage. If powder detergent is used, place the partition
into slot B.
compartment 2: Additives (fabric softeners, etc.)
The fabric softener should not overflow the grid.
Preparing the laundry
•Dividethelaundryaccordingto:
- the type of fabric/the symbol on the label
- the colours: separate coloured garments from whites.
•Emptyallgarmentpocketsandcheckthebuttons.
•Donotexceedthelistedvalues,whichrefertotheweight
of the laundry when dry: see “Table of wash cycles”.
How much does your laundry weigh?
1 sheet 400-500 g
1 pillow case 150-200 g
1 tablecloth 400-500 g
1 bathrobe 900-1200 g
1 towel 150-250 g
Special wash cycles
Daily Mix Wash & Dry use programme 1 to wash and
dry mixed garments (cotton and synthetics). This cycle
may be used to wash and dry loads of up to 3 kg; we
recommend the use of liquid detergent.
The use of the steam in this programme is optimised to re-
duce the formation of creases on garments, making them
easier to iron.
Shirts Wash & Dry: use programme 2 to wash and dry
shirts and T-shirts in different fabrics and colours to ensure
maximum care. This cycle may be used to wash and dry
loads of up to 2 kg. To achieve optimum results, use liquid
detergent and pre-treat cuffs, collars and stains. The use of
the steam in this programme is optimised to reduce the for-
mation of creases on garments, making them easier to iron.
Pre Iron: use this programme immediately before ironing;
max. 1.5 kg load. The use of the steam in this programme
is optimised to reduce the formation of creases on gar-
ments, making them easier to iron.
Steam Refresh: for refreshing garments, neutralised unple-
asant odours and relaxing the fibres by delivering steam into
the drum. The garments will be damp at the end of the cycle.
Anti-Stain Turbo 45’: this cycle ensures excellent stain
removal capacity even at 20°C in just 45 minutes. The tem-
perature of this cycle can be increased up to 40°C.
Anti-Stain Power 20°C: this programme ensures ma-
ximum stain removal capacity with no need for pre-treat-
ment at low temperatures, preserving fabrics and colours.
Multi Colour: for washing coloured cotton garments.
This programme is optimised to keep colours bright even
after repeated washing.
Ultra Delicates: use programme 11 to wash very delica-
te garments having strasses or sequins.
We recommend turning the garments inside out before washing
and placing small items into the special bag for washing delica-
tes. Use liquid detergent on delicate garments for best results.
When selecting an exclusively time-based drying function,
a drying cycle is performed at the end of the wash cycle
that is particularly delicate, thanks to light handling and
appropriate temperature control of the water jet.
The recommended durations are:
1 kg of synthetic garments --> 165 min
1 kg of synthetic and cotton garments --> 180 min
1 kg of cotton garments --> 180 min
The degree of dryness depends on the load and fabric
composition.
Wool - Woolmark Apparel Care - Green:
the wool wash cycle of this machine has been approved
by The Woolmark Company for the washing of wool gar-
ments labelled as “hand wash” provided that the products
are washed according to the instructions on the garment
label and those issued by the manufacturer of this washer-
dryer. (M1135)
Sport: for washing lightly soiled sports clothing (tracksuits,
shorts, towels, etc.); for best results, we recommend not
exceeding the maximum load indicated in the “Table of
wash cycles”. We recommend using liquid detergent, and
adding the amount suitable for a half-load.
Load balancing system
Before every spin cycle, to avoid excessive vibrations and
to distribute the load in a uniform manner, the drum rotates
continuously at a speed which is slightly greater than the
washing rotation speed. If, after several attempts, the load is
not balanced correctly, the machine spins at a reduced spin
speed. If the load is excessively unbalanced, the washer-
dryer performs the distribution process instead of spinning.
To encourage improved load distribution and balance, we
recommend small and large garments are mixed in the load.
Detergents and laundry
1
2
A
B
*

GB
11
Troubleshooting
Your washer-dryer could fail to work. Before contacting the Technical Assistance Centre (see “Assistance”), make sure that
the problem cannot be solved easily using the following list.
Problem:
The washer-dryer does not switch on.
The wash cycle does not start.
The washer-dryer does not take in
water (the text “NO WATER, Turn
tap on” appears on the display).
The washer-dryer continuously
takes in and
drains water.
The washer-dryer does not drain or
spin.
The washer-dryer vibrates a lot
during the spin cycle.
The washer-dryer leaks.
The machine is locked and the display
flashes, indicating an error code (e.g.
F-01, F-..).
There is too much foam.
The washer-dryer does not dry.
Possible causes / Solutions:
• Theapplianceisnotpluggedintothesocketfully,orisnotmakingcontact.
•Thereisnopowerinthehouse.
•Thewasher-dryerdoorisnotclosedproperly.
•TheON/OFFbuttonhasnotbeenpressed.
•TheSTART/PAUSEbuttonhasnotbeenpressed.
•Thewatertaphasnotbeenopened.
•Adelayedstarthasbeenset.
•Thewaterinlethoseisnotconnectedtothetap.
•Thehoseisbent.
•Thewatertaphasnotbeenopened.
•Thereisnowatersupplyinthehouse.
•Thepressureistoolow.
•TheSTART/PAUSEbuttonhasnotbeenpressed.
•Thedrainhoseisnotfittedataheightbetween65and100cmfromthefloor
(see “Installation”).
•Thefreeendofthehoseisunderwater(see “Installation”).
•Thewalldrainagesystemisnotfittedwithabreatherpipe.
If the problem persists even after these checks, turn off the water tap, switch
the appliance off and contact the Assistance Service. If the dwelling is on one of
the upper floors of a building, there may be problems relating to water drainage,
causing the washer-dryer to fill with water and drain continuously. Special anti-
draining valves are available in shops and help to avoid this inconvenience.
•Thewashcycledoesnotincludedraining:somewashcyclesrequirethedrain
phase to be started manually (see “Wash cycles and functions”).
•Thedrainhoseisbent(see “Installation”).
•Thedrainageductisclogged.
•Thedrumwasnotunlockedcorrectlyduringinstallation(see “Installation”).
•Thewasher-dryerisnotlevel(see “Installation”).
•Thewasher-dryeristrappedbetweencabinetsandwalls(see “Installation”).
•Thewaterinlethoseisnotscrewedonproperly(see “Installation”).
•Thedetergentdispenserdrawerisblocked(forcleaninginstructions,see “Care
and maintenance”).
•Thedrainhoseisnotfixedproperly(see “Installation”).
•Switchoffthemachineandunplugit,waitforapproximately1minuteandthen
switch it back on again.
If the problem persists, contact the Technical Assistance Service.
•Thedetergentisnotsuitableformachinewashing(itshoulddisplaythetext
“for washer-dryers” or “hand and machine wash”, or the like).
•Toomuchdetergentwasused.
• Theapplianceisnotpluggedintothesocket,ornotenoughtomakecontact.
• Therehasbeenapowerfailure.
• Theappliancedoorisnotshutproperly.
• ADelayTimerhasbeenset.
• DRYINGisintheOFF position.

12
GB
Before calling for Assistance:
• Check whether you can solve the problem alone (see “Troubleshooting”);
•Restarttheprogrammetocheckwhethertheproblemhasbeensolved;
•Ifthisisnotthecase,contactanauthorisedTechnicalAssistanceCentreusingthetelephonenumberprovidedonthe
guarantee certificate.
! Always request the assistance of authorised technicians.
Have the following information to hand:
• thetypeofproblem;
• theappliancemodel(Mod.);
• theserialnumber(S/N).
This information can be found on the data plate applied to the rear of the washer-dryer, and can also be found on the front of
the appliance by opening the door.
Service

13
PL
! Ten symbol przypomina o obowiązku
zapoznania się z niniejszą instrukcją obsługi.
Spis treści
Instalacja, 14-15
Rozpakowanie i wypoziomowanie
Podłączenia hydrauliczne i elektryczne
Pierwszy cykl prania
Dane techniczne
Utrzymanie i konserwacja, 16
Odłączenie wody i prądu elektrycznego
Czyszczenie pralki
Czyszczenie szuadki na środki piorące
Konserwacja okrągłych drzwiczek i bębna
Czyszczenie pompy
Kontrola przewodu doprowadzającego wodę
Zalecenia i środki ostrożności, 17
Ogólne zasady bezpieczeństwa
Utylizacja
Ręczne otwieranie okrągłych drzwiczek
Opis pralki, 18-19
Panel sterowania
Wyświetlacz
Jak wykonać cykl prania lub suszenie, 20
Programy i funkcje, 21
Tabela programów
Funkcje prania
Środki piorące i bielizna, 22
Szuadka na środki piorące
Przygotowanie bielizny
Programy specjalne
System równoważenia ładunku
Nieprawidłowości w działaniu i sposoby
ich usuwania, 23
Serwis Techniczny, 24
Instrukcja obsługi
PRALKA
Polski
PL
RDPD 107617 J
14
PL
Instalacja
! Należy zachować niniejszą książeczkę,
aby móc z niej skorzystać w każdej chwili. W
przypadku sprzedaży, odstąpienia lub prze-
niesienia pralki w inne miejsce należy zadbać
o przekazanie instrukcji wraz z nią, aby nowy
właściciel mógł się zapoznać z działaniem
urządzenia i z dotyczącymi go ostrzeżeniami.
! Należy uważnie przeczytać instrukcję
obsługi: zawiera ona ważne informacje
dotyczące instalacji oraz właściwego i
bezpiecznego użytkowania pralki.
Rozpakowanie i wypoziomowanie
Rozpakowanie
1. Rozpakować pralkę.
2. Sprawdzić, czy nie doznała ona
uszkodzeń w czasie transportu. W przypadku
stwierdzenia uszkodzeń, nie podłączać pralki
i skontaktować się ze sprzedawcą.
3. Odkręcić 4 śruby
zabezpieczające
urządzenie na czas
transportu oraz
zdjąć gumowy ele-
ment z podkładką,
znajdujący się w
tylnej części pralki
(patrz rysunek).
4. Zatkać otwory przy pomocy plastikowych
zaślepek, znajdujących się w wyposażeniu
urządzenia.
5. Zachować wszystkie części: w razie
konieczności przewiezienia pralki w inne
miejsce, powinny one zostać ponownie za-
montowane.
! Części opakowania nie są zabawkami dla
dzieci.
Poziomowanie
1. Ustawić pralkę
na płaskiej i twar-
dej podłodze, nie
opierając jej o ściany,
meble itp.
2. Jeśli podłoga
nie jest idealnie
pozioma, należy
skompensować
nierówności,
odkręcając lub dokręcając przednie nóżki
(patrz rysunek); kąt nachylenia, zmierzo-
ny na górnym blacie pralki, nie powinien
przekraczać 2°.
Staranne wypoziomowanie pralki zapew-
nia jej stabilność i zapobiega wibracjom,
hałasowi oraz przesuwaniu się urządzenia
w czasie pracy. W przypadku ustawienia na
dywanie lub wykładzinie dywanowej, należy
tak wyregulować nóżki, aby pod pralką
pozostawała wolna przestrzeń niezbędna dla
wentylacji.
Podłączenia hydrauliczne i elektry-
czne
Podłączenie przewodu doprowadzającego
wodę
1. Podlacz przewód
zasilajacy poprzez
przykrecenie go do
zaworu zimnej wody
z koncówka gwinto-
wana (patrz rysunek):
Przed podłączeniem
spuszczać wodę do
momentu, aż stanie
się ona całkowicie
przezroczysta.
2. Podłączyć do
urządzenia przewód
doprowadzający
wodę, przykręcając
go do odpowiednie-
go przyłącza wody,
znajdującego się w
tylnej części pralki, z
prawej strony u góry
(patrz rysunek).
3. Zwrócić uwagę, aby przewód nie był
pozaginany ani przygnieciony.
! Ciśnienie wody w kurku powinno mieścić
się w przedziale podanym w tabeli Danych
technicznych (patrz strona obok).
! Jeśli długość przewodu doprowadzającego
wodę jest niewystarczająca, należy zwrócić
się do specjalistycznego sklepu lub do auto-
ryzowanego technika.
! Nigdy nie instalować przewodów, które były
już używane.
! Stosować przewody znajdujące się w
wyposażeniu urządzenia.
15
PL
Dane techniczne
Model RDPD 107617 J
Wymiary
szerokość cm 59,5
wysokość cm 85
głêbokość cm 60,5
Pojemność
od 1 do 10 kg dla prania
od 1 do 7 kg dla suszenia
Dane prądu
elektrycznego
dane techniczne umieszczone
są na tabliczce na maszynie
Dane sieci
wodociągowej
Maksymalne ciśnienie
1 MPa (10 barów)
ciśnienie minimalne
0,05 MPa (0,5 barów)
pojemność bębna 71 litrów
Szybkość
wirowania
do 1600 obrotów na minutę
Programy kon-
trolne zgodnie
z przepisami
EN 50229
pranie: program 8; tempera-
tura 60°C; wykonane przy 10
kg załadowanej bielizny.
suszenie: suszenie większy
ładunku (7kg) bielizny należy
przeprowadzać wybierając
poziom suszenia “Extra”.
Suszenie pozostałej
części ładunku należy
przeprowadzać wybierając
poziom suszenia “Extra”:
ładunek powinien składać
się z 3 prześcieradeł, 2 pos-
zewka i 1 ręczników.
Urządzenie to zostało wy-
produkowane zgodnie z
następującymi przepisami CE:
- EMC 2014/30/EU (o
Kompatybilności Elektroma-
gnetycznej)
- 2012/19/EU (WEEE)
- LVD 2014/35/EU (o Niskim
Napięciu)
Aałas
(dB(A)
re 1 pW)
Pranie: 54
Wirowanie: 83
Suszenie: 63
Podłączenie przewodu odpływowego
Podłączyć przewód
odpływowy, nie
zginając go, do rury
ściekowej lub do ot-
woru odpływowego w
ścianie, które powin-
ny się znajdować na
wysokości od 65 do
100 cm od podłogi.
Alternatywnie
można oprzeć
rurę odpływową
na brzegu umy-
walki lub wanny,
przymocowując
prowadnicę
(można ją
zakupić w pun-
kcie serwisowym)
do kurka (pa-
trz rysunek). Wolny koniec przewodu
odpływowego nie powinien być zanurzony w
wodzie.
! Odradza się używanie rur przedłużających;
jednak jeśli jest to konieczne, przedłużacz
powinien mieć taki sam przekrój, jak ory-
ginalna rura, a jego długość nie powinna
przekraczać 150 cm.
Podłączenie elektryczne
Przed włożeniem wtyczki do gniazdka elekt-
rycznego należy się upewnić, czy:
• gniazdko posiada uziemienie i jest zgodne
z obowiązującymi przepisami;
• gniazdko jest w stanie wytrzymać maksymal-
ne obciążenie mocy urządzenia, wskazane w
tabeli Danych technicznych (patrz obok);
• napięcie zasilania mieści się w wartościach
wskazanych w tabeli Danych technicznych
(patrz obok);
• gniazdko pasuje do wtyczki pralki. W pr-
zeciwnym razie należy wymienić gniazdko
lub wtyczkę.
! Nie należy instalować pralki na otwartym
powietrzu, nawet w osłoniętym miejscu, gdyż
wystawienie urządzenia na działanie deszc-
zu i burz jest bardzo niebezpieczne.
! Po zainstalowaniu pralki gniazdko elektry-
czne powinno być łatwo dostępne.
! Nie używać przedłużaczy ani rozgałęźników.
! Kabel nie powinien być pozginany ani przy-
gnieciony.
! Przewód zasilania elektrycznego może być
wymieniany wyłącznie przez autoryzowanych
techników.
65 - 100 cm
Uwaga! Producent nie ponosi żadnej
odpowiedzialności, jeśli powyższe zasady
nie będą przestrzegane.
Pierwszy cykl prania
Po zainstalowaniu pralki, przed
przystąpieniem do jej użytkowania, należy
wykonać jeden cykl prania ze środkiem
piorącym, ale bez wsadu, nastawiając pro-
gram opcja czyszczenia pralki (patrz “Czy-
szczenie pralki”).
16
PL
Utrzymanie i konserwacja
Odłączenie wody i prądu elektrycznego
• Zamknąć kurek dopływu wody po każdym
praniu. W ten sposób zmniejsza się zużycie
instalacji hydraulicznej pralki oraz eliminuje
się niebezpieczeństwo wycieków.
• Przed przystąpieniem do czyszczenia pralki
oraz do czynności konserwacyjnych wyjąć
wtyczkę z gniazdka.
Czyszczenie pralki
• Obudowę zewnętrzną i gumowe części
pralki można myć ściereczką zmoczoną
w letniej wodzie z mydłem. Nie stosować
rozpuszczalników ani ściernych środków
czyszczących.
• Pralka jest wyposażona w program samo-
czyszcze części wewnętrznych, który należy
przeprowadzać nie wprowadzając niczego
do kosza pralki.
Środek piorący (w ilości równej 10% ilości
zalecanej dla lekko zabrudzonej odzieży) lub
dodatki przeznaczone specjalnie do czyszc-
zenia pralek, mogą zostać użyte jako środki
pomocnicze podczas programu czyszczenia.
Zaleca się przeprowadzanie programu czy-
szczenia co 40 cykli prania.
W celu włączenia programu należy nacisnąć
przycisk przez 5 sekund, a następnie
nacisnąć przycisk START/PAUZA: rozpocz-
nie się wykonywanie programu trwające ok.
70 minut.
Czyszczenie szuadki na środki
piorące
Wysunąć szuadkę,
unosząc ją lekko ku
górze i wyciągając
na zewnątrz (patrz
rysunek).
Wypłukać szuadkę
pod bieżącą wodą.
Czynność tę należy
wykonywać stosun-
kowo często.
Konserwacja okrągłych drzwiczek i
bębna
• Drzwiczki pralki należy zawsze
pozostawiać uchylone, aby zapobiec twor-
zeniu się nieprzyjemnych zapachów.
Czyszczenie pompy
Pralka wyposażona jest w pompę
samoczyszczącą, która nie wymaga za-
biegów konserwacyjnych. Może się jed-
nak zdarzyć, że drobne przedmioty (mo-
nety, guziki) wpadną do komory wstępnej
zabezpieczającej pompę, która znajduje się
w jej dolnej części.
! Należy się upewnić, że cykl prania został
zakończony i wyjąć wtyczkę z gniazdka.
Aby dostać się do komory wstępnej:
1. zdjąć panel po-
krywy z przedniej
strony pralki przy
pomocy śrubokrętu
(patrz rysunek);
2. odkręcić pokrywę,
obracając ją w kie-
runku przeciwnym
do ruchu wskazówek
zegara (patrz rysu-
nek): wypłynięcie
niewielkiej ilości
wody jest normalnym
zjawiskiem;
3. dokładnie wyczyścić wnętrze;
4. ponownie przykręcić pokrywę;
5. ponownie założyć panel upewniwszy się,
przed dociśnięciem go do maszyny, czy za-
trzaski zostały umieszczone w odpowiednich
otworach.
Kontrola przewodu
doprowadzającego wodę
Przynajmniej raz w roku należy sprawdzić
przewód doprowadzający wodę. Jeśli wido-
czne są na nim pęknięcia i rysy, należy go
wymienić: w trakcie prania duże ciśnienie
może bowiem spowodować jego nagłe rozer-
wanie.
! Nigdy nie instalować już używanych pr-
zewodów.
1
2
17
PL
Zalecenia i środki
ostrożności
! Pralka została zaprojektowana i wyprodukowana zgodnie
z międzynarodowymi normami bezpieczeństwa. Niniej-
sze ostrzeżenia zostały tu zamieszczone ze względów
bezpieczeństwa i należy je uważnie przeczytać.
Ogólne zasady bezpieczeństwa
• Urządzenie to zostało zaprojektowane wyłącznie do
użytkowania w warunkach domowych.
• Z niniejszego urządzenia mogą korzystać dzie-
ci powyżej 8 roku życia i osoby o ograniczony-
ch zdolnościach zycznych, zmysłowych bądź
umysłowych, jak również osoby nieposiadające
doświadczenia lub znajomości urządzenia, jeśli
znajdują się one pod nadzorem innych osób
lub jeśli zostały pouczone na temat bezpiecz-
nego sposobu użycia urządzenia oraz zdają
sobie sprawę ze związanych z nim zagrożeń.
Dzieci nie powinny bawić się urządzeniem.
Prace związane z czyszczeniem i konserwacją
nie mogą być wykonywane przez dzieci, jeśli
nie są one nadzorowane.
– Nie suszyć ubrań niewypranych.
– Odzież, która została zabrudzona takimi
substancjami, jak olej jadalny, aceton, alkohol,
benzyna, kerosen, odplamiacze, terpentyna,
woski i środki usuwające wosk, powinna pr-
zed rozpoczęciem suszenia zostać wyprana
w gorącej wodzie z dużą ilością detergentów.
– Zabronione jest suszenie w suszarce takich
rzeczy, jak guma piankowa (pianka lateksowa),
czepki prysznicowe, materiały wodoodporne,
ubrania podgumowane oraz ubrania i poduszki
z wkładkami z gumy piankowej.
– Środki zmiękczające tkaniny i podobne
produkty należy stosować zgodnie z instru-
kcjami producenta.
– Końcowa część cyklu suszenia jest
przeprowadzana bez ogrzewania (cykl
chłodzenia), co gwarantuje, że suszone
ubrania nie ulegną zniszczeniu.
UWAGA: Nie należy wyłączać suszarki
przed zakończeniem programu suszenia.
Jeśli do tego dojdzie, należy szybko wyjąć
wszystkie ubrania i rozwiesić je, tak aby
mogły szybko się ochłodzić.
• Nie dotykać pralki stojąc przy niej boso lub mając mokre
lub wilgotne ręce albo stopy.
• Nie wyjmować wtyczki z gniazdka ciągnąc za kabel, lecz
trzymając za wtyczkę.
• Nie dotykać usuwanej wody, gdyż może ona osiągać
wysokie temperatury.
• W żadnym wypadku nie otwierać drzwiczek pralki na siłę:
grozi to uszkodzeniem mechanizmu zabezpieczającego
drzwiczki przed przypadkowym otwarciem.
• W razie wystąpienia usterki nie należy w żadnym wypadku
próbować dostać się do wewnętrznych części pralki z zamia-
rem samodzielnego dokonania naprawy.
• Zawsze uważać, aby dzieci nie zbliżały się do pracującej pralki.
• Jeśli trzeba maszynę przestawić muszą to zrobić
dwie lub trzy osoby przy zachowaniu jak największej
ostrożności. Nigdy nie należy tego robić samemu, gdyż
urządzenie jest bardzo ciężkie.
• Przed włożeniem bielizny sprawdzić, czy bęben jest pusty.
• W trakcie suszenia drzwiczki nagrzewają się.
• Nie suszyć bielizny czyszczonej przy po-
mocy łatwopalnych rozpuszczalników (np.
trichloroetylen).
• Nie suszyć gumy gąbczastej ani podobnych
elastomerów.
Ręczne otwieranie okrągłych drzwiczek
Jeśli z powodu przerwy w dostawie energii elektrycznej nie
jest możliwe otwarcie okrągłych drzwiczek, w celu wyjęcia i
rozwieszenia prania należy wykonać następujące czynności:
1. wyjąć wtyczkę z gniazdka elektrycznego.
2. sprawdzić, czy poziom wody wewnątrz maszyny znajdu-
je się poniżej poziomu otwarcia drzwiczek; w przeciwnym
wypadku usunąć nadmiar wody przez przewód odpływowy,
zbierając ją do wiaderka w sposób wskazany na rysunku.
3. zdjąć panel pokrywy z przedniej strony pralki przy pomo-
cy śrubokrętu (patrz rysunek).
4. pociągnąć na zewnątrz klapkę wskazaną na rysunku, aż
do wyzwolenia się z zacisku plastikowego zaczepu; następnie
pociągnąć go w dół i równocześnie otworzyć drzwiczki.
5. ponownie założyć panel upewniwszy się, przed
dociśnięciem go do maszyny, czy zatrzaski zostały umieszc-
zone w odpowiednich otworach.
• Upewnić się, by w trakcie suszenia kurek wody był odkręcony.
• Wyjąć z kieszeni wszystkie przedmioty,
takie jak np. zapalniczki i zapałki.
• Dzieci poniżej 3 roku życia nie powinny
przebywać w pobliżu suszarki, jeśli nie są
cały czas nadzorowane.
Utylizacja
• Utylizacja opakowania: stosować się do lokalnych przepi-
sów, dzięki temu opakowanie będzie mogło zostać ponow-
nie wykorzystane.
• Europejska Dyrektywa 2012/19/EU dotycząca Zużytych
Elektrycznych i Elektronicznych Urządzeń zakłada zakaz
pozbywania się starych urządzeń domowego użytku jako
nieposortowanych śmieci komunalnych. Zużyte urządzenia
muszą być osobno zbierane i sortowane w celu zoptymalizo-
wania odzyskania oraz ponownego przetworzenia pewnych
komponentów i materiałów. Pozwala to ograniczyć za-
nieczyszczenie środowiska i pozytywnie wpływa na ludzkie
zdrowie. Przekreślony symbol „kosza” umieszczony na pro-
dukcie przypomina klientowi o obowiązku specjalnego sor-
towania. Konsumenci powinni kontaktować się z władzami
lokalnymi lub sprzedawcą w celu uzyskania informacji
dotyczących postępowania z ich zużytymi urządzeniami
gospodarstwa domowego.
20
18
PL
Szuadka na środki piorące: do dozowania środków
piorących i dodatków (patrz „Środki piorące i bielizna”).
Panel: w szuadce na środki piorące znajduje się panel, na
którym przedstawiono wszystkie dostępne programy, wraz z
oznaczeniami gracznymi informującymi na temat sposobu
użytkowania poszczególnych przegródek szuadkio.
Przycisk ON/OFF : nacisnąć krótko przycisk w celu
włączenia lub wyłączenia maszyny. Kontrolka START/PAU-
ZA, która pulsuje powoli w kolorze zielonym wskazuje, że ma-
szyna jest włączona. W celu wyłączenia pralki podczas prania
konieczne jest dłuższe przytrzymanie naciśniętego przycisku,
przez około 3 sek.; krótkie lub przypadkowe naciśnięcie nie
wystarczy do wyłączenia maszyny. Wyłączenie maszyny
podczas trwającego prania anuluje program prania.
POKRĘTŁO PROGRAMÓW: w celu ustawienia żądanego
programu (patrz “Tabela programów”).
Przyciski FUNKCJI: nacisnąć przycisk w celu wybrania po-
trzebnej funkcji. Na wyświetlaczu zaświeci się odpowiednia
kontrolka.
Przyciski
SAMOCZYSZCZENIE: nacisnąć, aby
przeprowadzić czyszczenie wewnętrznych części ma-
szyny
(patrz “Czyszczenie pralki”).
Przycisk DIRECT INJECTION
: nacisnąć,aby wybrać
opcję DIRECT INJECTION.
Przycisk PŁUKANIE EKSTRA : nacisnąć w celu wy-
brania żądanego rodzaju płukania.
Przycisk WIROWANIE : nacisnąć w celu zmniejszenia
lub całkowitego wyłączenia wirówki – wartość ukazana
zostanie na wyświetlaczu.
Przycisk TEMPERATURA : nacisnąć w celu zmniejsze-
nia temperatury: wartość zostaje wyświetlona na ekranie.
Przycisk SUSZENIE: należy przycisnąć, aby
zmniejszyć lub wyłączyć suszenie; poziom lub czas wybra-
nego suszenia zostanie wyświetlony na wyświetlaczu.
Przycisk TYLKO SUSZENIE : nacisnąć, aby wykonać
wyłącznie fazę suszenia.
Przycisk BLOK. PRZYCISKÓW : w celu uruchomienia
lub wylaczenia blokady panelu sterowania nalezy
przytrzymac nacisniety przycisk przez okolo 2 sekundy. Gdy
na wyświetlaczu pojawi się napis „BLOK. PRZYCISKÓW
WŁĄCZONA“, panel sterowniczy jest zablokowany (z
wyjątkiem przycisk ON/OFF). W ten sposób uniemozliwia
sie dokonywanie przypadkowych zmian w programach,
zwlaszcza, jesli w domu obecne sa dzieci. W celu
wylaczenia blokady panelu sterowania nalezy przytrzymac
nacisniety przycisk przez okolo 2 sekundy.
Przycisk OPÓŹNIONY START : nacisnąc w celu usta-
wienia opóźnionego uruchomienia wybranego programu.
Opóźnienie wyświetlone zostanie na ekranie.
Przycisk z kontrolką START/PAUZA: kiedy zielona kontrolka
pulsuje powoli, nacisnąć przycisk w celu uruchomienia prania.
Po uruchomieniu cyklu kontrolka świeci w sposób ciągły. W
celu wybrania pauzy w praniu należy nacisnąć ponownie przy-
cisk, kontrolka zacznie pulsować w kolorze pomarańczowym.
Jeśli symbol nie świeci się, można otworzyć drzwiczki. W
celu ponownego uruchomienia prania od miejsca, w którym
zostało przerwane, należy ponownie nacisnąć przycisk.
Funkcja stand by
Pralka ta, w myśl nowych norm europejskich związanych
z oszczędnością elektryczną, posiada system auto
wyłączenia (stand by), który włącza się po 30 minutach nie
użytkowania. Ponownie lekko wcisnąć przycisk
ON/OFF i poczekać, aż pralka ponownie włączy się.
Zużycie w trybie wyłączenia: 0,5 W
Zużycie w trybie czuwania: 8 W
Opis pralki
Panel sterowania
Szuadka na środki piorące
Przycisk z kontrolką
START/PAUZA
Przycisk
TEMPERATURA
Przyciski
FUNKCJI
Przycisk
ON/OFF
Przycisk
WIROWANIE
Przycisk
BLOK.
PRZYCISKÓW
Wyświetlacz
Przycisk
OPÓŹNIONY
START
Przycisk
SAMOCZY-
SZCZENIE
Przyciski
DIRECT
INJECTION
Przycisk
PŁUKANIE
EKSTRA
POKRĘTŁO
PROGRAMÓW
Panel
Przycisk
TYLKO
SUSZENIE
Przycisk
SUSZENIE
19
PL
Wyświetlacz
Wyświetlacz potrzebny jest w celu programowania maszyny i dostarcza wielu informacji.
W obszarze A jest wyświetlona ikona i wybrany program, fazy prania i suszenia oraz czas pozostały do zakończenia
cyklu.
W obszarze B zostają wyświetlone dwa poziomy intensywności związane z funkcją DIRECT INJECTION.
W obszarach C widoczne są kontrolki odnoszące się do dostępnych funkcji.
W obszarze D zostaje wyświetlony czas pozostały do uruchomienia wybranego programu, w przypadku, gdy ustawiono
OPÓŹNIONY START.
W wierszu E wyświetlana jest maksymalna wartość szybkości wirówki, jaką maszyna może uzyskać w przypadku wybra-
nego programu; jeśli program nie przewiduje ustawienia wirówki, w obszarze zostanie wyświetlony symbol “--” o niskiej
jasności.
W obszarze F wyświetlana jest maksymalna wartość temperatury, jaką można wybrać w zależności od wybranego
programu, jeśli program nie przewiduje ustawiania temperatury, w obszarze zostanie wyświetlony symbol “--” o niskiej
jasności.
Symbol zablokowanych drzwiczek
Zapalony symbol oznacza, że okrągłe drzwiczki pralki są zablokowane, aby zapobiec przypadkowemu ich otworzeniu. Aby
uniknąć uszkodzenia pralki, należy odczekać, aż symbol ten zgaśnie, zanim przystąpi się do otwierania drzwiczek pralki.
Uwaga: jeśli aktywna jest funkcja OPÓŹNIONY START drzwiczek nie można otworzyć. W celu ich otwarcia należy
ustawić maszynę w pauzie poprzez naciśnięcie przycisku START/PAUZA.
! Podczas pierwszego uruchomienia wymagane będzie dokonanie wyboru języka a wyświetlacz ustawi się automatycz-
nie na menu wyboru języka.
W celu wybrania żądanego języka nacisnąć przyciski X i Y, dla potwierdzenia wyboru nacisnąć przycisk Z.
Aby zmienić język, należy wyłączyć urządzenie, nacisnąć równocześnie przyciski G, H, I, aż do usłyszenia sygnału
dźwiękowego, wyświetli się menu wyboru języka.
! W celu zmiany jasności wyświetlacza, która fabrycznie ustawiona jest na najwyższy poziom, należy wyłączyć
urządzenie, nacisnąć równocześnie przyciski G, L, M aż do usłyszenia sygnału dźwiękowego. Nacisnąć przyciski X i Y,
aby wybrać żądany poziom jasności i potwierdzić naciskając przycisk Z.
! Podczas cyklu prania lub gdy ustawi się OPÓŹNIONY START, jeśli nie używa się wyświetlacza przez 1 minutę, włącza
się „WYGASZACZ EKRANU”. Aby powrócić do poprzednio wyświetlanego ekranu, wystarczy nacisnąć którykolwiek z
przycisków.
2:55
90°
1200
-- h
--
COTONE
H
G
Y
X Z
I
L M
A
B
C
C
D
E
C
F

20
PL
Jak wykonać cykl prania lub
suszenie
1. WŁĄCZENIE MASZYNY. Nacisnąć przycisk , na
wyświetlaczu pojawi się napis HOTPOINT, kontrolka START/
PAUZA zacznie powoli pulsować w kolorze zielonym.
2. WKŁADANIE BIELIZNY. Otworzyć szklane drzwiczki. Włożyć
bieliznę uważając, aby nie przekroczyć wielkości wsadu
wskazanej w tabeli programów na następnej stronie.
3. DOZOWANIE ŚRODKA PIORĄCEGO. Wysunąć
szuadkę i wsypać detergent do odpowiednich komór w
sposób wyjaśniony w „Środki piorące i bielizna”.
4. ZAMKNĄĆ DRZWICZKI.
5. WYBÓR PROGRAMU. Przy pomocy pokrętła
PROGRAMY wybrać żądany program, nazwa programu
pojawi się na wyświetlaczu; z nim powiązana jest
temperatura oraz prędkość wirowania, które mogą zostać
zmienione. Na wyświetlaczu pojawi się czas trwania cyklu.
6. PERSONALIZACJA CYKLU PRANIA.
Przy pomocy odpowiednich przycisków:
Zmienić temperaturę i/lub wirówkę. Maszyna wybierze
automatycznie temperaturę oraz wirówkę maksymalne
przewidziane dla danego programu, dlatego nie mogą one
być zwiększane. Poprzez naciskanie przycisku stopniowo
zmniejsza się temperaturę aż do prania w zimnej wodzie (na
wyświetlaczu widoczny jest symbol “--”). Naciskając przycisk
stopniowo zmniejsza się wirówkę aż do jej wyłączenia (na
wyświetlaczu widoczny jest symbol “--”). Dodatkowe naciśnięcie
przycisków przywróci maksymalne wartości przewidywane.
! Wyjątek: wybierając program 5 temperaturę można
podnieść aż do 40°.
! Wyjątek: wybierając program 7 temperaturę można
podnieść aż do 90°.
! Wyjątek: wybierając program 9 temperaturę można
podnieść aż do 60°.
Ustawienie opóźnionego rozpoczęcia.
W celu ustawienia opóźnionego rozpoczęcia wybranego
programu należy naciskać odpowiedni przycisk aż do
osiągnięcia żądanego czasu opóźnienia. W celu usunięcia
opóźnionego uruchomienia należy naciskać przycisk aż do
pojawienia się napisu “-- h”.
Ustawianie suszenia
Naciskając jeden raz lub kilka razy przycisk SUSZENIE
, ustawia się żądany rodzaj suszenia. Przewidziane są
dwie możliwości:
A - Na podstawie poziomu żądanego suszenia:
Prasowanie: wskazany dla bielizny, która będzie prasowana. Po-
ziom pozostałej wilgotności zmiękcza zgięcia i ułatwia ich usunięcie.
Wieszanie: Idealny dla tej bielizny, która wymaga kom-
pletnego prasowania.
Składanie: Odpowiedni dla bielizny, która ma być
ułożona w szae bez jej prasowania.
Extra: Odpowiedni dla bielizny, które wymagają
całkowitego wysuszenia, czyli taka jak gąbki czy szlafroki.
B - Zależnie od czasu: od 30 do 180 minut.
Aby wyłączyć suszenie, należy przytrzymać wciśnięty odpowiedni
przycisk aż do pojawienia się na wyświetlaczu napisu OFF.
Jeśli wyjątkowo ilość bielizny do prania i suszenia przewyższa
maksymalny przewidziany ładunek, należy wykonać pranie,
a po zakończeniu programu podzielić ładunek i włożyć do
bębna tylko jego część. Dalej postępować według instrukcji
dotyczących opcji „Tylko suszenie”. Powtórzyć te same
czynności dla pozostałej części bielizny. Zawsze po zakończeniu
suszenia wykonywane jest krótkie chłodzenie bielizny.
Tylko suszenie
Nacisnąć przycisk , aby przeprowadzić samo suszenie.
Po wybraniu żądanego programu, kompatybilnego z rodza-
jem bielizny, naciśnięcie przycisku spowoduje ominięcie
etapu prania i włączenie samego suszenia o najwyższym po-
ziomie dostępnym dla wybranego programu. Można zmienić
i ustawić poziom lub czas suszenia, naciskając przycisk
suszenia (Nie jest to możliwe dla programu 1-2-3-4 i 14).
Ustawić rodzaj płukania.
Opcja umożliwia wybranie rodzaju płukania
przeznaczonego do jak największej ochrony delikatnej skóry.
Po pierwszym naciśnięciu przycisku, zostaje ustawiony
poziom “Extra +1”, który pozwala wybrać dodatkowe
płukanie, oprócz standardowego, w celu usunięcia wszelkich
pozostałości detergentu. Po drugim naciśnięciu przycisku,
zostaje ustawiony poziom „“Extra +2”, który pozwala wybrać
dwa dodatkowe płukania, oprócz standardowego, w celu jak
najlepszej ochrony delikatnej skóry. Naciskając po raz trzeci
na przycisk ustawia się poziom “Extra +3”, który umożliwia
wybranie 3 dodatkowych płukań oprócz tych, które przewiduje
dany cykl. Aktywacja opcji w cyklach o temperaturze 40°
umożliwia usunięcie głównych alergenów, takich jak kocia i
psia sierść oraz pyłki; w cyklach o temperaturze powyżej 40°
osiąga się bardzo dobry poziom ochrony przeciwalergicznej.
Nacisnąć ponownie przycisk, aby powrócić do „Płukanie
zwykłe” rodzaju płukania. Jeśli któreś z ustawień lub zmiana
ustawienia nie jest możliwe, na wyświetlaczu pojawi się napis
„WYBÓR NIEMOŻLIWY” lub „ZMIANA NIEMOŻLIWA”.
Zmiana charakterystyki cyklu.
• Naciskać przycisk w celu uruchomienia funkcji; zapala
się odpowiednia ikona na wyświetlaczu.
• Nacisnąć ponownie przycisk w celu wyłączenia funkcji,
odpowiednia ikona na wyświetlaczu gaśnie.
! Jeśli wybrana funkcja nie jest kompatybilna z
ustawionym programem, jej ikona jest wyświetlana z
niską jasnością, a oprócz tego niekompatybilność jest
sygnalizowana sygnałem akustycznym (3 sygnały) i
napisem “WYBÓR NIEMOŻLIWY” na wyświetlaczu.
! Jeśli wybrana funkcja nie jest kompatybilna z inną, wcześniej
ustawioną, zostaje wyświetlony napis WYBÓR NIEMOŻLIWY”
na wyświetlaczu i funkcja nie zostaje włączona.
! Funkcje mogą zmieniać zalecane obciążenie i/lub czas
trwania cyklu.
7. URUCHOMIENIE PROGRAMU. Nacisnąć przycisk
START/PAUZA. Odpowiednia kontrolka zaświeci się
kolorem zielonym i drzwiczki zostaną zablokowane (symbol
ZABLOKOWANYCH DRZWICZEK świeci się). Podczas
prania na wyświetlaczu pojawi się nazwa bieżącej fazy.
W celu zmiany programu w czasie trwania cyklu należy
ustawić pralkę w pauzie naciskając przycisk START/PAUZA
(kontrolka START/PAUZA zacznie powoli pulsować w
kolorze pomarańczowym); następnie wybrać potrzebny cykl i
ponownie nacisnąć przycisk START/PAUZA. W celu otwarcia
drzwiczek w trakcie wykonywania cyklu należy nacisnąć
przycisk START/PAUZA; jeśli symbol ZABLOKOWANYCH
DRZWICZEK jest wyłączony możliwe będzie otwarcie
drzwiczek Nacisnąć ponownie przycisk START/PAUZA, aby
uruchomić program od punktu, w którym został przerwany.
8. KONIEC PROGRAMU. Wskazywany jest napisem
„KONIEC CYKLU” na wyświetlaczu, kiedy symbol
ZABLOKOWANYCH DRZWICZEK wyłączy się,
możliwe będzie otwarcie drzwiczek. Otworzyć drzwiczki,
wyjąć bieliznę i wyłączyć maszynę.
! Jeśli zamierza się anulować uruchomiony juz cykl,
przytrzymać dłużej naciśnięty przycisk . Cykl zostanie
przerwany i maszyna wyłączy się.
Direct Injection
Pralka jest wyposażona w innowacyjną technologię «Di-
rect Injection», która wstępnie miesza wodę z detergentem
aktywując od razu czynniki piorące detergentu. Ta aktywna
emulsja jest wprowadzana bezpośrednio do bębna pralki
i przenika jeszcze skuteczniej między włókna, usuwając
najbardziej uporczywe zabrudzenia, już w niskich tempe-
raturach, dbając przy tym maksymalnie o kolory i tkaniny.
Możliwe jest wybranie trybu «Power», pozwalającego
uzyskać najlepszą skuteczność prania lub trybu «EcoEner-
gy» zapewniającego największą oszczędność energii.
21
PL
Programy i funkcje
Tabela programów
Funkcje prania
! Jeśli wybrana funkcja nie jest kompatybilna z
ustawionym programem, jej ikona jest wyświetlana z
niską jasnością, a oprócz tego niekompatybilność jest
sygnalizowana sygnałem akustycznym (3 sygnały) i
napisem “WYBÓR NIEMOŻLIWY” na wyświetlaczu.
! Jeśli wybrana funkcja nie jest kompatybilna z inną, wcześniej
ustawioną, zostaje wyświetlony napis WYBÓR NIEMOŻLIWY”
na wyświetlaczu i funkcja nie zostaje włączona.
Odkażanie Parą
Po wybraniu tej opcji zwiększa się skuteczność mycia
poprzez wytworzenie pary, która podczas cyklu eliminuje
nawet ewentualne zarazki we włóknach naprawiając
je jednocześnie. Włożyć bieliznę do bębna, wybrać
odpowiedni program i wybrać opcję .
! Podczas prania drzwiczki nie będą przeźroczyste ze
względu na wytworzenie się pary.
Programy
Opis programu
Temp.
maks.
(°C)
Prędkość maks.
(obroty na
minutę)
Suszenie
Środki piorące
i dodatki
Wsad maks. (kg)
Czas trwania
cyklu
Pranie
Środek
zmiękczający
ANTI CREASE
Mo�liwa jest kontrola czasu trwania programów prania
na wy�wietlaczu.
1
Mieszanka Pierz&Susz
40°
800
3
2
Pranie&Susz. Koszul
40°
1000
2
3
Przed Prasowaniem
- - - - - 1,5
4
Odświeżanie Para
- - - - - 2
DAILY CLEAN
5
Odplamianie Turbo 45’
20°
(Max. 40°C)
1200
5,5
6
Odplamianie Power 20°C
20°
1600
10
7 Bawełna: tkaniny białe lekko zabrudzone i delikatne kolorowe.
40°
(Max. 90°C)
1600
10
8
Eko Bawełna
60°/40°
(1-2):
kaniny białe i kolorowe, wytrzymałe, mocno zabrudzone.
60° 1600
10
9
Syntetyczne (4): tkaniny kolorowe, wytrzymałe, lekko zabrudzone.
40°
(Max. 60°C)
1000
5
SPECIALS
10
Kolory
40° 1600
10
11
Bardzo Delikatne
30°
--
1
12
Wełna: do wełny, kaszmiru, itp.
40° 800
2,5
13
Sport
40° 600
4,5
14
Szybkie 30’ (**): w celu szybkiego odświeżenia lekko tkanin (niewskazany dla
wełny, jedwabiu i tkanin przeznaczonych do prania ręcznego).
30° 800
4
Częściowe
Płukanie
- 1600
-
10
Wirowanie + Odpompow.
- 1600
- - 10
Tylko Odpompowywanie *
-
--
- - - 10
Dla wszystkich Test Institutes
1) Program sterowania zgodny z normą EN 50229:
ustawić
program 8 z temperaturą 60°C.
2) Program bawełna, długi:
ustawić
program 8 z temperaturą 40°C i nacisnąć przycisk DIRECT INJECTION z trybem „Power”.
3) Program tkaniny syntetyczne długi: ustawić program 9 z temperaturą 40°C.
Czas trwania cyklu wskazany na wyświetlaczu lub w instrukcji jest czasem oszacowanym dla standardowych warunków. Rzeczywisty czas trwania cyklu może się
zmieniać w zależności od wielu czynników, takich jak temperatura i ciśnienie wody na wlocie, temperatura otoczenia, ilość detergentu, ilość i rodzaj pranej odzieży,
wyważenie ładunku, wybrane opcje dodatkowe.
* Po wybraniu programu i wyłączeniu wirowania maszyna wykona jedynie opróżnianie z wody.
** Jeśli zostanie ustawiony również cykl suszenia, maszyna wykona program „pranie+suszenie” o długości 45’ z maksymalnym wirowaniem i ładunkiem bielizny o masie 1 kg.
22
PL
Środki piorące i bielizna
Szuadka na środki piorące
Dobry rezultat prania zależy również od prawidłowego
dozowania środka piorącego: użycie jego nadmiernej
ilości nie poprawia skuteczności prania, lecz przyczynia
się do powstawania nalotów na wewnętrznych częściach
pralki i do zanieczyszczania środowiska.
! Piorące w proszku należy stosować do tkanin z białej
bawełny i do prania wstępnego oraz do prania w tempe-
raturze przekraczającej 60°C. Środki
! Należy stosować się do zaleceń podanych na opako-
waniu środka piorącego.
! Nie stosować środków do prania ręcznego, ponieważ
tworzą one za dużo piany.
Wysunąć szuadkę i
umieścić w niej środek
piorący lub dodatkowy w
następujący sposób.
! Nie wylewać detergentu do
przegródka środkowej (*).
Przegródka 1: Środek
piorący do prania zasad-
niczego (w proszku lub w
płynie)
W przypadku stosowania środka piorącego w płynie,
zaleca się użycie ścianki A dostarczonej na wyposażeniu,
która ułatwia prawidłowe dozowanie. W celu użycia środka
piorącego w proszku, należy wsunąć ściankę w zgłębienie B.
Przegródka 2: Środki dodatkowe (zmiękczające, itp.)
Środek zmiękczający nie powinien wypływać poza kratkę.
Przygotowanie bielizny
• Podzielić bieliznę do prania według:
- rodzaju tkaniny / symbolu na etykiecie.
- kolorów: oddzielić tkaniny kolorowe od białych.
• Opróżnić kieszenie i sprawdzić guziki.
• Nie przekraczać wskazanego ciężaru suchej bielizny:
patrz “Tabela programów”.
Ile waży bielizna?
1 prześcieradło 400-500 gr.
1 poszewka 150-200 gr.
1 obrus 400-500 gr.
1 szlafrok 900-1.200 gr.
1 ręcznik 150-250 gr.
Programy specjalne
Mieszanka Pierz&Susz: Codzienne Pranie&Suszenie:
program 1 przeznaczony jest do prania i suszenia tkanin
mieszanych (bawełna i syntetyczne). Po wybraniu tego cyklu
można prać i suszyć do 3 kg odzieży; zalecamy stosowanie
płynnego środka piorącego. Dzięki użyciu pary, program
jest zoptymalizowany w celu ograniczenia tworzenia się
zagnieceń na odzieży i ułatwienia prasowania.
Pranie&Susz. Koszul: program 2 przeznaczony jest do
prania i suszenia koszul i koszulek z różnych materiałów i
w różnych kolorach w celu zagwarantowania jak najlepszej
ochrony ubrań. Po wybraniu tego cyklu można prać i suszyć
do 2 kg odzieży. Aby otrzymać jak najlepsze wyniki prania
należy stosować płynny środek piorący; wcześniej wyprać
kołnierze, mankiety i plamy. Dzięki użyciu pary, program
jest zoptymalizowany w celu ograniczenia tworzenia się
zagnieceń na odzieży i ułatwienia prasowania.
Przed Prasowaniem: używać tego programu bezpośrednio
przed prasowaniem; wsad maksymalny 1,5 kg. Dzięki użyciu
pary, program jest zoptymalizowany w celu ograniczenia
tworzenia się zagnieceń na odzieży i ułatwienia prasowania.
Odświeżanie Para: do odświeżenia ubrań, zneutralizowania
nieprzyjemnych zapachów i zmiękczenia włókien poprzez
doprowadzenie pary do wnętrza bębna. Po zakończeniu cyklu
tkaniny będą wilgotne.
Odplamianie Turbo 45’: ten cykl gwarantuje znakomitą
zdolność usuwania plam już w temperaturze 20°C w zaledwie
45 minut. Temperaturę w tym cyklu można zwiększyć do 40°C.
Odplamianie Power 20°C: ten program oferuje
maksymalną zdolność usuwania plam, w niskiej tempera-
turze, nie niszcząc tkanin ani kolorów i bez konieczności
wcześniejszego stosowania innych środków odplamiających.
Kolory: do prania ubrań z barwionej bawełny. Ten program
pozwala na optymalne zachowanie kolorów nawet po kilku-
krotnym praniu.
Bardzo Delikatne: używać programu
11
do prania bardzo deli-
katnej odzieży, ozdobionej cekinami lub koralikami.
Zalecamy wywrócenie ubrań na lewą stronę i włożenie małych
części odzieży do woreczka przeznaczonego specjalnie do prania
delikatnych ubrań. Dla osiągnięcia najlepszych efektów, zalecamy
stosowanie środka piorącego w płynie do tkanin delikatnych.
Po wybraniu opcji suszenia wyłącznie czasowego, po
zakończeniu prania zostanie przeprowadzone szczególnie deli-
katne suszenie, dzięki lekkim obrotom i odpowiednio kontrolo-
wanej temperaturze strumienia powietrza. Zalecane czasy to:
1 kg tkanin syntetycznych --> 165 min.
1 kg tkanin syntetycznych i bawełnianych --> 180 min.
1 kg tkanin bawełnianych --> 180 min.
Stopień wysuszenia zależał będzie od wielkości wsadu i
rodzaju tkanin.
Wełna
- Woolmark Apparel Care - Green:
cykl prania „Wełna” niniejszej pralki został zatwierdzony pr-
zez Woolmark Company jako odpowiedni do prania odzieży
wełnianej i przeznaczonej do prania ręcznego, pod warun-
kiem, że pranie jest przeprowadzane zgodnie z instrukcjami
podanymi na etykiecie ubrania oraz ze wskazówkami dostar-
czonymi przez producenta pralki. (M1135)
Sport: został opracowany do prania mało zabrudzonej
odzieży sportowej (dresów, skarpetek, ręczników, itp.);
w celu osiągnięcia najlepszych rezultatów, nie należy
przekraczać maksymalnego wsadu podanego w “Tabela
programów”. Zaleca się stosowanie detergentu w płynie,
używając ilości odpowiedniej do połowy wsadu.
System równoważenia wsadu
Przed każdym wirowaniem, aby uniknąć nadmiernych
drgań oraz jednorodnie rozłożyć wsad, bęben wykonuje
obroty z prędkością nieco większą niż podczas prania.
Jeśli po kilku próbach wsad nie zostanie prawidłowo
zrównoważony, urządzenie wykona wirowanie z prędkością
mniejszą od przewidywanej. W przypadku wystąpienia
nadmiernego niezrównoważenia wsadu pralka dokona
jego rozłożenia zamiast odwirowania. Aby zapewnić lepsze
rozłożenie wsadu oraz jego właściwe zrównoważenie zale-
ca się mieszanie dużych i małych sztuk bielizny.
1
2
A
B
*

23
PL
Nieprawidłowości w działaniu
i sposoby ich usuwania
Może się zdarzyć, że pralka nie działa. Przed wezwaniem Serwisu Technicznego (patrz „Serwis Techniczny”) należy
sprawdzić, czy problemu nie da się łatwo rozwiązać przy pomocy poniższego wykazu.
Nieprawidłowości w działaniu:
Pralka nie włącza się.
Cykl prania nie rozpoczyna się.
Pralka nie pobiera wody (na
wyświetlaczu pojawi się napis „BRAK
WODY, Otwórz zawór”).
Pralka cały czas pobiera i odprowad-
za wodę.
Pralka nie odprowadza wody i nie
odwirowuje prania.
Pralka mocno wibruje w fazie wirowania.
Z pralki wycieka woda.
Maszyna jest zablokowana,
wyświetlacz pulsuje i sygnalizuje kod
anomalii (np.: F-01, F-..).
Tworzy się zbyt duża ilość piany.
Pralka nie suszy.
Możliwe przyczyny / Rozwiązania:
• Wtyczka nie jest włączona do gniazdka lub jest wsunięta za słabo, tak że nie
ma styku.
• W domu nastąpiła przerwa w dostawie prądu.
• Drzwiczki pralki nie są dobrze zamknięte.
• Nie został wciśnięty przycisk ON/OFF.
• Nie został wciśnięty przycisk START/PAUZA.
• Kurek dopływu wody jest zamknięty.
• Zostało nastawione opóźnienie startu.
• Przewód doprowadzający wodę nie jest podłączony do kurka.
• Przewód jest zgięty.
• Kurek dopływu wody jest zamknięty.
• W domu nastąpiła przerwa w dostawie wody.
• Ciśnienie wody nie jest wystarczające.
• Nie został wciśnięty przycisk START/PAUZA.
• Przewód odpływowy nie został zainstalowany na wysokości między 65 a
100 cm od podłogi (patrz „Instalacja”).
• Końcówka przewodu odpływowego jest zanurzona w wodzie (patrz „Instalacja”).
• Otwór odpływowy w ścianie nie posiada odpowietrznika.
Jeśli po sprawdzeniu tych możliwości problem nie zostanie rozwiązany, należy
zamknąć kurek dopływu wody, wyłączyć pralkę i wezwać Serwis Techni-
czny. Jeśli mieszkanie znajduje się na najwyższych piętrach budynku, może
wystąpić efekt syfonu, w wyniku którego pralka cały czas pobiera i odprowad-
za wodę. W celu wyeliminowania tej niedogodności należy zakupić specjalny
zawór, zapobiegający powstawaniu efektu syfonu.
• Program nie przewiduje odprowadzania wody: w przypadku niektórych pro-
gramów należy uruchomić je ręcznie (patrz „Programy i funkcje”).
• Przewód odpływowy jest zgięty (patrz „Instalacja”).
• Instalacja odpływowa jest zatkana.
• Podczas instalacji pralki bęben nie został prawidłowo odblokowany (patrz
„Instalacja”).
• Pralka nie jest właściwie wypoziomowana (patrz „Instalacja”).
• Pralka, zainstalowana pomiędzy meblami a ścianą, ma za mało miejsca
(patrz „Instalacja”).
• Przewód doprowadzający wodę nie jest dobrze przykręcony (patrz „Instalacja”).
• Szuadka na środki piorące jest zatkana (w celu jej oczyszczenia patrz „Utr-
zymanie i konserwacja”).
• Przewód odpływowy nie jest dobrze zamocowany(patrz „Instalacja”).
• Wyłączyć maszynę i wyjąć wtyczkę z gniazdka, odczekać około 1 minuty,
następnie włączyć ją ponownie.
Jeśli problem nie ustępuje, należy wezwać Serwis Techniczny.
• Środek piorący nie jest odpowiedni do pralek automatycznych (na opako-
waniu musi być umieszczony napis: „do pralek”, „do prania ręcznego i w
pralce” lub podobny).
• Użyto za dużo środka piorącego.
• Wtyczka nie jest włączona do gniazdka, lub jest wsunięta niedostatecznie,
tak że nie ma kontaktu.
• W domu brak jest prądu.
• Drzwiczki nie są dobrze zamknięte.
• Zostało nastawione opóźnienie startu.
• SUSZENIE znajduje się w pozycji OFF.

24
PL
Serwis Techniczny
Przed skontaktowaniem się z Serwisem Technicznym:
• Sprawdzić, czy problemu nie można rozwiązać samodzielnie (patrz„Nieprawidłowości w działaniu i sposoby ich usuwania”);
• Ponownie uruchomić program i sprawdzić, czy problem nie zniknął;
• Jeśli nie, zwrócić się do autoryzowanego Serwisu Technicznego, dzwoniąc pod numer podany w karcie gwarancyjnej.
! Nigdy nie wzywać nieautoryzowanych techników.
Należy podać:
• rodzaj nieprawidłowości;
• model maszyny (Mod.);
• numer seryjny (S/N).
Informacje te znajdują się na tabliczce umieszczonej w tylnej części pralki oraz widocznej z przodu po otwarciu drzwiczek.

DE
25
! Dieses Symbol erinnert Sie daran, das vorlie-
gende Handbuch zu lesen.
INHALTSVERZEICHNIS
Installation, 26-27
Auspacken und Aufstellen
Wasser- und Elektroanschlüsse
Erster Waschgang
Technische Daten
Reinigung und Pflege, 28
Abstellen der Wasser- und Stromversorgung
Reinigung des Gerätes
Reinigung der Waschmittelschublade
Pflege der Gerätetür und Trommel
Reinigung der Pumpe
Kontrolle des Wasserzulaufschlauchs
Vorsichtsmaßregeln und Hinweise, 29
Allgemeine Sicherheit
Entsorgung
Manuelles Öffnen der Gerätetür
Beschreibung Ihres Waschtrockneren, 30-31
Bedienblende
Display
Durchführung eines Wasch- oder Trockenzy-
klus, 32
Programme und Funktionen, 33
Programmtabelle
Waschfunktionen
Waschmittel und Wäsche, 34
Waschmittelschublade
Vorsortieren der Wäsche
Sonderprogramme
Unwuchtkontrollsystem
Störungen und Abhilfe, 35
Kundendienst, 36
RDPD 107617 J
Bedienungsanleitungen
WASCHTROCKNER
Deutsch
DE
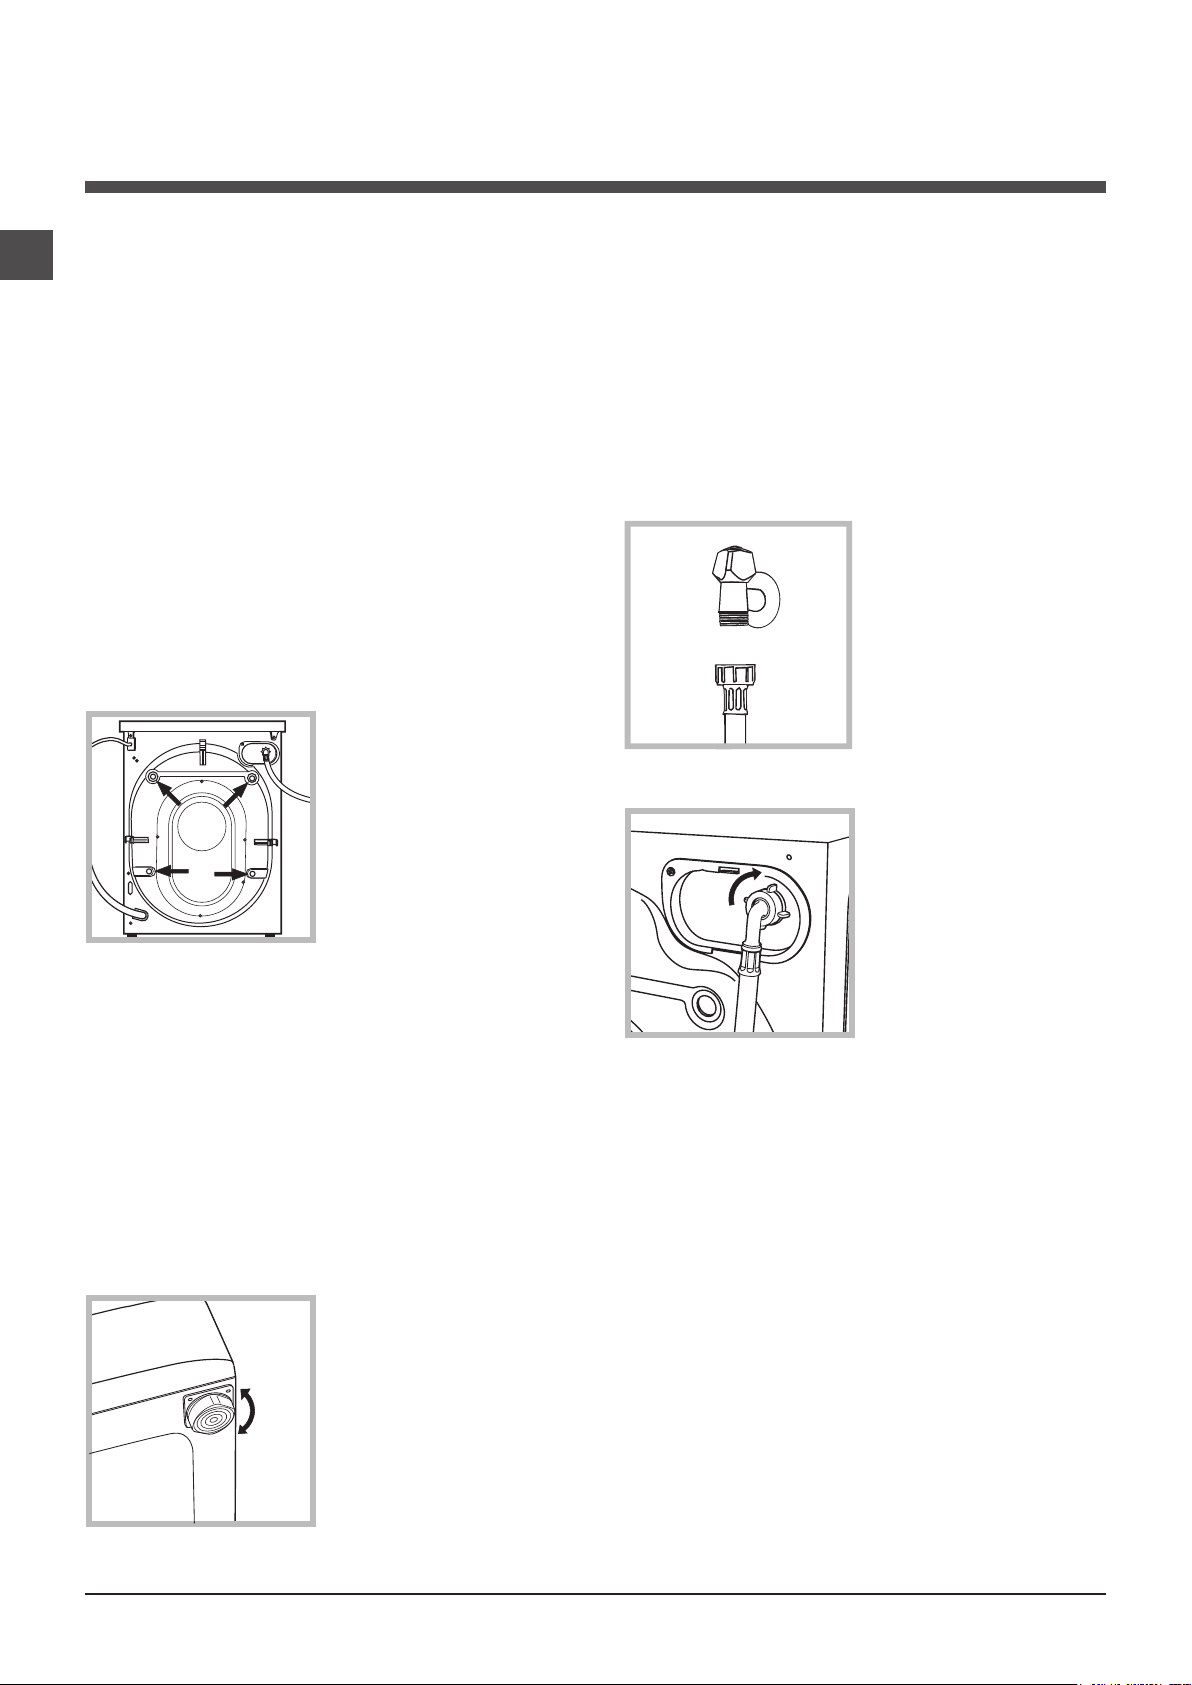
26
DE
Installation
! Es ist äußerst wichtig, diese Bedienungsanleitung
sorgfältig aufzubewahren, um sie jederzeit zu Rate
ziehen zu können. Sorgen Sie dafür, dass sie im
Falle eines Umzugs oder einer Übergabe an einen
anderen Benutzer das Gerät stets begleitet, damit
auch der neue Inhaber die Möglichkeit hat, diese
zu Rate zu ziehen.
! Lesen Sie bitte folgende Hinweise aufmer-
ksam durch: sie liefern wichtige Informationen
hinsichtlich der Installation, des Gebrauchs
und der Sicherheit.
Auspacken und Aufstellen
Auspacken
1. Gerät auspacken.
2. Sicherstellen, dass der Waschtrockner keine
Transportschäden erlitten hat. Schließen Sie
das Gerät im Falle einer Beschädigung bitte
nicht an und kontaktieren Sie Ihren Händler.
3. Die 4 Transport-
schutzschrauben aus-
schrauben und das an
der Rückwand befin-
dliche Gummiteil und
das entsprechende
Abstandsstück abneh-
men (siehe Abbildung).
4. Die Löcher mittels der mitgelieferten Kunst-
stoffstöpsel schließen.
5. Sämtliche Teile aufbewahren: Sollte der
Waschtrockner erneut transportiert werden
müssen, müssen diese Teile wieder eingesetzt
werden.
! Verpackungsmaterial ist kein Spielzeug für
Kinder.
Nivellierung
1. Der Waschtrockner muss auf einem ebe-
nen, festen Untergrund aufgestellt werden,
ohne diesen an Wände, Möbelteile oder ähnli-
ches anzulehnen.
2. Sollte der Boden
nicht perfekt eben
sein, müssen die
Unebenheiten durch
An- bzw. Ausdrehen
der vorderen Stellfüße
ausgeglichen werden
(siehe Abbildung), der
auf der Arbeitsfläche
zu ermittelnde Nei-
gungsgrad darf 2°
nicht überschreiten.
Eine präzise Nivellierung verleiht dem Gerät die
erforderliche Stabilität, durch die Vibrationen,
Betriebsgeräusche und ein Verrücken des
Gerätes vermieden werden. Bei Teppichböden
müssen die Stellfüße so reguliert werden, dass
ein ausreichender Freiraum zur Belüftung unter
dem Waschtrockneren gewährleistet ist.
Wasser- und Elektroanschlüsse
Anschluss des Zulaufschlauches
1. Schrauben Sie den
Wasserschlauch an
einen Kaltwasserhahn
mit ¾-Zoll-Gewinde-
anschluss an (siehe
Abbildung).
Lassen Sie das Wa-
sser vor dem An-
schluss so lange
auslaufen, bis klares
Wasser austritt.
2. Das andere Ende
des Schlauches an
den oben rechts am
Rückteil des Wa-
schtrockneren befin-
dlichen Wasseran-
schluss anschließen
(siehe Abbildung).
3. Der Schlauch darf nicht eingeklemmt oder
abgeknickt werden.
! Der Wasserdruck muss innerhalb der Wer-
te liegen, die in der Tabelle der Technischen
Daten angegeben sind (siehe nebenstehende
Seite).
! Sollte der Zulaufschlauch nicht lang genug
sein, dann wenden Sie sich bitte an einen
Fachhändler oder an einen autorisierten Fach-
mann.
! Verwenden Sie niemals bereits gebrauchte
Schläuche.
! Verwenden Sie die Schläuche, die mit dem
Gerät geliefert wurden.
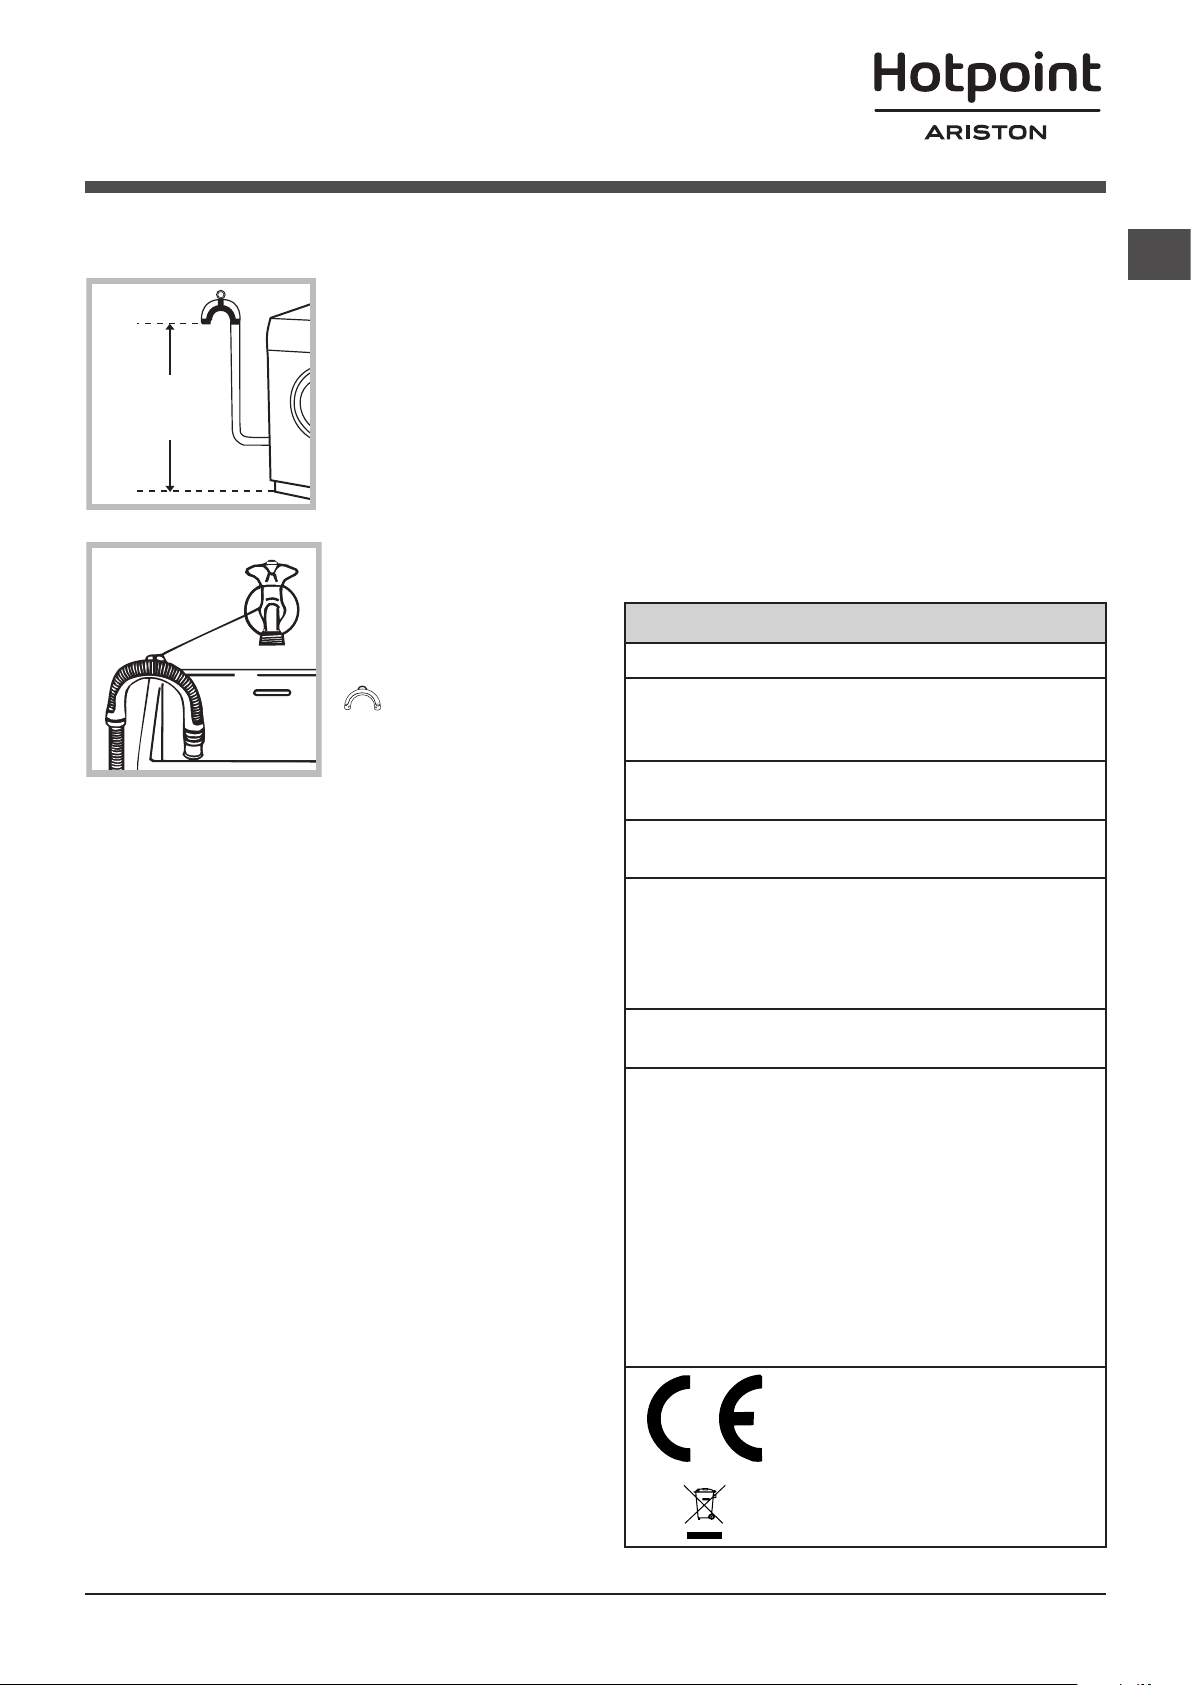
DE
27
Technische Daten
Modell
RDPD 107617 J
Abmessun-
ge
Breite 59,5 cm
Höhe 85 cm
Tiefe 60,5 cm
Fassung-
svermögen
1 bis 10 kg für Waschzyklus
1 bis 7 kg für Trockenzyklus
Elektroan-
schlüsse
siehe das am Gerät befindli-
che Typenschild
Wasseran-
schlüsse
Höchstdruck
1 MPa (10 bar)
Mindestdruck
0,05 MPa (0,5 bar)
Trommelvolumen 71 Liter
Schleuder-
touren
bis zu 1600 U/min.
Prüfpro-
gramme
gemäß
EN 50229
Waschen: programm 8;
Temperatur 60°C; bei einer
Lademenge von 10 kg.
Trocken: die größer Ladung
(7 kg) muss mit der Trocken-
stufe „Extra“ getrocknet
werden. Die Ladung mit der
restlichen Wäsche muss mit
der Trockenstufe „Extra“ ge-
trocknet werden: und soll aus
3 Bettlaken, 2 Kissenbezüge
und 1 Handtuch bestehen.
Dieses Gerät entspricht den
folgenden EG-Richtlinien:
- EMC 2014/30/EU (elektro-
magnetische Verträglichkeit)
- 2012/19/EU - (WEEE)
- LVD 2014/35/EU (Nieder-
spannung)
Anschluss des Ablaufschlauches
Schließen Sie den
Ablaufschlauch, ohne
ihn dabei zu knicken,
an eine Ablaufleitung,
oder an einen in der
Wand, in einer Höhe
von 65cm bis 100cm
an.
Oder hängen Sie den
Ablaufschlauch in ein
Becken oder eine
Wanne ein; befestigen
Sie ihn in diesem Falle
mittels der Führung
(beim Kunden-
dienst erhältlich) an
dem Wasserhahn
(siehe Abbildung). Das
freie Ablaufschlau-
chende darf nicht unter Wasser bleiben.
! Verlängerungsschläuche sollten nicht ein-
gesetzt werden, sollte dies jedoch absolut
unvermeidlich sein, muss die Verlängerung
denselben Durchmesser des Originalschlau-
chs aufweisen und darf eine Länge von 150
cm nicht überschreiten.
Elektroanschluss
Vor Einfügen des Netzsteckers in die Steckdo-
se ist sicherzustellen, dass:
• dieSteckdoseübereinenormgerechte
Erdung verfügt;
• dieSteckdosedieindenTechnischenDa-
ten angegebenen Höchstlast des Gerätes
trägt (siehe nebenstehende Tabelle);
• dieStromspannungdenindenTechnischen
Daten angegebenen Werten entspricht (sie-
he nebenstehende Tabelle);
• dieSteckdosemitdemNetzsteckerdes
Waschtrockneren kompatibel ist. Andernfal-
ls muss der Netzstecker (oder die Steckdo-
se) ersetzt werden.
! Der Waschtrockner darf nicht im Freien instal-
liert werden, auch nicht, wenn es sich um einen
geschützten Platz handelt. Es ist gefährlich, das
Gerät Gewittern und Unwettern auszusetzen.
! Die Steckdose muß jederzeit zugänglich sein.
! Verwenden Sie bitte keine Verlängerungen
oder Mehrfachstecker.
65 - 100 cm
! Das Netzkabel darf nicht gebogen bzw. ein-
geklemmt werden.
! Das Versorgungskabel darf nur durch autori-
sierte Fachkräfte ausgetauscht werden.
Achtung! Der Hersteller übernimmt keinerlei
Haftung, sollten diese Vorschriften nicht genau
beachtet werden.
Erster Waschgang
Lassen Sie nach der Installation bzw. vor
erstmaligem Gebrauch erst einen Waschgang
(mit Waschmittel) ohne Wäsche durchlaufen.
Stellen Sie hierzu das Waschprogramm auto
reinigen (siehe „Reinigung des Gerätes“).
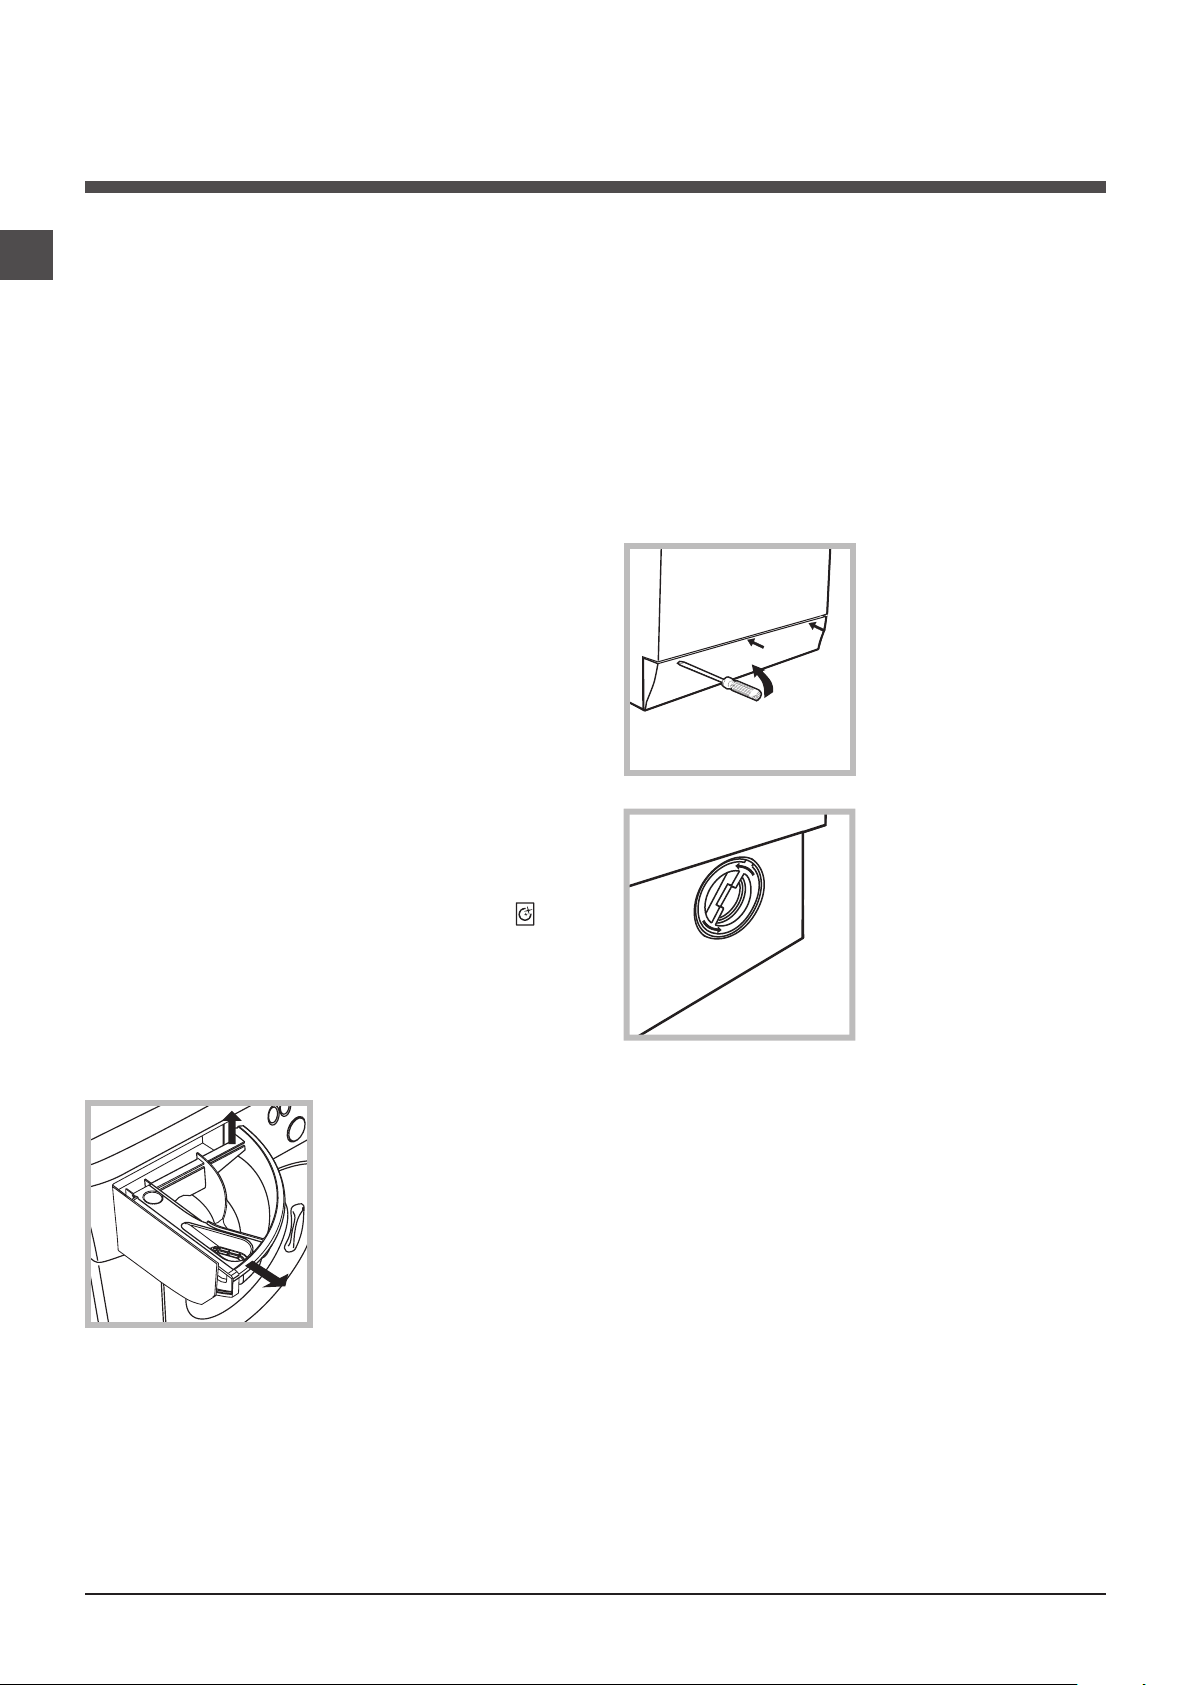
28
DE
Reinigung und Pflege
Reinigung der Pumpe
Ihr Gerät ist mit einer selbstreinigenden Pumpe
ausgerüstet, eine Wartung ist demnach nicht
erforderlich. Es könnte jedoch vorkommen,
dass kleine Gegenstände (Münzen, Knöpfe) in
die zum Schutz der Pumpe dienende Vorkam-
mer (befindlich unter der Pumpe) fallen.
! Vergewissern Sie sich, dass der Waschgang
abgeschlossen ist und ziehen Sie den Netz-
stecker heraus.
Zugang zur Vorkammer:
1. Nehmen Sie die
Abdeckung (befin-
dlich an der Geräte-
front) mit Hilfe eines
Schraubenziehers ab
(siehe Abbildung);
2. Drehen Sie den De-
ckel gegen den Uhrzei-
gersinn ab (siehe Ab-
bildung): es ist ganz
normal, wenn etwas
Wasser austritt;
3. Reinigen Sie das Innere gründlich;
4. Schrauben Sie den Deckel wieder auf;
5. Bringen Sie die Abdeckung wieder an. Stel-
len Sie hierbei sicher, dass die Haken in die
Schlitze eingreifen, bevor Sie die Abdeckung
fest andrücken.
Kontrolle des Wasserzulau-
fschlauchs
Kontrollieren Sie den Zulaufschlauch min-
destens einmal im Jahr. Weist er Risse bzw.
Brüche auf, muss er ausgetauscht werden.
Der starke Druck während des Waschpro-
gramms könnte zu plötzlichem Platzen führen.
! Verwenden Sie niemals bereits gebrauchte
Schläuche.
Abstellen der Wasser- und Strom-
versorgung
•DrehenSiedenWasserhahnnachjedem
Waschvorgang zu. Hierdurch wird der Ver-
schleiß der Wasseranlage verringert und
Wasserlecks vorgebeugt.
•ZiehenSiedenNetzsteckerausder
Steckdose, bevor Sie Ihren Waschtrockneren
reinigen.
Reinigung des Gerätes
•DieGehäuseteileunddieTeileausGummi
können mit einem mit warmer Spülmittellauge
angefeuchteten Tuch gereinigt werden. Ver-
meiden Sie Löse- und Scheuermittel.
•DieWaschmaschineverfügtübereinAuto
reinigen-Programm der inneren Teile, das
gänzlich ohne Wäsche durchgeführt werden
muss.
Als Hilfsmittel können bei diesem Waschgang
Waschmittel (10 % von der für gering versch-
mutzte Kleidungsstücke empfohlenen Menge)
oder spezifische Zusatzstoffe für die Reinigung
von Waschmaschinen verwendet werden. Es
wird empfohlen, das Reinigungsprogramm alle
40 Waschgänge durchzuführen.
Zur Aktivierung des Programms die Taste 5
Sekunden gedrückt halten und dann die Taste
START/PAUSE drücken, das Programm star-
tet und hat eine Dauer von etwa 70 Minuten.
Reinigung der Waschmittelschu-
blade
Heben Sie die Schu-
blade leicht an und
ziehen Sie sie nach
vorne hin heraus (sie-
he Abbildung).
Spülen Sie sie regel-
mäßig unter fließen-
dem Wasser gründlich
aus.
Pflege der Gerätetür und Trommel
•LassenSiedieGerätetürstetsleichtoffen
stehen, um die Bildung unangenehmer
Gerüche zu vermeiden.
1
2

DE
29
Vorsichtsmaßregeln und
Hinweise
! Der Waschtrockner wurde nach den strengsten internatio-
nalen Sicherheitsvorschriften entworfen und gebaut. Nachste-
hende Hinweise werden aus Sicherheitsgründen geliefert und
sollten aufmerksam gelesen werden.
Allgemeine Sicherheit
• DiesesGerätwurdeausschließlichfürdenEinsatzimpriva-
ten Haushalt konzipiert.
• Dieses Gerät darf von Kindern ab 8 Jahren und von
Personen mit eingeschränkten körperlichen, senso-
rischen oder geistigen Fähigkeiten oder mit unzurei-
chender Erfahrung und Kenntnis verwendet werden,
vorausgesetzt, sie werden überwacht oder sie
haben eine ausreichende Einweisung in die sichere
Nutzung des Geräts erhalten und haben die damit
verbundenen Gefahren verstanden. Erlauben Sie
Kindern nicht, mit dem Gerät zu spielen. Wartung
und Reinigung dürfen nicht von unbeaufsichtigten
Kindern ausgeführt werden.
- Trocken Sie keine nicht gewaschenen Wä-
schestücke.
- Wäschestücke, die mit Substanzen wie Speiseöl,
Nagellackentferner, Alkohol, Benzin, Kerosin, Fle-
ckenentfernern, Terpentin, Wachse und Stoffe zum
entfernen von Wachsen verschmutzt sind, müssen
in warmen Wasser mit einer größeren Mengen
Waschmittel gewaschen werden, bevor Sie in den
Trockner gegeben werden dürfen.
- Gegenstände wie Schaumgummi (Latex),
Duschhauben, wasserdichte Textilien, Artikel
mit einer Gummiseite oder Kleidung oder
Kissen mit Latexanteilen dürfen nicht in dem
Wäschetrockner getrocknet werden.
- Weichspüler oder ähnliche Produkte müs-
sen gemäß der Anweisungen des Herstel-
lers verwendet werden.
- Die Endphase eines Trockenzyklus erfolgt
ohne Hitze (Abkühlzyklus), damit die Wä-
sche nicht beschädigt wird.
ACHTUNG: Halten Sie den Wäschetrock-
ner nie vor Ablauf des Trockenprogramms
an. Nehmen Sie in diesem Fall die Wäsche
schnell aus dem Gerät heraus und hängen Sie sie
sofort auf, damit sie abkühlen kann.
• BerührenSiedasGerätnicht,wennSiebarfußsind,und
auch nicht mit nassen oder feuchten Händen oder Füßen.
• ZiehenSiedenNetzsteckernichtamNetzkabelausder
Steckdose, sondern nur am Netzstecker selbst.
• ÖffnenSiedieWaschmittelschubladenicht,wenndas
Gerät in Betrieb ist.
• BerührenSienichtdasAblaufwasser,eskönntesehrheißsein.
• ÖffnenSiedieGerätetürnichtmitGewalt:DerSicherheits-
Schließmechanismus könnte hierdurch beschädigt werden.
• BeietwaigenStörungenversuchenSiebittenicht,Innentei-
le selbst zu reparieren.
• HaltenSieKinderstetsvondeminBetriebbefindlichen
Gerät fern.
• WährenddesWaschgangskanndieGerätetürsehrheißwerden.
• MussdasGerätversetztwerden,solltenhierfürzweioder
drei Personen verfügbar sein. Versetzen Sie es niemals
allein, das Gerät ist äußerst schwer.
• BevorSiedieWäscheeinfüllen,stellenSiebittesicher,
dass die Wäschetrommel leer ist.
• WährenddesTrocknenskanndieGerätetürheißwerden.
• Trocknen Sie keine Wäsche, die in brennbaren
Lösemitteln (wie Trielin) gewaschen wurde.
• Trocknen Sie weder Schaumgummi noch
ähnliche Elastomer bzw. Gummimaterialien.
Manuelles Öffnen der Gerätetür
Sollte die Gerätetür aufgrund eines Stromausfalls nicht geöf-
fnet werden können, gehen Sie wie folgt vor, um die Wäsche
entnehmen und somit aufhängen zu können:
1. Ziehen Sie den Netzstecker aus der Steckdose.
2. Stellen Sie sicher, dass der Wasserstand im Innern des
Gerätes die Gerätetür nicht übersteigt, andernfalls lassen Sie das
überschüssige Wasser, so wie auf der Abbildung veranschau-
licht, durch den Ablaufschlauch in einen Eimer ablaufen.
3. Nehmen Sie die Abdeckung (befindlich an der Gerätefront)
mit Hilfe eines Schraubenziehers ab (siehe Abbildung).
4. Befreien Sie mithilfe der auf der Abbildung veranschau-
lichten Zunge (nach vorne ziehen) die Kunststoff-Spannvor-
richtung aus der Arretierung; ziehen Sie letztere dann nach
unten und öffnen Sie gleichzeitig die Gerätetür.
5. Bringen Sie die Abdeckung wieder an. Stellen Sie hierbei
sicher, dass die Haken in die Schlitze eingreifen, bevor Sie die
Abdeckung fest andrücken.
• VergewissernSiesich,dassderWasserhahn
während des Trocknens auf ist.
• Leeren Sie komplett alle Taschen
(Feuerzeuge, Streichhölzer, etc.).
• Kinder unter 3 Jahren müssen von dem
Wäschetrockner ferngehalten werden, wenn
sie nicht ständig beaufsichtigt werden.
Entsorgung
• EntsorgungdesVerpackungsmaterials:BefolgenSiedie
lokalen Vorschriften, Verpackungsmaterial kann wiederver-
wertet werden.
• GemäßderEuropäischenRichtlinie2012/19/EUüberElektro-
und Elektronik-Altgeräte dürfen Elektrohaushalts-Altgeräte
nicht über den herkömmlichen Haushaltsmüllkreislauf
entsorgt werden. Altgeräte müssen separat gesammelt
werden, um die Wiederverwertung und das Recycling der
beinhalteten Materialien zu optimieren und die Einflüsse auf
die Umwelt und die Gesundheit zu reduzieren. Das Symbol
„durchgestrichene Mülltonne“ auf jedem Produkt erinnert
Sie an Ihre Verpflichtung, dass Elektrohaushaltsgeräte ge-
sondert entsorgt werden müssen. Endverbraucher können
sich an Abfallämter der Gemeinden wenden, um mehr
Informationen über die korrekte Entsorgung ihrer Elektro-
haushaltsgeräte zu erhalten.
20
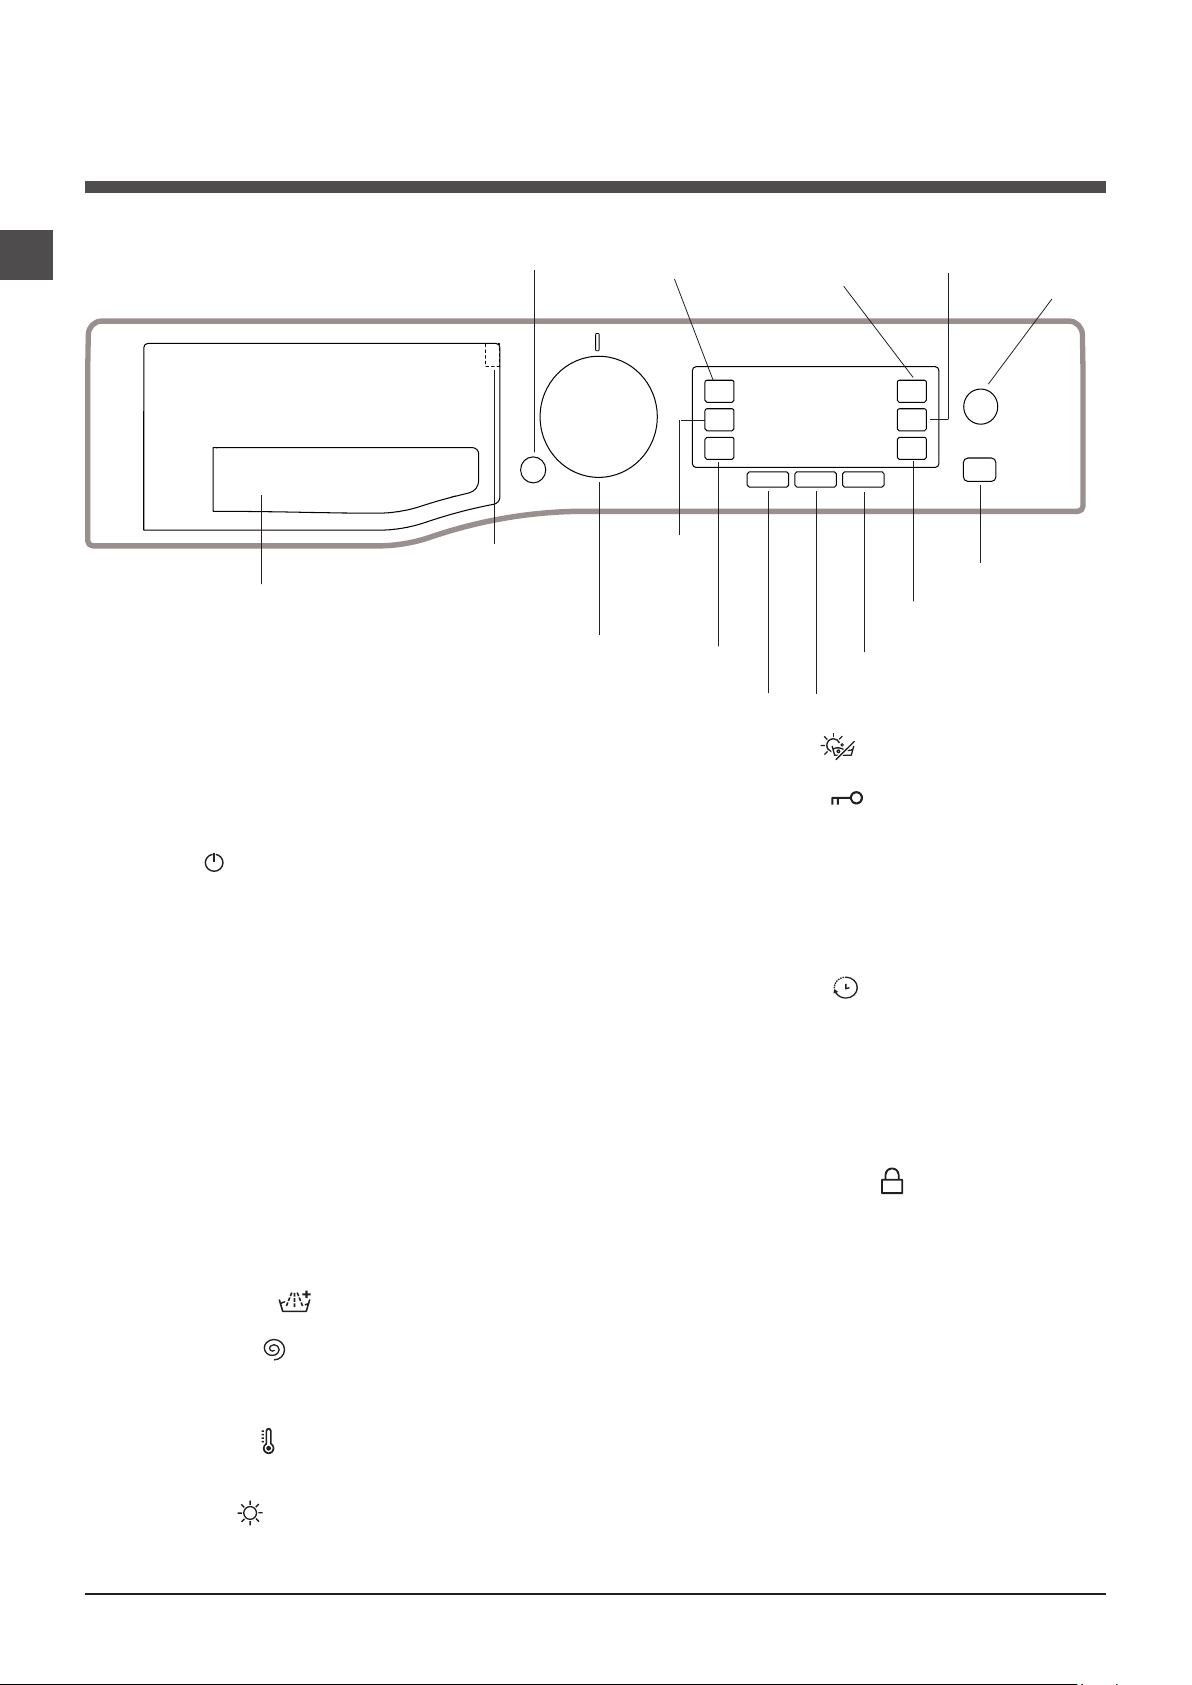
30
DE
Beschreibung Ihres
Waschtrockneren
Taste mit
Kontrollleuchte
START/PAUSE
Bedienblende
Taste
TEMPERATUR
Tasten
FUNKTIONEN
Waschmittelschublade
Taste ON/OFF
Taste
SCHLEUDERN
Taste
TASTEN SPERRE
Waschmittelschublade: für Waschmittel und Zusätze (sie-
he „Waschmittel und Wäsche“).
Kurzübersicht: die Waschmittelschublade enthält eine Kur-
zübersicht mit allen Waschprogrammen und einer grafischen
Anleitung zum Gebrauch der Einspülfächer.
Taste ON/OFF : drücken Sie kurz auf die Taste, um das
Gerät ein- bzw. auszuschalten. Die Kontrollleuchte START/PAU-
SE, die langsam grün blinkt, zeigt an, dass das Gerät einge-
schaltet ist. Um den Waschtrockneren während eines Wasch-
gangs auszuschalten, muss die Taste etwas länger gedrückt
werden (ca. 3 Sekunden); ein kurzer oder ein ungewollter Druck
bewirkt kein Ausschalten des Gerätes. Das Ausschalten des
Gerätes während eines laufenden Waschprogramms löscht den
gesamten Waschzyklus.
Tasten PROGRAMMWAHL: zur Einstellung des gewün-
schten Programms (siehe “Programmtabelle”).
Tasten FUNKTIONEN: drücken Sie die Taste, um die gewün-
schte Funktion auszuwählen. Auf dem Display schaltet sich
die entsprechende Kontrollleuchte ein.
Taste
AUTO REINIGEN
: diese Taste drücken, um das die
Reinigung der Innenteile des Geräts durchzuführen (siehe
“Reinigung des Gerätes”).
Taste DIRECT INJECTION: mit dieser Taste wählen Sie die
Option DIRECT INJECTION.
Taste
MULTI SPÜLEN
: drücken Sie diese Taste, um
die gewünschte Spülung auszuwählen.
Taste SCHLEUDERN : drücken Sie die Taste, um die
Schleudergeschwindigkeit herabzusetzen oder das Schleu-
dern ganz auszuschließen. Der Wert wird auf dem Display
angezeigt.
Taste TEMPERATUR : drücken Sie die Taste, um die
Temperatur herabzusetzen: Der Wert wird auf dem Display
angezeigt.
Taste TROCKNEN : Taste drücken, wenn Sie die Trock-
nung ändern oder ausschalten möchten, die ausgewählte
Trocknenstufe oder -zeit wird auf dem Display angezeigt.
Taste NUR TROCKNEN : Drücken Sie diese Taste, um
die Wäsche nur zu trocknen.
Taste TASTEN SPERRE : zur Aktivierung der Sperre
der Bedienblende halten Sie die Taste ca. 2 Sekunden
lang gedrückt. Erscheint auf dem Display die Anzeige
„TASTENSPERRE AKTIV“ ist die Bedienblende gesperrt
(mit Ausnahme der Taste ON/OFF). Auf diese Weise wird
verhindert, dass ein Programm aus Versehen geändert
wird, vor allem, wenn kleine Kinder im Hause sind. Zur
Deaktivierung der Sperre der Bedienblende halten Sie die
Taste ca. 2 Sekunden lang gedrückt.
Taste STARTZEITWAHL : zur Vorwahl der Startzeit des
gewählten Programms drücken Sie bitte diese Taste. Die
Zeitverzögerung wird auf dem Display angezeigt.
Taste mit Kontrollleuchte START/PAUSE: sobald die grüne
Kontrollleuchte auf langsames Blinklicht schaltet, drücken Sie
die Taste, um den Waschgang zu starten. Nach Ingangset-
zung des Programms schaltet die Kontrollleuchte auf Dau-
erlicht. Um den Waschgang zu unterbrechen, drücken Sie
erneut die Taste; die Kontrollleuchte schaltet auf orangefarbe-
nes Blinklicht. Wenn das Symbol nicht leuchtet, kann die
Gerätetür geöffnet werden. Um das Programm an der Stelle,
an der es unterbrochen wurde, wieder in Gang zu setzen,
drücken Sie die Taste erneut.
Funktion Standby
Zur Erfüllung der neuen Richtlinien zum Energieverbrauch ist
diese Waschmaschine mit einem automatischen Ausschaltsy-
stem (Standby) ausgestattet, das nach 30 Minuten des Nicht-
gebrauchs in Funktion tritt. Drücken Sie kurz die Taste ON/
OFF und warten Sie, bis sich die Maschine wieder einschaltet.
Verbrauch in Off-Betrieb: 0,5 W
Verbrauch in Left-On: 8 W
DISPLAY
Taste
AUTO
REINIGEN
Taste
STARTZEITWAHL
Taste
DIRECT
INJECTION
Taste MULTI
SPÜLEN
Kurzübersicht
WÄHLSCHALTER
PROGRAMME
Taste
NUR
TROCKNEN
Taste
TROCK-
NEN

DE
31
Das Display dient nicht nur zur Programmierung des Gerätes, sondern liefert auch zahlreiche Informationen.
In Bereich A werden das Symbol und das gewählte Programm, die einzelnen Schritte von Wasch- und Trockenprogramm
sowie die Restzeit bis zum Programmende angezeigt.
Im Bereich B werden die beiden Waschintensitäten bezüglich der Option „DIRECT INJECTION“ angezeigt.
In den Bereichen C befinden sich die Kontrollleuchten der verfügbaren Funktionen.
Im Bereich D wird die Zeit angezeigt, die bis zum Start des ausgewählten Programms verbleibt, wenn eine STARTZEITVOR-
WAHL (STARTZEITWAHL) eingestellt wurde.
In der Zeilenreihe E wird der Höchstwert der Schleudergeschwindigkeit angezeigt, die das Gerät für das eingestellte Pro-
gramm zulässt; sieht das Programm keinen Schleudergang vor, wird in diesem Bereich die Ikone “--” schwach leuchtend
angezeigt.
In dem Bereich F wird der Höchstwert der Temperatur angezeigt, der für das eingestellte Programm ausgewählt werden
kann; wenn das Programm keine Temperatureinstellung vorsieht, wird in diesem Bereich die Ikone “--” schwach leuchtend
angezeigt.
Symbol Gerätetür gesperrt
Durch Leuchten des Symbols meldet das Gerät, dass die Gerätetür gesperrt ist, um ein versehentliches Öffnen zu vermei-
den. Zur Vermeidung einer evtl. Beschädigung warten Sie bis das Symbol erlischt, bevor Sie die Gerätetür öffnen.
NB: Wenn die Funktion STARTZEITVORWAHL (STARTZEITWAHL) aktiviert ist, kann die Gerätetür nicht geöffnet werden.
Zum Öffnen schalten Sie das Gerät mittels der Taste START/PAUSE auf Pause.
! Vor dem ersten Einschalten werden Sie zur Auswahl der Sprache aufgefordert, und das Display blendet automatisch das
Menü zur Sprachauswahl ein.
Wählen Sie die gewünschte Sprache mittels der Tasten X und Y aus und drücken Sie dann zum Bestätigen der Auswahl auf
die Taste Z.
Um die Sprache zu ändern, schalten Sie das Gerät aus und drücken gleichzeitig die in der Abbildung mit G, H und I
gekennzeichneten Tasten. Nach dem ertönen eines akustischen Signals wird das Menü der Sprachauswahl angezeigt.
! Zur Änderung der Helligkeit des Display, das werksseitig auf die höchste Stufe eingestellt ist, die Maschine ausschalten
und dann gleichzeitig die Tasten G, L, M drücken, bis ein Signalton zu hören ist. Die X und Y drücken, um die gewünschte
Helligkeit einzustellen und dann mit der Taste Z bestätigen.
! Während des Waschzyklus oder nach Einstellung einer STARTZEITVORWAHL (STARTZEITWAHL) wird nach 1 Minute
Wartezeit ein „BILDSCHIRMSCHONER“ aktiviert. Zur Rückkehr zum vorherigen Bildschirm eine beliebige Taste drücken.
Display
2:55
90°
1200
-- h
--
COTONE
H
G
Y
X Z
I
L M
A
B
C
C
D
E
C
F
32
DE
Durchführung eines Wasch- oder
Trockenzyklus
1. EINSCHALTEN DES GERÄTES. Drücken Sie auf die Taste ,
woraufhin auf dem Display die Meldung HOTPOINT erscheint; die
Kontrollleuchte START/PAUSE blinkt langsam grün.
2. EINFÜLLEN DER WÄSCHE. Öffnen Sie die Gerätetür.
Füllen Sie die Wäsche ein. Achten Sie hierbei bitte darauf, die
in der Programmtabelle (auf der nächsten Seite) angegebene
Wäschemenge nicht zu überschreiten.
3. DOSIERUNG DES WASCHMITTELS. Ziehen Sie die
Waschmittelschublade heraus und füllen Sie das Waschmittel in
die entsprechenden Kammern (siehe “Waschmittel und Wäsche”).
4. SCHLIESSEN SIE DIE GERÄTETÜR.
5. WAHL DES WASCHPROGRAMMS. Stellen Sie mit dem
Wählschalter PROGRAMME das gewünschte Programm ein; die
Bezeichnung des Programms wird auf dem Display angezeigt; dem
Programm sind eine Temperatur und eine Schleudergeschwindigkeit
zugeordnet, die jedoch geändert werden können. Auf dem Display
wird die Programmdauer angezeigt.
6. INDIVIDUALISIERUNG DES WASCHGANGS. Verwenden
Sie hierzu die entsprechenden Tasten:
Änderung der Temperatur und/oder Schleudern. Das
Gerät wählt automatisch die für das eingestellte Programm
vorgesehene maximale Temperatur sowie die maximale
Schleudergeschwindigkeit. Diese können demnach nicht erhöht
werden. Durch Drücken der Taste kann die Temperatur
bis auf Kaltwäsche (das Display zeigt das Symbol “--
”) herabgesetzt werden. Durch Drücken der Taste
kann die Schleudergeschwindigkeit herabgesetzt oder der
Schleudervorgang auf (das Display zeigt das Symbol “--”)
ausgeschlossen werden. Ein weiterer Druck auf die Tasten bewirkt
die Einstellung der möglichen Maximalwerte.
! Ausnahme: Wird das Waschprogramm 5 eingestellt, kann die
Temperatur bis auf 40° erhöht werden.
! Ausnahme: Wird das Waschprogramm 7 eingestellt, kann die
Temperatur bis auf 90° erhöht werden.
! Ausnahme: Wird das Waschprogramm 9 eingestellt, kann die
Temperatur bis auf 60° erhöht werden.
Startzeitvorwahl.
Zur Vorwahl der Startzeit des eingestellten Programms drücken
Sie die entsprechende Taste bis die gewünschte Zeitverschiebung
angezeigt wird. Um die Startzeitvorwahl wieder zu deaktivieren,
drücken Sie die Taste bis auf dem Display der Schriftzug “-- h”
eingeblendet wird.
Trocknungsprogramm einstellen.
Durch einmaliges oder mehrfaches Drücken der Taste kann
die gewünschte Trocknungsart eingestellt werden. Es stehen
zwei Möglichkeiten zur Verfügung:
A - Nach Feuchtigkeitsgrad der getrockneten Wäsche:
Bügeln: noch leicht feuchte, einfach zu bügelnde Wäscheteile.
Aufhängen: ideal für Kleidungsstücke, die nicht komplett
trocken zu sein brauchen.
Falten: geeignet für Kleidungsstücke, die ohne Bügeln in den
Schrank geräumt werden können.
Extra: geeignet für Kleidungsstücke, die komplett trocken sein
müssen wie Frotteehandtücher und Bademäntel.
B - Nach Zeit: von 30’ bis 180’.
So deaktivieren Sie die Trockenpresse auf, bis Sie auf dem
Display OFF angezeigt.
Bei Überschreitung der max. Füllmenge der Wäscheladung für
waschen und trocknen in einem Programmablauf, aktivieren Sie
zuerst das Waschprogramm. Nach Ablauf des Waschprogramms
teilen Sie die Waschladung so auf, dass nur die max. mögliche
Füllmenge zum Trocknen in der Trommel verbleibt. Befolgen
Sie daraufhin die Anleitungen des Abschnitts “Nur Trocknen”.
Wiederholen Sie dasselbe nun mit der restlichen Wäschemenge.
Im Anschluss an den Trockenvorgang folgt immer eine kurze
Abkühlzeit.
Nur Trocknen
Drücken Sie die Taste , um nur zu trocknen.
Nachdem Sie das gewünschte Programm ausgewählt haben, das
für die zu behandelnden Kleidungsstücke geeignet ist, kann der
Waschvorgang durch Drücken der Taste ausgeschlossen
werden; der Trockner wird mit der höchsten Stufe gestartet, die
für das ausgewählte Programm möglich ist. Es besteht die Mö-
glichkeit, die Stufe oder die Dauer des Trocknungsvorgangs ein-
zustellen oder zu modifizieren, indem Sie die Taste drücken.
(Dies ist nicht kompatibel mit den Programmen 1-2-3-4 und 14).
Einstellen des Spülgangs.
Die Option ermöglicht die Auswahl des gewünschten
Spülgangs, um sensible Haut so gut wie möglich zu schonen.
Beim ersten Tastendruck wird die Einstellung „Extra +1“
ausgewählt, die die Auswahl eines zusätzlichen Spülgangs
ermöglicht, um alle Spuren des Waschmittels zu beseitigen.
Beim zweiten Tastendruck wird die Einstellung „Extra +2“
ausgewählt, die die Auswahl von zwei zusätzlichen Spülgängen
ermöglicht. Diese Einstellung wird für eine äußerst sensible
Haut empfohlen. Beim dritten Drücken der Taste wird die Stufe
„Extra +3“ eingestellt, mit der 3 zusätzliche Spülgänge zu den
Standardspülgängen des Zyklus hinzugewählt werden. Bei
40°-Waschgängen entfernt diese Option die wichtigsten Allergene
wie Katzen- und Hundehaare sowie Pollen, bei Waschgängen
über 40° wird ein hervorragender Allergieschutz erreicht. Drücken
Sie die Taste erneut, um zur Spülgangeinstellung „Normalspülen“
zurückzukehren. Wenn es nicht möglich ist, die bestehende
Einstellung zu ändern, wird auf dem Display “Nicht Wählbar”
oder “Nicht Änderbar” angezeigt.
Änderung der Eigenschaften des Waschgangs.
• DrückenSiedieTastezumAktivierenderFunktion;dieentsprechende
Kontrollleuchte auf dem Display schaltet sich ein.
• DurcherneutesDrückenderTastekanndieFunktionwieder
ausgeschaltet werden; die entsprechende Kontrollleuchte auf
dem Display schaltet sich aus.
! Ist die ausgewählte Funktion nicht mit dem eingestellten Programm
kompatibel, leuchtet die entsprechende Kontrollleuchte mit geringer
Helligkeit, zudem wird die Inkompatibilität mit einem Signalton
(3 Pieptöne) und der Meldung “Nicht Wählbar” auf dem Display anzeigt.
! Ist die ausgewählte Funktion nicht mit einer zuvor eingestellten
Funktion kompatibel, erscheint die Meldung “Nicht Wählbar” auf
dem Display und die Funktion wird nicht aktiviert.
! Die Funktionen können eine Änderung der empfohlenen
Beladungsmenge und/oder der Waschzeit bewirken.
7. STARTEN DES PROGRAMMS. Drücken Sie die Taste START/
PAUSE. Die zugehörige Kontrollleuchte schaltet auf grünes
Dauerlicht und die Gerätetür wird gesperrt (Symbol GERÄTETÜR
GESPERRT leuchtet) Während des Programmablaufs erscheint
auf dem Display die Bezeichnung der laufenden Programmphase.
Um ein Programm während eines laufenden Waschgangs zu ändern,
schalten Sie den Waschtrockner mittels der Taste START/PAUSE
auf Pause (die Kontrollleuchte START/PAUSE blinkt nun langsam
orangefarben); wählen Sie daraufhin das gewünschte Programm aus
und drücken Sie erneut auf die Taste START/PAUSE. Um während
eines laufenden Programms die Gerätetür zu öffnen, drücken Sie die
Taste START/PAUSE; wenn das Symbol GERÄTETÜR GESPERRT
erloschen ist, kann die Gerätetür geöffnet werden. Drücken Sie
die Taste START/PAUSE erneut, um das Programm an der Stelle
an der es unterbrochen wurde, wieder in Gang zu setzen.
8. ENDE DES PROGRAMMS. Das Programmende wird durch
die Anzeige “PROGRAMMENDE” auf dem Display angezeigt.
Wenn das Symbol GERÄTETÜR GESPERRT erlischt, kann
die Gerätetür geöffnet werden. Öffnen Sie die Gerätetür, nehmen
Sie die Wäsche heraus und schalten Sie das Gerät aus.
! Möchten Sie ein bereits in Gang gesetztes Waschprogramm
löschen, drücken Sie die Taste etwas länger. Der Waschgang wird
unterbrochen und das Gerät schaltet sich aus.
Direct Injection
Der Waschtrockner bietet die innovative Direct-Injection-Funktion, bei
der Wasser und Waschmittel vor dem Einspülen vermischt werden,
um die reinigungswirksamen Substanzen des Waschmittels sofort zu
aktivieren. Dieses Gemisch wird dann direkt in die Wäschetrommel
eingeleitet und dringt besonders wirksam in das Textilgewebe ein.
Dadurch wird auch hartnäckiger Schmutz schon bei niedrigen Tem-
peraturen entfernt, Farben und Textilien hingegen werden besonders
schonend behandelt. Sie haben die Wahl zwischen dem “Ein”-Modus
für optimale Reinigungsergebnisse und dem “EcoEnergy”-Modus für
eine maximale Energieeinsparung.
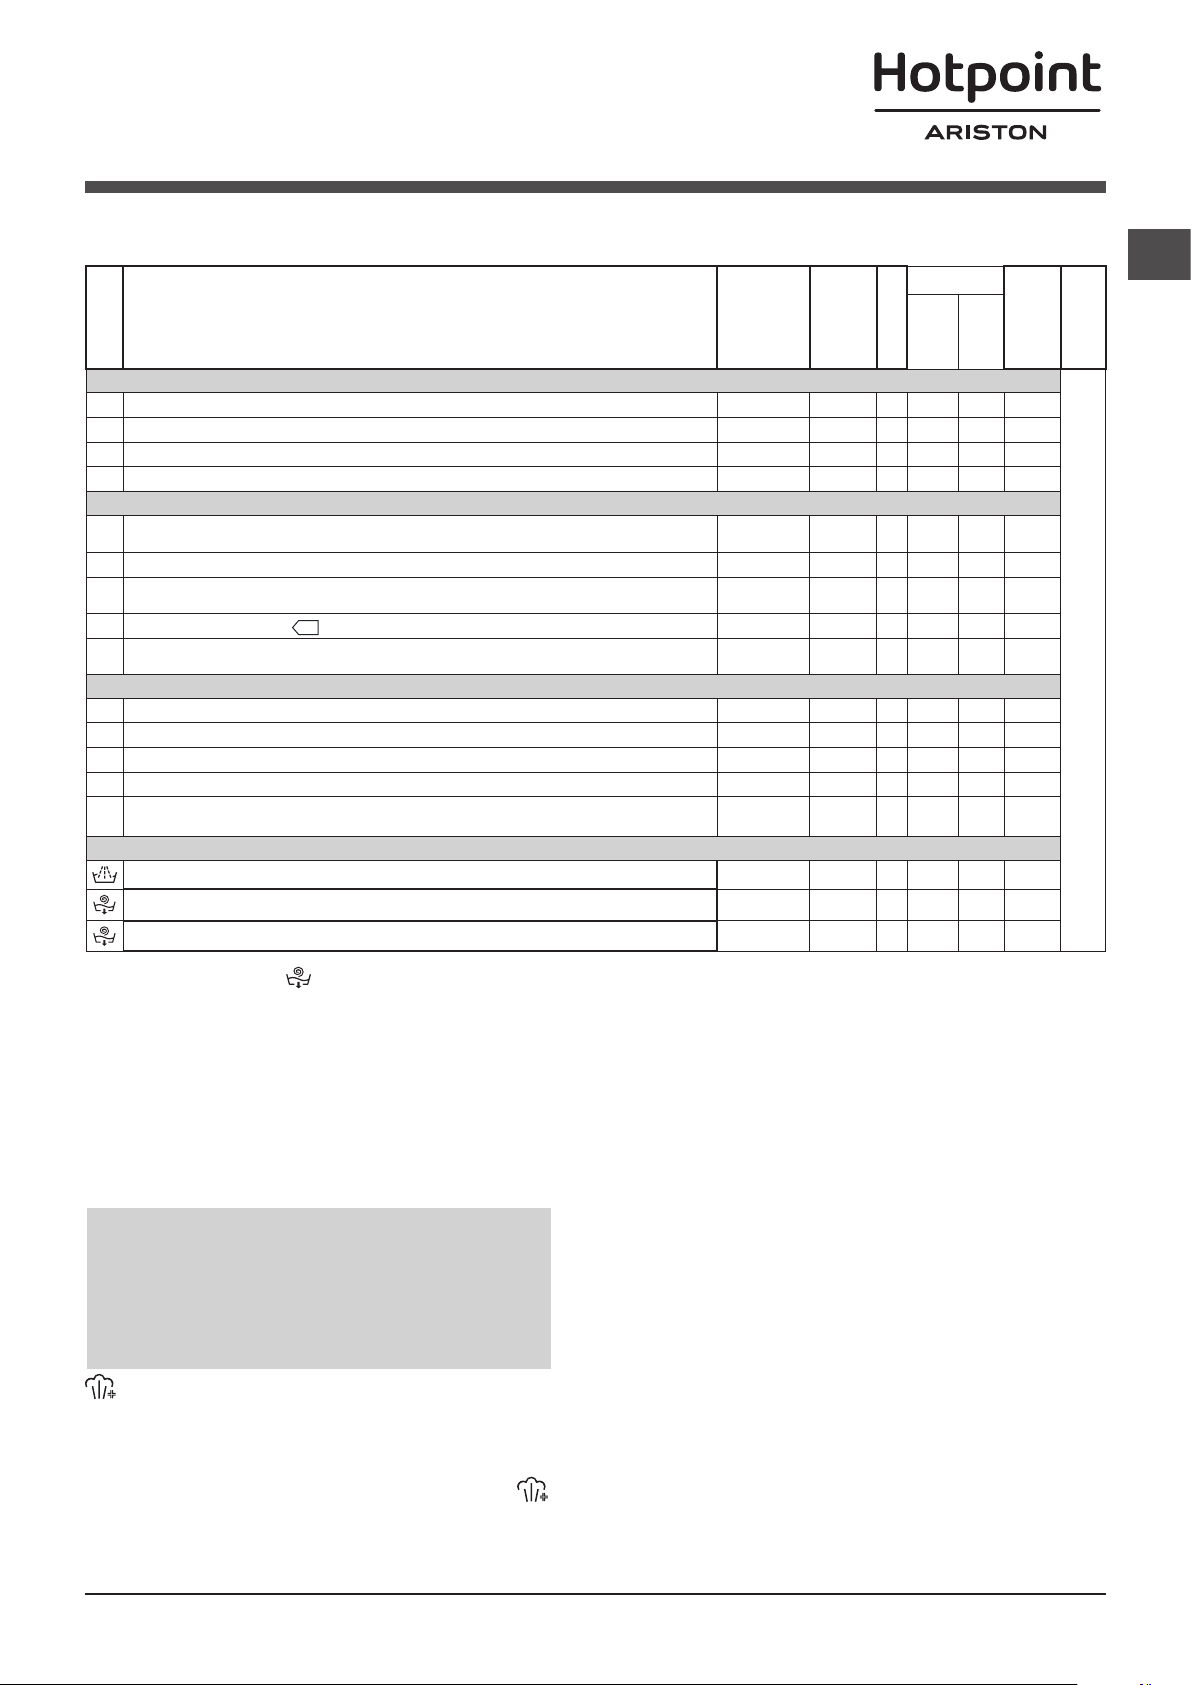
DE
33
Programme und Funktionen
Waschfunktionen
! Ist die ausgewählte Funktion nicht mit dem eingestellten
Programm kompatibel, leuchtet die entsprechende
Kontrollleuchte mit geringer Helligkeit, zudem wird die
Inkompatibilität mit einem Signalton (3 Pieptöne) und der
Meldung “Nicht Wählbar” auf dem Display anzeigt.
! Ist die ausgewählte Funktion nicht mit einer zuvor eingestellten
Funktion kompatibel, erscheint die Meldung “Nicht Wählbar”
auf dem Display und die Funktion wird nicht aktiviert.
Dampf
Mit dieser Option wird die Waschwirkung über zusätzlich
erzeugten Dampf erhöht, der während des Waschgangs
eventuelle Bakterien in den Stoffen abtötet und diese
gleichzeitig pflegt. Legen Sie die Wäsche in die Trommel,
wählen Sie das passende Programm und die Option .
! Während des Betriebs der Waschmaschine könnte die
Gerätetür durch die Dampfentwicklung weniger transpa-
rent sein.
Programmtabelle
* Bei Auswahl des Programms und Ausschluss der Schleuder, führt die Maschine nur den abpumpen aus.
Die auf dem Display und in der Bedienungsanleitung genannte Zyklusdauer wird ausgehend von Standardbedingungen berechnet. Die effektiv benötigte Zeit kann aufgrund zahlreicher Faktoren wie
Temperatur und Druck des Zulaufwassers, Raumtemperatur, Waschmittelmenge, Art, Menge und Verteilung der Waschladung sowie der gewählten Zusatzfunktionen variieren.
1) Prüfprogramm gemäß EN 50229: wählen Sie das Programm 8 bei 60 °C.
2) Langes Baumwollprogramm: Stellen Sie Programm 9 auf eine Temperatur von 40°C ein und schalten Sie dann die Taste DIRECT INJECTION auf den Be-
triebsmodus “Ein”.
3) Langes Synthetikprogramm: Programm 9 und eine Temperatur von 40°C einstellen.
** Wenn zusätzlich ein Trockenzyklus eingestellt wird, führt das Gerät ein „Waschen+Trocknen“-Programm mit einer Dauer von 45 Minuten, maximaler Schleuder-
zahl und einer Belademenge von 1kg aus.
Wasch-
programme
Beschreibung des Programms
Max.
Temperatur
(°C)
Max.
Schleu-
der Ge-
schwin-
digkeit
(U/min)
Trockner
Waschmittel
Max. Bela-
dungs-
menge (kg)
Programm-
dauer
Haup-
twäsche
Weich-
spüler
ANTI CREASE
Die Waschzeitdauer kann auf dem Display abgelesen werden.
1
Daily Mix Wash & Dry
40°
800
3
2
Hemden Wasch&Trock
40°
1000
2
3
Vorbügeln
- - - - - 1,5
4
Auffrischen Dampf
- - - - - 2
DAILY CLEAN
5 Fleckenstopp Turbo 45’
20°
(Max. 40°C)
1200
5,5
6
Fleckenstopp Power 20°C
20°
1600
10
7
Baumwolle: leicht verschmutzte Weiß- und empfindliche Buntwäsche.
40°
(Max. 90°C)
1600
10
8
Eco Baumwolle 60°C
60°/40°
(1-2): stark verschmutzte Weiß- und farbechte Buntwäsche.
60° 1600
10
9
Kunstfasern (3): stark verschmutzte, farbechte Buntwäsche.
40°
(Max. 60°C)
1000
5
SPECIALS
10 Buntwäsche
40° 1600
10
11
Ultra Feinwäsche
30°
--
1
12
Wolle: wolle, Kaschmir usw.
40° 800
2,5
13
Sport
40° 600
4,5
14
Kurz 30’ (**): zum kurzen Auffrischen leicht verschmutzter Wäsche (nicht geeignet
für Wolle, Seide und Handwäsche).
30° 800
4
Teilprogramme
Spülen
- 1600
-
10
Schleudern + Abpumpen - 1600
- - 10
Nur Ablauf *
-
--
- - - 10
34
DE
Waschmittel und Wäsche
Knittern der Wäschestücke, die sich anschließend leichter
bügeln lassen.
Auffrischen Dampf: Zum Auffrischen von Kleidungsstü-
cken, neutralisiert unangenehme Gerüche und lockert die
Fasern durch Dampf in der Trommel. Die Kleidungsstücke
werden am Ende des Programms befeuchtet.
Fleckenstopp Turbo 45’: dieser Waschzyklus garantiert eine
erstklassige Entfernung der Flecken schon bei 20 °C und in nur
45 Minuten. Die Temperatur für diesen Waschzyklus kann nach
Wunsch bis auf 40 °C erhöht werden.
Fleckenstopp Power 20°C: dieses Programm sorgt für
eine besonders leistungsfähige Entfernung von Flecken, ohne
Vorbehandlung, bei niedrigen Temperaturen und schonender
Behandlung von Textilien und Farben.
Buntwäsche: Zum Waschen von bunten
Kleidungsstücken aus Baumwolle. Dieses Programm
wurde verbessert, um die Farben auch nach mehrmaligem
Waschen leuchten zu lassen.
Ultra Feinwäsche: verwenden Sie das Programm 11 für die
Reinigung von Feinwäsche, die Applikationen wie Strass oder
Pailletten aufweist. Es wird empfohlen, die Kleidungsstücke vor
der Reinigung umzudrehen und kleinere Kleidungsstücke in den
entsprechenden Reinigungsbeutel für Feinwäsche zu geben.
Um bessere Ergebnisse zu erzielen, wird für die Reinigung von
Feinwäsche die Verwendung von Flüssigwaschmittel empfohlen.
Indem ausschließlich die zeitgesteuerte Trocknenfunktion
ausgewählt wird, wird ein besonders schonendes
Trocknungsprogramm mit leichten Bewegungen und einem
Luftstrom mit optimal angepasster Temperatur ausgeführt.
Die empfohlenen Programmdauern sind:
1 kg Synthetik --> 165 min.
1 kg Synthetik und Baumwolle --> 180 min.
1 kg Baumwolle --> 180 min.
Der Trocknungsgrad hängt von der Beladung und der
Beschaffenheit des Gewebes ab.
Wolle - Woolmark Apparel Care - Green:
das Waschprogramm „Wolle” dieser Waschmaschine wurde
von der Woolmark Company für die Wäsche von mit „Han-
dwäsche“ gekennzeichneten Wollkleidungsstücken anerkannt,
vorausgesetzt die Wäsche erfolgt gemäß der Anweisungen auf
Etikett des Kleidungsstück und den Angaben des Herstellers
dieser Waschmaschine. (M1135)
Sport: für wenig verschmutzte Sportkleidung
(Trainingsanzüge, Sporthosen, Handtücher); für beste
Resultate empfehlen wir, die in der “Programmtabelle“
angezeigte maximale Füllmenge nicht zu übersteigen.
Verwenden Sie ein Flüssigwaschmittel und nur die Menge
für eine halbe Gerätefüllung.
System zur Auswuchtung der Wäscheladung
Um zu starke Vibrationen, die durch Unwucht beim Schleu-
dern entstehen, zu vermeiden, sorgt das Gerät für eine
gleichmäßige Verteilung der Wäscheladung durch Rotationen
der Trommel. Sollte die Wäscheladung nach Ablauf mehrerer
Versuche immer noch nicht korrekt verteilt sein, schleudert
das Gerät die Wäsche bei einer niedrigeren Geschwindigkeit
als die der vorgesehenen Schleudergeschwindigkeit. Sollte
die Wäsche extrem ungleichmäßig verteilt sein, führt das
Gerät anstelle des Schleudergangs einen Wäscheverteilungs-
Zyklus durch. Um eine optimale Verteilung der Wäscheladung
und somit eine korrekte Auswuchtung zu begünstigen, sollten
große und kleine Wäscheteile gemischt eingefüllt werden.
Waschmittelschublade
Ein gutes Waschergebnis hängt auch von einer korrekten
Waschmitteldosierung ab: Eine zu hohe Dosierung bedeutet
nicht unbedingt reinere Wäsche, sie trägt nur dazu bei, die
Maschineninnenteile zu verkrusten und die Umwelt zu belasten.
! Waschmittel in Pulverform für Baumwollweißwäsche, für die
Vorwäsche und für Waschprogramme bei Temperaturen über
60°C verwenden.
! Bitte befolgen Sie den auf der Waschmittelverpackung an-
gegebenen Anweisungen.
! Verwenden Sie keine Handwaschmittel, diese verursachen
eine zu hohe Schaumbildung.
Schublade herausziehen und
Waschmittel oder Zusätze
wie folgt einfüllen:
! Kein Waschmittel in die
mittlere Kammer geben (*).
Kammer 1: Waschmittel
für die Hauptwäsche
(Waschpulver oder Flüs-
sigwaschmittel)
Falls Sie ein Flüssigwasch-
mittel verwenden, wird em-
pfohlen, die mitgelieferte
Trennwand A zu benutzen, um eine korrekte Dosierung
zu gewährleisten. Wenn Sie ein Pulverwaschmittel ver-
wenden, geben Sie die Trennwand in die Kammer B.
Kammer 2: Zusätze (Weichspüler usw.) Der Weich-
spüler darf das Gitter nicht übersteigen.
Vorsortieren der Wäsche
• SortierenSiedieWäschenach:
- Gewebeart / Waschetikettensymbol
- Farben: Buntwäsche von Weißwäsche trennen.
• EntleerenSiealleTaschen.
• DasangegebeneGewicht,dassichaufdiemaximaleLa-
dung an Trockenwäsche bezieht, sollte nicht überschritten
werden: siehe “Programmtabelle“.
Wie schwer ist Wäsche?
1 Betttuch 400-500 gr
1 Kissenbezug 150-00 gr
1 Tischdecke 400-500 gr
1 Bademantel 900-1200 gr
1 Handtuch 150-250 gr
Sonderprogramme
Daily Mix Wash & Dry: Waschen und trocknen Sie
Mischwäsche (Baumwolle und Kunstfaser) mit Programm
1. Mit diesem Programm können Sie bis zu 3 kg Wäsche
waschen und trocknen. Verwenden Sie möglichst ein
Flüssigwaschmittel. Mit Hilfe von Dampf verhindert das
Programm weitgehend das Knittern der Wäschestücke, die
sich anschließend leichter bügeln lassen.
Hemden Wasch&Trock: Waschen und trocknen Sie
Hemden und T-Shirts unterschiedlicher Textilarten und
Farben mit Programm 2, das eine maximale Schonung
garantiert. Mit diesem Programm können Sie bis zu 2 kg
Wäsche waschen und trocknen. Um optimale Ergebnisse zu
erzielen, sollten Sie ein Flüssigwaschmittel verwenden und
Bündchen, Kragen und Flecken vorbehandeln. Mit Hilfe von
Dampf verhindert das Programm weitgehend das Knittern
der Wäschestücke, die sich anschließend leichter bügeln
lassen.
Vorbügeln: Verwenden Sie dieses Programm unmittelbar
vor dem Bügeln mit einer max. Beladung von 1,5 kg. Mit
Hilfe von Dampf verhindert das Programm weitgehend das
1
2
A
B
*

DE
35
Störungen und Abhilfe
Bei Funktionsstörung: Bevor Sie sich an den Technischen Kundendienst wenden (siehe „Kundendienst“), vergewissern Sie sich zuerst,
ob es sich nicht um eine Kleinigkeit handelt, die Sie selbst beheben können. Ziehen Sie hierzu nachstehendes Verzeichnis zu Rate.
Störungen:
Der Waschtrockner schaltet sich
nicht ein.
Der Waschgang startet nicht.
Der Waschtrockner lädt kein Wasser
(auf dem Display wird die Meldung
“KEIN WASSER, Hahn öffnen” ein-
geblendet).
Der Waschtrockner lädt laufend Was-
ser und pumpt es laufend ab.
Der Waschtrockner pumpt nicht ab
und schleudert nicht.
Der Waschtrockner vibriert zu stark
während des Schleuderns.
Der Waschtrockner ist undicht.
Das Gerät ist blockiert, das Display
blinkt und zeigt einen Fehlercode
an (zum Beispiel: F-01, F-..).
Es bildet sich zu viel Schaum.
Der Waschtrockner trocknet nicht.
Mögliche Ursachen / Lösungen:
• DerSteckerstecktnichtinderSteckdose,odernichtso,dassderKontakthergestelltwird.
• DerStromistausgefallen.
• DieGerätetürwurdenichtvorschriftsmäßiggeschlossen.
• DieON/OFF-Tastewurdenichtgedrückt.
• DieTasteSTART/PAUSEwurdenichtgedrückt.
• DerWasserhahnistnichtaufgedreht.
• EswurdeeinverzögerterStartgewählt.
• DerZufuhrschlauchistnichtamWasserhahnangeschlossen.
• DerSchlauchistgeknickt.
• DerWasserhahnistnichtaufgedreht.
• EsistkeinWasserda.
• DerDruckistunzureichend.
• DieTasteSTART/PAUSEwurdenichtgedrückt.
• DerAblaufschlauchbefindetsichnichtaufdervorgeschriebenenHöhe,d.h.65–
100 cm vom Boden (siehe „Installation“).
• DasSchlauchendeliegtunterWasser(siehe „Installation”).
• DerAbflussderHausinstallationwurdenichtmiteinerEntlüftungsöffnungversehen.
Konnte die Störung durch diese Kontrollen nicht behoben werden, dann drehen Sie den
Wasserhahn zu, schalten das Gerät aus und fordern den Kundendienst an. Falls Sie in
einer der obersten Etagen eines Gebäudes wohnen, kann es vorkommen, dass sich im
Syphon ein Vakuum bildet, und der Waschtrockner ständig Wasser ansaugt und wieder
abpumpt. Zur Lösung dieser Probleme bietet der Handel spezielle Syphonventile.
• DasProgrammsiehekeinAbpumpenvor:BeieinigenProgrammenmussesvon
Hand eingestellt werden (siehe „Programme und Funktionen“).
• DerAblaufschlauchistgeknickt(siehe „Installation“).
• DieAblaufleitungistverstopft.
• DieTrommelwurdebeiderInstallationnichtkorrektbefreit(siehe „Installation“).
• DerWaschtrocknerstehtnichteben(siehe „Installation“).
• DerWaschtrocknerstehtzuengzwischenderWandundeinemMöbel(siehe „Installation“).
• DerZulaufschlauchwurdenichtordnungsgemäßaufgeschraubt(siehe „Installation“).
• DieWaschmittelschubladeistverstopft(zurReinigungsiehe „Wartung und Pflege“).
• DerAblaufschlauchistnichtkorrektbefestigt(siehe „Installation“).
• SchaltenSiedasGerätausundziehenSiedenNetzstecker;wartenSiedaraufhin
ca. 1 Minute und schalten Sie es wieder ein.
Bleibt die Störung bestehen, kontaktieren Sie bitte den Kundendienst.
• DasWaschmittelistfürWaschmaschinennichtgeeignet(esmussmitderAufschrift
„Für Waschmaschinen“, „Für Handwäsche und Waschmaschinen“ usw. versehen sein.
• Eswurdezuhochdosiert.
• Der Stecker steckt nicht in der Steckdose, oder nicht so, dass der Kontakt hergestellt wird.
• Der Strom ist ausgefallen.
• DasFüllfensteristnichtrichtiggeschlossen.
• Es wurde ein verzögerter Start gewählt.
• Der TROCKNEN befindet sich auf Position OFF.

36
DE
Kundendienst
Bevor Sie sich an den Kundendienst wenden:
• Sollten einige Kontrollen vorab selbst durchgeführt werden (siehe „Störungen und Abhilfe“);
•StartenSiedaraufhindasProgrammerneut,umsicherzustellen,dassdieStörungauchwirklichbehobenwurde;
•IstdiesnichtderFall,dannkontaktierenSiedenautorisiertenKundendienstunterderaufdemGarantiescheinbefindlichen
Telefonnummer.
! Wenden Sie sich auf keinen Fall an nicht autorisierte Techniker.
Geben Sie bitte Folgendes an:
• dieArtderStörung;
• dasMaschinenmodell(Mod.);
• dieSeriennummer(S/N).
Diese Daten entnehmen Sie bitte dem auf der Rückseite des Waschtrockneren und auf der Vorderseite (Gerätetür öffnen)
befindlichen Typenschild.

FR
37
Français
! Ce symbole vous rappelle de lire ce
mode d’emploi.
Sommaire
Installation, 38-39
Déballage et mise à niveau
Raccordements eau et électricité
Premier cycle de lavage
Caractéristiques techniques
Entretien et soin, 40
Coupure de l’arrivée d’eau et du courant
Nettoyage du lavante-séchante
Nettoyage du tiroir à produits lessiviels.
Entretien du hublot et du tambour
Nettoyage de la pompe
Contrôle du tuyau d’arrivée de l’eau
Précautions et conseils, 41
Sécurité générale
Mise au rebut
Ouverture manuelle de la porte hublot
Description du lavante-séchante, 42-43
Bandeau de commandes
Écran
Comment effectuer un cycle de lavage
ou un séchage, 44
Programmes et fonctions, 45
Tableau des programmes
Fonctions de lavage
Produits lessiviels et linge, 46
Tiroir à produits lessiviels
Triage du linge
Programmes spéciaux
Système d’équilibrage de la charge
Anomalies et remèdes, 47
Assistance, 48
FR
RDPD 107617 J
Mode d’emploi
LAVANTE SÉCHANTE
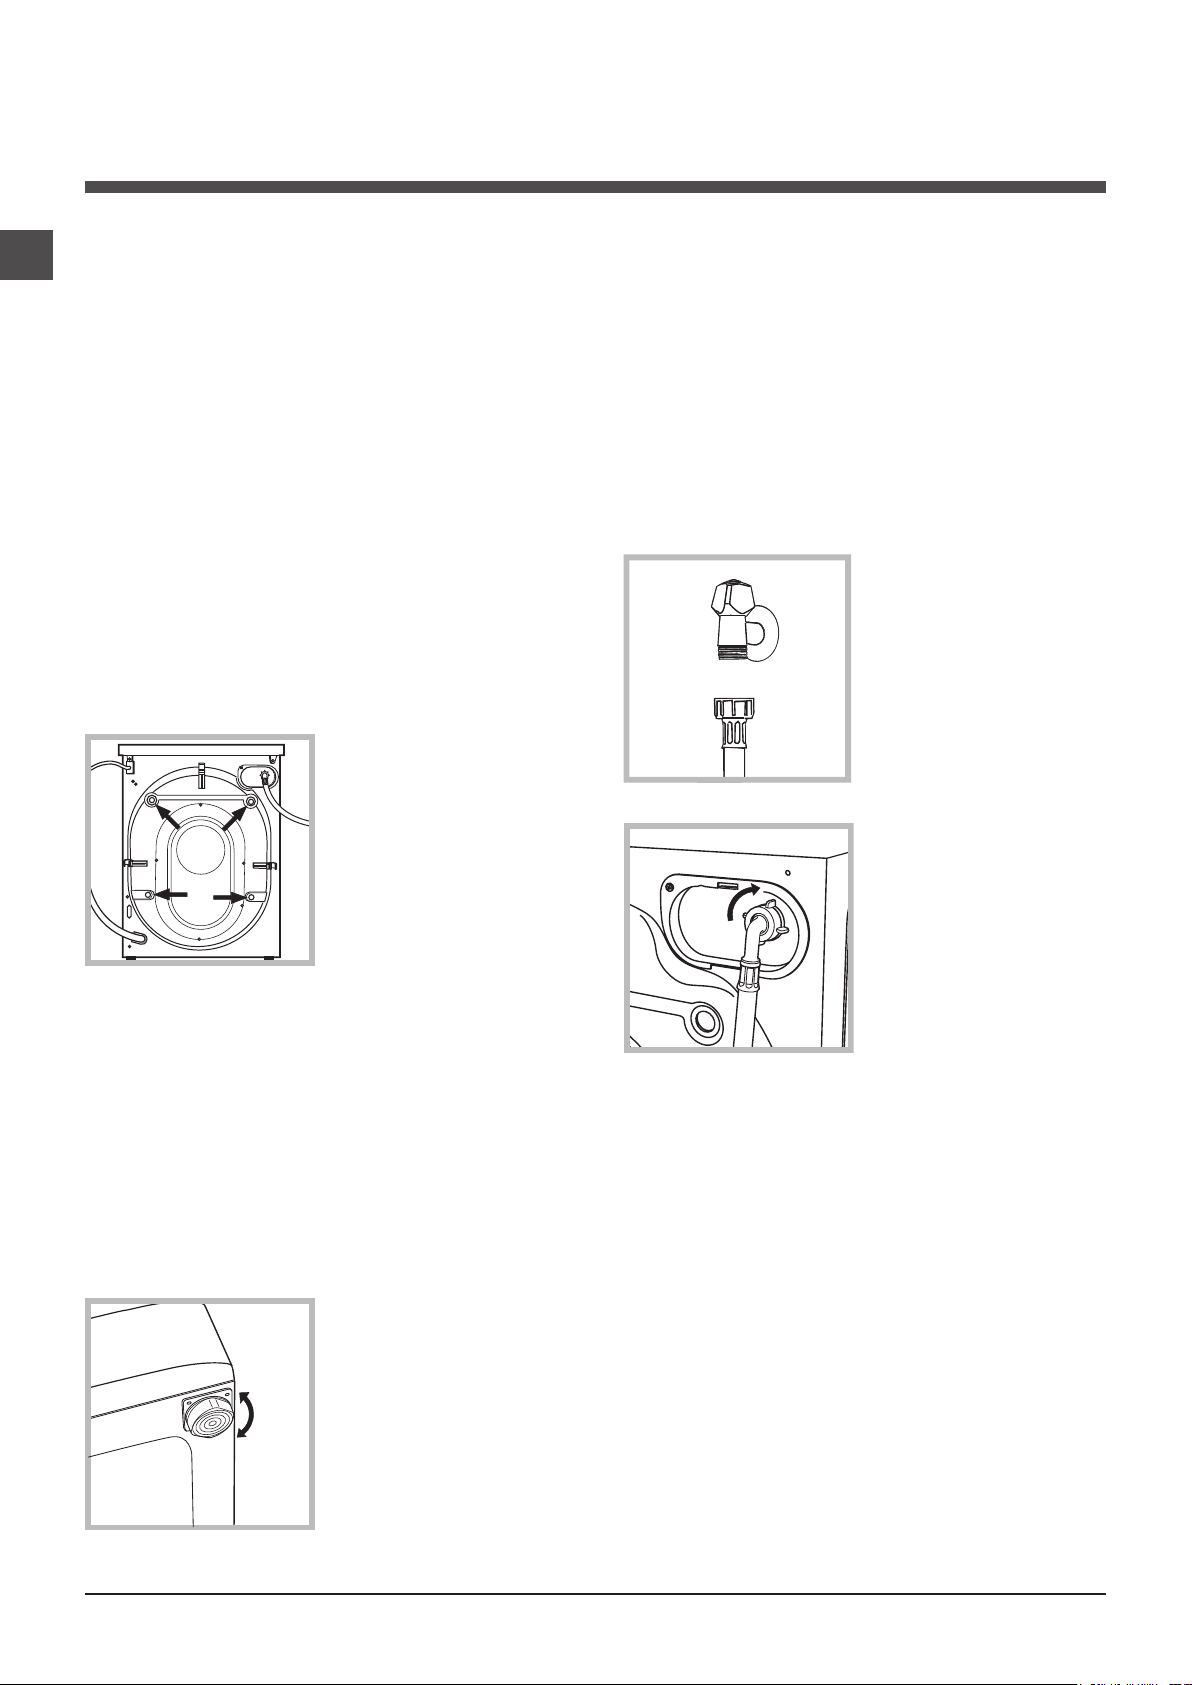
38
FR
Installation
! Conserver ce mode d’emploi pour pouvoir
le consulter à tout moment. En cas de vente,
de cession ou de déménagement, veiller à
ce qu’il suive toujours le lave-linge pour que
son nouveau propriétaire soit informé sur son
mode de optionnement et puisse profiter des
conseils correspondants.
! Lire attentivement les instructions: elles
fournissent des conseils importants sur l’instal-
lation, l’utilisation et la sécurité de l’appareil.
Déballage et mise à niveau
Déballage
1. Déballer le lave-linge.
2. Contrôler que le lave-linge n’a pas été en-
dommagé pendant le transport. S’il est abîmé,
ne pas le raccorder et contacter le vendeur.
3. Enlever les 4 vis
de protection servant
au transport, le ca-
outchouc et la cale,
placés dans la partie
arrière (voir figure).
4. Boucher les trous à l’aide des bouchons
plastique fournis.
5. Conserver toutes ces pièces: il faudra les
remonter en cas de transport du lave-linge.
! Les pièces d’emballage ne sont pas des
jouets pour enfants.
Mise à niveau
1. Installer le lave-linge sur un sol plat et rigide,
sans l’appuyer contre des murs, des meubles
ou autre.
2. Si le sol n’est pas
parfaitement horizon-
tal, visser ou dévisser
les pieds de réglage
avant (voir figure) pour
niveler l’appareil; son
angle d’inclinaison,
mesuré sur le plan
de travail, ne doit pas
dépasser 2°.
Une bonne mise à niveau garantit la stabilité
de l’appareil et évite qu’il y ait des vibrations,
du bruit et des déplacements en cours de
optionnement. Si la machine est posée sur de
la moquette ou un tapis, régler les pieds de
manière à ce qu’il y ait suffisamment d’espace
pour assurer une bonne ventilation.
Raccordements eau et électricité
Raccordement du tuyau d’arrivée de
l’eau
1. Reliez le tuyau
d’alimentation en le
vissant à un robinet
d’eau froide à embout
fileté 3/4 gaz (voir
figure).
Faire couler l’eau
jusqu’à ce qu’elle soit
limpide et sans impure-
tés avant de raccorder.
2. Raccorder le tuyau
d’arrivée de l’eau au
lave-linge en le vis-
sant à la prise d’eau
prévue, dans la partie
arrière en haut à droi-
te (voir figure).
3. Attention à ce que le tuyau ne soit pas plié
ou écrasé.
! La pression de l’eau doit être comprise entre
les valeurs indiquées dans le tableau des Ca-
ractéristiques techniques (voir page ci-contre).
! Si la longueur du tuyau d’alimentation ne
suffit pas, s’adresser à un magasin spécialisé
ou à un technicien agréé.
! N’utiliser que des tuyaux neufs.
! Utiliser ceux qui sont fournis avec l’appareil.
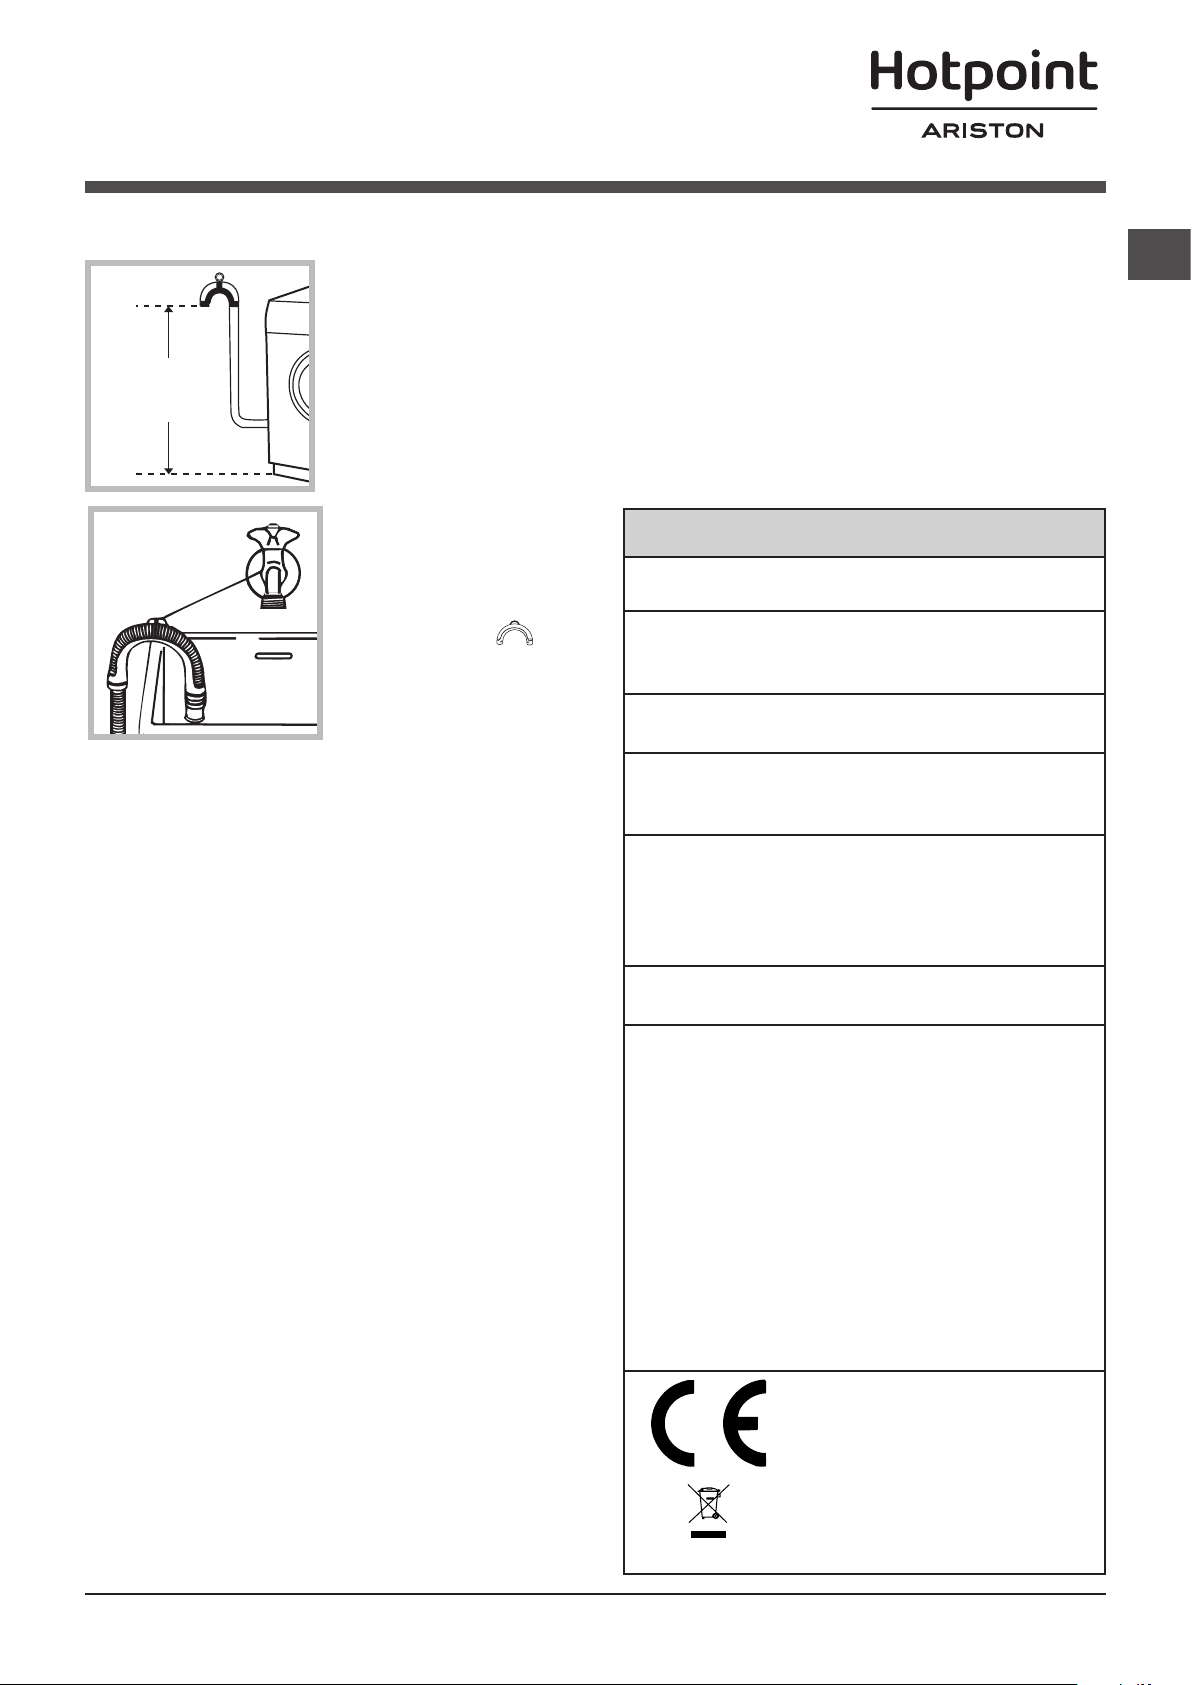
FR
39
Caractéristiques techniques
Modèle
RDPD 107617 J
Dimensions
largeur 59,5 cm
hauteur 85 cm
profondeur 60,5 cm
Capacité
de 1 à 10 kg pour le lavage
de 1 à 7 kg pour le séchage
Raccorde-
ments élec-
triques
Voir la plaque signalétique
appliquée sur la machine
Raccor-
dements
hydrauli-
ques
pression maximale
1 MPa (10 bar)
pression minimale
0,05 MPa (0,5 bar)
capacité du tambour 71 litres
Vitesse
d'essorage
jusqu'à 1600 tours minute
Programmes
de contrô-
le selon la
norme
EN 50229
lavage: programme 8; tem-
pérature 60°C; effectué avec
une charge de 10 kg.
séchage: pour le séchage
de la charge de linge plus
grand (7kg), sélectionner
le niveau de séchage “Ex-
tra”. Pour le séchage de la
charge de linge restante,
sélectionner le niveau de
séchage “Extra”; le linge
doit comprendre: 3 draps, 2
taies d’oreiller et 1 serviette
de toilette.
Cet appareil est conforme
aux Directives Communau-
taires suivantes:
- EMC - 2014/30/EU (Com-
patibilité électromagnétique)
- 2012/19/EU (WEEE)
- LVD - 2014/35/EU (Basse
Tension)
Raccordement du tuyau de vidange
Raccorder le tuyau
d’évacuation, sans
le plier, à un condu-
it d’évacuation ou
à une évacuation
murale placés à une
distance du sol com-
prise entre 65 et 100
cm.
Autrement, accro-
cher le tuyau de
vidange à un évier
ou à une baignoire,
dans ce cas, atta-
cher la crosse (à
acheter au service
d’assistance) au
robinet (voir figure).
L’extrémité libre du
tuyau d’évacuation
ne doit pas être plongée dans l’eau.
! L’utilisation d’un tuyau de rallonge est abso-
lument déconseillée mais si on ne peut faire
autrement, il faut absolument qu’il ait le même
diamètre que le tuyau original et sa longueur
ne doit pas dépasser 150 cm.
Raccordement électrique
Avant de brancher la fiche dans la prise de
courant, s’assurer que :
• lapriseestbienreliéeàlaterreetestcon-
forme aux réglementations en vigueur;
• lapriseestbienapteàsupporterlapuis-
sance maximale de l’appareil indiquée dans
le tableau des Caractéristiques techniques
(voir ci-contre);
• latensiond’alimentationestbiencomprise
entre les valeurs figurant dans le tableau des
Caractéristiques techniques (voir ci-contre);
• lapriseestbiencompatibleaveclafichedu
lavante-séchante. Autrement, remplacer la
prise ou la fiche.
! Le lavante-séchante ne doit pas être installé
dehors, même à l’abri, car il est très dan-
gereux de le laisser exposé à la pluie et aux
orages.
! Après installation du lavante-séchante, la pri-
se de courant doit être facilement accessible.
! N’utiliser ni rallonges ni prises multiples.
! Le câble ne doit être ni plié ni trop écrasé.
! Le câble d’alimentation ne doit être remplacé
que par des techniciens agréés.
65 - 100 cm
Attention! Nous déclinons toute responsabi-
lité en cas de non-respect des normes énu-
mérées ci-dessus.
Premier cycle de lavage
Avant la première mise en service de l’ap-
pareil, effectuer un cycle de lavage avec un
produit lessiviel mais sans linge et sélectionner
le programme auto nettoyage (voir “Nettoyage
du lavante-séchante”).
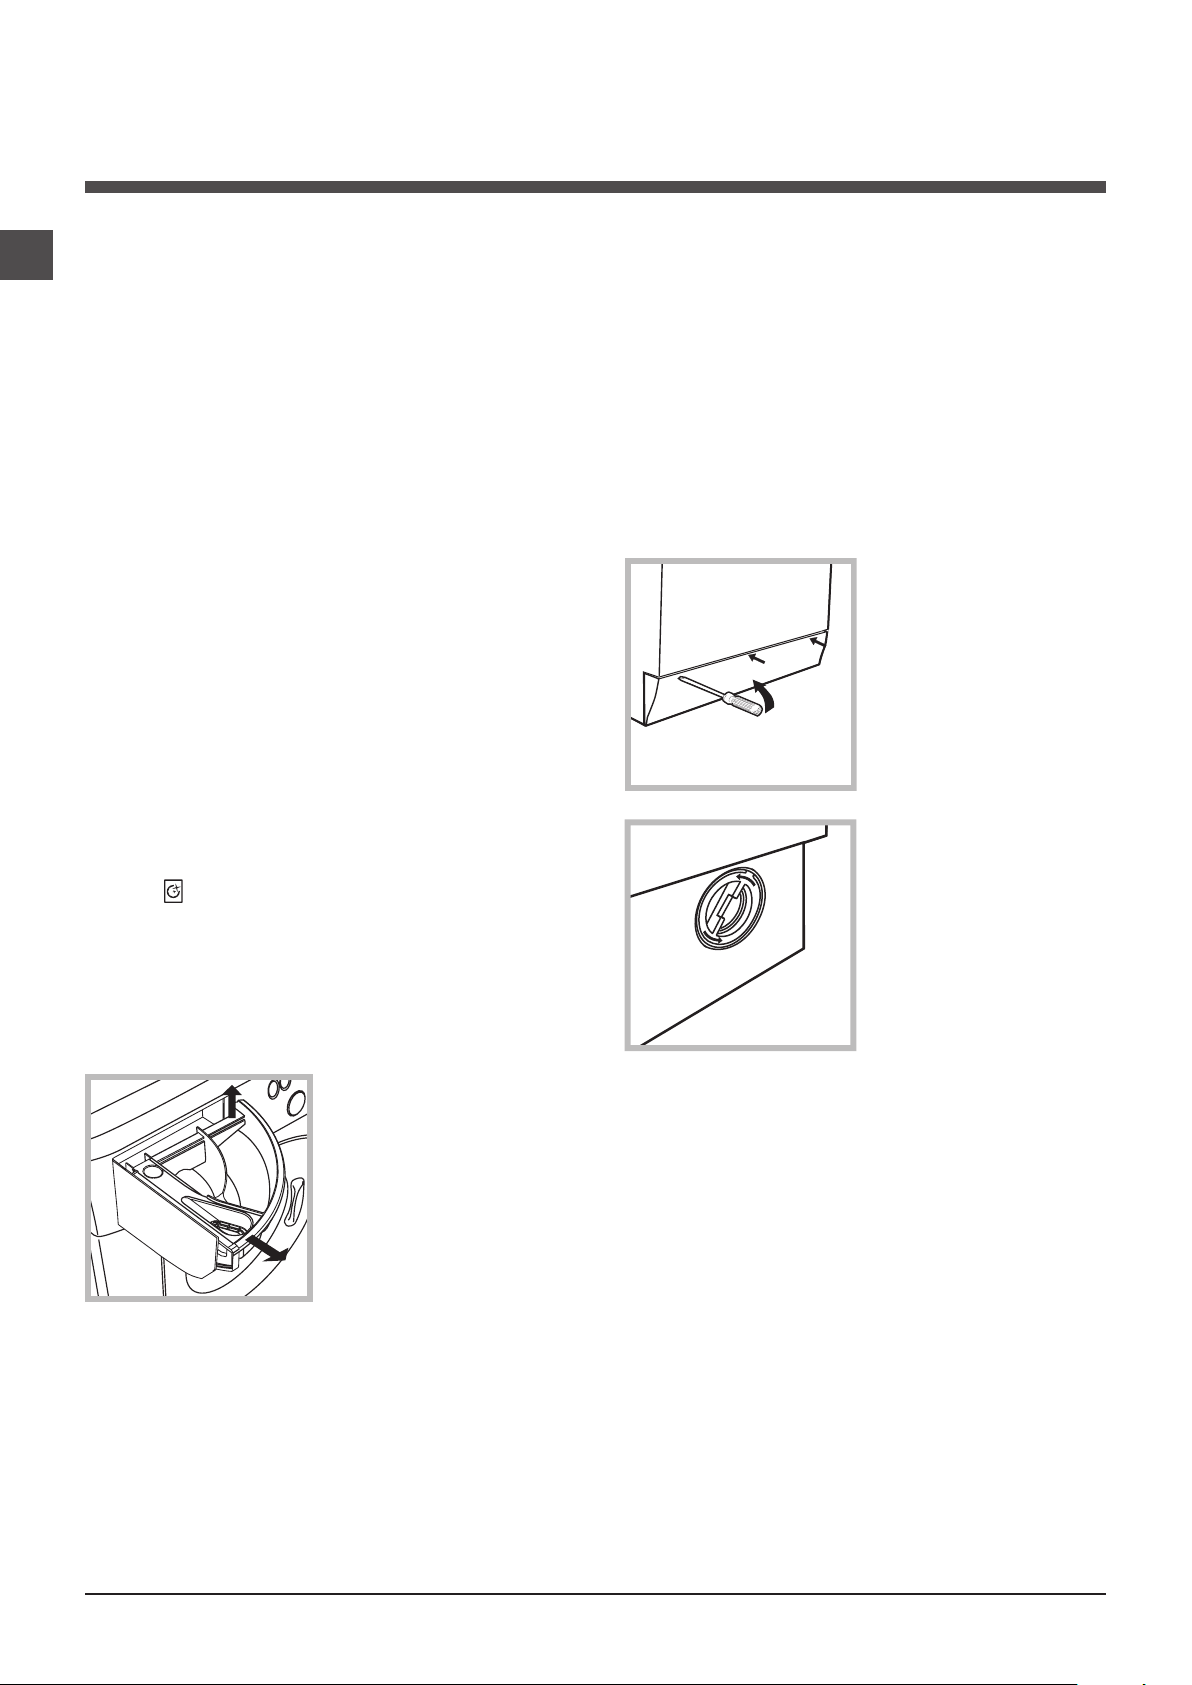
40
FR
Entretien et soin
Coupure de l’arrivée d’eau et du
courant
•Fermerlerobinetdel’eauaprèschaque
lavage. Cela réduit l’usure de l’installation
hydraulique du lavante-séchante et évite tout
danger de fuites.
•Débrancherlafichedelaprisedecourantlors
de tout nettoyage du lavante-séchante et pen-
dant tous les travaux d’entretien.
Nettoyage du lavante-séchante
•Pournettoyerl’extérieuretlespartiesenca-
outchouc, utiliser un chiffon imbibé d’eau tiède
et de savon. N’utiliser ni solvants ni abrasifs.
•Celavante-séchanteestéquipéd’unpro-
gramme auto nettoyage des parties internes
qui doit être effectué tambour complètement
vide.
La lessive (dans une quantité égale à 10% de
celle conseillée pour du linge peu sale) ou les
additifs spéciaux pour le nettoyage du lavante-
séchante, pourront être utilisés comme adju-
vants dans le programme de lavage. Il est
conseillé d’effectuer le programme de nettoya-
ge tous les 40 cycles de lavage.
Pour activer le programme, appuyer sur la
touche pendant 5 secondes, puis appuyer
sur la touche MARCHE/PAUSE : le program-
me démarrera et aura une durée d’environ 70
minutes
Nettoyage du tiroir à produits les-
siviels.
Soulever le tiroir et le
tirer vers soi pour le
sortir de son logement
(voir figure).
Le laver à l’eau cou-
rante; effectuer cette
opération assez sou-
vent.
Entretien du hublot et du tambour
•Ilfauttoujourslaisserlehublotentrouvert
pour éviter la formation de mauvaise odeurs.
Nettoyage de la pompe
Le lavante-séchante est équipé d’une pompe
autonettoyante qui n’exige aucune opération
d’entretien. Il peut toutefois arriver que de
menus objets (pièces de monnaie, boutons)
tombent dans la préchambre qui protège la
pompe, placée en bas de cette dernière.
! S’assurer que le cycle de lavage est bien
terminé et débrancher la fiche.
Pour accéder à cette préchambre:
1. démonter le pan-
neau situé à l’avant
du lavante-séchante
à l’aide d’un tournevis
(voir figure);
2. dévisser le cou-
vercle en le tournant
dans le sens inverse
des aiguilles d’une
montre (voir figure): il
est normal qu’un peu
d’eau s’écoule;
3. nettoyer soigneusement l’intérieur;
4. revisser le couvercle;
5. remonter le panneau en veillant à bien enfi-
ler les crochets dans les fentes prévues avant
de le pousser contre l’appareil.
Contrôle du tuyau d’arrivée de l’eau
Contrôler le tuyau d’alimentation au moins
une fois par an. Procéder à son remplacement
en cas de craquèlements et de fissures: car
les fortes pressions subies pendant le lavage
pourraient provoquer des cassures.
! N’utiliser que des tuyaux neufs.
1
2
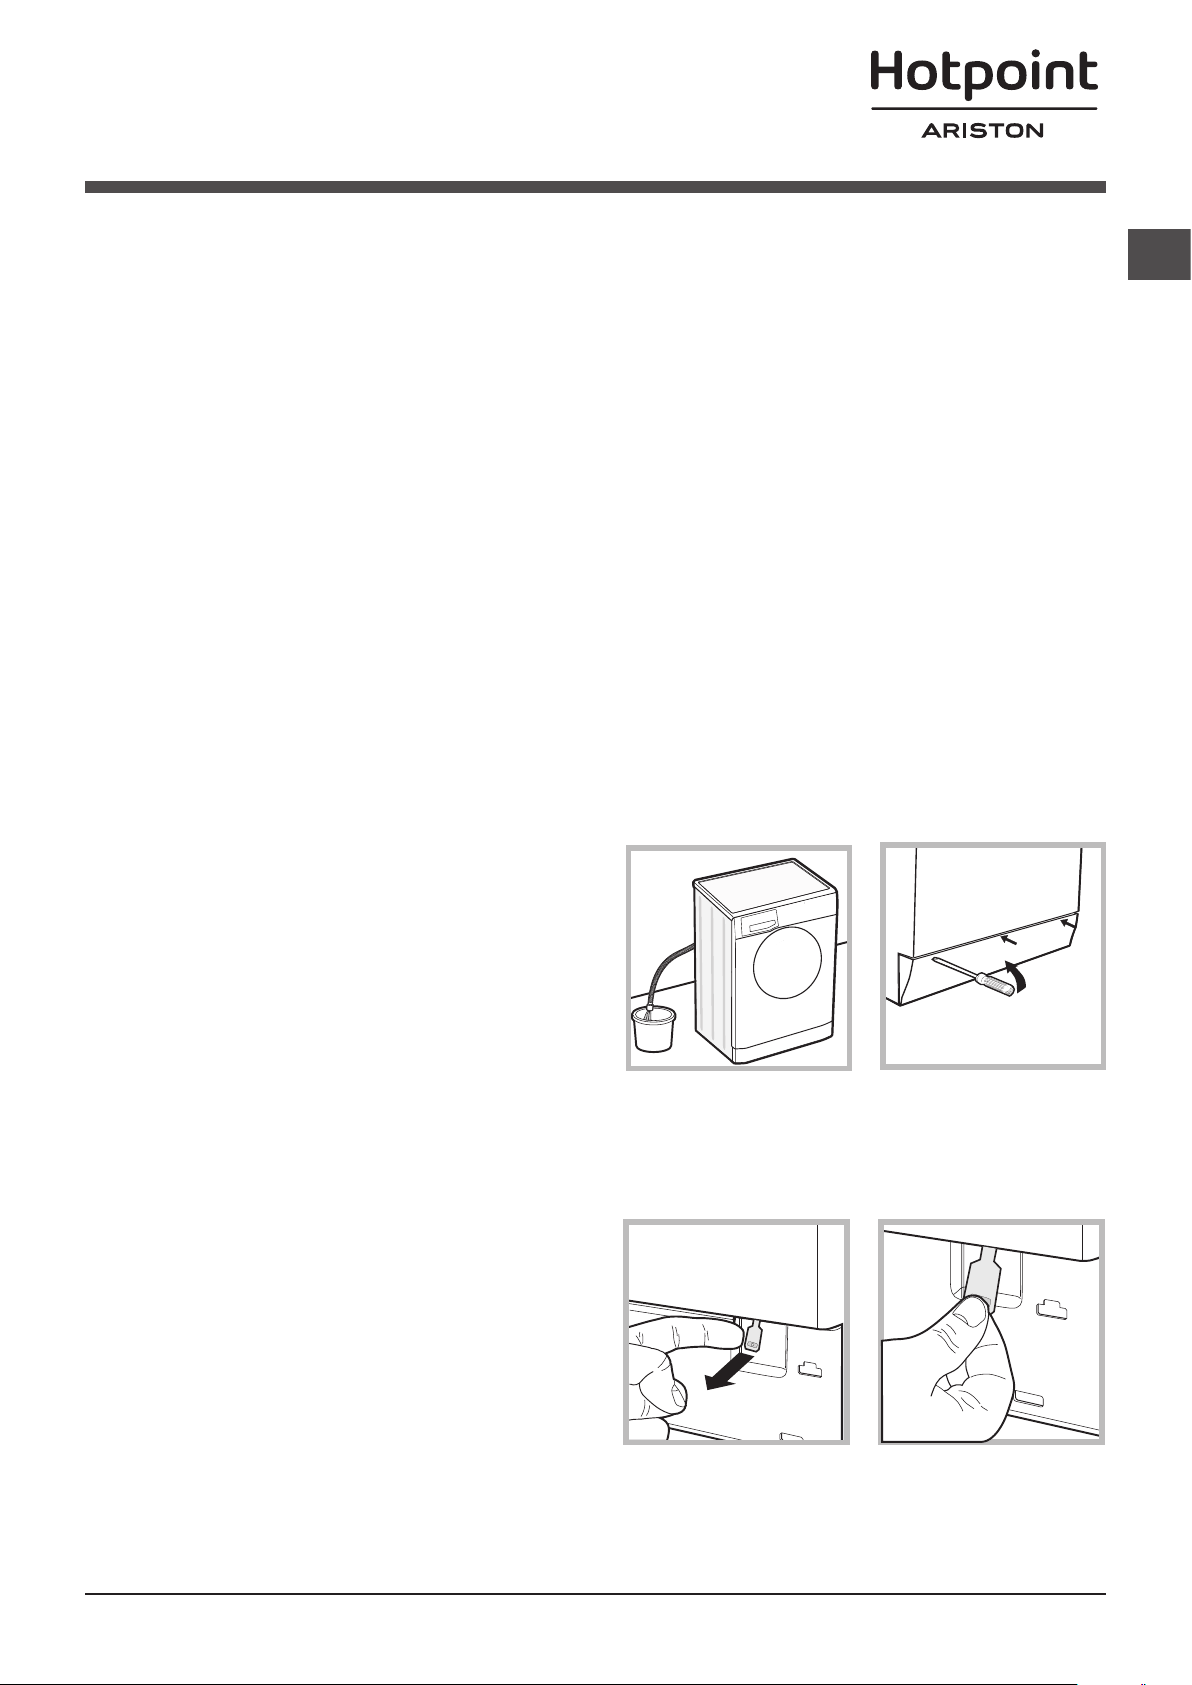
FR
41
Précautions et conseils
Ouverture manuelle du hublot
A défaut de pouvoir ouvrir la porte hublot à cause d’une pan-
ne de courant pour étendre le linge, procéder comme suit :
1. débrancher la fiche de la prise de courant.
2. s’assurer que le niveau de l’eau à l’intérieur de l’appareil
se trouve bien au-dessous de l’ouverture du hublot, si ce
n’est pas le cas vider l’eau en excès à travers le tuyau de
vidange dans un seau comme illustré voir figure.
3. démonter le panneau situé à l’avant du lavante-séchan-
te à l’aide d’un tournevis (voir figure).
4. se servir de la languette indiquée, tirer vers soi jusqu’à
ce que le tirant en plastique se dégage de son cran d’arrêt;
tirer ensuite vers le bas et ouvrir l’hublot en même temps.
5. remonter le panneau en veillant à bien enfiler les cro-
chets dans les fentes prévues avant de le pousser contre
l’appareil.
! Ce lavante-séchante a été conçu et fabriqué conformé-
ment aux normes internationales de sécurité. Ces consi-
gnes sont fournies pour des raisons de sécurité, il faut les
lire attentivement.
Sécurité générale
•Cetappareilestconçupourunusagedomestique.
• Cet appareil peut être utilisé par les enfants à
partir de 8 ans et par les personnes dont les
capacités physiques, sensorielles ou mentales
sont réduites ou qui ne disposent pas des con-
naissances suffisantes, à condition qu’ils soient
encadrés ou aient été formés de façon appro-
priée pour l’utilisation de l’appareil de façon sûre
et en comprenant les dangers qui y sont liés.
Les enfants ne doivent pas jouer avec l’appareil.
L’entretien et le nettoyage ne doivent pas être
effectués par les enfants sans surveillance.
- Ne pas mettre sécher du linge non lavé.
- Le linge contaminé avec des substances
telles que de l’huile de cuisson, de l’acéto-
ne, de l’alcool, de l’essence, du kérosène,
des détachants, de l’essence de térébenthi-
ne, de la cire et des substances pour l’en-
lever, doit être lavé à l’eau chaude avec une
dose supplémentaire de lessive avant d’être
introduit dans le sèche-linge.
- Des objets en mousse expansée (mousse
de latex), des bonnets de douche, des tex-
tiles imperméables, des articles doublés de
caoutchouc et des vêtements ou des cous-
sins ayant des parties en mousse de latex
ne doivent pas être séchés en sèche-linge.
- En cas d’utilisation d’assouplissants ou
de tout autre produit similaire, se conformer
aux instructions du fabricant.
- La partie finale d’un cycle du sèche-linge se
produit sans chaleur (cycle de refroidissement)
pour éviter tout endommagement du linge.
ATTENTION: Ne jamais arrêter le sèche-linge
avant la fin du programme de séchage. Dans
ce cas, sortir immédiatement tout le linge et
l’étendre pour le faire refroidir rapidement.
• Cetappareilestconçupourunusagedomestique.
• Nejamaistoucherl’appareilsil’onestpiedsnusetsi
les mains sont mouillées ou humides.
• Nejamaistirersurlecâblepourdébrancherlafichede
la prise de courant.
• Nepastoucheràl’eaudevidange,ellepeutatteindre
des températures très élevées.
• Nepasforcerpourouvrirlaportehublot:leverrouillage
de sécurité qui protège contre les ouvertures acciden-
telles pourrait s’endommager.
• Encasdepanne,éviteràtoutprixd’accéderauxméca-
nismes internes pour tenter une réparation.
• Veilleràcequelesenfantsnes’approchentpasde
l’appareil pendant son fonctionnement.
• Deuxoutroispersonnessontnécessairespourle
déplacer en faisant très attention. Ne jamais le déplacer
tout seul car il est très lourd.
• Avantd’introduirelelinge,s’assurerqueletambourest
bien vide.
• Pendant le séchage, le hublot a tendance à chauffer.
• Ne mettez pas à sécher du linge lavé avec des
solvants inflammables (trichloréthylène par ex.).
• Ne mettez pas à sécher du caoutchouc-
mousse ou des élastomères du même genre.
• Vérifiez qu’au cours du séchage, le robinet de l’eau soit
bien ouvert.
• les enfants de moins de 3 ans doivent être
tenus à bonne distance du sèche-linge s’ils
ne sont pas sous surveillance constante.
• Enlever tous les objets des poches, notam-
ment les briquets et les allumettes.
Mise au rebut
•Miseaurebutdumatérield’emballage:seconformeraux
réglementations locales de manière à ce que les embal-
lages puissent être recyclés.
•LaDirectiveEuropéenne2012/19/EUsurlesDéchetsdes
Equipements Electriques et Electroniques, exige que les
appareils ménagers usagés ne soient pas jetés dans le flux
normal des déchets municipaux. Les appareils usagés doi-
vent être collectés séparément afin d’optimiser le taux de
récupération et le recyclage des matériaux qui les compo-
sent et réduire l’impact sur la santé humaine et l’environne-
ment. Le symbole de la ‘’poubelle barrée’’ est apposée sur
tous les produits pour rappeler les obligations de collecte
séparée. Les consommateurs devront contacter les auto-
rités locales ou leur revendeur concernant la démarche à
suivre pour l’enlèvement de leur vieil appareil.
20
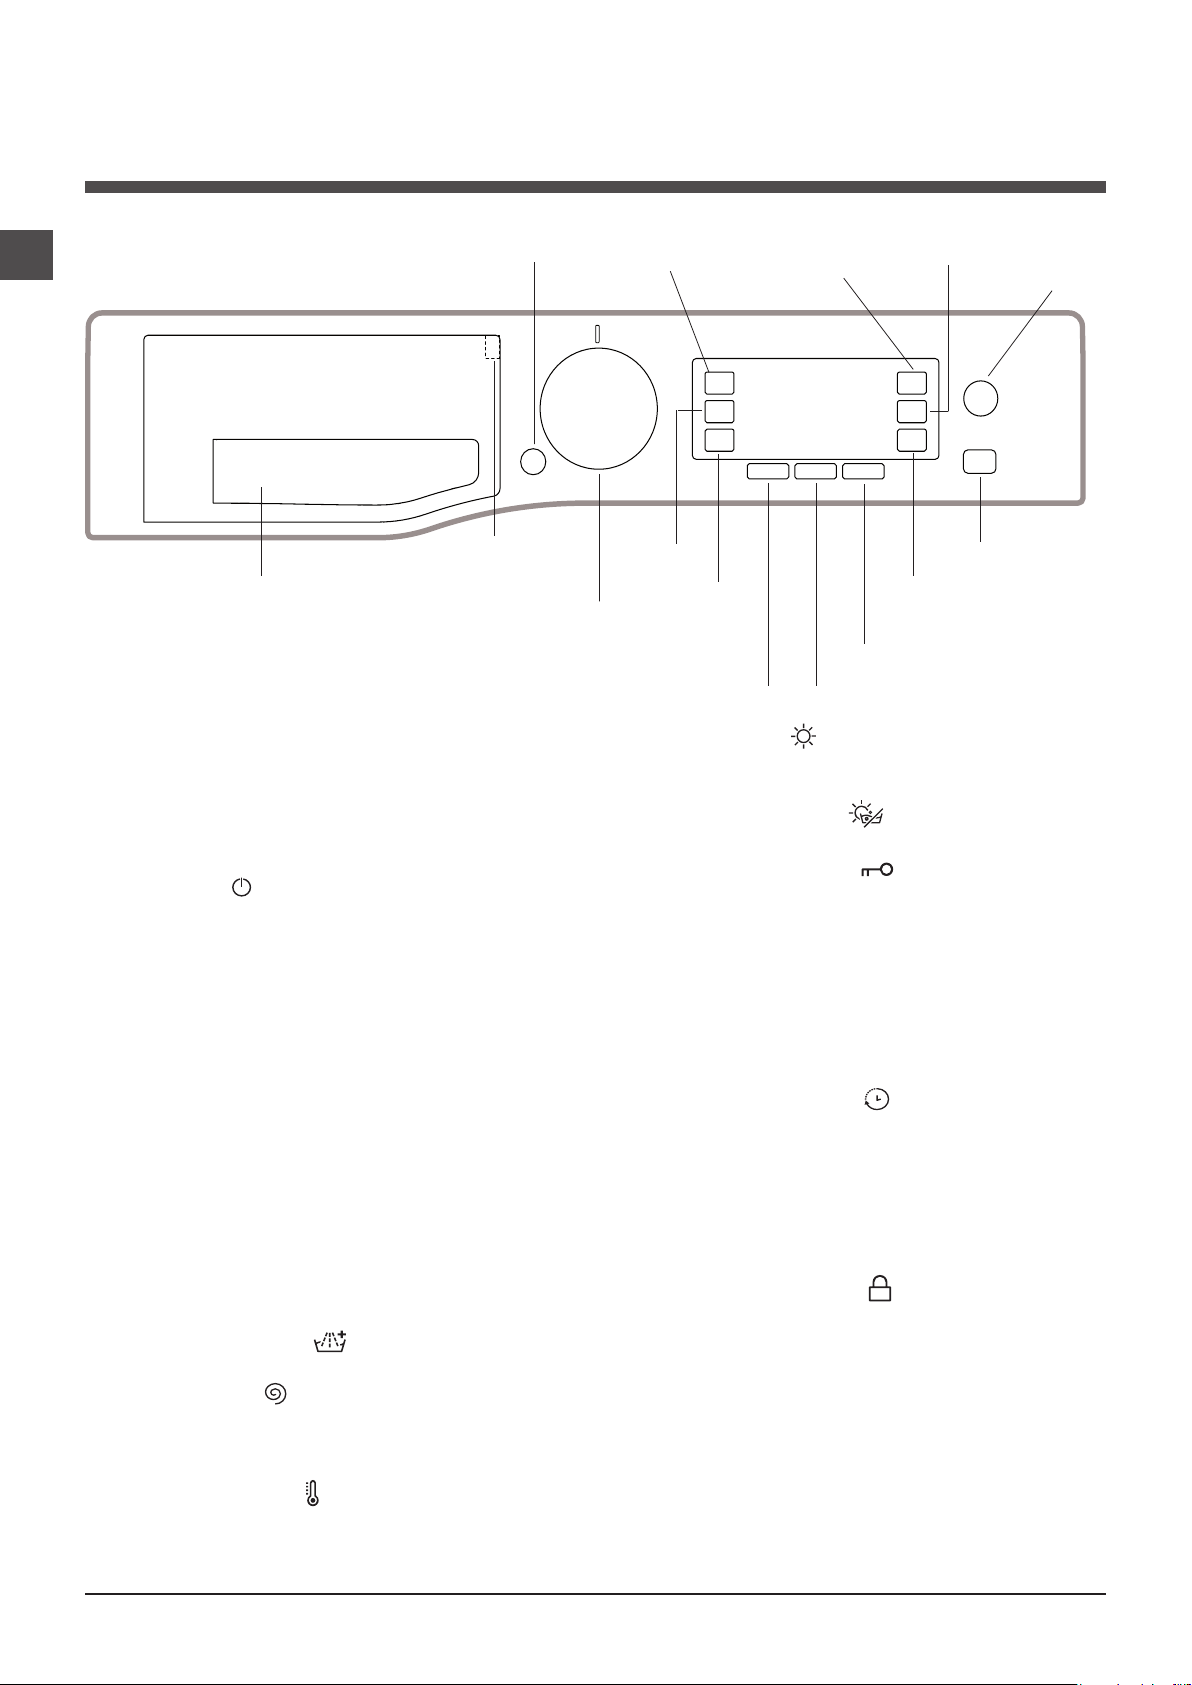
42
FR
Tiroir à produits lessiviels: pour charger les produits
lessiviels et les additifs (voir “Produits lessiviels et linge”).
Légende: à l’intérieur du tiroir à produits lessiviels se
trouve la légende qui résume tous les programmes dispo-
nibles, ainsi qu’un guide graphique expliquant comment
utiliser les différents bacs du tiroir.
Touche ON/OFF : appuyer brièvement sur la touche
pour allumer ou éteindre l’appareil. Le voyant vert MAR-
CHE/PAUSE clignotant lentement indique que la machine
est allumée. Pour éteindre le lavante-séchante en cours de
lavage, appuyer sur la touche pendant au moins 3 secon-
des de suite ; une pression brève ou accidentelle n’entraî-
ne pas l’arrêt de l’appareil. L’arrêt de l’appareil pendant un
lavage annule le lavage en cours.
BOUTON PROGRAMMES: pour sélectionner le pro-
gramme désiré (voir “Tableau des programmes”).
Touche FONCTION: appuyer sur la touche pour sé-
lectionner la fonction désirée. Le voyant correspondant
s’affiche à l’écran.
Touche AUTO-NETTOYAGE: appuyer sur cette touche
pour lancer un cycle de nettoyage de l’intérieur de la ma-
chine (voir “Nettoyage du lavante-séchante”).
Touche DIRECT INJECTION: appuyer pour sélectionner
l’option DIRECT INJECTION.
Touche MULTI RINÇAGE : appuyer pour sélection-
ner le type de rinçage désiré.
Touche ESSORAGE : appuyer sur cette touche pour
diminuer la vitesse de l’essorage ou pour le supprimer
complètement - la valeur correspondante s’affiche à
l’écran.
Touche TEMPERATURE : appuyer pour diminuer la
température : la valeur correspondante est affichée à
l’écran.
Touche SÉCAHGE : appuyer pour réduire ou suppri-
mer le séchage; le niveau ou le temps de séchage sélec-
tionné s’affiche à l’écran.
Touche SÉCAHGE SEUL : appuyer sur cette touche
pour n’effectuer que la phase de séchage.
Touche VERROU ENFANT : pour activer le
verrouillage des commandes, garder la touche enfoncée
pendant environ 2 secondes. Quand l’écran affiche le
message “VERROU ENFANT ACTIVÉ”, le bandeau de
commande est bloqué (exception faite de la touche
ON/OFF). Ceci permet d’éviter toute modification
involontaire des programmes, surtout s’il y a des
enfants à la maison. Pour désactiver le verrouillage des
commandes, garder la touche enfoncée pendant environ 2
secondes.
Touche DÉPART DIFFÉRÉ : appuyer sur cette touche
pour sélectionner un départ différé pour le programme
choisi. Le retard est affiché à l’écran.
Touche avec voyant MARCHE/PAUSE : quand le voyant
vert clignote lentement, appuyer sur la touche pour démar-
rer un lavage. Une fois le cycle lancé, le voyant passe à
l’allumage fixe. Pour activer une pause de lavage, appuyer
à nouveau sur la touche ; le voyant passe à l’orange et se
met à clignoter. Si le symbole n’est pas allumé, il est
possible d’ouvrir le hublot. Pour faire redémarrer le lavage
exactement à l’endroit de l’arrêt, appuyer une nouvelle fois
sur la touche.
Stand-by
Ce lavante-séchante, conformément aux nouvelles normes
en vigueur dans le domaine de l’économie d’énergie, est
équipée d’un système d’extinction automatique (veille)
activé après 30 minutes environ d’inutilisation. Appuyez
brièvement sur la touche ON/OFF et attendre que la ma-
chine soit réactivée.
Consommation en off-mode : 0,5 W
Consommation en Left-on : 8 W
Description du lavante-séchante
Bandeau de commandes
Touche avec voyant
MARCHE/PAUSE
Touche
TEMPÉRATURE
Tiroir à produits lessiviels
Touche
FONCTION
Touche
ON/OFF
Touche
ESSORAGE
Touche
VERROU ENFANT
Touche
DÉPART
DIFFÉRÉ
Touche
MULTI
RINÇAGE
Touche
AUTO-
NETTOYAGE
Légende
BOUTON
PROGRAMMES
Touche DIRECT
INJECTION
Écran
Touche
SÉCAHGE
SEUL
Touche
S
ÉCAHGE

FR
43
Écran
L’écran est utile pour programmer la machine et fournit de multiples renseignements.
La zone A affiche l’icône et le programme sélectionné, les phases de lavage et séchage et le temps restant jusqu’à la fin du
cycle.
La zone B affiche les deux niveaux d’intensité relatifs à l’option «DIRECT INJECTION».
Les zones C présentent les voyants des fonctions disponibles.
La zone D affiche le temps restant avant le démarrage du programme sélectionné si un DÉPART DIFFÉRÉ a été sélectionné.
La chaîne E affiche la valeur maximum de la vitesse d’essorage que la machine peut effectuer en fonction du programme
sélectionné; si le programme ne prévoit pas de cycle d’essorage, la zone affiche le symbole “--” faiblement éclairé.
La zone F affiche la température qui peut être sélectionnée sur la base du programme choisi ; si le programme ne prévoit
pas le réglage de la température, la zone affiche le symbole “--” faiblement éclairé.
Symbole verrouillage hublot
Le symbole allumé indique que le hublot est verrouillé pour éviter toute ouverture accidentelle. Pour éviter d’abîmer l’appareil,
attendre que le symbole s’éteigne avant d’ouvrir le hublot.
N.B.: si la fonction DÉPART DIFFÉRÉ est active, le hublot reste verrouillé, pour l’ouvrir mettre la machine en pause en appu-
yant sur la touche MARCHE/PAUSE .
! À la première mise en service, un message s’affiche demandant de sélectionner la langue et l’écran entre automatiquement
dans le menu de sélection de la langue.
Pour choisir la langue désirée, appuyer sur les touches X et Y; pour confirmer la sélection, appuyer sur la touche Z.
Pour changer de langue, éteindre l’appareil, appuyer simultanément sur les touches G, H et I jusqu’au signal sonore, le
menu de sélection de la langue s’affichera à nouveau.
! Pour modifier la luminosité de l’écran, qui est réglée sur la valeur maximum par défaut, éteindre la machine puis appuyer
simultanément sur les touches G, L, M jusqu’au déclenchement d’un signal sonore. Appuyer sur les touches X et Y pour
choisir la luminosité souhaitée puis appuyer sur la touche Z pour confirmer.
! Pendant un cycle de lavage ou lorsqu’un «DÉPART DIFFÉRÉ» a été demandé, l’économiseur d’écran entre en fonction
après 1 minute sans aucune interaction avec l’écran. Pour retourner à la page précédente, il suffit d’appuyer sur une touche
quelconque.
2:55
90°
1200
-- h
--
COTONE
H
G
Y
X Z
I
L M
A
B
C
C
D
E
C
F
44
FR
Comment effectuer un cycle de
lavage ou un séchage
1. METTRE L’APPAREIL SOUS TENSION. Appuyer sur
la touche , l’inscription HOTPOINT s’affiche à l’écran ;
le voyant de MARCHE/PAUSE passe au vert et clignote
lentement.
2. CHARGER LE LINGE. Ouvrir la porte hublot. Charger
le linge en faisant attention à ne pas dépasser la quantité
indiquée dans le tableau des programmes de la page
suivante.
3. DOSER LE PRODUIT LESSIVIEL. Sortir le tiroir et
placer le produit lessiviel dans les bacs correspondants
comme indiqué au paragraphe “Produits lessiviels et linge”.
4. FERMER LE HUBLOT.
5. CHOISIR LE PROGRAMME. Sélectionner à l’aide du
bouton PROGRAMMES le programme voulu; le nom du
programme est affiché à l’écran avec attribution d’une
température et d’une vitesse d’essorage qui peuvent être
modifiées. La durée du cycle s’affiche sur l’écran.
6. PERSONNALISER LE CYCLE DE LAVAGE. Appuyer
sur les touches correspondantes :
Modifier la température et/ou la vitesse d’essorage.
L’appareil sélectionne automatiquement la température et la
vitesse d’essorage maximales prévues pour le programme
sélectionné qui ne peuvent par conséquent pas être
augmentées. Par pression sur la touche on peut diminuer
progressivement la température de lavage jusqu’à un lavage
à froid (l’écran affiche le symbole “--”). Par pression sur la
touche on peut diminuer progressivement la vitesse
d’essorage jusqu’à sa suppression totale (l’écran affiche le
symbole “--”). Une autre pression sur les touches ramènera
les valeurs aux maximales prévues.
! Exception: lors de la sélection du programme 5 la
température peut être augmentée jusqu’à 40°.
! Exception: lors de la sélection du programme 7 la
température peut être augmentée jusqu’à 90°.
! Exception: lors de la sélection du programme 9 la
température peut être augmentée jusqu’à 60°.
Sélectionner un départ différé.
Pour programmer le départ différé d’un programme
sélectionné, appuyer sur la touche correspondante jusqu’à
ce que le retard désiré soit atteint. Pour annuler le départ
différé, appuyer sur la touche jusqu’à ce que l’inscription
“-- h” s’affiche à l’écran.
Sélectionner le séchage.
Pour sélectionner le type de séchage souhaité, appuyer une
ou plusieurs fois de suite sur la touche SÉCHAGE . Deux
possibilités sont offertes :
A - En fonction du degré d’humidité du linge:
Repasser: linge légèrement humide, facile à repasser.
Suspendre: idéal pour le linge n’exigeant pas de séchage
complet.
Plier: conseillé pour le linge à ranger dans l’armoire sans
repassage.
Extra: conseillé pour le linge exigeant un séchage complet,
serviettes éponge et peignoirs par exemple.
B - En fonction du temps : de 30 à 180 min.
Pour supprimer le séchage, appuyer sur la touche corre-
spondante jusqu’à affichage de OFF.
Si, exceptionnellement, la charge de linge à laver et faire sécher
dépasse la charge maximum prévue, procéder au lavage et
une fois le programme terminé, séparer le linge dont une
partie sera replacée dans le tambour. Suivre à présent les
instructions pour procéder au “Séchage seulement”. Pro-
céder de même pour le linge restant. Un cycle de refroidis-
sement est toujours prévu quand le séchage est terminé.
Séchage seulement
Appuyer sur la touche pour n’effectuer que le séchage.
Après avoir sélectionné le programme voulu, compatible
avec le type de linge traité, une pression sur la touche
exclut la phase de lavage et lance le séchage au
niveau maximum prévu pour le programme sélectionné. Il
est possible de modifier et de sélectionner le niveau ou la
durée du séchage en appuyant sur la touche séchage
(Incompatible avec les programmes 1-2-3-4-14).
Programmer le type de rinçage.
L’option permet de sélectionner le type de rinçage
désiré pour un maximum de protection des peaux sensibles.
Une première pression sur la touche programme le niveau
“Extra +1” qui permet d’ajouter un rinçage supplémentaire à
ceux normalement prévus par le cycle de manière à éliminer
toute trace de lessive. Une deuxième pression sur la touche
programme le niveau “Extra +2” qui permet d’ajouter deux
rinçages supplémentaires à ceux normalement prévus par le
cycle, il est conseillé pour les peaux extrêmement sensibles.
Une troisième pression sur la touche programme le niveau
“Extra +3”, qui permet d’ajouter 3 rinçages supplémentaires
à ceux normalement prévus par le cycle. Cette option
activée avec les cycles à une température de 40° permet
de supprimer les principaux allergènes tels que les poils
de chat, de chien et les pollens. Un excellent niveau de
protection hypoallergénique est obtenu avec les cycles à
une température supérieure à 40°. Appuyer une nouvelle
fois pour retourner au type de rinçage «Rinçage normal».
S’il n’est pas possible de sélectionner ou de modifier le
réglage existant, le message “Non Sélectionné” ou “Non
Modifiable” s’affiche.
Modifier les caractéristiques du cycle.
• Appuyersurlatouchepouractiverlafonction;levoyant
correspondant sur l’écran s’allume.
• Appuyerdenouveausurlatouchepourdésactiverla
fonction; le voyant correspondant sur l’écran s’éteint.
! Si la fonction sélectionnée n’est pas compatible avec le
programme choisi, le voyant correspondant est faiblement
éclairé ; de plus, l’incompatibilité est signalée par un
signal sonore (3 bips) et par l’affichage du message «Non
Sélectionné».
! Si la fonction sélectionnée n’est pas compatible avec une
autre fonction précédemment sélectionnée, l’écran affiche le
message «Non Sélectionné» et la fonction n’est pas activée.
! Les fonctions permettent de modifier le chargement
conseillé et/ou la durée du cycle de lavage.
7. DEMARRER LE PROGRAMME. Appuyer sur la touche
MARCHE/PAUSE . Le voyant correspondant s’allume
en vert fixe et le hublot est verrouillé (symbole HUBLOT
VERROUILLÉ allumé). Pendant le lavage, le nom de
la phase en cours s’affiche à l’écran. Pour modifier un
programme lorsqu’un cycle est en cours, mettre le lavante-
séchante en pause en appuyant sur la touche MARCHE/
PAUSE (le voyant MARCHE/PAUSE passe à l’orange et
clignote lentement) ; sélectionner le cycle désiré et appuyer
de nouveau sur la touche MARCHE/PAUSE . Pour ouvrir la
porte tandis qu’un cycle est en cours, appuyer sur la touche
MARCHE/PAUSE ; si le symbole HUBLOT VERROUILLÉ
est éteint, on peut ouvrir le hublot. Pour faire redémarrer
le programme exactement à l’endroit de l’arrêt, appuyer une
nouvelle fois sur la touche MARCHE/PAUSE.
8. FIN DU PROGRAMME. Elle est signalée par l’inscription
“FIN DE CYCLE” qui s’affiche à l’écran; quand le symbole
HUBLOT VERROUILLÉ s’éteint, on peut ouvrir le
hublot. Ouvrir le hublot, vider le lavante-séchante et
éteindre l’appareil.
! Une pression prolongée sur la touche permet d’annuler un
cycle déjà lancé. Le cycle est interrompu et la machine s’éteint.
Direct Injection
Le lavante-séchante est doté d’une technologie innovante
appelée « Direct Injection » qui pré-mélange l’eau et la lessive,
activant ainsi immédiatement les principes nettoyants du produit
lessiviel. Cette émulsion active est envoyée directement dans le
tambour du lavante-séchante et pénètre plus efficacement dans
les fibres, éliminant ainsi la saleté la plus tenace même à basse
température, tout en respectant au maximum les couleurs et les
tissus. Il est possible de choisir le mode « Power » pour obtenir
de meilleurs résultats en termes de propreté ou bien le mode «
Eco Energie » afin d’économiser de l’énergie.
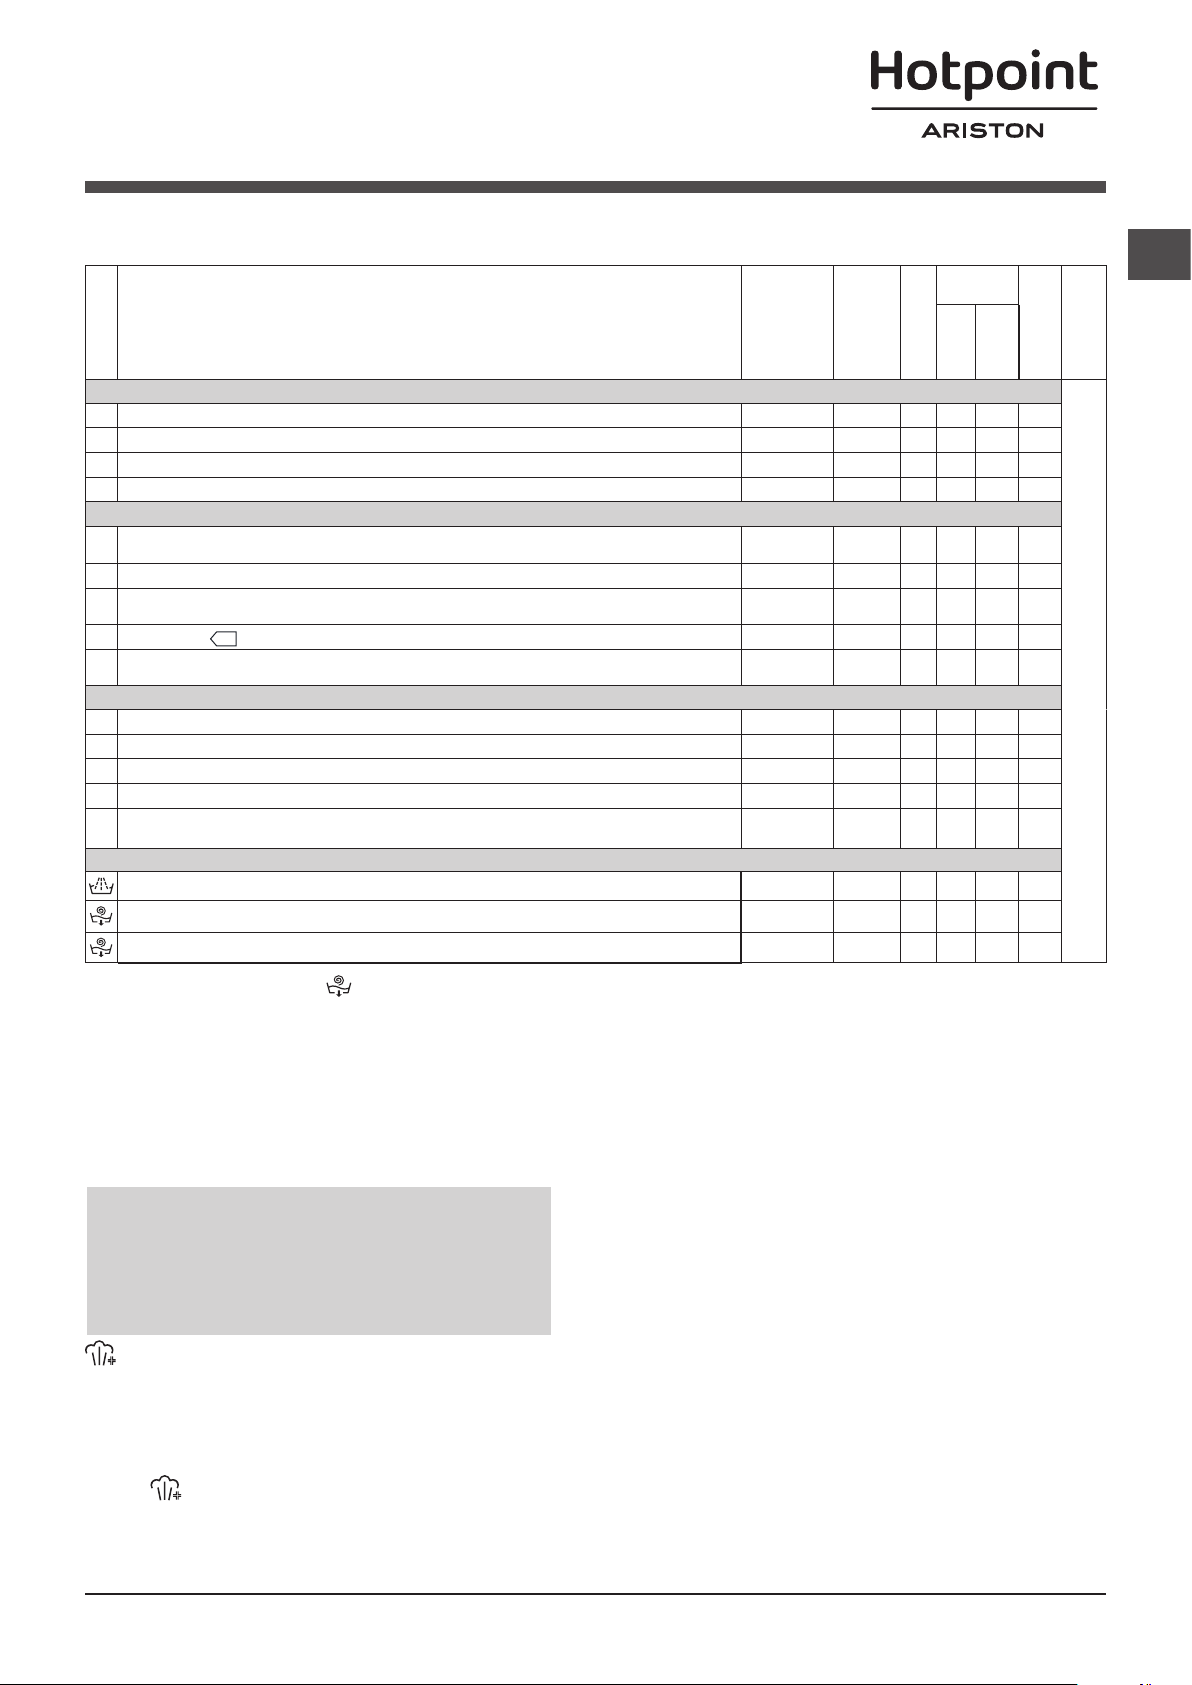
FR
45
Programmes et fonctions
Tableau des programmes
Fonctions de lavage
! Si la fonction sélectionnée n’est pas compatible avec le
programme choisi, le voyant correspondant est faiblement éclairé
; de plus, l’incompatibilité est signalée par un signal sonore (3
bips) et par l’affichage du message «Non Sélectionné».
! Si la fonction sélectionnée n’est pas compatible avec une
autre fonction précédemment sélectionnée, l’écran affiche le
message «Non Sélectionné» et la fonction n’est pas activée.
Hygiène Vapeur
La sélection de cette option augmente l’efficacité du
lavage par la production de vapeur qui pendant le cycle de
lavage élimine aussi les bactéries nichées dans les fibres
tout en prenant soin du linge. Introduire le linge dans le
tambour, sélectionner le programme compatible et choisir
l’option .
! Pendant le fonctionnement du lave-linge, il se peut que
la porte hublot soit moins transparente à cause de la
formation de vapeur.
1) Programme de contrôle selon la directive EN 50229: sélectionner le programme 8 et une température de 60°C.
2) Programme coton long: sélectionner le programme 8 avec une température de 40°C et appuyer sur la touche DIRECT INJECTION avec le mode “Power”.
3) Programme synthétique long: sélectionner le programme 9 avec une température de 40°C.
* En cas de sélection du programme et de suppression de l’essorage, la machine n’effectuera que la vidange.
La durée du cycle indiquée sur l’écran ou dans la notice représente une estimation calculée dans des conditions standard. Le temps effectif peut varier en fonction de nombreux facteurs tels que :
température et pression de l’eau en entrée, température ambiante, quantité de lessive, quantité et type de charge, équilibrage de la charge, options supplémentaires sélectionnées.
** Si l’on sélectionne également un cycle de séchage, la machine effectuera un programme de « lavage+séchage » d’une durée de 45 min à la vitesse d’essora-
ge maximale et avec une charge de linge de 1 kg.
Programmes
Description du Programme
Temp. maxi.
(°C)
Vitesse
maxi
(tours
minute)
Séchage
Produits
lessiviels
Charge maxi
(Kg)
Durée cycle
Lavage
Assou-
plissant
ANTI-PLIS
1
Lave & Sèche Mix Journée
40°
800
3
2
Laver&Secher Chemises
40°
1000
2
3
Pré-Repassage
- - - - - 1,5
4
Vapeur
- - - - - 2
QUOTIDIEN
5 Anti-Taches Turbo 45’
20°
(Max. 40°C)
1200
5,5
6
Anti-Taches Power 20°C
20°
1600
10
7
Coton: blancs et couleurs délicates peu sales.
40°
(Max. 90°C)
1600
10
8
Eco Coton
60°/40°
(1-2): blancs et couleurs résistantes très sales.
60° 1600
10
9
Synthétiques (3): couleurs résistantes très sales.
40°
(Max. 60°C)
1000
5
SPÉCIAL
10 Mix Couleurs
40° 1600
10
11
Ultra Délicats
30°
--
1
12
Laine: pour laine, cachemire, etc.
40° 800
2,5
13
Sport
40° 600
4,5
14
Rapide 30’ (**): pour rafraîchir rapidement du linge peu sale (ne convient pas pour la
laine, la soie et le linge à laver à la main).
30° 800
4
Programmes partiaux
Rinçage
- 1600
-
10
Essorage + Vidange
- 1600
- - 10
Vidange seulement * -
--
- - - 10
La durée des programmes de lavage est contrôlable sur l’afficheur.
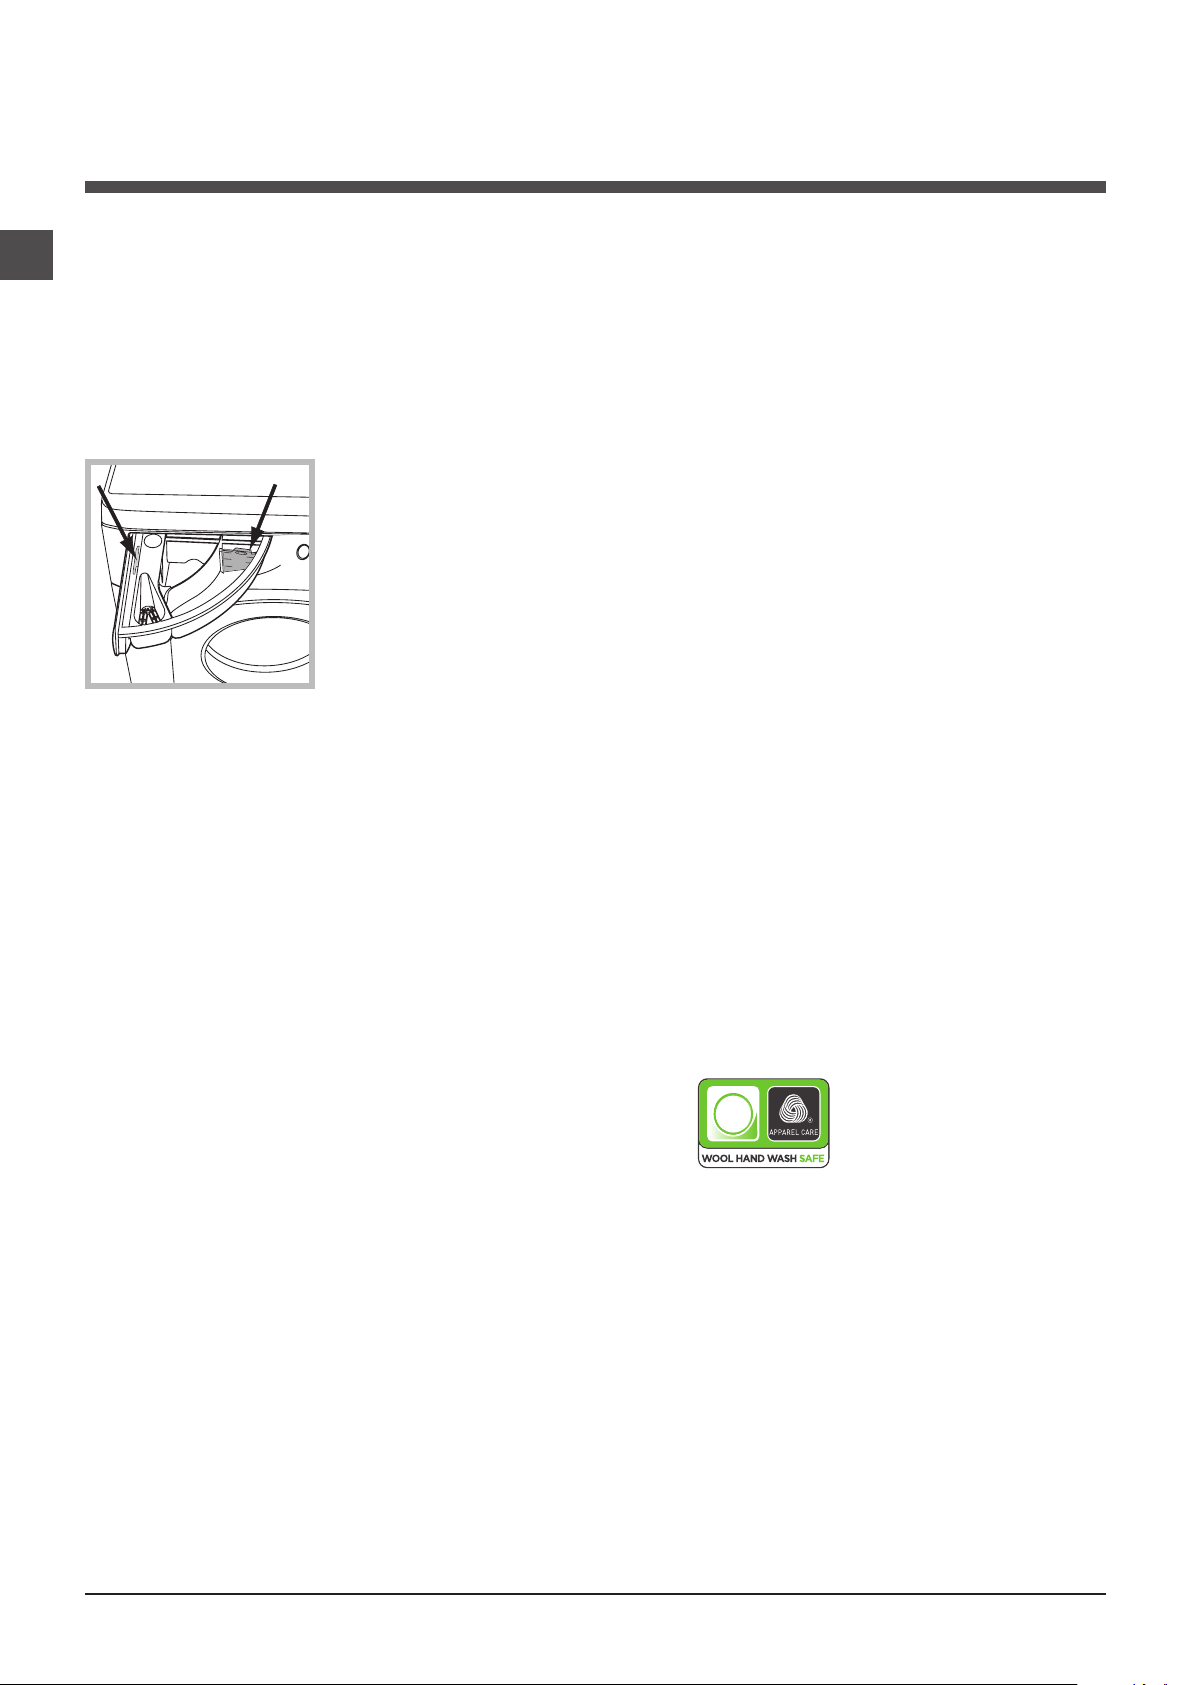
46
FR
Produits lessiviels et linge
Tiroir à produits lessiviels
Un bon résultat de lavage dépend aussi d’un bon dosage
de produit lessiviel: un excès de lessive ne lave pas mieux,
il incruste l’intérieur du lavante-séchante et pollue l’environ-
nement.
! Utiliser des lessives en poudre pour du linge en coton
blanc et en cas de prélavage et de lavages à une tempéra-
ture supérieure à 60°C.
! Respecter les indications figurant sur le paquet de lessive.
! Ne pas utiliser de lessives pour lavage à la main, elles
moussent trop.
Sortir le tiroir à produits
lessiviels et verser la lessive
ou l’additif comme suit.
! Ne pas mettre la lessive
dans la bac central (*).
bac 1: Lessive lavage
(en poudre ou liquide)
En cas d’utilisation de lessi-
ve liquide, nous conseillons
d’introduire le séparateur A
fourni avec le lavante-séchante pour mieux déterminer la
dose correcte. En cas d’utilisation de lessive en poudre,
placer le séparateur dans le bac B.
bac 2: Additifs (assouplissant, etc.)
L’assouplissant ne doit pas déborder de la grille.
Triage du linge
•Triercorrectementlelinged’après:
- le type de textile / le symbole sur l’étiquette.
- les couleurs: séparer le linge coloré du blanc.
•Viderlespochesetcontrôlerlesboutons.
•Nepasdépasserlesvaleursindiquéescorrespondantau
poids de linge sec : voir “Tableau des programmes”.
Combien pèse le linge ?
1 drap 400-500 g
1 taie d’oreiller 150-200 g
1 nappe 400-500 g
1 peignoir 900-1200 g
1 serviette éponge 150-250 g
Programmes spéciaux
Lave & Sèche Mix Journée: utiliser le programme 1 pour
laver et sécher des vêtements mélangés (coton et synthéti-
ques). La sélection de ce cycle permet de laver et de sécher
jusqu’à 3 kg de linge; il est conseillé d’utiliser une lessive
liquide.
Grâce à l’utilisation de la vapeur, le programme est optimisé
pour réduire la formation de plis sur les vêtements, ce qui
les rend plus faciles à repasser.
Laver&Secher Chemises: utiliser le programme 2 pour
laver et sécher avec le plus grand soin des chemises et
T-shirts de tissus et couleurs différents. La sélection de ce
cycle permet de laver et de sécher jusqu’à 2 kg de linge.
Pour obtenir de meilleurs résultats, utiliser une lessive liquide
; pré-traiter les cols, les poignets et les taches. Grâce à l’uti-
lisation de la vapeur, le programme est optimisé pour réduire
la formation de plis sur les vêtements, ce qui les rend plus
faciles à repasser.
Pré-Repassage: utiliser ce programme juste avant de
repasser le linge ; charge maximale 1,5 kg.
Grâce à l’utilisation de la vapeur, le programme est optimisé
pour réduire la formation de plis sur les vêtements, ce qui
les rend plus faciles à repasser.
Vapeur: pour rafraîchir les vêtements, neutraliser les odeurs
déplaisantes, et détendre la fibre en relâchant de la vapeur dans
le tambour. Les vêtements seront humides à la fin du cycle.
Anti-Taches Turbo 45’: ce cycle garantit une excellente
capacité d’élimination des taches dès 20°C et en seule-
ment 45 minutes. La température de ce cycle peut être
augmentée jusqu’à 40°C.
Anti-Taches Power 20°C: ce programme est celui qui
offre la capacité d’élimination des taches la plus élevée
sans qu’aucun pré-traitement ne soit nécessaire, à basse
température, et en préservant les tissus et les couleurs.
Mix Couleurs: pour laver les vêtements de couleur
en coton. Ce programme est optimisé pour garder les
couleurs brillantes, même après plusieurs lavages.
Ultra Délicats: utiliser le programme 11 pour le lavage
d’articles particulièrement délicats avec applications de
strass ou de paillettes.
Il est recommandé de mettre le linge à l’envers avant le
lavage et d’introduire les articles plus petits dans le sachet
prévu pour le lavage des articles délicats. Pour obtenir de
meilleurs résultats, nous conseillons d’utiliser de la lessive
liquide spéciale textiles délicats.
Pour obtenir de meilleurs résultats, nous conseillons
d’utiliser de la lessive liquide spéciale textiles délicats.
En cas de sélection de la fonction de séchage temporisé,
un séchage particulièrement délicat aura lieu à la fin du
lavage sous forme d’un brassage léger et avec un jet d’air
à une température dûment contrôlée.
Les temps conseillés sont :
1 kg de synthétique --> 165 min
1 kg de synthétique et coton --> 180 min
1 kg de coton --> 180 min
Le degré de séchage dépendra de la charge et de la
composition du textile.
Laine - Woolmark Apparel Care - Green:
le cycle de lavage « Laine » de ce lavante-séchante a été
approuvé par la société Woolmark Company pour le lava-
ge d’articles en laine classés comme « lavables à la main »,
à condition que le lavage soit effectué conformément aux
instructions indiquées sur l’étiquette du vêtement et aux in-
dications fournies par le fabricant de ce lavante-séchante.
(M1135)
Sport: pour laver des textiles propres aux vêtements de
sport (survêtements, shorts, serviettes, etc.) peu sales ;
pour obtenir d’excellents résultats nous recommandons
de ne pas dépasser la charge maximale indiquée dans
le “Tableau des programmes”. Nous recommandons
d’utiliser de la lessive liquide, avec une dose appropriée
pour une demi-charge.
Système d’équilibrage de la charge
Avant tout essorage, pour éviter toute vibration excessive
et répartir le linge de façon uniforme, le lavante-séchante
fait tourner le tambour à une vitesse légèrement supérieure
à la vitesse de lavage. Si au bout de plusieurs tentatives, la
charge n’est toujours pas correctement équilibrée, l’appa-
reil procède à un essorage à une vitesse inférieure à la vi-
tesse normalement prévue. En cas de déséquilibre exces-
sif, le lavante-séchante préfère procéder à la répartition du
linge plutôt qu’à son essorage. Pour une meilleure répar-
tition de la charge et un bon équilibrage, nous conseillons
de mélanger de grandes et petites pièces de linge.
1
2
A
B
*

FR
47
Anomalies et remèdes
Il peut arriver que le lavante-séchante ne fonctionne pas bien. Avant d’appeler le Service de dépannage (voir “Assistance”),
contrôler s’il ne s’agit pas par hasard d’un problème facile à résoudre à l’aide de la liste suivante.
Anomalies:
Le lavante-séchante ne s’allume pas.
Le cycle de lavage ne démarre pas.
Il n’y a pas d’arrivée d’eau (le mes-
sage “ABSENCE EAU, Ouvrir robi-
net” s’affiche à l’écran).
Le lavante-séchante prend l’eau et
vidange continuellement.
Le lavante-séchante ne vidange
pas et n’essore pas.
Le lavante-séchante vibre beau-
coup pendant l’essorage.
Le lavante-séchante a des fuites.
L’appareil est bloqué, l’écran cli-
gnote et affiche un code d’anomalie
(par ex. : F-01, F-…).
Il y a un excès de mousse.
Le lavante-séchante ne sèche pas.
Causes / Solutions possibles:
•Lafichen’estpasbranchéedanslaprisedecourantoumalbranchée.
•Ilyaunepannedecourant.
•Lehublotn’estpasbienfermé.
•LatoucheON/OFFn’apasétéenfoncée.
•LatoucheMARCHE/PAUSEn’apasétéenfoncée.
•Lerobinetdel’eaun’estpasouvert.
•Undépartdifféréaétésélectionné.
•Letuyaud’arrivéedel’eaun’estpasraccordéaurobinet.
•Letuyauestplié.
•Lerobinetdel’eaun’estpasouvert.
•Ilyaunecoupured’eau.
•Lapressionn’estpassuffisante.
•LatoucheMARCHE/PAUSEn’apasétéenfoncée.
•Letuyaudevidangen’estpasinstalléàunedistancedusolcompriseentre65
et 100 cm (voir “Installation”).
•L’extrémitédutuyaudevidangeestplongéedansl’eau(voir “Installation”).
•L’évacuationmuralen’apasd’évent.
Si après ces vérifications, le problème persiste, fermer le robinet de l’eau, éteindre la
machine et appeler le service Assistance. Si l’appartement est situé en étage dans
un immeuble, il peut y avoir des phénomènes de siphonnage qui font que le lavante-
séchante prend et évacue l’eau continuellement. Pour supprimer cet inconvénient,
on trouve dans le commerce des soupapes spéciales anti-siphonnage.
•Leprogrammeneprévoitpasdevidange:pourcertainsprogrammes,ilfautla
faire partir manuellement (“Programmes et fonctions”).
•Letuyaudevidangeestplié(voir “Installation ”).
•Laconduited’évacuationestbouchée.
•Letambourn’apasétédébloquécommeilfautlorsdel’installationdu
lavante-séchante (voir “Installation”).
•Lelavante-séchanten’estpasposéàplat(voir “Installation”).
•Lelavante-séchanteestcoincéentredesmeublesetlemur(voir “Installation”).
•Letuyaud’arrivéedel’eaun’estpasbienvissé(voir “Installation”).
•Letiroiràproduitslessivielsestbouché(pourlenettoyervoir “Entretien et soin”).
•Letuyaudevidangen’estpasbienfixé(voir “Installation”).
•Eteindrel’appareiletdébrancherlafichedelaprisedecourant,attendre1
minute environ avant de rallumer.
Si l’anomalie persiste, appeler le service d’assistance.
•Leproduitdelavageutilisén’estpasunelessivespécialemachine(ilfautqu’il
y ait l’inscription “pour lave-linge”, “main et machine”, ou autre semblable).
•Laquantitéutiliséeestexcessive.
• Lafichen’estpasbranchéedanslaprisedecourantoumalbranchée.
• Ilyaunepannedecourant.
• Lehublotn’estpasbienfermé.
• Undépartdifféréaétésélectionné.
• LeSÉCHAGEestenpositionOFF.

48
FR
Assistance
Avant d’appeler le service après-vente:
•Vérifiersionnepeutpasrésoudrel’anomalieparsespropresmoyens (voir “Anomalies et Remèdes”);
•Remettreleprogrammeenmarchepourcontrôlersil’inconvénientadisparu;
•Autrement,contacterleCentred’Assistancetechniqueagrééaunumérodetéléphoneindiquésurlecertificatdegarantie.
! Ne jamais s’adresser à des techniciens non agréés.
Communiquer:
• letypedepanne;
• lemodèledel’appareil(Mod.);
• sonnumérodesérie(S/N).
Ces informations se trouvent sur la plaque signalétique apposée à l’arrière du lavante-séchante et à l’avant quand on ouvre la
porte hublot.
11107217
04/2017
Whirlpool EMEA S.p.A. - Socio Unico
via Carlo Pisacane n.1,
20016 Pero (MI)
Italy
www.hotpoint.eu