
1
USE & CARE MANUAL
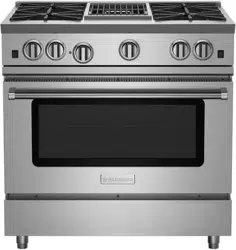
Freestanding Ranges
Sealed Burner
750300
2
BlueStar® Freestanding Ranges Use & Care Manual
MODELS RCS30SB, RCS36SB
THIS APPLIANCE WAS DESIGNED FOR EASE OF INSTALLATION AND OPERATION. HOWEVER, WE
RECOMMEND THAT YOU READ ALL SECTIONS OF THIS MANUAL BEFORE YOU BEGIN INSTALLATION.
INSTALLATION MUST BE PERFORMED BY AN APPROVED GAS INSTALLER OR GAS SERVICE TECHNICIAN OR
THE WARRANTY IS VOID. IN THE COMMONWEALTH OF MASSACHUSETTS A LICENSED PLUMBER OR GAS
FITTER CAPABLE OF REVIEWING AND PERFORMING THE MANUFACTURER’S INSTALLATION CHECKLIST
SHOULD INSTALL THIS APPLIANCE. THE INSTALLATION CHECKLIST IS INCLUDED AT THE REAR OF THIS
BOOKLET.
DO NOT REMOVE PERMANENTLY AFFIXED LABELS, WARNINGS OR DATA PLATES FROM YOUR APPLIANCE.
THIS MAY VOID THE MANUFACTURER’S WARRANTY AND/OR HINDER EFFECTIVE SERVICING AND
MAINTENANCE.
THESE INSTRUCTIONS ARE TO REMAIN WITH THE APPLIANCE AND THE CONSUMER IS TO RETAIN THEM FOR
FUTURE REFERENCE.
WARNING: If the information in this manual is not followed exactly,
a fire or explosion may result causing property damage, personal
injury or death.
- Do not store or use gasoline or other flammable vapors and
liquids in the vicinity of this or any other appliance.
- WHAT TO DO IF YOU SMELL GAS
Do not try to light any appliance
Do not touch or activate any electrical switch
Do not use any phone in your building
Immediately call your gas supplier from a neighbor’s phone.
Follow the gas supplier’s instructions.
If you cannot reach your gas supplier, call the fire
department
- Installation and service must be performed by a qualified
installer, service agency or the gas supplier.
NOTE: WARRANTY SERVICE MUST BE PERFORMED BY AN AUTHORIZED SERVICE AGENT. YOU MAY
REQUEST WARRANTY SERVICE BY CALLING 800-449-8691. YOU MAY ALSO REQUEST SERVICE VIA THE
INTERNET BY SUBMITTING THE SERVICE REQUEST FORM AT WWW.BLUESTARCOOKING.COM
In the Commonwealth of Massachusetts, gas connections must be performed by a licensed plumber or licensed
gas fitter.
Proposition 65 Warning
WARNING AND IMPORTANT SAFETY NOTICE RELATING TO CARBON MONOXIDE: The California Safe Drinking
Water and Toxic Enforcement Act requires the Governor of California to publish a list of substances known to the state to
cause cancer, birth defects or other reproductive harm, and requires businesses to warn customers of potential exposure
to such substances. Carbon Monoxide is one such substance known to the state to cause birth defects or other
reproductive harm. Operation of this product could expose you to carbon monoxide if the air shutter are not adjusted
properly. Directions on how to adjust the air shutters properly can be found in more detail in the MAINTENANCE section
of the Use & Care Manual.
© Copyright 2013 Prizer –Painter Stove Works, Inc. All specifications are subject to change without prior notification

3
THANK YOU & WELCOME
Thank you for your purchase and welcome to the BlueStar® Family!
BlueStar® ranges are designed for discerning home chefs who demand restaurant-quality results in their own
kitchens. As the owner of a new BlueStar® range you can look forward to years of culinary excellence. You
will prepare meals with the speed and accuracy of a professional chef right in your own kitchen. All equipment
is designed and manufactured to the highest quality standards in the industry specifically to meet the needs of
the world’s most demanding chef: you. From simmering to sautéing, baking and broiling these versatile
ranges provide the flexibility you need in any cooking application. Please review and familiarize yourself with
this Use & Care Guide which includes operating and cleaning instructions as well as tips for getting the most
out of your range.
Since 1880, we have been handcrafting the highest quality ranges at our Reading, Pennsylvania factory. If
your range ever needs attention, please be sure to use a BlueStar® certified service provider recommended by
our sales service team. Our service team can be reached at 1-800-449-8691 or
serviceteam@bluestarcooking.com. Please take a few moments now to fill in the Service Information on
PAGE 4 for your future reference. In the event you require parts or service, this information will be needed to
ensure you receive the highest quality service we can provide.
We hope you enjoy your new range,
The BlueStar® Team
PLEASE NOTE: ALL RANGES SHOULD BE INSPECTED UPON ARRIVAL. PER THE WARRANTY ANY
COSMETIC ISSUES MUST BE REPORTED TO YOUR DEALER WITHIN 7 DAYS OF DELIVERY. THE
PERFROMANCE CHECKLIST (PAGE 24) MUST BE COMPLETED BY THE CERTIFIED INSTALLER
WITHIN 15 DAYS OF INSTALLATION AND SEND IN.

4
SERVICE INFORMATION
Date of Purchase
Model Number
Serial Number
Dealer Name
Dealer Phone
Dealer Address
Date of Installation
Installer Name
Installer Phone
Installer Address
Your installer should complete the Performance Checklist, found in the Installation Manual or page 24 of this
manual, before leaving your residence. Mail the completed checklist to: Warranty Department Prizer-Painter
Stove Works Inc. 600 Arlington Street Reading, PA 19611 or Fax (610) 376-2596.
NOTE: WARRANTY SERVICE MUST BE PERFORMED BY AN AUTHORIZED SERVICE AGENT. YOU
MAY REQUEST WARRANTY SERVICE BY CALLING 800-449-8691. YOU MAY ALSO REQUEST SERVICE
VIA THE INTERNET BY SUBMITTING THE SERVICE REQUEST FORM AT
WWW.BLUESTARCOOKING.COM
In the Commonwealth of Massachusetts, gas connections must be performed by a
licensed plumber or licensed gas fitter.
5
IMPORTANT SAFETY INSTRUCTIONS
SAVE THESE INSTRUCTIONS
Read all instructions before using your appliance. Follow these important safety precautions to reduce the risk of fire,
electric shock, personal injury or property damage.
Do not remove permanent labels, warnings or data plates including the serial number from your appliance. Removal may
void the manufacturer’s warranty and/or hinder effective servicing and maintenance.
If the information in this manual is not followed exactly, a fire or explosion may result causing property
damage, personal injury or death.
Do not store gasoline, aerosol cans, sealed containers or any flammable vapors and liquids in the vicinity
of this or any other appliance.
If You Smell Gas
Do not try to light any appliance.
Do not touch or activate any electrical switch.
Do not use any phone in your building.
Immediately call your gas supplier from outside your home. Follow the gas supplier’s instructions.
If you cannot reach your gas supplier, call the fire department.
Installation must be performed by an approved gas installer or gas service technician or the warranty is
void. In the Commonwealth of Massachusetts a licensed plumber or gas fitter capable of reviewing and
performing the manufacturer’s installation should install this appliance.
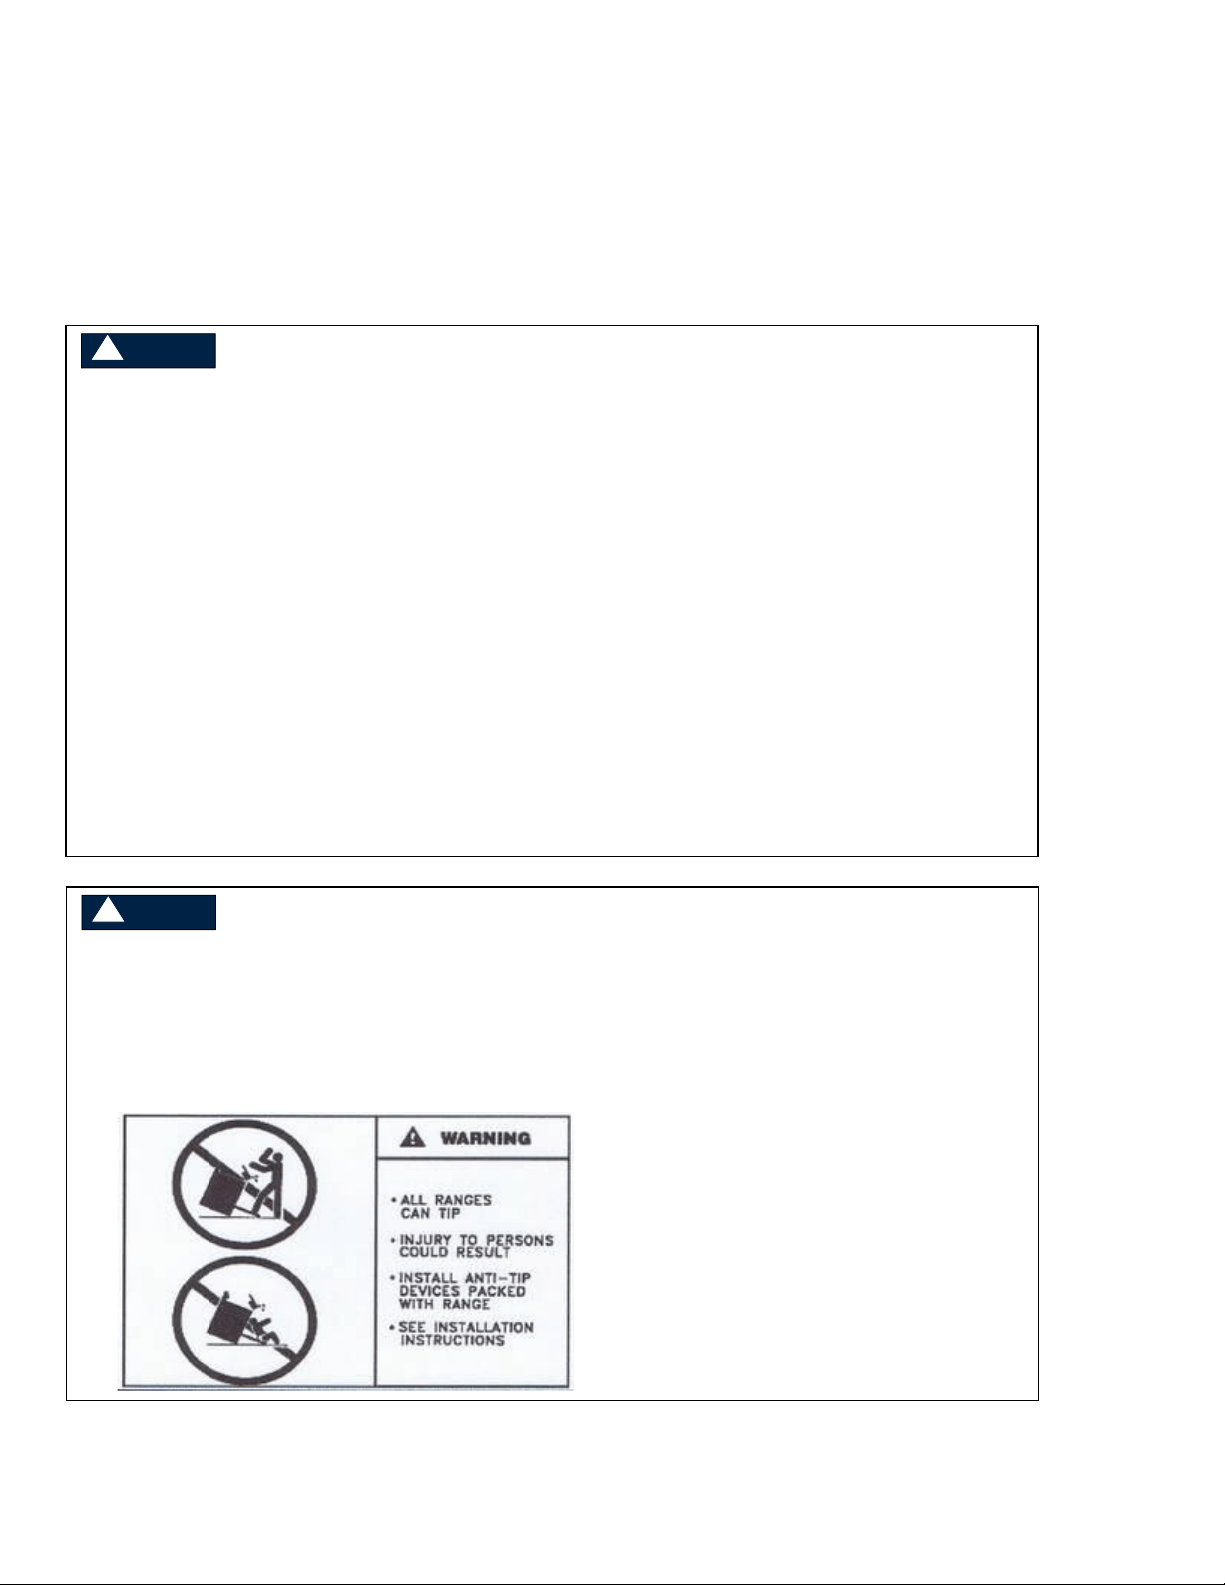
WARNING
Tipping Hazard
A child or adult can tip the range over which may cause serious personal injury or death.
Make sure the anti-tip bracket is securely installed.
Ensure the anti-tip bracket is engaged when the range is moved.
Do not operate the range without the anti-tip bracket in place.
WARNING

6
GENERAL SAFETY INSTRUCTIONS
SAVE THESE INSTRUCTIONS
IMPORTANT SAFETY INFORMATION
SAVE THESE INSTRUCTIONS
Your appliance should be installed by a qualified gas installation technician. Have the technician show
you the exact location of the gas shutoff valve on the incoming gas line so you know how to turn off
the gas if necessary.
Never use this appliance as a space heater to warm a room. Doing so may result in carbon monoxide
poisoning and overheating of the oven.
Do not touch the hot surfaces of the range including the burners, burner grates, cooktop, backguard,
oven and oven door interior.
Before any maintenance or repairs are performed, disconnect the appliance from the electric supply.
In the event of a power failure, do not attempt to operate the appliance or light any of the burners. This
is a gas fired appliance that uses electrical components such as the ignition and safety devices.
Do not attempt to repair or replace any part of this appliance unless specifically instructed to do so in
this manual. In-warranty service must be performed by an authorized service agency.
Only use this appliance for the intended purposes described in this user manual.
This appliance should be operated with a properly sized and operational ventilation hood.
The ventilation and flue ways of this appliance must remain unobstructed at all times.
Additional care should be exercised if your appliance is equipped with a high-shelf. During heavy or
continued use this shelf may become hot. Do not place combustible materials or plastics on this shelf.
Do not sit, stand, or climb on any part of the appliance including the oven door and cooktop. Serious
injury may occur.
Do not store items of interest to children above the appliance.
Never leave the appliance unattended during use. Boil-overs may occur, causing spills which may
ignite.
WARNING
KEEP FLAMMABLE MATERIALS AWAY FROM THE RANGE AND OVEN BURNER
Do not store flammable materials on, in or near the appliance. Keep the appliance area clean and free
of combustible materials, gasoline and other flammable vapors and liquids, aerosol and sealed
containers like baby food jars. Check before each use to make sure that no hazardous materials are in
the area.
Never wear loose fitting clothing or garments with loose sleeves or strings while using this appliance.
Use care when reaching over the range or into the oven.
Do not let cooking grease accumulate in or near the range or inside the oven, since it may ignite.
Clean the grease drip trays and ventilation hood filters frequently to prevent grease build-up.
WARNING
7
IMPORTANT SAFETY INFORMATION
SAVE THESE INSTRUCTIONS
IN THE EVENT OF FIRE, TAKE THE FOLLOWING STEPS TO PREVENT INJURY AND FIRE SPREADING
Do not use water on grease fires. Never pick up a flaming pan. Turn off the controls and smother the
flaming pan with a fitted lid, cooking sheet or large flat tray.
If there is a fire in the oven, turn off the oven and keep the oven door closed.
It is recommended you purchase a multi-purpose dry chemical or foam-type fire extinguisher for your
home. Store it in close proximity to your appliance.
WARNING
COOKTOP SAFETY INSTRUCTIONS
The push-in and turn control knobs on this appliance are designed to be child-safe, however are not a
guarantee of safe operation.
Do not leave children alone or unattended in the kitchen while the appliance is in use.
When flaming liquor or other spirits, and if your appliance is installed under a ventilation hood, TURN
THE FAN OFF. The draft created could cause the flames to spread.
Turn pot and pan handles inward so they do not extend over adjacent burners or the front of the range
to reduce the risk of burns, igniting flammable materials, and spillage.
After use do not touch the range surface until completely cooled.
Never leave the surface burners unattended at medium or high heat settings. Foods, especially oily
foods, may ignite resulting in fire that could spread to surrounding cabinets.
Never leave oil unattended while frying. If allowed to heat beyond its smoking point, oil may ignite
resulting in fire that may spread to surrounding cabinets. Use a deep fry thermometer whenever
possible to monitor oil temperature and operate with safe limits.
To avoid oil spillover and fire, use a minimum amount of oil when shallow pan-frying and avoid
cooking frozen foods with excessive amounts of ice.
Use proper pan size and avoid pans that are unstable or easily tipped. Select cookware that is
matched to the size of the burner. Burner flames should be adjusted so that they do not extend
beyond the bottom of the pan. Excessive flames may be hazardous.
When using glass/ceramic cookware, make sure it is suitable for cooktop service. Some materials
may break because of sudden change in temperature.
Do not use cookie sheets or aluminum foil to cover the grates or line any part of the cooktop. Doing so
may result in carbon monoxide build-up and poisoning, over heating the cooktop surfaces, or a
potential fire hazard.
WARNING

8
Proposition 65 Warning
WARNING AND IMPORTANT SAFETY NOTICE RELATING TO CARBON MONOXIDE: The California Safe Drinking
Water and Toxic Enforcement Act requires the Governor of California to publish a list of substances known to the state to
cause cancer, birth defects or other reproductive harm, and requires businesses to warn customers of potential exposure
to such substances. Carbon Monoxide is one such substance known to the state to cause birth defects or other
reproductive harm. Operation of this product could expose you to carbon monoxide if the air shutter are not adjusted
properly. Directions on how to adjust the air shutters properly can be found in more detail in the MAINTENANCE section
of the Use & Care Manual.
OVEN SAFETY INSTRUCTIONS
Do NOT cover the bottom of the oven floor with aluminum foil or any oven liner.
Only use dry potholders. Moist or damp potholders on hot surfaces may result in steam burns. Do not
allow potholders to touch hot burner areas. Do not use a towel or other bulky material as a potholder.
Do NOT heat unopened food containers or jarred products like baby food in the oven. The built-up
pressure may cause the container to explode.
Keep the oven door closed at all times when lighting the oven and broiling. Open only to insert or
remove food.
Do NOT cover an entire oven rack with any material such as aluminum foil. It will block airflow
throughout the oven and may cause carbon monoxide poisoning. Aluminum foil linings may trap heat,
creating a fire hazard.
Do NOT use a silicone mat on the bottom of the oven. This will block airflow throughout the oven and
may cause carbon monoxide poisoning.
Do NOT place any pot, pan or food directly on the oven floor when baking.
Do NOT put your face near the infrared broiler.
Do NOT operate the convection fan while broiling or during the initial pre-heat of the oven.
Do NOT store food, pots or pans, cooking equipment or containers in the oven when not in use.
Keep the oven free from grease buildup. Grease in the oven may ignite.
WARNING
9
GETTING STARTED
We know you are excited to start cooking and baking with your new BlueStar
®
range. Before you begin, it is essential that
you follow these steps for safe and optimal use.
Become familiar with all the parts of your range.
Remove and properly discard all temporary labels and packaging material from the cooktop, burners, burner grates,
oven exterior, oven interior, oven rack glides and oven racks. Remove all: cardboard, zip ties, paper and plastic
sheathing used as packaging.
Wash all removable parts including top grates, oven racks, and oven rack glides in hot, soapy water. Rinse well and
dry thoroughly. See the Care and Cleaning section.
Register your appliance by mailing the Performance Checklist, completed by your installer, and mail to the below
address. The Performance Checklist can be found in the Installation Manual or on page 24 of this manual.
Warranty Department
Prizer-Painter Stove Works Inc.
600 Arlington Street
Reading, PA 19611
Perform the Oven Burn-Off procedure before using your oven the first time. The Oven Burn-Off
removes all factory oils and residue.
ATTENTION
10
COOKTOP
BURNERS
BEFORE YOU BEGIN
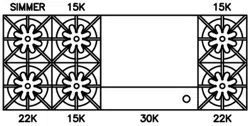
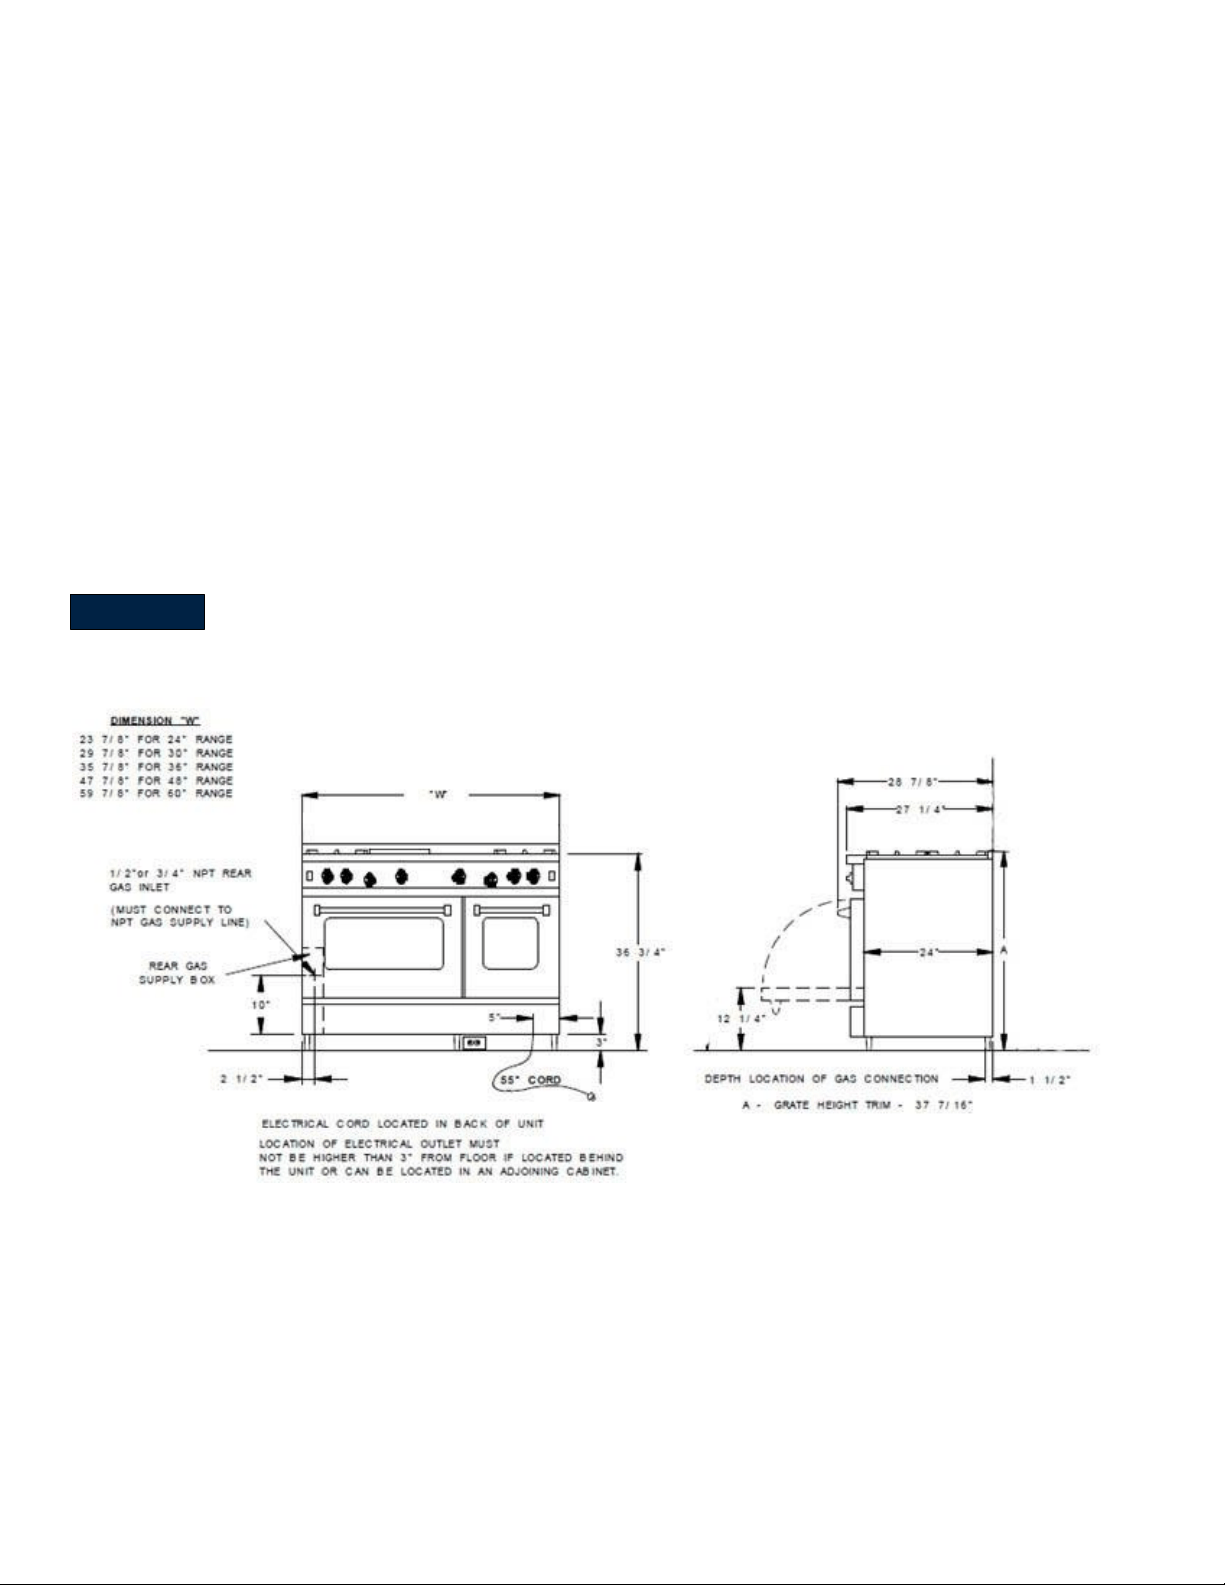
Each of your burners has a specific BTU (British Thermal Unit) rating. Before disassembly, note the
location of each burner. If a burner is replaced in the wrong position it may not function correctly.
Become familiar with the location of your burners. Below are the standard burner configurations.
Models – 30”, 36”
BURNER OPERATION
Push in and turn the control knob counter clockwise to HIGH to start the ignition process. The igniter will spark and
make a clicking sound. The clicking will stop after the burner ignites. The initial ignition may take a few seconds. You
may hear multiple clicks before it ignites.
After ignition, turn the knob to your desired setting.
Turn the knob to OFF to extinguish the burner. The flame may linger for several seconds until all the gas in the feeder
tube is burned off.
If the burner does not ignite, see the Before Calling for Service section for possible causes and
solutions.
Burners have a re-ignite feature in case the flame is extinguished for any reason. It may take several
seconds for the burner to re-ignite.
Never operate the burner with the knob set between the HIGH and OFF position. The flame will NOT
re-ignite in this position and a gas leak could occur.
BURNER SETTINGS
Burners can be set to any setting between LOW and HIGH.
The flame should be adjusted to not wrap around the bottom edge of any pot or pan using the knob.
If the flame is set too high in relation to the edge of the pot or pan, you might scorch the backguard or
other areas around your range
At the HIGH setting, flames should appear as a defined cone with a dark blue center and light blue outside. Some
yellow/orange flame may be seen depending on the type of gas and the supply line.
ATTENTION
CAUTION
ATTENTION
ATTENTION

11
Simmer Burner
The SIMMER burner gives you a choice of simmer settings from SIMMER to HIGH. The SIMMER setting can be used to
gently melt chocolate and hold delicate sauces at low temperatures.
For the lowest simmer setting, push in and turn the knob to HIGH to ignite the burner, then turn counter clockwise to
the SIMMER setting on the knob.
o For burners without the SIMMER setting marked on the control knob, push in and turn the control knob to
HIGH to initially ignite the burner, then turn the knob counterclockwise past the LOW indicator until the knob
stops.
For best simmer results only use the simmer burner. To locate the simmer burner on your range, reference the
burner configuration in the beginning of this manual. The simmer burner is located in the back left position of most
ranges.
TOP GRATES
TIP: When placing the top grate back on the cooktop, locate the pin on the bottom of the grate and place inside the
positioning holes of the cooktop.
Your top grates may darken over time with use. This is normal.
TIP: To prevent your burners from darkening at an uneven rate, rotate top grates between more and less active burners.
BURNER CLEANING
Top Grates
TIP: Clean spills as soon as possible to prevent sticking and build up.
When burner is cool, remove the ring grate, top grate and center filler grate (30” models only).
Wash in hot, soapy water. Rinse well and dry thoroughly to prevent rusting.
Handle gently to prevent nicks/chips, which can lead to rusting
TIP: If you have a nick or chip you can season the area to prevent rusting. Nicks or chips are not covered under warranty.
Put corn oil or other high smoke point oil on a paper towel and rub onto rusted area.
Wipe away excess oil and replace the part on the range.
Do not submerge the burner grates in water for extended periods of time. Prolonged exposure to moisture
may cause rusting
For heavy soiling, use a commercially available oven cleaner. Follow the cleaner manufacturer’s
instructions.
Make sure the cleaning chemicals do not contact any stainless steel or painted surface on your
appliance.
Reinstall grates in cooktop and make sure they are seated properly, and do not move unsteadily from side
to side.
Burner Caps
Burner caps locations are specific to the valves on the front of the unit. If burner caps are removed for
cleaning or other purposes, they must be re-installed in the same location they were removed from.
Failure to do so may result in a burner that will not light or possibly have a high flame.
CAUTION
ATTENTION
ATTENTION
ATTENTION

12
TIP: Clean spills as soon as possible to prevent sticking and build-up, and to keep the burner ports clear.
For fresh spills, make sure burner is cool and clean with a cloth and hot water.
OPERATING THE OVEN
BEFORE YOU BEGIN – ALL MODELS
Clean removable oven parts
As part of installation protective plastic wrappers on stainless steel surfaces should be removed. These wrappers
must be removed before operation. Remove and properly discard all temporary labels and packaging material
including cardboard, zip ties, paper and wrapping from the oven, oven racks, oven rack glides and exterior surfaces.
Remove protective plastic wrap from any stainless steel surfaces.
BEFORE turning on your oven for the first time, remove and wash the oven racks and rack glides in hot, soapy water.
Rinse well and dry thoroughly. See the Care and Cleaning guide for more details.
Set glides, and racks aside until the Oven Burn-Off procedure is complete.
Oven Burn-Off Procedure
The entire Burn-Off Procedure takes about 100 minutes.
New appliances are wiped clean with solvents at the factory prior to shipping. The Burn-Off procedure
burns off any remaining processing residue.
Failing to perform the Oven Burn-Off procedure before first use may result in undesirable odors, flavors,
and excessive smoke when you use your oven the first time.
Make sure your appliance has been installed properly and all performance checks and adjustments are completed.
Turn on ventilation hood and make sure entire room is well-ventilated.
Check that the oven cavity is empty. Oven racks and guides should NOT be in the oven.
Push in and turn the oven control knob counter clockwise to 300º. The blue oven indicator light will illuminate. The
blue indicator light will cycle on and off as the oven reaches and maintains the set temperature.
After 10 minutes, turn on the convection fan. Wait 30 minutes.
Increase the oven temperature setting to 450º. Wait 60 minutes.
After 60 minutes, turn off the oven by turning the control knob clockwise to OFF position.
Allow oven to cool completely.
Insert oven rack guides and racks.
Your oven is now ready for use.
You may notice the following events during the Oven Burn-Off procedure. All are normal.
Strong odor
Some smoke
Condensation on the front of the range including the oven door, oven window, control panel and side
panel.
ATTENTION
CAUTION
ATTENTION
Your oven is not a storage compartment. Do NOT place food, pots or pans, cooking equipment or storage
containers in the oven when not in use.
WARNING

13
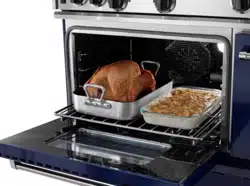
Oven Guides and Racks
Your oven has two standard racks and two five-position rack guides. Follow your recipe guidelines to determine the best
rack location for your dish.
TIP: For best results, center baking pans on the rack this will allow maximum air circulation around the food.
OVEN RACKS AND GUIDES CLEANING
Make sure oven is cool.
Remove oven racks and guides.
Wash in hot, soapy water. Rinse and dry thoroughly.
Oven racks and guides are dishwasher safe.
Always use an oven rack. Never place any food, pot, pan or tray directly on the oven floor.
WARNING

14
Operating the Oven
Push in and turn the oven control knob counter clockwise to any temperature setting between 150º and 500°F. The
blue oven indicator light will illuminate indicating the oven is on and preheating.
Although the oven is on, it may take up to three minutes for the oven burner to ignite. This is normal.
In about 10 minutes, the blue oven indicator light will turn off, indicating the oven sensor has reached the desired
temperature. However, it will take up to 30 minutes for the oven cavity to be fully preheated at that temperature.
The blue indicator light will turn on and off as the oven cycles to maintain the set temperature.
For best results, do not place your food into the oven until it is fully saturated at the desired temperature.
You may observe the following during the pre-heating process. All are normal.
Condensation on the front of the range including the oven door, oven window, control panel and side
panel. It will disappear as the oven heats.
Popping sounds as the metal in the oven expands.
ATTENTION
ATTENTION
Do NOT cover any slots, holes or passages on the bottom of the oven.
Do NOT cover an entire oven rack with any material such as aluminum foil.
Do NOT use a silicone mat on the oven floor.
Foil and silicone mats will block airflow into the oven and may cause carbon
monoxide poisoning. Aluminum foil linings may trap heat, creating a fire hazard.
WARNING
ATTENTION

15
Convection Baking and Roasting
Convection baking and roasting uses a fan inside the oven to circulate the heated air more evenly, resulting in better heat
distribution and a more consistent front to back, side to side, and top to bottom temperature.
In general, convection baking or roasting takes less time and at lower temperatures than traditional baking or roasting.
TIP
For best results when convection baking
Reduce the recommended temperature by 25°F to 50°F.
Reduce the recommended cooking time.
Closely monitor the first batch of each new recipe.
Keep a record of temperature, time and weight for each recipe. Adjust accordingly for the next batch.
Place baking dishes at the center of racks for maximum air flow, allowing at least 1” between pans.
Select a baking dish that has no or low sides like a broiler pan so that the air can circulate freely around the food.
Covered dishes do not benefit from Convection Baking or Roasting.
Do not use the Convection Fan to broil.
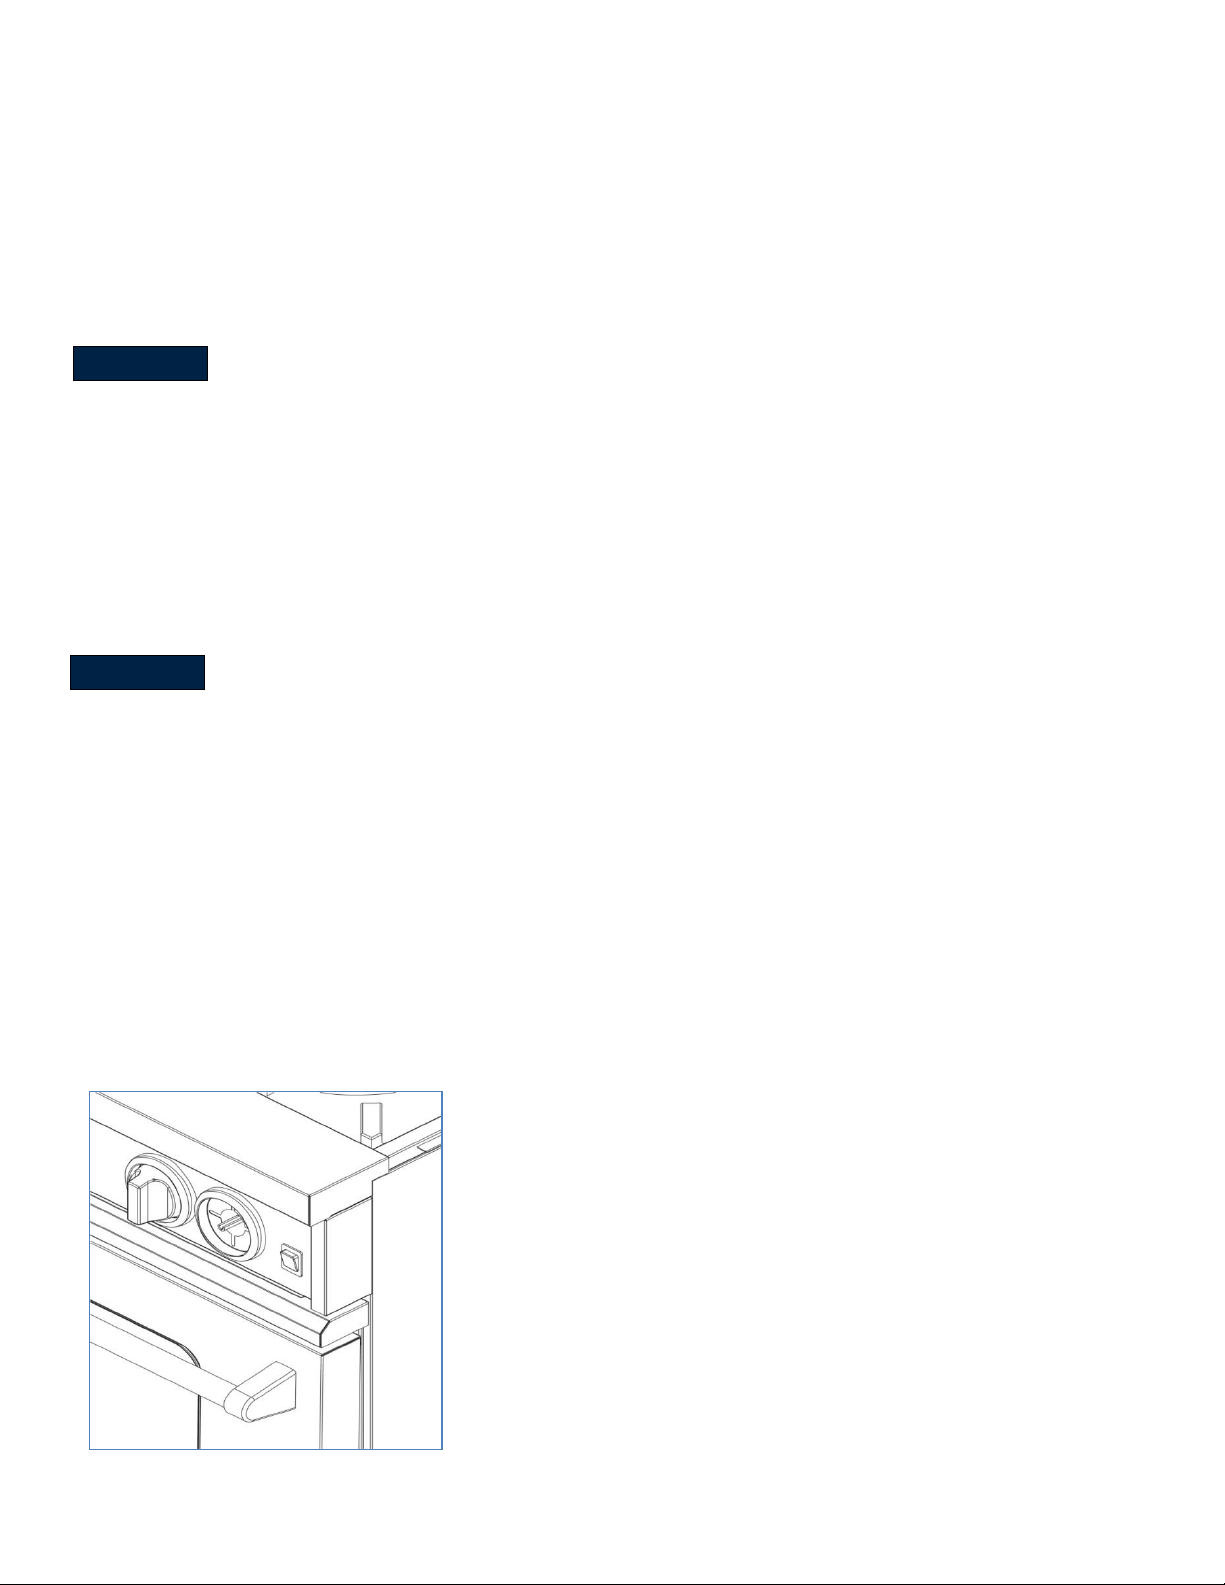
Operating the Convection Fan
Convection Fan Switch
Push in and turn the oven control knob counter clockwise to any temperature setting between 150º and 500°F. The
blue oven indicator light will illuminate, indicating the oven is on and preheating.
Although the oven is on, it may take up to three minutes for the oven burner to ignite. This is normal.
Do not use the Convection Fan during the initial preheat cycle. Wait until the blue indicator light turns off,
signaling the oven has reached the desired set temperature before turning the convection fan on.
In about 10-15 minutes, the blue oven indicator light will turn off, indicating the oven sensor has reached the desired
temperature, if the oven is set to 350°F. Time will vary accordingly with greater or lesser set temperature. It will take
up to 30 minutes for the oven cavity to be fully preheated at that temperature. The blue indicator light will turn on and
off as the oven cycles to maintain the set temperature.
Turn the Convection Fan switch, located on the front control panel, to ON after the oven has pre-heated and the blue
oven indicator light has turned off. The convection fan can be turned on or off as desired from this point.
For best results, do not place your food into the oven until it is fully preheated at the desired temperature.
After every use, after the oven is cooled, check the Convection Fan guard to make sure it is not
obstructed. Remove any food particles or obstructions like aluminum foil.
ATTENTION
CAUTION
ATTENTION
ATTENTION

16
Operating the Infrared Broiler
With oven door shut, push in and turn the oven thermostat control knob counter clockwise to BR (broil).
The blue oven indicator light will illuminate.
The broiler igniter will begin to glow and the ceramic broiler burners will light. The broiler will cycle on and off to
maintain an even broiling temperature. once the cavity reaches a temperature of 500°F.
It takes up to 3 minutes for the burners to light.
You may see a large flame at first. This is normal and will soon become a blanket of blue flame that
will glow red.
Note: The broiler and oven burner will not operate at the same time.
TIP
Before turning the broiler on, determine the correct oven rack position based on the recipe, depth of the broiler pan,
and food thickness and move the oven rack to the correct position.
You can use the broiler as soon as it is lit. No need for pre-heating.
ATTENTION
Keep the oven door closed at all times when lighting and broiling. Open only to insert
or remove food.
Leaving the oven door open throughout the cooking process could damage range
components.
Do NOT put your face near the infrared broiler.
Do NOT operate the convection fan while broiling.
WARNING

17
Oven Cleaning
Make sure the area is well-ventilated when using commercial oven cleaners.
Line the floor beneath the oven door with several layers of newspaper or other protective material to
catch drips and run-off.
Oven Window
When oven is cool, and after each use, use a cloth and warm soapy water to clean the interior oven door window to
remove baked-on stains. Rinse with clear water and dry thoroughly.
For tougher stains, you can use glass cleaner. Follow cleaner manufacturer’s instructions.
TIP: To prevent build-up of residue on glass, clean window after each use.
Interior Oven Walls
The oven interior is coated with porcelain enamel and can be cleaned with commercial oven cleaners. Follow the
cleaner manufacturer’s instructions. Do NOT use on door gasket, igniter, or infrared ceramic broiler.
To loosen tough baked-on stains, lay a cloth soaked in hot water on the area for several minutes Do NOT use soap
and do NOT turn ON the oven.
Oven Fan Guard
Clean the oven fan guard periodically. Keep the fan guard clear of obstructions.
Apply commercial oven cleaner to cloth, not directly to the fan guard, to remove grease build-up and food particles.
Follow manufacturer’s cleaning instructions.
Oven Racks and Guides
Remove and clean racks and guides in hot, soapy water. Rinse well and dry thoroughly.
Racks and guides can be cleaned in the dishwasher.
Do NOT clean the infrared ceramic broiler.
Do NOT apply commercial oven cleaners to the oven door gasket. Do NOT rub or scrub
the gasket since may damage the oven door seal.
Make sure cleaning chemicals do not come in contact with any stainless steel, painted
surfaces or the infrared ceramic broiler.
Do NOT use steel wool or metal pads to clean the interior oven walls. They may damage
or scratch the enamel coating.
WARNING
ATTENTION

18
CARE AND CLEANING
Make sure the cooktop surface and range are cool before cleaning.
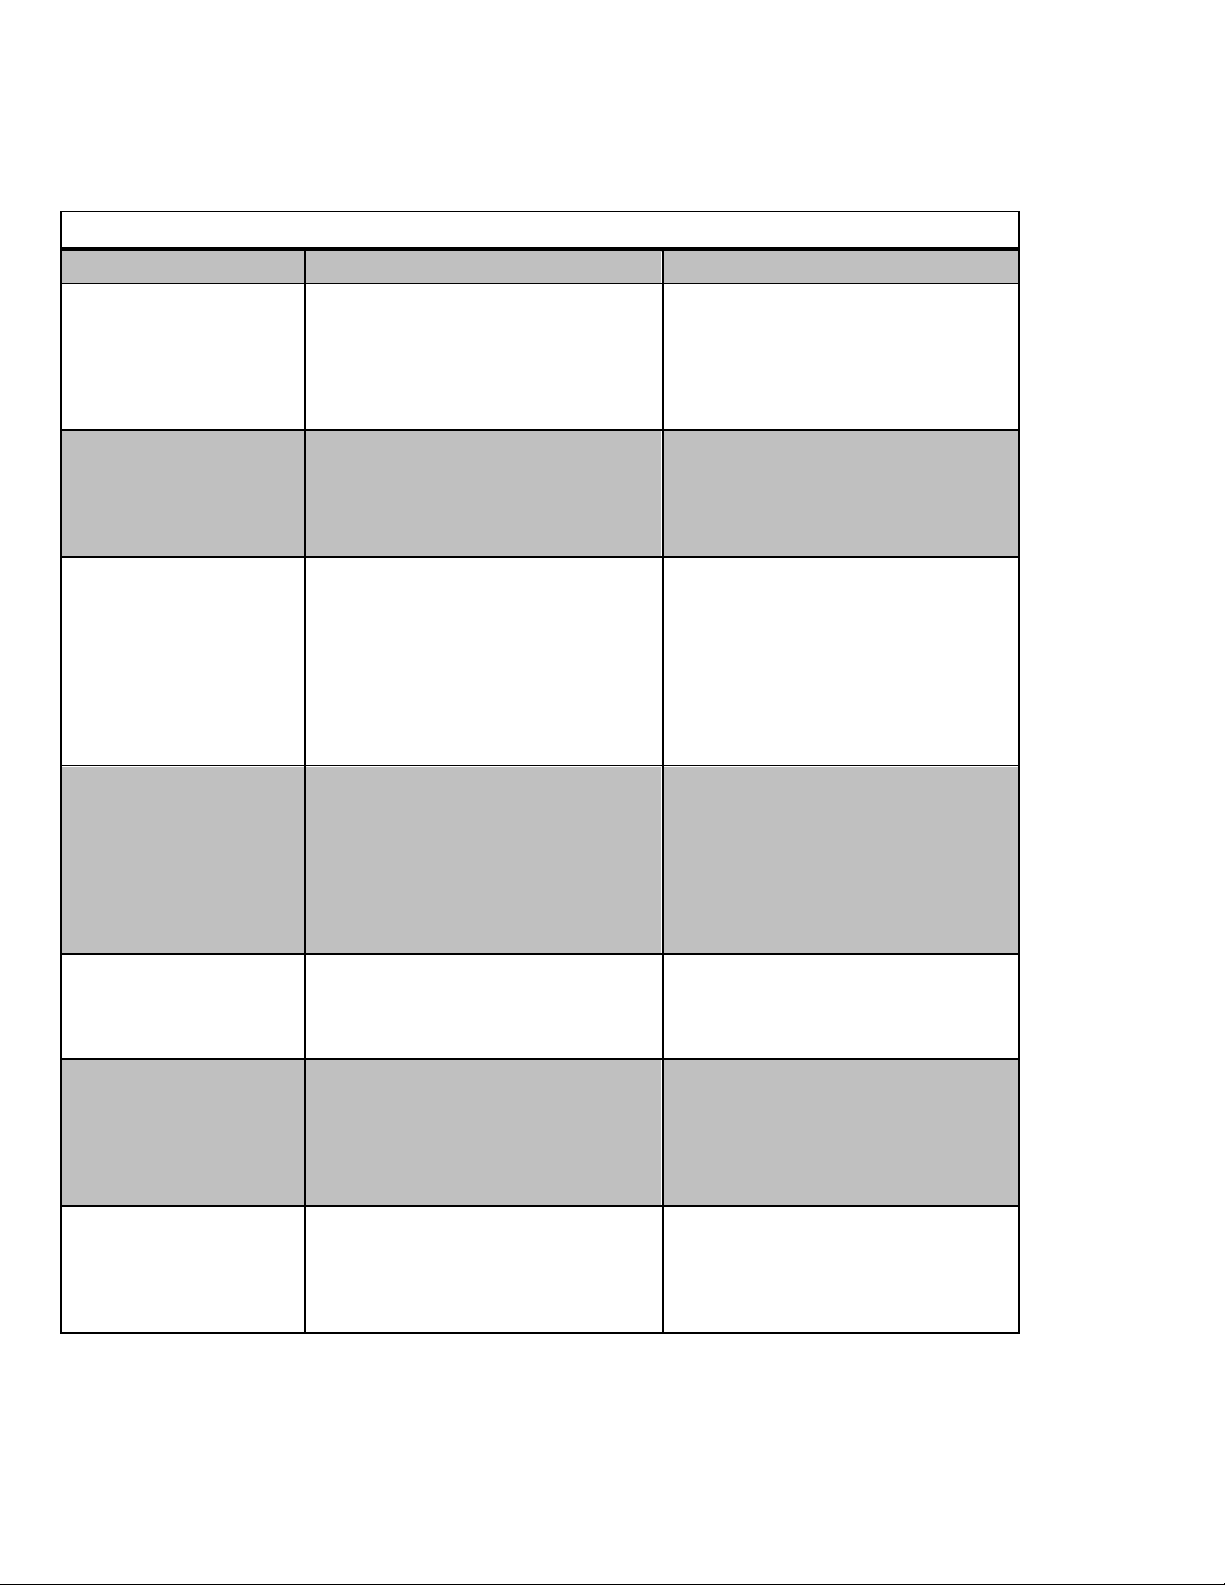
PART/
MATERIAL
CLEANING
FREQUENCY
ATTENTION
Backguard
Clean with stainless steel cleaner. Follow
cleaner manufacturer’s instructions.
As needed
Do NOT use steel wool, metal
pads or abrasive cleaners.
Discoloration may occur with
heavy use.
Burner Top
Grates and
Burner Cap
Wash grates in hot, soapy water. Rinse well
and dry thoroughly.
For heavy soiling, use a commercially
available oven cleaner. Follow the cleaner
manufacturer’s instructions.
As needed
Do not submerge in water for
extended periods as this may
cause rusting.
Do NOT allow commercial oven
cleaner to touch painted or
stainless steel surfaces.
Convection Fan
Guard /
Porcelain
Enamel
Remove obstructions like aluminum foil or
other particles.
Apply commercial oven cleaner to a cloth and
wipe the guard. Follow manufacturer’s
instructions.
Once a month;
more often with
frequent use.
Turn on ventilation fan and
make sure room is well vented.
Do NOT use steel wool, metal
pads or abrasive cleaners. They
may scratch and damage the
coating.
Exterior Body /
Stainless Steel
Only moving in the direction of the grain, clean
with hot, soapy water. Rinse well and dry
thoroughly.
For tough stains, use a commercial stainless
steel cleaner and follow the cleaning
manufacturer’s instructions.
As needed
Do NOT use steel wool, metal
pads or abrasive cleaners.
Do NOT use any metal objects
to scrape the surface.
Do NOT allow citrus or tomato
juices to sit and dry on the
surface. Citric acid can discolor
stainless steel.
Oven Interior /
Porcelain
Enamel
Use a commercial oven cleaner. Follow
cleaner manufacturer’s instructions.
Once a month;
more often with
frequent use.
Turn on ventilation fan and
make sure room is well vented.
Do NOT clean the infrared
ceramic broiler. This can easily
crack.
Do NOT apply commercial oven
cleaners to the oven door
gasket.
Do NOT rub or scrub the
gasket. This may damage the
oven door seal.
Do NOT use steel wool, metal
pads or abrasive cleaners. They
may scratch and damage the
coating.
Oven Racks and
Guides
Remove and wash in hot, soapy water. Rinse
well and dry thoroughly.
Dishwasher safe.
Once a month;
more often with
frequent use.
WARNING
19
BEFORE CALLING FOR SERVICE
Check these helpful tips for any problems with your range. If you need additional help call BlueStar
®
Customer Service at
1-800-449-8691.
COOKTOP
PROBLEM
POSSIBLE CAUSE
SOLUTION
Burner will not ignite – no
“clicking” sound
No electrical power to the unit.
Plug into a three-prong electrical outlet
that is properly grounded.
Check and re-set circuit breaker for the
unit.
Burner will not ignite –
“clicking” sound with spark
Gas not turned on
Burner Cap not in correct location
Turn on gas supply.
Identify burners and move them to the
correct location.
Burner ignites – “clicking”
sound does not stop
Burners are wet
Burner setting too low
Air draft flowing over cooktop
Let burners dry and try again.
Turn off, re-ignite and change setting.
Eliminate draft source.
Burner doesn’t fully ignite
Clogged burner ports
Partial gas supply
Burner Cap not properly positioned
Use a push pin to clear ports.
Make sure gas supply is fully on.
Check that burner cap is in the proper
location.
Burner ignition delay –
“clicking” sound then
ignition whoosh
Knob not on correct position
Turn burner to LOW setting to ignite.
Lazy flame – floats, larger
in size than normal
Low propane supply (for LP users)
Low flame setting needs adjustment
Fill the propane tank.
Turn on/off valve fully to on.
See Low flamme setting adjustment
instruction.
Lifting flame – well-defined
with visible inner core,
noisy, gap between burner
and flame
Incorrect regulator setting.
Low flame setting needs adjustment
Set regulator to proper setting - Liquid
Propane or Natural Gas.
See Low flamme setting adjustment
instruction.

20
OVEN
PROBLEM
POSSIBLE CAUSE
SOLUTION
Oven will not ignite
Takes up to three minutes to ignite.
No electrical power to the unit.
Gas not flowing to oven.
Igniter does not glow red
Wait three minutes.
Plug into a three-prong electrical outlet
that is properly grounded.
Check and re-set circuit breaker for the
wall outlet used for this unit.
Turn a top burner on. If top burner ignites,
call for service.
Make sure gas supply valve is on.
Call for service
Lazy flame – floats, larger
in size than normal
Low propane supply (for LP users)
Needs an air shutter adjustment
Fill the propane tank.
Turn on/off valve fully to on.
See Oven Burner Air Shutter Adjustment
instructions.
Lifting flame – well-defined
with visible inner core,
noisy, gap between burner
and flame
Incorrect regulator setting.
Air shutter adjustment
Set regulator to proper setting - Liquid
Propane or Natural Gas.
See Oven Burner Air Shutter Adjustment
instructions.
Oven light not on
No electrical power to the unit.
Oven light bulb burned out.
Plug unit into a three-prong electrical
outlet that is properly grounded.
Check and re-set circuit breaker for the
wall outlet used for the unit.
Replace with 40 Watt Appliance light bulb
only. See Replacing Oven Bulb
instructions.
Platinum only: Replace with 25 Watt.
Convection fan does not
turn
No electrical power to the unit.
Fan guard is obstructed or clogged.
Plug into a three-prong electrical outlet
that is properly grounded.
Check and re-set circuit breaker for the
unit.
When oven is cool, remove any
obstructions like baked-on food or
aluminum foil.
Call for service.
Lazy or lifting flame on the
power burner in the PowR
Oven™
Air shutter adjustment
It is recommended that a certified
BlueStar service provider adjust the air
shutter on your PowR Oven™.
To adjust the air shutter, make sure the
range is off and cool.
Remove screws (3-4) holding the kick
plate in place.
Locate air shutter and loosen the air
shutter set screw.
Rotate the air shutter left or right until the
desired flame is achieved. Retighten the
screw.
The flame should appear blue.
21
MAINTENANCE
Oven Doors
Periodically oven door hinges may require added lubrication to work smoothly. Whether this is necessary or how
frequently will depend on how and how often you use your oven. Open the door fully and apply a small amount of
lubricant to the ball visible in the hinge slot on your door. We recommend a food grade light oil or grease. Cooking oil or
mineral oil may be used, but should be avoided if possible. Do not use sprays like WD-40 or CRC that may get onto the
oven door surface.
OVEN BULB REPLACEMENT
Only use a 40 Watt Appliance bulb. Regular light bulbs cannot tolerate oven temperatures.
1. Make sure oven is cool.
2. Grasp the clear globe lens with your fingers and turn counter clockwise to loosen and remove.
3. Replace the burned out bulb with a 40 Watt Appliance bulb.
4. Replace the clear globe by turning clockwise.
TOP BURNER LOW FLAME ADJUSTMENT
At its lowest setting, a properly adjusted burner will produce a steady flame about 1/8” above the burner ports. If your
flames do not appear, follow the instructions to adjust the flame height.
Before you begin, follow the steps in the Air Shutter Checklist.
1. Push and turn the burner fully counter clockwise to the lowest simmer setting. Leave burner on.
2. Remove the burner knob from the valve stem by pulling the knob straight toward you. Set the knob aside.
3. Use a wrench to secure the valve stem while you make the adjustments.
4. Insert a 1/8” flat-head screwdriver blade into the “D” shaped valve stem and is inserted into the adjusting screw.
To lower the flame, turn the adjusting screw clockwise 1/8 of a turn at a time until the flame is at the desired
height.
To raise the flame, turn the adjusting screw counter clockwise 1/8 of a turn at a time until the flame is at the
desired height.
5. To replace the knob, align the “D” shaped cut-out on the knob with the valve stem.
6. Push the knob straight onto the valve stem and turn the knob clockwise to the off position.
7. To check new burner height: Push and turn the burner knob counter clockwise to the lowest simmer. If you hear a
clicking sound but the burner does not ignite, repeat the steps to increase the flame height until the burner ignites and
remains lit at the lowest simmer setting.
TIP: This adjustment will also adjust the burner’s high flame setting.
ATTENTION
ATTENTION

22
OVEN BURNER AIR SHUTTER ADJUSTMENT
Before you begin, follow the steps in the Air Shutter Checklist.
Wear heavy duty gloves when removing oven door, oven floor and front panel to prevent injury from
sharp edges.
CAUTION
Oven door weighs about 25 pounds. Use extreme care when removing or replacing to prevent personal
injury or property damage.
Tools needed: Phillips screwdriver, straight stubby screwdriver or a 3/16” open-end box wrench, heavy duty work gloves
Preparing the Oven for Oven Burner Air Shutter Adjustment
1. Remove oven racks from the oven and set aside.
2. Remove the oven door.
Open the oven door fully so it is parallel to the floor.
Locate the hinge clip within the hinge cavity in the oven frame.
Insert the tip of a flat-head screwdriver into the square opening of the hinge cavity just above the clip.
Use the screwdriver to rotate the clip up and out so it is facing you. Repeat for the other hinge.
Lift up the oven door about halfway, as if closing the door
Observe and remember the hinge position in the hinge receiver before you remove it. It should appear this
way when replacing the door.
With the door halfway up, use your hands to grasp both short sides of the door near the door handle.
Lift the oven door straight up and out from the hinge receiver. Carefully set the door aside.
3. Remove the lower kick panel.
Use a Phillips head screwdriver and remove the sheet metal screws securing the kick panel. Set the screws
aside.
Pull on the kick panel to remove it and place to the side.
4. Remove the oven floor.
Wearing heavy duty gloves, insert your fingers into the holes of the oven floor panel.
Lift panel up and out of the oven. Set aside.
5. Turn on the oven to 300°F and wait 15 minutes.
Do NOT turn on the convection oven during the adjustment procedure.
6. With the oven on, locate the air shutter adjustment screw in the oven cavity. Figure xx.
7. Use a straight stubby screwdriver or a 3/16" open-end box wrench to loosen the air shutter screw.
8. Use your fingers to adjust the air shutter gap:
Widen the gap to remove yellow tips and to eliminate a lazy flame
Reduce the gap to remove a lifting flame.
9. When adjustments are complete, turn off the oven and tighten the air shutter screw with the screwdriver.
ATTENTION
WARNING
CAUTION
ATTENTION

23
10. Wearing heavy duty gloves, replace the oven floor in the oven, making sure that the seven holes are facing you.
11. Replace the kick panel and secure with the sheet metal screws.
12. Replace the oven door
Grasp the door with both hands on each side of the door handle.
Slide the door hinges into the hinge receiver, making sure that the notch in the hinges is resting properly.
Rotate the hinge clip down into the hinge receiver to secure the hinge. Repeat on the other side.
13. Make sure the door lays flat and parallel to the floor when fully open.
14. Make sure the door closes smoothly and completely with no gap between the door and oven gasket.
15. If not, remove the door and repeat step 12.
16. Replace oven racks.
24
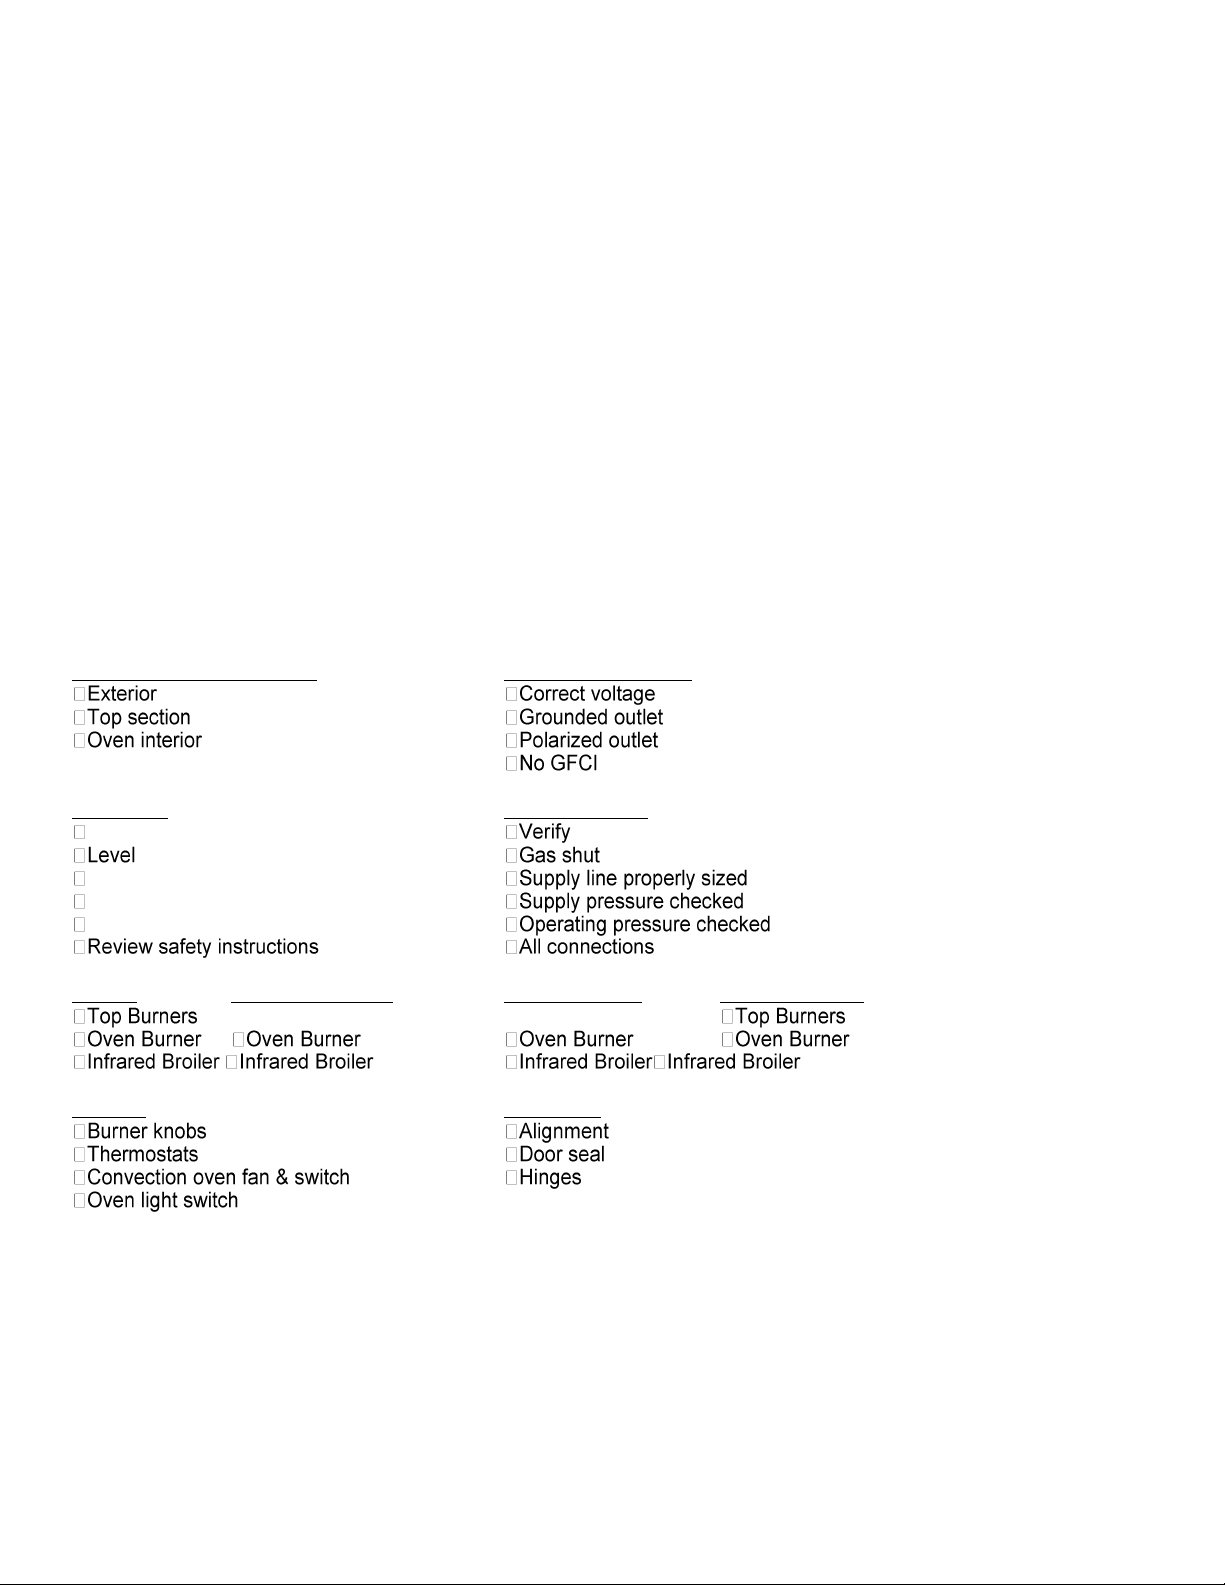
PERFORMANCE CHECKLIST
This checklist has been developed to assure proper installation of your appliance.
To validate your warranty you must mail or fax this form within 15 days of installation and a copy of your receipt to:
Warranty Department, Prizer-Painter Stove Works Inc., 600 Arlington Street, Reading, PA 19611, or Fax (610) 376-2596.
Failure to do so will void the warranty.
Customer Information (Please Print) Product Information (Please Print)
Name: ________________________________________ Model No: ________________________________
Address: ______________________________________ Serial No: _________________________________
City: _________________________________________ Purchase Date: _____________________________
State, Zip Code: ________________________________ Installation Date: ___________________________
E-mail: _______________________________________ Installer’s Name: ___________________________
Telephone: ____________________________________ Company: _________________________________
Dealer: _______________________________________ Telephone: ________________________________
CHECK ALL THAT APPLY
Appearance and Aesthetics Electrical Connection
Installation Gas Connection
Proximity to cabinets fuel—_____Nat _____LP
-off present and accessible
Backguard in place
Ventilation system
Read User Manual
checked for leaks
Ignition Flame Adjustment Air/Gas Mixture Valve Operation
Controls Oven Door

LIMITED WARRANTY
BlueStar® Cooking Appliances, BlueStar® Ventilation Hoods and Prizer Hoods® Ventilation Hoods
For further information about this warranty,
contact Prizer-Painter Customer Service at [1-800-449-8691]
Who Is Providing The Warranty?
This Warranty is provided to you by Prizer-Painter Stove Works, Inc.
(“Prizer-Painter”), which warrants the parts of your BlueStar®
cooking appliance, BlueStar® ventilation hood or Prizer Hoods®
ventilation hood (“Product”), as described below.
Who Does This Warranty Cover?
This Warranty covers the owner of the residence in which the
Product is installed, and his or her spouse (“Owner”).
To What Types Of Installations Does This Warranty Apply?
This Warranty applies to cooking appliances and ventilation hoods
installed in residential properties only. The Product must be
installed by a certified gas technician or licensed plumber for the
warranty to apply. Self-installations or installations by a person,
who is not a certified gas technician or a licensed plumber, will void
this Warranty. This Warranty is also void if the original factory
installed serial number is altered or removed from the Product.
What Products Does this Warranty Cover?
This Warranty applies only to BlueStar® cooking appliances,
BlueStar® ventilation hoods, and Prizer Hoods® ventilation hoods
purchased in the continental U.S. and Canada on or after February
22, 2002.
What Products Does this Warranty Not Cover?
This Warranty does not apply to Products installed or used in any
commercial or other non-residential property such as, but not
limited to, day care facilities, hotels, motels, and nursing homes.
This Warranty does not cover Products installed outside the U.S. or
Canada. This Warranty does not apply to gas type conversions on
cooking appliances not completed by a certified gas technician,
licensed plumber or certified BlueStar® servicer.
What Problems Does this Warranty Cover?
Subject to the conditions set forth below, this Warranty covers
defects in materials and workmanship that appear under normal
use and maintenance.
What Problems Does this Warranty Not Cover?
This Warranty does not cover, and specifically excludes:
Damage caused by shipping.
Damage or repairs to the porcelain igniters, calibrations and
normal adjustments after installation and setup, including burner
adjustments.
Normal wear, care, and maintenance of the Product as described
in the installation and operating manual, such as cleaning of parts,
discoloration of the griddle, rust, gasket materials, ceramic
materials, and fuses.
Damage or repairs caused by alterations or modifications, abuse,
misuse, neglect, or improper installation, instruction, handling,
operation, maintenance or storage.
Accidental or intentional damage.
Damage or repairs caused by unauthorized service or repairs
Damage or repairs as a result of natural disasters, fires, floods,
earthquakes, winds, lightning, corrosive atmosphere, loss of
electrical power to the Product for any reason, or other
conditions beyond Prizer-Painter’s control.
Damage or repairs caused by alteration for outdoor use.
Damage or repairs caused by the use of harsh chemicals or
cleaning products improperly applied.
This warranty is in lieu of all other express warranties. ALL IMPLIED
WARRANTIES, INCLUDING BUT NOT LIMITED TO WARRANTIES OF
MERCHANTABILITY AND FITNESS FOR PARTICULAR PURPOSE ARE
LIMITED TO THE DURATION OF THIS WARRANTY. Some states and
provinces do not allow limitations on implied warranties, so the
above limitation may not apply to you.
If you are a California or Quebec resident, please refer to the
section below.
THE OWNER AND PRIZER-PAINTER AGREE THAT THE REMEDIES
SET OUT HEREIN ARE THE OWNER’S EXCLUSIVE REMEDIES FOR
BREACH OF ALL WARRANTIES, EXPRESS OR IMPLIED.
WHETHER ANY CLAIM IS BASED ON NEGLIGENCE OR OTHER TORT,
BREACH OF WARRANTY OR BREACH OF CONTRACT, OR ANY
OTHER TORT THEORY, PRIZER-PAINTER SHALL IN NO EVENT BE
LIABLE FOR INCIDENTAL, CONSEQUENTIAL OR SPECIAL DAMAGES,
INCLUDING BUT NOT LIMITED TO EXTRA UTILITY EXPENSES,
SHIPPING COSTS RELATED TO REPAIR OR REPLACEMENT OF ANY
PRODUCT OR DAMAGES TO PROPERTY, RESULTING FROM BREACH
OF THIS WARRANTY OR ANY IMPLIED WARRANTY. Some states
and provinces do not allow the exclusion or limitation of incidental
or consequential damages, so this provision may not apply to you.
When Does Warranty Coverage Begin?
Warranty coverage begins the date that the Product is originally
installed. (“Installation Date”).
How Long Does the Warranty Coverage Last?
Registration is not required to obtain Warranty coverage, but
registration affects the length and certain other remedies available
under the Warranty. If the Product is not registered, the Warranty
lasts for one (1) year on all parts, including the functional component
parts contained in the cast iron burner top; seven (7) days for
cosmetic component defects as described below; and ninety (90)
days on all floor models whether or not used for demonstration.
If the Product is properly registered with Prizer-Painter within (30)
days of the installation date, the Warranty lasts for ten (10) years
on cast iron burner heads and grates; one (1) year on all other
functional component parts and related service; seven (7) days for
cosmetic flaws as described below; and provides for extended
coverage on certain floor models under the conditions described
below.
.Cosmetic Component Warranty: This Warranty covers all
cosmetic component flaws for seven (7) calendar days from the
date of delivery of the Product to the original purchaser. Cosmetic
components include top grates, ring grates, plate rail, kick panel,
body sides, glass, control panel, door panel, back guards, oven seals,

For further information about this warranty,
contact Prizer-Painter Customer Service at [1-800-449-8691]
light bulbs, and enameled parts. Cosmetic component flaws include
visible chips, scratches, dents. All cosmetic component claims to
Prizer-Painter must be made within the seven (7) day warranty
period or they are void.
.Floor Models Not Used For Demonstration: Floor models are
covered by a one (1) year limited functional parts and related
services warranty, with proof of date of installation. There is no
cosmetic warranty of any kind for floor models.
‧Floor Models Used For Demonstration: Floor models used for
demonstration are covered by a ninety (90) day limited parts
warranty only, with proof of date of installation. There is no service
or cosmetic warranty of any kind for floor models.
The replacement of a part or Product under this Warranty does not
extend the Warranty period. None of these Warranty periods
continues if the Product is removed from the property where it was
originally installed.
How do I Register?
Registration is strongly urged. TO REGISTER, please fill out the
“Performance Checklist and Warranty Form” located in the back of
the Product Use and Care and Limited Warranty Manual and mail or
fax (610-376-2596) the form to: Warranty Department, Prizer-
Painter Stoveworks, 600 Arlington Street, Reading, PA 19611.
What Will Prizer-Painter Do To Correct Problems?
Prizer-Painter will furnish a replacement part, without charge, to
replace any part found to be defective due to workmanship or
materials under normal use and maintenance. Furnishing the
replacement part is Prize-Painter’s only responsibility under this
Warranty to Owners, and a no-charge replacement part is the
Owner’s only remedy, subject to the related conditions described
below.
‧Cosmetic Components. Prizer-Painter will provide for a factory
authorized service agent, free of charge, to repair or replace any
cosmetic component flaw properly reported within seven (7)
calendar days from the date of delivery of the Product to the
original purchaser.
‧Functional Components. In addition to a replacement part,
Prizer-Painter will cover reasonable labor and material costs for
repair or replacement service of a functional component during the
applicable Warranty period. Such repair or replacement service
must be performed by a factory authorized service agent located
within 100 miles roundtrip from the location of the Product. Service
will be provided during normal business hours. The Owner will be
responsible for any and all costs associated with additional mileage,
non-standard service or overtime, and special equipment required
to remove the Product so that service may be performed. The
Owner is responsible for all other labor and labor related costs.
How Can An Owner Obtain Warranty Service?
All Warranty claims must be reported to Prizer-Painter Stove Works,
Inc., 600 Arlington St., Reading, Pennsylvania 19611 prior to the
expiration of the applicable Warranty Periods set forth above. If a
Warranty claim is not submitted as required, such claim will be
invalid and will not be honored.
To obtain Warranty service, where applicable, the Owner must call
the factory (toll free: 1-800-449-8691) to report a warranty claim,
and must, at that time, provide (1) the model number of the
Product, (2) the serial number of the Product, (3) proof of delivery,
(4) a signed installation receipt, (5) a description of the claimed
defect, and (5) proof of purchase of the Product, including the
original retail receipt or invoice to establish the Warranty Period.
Prizer-Painter must be given an opportunity to inspect any Product
subject to a warranty claim. All warranty related service repairs
must be performed by a factory authorized service agent.
This Limited Warranty gives you specific legal rights, and you may
also have other rights that may vary from state to state or province
to province.
California and Quebec Residents
Failure by California and Quebec residents to complete the Product
registration form does not diminish their warranty rights.
Where Can Any Legal Remedies Be Pursued?
Please see the Arbitration Clause and Related Provisions, which
affect your legal rights. Read this Arbitration Clause and its
related provisions carefully. The Arbitration Clause is also
available on Prizer-Painter’s website.

For further information about this warranty,
contact Prizer-Painter Customer Service at [1-800-449-8691]
ARBITRATION CLAUSE. IMPORTANT. PLEASE REVIEW THIS
ARBITRATION CLAUSE. IT AFFECTS YOUR LEGAL RIGHTS.
1. Parties: This arbitration clause affects your rights against Prizer-
Painter Stove Works, Inc. and any of its affiliates or employees or
agents, successors, or assigns, all of whom together are referred to
as “we” or “us” for ease of reference.
2. ARBITRATION REQUIREMENT: EXCEPT AS STATED BELOW, ANY
DISPUTE BETWEEN YOU AND ANY OF US SHALL BE DECIDED BY
NEUTRAL, BINDING ARBITRATION RATHER THAN IN COURT OR BY
JURY TRIAL. “Dispute” will be given the broadest possible meaning
allowable by law. It includes any dispute, claim, or controversy
arising from or relating to your purchase of a Prizer-Painter Product,
any warranty upon the unit, or the unit’s condition. It also includes
determination of the scope or applicability of this Arbitration Clause.
The arbitration requirement applies to claims in contract and tort,
pursuant to statue, or otherwise.
3. CLASS-ARBITRATION WAIVER: ARBITRATION IS HANDLED ON
AN INDIVIDUAL BASIS. IF A DISPUTE IS ARBITRATED, YOU AND WE
EXPRESSLY WAIVE ANY RIGHT TO PARTICIPATE AS A CLASS
REPRESENTATIVE OR CLASS MEMBER ON ANY CLASS CLAIM YOU
MAY HAVE AGAINST US, AND US AGAINST US, OR AS A PRIVATE
ATTORNEY GENERAL OR IN ANY OTHER REPRESENTATIVE
CAPACITY. YOU AND WE ALSO WAIVE ANY RIGHT TO CLASS
ARBITRATION OR ANY CONSOLIDATION OF INDIVIDUAL
ARBITRATIONS.
4. Discovery and Other Rights: Discovery and rights to appeal in
arbitration are generally more limited than in a lawsuit. This applies
to both you and us. Other rights that you or we would have in court
may not be available in arbitration. Please read this Arbitration
Clause and consult the rules of the arbitration organizations listed
below for more information.
5. SMALL CLAIMS COURT OPTION: YOU MAY CHOOSE TO LITIGATE
ANY DISPUTE BETWEEN YOU AND ANY OF US IN SMALL CLAIMS
COURT, RATHER THAN IN ARBITRATION, IF THE DISPUTE MEETS
ALL REQUIREMENTS TO BE HEARD IN SMALL CLAIMS COURT.
6. OPTING OUT OF THIS ARBITRATION CLAUSE: YOU MAY OPT
OUT OF THIS ARBITRATION CLAUSE WITHIN 60 DAYS OF WHEN
WARRANTY COVERAGE BEGINS, IF YOU INFORM PRIZER-PAINTER
IN WRITING, VIA REGISTERED MAIL (SENT TO PRIZER-PAINTER
CONSUMER AFFAIRS , Prizer-Painter Stoveworks, 600 Arlington
Street, Reading, PA 19611. THAT YOU ARE OPTING OUT. There is
no other procedure to opt out. Opting out of this Arbitration Clause
will not affect your other rights under this warranty.
7. Governing Law: The procedures and effect of the arbitration
clause will be governed by the Federal Arbitration Act (9 U.S.C. § 1
et seq.) rather than by state law concerning arbitration. The law
governing your substantive warranty rights and other claims will be
the law of the state in which you purchased your Prizer-Painter
Product. Any court having jurisdiction may enter judgment on the
arbitration award.
8. Rules of the Arbitration: If the amount in controversy is less
than $50,000, the arbitration will be decided by a single arbitrator.
If the amount in controversy is greater than or equal to $50,000, the
arbitration will be decided by a panel of three arbitrators. The
arbitrator(s) will be chosen pursuant to the rules of the
administering arbitration organization. You may choose either of
the following arbitration organizations, and its applicable rules: the
American Arbitration Association, 1633 Broadway, 10th Floor, New
York, NY 10019 (www.adr.org), JAMS, 1920 Main Street, Ste. 300,
Irvine, CA 92614 (www.jamsadr.com), or any other organization
that you may choose subject to our approval. These organizations’
rules can be obtained by contacting the organization or visiting its
website. If the chosen arbitration organization’s rules conflict with
this Arbitration Clause, the provisions of this Arbitration Clause
control. The award of the arbitrator(s) shall be final and binding on
all parties.
9. Location of the Arbitration Hearing: Unless applicable law
provides otherwise, the arbitration hearing will be conducted in the
federal district in which you reside.
10. Costs of the Arbitration: Each party is responsible for its own
attorney, expert and other fees, unless awarded by the arbitrator(s)
under applicable law. Prizer-Painter will pay your share of the fees
charged by the arbitration organization and arbitrator(s) beyond the
first $200. Where permissible by law, you may be required to
reimburse Prizer-Painter for the fees of the arbitration organization
and arbitrator(s) in whole or in part by decision of the arbitrator(s)
at the discretion of the arbitrator(s).
11. Survival and Enforceability of this Arbitration Clause: This
Arbitration Clause shall survive the expiration or termination, or any
transfer, of the warranty on your unit. If any part of this Arbitration
Clause, except waivers of class-action rights, is found to be
unenforceable for any reason, the remainder shall remain
enforceable. If, in a case in which class-action allegations have been,
a waiver of class-action rights is found to be unenforceable with
respect to all or some parts of a dispute, the remainder of this
Arbitration Clause shall be unenforceable as those parts. Instead,
those parts will be severed and proceed in court, with the remaining
parts proceeding in arbitration.
Owner Name:____________________________________________
Address of
Installation:______________________________________________
City/State-Province/Zip-Postal Code:__________________________
Phone #:________________________________________________
Model #:________________Serial #:__________________________
Installation Date: _________________________________________