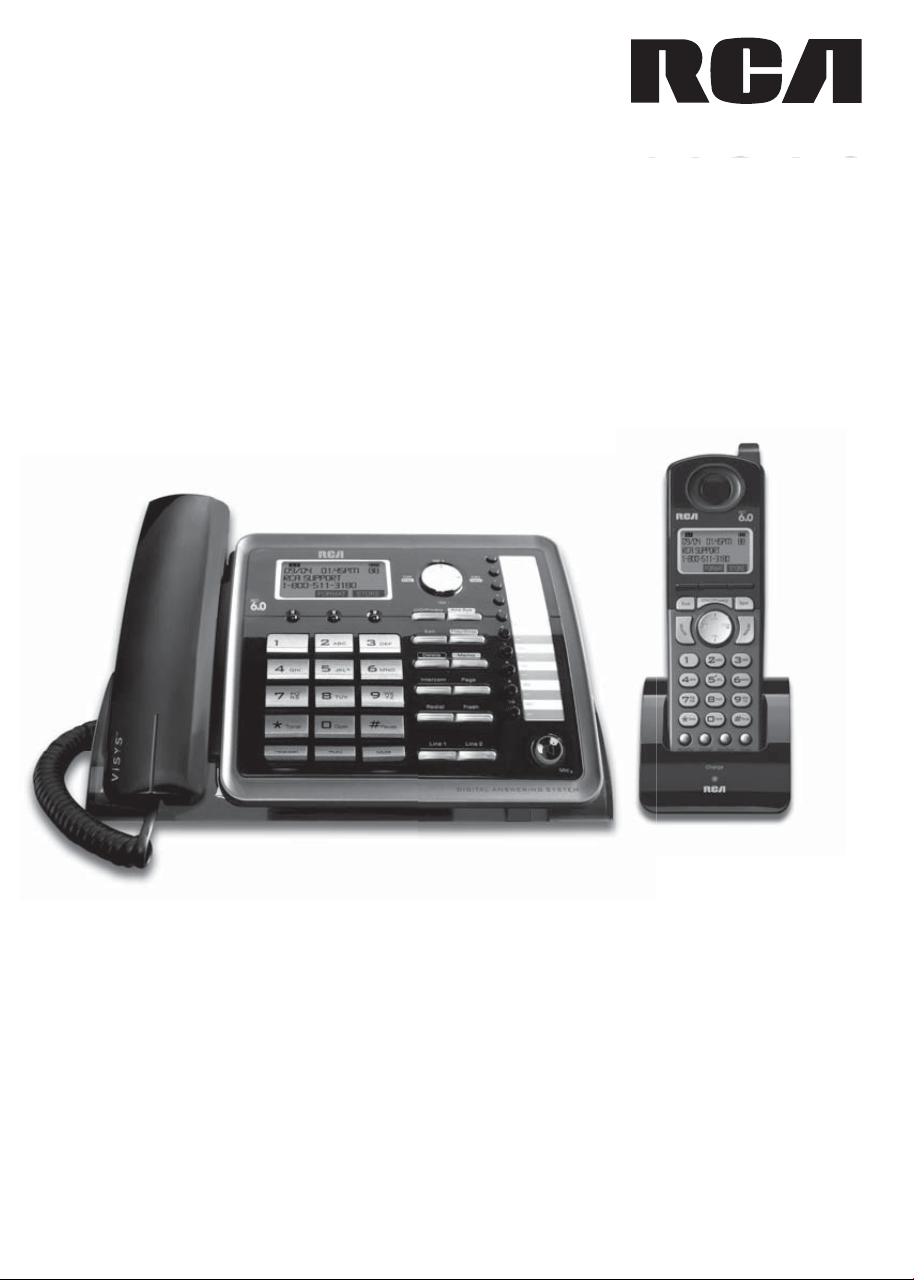
2-Line Intercom
Speakerphone DECT6.0
Corded/Cordless
Handset Telephone
Answering System
User’s Guide
ViSYS
™
ViSY
ViSY
ViSY
S
S
S
9,

2
Equipment Approval Information
<RXUWHOHSKRQHHTXLSPHQWLVDSSURYHGIRUFRQQHFWLRQWRWKH3XEOLF6ZLWFKHG7HOHSKRQH
1HWZRUNDQGLVLQFRPSOLDQFHZLWKSDUWVDQG)&&5XOHVDQG5HJXODWLRQVDQGWKH
7HFKQLFDO5HTXLUHPHQWVIRU7HOHSKRQH7HUPLQDO(TXLSPHQWSXEOLVKHGE\$&7$
1 Notification to the Local Telephone Company
2QWKHERWWRPRIWKLVHTXLSPHQWLVDODEHOLQGLFDWLQJDPRQJRWKHULQIRUPDWLRQWKH
86QXPEHUDQG5LQJHU(TXLYDOHQFH1XPEHU5(1IRUWKHHTXLSPHQW<RXPXVWXSRQ
UHTXHVWSURYLGHWKLVLQIRUPDWLRQWR\RXUWHOHSKRQHFRPSDQ\
7KH5(1LVXVHIXOLQGHWHUPLQLQJWKHQXPEHURIGHYLFHV\RXPD\FRQQHFWWR\RXU
WHOHSKRQHOLQHDQGVWLOOKDYHDOORIWKHVHGHYLFHVULQJZKHQ\RXUWHOHSKRQHQXPEHULV
FDOOHG,QPRVWEXWQRWDOODUHDVWKHVXPRIWKH5(1VRIDOOGHYLFHVFRQQHFWHGWRRQH
OLQHVKRXOGQRWH[FHHG7REHFHUWDLQRIWKHQXPEHURIGHYLFHV\RXPD\FRQQHFWWR
\RXUOLQHDVGHWHUPLQHGE\WKH5(1\RXVKRXOGFRQWDFW\RXUORFDOWHOHSKRQHFRPSDQ\
$SOXJDQGMDFNXVHGWRFRQQHFWWKLVHTXLSPHQWWRWKHSUHPLVHVZLULQJDQGWHOHSKRQH
QHWZRUNPXVWFRPSO\ZLWKWKHDSSOLFDEOH)&&3DUWUXOHVDQGUHTXLUHPHQWVDGRSWHG
E\WKH$&7$$FRPSOLDQWWHOHSKRQHFRUGDQGPRGXODUSOXJLVSURYLGHGZLWKWKLV
SURGXFW,WLVGHVLJQHGWREHFRQQHFWHGWRDFRPSDWLEOHPRGXODUMDFNWKDWLVDOVR
FRPSOLDQW6HHLQVWDOODWLRQLQVWUXFWLRQVIRUGHWDLOV
Notes
f 7KLVHTXLSPHQWPD\QRWEHXVHGRQFRLQVHUYLFHSURYLGHGE\WKHWHOHSKRQHFRPSDQ\
f 3DUW\OLQHVDUHVXEMHFWWRVWDWHWDULIIVDQGWKHUHIRUH\RXPD\QRWEHDEOHWRXVH\RXU
RZQWHOHSKRQHHTXLSPHQWLI\RXDUHRQDSDUW\OLQH&KHFNZLWK\RXUORFDOWHOHSKRQH
FRPSDQ\
f 1RWLFHPXVWEHJLYHQWRWKHWHOHSKRQHFRPSDQ\XSRQSHUPDQHQWGLVFRQQHFWLRQRI
\RXUWHOHSKRQHIURP\RXUOLQH
f ,I\RXUKRPHKDVVSHFLDOO\ZLUHGDODUPHTXLSPHQWFRQQHFWHGWRWKHWHOHSKRQHOLQH
HQVXUHWKHLQVWDOODWLRQRIWKLVSURGXFWGRHVQRWGLVDEOH\RXUDODUPHTXLSPHQW,I\RX
KDYHTXHVWLRQVDERXWZKDWZLOOGLVDEOHDODUPHTXLSPHQWFRQVXOW\RXUWHOHSKRQH
FRPSDQ\RUDTXDOLfiHGLQVWDOOHU
US Number is located on the cabinet bottom
REN number is located on the cabinet bottom
2 Rights of the Telephone Company
6KRXOG\RXUHTXLSPHQWFDXVHWURXEOHRQ\RXUOLQHZKLFKPD\KDUPWKHWHOHSKRQH
QHWZRUNWKHWHOHSKRQHFRPSDQ\VKDOOZKHUHSUDFWLFDEOHQRWLI\\RXWKDWWHPSRUDU\
GLVFRQWLQXDQFHRIVHUYLFHPD\EHUHTXLUHG:KHUHSULRUQRWLFHLVQRWSUDFWLFDEOHDQG
WKHFLUFXPVWDQFHVZDUUDQWVXFKDFWLRQWKHWHOHSKRQHFRPSDQ\PD\WHPSRUDULO\
GLVFRQWLQXHVHUYLFHLPPHGLDWHO\,QFDVHRIVXFKWHPSRUDU\GLVFRQWLQXDQFHWKH
WHOHSKRQHFRPSDQ\PXVWSURPSWO\QRWLI\\RXRIVXFKWHPSRUDU\GLVFRQWLQXDQFH
DIIRUG\RXWKHRSSRUWXQLW\WRFRUUHFWWKHVLWXDWLRQDQGLQIRUP\RXRI\RXUULJKWWR
EULQJDFRPSODLQWWRWKH&RPPLVVLRQSXUVXDQWWRSURFHGXUHVVHWIRUWKLQ6XESDUW(RI
3DUW)&&5XOHVDQG5HJXODWLRQV
Privacy of communications may not be ensured when using this phone.
Warning:
4
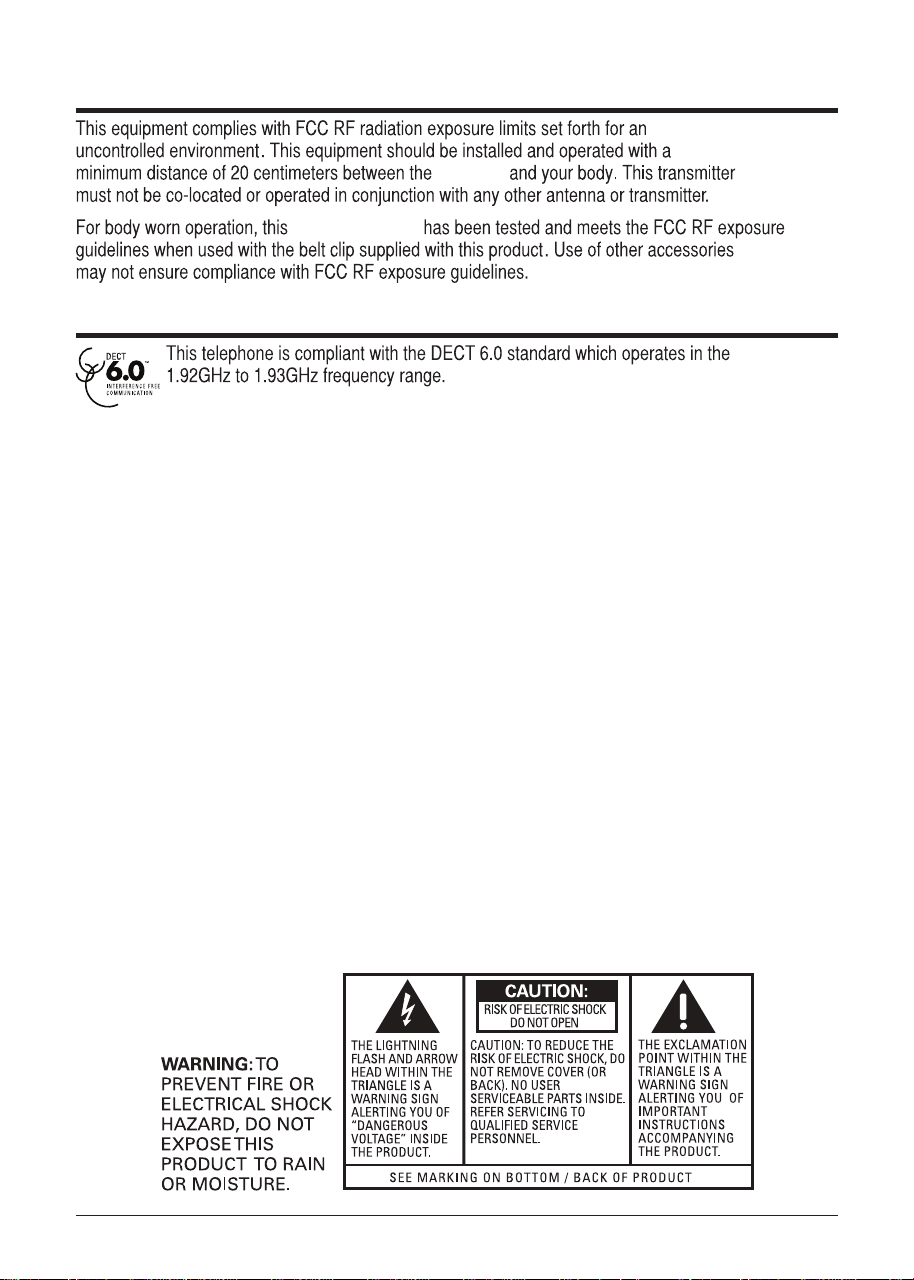
FCC RF Radiation Exposure Statement
Information for DECT Product
base unit
cordless handset

5
Equipment Approval Information 2
Interference Information 3
Licensing 3
Hearing Aid Compatibility 3
FCC RF Radiation Exposure Statement 4
Information for DECT Product 4
Introduction
7
Parts Checklist 7
-Telephone Jack Requirements
Installation 8
-Digital Security System
Important Installation Guidelines 8
Handset Layout 9
Base Layout 10
Installing the Phone 11
-Installing the handset battery 11
-Base Station 12-14
Programming the Phone 15
-Standby Screen 15
-Programming Functions 15
-Phone Setting 15
-Date/Time 16
-Auto Answer 16
-Auto Answer Intercom 16
-Dial Mode 17
-Area Code 17
-Registration 17
-Register 18
-Remove Handset 18
-De-Register 18
-2nd Call Alert 19
-Add Headset 18
-Handset Name 19
-Update Handset List 19
-Display Setting 19
-Contrast 20
-Backlight 20
-Sound Setting 20
-Answering System 21
-VOICE MAIL 21
-On/Off Status 21
-Outgoing Message (OGA) Playback 22
-Set Office Time 22
-Set Work Hours 23
-Set After Hours 23
-Ring Delay 24
-Message Length 24
-Call Screening 24
-Message Alert 24
-Remote Password 25
-Restore Setting 25
Table of Contents
Telephone Operation 25
-Making calls with the cordless handset 25
-Making calls with the corded handset (from the base) 25
-Making calls in the speakerphone mode (from the base) 26
-Making calls in the speakerphone mode (from the handset) 26
-Making calls with the optional headset 26
-Pre-dialing 27
-Answering a Call 27
-Switching between the speakerphone, handset & headset
mode
27
-Mute 28
-Do not disturb 28
-Flash 28
-Inserting a pause in the dialing sequence 28
-Redial 29
-Reviewing the Redial Numbers 29
-Storing a Redial Record in Directory 29
-Transferring a call to another extension 30
-Receiving a transferred call from another extension 30
-Ringer on/off and ringer volume 30
-Speakerphone, handset and headset volume 30
-Hold 31
-Conference calls 31
Intercom Calls 32
-One-touch /memory log 32
-Answering an intercom call 32
-Page 32
-Auto Standby 32
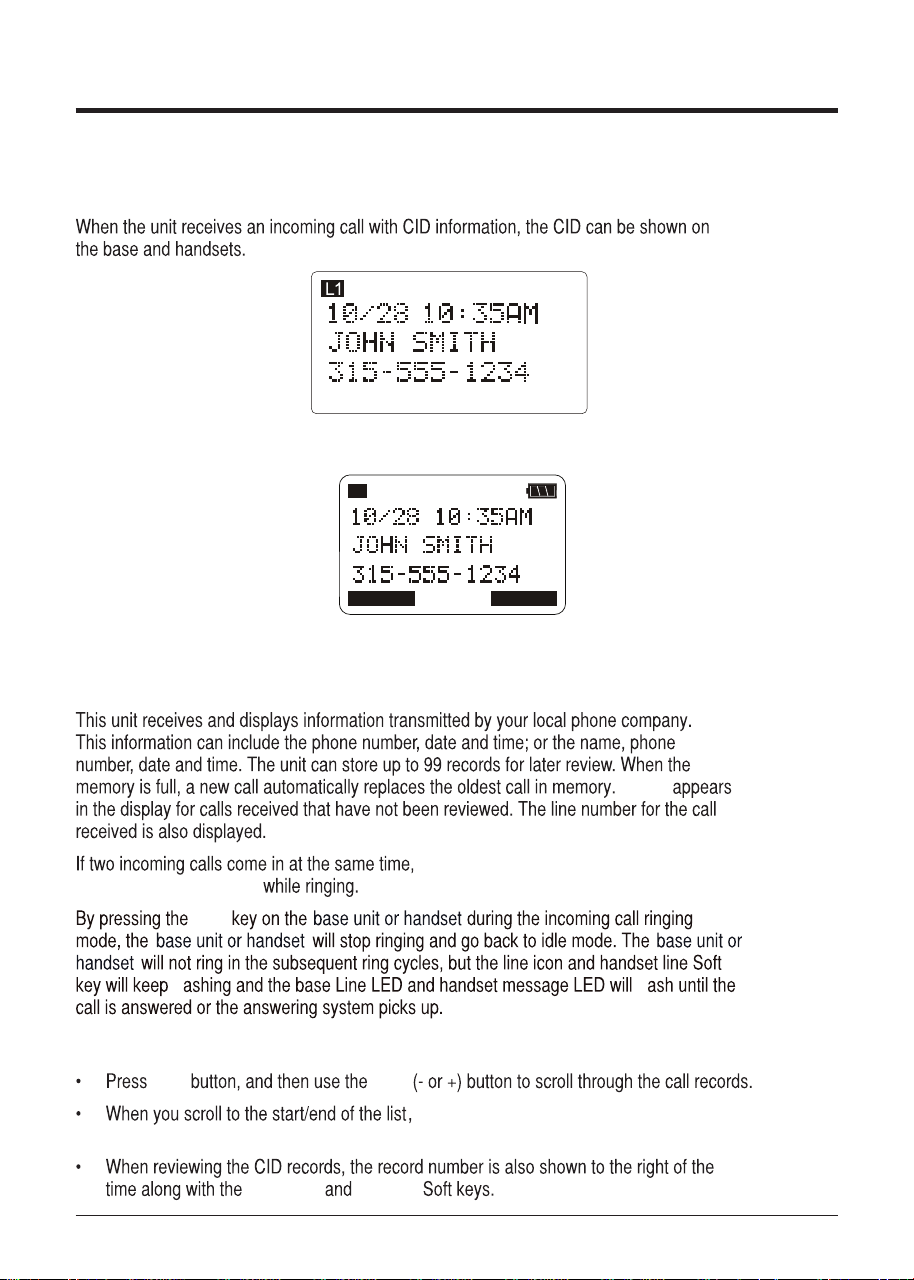
Caller ID (CID) 33
-Receiving and storing CID records 33
-Reviewing CID records 33
-Saving a CID record to the phone directory 34
-Deleting a CID record 34
-Deleting all call records 34
-Dialing back 34
-Call waiting caller ID 35
Directory & One-Tou
ch Memory 36
-Adding directory entries 36
-Storing a record in the one-touch/memory buttons 36
-Reviewing directory records 37
-Editing a name or number stored in the one-touch/
memory log
37
-Reviewing record in the one-touch/memory 37
-Editing a directory record 37
-Copying a directory record 38
-Deleting a directory record 38
-Deleting all directory records 38
-Deleting a one-touch/memory 39
-Dialing a directory record 39
-Dialing a one-touch memory/record 39

6
Table of Contents Cont.
Answering System Operation 40
-Answering system on/off 40
-Recording incoming messages 40
-Monitoring incoming calls 40
-Memo record 41
-Memo recording 41
-Message/memo playback 41
-Erasing messages 42
-Remote access from remote party 42
-Memory full 43
Changing the Battery 43
Battery Safety Precautions 43
Display Messages 44
Handset Sound Signals 45
-Backup battery operation 45
Troubleshooting Guide 46
-Telephone solutions 46
-Caller ID solutions 47
-Battery 47
General Product Care 48
Causes of Poor Reception 48
Warranty Assistance 49
Limited Warranty 50-51
7
Introduction
CAUTION: When using telephone equipment, there are basic safety
instructions that should always be followed. Refer to the IMPORTANT
SAFETY INSTRUCTIONS provided with this product and save them for future
reference.
IMPORTANT: Because cordless phones operate on electricity, you should have
at least one phone in your home that isn’t cordless, in case the power in your
home goes out.
Corded
Handset
Handset battery
pack
Telephone
2- Line cords
AC power
adaptor
(for base)
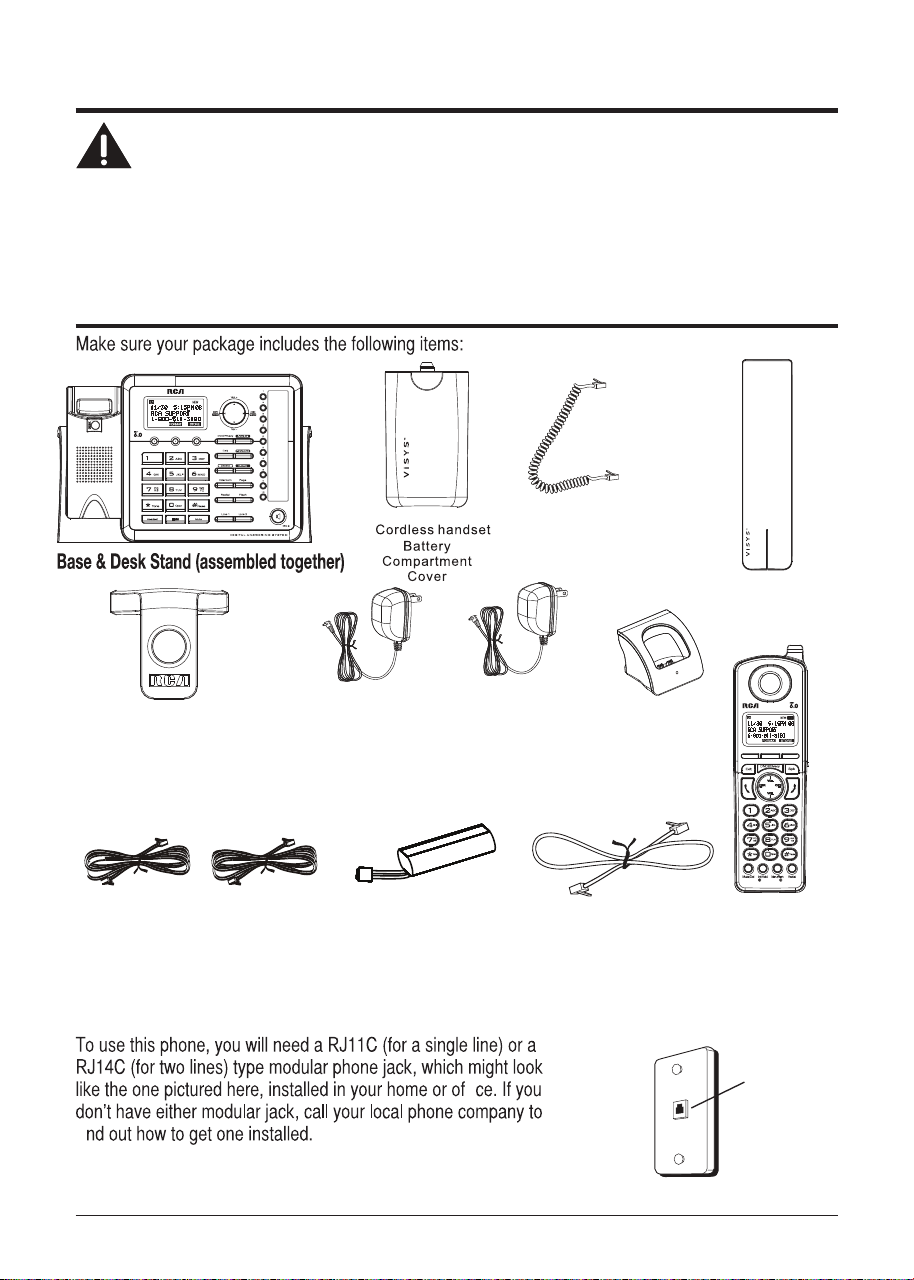
Parts Checklist
Short Line Cord
Belt Clip
Coiled Handset
Cord
Charging
Cradle
Telephone Jack Requirements
fi
fi
Modular
telephone line
jack
Wall plate
Cordless
Handset
AC power
adaptor
(for charging
cradle)
7

8
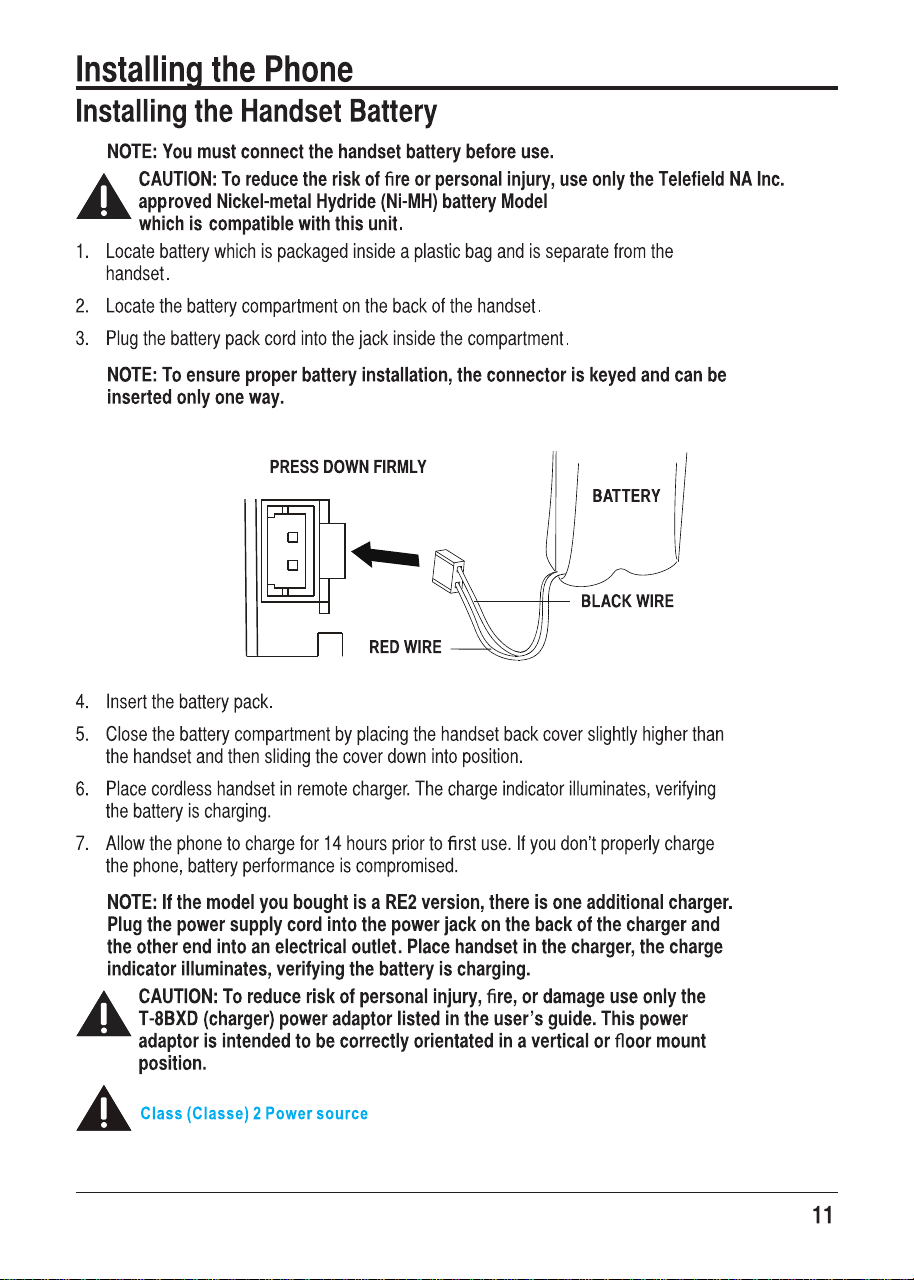
Installation
Digital Security System
Your cordless phone uses a digital security system to protect against false
ringing, unauthorized access, and charges to your phone line.
INSTALLATION NOTE: Some cordless telephones operate at frequencies that
may cause or receive interference with nearby TVs, microwave ovens, and
VCRs. To minimize or prevent such interference, the base of the cordless
telephone should not be placed near or on top of a TV, microwave ovens, or
VCR. If such interference continues, move the cordless telephone farther away
from these appliances.
Certain other communications devices may also use the 1.9 GHz frequency
for communication, and, if not properly set, these devices may interfere with
each other and/or your new telephone. If you are concerned with interference,
please refer to the owner’s manual for these devices on how to properly set
channels to avoid interference. Typical devices that may use the 1.9 GHz
frequency for communication include wireless audio/video senders, wireless
computer networks, multi-handset cordless telephone systems, and some long-
range cordless telephone systems.
Important Installation Guidelines
f $YRLGVRXUFHVRIQRLVHDQGKHDWVXFKDVPRWRUVflXRUHVFHQWOLJKWLQJPLFURZDYH
RYHQVKHDWLQJDSSOLDQFHVDQGGLUHFWVXQOLJKW
f $YRLGDUHDVRIH[FHVVLYHGXVWPRLVWXUHDQGORZWHPSHUDWXUH
f $YRLGRWKHUFRUGOHVVWHOHSKRQHVRUSHUVRQDOFRPSXWHUV
f 1HYHULQVWDOOWHOHSKRQHZLULQJGXULQJDOLJKWQLQJVWRUP
f 1HYHULQVWDOOWHOHSKRQHMDFNVLQZHWORFDWLRQVXQOHVVWKHMDFNLVVSHFLfiFDOO\GHVLJQHGIRU
ZHWORFDWLRQV
f 1HYHUWRXFKQRQLQVXODWHGWHOHSKRQHZLUHVRUWHUPLQDOVXQOHVVWKHWHOHSKRQHOLQHKDV
EHHQGLVFRQQHFWHGDWWKHQHWZRUNLQWHUIDFH
f 8VHFDXWLRQZKHQLQVWDOOLQJRUPRGLI\LQJWHOHSKRQHOLQHV
9
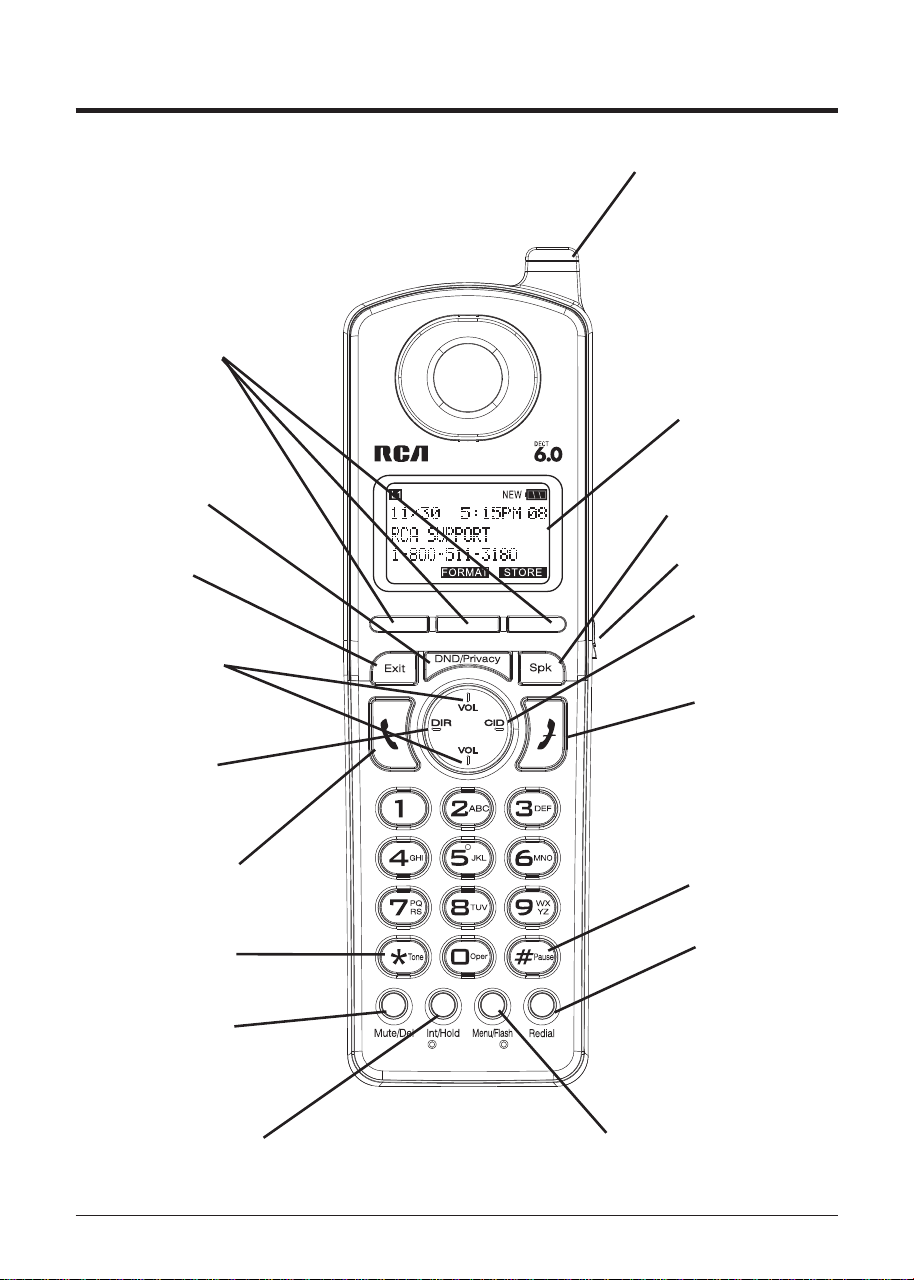
Handset Layout
Display
DND/ Privacy
(button)
Spk
(Speaker button)
DIR
(button)
CID
(button)
3 Soft keys
VOL +/-
(buttons)
Talk
(button)
End
(button)
Redial
(button)
Menu/ Fl ash
(button)
Exit
(button)
Int/ Hold
(button)
Mute/ Del
(button)
Visual Indicator
*
Tone
(button)
# Pause
(button)
Headset Jack
10
Base Layout
DND/ Privacy
(button)
Delete
(button)
Exit
(button)
3 Soft Keys
Play/ Stop
(button)
Memo
(button)
Ans Sys
(button)
DIR/ Prev
(button)
CID / Next
(button)
Vol +/-
(buttons)
Line 1 & 2
(buttons)
Intercom
(button)
Page
(button)
Redial
(button)
Hold
(button)
Headset
(button)
Flash
(button)
M
ute
(button)
Speaker
(button)
*Tone (button)
One Touch/
Memory Log (1- 10)
buttons
# Pause
(button)
Display
Headset
Jack
T-T104 (GP, 2.4V, 550mAh),
12
Base Station
7KHSKRQHPD\EHFRQQHFWHGWRWZROLQH5-&ZDOOMDFNVWRDFFRPPRGDWHDOOWZROLQHV
&KRRVHDQDUHDQHDUDQHOHFWULFDORXWOHWDQGDWHOHSKRQHZDOOMDFN5-&DQGSODFH
\RXUFRUGOHVVWHOHSKRQHRQDOHYHOVXUIDFHVXFKDVDGHVNWRSRUWDEOHWRSRU\RXPD\
PRXQWLWRQWKHZDOO
,QVWDOO$$$VL]HDONDOLQHEDWWHULHVQRWLQFOXGHGIRUEDFNXSSRZHULQWKHHYHQWRID
SRZHUIDLOXUH
f ,QVHUWDflDWKHDGVFUHZGULYHURU VLPLODUREMHFWLQWRWKHEDWWHU\GRRUODWFKDQGJHQWO\
SU\XSZDUGWRUHOHDVHWKHEDWWHU\GRRUIURPWKHEDVH
f ,QVHUWWKHEDWWHULHVLQVLGHWKHEDWWHU\FRPSDUWPHQWDVVKRZQRQWKHGLDJUDP
f 6QDSWKHEDWWHU\FRPSDUWPHQWGRRUEDFNLQWRSODFH
NOTE: If the low battery icon appears in the display, you need to replace the
batteries. It is important that you replace them as soon as possible to maintain
unit operation when electrical power is off. As a precaution, you may want to
write down any stored information you do not want erased.
IMPORTANT: If you are not going to use the telephone for more than 30 days,
remove the batteries because they can leak and damage the unit.
3OXJWKHSRZHUVXSSO\FRUGLQWRWKHSRZHUMDFNRQWKHEDFNRIWKHEDVHDQGWKHRWKHU
HQGLQWRDQHOHFWULFDORXWOHW
CAUTION: To reduce risk of personal injury, fire, or damage use only the
T-2757 (base) power adaptor listed in the user’s guide. This power adaptor
is intended to be correctly orientated in a vertical or floor mount position.
&RQQHFWWKHWHOHSKRQHOLQHFRUGV
,I\RXKDYHVLQJOHOLQHZDOOMDFNVLQVWDOOHGLQ\RXUKRPHRURIfiFH\RXFDQXVH
DGDSWRUVFRXSOHUVQRWLQFOXGHGWRFRPELQHWKHVLQJOHWHOHSKRQHOLQHVLQWRGXDO
OLQHV7KHDGDSWRUFRXSOHUPD\ORRNVLPLODUWRWKHRQHSLFWXUHGKHUHDQGFDQEH
SXUFKDVHGIURP\RXUORFDOWHOHSKRQHSURGXFWVUHWDLOHU
Line 1
Line 2
13
Line 1 + 2
Line 1
Line 2
2U\RXFDQXVHWKHVLQJOHWHOHSKRQHOLQHVSOXJLQWRWKHMDFNVRQWKHEDFNRIWKH
WHOHSKRQH
,I\RXKDYH/LQHDQG/LQHZLUHGLQWRRQHZDOOMDFNLQ\RXUKRPHRURIfiFH\RXFDQ
XVHRQHRIWKHVXSSOLHGWHOHSKRQHOLQHFRUGVWRFRQQHFWIURPWKHZDOOMDFNWRWKH
/LQHMDFNRQWKHEDFNRIWKHSKRQHDVVKRZQEHORZ
Line 1
Line 2
,I\RXZDQWWRPRXQWWKHWHOHSKRQHRQWKHZDOO\RXFDQSOXJWKHOLQHVVXFKDVWKH
EHORZGUDZLQJ
25
14
25
&RQQHFWWKHKDQGVHWFRUG
&RQQHFWRQHHQGRIWKHFRLOHGKDQGVHWFRUGWRWKHMDFNRQWKHVLGHRIWKHEDVHDQGWKH
RWKHUHQGLQWRWKHMDFNLQWKHKDQGVHWDQGSODFHWKHKDQGVHWLQWKHFUDGOH
Line 1
Line 2
Line 1 & 2
15
Programming the Phone
Standby Screen
NOTE: The Soft keys will change according to the status of the unit.
NOTE: The base LCD has a dedicated “SET CLOCK” icon flashing when the clock
is not set. Please go to menu “Phone Setting- Date /Time” to set the clock.
Programming Functions
NOTE: During programming, you may press the BACK Soft key (left) at any time
to exit the sub-menu and return to the main menu, or press exit key to exit
programming and return to standby screen.
NOTE: If no key is pressed for 30 seconds, the handset or base will automatically
exit programming and return to standby screen.
Phone Setting
OFF
menu MENU
VOL
SELECT
Add Headset (base only)
fi
Answering SYS., Voice Mail and Restore Setting.

16
Date/Time
From the Phone Setting Menu:
VOL
2. Press SELECT Soft key.
3. LCD will display last-set time (or, if the device is new or has been reset to default, the LCD will display
12:00AM 01/01/11)
4. Use the dial-pad to enter digits for the current time and date.
Note: Use DIR/CID button to move the cursor and the AM/PM softkey to set the time AM or PM.
5. Press SAVE softkey to confirm the setting, a confirmation tone will indicate that your selection has been
saved.
Date/Time
NOTE: If you subscribe to Caller ID service, the current Date/Time is set
automatically when you receive your first CID record and will override manually
set Date/Time. However the Year must still be set manually. The Year
information is not in the CID record.
NOTE: The Date/Time setting item only exists in base menu, handset Date/Time
should update automatically after it is set in the base.
Auto Answer (only applicable for cordless handset)
Talk/Spk/L1/L2
From the Phone Setting Menu:
VOL Auto Answer
SELECT VOL
SELECT
Auto Answer Intercom
(applicable for base and cordless handset)
From the Phone Setting Menu:
VOL Auto Answer Int.
SELECT VOL
Off
SELECT
17
Dial Mode (only applicable for base)
From the Phone Setting Menu:
vol Dial Mode
SELECT
3. Use the VOL (- or +) button to toggle between L1 and L2 and press Select soft key
to confirm, then use the VOL (- or +) button to scroll to Tone or Pulse.
SELECT
NOTE: The Dial mode only can be set in the base menu.
Area Code (only applicable for base)
From the Phone setting Menu:
vol Area code
SELECT
SAVE .
Registration (only applicable to handset)
NOTE: If a handset has not been registered to the base, then the display
will show PRESS REG TO INITIATE REGISTRATION once the handset has been
activated. Press the REG Soft key to start the registration.
From the Phone Setting Menu:
VOL Registration
SELECT
NOTE: If an optional cordless headset has been registered to the base ,
up to 9 cordless handset can be registered to one base .
Register
From the Phone Setting Menu:
VOL Register
SELECT Register HS Registering....
page about 3 seconds
Registering
Registration complete
fi
REGISTRATION FAILED!
Remove Handset
WARNING: It is not recommended that a handset be deregistered unless
absolutely necessary because once a handset is deregistered, that
handset’s telephone features cannot be used until the handset is
re-registered.
From the Phone Setting Menu:
VOL Remove handset
SELECT Remove handset?
YES fi Press REG to
initiate registration
NOTE: You can press the REG Soft key to enter the registation mode again.
De-Register (only applicable for base)
From the Phone Setting Menu:
vol Deregistration
SELECT
vol
SELECT Remove handset?
YES fi base emit a confirm tone
Press REG to initiate registration
18
Add Headset (only applicable for base)
Note: This wireless headset option is only compatible with the RCA 25065RE1.
From the Phone Setting Menu:
Note: Only one cordless Headset may pair with a base unit.
Talk On/Off
19
2nd Call Alert
From the Phone Setting Menu:
VOL 2ND Call Alert
SELECT VOL
On
SELECT
Handset Name (only applicable for handset)
From the Phone Setting Menu:
VOL Handset name
SELECT Handset
NOTE: If you make a mistake, press DIR/CID button to move the cursor forward
or backward, and then use the mute/del button to backspace and delete one
character at a time.
SAVE
Update Handset List (only applicable for base)
From the Phone Setting Menu:
vol Update HS List
SELECT
Display Setting
OFF
menu MENU
VOL Display Setting
SELECT
20
Language
From the Display Setting Menu:
VOL Language
SELECT
VOL English , Francais Espa ol
ñ
English
SELECT
Contrast
From the Display Setting Menu:
VOL Contrast
SELECT
VOL
VOL
SELECT
Backlight (only applicable for base)
From the Display Setting Menu:
vol Backlight
SELECT vol Always On Automatic
SELECT
Sound Setting
OFF
menu MENU
VOL Sound Setting
SELECT fi
Ring Tone
From the Sound Setting Menu:
VOL Ring Tone
SELECT
3. Use the VOL (- or +) button to toggle between L1 and L2 and use the VOL (- or +) button to
scroll to your selection.The default setting is Melody 1 for Line1 and Melody 2 for Line 2.
SELECT
21
Ring Volume
From the Sound Settings Menu:
VOL Ring Volume
SELECT
3. Use the VOL (- or +) button to toggle between L1 and L2 and use the VOL (- or +) button to
scroll to your selection.The default setting is VOL 3.
SELECT
This feature is used to conveniently access the voicemail feature offered by your telephone service provider.
NOTE: You must subscribe to telephone service provider-offered voicemail on at least one phone
line in order for this feature to operate.
1. Make sure your phone is in idle mode. (not in Talk mode)
2. Press the MENU Soft key (left) to go to the main menu.
3. Press VOL (- or +) button to scroll to Voice Mail.
4. Press SELECT Soft key (right) to confirm and you may program the following items:
Call VM
Settings
Call VM
From the Voice Mail Menu:
1. Press VOL (- or +) button to scroll to Call VM.
2. Press SELECT Soft key
3. Use the VOL (- or +) button to toggle between Line 1 and Line 2 and press SELECT soft key to select.
4. The phone will dial your voicemail access number. You may proceed to access your voicemail per
your service provider’s instructions.
Settings
From the Voice Mail Menu:
1. Press VOL (- or +) button to scroll to Settings.
2. Press SELECT Soft key
3. Use the VOL (- or +) button to toggle between Line 1 and Line 2 and press SELECT soft key to select.
4. Use the dial pad to enter the call-in access number for your voicemail. Press Delete button to
backspace and delete numbers, if necessary.
5. Press SAVE Soft key.
6. A confirmation tone will indicate that your selection has been saved.
Key Tone
From the Sound Settings Menu:
Voice Mail
From the Main Menu:
VOL Key Tone
SELECT VOL On Off
SELECT
Answering System (only applicable for base)
OFF
22
Outgoing Message (OGA) Playback
From the Answering Sys Menu:
VOL OGA Playback
SELECT
Use VOL(- or+) to select Line1 or Line2, press select softkey and then use Vol(- or +)
button to select the direct OGA record.
Use VOL(- or+) to select Line1 or Line2, press select softkey and then use Vol(- or +)
button to select the direct OGA.
Use VOL(- or+) to select Line1 or Line2, press select softkey and then use Vol(- or +) button to
select the direct OGA record.
an error tone will be emit.
SELECT
EMPTY
Outgoing Message (OGA) Record
From the Answering Sys Menu:
VOL
1.
2.
3.
1.
2.
3.
4.
4.
5.
6.
OGA Record
SELECT
SELECT
FINISH
Set Outgoing Message (OGA)
From the Answering Sys Menu:
VOL Set OGA
SELECT
SELECT
EMPTY
MENU
VOL Answering Sys.
fi
SELECT
On/Off Status
From the Answering Sys Menu:
VOL On/Off Status
SELECT
VOL Line1 or Line2, press select softkey and then use
SELECT
fi
Vol(- or +) button to select On or Off.
23
Set Work Hours
From the Set Office Time Menu:
VOL Set Work Hours
SELECT
AM/PM AM PM
SAVE
5. Use the Yes or No Soft key for Announce Only.
5. Use the Yes or No Soft key for Announce Only.
NOTE: If you select Yes for Announce Only, the “Work Hours” OGA and “After Hours” OGA
The unit will hang up the call after announcing the greeting when
answering the call is in the answering mode.
Set After Hours
From the Set Office Time Menu:
VOL Set After Hours
SELECT
AM/PM AM PM
SAVE
NOTE: If you select Yes for Announce Only, the “Work Hours” OGA and “After Hours” OGA
. The unit will hang up the call after announcing the greeting when
answering the call is in the answering mode.
NOTE: If you select the option “TIMED”, the “Work Hours” OGA and “After Hours” OGA MUST
berecorded first. When there is an incoming call, the “Work Hours” OGA or “After Hours”
OGA will be played to the caller according to the office time you set.
Set Office Time
From the Answering Sys Menu:
VOL Set Office Time
SELECT
24
Ring Delay
From the Answering Sys Menu:
VOL Ring Delay
SELECT
SELECT
NOTE: When the Toll saver is selected, the unit will answer the incoming call
after 3 rings if there is new message. Otherwise, the unit will answer the
incoming call after 5 rings.
Message Length
From the Answering Sys Menu:
VOL Message Length
SELECT
SELECT
Call Screening
From the Answering Sys Menu:
VOL Call Screening
SELECT VOL On Off
SELECT
Message Alert
From the Answering Sys Menu:
VOL Message Alert
SELECT VOL On Off Off
SELECT
Use VOL(- or+) to select Line1 or Line2, press select softkey and then use Vol(- or +) button
to select from 2 rings to 6 rings or toll saver.
Use VOL(- or+) to select Line1 or Line2, press select softkey and then use VOL(- or +) button to
select from 1 to 3 minutes.
25
Remote Password
From the Answering Sys Menu:
VOL Remote Password
SELECT
000.
SAVE
Restore Setting
From the Standby or Idle Mode (not in Talk mode) :
menu MENU
VOL Restore Setting
SELECT LOAD TO DEFAULT?
YES
then reset the unit automatically after the base shows " please
NOTE: Use the Clear soft key or Delete button can delete the exist numbers and then
enter the new password.
wait..." in the display for about 3 seconds.
NO
Telephone Operation
Making Calls with the Cordless Handset
Talk
line 1 line 2
end
Making Calls with the Corded Handset (from the base)
line 1 line 2
fi
fi
fi
fi
fi
3. Use the Clear Soft key to delete the current Remode password,then use the touch-tone pad to
enter your desired 3-digit security code.
26
Making Calls in the Speakerphone Mode
(from the base)
speaker
fi
line 1 line 2
One-Touch/Memory Log
speaker fi
NOTE: After pick the line, the call timer starts to run until all the calls are hung
up. The timer serves for both 2 lines.
Making Call in the Speakerphone Mode (from the handset)
Spk fi
Press the Line1 or Line2 Softkey to select a specific line. The Handset will activate the ear
piece. Then press the SPK button to switch to the speakerphone mode.
end fi
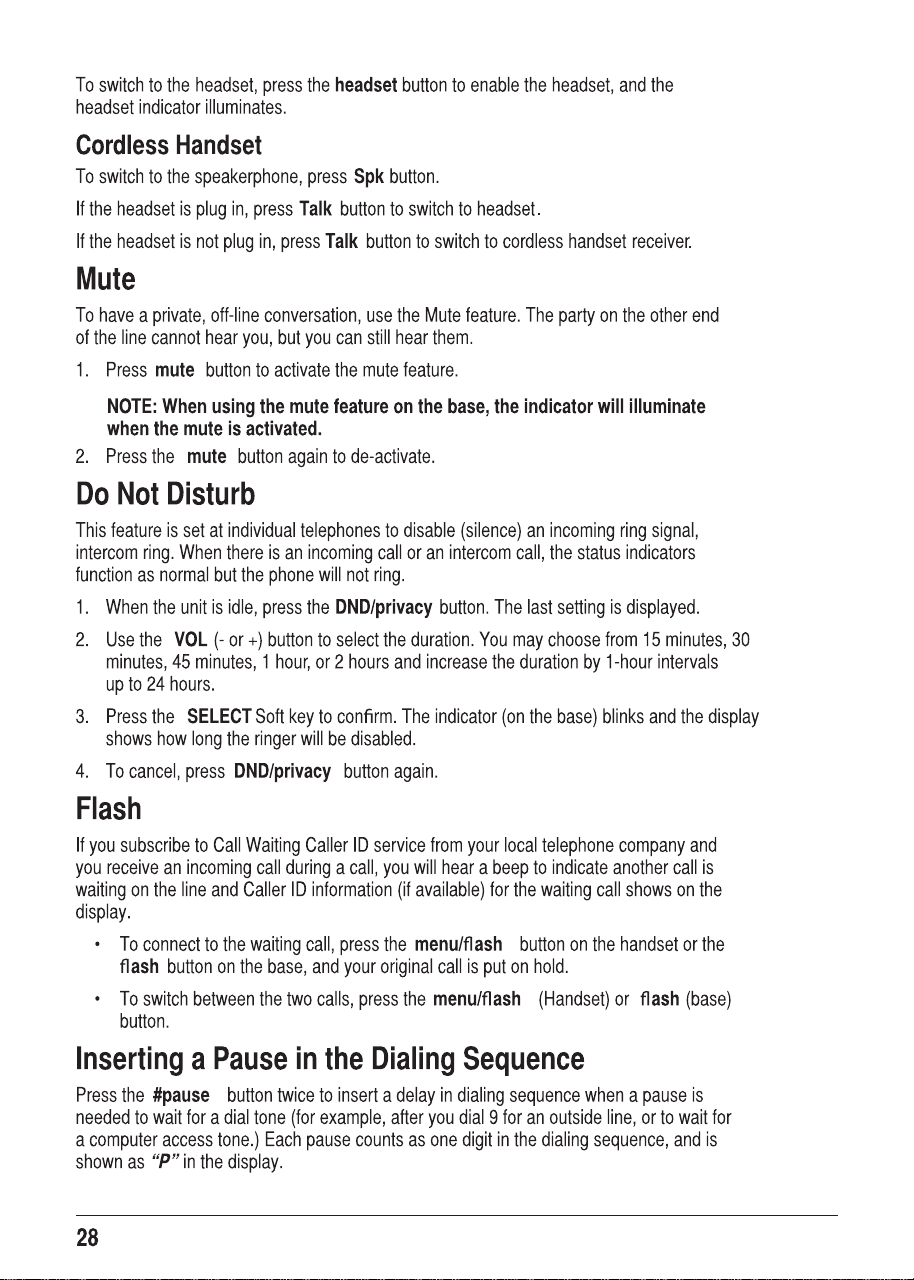
Making Calls with a Wired Headset
headset
fi
Talk
headset end
fi
Note: Although this device will accept a variety of standard 2.5mm telephone headsets,
RCA does not guarantee compatibility with 3rd party devices. Performance may vary
depending on the quality of the headset.
.
Making Calls with the RCA Wireless Headset
Please refer to the Instruction Booklet for your RCA Wireless Headset for instructions
on setup and use.
2.
3.

27
Pre-Dialing
1. With the phone idle, manually enter the telephone number. The maximum pre-dialing
number length is 32 digits, if the number is over 32 digits, it will emit an error tone. The
telephone number shows in the display.
2. Press the DIAL Soft key (on base only), Spk button, Talk button (handset only), or line
1 or line 2 button to take a line, or pick up the corded handset (on the base only) and
then the telephone number will be dialed out.
Answering a Call
For cordless handset:
1. Press the Talk button to answer the call in receiver mode,
-OR-
2. Press the Spk button to answer the call in speakerphone mode,
-OR-
3. Press the corresponding LINE Soft key to answer the call in receiver mode.
4. When finished, press end button.
For the base:
1. Pick up the corded handset,
-OR-
2. Press the speaker button to answer the call in speakerphone mode,
-OR-
3. Press the corresponding line button to answer the call in speakerphone mode,
-OR-
4. Press the headset button on base to answer the call in headset mode.
6. When finished, hang up the corded handset or press Spk button (in speakerphone) or
headset button (in headset mode) or press the
Talk On/Off
button on the cordless headset
NOTE: If you have set the Auto Answer as On in the cordless handset, you can
answer the call directly by picking up this handset from the charger, without
pressing any buttons.
NOTE: Adjust the volume by pressing the vol (- or +) button during a call.
Switching Between the Speakerphone, Handset and Headset
Mode
Base
To switch to the speakerphone, press speaker button. The speakerphone indicator
illuminates. Place the corded handset back into the cradle.
To switch to the corded handset, pick up the handset. The speakerphone or corded headset
indicator will turn off .
5. Press the Talk On/Off button on the cordless headset (only applicable for RCA 25065RE1).
(only applicable
for RCA 25065RE1) to end the call.

29
Redial
3UHVVWKHTalk EXWWRQ RQWKHFRUGOHVVKDQGVHWRUSUHVVWKH SpkEXWWRQVSHDNHUSKRQH
PRGHRUSUHVVWKH headset EXWWRQKHDGVHWPRGHRUSLFNXSWKHFRUGHGKDQGVHW
IURPWKHEDVH DQGWKHfiUVWDYDLODEOHOLQHZLOOJRRIIKRRN,IERWKOLQHVDUHDYDLODEOH/LQH
ZLOOEHXVHG
25
3UHVVD line EXWWRQWRVHOHFWDOLQH
3UHVVWKHredialEXWWRQ7KHUHGLDOQXPEHUOLVWODVWSUHYLRXVO\GLDOHGQXPEHUVLV
VKRZQ
8VHWKHVOLRUEXWWRQWRVHOHFWWKHQXPEHU3UHVVWKHDIAL 6RIWNH\WRGLDORXWWKH
QXPEHU
NOTE: If the number you dialed is longer than 32 digitals, It will not be saved in the redial
list and can't be redialed.
Reviewing the Redial Numbers
<RXUSKRQHUHFRUGVXSWRWKUHHSUHYLRXVO\GLDOHGSKRQHQXPEHUV
:KHQWKHSKRQHLVLGOHSUHVVWKH redial EXWWRQ
8VHWKHVOLRUEXWWRQWRYLHZWKHODVWWKUHHSUHYLRXVO\GLDOHGQXPEHUV
:KLOHWKHSUHIHUUHGQXPEHULVGLVSOD\HGSUHVVWKHSpkTalk Dline EXWWRQRUSLFNXS
WKHFRUGHGKDQGVHW WRGLDOWKHSKRQHQXPEHU
NOTE: If you do not select a line button, the line is automatically seized and the
number is dialed accordingly.
Storing a Redial Record in Directory
0DNHVXUHWKHSKRQHLVOFFQRWLQ7DONPRGH
3UHVVWKH redial EXWWRQWKHQXVHWKH VOLRUEXWWRQWRVFUROOWRWKHGHVLUHGUHGLDO
QXPEHU
3UHVVWKHSAVE6RIWNH\
7KHVFUHHQGLVSOD\V Enter Name,QSXWDQDPHE\SUHVVLQJWKHNH\SDG
NOTE: More than one letter is stored in each of the number keys so it requires
more than one press for some letters. For example, for the letter “B” press the
number 2 key twice. To add a space press the 1 key.
NOTE: A name must be input otherwise the record cannot be stored.
3UHVVWKHSAVE6RIWNH\7KHGHVLUHGUHGLDOQXPEHUVKRZVLQWKHGLVSOD\
<RXFDQHGLWWKHWHOHSKRQHQXPEHU E\XVLQJWKHdelete EXWWRQDQGQXPEHUNH\V
3UHVV SAVE6RIWNH\WRHQWHUWKH9,37RQH0HORG\VHOHFWLRQ
8VH VOLRUEXWWRQWRVFUROOWRWKHGHVLUHGULQJWRQHPHORG\DQGSUHVVSELECT6RIW
NH\WRFRPSOHWH
NOTE: If an incoming call number matches this record the VIP Tone Melody will
ring.

30
Transferring a Call to Another Extension
1. Press XFER Soft key when the phone is in Talk mode. The current call is put on hold.
2. Use VOL (- or +) to select the desired handset or base you want to transfer to, and then
press the SELECT Soft key.
3. The unit will intercom
ring
the selected handset or base.
Wait until the selected handset or base answers the intercom call and have a
conversation and then hang up to finish the transfer or press Conference to have a 3
way conference call.
4. If the selected unit rejects the intercom call, or the call is not answered within 30 seconds, the
call is transferred back to the original unit and the display will show as below a) or b)
Receiving a Transferred Call from Another Extension
If the unit receives a transfer call paging, Intercom call from base/Handset X shows in the
display. Press the Talk button (handset only) or speaker button (both base and handset) or
leave the corded handset on the base unit to answer the call.
If you press the REJECT Soft key or the call is not answered within 30 seconds , the
intercom paging will be stopped and the call is transferred back to the original unit.
Ringer On/Off and Ringer Volume
1. Make sure the phone is in idle mode.
2. Press the VOL (- or +) button to activate the ringer volume setting. Press Line1 or Line2 button to
select the direct line which you want to set, then use the VOL (- or +) button to scroll to your selection.
The default setting is VOL 3.
3. Press the SELECT Soft key to save your selection.
NOTE: If you choose the ringer OFF, the screen displays L1/L2 RINGER OFF.
Speakerphone, Handset, and Corded Headset
V
olume
While the phone is in use, during the desired mode, press the VOL (+ or -) buttons until
you reach a comfortable listening level. The phone stores the setting after the last button
pressed.

31
Hold
,Q7DONPRGHSUHVVWKH hold EXWWRQWRKROGWKHOLQH Line X ON HOLD VKRZVLQWKH/&'
GLVSOD\DQGWKHOLQHLFRQZLOOflDVK2QWKHEDVHWKH line EXWWRQLQGLFDWRUZLOOflDVKDOVR
:KHQWKHOLQHLVRQKROGWKHKROGDOHUWWRQHZLOOEHHPLWWHG WRERWKWKHSHUVRQRQKROGDQG
WRWKHXVHUWKDWLQLWLDWHGWKHKROG
3UHVVWKHFRUUHVSRQGLQJ LINE 6RIWNH\RQKDQGVHWRUWKHline EXWWRQRQEDVHWRUHOHDVH
WKHKROGDQGSLFNXSWKHFDOODJDLQ
Conference Calls
7KLVV\VWHPFDQVXSSRUWZD\DQGZD\FRQIHUHQFHFDOOV
Join a call in progress:
:KLOHDFDOOLVLQSURJUHVVDQRWKHUXVHUFDQMRLQWKDWFDOOE\SUHVVLQJWKHFRUUHVSRQGLQJ
line EXWWRQRQWKHEDVHXQLWRU6RIWNH\LQWKHKDQGVHW%RWKSDUWLHVRQWKHRULJLQDOFDOO
ZLOOKHDUDWRQHWRDOHUWWKHPVRPHRQHHOVHKDVMRLQHGWKHFDOO
NOTE: If the privacy feature is On for the original call, the call cannot be joined
by another user.
3-way conference call by an intercom call:
:KLOHRQDFDOOSUHVVWKH intercom EXWWRQZDLWIRUWLPHUWRFOHDUIURPWKHVFUHHQ
SUHVVWKH intercom EXWWRQDJDLQDQGWKHQVHOHFWWKHGHVLUHGKDQGVHWRUEDVHWR
LQWHUFRP
7KHVHOHFWHGKDQGVHWRUEDVHZLOOHPLWDSDJHWRQH7KHXVHUFDQSUHVVWKH Talk EXWWRQ
RQWKHKDQGVHWRUWKH speakerEXWWRQRQWKHEDVHWRDQVZHUWKHLQWHUFRPFDOOSDJH
7KHRULJLQDWLQJFDOOHUFDQWKHQSUHVVWKH CONF 6RIWNH\VKRZQRQWKHGLVSOD\WR
HVWDEOLVKDZD\FRQIHUHQFHEHWZHHQWKHH[WHUQDOFDOOHUDQGWKHLQWHUFRPFDOO
3-way conference call with two lines:
'XULQJDFDOORQ/LQHSUHVVWKHhold EXWWRQWRSXWWKHFDOORQKROG
3UHVVWKHline 2 EXWWRQRU6RIWNH\RQWKHKDQGVHWWRJHWDGLDOWRQH'LDOWKHQXPEHU
DQGWKHQWDONWRWKHRWKHUSHUVRQ
7KHRULJLQDWLQJFDOOHUFDQWKHQSUHVVWKH CONF 6RIWNH\VKRZQRQWKHGLVSOD\WR
HVWDEOLVKDZD\FRQIHUHQFHEHWZHHQWKHWZROLQHV
4-way conference call (Line 1 + Line 2 + 2 extension):
2QFHWKHEDVHXQLWRUKDQGVHWKDVERWK/LQHDQGRQKROGSUHVVWKH intercom
EXWWRQDQGWKHQVHOHFWWKHGHVLUHGKDQGVHWRUEDVHWRLQWHUFRP
7KHVHOHFWHGKDQGVHWRUEDVHZLOOHPLWDSDJHWRQH7KHXVHUFDQSUHVVWKHTalk EXWWRQ
RQWKHKDQGVHWRUWKH speaker EXWWRQRQWKHEDVHWRDQVZHUWKHLQWHUFRPFDOOSDJH
7KHRULJLQDWLQJFDOOHUFDQWKHQSUHVVWKH CONF 6RIWNH\VKRZQRQWKHGLVSOD\WRLQLWLDWH
DFRQIHUHQFH6LQFH/LQHDQGDUHERWKRQKROGWKHXVHUZLOOEHSURPSWHGWRVHOHFW
/LQH/LQHRU%RWKWRFRQIHUHQFHZLWK7KHXVHUFDQWKHQXVHWKH6RIWNH\VWRVHOHFW
WKHGHVLUHGRSWLRQ,IWKH BOTH 6RIWNH\LVVHOHFWHGDZD\FRQIHUHQFHLVHVWDEOLVKHG
EHWZHHQWKHRULJLQDWLQJFDOOHUERWKOLQHVDQGWKHLQWHUFRPFDOO
32
Intercom Calls
One-Touch/Memory Log
One-Touch/Memory Log
One-Touch/Memory Log
intercom
VOL
SELECT fi
NOTE: To abort intercom call, press the STOP Soft key.
NOTE: If the receiving station does not answer within 30 seconds, the
intercom call is cancelled. You will hear an error tone and the screen displays
Unavailable .
Answering an Intercom Call
REJECT
Page
page
fl Paging from Base
page STOP
exit
Auto Standby
33
Caller ID (CID)
IMPORTANT: In order to use this unit’s Caller ID features, you must subscribe
to either the standard Name/Number Caller ID Service or Call Waiting Caller ID
Service. To know who is calling while you are on the phone, you must subscribe
to Call Waiting Caller ID Service.
Base Display
Handset Display
LINE1
LINE2
L1
Receiving and Storing CID Records
NEW
exit
the line1 and line2 phone numbers shows
Reviewing CID Records
CID VOL
FORMAT STORE
fi
on the display separately
the unit emit a warning tone and then scroll to
the end or the start of the record.
fi
34
Saving a CID Record to the Phone Directory
NOTE: If you want to change the format of the CID number to 7, 10 or 11 digits
and save it in the directory, press the FORMAT Soft key to format the CID
number rst before pressing the STORE Soft key.
fi
See the “Dialing Back” section
for more information on formatting a number.
STORE
SAVE
NOTE: The name eld cannot be left empty.fi
SAVE
VOL
SELECT
NOTE: If an incoming call number matches this record the VIP Tone Melody will
ring.
Deleting a CID Record
delete
DELETE? OK fi
Deleting All Call Records
delete
Delete All ?
OK A confirm tone emit and Emptyfi
Dialing Back
headset Talk Spk line 1 line 2
If You Programmed Your Local Area Code
CID
FORMAT
FORMAT
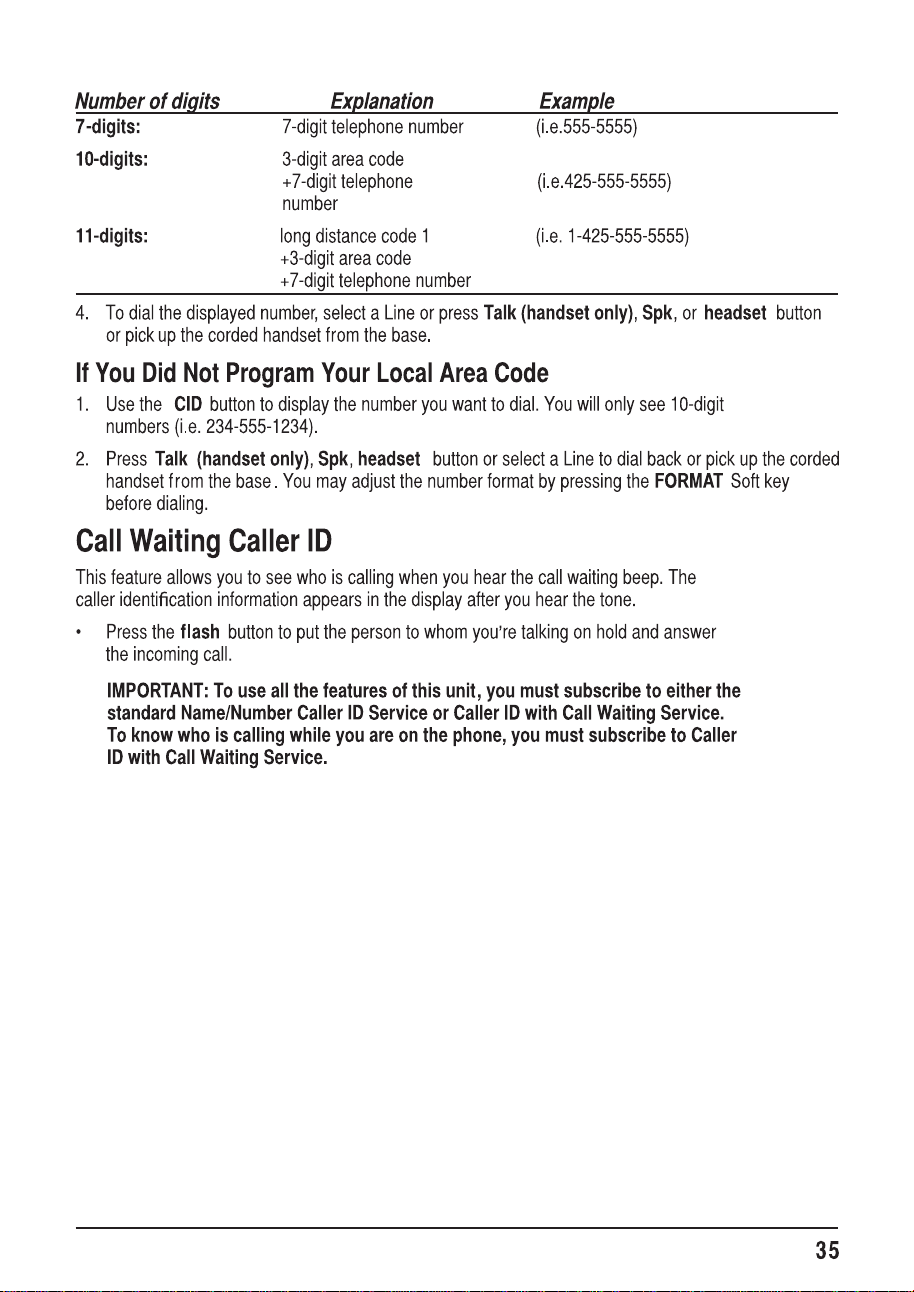
36
Directory and One-Touch Memory
Adding Directory Entries
OFF
DIR
NEW Enter Name
NOTE: More than one letter is stored in each of the number keys so it requires
more than one press for some letters. For example, for the letter “B” press the
number 2 key twice. To add a space press the 1 key.
NOTE: The name field cannot be left empty.
SAVE Enter Number
TIP: Press the #pause button twice to insert a pause in a number if necessary.
SAVE
NOTE: If an incoming call number matches this record the VIP Tone Melody will
ring.
VOL SELECT
NOTE: If Memory full shows in the display, you should delete one or more
unnecessary records and repeat above steps to continue the call record
storage.
Storing a Record in the One-Touch Memory Buttons
(Only applicable for base)
OFF
STORE
Select Button Location One-Touch/Memory Log
NOTE: If there is a record stored in selected memory location. Press REPLACE
Soft key to confirm overwrite or press the BACK Soft key, then repeat the step 1~3 to
select a new location.
Enter Name
37
NOTE: More than one letter is stored in each of the number keys so it requires
more than one press for some letters. For example, for the letter “B” press the
number 2 key twice. To add a space press the 1 key.
NOTE: The name field cannot be left empty.
SAVE Enter Number
TIP: Press the #pause button twice to insert a pause in a number if necessary.
SAVE
Reviewing Directory Records
OFF
DIR
VOL
Editing a Name or Number Stored in the
One-Touch /Memory Log
DIR
4.
Then you can press Menu softkey and then use VOL(- or +) to select View to review the direct
record.
One-Touch/Memory Log
EDIT “Storing
Record in One-Touch Dialing ”
NOTE: The left and right (DIR & CID) navigational buttons allow the cursor to be
moved. The delete button can be used to delete character or number to the left
of the cursor.
Reviewing Record in One-Touch Memory
OFF
DIR
One-Touch/Memory Log
Editing a Directory Record
VOL
Press Menu soft key and then use VOL(- or +) to select Edit Entry.
SAVE
SAVE VOL
“Handset Name”
38
NOTE: If an incoming call number matches this record the VIP Tone Melody will
ring.
SELECT
NOTE: Press the BACK Soft key to keep the previous setting (making no
changes).
Copying a Directory Record
In the extension handset:
COPY
Copy Current Record or Entire Directory? CURR
ENTIRE
Record Copied to Base Unit!
In the Base Unit:
COPY
Copy Current Record or Entire Directory? CURR
ENTIRE
vol
SELECT
Record Copied!
Saved
Deleting a Directory Record
VOL
delete
Delete?
OK
OK
fi
Deleting All Directory Records
DIR
delete DELETE ALL?
Empty.
fi
fi
fi

39
Deleting a One-Touch /Memory
DIR
delete
OK fi
NOTE: Press the exit button to cancel the “delete” function.
Dialing a Directory Record
Dial a directory record while in Talk (handset only) mode:
ON Talk Spk
line
DIR
VOL
DIAL
Dial a directory record while reviewing it:
OFF
DIR
VOL
Talk Spk speaker line 1/2
Dialing a One-Touch/Memory Record
(Only applicable for base)
while in Talk mode:
ON Spk Line
One-Touch/Memory Log
while reviewing it:
OFF
DIR
One-Touch/Memory Log
speaker line 1/2

40
Answering System Operation
There are two mailboxes in the system. One is for Line 1 and another is for Line 2.
For memo recording, you can select which mailbox is used to record the memo.
Answering System On/Off
Press and hold the base Ans Sys button for 2 seconds, the Base unit will show the On/Off Status
menu, setting the On/off status please refer to the Answering On/Off section.The Answering a
system light illuminates when the function is activated.
If the ans sys button indicator is flashing, pressing it will go to the Play Message display.
Otherwise, pressing the button will display Line 1 and Line 2 On/Off status for 3 seconds.
Recording Incoming Messages
The unit will answer incoming calls or routed calls after X rings (pickup delay set in Menu)
and play the outgoing greeting. After hearing the greeting followed by a long beep, the
caller can leave a message. If there is a new message recorded in the unit, the Answering
system indicator will flash, and the envelope icon shows in the LCD.
NOTE: Your unit will record a message up to the maximum length of time you
set as long as the caller continues speaking. To save recording capacity, your
unit will automatically stop recording after 7 seconds of silence or if there is a
steady dial tone for 7 seconds.
The maximum recording time for each incoming message can be set in Menu.
Monitoring Incoming Calls
Whenever an incoming message is being recorded you can hear it through the speaker
if Call Screening is On. To take the call, press Line button on base or Line softkey on handset
to pick up the available line.

41
Memo Record
memo
memo
Record memo after beep
Recording
FINISH
NOTE: The maximum duration allowed for memo is the same as the message
length setting in the menu.
Memo Recording (Only applicable for handset )
From the Handset Main Menu:
vol Memo recording
Recording
FINISH
Message/Memo Playback
ans sys play
SELECT
CID/next
DIR/prev
DIR/prev
“You have NO messages”
Press VOL (- or +) button to toggle between Mailbox 1 or Mailbox 2, press SELECT
button to confirm.
Press VOL (- or +) button to toggle between Mailbox 1 or Mailbox 2, press SELECT
button to confirm.
fl
Use VOL(- or +) can select
Record memo after beep
42
Erasing Messages
To erase a message while it is playing
delete
OK
To erase all previously played messages in a mailbox
delete Delete all
messages in line X mailbox?
OK
Remote Access From Remote Party
NOTE: The default security code is 000.
NOTE: Only the message being played can be erased in remote access mode.
fi
fi
T-T104 (GP, 2.4V, 550mAh),
44
Display Messages
DELETE ALL?
DELETE?
ENTER NAME
ENTER NUMBER
NEW CALLS
HANDSET NAME
UNAVAILABLE
NO LINE
LINE IN USE
EMPTY
OUT OF RANGE
BLOCKED
UNKNOWN
INCOMPLETE
DATA
HEADSET
CONNECTED

45
Handset Sound Signals
Signal Meaning
$ORQJZDUEOLQJWRQHZLWKULQJHURQ 6LJQDOVDQLQFRPLQJFDOO
7ZRVKRUWEHHSVVHYHUDOWLPHV 3DJHVLJQDO
2QHEHHSHYHU\VHFRQGV /RZEDWWHU\ZDUQLQJ
2QHORQJEHHSDIWHUSUHVVRQHNH\ &RQfiUP
$VKRUWZDUEOLQJWRQHZLWKULQJHURQ (UURU
Backup Battery Operation
,IWKHSRZHUFRUGLVQRWSOXJJHGLQWRWKHXQLWDQGWKHEDWWHU\LVDYDLODEOHWKHXQLWHQWHUV
%DWWHU\2SHUDWLRQ0RGH,QWKLVPRGHWKH EDVHLVIXOO\IXQFWLRQDO


47
Caller ID Solutions
No Display
f &KDUJHWKHEDWWHU\IRUKRXUV2UUHSODFHWKHEDWWHU\
f 0DNHVXUHWKHXQLWLVFRQQHFWHGWRDQRQVZLWFKHGHOHFWULFDORXWOHW'LVFRQQHFWWKH
SRZHUDGDSWRUIURPWKHEDVHDQGUHFRQQHFWLW
No Caller ID
f <RXPXVWEHVXEVFULEHGWRWKHVWDQGDUG1DPH1XPEHU&DOOHU,'VHUYLFHIURP\RXU
ORFDOWHOHSKRQHFRPSDQ\WRUHFHLYH&,'LQIRUPDWLRQ
Battery
,I\RXH[SHULHQFHDQ\RIWKHIROORZLQJSUREOHPVHYHQDIWHUUHFKDUJLQJWKHEDWWHU\\RX
PD\QHHGWRUHSODFHWKHEDWWHU\SDFN
f 6KRUWWDONWLPH
f 3RRUVRXQGTXDOLW\
f /LPLWHGUDQJH

49
1-800-511-3180
1-800-511-3180.
302

50
What your warranty covers:
t%FGFDUTJONBUFSJBMTPSXPSLNBOTIJQ
For how long after your purchase:
t5XPZFBSTGSPNEBUFPGQVSDIBTF
What we will do:
t1SPWJEFZPVXJUIBSFQMBDFNFOUVOJU5IFFYDIBOHFVOJUJTVOEFSXBSSBOUZGPSUIFSFNBJOEFSPGUIF
PSJHJOBMQSPEVDUhTXBSSBOUZQFSJPE
How you get service:
t-PDBUFZPVSQSPPGPGQVSDIBTFJOUIFGPSNPGBCJMMPGTBMFPSSFDFJQUFEJOWPJDFXIJDIJTFWJEFODFUIBUUIF
QSPEVDUJTXJUIJOUIFXBSSBOUZQFSJPE1SPPGPGXBSSBOUZFMJHJCJMJUZJTSFRVJSFEBOENVTUCFQSFTFOUFEUP
PCUBJOXBSSBOUZTFSWJDF
t$POUBDU3$"$VTUPNFS$BSFBU0VSSFQSFTFOUBUJWFTXJMMIFMQZPVUSPVCMFTIPPUBOE
EJBHOPTFUIFQSPCMFN"TZPVNBZCFBTLFEUPEJTDPOOFDUZPVS3$"UFMFQIPOFGSPNJUhTQPXFSTPVSDFZPV
NVTUDBMMGSPNBOPUIFSUFMFQIPOF*GUIFJTTVFDBOOPUCFSFTPMWFECZPVS$VTUPNFS$BSF5FBNZPVXJMMCF
JTTVFEBO3."3FUVSO.FSDIBOEJTF"VUIPSJ[BUJPOOVNCFSBOECFHJWFOJOTUSVDUJPOTPOIPXUPTVCNJU
ZPVSQSPPGPGQVSDIBTFQBQFSXPSLBOEXIFSFUPTFOEZPVSEFGFDUJWFNFSDIBOEJTF
t:PVXJMMCFSFTQPOTJCMFGPSTIJQQJOHUIFEFGFDUJWFVOJUCBDLUPPVSXBSSBOUZGVMöMMNFOUDFOUFSBUZPVS
PXOFYQFOTF:PVBSFSFTQPOTJCMFGPSEBNBHFPSMPTTEVSJOHTIJQNFOUTPJOTVSJOHUIFQSPEVDUEVSJOH
SFUVSOTIJQQJOHJTIJHIMZSFDPNNFOEFE
t8FXJMMTIJQBSFQMBDFNFOUUPZPVGSFJHIUQSFQBJE
What your warranty does not cover:
t$VTUPNFSJOTUSVDUJPO:PVS*OTUSVDUJPO#PPLQSPWJEFTJOGPSNBUJPOSFHBSEJOHPQFSBUJOHJOTUSVDUJPOTBOE
VTFSDPOUSPMT"EEJUJPOBMMZPVS$VTUPNFS$BSF$FOUFSJTTUBòFEYXJUIQSPEVDUFYQFSUTUIBUDBOBTTJTU
ZPVXJUIBOZRVFTUJPOTUIBUNBZBSJTFEVSJOHTFUVQBOEVTFPGZPVS3$"UFMFQIPOF
t*OTUBMMBUJPOBOETFUVQTFSWJDFBEKVTUNFOUT
t#BUUFSJFT
t%BNBHFGSPNNJTVTFPSOFHMFDU
t1SPEVDUTUIBUIBWFCFFONPEJöFEPGTFSWJDFEPVUTJEFUIF64"
t1SPEVDUTQVSDIBTFEGSPNOPOBVUIPSJ[FESFUBJMFSTEFBMFSTPSSFTFMMFST
t1SPEVDUTQVSDIBTFEPSTFSWJDFEPVUTJEFUIF64"
t"DUTPGOBUVSFTVDIBTCVUOPUMJNJUFEUPMJHIUOJOHEBNBHF

51
Limitation of Warranty:
THE WARRANTY STATED ABOVE IS THE ONLY WARRANTY APPLICABLE TO THIS PRODUCT .
ALL OTHER WARRANTIES , EXPRESS OR IMPLIED (INCLUDING ALL IMPLIED WARRANTIES OF
MERCHANTABILITY OR FITNESS FOR A PARTICULAR PURPOSE) ARE HEREBY DISCLAIMED . NO
VERBAL OR WRITTEN INFORMATION GIVEN BY TELEFIELD NA INC., ITS AGENTS, OR EMPLOYEES
SHALL CREATE A GUARANTY OR IN ANY WAY INCREASE THE SCOPE OF THIS WARRANTY .
REPAIR OR REPLACEMENT AS PROVIDED UNDER THIS WARRANTY IS THE EXCLUSIVE
REMEDY OF THE CONSUMER . TELEFIELD NA INC. SHALL NOT BE LIABLE FOR INCIDENTAL OR
CONSEQUENTIAL DAMAGES RESULTING FROM THE USE OF THIS PRODUCT OR ARISING OUT OF
ANY BREACH OF ANY EXPRESS OR IMPLIED WARRANTY ON THIS PRODUCT . THIS DISCLAIMER
OF WARRANTIES AND LIMITED WARRANTY ARE GOVERNED BY THE LAWS OF THE STATE OF
OREGON. EXCEPT TO THE EXTENT PROHIBITED B
Y APPLICABLE LAW, ANY IMPLIED WARRANTY
OF MERCHANTABILITY OR FITNESS FOR A PARTICULAR PURPOSE ON THIS PRODUCT IS LIMITED
TO THE APPLICABLE WARRANTY PERIOD SET FORTH ABOVE.
How state law relates to this warranty:
t4PNFTUBUFTEPOPUBMMPXUIFFYDMVTJPOOPSMJNJUBUJPOPGJODJEFOUBMPSDPOTFRVFOUJBMEBNBHFTPSMJNJUBUJPOT
POIPXMPOHBOJNQMJFEXBSSBOUZMBTUTTPUIFBCPWFMJNJUBUJPOTPSFYDMVTJPOTNBZOPUBQQMZUPZPV
t5IJTXBSSBOUZHJWFTZPVTQFDJöDMFHBMSJHIUTBOEZPVBMTPNBZIBWFPUIFSSJHIUTUIBUWBSZGSPNTUBUFUP
TUBUF
If you purchased your product outside the USA, Mexico or Canada:
5IJTXBSSBOUZEPFTOPUBQQMZ$POUBDUZPVSEFBMFSGPSXBSSBOUZJOGPSNBUJPO
52
302
25255RE2
Model 25255RE2
1
T0008003 (REV 06 E)
12-32
Printed in China