74
3TAR"OARD74
5SERgS'UIDE
74

WEEE
"The mark (bin mark) is in compliance with the Waste Electrical and Electronic Equipment Directive
2002/96/EC (WEEE)."
"The mark indicates the requirement NOT to dispose the equipment as unsorted municipal waste, but use the
return and collection systems available"
As for details, please verify the product home page.
WEEE
“Die Markierung (Symbol mit der Mülltonne) entspricht der Verordnung 2002/96/EC für
Elektroschrott (Waste Electrical and Electronic Equipment Directive 2002/96/EC, WEEE).”
“Die Markierung bedeutet, dass das Zubehör NICHT im unsortierten Hausmüll entsorgt werden darf, sondern den
verfügbaren Sammelstellen für eine fachgerechte Entsorgung zugeführt werden muss.“
Sie finden detaillierte Informationen hierzu auf der Homepage des Produkts.
WEEE
“Le symbole représenté ci-dessous est conforme à la directive 2002/96/EC (WEEE)”.
“Ce symbole indique l’obligation de ne pas mettre cet équipement au rebut avec les déchets ménagers ordinaires
et d’utiliser les circuits de ramassage et de recyclage disponibles”.
Pour plus de détails, veuillez vérifier la page d’accueil du produit.
WEEE
“Il contrassegno (contrassegno del raccoglitore) è conforme alla direttiva Rifiuti di apparecchiature elettriche
2002/96/EC (WEEE)”.
“Il contrassegno indica il requisito NON smaltire l’apparecchiatura come rifiuti urbani non differenziati, ma
utilizzare i sistemi di raccolta e di restituzione disponibili”.
Per quanto riguarda i dettagli, visitare la home page del prodotto.
WEEE
“La marca (marca de la papelera) es conforme a la Directiva de residuos de equipos eléctricos y
electrónicos (Waste Electrical and Electronic Equipment Directive (WEEE)) 2002/96/EC.”
“La marca indica que NO se deben desechar estos equipos como residuos municipales no
separables, sino que se deben utilizar los sistemas de devolución y recogida disponibles.”
Para obtener información detallada, consulte la página web del producto.
WEEE
“A marca (marca do caixote de lixo) está em conformidade com a Directiva de Eliminação de
Equipamentos Eléctricos e Electrónicos 2002/96/EC (WEEE)”.
“A marca indica a obrigatoriedade de NÃO eliminar o equipamento como dejectos municipais não
triados, mas sim utilizar os sistemas de devolução e recolha disponíveis”.
Para mais informações, consulte o site da Internet do produto.

The R&TTE Directive
We, the manufacturer hereby declare that this equipment, model StarBoard WT-1(NWT-101, NWT-101R) is in
compliance with the essential requirements and other relevant provisions of Directive 1995/5/EC.
Die R&TTE Richtlinie
Als Hersteller dieses Gerätes erklären wir hiermit, dass das Modell StarBoard WT-1(NWT-101, NWT-101R) den
grundlegenden Anforderungen sowie weiteren relevanten Bestimmungen der Richtlinie 1995/5/EG entspricht
La directive R&TTE
Nous, le fabricant, déclarons par la présente que cet appareil, modèle StarBoard WT-1(NWT-101, NWT-101R), est
conforme aux exigences essentielles et autres dispositions de la Directive 1995/5/EC qui lui sont applicables.
Direttiva R&TTE
Come produttore di questa apparecchiatura dichiariamo che questo modello StarBoard WT-1(NWT-101,
NWT-101R) è conforme ai requisiti fondamentali e ad altre clausole pertinenti della Direttiva 1995/5/EC.
La Directiva R&TTE
Nosotros, el fabricante, declaramos por el presente documento que este equipo, modelo StarBoard
WT-1(NWT-101, NWT-101R), cumple los requisitos esenciales y demás disposiciones relevantes de la Directiva
1995/5/EC.
Directiva R&TTE
O fabricante declara por este meio que este equipamento, o modelo StarBoard WT-1(NWT-101, NWT-101R) está
em conformidade com os requisitos essenciais e outras disposições importantes da Directiva 1995/5/CE.
R&TTE Richtlijn
Als fabrikant van dit product verklaren wij hierbij dat dit model StarBoard WT-1(NWT-101, NWT-101R) geheel
voldoet aan de voornaamste eisen en andere relevante voorschriften vervat in Richtlijn 1995/5/EC.

FEDERAL COMMUNICATIONS
COMMISSION INTERFERENCE
STATEMENT
This equipment has been tested and found to comply with the limits for a Class B digital device, pursuant to part
15 of the FCC Rules. These limits are designed to provide reasonable protection against harmful interference in a
residential installation. This equipment generates, uses and can radiate radio frequency energy and, if not installed
and used in accordance with the instructions, may cause harmful interference to radio communications. However,
there is no guarantee that interference will not occur in a particular installation. If this equipment does cause
harmful interference to radio or television reception, which can be determined by turning the equipment off and on,
the user is encouraged to try to correct the interference by one or more of the following measures:
• Reorient or relocate the receiving antenna.
• Increase the separation between the equipment and receiver.
• Connect the equipment into an outlet on a circuit different from that to which the receiver is connected.
• Consult the dealer or an experienced radio/ TV technician for help.
RF exposure warning
The equipment complies with FCC RF exposure limits set forth for an uncontrolled environment.
The equipment must not be co-located or operating in conjunction with any other antenna or transmitter.

CAUTION:
Any changes or modifications not expressly approved by the grantee of this device could void the user’s authority
to operate the equipment.
VORSICHT:
Veränderungen an dem Gerät, die nicht ausdrücklich vom Hersteller zugelassen wurden, können zur Ungültigkeit
der Betriebserlaubnis des Gerätes führen.
PRÉCAUTION :
Tout changement ou modification sans l’autorisation expresse du fabricant de cet appareil peut entraîner la
révocation du droit de l’utilisateur.
ATTENZIONE:
Qualsiasi alterazione o modifica non espressamente approvata dal fornitore di questa apparecchiatura potrebbe
annullare la licenza dell'utente di utilizzarla.
PRECAUCIÓN:
Cualquier cambio o modificación no aprobado expresamente por el proveedor de este dispositivo podría invalidar
el derecho del usuario a operar el equipo.
ATENÇÃO:
Qualquer modificação ou alteração não expressamente aprovada pelo fabricante deste dispositivo pode anular a
autoridade do utilizador para operar o equipamento.
VOORZICHTIG:
Enige aanpassing, wijziging of ingreep in dit apparaat die niet expliciet is toegestaan in de garantievoorwaarden
van dit apparaat zou uw garantie ongeldig kunnen maken.

StarBoard WT-1
User’s Guide
How to Request a User’s Guide
When requesting a separate copy of this user’s guide, specify WT1-090101.
WT1-090101
Hitachi Software Engineering Co., Ltd.
Read this user’s guide and carefully retain it for future reference.
Before using this product, carefully read and fully understand the safety instructions.
Store this User’s Guide nearby for ease of reference.

1
StarBoard
W
T
-
1
Englis
h
Notices
Reproduction or reprinting, without permission, of this manual or any part thereof is prohibited.
The contents of this manual are subject to change without prior notice.
Every effort has been made to ensure that this manual is complete and correct. However, should
any questionable points, mistakes, etc., come to your attention, please inform the vendor.
Please be advised in advance that this company will assume no responsibility for losses, etc.,
resulting from the operation of this product, regardless of the preceding clauses.
Disclaimers
Hitachi Software Engineering Co., Ltd. assumes no liability and makes no warranty, either express
or implicit, regarding the contents of this user’s guide.
Also, the company makes no warranty as to the product’s suitability, merchantability or fitness for a
particular intended use.
All products of Hitachi Software Engineering Co., Ltd., described in this user’s guide are presently
for sale or are site-licensed.
Users who purchased the aforesaid product(s) will bear the costs of all required services, repairs,
and damages resulting from defects in this product, and will bear the costs of direct or indirect
damages (including the loss of profits or required information) that resulted from the product
defects.
Moreover, Hitachi Software Engineering Co., Ltd., retains the right to revise this user’s guide and
to modify the contents thereof, without any obligation to notify anyone.

2
StarBoard
W
T
-
1
Englis
h
Product Assurance Provisions
This product is limited to use in the country where the user bought this product.
For warranty details, refer to Appendix 4.5 at the end of this user’s guide.
This first edition of the user’s guide (WT1-090101) is for the following products:
StarBoard WT-1(NWT-101, NWT-101R) AH00222
The StarBoard WT-1 incorporates WALTOP’s wireless tablet integrated digitizer and 2.4G RF
technology.
Windows 2000, Windows XP, Windows Vista are trademarks of Microsoft Corporation (U.S.) and
in other countries.
Mac OS are trademarks of Apple Inc., registered in the U.S. and other countries.
Any use of these marks by Waltop International Corporation is under license. Other trademarks and
trade names are those of their respective owners.
Manual Creation Dates
January 2009, First Edition WT1-090101
All Rights Reserved. Copyright © 2009, Hitachi Software Engineering Co., Ltd.
3
Safe Handling
StarBoard
W
T
-
1
Englis
h
Safe Handling
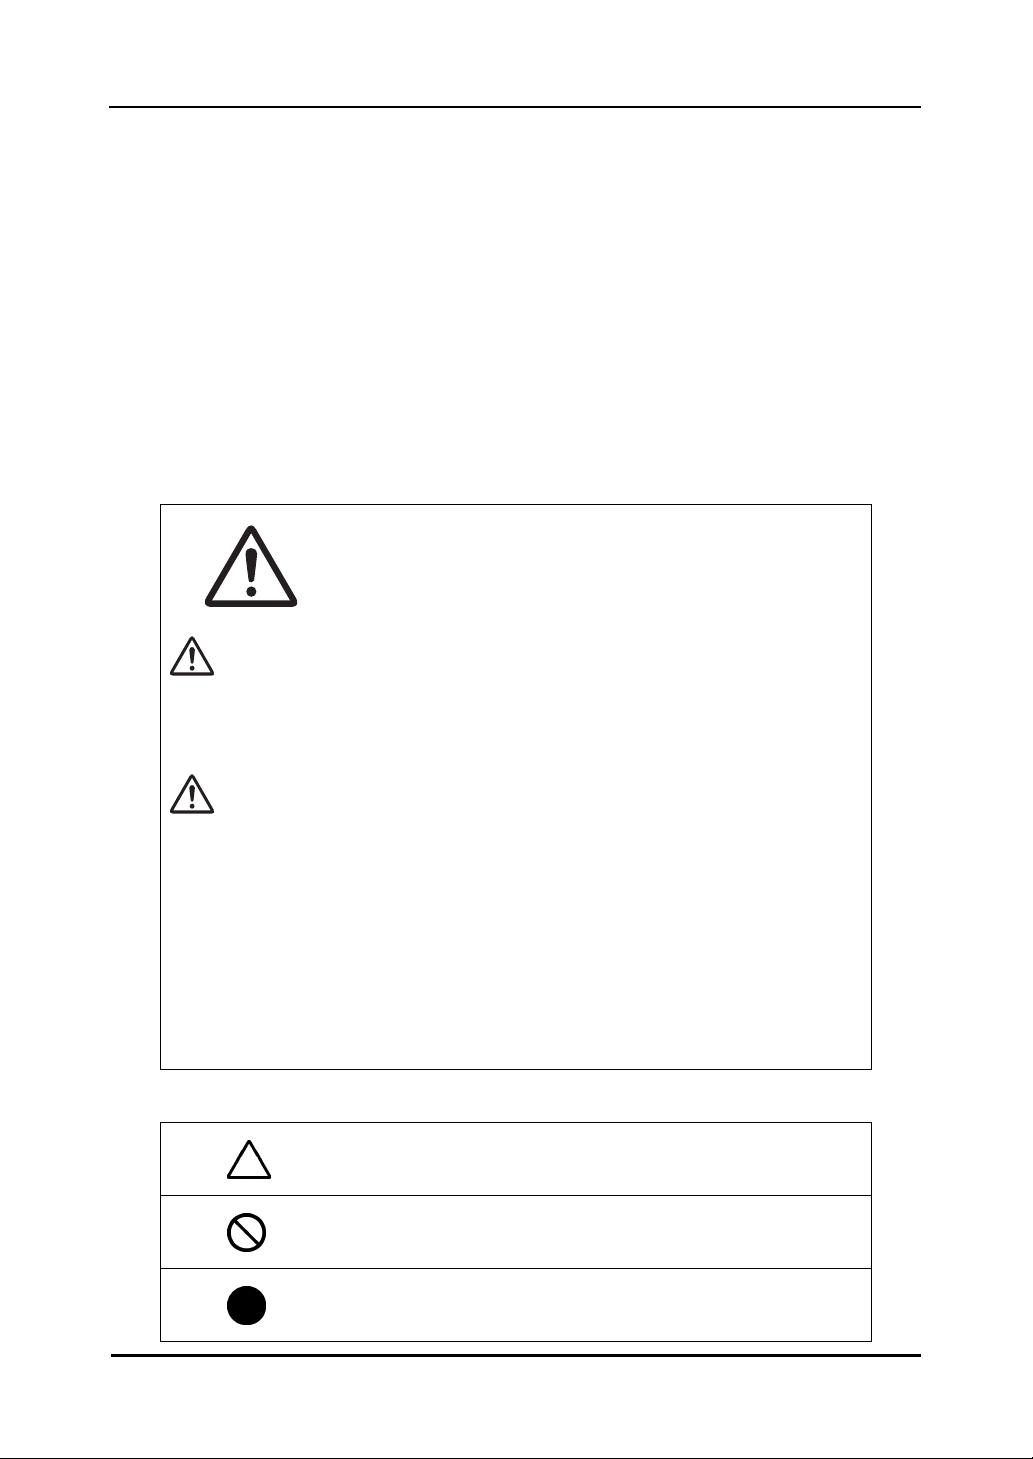
Markings and Symbols
Various markings and symbols are used in this user’s guide and on this product, to ensure the
safe and correct use of this product and to prevent personal injury and property damage. These
symbols and their meanings are as explained below. Understand the information well before
reading the body of the user’s guide.
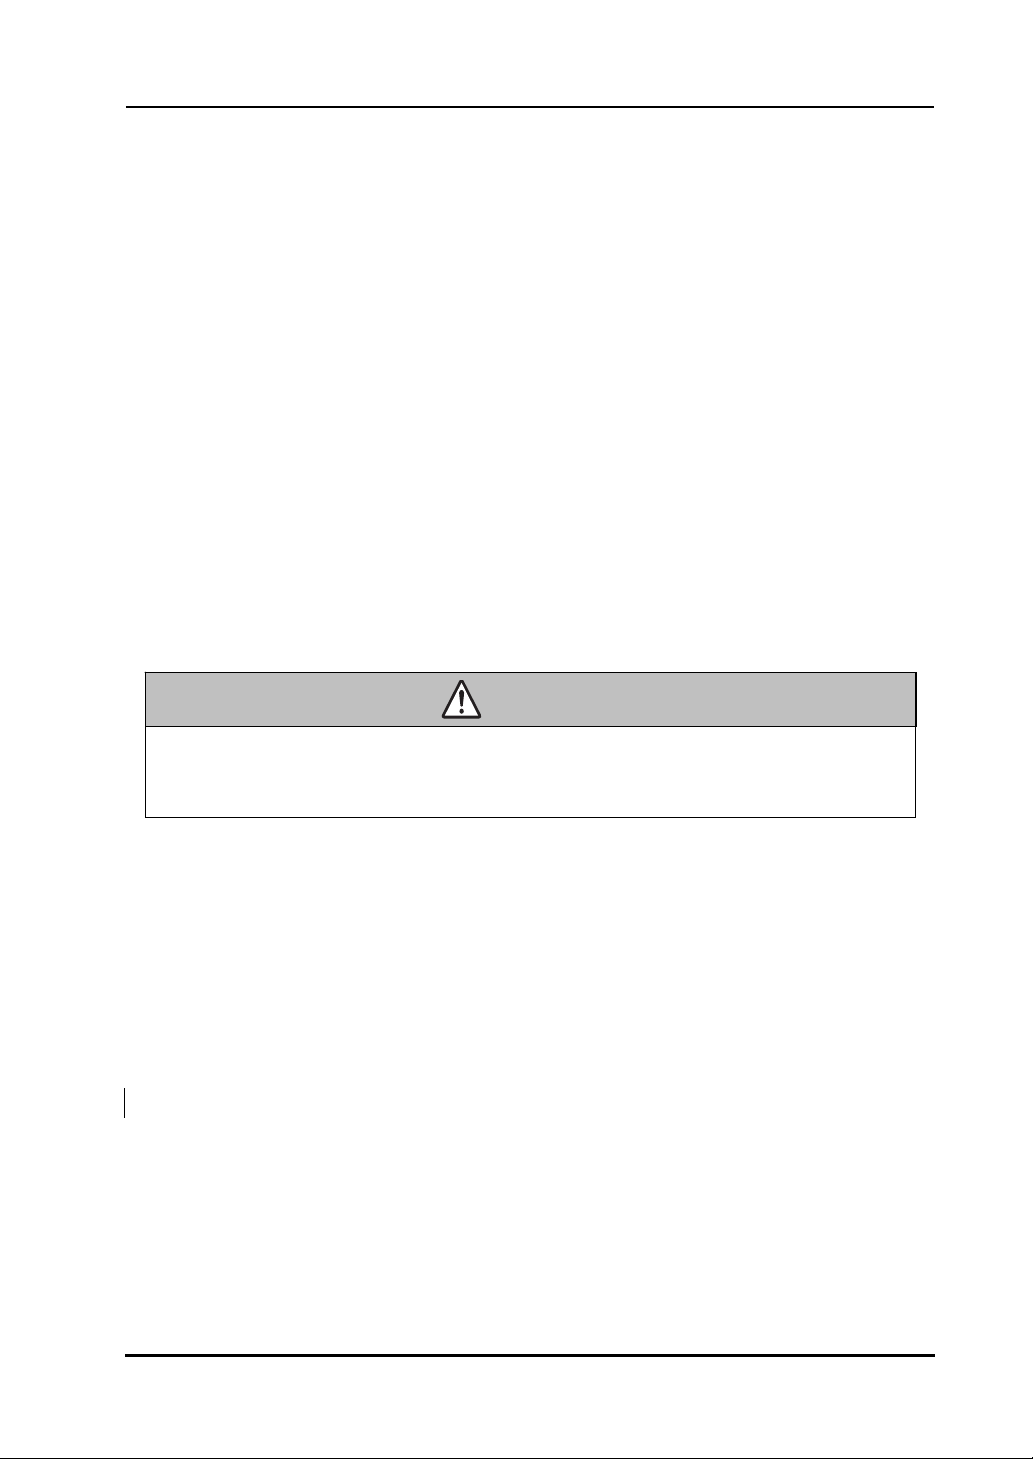
This is the safety alert symbol. It is used to alert you to potential
personal injury hazards. Obey all safety messages that follow
this symbol to avoid possible injury or death.
WARNING
Indicates a potentially hazardous situation which, if not avoided, could result in
death or serious injury.
CAUTION
Indicates a potentially hazardous situation which, if not avoided, may could result
in minor or moderate injury.
NOTICE
Indicates a potentially hazardous situation which, if not avoided, may could result
in damage not related to personal injury property damage. (except personal injury
hazardous)
This symbol draws attention to cautions (including warnings).
This symbol indicates something prohibited.
This symbol indicates something that must be done.
4
Safe Handling
StarBoard
W
T
-
1
Englis
h
Do not use this product near water.
Electric shock might result.
Be careful about the locations of the USB
cable, etc.
The USB cable might trip someone,
possibly causing the product to fall,
etc., thereby causing injury or
product failure. Be careful with their
locations.
Do not use this product in a location with
high temperature or high humidity or
leave it in direct sunlight.
The tablet and other parts might be
damaged.
Do not leave this product or any of its
accessories on the floor.
Someone might step on it and
break it, or might be injured by
tripping on it.
Do not dispose the equipment as unsorted
municipal waste, but use the return and
collection systems available.
Contact your dealer for details.
Always keep the device more that 6 inches
(15.3 centimeters) from the pacemaker.
If you suspect interference, switch
odd your device and move the
device away.
Do not place a heavy object on the Tablet
and USB cable, heat or pull it.
The tablet and USB cable might be
damaged, causing fire or electric
shock.
Safety Precautions
Alwa
y
s com
p
l
y
with them.
CAUTION
NOTICE
5
Safe Handling
StarBoard
W
T
-
1
Englis
h
Careful thought was given to the cautions on this device and in this user’s guide. However,
unanticipated circumstances might occur. When operating this product, users themselves must
exercise caution as well as follow instructions.
Caution Details Page
Do not perform unauthorized disassembly of the WT-1. It may pose a risk of
injury from fire or electric shock, and may damage the WT-1. Contact a
customer service center regarding battery replacement.
P.4-4
Notice Details Page
Use a computer USB port or the included AC adaptor to charge the tablet.
Using other charging devices or AC adaptors for charging will charge the
tablet under different conditions, which may pose a risk of overheating or fire.
P.2-1
Be sure to orient the battery correctly.
Do not reverse the + and - terminals of the battery, and use only the specified
type of battery. Otherwise, it will overheat and fail.
P.2-6
When changing the battery, be careful not to close the pen’s
rear part too forcefully.
If too much force is applied when closing the rear part of the stylus pen, the
pen may be damaged.
P.2-6
CAUTION
NOTICE

6
Contents
StarBoard
W
T
-
1
Englis
h
Contents
1. Introduction.......................................................................................................................... 1-1
1.1 Parts Check .............................................................................................................. 1-1
1.2 Part Names and Functions ....................................................................................... 1-2
1.2.1 Front Side of the tablet.................................................................................................... 1-2
1.2.2 Rear View of the Tablet .................................................................................................. 1-3
1.2.3 Side View of the Tablet...................................................................................................1-3
1.2.4 2.4G RF Adaptor............................................................................................................. 1-3
2. Usage Procedures.............................................................................................................. 2-1
2.1 How to use tablet ..................................................................................................... 2-1
2.1.1 Charging the battery in the tablet.................................................................................... 2-1
2.1.2 Basic Tablet operation..................................................................................................... 2-2
2.1.3 LCD indicator ................................................................................................................. 2-4
2.2 Using the Stylus Pen ................................................................................................ 2-5
2.2.1 Basic Stylus Pen Operations ........................................................................................... 2-5
2.2.2 Stylus pen Settings.......................................................................................................... 2-5
2.2.3 Changing the battery in the Stylus pen ........................................................................... 2-6
2.2.4 Replacing the Stylus pen Tip .......................................................................................... 2-7
3. Start to use.......................................................................................................................... 3-1
3.1 Setup Hardware........................................................................................................ 3-1
3.2 Setup Software......................................................................................................... 3-1
3.2.1 For Windows User ..........................................................................................................3-1
3.2.2 For Mac User .................................................................................................................. 3-1
3.3 How to connect WT-1 .............................................................................................. 3-2
4. Appendix................................................................................................................................ 4-1
4.1 Troubleshooting ....................................................................................................... 4-1
4.2 System Specifications.............................................................................................. 4-3
4.3 Battery Replacement................................................................................................ 4-4
4.4 Replaceable Parts..................................................................................................... 4-4
4.5 Provisions of Product Warranty ............................................................................... 4-5
1-1
StarBoard
W
T
-
1
Introduction
Englis
h
1. Introduction
1.1 Parts Check
After unpacking, make sure that all of the following parts are included.
Parts
No. Name Qty.
(1) 2.4G RF Tablet 1
(2) 2.4G RF adaptor* 1
(3) AC adaptor 1
(4) AC adaptor plug 3
(5) Stylus pen 1
(6) AAA alkaline battery 1
(7) Pen tip replacement pin 1
(8) Spare pen tips 2
(9) USB cable 1
(10) WT-1 Setup Software (CD-ROM) for Windows, Mac 2
(11) WT-1 Quick Start Guide 1
*In the holder on the back of the tablet.
(1)
(2)
(3)
(4)
(5)
(6)
(7)
(8)
(9)
(10) (11)

1-2
StarBoard
W
T
-
1
Introduction
Englis
h
1.2 Part Names and Functions
1.2.1 Front Side of the tablet
*Hereafter, the 2.4G RF Tablet is simply referred to as the tablet.
(1) Power button
Keep pressing this button for 3 seconds
or longer, turns power to the tablet
circuitry on and off.
(2) LCD indicator
LCD indicator that shows the
connection status between the tablet
and PC, as well as the remaining
battery level.(For details on LCD
indicator, see ‘2.1.3 LCD indicator’ on
page 2-4 of this User's Guide.)
(3) Function area
Sixteen functions can be assigned to
this area. (For details on function area
initial settings, see ‘2.1.2 Basic Tablet
operation’ on page 2-2 of this User’s
Guide.)
(4) Page up / Page down
For scrolling pages.
(5) Volume control
Volume adjustment is possible by
drawing a circle with the pen here.
(6) Tablet active area
Receives text and graphical information
entered with the stylus pen, and
transmits the data to a PC.
(5)
(4)
(6)
(3)
(2)
(1)
1-3
StarBoard
W
T
-
1
Introduction
Englis
h
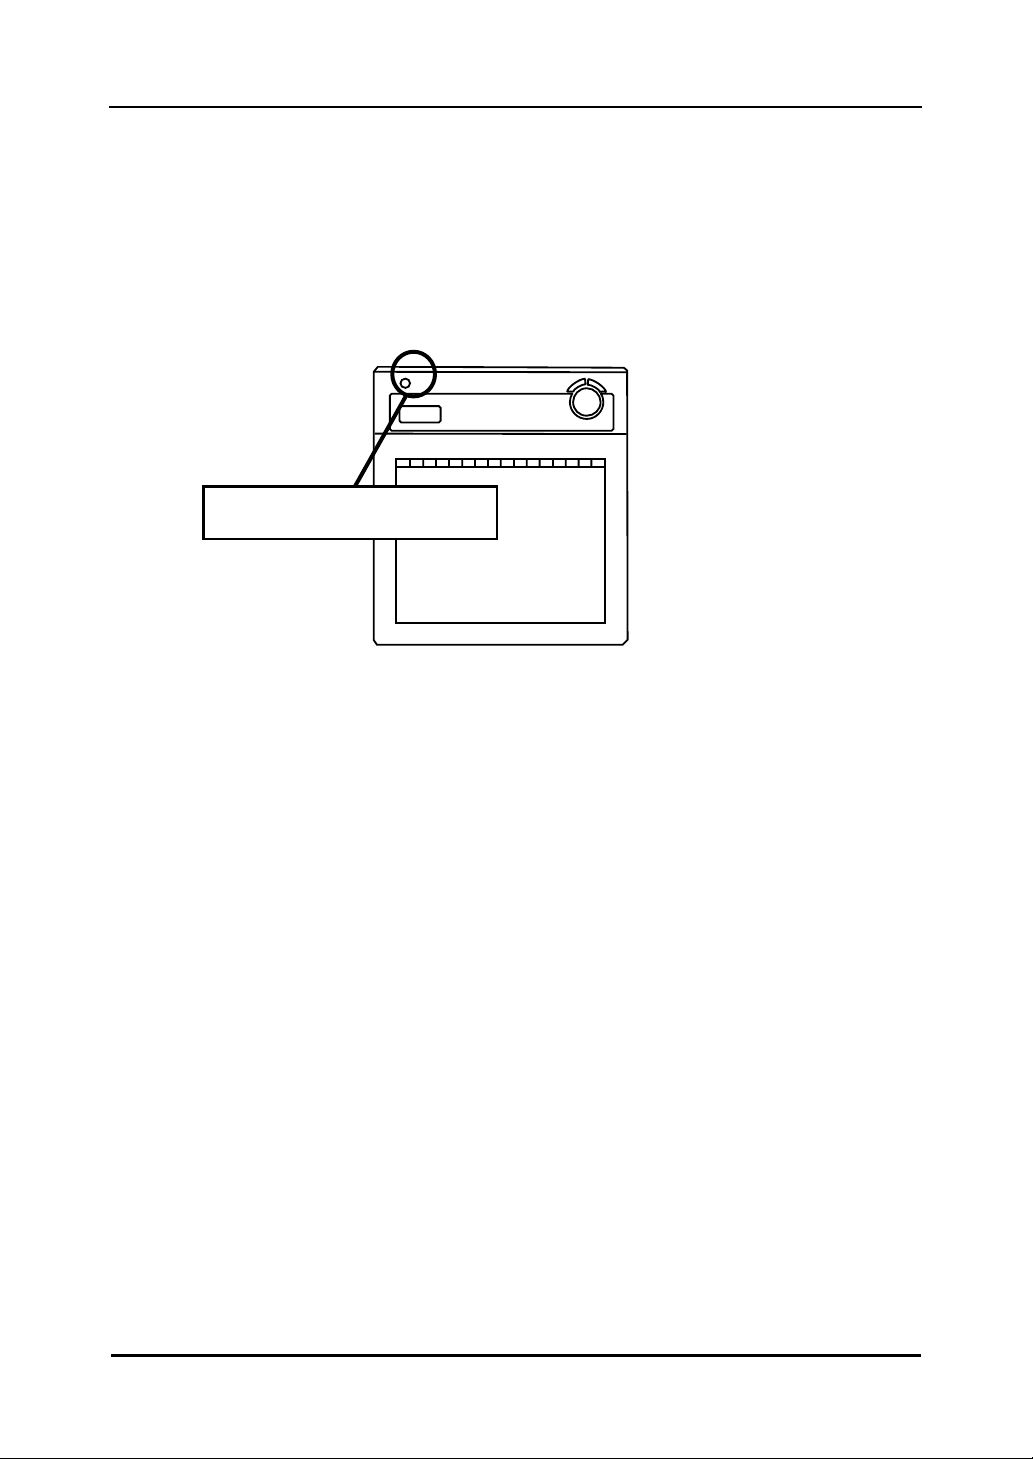
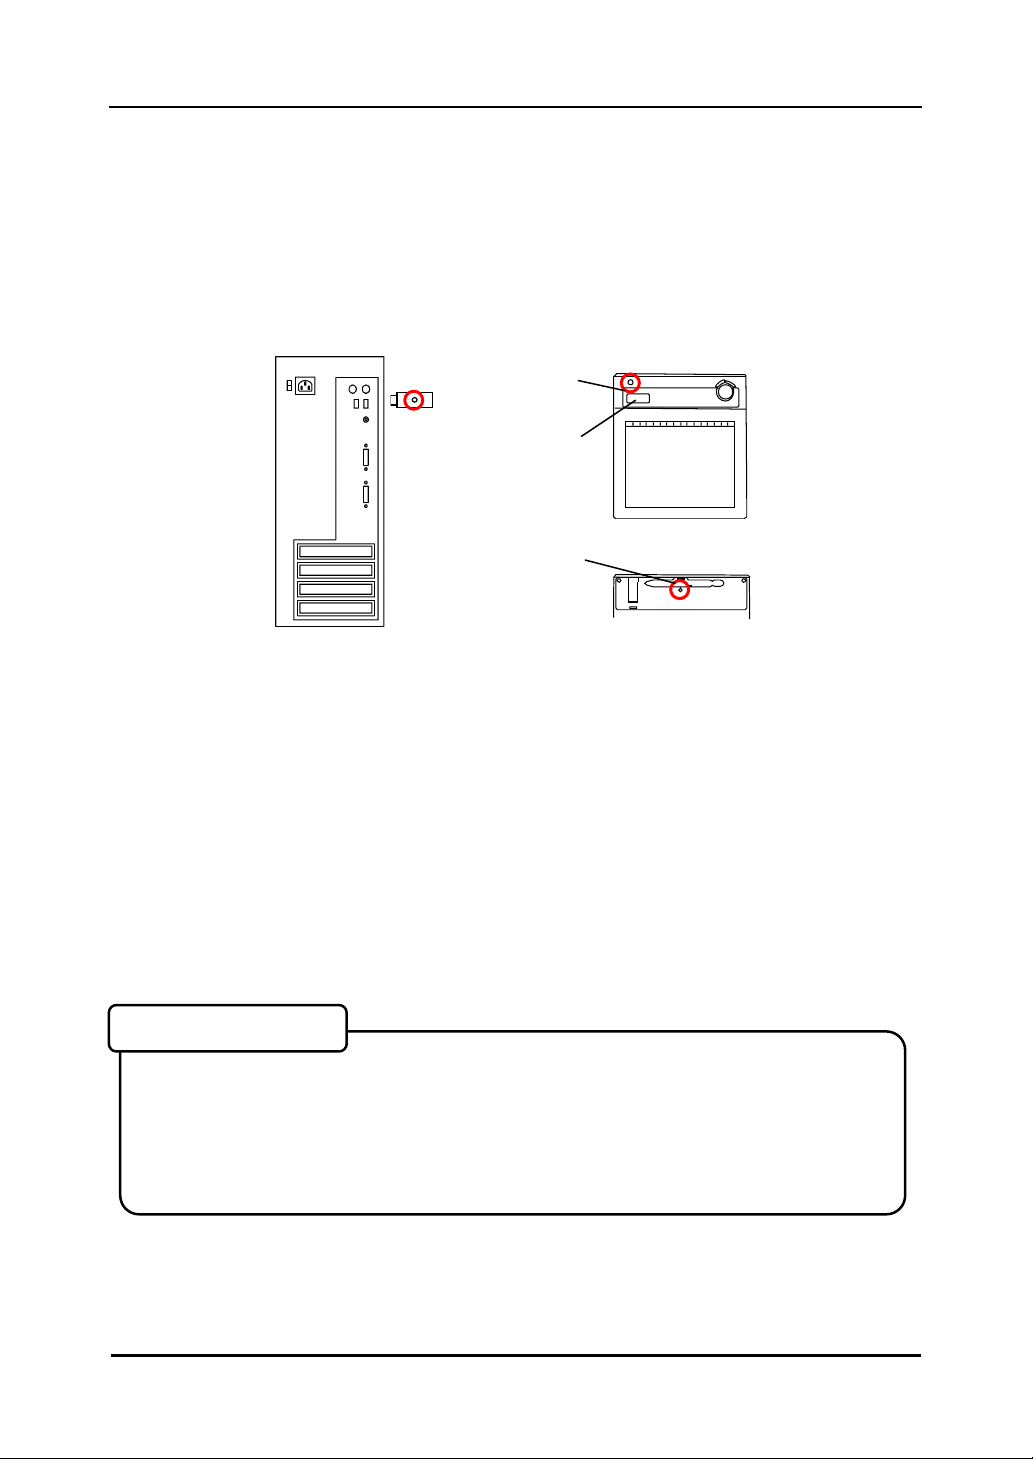
1.2.2 Rear View of the Tablet
(1) Adaptor holder
(2) Pen holder
(3) Connecting button
Button to establish a connection
between the tablet and the 2.4G RF adaptor.
1.2.3 Side View of the Tablet
(1) USB port
A USB cable can be connected here when
charging the battery.
1.2.4 2.4G RF Adaptor
(1) Connecting buttonButton to establish a
connection
between the tablet and the 2.4G RF adaptor.
(1)
(2)
(3)
(1)
(1)
2-1
StarBoard
W
T
-
1
Usage Procedures
Englis
h
2. Usage Procedures
This section describes the basic procedures for using StarBoard.
2.1 How to use tablet
This section describes how to use the tablet.
2.1.1 Charging the battery in the tablet
The tablet contains Li-ion battery. When the battery is drained, charge the battery as
described below. Note that battery life is approximately 16 hours under normal usage.
Charging the tablet takes approximately 2 hours.
AC adaptor Mode
Connect the tablet and the AC adaptor with the USB cable, and then plug the AC adaptor into an
electrical outlet.
PC Mode
Turn on the PC. Connect the tablet to the PC with the USB cable.
# When charging the tablet from a PC, unplug any other USB devices from the port before connecting the
tablet. If other devices are connected, use another port or charge the tablet in AC adaptor mode.
Use a computer USB port or the included AC adaptor to charge the tablet.
Using other charging devices or AC adaptors for charging will charge the tablet under
different conditions, which may pose a risk of overheating or fire.
NOTICE
2-2
StarBoard
W
T
-
1
Usage Procedures
Englis
h
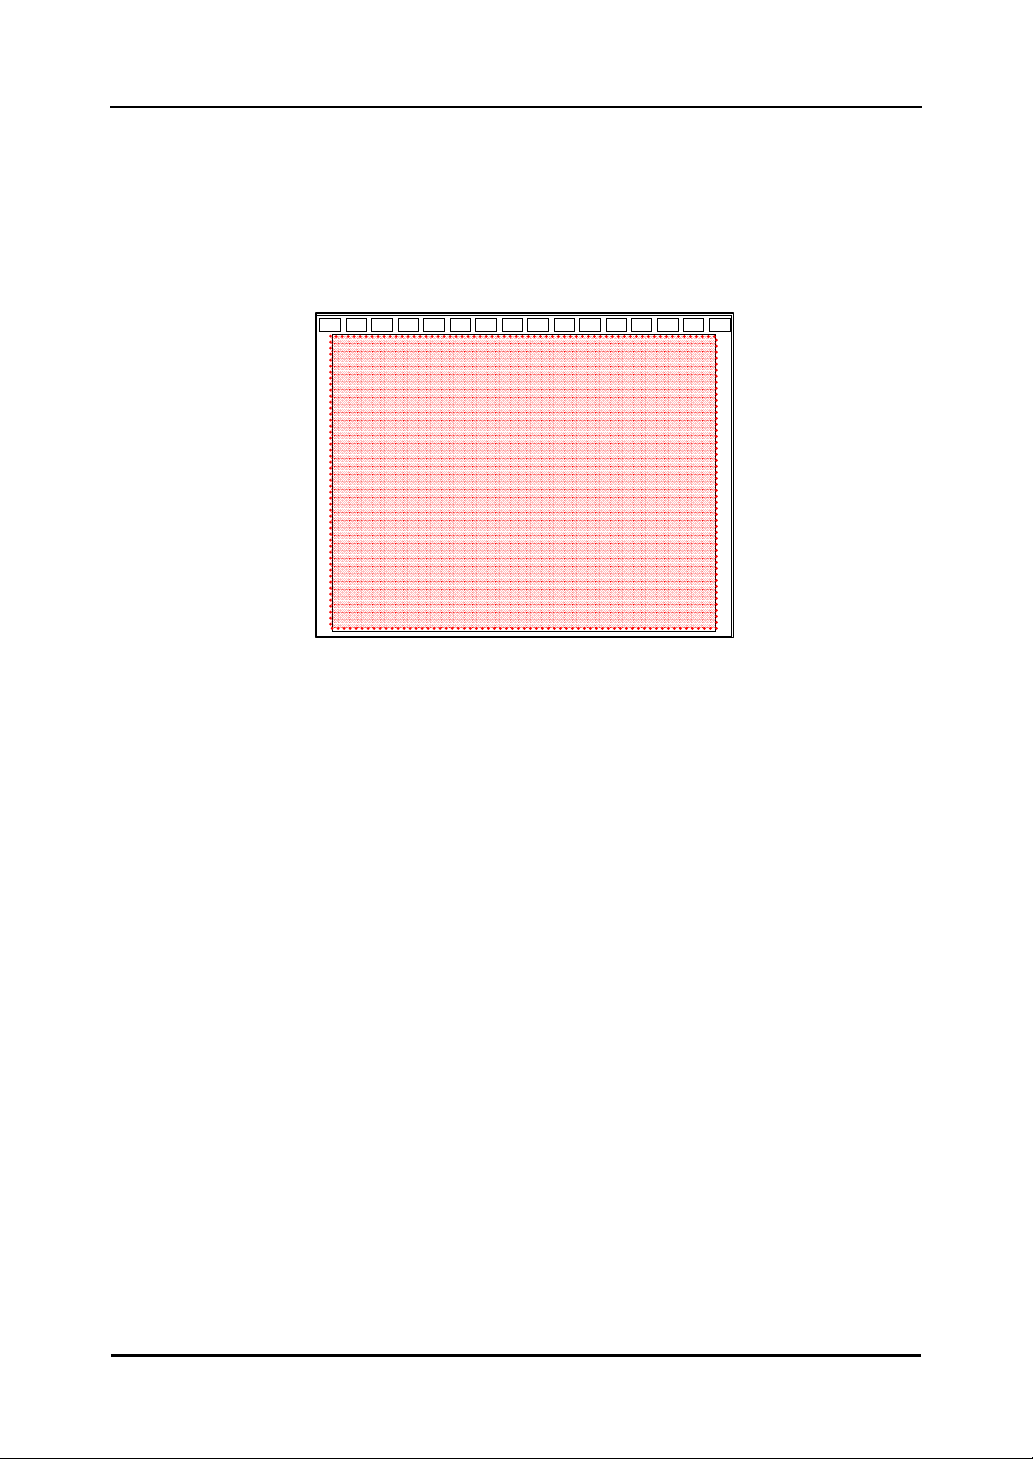
2.1.2 Basic Tablet operation
(1) Tablet active area
Tablet active area is inside of the rectangle outlined on the tablet. The active area
and the display resolution should automatically correspond. If they do not suit,
please reboot the PC.
(2) Function area
There are 16 function areas on top of the tablet active area. You can assign
applications, documents or URL to these. To assign the function, use ’Macro Key
Manager’.
For details on Macro Key Manager, refer to the electronic manual in the included
software.
When using StarBoard Software, do not install Macro Key Manager.
Active area
2-3
StarBoard
W
T
-
1
Usage Procedures
Englis
h
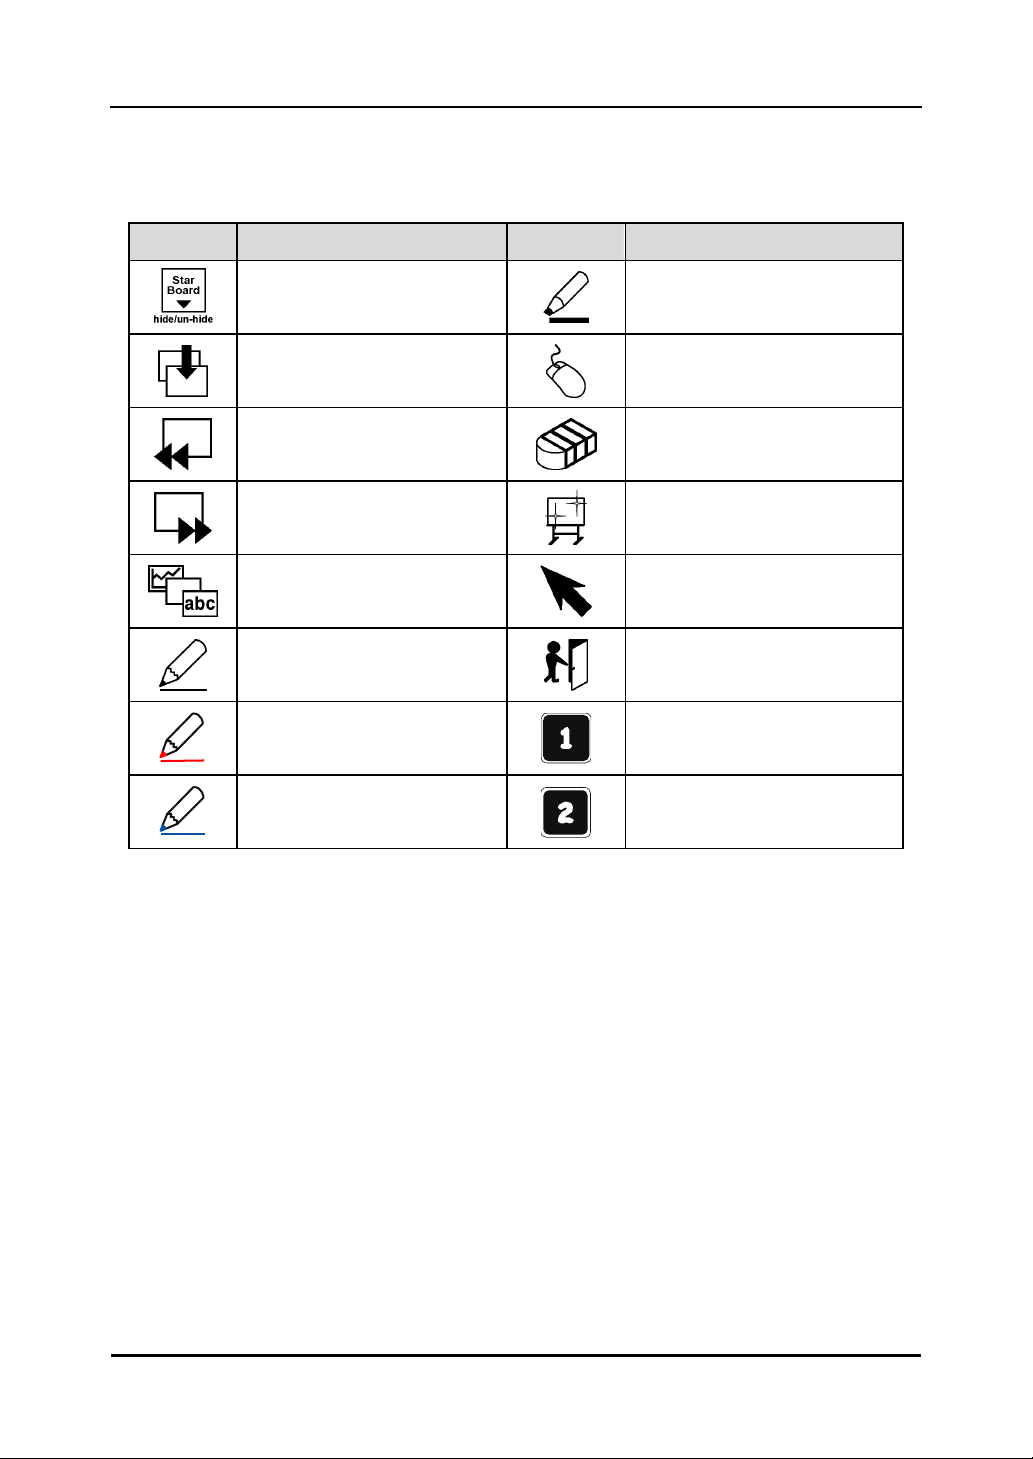
If you have installed StarBoard Software, you can use these keys in StarBoard Software.
The default setting is as follows;
Symbol Description Symbol Description
Hides/displays the StarBoard
Software Toolbar.
Select Marker Pen.
Add a new blank page.
Switch to PC Operation.
Show previous page.
Select Eraser.
Show next page.
Select Clear
Hides/displays the Topic List.
Select
Select Solid Pen.
Black.
Select Exit
Select Solid Pen.
Red.
Programable1
Select Solid Pen.
Blue.
Programable2
2-4
StarBoard
W
T
-
1
Usage Procedures
Englis
h
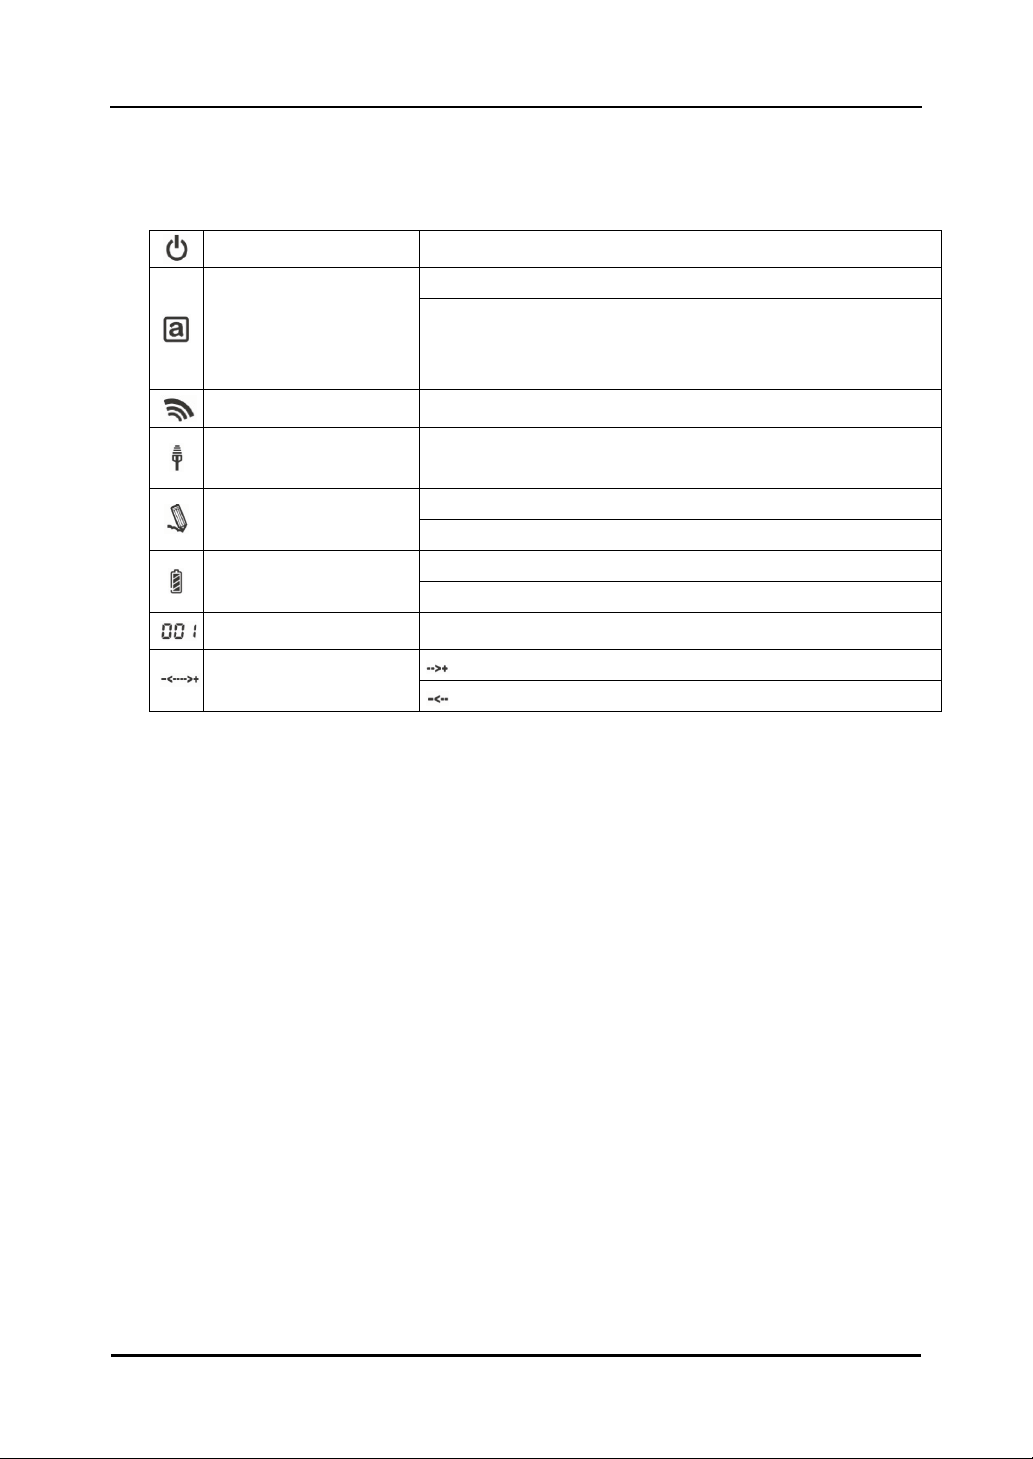
2.1.3 LCD indicator
LCD indicate the current condition of the tablet.
Power on Displayed when the tablet is on.
Lit: Displayed when the pen is in use.
Active mode
Off: The tablet automatically enters power-saving mode after
about 3 seconds when the pen is away from the active area or
there is no activity.
Communication status Displayed when the 2.4G RF adaptor detects input.
Connection status Displayed when communication with the 2.4G RF adaptor is
possible.
Flashing: Flashes when the pen is within range of input.
Pen down
Lit: Lit when the pen is in contact with the active area.
Flashing: Flashes when the tablet is charging.
Battery level
Lit: Indicates the remaining tablet battery power, in 4 levels.
Tablet number Numbers are assigned in the order of successful pairing.
Volume up
Vo l u m e
Vol u me dow n
2-5
StarBoard
W
T
-
1
Usage Procedures
Englis
h
2.2 Using the Stylus Pen
This section describes how to use the Stylus pen.
2.2.1 Basic Stylus Pen Operations
The stylus pen can be used in the same way as a mouse. Under the stylus pen’s default
settings, the pen tip button is set to correspond to the left mouse button. When Windows is
open, the pen tip button may be used to perform the following mouse actions.
• Clicking
Tap the pen tip against the tablet operating area with a suitable amount of pressure and then
release it quickly.
• Double-clicking
Double tap the pen tip against the tablet operating area with a suitable amount of pressure
and then release it.
• Dragging
Press the pen tip against the tablet operating area with a suitable amount of pressure and
then move the pen while keeping it pressed against the tablet operating area (without
releasing it from the tablet operating area).
The pen can be angled at up to 30°from vertical but it may not work correctly, if the pen is
tilted at an angle greater than 30°.
2.2.2 Stylus pen Settings
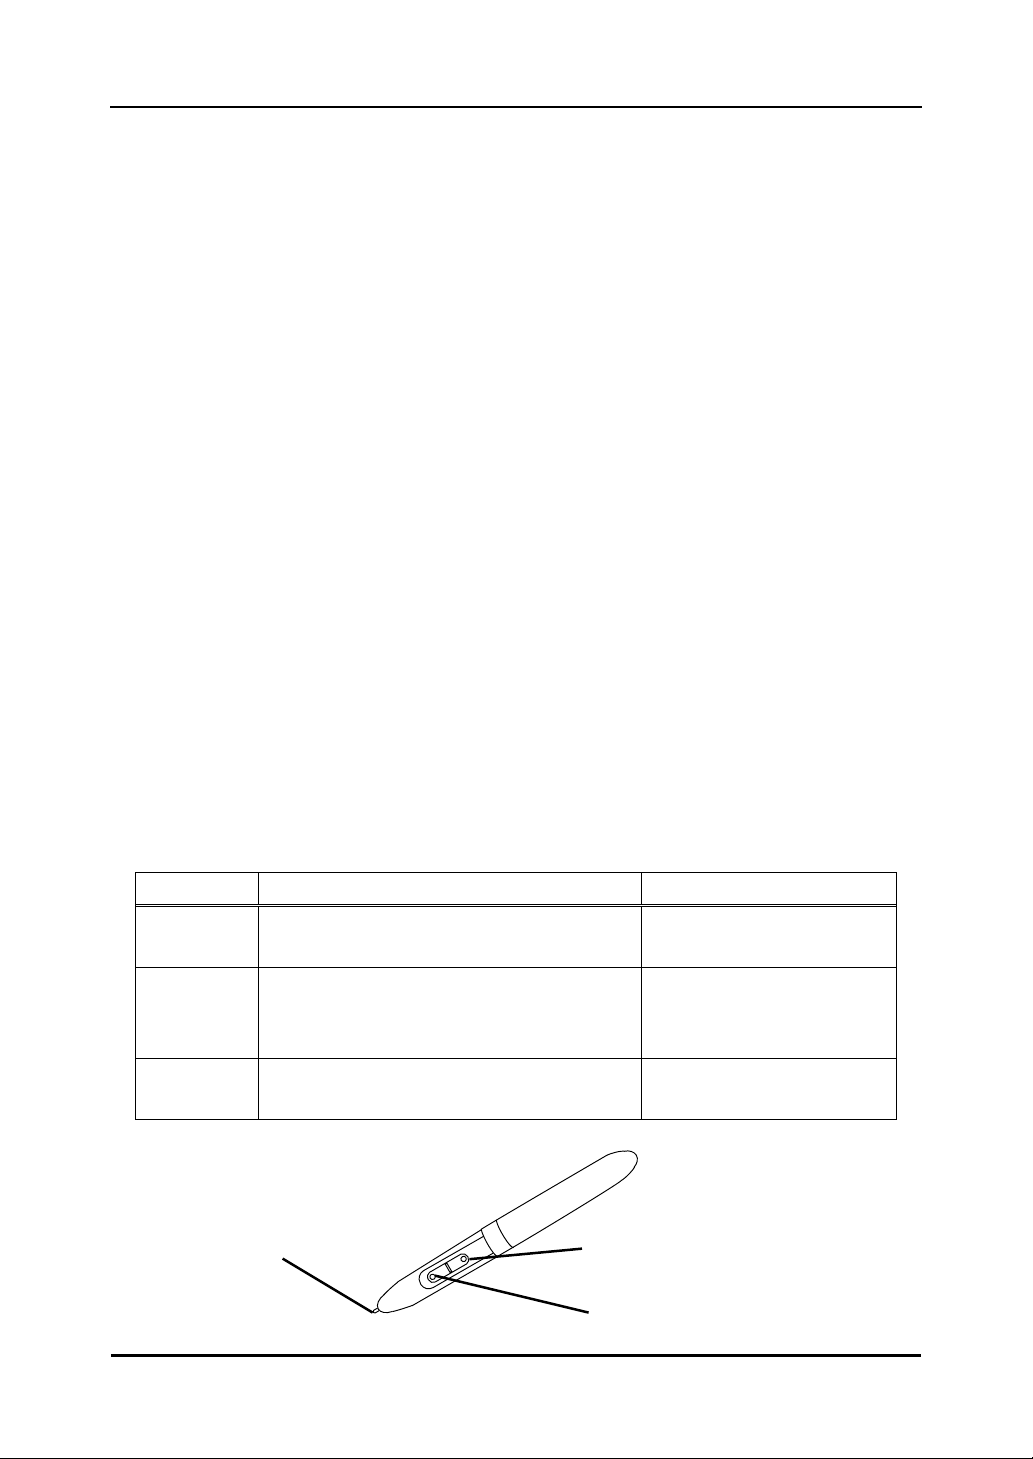
The stylus pen has one pen tip button, and two side buttons. Mouse actions can be assigned
to these three buttons. The default button settings are summarized in the following table.
Button User action Corresponding mouse action
Pen tip Press the pen tip against the tablet operating
area
Mouse left-click
Side Button
No.0
Press the button with the pen tip very
slightly above the tablet operating area
(5 mm or less)
Mouse left double-click
Side Button
No.1
Same as above Mouse right-click
Pen ti
p
Side Button No.0
Side Button No.1
2-6
StarBoard
W
T
-
1
Usage Procedures
Englis
h
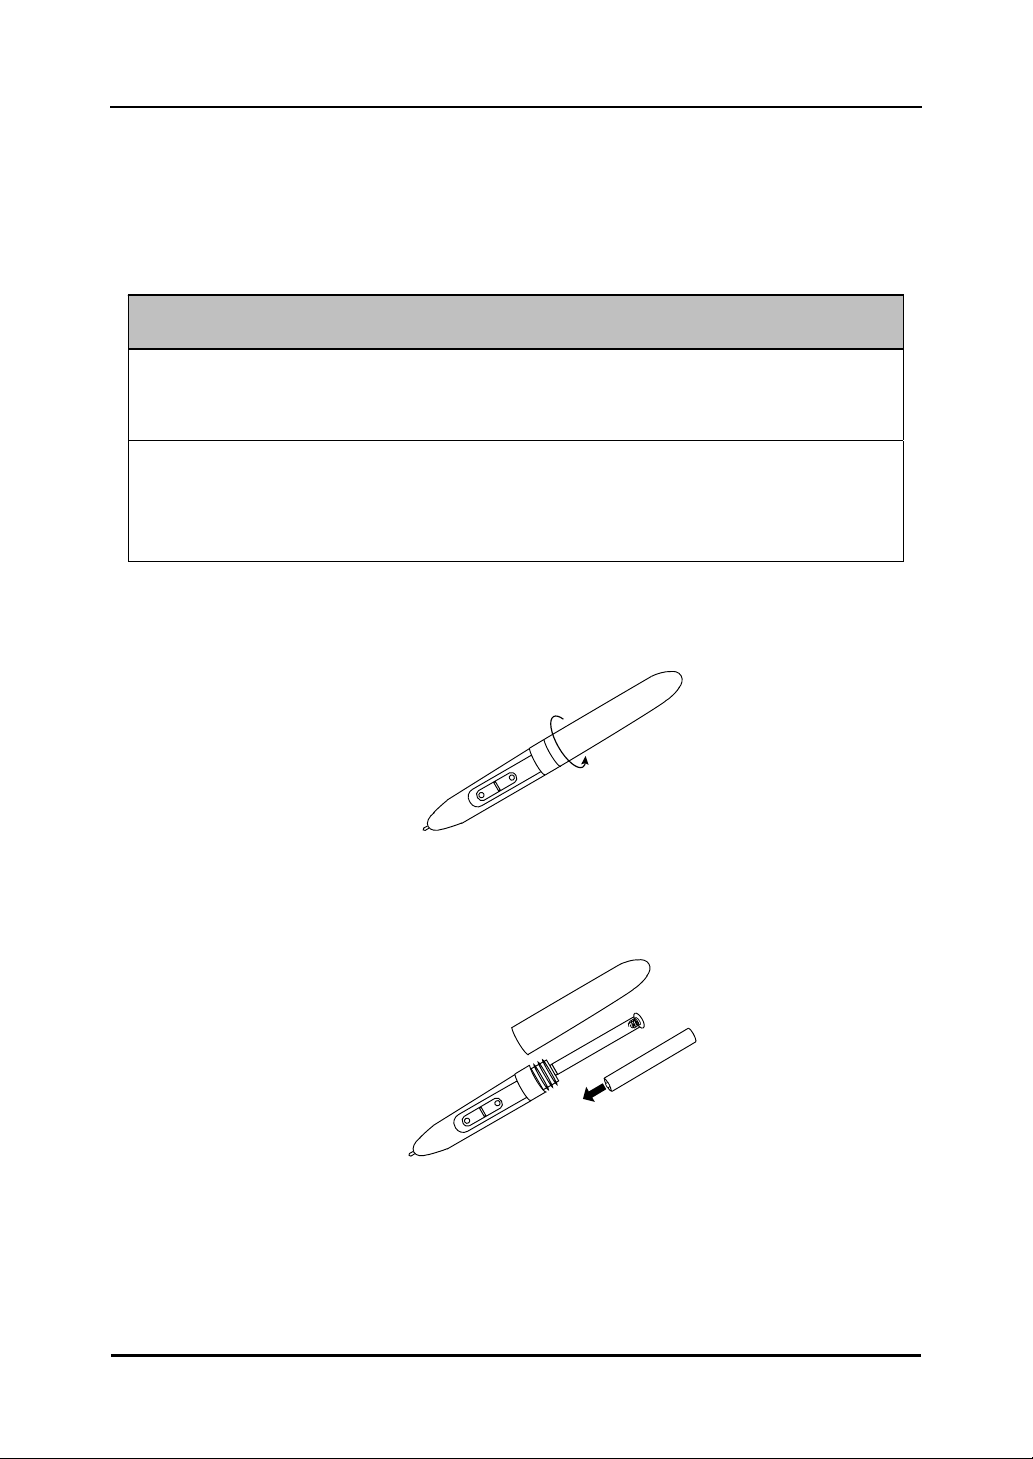
2.2.3 Changing the battery in the Stylus pen
The stylus pen contains a single AAA alkaline battery. If the pen begins to operate
erratically (e.g., if pen input is cut off), change the battery as described below. Note that
battery life is approximately 1680 hours under normal usage.
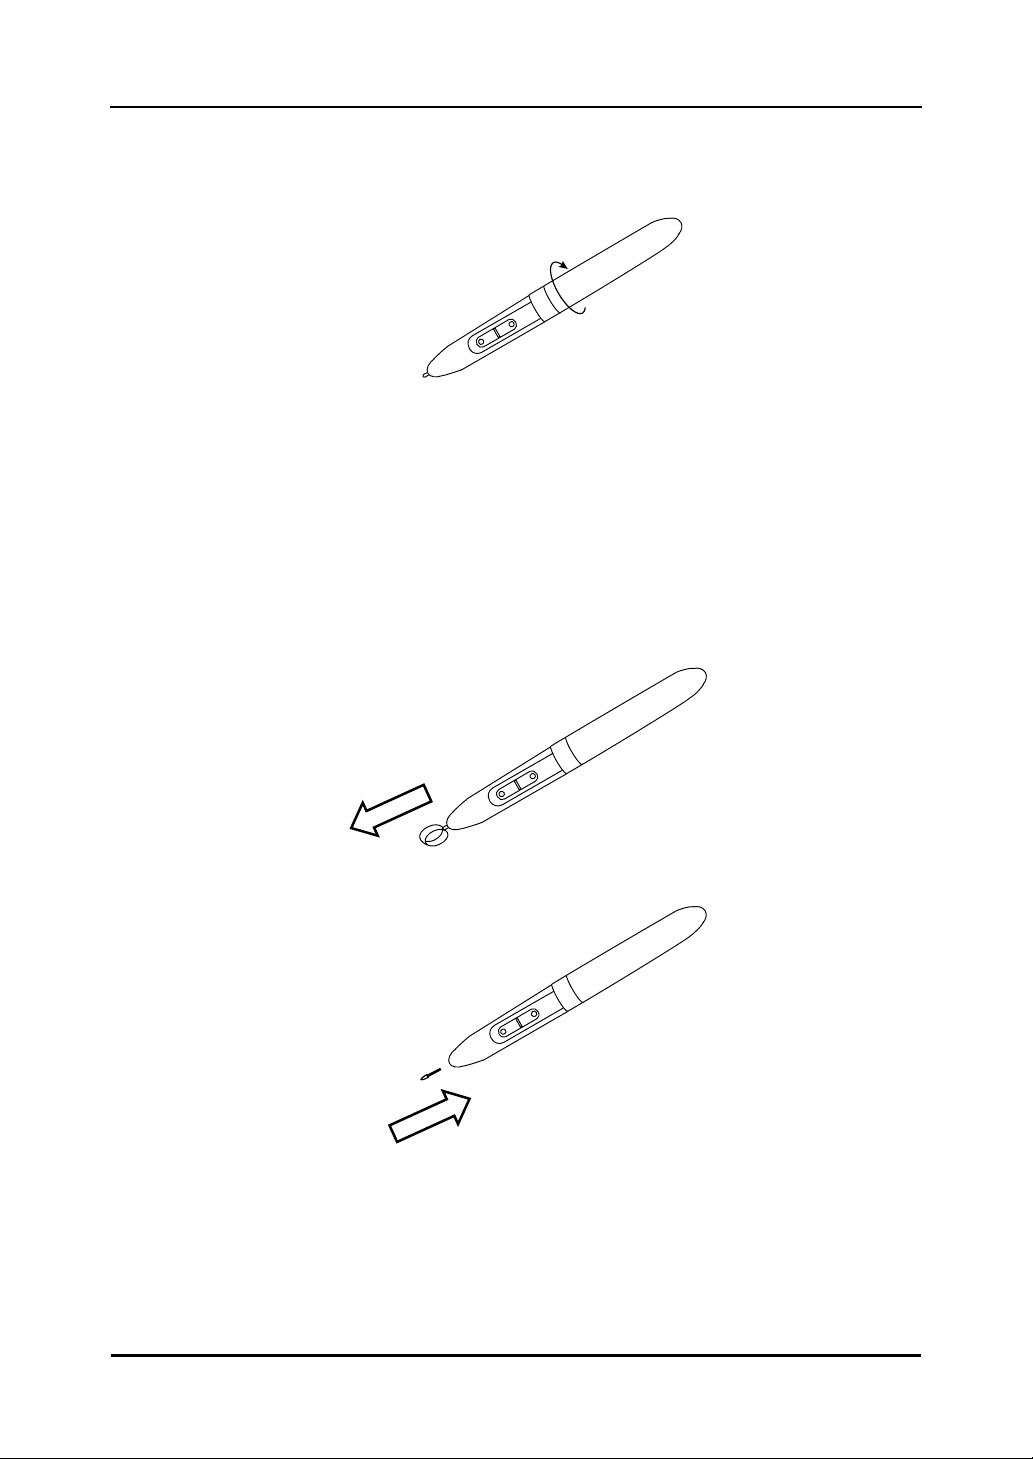
(1) Turn the stylus pen grip to separate the two halves.
(2) Remove the AAA alkaline battery contained in the grip, and insert a new cell with the
positive end facing the pen tip.
Be sure to orient the battery correctly.
Do not reverse the + and - terminals of the battery, and use only the specified type of battery.
Otherwise, it will overheat and fail.
When changing the battery, be careful not to close the pen’s rear part too
forcefully.
If too much force is applied when closing the rear part of the stylus pen, the pen may be
damaged.
+
-
NOTICE
2-7
StarBoard
W
T
-
1
Usage Procedures
Englis
h
(3) Put the stylus pen back together.
2.2.4 Replacing the Stylus pen Tip
When the stylus pen tip wears down and becomes too short, replace it as described below.
(1) Using the special pin set, remove the stylus pen tip.
(2) Insert a new pen tip into the stylus pen.
3-1
StarBoard
W
T
-
1
Start to use
Englis
h
3. Start to use
3.1 Setup Hardware
Before starting installation, tablet and stylus pen needs to be ready.
(1) Insert a battery to the stylus pen.
(2) Turn on the tablet.
3.2 Setup Software
3.2.1 For Windows User
Setup is not necessary when using StarBoard Software 8.11 or later.
In this case, do not install the included setup software.
Use either StarBoard Software or the setup software.
(1) Insert ’WT-1 Setup Software for Windows’ CD to your PC.
(2) Click ‘Macro Key Manager’.
Installation will start automatically.
(3) After the installation, select ‘Yes, I want to restart my computer now’ and then click ‘Finish’.
3.2.2 For Mac User
(1) Insert ’WT-1 Setup Software for Mac’ CD to your PC.
(2) Double-click ‘Pen Pad Tablet Driver’ to install Pen Pad Driver.
Keep pressing 3seconds or longer.
3-2
StarBoard
W
T
-
1
Start to use
Englis
h
3.3 How to connect WT-1
If you would like to use WT-1 in the case which needs to connect in wireless, please
connect WT-1 and PC as follows. Perform pairing the first time you use the WT-1 or in case of
communication problems with the 2.4G RF adaptor. Press the connection buttons on the back
of the tablet and on the 2.4G RF adaptor.
To Connect
(1) Turn the Tablet on.
(2) Connect the 2.4G RF adaptor to the PC.
(3) Press the connecting buttons on the back of the tablet and on the 2.4G RF adaptor at
the same time. (While the LED indicator is flashing, press the connecting button on the
back of the tablet.)
(4) When pairing is successful, a number is displayed on the LCD indicator.
• The receiving quality of the tablet may be influenced by environment. The best
environment for the tablet is where no other cordless products are functioning, such as
microwave ovens.
• Cement walls and wooden walls absorb radio wave and decrease receiving quality. Open
space without barriers is the best environment for the tablet.
Connecting environment
(1)
(3)
(3)
(2)
(4)
4-1
Englis
h
StarBoard
W
T
-
1
Appendix
4. Appendix
4.1 Troubleshooting
First, check adjustments and handling methods and check for poor cable connections.
Those are often the causes of problems when nothing is actually broken.
Connection problems
In this case Check this And do this
Is the 2.4G RF adaptor
connected to the PC
properly?
If it is connected properly, LED light
on. Otherwise, please unplug and
replug the 2.4G RF adaptor.
Was system setup done in
the proper order?
Setup system in proper order. (For
details on how to setup the system, see
‘3. Start to use’ on page 3-1 of this
User’s Guide.)
Software may be damaged
or did not install correctly.
Uninstall the related software, and then
reinstall. (For details on how to setup
the system, see ‘3.2. Setup Software’ on
page 3-1 of this User’s Guide.)
Are there any wireless
devices located nearby
WT-1 such as cordless
phone, video transmitters, or
radio transmitters?
2.4G RF uses 2.4GHz unlicensed ISM
band. Other wireless devices may
caused unstable connection. So use the
WT-1 away from other wireless
devices.
Are there any electronic
devices located nearby
WT-1 such as microwave
ovens or radio transmitters
that emit electromagnetic
noise?
This product is susceptible to
electromagnetic noise, so use the
StarBoard away from devices that emit
noise.
Were the batteries
full-charged?
If the battery is not charged enough,
WT-1 may not work properly. Charge
the batteries.
WT-1 does not work.
Other Contact technical support.
Is the USB cable connected
properly?
Check connection of USB cable. WT-1 is not charged.
Other Contact technical support.
4-2
Englis
h
StarBoard
W
T
-
1
Appendix
Stylus pen-related problems
In this case Check this And do this
Is battery worn out? Replace stylus pen battery.
(For details on how to change the
battery, see “2.2.3 Changing the
Battery in the Stylus pen” on page 2-6
of this User’s Guide.)
Is pen tip worn down? Check if the pen tip is worn down or
is too short.
(For details on how to replace the
stylus pen tip, see “2.2.4 Replacing
the Stylus pen Tip” on page 2-7 of this
User’s Guide.)
Restart Windows and StarBoard
Software.
Stylus pen does not operate.
Other
Contact technical support.
StarBoard Software-related problems
In this case Check this And do this
Stylus pen does not operate
under installing StarBoard
Software.
Is the connection OK? Check the connection from the
StarBoard Software. (See the
‘StarBoard Software user’s guide’.)
4-3
Englis
h
StarBoard
W
T
-
1
Appendix
4.2 System Specifications
Item Specification
Product name StarBoard WT-1
Model No StarBoard WT-1(NWT-101, NWT-101R), AH00222
Input system Electromagnetic induction
Interface 2.4GHz RF
Active area size 203.2mm(W) x 152.4mm(H) (8 x 6 inches)
External dimensions 278mm (W) x 265mm (H) x 23mm (D)
Function button(s) 16
Power supply Li-ion battery 3.7V, 700mAh
Battery use time 16 hours (Continuous use) *1
Battery Cycle life Approximately 400cycles*2*3
Battery charging
time
Approximately 2 hours
Weight 590g
Tablet
characteristics
Pen Stylus pen
(Uses one AAA alkaline battery; battery life: approximately
1680 hours*3)
Interface USB 1.1
RF range Up to 10m (limited condition)*4
Power supply USB bus power
Physical Dimensions
20.00mm (W) x 9.4mm (H) x 47.8mm (D)
2.4G RF adaptor
Weight 10g
AC adaptor Input : AC100~240V, 47Hz~63Hz, 0.15A
Output : 5VDC, 0.5A
Temperature During use:+10~+35℃, in storage:-20~+60℃ Environmental
conditions
Humidity During use:20~80%(no condensation),
In storage:20~95%(no condensation)
Safety Standard approvals CE, FCC class B
OS Required Windows 2000/XP/Vista, Mac 10.4 above available
Software Required (Macro Key Manager) Version 3.35 or higher
(Pen Pad Tablet Driver) Version 1.69 or higher
(StarBoard Software) Version 8.11 or higher
*1 Estimate based on usage within cycle life.
*2
After the battery is recharged approximately 400 times, it will retain only 80% of the
original capacity after a full charge.
*3
Battery life varies depending on the temperature and humidity of the usage environment.
*4
Distance varies depending on the usage environment.
4-4
Englis
h
StarBoard
W
T
-
1
Appendix
4.3 Battery Replacement
The built-in lithium-ion (Li-ion) battery has a useful life of approximately two years.
Continuing to use the battery after this period poses a risk of battery overheating, rupture, or
fire.
If you notice something unusual when charging or using the battery (such as unusual odors,
overheating, discoloration, or deformation), discontinue use and request service.
Li-ion batteries are generally not affected by the so-called battery memory effect from
repeated use and recharging, and it is claimed that they last longer than other rechargeable
batteries.
For this reason, no clear values for the useful life (in terms of cycles of use and recharging) are
defined. However, battery capacity does decline after repeated use and recharging. The point
at which batteries can only be charged to about 80% of the original capacity is defined as their
cycle life. The cycle life of the tablet battery is approximately 400 charges.
Although you can continue to use the battery after this point, if the battery only lasts for about
8 hours after a full charge, the battery has reached the end of its useful life. Request
replacement at this time.
4.4 Replaceable Parts
(1) AAA alkaline battery
(2) Spare pen tip
For details on obtaining them, contact your dealer or a support centre.
Do not perform unauthorized disassembly of the WT-1. It may pose a risk of injury from
fire or electric shock, and may damage the WT-1. Contact a customer service center
regarding battery replacement.
CAUTION
4-5
Englis
h
StarBoard
W
T
-
1
Appendix
4.5 Provisions of Product Warranty
1. During the free warranty service period, if a malfunction occurs during normal use, the
malfunction will be corrected without charge, according to the provisions of the
warranty. Furthermore, if the customer registration card accompanying the warranty is
not returned to our company, the customer information will not be registered, so free
repairs might be unavailable. After receiving this product, please immediately fill out
and return this customer registration card.
2. The warranty coverage is as listed in the following table:
Legend: + Covered by warranty (excluding wear and physical damage)
– Not covered by warranty
3. Please refer to the warranty about this product’s warranty service period.
4. Even during the warranty period, there will be a repair charge in the following cases:
(1)If the registration card accompanying the warranty is not returned to our company.
(2)If the warranty is not presented.
(3)If specified fields on the registration card accompanying the warranty are not
completed, or if the wording has been changed without authorisation.
(4)The warranty applies only to the original purchasers. (It does not apply to a third
party to whom the customer resold this product.)
(5)In the event of a malfunction or damage resulting from the customer’s improper
handling (e.g., a fall, impact, etc., caused by the customer during transportation or
movement).
(6)In the event of problems resulting from handling contrary to the handling and
precautions mentioned in this user’s guide.
(7)In the event of failure or damage resulting from abnormal voltages, pollution or
other natural disasters (e.g., fire, earthquake, lightning).
(8)In the event of a malfunction in this product caused by the connection to this
product of equipment other than the equipment specified by our company.
(9)In the event that there is no abnormality in this product, but a defect in a part other
Product Name Part Name Warranty Coverage
2.4G RF Tablet + StarBoard
Stylus pen +
2.4G RF adaptor +
AC adaptor +
AC adaptor plug +
Replacement tip for Stylus pen –
Other parts –

4-6
Englis
h
StarBoard
W
T
-
1
Appendix
than this product was detected or remedied.
(10)In the event of ordinary wear and tear, wear, deterioration, etc., of consumables,
even during normal use.
5. If this product malfunctions, review the contents of this user’s guide. If the problems
remain irreparable, contact technical support. Technical support will determine
whether or not the product must be repaired, so please contact them. If the customer
sends the product to our company without RMA (Return Merchandise Authorisation)
number, it might not be covered by warranty.
6. As a rule, the customer is responsible for shipping charges required to send all or part
of the product for repair, etc. Our company will assume responsibility for the return
shipping to the customer.
7. This warranty does not cover labour fees for repair-associated equipment assembly or
disassembly.
8. Incidental damage caused by the failure of this product (e.g., loss of profit that should
have resulted from the use of this product) is outside the scope of this warranty.
9. The aforementioned provisions define this warranty, and they supersede those of all
express or implied warranties that include legal defect liability.
3TAR"OARD745SERgS'UIDE
74
74
CAUTION
●
Do not use this product near water.
●
Do not place a heavy object on the Tablet and USB cable, heat or pull it.
●
Always keep the device more that 6 inches (15.3 centimeters) from the
pacemaker.
●
Be careful about the locations of the USB cable, etc.
●
Do not leave this product or any of its accessories on the floor.
●
Do not perform unauthorized disassembly of the WT-1.
It may pose a risk of injury from fire or electric shock, and may
damage the WT-1. Contact a customer service center regarding battery
replacement.
●
Securely insert the AC adaptor into the power socket.
●
Do not plug in the AC adaptor with a wet hand.
●
Use the product at the indicated power supply voltage.
●
DO NOT keep plugging for long periods.
For more detailed information about cautions, please refer the
"StarBoard WT-1 User's guide" in "WT-1 Setup Software".
VORSICHT
●
Dieses Gerät nicht in der Nähe von Wasser verwenden.
●
Keine schweren Gegenstände auf dem Tablett oder dem USB-Kabel
abstellen, das Kabel nicht erhitzen und nicht am Kabel ziehen.
●
Halten Sie das Gerät stets in einem Abstand von über 15,3 cm vom
Herzschrittmacher entfernt.
●
Verlegen Sie USB-Kabel etc sorgfältig.
●
Dieses Gerät und sein Zubehör nicht auf dem Boden liegen lassen.
●
Bauen Sie das WT-1 auf keinen Fall selbst auseinander.
Es besteht Verletzungsgefahr durch Feuer oder elektrischen Schlag,
und das WT-1 kann beschädigt werden. Wenden Sie sich zum
Auswechseln des Akkus an den Kundendienst.
●
Den Netzgerät stets fest an die Netzsteckdose anschließen.
●
Fassen Sie den Netzgerät beim Einstecken nicht mit nassen Händen
an.
●
Dieses Gerät ausschließlich mit der angegebenen Netzspannung
betreiben.
●
Das Gerät darf NICHT über einen längeren Zeitraum angeschlossen
sein.
Sie finden ausführliche Informationen zu den Warnhinweisen im
"StarBoard WT-1 Benutzerhandbuch" auf der CD "WT-1 Setup Software".
ATTENTION
●
Ne pas utiliser près de points d’eau.
●
Évitez de poser des objets lourds sur la tablette et le câble USB,
de les chauffer ou de tirer dessus.
●
Maintenez toujours une distance de plus de 15,3 cm (6 pouces)
entre l’appareil et un pacemaker.
●
Choisissez avec précaution les emplacements du câble d’USB, etc.
●
Ne laissez pas ce produit ni ses accessoires par terre.
●
Ne procédez pas à un démontage non autorisé du WT-1.
Ceci peut présenter un risque de blessure suite à un incendie ou
une électrocution, et pourrait endommager le WT-1.
Prenez contact avec un centre d’attention clientèle à propos du
remplacement des piles.
●
Veillez à bien insérer la l’adaptateur secteur dans la prise de courant.
●
Ne branchez pas la l’adaptateur secteur dans la prise de courant avec
les mains humides.
●
Se servir de cet appareil à la tension d’alimentation électrique indiquée.
●
ÉVITEZ de laisser branché sur des périodes prolongées.
Pour de plus amples informations sur les mises en garde, reportez-vous au
«Guide de l’utilisateur du StarBoard WT-1» dans le «WT-1 Setup Software».
ATTENZIONE
●
Non utilizzare questo prodotto vicino all’acqua.
●
Non mettere oggetti pesanti sulla tavoletta e sul cavo USB,
e non sottoporli a calore o tirarli.
●
Tenere sempre il dispositivo a più di 15,3 cm di distanza da un
pacemaker.
●
Prestare attenzione alla sistemazione del cavo USB, ecc.
●
Non mettere il prodotto né i relativi accessori sul pavimento.
●
Non smontare senza autorizzazione il WT-1.
Potrebbe derivarne il rischio di incendio o scossa elettrica e il WT-1
potrebbe venire danneggiato.Per la sostituzione della batteria,
contattare un centro di assistenza clienti.
●
Inserire saldamente la l'adattatore C.A. nella presa.
●
Non inserire la l'adattatore C.A. con le mani bagnate.
●
Usare il prodotto con la tensione di alimentazione indicata.
●
NON mantenere collegato per lunghi periodi.
Per informazioni più dettagliate relative alle avvertenze, consultare
la "Guida per l'utente di StarBoard WT-1" in "WT-1 Setup Software".
PRECAUCIÓN
●
No utilice este producto cerca del agua.
●
No ponga objetos pesados sobre la pizarra y el cable USB,
no caliente el cable ni tire de él.
●
Mantenga alejado el dispositivo a más de 15,3 centímetros (6 pulgadas)
del marcapasos.
●
Tenga cuidado con la ubicación del cable USB, etc.
●
No deje este producto ni ninguno de sus accesorios en el suelo.
●
Bauen Sie das WT-1 auf keinen Fall selbst auseinander.
Es besteht Verletzungsgefahr durch Feuer oder elektrischen Schlag,
und das WT-1 kann beschädigt werden. Wenden Sie sich zum
Auswechseln des Akkus an den Kundendienst.
●
Inserte firmemente el enchufe en la toma de alimentación.
●
No introduzca el enchufe en la toma de alimentación con las manos
húmedas.
●
Utilice el producto con la tensión de suministro de alimentación
indicada.
●
NO dejar enchufado durante largos periodos de tiempo.
Para obtener información más detallada sobre las precauciones,
consulte "Manual del usuario de StarBoard WT-1" en "StarBoard WT-1
Setup Software".
Setup Hardware
1. Insert batteries to pen.
AAA batteries
Do not reverse the + and - terminals of the battery.
2. Please full-charge the batteries, before the first usage.
Charging the tablet takes approximately 2 hours.
AC adaptor Mode
Connect the tablet and the AC adaptor with the USB cable, and then
plug the AC adaptor into an electrical outlet.
PC Mode
Turn on the PC. Connect the tablet to the PC with the USB cable.
# When charging the tablet from a PC, unplug any other USB devices
from the port before connecting the tablet. If other devices are
connected, use another port or charge the tablet in AC adaptor mode.
Setup Software
For Windows User
Setup is not necessary when using StarBoard Software 8.11 or later.
In this case, do not install the included setup software.
Use either StarBoard Software or the setup software.
(1) Insert ’WT-1 Setup Software for Windows’ CD to your PC.
(2) Click ‘Macro Key Manager’. Installation will start automatically.
(3) After the installation, select ‘Yes, I want to restart my computer
now’ and then click ‘Finish’.
For Mac User
(1) Insert ’WT-1 Setup Software for Mac’ CD to your PC.
(2) Double-click ‘Pen Pad Tablet Driver’ to install Pen Pad Driver.
How to connect WT-1
If you would like to use WT-1 in the case which needs to connect in
wireless, please connect WT-1 and PC as follows. Perform pairing the
first time you use the WT-1 or in case of communication problems
with the 2.4G RF adaptor. Press the connection buttons on the back of
the tablet and on the 2.4G RF adaptor.
(1) Turn the Tablet on.
(2) Connect the 2.4G RF adaptor to the PC.
(3) Press the connecting buttons on the back of the tablet and on the
2.4G RF adaptor at the same time. (While the LED indicator is
flashing, press the connecting button on the back of the tablet.)
(4) When pairing is successful, a number is displayed on the LCD
indicator.
For more detailed information, please refer the ‘StarBoard
WT-1 User's guide’ in ‘WT-1 Setup Software’ CD.
Einrichtung der Hardware
1. Setzen Sie die Batterien für Stift ein.
AAA-Batterien
Die Pole + und - müssen in der richtigen Reihenfolge angeschlossen
werden.
2. Vor der ersten Verwendung müssen die Batterien vollständig geladen
werden.
Der Ladevorgang für das Tablett dauert ca. 2 Stunden.
Netzgerät-Modus
Verbinden Sie Tablett und Netzgerät mit dem USB-Kabel. Schließen
Sie das Netzgerät anschließend an eine Netzsteckdose an.
PC-Modus
Schalten Sie den PC ein. Verbinden Sie Tablett und PC mit dem
USB-Kabel.
# Wenn Sie das Tablett über einen PC laden, ziehen Sie vor dem
Anschließen des Tablettes alle anderen USB-Geräte vom PC ab. Wenn
andere Geräte angeschlossen sind, verwenden Sie einen anderen
Anschluss oder laden Sie das Tablett mit dem Netzgerät auf.
Einrichtung der Software
Für Windows-Benutzer
Das Setup ist nicht erforderlich, wenn Sie StarBoard Software 8.11
oder eine spätere Version verwenden.
Installieren Sie in diesem Fall nicht die mitgelieferte Setup-Software.
Verwenden Sie entweder StarBoard Software oder die Setup-Software.
(1) Legen Sie die CD " WT-1 Setup Software for Windows " in Ihren
PC ein.
(2) Klicken Sie auf " Macro Key Manager ". Die Installation startet
automatisch.
(3) Wählen Sie nach der Installation "Ja, Computer jetzt neu starten.",
und klicken Sie dann auf "Fertig stellen".
Für Mac-Benutzer
(1) Legen Sie die CD " WT-1 Setup Software for Mac " in Ihren PC
ein.
(2) Doppelklicken Sie auf " Pen Pad Tablet Driver ", um den Pen
Pad-Treiber zu installieren.
Herstellen einer Verbindung zum WT-1
Wenn Sie das WT-1 mit einer drahtlosen Verbindung verwenden
möchten, schließen Sie das WT-1 und den PC wie folgt an. Führen Sie
den Pairing-Prozess aus, wenn Sie das WT-1 zum ersten Mal
verwenden oder wenn Kommunikationsprobleme mit dem 2.4G
RF-Adapter auftreten. Drücken Sie die Verbindungstasten auf der
Rückseite des Tablettes und am 2.4G RF-Adapter.
(1) Schalten Sie das Tablett ein.
(2) Schließen Sie den 2.4G RF-Adapter an den PC an.
(3) Drücken Sie gleichzeitig die Verbindungstasten auf der Rückseite
des Tablettes und am 2.4G RF-Adapter. (Während die LED-Anzeige
blinkt, drücken Sie die Verbindungstaste auf der Rückseite des
Tablets.)
(4) Nach erfolgreichem Pairing wird auf der LCD-Anzeige eine
Nummer angezeigt.
Sie finden ausführliche Informationen im "StarBoard
WT-1 Benutzerhandbuch" auf der CD "WT-1 Setup
Software".
Quick Start Guide
+
-
English
(1)
(3)
(3)
(2)
(4)
Deutsch
+
-
(1)
(3)
(3)
(2)
(4)
Installer le matériel
1. Insérez les piles dans le stylet.
Pile AAA
Évitez d’inverser les bornes + et - de la batterie.
2. Chargez complètement les piles avant la première utilisation.
La recharge de la tablette prend environ 2 heures.
Mode adaptateur secteur
Raccordez la tablette et l’adaptateur secteur au moyen du câble USB,
puis branchez l’adaptateur secteur dans une prise électrique.
Mode ordinateur
Mettez l’ordinateur sous tension. Raccordez la tablette à l’ordinateur au
moyen du câble USB.
# Lorsque vous rechargez la tablette depuis un ordinateur, débranchez
tout autre périphérique USB du port avant de brancher la tablette. Si
d’autres périphériques sont branchés, utilisez un autre port ou
rechargez la tablette en mode adaptateur secteur.
Installer le logiciel
Pour les utilisateurs Windows
La configuration est inutile lorsque vous utilisez le StarBoard Software
8.11 ou ultérieur.
Dans ce cas, n’installez pas le logiciel de configuration fourni.
Utilisez soit le StarBoard Software, soit le logiciel de configuration.
(1) Insérez le CD « WT-1 Setup Software for Windows » dans
l’ordinateur.
(2) Cliquez sur « Macro Key Manager». L’installation est
automatiquement lancée.
(3) Après l’installation, sélectionnez « Oui, je veux redémarrer mon
ordinateur maintenant. », puis cliquez sur « Terminer ».
Pour les utilisateurs Mac
(1) Insérez le CD « WT-1 Setup Software for Mac » dans l’ordinateur.
(2) Double-clic sur « Pen Pad Tablet Driver » pour installer le Pen Pad
Driver.
Comment connecter la WT-1
Dans le cas d’une utilisation de la WT-1 via une connexion sans fil,
procédez comme suit pour la connecter à l’ordinateur. Procédez au
pairage la première fois que vous utilisez le WT-1 ou en cas de
problèmes de communication avec l’adaptateur RF 2.4G. Appuyez sur
les touches de connexion au dos de la tablette et sur l’adaptateur RF
2.4G.
(1) Allumez la tablette.
(2) Branchez l’ adaptateur RF 2.4G sur l’ordinateur au besoin.
(3) Appuyez sur les touches de connexion au dos de la tablette et sur
l’adaptateur RF 2.4G simultanément. (Pendant que le voyant DEL
clignote, appuyez sur la touche de
connexion au dos de la tablette.)
(4) Lorsque le pairage réussit, un numéro s’affiche sur l’indicateur
LCD.
Pour de plus amples informations, reportez-vous au
«Guide de l’utilisateur du StarBoard WT-1» dans le CD
«WT-1 Setup Software».
Installazione hardware
1. Inserire le batterie nella penna.
Batteria AAA
Non invertire la polarità + e - dei contatti della batteria.
2. Caricare completamente le batterie prima di utilizzarle per la prima
volta.
La carica del tablet richiede circa 2 ore.
Modalità adattatore C.A
Collegare il tablet e l'adattatore C.A. con il cavo USB, quindi inserire
l'adattatore C.A. in una presa
di rete.
Modalità PC
Accendere il PC. Collegare il tablet al PC con il cavo USB.
# Quando si carica il tablet da un PC, prima di collegare il tablet,
scollegare eventuali altre periferiche USB dalla porta. Se sono
collegate altre periferiche, usare una porta diversa o caricare il tablet
tramite l'adattatore C.A.
Configurare il software
Per gli utenti Windows
"L'impostazione non è necessaria quando si usa StarBoard Software
8.11 o successivo.
In tal caso, non installare il software di impostazione in dotazione.
Usare il StarBoard Software o il software di impostazione. "
(1) Inserire il CD ‘WT-1 Setup Software for Windows’ nel PC.
(2) Fare clic su ‘Macro Key Manager’. L’installazione di Macro Key
Manager si avvia automaticamente.
(3) Dopo l’installazione, selezionare ‘Riavvia il computer adesso.’,
quindi fare clic su ‘Fine’.
Per gli utenti Mac
(1) Inserire il CD ‘WT-1 Setup Software for Mac’ nel PC.
(2) Fare Doppio clic su ‘Pen Pad Tablet Driver’ per installare il Pen
Pad Driver.
Come collegare e scollegare WT-1
Se si desidera utilizzare la tavoletta WT-1 in situazioni in cui è
necessario un collegamento
senza fili, collegare la WT-1 e il PC nel modo seguente. Effettuare il
pairing la prima volta che si usa il WT-1 o se si verificano problemi di
comunicazione con l'adattatore 2.4G RF. Premere i pulsanti di
collegamento sul lato posteriore del tablet e sull'adattatore 2.4G RF.
(1) Accendere la tavoletta.
(2) Collegare l'adattatore 2.4G RF al PC, se necessario.
(3) Premere contemporaneamente i pulsanti di collegamento sul lato
posteriore del tablet e sull'adattatore 2.4G RF (premere il pulsante di
collegamento sul lato posteriore del tablet mentre l'indicatore LED
lampeggia).
(4) Quando il pairing è stato effettuato correttamente, sull'indicatore
LCD viene visualizzato un numero.
Per informazioni più dettagliate, consultare la "Guida
per l'utente di StarBoard WT-1" nel CD "WT-1 Setup
Software".
Instalación del hardware
1. Inserte las pilas en el lápiz.
Pilas AAA
No invierta los terminales + y – de la pila y use únicamente el tipo de
pila especificado.
2. Las pilas deben estar totalmente cargadas antes de usarlas por
primera vez.
La carga de la pizarra tarda aproximadamente 2 horas.
Modo adaptador de CA
Conecte la pizarra y el adaptador de CA con el cable USB, y luego
enchufe el adaptador de CA
en un tomacorriente.
Modo PC
Encienda el PC. Conecte la pizarra al PC mediante el cable USB.
# Si se está cargando la pizarra desde un PC, desenchufe cualquier otro
dispositivo USB que esté enchufado al puerto antes de conectar la
pizarra.
Si hay otros dispositivos conectados, use otro puerto o cargue la pizarra
en el modo de adaptador de CA.
Instalación del software
Para usuarios de Windows
La instalación no es necesaria si se está usando StarBoard Software
8.11 o una versión posterior.
En este caso, no instale el software de instalación incluido.
Use o bien StarBoard Software o bien el software de instalación.
(1) Inserte el CD ’WT-1 Setup Software for Windows’ en su PC.
(2) Haga clic en ‘Macro Key Manager’.La instalación de Macro Key
Manager se iniciará automáticamente.
(3)Después de la instalación, seleccione ‘Sí, deseo reiniciar el equipo
ahora.’ y haga clic en ‘Finalizar’.
Para usuarios de Mac
(1) Inserte el CD ’WT-1 Setup Software for Mac’ en su PC.
(2) Haga clic en ‘Pen Pad Tablet Driver’ para instalar el controlador de
Pen Pad.
Cómo conectar la WT-1
Si desea usar la WT-1 con una conexión inalámbrica, deberá conectar
la WT-1 y el PC del siguiente modo.
Ejecute el emparejamiento la primera vez que utilice la pizarra WT-1 o
en caso de que surjan problemas de comunicación con el adaptador RF
de 2,4 G. Presione los botones de conexión en laparte trasera de la
pizarra y en el adaptador RF de 2,4 G.
(1) Encienda la pizarra.
(2) Conecte el adaptador RF de 2,4 G al PC si es necesario.
(3) Presione los botones de conexión en la parte trasera de la pizarra y
en el adaptador RF de 2,4 G al mismo tiempo. (Mientras el indicador
LED está parpadeando, presione el botón de conexión en la parte
posterior de la pizarra.)
(4) Cuando se logra el emparejamiento, aparece un número en el
indicador LCD.
Para obtener más información, consulte "Manual del
usuario de StarBoard WT-1" en el CD "WT-1 Setup
Software".
Quick Start Guide
+
-
(1)
(3)
(3)
(2)
(4)
+
-
(1)
(3)
(3)
(2)
(4)
+
-
(1)
(3)
(3)
(2)
(4)
Français Italiano
Español