This booklet is made from 97% post-consumer recycled paper.
This booklet is printed with soy ink. Printed in Mexico
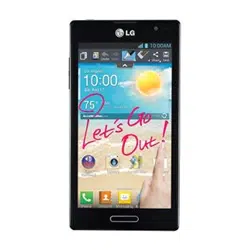
User Guide
MFL67791401 (1.0)
MW
User Guide
Guía del
Usuario

&RS\ULJKW/*(OHFWURQLFV,QF$OOULJKWVUHVHUYHG
/*DQGWKH/*ORJRDUHUHJLVWHUHGWUDGHPDUNVRI/*
*URXSDQGLWVUHODWHGHQWLWLHVDUHUHJLVWHUHG,QWXLWLRQLVD
WUDGHPDUNRI/*(OHFWURQLFV,QF$OORWKHUWUDGHPDUNVDUH
WKHSURSHUW\RIWKHLUUHVSHFWLYHRZQHUV

1
Important Customer Information
Before you read
Before getting started, please review the separate Product Safety and
Warranty Information guide for important product safety and warranty
information about your device.

2
Table of Contents
Important Customer Information...............................................1
Table of Contents .......................................................................2
Technical Details .........................................................................5
The Basics ...................................................................................8
Phone Overview .................................................................................................... 8
Help .......................................................................................................................11
Charging the Phone ............................................................................................12
Optimizing Battery Life ......................................................................................13
Turning the Phone On and Off ..........................................................................15
Phone’s Status Icons .........................................................................................20
Getting to Know the Home Screen ..................................................................22
Mini Canvas View ...............................................................................................23
Touchscreen ........................................................................................................ 26
Applications: How to View, Open and Switch ..................................................30
Working With Menus .........................................................................................34
Managing Notifications .....................................................................................35
Searching Your Phone and the Web ................................................................. 37
Locking the Screen ............................................................................................ 39
Customizing the Home Screen .........................................................................43
Connecting Quickly With Your Contacts ..........................................................45
QuickMemo™
......................................................................................................46
Calls .......................................................................................... 48
Placing and Ending Calls ..................................................................................48
Answering or Rejecting Calls ............................................................................50
Working with the Call Log .................................................................................52
Calling Your Contacts.........................................................................................53
Voice Dialer .........................................................................................................54
Options During a Call ........................................................................................54
Managing Multiple Calls ....................................................................................56
Listening to Your Voicemail ...............................................................................56

3
Table of Contents
Connecting to Networks and Devices ................................... 58
Connecting to Wi-Fi Networks .........................................................................58
Make Your Device a Mobile Hotspot .................................................................64
NFC ......................................................................................................................65
LG Tag+ ...............................................................................................................65
Using Tag+ writing ..............................................................................................65
Using Tag+ reading ............................................................................................66
Transfer Content.................................................................................................66
Web ........................................................................................... 68
Backup Assistant Plus .......................................................................................68
Browser ................................................................................................................ 70
Maps .................................................................................................................... 78
Checking the Weather ........................................................................................81
Changing Weather Settings ..............................................................................83
Communication ....................................................................... 84
Contacts ..............................................................................................................84
Email .................................................................................................................... 92
Visual Voicemail .................................................................................................. 95
Gmail ...................................................................................................................96
Talk ...................................................................................................................... 114
Entertainment ..........................................................................121
Camera ............................................................................................................... 121
Video Camera ................................................................................................... 126
Gallery ............................................................................................................... 129
Video Wiz .......................................................................................................... 132
Play Store .......................................................................................................... 135
Music ................................................................................................................. 138
Videos ................................................................................................................ 144
YouTube™ .......................................................................................................... 146
Voice Recorder ................................................................................................. 148

4
Table of Contents
Tools .........................................................................................150
Notebook ........................................................................................................... 150
Calendar ............................................................................................................ 152
Tasks .................................................................................................................. 159
Calculator ........................................................................................................... 161
Alarm/Clock ...................................................................................................... 162
Polaris Office 4 ................................................................................................ 166
FileShare ........................................................................................................... 168
SmartShare ....................................................................................................... 168
Settings ....................................................................................171
LG Smart Mobile Office ..........................................................191
Specifications ........................................................................204
Index .......................................................................................205

5
Technical Details
FCC RF Exposure Information
WARNING!
Read this information before operating the phone.
In August 1996, the Federal Communications Commission (FCC) of the
United States, with its action in Report and Order FCC 96-326, adopted
an updated safety standard for human exposure to Radio Frequency (RF)
electromagnetic energy emitted by FCC regulated transmitters. Those
guidelines are consistent with the safety standard previously set by both U.S.
and international standards bodies. The design of this phone complies with
the FCC guidelines and those international standards.
Bodily Contact During Operation
This device was tested for typical use with the back of the phone kept
0.39 inches (1.0 cm) from the body. To comply with FCC RF exposure
requirements, a minimum separation distance of 0.39 inches (1.0 cm)
must be maintained between the user’s body and the back of the
phone, including the antenna. Third-party belt-clips, holsters, and similar
accessories containing metallic components should not be used. Avoid
the use of accessories that cannot maintain 0.39 inches (1.0 cm) distance
between the user’s body and the back of the phone and have not been
tested for compliance with FCC RF exposure limits.
Vehicle-Mounted External Antenna
(Optional, if available.)
To satisfy FCC RF exposure requirements, keep 8 inches (20 cm) between
the user / bystander and vehicle-mounted external antenna. For more
information about RF exposure, visit the FCC website at www.fcc.gov.

6
Technical Details
FCC Notice and Cautions
This device and its accessories comply with part 15 of FCC rules.
Operation is subject to the following two conditions: (1) This device and its
accessories may not cause harmful interference, and (2) this device and its
accessories must accept any interference received, including interference
that causes undesired operation.
Any changes or modifications not expressly approved in this user guide
could void your warranty for this equipment. Use only the supplied antenna.
Use of unauthorized antennas (or modifications to the antenna) could
impair call quality, damage the phone, void your warranty and/or violate FCC
regulations.
Don’t use the phone with a damaged antenna. A damaged antenna could
cause a minor skin burn. Contact your local dealer for a replacement
antenna.
Part 15.19 statement
This device complies with part15 of FCC rules. Operation is subject to the
following two conditions:
(1) This device may not cause harmful interference.
(2) This device must accept any interference received, including interference
that may cause undesired operation.
Part 15.21 statement
Changes or modifications that are not expressly approved by the
manufacturer could void the user’s authority to operate the equipment.
Part 15.105 statement
This equipment has been tested and found to comply with the limits for a
class B digital device, pursuant to Part 15 of the FCC rules. These limits are
designed to provide reasonable protection against harmful interference in
a residential installation. This equipment generates, uses, and can radiate
radio frequency energy and, if not installed and used in accordance with
the instructions, may cause harmful interference to radio communications.
However, there is no guarantee that interference will not occur in a
particular installation. If you experience interference with reception

7
Technical Details
(e.g., television), determine if this equipment is causing the harmful
interference by turning the equipment off and then back on to see if the
interference is affected. If necessary, try correcting the interference by one
or more of the following measures:
- Reorient or relocate the receiving antenna.
- Increase the separation between the equipment and receiver.
- Connect the equipment into an outlet on a circuit different from that to
which the receiver is connected.
- Consult the dealer or an experienced radio/TV technician for help.
The phone operates on Verizon’s 4G network, based on Long Term
Evolution (LTE) technology and Mobile Broadband 4G networks in the
United States*.
Now you can connect easily at high speeds to the Internet, your corporate
Intranet, and your email while you’re away from the office.
*
Service not available everywhere. Visit website (verizonwireless.com/4G) for a
complete list of available areas.
*
Information subject to change.
Cautions
㻌
The user interface of Google applications (Google Search, Google
Maps, Navigation, etc.) can vary depending on its software version.
㻌
Locations are inaccurate when GPS and Wi-Fi are not set.
㻌
With the Android operating system, some available Play Store
applications only operate correctly with phones that have a specific
screen resolution.
Please be advised that some of the applications on the Play Store may
not be available for your phone due to LCD resolution requirement
that does not match your phone. In addition, please be aware that 3rd
party applications with programming defects may cause issues with
your phone, including lock ups and resets.
㻌
All the contents, including content the user created or downloaded,
will be deleted after performing the factory reset.
8
The Basics
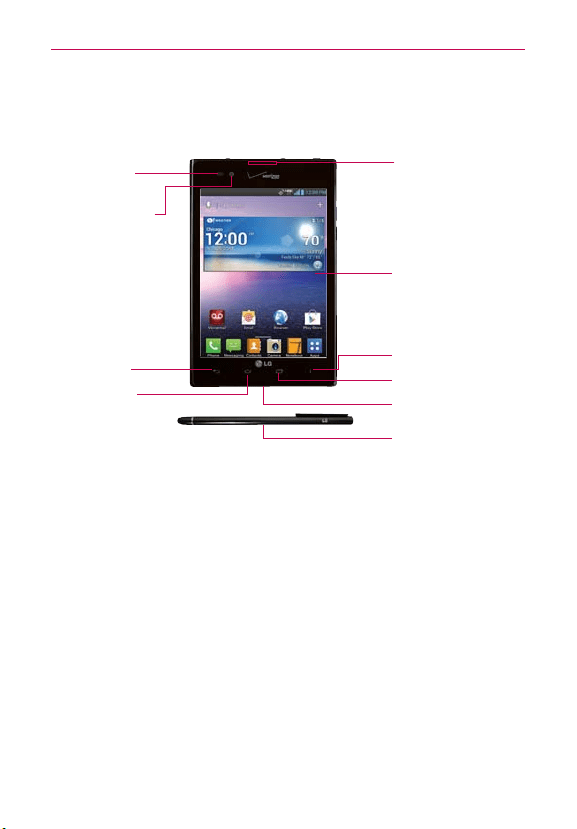
Phone Overview
Front View
❷
Front Camera
Lens
❸
Back Key
❹
Home Key
❻
Recent Apps Key
❾
Earpiece
❽
Home Screen
❼
Menu Key
❶
Proximity
Sensor
❺
Microphone
❿
Rubberdium™ Pen
NOTES
•
All screen shots in this guide are simulated. Actual displays may vary
.
•
Instructions to perform tasks in this guide are based on the default phone settings and
may change depending on the software version on your phone.
1. Proximity Sensor Senses proximity toward other objects (such as your
head) so that tap commands are not accidentally activated during a call.
NOTES
•
Do not block the sensor to avoid problems with the tap operations.
•
The use of a film cover produced by manufacturers other than LG may cause a
disturbance in tap operations, the display
, etc.
2. Front Camera Lens Use to take pictures and record videos of yourself.
You can also use this for video chatting. Keep it clean for optimal
performance.
3. Back Key Returns to the previous screen. Also closes pop-up display
items, such as menus, dialog boxes, and the on-screen keyboard.
4. Home Key Returns to the Home screen. If you’re already viewing one
of the Home screen extension canvases, it navigates you to the central
Home screen canvas.
9
The Basics
5. Microphone Transmits your voice to the other caller and is used for
voice-activated functions.
6. Recent Apps Key Opens the list of recently used applications. Touch
and hold an application on the list to open a context menu. To remove an
application from the list, touch and swipe it to the left or right.
7. Menu Key Opens an Options menu with selections that affect the
current screen or application, when available.
8. Home Screen Displays all of the information needed to operate your
phone, such as applications, call status, date, time, signal status, and
battery strength.
9. Earpiece Lets you hear callers and automated prompts.
10. Rubberdium™ Pen enables you to draw or write text on a captured
screen.
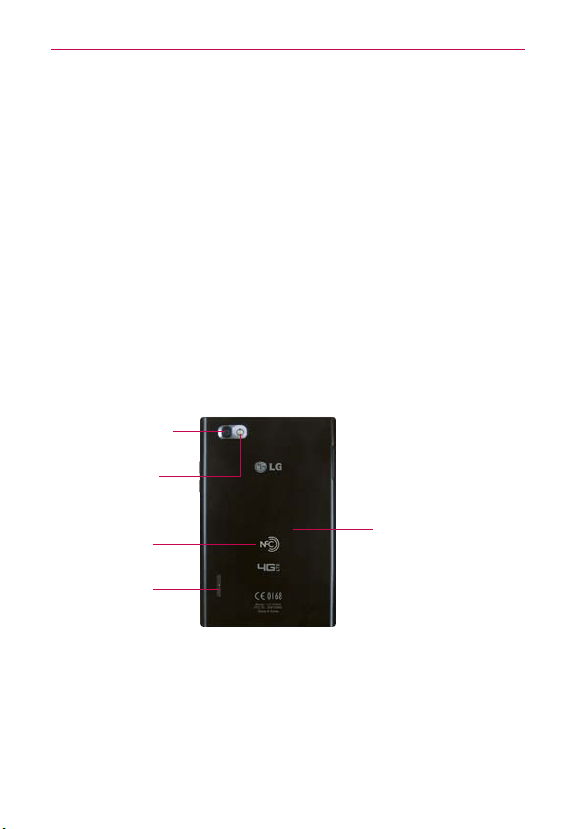
Rear View
Back Cover
Speaker
NFC
Touch point
LED Flash
Rear Camera
Lens
11. Rear Camera Lens Use to take pictures and record videos. Keep it
clean for optimal performance.
12. LED Flash Brightens up the captured image or recorded video when you
turn on the flash.
13. NFC Touchpoint Tap the back of your phone to an NFC tag or another
NFC compatible device in this location.
10
The Basics
14. Speaker Sound comes from the rear speaker instead of the earpiece
(e.g., the speakerphone function, music player function, etc.).
15. Back Cover The non-removable back cover encloses the battery
compartment.
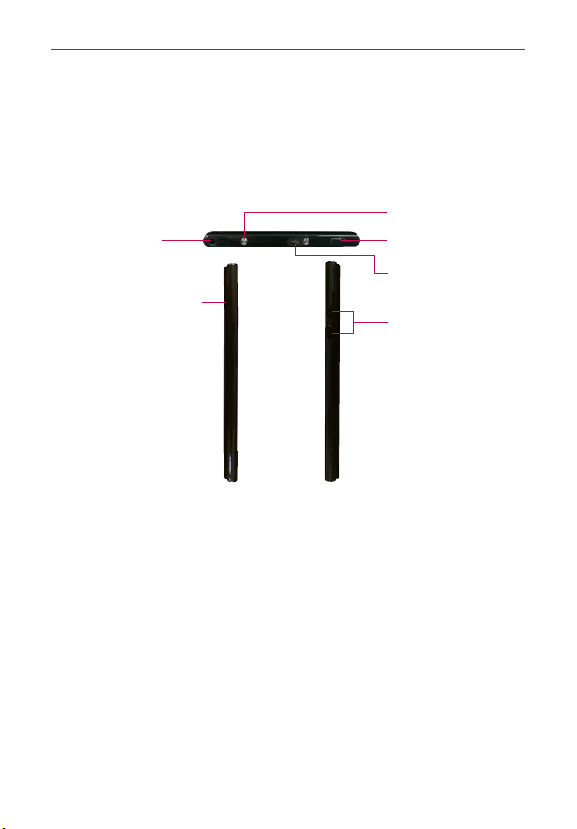
Top View and Side Views
USB/Charger
Port
Volume Keys
3.5mm
Headset Jack
SIM Card Slot
Power/Lock Key
QuickMemo Key
16. 3.5mm Headset Jack Allows you to plug in an optional headset for
convenient, hands-free conversations. You can also plug in headphones
to listen to music.
17. SIM Card Slot Open the SIM card slot cover and insert the SIM card
into the slot to connect to a network.
18. Volume Keys Allow you to adjust the ringer, the media volumes, or the
in-call volume during a call.
19. USB/Charger Port Allows you to connect the phone charger, USB
Cable, or other compatible accessories.
20. Power/Lock Key Press to lock/unlock the screen. Press and hold to
turn the phone on/off, restart it, activate/deactivate airplane mode, and
change the sound settings. If your screen turns off, press this key to
turn it back on.
21. QuickMemo Key Allows you to access the QuickMemo application and
draw notes using the current screen.
11
The Basics
Help
The Help application allows you to quickly and conveniently view
information about your phone, including the user guide and video tutorials.
To access Help, from the Home screen, tap Apps
> Help .
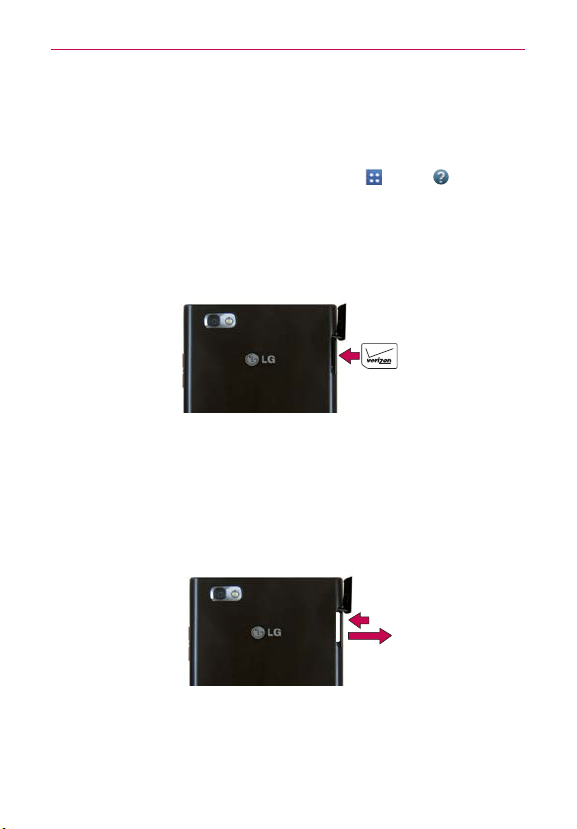
Insert the SIM card
1. With the phone face down, locate the SIM Card Slot and open the cover.
2. Position the SIM Card with the Verizon logo facing up and slide it into
place until it clicks.
Remove the SIM card
1. Locate the SIM Card Slot and open the cover.
2. Gently press the SIM Card inwards to release it, and remove from the
slot.
3. Close the cover by inserting the notch into the phone and pressing
down.
12
The Basics
Charging the Phone
Your phone comes with an adapter and a USB Cable which connect
together to charge your phone. To charge your phone:
NOTICE
Please use only an approved charging accessory to charge your phone.
Improper handling of the USB/Charger Port, as well as the use of an incompatible
charger, may cause damage to your phone and void the warranty.
1. Connect the USB Cable with the adapter. As shown below, the LG logo
on the USB Cable should face toward you.
USB Cable
Adapter
2. The USB/Charger Port, located at the top of the device, has a slide cover
to protect it. Slide the cover open, then correctly orient the cable with the
port and plug it into the port.
USB Cable
3. Plug it into an electrical outlet to begin charging.
Charging with the USB Cable and your computer
You can use your computer to charge your phone. To be able to charge with
the USB Cable, you need to have the necessary USB drivers installed on
your PC first. Connect one end of the USB Cable to the USB/Charger Port on
your phone (as shown above) and connect the other end to a USB port on
your PC. It is best to use the rear USB port when connecting to a desktop
PC. The USB hub should be powered by an external power source.
NOTE
If there is not enough charge in the battery to turn on the phone, the LED lights at the
bottom of the keypad flash to indicate that the battery is charging. Once the battery has
enough charge to turn the phone on, the flashing stops and the battery charge animation
appears on the touchscreen.

13
The Basics
Non-Removable Battery
Your device is equipped with an internal rechargeable battery which should
be replaced only by LG or an authorized LG repair center. You should never
attempt to open or disassemble this device yourself and doing so may
cause damage that voids your warranty.
NOTE
If your device freezes, press and hold the Power/Lock Key
for 10 seconds to reboot
the device.
Optimizing Battery Life
You can extend your battery’s life between charges by turning off features
that run in the background. You can also monitor how applications and
system resources consume battery power.
Tips to extend the life of your battery
㻌
Turn off radio communications that you aren’t using. If you aren’t
using Wi-Fi, Bluetooth, or GPS, use the Settings menu to turn them
off (Note that the GPS receiver is only turned on when you’re using an
application that makes use of it).
㻌
Turn down screen brightness and set a shorter screen timeout.
㻌
Turn off automatic syncing for Gmail, Calendar, Contacts, and other
applications if you don’t need it.
㻌
Use the Power saver mode switch in the Settings menu.
㻌
Use the Power Control widget to control data activity, Bluetooth
connection, GPS connection, syncing activity, and screen brightness.
㻌
Use the Quick settings in the Notifications Panel to control sound,
Bluetooth power, NFC power, GPS connection, and airplane mode.
To check the battery charge level
㻌
From the Home screen, tap Apps
> Settings > About phone >
Battery.
The battery status (Charging or Discharging) and level (as a percentage
of fully charged) will be displayed at the top of the screen.
14
The Basics
To monitor and control what uses the battery
The Battery use screen allows you to see which applications are consuming
the most battery power. Information on this screen allows you to identify
downloaded applications you may want to turn off when not being used, so
you can get the most out of your battery power.
㻌
From the Home screen, tap Apps
>
Settings
> About phone
> Battery > Battery use
. This screen displays battery usage times. It
lists all of the applications or services using battery power from the
greatest amount of energy used to the least amount.
㻌
Tap an application or service in the Battery use screen to see the
details about its power consumption, including either how long since
last connected to a power source or how long you were last running
on battery power. Different applications or services offer different
kinds of information, and they may even include options to modify the
settings so you can reduce power consumption by that application.
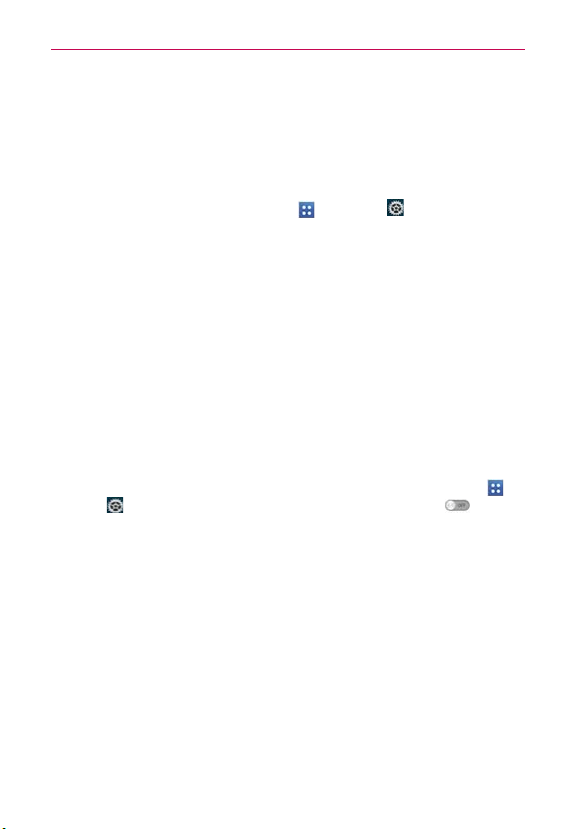
Power saver mode
If the battery charge level drops to low levels, the phone automatically
activates Power saver mode to conserve battery power until you can
recharge it. To activate this feature, from the Home screen, tap Apps
>
Settings
> Power saver
.
Then tap the Power saver switch
to turn
it on. You can set the phone to activate Power saver mode immediately,
when the charge drops to 10%, 20%, 30%, or 50%. If you turn off Power
saver mode, when the battery charge becomes low, a notification prompts
you to turn it on.

15
The Basics
Turning the Phone On and Off
Turning the phone on
㻌
Press and hold the Power/Lock Key
for a couple of seconds until
the screen turns on.
Turning the phone off
1. Press and hold the Power/Lock Key until the Phone options menu
appears.
2. Tap Power off in the dialog box that appears.
3. Tap OK to confirm that you want to turn off the phone.
Restarting the phone
1. Press and hold the Power/Lock Key until the Phone options menu
appears.
2. Tap Power off and restart in the dialog box that appears.
3. Tap OK to confirm that you want to restart the phone.
NOTE
If your device freezes, press and hold the Power/Lock Key
for 10 seconds to reboot
the device.
To unlock the phone
If you don’t use the phone for a while, the screen
and backlight will turn off to conserve battery power.
To unlock the phone:
1. Press the Power/Lock Key
. The default Lock
screen will appear.
2. Swipe the screen in any direction to unlock the
default Lock screen. To use a shortcut, swipe the
icon in any direction. The screen will unlock and
launch the application.
NOTE
•
The default Lock screen simply locks the screen to prevent unintentional actions.
For more security to guard against unauthorized use, you can an unlock requirement
(such as a pattern, PIN, password, or face recognition) that will need to be entered
to unlock it.
•
Different clock themes and shortcuts can be applied to the lock screen.

16
The Basics
About Lock Screen Improvement
Notification Viewing from Lock Screen
From the lock screen simply slide the Status Bar down to see the latest
notifications, all in one step. See "To open the Notifications panel" on page
35 for the reference.
Customizable Lock Screen
Customize by selecting a clock theme or any app on the phone and adding
a hot key for direct access from the lock screen. See "Customizing clocks &
shortcuts on the lock screen" on page 42 for the reference.
Face Unlock
Using the front-facing camera, you can use your face to unlock your phone
thanks to the facial recognition technology supported by your phone’s
operating system. Please note that this feature is only available after you
set up your Google account on your device. See "Face Unlock" on page 39
for the reference.
Selectively Clear Notifications by Swiping
After receiving several download, app upgrade, notification texts, and
emails, the Status Bar can get really full. There are times when users
want to keep some of the notifications in the bar while dismissing others,
just like a “to do” list. Now, with a swipe left or right, users can clear the
notification they want to remove from the list. See "To clear all notifications"
on page 36 for the reference.
To turn the phone sounds off
If you’re in a place where phone sounds may disturb others, you can quickly
silence your phone from the Home screen.
1. Press and hold the Power/Lock Key
until the Phone options menu
appears.
2. Tap the Silent mode icon
.
NOTE
Only one mode can be selected at a time. The currently activated mode (Silent, Vibration, or
Sounds) is underlined in blue. T
ap any of the sounds mode icons to switch to that mode.
OR

17
The Basics
Press the down Volume Key on the side of the phone until all sounds
are turned off.
NOTE
You can also use these keys to quickly turn the phone sounds back on. Press and hold
the Power/Lock Key
, then tap either the Vibrate mode icon or the Sounds
mode icon
. While in Silent mode, press the up Volume Key once to activate Vibration
mode and twice to turn on phone sounds (continue pressing to increase volume).
Setting Up Your Device
Follow the onscreen instructions to quickly set up your phone and email
accounts.
To set up your device, follow the steps below:
1. Select your language and tap Next.
2. If you've already inserted the SIM card, the device will automatically be
activated. Tap Next to continue.
3. On the Welcome screen, tap Next to set up your device.
4. If you are already subscribed, tap Next to continue to set up the email
accounts.
If not, put a checkmark in the Sync contacts checkbox and tap Next to
sign in Backup Assistant Plus or uncheck the checkbox to skip it.
5. Choose the type of email account you want to set up and configure it.
6. Read the Privacy caution and data usage information and tap the I agree
to share my location checkbox if you agree to share your location. Then
tap Next.
7. View the available Help information and touch Next to continue.
NOTE
After successfully setting up your device, you can choose to view options that teach you
about your new phone. These options include a quick reference guide, the user guide, a
watch and learn video tutorial, and an icon glossary
. View these options later by tapping
Help
on the Applications screen.
8. If you have a Google Account, tap Ye s and sign into your existing Google
Account. Otherwise, tap No, then tap Get an account to create an
account or Not now to set it up later. With a Google Account, Google
applications are automatically synced between your phone and computer
regardless of where you make an update.

18
The Basics
9. Read the Google & location information and tap the checkboxes if you
agree. Then tap .
10. Setup is complete. Tap Done with setup to use your phone.
Setting up your Google Account
1. At the Setup screen, tap Existing or New.
2. Enter your username and password or any other necessary information (if
creating an account), then tap
.
NOTE
Tap the Back Key
to close the keyboard.
3. Set up a payment method if necessary.
4. Complete the Backup and restore screen to allow your Google Account
to back up your apps, settings, and other data, then tap
.
5. Now your Gmail, Google Contacts, and Google Calendar events will all
be loaded to your phone automatically.
NOTE
This is automatic for the first Google account you add. When adding additional Google
accounts, you have to select which options to synchronize.

19
The Basics
You can use the area below to record your Google Account information for
future reference.
Username:[email protected]
Password:____________________________________________
Your Google Account
You must sign into a Google Account to use Gmail, Google Talk, Google
Calendar, and other Google Applications; to download applications from
the Play Store; to back up your settings to Google servers; and to take
advantage of other Google services on your phone.
IMPORTANT
•
If you don’t have a Google Account, you’re prompted to create one.
•
If you have an enterprise account through your company or other organization, your IT
department may have special instructions on how to sign into that account.
•
When you sign in, you’re prompted to enter your username and password using the
on-screen keyboard.
•
When you sign in, your contacts, Gmail messages, Calendar events, and other
information from these applications and services on the web are synchronized with
your phone.
•
If you don’
t sign into a Google Account during setup, you are prompted to sign in or to
create a Google Account the first time you start an application that requires one, such
as Gmail or Play Store.

20
The Basics
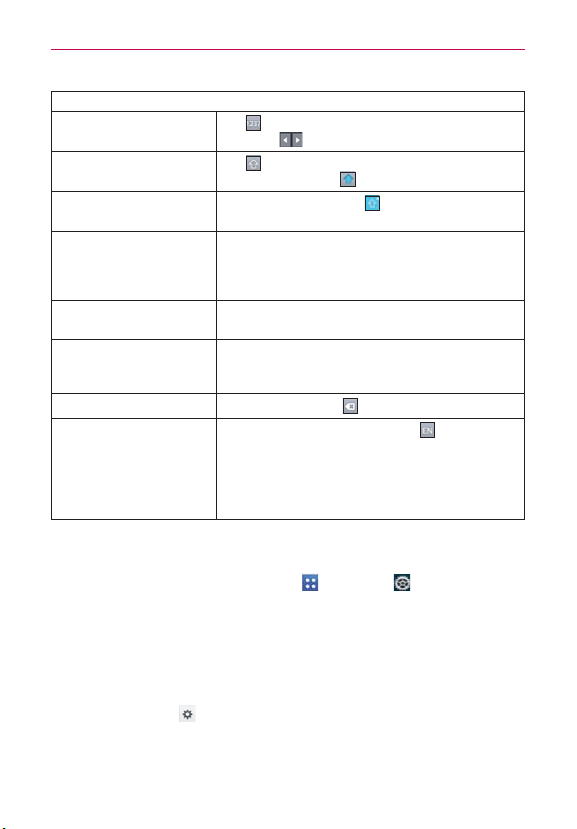
Phone’s Status Icons
The Status Bar appears at the top of every screen. It displays icons
indicating that you’ve received notifications (on the left) and icons indicating
the phone’s status (on the right), along with the current time.
Notification icons
Status icons
If you have more notifications than can fit in the Status Bar, a plus icon
prompts you to open the Notifications panel to view them all. To open the
Notifications panel, tap and drag the Status Bar down.
The following icons indicate the status of your phone.
Call icons
Microphone is muted during a
call
Missed call notification
In call In call using Bluetooth device
Speaker is on Privacy call
Calendar and Alarm icons
Alarm set Calendar event notification
Email and Messaging icons
Other Email event received Sending other Email failed
New text or multimedia
message received
Sending message failed
New Voicemail received New Visual Voicemail received
Google Talk message received
Playing Visual Voicemail in the
background
Gmail notification
Sound icons
Music is currently playing Silent mode is on
Vibrate mode is on Wired headset is connected
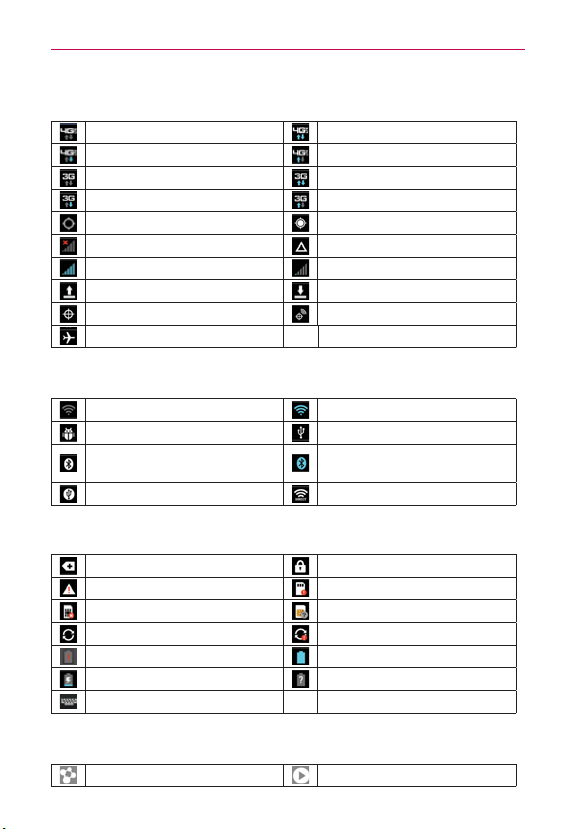
21
The Basics
Network icons
4G network connected
Using 4G network
Download through 4G network
Upload through 4G network
3G network connected
Using 3G data network
Download through 3G network Upload through 3G network
Acquiring GPS access GPS is on
No service Roaming
Strong network signal Weak network signal
Uploading Downloading
Location access is off Location access is on
Airplane mode is on
Connectivity icons
No Wi-Fi signal Strong Wi-Fi signal
Android debugger connected USB is connected
Bluetooth is on
Bluetooth device is
connected
USB tethering is on Wi-Fi Direct connected
System icons
More notifications available System is secured
System alert Memory processing error
No SIM card Unknown SIM card
Google sync in progress Google sync error
Battery is low Battery is full
Battery is charging Battery status unknown (error)
Keyboard layout change
Indicator icons
SmartShare is on SmartShare music is playing
22
The Basics
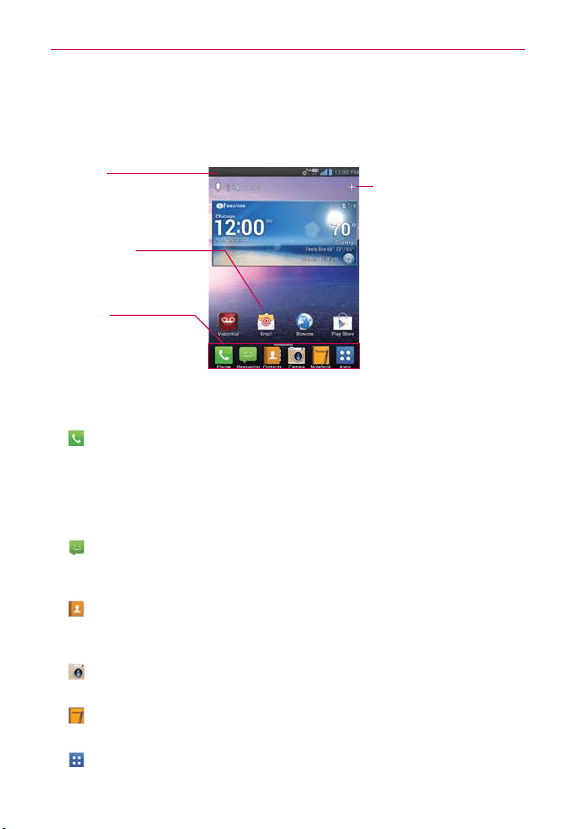
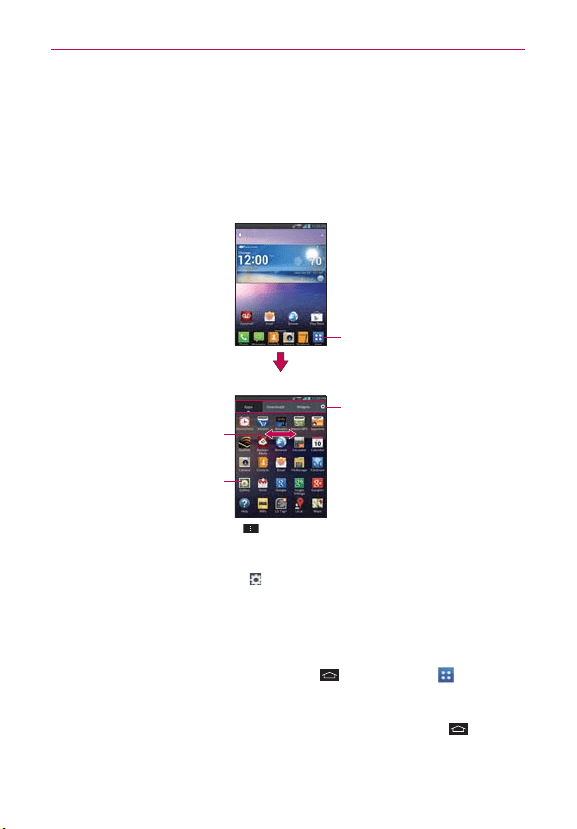
Getting to Know the Home Screen
The Home screen is your starting point to access all of the features on your
phone. It displays application shortcuts, icons, widgets, and other features.
Status Bar
Shows device status
information, including the time,
signal strength, battery status,
and notification icons.
Add shortcuts & widgets
Tap this icon to display the
Home screen canvases at
the top of the screen and the
Applications screen at the
bottom.
Application Icon
Tap an icon (application,
widget, folder, etc.) to open the
application and use it.
Quick Keys
Provide easy, one-tap access to
the phone functions used most
often.
Quick Keys
The Quick Keys are located at the bottom of the Home screen.
: Opens the Phone application which displays a dialpad so you can
dial an unsaved number. You can also make calls using your Call logs,
Contacts, and Favorites by tapping the tabs across the top of the
screen.
TIP
The Favorites tab provides easy access to a list of your frequently called contacts.
: Opens the Messaging application. You can send text messages or
multimedia messages, which can contain pictures, videos, audio,
maps of your location, slideshows, and vCard files.
:
Opens the Contacts application and displays your Contact list. You
can also access your Groups and your Favorites list by tapping the
tabs across the top of the screen.
:
Opens the Camera application which allows you to take pictures and
record videos.
:
Opens the Notebook application. You can create, view, and manage
your notebook files.
:
Opens the Applications screen which displays phone options and
applications. You can also access your list of downloaded files and
23
The Basics
a list of available widgets by tapping the tabs across the top of the
screen.
NOTE
To add an icon, touch and hold the desired icon and drag it to the Quick Keys bar.
Release it at the desired location. To remove an icon, touch and hold it, then drag it out
of the Quick Keys bar.
To return to the Home screen
㻌
Tap the Home Key
at any time, from any application.
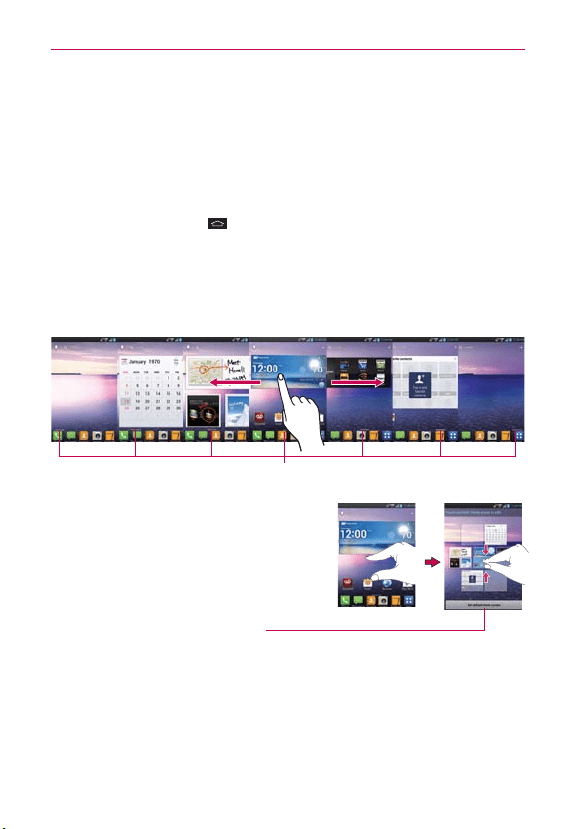
To view other Home screen canvases
㻌
Swipe (or flick) your finger left or right across the Home screen. The
Home screen spans up to seven screen widths, allowing more space
for icons, widgets, shortcuts, and other items.
TIP
P
inch in on the Home screen to display
the mini canvas view, then tap the
Home screen canvas you want to view.
Touch and hold the panel you want to
edit. Drag the panel to Remove icon on
the top to delete.
Tap here to set the default
Home screen canvas.
Home Screen Canvas Indicator
The white line above the Quick Keys bar indicates which Home screen canvas you are viewing.
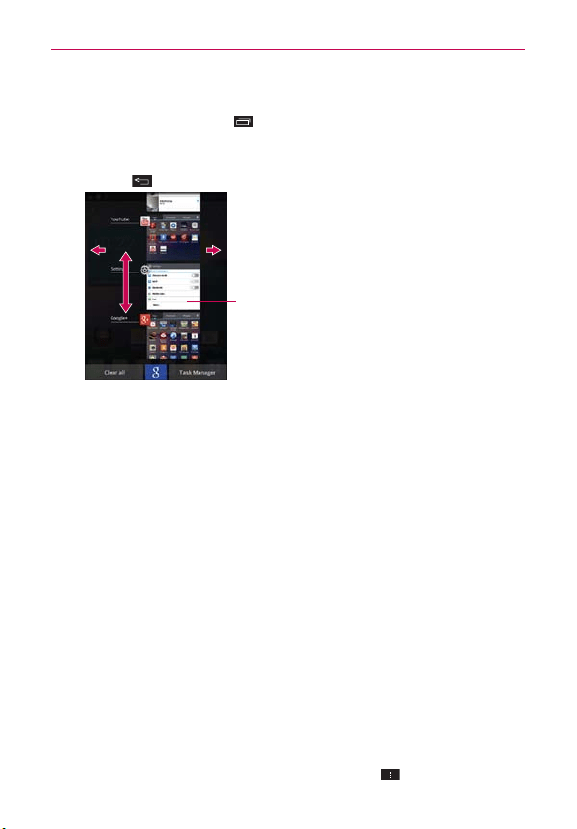
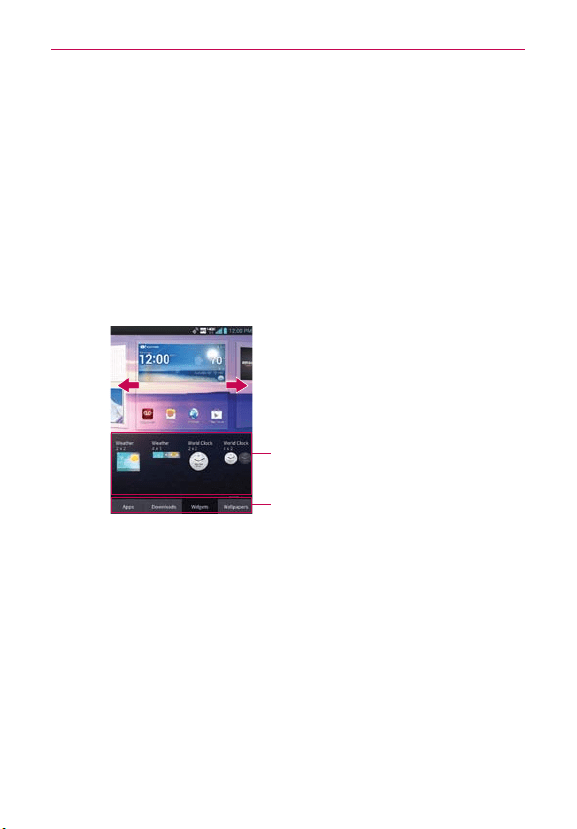
Mini Canvas View
Mini canvas view allows direct access to any of the Home screen canvases
and also allows you to manage the canvases. You can delete canvases and
even rearrange the canvas order to suit your needs.

24
The Basics
Pinch in on any of the Home screen canvases to change from full screen view
to mini canvas view. From mini canvas view you have the following options:
㻌
To go directly to any Home screen canvas, simply tap the one you
want.
㻌
To add a new Home screen canvas, tap
.
㻌
To delete a Home screen canvas, tap and hold the canvas to delete,
then drag it to
at the top of the screen. When the Remove
icon changes to
, lift your finger.
㻌
To rearrange your canvases, tap and hold the canvas to move, drag it
on top of the canvas position where you want it, then lift your finger.
The moved canvas takes that position and the remaining canvases
shift accordingly.
㻌
To set another canvas as the default Home screen, tap the Set default
home screen at the bottom of the screen, then tap the screen you
want to set as the default Home screen canvas.
Clean View
Wallpapers can now be seen without intrusion, simply by using the
“expand” technique that will temporarily hide the icons on the Home
screen. You can now really show off the picture of your loved ones or the
awesome concert you saved as wallpaper. To clear clean view, tap the Back
Key
or pinch in on the screen.
25
The Basics
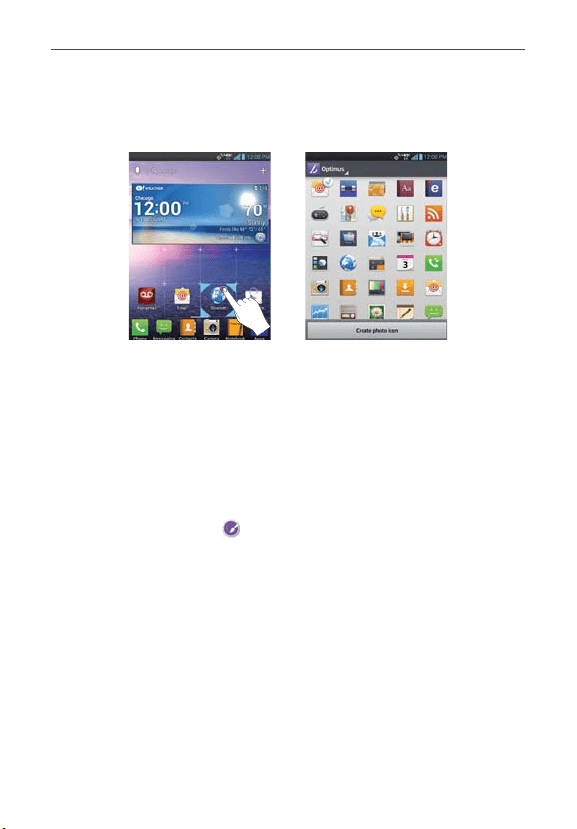
Your Home screen
Customizing an application icon from the Home screen
NOTE
This feature allows you to make and use an icon with the pictures in your Gallery.
You can edit the icons on Quick Launch Bar, Home screen or Applications
screen by creating your own icons with the camera or Gallery images. This
gives you the ability to replace the generic icons and have images of loved
ones—or with any other image you capture. With customization, it’s easy to
access what is most important, like a special contact or a frequently used
app.
1. Tap and hold an icon until the canvas grid is displayed, then release
the icon. An editing icon
appears at the upper right corner of the
application icon.
2. Tap the icon and select the desired icon design.
OR
Tap the Create photo icon and select T
ake photo to open the Camera
application and take a picture or Select from Gallery to choose one of
the available pictures.
NOTE
If you want to revert back to the default image, follow steps 1 - 2 above and select the
default icon again.

26
The Basics
Touchscreen
Your touchscreen provides an excellent way to interact with and use your
Android phone. With the tap of your finger, you can download and use
available applications, make menu selections, and access data saved to
your phone.
The following terms are used for describing the different available actions
using the touchscreen:
Touch or tap
A single finger tap selects an item. For example, tap an icon
(e.g., an application, widget, or folder), tap words (e.g., menu selection or
to answer an on-screen question), or tap letters and numbers to type.
Tap and hold
Tap and hold an item on the screen by tapping it and not
lifting your finger until an action occurs. For example, to open a Context
menu for editing a contact, tap and hold a contact entry until the Context
menu appears.
Drag
Tap and hold an item for a moment and then, without lifting your
finger
, move your finger on the screen until you reach the target position.
You can drag items on the Home screen to reposition them and drag the
Status Bar downward to open the Notifications panel.
Swipe, slide, or flick
Move your finger quickly across the surface of the
screen, without pausing when you first tap it (so you don’
t drag an item
instead). For example, you can slide the screen up or down to scroll a list
or browse through the different Home screen canvases by swiping from
left to right (and vice versa), or remove an application from the Recent
apps screen by flicking its graphic off the screen.
Double-tap
Double-tap to zoom in or out on a screen. For example,
quickly double-tap a section of a web page to zoom in or out on that
section to fit the width of the screen. Y
ou can also double-tap to control
the zoom in Maps and in other applications.
Pinch-to-Zoom
Use your index finger and thumb in a pinch or spread
motion to zoom in or out when using the Browser
, a map, or pictures.
This motion also changes the Home screen to mini canvas view.
NOTE
Aspect ratio correction The resolution size of the downloaded application is optimized
to the the phone’s screen.
27
The Basics
Rotate the screen
From many applications, the orientation of the screen
rotates with the phone as you turn it from upright to sideways and back again.
Rotate the phone sideways for
landscape orientation.
Rotate the phone upright for portrait
orientation.
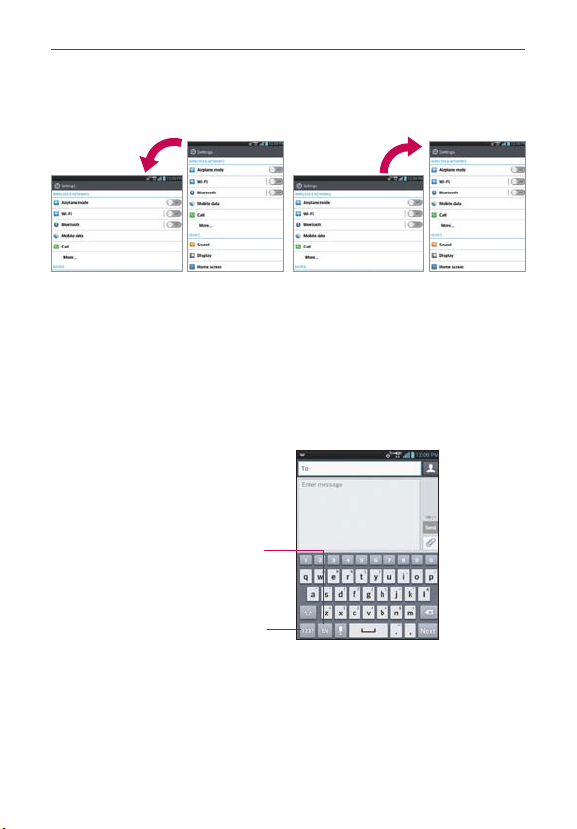
Text Input Methods
On-screen Keyboard
You can easily enter text using the on-screen keyboard. The on-screen
keyboard displays automatically when you need to enter text. To manually
display the keyboard, simply tap a text field where you want to enter text.
Toggles between different
languages (only available
when multiple languages
are selected).
Toggles between 123/SYM
mode and ABC mode. Tap
and hold to access the LG
Keyboard settings.
28
The Basics
Typing tips
Enter other characters
Tap to view the Numbers/Symbols Keyboard.
Then tap
to view additional symbols.
Enter one capital letter
Tap
to capitalize the next letter. The Shift
Key will change to
.
Enter all capital letters
Tap the Shift Key until
is displayed. Tap
again to revert to lowercase.
Highlight text
Double-tap a word to highlight it. To highlight a
range of text, double-tap a word, then drag the
blue highlight markers to highlight the text you
want.
Cut or copy selected
text
Highlight the desired text, then tap Cut or
Copy.
Paste cut or copied text
Tap the location to place the cursor where you
want to paste the text. Then tap and hold the
location and select Paste.
Delete a character
Tap the Delete Key
Language toggle
Tap and hold the Language Key
to open
a dialog box to set the languages to toggle
between.
NOTE
This key is only available when multiple languages have
been enabled for text entry
.
Text input settings
To change your text entry settings and see the dictionary of terms you’ve
used, from the Home screen, tap Apps
> Settings > Language
& input. The following options are available in the KEYBOARD & INPUT
METHODS section.
Default - Allows you to choose the default keyboard to use when
entering text.
Google voice typing - Checkmark to select Google voice typing to
enter text. Tap
to change the Google voice typing settings.
• Choose input languages: Allows you to select the languages to
support with Google voice typing.

29
The Basics
• Block offensive words: Checkmark to hide recognized offensive
text.
• Download offline speech recognition: Checkmark to enable voice
input while offline.
LG Keyboard - Checkmark to select the LG Keyboard to enter text.
Tap
to change the following settings.
• Input language & type: Allows you to select the keyboard language
and type.
• Word suggestion: Allows you to set word prediction and auto word
correction.
• Auto capitalize: Checkmark so capitalize the first letter of the word
automatically.
• Auto punctuation: Checkmark to insert a period when double
tapping the space key.
• Voice typing key: Checkmark to display the Voice typing key on the
keyboard.
• Touch feedback: Allows you to set key preview, sound feedback,
and vibrate feedback when typing.
• Handwriting: Allows you to set the pen width, color, and delay time.
• Path keyboard: Checkmark to enter a word by drawing a path
through all the letters.
• Hide keyboard: Checkmark to allow the keyboard to hide by
swiping down.
• One hand keyboard: Checkmark to allow you to flick the keyboard
or press the arrow to adjust the position of the LG Keyboard left or
right.
• Split keyboard: Checkmark to split the keyboard to the sides of the
screen on landscape mode.
• Extend keyboard: Checkmark to add number key row on top of
QWERTY keyboard.
30
The Basics
• Fuzzy pinyin: Checkmark to automatically correct common pinyin
mistakes.
• Software version: Displays the LG Keyboard software version.
Applications: How to View, Open and Switch
Home screen
Applications screen
Tap to open the Applications screen.
Tap an application icon
to open the application.
Slide the screen left or right
to bring more icons into view.
Tap the tabs to select Apps,
Downloads or Widgets.
NOTE
•
Y
ou can tap the Menu Key
, then Show small/large icons to get a better viewing
experience if you prefer smaller or larger icons.
•
Folders can be created in the Apps menu, as well as on the Home screen for
organizational purposes. T
ap
and drag an icon over another to create folders.
Opening and Closing the Applications screen
Opening the Applications screen
It’s easy to access the Applications screen no matter what feature you’re
currently using. Simply tap the
Home Key
, then tap Apps .
Closing the Applications screen
To manually close the Applications screen, tap the Home Key .
NOTE
The Applications screen closes automatically when you tap an icon to open its
application. Dragging an icon onto your Home screen also closes the Applications screen
automatically
.
31
The Basics
Customizing the Applications screen
The phone includes a wide variety of applications and you can download
even more applications to your device. You can customize these items on
the Applications screen for faster access (less scrolling) to the applications
you use most often. To download applications, tap Play Store
on the
Home screen.
Rearranging the Applications screen icons
You can rearrange the order of the icons on the Applications screen to
provide more convenient access to the applications you use the most.
Applications are listed in alphabetical order.
1. From the Home screen, tap Apps
.
2. Tap the Apps tab (if necessary), then tap Settings
at the top right of
the tab bar. The Settings icon changes to a checkmark .
3. Tap and hold the application icon you want to move, drag it to its new
position, then lift your finger. The remaining icons shift to the right.
NOTE
If you drag the application icon onto another application icon, it creates a folder with both
of the applications in it.
Sorting applications
You can sort all of your application icons on the Applications screen by
alphabetical order or installation date.
1. From the Home screen, tap Apps
to open the Applications screen.
2. Tap the Menu Key
> Sort by > Alphabetical or Installation date.
Changing the icon size
You can change the size of the icons on the Applications screen.
1. From the Home screen, tap Apps
to open the Applications screen.
2. Touch the Menu Key
> Show small icons (Show large icons) > OK.
32
The Basics
Checking application information
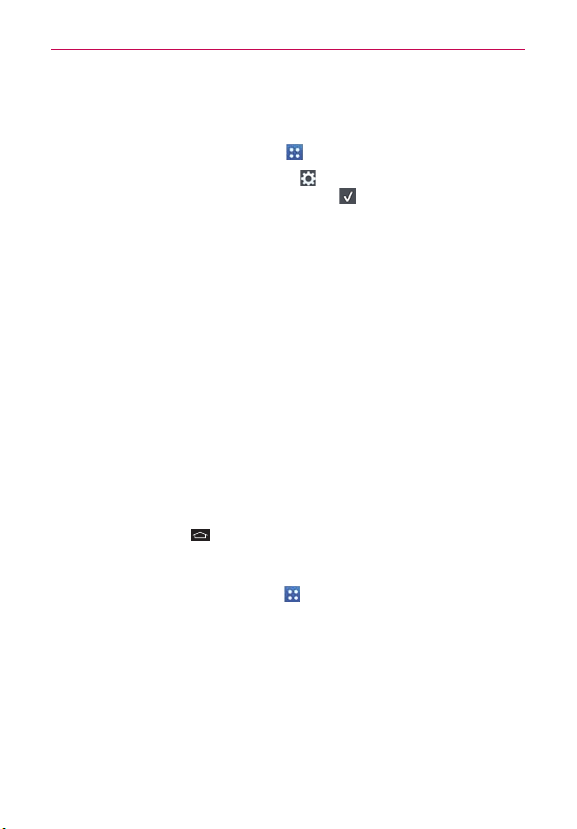
To check on an application’s detail information from the Applications screen:
1. From the Home screen, tap Apps
.
2. Tap the Apps tab, then tap Settings
at the top right of the tab bar.
The Settings icon changes to a checkmark .
3. Tap any of the application icons to display an information dialog box.
4. Tap OK to exit.
Opening and Switching Applications
Multi-tasking is easy with Android™ because open applications keep
running even when you open another application. There’s no need to quit an
application before opening another. You can use and switch among several
open applications. Android manages each application, stopping and starting
them as needed, to ensure that idle applications don’t consume resources
unnecessarily.
Opening an application
Open an application simply by tapping its icon on the screen.
Opening multiple applications
1. Tap an application icon to open it.
2. Tap the Home Key
.
NOTE
If the application icon you want is on your Home screen, simply tap the icon to open and
use it.
3. From the Home screen, tap Apps .
4. Tap the icon for the other application you want to open.
33
The Basics
Switching between multiple applications
1. Tap the Recent Apps Key . A screen with the icons of the applications
that you’ve used recently will appear.
2. Tap the application preview of the application you want to use or tap the
Back Key
to return to the current screen.
Tap an app preview to open an
application you’ve used recently (tapping
the background redisplays the Home
screen).
If you flick the application preview to the
right or left, it disappears from the recent
apps list.
Adding application icons to the Home screen
Customize your Home screen with the applications you use most often.
1. Open the Applications screen.
2. Tap and hold the application icon you want to add to your Home screen.
The Applications screen will close so that you can place the icon on the
Home screen.
3. Lift your finger to place it or drag the icon to where you want it on the
screen, then lift your finger.
NOTE
To add a shortcut for direct access on the Quick Keys bar, place the application icon in
the Quick Keys area in the same way
.
Moving applications to other Home screens
You can place application icons on any of the Home screen canvases.
Drag Tap and hold, then drag the icon to the left or right edge of the
screen to advance to the other screen canvases before lifting your finger.
Tilt Tap and hold an item, then tilt the device to move it to one of the
Home screen canvases in that direction, then lift your finger.
NOTE
To be able to use the Tilt method, the Move home screen items checkbox needs to be
checkmarked. From the Home screen, tap the Menu Key
> Settings > Gestures >
Move Home screen items.
34
The Basics
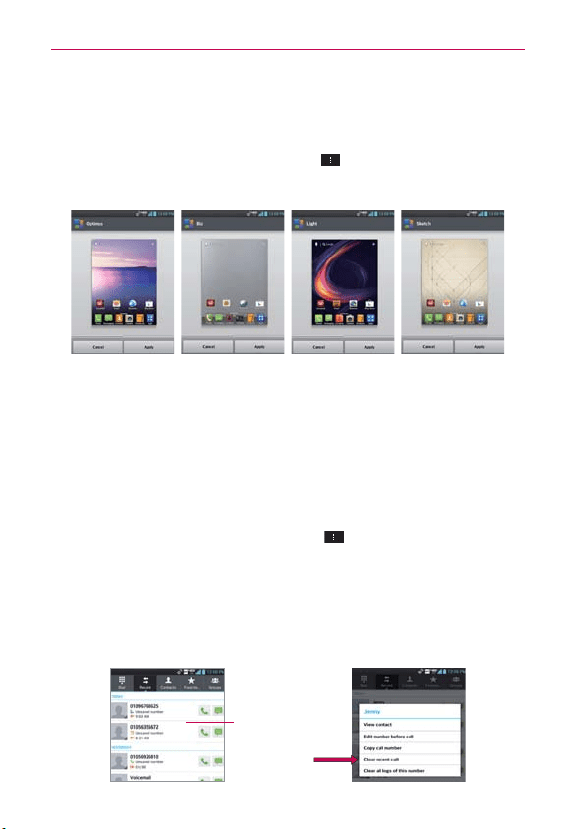
Setting the Theme
Four different themes are provided, each with a stylized Home screen
wallpaper and unique application icons per theme. To change your theme,
from the Home screen, tap the Menu Key
> Theme. The current
theme is indicated by a checkmark in the top corner. Tap the theme you
want, then tap Apply at the bottom of the screen.
Optimus Biz Light Sketch
Working With Menus
There are two kinds of Android menus: Options menus and Context menus.
Options menus
Options menus contain tools that apply to the activities of the current
screen or application, not to any specific item on the screen. To open the
available Options menu, tap the Menu Key
. Not all applications have
Options menus.
Context menus
Context menus contain options that apply to a specific item on the screen.
To open a Context menu, tap and hold an item on the screen. Not all items
have Context menus.
When you tap and
hold certain items on
a screen, a Context
menu opens.
35
The Basics
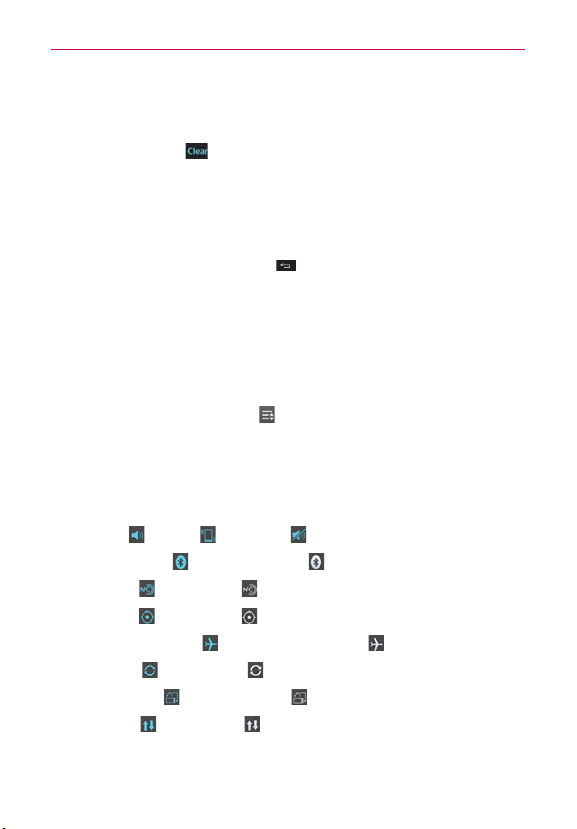
Managing Notifications
Notification icons report the arrival of new messages, calendar events,
alarms, as well as ongoing events, such as when you are on a call.
When you receive a notification, the notification icon will be displayed in the
Status Bar. You can open the Notifications panel to view a list of all recent
notifications. Depending on your settings, you may hear a notification sound
and/or the phone may vibrate.
To open the Notifications panel
Tap and drag the Status Bar to the bottom of the screen.
NOTE
The Status Bar is sensitive to the drag motion so just beginning the downward drag will
open the Notifications panel.
Tap a notification to open it.
Tap to edit Quick Settings
icons displayed on the
Notifications panel. You can
add up to nine icons.
To respond to a notification
1. Open the Notifications panel. Your current notifications are listed in the
panel, each with a brief description.
2. Tap a notification to view it.
The Notifications panel will close and the application that corresponds to
your response will open. For example, new voicemail notifications dial
your voicemail box, and Gmail notifications open the Gmail application
so you can read your new messages.
36
The Basics
To clear all notifications
1. Open the Notifications panel.
2. Tap the Clear icon
. All event-based notifications will be cleared;
ongoing notifications will remain in the list.
NOTE
You can also swipe a notification to the left or right to delete that specific notification.
To close the Notifications panel
Tap and drag the tab at the bottom of the Notifications panel to the top of
the screen or just tap the Back Key
.
The panel will also close when you tap a notification.
NOTE
The Notifications tab at the bottom of screen is sensitive to the drag motion so just
beginning the upward drag will close the panel.
Quick settings on the Notifications panel
The top of the Notifications panel includes Quick Settings. These icons
allow quick and easy access to set modes including Sound, Bluetooth,
GPS, Airplane and Data. Tap Edit
to select additional functions you want
displayed in the Quick Settings bar.
Tap any of the Quick Settings to toggle through the available settings:
QuickMemo activates the ability to write on the current Home screen
canvas.
Sound
, Vibrate
, and Silent .
Bluetooth On
and Bluetooth Off .
NFC On
and NFC Off .
GPS On
and GPS Off .
Airplane mode On
and Airplane mode Off .
Sync On
and Sync Off .
Rotation On
and Rotation Off .
Data On
and Data Off .
NOTE
If necessary, scroll horizontally to see all of the available icons.
37
The Basics
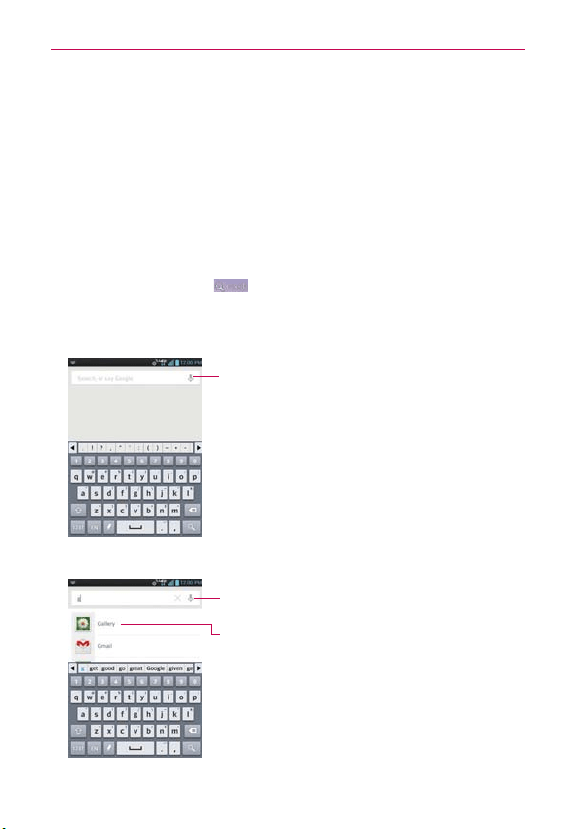
Searching Your Phone and the Web
You can search for information on your phone and on the web using the
Search application. Some applications, such as Gmail, Contacts, and Browser
have the ability to search contents within those specific applications.
You can conduct the search by typing in the search terms or saying what you’re
looking for. Typing can be useful because the search application can provide
suggestions so you don’t necessarily have to type out your full request.
Phone and Web search using text entry
1. Tap the Search Widget on the Home screen. The Quick Search
Box will open automatically.
NOTE
If this is the first time accessing Google Search, you will have the option to configure
Google Now
.
Voice Search
Tap to search by voice.
2. Enter the text you’re searching for in the Quick Search Box.
As you type, search results from your phone,
previous search terms, and web search
suggestions appear. Tap an item to activate
that search result.
The Voice search icon changes to the Go icon
as soon as you begin entering text.
38
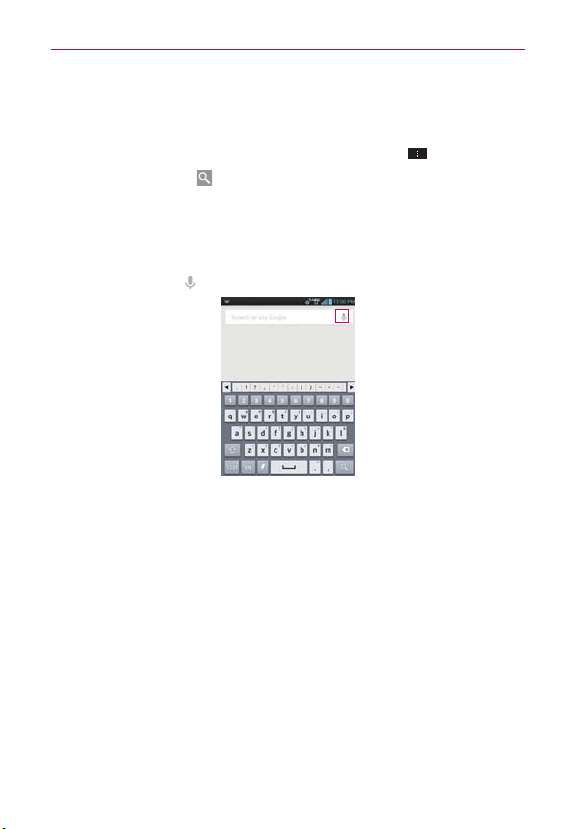
The Basics
You can use the Search preferences to configure some aspects of web
search (for example, whether it makes suggestions below the Quick
Search Box as you type), and what phone features you want to include in
searches. To access these settings tap the Menu Key > Settings.
3. Tap the Search Key
from the keyboard.
Using the Voice Search
1. Tap the Search Widget on the Home screen. The Quick Search Box will
open automatically.
2. Tap Voice Search
in the Quick Search Box to search by voice.
3. Speak the voice search command. Depending on your command,
different applications will open.

39
The Basics
Locking the Screen
Your phone automatically uses a default Lock Screen to prevent
unintentional function activation. You can choose to secure your phone so
that only you can unlock it to make calls, access your data, buy applications,
and so on. For added security to guard against unauthorized use, you can
set a Face Unlock, Pattern, PIN or Password that will need to be entered
to unlock.
Setting a screen lock
Follow these steps to set an unlock sequence for the first time or after you
disable a previously set unlock sequence.
1. From the Home screen, tap Apps
> Settings
> Lock screen.
2. Tap Select screen lock.
NOTE
You can also select the W
allpaper or Clocks & shortcuts for the lock screen.
3. Tap None, Swipe, Face Unlock, Pattern, PIN or Password.
None: If you don't want to set lock screen, select None so you don't
need to enter anything.
Swipe: Select Swipe if you want to swipe to unlock screen.
Face Unlock: Unlocks the screen though facial recognition. Read the
information on the screen and tap Set it up > Continue. To set up Face
Unlock, line up your face in the outline on the screen. Your face will
automatically be captured. Tap Continue. Then choose Pattern or PIN to
set another form of security when Face Unlock can't see you.
NOTE
Please keep in mind that Face Unlock is less secure than a pattern, PIN, or password,
someone who looks similiar to you could unlock your phone, and the data used to
identify your face is kept private on the phone. Also note that this feature is only
available after you set up your Google account on your device.
Pattern: Locks the screen using a pattern you draw with your finger.
The first time you set an unlock pattern, you will see a tutorial with
instructions on how to create it. Read the tutorial and tap Next. Draw
your pattern (connect at least 4 dots) and tap Continue. Then redraw
your pattern and tap Confirm.
40
The Basics
PIN: Locks the screen with a number sequence. Enter a PIN (at least 4
digits) and tap Continue. Reenter your PIN and tap OK to confirm it.
Password: Locks the screen with an alphanumeric sequence. Enter
a password (at least 4 characters) and tap Continue. Reenter your
password and tap OK to confirm it.
From then on, any time you want to turn the phone on or unlock the
screen, you will need to draw your unlock pattern or enter your PIN or
password to unlock the screen.
Disabling the lock sequence
If you change your mind about using a lock sequence to secure your phone,
you can disable it.
1. From the Home screen, tap Apps
> Settings > Lock screen.
2. Tap Select screen lock.
3. Confirm your unlock information.
4. Tap None.
Changing Your Unlock Pattern
1. From the Home screen, tap Apps > Settings
> Lock screen.
2. Tap Select screen lock.
3. Draw your current unlock pattern.
4. Tap Pattern to change it.
5. You’re prompted to draw and redraw your new pattern.
6. Enter a Backup PIN and tap Continue. Then confirm your Backup PIN
and tap OK.
Changing your Lock Screen PIN or Password
1. From the Home screen, tap Apps > Settings
> Lock screen.
2. Tap Select screen lock.
3. Enter your current lock sequence.
4. Tap PIN to change your number lock sequence or tap Password to
change your alphanumeric lock sequence.
41
The Basics
5. You’re prompted to enter and reenter your new lock sequence.
From then on, you will need to enter the sequence and tap OK to unlock
the screen.
NOTES
•
You have 5 opportunities to enter your unlock pattern, PIN or password. If you used
all of opportunities, you can try again after 30 seconds.
•
If you have set up a Microsoft Exchange account, you are only allowed to set up a
password.
•
When you can’t recall your unlock pattern:
-
If you’ve created a Google Account on the phone, tap Forgot pattern?. Then you
are required to sign in with your Google Account to unlock your phone.
•
If you forgot the unlock pattern, you can unlock with the Backup PIN.
Hard Reset (Factory Reset)
If you forget your unlock sequence and the Backup PIN, please follow the
instructions below to perform a factory reset. Please not that all of your
data will be deleted.
1. Turn the device off.
2. Press and hold the following keys at the same time for 8 seconds:
Volume Down Key
+ Power/Lock Key .
3. Read the FACTORY HARD RESET screen message. Press the Power/
Lock Key
to confirm or any other key to cancel.
4. You will be prompted to confirm again. Press the Power/Lock Key
one more time to confirm and perform the factory reset. Or press any
other key to cancel.
Customizing the lock screen wallpaper
1. From the Home screen, tap Apps > Settings > Lock screen >
Wallpaper.
2. Tap either Gallery or Wallpaper gallery to select where you want to
choose the wallpaper from.
3. Choose the wallpaper to display on the lock screen.

42
The Basics
Customizing clocks & shortcuts on the lock screen
1. From the Home screen, tap Apps > Settings
> Lock screen >
Clocks & shortcuts.
2. Swipe (or flick) your finger left or right to select the clock you want to
display on the lock screen.
3. Tap the shortcut icon you want to change and choose the icon you want
to display on the lock screen. Then, the previous icon changes to the
icon you selected for a shortcut.
4. Tap Save.
Owner info
1. From the Home screen, tap Apps > Settings
> Lock screen.
2. Checkmark Owner info to show owner info on the lock screen.
3. Tap
.
4. Enter the text you want to display on the lock screen.
5. Tap Save.
Security lock timer
If a security lock is enabled, the Security lock timer option sets the
delay time after the screen darkens due to inactivity before the screen
automatically locks and requires you to enter your unlock sequence.
1. From the Home screen, tap Apps
> Settings
> Lock screen.
2. Tap Security lock timer.
3. Choose the delay time after the screen timeout from any of the available
options.
Power button instantly locks
If a security lock is enabled, the Power button instantly locks option
allows pressing the Power/Lock Key
to instantly lock the screen.
1. From the Home screen, tap Apps
> Settings
> Lock screen.
2. Tap Power button instantly locks to checkmark and enable the device
to instantly lock the screen by pressing the Power/Lock Key
or
remove the checkmark to disable it.
43
The Basics
Customizing the Home Screen
You can personalize your Home screen by adding application icons,
shortcuts, widgets, and other items to any Home screen canvas. You can
also change the wallpaper.
To add an item to the Home screen
1. Go to the Home screen canvas where you want to add the item.
2. Tap and hold an empty spot on the Home screen canvas.
NOTE
If space is not available on a particular Home screen canvas, you must delete or remove
an item before you can add another item. Or
, switch to another Home screen canvas.
3. In the menu that opens, tap the type of item to add.
Tap and hold the icon and drag to the
screen you want to put.
Tap to access a different tab.
Slide the screen right or left to view
different screen.
4. You can add the following types of items to the Home screen:
Apps: Displays all installed applications.
Downloads: Displays all downloaded applications.
Widgets: Displays all installed widgets.
Wallpapers: Allows you to change the Charging, Live, and Home
screen wallpapers to preloaded images or pictures from your Gallery.
5. Swipe left and right to scroll through the available choices in the
category tab you selected. Tap and hold the item you want, then drag it
onto the Home screen canvas.

44
The Basics
To move an item on the Home screen
1. Tap and hold the item.
2. Drag the item to a new location on the screen.
Pause at the left or right edge of the screen to drag the item onto the
next available Home screen canvas.
3. When the item is where you want it, lift your finger.
NOTE
If Move home screen items is enabled in the Gestures settings, simply tilt the device
in the direction you want to move the item to one of the canvases.
To remove an item from the Home screen
1.
Tap and hold the item.
2.
Drag the item to
at
the top of the screen.
3. When the Remove icon changes to , lift your finger.
To change the Home screen
From the Home screen, tap the Menu Key > Home screen settings to
access the following settings to personalize your Home screen.
Theme: Please refer to page 33 to see how to change the theme on the
Home screen.
Animation: You can set the Home screen with All animations or No
animations.
Screen swipe effect: You can set the one of 7 types of screen swipe effect
on the Home screen. Choose the effect you want among Basic, Breeze,
Accordion, Panorama, Carousel, Layer, and Domino.
Wallpaper: Select wallpaper from Charging wallpapers, Gallery, Live
wallpapers, and Wallpaper gallery.
Portrait view only: Tap to checkmark if you want the Home screen to
always be displayed in portrait view.
Scroll screen circularly: Tap to checkmark if you want to show first screen
after the last screen when scrolling. If not, remove checkmark to disable it.
45
The Basics
Connecting Quickly With Your Contacts
As you build up your list of contacts on your phone, you can use the Quick
Contact for Android feature to quickly chat, email, text message, place a
call, or locate your contacts. Quick Contact for Android is a special set of
icons that you can use to quickly and easily connect with a contact.
From the Home screen, tap
Contacts
, scroll to a contact and tap
the contact's picture.
Tapping the contact’s picture opens a Quick Contact dialog box. It
displays icons for all of the ways you can communicate with that
contact. The available icons depend on the information you have
saved for that contact.
Quick Contact for
Android
Contact list
Alphabetical Listing
Slide your finger
vertically along the
letters to view the
entries under a
specific letter.
New Contact
Tap here to add a
new contact.
Contact picture
Tap here to
open Quick
Contact for
Android for this
contact.
Type in the
name you want
to search.
Tap a Quick Contact icon to communicate with the contact. Depending
on the icon you’ve tapped, a different application will open.
TIP
Adding a shortcut for a contact to your Home screen allows you to open Quick Contact
for that contact without opening the Contacts application.
NOTE
To add Contacts, tap
and enter the name, phone number, email address and then tap
Save.
To edit Contacts, tap the contact you want to edit and tap
and edit the contact's
information and then tap Save.
46
The Basics
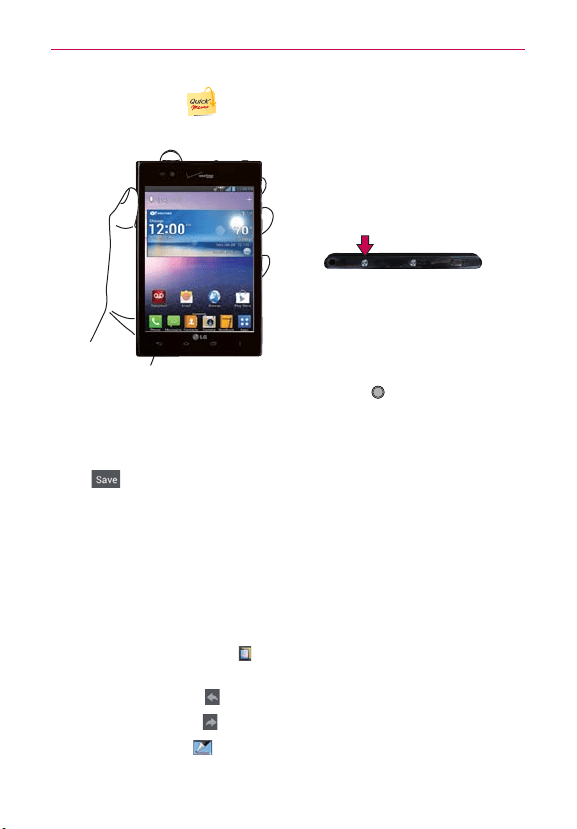
QuickMemo™
Front view
Top view
QuickMemo Key
1. Quickly press and release the QuickMemo Key at the top of the
phone to access the QuickMemo application.
2. Select the desired menu options including pen type and color, then
create a memo.
3. Tap
in the upper right-hand corner to save the memo to your Gallery
or Notebook.
NOTE
When using the QuickMemo function, please use a fingertip or stylus. Do not use
your fingernail (or any other rigid object).
Using the QuickMemo options
The QuickMemo options bar at the top of the screen allows you to easily
create memos. Tap the tool bar tab to access the tool bar options and tap it
again to hide them.
Tap the Notepaper icon
to change the background for your note
from the screen background to plain paper.
Tap the Undo icon
to undo the last edit.
Tap the Redo icon
to restore the previously deleted edit.
Tap the Pen icon
to select the pen type and color.

47
The Basics
Tap the Eraser icon
to selectively erase drawn lines or erase the
entire memo.
Tap the Share icon
share your memo with others.
Tap
in the upper right-hand corner to save your memo to one of
your notebooks or to your Gallery.
NOTE
T
ap the Lock front keys icon
in the bottom left-hand corner of the screen to lock
the front keys while you are working in QuickMemo. Tap it again to unlock the front
keys.
Viewing saved QuickMemos
Your QuickMemos can be saved in the Notebook application or in the
Gallery application.
To view QuickMemos saved in one of your notebooks, from the Home
screen, tap Notebook
, then tap the QuickMemo notebook.
To view QuickMemos saved in your Gallery, from the Home screen,
tap Apps
> Gallery , then select the QuickMemo album.
Discarding QuickMemos
To exit, press the QuickMemo Key or tap the Back Key and tap
$ISCARD
.
48
Calls
Placing and Ending Calls
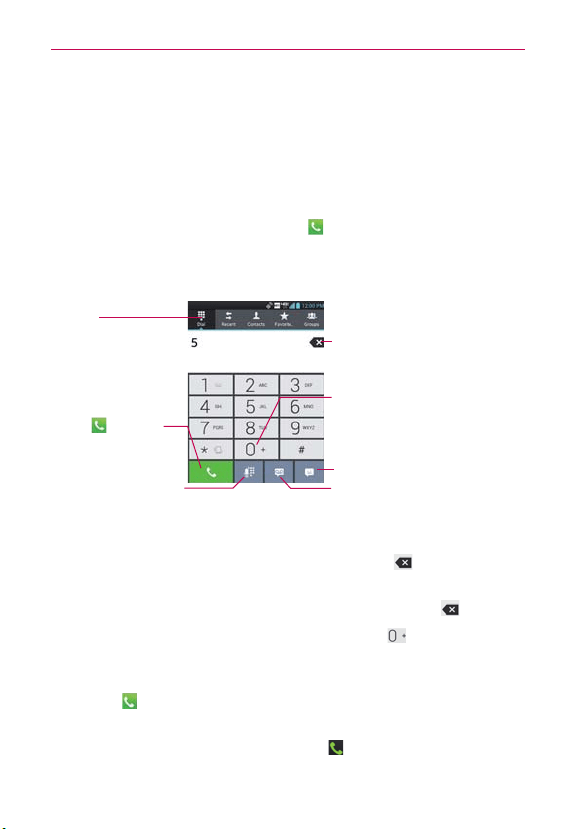
You place calls using the Phone application. Calls can be manually dialed
using the Dial tab. You can also dial from your phone’s memory using the
Recent tab, Contacts tab, Favorites tab, or the Groups tab.
To open the Phone application
From the Home screen, tap Phone .
To place a call by dialing
1. Open the Phone application.
To dial an international number, tap and
hold the 0 Key to enter the plus (+)
symbol. Then, enter the international
prefix for the country; followed by the
full phone number.
Tap the Message Key to send a message.
Tap Call
to dial the
number that you entered.
Delete Key
Tap the Voice Dialer Key to
dial by saying the number.
Tap the Voicemail Key to access your
voicemail feature.
Dial tab
Displays the dialpad.
2. Tap the keys on the dialpad to manually enter a phone number.
If you enter a wrong number, tap the Delete Key
to erase digits
one by one.
To erase the entire number, tap and hold the Delete Key
.
To dial an international number, tap and hold the
Key to enter the
plus ( + ) symbol. Then, enter the international prefix for the country;
followed by the full phone number.
3. Tap Call
to dial the number that you entered.
You can use other phone features while the call is underway. If you
open another application, the Call icon
appears in the Status Bar for
the duration of the call.
Press the Volume Keys to adjust the call volume.

49
Calls
Use the on-screen dialpad to enter additional numbers, place the
call on hold and take an incoming call, add another call, use the
speakerphone, end the call, and other options.
NOTE
If you opened other applications while on a call, you'll need to return to the Call screen
and tap End call
to end the call. You can tap the Home Key , then Phone or
tap the Contact's name or number at the top right corner of the Home screen to return
to the call screen. You can also drag the Notifications panel down and tap End call
to
end the call.
Instant List
Instant list is displayed on the Dial tab to help you to use the information
stored in your Contacts list and Call log without needing to open and search
those applications first. Once you enter three or more numbers you want
to dial, Instant list displays entries from your Contacts list or Call log that
match the sequence that you entered.
Sequence matches
The device searches for the entered sequence anywhere in the number,
beginning, end, or anywhere in-between. The matching number sequence
is displayed within the number in orange text. The name and type of
number (i.e., Mobile, Work, etc.) associated with the number you enter is
displayed above the dial pad. When there are multiple matches, tap the
Instant list dropdown icon
to view more matching entries.
Selecting an Instant list entry
Tap an entry in the Instant list to insert it on the dialpad and tap Call to
dial it.
Instant list Icon
Tap to view more of the Instant list.
Instant List
50
Calls
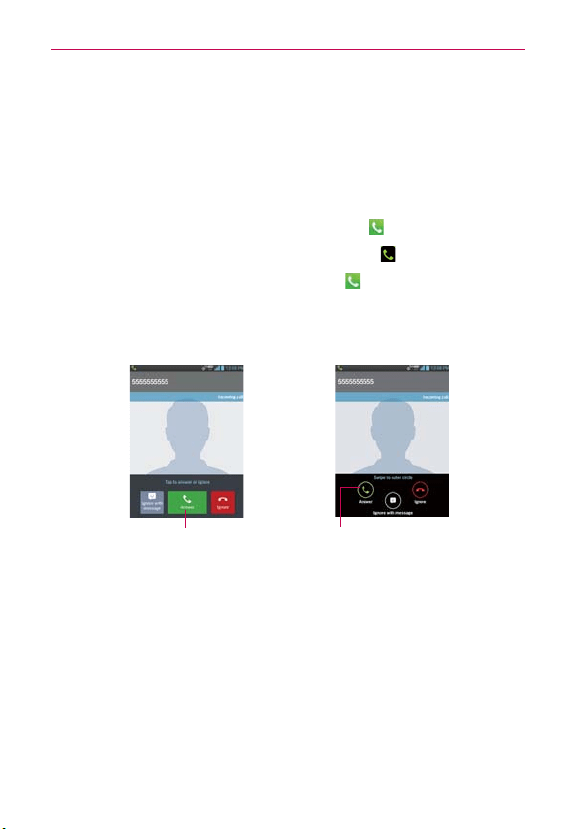
Answering or Rejecting Calls
When you receive a phone call, the Incoming call screen opens with the
caller ID and any additional information about the caller that you have saved
in the Contacts list. All incoming calls are recorded in the Call log.
To answer a call
If the screen is unlocked, simply tap Answer .
If the screen is locked, swipe the Answer icon
in any direction.
If you were already on a call, tap Answer
to place the first call on
hold while you answer the new call.
NOTE
To silence the incoming call ringer, press the V
olume Keys.
Swipe in any direction to
answer the call.
Unlocked Screen Locked Screen
Tap to answer the
call.
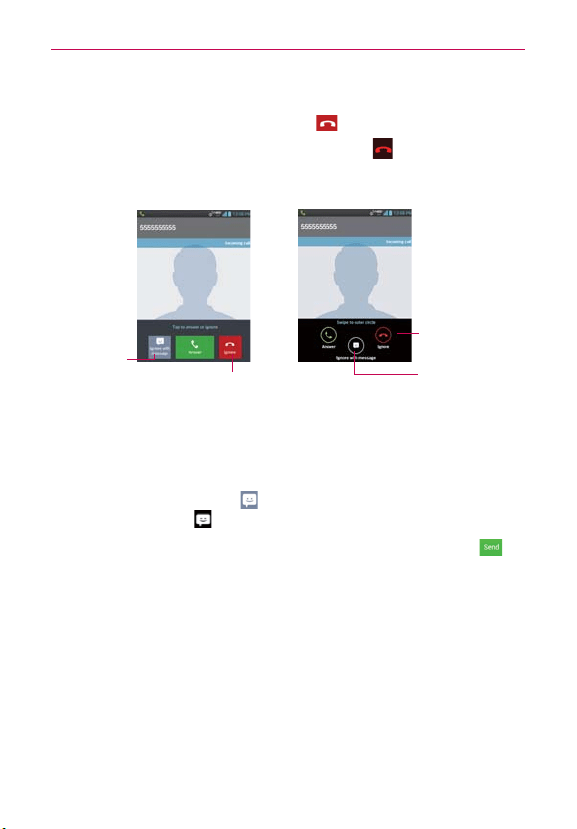
51
Calls
To ignore a call and divert it to voicemail
If the screen is unlocked, tap Ignore .
If the screen is locked, swipe the Ignore icon
in any direction.
The caller is sent directly to your voicemail box to leave a message.
Tap to send a
quick message
to the caller and
forward them to
your voicemail.
Unlocked Screen Locked Screen
Tap to ignore the call and send the caller
directly to your voicemail box to leave a
message.
Swipe in any
direction to ignore
the call.
Swipe in any direction
to send a message to
the caller.
NOTE
To silence the ringer, press the V
olume Keys.
To Ignore a call and send a text message
1. When you receive an incoming call and the screen is unlocked, tap the
Ignore with message Key . If the screen is locked, swipe the Ignore
with message icon
in any direction.
2. The text message screen will appear. Type your message and tap
in
place of answering the call.
NOTE
This feature can only be used to send a message to another mobile phone. It is not
applicable to incoming landline calls.
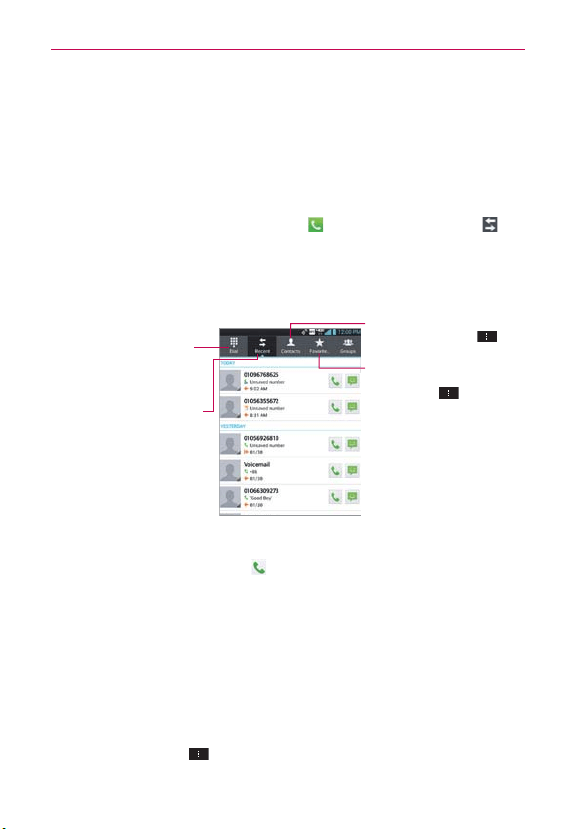
52
Calls
Working with the Call Log
The Call log is a list of all of the calls you’ve dialed, received, or missed. It
offers a convenient way to redial a number, return a call, or add a number to
your Contacts list.
To open the Call log
From the Home screen, tap Phone and then the Recent tab at
the top of the screen.
All calls (sent, received, and missed) are listed in the Recent tab. The
most recent calls are located at the top of the list. Scroll down to see
older entries.
You can set favorites contact
with frequently called. Tap
the Menu Key
for more
options.
This tab allows you to dial a
phone number manually. You
can also call voicemail using
this keypad.
This tab displays the history
of all your calls.
This tab displays your Contacts
list. Tap the Menu Key
for
more options.
To dial a number in the Call log
From the Call log, tap Call at the right of the call entry.
You can also tap and hold the entry to open a Context menu with
more options to communicate with that contact in other ways.
To add an entry’s number to your Contacts
1. Tap and hold the call entry.
2. Tap Edit number before call in the Context menu that appears. The
Dial screen is displayed so you can edit the number, if necessary, before
adding it to your Contacts list.
3. Tap the Menu Key
, then tap Add to Contacts.

53
Calls
4. Tap an existing contact entry to add the new number to it or tap the
Create new contact icon to save it as a new entry.
Clearing the Call logs
You can empty the entire Call logs at once or selectively delete entries.
1. Access the Call logs.
2. Tap the Menu Key
.
Tap Clear to select entries to remove from the list.
Tap Clear all to remove all of the entries from the list.
Calling Your Contacts
Instead of manually dialing phone numbers using the dial pad, you can use
your Contacts list to dial quickly and easily.
You can also quickly call a contact using Quick Contact. If you have contacts
on the web, you can choose whether to synchronize with your phone when
you first set up your Google™ Account.
To call a contact
1. From the Home screen, tap Contacts .
2. Tap the contact you want to call.
3. Tap the contact’s phone number you want to call.
To call a favorite contact
1. From the Home screen, tap Contacts .
2. Tap the Favorites tab and then tap the contact you want to call.
3. Tap the contact’s phone number you want to call.
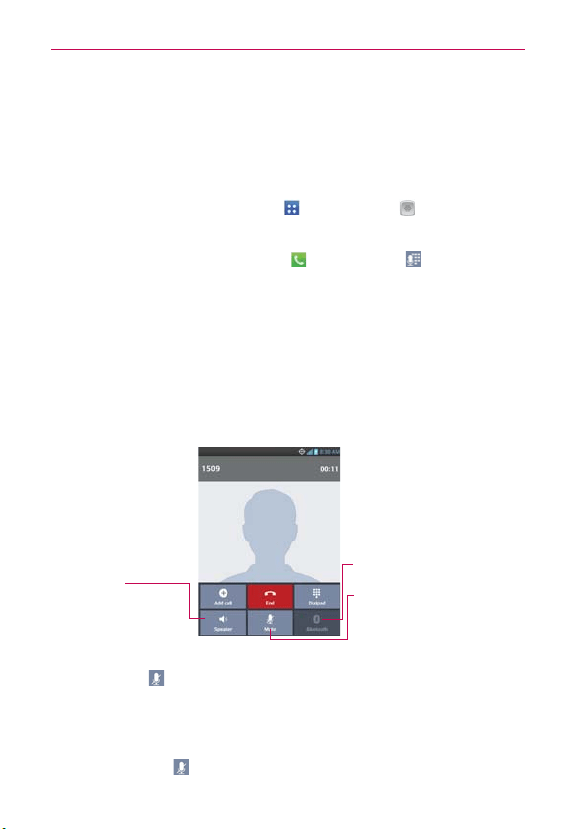
54
Calls
Voice Dialer
You can use the Voice Dialer application to place a phone call by speaking
the name of a contact or a phone number.
To place a call by speaking
1. From the Home screen, tap Apps > Voice Dialer .
You can also use the Voice Dialer from the dial pad.
From the Home screen, tap Phone
> Voice Dialer .
If you have a Bluetooth device that supports "voice-recognition" or "voice
dialing" you may be able to open Voice Dialer by pressing your headset’s
main button or in some other way, and dial by voice using your headset.
For details, see the documentation that came with your headset.
2. Say "Call" followed by the name of the contact or say "Dial" followed by a
phone number.
Options During a Call
Tap to turn the
speakerphone on or off.
The Speaker Key lights up
to indicate that the
speakerphone is on.
Tap to mute the microphone during
a call. The Mute Key lights up to
indicate that the microphone is
muted.
Tap to switch between a Bluetooth
headset and the phone.
To mute the microphone during a call
Tap Mute .
The light bar on the Mute button illuminates blue to indicate that the
microphone is muted.
While viewing the in-call screen, you can unmute the microphone by
tapping Mute
again.
The microphone is unmuted automatically when the call ends.

55
Calls
To turn the speakerphone on or off
Tap Speaker .
The light bar on the Speaker button illuminates blue to indicate that
the speakerphone is on and the sound from your call is played through
the phone’s speaker on the back of the device.
While viewing the in-call screen, you can turn the speakerphone off by
tapping Speaker
again.
The speaker is turned off automatically when the call ends.
WARNING!
To avoid damage to your hearing, do not hold the phone against your ear when the
speakerphone is turned on.
To switch between a Bluetooth device and the phone
When a Bluetooth device is paired and connected to your phone, you can
conduct calls on it for hands-free conversations. During a call, you can easily
switch between using the Bluetooth device and your phone.
When using the Bluetooth device during a call, the Ongoing Call notification
icon is blue in the Status Bar (the icon is green when using the phone).
Tap Bluetooth
to switch the call from the headset to the phone, or
vice versa.
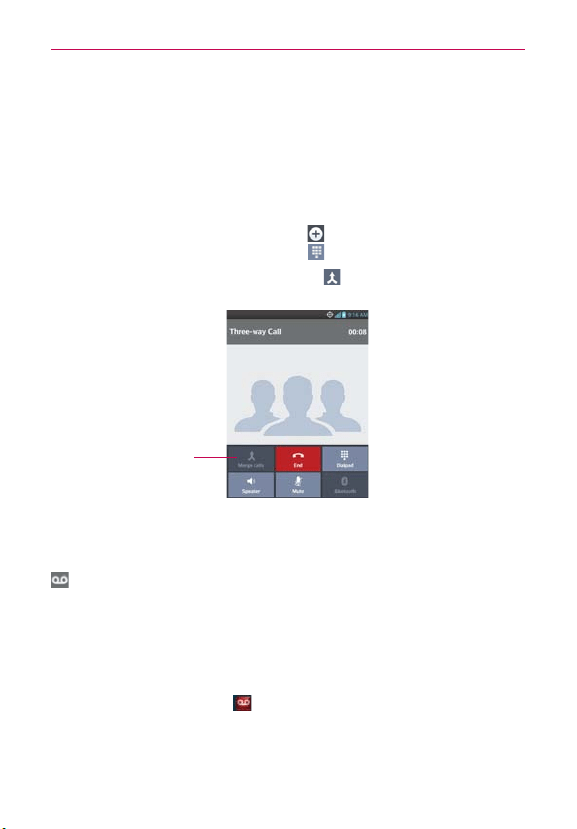
56
Calls
Managing Multiple Calls
Contact your wireless service provider to learn whether they support
conference calls and how many participants you can include.
To set up a conference call
1. Place a call to the first participant.
2. When you're connected, tap Add call
and select the contact you
wish to add. You can also tap Dialpad then add call.
3. After you’re connected, tap Merge calls
. The participant is added to
the conference call.
Tap here to merge the
separate calls into a
conference call.
Listening to Your Voicemail
When you have a new voicemail message, the Voicemail notification icon
appears in the Status Bar. If you have not set up your voicemail number,
or if you need to change it, you can do that in the Call settings.
To listen to your Voicemail
Open the Notifications panel and tap New voicemail.
OR
T
ap the Voicemail icon
on the Home screen.
OR
57
Calls
From the Home screen, tap Phone , then tap the Voicemail Key
. Typically, your carrier’s voicemail system guides you through the
process of listening to and managing your voicemail. The first time
you call your voicemail, it also guides you through the process of
recording greetings, setting a password, etc.
To set up your Voicemail
1. From the Home screen, tap Phone .
2. Tap the Voicemail Key
to dial your voice mailbox.
3. If you hear a system greeting, tap the Pound Key
to interrupt it, if
applicable.
4. Follow the setup tutorial.
5. Select a password.
6. Record a voice signature and greeting for your voice mailbox.
To access your voicemail from your wireless device
1. From the Home screen, tap Phone .
2. Tap the Voicemail Key
to dial your voice mailbox. If you hear
a system greeting or your own greeting, tap the Pound Key
immediately to interrupt the system greeting.
3. Follow the prompts to enter your password and retrieve your messages.
58
Connecting to Networks and Devices
Connecting to Wi-Fi Networks
Wi-Fi is a wireless networking technology that can provide Internet access
at distances of up to 100 meters, depending on the Wi-Fi router and your
surroundings.
To use Wi-Fi on your phone, you must connect to a wireless access point,
or “hotspot.” Some access points are open and you can simply connect to
them. Others are hidden or implement other security features, so you must
configure your phone so it can connect to them.
NOTE
Turn off Wi-Fi when you’re not using it, to extend the life of your battery.
The following Status Bar icon indicates your Wi-Fi status.
Connected to a Wi-Fi network (waves indicate connection strength)
When you connect to a Wi-Fi network, the phone obtains a network
address and other information it needs from the network, using the DHCP
protocol. To configure the phone with advanced settings, from the Wi-Fi
settings screen tap the Menu Key
> Advanced.
To automatically connect to a Wi-Fi network when launching
applications
1. From the Home screen, tap the Menu Key > Settings> Wi-Fi. Or
you can just tap the Wi-Fi icon from the Notifications panel to turn on
Wi-Fi.
2. Tap the Auto connect checkbox to checkmark it and enable this setting.
To configure the phone with a static IP address.
1. Turn on Wi-Fi, if it's not already on.
2. Tap and hold the name of an added network then tap Modify network.
Type in the password and tap Save to add as network.
3. Tap Show advanced options to mark the checkbox, then complete the
fields as necessary.
59
Connecting to Networks and Devices
To turn Wi-Fi on and connect to a Wi-Fi network
1. From the Home screen, tap Apps > Settings .
OR
Open the Notifications panel and tap Wi-Fi to turn the feature on.
2. Tap Wi-Fi. If Wi-Fi is off, tap
to turn it on. Your device scans for
available Wi-Fi networks.
3. Tap a network to connect to it.
O
If the network is secured, you will be prompted to enter a password
(Ask your network administrator for details).
O
When you’re connected to a network, you can tap the network name
in the Wi-Fi settings screen for details about the speed, security,
address, and related settings.
New network detection and notification
1. From the Home screen, tap Apps > Settings > Wi-Fi.
2. Checkmark the Notify Me checkbox in the Wi-Fi settings screen to be
notified when new networks are detected.
When Wi-Fi is on and the user launches an application that uses Wi-Fi,
a dialog box will appear when new networks are detected.
If the Notify Me checkbox is not marked and Wi-Fi is off, the device
will not display a dialog box when new networks are detected.
To add a Wi-Fi network
You can add a Wi-Fi network so the phone will remember it, along with any
security credentials, and connect to it automatically when it is in range. You
can also add a Wi-Fi network manually if it does not broadcast its name
(SSID) or if you want to add a Wi-Fi network when you are out of its range.
To add a secured network, you need to contact the network’s administrator
to obtain the password or other required security credentials.
1. Turn on Wi-Fi, if it’s not already on.
2. From the Home screen, tap Apps
> Settings > Wi-Fi.
60
Connecting to Networks and Devices
3. From the Wi-Fi settings screen, tap ADD NETWORK at the bottom right
corner of the screen.
4. Enter the Network SSID (name) of the network.
If the network is secured, tap Security
and tap the type of security
deployed on the network.
5. Enter the required passwords and security credentials.
6. Tap Save.
The phone will connect to the wireless network. Any credentials that you
entered are saved, so you’re connected automatically the next time you
come within range of this network.
To forget a Wi-Fi network
You can make the phone forget about the details of a Wi-Fi network that
you added. For example, if you don’t want the phone to connect to it
automatically or if it’s a network that you no longer use.
1. Turn on Wi-Fi, if it’s not already on.
2. From the Home screen, tap Apps
> Settings > Wi-Fi.
3. In the Wi-Fi settings screen, tap and hold the name of the network that
you want to forget.
4. Tap Forget network in the Context menu that appears.
Wi-Fi Direct connection
You can make a connection directly with Wi-Fi devices without any access
point. Your device can create a group connection or an individual connection.
1. From the Home screen, tap Apps
> Settings > Wi-Fi.
2. Tap Menu Key
and Wi-Fi Direct to turn it on.
Connecting Your Device to Your Computer
Before using your device’s Media sync (MTP) or Camera (PTP) capabilities,
you need to prepare your device’s data services to synchronize with your
desktop or laptop computer. Once you have connected the device to the
computer, you can transfer your data to or from the device memory.

61
Connecting to Networks and Devices
To connect your device to a computer via USB:
1. Use the USB Cable that came with your phone to connect the phone to
a USB port on your computer.
2. Open the Notifications panel and tap USB connected
.
3. Tap the connection mode you want to use to connect to the PC. Choose
from the following options: Charge only, Media sync (MTP), Internet
connection, or Camera (PTP).
USB Autorun
USB Autorun is a feature that allows your phone to connect to a PC using a
USB Cable and set it up on that PC without using a physical CD-ROM.
Automatically installs the LG USB Modem driver.
Allows a phone to be used as an MTP device. It allows transfer of
protected content from the phone to the PC and vice versa.
To select USB mode for Autorun
1. From the Home screen, tap Apps > Settings > PC connection >
USB connection type.
2. Tap Media sync (MTP) or Camera (PTP) to connect to the PC for
Autorun.
Tap Charge only to use only the charging function and not the USB
function.
Tap Internet connection to use the ethernet or modem function and not
the default USB function.
NOTES
•
USB Autorun only works with Windows
®
XP, Windows
®
Vista, and Windows
®
7
operating systems.
•
Log on to the PC as Administrator. Non-Administrator accounts have insufficient
privilege to install the USB Modem driver and don’t run the Autorun feature.
•
Do not unplug the USB Cable during Autorun.
•
If Autorun doesn’t function properly, the USB mode is changed to Media sync (MTP)
mode by default.
Autorun automatically installs the USB device driver for every USB mode.

62
Connecting to Networks and Devices
Internet connection mode
You can share your phone’s internet connection with your PC using a USB
Cable. After connecting with a USB Cable, set the USB connection mode to
Internet connection. Then select either Ethernet or Modem.
Ethernet This mode changes the phone to USB tethering mode from
the PC. From the Home screen, tap Apps
> Settings > PC
connection > USB connection type > Internet connection > Ethernet.
Return to the Settings screen and tap More... (under the WIRELESS &
NETWORKS section) > USB tethering > Mobile Broadband Connect
checkbox.
NOTE
This mode can only be used by a user registered to a tethering plan.
Modem This mode changes the phone to Modem mode from the PC.
Ask on connection
You can choose to be asked to confirm the USB connection when
connecting to a computer.
When Ask on connection is checkmarked, the USB selection dialog box is
displayed when the USB Cable is connected to the phone and computer.
Autorun is not available when:
The phone is booting (powering up).
The PC operating system is not set to Autorun (automatic execute
command).
To change the connection mode settings while Autorun is running:
You can change the settings while Autorun is running. From the Home
screen, tap
Apps > Settings
> PC connection > USB connection
type > Media sync (MTP).
NOTE
Be sure to checkmark the box Ask on connection if you want to be asked to confirm
the USB connection mode when the phone is connected to a computer
.
63
Connecting to Networks and Devices
Using the Status Bar to change the settings
The Status Bar displays the current USB connection mode so you can easily
open the Status Bar and change the settings as needed.
When connected via USB, the current USB connection mode also appears
on the Notifications panel. Tap the connection setting to display a screen
where you can change the USB connection mode.
NOTE
If the Ask on connection checkbox is marked, the screen is only provided during USB
connection. If Autorun fails to run, the device automatically switches to Media sync (MTP)
mode.
Step 1. Connecting the phone to a PC
Connect your phone to your PC with a compatible USB Cable
(supplied). LG Autorun starts automatically.
Click ‘I accept the terms in the agreement’ then ‘Yes’.
NOTES
•
USB Autorun is only supported for Windows
®
XP, Windows
®
Vista, and Windows
®
7.
•
The USB Autorun feature works only under an Administrator account. The installer has
insufficient privileges under a Non-Administrator account. Log on as Administrator. The
device is switched back to the Media sync (MTP) mode within 30 seconds. If Autorun
fails to run, the device automatically switches to Media sync (MTP) mode.
Step 2. Downloading the LG USB Modem Driver.
NOTES
•
If a previous version of the LG USB Modem driver is installed in the computer, it will
automatically be updated to the recent version.
64
Connecting to Networks and Devices
•
If a recent version of the LG USB Modem driver is installed in the computer, LG Autorun
skips ‘Step 2.’
Step 3. Installing the LG USB Modem Driver.
Step 4. Installing the Utility Application.
Make Your Device a Mobile Hotspot
The Mobile Hotspot application can share the phone’s 4G data connection
with up to 10 Wi-Fi capable devices.
WARNING!
There are security risks associated with creating a Wi-Fi network open to the public. It is
highly recommended that you take steps to protect your Wi-Fi network from unauthorized
access. To add encryption to your Wi-Fi Hotspot:
1. From the Home screen, tap Apps > Mobile Hotspot .
2. Tap the Mobile Hotspot checkbox to enable this feature.
3. Read the disclaimers and Help information, then tap OK.
4. Your portable Wi-Fi Hotspot is now created.
You can use this menu to enable and disable the connection. Once the
connection is active, go to the device you want to connect and configure
its wireless connection to the Network SSID for your Android device
and input the password (if you are using WPA2 PSK). You will now have
wireless access on your device.
NOTE
WEP is highly vulnerable to hacking. WPA2 is recommended by the IEEE.
The following Status Bar icon indicates your Wi-Fi Hotspot status.
Portable Wi-Fi Hotspot is active. The number indicates how many devices are connected.
65
Connecting to Networks and Devices
NFC
Near field communication (NFC) lets you get things done just by tapping
your phone on NFC touchpoints – quickly change your phone settings,
for example, or open a website featured on an advertising poster without
typing the Web address, and lots more.
Android Beam lets you transfer data between NFC and Bluetooth capable
devices. You can beam app contents like Browser pages or files like images
from the Gallery.
LG Tag+ allows you to spend less time managing your phone and open
app content without typing or tapping. Touching the NFC tag with the back
cover of your phone will instantly set your selected settings such as turning
on Silent mode and turning off Bluetooth simultaneously. You can also write
information such as contacts, URLs, and memos on the NFC tag.
To turn the NFC feature on, from the Home screen tap Apps
> Settings
> More... > and tap the NFC switch
. Then tap the Android Beam
switch
to turn activate Android Beam.
LG Tag+
LG Tag+ lets you set up tags as NFC touchpoints that apply your own
custom settings to your phone by just tapping the phone to the tag. For
example, you could have one tag with the settings you want at work and
one for settings when you’re at home.
NOTE
Two tags come in the box. These tags are rewritable.
Using Tag+ writing
1. From the Home screen, tap Apps > LG Tag+ .
2. Select the desired mode (Car/Office/ Sleep/User mode) and modify the
settings as desired.
3. Tap Write on NFC tag and tap the back of your device to a tag or a
device to share.
NOTE
Tap Help
in the lower right corner to learn more about setting up your own tags.
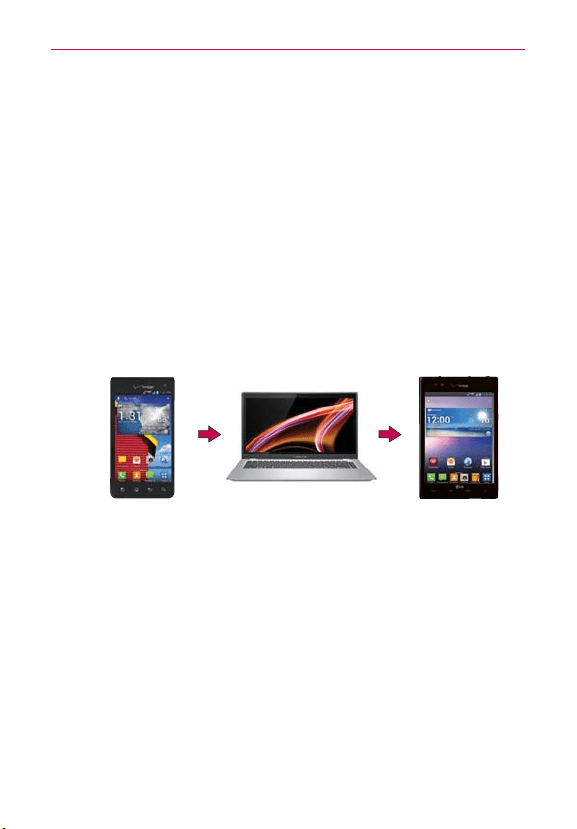
66
Connecting to Networks and Devices
Using Tag+ reading
Make sure the display screen is on and unlocked, then tap the NFC tag or
NFC-enabled device with the back of your phone. When tapping the set tag
or a device, the preconfigured mode will be activated right away.
NOTE
For best results tap between the LG and 4G LTE logos on the back of your phone.
Transfer Content
Transferring data (i.e., pictures) from an Android device to
LG Intuition™
Via PC or Laptop
File transfer over USB cable/
Memory card reader
File transfer over USB cable/
Memory card reader
Previous device PC or Laptop LG Intuition
1. Connect the Android device to a computer using a USB cable. Then
open the Android device's Notifications panel.
2. Tap USB connected, then (depending on the device) tap Media sync
(MTP), Turn on USB storage or Mass storage.
3. On the computer, open My computer (or Windows Explorer), click the
removable drive associated with your device, then transfer all of the files
you want to the computer.
4. On the computer, safely stop/remove the USB device. For example, for
Windows
®
XP, use the Safely Remove Hardware option.
5. On the Android device, open the Notifications panel, tap USB
connection type (or USB connected) > Charge only (or Turn off
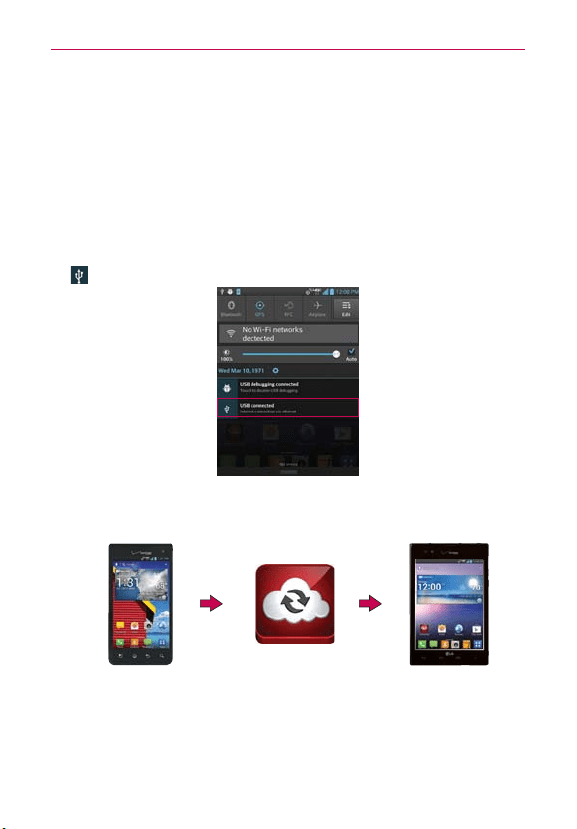
67
Connecting to Networks and Devices
USB storage) then disconnect the previous Android device from the
computer.
6. Connect the LG Intuition to the computer using the supplied USB cable.
7. In the USB connection type menu on the LG Intuition, tap Media sync
(MTP).
8. On the computer, organize the files in the folder, transfer the files into
the LG Intuition folder, then safely stop/remove the USB device.
9. On the LG Intuition, open the Notifications panel, tap USB connected
> Charge only, then disconnect it from the computer.
Via cloud storage
File uploads to the
Cloud Storage
Data
consuming
Data
consuming
File downloads from the
Cloud Storage
Previous device
Cloud Storage
LG Intuition
TIP
We recommend to access your content through the cloud using Wi-Fi connection to
avoid data consumption.
68
Web
Backup Assistant Plus
How to access and register Contacts backup settings from Backup
Assistant Plus
If you didn’t set up Backup Assistant Plus when you turned on your phone
for the first time, you can enable it in the Settings application or from the
Contacts application.
1. From the Home screen, tap Apps
> Settings > Backup Assistant
Plus > Contacts.
2. Read the information provided on the screen and tap Start.
3. The Registration complete screen appears and your first backup process
begins. Tap Done at the bottom of the screen.
Backup Assistant Plus can be accessed directly from the Contacts
application
1. Open the Contacts application.
2. Tap the Menu Key
> Backup now.
If you’ve already registered your Backup Assistant Plus account, a
background backup will be performed. If not, the Backup Assistant Plus
registration screen will be displayed for you to complete registration then
backup your files.
How to access and register Media backup settings from Backup
Assistant Plus
1. From the Home screen, tap Apps > Settings > Backup Assistant
Plus > Media.
NOTE
If you are not subscribed, the subscription screen will be shown. Read the information
provided on the screen and follow the instructions.
69
Web
Backup Assistant Plus can be accessed directly from the various
multimedia applications
From the Music application
, select Backup Assistant Plus icon
to upload files from your device, to download files from the server,
and for file streaming from the server.
From the Gallery application , tap Backup Assistant Plus icon
to upload files from your device, to download files from the server,
and to open files from the server.
From the Camera application , select the Backup Assistant Plus
icon
when sharing to upload a captured image to Backup Assistant
Plus.
From the Voice Recorder application , tap Backup Assistant Plus
icon
to upload files from your device, to download files from the
server, and to open files from the server.
From the File Manager application , tap Backup Assistant Plus
icon
to upload files from your device, to download files from the
server, and to open files from the server.
Using Backup Assistant Plus
On the schedule you selected, the Backup Assistant Plus application
checks the phone’s address book to see if any changes have occurred since
the last backup. If changes are detected, the application will launch and the
backup process will start. If no changes are detected, Backup Assistant
Plus sleeps until the next daily automatic backup is triggered.
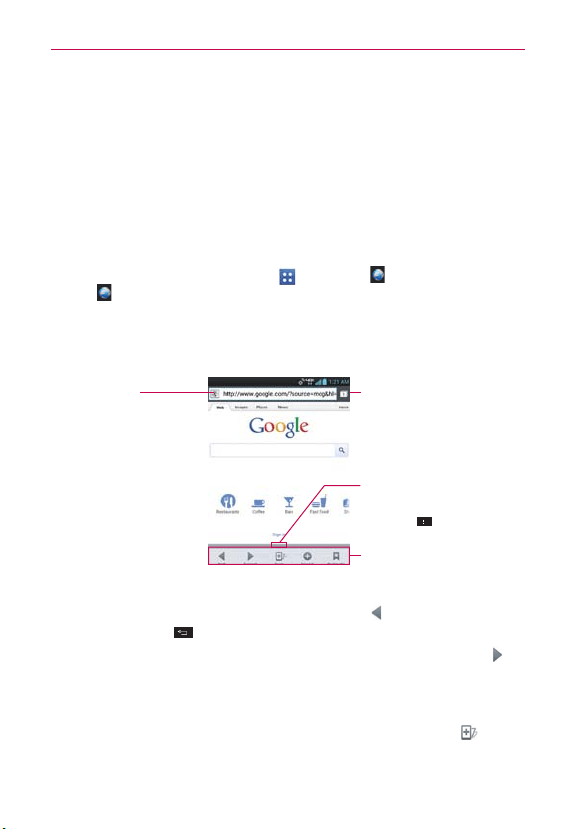
70
Web
Browser
The Browser application allows you to access the internet from your
Verizon Wireless device. Access and selections within this feature are
dependent upon your service provider. For specific information on Browser
access through your phone, contact your service provider.
NOTES
•
Y
ou may incur additional charges for accessing the web and downloading media. For
details, contact your service provider.
Browse web pages
1. From the Home screen, tap Apps
> Browser . Or, tap the Browser
icon directly from the Home screen.
2. To navigate directly to a specific web page, enter the address (URL) of a
web page, then tap Go in the lower right corner of the keypad.
NOTE
If you don't see the URL input field, drag the top of the current web page down to reveal it.
Toolbar
Windows
Tap here to access other open
web pages (if multiple window
tabs are open).
Toolbar handle
Drag the toolbar handle upward
to display the toolbar or drag it
downward to hide it. You can
also set whether the toolbar is
displayed or not by tapping the
Menu Key
> Settings >
General > Toolbar checkbox.
URL Input Field
Tap here to enter a web
address for the web page
you want to access.
3. While browsing the web page, use the following options:
To go to the previous page, tap the Back icon in the toolbar or tap
the Back Key .
To go to the next page in your web history, tap the Forward icon
in
the toolbar.
To zoom in or out, double-tap the screen. You can also use the
pinch-to-zoom method. Place two fingers on the screen and slowly
pinch or spread them apart. Or, tap and hold the Zoom icon
in the
toolbar, then tilt the phone down to zoom out or tilt it up to zoom in.
71
Web
To open a new window tab, tap the New tab icon in the toolbar.
To view your list of bookmarks, tap the Bookmarks icon
in
the toolbar. You can also manage (edit, delete, move, etc.) your
bookmarked web pages from the Bookmarks tab.
To stop loading a web page, tap the Stop icon . The Stop icon
appears to the left of the URL while a web page is loading.
To reload the current web page, tap
the Menu Key
> Refresh or
tap the Refresh icon at the top right of the screen.
To bookmark the current web page, tap the
Menu Key
> Save to
bookmarks.
To open your Homepage, tap the
Menu Key
> Homepage.
To send the web address (URL) of the web page to others, tap the
Menu Key
> Share page.
To search for text on the web page, tap the
Menu Key
> Find on
page.
To change the current mobile web page to the desktop formatted
page, tap the
Menu Key
and checkmark the box for Desktop
view.
To save a web page to read later when you are offline, tap the
Menu Key
> Save for offline reading. To access it later, tap the
Bookmarks icon
in the toolbar, then tap the Saved pages tab at
the top of the screen.
To access your list of downloaded files, tap the Menu Key
>
Downloads.
To customize the Browser settings, tap the Menu Key
> Settings.
To close the Browser application, tap the Menu Key
> Exit or tap
the Home Key
.
To view the currently active window tabs, tap the Windows tab icon
to the right of the URL input field. Flick the screen up or down to
scroll through your open windows. To view one, simply tap it. To close
a window, tap the Close window icon
in the upper-right corner of
the window, or flick the window off the screen to the right or left. The
window closes and disappears from the screen.
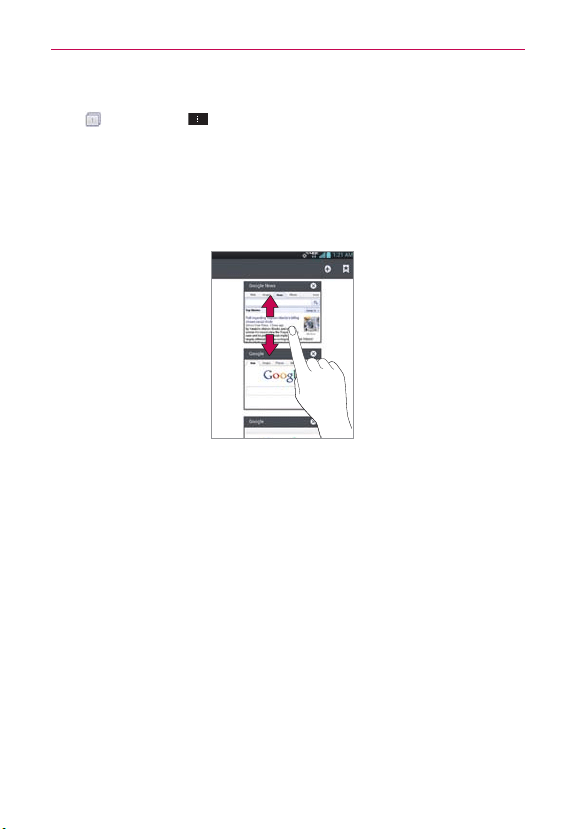
72
Web
To open a new incognito window tab, tap the Windows tab icon
>
Menu Key
> New incognito tab. Information about using
incognito window tabs is displayed to help you to understand this
feature.
To view the web page details, tap the web page’s icon to the left of
the URL bar.
NOTE
When you are in a secure page, tap V
iew certificate on the Page info. screen to see the
certificate for the current page.
Tap and hold text on a web page. The text is highlighted in blue with
cursor markers at each end. A dialog box appears with Select all,
Copy, Share, Find, and Web Search. To adjust the range of your
selected text, drag the cursor markers to move them as needed.

73
Web
Bookmark your favorite web pages
If you know the web address of the web page, you can manually add a
bookmark. To add a bookmark:
1. While viewing the web page you want to bookmark, tap the
Menu Key
> Save to bookmarks.
2. You can edit the Label and Address (URL). You can also set where it is
saved, as well as set where it is saved, as well as select or create a new
bookmark folder.
3. Tap OK.
From your Bookmarks list, tap and hold a bookmark to open the Context
menu and use the following options:
To open the web page in the current window, tap Open.
To open the web page in a new window, tap Open in new tab.
To edit the bookmark details, tap Edit bookmark.
To add the bookmark as a shortcut to one of the Home screen
canvases, tap Add shortcut to home.
To send the web address (URL) of the web page to others, tap Share
link.
To copy the web address (URL) of the web page, tap Copy link URL.
To delete the bookmark, tap Delete bookmark.
To use the web page as your Browser Homepage, tap Set as
homepage.
To add a new bookmarked web page, tap the Menu Key
> Add
bookmark.
To create a new bookmark folder to organize your bookmarked web
pages, tap the Menu Key
> Add folder. Enter the folder name,
then tap OK.
74
Web
To delete a group of bookmarks from the list all at once, tap the Menu
Key
> Delete. Tap each bookmark to be deleted to checkmark it,
tap Delete, then Yes.
To move a group of bookmarks in the list all together at once, tap
the Menu Key
> Move. Tap each bookmark to be moved to
checkmark it, tap Move, select the subfolder, then tap OK.
To view the list of recently visited web pages, tap Bookmarks
in
the toolbar, then tap the History tab at the top-center of the screen.
You can select to view today’s list, the list from the last 7 days, and
the most visited list. Tap the Menu Key > Clear all history to
delete all entries from all of the lists.
To view the list of pages that you’ve saved, tap Bookmarks
in the
toolbar, then tap the Saved pages tab at the top-right of the screen.
You can view the text on these pages even when you are offline.
Changing the Browser settings
You can configure a number of the Browser settings, including how you
view and use pages as well as allowing you to manage your privacy.
To open the Browser settings screen, open the Browser application,
tap the Menu Key
> Settings.
General
Set homepage: Allows you to set the homepage to any of the following
choices: Current page, Blank page, Default page, Most visited sites,
Custom page.
Toolbar: Checkmark to display the toolbar at the bottom of the screen.
AUTO-FILL
Form auto-fill: Checkmark to enable the device to fill out web forms with
a single tap.
Auto-fill
text: Allows you to set up text to auto-fill in web forms.

75
Web
LARGE FILE TRANSFER
Large File Transfer: Checkmark so that large files are transferred using a
Wi-Fi connection instead of the mobile network.
Privacy & Security
Clear cache: Clears locally cached content and databases.
Clear history: Clears the navigation history.
Show security warnings: Checkmark to show a warning if there is a
problem with a site’s security.
COOKIES
Accept cookies: Checkmark to allow sites to save and read cookie data.
Clear all cookie data: Clears all of the Browser cookie data.
FORM DATA
Remember form data: Checkmark to allow the Browser to remember
data that has been typed in forms for later use.
Clear form data: Clears all of the saved form data.
LOCATION
Enable location: Checkmark to allow sites to request access to your location.
Clear location access: Clears the location access for all websites.
PASSWORDS
Remember passwords: Checkmark to allow the Browser to save
usernames and passwords for websites.
Clear passwords: Clears all saved passwords.

76
Web
Accessibility
Force enable zoom: Checkmark to override a website’s request to control
the zoom behavior.
TEXT SIZE
Preview: Allows you to see how the text size choices are affected as you
move the slider on the Text scaling bar and the Minimum font size bar.
Text scaling: Sets the text magnification when you access a web page.
Move the slider along the bar to set it.
Zoom on double-tap: Sets the zoom magnification when you double-tap
the screen. Move the slider along the bar to set it.
Minimum font size: Sets the minimum font size to display. Move the
slider along the bar to set it.
INVERTED SCREEN RENDERING
Preview: Displays what the screen will look like if the Inverted rendering
box is checkmarked.
Inverted rendering
: Checkmark for inverted rendering. Black becomes
white and vice versa.
Contrast: Sets the amount of contrast between black and white if
Inverted rendering is checkmarked. Move the slider along the bar to set it.
Advanced
Set search engine: Allows you to select which search engine to use.
Open in background: Checkmark to open new window tabs behind the
current window tab.
Enable Javascript: Checkmark to enable javascript.
Allow multiple tabs per app: Checkmark to open new tabs when web
pages are opened from other apps.
Enable plug-ins: Allows you to set when to enable plug-ins.
Website settings: Allows you to manage advanced settings for individual
websites.

77
Web
PAGE CONTENT
Default zoom: Allows you to set the default zoom to far, medium, or
close.
Open pages in overview: Checkmark to show newly-opened pages in an
overview format.
Auto-fit pages: Checkmark to format web pages to fit the screen.
Block pop-ups: Checkmark to block websites from displaying pop-ups.
Text encoding: Allows you to set text encoding.
RESET DEFAULTS
Reset to default: Restores all of the Browswer settings back to the
default values.
Bandwidth management
Pre-load search results: Allows browser to pre-load high confidence
search result in background.
Pre-load web page: Allows browser to pre-load linked web pages in the
background.
Load images: Checkmark to set whether or not to display images on web
pages.
Labs
Quick controls: Checkmark to hide the toolbar and URL bar and instead
allow you to open a quick controls wheel when you slide your thumb
along the left or right edge of the touchscreen.
Fullscreen: Checkmark to display the web pages in full screen mode and
hide the Status Bar.
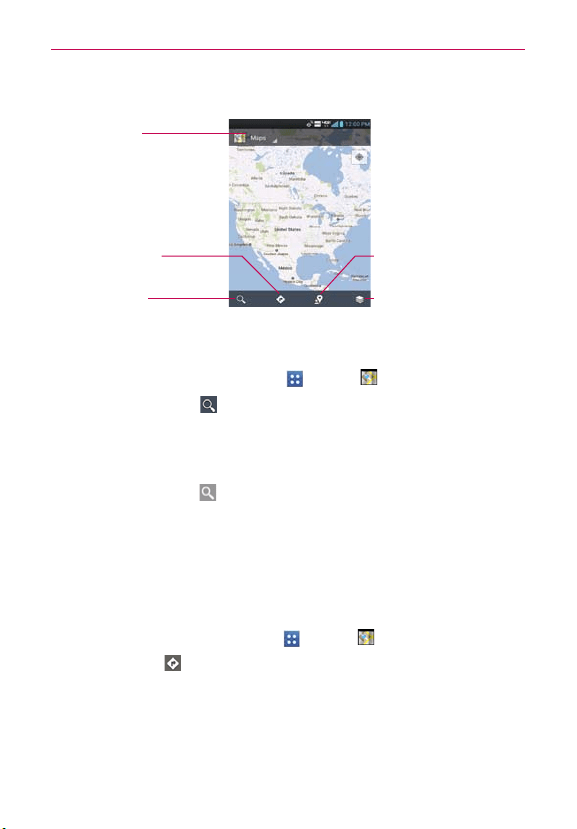
78
Web
Maps
Layers Icon
Tap here to select the type
of map you want to view.
Local Icon
Tap here to find types of
places near your location.
Maps Menu
Tap here to access Map, Local,
Offers, Navigation,
Join Latitude, Location history,
and My Places.
Directions Icon
Tap here to get directions to a
destination.
Search Icon
Tap here to open the keyboard to
enter your search.
To search for a location
1. From the Home screen, tap Apps > Maps .
2. Tap the Search icon
at the bottom left corner of the screen.
3. In the search box, enter the place you’re looking for. You can enter an
address, a city, or a type of business or establishment. For example,
“theater in New York”.
4. Tap the Search Key
at the bottom right corner of the keyboard.
Red markers indicate search matches on the map.
You can tap a marker to open a balloon that contains a label. Tap the
balloon to open a screen with more information about the location, as
well as options for obtaining directions.
To get directions
1. From the Home screen, tap Apps > Maps .
2. Tap Directions
.
3. Enter a starting point in the top text field and your destination in the
bottom text field. The starting point and destination can be entered
manually using the keyboard, past searches, or you can select places
using their drop-down menus.
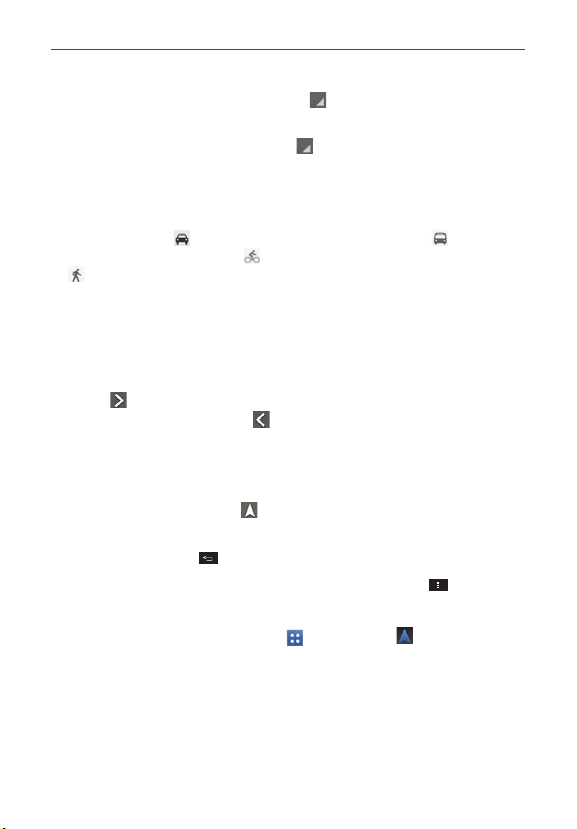
79
Web
The starting point drop-down menu includes My current location,
Contacts, Point on map, and My Places.
The destination drop-down menu
includes Contacts, Point on
map, and My Places.
NOTE
When you search for a location in the Maps application, your current location is
automatically designated as the starting point and a dialog box displays your recent
searches allowing you to tap one to select it as the destination.
4. Tap the Car icon for driving directions, the Transit icon for transit
directions, the Cycling icon for cycling directions, or the Walking icon
for walking directions.
5. Tap the GET DIRECTIONS button below the transportation mode icons.
6. Your route is displayed on a map.
Tap a white circle marker on the map to see direction change
indicators.
Tap
to display each direction instruction sequentially in a bubble at
each juncture. You can tap
to step backward through the direction
instructions.
To view the directions in text format, tap
DIRECTIONS LIST
at the
bottom left corner of the screen.
Tap the Navigation icon
to open a dialog box to select alternate
navigation applications to obtain directions.
Tap the Back Key
to return to map view.
NOTE
To reverse the directions, from the Directions list tap the Menu Key
> Reverse.
To get directions using the Navigation application
5. From the Home screen, tap Apps > Navigation .
6. Tap Speak destination to enter your destination using voice or Type
destination to enter the destination using the on-screen keyboard.
7. Select the destination, then choose Navigation on the pop-up menu.
8. Your turn-by-turn navigation directions will be displayed on the screen.
NOTE
While viewing the Navigation home screen, swipe to the left to view your Contact's
addresses and swipe to the right to view your Starred places.
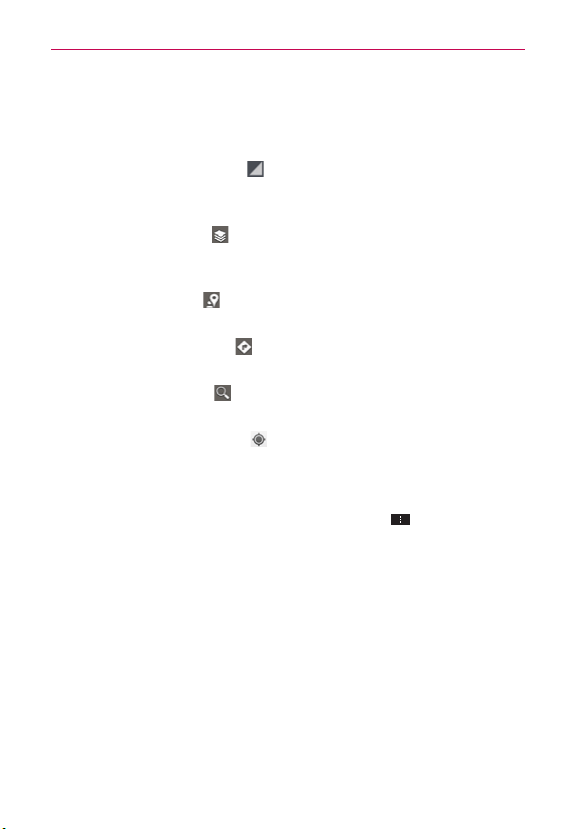
80
Web
Switching between common features
The Maps application has icons for easy access to many common features
used when searching for the places you want to go.
Tap the Maps Menu icon
in the upper left corner of the screen to
access Map, Local, Offers, Navigation, Join Latitude, Location history,
and My Places.
Tap the Layers icon
in the Maps toolbar in the lower right corner of
the screen to access Traffic, Satellite, Terrain, Transit Lines, Latitude,
My Maps, Bicycling, Wikipedia and your search history.
Tap the Local icon
in the Maps toolbar at the bottom of the screen
to search for places near your location or your destination.
Tap the Directions icon
icon in the Maps toolbar at the bottom of
the screen to get directions.
Tap the Search icon
in the Maps toolbar at the bottom left of the
screen to conduct a new search.
Tap the My Location icon
in the upper right corner of the screen to
display your current location on the map.
Maps settings
Access the Maps application, then tap the Menu Key > Settings.
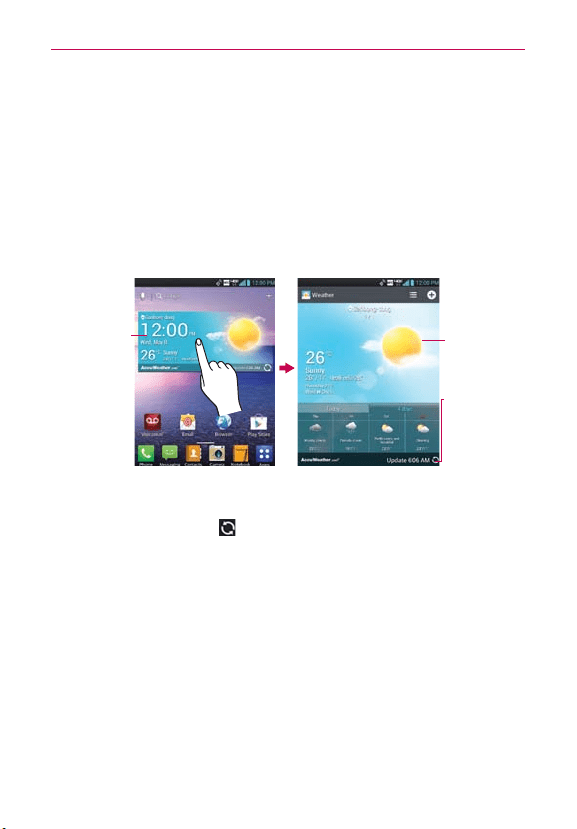
81
Web
Checking the Weather
The Weather application provides weather forecasts and other weather
information. You can place a Weather widget on your Home screen for a
summary of your local weather. Access the Weather application for more
detailed weather information.
To get details about the weather
Tap the Weather widget on the Home screen to open the Weather
application to view summarized and detailed weather information.
Weather Widget
Weather
Information
Refresh Icon
Tap here to
update the
current weather
in the currently
displayed city.
Swipe right or left to scroll through the weather information for each
of the cities in your list.
Tap the Refresh icon
in the lower right corner of the Weather
application screen to update the current weather for the displayed city.
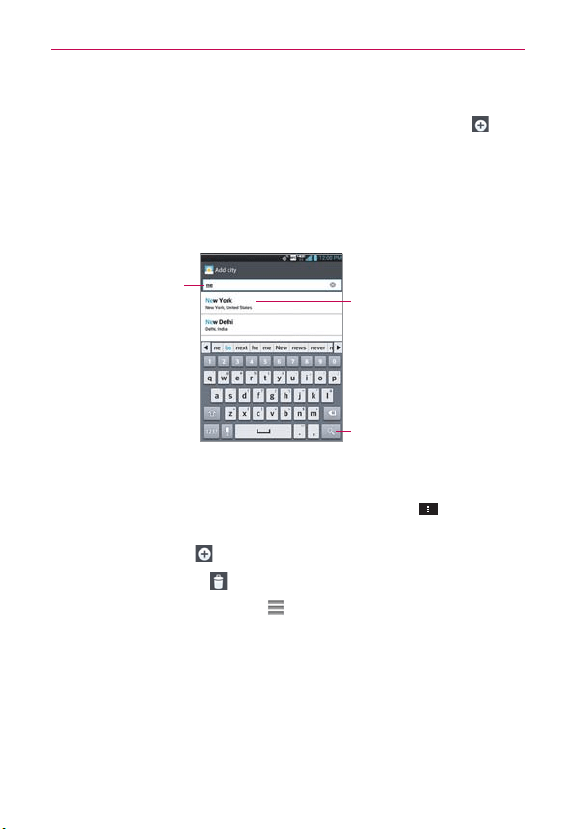
82
Web
To add a city or update current location
To add a new city or update your current location, tap the Add icon in
the upper right corner of the weather widget screen.
Enter a location in the Search city box, then tap the city you want to
add.
Tap Current location at the top of the screen to update your current
location.
Tap here to search.
Tap here to add the city to your
City list.
Type in the city, state or
ZIP code to search for that
location.
Managing your City list
The City list screen allows you to manage a list of cities that you want to
monitor. From the Weather application, tap the Menu Key
> Settings >
Edit city list.
Tap the Add icon to add another location.
Tap the Delete icon to delete a city from your list.
Tap and drag the handle icon (to the right side of the city name) to
move a city to a new position in your city list. This affects the order
viewed when you swipe across the Weather application screen.
83
Web
Changing Weather Settings
You can configure a number of settings for the Weather application.
The location and related settings also affect the display of the Weather
widget application.
To open the Weather settings screen, from the Weather application, tap
the
Menu Key
>
Settings
.
You can configure a number of Weather application settings.
LIST SETTINGS
Edit city list: Allows you to manage the list of cities you monitor.
DATA AND SYNCHRONIZATION
Update data: Checkmark this setting to automatically update the weather
data for the cities in your City list.
Update interval: Allows you to set the schedule to update the weather
data for the cities in your City list.
GENERAL SETTINGS
Temperature unit: Allows you to set degrees to be display in Celsius or
Fahrenheit.
Wind speed unit: Allow you to set wind speed unit to be display in m/
s(meter per second) or MPH(miles per hour).
From the Home screen, tap
Apps
> Weather. Then tap at
the bottom left of the screen to access the Accuweather website.
NOTE
You can also access by tapping
at the bottom left of the weather
widget on the Home screen.
84
Contacts
The Contacts application allows you to store names, phone numbers, and
other information in your phone’s memory.
Using Your Contacts
Use the Contacts application to add, view, and communicate with your
friends and acquaintances.
To open your Contacts application
From the Home screen, tap Apps > Contacts .
OR
From the Home screen, tap
Contacts .
All of your contacts are displayed alphabetically in a list in the Contacts
tab. If you have a new phone and haven’t added any contacts yet, the
Contacts application will display hints on how to start adding contacts to
your phone.
To open a list of your favorite contacts
The Favorites tab lists the contacts you’ve added to the list, followed by a
list of your most frequently called contacts.
Open your Contacts application then tap the Favorites tab
.
To open your list of Groups
The Groups tab displays your Contacts in the groups you designated, for
example Co-workers, Family, and Friends, etc. You can also create your
own group label (e.g., School).
Open your Contacts application, then tap the Groups tab
.
Communication
85
Communication
To view details about a contact and communicate
1. Open your Contacts application.
2. Tap the contact whose details you want to view.
3. The Contact Info tab displays by default. In the contact’s details screen,
tap the way you want to communicate with the contact.
The Dial icon
places a call to the number.
The Message icon
starts a message.
The Mail icon
starts an email.
The Chat icon
starts a chat.
Tap the
Menu Key
for the following menu options: Delete, Share,
Join, Export, Add to home screen, and All calls to voicemail.
NOTE
Anytime you see the Dial icon
next to a number, such as in your Favorites or Call
logs, just tap it to call that number.
Adding Contacts
You can add contacts on your phone and synchronize them with the
contacts in your Google™ Account, Microsoft Exchange account, or other
accounts that support syncing contacts.
Since your contacts can come from a variety of sources, the Contacts
application attempts to join new information with existing similar contact
entries, to create a single entry. You can also manage that process manually
by joining or splitting entries.

86
Communication
To add a new contact
1. From the Home screen, tap
Apps > Contacts
. You can also open the
Contacts application by tapping Contacts
from the Home screen.
2. Tap the New contact icon to the right of the Search box to start a
new contact entry.
3. If you have more than one account with contacts, tap
at the top of the
screen and choose the account to which you want to add the contact.
4. Enter the contact’s name.
5. Tap a category of contact information (such as phone number or email
address) to enter that kind of information about your contact. Tap the
drop-down menu icon
to the right of the information you entered to
open a list of preset labels (such as Work for a phone number or email
address), then select the label you want.
6. Tap a category’s Add icon
to add more than one entry for that
category. For example, in the phone number category, enter a work
number and add a home number. Tap its drop-down menu icon to the
right to set the label. For example, WORK or HOME for a phone number.
NOTE
You can make a contact a Favorite. Tap and hold the contact you want to make a favorite
and tap Add to favorites.
7. Tap the Picture icon to select a picture to display next to the name in
your list of contacts and in other applications.
8. When you’re finished, tap Save.
Editing Contacts
1. From the Home screen, tap
Apps > Contacts
. You can also open
the Contacts application by tapping
Contacts
from the Home screen.
2. Tap the Contact entry you want to edit.
3. Tap the Edit icon
near the upper right corner of the screen.
4. Make the changes to the entry as needed.
5. Tap Save.

87
Communication
Importing, Exporting, and Sharing Contacts
If you have contacts stored in vCard format in your phone’s internal storage,
you can import them into your Contacts application on your phone. You can
also export contacts in vCard format from your phone’s internal storage.
Exporting your contacts to internal storage allows you to back them up to a
computer or other device. It also allows you to send the contact via email.
To import contacts from the phone’s internal storage
You can copy contacts, in vCard format, into internal storage then import
them into your phone.
1. Open the Contacts application.
2. Tap the Menu Key
> Import/Export.
3. Tap Import from internal storage.
4. If you have more than one account on your phone, tap the account into
which you want to import the contacts.
5. Select the vCard you want to import from the internal storage, then tap
Import.
To export contacts to internal storage
You can export all of the contacts on your phone to internal storage, as
vCard files. You can then copy this file to a computer or another device that
is compatible with this format, such as an address book application.
1. Open the Contacts application.
2. Tap the Menu Key
> Import/Export.
3. Tap Export to internal storage.
4. Tap the contacts you want to export to internal storage. To export all of
the contacts, tap the Select all checkbox in the upper left corner of the
screen.
5. Then tap Export, then Ye s to confirm.
6. Enter a name for the file and tap OK.

88
Communication
To share a contact
You can share a contact with someone by sending it to them as a vCard file.
1. Open the Contacts application.
2. Tap the contact you want to share to view its details.
3. Tap the Menu Key
> Share.
4. Choose the method for sending.
5. Enter the necessary information and share it.
Adding a Contact to Your Favorites
The Favorites tab
contains the list of people you choose as your
favorites and a short list of the contacts you communicate with most often.
To add a contact to your Favorites list
1. Open the Contacts application.
2. Tap a contact to view its details.
3. Tap the star to the right of the contact’s name.
When the contact is added to your Favorites list, the star will be yellow-
colored.
To remove a contact from your Favorites list
1. Open the Contacts application.
2. Tap the contact to view its details.
TIP
If you have a long list of contacts, it may be faster to tap the Favorites tab
then tap
the contact entry to view its details.
3. Tap the yellow star to the right of the contact’s name.
The grey-colored star indicates that the contact was removed from your
Favorites list.
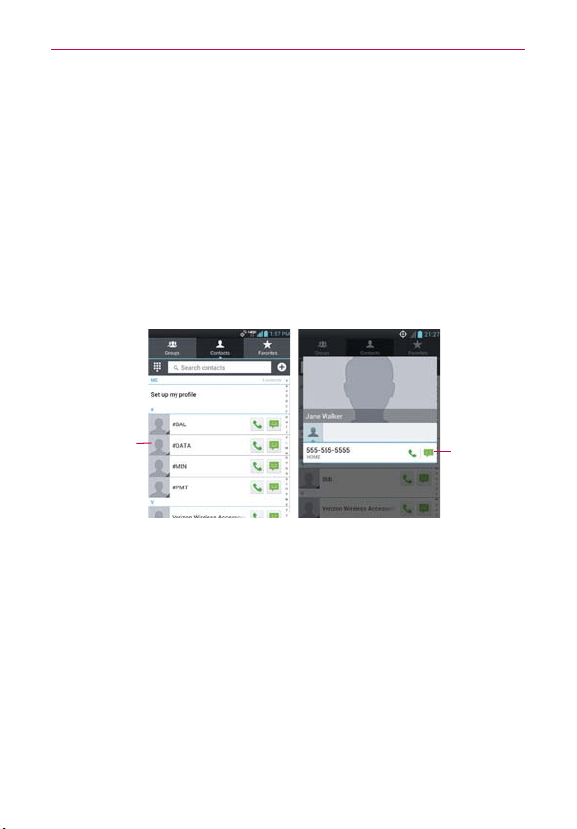
89
Communication
Communicating with Your Contacts
From the Contacts tab, Favorites tab, or Groups tab, you can quickly
call or send a text (SMS) or multimedia (MMS) message to a contact’s
default phone number. You can also open a list of all of the ways you can
communicate with that contact.
This section describes ways to initiate communication when viewing your
list of contacts. The Contacts application shares your contacts with many
other applications, such as Gmail™ and Messaging.
To connect using Quick Contact for Android™
1. Tap a contact’s picture to open Quick Contact for Android.
Tap a contact's
picture.
Quick Contact
Contact list screen Quick Contact panel
2. Tap the icon corresponding to the type of communication you want to
start.
The communication icons displayed in the Quick Contact panel depend
on the types of information you saved in the contact's file.

90
Communication
Selecting Which Contacts are Displayed
You can configure which groups of contacts you want to display in the
Contacts list.
To change which groups are displayed
1. Open the Contacts application.
2. Tap the Menu Key
> Settings > Display options.
3. Select which account entries are displayed.
Tap All contacts to display all contacts in all of your accounts.
Tap an account to display only the contact entries in that single
account.
Tap Customize to select a combination of accounts to display their
contact entries.
To customize which groups are displayed
If you choose to customize your Contacts list, it will only affect which
contacts are displayed. Your sync settings will not be affected.
1. Open the Contacts application.
2. Tap the Menu Key
> Settings > Display options.
3. Tap Customize.
4. Tap each group whose contacts you want to view in your Contacts list,
then select the Contact types you want to appear. Contact types with a
checkmark will appear in your Contacts list.
5. Tap Apply to save your settings.
Joining Contacts
When you add an account or add contacts in other ways, such as by
exchanging emails, the Contacts application attempts to avoid duplication by
joining contact information automatically. You can also join contacts manually.

91
Communication
To join contacts
1. Open the Contacts application.
2. Tap the contact entry to which you want to add information. The contact
name for this entry will remain unchanged after you join it with another
contact.
3. Tap the Menu Key
> Join.
4. Tap the contact whose information you want to join with the first contact.
The information from the two contacts will be merged and displayed
under the name from the first contact. The contact information will be
displayed in one contact entry.
Separating Contact Information
Each contact entry on your phone may contain ‘joined’ information from a
variety of sources. If contact information from different sources was joined
in error, you can separate the information back into individual contact entries
on your phone.
To separate contact information
1. Open the Contacts application.
2. Tap the contact entry whose information you want to separate.
3. Tap the Menu Key
> Separate.
4. Tap Yes to confirm that you want to separate the entries. The contact
information will separated into individual contact entries in your Contacts
list.
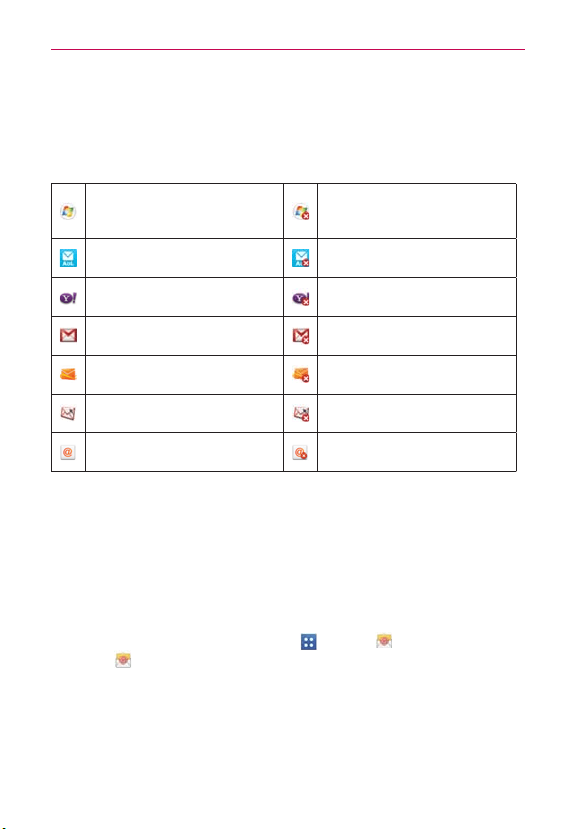
92
Communication
Email
NOTE
AOL, Yahoo! and Hotmail icons only appear when the SIM card is inserted.
Email icons
New Exchange mail
message received or sending
succeeded
Exchange mail message
sending or receiving failed
AOL mail message received
or sending succeeded
AOL mail message sending or
receiving failed
Yahoo! mail message received
or sending succeeded
Yahoo! mail message sending
or receiving failed
Gmail message received or
sending succeeded
Gmail message sending or
receiving failed
Hotmail received or sending
succeeded
Hotmail message sending or
receiving failed
Verizon.net mail received or
sending succeeded
Verizon.net mail message
sending or receiving failed
Other mail received or sending
succeeded
Other mail message sending
or receiving failed
Opening Email and the Accounts Screen
You can use the Email application to read email from services other than
Gmail™. The Email application supports the following account types:
Microsoft Exchange, Windows Live Hotmail, Yahoo! Mail, AOL Mail,
Verizon and other accounts.
To open the Email application
From the Home screen, tap Apps > Email , or tap the Email
icon
directly from Home screen.
The first time you open the Email application, a setup wizard opens to
help you add an email account. After the initial setup, the Email application
displays the contents of your Inbox.

93
Communication
The Accounts screen
The Accounts screen lists all of your accounts.
Open the Email application. If you’re not on the Accounts screen, tap
the Menu Key
> Accounts.
You can also view accounts by tapping
at the top of the screen to
switch between your accounts.
Each account on the Accounts screen displays the number of unread mail.
You can tap an account to view its Inbox.
The account from which you send email by default is indicated with a
checkmark.
Reading Your Email
You can read your email from the Inbox, or from other folders within each
individual account.
To read an email
From the Accounts screen, simply tap any account to display that account’s
folders and contents.
You can also go to the folder list of the account by tapping the Menu Key
> Folders from the Inbox.
NOTE
When new email arrives, a notification appears in the Status Bar
. Drag the Notifications
panel downward and tap the email notification.
Email settings
To access the Email settings, from the Accounts screen, tap the Menu Key
> Settings.
ACCOUNTS
Tap an account to access settings specific to that email account.
GENERAL SETTINGS
Checkmark Split view so that the email list and email contents are
split while in landscape orientation.

94
Communication
Tap Set default account to select which email account to designate
as your default account.
Tap Roaming to checkmark this setting to automatically retrieve email
while roaming outside your home network. Data fees will be charged.
NOTIFICATION SETTINGS
Tap Notifications to checkmark this setting so that you are notified of
new email notifications.
Tap Notification sound to set the sound when you receive a new
email notification. This setting is unavailable when the phone is in
Vibrate mode or Silent mode.
Tap Vibrate to set a vibration when you receive a new email
notification. This setting is unavailable when the phone is in Silent
mode.
GEOTAGGED MEDIA SETTINGS
Tap Geotagging notification to display a notification popup when
sharing pictures with location information.
Tap Share pictures if you want pictures to include location information
or not include it when sharing them.
APP SETTINGS
Tap Screen after deleting to choose which screen to show after you
delete email.
Tap Ask before deleting to checkmark this setting if you want to be
asked before deleting mail.
Tap Show image to set when to show images.
Tap Conversational view to checkmark this setting if you want your
email Inbox to display your email messages by conversation threads.
Tap Email preview to set how many lines of email text to download
on your device for preview.
Tap Email preview (Split view) to set how many lines of email text to
download on your device for preview when it is set to Split view.

95
Communication
MICROSOFT EXCHANGE SETTINGS
Tap Corporate directory to checkmark this setting to search the
online directory for the entered recipient.
Visual Voicemail
The Voicemail application allows the management of voicemail directly from
the device rather than accessing voicemail via traditional methods.
Visual Voicemail displays a list of your messages and allows you to choose
which message(s) to listen to or delete, without having to dial into your
mailbox and listen to voice instructions or prior messages.
To be able to use Visual Voicemail
1. From the Home screen, tap Voicemail .
NOTE
Listening to voicemail and setting up your voicemail service depends on subscription
to the visual voice mail service. When you tap the V
oicemail Key
and you have
subscribed to the visual voice mail service, the Visual Voicemail application will be
launched. If you are not subscribed, you will be dialed into your traditional voicemail box.
2. The first time you access the Voicemail application, you will have to
subscribe to the Visual Voicemail service to be able to use it.
3. After subscription to the Visual Voicemail service, you will be prompted
to enter your password. To change the password call voicemail (dial *86).
4. After entering the password, your voicemail entries will be displayed in
your Voicemail Inbox. While viewing the voicemail list, you can select an
entry (see step 5). For additional options, tap the Menu Key
> New,
Delete, Save as, Mark as heard, Sort by, Saved voicemails, Refresh,
Settings, Search, Logout.
5. Tap a voicemail entry to listen to it. Then you can tap Call back, Save,
Erase, or Speaker. To forward or reply to a message, tap the Menu Key
> Forward or Reply.
6. If you decide to reply with a voicemail or forward it, record a message.
The keys at the bottom of the screen allow you to record, stop,
re-record, or cancel the message.

96
Communication
Gmail
Opening Gmail and Your Inbox
When you open the Gmail application, the most recent conversations are
displayed in your Inbox.
To open the Gmail application
From the Home screen, tap Apps > Gmail .
All of your conversations are displayed in your Inbox unless you delete,
archive, or filter them.
The current Google Account is displayed at the top of the Inbox. If you
have more than one account, you can switch accounts to view the
messages in each Inbox.
Conversations with new messages are displayed with bold subject lines.
To read a message in a conversation, tap its subject line text.
indicates that you were CC'd on this message.
indicates that this message was sent directly to you.
To view your Inbox when Gmail is running
If you are viewing a message or another label, tap the Back Key until
you return to your Inbox or tap
and select Inbox.

97
Communication
Adding another Google Account
1. From your Gmail Inbox, tap the Menu Key > Settings.
2. Tap ADD ACCOUNT in the upper right corner of the screen.
3. Tap Existing or New, then enter the necessary information.
To switch accounts
Gmail displays conversations and messages from one Google Account at a
time. If you have set up more than one Google Account on your device, you
can easily switch between them.
From your Gmail Inbox, tap the Accounts icon
on the Inbox header,
then tap the account that contains the email you want to read.
NOTE
The number to the right of the selected Google Account indicates the number of unread
messages you have in that account.
Gmail Inbox
Accounts & Labels
Tap here to open a
drop-down menu of
account choices and
account labels.
Tap here to add an account.
98
Communication
Navigating in the Gmail application
If you are viewing a message or another label, tap the Back Key until
you return to your Inbox.
While viewing your Inbox, swipe the screen up and down to scroll through
the list. The icons at the bottom of the screen allow you to navigate within
the Gmail Application as well as use Gmail features:
Compose
Tap this icon to start a new Gmail message.
Search
Tap this icon to search within the Gmail application.
Labels
Tap this icon to view your messages by Gmail label.
Sync
Tap this icon to sync your Google Account(s) on your device.
While viewing a message, flick the screen left and right to scroll through all
of your messages and use the following icons:
Archive
Tap this icon to send the message to your archive folder.
Delete
Tap this icon to delete the message.
Labels
Tap this icon to set labels for the message to help organize
your messages.
Read/Unread
Tap this icon to mark your email as unread or
read.
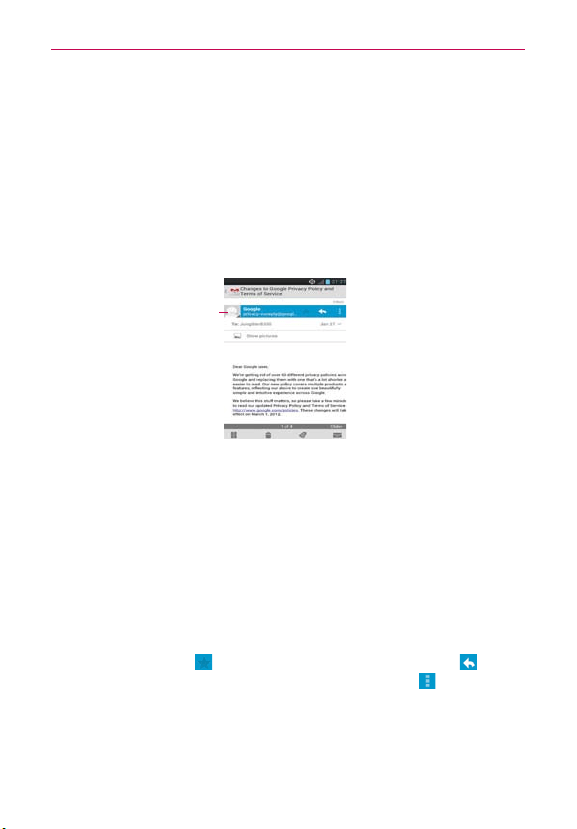
99
Communication
Reading Your Messages
While viewing a list of conversations in your Inbox, or in any list of labeled
conversations, you can open a conversation to read its messages.
To read a message
Tap a conversation that contains the message you want to read.
The conversation opens to the first new (unread) message, or to the
first starred message, if you’ve previously starred a message in the
conversation.
Tap the Contact's picture to
open Quick Contact.
The Google Talk online status will appear next to the name of the
sender of each message if the sender has a Google Account. Tap the
contact’s picture to open Quick Contact.
After you archive or delete a conversation, you can tap Undo in the
dialog box that appears at the bottom of the screen to undo the last
action and restore the message to its previous location.
You can also swipe left and right across the screen to scroll though
and read the messages in your Inbox (or the conversation list you’re
working in).
Tap the Star icon
to mark it as important, the Reply icon to start
a reply message to the sender, and the Options icon
to provide
access to Reply all to reply to all addresses and Forward to forward
the message to someone else.
100
Communication
To reread a message
When you open a conversation, messages that you’ve already read are
minimized into a tab that indicates the number of hidden messages.
1. From the Home screen, tap Apps
> Gmail
. Then tap the
conversation you want to view.
2. Tap the contact name to open that message.
While reading a message you can tap
to return a read message to the
unread state. For example, it can remind you to read it again later.
Composing and Sending a Message
You can compose and send a message to people or groups with Gmail
addresses or other email addresses.
To compose and send a message
1.
From the Home screen, tap Apps
> Gmail > Compose at the
lower left corner of the screen.
NOTE
This will start the message from your default Gmail account. To send it from another
account, on the Accounts screen, tap the account Accounts icon
to the right of the
current Google Account, then tap the account you want to use.
2. Enter a recipient’s address.
As you enter text, matching addresses are offered from your Contacts
list. You can tap a suggested address or continue entering text to enter a
new one.
3. Tap the Menu Key
> Add Cc/Bcc to copy (normal or blind status)
recipients, if necessary.
4. Enter a subject for the message in the Subject field.
5. Enter your message in the text field.
6. Tap the Menu Key
> Attach picture or Attach video if you want to
add an attachment to the email.
7. Tap Send
in the upper right corner of the screen to send your
message.
NOTE
If you aren't ready to send the message, tap the Menu Key
, then tap Save draft.
101
Communication
Replying to or Forwarding a Message
You can continue an email conversation by replying to a message or by
forwarding it.
To reply to or forward a message
1. Open the message you want to reply to or forward.
2. On the message header, tap
or tap , then Reply all or Forward.
Replying to or forwarding messages without changing the subject adds
your reply to the current conversation.
Changing the subject starts a new conversation.
The message will open in a new screen where you can add or remove
addresses, edit the subject, and add or remove text or attachments.
You can add one or more people to an ongoing conversation by replying
to all and then adding the new person’s address(es) to the reply.
Note that the conversation text and previous messages are also included
in your reply (or forwarded) message.
3. Tap Send
in the upper right corner of the screen to send your
message.
NOTE
You can change the message action after you've started the message. Simply tap
in the
message header to the right of the current message action, then tap the one you want. For
example, if you chose Reply but decide you want to Reply all.
Google Account settings
1. From the Home screen, tap Apps > Gmail .
2. Tap the Menu Key
> Settings > General settings.
Confirm before deleting: Mark the checkbox to ask to confirm before
deleting a message.
Confirm before archiving: Mark the checkbox to ask to confirm before
archiving a message.
Confirm before sending: Mark the checkbox to ask to confirm before
sending a message.
Swiping conversation list: Allows you to choose an action to perform
when you swipe a conversation.

102
Communication
Reply all: Mark the checkbox to make Reply all the default message
action.
Auto-fit messages: Allows you to shrink messages to fit the screen and
allow zooming.
Auto-advance: Allows you to set which conversation list is viewed next.
Hide checkboxes: Mark the checkbox to hide checkboxes so that tap
and hold will select an item.
Message actions: Allows you to set when to show message actions.
Individual account settings
You can set each of your accounts with specific, individual settings.
1. From the Home screen, tap Apps
> Gmail
.
2. Tap the Menu Key
> Settings.
3. Tap the account whose settings you want to modify.
Priority Inbox Mark the checkbox to make Priority Inbox the default
Inbox for this account.
Notifications Mark the checkbox to receive a Status Bar notification
when mail arrives.
Inbox sound & vibrate Allows you to set the Sync download amount
for this account and how you want to be notified.
Signature Allows you to enter the signature you want to send at the
end of your email.

103
Communication
DATA USAGE
Sync Gmail Opens the Accounts & Sync screen to modify your sync
settings for this account, or remove this account.
Days of mail to sync Allows you to set the number of days of mail to
sync. Modifying this setting affects the sync download in the Ringtone &
vibrate setting.
Manage labels Allows you to set which mail labels are synced.
Download attachments Mark the checkbox to automatically download
attachments to recent messages using a Wi-Fi connection.
Responding with quoted text
When you respond to a Gmail message you can choose to type within the
previous text. For example, if the previous text includes multiple questions,
you can insert your responses immediately after each question instead of
responding as a separate message.
1. Open a Gmail message and initiate your response action (e.g., Reply,
Forward, etc.).
2. Tap the QUOTE TEXT checkbox below the Compose field to checkmark
it, then tap RESPOND INLINE.
3. Tap where you want to insert your text, then enter your text as
necessary.
4. Tap Send
in the upper right corner of the screen to send it.
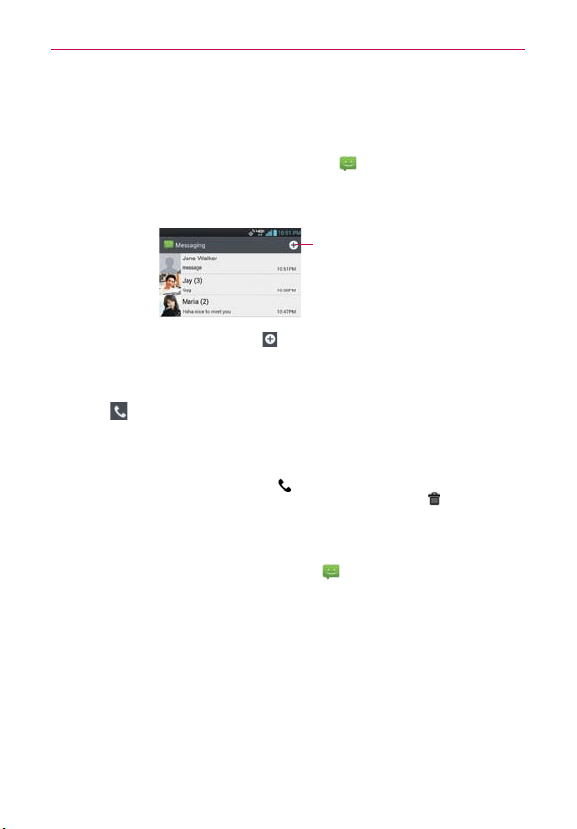
104
Communication
Messaging
To open Messaging
From the Home screen, tap Messaging .
The Messaging screen will open, where you can create a new
message or open an ongoing message thread.
New Message
Tap here to create a
new message.
Tap the New message icon to start a new text or multimedia
message.
Tap an existing message thread to open it.
Tap
to make a call in the message screen.
TIP
QUICK REPLY
When a New Message notification is displayed, you can reply quickly without accessing
the Messaging application. Simply tap the T
ext field in the notification to respond with
a text message, or tap the Call icon
to call the person instead of responding by text,
tap View to open the Messaging application, or tap the Delete icon
to delete the
message.
To delete a message thread from the Messaging window
1. From the Home screen, tap Messaging , then tap and hold the
message thread.
2. Tap Delete in the Context menu that opens.
3. Tap Yes to confirm you want to delete the message thread.
Exchanging Messages
You can send a text message (SMS) with up to 160 characters to another
mobile phone. If you type more than the allotted text amount (up to 7 pages
of 153 characters), the message is delivered as a series of messages (EMS).
If you keep typing after the limit, your message is delivered as Multimedia
messages (MMS).
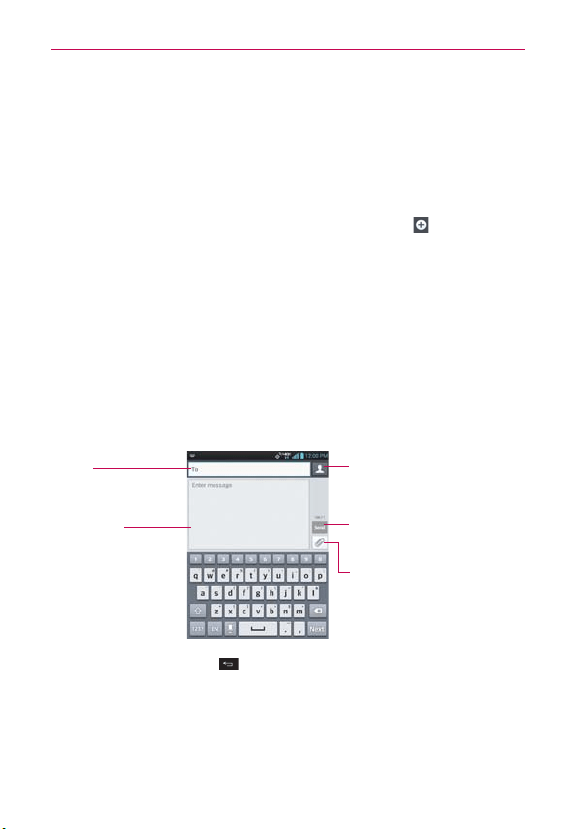
105
Communication
Multimedia messages (MMS) can contain text and a picture, location, a
recorded voice, an audio file, a video, or a picture slideshow.
The Messaging application automatically converts a message into a
multimedia message if you add a subject or attach a media file.
To send a text message
1. On the Messaging screen, tap the New message icon in the upper
right corner of the screen.
2. Enter a mobile phone number or email address in the To field.
As you enter the information, matching contacts appear. You can tap a
suggested recipient or continue entering the phone number or email.
NOTE
Instead of a phone number or email address, you can enter a name. As you enter
characters, matching Contact entries are displayed for you to select.
3. Tap the Message field to start entering your message.
A character counter is displayed to the right of the message field to let
you know how many more characters you can type and also the number
of pages in the message.
Character counter
Displays the amount of remaining
characters and the number of pages.
Attachment icon
Tap here to add an attachment to
your message.
To field
Tap here to enter the
recipient(s).
Contacts icon
Tap here to enter the recipient(s)
by searching through your stored
Contact information.
Message field
Tap here to enter your
message.
If you tap the Back Key while composing a message, it’s saved as a
draft. Tap the message to resume composing it.
106
Communication
4. Tap Send to send the message.
Your message is displayed and responses appear in the same window,
creating a message thread with that contact.
To create and send a multimedia message
1. On the Messaging screen, tap the New message icon in the upper
right corner of the screen.
2. Enter a mobile phone number, email address, or Contact name in the To
field. As you type, matching contacts appear. You can tap a suggested
contact or continue typing.
3. Tap the Message field to start entering your message.
4. Tap the Menu Key
> Add subject to add a message subject.
5. Tap the Attachment icon
to open a dialog box where you can choose
the type of media file to attach to the message.
Tap Picture to select a picture from your Gallery.
Tap Take photo so you can take a picture and attach it.
Tap Video to select a video from your Gallery.
Tap Record video so you can record a video and attach it.
Tap Audio to select an audio file stored in your phone’s memory.
Tap Record voice so you can record an audio message and attach it.
Tap Location and select from My current location, Places of
Interests, Enter address, Contact, and From geotagged media.
Tap Contact to select the contact(s) you want to send as vCard file(s).
Tap Slide to create a slideshow with 10 pictures.
NOTE
To delete an attachment, simply tap the Delete icon
to the right of the attached file.
6. Tap Send MMS to send the message.
107
Communication
To attach a location in a message
1. Create a new message and add a recipient.
2. Tap the Attachment icon
and tap Location.
3. Select a location type from the available choices, then complete the
location information as necessary.
4. Tap Attach.
5. Type your message, then tap Send MMS.
To send a group message.
1. On the Messaging screen, tap the New message icon in the upper
right corner of the screen.
2. Add the recipient(s).
3. If you entered more than one recipient, Group Conversation and
Individual Messages icons appear below the message recipients as
soon as you tap the Message field.
Tap Group Conversation to allow all of the recipients to be viewed by
each other so they can respond to you and the group. The message is
sent as a multimedia message (MMS).
Tap Individual Messages so that none of the recipients can see the
other recipients (similiar to BCC). Each individual can only respond to you.
NOTE
Tap the Help icon
to view information regarding using these buttons.
4. Complete the message as necessary, then tap Send to all.
108
Communication
To respond to messages you receive
If you receive a new message while you’re working in a message window,
the new message is displayed. If not, you’ll receive a new message
notification and the new message icon
appears in the Status Bar. When
a New Message notification is displayed, you can reply quickly without
accessing the Messaging application. Simply tap the Text field in the
notification to respond with a text message. Tap View in the New Message
notification to open the Messaging application, or tap the Call icon
to
call the person instead of responding by text.
If the Auto-retrieve setting is not checkmarked, you must tap Download to
view the message.
If the message contains a media file, tap the Play icon
to view, watch,
or listen to it. Tap and hold the media file to open a Context menu with
additional options.
To view details about a message
1. Tap and hold a message in the message window.
2. Tap View message details in the Context menu that opens.
Changing Messaging Settings
To change your Messaging settings, open the Messaging application, tap
the Menu Key
> Settings.
Storage
Delete old messages: Checkmark this setting to allow the phone to delete
older messages in a thread when the Text message limit or Multimedia
message limit is reached. Remove the checkmark to keep all of your
messages.
Text message limit: Allows you to set the number of text messages to
save per thread.
Multimedia message limit: Allows you to set the number of multimedia
messages to save per thread.

109
Communication
Signature: Allows you to enter the signature you want to send with your
messages. A checkmark appears in the box after you save your signature.
Callback number: Allows you to enter the callback number you want to
send with your messages. A checkmark appears in the box after you save
your callback number.
Text message
Delivery reports: Checkmark this setting to allow your phone to receive
delivery reports for the text messages you send.
Manage SIM card messages: Allows you to manage the text messages
stored on your SIM card. This only appears when a SIM card is inserted.
Set priority: Allows you to set the default priority for the text messages
that you send.
Multimedia message
Delivery reports: Checkmark this setting to allow your phone to receive
delivery reports for the multimedia messages you send.
Allows delivery reports: Checkmark this setting to send a delivery report
when it is requested.
Auto-retrieve: Checkmark this setting to automatically download entire
multimedia messages. Remove the checkmark to download only the
heading of multimedia messages, allowing you to manually download the
whole message when you’re ready. This is useful for controlling how much
data you download.
Roaming auto-retrieve: Checkmark this setting to allow messages to be
received even if you are roaming outside of the network.
Set priority: Allows you to set the default priority for your multimedia
messages.

110
Communication
Group Conversation
Group conversation: Checkmark this setting so that message recipients
can see who received the message and reply to them.
Help: Displays information describing the Group Messaging feature.
Conversation skin
Allows you to change the conversation display style.
Notification
Notifications: Checkmark this setting to allow your phone to receive a
notification in the Status Bar whenever you receive a new message.
Preview: Checkmark to preview message contents when the message is
received.
New message popup: Checkmark this setting to enable a dialog box to
alert you to new message arrival(s).
Notification sound: Allows you to select the sound when you receive a
new message notification. This setting is greyed-out when the phone is set
to Vibration mode or Silent mode.
Vibrate: Allows you to set the phone vibration setting when you receive a
new message notification. This setting is greyed-out when the phone is set
to Silent mode.
Message Reminder: Checkmark to set a reminder every 2 minutes for
unread messages.
Receive emergency alerts
These are the settings associated with the Commercial Mobile Alert
System.
Presidential alert: This setting allows presidential alerts to be always
presented. This setting is greyed-out because it cannot be changed.
Extreme alert: Checkmark this setting so that Extreme alerts are always
presented.
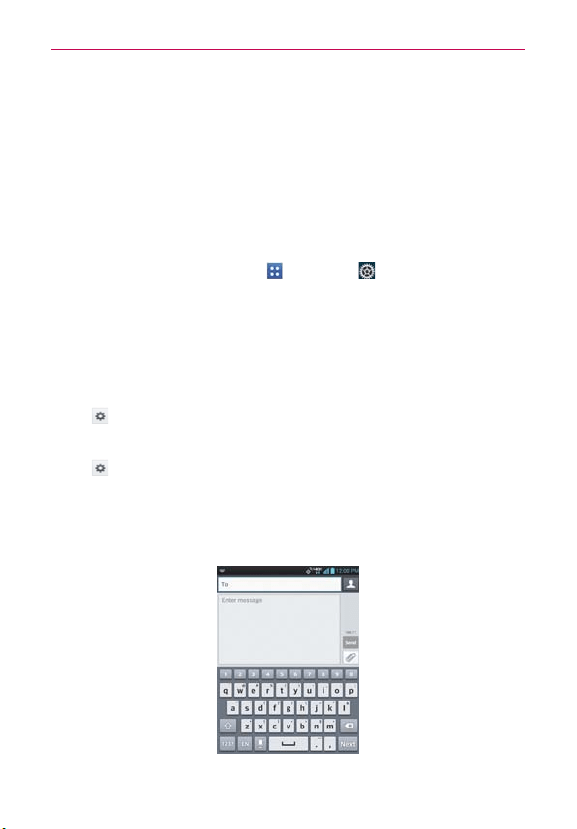
111
Communication
Severe alert: Checkmark this setting so that Severe alerts are always
presented.
AMBER alert: Checkmark this setting so that AMBER alerts are always
presented.
Alert reminder: Allows you to select how often you want to be reminded
when notified of an alert.
To change input language and the keyboard layout
From the Home screen, tap Apps > Settings > Input language &
Input.
OR
While entering text, follow the instructions below.
1. Open the Notifications Panel and tap Choose input method > Setup
input methods.
2. T
ap
> Input language & type.
3. Tap each language to select as one of input languages.
4. Tap
to change the keyboard layout.
5. Tap QWERTY keyboard or Phone keyboard.
Using the QWERTY keyboard
Allow you to write letters with a computer keyboard layout.
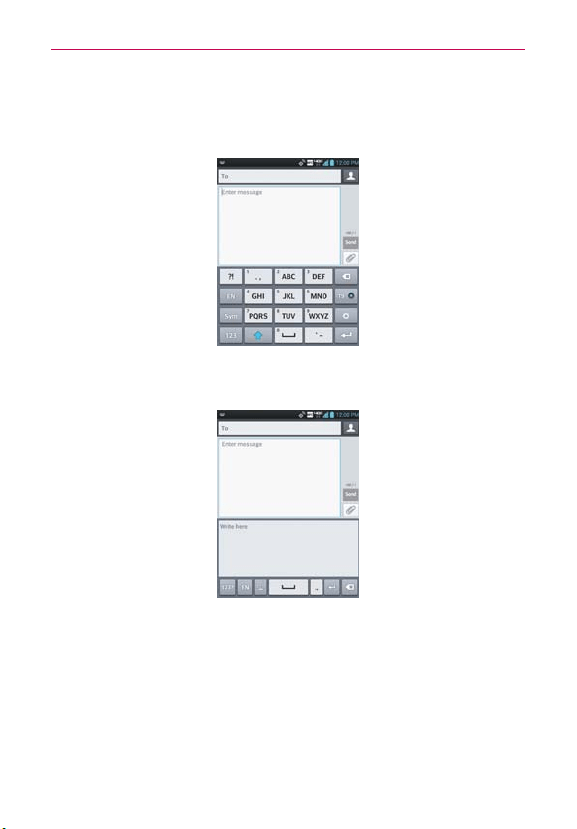
112
Communication
Using the Phone keypad
Allow you to write letter with a phone keyboard layout. Tap each key with
the respective letter you want until it is displayed.
Using the Handwriting
Allow you to write letter in a style of writing with a pen or pencil.

113
Communication
Text Entry Tips using Path keyboard
Put your finger on the first letter of the word and draw a path from
letter to letter, lifting your finger up after the final letter.
Create a squiggle (like an S shape) to create a double letter (such as
pp in apple).
Tap and hold a key to enter the alternate letter or symbol located at
the top right corner of the key.
Tap the suggested word above the keyboard if you want to change or
correct a misspelled word.
Tap the Delete Key
to erase one character. Tap and hold the Delete
Key
to erase an entire word.
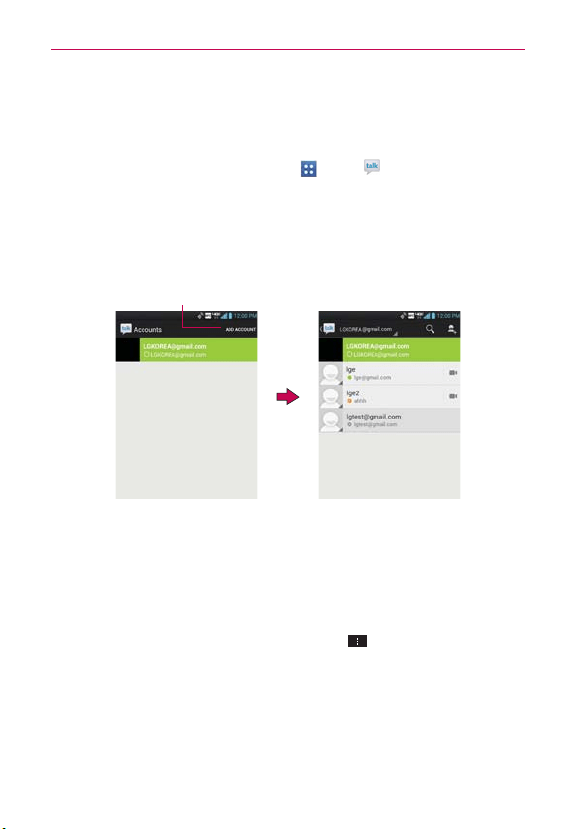
114
Communication
Talk
To open Google Talk and sign in
From the Home screen, tap Apps > Talk .
When you first open Google Talk, the Google Talk accounts screen is
displayed. Tap your Google Account to sign in to it and display your
Friends list.
Your Friends list includes all of the friends you’ve added by using
Google Talk on the web or on the phone.
Google Talk
Accounts Screen
Google Talk
Friends List
Tap here to add an account.
To sign out of Google Talk
You can sign out of Google Talk. For example, if you want to limit Google
Talk conversations to your computer. Also, signing out can extend your
battery life.
From your Friends list, tap the Menu Key
> Sign out.
You will no longer receive chat notifications or see others’ Google Talk
status in other applications, such as Gmail
™
.

115
Communication
Chatting with Friends
To chat with a friend
1. From the Home screen, tap Apps > Talk .
2. Tap the Google Talk account you want to sign in to.
3. Tap the friend you want to chat with.
4. Enter your message, then tap the Send icon
to the right of your Talk
text.
To accept an invitation to chat
When a friend sends you a Google Talk message, you will receive a notification.
The friend’s name in the Friends list turns white and displays the message.
Tap the name of the person in your Friends list.
OR
Open the Notifications panel then tap the chat notification.
A chat window will open where you can exchange messages with
your friend.
Options from your Friends list
From your Friends list, tap the Menu Key to select Display options,
End all chats, Sign out, Settings, Help, and Send feedback.
Options while chatting
While chatting, tap the Menu Key to select End chat, Go off the
record, Stop chatting off the record, Friend info, Add to chat, Clear chat
history, Settings, Help, and Send feedback.
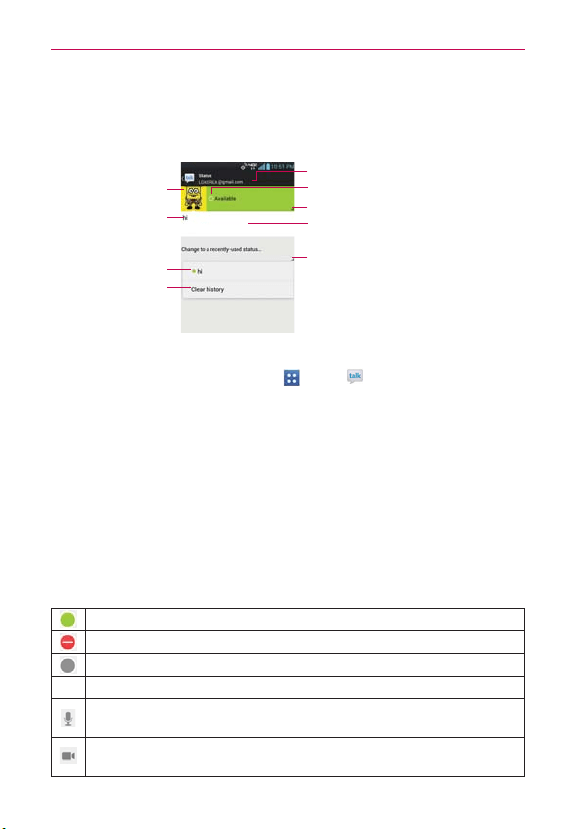
116
Communication
Changing and Monitoring Online Status
Tap your account at the top of your Friends list to change and monitor your
online status.
Tap here to change your online status.
Displays your current account.
Tap here to change the status message.
Your current online status.
Tap here to access previously used status
text.
Your picture
Tap to change it.
Your current status
message.
Previously used status.
Tap here to delete all
previously used status.
To change your online status
1. From the Home screen, tap Apps > Talk (Sign in to your Google
Talk account, if necessary.).
2. Tap your account at the top of your Friends list.
3. In the Status screen that opens, tap your current status, then tap the
new status you want to set.
Your status, including any message you’ve entered, appear in your
Friends' lists and in other locations where your status or status message
are displayed.
Status Icons
Icons in Google Talk, Gmail, and other applications indicate the Google Talk
status for you and your friends.
Available: Signed into Google Talk and available to chat
Busy: Signed into Google Talk but too busy to chat
Invisible: Signed into Google Talk but appear signed out to others
Signed out of Google Talk
Voice Chat Available: Signed into Google Talk and available for
voice chat.
Video Chat Available: Signed into Google Talk and available for
video chat.

117
Communication
To change your status message
In addition to the standard status icons described in the table above, you
can also enter a status description to go with your status.
1. From the Home screen, tap Apps
> Talk (Sign in to your Google
Talk account, if necessary.).
2. Tap your account at the top of your Friends list.
3. In the Status screen that opens, tap your current status description, then
enter the text you want displayed with your status.
NOTE
Any status descriptions that you've entered previously are added to your status message
list, so you can easily tap one of them to use it in the future without retyping. T
o clear
your list and start over, tap the Recently used status list, then tap Clear history.
To change your picture
1. Tap your account at the top of your Friends list.
2. Tap your picture at the top left of the screen.
3. Tap Select from Gallery to change to an existing photo, tap Take with
Camera to take a photo to change to, or tap Remove to simply remove
it.
Choose an image from your Gallery, crop it as necessary, then tap OK.
After taking the picture, select it as your Google Talk photo.
Managing Your Friends List
Your Google Talk Friends list contains the friends you’ve invited to become
friends or whose invitations you’ve accepted in Google Talk. Friends can
invite each other to chat in Google Talk and see each others’ online status
in Google Talk and other applications, such as in Gmail.
The Google Talk Friends list is sorted by your friends’ online status: active
chats, online, busy, away, and offline. Within each grouping, friends are
listed alphabetically.
To add a friend to your Friends list
You can invite anyone with a Google Account to become your friend in
Google Talk, so you can chat with each other and stay up-to-date with each

118
Communication
others’ online status.
1. From your Friends list, tap Add Friend
in the upper right corner of the
screen.
2. Enter your friend’s Gmail address then tap Done
in the upper right
corner of the screen.
To view and accept an invitation to become a friend
When a contact invites you to become a friend in Google Talk, you receive a
notification in the Status Bar and the invitation appears in your Friends list.
1. Tap the invitation from either the Status Bar or the Friends list.
2. Tap Accept to chat with the contact, or Cancel if you don’t want to chat
with and share your Google Talk status with the sender.
To view all friends or only those most popular with you
By default, only the friends that you frequently chat with (the most popular)
are shown in the Friends list. But you can change which friends are listed.
In the Friends list, tap the Menu Key
> Display options.
Availability displays only your most popular friends who are available
to chat.
Name displays all of your friends.
Recency displays only your friends you’ve recently chatted with.
To block a friend
You can block a friend from sending you messages. When blocked, your
friend will be removed from your Friends list.
1. From the Friends list, tap the friend’s name.
If you don’t see the friend, tap the Menu Key
> Display options >
Names.
2. Tap the Menu Key
> Friend info, then tap Block at the bottom of
the screen.
You can view a list of your blocked friends by opening your Friends list

119
Communication
and tapping the Menu Key > Settings. Tap the Google Account the
friend is in, then tap Blocked friends. You can unblock a friend by tapping
the friend’s name in the blocked list then tapping OK in the dialog box
that opens.
Changing Google Talk Settings
You can configure Google Talk to send you a notification with the contents
of each message that you receive in a chat, and also to sound a ringtone or
vibrate the phone.
You can also configure Google Talk to sign you in automatically when
you turn on your phone, and you can set whether the mobile indicator is
displayed next to your name in other people’s Friends lists.
To show or hide the mobile indicator to friends
1. From the Friends list, tap the Menu Key > Settings.
NOTE
Each Google Account uses its own settings. If you use more than one Google Account
on your device, tap the account you want to modify
.
2. Checkmark Mobile indicator (or remove the checkmark).
If Mobile indicator is checkmarked, your friends see an outline of an
Android
™
next to your name in their Friends list when you’re signed into
Google Talk on an Android phone.
To set Google Talk to change your status
1. From the Friends list, tap the Menu Key > Settings.
NOTE
Each Google Account uses its own settings. If you use more than one Google Account
on your device, tap the account you want to modify
.
2. Checkmark Away when screen off (or remove the checkmark).
When Away when screen off is checkmarked, your status will
automatically be changed to Away
when the screen is turned off.

120
Communication
To configure notifications for new Google Talk messages
From the Friends list, tap the Menu Key > Settings.
NOTE
Each Google Account uses its own settings. If you use more than one Google Account
on your device, tap the account you want to modify.
Checkmark Invitation notifications to receive a notification in the
Status Bar when friend invitation(s) are received.
Tap the IM notifications (or Video chat notifications) setting to set
how to be notified when a new chat message arrives.
Tap the Notification ringtone (or Video chat ringtone) setting to set
the ringtone when a new chat message arrives.
Tap the Vibrate setting (in the CHAT NOTIFICATIONS and VOICE &
VIDEO CHAT sections) to set when to vibrate as a notification for new
chat messages.
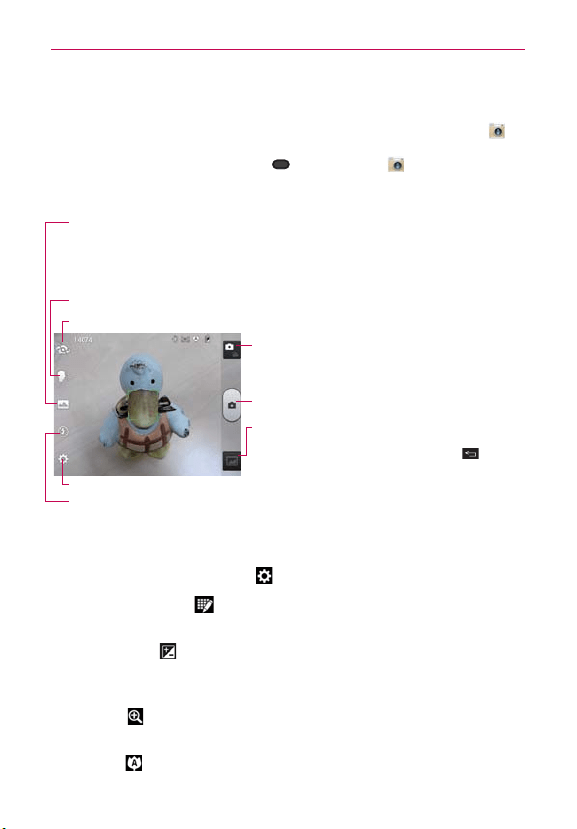
121
Entertainment
Camera
To open the Camera application, from the Home screen, tap Camera .
TIP
If you've set your phone to use the Swipe unlock method, from the locked screen,
simply press the Power/Lock Key
, then drag Camera upward to open the
Camera application.
Getting to know the viewfinder
Shot Mode – Allows you to set how the shot will be taken. Select from the following modes:
• Normal - Captures a normal photo shot.
• Panorama - Multiple continuous photos are assembled into one single panoramic image. Tap the
Capture button to start then slowly turn the camera from one side of the scene to the other.
• Continuous shot - Six continuous photos are taken, one after another.
Mode Switch
–
Tap to switch between Camera mode
and Video mode.
Capture
–
Tap to take a photo.
Gallery – Accesses your saved photos from within
Camera mode. Simply tap this icon and your Gallery
will appear on the screen. Tap the Back Key
to
return to Camera mode.
Voice shutter – Allows you to say 'Cheese' to take a photo.
Settings – Opens the Photo settings menu. See Photo options below.
Flash – Allows you to set the Flash mode. Choose from Off, On, or Auto.
Swap Camera – Allows you to swap between the rear camera lens and the front camera lens.
Rear camera photo options
You can make adjustments to optimize your shot. The following options are
available when you tap Settings
on the viewfinder screen:
Edit quick menu
: Allows you to edit the functions available on the
viewfinder.
Brightness
: Defines and controls of the amount of light entering
the lens. Slide the brightness indicator along the bar toward “-” for a
lower brightness image or toward “+” for a higher brightness image.
Zoom
: Allows you to zoom in and out. Alternatively, you can use
the Volume Keys.
Focus
: Defines the focus of the shot.

122
Entertainment
Auto: Sets the camera to focus automatically on the object you tap on
the screen before tapping the Capture icon
.
Face tracking: Sets the camera to automatically detect and focus on
human faces. When set, tapping the screen does not activate the
focus box.
Image size
: Defines the resolution for the photo. Choose from
8M(3264x2448), 5M(2560x1920), 3M(2048x1536), and 1M(1280x960).
NOTE
The default resolution is 8M (3264x2448).
Scene mode : Adjusts for better image capture in different
environments. Choose from Normal, Portrait, Landscape, Sports,
Sunset, and Night.
ISO
: Defines and controls the camera’s sensitivity to light. Choose
from Auto, 400, 200, and 100.
White balance
:
Defines the ambient lighting to improve the color
qualities of the photo under different lighting conditions. Choose from
Auto, Incandescent, Sunny, Fluorescent, and Cloudy.
Color effect : Applies artistic effects to pictures. Choose from
None, Mono, Sepia, and Negative.
Timer
: Sets a delay timer for the camera. This is ideal if you want to
be in the picture. Choose from Off, 3 sec, 5 sec, and 10 sec.
Geotagging
: Sets the camera to add location information to the
picture. This is ideal for geotagging purposes. Choose Off and On.
Shutter sound
: Sets the Shutter sound for the Camera. Choose
from Off, Tone 1, Tone 2, Tone 3, Tone 4.
Auto review
: Sets the amount of time the shot remains on screen
after taking it. Choose from Off, On, 2 sec, and 5 sec.
Reset
: Resets all of the rear camera lens settings back to the
default values.
Camera help guide
: Displays information about some useful
Camera options.

123
Entertainment
Front camera photo options
The following options are available when you tap Settings on the
viewfinder screen when switched to the front facing camera:
Edit quick menu
: Allows you to edit the functions available on the
viewfinder.
Image size
: Defines the resolution for the photo. Choose
1M(1280x960) or VGA(640x480).
Scene mode
: Adjusts for better image capture in different
environments. Choose Normal or Night.
White balance
: Defines the ambient lighting to improve the color
qualities of the photo under different lighting conditions. Choose from
Auto, Incandescent, Sunny, Fluorescent, and Cloudy.
Color effect
: Applies artistic effects to pictures. Choose from
None, Mono, Sepia, and Negative.
Timer
: Sets a delay timer for the camera. Choose from Off, 3 sec,
5 sec, and 10 sec.
Geotagging
: Sets the camera to add location information to the
picture. Choose Off or On.
Save as flipped
: Sets the camera to save the image as flipped.
When you set to On, the image you captured will be saved as a
flipped condition. When you set to Off, it will be saved as it is.
Shutter sound
: Sets the shutter sound for the camera. Choose
from Off, Tone 1, Tone 2, Tone 3, Tone 4.
Auto review
: Sets the amount of time the shot remains on the
screen after taking it. Choose from Off, On, 2 sec, and 5 sec.
Reset
: Resets all of the front camera lens settings back to the
default values.
Camera help guide
: Displays information about some useful
Camera options.
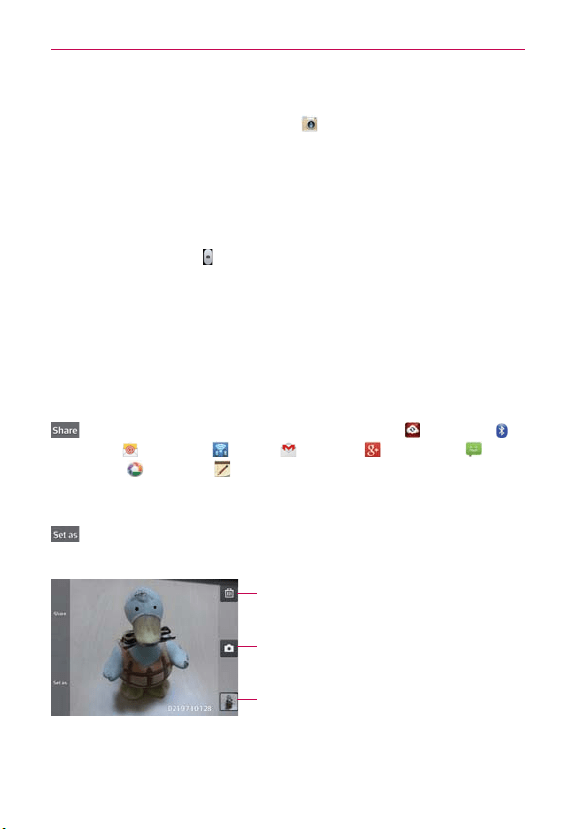
124
Entertainment
Taking a quick photo
1. From the Home screen, tap Camera to open the Camera application.
2. Hold the phone horizontally and point the lens toward the subject you
want to photograph.
3. Tap the subject on the screen and a focus box will appear in the
viewfinder.
4. When the focus box turns green, the camera has focused on your subject.
5. Tap
the
Capture icon to take the picture.
Once you’ve taken the photo
If Auto review is set to On, your captured photo will appear on the screen
until you tap an option or icon to proceed.
The following options are available after taking a photo if Auto review is set to
On.
NOTE
If Auto review is set to Off, these options can be accessed while viewing the photo in
the Gallery application.
Tap to share your photo using Backup Assistant Plus , Bluetooth ,
Email
, FileShare , Gmail , Google+ , Messaging ,
Picasa
, Richnote , or any other application you’ve downloaded
that supports this feature. Choose one of the Share options, then
complete as necessary.
Tap to use the image as a Contact photo, Home screen wallpaper, or
Lock screen wallpaper. Then complete as necessary.
Tap here to delete the image, then tap Ye s to confirm.
Tap here to take another photo immediately. Your current
photo will be saved to your Gallery.
Tap here to view the Gallery of your saved photos
beginning with the photo you just took.
125
Entertainment
Viewing your saved photos
You can access your saved photos from Camera mode. Just tap the image
thumbnail at the bottom right corner of the Camera screen.
Slide or flick your finger left or right to scroll through your photos or
videos in full size.
Tap the screen to display smaller film-like images of your photos
across the bottom of the screen, then tap the one you want to view.
TIP
Slide or flick your finger left or right to view other photos or videos.
While viewing a photo, tap the screen to access the following options:
SmartShare
Tap to share using SmartShare.
Delete
Tap to delete the photo, then tap OK.
Gallery
Tap to access the Gallery application.
Camera
Tap to return to Camera mode.
Share
Tap to select which application to use to share the photo.
You can also tap the Menu Key
to access the following additional
options.
Add location Tap to set a location tag where the photo was taken.
Set image as Tap to set the photo as the icon identifying a contact or
set it as your phone default Lock screen wallpaper or Home screen
wallpaper.
Move Tap to move the picture to another album or folder.
Copy Tap to copy the picture to another album or folder.
Rename Tap to rename the photo for easy identification.
Rotate left Tap to rotate the photo counter-clockwise.
Rotate right Tap to rotate the photo clockwise.
Crop Tap to open a cropping box tool that allows you to manually
crop the photo. Use your finger to move or resize the cropping box to
encompass only the part of the photo you want to see, then tap OK.
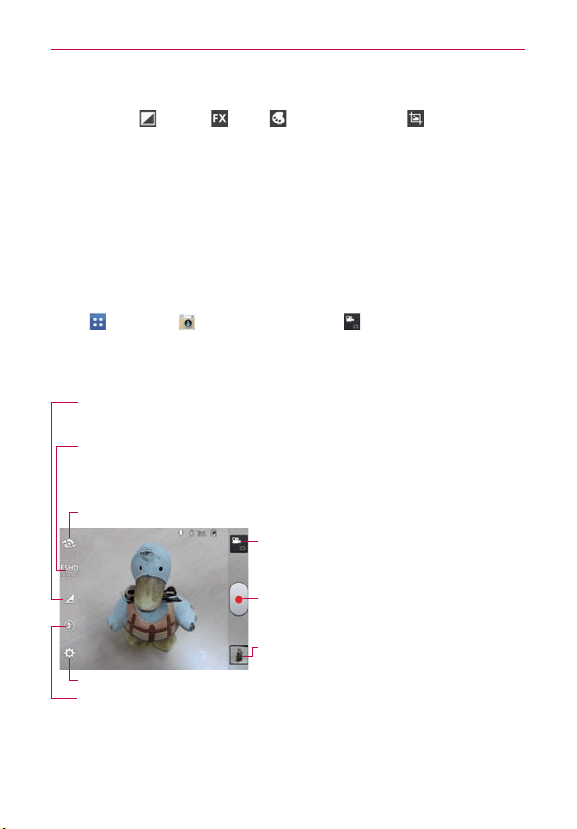
126
Entertainment
Edit Tap to edit the photo with a variety of adjustment tools including
contrast
, effects , color , and other options to fine tune
your photo.
Slideshow Tap to see your photos played in a slideshow.
Details Tap to display information about the photo (e.g., file type, file
size, etc.).
TIP
You can use the pinch-to-zoom gesture to easily zoom in and out of the displayed picture.
Video Camera
To open the Video Camera application, from the Home screen tap
Apps
> Camera . Tap the Mode Switch icon to toggle from
Camera mode to Video mode.
Getting to know the viewfinder
Brightness – Defines and controls of the amount of light entering the lens. Slide the
brightness indicator along the bar toward “-” for a lower brightness video or toward “+” for
a higher brightness video.
Mode Switch – Tap to switch between Camera mode
and Video mode.
Capture – Tap to start recording video.
Gallery – Accesses your saved photos and videos.
Video size – Defines the resolution for the video which affects the final file size. Choose
from Full HD (1920x1080), Full SHD (1440x1080), HD (1280x720), TV (720x480), VGA
(640x480), MMS(320x240) and MMS(176x144). When using the front camera lens for
recording video, the video size choices are HD (1280x720), TV (720x480), VGA (640x480),
MMS(320x240), and MMS(176x144).
Settings – Opens the Video settings menu. See Video options below.
Flash
–
Allows you to set the Flash mode. Choose Off or On.
Swap Camera – Allows you to swap between the rear camera lens and the front camera lens.
NOTE
The Zoom and Flash settings are not available when using the front camera lens to
record video.
127
Entertainment
Video options
You can make adjustments to optimize your video. The following options
are available when you tap Settings
on the viewfinder screen:
Edit quick menu
: Allows you to edit the functions available on the
viewfinder.
Zoom
: Allows you to zoom in and out. Alternatively, you can use
the Volume Keys.
White balance
: Defines the ambient lighting to improve the color
qualities of the video under different lighting conditions. Choose from
Auto, Incandescent, Sunny, Florescent, and Cloudy.
Color effect
: Applies artistic effects to videos. Choose from None,
Mono, Sepia, and Negative.
Geotagging
: Sets the camera to add location information to the
video. This is ideal for geotagging purposes. Choose Off or On.
Audio recording
: Sets the camcorder to record audio with the
video. Choose Off or On.
Auto review
: Sets the amount of time the shot remains on the
screen after taking it. Choose from Off, On, 2 sec, or 5 sec.
Reset
: Resets all of the settings back to the default values.
Video help guide
: Displays information about some useful
Camera options.
Recording a quick video
1. From the Home screen tap Apps > Camera to open the Camera
application.
2. Tap the Mode Switch icon
to toggle it to Video mode. The camera
Mode Switch icon changes to and the Capture icon changes to .
3. The Video camera’s viewfinder will appear on the screen.
4. Hold the phone horizontally and point the lens toward the subject of the
video.
5. Tap the Capture icon once to start recording.
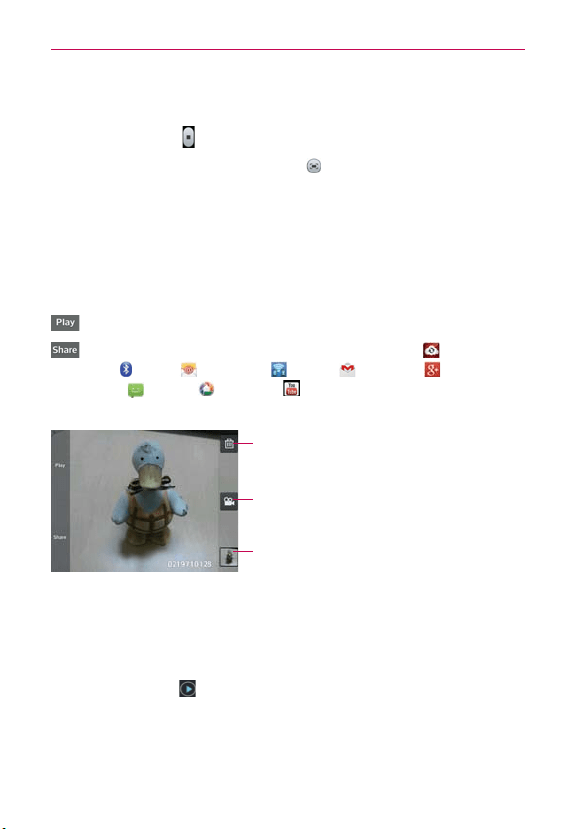
128
Entertainment
6. The record dot at the upper left corner of the viewfinder turns red and
the video length timer begins counting.
7. Tap the Stop icon
on the screen to stop recording.
TIP
To capture pictures while recording video, tap
.
After recording a video
If Auto review is set to On, a still image representing your video will appear
on the screen until you tap an option or icon to proceed.
The following options are available if Auto review is set to On.
NOTE
If Auto review is set to Off, these options can be accessed while viewing the video in
the Gallery application.
Tap to play the video you just recorded.
Tap to share your video using Backup Assistant Plus ,
Bluetooth
, Email , FileShare , Gmail , Google+
,
Messaging
, Picasa , YouTube , or any other application you’ve
downloaded that supports this feature.
Tap here to delete the video you just recorded, and
confirm by tapping Yes . The viewfinder will reappear.
Tap here to record another video right away. Your
current video will be saved in your Gallery.
Tap here to view the Gallery of your saved videos
beginning with the video you just recorded.
Watching your saved videos
1. In the viewfinder, tap the image thumbnail in the lower right corner of
the Camera screen.
2. Your video will appear on the screen.
3. Tap the Play icon
to play it automatically.

129
Entertainment
Your Photos and Videos
Adjusting the volume when viewing a video
To adjust the volume of a video while it is playing, use the Volume Keys on
the right side of the phone.
Setting a photo as wallpaper
1. From the Home Screen, tap Apps > Gallery and tap the photo
you want to set as wallpaper to open it.
2. Tap the Menu Key
> Set image as > Home screen wallpaper or
Lock screen wallpaper.
3. Crop the photo, if necessary, then tap OK.
Gallery
Opening Gallery and Viewing Your Albums
Open the Gallery application to view albums of your pictures and videos.
To open Gallery and view your albums
From the Home screen, tap the Apps Key > Gallery .
OR
Open Gallery from the Camera application by tapping the thumbnail
image at the bottom corner of the screen.
The Gallery application presents the pictures and videos saved in your
phone, including those you’ve taken with the Camera application and
those you downloaded from the web or other locations.
Tap an album to open it and view its contents.
Tap a picture or video in an album to view it.
Return to the main Gallery screen at any time by tapping
at the
top
left of the screen.
Tap the Menu Key
to access New Album, Delete, Hide/Show
album, and Settings.
130
Entertainment
To share an album
You can share the entire contents of one or more albums or individual
images or videos from an album.
1. From the Home screen, tap the Apps Key
> Gallery .
2. Touch and hold the desired album, tap Share, then select the application
to use to share your images.
Working with photos
Use the Gallery application to view pictures that you’ve taken with the
Camera application, downloaded, copied onto your microSD card or that
are stored in Picasa web albums.
To view and browse photos
1. From the Home screen, tap the Apps Key > Gallery .
2. Open an album and tap a picture.
3. Tap the Menu Key
to access Add/Remove location, Set image as,
Move, Copy, Rename, Rotate left, Rotate right, Crop, Edit, Slideshow
or Details.
Tap here to share.
Tap here to delete.
Tap here to go to
camera mode.

131
Entertainment
To edit pictures
Tap here to redo the step.Tap here to go to previous
step.
Tap here to save.
Tap here to access the editing tools.
Working with Videos
Use the Gallery application to play videos that you’ve taken with the
Camera application and to share them with friends.
To play videos
Open a Gallery album then tap a video.
The video plays in the orientation you recorded it in.
Tap here to lock the screen.
Tap here to change viewing
from its original size to full
screen.
Tap here to access
SmartShare.
Tap here to adjust the
volume.
Tap the screen while the video is playing to view the playback
controls.
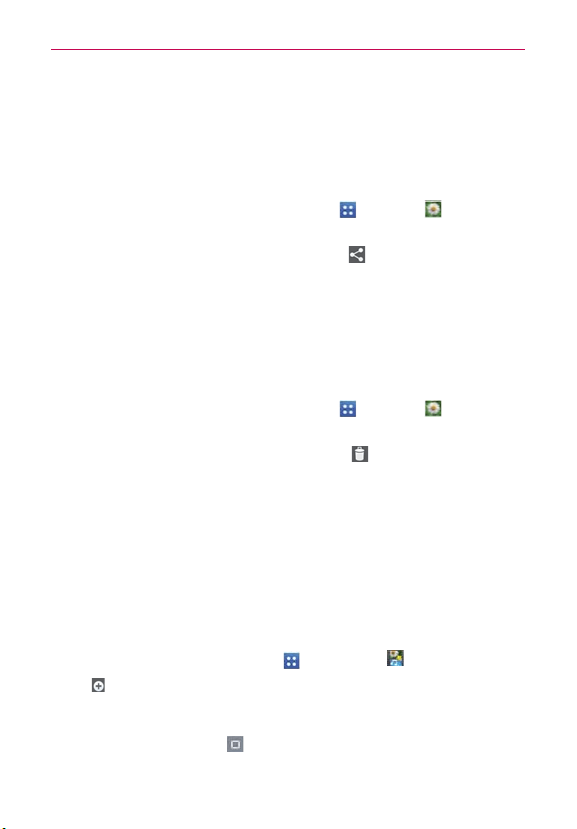
132
Entertainment
To share a video
You can share your videos in a variety of ways, including sending it by email
or multimedia message (MMS), or via SmartShare or a Bluetooth device.
You even have the option to share your videos publicly by uploading it to the
YouTube™ website.
1. From the Home screen, tap the Apps Key
> Gallery , then touch
an album.
2. While viewing an album, tap the Share icon
.
3. Checkmark the desired videos, then tap Share.
4. In the dialog box that opens, tap the application you would like to use to
share the selected videos.
5. Enter the necessary information and share it.
To delete a video
1. From the Home screen, tap the Apps Key > Gallery , then touch
an album.
2. While viewing an album, tap the Delete icon
at the top right corner of
the screen.
3. Tap to checkmark the video(s) you want to delete.
4. Tap Delete at the bottom of the screen.
5. Tap Yes to confirm.
NOTE
Touch and hold a video file to delete a single video. Tap Delete, then tap Ye
s to confirm.
Video Wiz
You can make your own movie using your images, video, and music.
1. From the Home screen, tap Apps
> Video Wiz .
2. Tap
to add the image and video files to make your music video.
NOTE
You can add up to 20 images and 5 videos. Video files should be between 3 sec. - 10
mins.
3. Tap the Select style icon to select the style of video you want to
create.
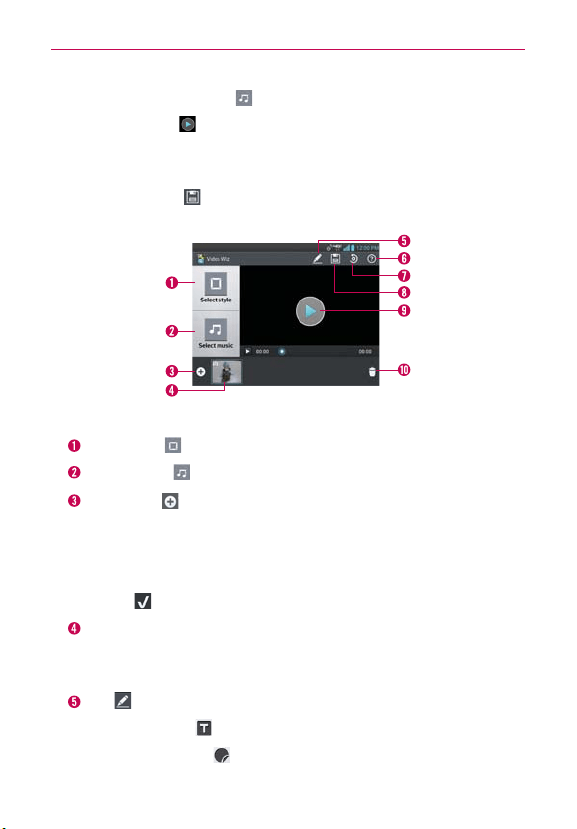
133
Entertainment
4. Tap the Select music icon to select the background music.
5. Tap the Play icon
to preview your music video.
NOTE
The length of the final version will vary depending on the size and number of the images,
the size and length of the video footage, as well as the music added and the style
selected.
6. Tap the Save icon to save the video.
NOTE
Your saved music video is saved in the 'VideoWiz' folder of your microSD card.
Video Wiz Options
Select style
Tap this icon to select the desired movie style.
Select music
Tap this icon to set the background music.
Add Media
Tap this icon to add additional images and/or video to
your movie.
Tap Image to add images, then tap the image(s) you want to add.
Tap Video to add video footage, then tap the video(s) you want to add.
Tap OK
to exit after all of the media files have been added.
Added Contents window Displays all of the selected image(s) and/or
video(s) for your movie.
Swipe left and right to scroll through all of the files you’ve added.
Edit
Tap this icon to edit the movie file.
Tap the Text icon
to insert text.
Tap the Sticker icon
to insert a sticker.
134
Entertainment
Tap the Magic spot icon to activate/deactivate this feature.
Tap OK
to exit when you’re finished editing.
Help
Tap this icon to view information on how to use the Video
Wiz application.
Reset Tap this icon to revert to the default and remove all of your
edits.
Save
Tap this icon to save the movie file.
Preview
Tap this icon to play your movie.
Delete Media
Tap this icon to remove the selected image(s) and/or
video(s).
Tap Delete
at the upper right side of the image or video,
then tap OK
.
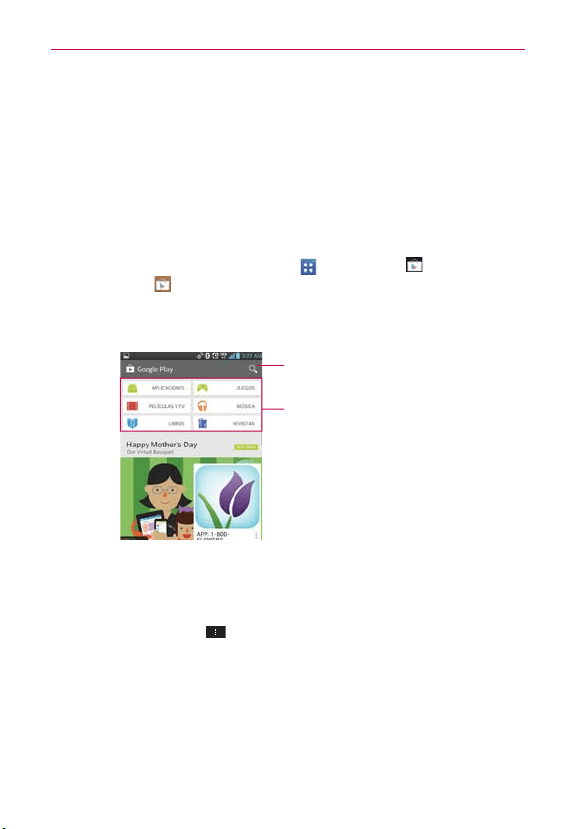
135
Entertainment
Play Store
Opening Google Play Store™ and Finding Applications
Open the Google Play Store™ application to browse and search for free
and paid applications.
NOTE
You must subscribe to Google and have an account to access the Play Store.
To open the Google Play Store™ application
From the Home screen, tap Apps > Play Store or tap the Play
Store icon
from the Home screen.
When you open the Google Play Store™ application for the first
time, you must read and accept the terms of service to continue.
Tap here to search for Play Store
applications.
Tap here to view and explore sub-
categories.
To get help with Google Play Store™
Google Play Store™ Help web pages are available from all of the Google
Play Store™ screens.
Tap the Menu Key
> Help.
The Browser application opens to the Google Play Store™ Help page,
with links to many help topics.
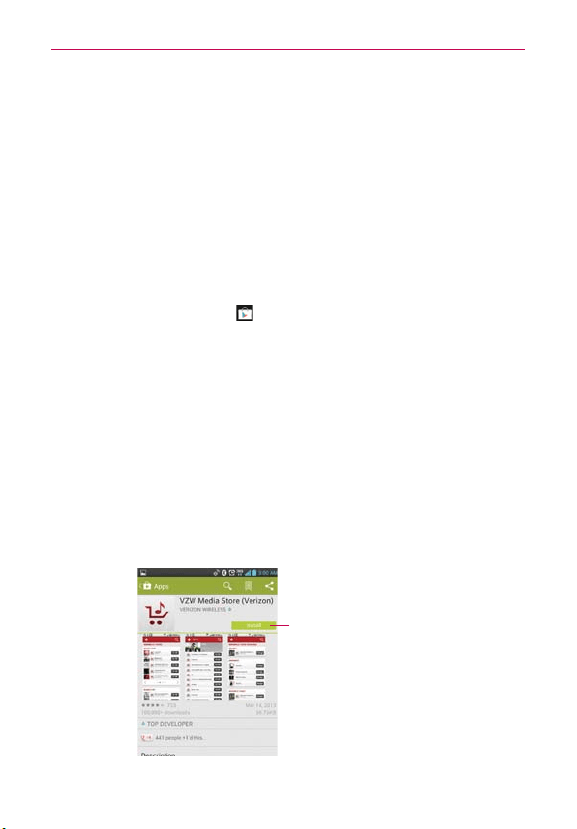
136
Entertainment
To open a screen with details about an application
At any time while browsing through the Google Play Store™, tap an
application to open its details screen.
The Application details screen include a description, ratings, comments,
and related information about the application. From this screen, you can
download, install, uninstall, rate the application, and more.
To return to the Google Play Store™ homepage
You can return directly to the Google Play Store™ homepage from most
other Google Play Store™ screens.
Tap the Play Store icon
in the upper left corner of the screen.
Downloading and Installing Applications
When you find an application you want, you can install it on your phone.
To download and install an application
NOTE
Before you can download a paid application, you must set up a billing arrangement.
1. Find an application you want and open its details screen.
In the application’s details screen, you can read more about the
application, including its cost, overall rating, and comments by users.
Scroll down to the Developer Info section to view more applications by
this developer, visit the developer’s website, or send the developer an
email message.
Tap to install an application.

137
Entertainment
2. Tap Price (for paid applications) or Install (for free applications). The
screen will display what the application can access, such as your data
and device functions, if you continue with the download.
WARNING!
Read this screen carefully. Be especially cautious with applications that have access to many
functions or to a significant amount of your data. Once you accept on this screen, you are
responsible for the results of using this item on your phone.
3. If you agree to the application’s access requirements, tap Accept.
If you selected a paid application, you’re redirected to the Google
™
Checkout screen to pay for the application before it’s downloaded to
your phone.
After accepting the application's access requirements, you receive
a series of notifications as the application is downloaded and then
installed on your phone.
When the application is installed, you can tap the notification to open
the application or open it by tapping its icon in the Applications screen.
If you have another Android™ phone, you can download a paid
application to that phone using the same Google Play Store™ account,
at no additional charge.
To create a Google Checkout account
You must have a Google Checkout account associated with your Google
Account to purchase items from the Google Play Store™.
On your computer, go to http://checkout.google.com to establish a
Google Checkout account.
OR
The first time you use your phone to buy an item from the Google
Play Store, you’re prompted to enter your billing information to set up
a Google Checkout account.
WARNING!
After you’ve used Google Checkout once to purchase an application from the Google
Play Store™, the phone remembers your password, so you don’
t need to enter it the
next time. For this reason, you should secure your phone to prevent others from using it
without your permission.

138
Entertainment
Music
Transferring Music Files to Your Phone
The Music application plays audio files that are stored in your phone’s
internal memory. Copy audio files from your computer into your phone’s
internal memory before you open the Music application.
NOTE
The LG USB driver needs to be installed on your PC before connecting your phone to
transfer music.
To copy music files onto the phone
1. Connect the phone to your computer with a USB Cable. If the default
connection mode is not set to Media sync (MTP)/Camera (PTP) mode,
open the Notifications panel and tap USB connected > Media sync
(MTP)/Camera (PTP). Your computer will prompt you with different
actions to take. Choose to open the folder to view files.
Use the computer to organize your audio files then create a music
folder in your phone’s internal memory.
2. Use the computer to copy music and other audio files into the folder that
you created in your phone's internal memory.
You can use subfolders in your phone’s internal memory to organize
your music files or you can simply copy the audio files to the music
folder you created in your phone’s internal memory.
3. Open the Notifications panel and tap USB connected > Charge only.
Then disconnect the USB Cable from the phone.
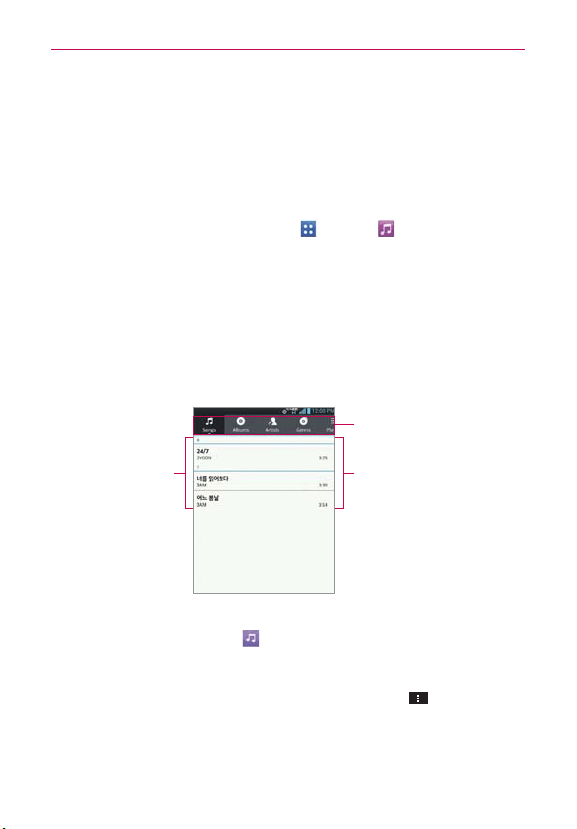
139
Entertainment
Opening the Music and Working with Your Library
After you’ve copied some music into your phone’s internal memory, you
can open the Music application and view your library of music files. Your
music files are sorted and displayed based on the Music tab you select.
To open the Music and view your music library
From the Home screen, tap Apps > Music .
The Music application searches your phone for music files you copied
into it, then builds a catalog of your music based on the information
contained in each music file. This can take from a few seconds to
several minutes, depending on how many files you have copied.
When the catalog is complete, the Music library screen opens with
tabs across the top of the screen that you can tap to view your music
library organized by Songs, Albums, Artists, Genres, Playlists, or
Folders.
Music library tabs
Tap here to select a
different tab.
Tap one of the entries
in your Music library to
play it.
Your Music
library is listed in
alphabetical order
You can return to the main Library screen from the Playback screen in the
Music application by tapping
.
To search for music in your library
1. Open the main Library screen then tap the Menu Key > Search.
2. Start typing the name of the artist, album, or track you’re looking for.
Matching songs are displayed in the list below the search box.
3. Tap a matching song to play it or tap a matching album or artist to view a
list of associated songs.

140
Entertainment
To delete a song from your phone’s internal memory
You can delete music from your phone’s internal memory.
Tap and hold a song in a Library list. In the Context menu that opens,
tap Delete.
OR
On the Playback screen, tap the Menu Key
> Delete.
You can also delete music files from your phone’s internal memory
when your phone is connected to the computer. To do this, browse
for the music files you want to delete and delete them from the folder.
Playing Music
You can listen to music using the phone’s built-in speaker, through a wired
headset, or through a wireless Bluetooth stereo headset that supports the
A2DP profile.
To play music
Tap a song in your library to listen to it.
OR
While viewing a list of tracks in an album, tap the Menu Key
>
Select to play > Select the songs you want to play > Play.
The Playback screen opens and the song you tapped or the first song
in the album or other playlist starts to play. Your music continues to play
even when you switch applications or receive a phone call. The tracks
in the current playlist play in order until it reaches the end, then stops. If
you choose a repeat option, playback only stops when you stop it.
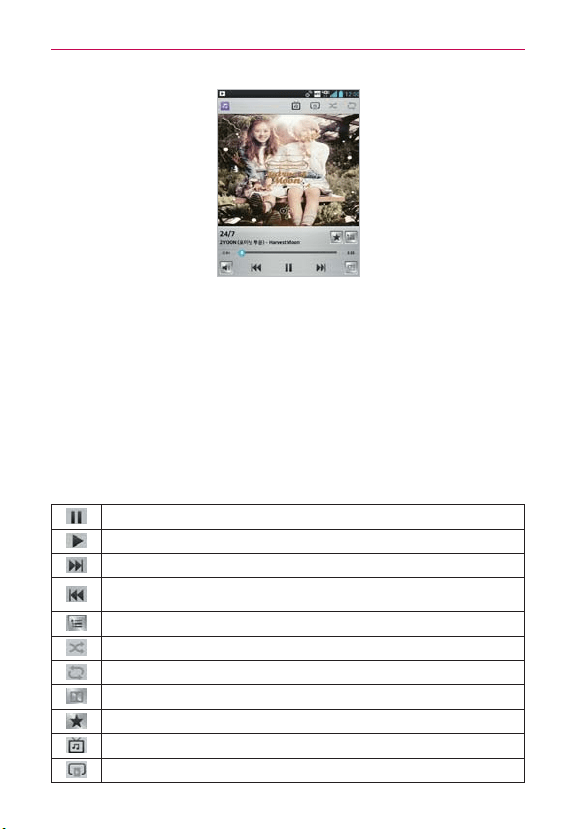
141
Entertainment
You can return to the Playback screen from most other screens in the
Music application by tapping the currently playing song at the bottom
of the screen.
You can return to the Playback screen from any other application
by opening the Notifications panel and tapping the ongoing music
notification.
To control playback
The Playback screen contains several icons that you can tap to control the
playback of songs, albums, and playlists:
Tap to pause playback.
Tap to resume playback.
Tap to skip to the next track in the album, playlist, or shuffle. Tap and hold to fast forward.
Tap to restart the current track or skip to the previous track in the album, playlist, or
shuffle. Tap and hold to rewind.
Tap to open the current playlist.
Tap to play the current playlist in shuffle mode (tracks are played in random order).
Tap to set repeat mode to repeat all songs, repeat current song, or repeat off.
Tap to set the Dolby sound settings.
Tap to set the song as a favorite.
Tap to find the song on YouTube.
Tap to share your music via SmartShare.

142
Entertainment
To control playback volume
In addition to the techniques for setting media volume, you can control the
volume of music in the Music application.
Press the phone’s up/down Volume Keys.
A panel opens to show the current media volume.
Some headsets include their own volume controls or ways to pause
and resume playback or to skip tracks.
To customize settings in the Playback or a Library screen
Tap the Menu Key > Settings while viewing a Playback screen or a
Library screen.
Show notification Shows the controller on the Notifications panel.
Sleep timer Turns off the Music automatically. Select from the
following: Off, After 10 min, After 20 min, After 30 min, After 1 h,
After 2 h
Dolby Mobile Applies the following sound effect (Dolby) options:
Off, Neutral, Expansive, Bass Boost, Treble Boost, Vocal Boost.
NOTE
Dolby Mobile is only available when an ear jack is plugged in.
To use a song as a ringtone
You can set a song to be used as your phone ringtone in place of one of the
ringtones that come with the phone.
Tap and hold a song in a Library list. In the Context menu that opens,
tap Set as ringtone.
OR
On the Playback screen, tap the Menu Key
> Set as ringtone.
NOTE
This adds the song to your ringtone list. Access the Contacts application to set it for a
specific Contact entry
.
143
Entertainment
Working with Playlists
You can create playlists to organize your music files into sets of songs,
which you can play in the order you set or in a shuffle.
To create a playlist
1. From the Music Library, tap the Playlists tab.
2. Tap the Menu Key
> New playlist.
3. Enter a name for the playlist and tap OK. The new playlist is added to the
Playlist tab
To add a song to a playlist
1. From the Music Library, tap the Playlists tab.
2. Tap and hold the name of the song you want to add and tap Add to
playlist. You can also add the song that is playing in the Playback screen
to a playlist by tapping the Menu Key
> Add to playlist.
3. Select the playlist you want to add the song to.
To remove a song from a playlist
1. Open a playlist.
2. Tap and hold the song you want to remove then tap Remove from playlist
in the Context menu that opens.
To play music in the background while accessing other applications
1. From the Home screen, tap Apps > Music .
2. Tap a song in your library to listen to it.
3. Tap the Menu Key
> Settings and checkmark the Show notification
option so that the music controller is displayed on the Notifications
panel.
4. Tap Home Key
.
5. Tap Apps
and tap the application you want to access.
Then, you can listen to music in the background while you access other
144
Entertainment
applications. To control the music, slide the Status Bar down to display the
Notifications panel. Here you will see the music controller menu where you
can control music playback.
To delete playlist
1. Open the Playlist library.
2. Tap and hold the playlist you want, then tap Delete and select Ye s to
confirm.
To rename a playlist
1. Open the Playlist library.
2. Tap and hold the playlist to display the Context menu, then tap Rename.
3. Enter a name and tap OK.
Videos
You can play a wide variety of videos using the Videos application.
Supported file formats are dependent on the software version of the
phone.
To open the Videos application
1. From the Home screen, tap Apps > Videos .
2. Tap the video you want to play.
145
Entertainment
Playback controls
Tap the screen to display the playback controls. The following options allow
you to control the video playback:
Pause playback.
Play a video file.
Tap to fast-forward the playback about 10 seconds. Tap and hold to fast-forward the
playback in 3 second increments.
Tap to rewind the playback about 10 seconds. Tap and hold to rewind the playback in 3
second increments.
Tap to display a slider bar to increase or decrease the media volume.
Tap to lock the Videos screen so that the video playback controls are not displayed when the
screen is tapped. To unlock it, tap the screen, then tap the Lock icon
in the upper right
corner of the screen.
Allows you to share via SmartShare.
Tap to change the ratio of the video screen
NOTE
You can also flip the device over to pause the video playback. This is only available when
the Pause video option is checkmarked in the Gestures settings. T
ap the screen to
redisplay the playback controls, then tap Play
to resume playback.
Videos list options
The following options are available from the Videos list screen:
Details: Tap and hold a video in the list and tap Details.
Delete: Tap
in the upper right corner of the screen, then checkmark
each video to delete. When all files to be deleted have been
checkmarked, tap Delete > OK to confirm.
Backup+ Media: Tap
to upload the video to Backup+ Media.
View type: Tap
to view the videos list in List, Grid, or Folder view.
Share: Tap
to share the video with others.
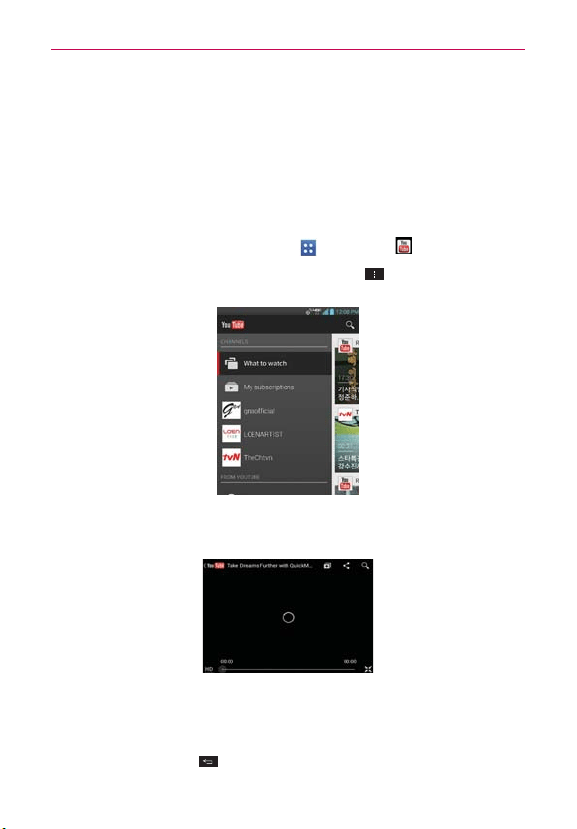
146
Entertainment
YouTube™
Opening YouTube and Watching Videos
You can browse, search for, view, upload, and rank YouTube videos on your
phone with the YouTube application.
To open the YouTube application
From the Home screen, tap Apps > YouTube .
Tap a video to watch it or tap the Menu Key
for other YouTube
options.
To watch and interact with YouTube videos
Tap a video to play it.
Tap the screen to view the Playback controls. You can pause and
play the video or drag the slider to the point in the video you want to
watch.
Tap the Back Key
to stop playback and return to the videos list.
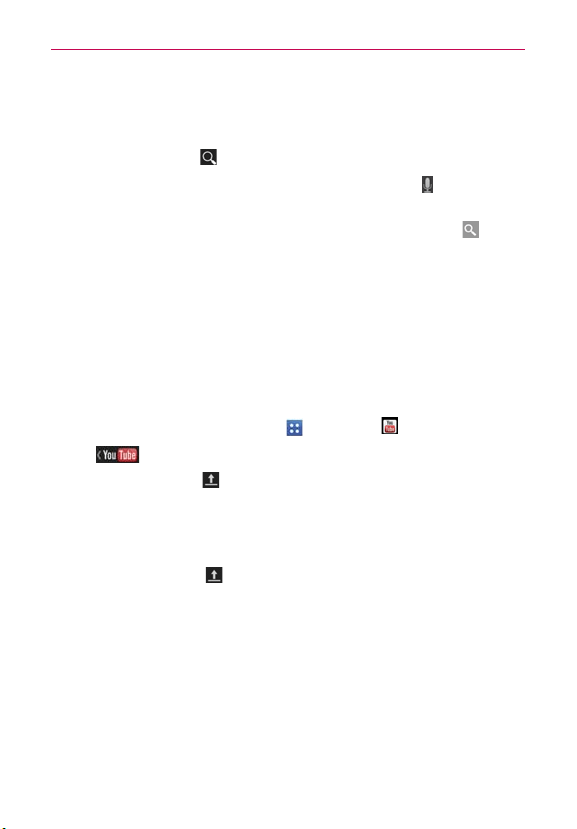
147
Entertainment
For details about these features, visit the YouTube website.
To search for videos
1. Tap the Search icon in the upper right corner of the screen.
2. Enter the text to search for or tap the Microphone icon
to search by
voice.
3. Tap a suggestion below the search box or tap the Search icon
in the
lower right corner of the keyboard.
4. Scroll through the search results and tap a video to watch it.
To share your videos on YouTube
You can share a prerecorded video using the YouTube application. First, you
must create a YouTube account and sign into it on your phone.
You can also share the videos you record with the Camera application by
uploading them to the YouTube site.
1. From the Home screen, tap Apps
> YouTube .
2. Tap
and tap your account.
3. Tap the Upload icon
and select the video.
4. Enter a title, description, and tags for your video.
5. If you want to share the video with everyone, tap the Privacy field and
then tap Public. If not, tap Private or Unlisted.
6. Tap the Upload icon
to upload the video.
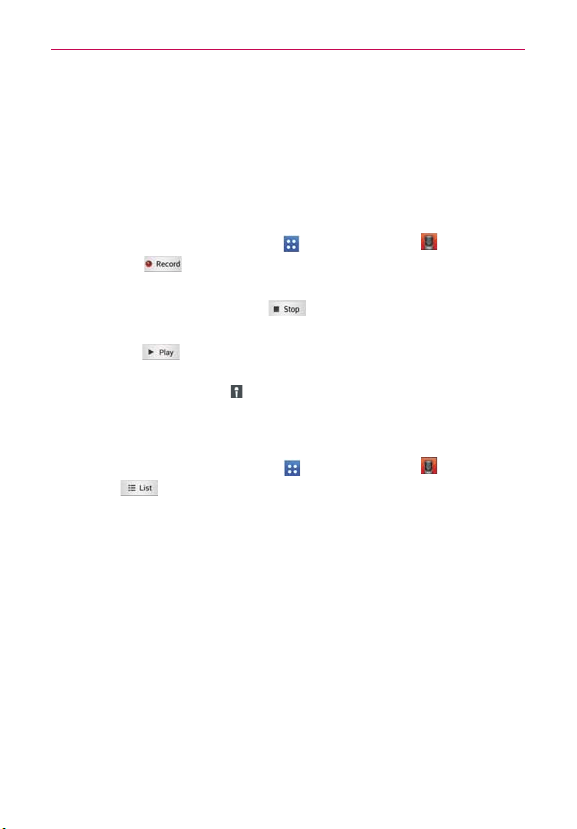
148
Entertainment
Voice Recorder
The Voice Recorder application records audible files for you to use in a
variety of ways. Use your recordings to simply remind you about something
you don’t want to forget (like a grocery list) or record sound effects that you
can attach to a message or set as a ringtone for calls.
Record a Voice Memo
1. From the Home screen, tap Apps > Voice Recorder .
2. Tap Record
at the bottom left of the screen to start recording.
3. Speak into the microphone.
4. When you’re finished, tap Stop
at the bottom right of the screen.
The recording is automatically saved to your recordings list.
Tap Play
at the bottom left of the screen to listen to your
recording.
NOTE
Tap the Microphone icon
in the upper right corner of the Voice Record screen to set
the audio file size mode. Tapping the icon toggles between For general use and For
message.
Play a Voice Memo
1. From the Home screen, tap Apps > Voice Recorder .
2. Tap List
at the bottom left of the screen.
3. Tap the voice memo you want to play.
NOTE
You can also tap and hold an audio file in the list to select Share, Delete, Rename, T
rim,
and Details the Context menu that opens.
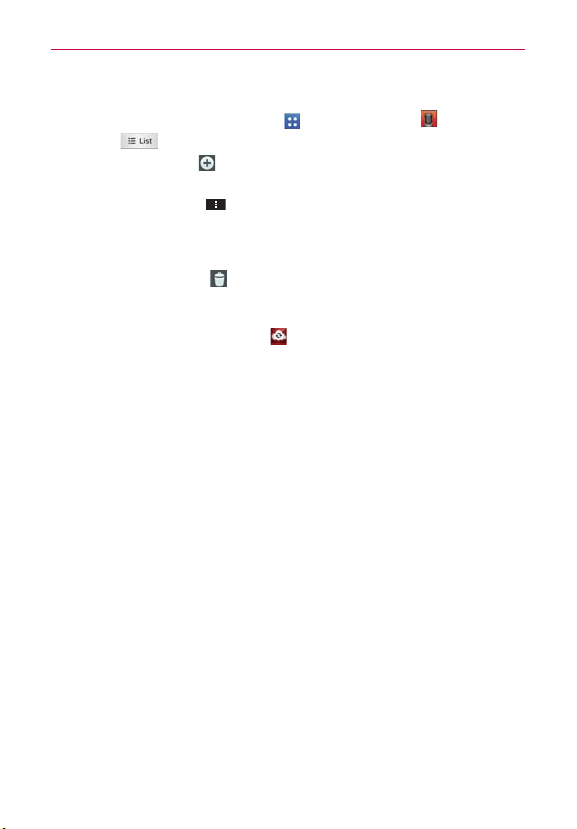
149
Entertainment
Managing your Voice Memos
1. From the Home screen, tap Apps > Voice Recorder .
2. Tap List
at the bottom right of the screen.
Tap the New icon
at the top right of the screen to record a new
audio file.
Tap the Menu Key
> Share to share voice memo(s). Checkmark
the voice memo(s) to share, then tap the Share button at the bottom
of the screen. Tap the method you want to use to share the voice
memo.
Tap the Delete icon
in the upper right corner of the screen to
delete voice memo(s). Checkmark the voice memo(s) to delete, then
tap Delete > Yes in the Context menu that opens.
Tap the Backup+ Media icon
to upload the the memos to Backup
Assistant
SM
Plus.
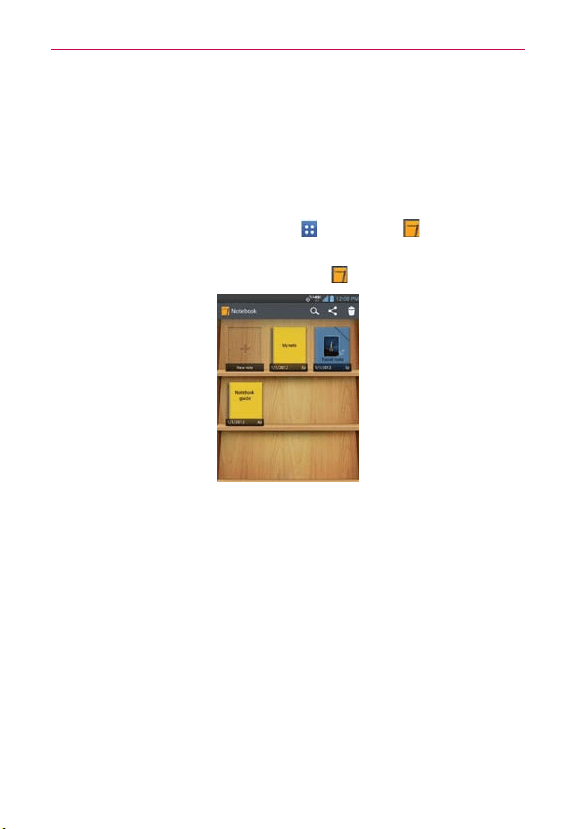
150
Tools
Notebook
Notebook allows you to make your own notes using handwriting tools or
attaching preferred multimedia files. With the Notebook application, you
can manage and personalize a wide variety of information.
To open the Notebook application
From the Home screen, tap Apps > Notebook .
OR
From the Home screen, tap Notebook
.
To make and decorate a notebook
1. Open the Notebook application.
2. Tap New note to create a note.
O
If you chose New note, the first page without a cover will be displayed.
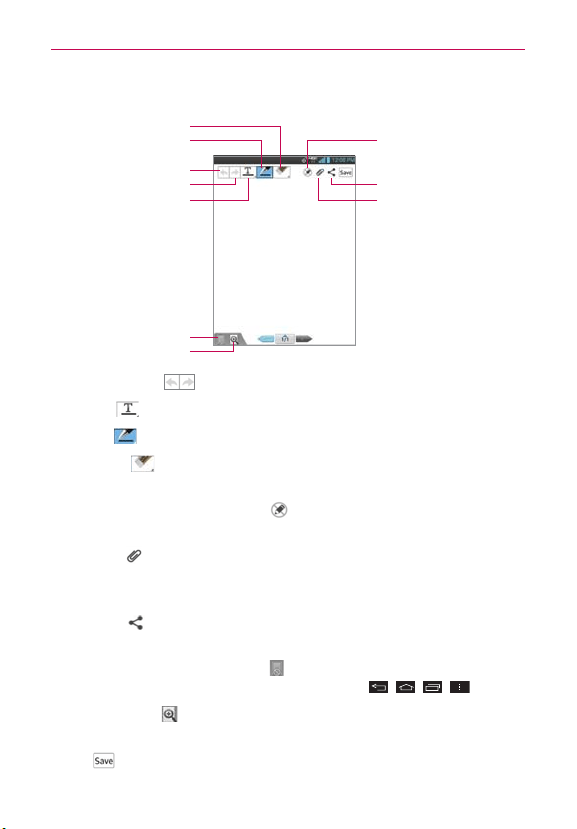
151
Tools
3. Make or create a note using the available tools.
Share
Insert Multimedia
Switch between Read only
mode and Edit mode
Undo
Redo
Text
Lock/Unlock the Front Keys
Zoom note
Eraser
Pen
Undo/Redo : Allows you to undo or redo recent edits.
Text
: Select Type, Size, and Color of the text.
Pen
: Select Pen type, Thickness, Opacity, and Color.
Eraser
: Allows you to delete any edits you've made. Tap Clear
all to delete all of the edits.
Read only mode/Edit mode
: Switch between Read only mode
and Edit mode. You are allowed to read only in the Read only mode.
Insert
: Allow you to insert multimedia file from Sticker, Image,
Take photo, Video, Record video, Audio, Record voice, Location,
Date and time, and Schedule.
Share
: Share as an image or text and image using any of the
available applications.
Lock/Unlock the Front Keys
: Allows you to lock and unlock the
front touch keys at the bottom of the device.
, , ,
Zoom note : Allow you to put notes that can be zoomed in and
out. Front key will be automatically locked at this mode.
4. Tap
to save the note.

152
Tools
Calendar
Viewing Your Calendar and Events
Open the Calendar application to view events you’ve created or that others
have invited you to.
When you first set up your phone, you configured it to use an existing
Google Account or you created a new account. The first time you open the
Calendar application on your phone, it displays any existing calendar events
from your Google Account on the web or a new account you created.
To open the Calendar application
From the Home screen, tap Apps > Calendar .
Events from each account you’ve added to your phone and configured
to synchronize calendars is displayed in your Calendar application.
Events from each calendar account are displayed in a different color.
To change your calendar view
No matter where you are in the Calendar application, you can easily switch
calendar views.
Tap the date in the upper left corner of the screen to display a drop-
down menu of calendar views. Tap Day, Week, Month, or Agenda.
Each view displays the events in your calendar for the period of time
specified.
Tap the Week tab, the Day tab, or the Agenda tab below the calendar.
To view more information about an event in the Agenda, Day, or Week
view, tap the event.
To view the events of a day in Month view, tap a day. The event will
be displayed below the calendar. Tap the event to view its details.

153
Tools
Dual Calendar Views
There is a at the top center of the screen in Day, Week, and Agenda
view. It allows you to open the Month view calendar at the top of the
screen and another calendar view at the bottom. Simply drag the calendar
handle all the way down the screen to open the month calendar above the
currently selected calendar type. Drag it all the way back up to close it.
You can also view a single week of the Month view. Drag the handle slightly
downward if the Month view is hidden or, when it’s open, stop the upward
drag motion before you reach the top. Swipe up or down to view previous
or subsequent months.
Working in Day View
Day view displays a list of the events of one day, in a table of one-hour
rows. The current time will be designated as a horizontal black line. If it’s a
day of commemoration (e.g., a holiday) it is listed in blue at the top of the
screen. All-day and multi-day events are displayed at the top of the screen
before the time slots. Part of the title of each event is displayed in the row
that corresponds to when it occurs.
To view other days, simply swipe left to see future days and right to see
past days.
To switch to Day view
Tap the date in the upper left corner above the calendar, then tap Day
in the drop-down menu.
Tap here to create a new
event.
Current Date Return Icon
Tap here to jump back to
the current date in the
displayed calendar view.
Month Calendar Handle
Drag this handle
downward to display
(or upward to hide) the
Month dual view.
Tap here to switch
to Week, Month, or
Agenda view.
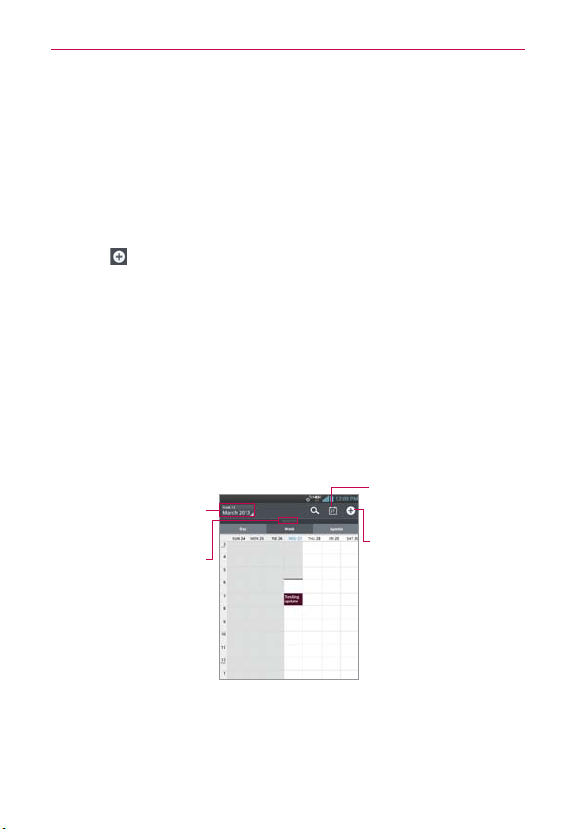
154
Tools
To learn more about events in Day view
Tap an event to view its details.
To add an event in Day view
Tap and hold an empty spot or an event in the day to open a Context
menu, then tap New event to create a new event at that time.
OR
T
ap
and select the calendar you want to use (if applicable).
NOTE
You can create a new event in the same time slot allowing you to juggle multiple events
within the same timeframe.
Working in Week View
Week view displays a chart of the events of one week. All-day and
multi-day events are displayed at the top of the screen. To view other
weeks, simply swipe left to see future weeks and right to see past weeks.
To switch to Week view
Tap the date in the upper left corner above the calendar, then tap
Week in the drop-down menu.
Tap here to create a new
event.
Current Date Return Icon
Tap here to jump back to
the current date in the
displayed calendar view.
Month Calendar Handle
Drag this handle
downward to display
(or upward to hide) the
Month dual view.
Tap here to switch to
Day, Month, or Agenda
view.
To learn more about events in Week view
Tap an event to view its details.
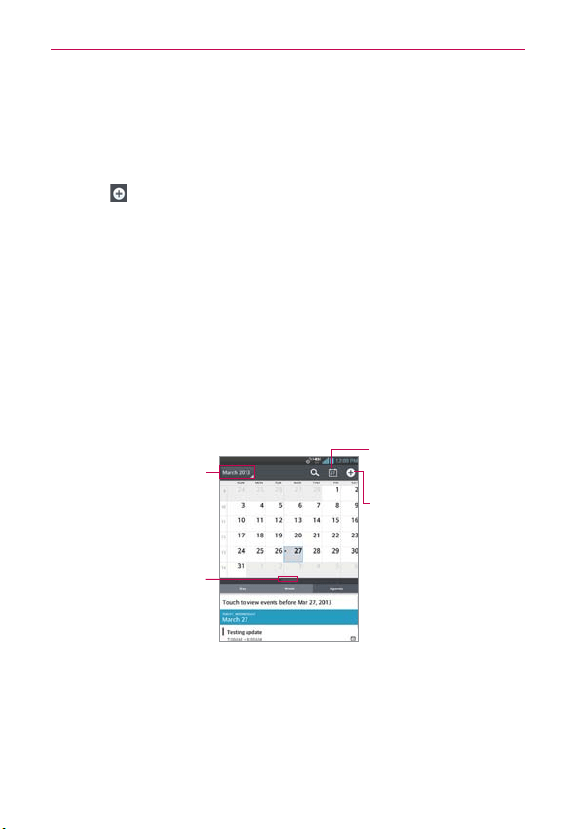
155
Tools
To add an event in Week view
Tap and hold an empty spot or an event in the week to open a Context
menu, then tap New event to create a new event at that time.
OR
Tap
and select the calendar you want to use (if applicable).
NOTE
You can create a new event in the same time slot allowing you to juggle multiple events
within the same timeframe.
Working in Month View
Month view displays a chart of the events of the month. Segments of each
day with scheduled events are blue in the day’s vertical bar. To view other
months, simply swipe upward to see future months and downward to see
past months.
To switch to Month view
Tap the date in the upper left corner above the calendar, then tap
Month in the drop-down menu.
Tap here to create a new
event.
Current Date Return Icon
Tap here to jump back to
the current date in the
displayed calendar view.
Month Calendar Handle
Drag this handle
downward to display
(or upward to hide) the
Month dual view.
Tap here to switch to
Day, Month, or Agenda
view.
To view more information about events in Month view
Tap a day to display the events below the calendar. You can then tap
the event to view more information about it.

156
Tools
Working in Agenda View
Agenda view is a list of your events in chronological order by day. A month’s
worth of events is displayed. To show earlier Agenda events, tap Touch to
view events before at the top of your Agenda list. To show later Agenda
events tap Touch to view events after at the bottom of your Agenda list.
All-day and multi-day events are listed at the start of each day.
To switch to Agenda view
Tap the date in the upper left corner above the calendar, then tap
Agenda in the drop-down menu.
Tap here to create a new
event.
Current Date Return Icon
Tap here to jump back to
the current date in the
displayed calendar view.
Month Calendar Handle
Drag this handle
downward to display
(or upward to hide) the
Month dual view.
Tap here to switch
to Week, Month, or
Agenda view.
To learn more about events in Agenda view
Tap an event to view its details.
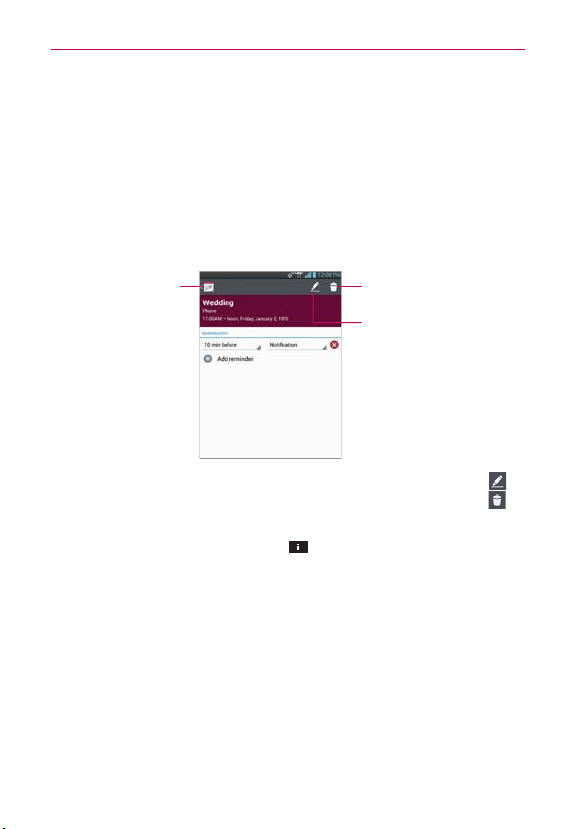
157
Tools
Viewing Event Details
You can view more information about an event in a number of ways,
depending on the current view.
To view information about an event
In Agenda, Day, or Week view, tap an event to view its details.
In Month view, tap a day to display the events below the calendar.
Then tap an event to view its details.
Delete Icon
Tap here to delete the event.
Edit Icon
Tap here to edit the event.
Calendar Icon
Tap here to go back
to Calendar view.
If you have permission to change the event, you can tap the Edit icon
(at the top right of the screen) to edit the event or tap the Delete icon
(in
the upper right corner of the screen) to delete the event.
To share an event, tap the Menu Key
, then tap Share in the Options
menu that opens. Choose the method for sharing and complete as
necessary.

158
Tools
Setting an Event Reminder
You can set one or more reminders for an event, whether or not you
created the event or have permission to edit its other details.
To set an event reminder
1. Tap an event to view its details.
2. If no reminder is set, tap the Add reminder icon
to automatically add
a reminder for 10 minutes before the event.
If a reminder is already set, tap the Add reminder icon
to set more
reminders for the event.
3. Tap the Time field that is displayed, to set the length of time before the
event that you want to be reminded of it. Tap the Notification field that
is displayed to set how you want to be reminded.
When the time comes, you receive a notification about the event.
You can use Google Calendar on the web to configure additional
reminder settings.
To delete an event reminder
1. Tap an event to view its details.
2. Tap the Remove reminder icon
next to the reminder field for the
reminder you want to delete.
159
Tools
Tasks
The Tasks application allows you to create a list of tasks to keep track of
outstanding items and remind you when due dates approach. Your list of
tasks can be synchronized with your MS Exchange account. You can create
a task, revise it, and delete it using the Tasks application on your phone or in
MS Outlook or MS Office Outlook Web Access on your computer.
To open and use your Tasks list
1. From the Home screen, tap Apps
> Tasks
.
2. Create a new task.
Tap New task
in the upper right corner of the screen, enter the
task fields, then tap Save at the bottom of the screen.
NOTE
If you haven’t set up your MS Exchange account to sync, you will see a message about
syncing your device with your account.
To Synchronize with your MS Exchange account
1. From the Home screen, tap Apps
> Settings .
2. Tap Add account.
3. Tap Microsoft Exchange to enter (or create) your email address and
password.
4. Checkmark the Sync Tasks checkbox.
To edit a task
1. From the Home screen, tap Apps
> Tasks
.
2. Tap a task in the list.
3. Tap Edit
at the top right of the screen, edit the details as necessary,
then tap Save at the bottom of the screen.
Task Tap to enter the task to be done.
Start date Tap to set the start date, then tap OK. Tap Remove
to
remove the start date.

160
Tools
Due date Tap to set the due date, then tap OK. Tap Remove to
remove the due date.
Description Tap to enter a description for the task, then tap the Back
Key
to return to the task details screen.
Priority Tap to set the priority level for the task.
Repeat Tap to set if, and how, the task needs to be repeated.
Add reminder Tap this icon first, then tap the date to set the due
date and tap the time to set the time to activate the task reminder.
Tap Remove
to remove the reminder.
Monitoring your tasks and using your tasks list
1. From the Home screen, tap Apps
> Tasks
.
Tap and hold a task in the list to select Edit, Move, Delete, or Share.
Tap the drop-down menu
at the top left of the screen to select All
tasks, Overdue tasks, or Due today tasks.
Tap the Menu Key
to select Sort by, Accounts and Lists,
Import/Export, or Settings.
NOTE
The Tasks settings include Set default account, Hide completed task, Notifications,
Notification sound, V
ibrate, and Pop-up notification.
To delete a task
1. From the Home screen, tap Apps
> Tasks
.
2. Tap a task in the list.
3. Tap Delete
and Yes to confirm.
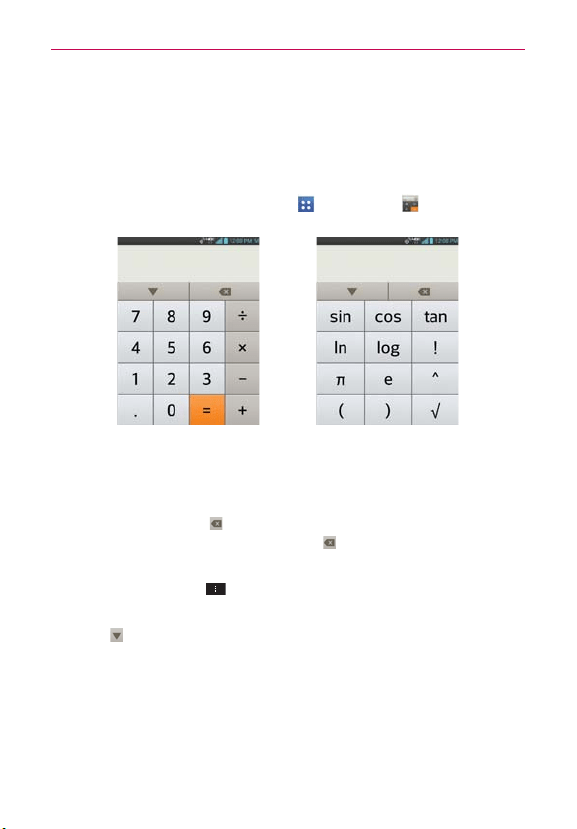
161
Tools
Calculator
The Calculator application allows you to perform simple mathematical
calculations.
To open and use the Calculator
From the Home screen, tap Apps > Calculator .
Basic Panel Advanced Panel
Enter numbers and arithmetic operators on the Basic panel.
Swipe the Basic panel to the left to open the Advanced panel, then
swipe to the right to go back to the Basic panel.
Tap the Delete Key
to delete the last number or operator you
entered. Tap and hold the Delete Key
to delete all of the entered
information.
Tap the Menu Key
to open an Options menu to clear your
calculation(s) history or change panels between Advanced and Basic.
Tap
to view your calculator history. You can tap an entry to calculate
it again or edit it.

162
Tools
Alarm/Clock
You use the Alarm/Clock application to access the Alarms, Timer, World
clock, and Stopwatch functions. These functions are accessed by tapping
the tabs across the top of the screen.
To open the Alarm/Clock application
From the Home screen, tap Apps > Alarm/Clock .
Setting Alarms
The Alarms function allows you to set varying alarm clocks. You can set an
alarm by modifying an existing alarm or by adding a new one. After you’ve
created one or more alarms, you can easily activate or deactivate an alarm
by tapping the On/Off switch
. Tap to turn it on and tap
to turn it
off.
To set an alarm
1. Open the Alarm/Clock application, then tap the Alarms tab in the
upper left corner of the screen.
2. Tap the New alarm icon
in the lower left corner of the screen, or tap
an existing alarm to modify it.
Existing Alarm
Tap here to modify
this alarm's
settings.
New Alarm Icon
Tap here to create a
new alarm.
On/Off Switch
Tap here to activate this
alarm, slide it to the left to
deactivate it.
Delete Icon
Tap here to delete an alarm.
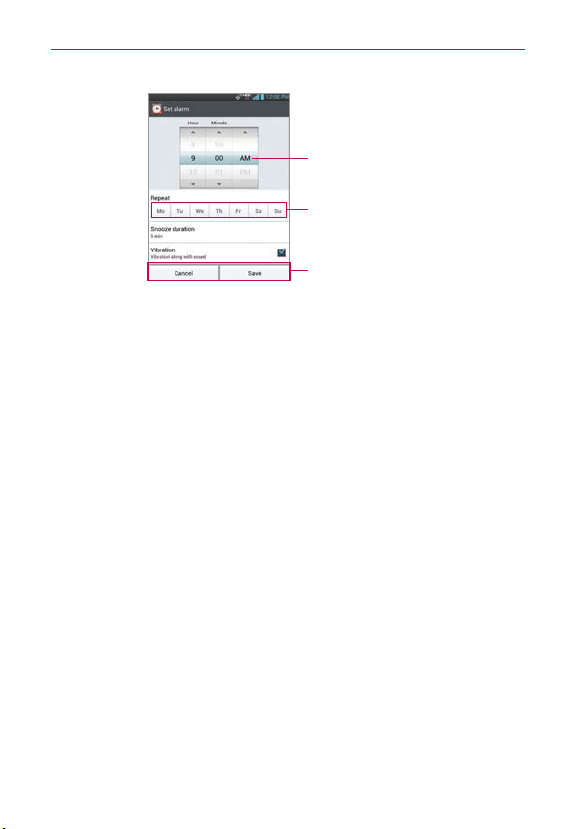
163
Tools
Time Wheel
Scroll here to change the
alarm time.
Repeat Field
Tap here to set which
days to activate the
alarm.
Set Alarm Screen
3. Scroll the time wheel to set the alarm time (Hour and Minute) and the
time of day (AM or PM)
4. Tap the day(s) when you want the alarm to sound in the Repeat field. If
you don’t tap the Repeat setting, the alarm sounds only the one day you
set it.
5. Tap Snooze duration to set the amount of time to wait before sounding
the alarm again if it is not dismissed. You can set the alarm to ring
repeatedly from 5 minutes up to 1 hour.
6. Tap Vibration to checkmark the setting and have the phone vibrate, in
addition to playing the alarm sound.
7. Tap Alarm sound to select a sound (e.g., ringtone) for the alarm, then
tap
OK.
The ringtone plays briefly when you select it.
8. Slide the button on the Alarm volume slider to the right to increase the
alarm volume and to the left to decrease it.
9. Tap Auto app starter to set an application to run when the alarm is
stopped.
10. Tap Puzzle lock to checkmark the setting, which requires you to wake
up enough to solve a simple puzzle to dismiss the alarm.
11. Tap Memo to enter information about the alarm. For example, to
identify when to use it (e.g., class day).
12. When you’re finished, tap
Save.
164
Tools
When the alarm sounds
Tap Stop or, if set, or use the Gesture feature of simply flipping the
device over to stop the alarm.
Tap Snooze to stop the alarm for the snooze duration you set.
NOTE
If Puzzle lock is set to On, using the Gesture feature of flipping the device over will
snooze the alarm instead of turning it off.
Setting the Timer
The Timer function can be used to alert you with an audible signal when a
set amount of time has passed.
1. Open the Alarm/Clock application, then tap the Timer tab
.
2. Set the time by scrolling the Hour, Minute and/or Second on the time
wheel.
3. Tap Vibration to checkmark the setting and have the phone vibrate
when the set time expires.
4. Tap Alert sound to select an alert sound for the timer, then tap
OK
.
5. Tap
Start at the bottom of the screen
to begin the time countdown.
6. Once the alarm sounds, tap
Stop
to stop the timer.
Setting the World Clock
The World clock function allows you to set up a list of cities to easily check
current times in other time zones with a quick glance.
1. Open the Alarm/Clock application, then tap the World clock tab
.
2. Tap New City
in the lower of the screen to search through the
available cities for the one you want.
165
Tools
Managing the World Clock Cities
Tap New city in the lower of the screen to select another city for
your list.
Tap Delete
in the lower right corner of the screen, then checkmark
one or more cities to delete from your list.
Tap the Menu Key
> Delete all > Yes to remove all cities from
your list.
Tap and hold an entry in the list to open a Context menu to select Set
daylight saving (Daylight Savings Time) or Delete.
Using the Stopwatch
The Stopwatch function allows you to use your phone as a Stopwatch.
1. Open the Alarm/Clock application, then tap the Stopwatch tab
.
2. Tap
Start at the bottom of the screen
to start timing and tap
Stop
to stop
the time.
You can use the Lap function by tapping
Lap
to record lap times.
3. Tap
Reset
to reset the Stopwatch or
Resume to continue monitoring
time.

166
Tools
Polaris Office 4
With Polaris Office 4, you can view, create and edit document files on your
device. Files can be downloaded from email attachments, uploaded from a
memory card or internal memory.
The Polaris Office 4 application supports the following file formats: txt, doc,
docx, xls, xlsx, ppt, pptx, pdf (Word, excel, Powerpoint, etc).
Create a New Document
1. From the Home screen, tap the Apps Key > Polaris Office 4 .
2. Register your name and email address on the Registration page.
3. Tap List view, Grid view, or Favorites to search for saved documents.
4. Tap
to start a new document.
5. Tap a document type.
6. Enter contents in the document using the tools at the top of the screen
and the on-screen keyboard.
7. When you're done working on the document, tap
> Save (or Save
as to enter a new document name) to save.
8. Enter the document name and tap Save.
9. Tap the Back Key
to exit.
View and edit a document on your device
1. From the Home screen, tap the Apps Key > Polaris Office 4 .
2. Tap List view, Grid view, or Favorites to search for saved documents.
3. Tap the document that you want to view or edit.
NOTE
You can also open an attachment in an email by tapping the attachment in the message.
167
Tools
4. The document opens for you to view. If you want to edit it, tap
anywhere on the document.
To move between pages or pan through the document, scroll in the
corresponding direction.
To change the zoom level, simply pinch-to zoom to achieve the zoom
level you want.
Use the toolbar at the top of the screen to edit the document (Word,
Excel, or PowerPoint file).
Tap
for the following additional menu options : Save, Save as, PDF
Export, Find & Replace, Page layout, Full width view, Reflow text,
Text-to-speech, and Share.
5. When you’re finished editing, tap
> Save. Then tap the Back Key
to exit.
Polaris Office 4 toolbar
The Polaris Office 4 application has a toolbar that appears automatically
when you create a document.
1. To display the toolbar in an existing document, tap
.
2. Tap the Font, Paragraph, or Style tab and choose the desired options.
3. To hide the tool options pop-up balloon, tap
.
168
Tools
FileShare
FileShare application allows you to share multimedia files and documents to
other devices via Wi-Fi Direct.
To access this application, from the Home screen, tap Apps
>
FileShare .
1. Choose the types of content you would like to share. Tap Images,
Videos, Music, or Documents.
2. Tap Send file
in the upper right corner of the screen, then checkmark
the file(s) you want to share.
3. Tap
to begin scanning for available devices, then select the device
you want from the list.
SmartShare
SmartShare uses DLNA (Digital Living Network Alliance) technology to
share digital content through a wireless network. Both devices must be
DLNA certified to support this feature.
To turn SmartShare on and allow sharing contents
1. From the Home screen, tap Apps > SmartShare .
2. Tap the Menu Key
> Settings.
3. Touch Discoverable to allow your device to be detected by other
devices.
Touch Always accept request if you would like to automatically
accept sharing requests from other devices.
Touch Receive files if you would like to allow the other devices to
upload media files to my phone.
NOTE
Make sure that the microSD card is correctly mounted and the Receive files option in
the Settings menu is checked.
4. Under the Shared contents section, touch to checkmark the types of
content you would like to share. Choose from Photos, Videos, and
Music.
169
Tools
5. SmartShare is now activated and ready to share contents.
To control your renderer devices
Let your renderer device (e.g., TV) play multimedia contents from your
remote content library (e.g., PC).
NOTE
Make sure that the DLNA functionality of your devices is properly configured (e.g., TV
and PC).
1. From the Home screen, tap Apps > SmartShare .
2. Tap the To icon and select the device from the renderer device list.
3. Tap the From icon and select the device of the remote content library.
4. You can browse the content library.
5. Touch and hold a content thumbnail and tap Play or tap the Menu Key
> Play.
To share contents from your phone to your renderer device (e.g. TV)
NOTE
Make sure that your renderer device is properly configured.
1. While playing your music using the Music application, tap one of the
icons
/ / on the Title area.
: Need to be connected network.
: Select the device on network.
: Currently, the content is being shared through SmartShare.
2. Select the device from renderer lists to play the files.
NOTE
Follow the similar steps to use the Gallery, V
ideos, or Polaris Office 4 to share
contents.
NOTICE
•
Check that your device is connected with your home network using Wi-Fi connection
to use this application.
•
Some DLNA enabled devices (e.g. TV) support only the DMP feature of DLNA and will
not appear in the renderer device list.
•
Your device might not be able to play some contents.
170
Tools
To download contents from the remote content library
1. From the Home screen, tap Apps > SmartShare .
2. Tap the From icon
and select the device of the remote content library.
3. You can browse the content library.
4. Touch and hold a content thumbnail and then touch Download.
NOTICE
Some contents are not supported.
To upload contents to the remote content library
1. From the Home screen, tap Apps > SmartShare .
2. Tap the From icon
and select My phone.
3. You can browse the local content library to find the content(s) you want.
4. Touch and hold a content thumbnail and then touch Upload.
5. 5 Select the device of the remote content library to be uploaded.
NOTICE
•
Some DLNA enabled devices do not support the DMS upload functionality and will not
upload files.
•
Some contents are not supported.
171
Settings
Settings
The Settings application contains most of the tools for customizing and
configuring your phone. All of the settings in the Settings application are
described in this section. For settings specific to the Browser application,
see the Browser section, and for settings specific to your Google
Account(s), see the Gmail section.
To open the Settings application
From the Home screen, tap the Menu Key > Settings.
OR
From the Home screen, tap Apps
> Settings .
WIRELESS & NETWORKS
The Wireless and Networks section allows you to configure and manage
your device’s wireless radio communications.
Airplane mode
Drag
to the right to disable all wireless connections.
Some locations may require you to turn off your phone’s wireless
connections by placing your phone in Airplane mode.
You can also toggle Airplane mode on and off by following the instructions
below:
1. Press and hold the Power/Lock Key
.
2. Tap Turn on Airplane mode or Turn off Airplane mode.
NOTE
The Notifications panel also has an Airplane mode icon which toggles it on or off.
Wi-Fi
Drag the Wi-Fi switch
to the right to turn on the Wi-Fi functionality to
connect to available Wi-Fi networks. Drag it to the left to turn it off.
Notify Me: Checkmark to be notified when a Wi-Fi network is in range
when you launch an application.

172
Settings
Auto connect: Checkmark to automatically turn on Wi-Fi and connect
without notification.
Tap the Menu Key
to access the following options:
WPS Push Button: Tap to configure Wi-Fi using the Wi-Fi Protected Setup
button.
WPS Pin Entry: Tap to configure Wi-Fi using a PIN.
Wi-Fi Direct: Tap to directly connect to another device without the need of
wireless acccess points in order to share data.
Advanced: Tap to set following advanced Wi-Fi settings.
Keep Wi-Fi on during sleep: Allows you to keep Wi-Fi on during sleep.
Avoid poor connections: Don't use a Wi-Fi network unless it has a good
Internet connection.
MAC address: Allows you to view the MAC address.
IP address: Allows you to view the IP address.
Manage networks: Drag a network to specify the order in which it will
be detected.
WI-FI NETWORKS
The list of all of the Wi-Fi networks that are within access range. Tap one
to access it.
NOTE
Tap SEARCH at the bottom left of the screen to scan for available Wi-Fi networks. T
ap
ADD NETWORK at the bottom right of the screen to add a new network.
Bluetooth
Drag the Bluetooth switch
to the right to turn on the Bluetooth
functionality to connect to Bluetooth devices. Drag it to the left to turn it off.
Tap the checkbox to allow other Bluetooth devices to see your phone for
pairing and connection. The Bluetooth name checkbox turns blue while it is
visible, then turns white when it's no longer visible.
PAIRED DEVICES
The list of all devices which are paired with this phone.

173
Settings
AVAILABLE DEVICES
The list of all of the available in-range Bluetooth devices.
Tap the Menu Key
to access the following options:
Rename phone: Allows you to rename your phone as it is seen by other
Bluetooth compatible devices.
Visibility timeout: Tap to set the visibility timeout when other Bluetooth
devices see your phone for pairing and connection.
Show received files: Tap to view your Bluetooth received files.
Device search option: Allows you to select the type of device(s) you
want your Bluetooth device to search for. The default setting is All
devices.
Advanced: Tap to turn the FTP server and Phonebook access services
on or off.
NOTE
Tap Search for devices at the bottom of the screen to search for in-range Bluetooth
devices.
Mobile data
This menu allows you to manage your mobile data usage.
Mobile data: Slide the Mobile data switch
to the right to enable
mobile data.
Limit mobile data usage: Checkmark to limit your mobile data. Your
mobile data connection will be disabled when you reach the limit you
set.
Alert me about data usage: Checkmark to allow your phone to alert you
when your mobile data usage reaches the warning amount you have set.
Data usage cycle: Displays your current data usage cycle. Tap the drop-
down menu icon
to change the cycle date.
Data usage graphic: Displays your data usage on a graph which allows
you to move your data limit on the graph if you checkmark the Limit
mobile data usage setting.
Data usage applications: Applications are displayed with their data
usage on a bar graph. Tap one to see more detailed information.
174
Settings
To access advanced options, tap the Menu Key .
Data roaming: Allows you to use data connections when you are
roaming.
Restrict background data: Allows you to disable sync in the background
while using a mobile network.
Auto-sync data: Allows you to automatically sync data.
Show Wi-Fi usage: Allows you to view your data usage via Wi-Fi.
Mobile hotspots: Allows you to select the Wi-Fi networks which are
mobile hotspots in order to restrict apps from using these networks
when in the background. Apps may also warn before using these
networks for large downloads.
Call
This menu allows you to manage various call settings.
Voicemail: Tap to set your voicemail details, including the following:
Service: Changes your voicemail service. The default is My carrier.
Setup: Changes your voicemail access (e.g., the number that dials your
voicemail service).
Notification sound: Sets the sound for notifications.
Vibrate: Sets the vibrate mode.
Ignore with message: Checkmark to enable the Quick text message
feature. It allows you to use the Ignore with message option to ignore
an incoming call and respond to the caller with a specified text message
instead. Tap Settings
to manage your Quick messages. Tap the New
icon
to create a new quick message, tap a message to edit it, or tap
the Delete icon
to delete a message.
Power button ends call: Checkmark to allow you to end voice calls by
pressing the Power/Lock Key
.
Show dialpad: Sets which types of calls will automatically display the
dialpad.
Auto retry: Sets the amount of time to wait before automatically
redialing a call that failed to connect.

175
Settings
Hearing aids: Checkmark to turn on hearing aid compatibility.
TTY mode: Sets the TTY mode to communicate with other TTY devices.
DTMF tones: Sets the length of the DTMF tones.
Assisted dialing: Configures the Assisted dialing options when you are
traveling outside of your home country.
CDMA call settings: Allows you to set the following CDMA only call
settings.
Call forwarding: Enables or disables call forwarding.
Voice privacy: Sets whether the phone displays the caller's
information when you receive a call.
Auto answer: Sets the time before a connected hands-free device
automatically answers an incoming call.
GSM call settings: Allows you to set the following GSM only call
settings.
Call forwarding: Enables or disables call forwarding.
Call barring: Lock incoming, outgoing, and international calls.
Call duration: Check call duration.
Additional settings: Set various additional call settings.
More...
This menu allows you to manage other network and wireless settings.
USB tethering: Allows you to set up the ability to share your phone’s
mobile data connection using a USB connection.
NFC: Checkmark to allow data exchange when the phone touches
another data-compatible device. NFC (Near Field Communication)
establishes radio communication between smartphones and similar
devices. If this option is greyed out, you can not beam app content to
another NFC-capable device.
Android Beam: Opens an information screen and provides a switch to
enable transmission of application content using NFC. Slide the Android

176
Settings
Beam switch
(in the upper right corner of the screen) to the right to
turn it on.
VPN: Allows you to set up and manage Virtual Private Networks (VPNs).
Mobile networks: Allows you to set up options for data access, roaming,
networks, and APNs (Access Point Names).
DEVICE
The Device section allow you to configure and manage the general device
functions such as sound and display options.
Sound
This menu allows you to manage your device’s sound settings.
SOUND PROFILE
Silent mode: Allows you to set the device to Silent mode.
Choose between Off, Vibrate, and On.
Volumes: Allows you to individually set the volumes for Phone ringtone,
Notification sound, Touch feedback & system, and Music, video, games,
and other media. Move the slider button on each volume bar to set the
volume.
Quiet time: Drag the Quiet time switch
switch to the right to
enable this function. Tap Quiet time to open a screen to set the days and
times to automatically turn off all sounds except for alarms and media.
RINGTONE & NOTIFICATIONS
Ringtone with vibration: Checkmark to set the phone to also vibrate
when you receive calls and notifications.
Phone ringtone: Allows you to set the ringtone for calls. Tap a ringtone
to listen to it. You can also add a ringtone by tapping the New icon
in
the upper right corner of the screen.
Notification sound: Allows you to set the sound for notifications.
Tap a ringtone to listen to it. You can also add a sound by tapping the
New icon
in the upper right corner of the screen.

177
Settings
TOUCH FEEDBACK & SYSTEM
Dial pad touch tones: Checkmark to set the phone to make a sound
when you tap the dialpad.
Touch sounds: Checkmark to set the phone to make a sound when you
tap an item to activate it (e.g., tapping a checkbox).
Screen lock sound: Checkmark to set the phone to make a sound when
the screen is locked using the Power/Lock Key and also when it is
unlocked.
Sound when roaming: Checkmark to enable an Enhanced Roaming
Indication alert sound.
Emergency tone: Set the behavior when an emergency call is placed.
Vibrate on touch: Checkmark to set the phone to vibrate when you tap
the front keys.
Display
The Display menu allows you to manage your phone’s display settings.
SCREEN
Brightness: Allows you to adjust the brightness of the screen.
For best battery performance, use the dimmest comfortable brightness.
Tap Automatic brightness checkbox to set brightness being changed
automatically depending on the surrounding lighting.
Screen timeout: Allows you to set the amount of time before the screen
times-out due to inactivity.
Auto-rotate screen: Checkmark to set the phone to automatically rotate
the screen based on the phone orientation (portrait or landscape).
FONT
Font type: Allows you to set the type of font used for the phone and
menus.
Font size: Allows you to set the size of the font displayed in the phone
and menus.

178
Settings
ADVANCED SETTINGS
Front key light: Allows you to set whether the front keys are illuminated
and how long they will stay lit.
Aspect ratio correction: Allows you to set the resolution size of
downloaded applications to fit the screen size.
Motion sensor calibration: Allows you to calibrate the device to
improve the tilt accuracy and the sensor’s speed.
Home screen
This menu allows you to manage your Home screen settings.
Theme: Allows you to set the screen theme for your device.
Animation: Allows you to set the device to use the available animations,
or not use the animations.
Screen swipe effect: Allows you to select the effect to use when you
swipe to change screens.
Wallpaper: Allows you to set the wallpaper to use on your Home
screen.
Portrait view only: Checkmark to set the Home screen to always be
displayed in portrait view.
Scroll screens circularly: Checkmark to set the Home screens to scroll
continuously, eliminating the need to scroll back in the opposite direction
when you reach one end.
Lock screen
This menu allows you to manage your Lock screen settings.
SCREEN
Select screen lock: Allows you to set how to secure your phone from
unauthorized use, or disable screen lock.
Wallpaper Allows you to set your Lock screen wallpaper.
Clocks & shortcuts: Allows you to set the clock widget displayed on the
Lock screen. Also allows you to change the shortcuts on the Lock screen
when it is set to the Swipe unlock method.
Screen effect: Sets the screen effect when unlocking the device.

179
Settings
Owner info: Checkmark to set the device owner’s name to be displayed
on the Lock screen. Tap Settings
to enter the text to be displayed as
the Owner info.
LOCK TIME
Security lock timer: Allows you to set the amount of time before the
screen automatically locks after the screen has timed-out.
Power button instantly locks: Checkmark to instantly lock the screen
when the Power/Lock Key is pressed. This setting overrides the Security
lock timer setting.
FEEDBACK
Vibrate on touch: Checkmark to turn on touch feedback when unlocking
the screen.
Gestures
The Gestures menu allows you to manage various gesture settings.
Move Home screen items: Checkmark to be able to move items within
the Home screen or applications by tapping and holding an item, then
tilting the device in the direction you want to move it.
Tilt sensitivity: Allows you to test and adjust the sensitivity of the tilt
sensors used for the Home screens and applications. To adjust the
sensitivity, tap the Default sensitivity checkbox, then move the slider
along the bar toward slow or fast to suit your preference.
Silence incoming calls: Checkmark to enable you to simply flip the
device to mute an incoming call ringtone.
Snooze or stop alarm: Checkmark to enable you to simply flip the
device to snooze or stop the alarm.
Pause video: Checkmark to enable you to simply flip the device to pause
the currently playing video.
Help: Displays a help guide on how to use the Gesture features of your
device.
Storage
Use the Storage menu to monitor the used and available space in your
phone’s internal memory.

180
Settings
INTERNAL STORAGE
Total space: Displays the total amount of space in the phone’s internal
memory. It’s listed in Gigabytes and also on a colored bar graph with a
color-coordinated list of the applications as well as the amount of space
they use. Remaining memory space is grey-colored.
Power saver
Drag the Power saver switch
to the right to turn it on. Drag it to the
left to turn it off.
TURN POWER SAVER ON
Turn Power saver on: Allows you to set the battery charge percent level to
automatically turn on Power saver.
Power saver Tips: Displays tips for using the Power saver function.
POWER SAVING ITEMS
Auto-sync: Checkmark to turn off Auto-sync when Power saver is activated.
Wi-Fi: Checkmark to turn Wi-Fi off when Power saver is activated and data
is not being used.
Bluetooth: Checkmark to turn Bluetooth off when not connected to a device
and Power saver is activated.
Vibrate on touch: Checkmark to turn off tap feedback when Power saver is
activated.
Brightness: Checkmark to turn off the screen brightness you set for Power
saver mode. Tap Settings
to change the setting.
Screen timeout: Checkmark to turn off the screen timeout you set for
Power saver mode. Tap Settings
to change the setting.
Front key light: Checkmark to turn off the front key light settings for Power
saver mode. Tap Settings
to change the settings.
BATTERY INFORMATION
The Battery charge information is displayed on a battery graphic along with
the percentage of the remaining charge and its status.
Battery percentage: Checkmark to display the battery level percentage on

181
Settings
the Status Bar next to the battery icon.
Battery use: Displays which components and applications are using the
most battery power. Tap one of the entries to see more detailed information.
Application manager
Use the Application manager to view details about the applications installed
on your phone, manage their data, force them to stop, and set whether you
want to permit installation of applications that you obtain from websites
and email. Select one of the three tabs across the top of the screen to view
detailed information for DOWNLOADED, RUNNING, and ALL applications.
PERSONAL
The Personal section allow you to configure and manage your accounts.
Location access
Use the Location access menu to set your preferences for using and
sharing your location when you search for information and use location-
based applications, such as Maps.
Access to my location: Tap the Access to my location switch
to
toggle between On and Off. On allows applications that have asked your
permission use your location information.
E911: E911 Location cannot be turned off on any mobile phone. Intended
for personal safety in urgent situations, this setting cannot be altered by
the user.
Verizon Location Services: Checkmark to enable Verizon Wireless and
third party authenticated and validated location services to access certain
location information available through this service and/or the network.
Standalone GPS Services: Checkmark to enable your phone’s
standalone global positioning system (GPS) satellite receiver to pinpoint
your location to within an accuracy as close as several meters (“street
level”). Actual GPS accuracy depends on a clear view of the sky and
other factors.
Wi-Fi & mobile network location: Checkmark to use information from

182
Settings
Wi-Fi and mobile networks to determine your approximate location that
is used while searching in Google Maps and other applications. When
you checkmark this option, you’re asked whether you consent to sharing
your location anonymously with Google’s location service.
Security
Use the Security menu to configure how to help secure your phone and its
data.
ENCRYPTION
Encrypt phone: Allows you to encrypt the phone to keep it secure. After
encryption, a PIN or password needs to be entered each time you power
the phone on.
SIM CARD LOCK
Set up SIM card lock: Allows you to set if you want to require a PIN to
be able to access the SIM card. If set, you can change the PIN.
PASSWORDS
Password typing visible: Checkmark to briefly show each character of
the password as you type so that you can see what you enter.
PHONE ADMINISTRATION
Phone administrators: Allows you to view and/or deactivate phone
administrators.
Unknown sources: Checkmark to allow installation of non-Play Store
applications.
CREDENTIAL STORAGE
Trusted credentials: Allows applications to access your phone’s
encrypted store of secure certificates, related passwords and other
credentials. The screen has a System tab and a User tab.
Credential storage is used to establish some kinds of VPN and Wi-Fi
connections. This setting is dimmed if you have not set a password to
secure your credential storage.
Install from storage: Allows you to install a secure certificate from your
phone’s internal memory.

183
Settings
Clear credentials: Allows you to delete all secure certificates and related
credentials and erase the secure storage’s own password. You are
prompted to confirm you want to clear this data.
Language & input
Use the Language & input menu to select the language for the text on your
phone and for configuring the on-screen keyboard. You can also manage
your language dictionary for personal words that you’ve added.
Language: Allows you to set the language to use on your device.
Personal dictionary: Displays a list of the personal words that you’ve
added that are not in the standard dictionaries.
KEYBOARD & INPUT METHODS
Default: Allows you to select the default input method.
Google voice typing: Checkmark to select Google voice typing to enter
data. Tap Settings
to change the Google voice settings.
Block offensive words: Checkmark to hide recognized offensive text.
Download offline speech recognition: Allows you to download offline
speech recognition to enable voice input while offline.
LG Keyboard: Checkmark to select the LG Keyboard to enter data.
Tap Settings
to change the following settings:
Input language and type: Allows you to select the keyboard language
and type.
Word suggestion: Allows you to set word prediction and auto word
correction.
Auto capitalize: Checkmark so capitalize the first letter of the word
automatically.
Auto punctuation: Checkmark to insert a period when double tapping
the space key.
Voice typing key: Checkmark to display the Voice typing key on the
keyboard.
Touch feedback: Allows you to set key preview, sound feedback, and
vibrate feedback when typing.
Handwriting: Allows you to set the pen width, color, and delay time.

184
Settings
Path keyboard: Checkmark to allow drawing a path through all the
letters used when entering a word.
Hide keyboard: Checkmark to set downward swipe to close the
keyboard.
One hand keyboard: Checkmark to set the keyboard to use only one
hand to enable typing.
Split keyboard: Checkmark to split the keyboard to the sides of the
screen on landscape mode.
Extend keyboard: Checkmark to add number key row on top of
QWERTY keyboard.
Fuzzy pinyin: Checkmark to enable this setting. Tap Settings
to
select common pinyin mistakes.
Software version: Displays the software version installed on the
device.
SPEECH
Voice Search: Allows you to set voice search options.
Language: Allows you to select the Google search by voice language.
Speech output: Allows you to select when to use speech out.
Block offensive words: Checkmark to hide offensive voice results.
Hotword detection: Allows you to say "Google" to launch voice search.
Download offline speech recognition: Allows you to download
offline speech recognition to enable voice input while offline.
Personalized recognition: Checkmark to improve speech recognition
accuracy.
Google Account dashboard: Allows you to manage your collected data.
Bluetooth headset: Allows you to record audio through the Bluetooth
headset if available.
Text-to-speech output: Allows you to set the preferred speech engine
and other general settings.
Google Text-to-speech Engine: Select your preferred text-to-speech
engine. Touch
to set the language and other settings.

185
Settings
Speech rate: Allows you to set the speed at which the text is spoken.
Listen to an example: Plays a short demonstration of speech
synthesis.
MOUSE/TRACKPAD
Pointer speed: Allows you to set the pointer speed.
Backup & reset
This menu allows you to back up and erase your data.
BACKUP & RESTORE
Back up my data: Checkmark to backup application data, Wi-Fi
passwords, and other settings to Google servers.
Back up account: Allows you to select the account to backup. You can
also add an account for backup.
Automatic restore: Checkmark to allow the device to automatically
restore backed up settings and data when an application is reinstalled on
the device.
PERSONAL DATA
Factory data reset: Allows you to erase all of the data on the phone.
Read the warning, then tap Reset phone at the bottom of the screen
and Erase everything to confirm.
ACCOUNTS
Use the Accounts menu to manage your Google™ and other supported
accounts. You also use these settings to control data synchronization. You
can set how and whether each application sends, receives, and syncs data
on their own schedules or whether user data is synchronized automatically.
Gmail™, Calendar, and other applications may also have their own
settings to control how they synchronize data; see the sections on those
applications for details.
Backup Assistant Plus: Allows you to manage your Backup Assistant Plus
settings.
Add account: Allows you to add accounts.

186
Settings
SYSTEM
The System section allows you to manage various system settings.
Date & time
This menu allows you to manage your date and time formats.
Automatic date & time: Checkmark to use the network provided values.
Automatic time zone: Checkmark to use the network provided time
zone information.
Set date: Allows you to set your own date (when the automatic setting
is not checkmarked).
Set time: Allows you to set your own time (when the automatic setting
is not checkmarked).
Select time zone: Allows you to set your own time zone (when the
automatic setting is not checkmarked).
Use 24-hour format: Checkmark to display the time using the 24-hour
time format (for example, 13:00 instead of 1:00 pm).
Select date format: Allows you to set the format for displaying dates.
Accessibility
Use the Accessibility menu to configure any accessibility plug-ins you have
installed on your phone.
SERVICES
TalkBack: Allows you to set up the TalkBack function. Drag the TalkBack
switch
to the right to turn it on. Tap SETTINGS at the bottom of the
screen to adjust the TalkBack settings.
SYSTEM
Large Text: Checkmark to set the size of the text.
Power button ends call: Checkmark so that you can end voice calls by
pressing the Power/Lock Key. When this option is enabled, pressing the
Power/Lock Key during a call does not lock the screen.

187
Settings
Auto-rotate screen: Checkmark to allow the device to rotate the screen
depending on the device orientation (portrait or landscape).
Power button ends call: Checkmark so that you can end voice calls by
pressing the Power/Lock Key. When this option is enabled, pressing the
Power/Lock Key during a call does not lock the screen.
Speak passwords: Checkmark so that you can say your log in
passwords (instead of typing your passwords).
Text-to-speech output: Text-to-speech output provides audible readout
of text, for example, the contents of text messages, and the Caller ID for
incoming calls.
Touch & hold delay: Allows you to set the touch and hold delay (Short,
Medium, Long).
Install web scripts: Allows you to enable (or disable) installation of web
scripts.
PC connection
This menu allows you to manage the default USB connection type and
other functions.
USB CONNECTION
USB connection type: Allows you to choose the default mode when
connecting your phone to a PC using a USB Cable.
Ask on connection: Checkmark to display a dialog box to confirm the
USB connection type when you connect to a PC.
Help: Allows you to view connection settings information.
AUTO-LAUNCH
Media Home: Checkmark to set the phone to Media Home mode when
it’s connected to the MHL cable.
Developer options
Keep in mind that turning on these developer settings may result in irregular
device behavior.

188
Settings
Take bug report: This will collect information about your current device
state, to send as an email message.
Desktop backup password: Sets a password to back up the desktop.
Stay awake: Checkmark to set the screen to never timeout while
charging.
Protect SD card: Checkmark to protect the microSD card. When the
microSD card is protected, applications must request permission to read
data from external storage.
DEBUGGING
USB debugging: Checkmark to turn on debug mode when USB is
connected.
Allow mock locations: Checkmark to set the device to a mock location.
Select debug app: Allows you to select the debugging application.
Wait for debugger: Checkmark to wait for debugger. Debugged
application waits for debugger to attach before executing.
INPUT
Show touches: Checkmark to show visual feedback when the screen is
tapped.
Show touch data: Checkmark to make tap data visible on the screen.
DRAWING
Show layout bounds: Checkmark to show clip bounds, margins, etc.
Show GPU view updates: Checkmark to flash views inside windows
when drawn with the GPU.
Show screen updates: Checkmark to flash areas of the screen when
they are updated.
Window animation scale: Allows you to set the window animation
scale.
Transition animation scale: Allows you to set the transition animation
scale.

189
Settings
Animator duration scale: Allows you to set the animator duration scale.
Disable HW overlays: Checkmark to use the GPU for screen
compositing.
Force GPU rendering: Checkmark to use the 2D hardware acceleration
in applications.
MONITORING
Enable strict mode: Checkmark to flash the screen when applications
operate for a long period of time on the main thread.
Show CPU usage: Checkmark to overlay the current CPU usage on the
screen.
Profile GPU rendering: Checkmark to measure rendering time in adb
shell dumpsys gfxinfo.
Enable traces: Allows you to select enabled traces.
APPS
Don't keep activities: Checkmark to force stop every activity as soon as
the user leaves it.
Background process limit: Allows you to set the background process
limit.
Show all ANRs: Checkmark to show a dialog box when applications
running in the background are not responding.
About phone
This menu allows you to manage your software updates and view various
information relating to your device.
Software update: Allows you to check for Android system software
updates and other current information.
Network: Allows you to view your network, network type and strength,
service state, roaming status, mobile network state, IP address, and IMS
registration.
Phone identity: Allows you to view the model number, phone number,

190
Settings
PRL version, ERI version, IMEI, IMEI SVN, ICCID, up time, lifetime calls,
and warranty date code.
Battery: Allows you to view battery status, battery level, and battery use
information.
Hardware information: Allows you to view Wi-Fi MAC address,
Bluetooth address, and Hardware version.
Software information: Allows you to view Android version, baseband
version, kernel version, build number, and software version.
Legal information: Allows you to view open source licenses and Google
legal information.
Patent information: Displays LG patent information.
Global Ready™
Verizon Wireless keeps you connected around the corner and around
the world. For up-todate information on destinations and rates go to
verizonwireless.com/tripplanner.

191
LG Smart Mobile Office
LG Smart Mobile Office
Introduction
The LG Smart Mobile Office program provides a productive and secure
mobile working environment, helping you to stay on top of your business
whether you are at the office, at home, or on the move. An array of
business applications, built-in or downloadable from Google Play, enables
extending your workspace through your fingertips. Connect with your
colleagues and customers instantly, and manage your tasks, schedules,
and projects simultaneously across locations, devices, and people. View
your customer information, check inventories, and place orders anywhere,
anytime. Make notes, revise your presentations, and send final materials
even while you are speaking with your clients. All of your personal and
corporate information is protected, from on-device to network, to platform.
It is as simple as it gets.
Utilizing LG Smart Mobile Office Features
The following is a guide to walk you through select business scenario
features using the Intuition™.
Microsoft Exchange ActiveSync
An HTTP and XML based Microsoft Exchange synchronization protocol is
used for communication with the Microsoft Exchange Server. Exchange
ActiveSync provides access to email, calendar, contacts, and tasks
seamlessly between the handset and computers.
Exchange ActiveSync Settings
Account Setup
1. Open the Email application from the Home screen.
2. Tap the Menu Key
> Accounts.
3. Tap the New account icon
in the upper right corner of the screen,
then tap Microsoft Exchange.
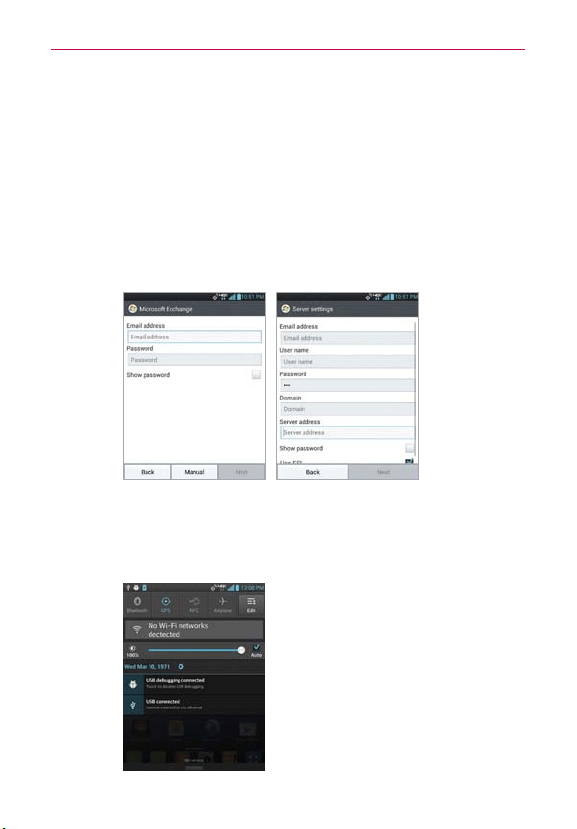
192
LG Smart Mobile Office
4. Enter your account information, including an email address.
You may need additional information such as domain name, server
address, etc. Please refer to your IT administrator for the necessary
corporate network information. Then tap Next.
5. Checkmark the information you want to sync including Sync contacts,
Sync Calendar, Sync Email, and Sync Tasks, then tap the Next button.
6. Read the notice carefully, then tap Active.
7. Read the prompt and set up a password.
8. Setup is complete. Tap Done. Your Exchange account Inbox is displayed.
Push Email
The Microsoft Exchange Push Email feature allows you to exchange
immediate email transmissions along with notification(s) in the Status Bar
on your handset.
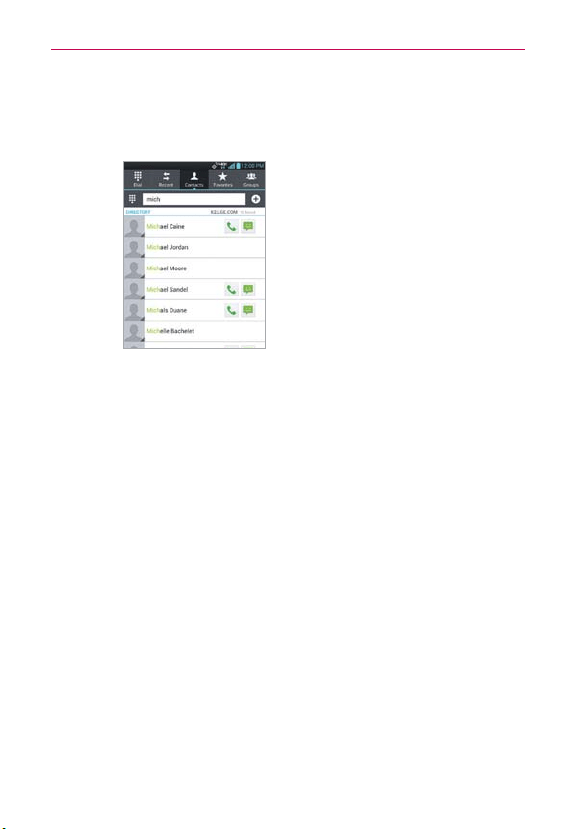
193
LG Smart Mobile Office
Contacts
Use the Global Address List (GAL) to look up your colleagues and their
contact information in the company directory.
Calendar
Easily manage your calendar seamlessly across devices, allowing you to
organize meetings promptly, and stay on top of your schedule wherever
and whenever. Propose a new meeting (time, location, invitees, and
agenda), and track replies (accept, tentative, or decline).
Host meeting
1. Complete your meeting information:
Event name: The name of the event.
Location: Where the meeting will be held.
Period: The start time and end time.
All-day: Indicate if the meeting will last all day.
Time zone: The location-based GMT.
Guests: The list of participants.
Description: Optional information, for example a detailed meeting
agenda.
2. Add all of the participants' email addresses to the Guests field.

194
LG Smart Mobile Office
3. Tap Save.
Accept meeting
1. Open the invitation email.
2. Tap Calendar
to reply regarding your attendance.
3. Tap Accept, Tentative, or Decline, then tap OK.
Tasks
The Tasks function provides a complete overview of your task schedule
and associated progress to help you to keep your projects on track.
Create, send, and receive tasks via emails and organize them by various
categories (due date, priority, etc).
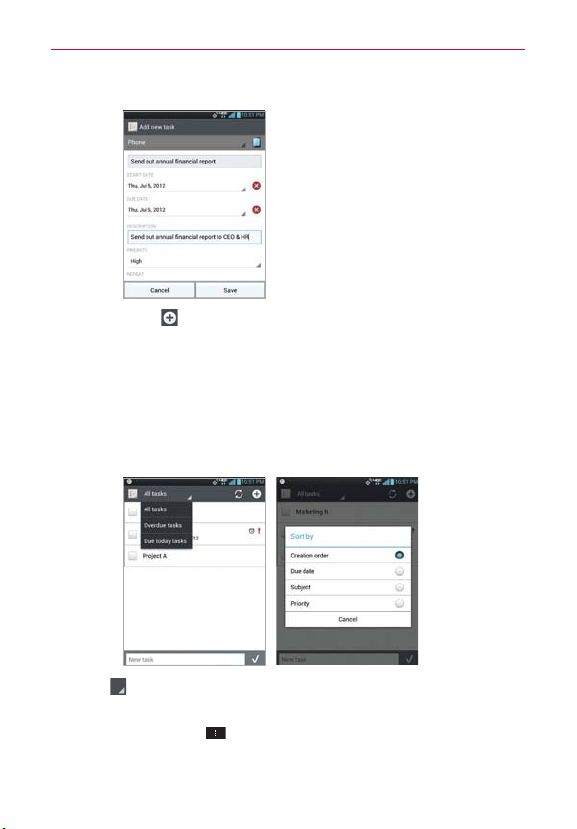
195
LG Smart Mobile Office
Create a task in detail
1. Tap New task in the upper right corner of the screen to add a task.
2. Enter the detailed task information including subject, period, description,
priority, repeat, and reminder.
3. Tap Save.
Filter and Sort
You can filter your tasks list as well as organize your tasks by various
categories (due date, subject, priority, etc).
Tap at the top, center of the Tasks title bar to filter your tasks list by
All tasks, Overdue tasks, or Due today tasks.
Tap the Menu Key
to open the Options menu to select how to
sort your tasks. Tap Sort by, then select Creation order, Due date,
Subject, or Priority.
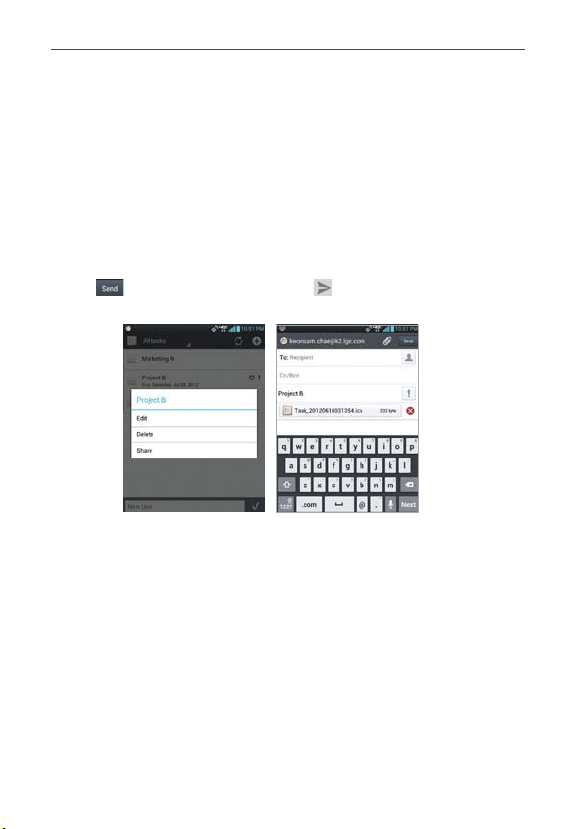
196
LG Smart Mobile Office
Task share
Share your task(s) with your colleagues, partners, or customers to
collaborate on your projects.
1. Tap and hold a task in your Tasks list.
2. Tap Share in the Context menu that opens.
3. Tap the email service to use, then type the email address(es) of the task
members into the Recipient field.
4. Task information will be automatically attached to the email.
5. Tap
using the Email application or using the Gmail application to
send the email.
Password
LG Smart Mobile Office supports server configurable password
enforcement policies. Its preliminary defense mechanism of device
password shields unauthorized access and use in case of device loss or
theft.
The following password policies are supported:
Device password enforcement
Device password enabled
Allow/Disallow simple password
Number of password tries

197
LG Smart Mobile Office
Minimum device password length
Alphanumeric password
Minimum device password complex characters
Device password history
Device password recovery
Device password expiration
Encryption
LG Smart Mobile Office supports encryption by the Exchange Server.
Please refer to your IT administrator for your corporate encryption policy.
Both device and internal storage encryption are available. Please refer to
the Data Security section on pages 201 for more information regarding
Encryption.
Virtual Private Networks
LG mobile supports a range of established industry-standard virtual private
network (VPN) protocols, allowing secure access to private corporate
networks as follows:
IPSec: Multi-headed VPN protocol interoperating with various VPN
gateways.
User authentication by password, and machine authentication by
shared secret and certificates.
L2TP over IPSec: User authentication by password and machine
authentication by shared secret.
PPTP: User authentication by password.
SSL VPN: Downloadable from Cisco, Juniper, F5 applications from
Google Play.
User authentication by password and certificates.
If your organization supports IPSec, L2TP over IPSec, or PPTP, which are
built-in VPN protocols in LG smartphones, you can simply connect your LG
smartphone to your VPN without additional network configuration or third-
party applications.
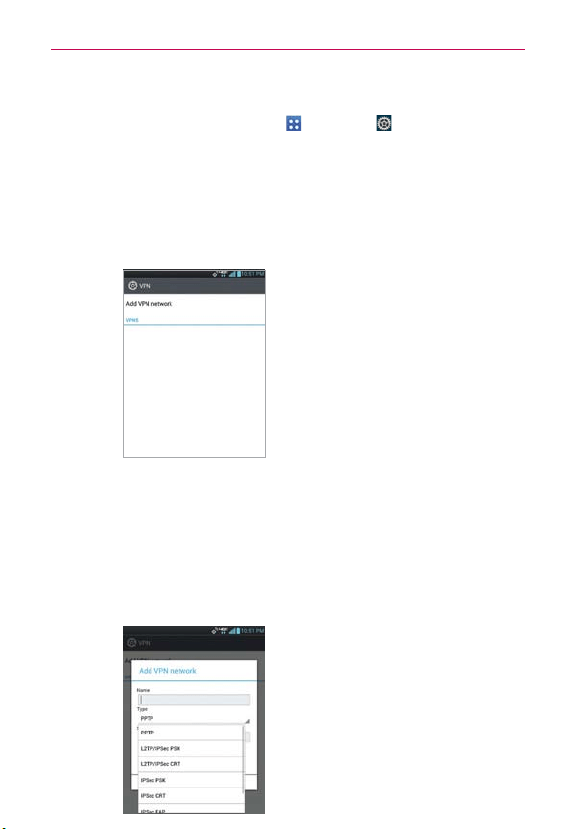
198
LG Smart Mobile Office
VPN Settings
1. From the Home screen, tap Apps > Settings .
2. Tap More... under the Wireless & networks section.
3. Tap VPN.
4. Tap Add VPN network, then enter the VPN network information to
match your corporate network.
Please refer to your network administrator for protocol related
information regarding your corporate network(s).
Add VPN network
LG Mobile provides a variety of VPN protocol access
Authentec IPSec : L2TP/IPSec PSK, L2TP/IPSec CRT, IPSec PSK, IPSec
CRT,
IPSec EAP
PPTP, IPSec Hybrid RSA
1. Check Name (Name of the connection shown at the start)
2. Select Type (Type of the connection)
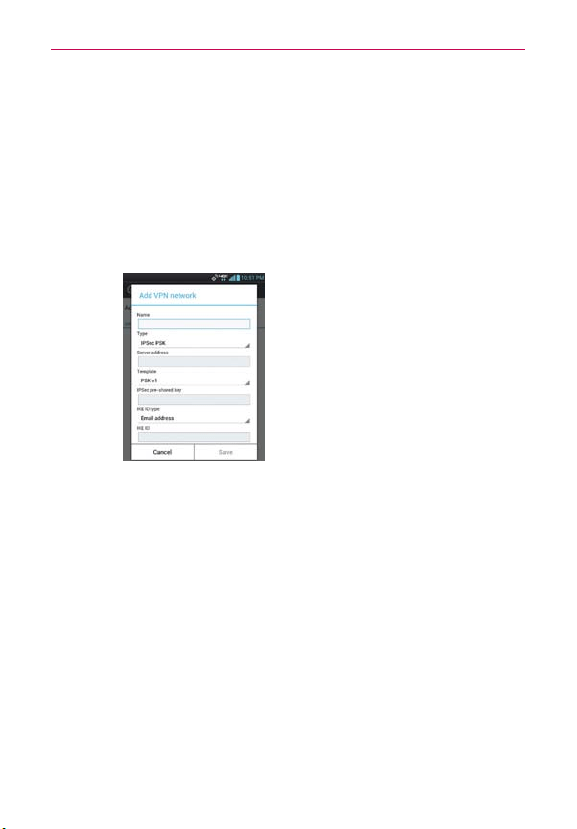
199
LG Smart Mobile Office
Type: IPSec PSK
1. Server Address: IP address
2. Template: Type of connection and pre-set parameters that affect types
of parameters
3. Pre-Shared Key: The key for authentication
4. IKE ID type: Type to be used with this connection
5. IKE ID: Identity to be used
6. User authentication: Requires user name and password
Advanced options
Checkmark the Show advanced options checkbox when your corporate
environment requires particular protocols. However, you won’t have to
input cumbersome text because LG provides easy input options to select
from.
IPSec encryption: IPSec encryption algorithm (3DES-CBC, AES-
CBC-128/192/256, etc.)
IPSec integrity: Algorithm for IPSec Integrity (Auto, HMAC-MD5-96,
HMAC-SHA1-96, etc.)
IPSec PFS: Check when the perfect-forward-secrecy is used
IKE version: 1 or 2
IKE aggressive mode: When the aggressive-mode is checked,
aggressive mode phase 1 exchange is used with IKEv1 instead of
main mode.
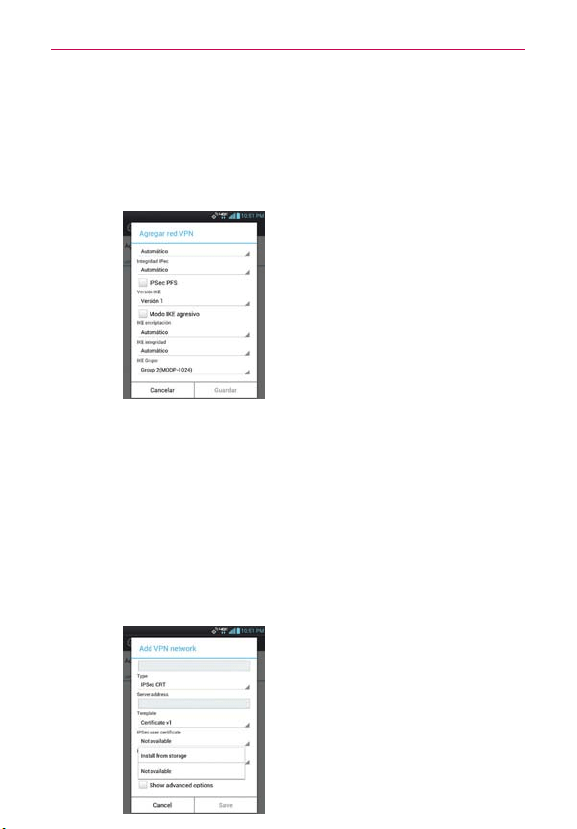
200
LG Smart Mobile Office
IKE encryption: IKE encryption algorithm (3DES-CBC, AES-
CBC-128/192/256, etc.)
IKE integrity: Algorithm for IKE integrity (HMAC-MD5-96, HMAC-
SHA1-96, etc.)
IKE group: The group element specifies the Diffie-Hellman group
used in the IKE SA negotiation.
Type: IPSec CRT
1. Server Address: IP address.
2. Template: Type of connection and pre-set parameters that affect types
of parameters.
3. Tap IPSec User Certificate.
4. Tap Install from Storage.
5. If you have preinstalled your corporate security certificates, a list of
available certificates will be displayed.
6. Select the certificate designated by your corporate IT administrator.
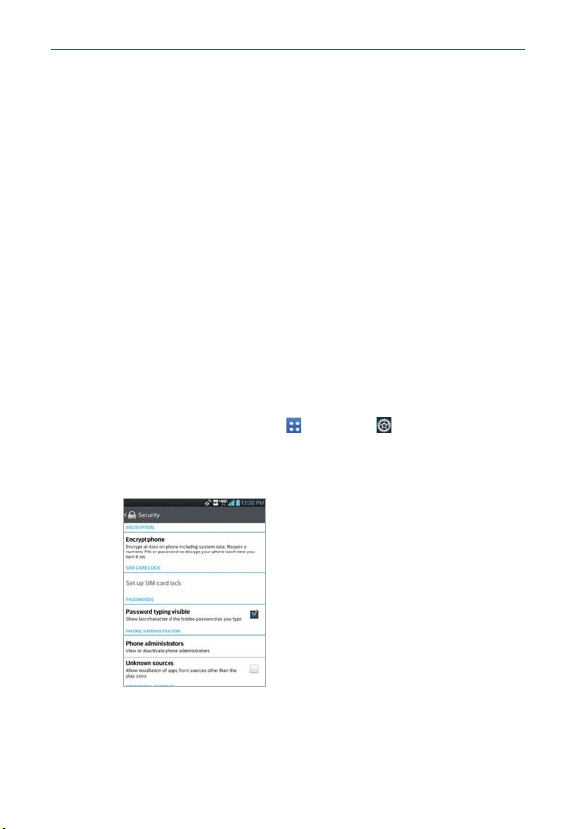
201
LG Smart Mobile Office
Device Security
Device security establishes security policies to prevent unauthorized use.
The device can also be deactivated or erased when lost or stolen.
Passcode policies: minimum length, case-sensitive, special characters
Local/ Remote lock, wipe data
Policy enforcement: restrict camera, Bluetooth, Wi-Fi
Data Security
Data security protects the user data stored in the device memory i.e.,
the data section of the internal device memory. Specifically, Data-at-rest
Encryption (DARE), an underlying security mechanism, encrypts the user
data by using such state-of-the-art encryption algorithm as Advanced
Encryption Algorithm (AES), supporting 128-bit or 256-bit key length.
Encryption Setup
1. From the Home screen, tap Apps > Settings .
2. Tap Security.
3. Tap Encrypt phone.
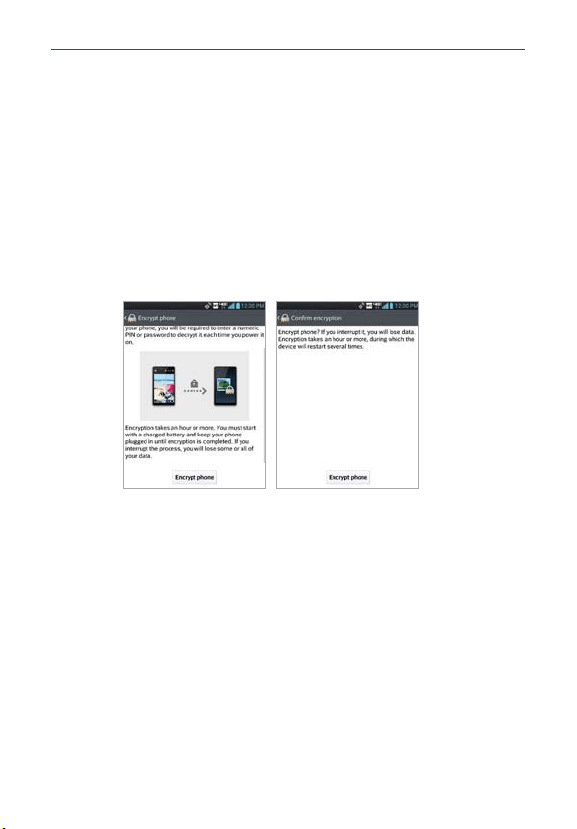
202
LG Smart Mobile Office
Encrypt phone
In order to encrypt the device, the battery status needs to be over 80% and
the charger plugged in and supplying power.
1. Access the Encryption settings, then tap Encrypt phone.
2. Tap Encrypt phone at the bottom of the screen.
3. Enter your current encryption PIN or set the numeric PIN if it has not
been previously set.
Please be aware that device encryption may take more than an hour, and
the phone may restart several times.

203
LG Smart Mobile Office
Network Security
Network security ensures that only authorized users access and watch user
data during data transmission. Data transmission is securely protected.
VPN: SSP VPN, Authentec IPSec, L2TP over IPSec, PPTP
SSL/ TLS: SSLv3, TLS1.0
Wi-Fi security protocols: WEP, WPA Enterprise/ Personal, WPA 2
Enterprise/ Personal
802. 1x authentication: EAP-TLS, -EAP-TTLS, PEAPv0 (EAP-MS-CHAP
v2), PEAPv1 (EAP-GTC)
Platform Security
Platform security provides a secure platform environment supported by the
hardware-enforced security architecture.
Secure booting: Detects unauthorized modifications of the platform
during the boot process.
Secure storage: Provides confidentiality and integrity protection of
sensitive data or key materials.
Trusted Execution Environment (TEE): Enables secure data
processing by utilizing TrustZone technology.

204
Specifications
DivX Mobile
ABOUT DIVX VIDEO: DivX
®
is a digital video format created by DivX, LLC, a
subsidiary of Rovi Corporation. This is an official DivX Certified
®
device that
plays DivX video. Visit divx.com for more information and software tools to
convert your files into DivX videos.
ABOUT DIVX VIDEO-ON-DEMAND: This DivX Certified
®
device must be
registered in order to play purchased DivX Video-on-Demand (VOD) movies.
To obtain your registration code, locate the DivX VOD section in your device
setup menu. Go to vod.divx. com for more information on how to complete
your registration.
DivX Certified
®
to play DivX
®
video up to HD 720p, including premium
content.
DivX
®
, DivX Certified
®
and associated logos are trademarks of Rovi
Corporation or its subsidiaries and are used under license.
Dolby Digital Plus License notice
Manufactured under license from Dolby Laboratories. Dolby
and the double-D symbol are trademarks of Dolby Laboratories.
Manufactured under license from DTS Licensing Limited. DTS and
the Symbol are registered trademarks, & DTS 2.0 Channel and the
DTS logos are trademarks of DTS, Inc. Product includes software. © DTS,
Inc. All Rights Reserved.

205
Index
A
Adding a Contact to Your
Favorites 88
Adding Contacts 85
Alarm/Clock 162
Android™ 89
Answering or Rejecting
Calls 50
Applications: How to View,
Open and Switch 30
B
Backup Assistant Plus 68
Browser 70
C
Calculator 161
Calendar 152
Calendar and Alarm icons
20
Call icons 20
Calling Your Contacts 53
Camera 121
Changing and Monitoring
Online Status 116
Changing Browser settings
74
Changing Google Talk
Settings 119
Changing Messaging
Settings 108
Changing Weather Settings
83
Charging the Phone 12
Chatting with Friends 115
Checking the Weather 81
Communication 84
Composing and Sending a
Message 100
Connecting Quickly With
Your Contacts 45
Connecting to Wi-Fi
Networks 58
Connectivity icons 21
Contacts 84
Customizing the Home
Screen 43
D
Device Security 201
DivX Mobile 204
Dolby Digital Plus License
notice 204
Downloading and Installing
Applications 136
E
Email 92
Email and Messaging icons
20
Exchanging Messages 104
F
FileShare 168
G
Gallery 129
Getting to Know the Home
Screen 22
Gmail 96
H
Help 11
I
Important Customer
Information 1
Importing, Exporting, and
Sharing Contacts 87
Index 205
Indicator icons 21
Insert the SIM card 11
Instant List 49
J
Joining Contacts 90
L
LG Smart Mobile Office
191
LG Tag+ 65
Listening to Your Voicemail
56
Locking the Screen 39
M
Make Your Device a Mobile
Hotspot 64
Managing Multiple Calls 56
Managing Notifications 35
Managing the World Clock
Cities 165
Maps 78
Messaging 104

206
Index
Microsoft Exchange
ActiveSync 191
Mini Canvas View 23
Music 138
N
Navigating in the Gmail
application 98
Network icons 21
Network Security 203
NFC 65
Notebook 150
O
Opening Android Market
and Finding Applications
135
Opening Email and the
Accounts Screen 92
Opening Gallery and
Viewing Your Albums 129
Opening Gmail and Your
Inbox 96
Opening Music and Working
with Your Library 139
Opening YouTube and
Watching Videos 146
Optimizing Battery Life 13
Options During a Call 54
P
Phone Overview 8
Phone’s Status Icons 20
Placing and Ending Calls 48
Platform Security 203
Playing Music 140
Play Store 135
Polaris Office 4 166
Q
Quick Keys 22
QuickMemo™ 46
R
Reading Your Messages
93
,
99
Remove the SIM card 11
Replying to or Forwarding a
Message 101
Responding with quoted
text 103
S
Searching for a Contact 89
Searching Your Phone and
the Web 37
Selecting an Instant list
entry 49
Selecting Which Contacts
are Displayed 90
Separating Contact
Information 91
Sequence matches 49
Setting Alarms 162
Setting an Event Reminder
158
Settings 171
Setting the Timer 164
Setting the World Clock
164
Setting Up Your Device 17
SmartShare 168
Sound icons 20
System icons 21
T
Table of Contents 2
Talk 114
Tasks 159
Technical Details 5
Text Input Methods 27
Touchscreen 26
Transfer Content 66
Transferring data 66
Transferring Music Files to
Your Phone 138
Turning the Phone On and
Off 15
U
USB Autorun 61
Using Backup Assistant
Plus 69
Using Tag+ reading 66
Using Tag+ writing 65
Using the Stopwatch 165
Using Your Contacts 84
Utilizing LG Smart Mobile
Office Features 191
V
Video Camera 126
Video options 127
Videos 144

207
Index
Video Wiz 132
Viewing Event Details 156,
157
Viewing Your Calendar and
Events 152
Virtual Private Networks
197
Visual Voicemail 95
Voice Dialer 54
Voice Recorder 148
W
Web 68
Working in Day View 153
Working in Month View
155
Working in Week View 154
Working with Conversations
in Batches 104
Working with Menus 34
Working with photos 130
Working with Playlists 143
Working with the Call Log
52
Working with Videos 131
Y
Your Home screen 25
Your Photos and Videos
129
YouTube™ 146