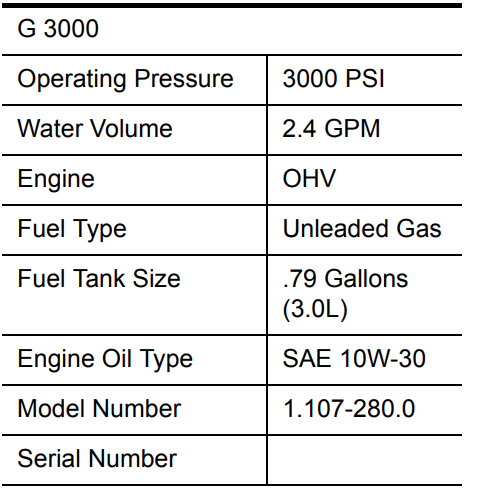
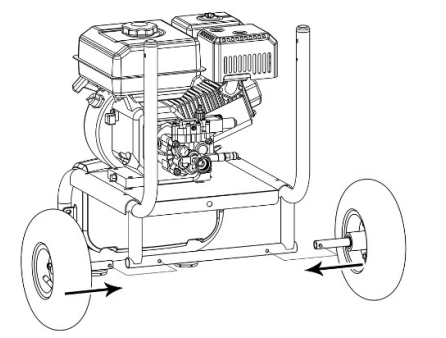
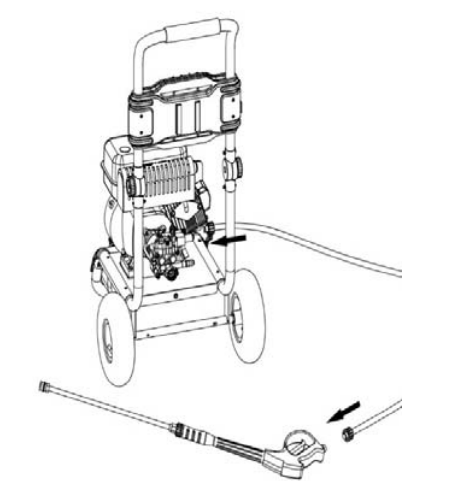
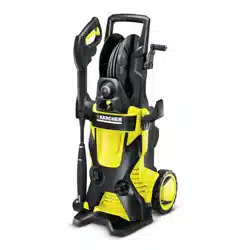
► Install the wheels to the main frame by pressing the spring loaded pin on wheel axle, then insert wheel axle into frame. Ensure that the spring pin is fixed in position. Repeat for the other wheel.
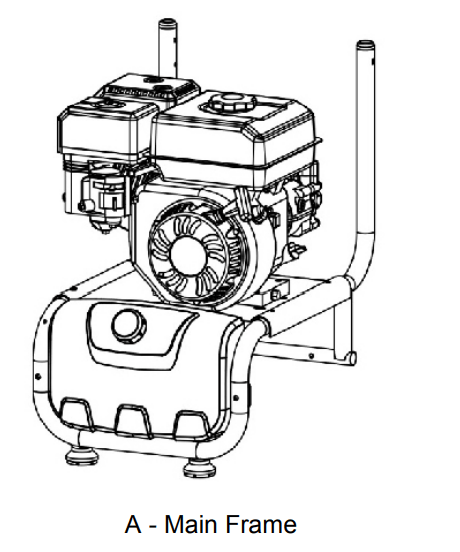
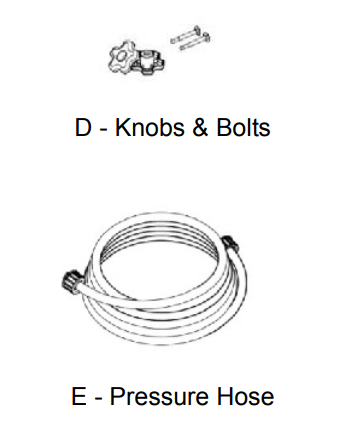
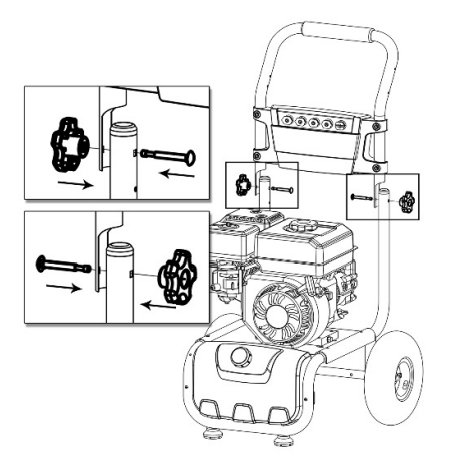
► Attach the handle and main frame with knobs and bolts.
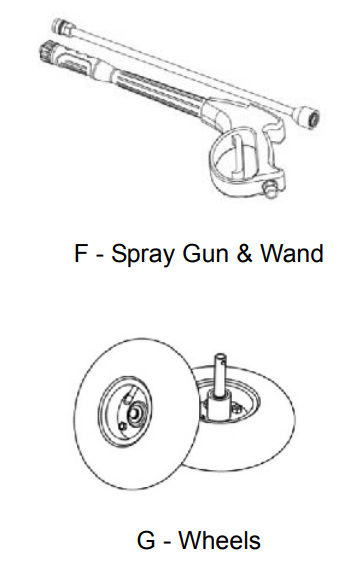
► Attach the gun & hose hooks to the handle.
Preparation
Oil Level
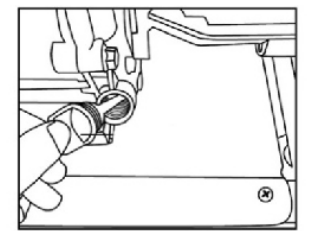
► Turn the oil gauge dipstick counter clockwise; remove it and clean it with a clean cloth.
► Fully reinsert the oil gauge dipstick and pull it out to check the oil level.
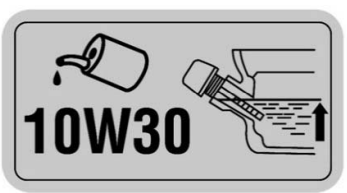
► If the oil level is halfway up the dipstick or below, refill with SAE 10W-30 oil through the dipstick hole until the oil level reaches 3/4 up the dipstick or until it reaches the bottom lip of the dipstick hole as shown.
Always use SAE 10W-30 oil.
Oil crankcase capacity: 0.6L.
► Reposition the oil gauge dipstick and tighten it by turning clockwise.
► Engine oil should be changed after the first 5 hours, then every 50 hours.
Fuel Level
► If it is necessary to add fuel, first make sure the engine is OFF, and then remove the fuel cap by turning it counter clockwise.
► When refueling, make sure the fuel filter is in place and keep in mind all safety precautions.
► Use clean unleaded gasoline with a minimum of 87 octane. DO NOT use old gas. DO NOT mix oil with gasoline.
Fuel tank capacity: .79 Gallons (3.0 Lt)
Air Filter
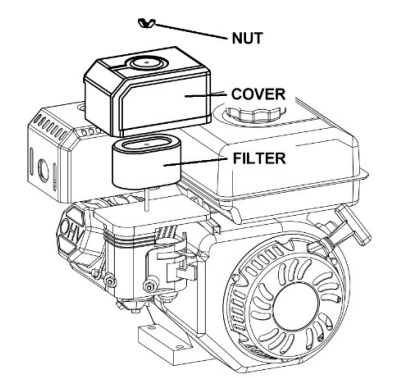
► Unscrew the nut on the cover counterclockwise. Remove the cover.
► Remove the air filter, wash filter in kerosene, squeeze kerosene out, soak filter in engine oil and squeeze engine oil out.
► Replace filter and replace the air filter cover.
Operating Instructions
Starting Procedure:
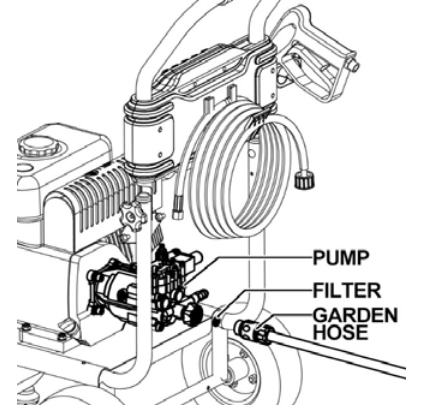
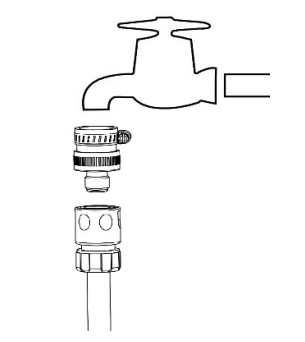
► Connect garden hose.
► Connect spray gun and pressure hose.
► Open water source.
► Start the Engine
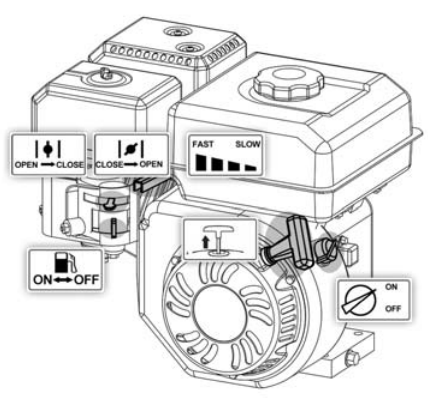
Turn the engine switch to "ON" position
Move choke lever to "CLOSE" position.
Turn the fuel valve to "ON" position.
Put the throttle lever to the "FAST" position.
Pull trigger on spray gun to release pressure.
Locate recoil cord and pull slowly until resistance is felt. At this point, pull rapidly to start engine.
After the engine has started, turn the choke lever to "OPEN" position.
NOTE: If unable to start the engine, repeat the above operation one or two times.
NOTE: If the temperature is higher, such as during summer or if the engine is hot, choke valve should be switched to "OPEN" position before starting
Cleaning Procedure:
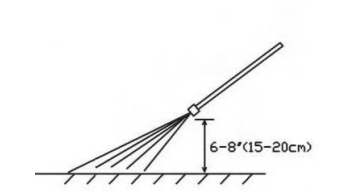
► Position the tip of the wand 6-8” (15-20 cm) away from the surface to clean at a 45°angle.
Using the Accessories
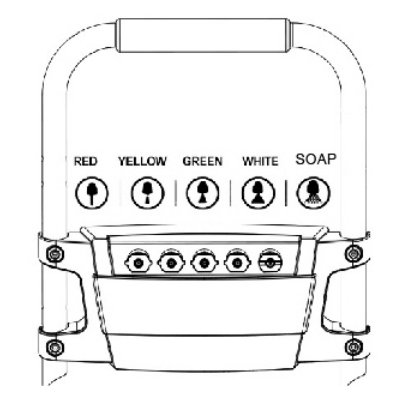
Quick Connect Nozzles
The color-coded quick connect nozzles provide a wide array of spray widths from 0° to 65° and are easily accessible when placed in the convenient nozzle holder.
0° spray angle = Red nozzle
For particularly stubborn accumulation of grime. Not recommended for soft materials like sidings, decks, painted surfaces, cars.
15° spray angle = Yellow nozzle
For dirt accumulation over a surface.
25° spray angle = Green nozzle
For dirt accumulation over a large surface.
40° spray angle = White nozzle
For moderate dirt accumulation over a large surface.
Soap = Black nozzle
For operating with detergents or cleaning with low pressure.
Adjusting Water Pressure
The pressure can be adjusted by changing the speed of the engine using the throttle lever.
Turning the throttle lever to the left can increase the speed to get more pressure.
Turning the throttle lever to the right can decrease the speed to get less pressure.
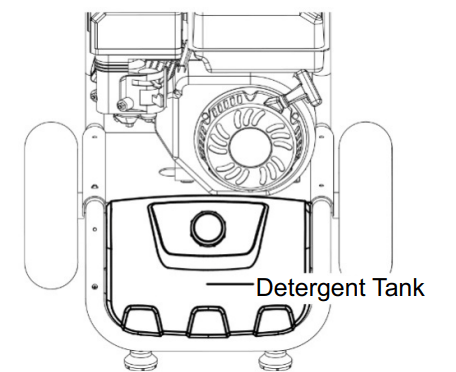
Working with Detergents
Detergents can only be applied with the black detergent nozzle.
► Install the black detergent nozzle for detergent application at low pressure.
► Fill the detergent tank with Kärcher Brand Detergent.
► With the engine running, pull trigger to operate unit.
► Liquid detergent is drawn into the unit and mixed with water.
► Apply detergent to work area.
► Do not allow detergent to dry on surface.
► Always flush the detergent bottle with fresh water when the cleaning job is done, to rinse/flush any remaining detergents from the injection system.
NOTE: For best results see Cleaning Tips for specific information on how to clean different surfaces.
Taking a Break ...five minutes or more
► Move the engine stop switch to the OFF position. For engine details see engine manual.
► Release trigger and engage safety lock.
Shutting Down & Clean Up
► If detergents have been used, insert 1 gallon of fresh water into Detergent Bottle. Siphon water at low pressure for one minute to clear the line of residual detergent.
► Move the engine stop switch to the OFF position. Close the fuel valve.
► Turn off the water source.
► Press trigger to release water pressure.
► Release trigger and engage gun safety lock.
► Disconnect the garden hose from the water inlet on the unit.
► Disconnect the high pressure hose from the high pressure outlet. Store the high pressure hose in the gun holder assembly.
Winterizing & Long-Term Storage
It is highly recommended to use Kärcher Pump Guard (part number 9.558-998.0) before winter storage and during the cleaning season to protect the pump from freezing and premature wear.
► Turn engine switch to the OFF position.
► Disconnect all hoses.
► Unscrew cap from Pump Guard bottle.
► Remove internal seal.
► Reattach cap to Pump Guard bottle and remove black protective cap.
► Screw bottle into water inlet on pressure washer pump and squeeze.
► With ignition OFF, pull starter rope until fluid starts to exit.
► Unscrew bottle. Store or dispose properly. If Kärcher Pump Guard is unavailable, perform the following:
► Disconnect all water connections.
► Turn on the machine for a few seconds, until the water which remained in the pump exits. Turn off engine immediately.
Maintenance Instructions
Pump
Pump Inspection
You should routinely make a visual inspection of the pressure washer’s pump. If you notice oil leaking around the pump seals, you should take the pressure washer to a Kärcher Authorized Service Center for repair.
Engine
Carry out maintenance tasks for the engine according to the specifications provided in the operating instructions provided by engine manufacturer.
Cleaning Tips
Deck Cleaning
With or Without Detergent
Pre-rinse deck and surrounding area with fresh water. If using Kärcher Deck Wash, apply to surface at low pressure. For best results, limit your work area to smaller sections of approximately 25 square feet. Allow Deck Wash to remain on surface 1-3 minutes. Do not allow detergent to dry on surface. Rinse at high pressure in a long sweeping motion keeping the spray nozzle approximately 3-6 inches from the cleaning surface. Always clean from top to bottom and from left to right. When moving on to a new section of the cleaning surface, be sure to overlap the previous section to eliminate stop marks and ensure a more even cleaning result.
Cars, Boats & Motorcycles
With or Without Detergent
Pre-rinse vehicle with fresh water. If using Kärcher Touchless Vehicle Wash, apply to surface at low pressure. For best results, clean one side of vehicle at a time and always apply detergent from bottom to top, do not allow detergent to dry on surface. If needed, use special wash brush attachment (not included) to remove stubborn dirt. Rinse at high pressure in a sweeping motion keeping the spray nozzle approximately 6-8 inches from the cleaning surface (distance should increase when rinsing pin-striping or other sensitive surfaces). Always clean from top to bottom and from left to right. For best results, wipe surface dry with a chamois or soft dry cloth.
House Siding
With or Without Detergent
Pre-rinse cleaning surface with fresh water. If using Kärcher Pressure Wash, apply to surface at low pressure (for best results, limit your work area to sections of approximately 6 feet and always apply detergent from bottom to top). Allow detergent to remain on surface 1-3 minutes. Do not allow detergent to dry on surface, if surface appears to be drying, simply wet down surface with fresh water. If needed, use special wash brush attachment (not included) to remove stubborn dirt. Rinse at high pressure from top to bottom in an even sweeping motion keeping the spray nozzle approximately 6 inches from the cleaning surface.
Cement Patios, Brick & Stone
With or Without Detergent
Pre-rinse cleaning surface with fresh water. If using Kärcher Pressure Wash or Degreaser, apply to surface at low pressure. For best results, limit your work area to smaller sections of approximately 25 square feet. Allow Pressure Wash or Degreaser to remain on surface 1-3 minutes. Do not allow detergent to dry on surface. Rinse at high pressure in a sweeping motion keeping the spray nozzle approximately 3-6 inches from the cleaning surface. Always clean from top to bottom and from left to right. For removing extremely stubborn stains, use a DirtBlaster® Spray Nozzle (sold separately).
Barbecue Grills, Outdoor Power Equipment & Gardening Tools
With or Without Detergent
Pre-rinse cleaning surface with fresh water. If using Kärcher Pressure Wash or Degreaser, apply detergent at low pressure. Allow Pressure Wash to remain on surface 1-3 minutes. Do not allow detergent to dry on surface. Rinse at high pressure keeping the spray nozzle approximately 3-6 inches from the cleaning surface. For removing extremely stubborn dirt, it may be necessary to move the spray nozzle even closer to the surface for greater dirt cutting action.
Patio & Lawn Furniture
With or Without Detergent
Pre-rinse furniture and surrounding area with fresh water. If using Pressure Wash, apply to surface at low pressure. Allow Pressure Wash to remain on surface 1-3 minutes. Do not allow detergent to dry on surface. If needed use special Wash Brush Attachment (not included) to remove stubborn dirt. Rinse at high pressure in a sweeping motion keeping the spray nozzle approximately 3-6 inches from the cleaning surface. For best results, clean from top to bottom and from left to right.
Recommendations
▬ Before cleaning any surface, an inconspicuous area should be cleaned to test spray pattern and distance for maximum cleaning results.
▬ If painted surfaces are peeling or chipping, use extreme caution as pressure washer may remove the loose paint from the surface.
▬ When using on surfaces which might come in contact with food, flush surfaces with plenty of drinking water.
▬ For additional cleaning tips, visit our website
Optional Accessories
Optional accessories are available to further enhance your cleaning capabilities. These accessories are accurate as of the printing date of this manual. Please check our website for pricing and up to date information.
▬ Extension Hose
▬ DirtBlaster® Spray Nozzle
▬ Universal Wash Brush Kit
Troubleshooting
Symptom
Cause
Solution
Engine Will Not Start
No Gasoline.
Fill Gas Tank.
Choke is not in the correct position.
Slide lever out to closed position.
Ignition switch is not in the correct position.
Turn Ignition switch on.
Water pressure built up in the machine.
Squeeze the trigger to release the pressure.
For additional engine problems refer to the engine manual.
Unit Does Not Reach High Pressure
Diameter of garden hose is too small.
Replace with a 5/8 inch or larger garden hose.
Water supply is restricted.
Check garden hose for kinks, leaks and blockage.
Not enough inlet water supply.
Turn water on full force. Check garden hose for kinks, leaks or blockage.
Water inlet filter is clogged.
Remove filter and rinse out in warm water.
Black detergent nozzle is attached.
Remove black detergent nozzle and attach high pressure nozzle.
Output Pressure Varies High And Low
Not enough inlet water supply.
Turn water on full force. Check garden hose for kinks, leaks or blockage.
Output Pressure Varies Between High And Low
Pump is sucking air.
Check that hoses and fittings are air tight. Turn off machine and purge pump by squeezing trigger gun until a steady flow of water emerges through the nozzle.
Water inlet filter is clogged.
Remove filter and rinse out in warm water.
Spray nozzle is obstructed.
Blow out or remove debris with a fine needle.
Calcified gun, hose or spray wand.
Run distilled vinegar through detergent tank.
No Detergent
Detergent suction tube not properly connected to the machine.
Check connection.
Detergent is too thick.
Dilute detergent, for best results use Kärcher detergent.
Filter on detergent suction tube is clogged.
Run warm water through filter to remove debris
Damaged or clogged detergent suction tube.
Remove obstruction or replace detergent suction tube.
A high pressure nozzle is attached.
Replace with black detergent nozzle.
Spray nozzle is obstructed.
Blow out or remove debris with fine needle.
Garden Hose Connection Leaks
Loose fittings.
Tighten fittings.
Missing/worn rubber washer.
Insert new washer.
Spray Wand Leaks
Spray wand not properly attached.
Turn the swivel nut of the gun clockwise until connection is tight.
Broken o-ring or plastic insert.
Visit karcher-help website or locate a service center at karcher-service website
Pump Is Noisy
Not enough gas or engine oil.
Check that hoses and fittings are air tight. Turn off machine and purge pump by squeezing trigger gun until a steady flow of water emerges through the nozzle.
Water Leaks From Pump (Up To 10 Drop Per Minute Is Permissible)
Loose fittings.
Check fittings.
Water seals are damaged or worn.
Visit karcher-help website or locate a service center at karcher-service website
Thermal protection device is activated.
Thermal protection device will auto reset. Do not run pump for more than 5 minutes without spraying.
Oil Drip
Oil seals are damaged or worn.
Visit karcher-help website or locate a service center at karcher-service website
If the symptom you are experiencing is not listed above, or if the provided solutions do not solve your issue, please visit our extensive online troubleshooting database at: karcher-help website