Steam outlet - number and position depends on the model
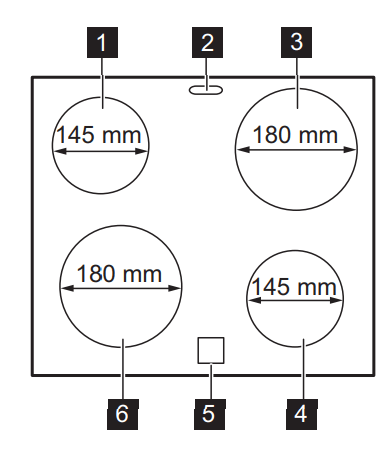
Cooking zone 1700 W
Cooking zone 1200 W
Residual heat indicator
Cooking zone 1700 W
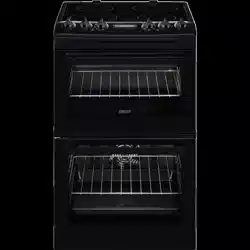
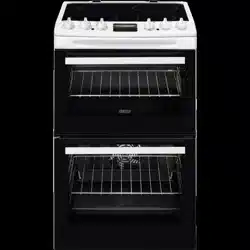
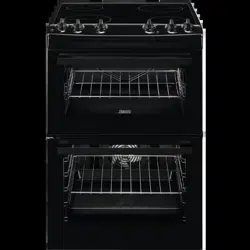
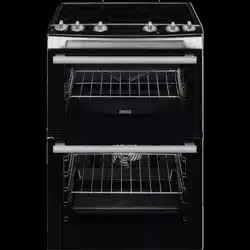
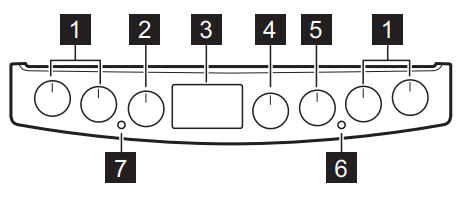
COOKER CONTROL PANEL
Knobs for the hob
Knob for the top oven functions
Display
Knob for the main oven functions
Knob for the main oven temperature
Temperature indicator / symbol for the main oven
Temperature indicator / symbol for the top oven
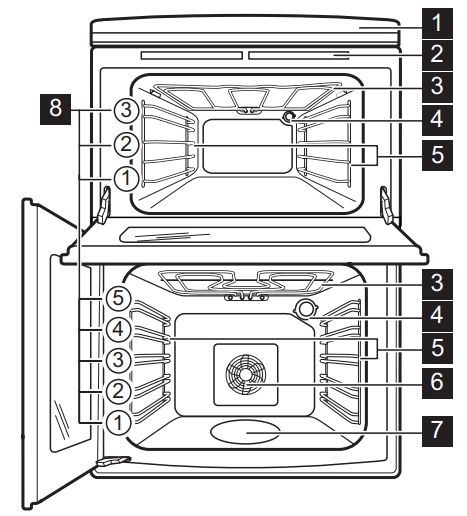
ACCESSORIES
•Wire shelf
For cookware, cake tins, roasts.
•Grill- / Roasting pan
To bake and roast or as pan to collect fat.
•AirFry tray
To fry food with less oil or without baking paper.
•Trivet
For roasting and grilling.
Use the trivet only with the Grill- / roasting pan.
BEFORE FIRST USE
WARNING! Refer to Safety chapters.
INITIAL CLEANING
Remove all accessories and removable shelf supports from the oven.
Refer to "Care and cleaning" chapter.
Clean the oven and the accessories before the first use.
Put the accessories and the removable shelf supports back to their initial position.
SETTING THE TIME
You must set the time before you operate the oven.
Only the top oven works without the set time.
The flashes when you connect the appliance to the electrical supply, when there was a power cut or when the timer is not set.
Press the to set the correct time.
After approximately five seconds, the flashing stops and the display shows the time of day you set.
CHANGING THE TIME
You cannot change the time of day if the Duration function operates.
Press again and again until the indicator for the Time of Day function flashes.
To set a new time, refer to "Setting the time".
PREHEATING
Preheat the empty oven before first use.
Preheat the two ovens before first use. Heat up one oven at a time.
Set the functions listed below, if applicable.
1. Set the function . Set the temperature to 250ºC.
2. Let the oven operate for 1 hour.
3. Set the function . Set the temperature to 250ºC.
4. Let the oven operate for 15 minutes.
5. Turn off the oven and let it cool down.
Accessories can become hotter than usual. The oven can emit an odour and smoke. Make sure that the airflow in the room is sufficient.
HOB - CARE AND CLEANING
WARNING! Refer to Safety chapters.
GENERAL INFORMATION
•Clean the hob after each use.
•Always use cookware with a clean base.
•Scratches or dark stains on the surface have no effect on how the hob operates.
•Use a special cleaner suitable for the surface of the hob.
•Use a special scraper for the glass.
CLEANING THE HOB
•Remove immediately: melted plastic, plastic foil, sugar and food with sugar, otherwise, the dirt can cause damage to the hob. Take care to avoid burns. Use a special hob scraper on the glass surface at an acute angle and move the blade on the surface.
•Remove when the hob is sufficiently cool: limescale rings, water rings, fat stains, shiny metallic discoloration. Clean the hob with a moist cloth and a non-abrasive detergent. After cleaning, wipe the hob dry with a soft cloth.
•Remove shiny metallic discoloration: use a solution of water with vinegar and clean the glass surface with a cloth.
OVEN - DAILY USE
TOP OVEN FUNCTIONS
Symbol
Oven function
Application
Off position
The oven is off.
Oven Lamp
To turn on the lamp without a cooking function.
100 - 250
Conventional Cooking
To bake and roast food on one shelf position.
Dual Circuit Grill
To grill flat food in medium quantities in the middle of the shelf. To make toasts.
Full Grill
To grill flat food and to toast bread.
MAIN OVEN FUNCTIONS
Symbol
Oven function
Application
Off position
The oven is off.
AirFry/ Thermaflow®
To fry food with less oil or without baking paper. For dishes like french fries or pizza./
To bake on up to two shelf positions at the same time and to dry food.
Plus Steam
To add humidity during the cooking. To get the right col- our and crispy crust during baking. To give more juiciness during reheating.
Moist Fan Baking
This function is designed to save energy during cooking. For the cooking instructions refer to "Hints and tips" chapter, Moist Fan Baking. The oven door should be closed during cooking so that the function is not interrup- ted and to ensure that the oven operates with the highest energy efficiency possible. When you use this function, the temperature in the cavity may differ from the set tem- perature. The heating power may be reduced. For general energy saving recommendations refer to "Energy Efficien- cy" chapter, Energy Saving. This function was used to comply with the energy efficiency class according to EN 60350-1.
You can defrost food by choosing Moist Fan Baking function without setting the temperature.
ACTIVATING AND DEACTIVATING THE TOP / MAIN OVEN
It depends on the model if your appliance has knob symbols, indicators or lamps:
•The indicator comes on when the oven heats up.
•The lamp comes on when the oven operates.
•The symbol shows whether the knob controls one of the cooking zones, the oven functions or the temperature.
1.Turn the knob for the top / main oven functions to select an oven function.
2.Turn the knob for the temperature to select a temperature.
3.To deactivate the oven turn the knob for the top / main oven functions to the off position.
ACTIVATING THE FUNCTION: PLUS STEAM
This function allows to have an improvement of humidity during the cooking.
WARNING! Risk of burns and damage to the appliance.
Released humidity can cause burns:
•Do not open the appliance door when using the function: Plus Steam.
•Open the appliance door with care after using the function: Plus Steam.
Refer to “Hints and tips” chapter.
1.Open the oven door.
2.Fill the cavity embossment with tap water. The maximum capacity of the cavity embossment is 250 ml.
Fill the cavity embossment with water only when the oven is cold.
3.Turn the knob for the function: Plus Steam .
4.Turn the knob for the temperature to select a temperature.
5.Put food in the appliance and close the oven door.
CAUTION! Do not refill the cavity embossment with water during cooking or when the oven is hot.
6.To deactivate the appliance, turn the knobs for the oven functions and temperature to the off position.
7.Remove water from the cavity embossment.
WARNING! Make sure that the appliance is cool before you remove the remaining water from the cavity embossment.
COOLING FAN
When the oven operates, the cooling fan turns on automatically to keep the surfaces of the oven cool. If you turn off the oven, the cooling fan can continue to operate until the oven cools down.
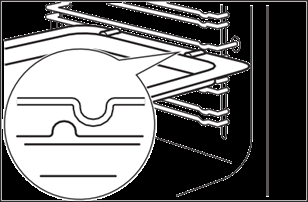
INSERTING THE OVEN ACCESSORIES
Deep pan:
Push the deep pan between the guide bars of the shelf support.
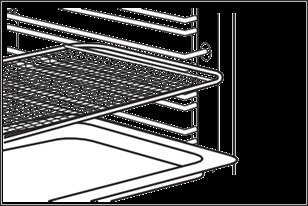
Wire shelf and the deep pan together:
Push the deep pan between the guide bars of the shelf support and the wire shelf on the guide bars above.
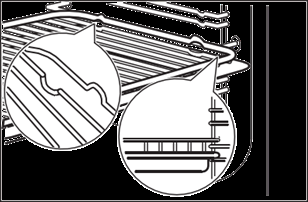
AirFry tray:
Place the AirFry tray on the third shelf position. Place the baking tray on the first shelf position.
•All accessories have small indentations at the top of the right and left side to increase safety. The indentations are also anti-tip devices.
•The high rim around the shelf is a device which prevents cookware from slipping.
TRIVET AND GRILL- / ROASTING PAN
You can use the trivet to roast larger pieces of meat or poultry on one shelf position.
1. Put the trivet into the deep pan so that the supports of the wire shelf point up.
2. Put the deep pan into the oven on the necessary shelf position.
You can use the trivet to grill flat dishes in large quantities and to toast.
1. Put the trivet into the deep pan so that the supports of the wire shelf point down.
2. Put the deep pan into the oven on the necessary shelf position.
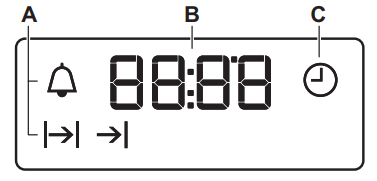
OVEN - CLOCK FUNCTIONS
DISPLAY
The display works only with the main oven.
A.Clock functions
B.Timer
C. Clock function
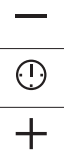
Button
Button
Function
Description
MINUS
To set the time.
CLOCK
To set a clock function.
PLUS
To set the time.
CLOCK FUNCTIONS TABLE
Clock function
Application
TIME OF DAY
To set, change or check the time of day.
DURATION
To set how long the appliance operates.
END
To set when the appliance deactivates.
TIME DELAY
To combine DURATION and END function.
MINUTE MINDER
To set countdown time. This function has no effect on the opera- tion of the appliance. You can set the MINUTE MINDER at any time, also when the appliance is off.
SETTING THE DURATION
1. Set an oven function and temperature.
2. Press again and again until starts to flash.
3. Press to set the DURATION time. The display shows .
4. When the time ends, flashes and an acoustic signal sounds. The appliance deactivates automatically.
5. Press any button to stop the acoustic signal.
6. Turn the knob for the oven functions and the knob for the temperature to the off position.
DURATION works only for the main oven
SETTING THE END
1. Set an oven function and temperature.
2. Press again and again until starts to flash.
3. Press to set the time. The display shows .
4. When the time ends, flashes and an acoustic signal sounds. The appliance deactivates automatically.
5. Press any button to stop the signal.
6. Turn the knob for the oven functions and the knob for the temperature to the off position.
The function works only for the main oven.
SETTING THE TIME DELAY
1. Set an oven function and temperature.
2. Press again and again until starts to flash.
3. Press to set the time for DURATION.
4. Press .
5. Press to set the time for END.
6. Press to confirm. Appliance turns on automatically later on, works for the set DURATION time and stops at the set END time. At the set time an acoustic signal sounds.
7. The appliance deactivates automatically. Press any button to stop the signal.
8. Turn the knob for the oven functions and the knob for the temperature to the off position.
TIME DELAY works only for the main oven.
SETTING THE MINUTE MINDER
1. Press again and again until starts to flash.
2. Press to set the necessary time. The Minute Minder starts automatically after 5 seconds.
3. When the set time ends, an acoustic signal sounds. Press any button to stop the acoustic signal.
4. Turn the knob for the oven functions and the knob for the temperature to the off position.
CANCELLING THE CLOCK FUNCTIONS
1. Press the again and again until the necessary function indicator starts to flash.
2. Press and hold —.
The clock function goes out after some seconds.
OVEN - CARE AND CLEANING
NOTES ON CLEANING
Cleaning Agents
Clean the front of the oven with a soft cloth with warm water and a mild detergent.
Use a cleaning solution to clean metal surfaces.
Clean stains with a mild detergent. Do not apply it on the catalytic surfaces.
Everyday Use
Clean the cavity after each use. Fat accumulation or other residue may cause fire.
Dry the cavity with a soft cloth after each use.
Accessories
Clean all accessories after each use and let them dry. Use a soft cloth with warm water and a mild detergent. Do not clean the accessories in a dishwasher (except from AirFry tray).
Do not clean the non-stick accessories using abrasive cleaner or sharp-edged objects.
CLEANING THE AIRFRY TRAY
1.Put the AirFry tray on the baking tray.
2.Pour hot water with detergent and let it soak.
3.Clean the AirFry tray with a sponge or use a brush to remove scraps.
Cleaning in the dishwasher is also possible.
CATALYTIC CLEANING
CAUTION! Do not clean the catalytic surface with oven sprays, soap or other cleaning agents. It will damage the catalytic surface.
CAUTION! Always turn the oven light on while using the catalytic cleaning (if applicable).
WARNING! Keep children away when you clean the oven at a high temperature. The oven surface becomes very hot and there is a risk of burns.
Spots or discolouration of the catalytic surface have no effect on catalytic properties.
Before activating the catalytic cleaning remove all the accessories from the oven.
The walls with catalytic coating are self-cleaning. They absorb fat which collects on the walls while the appliance operates.
To support the self-cleaning procedure, heat the empty oven on a regular basis.
The oven cavities must be cleaned separately. Catalytic cleaning works only in the main oven.
1.Clean the oven floor with warm water and washing-up liquid, then dry it.
2.Set the oven temperature to 250 °C and let the oven operate for 1 hour.
3.When the appliance is cool, clean it with a soft and moist sponge.
CLEANING THE CAVITY EMBOSSMENT
The cleaning procedure removes limestone residue from the cavity embossment after cooking with steam.
For the function: Plus Steam we recommend to do the cleaning procedure at least every 5 - 10 cooking cycles.
1.Put 250 ml of white vinegar into the cavity embossment at the bottom of the oven. Use maximum 6% vinegar without any additives.
2.Let the vinegar dissolve the residual limestone at the ambient temperature for 30 minutes.
3.Clean the cavity with warm water and a soft cloth.
REMOVING THE SHELF SUPPORTS
To clean the oven, remove the shelf supports.
1. Pull the front of the shelf support away from the side wall.
2. Pull the rear end of the shelf support away from the side wall and remove it.
Install the shelf supports in the opposite sequence.
CAUTION! Make sure that the longer fixing wire is in the front. The ends of the two wires must point to the rear. Incorrect installation can cause damage to the enamel.
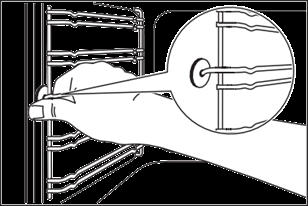
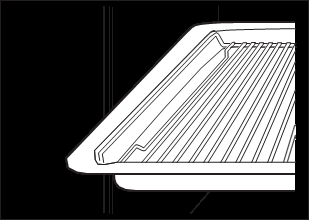
REMOVING AND CLEANING THE DOOR GLASSES - TOP OVEN
The door glass in your product can be different in type and shape from the examples you see in the image. The number of glasses can also be different.
1.Open the door.
2.Hold the door trim on the top edge of the door at the two sides and push inwards to release the clip seal.
3.Pull the door trim to the front to remove it.
4.Remove the glass panels.
To install the panels, do the same steps in reverse.
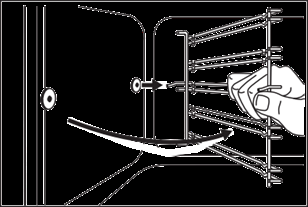
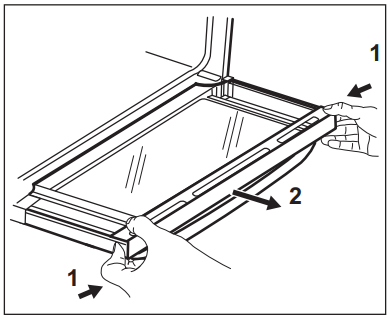
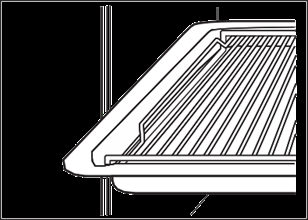
REMOVING AND CLEANING THE DOOR GLASSES - MAIN OVEN
The door glass in your product can be different in type and shape from the example you see in the image. The number of glasses can also be different.
1. Push the door trim at one side to remove it.
2.Pull up the trim.
3.Remove the glass panels.
To replace the glass panels, do the same steps in reverse. Before you lower the trim, attach the A trim part to the door. Refer to the image.
REPLACING THE LAMP
WARNING! Risk of electric shock. The lamp can be hot.
1.Turn off the oven. Wait until the oven is cold.
2.Disconnect the oven from the mains.
3.Put a cloth on the bottom of the cavity.
The back lamp
The lamp glass cover is at the back of the cavity.
1.Turn the lamp glass cover counterclockwise to remove it.
2.Clean the glass cover.
3.Replace the oven lamp with a suitable 300 °C heat-resistant oven lamp. Use the same oven lamp type.
4.Install the glass cover.
TROUBLESHOOTING
WHAT TO DO IF...
Problem
Possible cause
Remedy
You cannot activate the appli- ance.
The appliance is not connec- ted to an electrical supply or it is connected incorrectly.
Check if the appliance is cor- rectly connected to the electri- cal supply.
You cannot activate the appli- ance.
The fuse is blown.
Make sure that the fuse is the cause of the malfunction. If the fuse is blown again and again, contact a qualified electrician.
Residual heat indicator does not come on.
The zone is not hot because it operated only for a short time.
If the zone operated sufficiently long to be hot, speak to an Au- thorised Service Centre.
The oven does not heat up.
The oven is deactivated.
Activate the oven.
The oven does not heat up.
The clock is not set.
Set the clock.
The oven does not heat up.
The necessary settings are not set.
Make sure that the settings are correct.
The lamp does not operate.
The lamp is defective.
Replace the lamp.
The display shows "12.00".
There was a power cut.
Reset the clock.
Steam and condensation settle on the food and in the cavity of the oven.
You left the dish in the oven for too long.
Do not leave the dishes in the oven for longer than 15 - 20 minutes after the cooking process ends.
There is no good cooking per- formance using the Plus Steam function.
You did not fill the cavity em- bossment with water.
Refer to "Activating the Plus Steam function".
The water in the cavity em- bossment does not boil.
The temperature is too low.
Set the temperature at least to 110°C. Refer to "Hints and Tips" chapter.
The water comes out of the cavity embossment.
There is to much water in the cavity embossment.
Deactivate the oven and make sure that the appliance is cold. Wipe the water with a cloth or sponge. Add the correct amount of water to the cavity embossment. Refer to "Activat- ing the Plus Steam function".
 Use the trivet only with the Grill- / roasting pan.
 flashes when you connect the appliance to the electrical supply, when there was a power cut or when the timer is not set.
 to set the correct time.
 function operates.
 . Set the temperature to 250ºC.
 . Set the temperature to 250ºC.


 starts to flash.
 .
. starts to flash.