Owner Guide Dehumidifier
Features and Controls
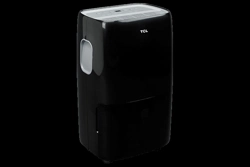
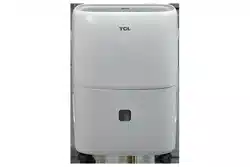
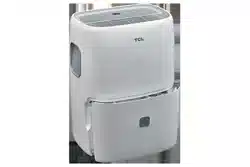
KEY PARTS AND COMPONENTS
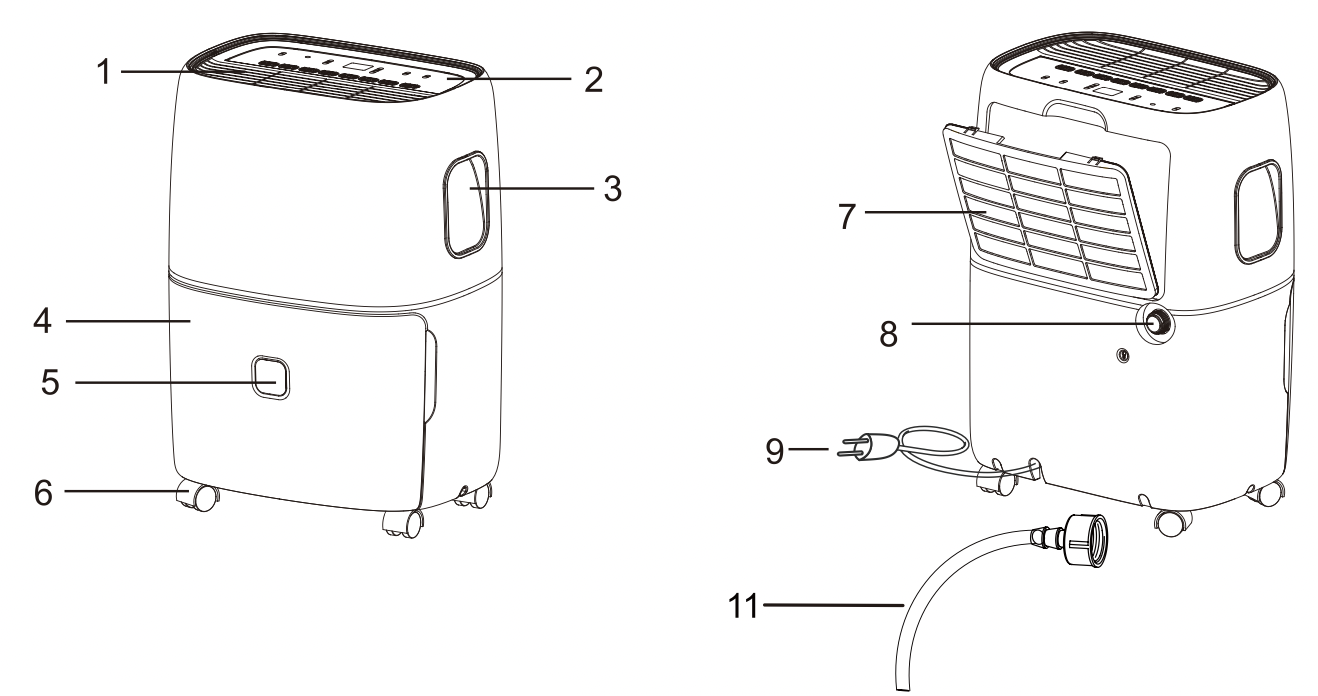
- Air Outlet Grill
- Control Panel
- Carrying Handle
- Bucket
- Water Level
- Casters
- Air Intake Grill
- Drain connection (Hose Not Included)
- Power Cord
- Product Manual(Not Shown)
- Pump Connection Kit: Clear drain hose and connector with rubber washer
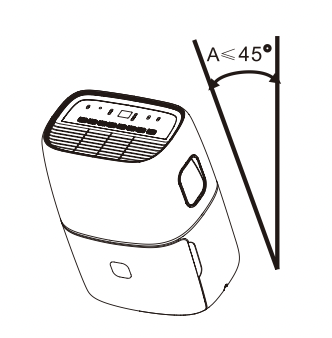
CASTER INSTALLATION
- Remove casters from bucket.
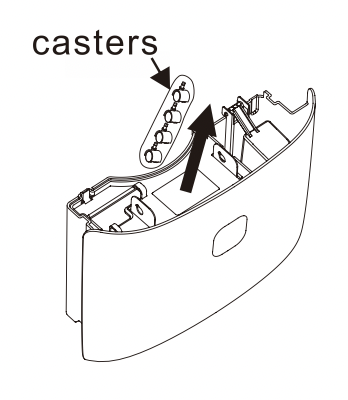
- Install the casters.
Tilt the dehumidifier no more than 45° and forcibly insert the casters. Make sure the ring around the caster is flush against the bottom of the dehumidifier.
CONTROL PANEL
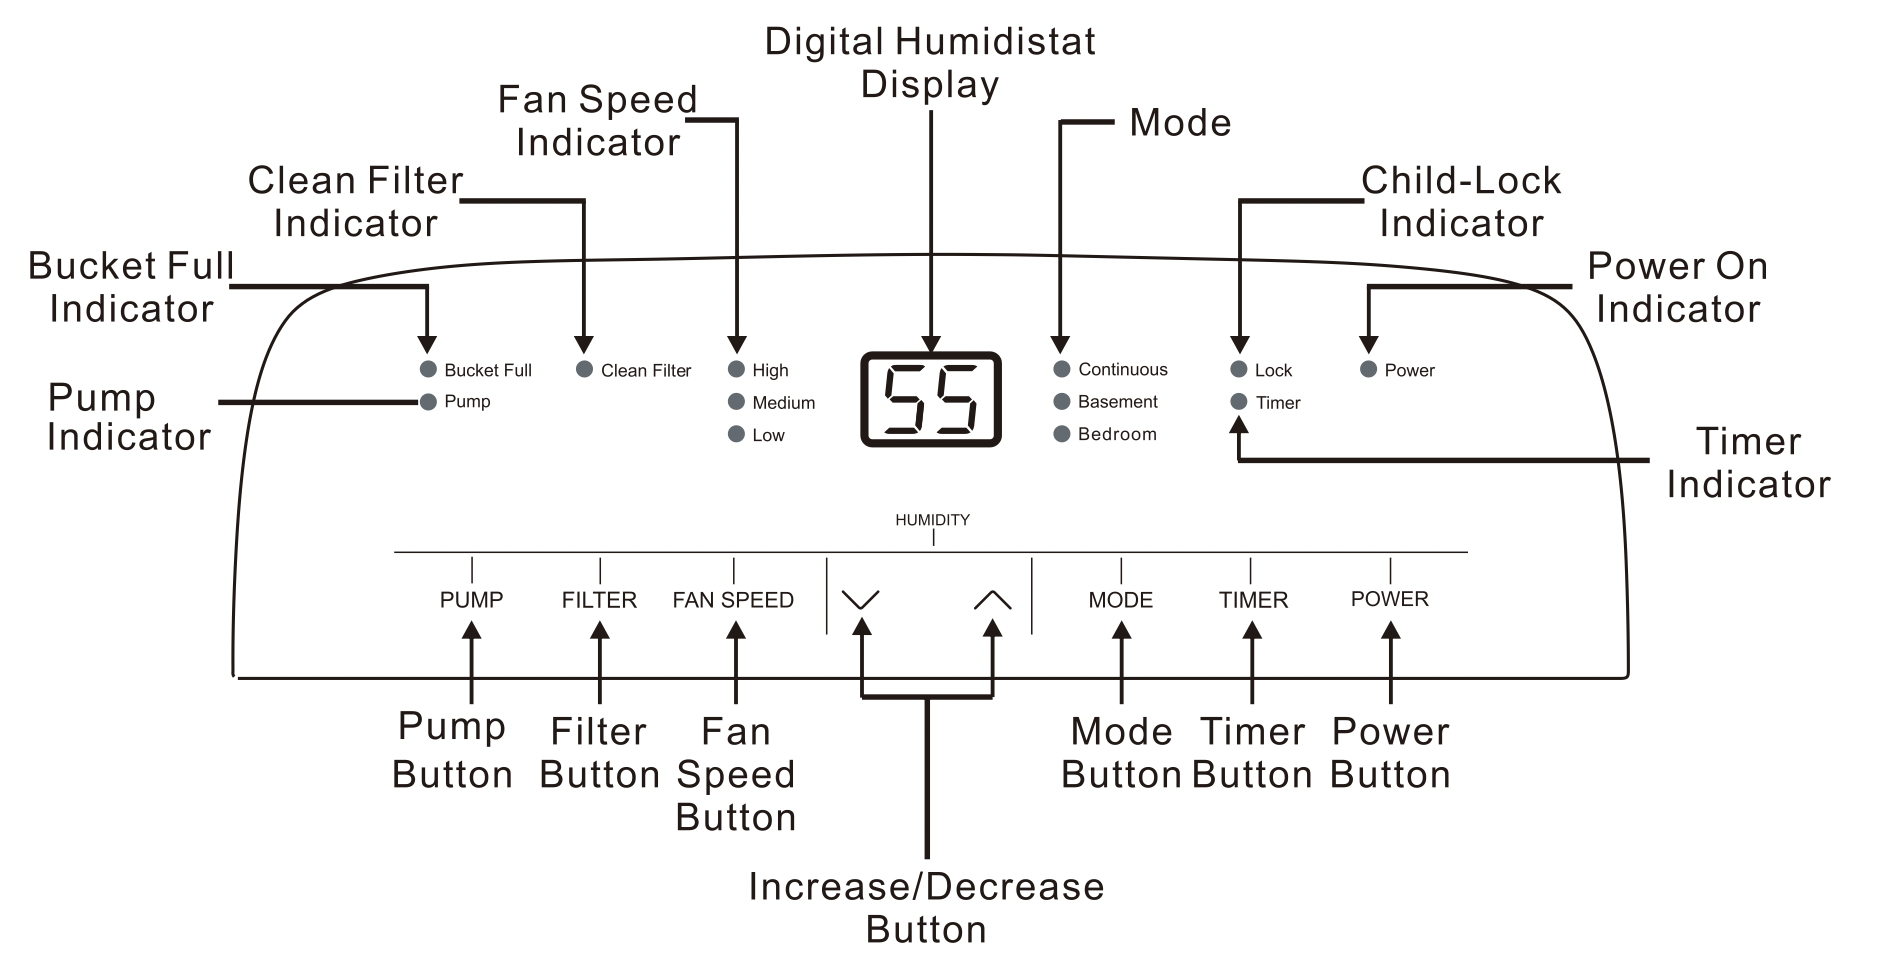
- When first operating the dehumidifier, run it in Continuous mode for 24 hours.
- Power On and Off - Press the POWER button once to manually turn the unit on. Press the POWER button once more to turn the unit off.
- Humidity Selection - Press the
 or
or  buttons to choose the desired relative humidity in the room. Once the preferred humidity level is selected, the display will show the actual room % humidity. Each press of the button will change the desired room humidity by 5%. The room humidity is selectable from 35% - 80% or continuous. The unit will cycle on and off to maintain the humidity level chosen on the digital display. If you want the dehumidifier to operate continuously regardless of the room humidity, press the MODE button until you see "CO" on the digital display. This will enable continuous operation and the "Continuous" indicator will light up on the control panel.
- Fan Speed Control - Press the FAN SPEED Button to cycle through the different fan speeds: High, Medium, and Low. The fan speed can be visually distinguished by the fan speed indicators on the control panel.
- Timer Auto On - To program the unit to automatically turn on, press the TIMER button when the unit is off. Press to increase or decrease the timer in 30 min increments (0.5 hours) up to 10 hours. After 10 hours, each press of the button will increase the timer in 1 hour increments and up to 24 hours.
Timer Auto Shut-Off - To program the unit to automatically turn off, press the TIMER button when the unit is on. Each press of the button will change the timer setting in 30 min increments (0.5 hours) up to 10 hours. After 10 hours, each press of the button will increase or decrease the timer in 1hour increments up to 24 hours. Once the desired time is over, the unit will automatically power off.
NOTE: Fan will continue to run even when the compressor is off. This is normal and allows the unit to circulate air and operate more efficiently.
- Bucket Full - When the water bucket is full of water, the unit will automatically shut off, make a beeping noise, and the Bucket Full Indicator will light up. The dehumidifier will not function until the water bucket is emptied and placed back inside the unit. The bucket should be cleaned every few weeks to prevent the growth of mold, mildew and bacteria. Use a mild detergent to clean the bucket.Once clean, completely dry the bucket and place it back inside the dehumidifier.
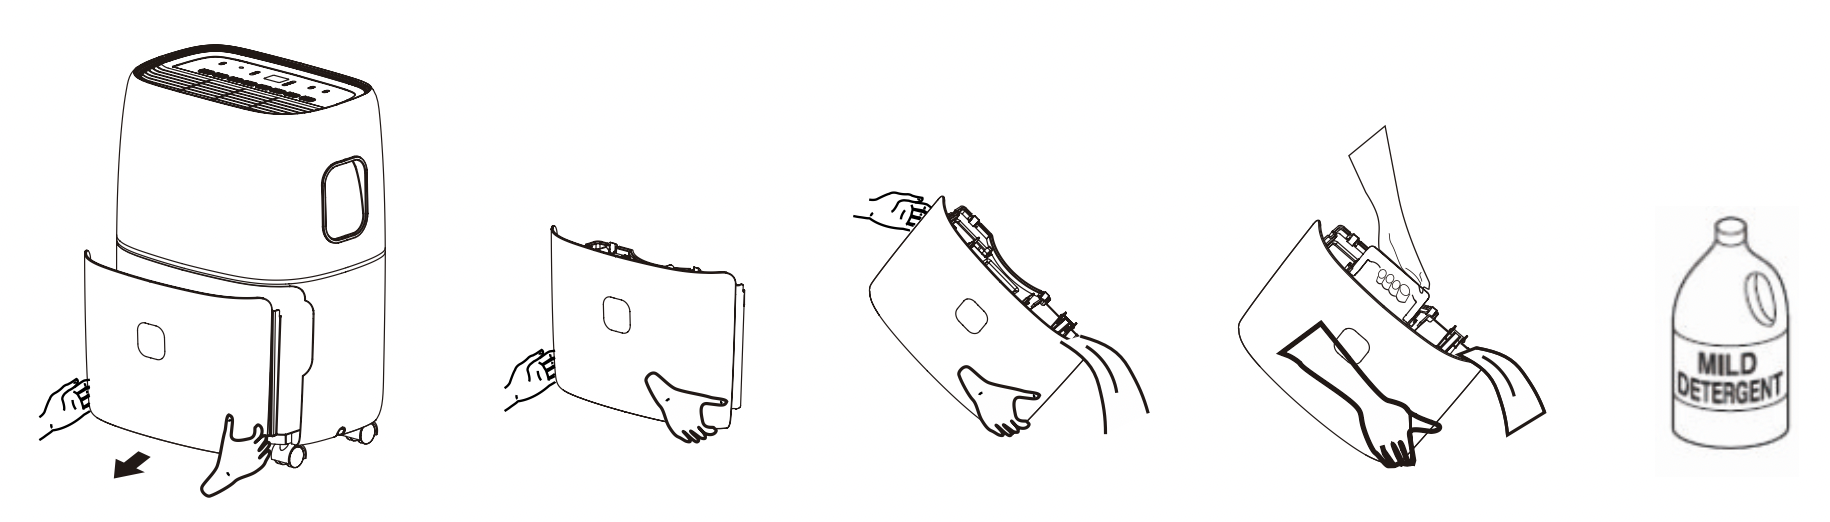
NOTE: Hold bucket with both hands when emptying.
NOTE: When the bucket is full or removed from the machine, the compressor will turn off, but the fan will continue to run for a few minutes. This is completely normal. The dehumidifier will not be removing moisture from the air at this time.
NOTE: When removing moisture from the air, the dehumidifier will exhaust warm air from the side exhaust vent.
NOTE: Do not place a full bucket on the floor because the bottom is uneven.
- Clean Filter - When the filter needs to be cleaned, the filter indicator will light up (after 250 hours of use). Remove the filter from the back of the unit by using your thumbs to press down on the filter tabs directly above the filter. Clean the filter with warm, soapy water. Dry thoroughly before replacing the filter. Once the filter is completely dry, place the filter back in the unit and press the FILTER button to reset the filter indicator.
CAUTION: DO NOT OPERATE THE DEHUMIDIFIER WITHOUT THE FILTER
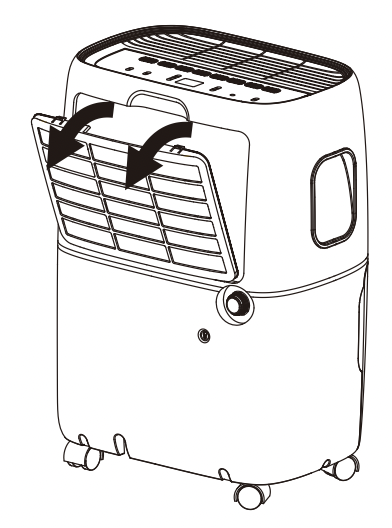
NOTE: Do not clean filter in dishwasher.
- Pre-set Modes - Preset humidity level settings allow the user to easily move the dehumidifier room-to-room and select the corresponding mode for the location in which the dehumidifier is operating for optimum performance.Press the MODE button to choose from Bedroom (55% RH) or Basement (45% RH) or Continuous (15% RH).
- Child-Lock Mode - To lock the control panel, press and hold the TIMER button for 3 seconds when the unit is on. Locking the control panel prevents someone from accidentally changing the settings. When locked, the LOCK indicator will light up. Press and hold the TIMER button for 3 seconds to unlock the control panel.
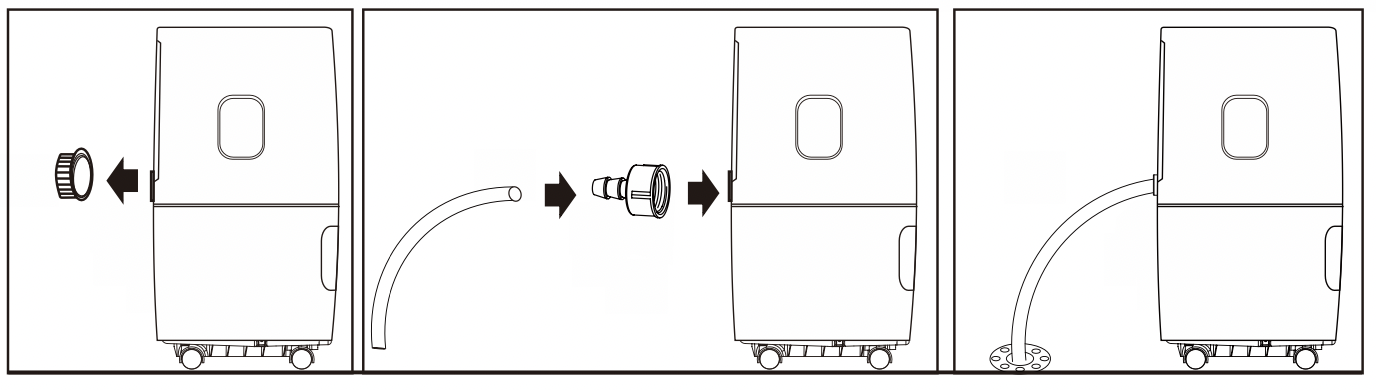
- Internal Pump Mode - The interal pump allows the unit to operate without having to empty the bucket and requires the installation of the included pump drain house kit. To install the clear plastic hose, remove the drain cap on the back of the unit. The pump mode operation will pump water up to 16 feet using the clear hose included. Force the included clear drain house on to the pump adapter and turn adapter clockwise on to the threaded connection on the back of the unit. Once securely installed, lead the drain hose to a nearby drain, sink or out a window. Turn on the dehumidifier and press the PUMP button to activate the internal pump.The "PUMP" LED indicator should illuminate.
NOTE: Water can be pumped up to 16' in height from base of the unit. Make sure there are no kinks or knots in the hose. Only use the clear plastic hose included with the unit (and NOT an optional garden
hose) when using the pump mode.
CHOOSING A LOCATION
A dehumidifier operating in a basement will have little or no effect in drying out an adjacent enclosed storage area, such as a closet, unless there is adequate circulation of air in and out of the area.
- Do not use outdoors.
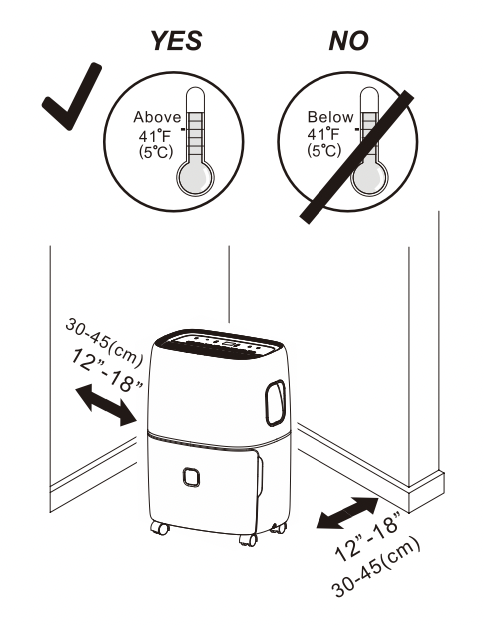
- This dehumidifier is intended for indoor use only. Place the dehumidifier on a smooth, level floor surface that is strong enough to support the unit with a full bucket of water.
- Allow at least 12"-18" of air flow on all sides.
- Place the dehumidifier in an area where the temperature will not fall below 41°F (5℃). The coils can become covered with frost at temperatures below 41°F (5℃), which may reduce performance.
- Use the dehumidifier in cooking, laundry, bathing and dishwashing areas that have excessive moisture.
NOTE: Place the dehumidifier away from a clothes dryer.
- Use the dehumidifier to prevent moisture damage anywhere books or valuables are stored.
- Use the dehumidifier in a basement to help prevent moisture
- The dehumidifier must be operated in an enclosed area to be most effective.
- Close all doors, windows and other outside openings to the room.
AUTOMATIC DEFROST
When frost builds up on the evaporator coils, the compressor will cycle off and the fan will continue to run until the frost disappears. When the coils are completely defrosted, the compressor or fan (depending on the model) will automatically restart and dehumidification will resume.
CONTINUOUS MODE - GARDEN HOSE INSTALLATION AND SETUP
Water can be automatically emptied by attaching a hose to the continuous drainage port on the back of the dehumidifier. This will allow the unit to run and drain continuously (depending on the selected humidity included). The thread standard for garden hoses in North America is know as GHT or "garden hose thread" which has an outer diameter of 1-1/16 inches (1.0625 inches or 27.0 mm) and a pitch of 11.5 TPI.
- Place dehumidifier on a level surface.
- Unscrew the cap on the back of the unit to access the garden hose nozzle.
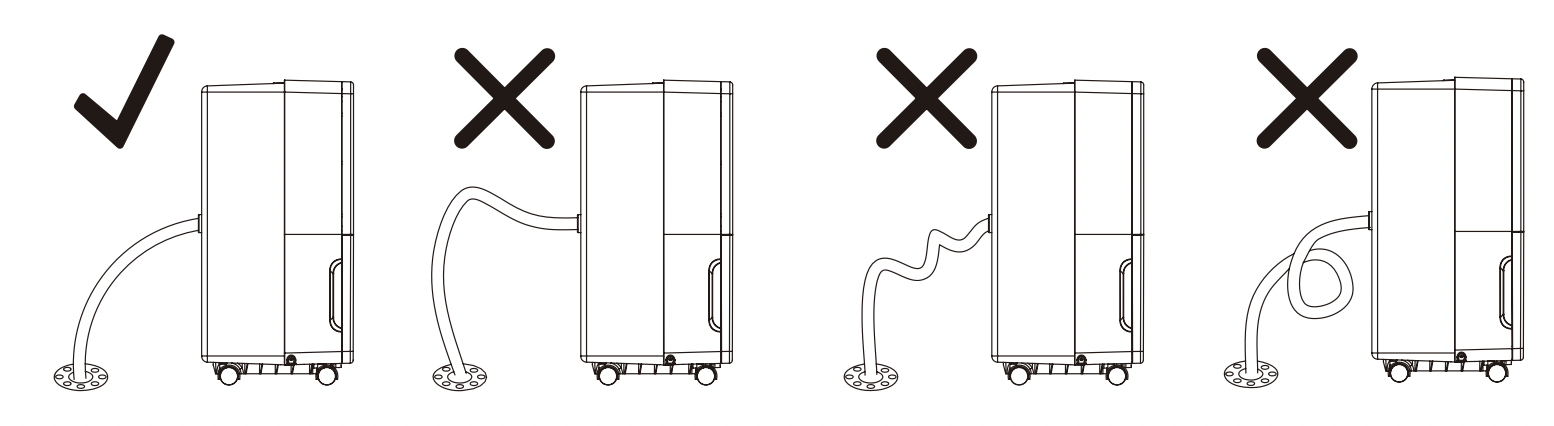
- Thread a garden hose (not supplied) onto the accessible nozzle, lead to a floor drain and cut to length. Make sure that there are no kinks or knots in the garden hose. (See next page for image)
- Turn on the unit and press the MODE button until its set to CONTINUOUS.
Garden Hose Installation Reference Guide
IMPORTANT NOTES: Placing the dehumidifier on an uneven surface or improper hose installation may result in water filling up the bucket and causing the unit to shut off. Empty bucket if shut-off occurs, then check dehumidifier location and hose for proper setup. The bucket must be in place and securely seated for the dehumidifier to operate.
MAINTENANCE
Note: Make sure power is off and the power cord is not plugged into an electrical outlet prior to performing any maintenance on the unit.
Clean or Replace Filter-Refer to the Clean Filter section of the Operating Instructions.
Clean the Unit Housing
- Keep the unit from being exposed directly to the sun to prevent color fading.
- Clean the surface with a damp cloth and dry it with a soft towel.
Storing the Unit for an Extended Period of Time or Transporting the Unit
- Clean or replace filter - Refer to the Clean Filter section of the Operating Instructions.
- Unplug the unit.
- Empty any excess water.
- The unit should be stored in a cool, dry place.
TROUBLESHOOTING
BEFORE CALLING FOR SERVICE
Before you call for service, review this list. It may save you time and expense.This list includes common occurrences that are not the result of a defect in workmanship or materials.
| Problem |
Possible Causes |
Solutions
|
| Dehumidifier does not start |
- The dehumidifier is unplugged.
- The fuse is blown/circuit breaker is tripped.
- Dehumidifier has reached its present level or the bucket is full.
- Bucket is not in the proper position.
- Power failure.
|
- Make sure the dehumidifier's plug is pushed completely into the outlet.
- Check the house fuse/circuit breaker box and replace house fuse or reset breaker
- The dehumidifier automatically turns off when either condition occurs. Change to a lower setting or empty the water bucket and the bucket must be replaced properly for the dehumidifier to operate.
- The bucket must be replaced properly for the dehumidifier to operate. Check to make sure the pump arm is locked in position and not hindering the bucket from being replaced.
- There is a protective time delay (up to 3 min.) to prevent tripping of the compressor overload. For this reason, the unit may not start normal dehumidification for 3 min. after it is powered back on.
|
| Dehumidifier does not dry the air as it should |
- Not enough time allowed for unit to remove moisture.
- Airflow is restricted.
- Dirty filter.
- The Humidity Control may not be set low enough.
- Doors and windows may not be closed tightly.
- Clothes dryer may be blowing moist air into the room.
- Room temperature is too low.
|
- When first installed, allow at least 24 hours to reach the desired dryness/humidity level.
- Make sure there are no curtains, blinds, or furniture blocking the front or back of the dehumidifier. See the CHOOSING A LOCATION section.
- See the CLEAN FILTER section.
- For drier air, press the
 to lower the humidity setting percentage in the room set the dehumidifier to CO for maximum dehumidification. to lower the humidity setting percentage in the room set the dehumidifier to CO for maximum dehumidification.
- Check that all doors, windows, and other openings are securely closed.
- Install the dehumidifier away from the dryer.
The dryer should be vented outside.
- Moisture removal is best at higher room temperatures. Lower room temperatures will reduce the moisture removal rate. This model is designed to operate at temperatures above 41F (5℃).
|
| Dehumidifier runs too much |
- The area to be dehumidified is too large.
- Doors and windows are open.
|
- The capacity of your dehumidifier may not be adequate for the room size.
- Close all doors and windows to the outside.
|
| Frost appears on the coils |
- The dehumidifier has recently been turned on or the room temperature is below 41°F (5℃).
|
- This is normal. Frost will usually disappear within 60 minutes.
|
| Controls cannot be set |
- The compressor will turn off and the fan will automatically continue to run for approximately 3 minutes at a fixed setting.
- Air is moving through the unit.
|
- This is normal. Wait approximately 3 minutes and set the fan speed to the desired level.
- This is normal.
|
| Water on the floor |
- Hose connection may be loose.
- Hose is attached but not draining.
|
- Check the hose connection. See the CONTINUOUS MODE - GARDEN HOSE INSTALLATION AND SET UP Section.
- Disconnect the hose if using the bucket or place the hose near a drain.
|
ERROR CODE
| Error Code |
Description
|
| EH |
Humidity Sensor Fault
|
| E1 or E2 |
Temperature Sensor Fault
|
| E3 |
E3 - potential system leak - Check NOTE below
|
NOTE:
- If E3 appears, please check the if the air temperature in the room is below 89.6°F.
- If the ambient temperature is over 89.6°F, place the unit in a room below that temperature (below 86°F) for at least two hours before running the dehumidifier again.
- Start up the unit. If E3 appears again within the next 2 hours, please contact customer service.