USE & CARE GUIDE
GUIDE
D’UTILISATION
ET D’ENTRETIEN
MANUAL DE USO
Y CUIDADO
Model/Modele/Modelo
T18IF905SP
T24IF905SP
T30IF905SP
T36IF905SP
Freezer
Congélateur
Congelador

en-us
2
en Table of contents
en I ns t r uc t i o n manual
( Important safety instructions . . . . . . . . . . . . 4
Definitions . . . . . . . . . . . . . . . . . . . . . . . . . . . . . . . . 4
About these instructions . . . . . . . . . . . . . . . . . . . . . 4
Introduction . . . . . . . . . . . . . . . . . . . . . . . . . . . . . . . 4
Restriction of user group. . . . . . . . . . . . . . . . . . . . . 4
Risk of explosion. . . . . . . . . . . . . . . . . . . . . . . . . . . 4
Risk of electric shock . . . . . . . . . . . . . . . . . . . . . . . 5
Risk of cold burns . . . . . . . . . . . . . . . . . . . . . . . . . . 5
Risk of injury . . . . . . . . . . . . . . . . . . . . . . . . . . . . . .5
Fire hazard/Danger due to refrigerants . . . . . . . . . . 5
Risk of fire . . . . . . . . . . . . . . . . . . . . . . . . . . . . . . . . 5
Risk of suffocation. . . . . . . . . . . . . . . . . . . . . . . . . . 6
Damage . . . . . . . . . . . . . . . . . . . . . . . . . . . . . . . . . 6
Weight . . . . . . . . . . . . . . . . . . . . . . . . . . . . . . . . . . . 6
State of California Proposition 65 Warnings . . . . . . 6
8 Intended use . . . . . . . . . . . . . . . . . . . . . . . . . . 7
7 Environmental protection . . . . . . . . . . . . . . . 7
Packaging . . . . . . . . . . . . . . . . . . . . . . . . . . . . . . . . 7
Old appliances . . . . . . . . . . . . . . . . . . . . . . . . . . . . 7
5 Installation and connection . . . . . . . . . . . . . . 7
Contents of package. . . . . . . . . . . . . . . . . . . . . . . . 7
Technical data. . . . . . . . . . . . . . . . . . . . . . . . . . . . . 7
Installing the appliance . . . . . . . . . . . . . . . . . . . . . . 7
Check built-in cut-out. . . . . . . . . . . . . . . . . . . . . . . . 7
Side-by-side installation . . . . . . . . . . . . . . . . . . . . . . 7
Saving energy . . . . . . . . . . . . . . . . . . . . . . . . . . . . . 8
Before using for the first time . . . . . . . . . . . . . . . . . 9
Water connection . . . . . . . . . . . . . . . . . . . . . . . . . .9
Electrical connection . . . . . . . . . . . . . . . . . . . . . . . . 9
* Getting to know your appliance . . . . . . . . . 10
Appliance . . . . . . . . . . . . . . . . . . . . . . . . . . . . . . . 10
Operating controls. . . . . . . . . . . . . . . . . . . . . . . . .11
Equipment . . . . . . . . . . . . . . . . . . . . . . . . . . . . . . . 12
1 Operating the appliance . . . . . . . . . . . . . . . . 15
Switching the appliance on . . . . . . . . . . . . . . . . . . 15
Switching off and disconnecting the
appliance. . . . . . . . . . . . . . . . . . . . . . . . . . . . . . . . 15
Setting the language . . . . . . . . . . . . . . . . . . . . . . . 15
Setting the temperature unit . . . . . . . . . . . . . . . . .15
Setting the temperature. . . . . . . . . . . . . . . . . . . . .15
Super freezing . . . . . . . . . . . . . . . . . . . . . . . . . . . . 15
Clean lock . . . . . . . . . . . . . . . . . . . . . . . . . . . . . . .16
Switching ice cube production on or off . . . . . . . .16
Reset water filter counter. . . . . . . . . . . . . . . . . . . . 16
Eco mode . . . . . . . . . . . . . . . . . . . . . . . . . . . . . . .16
Self-test . . . . . . . . . . . . . . . . . . . . . . . . . . . . . . . . .16
Setting the brightness of the control panel . . . . . .16
Switching key press sound on or off . . . . . . . . . . . 17
Setting the key volume . . . . . . . . . . . . . . . . . . . . . 17
Setting the signal tone volume . . . . . . . . . . . . . . . 17
Automatic clean lock . . . . . . . . . . . . . . . . . . . . . . 17
Automatic door opening . . . . . . . . . . . . . . . . . . . . 17
Switching the water filter counter on and off. . . . . 18
Theater mode . . . . . . . . . . . . . . . . . . . . . . . . . . . . 18
Resetting to the factory settings . . . . . . . . . . . . . . 18
Switching demo mode on or off . . . . . . . . . . . . . . 18
Sabbath mode . . . . . . . . . . . . . . . . . . . . . . . . . . . 18
Home network . . . . . . . . . . . . . . . . . . . . . . . . . . . 18
M Alarm. . . . . . . . . . . . . . . . . . . . . . . . . . . . . . . 19
Door alarm . . . . . . . . . . . . . . . . . . . . . . . . . . . . . . 19
Temperature alarm . . . . . . . . . . . . . . . . . . . . . . . . 19
o Home Connect. . . . . . . . . . . . . . . . . . . . . . . . 20
Setting up a home network. . . . . . . . . . . . . . . . . . 20
Connecting the refrigerator to the
Home Connect app . . . . . . . . . . . . . . . . . . . . . . . 20
Installing updates for the Home
Connect software . . . . . . . . . . . . . . . . . . . . . . . . . 21
Customer Service access. . . . . . . . . . . . . . . . . . . 21
Deleting network settings . . . . . . . . . . . . . . . . . . . 21
Switch on or off the connection to the home
WLAN network (Wi-Fi). . . . . . . . . . . . . . . . . . . . . . 21
Information on data protection . . . . . . . . . . . . . . . 21
W Freezer compartment. . . . . . . . . . . . . . . . . . 22
Fully utilizing the freezer volume. . . . . . . . . . . . . . 22
Purchasing frozen food. . . . . . . . . . . . . . . . . . . . . 22
When loading products . . . . . . . . . . . . . . . . . . . . 22
Freezing fresh food. . . . . . . . . . . . . . . . . . . . . . . . 22
Thawing frozen food . . . . . . . . . . . . . . . . . . . . . . . 23
= Defrosting . . . . . . . . . . . . . . . . . . . . . . . . . . . 23
Freezer compartment . . . . . . . . . . . . . . . . . . . . . . 23
D Cleaning . . . . . . . . . . . . . . . . . . . . . . . . . . . . 23
Cleaning the display . . . . . . . . . . . . . . . . . . . . . . . 23
Cleaning the appliance interior. . . . . . . . . . . . . . . 23
Cleaning the equipment . . . . . . . . . . . . . . . . . . . . 23
Care instructions for stainless steel surfaces . . . . 23
> Noises . . . . . . . . . . . . . . . . . . . . . . . . . . . . . . 24
Normal noises . . . . . . . . . . . . . . . . . . . . . . . . . . . 24
Preventing noises . . . . . . . . . . . . . . . . . . . . . . . . . 24
9 Lighting. . . . . . . . . . . . . . . . . . . . . . . . . . . . . 24
3 Faults – what to do? . . . . . . . . . . . . . . . . . . 25
Appliance . . . . . . . . . . . . . . . . . . . . . . . . . . . . . . . 25
Ice maker . . . . . . . . . . . . . . . . . . . . . . . . . . . . . . . 26

9 Important safety instructions
READ INSTRUCTIONS - DO NOT DISCARD!
en-us Important safety instructions
4
(Important safety instructions
Impor t ant saf et y i nst r uct i ons
READ INSTRUCTIONS - DO NOT DISCARD!
Definitions
9 WARNING
Non-observance of this warning could
result in death or serious injuries.
9 CAUTION
Non-observance of this warning could
result in slight or moderately serious
injuries.
NOTICE: Non-observance of this
information could damage the appliance.
Note: This indicates important information
and/or tips.
About these instructions
■ Read and follow the operating and
installation instructions. They contain
important information on how to install,
use and maintain the appliance.
■ The manufacturer is not liable if you
disregard the instructions and warnings
in the operating and installation
instructions.
■ Retain all documents for subsequent use
or for the next owner.
Introduction
■ This appliance complies with the relevant
safety regulations for electrical
appliances.
■ The refrigeration circuit has been
checked for leaks.
Restriction of user group
■ Avoid placing children and vulnerable
persons at risk.
■ This appliance may be used by children
and persons who have reduced physical,
sensory or mental abilities or inadequate
experience and/or knowledge, provided
they are supervised or have been
instructed on how to use the appliance
safely and have understood the resulting
dangers.
■ Children should be supervised to ensure
that they do not play with the appliance.
Risk of explosion
■ If the appliance's ventilation openings are
sealed, a leak in the refrigeration circuit
may result in a flammable mixture of gas
and air.
Keep ventilation openings in the
appliance enclosure or in the built-in
structure clear of obstruction.
■ Never use electric devices inside the
appliance (e.g. heaters or electric ice
makers).
■ Do not store products which contain
flammable propellants (e.g. spray cans)
or explosive substances in the appliance.
■ Only store high-proof alcohol tightly
closed and upright.
■ Do not use additional means to
accelerate the defrosting process other
than those recommended by the
manufacturer.
9 Important safety instructions
READ INSTRUCTIONS - DO NOT DISCARD!
Important safety instructions en-us
5
Risk of electric shock
Improper installations or repairs may put the
user at considerable risk.
■ When installing the appliance, make sure
that the power cord does not get jammed
or damaged.
■ In order to avoid danger, if the power
cord is damaged, disconnect the
appliance from the power source
immediately. Have the power cord
replaced by the manufacturer, customer
service or a similarly qualified person.
■ Do not use multiple outlets, extension
cords, or adapters.
■ Before servicing the appliance or
carrying out installation work, disconnect
the appliance from the power source or
switch off the fuse.
Before cleaning the appliance, press the
main On/Off switch to switch the
appliance off.
Glass shelves and other fittings can be
moved without any risk while the
appliance is switched on.
■ Never cut through or remove the power
cord's third conductor (grounding
conductor).
■ Never defrost or clean the appliance
using a steam cleaner. The steam may
penetrate electrical parts and cause a
short circuit.
■ The appliance, cord and accessories
should only be repaired or replaced by
the manufacturer or an authorized
service provider.
■ Only use original parts supplied by the
manufacturer.
These parts come with a warranty from
the manufacturer that they satisfy the
safety requirements.
Risk of cold burns
■ Never put frozen food straight from the
freezer compartment into your mouth.
■ Avoid prolonged skin contact with frozen
food, ice or any other surface inside the
freezer compartment.
Risk of injury
■ Containers with carbonated drinks may
burst.
■ Do not store containers which contain
carbonated drinks in the freezer
compartment.
Fire hazard/Danger due to
refrigerants
The tubes of the refrigeration circuit contain
a small quantity of an environmentally
friendly but flammable refrigerant (R600a).
It does not damage the ozone layer and
does not add to the greenhouse effect. If
the refrigerant escapes, it may injure your
eyes or ignite.
■ Do not damage the tubes.
If the tubes are damaged:
■ Keep naked flames and ignition sources
away from the appliance.
■ Ventilate the room.
■ Switch off the appliance and unplug the
mains plug.
■ Please contact customer service.
Risk of fire
Portable multi-outlet power strips and
portable power supplies may overheat,
causing a fire.
■ Never leave portable multi-outlet power
strips or portable power supplies behind
the appliance.
9 Important safety instructions
READ INSTRUCTIONS - DO NOT DISCARD!
en-us Important safety instructions
6
Risk of suffocation
■ If the appliance features a door lock:
keep the key out of the reach of children.
■ Keep children away from the packaging
and its parts.
Damage
To avoid damage:
■ Do not stand or lean on the base,
runners or doors.
■ Keep plastic parts and door seals free of
oil and grease.
■ Pull the power plug – not the power cord.
Weight
The appliance is very heavy. The appliance
should always be transported and set up by
at least 2 people.
~ "Installing the appliance" on page 7
State of California Proposition 65
Warnings
This product may contain a chemical known
to the State of California, which can cause
cancer or reproductive harm. Therefore, the
packaging of your product may bear the
following label as required by California:

Intended use en-us
7
8Intended use
Intended us e
Use this appliance
■ only for freezing food and making ice.
■ only in the home and in the home environment.
■ only according to these operating instructions.
This appliance is intended for use at an elevation of
no more than 2000 meters above sea level.
7Environmental protection
En v i r o n ment al pr ot ec t i on
Packaging
All materials are environmentally safe and
recyclable:
■ Dispose of packaging in an environmentally
responsible manner.
■ Please ask your dealer or inquire at your local
authority about current means of disposal.
Old appliances
Valuable raw materials can be reclaimed by
recycling old appliances.
9 WARNING
CHILDREN MAY BECOME LOCKED IN THE
APPLIANCE AND SUFFOCATE!
Before disposing of your old appliance:
■ Remove the door.
■ Leave shelves and bins in the appliance to
prevent children from climbing in.
■ Keep children away from the discarded
appliance.
9 CAUTION
REFRIGERANT AND HARMFUL GASES MAY
ESCAPE.
Do not damage the tubes of the refrigeration
circuit and insulation.
1. Pull out the power plug.
2. Cut through the power cord.
3. Have the appliance disposed of properly.
5 Installation and
connection
Inst all ati on and connect i on
Contents of package
After unpacking all parts, check for any damage
during transport.
If you have any complaints, please contact the
dealer from whom you purchased the appliance or
our customer service.
~ "Customer service" on page 27
The delivery consists of the following parts:
■ Built-in appliance
■ Equipment (depending on model)
■ Installation material
■ Instruction manual
■ Installation instructions
■ Customer service booklet
■ Warranty enclosure
■ Information on the energy consumption and
noises
Technical data
Refrigerant, cubic capacity and further technical
specifications can be found on the rating plate.
~ "Getting to know your appliance" on page 10
Installing the appliance
Installation location
The weight of the appliance may be up to 460 kg
depending on the model. The base must be
sufficiently stable and should not give. If necessary,
reinforce the floor.
Check built-in cut-out
The cut-out must fulfill these criteria:
■ Anti-tilt bracket must be fitted
■ Cut-out depth min. 24” (610 mm), for flush
installation 25” (635 mm)
■ rectangular
■ stable – the side panels and the top must be min.
5/8" (16 mm) thick and securely attached to the
floor or wall
■ Depth of shortest side panels min. 4” (100 mm)
Side-by-side installation
Observe the specifications in the installation
instructions for a side-by-side installation.
If a partition wall is required between the appliances
it must be at least 5/8" (16 mm) wide.

en-us Installation and connection
8
Saving energy
If you follow the instructions below, your appliance will use less power.
Note:
The arrangement of the equipment does not affect the energy consumption of the appliance.
--------
Installing the appliance
Keep the appliance out of direct sunlight. The appliance needs to cool less frequently at low ambient tempera-
tures and therefore consumes less power.
Install the appliance as far away as possible from heating elements,
cooker and other heat sources:
At least 1¼” (3 cm) from electric or gas cookers.
At least 11¾" (30 cm) from oil or solid-fuel cookers.
Select an installation location at a room temperature of approx. 68 °F
(20 °C).
Do not cover or block the ventilation openings. The appliance needs to cool less frequently if the warm air can
escape and therefore consumes less power.
Ventilate the room daily.
Using the appliance
Open the appliance door only briefly. The air in the appliance does not warm up so intensely. The appliance
needs to cool less frequently and therefore consumes less power.
Transport purchased food in a cool bag and place in the appliance
quickly.
Allow warm food and drink to cool down before placing in the appli-
ance.
Thaw frozen food in the refrigerator compartment to utilize the low
temperature of the frozen food.
Always leave a space between the food and the back panel. The air can circulate and the humidity will remain constant.The appli-
ance needs to cool less frequently and therefore consumes less
power.
Pack food airtight.
Do not cover or block the ventilation openings. The appliance consumes less power if the warm air can escape.
Vacuum the ventilation openings once a year.

Installation and connection en-us
9
Before using for the first time
1. Remove information material, adhesive tape and
protective foil.
2. Clean the appliance.
~ "Cleaning" on page 23
Water connection
9 CAUTION
■ Installation and connection of the appliance
must be carried out by authorized technicians
according to the installation instructions
supplied.
■ To avoid damage to the appliance and to
ensure its proper functioning, it should only be
connected to a drinking water system.
■ To avoid water damage, a shut-off valve must
be installed.
Water pressure of drinking water system
9 CAUTION
To avoid damage to the appliance, a pressure
relief valve must be installed between the
drinking water connection and the tubing,
should the water pressure exceed the
maximum value.
Note: If the water pressure is too low, this will impair
the relevant functions of the appliance.
■ Min. 0.2 Mpa (2 bar / 29 psi)
■ Max. 0.8 Mpa (8 bar / 116 psi)
Electrical connection
9 CAUTION
Do not connect the appliance to electronic
energy saver plugs.
Note: You can connect the appliance to mains-
controlled and sine-controlled inverters.
Mains-controlled inverters are used for photovoltaic
systems which are connected directly to the national
grid. Sine-controlled inverters must be used for
isolated applications. Isolated applications, e.g. on
ships or in mountain lodges, are not directly
connected to the national grid.
1. After installing the appliance, wait at least 1 hour
before connecting it to prevent damaging the
compressor.
2. Check that the outlet was installed according to
the regulations and complies with the
requirements.
Requirements for outlets
Maximum simultaneous load
3. Connect the appliance to an outlet near the
appliance.
The outlet must also be freely accessible
following installation of the appliance.
If free access is impossible, an all-pole isolating
switch must be integrated into the permanent
electrical installation according to the installation
regulations.
9 WARNING
RISK OF ELECTRIC SHOCK!
Never use multiple outlets, extension cords
or adapters.
The appliance must be grounded correctly.
Never cut through or remove the power
cord's third conductor (grounding
conductor).
9 WARNING
RISK OF ELECTRIC SHOCK!
If the power cord is too short, never use
multiple outlets or extension cords. Instead,
please contact customer service.
Outlet with 110 V ... 120 V
Protective conductor60 Hz
Fuse 10 A ... 16 A
Appliance 6 A

en-us Getting to know your appliance
10
*Getting to know your
appliance
Get t i ng to know your appl i ance
Appliance
6XSHU)UHH]H
@
6HWWLQJV
+
3
;
K
C
-
( ... H Operating controls
P Main On/Off switch
X Door damper
` Ice maker
h Rating plate
)" Ice cube bin
)* Frozen food container
)2 Ventilation opening
): Automatic door opening
)J Water filter
Getting to know your appliance en-us
11
Operating controls
Settings menu
Press " button to open the menu.
In the Settings menu you will find:
■ Appliance settings
■ Clean lock
■ Ice cube production
■ Water filter counter
■ Eco mode
■ Self-test
■ Sabbath mode (if activated)
~ "Operating the appliance" on page 15
Appliance settings menu
This is how to navigate to the Appliance settings
menu:
1. Press " button.
2. Use ( button to move to the Appliance settings
menu.
3. Open the menu using 8 button.
In the Appliance settings menu you will find the
following sub-menus and setting options:
■ Brightness
■ Key press sound
■ Key volume
■ Signal tone volume
■ Automatic clean lock
■ Automatic door opening
■ Water filter counter
■ Theater mode
■ Temperature unit
■ Language
■ Home network
■ Factory settings
■ Demo mode
■ Sabbath mode
~ "Operating the appliance" on page 15
( Touch fields
There are sensors under the touch fields.
Touching the symbol calls up the respective
function.
0 Freezer compartment temperature display
Indicates the set temperature in °C/°F.
8 A/@ buttons
Used to change the temperature.
@ " button
Opens the Settings menu.
~ "Settings menu" on page 11
H Super Freeze button
Switches Super Freeze on or off.
6XSHU)UHH]H
C
²
6H W WLQJV
#
+
en-us Getting to know your appliance
12
Equipment
(not all models)
Storage compartment
You can remove and adjust the height of the storage
compartments:
1. Lift up the storage compartment and remove.
2. When re-inserting, insert hooks on back of
storage compartment at same height to make it
level.
Note: Insert the storage compartment carefully to
avoid scratching the appliance.
Shelf
You can remove and adjust the shelf:
1. Lift shelf and remove.
2. When re-inserting, insert hooks on back of shelf
at same height to make it level.
Note: Insert shelf carefully to avoid scratching the
appliance.
Container
You can remove the container:
■ Press container to the rear,
■ lift the container at the rear and remove.
You can insert the bin:
■ Pull out the telescopic rails all the way.
■ Place the bin on the telescopic rails and push into
the appliance until it engages.

Getting to know your appliance en-us
13
Ice cube bin
Note: To avoid damaging the ice cube container,
always empty it if you switch the appliance off for a
prolonged period or if there is a power failure.
This is how to remove the ice cube container:
1. Take out the frozen food container.
Note: If the door opening angle is 90°, you will find it
easier to access the ice cube container by first
removing the frozen food container.
~ "Container" on page 12
2. Lift the ice cube container at the rear and remove.
This is how to re-insert the ice cube container:
1. Take out the frozen food container.
2. Insert the ice cube container in the recess of the
frozen food container provided for this purpose.
Ice pack
In the event of a power failure or a fault:
■ The ice pack delays the warming of stored frozen
food.
You can take out the ice pack to temporarily keep
food cool, e.g. in a cool bag.
Ice maker
9 CAUTION
DAMAGE TO THE APPLIANCE!
Never store bottles or food in the ice cube
container, even for short periods. This can
block and damage the ice maker.
Ice cube production starts as soon as the appliance
has reached the set temperature.
Notes
■ Ice cube production stops automatically when the
ice cube container is full.
■ When using the appliance for the first time,
discard ice cubes produced within the first
24 hours for hygiene reasons.
■ If you have stopped ice cube production for
several days, discard the first 30-40 ice cubes
produced for hygiene reasons.
Information about switching ice cube production on
and off
~ "Switching ice cube production on or off"
on page 16
en-us Getting to know your appliance
14
Water filter
Change the water filter after 6 months at the latest.
If the ice tastes stale, discard the rest of the ice
cubes and the ones produced over the next
24 hours. If the ice still tastes stale, change the
water filter.
Note: If you use an external water filter system, you
can also operate the appliance without a water
filter.Replace the water filter with a bypass cartridge.
Switch off the water filter counter. There is no need
to change the bypass cartridge.
A new water filter or bypass cartridge can be
obtained from customer service or a specialist
dealer.
Exchange water filter or replace with bypass
cartridge
You can change the water filter, or replace it with a
bypass cartridge. The bypass cartridge can remain
in the appliance permanently: it does not need to be
changed.
Note: After installing a water filter or a bypass
cartridge, discard all ice cubes produced over the
first 24 hours.
1. Turn the cap of the water filter counter-clockwise.
2. Take the water filter out.
3. Remove the protective cap of the new water filter
or the new bypass cartridge.
4. Take off the cap of the used water filter and put it
on the new water filter or bypass cartridge.
5. Slide the new water filter or bypass cartridge to
the stop in the filter opening.
Note: The cap must be vertical here.
6. Turn the water filter or bypass cartridge clockwise
to the mark.
Note: If you do not turn the water filter or bypass
cartridge far enough, damage will be caused by
escaping water.
7. When installing a water filter: reset water filter
counter.
When installing a bypass cartridge: switch off
water filter counter.
8. Discard ice cubes produced over the first
24 hours.
9. Drain the water out of the used water filter.
Note: You can dispose of the used water filter with
your household garbage.

Operating the appliance en-us
15
1Operating the appliance
Oper at i ng the appl i ance
Switching the appliance on
1. Press the main On/Off switch.
The appliance starts cooling and the light is
switched on when the door is open.
2. Set the required temperature.
~ "Setting the temperature" on page 15
Operating tips
■ When the appliance has been switched on, it may
take several hours until the set temperatures have
been reached. Do not put in any food until the
selected temperature has been reached.
■ The fully automatic NoFrost system ensures that
the freezer compartment remains frost-free.
Defrosting is not required.
■ The front sides of the housing are partly heated
slightly. This prevents condensation in the area
of the door seal.
■ If the freezer compartment door cannot be
immediately re-opened after it has been closed,
wait until the resulting low pressure has
equalized.
Switching off and disconnecting the
appliance
Switching off the appliance
■ Press the main On/Off switch.
The appliance is no longer cooling.
Disconnecting the appliance
9 CAUTION
Deterioration in water quality
The water supply must be turned off 3 hours
before disconnecting. This prevents mold
forming with any unused water.
If you do not use the appliance for a prolonged
period:
1. Turn off the water supply to the appliance and
wait 3 hours.
2. Remove groceries.
3. Press the main On/Off switch.
4. Pull out the mains plug or switch off the fuse.
The appliance is no longer cooling.
5. Empty the ice cube container and clean the
appliance.
~ "Cleaning" on page 23
6. Leave appliance open.
Setting the language
1. Press " button to open the Settings menu.
2. Use ( button to move to the menu item Appliance
settings.
3. Press 8 button.
4. Press ( button to move to the menu item
Language.
5. Press : button.
6. Use ( ) buttons to move to the required language.
7. Press 8 button.
The display restarts, and the start screen is
displayed.
Setting the temperature unit
You can choose between the unit °C and °F.
1 ° means 1 °F
1 °C means 1 °C
1. Press " button to open the Settings menu.
2. Use ( button to move to the menu item Appliance
settings.
3. Press 8 button.
4. Use ( button to move to the menu
item Temperature unit.
5. Press : button.
6. Use ( ) buttons to move to the required unit.
7. Press 8 button.
The unit will be changed.
8. Press ; button to exit the menu.
Setting the temperature
Recommended temperature
Freezer compartment
■ Keep pressing @/A button until the display
indicates the required temperature.
Super freezing
Super freezing cools the freezer compartment as
cold as possible.
Switch on super freezing, e.g.:
■ to quickly freeze food right through to the center
■ 4 ... 6 hours before freezing food weighing 2 kg
or more
Note: When super freezing is switched on, increased
operating noise may occur.
After approx. 2 ^ days the appliance switches to
normal operation.
Switching super freezing on or off
■ Press ]/\ button.
Freezer compartment: 0 °F (-18 °C)
en-us Operating the appliance
16
Clean lock
You can use this function to switch off the touch
function of the controls for 10 seconds. During this
time you can clean the display.
~ "Cleaning the display" on page 23
1. Press " button to open the Settings menu.
2. Press < button.
The cleaning display appears, and the countdown
starts.
Automatic clean lock
You can use this function to select whether the
automatic clean lock is switched on automatically
when the door is opened.
1. Press " button to open the Settings menu.
2. Use ( button to move to the menu item Appliance
settings.
3. Press 8 button.
4. Press ) button to move to the menu
item Automatic clean lock.
5. To change the setting, press : button.
Switching ice cube production on or off
9 CAUTION
Damage to the appliance!
Never store bottles or food in the ice cube
container, even for short periods. This can
block and damage the ice maker.
Ice cube production starts as soon as the appliance
has reached the set temperature.
Note: Ice cube production stops automatically when
the ice cube container is full.
Switching ice maker on or off
1. Press " button to open the Settings menu.
2. Use ) button to move to the menu item Ice cube
production.
3. Press </= button.
Reset water filter counter
After replacing the water filter, you have to reset the
water filter counter.
1. Press " button to open the Settings menu.
2. Use ) button to move to the menu item Reset
water filter counter.
3. Use 8 button to confirm, and confirm the query
again with 8 button.
Note: If you cancel the query or take longer than
10 seconds to make an input, the water filter counter
will not be reset.
Switching the water filter counter on and off
If you have replaced the water filter with a particle
filter, switch the water filter counter off. It is not
needed in this case as the particle filter does not
have to be replaced.
1. Press " button to open the Settings menu.
2. Use ( button to move to the Appliance settings
menu.
3. Press 8 button.
4. Press ) button to move to the menu item Water
filter counter.
5. To change the setting, press : button.
Eco mode
Eco mode switches the appliance to energy-saving
operation.
The appliance automatically sets the following
temperatures:
■ Freezer compartment: +3 °F (-16 °C)
Switching Eco mode on or off
1. Press " button to open the Settings menu.
2. Press ) button to move to the menu item Eco
mode.
3. Press </= button.
The temperature is changed and the display shows
the new temperature. When Eco mode is switched
off, the recommended temperature is set.
Note: You can also switch Eco mode on or off by
adjusting the temperature with A/@ buttons.
Self-test
This function can be used to start fault analysis on
your appliance.
~ "Appliance self-test" on page 27
Setting the brightness of the control panel
1. Press " button to open the Settings menu.
2. Use ( button to move to the menu item Appliance
settings.
3. Press 8 button.
4. Press : button to open the menu
item Brightness.
5. Press ( ) buttons to set the required brightness.
6. Press 8 button.
The setting is saved.
7. Press ; button to exit the menu.

Operating the appliance en-us
17
Switching key press sound on or off
You can switch the sounds generated when pressing
keys off and back on again.
1. Press " button to open the Settings menu.
2. Use ( button to move to the menu item Appliance
settings.
3. Press 8 button to open the menu item.
4. Press ) button to move to the menu item Key
press sound.
5. Press : button to open the menu item.
6. Use ( ) buttons to select the required setting.
7. Press 8 button.
The setting is saved.
8. Press ; button to exit the menu.
Setting the key volume
You can adjust the volume level of the sounds
generated when pressing keys.
1. Press " button to open the Settings menu.
2. Use ( button to move to the menu item Appliance
settings.
3. Press 8 button to open the menu item.
4. Use ) button to move to the menu item Key
volume.
5. Press : button to open the menu item.
6. Use ( ) buttons to select the required setting.
7. Press 8 button.
The setting is saved.
8. Press ; button to exit the menu.
Setting the signal tone volume
You can adjust the volume level of the signal tones
generated e.g. with alarms.
1. Press " button to open the Settings menu.
2. Use ( button to move to the menu item Appliance
settings.
3. Press 8 button to open the menu item.
4. Use ) button to move to the menu item Signal
tone volume.
5. Press : button to open the menu item.
6. Use ( ) buttons to select the required setting.
7. Press 8 button.
The setting is saved.
8. Press ; button to exit the menu.
Automatic clean lock
You can use this function to select whether the
automatic clean lock is switched on automatically
when the door is opened.
1. Press " button to open the Settings menu.
2. Use ( button to move to the menu item Appliance
settings.
3. Press 8 button.
4. Press ) button to move to the menu
item Automatic clean lock.
5. To change the setting, press : button.
Automatic door opening
The automatic door opening function supports you in
opening the door.
As soon as you activate this function, automatic door
opening moves out and supports you in opening the
door.
9 CAUTION
Repeatedly closing the door too early will cause
automatic door opening to fail or wear out.
Do not close the door as long as automatic
door opening is still moved out.
If you have nevertheless closed the door, leave
it closed for 5 minutes. Automatic door opening
will re-adjust itself.
Open menu item Auto door opening:
1. Press " button to open the main menu.
2. Use ( button to move to the Appliance settings
menu.
3. Press 8 button to open the menu.
4. Press ) button to move the menu item Auto door
opening.
5. To change the setting, press : button.
Switching on Push-to-open system
In an installation situation without handles you can
select the Push-to-open system. Your appliance will
then open a crack if you press lightly on the door.
Note: Please note that automatic door opening is
disabled if Sabbath mode is activated.
1. Open menu item Auto door opening.
2. Select menu item Push-to-open system.
3. Press 8 button to open the menu item.
4. Select Opening force.Here you can select the
level of force required to activate automatic door
opening.
5. Select Opening duration.Here you can select
how long the door should remain open a crack
before it closes again automatically.
Note: If the door only remains open a crack, the
appliance checks once a second whether the door
is still ajar.After the selected opening duration
elapses, the appliance will close the door
automatically.
Switching on Pull-to-open system
In an installation situation with handles you can
select the Pull-to-open system. Your appliance will
support you in opening the door as soon as you pull
on the handle.
1. Open menu item Auto door opening.
2. Select menu item Pull-to-open system.
3. Press 8 button to open the menu item.
4. Select Opening force.Here you can select the
level of force required to activate automatic door
opening.
Switching off automatic door opening
1. Open menu item Auto door opening.
2. Select menu item Off.

en-us Operating the appliance
18
Switching the water filter counter on and
off
If you have replaced the water filter with a particle
filter, switch the water filter counter off. It is not
needed in this case as the particle filter does not
have to be replaced.
1. Press " button to open the Settings menu.
2. Use ( button to move to the Appliance settings
menu.
3. Press 8 button.
4. Press ) button to move to the menu item Water
filter counter.
5. To change the setting, press : button.
Theater mode
If Theater mode is switched on, the light will slowly
become brighter when the appliance is opened, and
then slowly darker when it is closed.
Switching Theater mode on or off
1. Press " button to open the Settings menu.
2. Use ( button to move to the menu item Appliance
settings.
3. Press 8 button to open the menu item.
4. Use ) button to move to the menu item Theater
mode.
5. Press : button to open the menu item.
6. Use ) button to move to the menu item On or Off.
7. Press 8 button.
The setting is saved.
8. Press ; button to exit the menu.
Resetting to the factory settings
1. Press " button to open the Settings menu.
2. Use ( button to move to the menu item Appliance
settings.
3. Press 8 button.
4. Use ( button to move to the menu item Factory
settings.
5. Press : button.
A signal tone sounds, and a prompt to confirm
reset appears.
6. Press 8 button.
All settings are reset to the factory settings.
7. Press ; button to exit the menu.
Switching demo mode on or off
The cooling function of the appliance is switched off.
All other functions can be used.
Note: Do not store any food items in demo mode as
the appliance remains at room temperature.
1. Press " button to open the Settings menu.
2. Use ( button to move to the menu item Appliance
settings.
3. Press 8 button.
4. Use ( button to move to the menu item Demo
mode.
5. Press : button.
6. Use ( ) buttons to select the setting On or Off
7. Press 8 button.
The setting is saved.
8. Press ; button to exit the menu.
Sabbath mode
All non-essential functions are switched off so you
can also use the appliance on the Sabbath.
The appliance switches off the following:
■ Ice maker
■ Audible signals
■ Interior light
■ Messages on the display
■ Background illumination of display is reduced
Switching Sabbath mode on or off
Displaying Sabbath mode in the Settings menu
To use Sabbath mode, you first have to display the
function in the Settings menu:
1. Press " button to open the Settings menu.
2. Use ( button to move to the Appliance settings
menu.
3. Press 8 button.
4. Use ( button to move to the menu item Sabbath
mode.Press : button.
5. Use ( button to move to the menu
item Available.Confirm by pressing 8 button.
6. Press ; button to exit the menu.
The function is added to the Settings menu.
Switching on Sabbath mode
1. Press " button to open the Settings menu.
2. Press › button to open the view Duration
Sabbath mode.
3. Select one of the presettings, or change the
duration with A/@ buttons.
4. Press < button to start.
The appliance switches all listed functions off.
Switching Sabbath mode off
■ After the selected time elapses, the appliance
switches over to normal operation.
■ To end Sabbath mode before the selected time
elapses, press = button.
Home network
You can use this function to establish a connection
between the refrigerator and your mobile device.
~ "Home Connect" on page 20

Alarm en-us
19
MAlarm
Al a r m
Door alarm
If the appliance door is open for a long time, the
door alarm switches on. A message appears on the
control panel.
Switching off the door alarm
■ Close the door.
Note: To mute the door alarm, you only have to
acknowledge the message on the control panel. If
the door remains opens a few more minutes, the
message will appear again.
Temperature alarm
If the freezer compartment becomes too warm, the
temperature alarm is switched on. A message
appears on the control panel. The message shows
the warmest temperature reached in the freezer
compartment.
9 CAUTION
DURING THE THAWING PROCESS, BACTERIA
MAY DEVELOP AND SPOIL THE FROZEN
ITEMS.
Do not refreeze partly or completely thawed
food.
Refreeze food only after cooking. No longer
store the frozen items for the maximum storage
period.
Note: The alarm may be actuated without risk to the
food in the following cases:
■ The appliance is put into service and does not yet
contain any food.
■ Large quantities of fresh food are placed in the
appliance.
■ The freezer compartment door has been open
too long.
Switching off the temperature alarm
1. Check that the cause of the temperature alarm
has been eliminated.
2. Press 8 button to acknowledge the message.
The message disappears. The control panel
again indicates the temperature selected.
From this time on the warmest temperature is
recalculated and saved.

en-us Home Connect
20
o Home Connect
Ho me Connect
This appliance is Wi-Fi-capable and can be
controlled remotely using a mobile device.
Note: Wi-Fi is a registered trade mark of the Wi-Fi
Alliance.
In the following cases, the appliance functions like a
refrigerator without a network connection and can
still be operated manually via the controls:
■ The appliance is not connected to a home
network.
■ The availability of the Home Connect function
depends on the availability of Home Connect
services in your country. Home Connect services
are not available in every country. You can find
more information on www.home-connect.com.
Note: Please observe the safety information in this
instruction manual. Ensure that this is also observed
if you operate the appliance via the Home Connect
app and are not at home when doing so.
~ "Important safety instructions" on page 4
Follow the instructions in the Home Connect app as
well.
Setting up a home network
Notes
■ Wait at least 2 minutes after switching on the
appliance before setting up Home Connect. Only
then is internal appliance initialization complete.
■ Take note of the Home Connect supplementary
sheet, which is supplied with the appliance or is
available for download at www.thermador.com
together with the instructions. Enter the E-number
of your appliance in the search field.
You can connect your appliance to the home WLAN
network (Wi-Fi) in 3 basic steps.
1. Install the app.
2. Connect your refrigerator to the home WLAN
network (Wi-Fi).
3. Connect the refrigerator to the Home Connect
app.
The first time you open the menu, you will be
automatically guided through initial setup. Follow the
instructions on the control panel. For further
information, please also see the following chapters.
The following sub-menus can be found in the Home
network menu:
■ Connection
■ Connect to app
■ Software update
■ Delete network settings
Open Home network menu
1. To open the Settings menu, press the " button.
2. Use ( button to move to the menu item Appliance
settings.
3. Press 8 button.
4. Press ( button to move to the menu item WiFi.
5. Press : button.
Note: The first time you open the menu, you will be
automatically guided through initial setup. Follow the
instructions on the control panel.
Setting up the connection to the home network
The first time you open the menu, you will be
automatically guided through initial setup. Follow the
instructions on the control panel.
1. Install the Home Connect app on your mobile
device.
2. Open the Home network menu on your
refrigerator.
3. Open the app on your mobile device.
4. Log in or register with the app if access is not yet
available.
5. Check the router of your home network to see if a
WPS function is available for automatic
connection.
6. If this function is available, start automatic
network connection with 8 button.
Follow the instructions on the control panel.
7. Start manual network connection if this function is
not available, if you're not sure whether the
function is available, or if automatic network
connection failed.
The refrigerator temporarily generates its own
network for connecting the mobile device.
8. Start manual network connection in the app of
your mobile device.
As soon as the refrigerator is connected to the
mobile device, a connection between the refrigerator
and your home network is established.
Note: If the connection cannot be established, check
whether there is sufficient reception.
~ "Verifying signal strength" on page 20
Verifying signal strength
The signal strength is displayed in the start window
of the Home network menu.The signal strength
should be at least 50 %. If the signal strength is too
weak, the connection may be interrupted.
Improving signal strength
■ Place the router closer to the refrigerator.
■ Check that screening walls do not interfere with
the connection.
■ Install a repeater to make the signal stronger.
Connecting the refrigerator to the
Home Connect app
Use this menu to connect your refrigerator to mobile
terminal devices.
1. Install the Home Connect app on your mobile
terminal device and log in or register.
2. Open the Home network menu on your
refrigerator.
3. Press ) button to move to the menu item Connect
to app.
4. Press : button to open the menu item.

Home Connect en-us
21
5. Confirm the prompt to display the refrigerator in
the app.
6. Open the app and wait until the refrigerator is
displayed.
Press Add to confirm the connection between the
app and the refrigerator.
If the refrigerator is not automatically displayed,
click on Add appliance in the app and follow the
instructions. As soon as your refrigerator is
displayed, add it with +.
7. Follow the instructions in the app until the
process is complete.
Installing updates for the Home
Connect software
The refrigerator checks at regular intervals whether
updates are available for the Home
Connect software.
The Info @ button is visible when an update is
available.
Installing the update:
1. Press @ button.
A note window with the necessary steps for
installing the new software appears.
2. Press 8 button to close the note.
3. Open the Home network menu on your
refrigerator.
4. Press ) button to move to the menu
item Software update.
5. Press : button to open the menu item.
Note: The : button is only visible if an update is
available.
The software is installed.
6. A note appears when installation is complete.
7. Press 8 button to close the note.
Customer Service access
If you contact Customer Service, they can access
your appliance and view its status after you have
given your consent. You need to have your
appliance connected to your home network for this.
Further information about Customer Service access
and its availability in your country is available under
www.home-connect.com in the Help & Support area.
1. Contact Customer Service.
~ "Customer service" on page 27
2. Confirm the start of Customer Service access in
the app.
During Customer Service access the symbol Ù
appears on the control panel.
3. As soon as Customer Service has obtained the
necessary data, they end access.
Note: You can interrupt remote diagnosis early by
switching off Customer Service access in the Home
Connect app.
Deleting network settings
If there is a problem when trying to establish a
connection, or if you would like to register the
appliance in a different home WLAN network (Wi-Fi),
the Home Connect settings can be reset.
1. Open the Home network menu on your
refrigerator.
2. Press ) button to move to the menu item Delete
network settings.
3. Press : button to open the menu item.
4. Confirm the prompt to delete the network
settings.
To then reconnect the appliance to the home WLAN
network (Wi-Fi), perform initial setup again.
~ "Setting up the connection to the home network"
on page 20
Switch on or off the connection to the
home WLAN network (Wi-Fi)
1. Open the WiFi menu on your refrigerator.
~ "Open Home network menu" on page 20
Note: The first time you open the menu, you will be
automatically guided through initial setup. Follow the
instructions on the control panel.
2. To open the menu item, press
Connection : button.
3. Use ( ) buttons to select the required setting.
4. To select the setting, press 8 button.
Note: If you switch off the Home Connect
connection, you will no longer be able to operate the
appliance with your mobile device.
Information on data protection
The first time your Home Connect appliance is
registered on a WLAN home network connected to
the Internet (Wi-Fi), your appliance will transmit the
following types of data to the Home Connect server
(initial registration):
■ Unique appliance identification (consisting of
appliance codes as well as the MAC address of
the installed Wi-Fi communication module).
■ Security certificate of the Wi-Fi communication
module (to ensure a secure data connection).
■ The current software and hardware version of
your domestic appliance.
■ Status of any previous resetting to factory
settings.
This initial registration prepares the
Home Connect functions for use and is only required
when you want to use these
Home Connect functions for the first time.
Note: Please note that the Home Connect functions
can be utilized only in conjunction with the
Home Connect app. Information on data protection
can be called up in the Home Connect app.

en-us Freezer compartment
22
WFreezer compartment
Fr eezer compar t ment
The freezer compartment is suitable for:
■ storing frozen food
■ making ice cubes
■ freezing food
The temperature can be set from -11 °F (-
24 °C)... +7 °F (-14 °C).
The freezer compartment can be used to store
perishable foods long-term almost without any
noticeable reduction in quality, as the low
temperatures considerably slow down or stop
deterioration. Appearance, flavor and all valuable
ingredients are largely retained.
The time between putting fresh food in the freezer
compartment and it freezing solid depends on the
following factors:
■ temperature set
■ type of food
■ amount of food in the freezer compartment
■ quantity and type of storage
Fully utilizing the freezer volume
To place the maximum quantity of frozen food in the
freezer compartment:
■ Remove all fittings.
■ Store food directly on the shelves and on the floor
of the freezer compartment.
Purchasing frozen food
■ Ensure the packaging is not damaged.
■ Check there is a sell-by date.
■ The temperature in the supermarket freezer must
be 0 °F (-18 °C) or lower.
■ Do not interrupt the freezing chain. If possible,
transport frozen food in a cool bag and place in
the freezer compartment quickly.
When loading products
■ Freeze large quantities of food in the top
compartment.
This is where it will freeze especially quickly and
gently.
■ Distribute food in the compartments or frozen
food containers.
■ Do not bring food which is to be frozen into
contact with frozen food.
If required, restack frozen food in the frozen food
containers.
■ Important for unrestricted air circulation in the
appliance:
push in frozen food containers up to the limit
stop.
Freezing fresh food
Freeze only fresh and undamaged food.
Food which is boiled, fried or baked is more suitable
for freezing than food which is eaten raw.
Before freezing food, make preparations appropriate
to the food in order to retain the best possible
nutritional value, flavor and color:
■ Vegetables: wash, chop, blanch.
■ Fruit: wash, pit and perhaps peel, possibly add
sugar or ascorbic acid solution.
Information on how to do this can be found in
relevant literature.
Suitable for freezing
■ Baked goods
■ Fish and seafood
■ Meat
■ Poultry and game
■ Vegetables, fruit and herbs
■ Eggs without shells
■ Dairy products, e.g. cheese, butter and quark
■ Ready meals and leftovers, e.g. soups, stews,
cooked meat and fish, potato dishes, soufflés and
desserts
Not suitable for freezing
■ Types of vegetables which are usually eaten raw,
e.g. lettuce or radishes
■ Unpeeled or hard-boiled eggs
■ Grapes
■ Whole apples, pears and peaches
■ Yoghurt, soured milk, sour cream, creme fraiche
and mayonnaise
Packing frozen food
The correct type of packaging and material selection
are decisive factors in the retention of the product
quality and prevent the development of freezer burn.
1. Place food in packaging.
2. Remove air.
3. Pack food airtight to prevent it from losing flavor
or drying out.
4. Label packaging with contents and date of
freezing.
Suitable packaging:
■ Plastic foil
■ Tubular foil made of polyethylene (PE)
■ Aluminum foil
■ Freezer containers
Suitable closures:
■ Rubber bands
■ Plastic clips
■ Cold-resistant adhesive tape
Unsuitable packaging:
■ Wrapping paper
■ Greaseproof paper
■ Cellophane

Defrosting en-us
23
■ Garbage bags and used grocery bags
Shelf life of frozen food at 0 °F (-18 °C)
Thawing frozen food
The thawing method must be adjusted to the food
and application in order to retain the best possible
product quality.
Thawing methods:
■ In the refrigerator compartment (especially
suitable for animal-based foods such as fish,
meat, cheese)
■ At room temperature (bread)
■ In the microwave (food for immediate
consumption or immediate preparation)
■ In the oven/cooker (food for immediate
consumption or immediate preparation)
9 CAUTION
Do not refreeze partly or completely thawed
food.You can only refreeze food once it has
been cooked (boiled or fried).
The frozen food can no longer be stored for the
maximum duration.
=Defrosting
Defrosti ng
Freezer compartment
The fully automatic NoFrost system ensures that the
freezer compartment remains frost-free. Defrosting is
no longer required.
DCleaning
Cl eani ng
9 CAUTION
AVOID DAMAGING THE APPLIANCE AND THE
EQUIPMENT.
■ Do not use abrasive, chloride-based or acidic
cleaning agents or solvents.
■ Do not use scouring or abrasive sponges.
The metallic surfaces may corrode.
■ Never clean the shelves or bins in the
dishwasher.
The parts may become deformed.
Cleaning the display
The change in temperature and humidity can cause
the controls to steam up.
Switch the clean lock on before cleaning.
~ "Clean lock" on page 16
Use a clean micro-fiber cloth for cleaning.
Cleaning the appliance interior
Proceed as follows:
1. Press the main On/Off switch.
2. Take out food and store in a cool location.
Place ice pack (if available) on the food.
3. Clean the appliance with a soft cloth, lukewarm
water and a little pH-neutral washing-up liquid.
9 CAUTION
The rinsing water must not run into the light
or through the drainage hole into the
evaporation area.
4. Wipe door seal with clear water and dry
thoroughly with a cloth.
5. Switch appliance back on and put in food.
Cleaning the equipment
To clean, take the removable parts out of the
appliance.
~ "Equipment" on page 12
Care instructions for stainless steel
surfaces
When taking care of and cleaning stainless steel
surfaces, use only cleaning agents suitable for
stainless steel and a stainless steel cleaning cloth.
You can purchase a suitable stainless steel cleaning
cloth from customer service.
To prevent visible scratches, clean the stainless
steel surface in the direction of the structure.
Fish, sausage, ready meals, and cakes
and pastries:
up to 6 months
Meat, poultry: up to 8 months
Vegetables, fruit: up to 12 months

en-us Noises
24
>Noises
No i s e s
Normal noises
Droning: A motor is running, e.g. refrigerating unit,
ventilator.
Bubbling, buzzing or gurgling: Refrigerant is
flowing through the tubes.
Clicking: Motor, switches or solenoid valves are
switching on or off.
Cracking: Automatic defrosting is running.
Preventing noises
Appliance is not level: Align appliance using a
water level. If required, place a little packing
underneath.
Bins, shelves or storage compartments wobble or
stick: Check the removable equipment and re-insert
if required.
9Lighting
Li ght i ng
Your appliance features a maintenance-free LED
light.
Only customer service or authorized technicians may
repair the light.
Faults – what to do? en-us
25
3 Faults – what to do?
Fau l t s – wh a t to do?
Before you call customer service, use this table to check whether you can rectify the fault yourself.
Appliance
--------
Temperature differs greatly from the set value.
Switch off appliance for 5 minutes.
~ "Switching off and disconnecting the appliance" on page 15
If the temperature is too warm, check temperature again after a cou-
ple of hours.
If the temperature is too cold, check temperature again on the follow-
ing day.
Displays do not light up.
The power plug has not been inserted properly. Connect the power plug.
The fuse has tripped. Check the fuses.
The power has failed. Check whether the power is on.
The refrigeration unit is switching on more frequently and for longer.
The appliance was opened frequently. Do not open the appliance unnecessarily.
The ventilation openings are covered up. Remove obstacles.
Large quantities of fresh food have been put in. Switch on super cooling promptly in advance.
Appliance is not cooling, display and lighting are lit.
Demo mode is switched on. Switch demo mode off.
~ "Switching demo mode on or off" on page 18
The door does not open when pressed.
A special mode has switched off automatic door opening. To open the door, reach from below underneath the bottom panel of
the unit or switch off special mode.
~ "Switching Sabbath mode on or off" on page 18
Pull-to-open is switched on. Switch the appliance to Push-to-open.
~ "Automatic door opening" on page 17
The opening force is set too high. Select a lower setting for the opening force.
~ "Automatic door opening" on page 17
The fuse has tripped. Check the fuses.
The power has failed. Check whether the power is on.
en-us Faults – what to do?
26
Ice maker
--------
The ice maker is not functioning.
Ice cube production is switched off. Switch on ice cube production.
Freezer compartment is too warm. Set the temperature lower.
~ "Operating the appliance" on page 15
Ice cube container is not properly inserted. Insert ice cube container fully.
Ice maker without power. Call customer service.
~ "Customer service" on page 27
No water supply. Check water connection and contact technician if necessary.
Low water pressure. Only connect appliance to pipes with sufficient water pressure.
Kink in water hose. Turn off water supply, straighten out kink. Replace water hose, if nec-
essary.
Too few or deformed ice cubes, water pressure lower than usual.
After switching on or removing many ice cubes, there will be too few
in the ice cube container.
It takes around 24 hours for an empty ice cube container to fill up.
Ice cube production stops even though the ice cube container is still
not full.
Do not store the ice shovel on the ice in the ice cube container. Other-
wise, the sensor will not detect the actual fill level of the container.
Low water pressure. Only connect appliance to pipes with sufficient water pressure.
The water filter is blocked or needs to be replaced. Replace water filter.
Freezer compartment is too warm. Set the temperature lower.
~ "Operating the appliance" on page 15
Water is leaking out of the appliance.
Water connection is not tight. Check if the connections are fastened firmly and the water hose is
undamaged.
If the water hose is damaged, contact customer service and have it
replaced. Replacement must be performed by customer service or a
similarly qualified person only.Use original parts supplied by the man-
ufacturer only.

Customer service en-us
27
4Customer service
Cu s t o mer ser vi ce
If you are unable to rectify the fault, please contact
our customer service. We will always find an
appropriate solution in order to avoid unnecessary
visits by engineers.
The contact information for your nearest customer
service can be found here or on the enclosed
customer service list.
When calling, please state the product number (E-
Nr.) and the production number (FD), which can be
found on the rating plate.
~ "Getting to know your appliance" on page 10
Trust the expertise of the manufacturer. You can
therefore be sure that the repair is carried out by
trained service engineers who carry original spare
parts for your home appliances.
Appliance self-test
Your appliance features a self-test program which
displays the fault your customer service can rectify.
1. Press " button to open the Settings menu.
2. Use ) button to move to the menu item Self-test.
3. Press 8 button to start the self-test.
The self-test starts.
4. If faults are present, they will be displayed. In this
case follow the instructions.
5. The appliance restarts.
6. A message that the self-test has finished is
displayed for 10 seconds.
When the self-test has ended, the appliance
switches to normal operation.
Repair order and advice on faults
Contact information for all countries can be found on
the enclosed customer service list.
--------
USA 1-800-735-4328 Toll-free in the USA
CA 1-800-735-4328

fr-ca
28
fr Table des matières
fr Notice d' ut i l i sat i on
( Consignes de sécurité importantes . . . . . . 30
Définitions . . . . . . . . . . . . . . . . . . . . . . . . . . . . . . .30
À propos de cette notice. . . . . . . . . . . . . . . . . . . . 30
Introduction . . . . . . . . . . . . . . . . . . . . . . . . . . . . . .30
Restrictions au cercle d’utilisateurs. . . . . . . . . . . . 30
Risque d’explosion . . . . . . . . . . . . . . . . . . . . . . . . 30
Risque d’électrocution. . . . . . . . . . . . . . . . . . . . . .31
Risque d'engelures provoquées par le froid . . . . .31
Risque de blessure . . . . . . . . . . . . . . . . . . . . . . . .31
Risque d’incendie/risques dus au fluide
frigorigène . . . . . . . . . . . . . . . . . . . . . . . . . . . . . . . 31
Risque d’incendie . . . . . . . . . . . . . . . . . . . . . . . . .31
Risque d’asphyxie . . . . . . . . . . . . . . . . . . . . . . . . .32
Dégâts matériels . . . . . . . . . . . . . . . . . . . . . . . . . .32
Poids . . . . . . . . . . . . . . . . . . . . . . . . . . . . . . . . . . .32
Avertissements de la Proposition 65 de
l’État de la Californie . . . . . . . . . . . . . . . . . . . . . . .32
8 Utilisation conforme . . . . . . . . . . . . . . . . . . . 33
7 Protection de l'environnement . . . . . . . . . . 33
Emballage . . . . . . . . . . . . . . . . . . . . . . . . . . . . . . .33
Appareil usagé . . . . . . . . . . . . . . . . . . . . . . . . . . .33
5 Installation et branchement . . . . . . . . . . . . . 34
Contenu de livraison . . . . . . . . . . . . . . . . . . . . . . .34
Données techniques . . . . . . . . . . . . . . . . . . . . . . .34
Installer l’appareil . . . . . . . . . . . . . . . . . . . . . . . . . 34
Vérifier la cavité d’installation . . . . . . . . . . . . . . . . 34
Installation juxtaposée . . . . . . . . . . . . . . . . . . . . . . 34
Économiser de l’énergie . . . . . . . . . . . . . . . . . . . .35
Avant la première utilisation . . . . . . . . . . . . . . . . . 36
Raccordement de l’eau . . . . . . . . . . . . . . . . . . . . . 36
Connexion électrique. . . . . . . . . . . . . . . . . . . . . . . 36
* Présentation de l’appareil . . . . . . . . . . . . . . 37
Appareil. . . . . . . . . . . . . . . . . . . . . . . . . . . . . . . . .37
Éléments de commande . . . . . . . . . . . . . . . . . . . .38
Équipement . . . . . . . . . . . . . . . . . . . . . . . . . . . . . .39
1 Utiliser l'appareil . . . . . . . . . . . . . . . . . . . . . . 42
Allumer l’appareil . . . . . . . . . . . . . . . . . . . . . . . . . 42
Arrêter et remiser l’appareil. . . . . . . . . . . . . . . . . .42
Réglage de la langue . . . . . . . . . . . . . . . . . . . . . .42
Régler l’unité de température . . . . . . . . . . . . . . . .42
Régler la température . . . . . . . . . . . . . . . . . . . . . .42
Supercongélation . . . . . . . . . . . . . . . . . . . . . . . . .42
Verrouillage de nettoyage . . . . . . . . . . . . . . . . . . .43
Lancer et arrêter la production de glaçons . . . . . . 43
Réinitialiser de compteur du filtre à eau . . . . . . . .43
Mode éco . . . . . . . . . . . . . . . . . . . . . . . . . . . . . . . 43
Test automatique . . . . . . . . . . . . . . . . . . . . . . . . . 43
Régler la luminosité . . . . . . . . . . . . . . . . . . . . . . . 44
Activer ou désactiver le son d'actionnement
des touches . . . . . . . . . . . . . . . . . . . . . . . . . . . . . 44
Régler le volume du son des touches . . . . . . . . . 44
Régler le volume du signal sonore. . . . . . . . . . . . 44
Verrouillage automatique de nettoyage . . . . . . . . 44
Ouverture de porte automatique. . . . . . . . . . . . . . 44
Activer et désactiver le compteur du filtre
à eau . . . . . . . . . . . . . . . . . . . . . . . . . . . . . . . . . . 45
Mode théâtre . . . . . . . . . . . . . . . . . . . . . . . . . . . . 45
Réinitialiser les réglages d'usine. . . . . . . . . . . . . . 45
Activer ou désactiver le mode démo . . . . . . . . . . 45
Mode Sabbat . . . . . . . . . . . . . . . . . . . . . . . . . . . . 46
Réseau domestique . . . . . . . . . . . . . . . . . . . . . . . 46
M Alarme. . . . . . . . . . . . . . . . . . . . . . . . . . . . . . 46
Alarme de porte . . . . . . . . . . . . . . . . . . . . . . . . . . 46
Alarme de température. . . . . . . . . . . . . . . . . . . . . 46
o Home Connect. . . . . . . . . . . . . . . . . . . . . . . . 47
Configurer le réseau domestique . . . . . . . . . . . . . 47
Connecter le réfrigérateur à l’application
Home Connect . . . . . . . . . . . . . . . . . . . . . . . . . . . 48
Installer une mise à jour du logiciel Home
Connect . . . . . . . . . . . . . . . . . . . . . . . . . . . . . . . . 48
Accès au service à la clientèle . . . . . . . . . . . . . . . 48
Supprimer les paramètres réseau . . . . . . . . . . . . 48
Activer ou désactiver la connexion au réseau
domestique WLAN (Wi-Fi). . . . . . . . . . . . . . . . . . . 49
Remarque sur la protection des données . . . . . . 49
W Compartiment congélateur . . . . . . . . . . . . . 50
Utiliser l’intégralité du volume de
congélation. . . . . . . . . . . . . . . . . . . . . . . . . . . . . . 50
Achats de produits surgelés. . . . . . . . . . . . . . . . . 50
Consignes de rangement . . . . . . . . . . . . . . . . . . . 50
Congeler des produits frais . . . . . . . . . . . . . . . . . 50
Décongélation des produits . . . . . . . . . . . . . . . . . 51
= Dégivrer l’appareil . . . . . . . . . . . . . . . . . . . . 51
Compartiment congélateur . . . . . . . . . . . . . . . . . . 51
D Nettoyage . . . . . . . . . . . . . . . . . . . . . . . . . . . 52
Nettoyer l'écran. . . . . . . . . . . . . . . . . . . . . . . . . . . 52
Nettoyer le compartiment intérieur de
l'appareil . . . . . . . . . . . . . . . . . . . . . . . . . . . . . . . . 52
Nettoyer l’équipement. . . . . . . . . . . . . . . . . . . . . . 52
Consignes d'entretien pour les surfaces
en inox . . . . . . . . . . . . . . . . . . . . . . . . . . . . . . . . . 52

fr-ca
29
> Bruits . . . . . . . . . . . . . . . . . . . . . . . . . . . . . . . 53
Bruits normaux . . . . . . . . . . . . . . . . . . . . . . . . . . . 53
Prévenir les bruits . . . . . . . . . . . . . . . . . . . . . . . . .53
9 Éclairage . . . . . . . . . . . . . . . . . . . . . . . . . . . . 53
3 Que faire en de problème. . . . . . . . . . . . . . . 54
Appareil. . . . . . . . . . . . . . . . . . . . . . . . . . . . . . . . .54
Distributeur de glaçons . . . . . . . . . . . . . . . . . . . . . 55
4 Service à la clientèle. . . . . . . . . . . . . . . . . . . 56
Autodiagnostic de l’appareil . . . . . . . . . . . . . . . . . 56
Commande de réparation et conseils
en cas de problèmes . . . . . . . . . . . . . . . . . . . . . . 56
9 Consignes de sécurité importantes
VEUILLEZ LIRE ET CONSERVER CES CONSIGNES!
fr-ca Consignes de sécurité importantes
30
(Consignes de sécurité importantes
Co n s i g n e s de sécur i t é impor t ant es
VEUILLEZ LIRE ET CONSERVER CES CONSIGNES!
Définitions
9 AVERTISSEMENT
Cet avertissement indique un risque
pouvant avoir des conséquences
graves, voire mortelles.
9 ATTENTION
Cet avertissement indique un risque
pouvant avoir des conséquences
mineures, voire modérées.
AVIS : Cette mise en garde indique un
risque de dommage à l'appareil.
Remarque : Ce symbole sert à identifier
des renseignements importants ou des
conseils.
À propos de cette notice
■ Veillez lire et respecter le contenu de
cette notice d'utilisation et de montage.
Elle contient des remarques importantes
concernant l’installation, l’utilisation et
l’entretien de l’appareil.
■ Le fabricant décline toute responsabilité
si vous ne tenez pas compte des
remarques et avertissements figurant
dans la notice de montage et celle
d'utilisation.
■ Veuillez conserver tous ces documents
en vue d’une réutilisation ultérieure ou
pour le cas où l’appareil changerait de
propriétaire.
Introduction
■ Cet appareil est conforme aux
dispositions de sécurité applicables aux
appareils électriques.
■ Le circuit frigorifique a subi un contrôle
d’étanchéité.
Restrictions au cercle d’utilisateurs
■ Prévenez les dangers pour les enfants et
les personnes à risque.
■ Les enfants et les personnes souffrant
d’un handicap physique, sensoriel ou
mental ou sans l’expérience ou les
connaissances nécessaires peuvent
utiliser cet appareil uniquement sous
surveillance, après avoir été dûment
renseignés sur le fonctionnement de
l'appareil et après en avoir compris les
dangers qui en émanent.
■ Les enfants doivent être surveillés afin
d’éviter qu’ils ne jouent avec l’appareil.
Risque d’explosion
■ Si les orifices de ventilation de l’appareil
sont fermés, un mélange gaz-air
inflammable peut se produire si le circuit
de réfrigération fuit.
Ne fermez pas les orifices de ventilation
dans le boîtier de l’appareil ou dans le
boîtier d’installation.
■ N’utilisez pas d’appareils électriques
à l’intérieur de l’appareil (par ex.
appareils de chauffage, machine
à glaçons).
■ Ne stockez dans l’appareil aucun produit
contenant des gaz propulseurs
combustibles (bombes aérosols par
exemple) et aucune substance explosive.
■ Ne conservez les bouteilles de boissons
fortement alcoolisées qu’hermétiquement
fermées et debout.
■ Hormis les instructions du fabricant, ne
prenez aucune mesure visant à accélérer
le dégivrage de l’appareil.
9 Consignes de sécurité importantes
VEUILLEZ LIRE ET CONSERVER CES CONSIGNES!
Consignes de sécurité importantes fr-ca
31
Risque d’électrocution
Toute installation ou réparation incorrecte
peut engendrer des risques considérables
pour l’utilisateur.
■ Veillez à ne pas coincer ou endommager
le câble d'alimentation en posant
l'appareil.
■ Dans une optique préventive,
débranchez l'appareil dès que le câble
d'alimentation est endommagé. Faites
remplacer le câble secteur par le
fabricant, le service à la clientèle ou une
personne présentant une qualification
équivalente.
■ N'utilisez pas de rallonge, de bloc
multiprise ou d'adaptateur.
■ Débranchez la fiche de contact ou
ramenez le disjoncteur en position
éteinte avant d'effectuer l'entretien ou les
opérations de montage autorisées sur
l'appareil.
Avant de nettoyer l'appareil, actionnez
l'interrupteur principal Marche / Arrêt
pour éteindre l'appareil.
Les clayettes en verre et autres
équipements peuvent être déplacés sans
danger pendant que l'appareil est en
marche.
■ Ne retirez ni sectionnez jamais le
troisième conducteur (conducteur de
mise à la terre) du cordon d'alimentation.
■ Ne décongelez et ne nettoyez jamais
l’appareil avec un nettoyeur à vapeur. La
vapeur risque d’atteindre des pièces
électriques et de provoquer un court-
circuit.
■ Ne confiez la réparation ou le
remplacement de l'appareil, du cordon et
des accessoires qu'au fabricant ou à un
technicien autorisé.
■ N’utilisez que des pièces de rechange
d'origine venant du fabricant.
Le fabricant garantit que ces pièces
d'origine remplissent les exigences de
sécurité.
Risque d'engelures provoquées par le
froid
■ Ne portez jamais des produits surgelés à
la bouche immédiatement après les avoir
sortis du compartiment congélateur.
■ Évitez tout contact prolongé de la peau
avec le produit congelé, la glace et les
tubulures présents dans le compartiment
congélateur.
Risque de blessure
■ Les récipients contenant des boissons
gazeuses risquent d'éclater.
■ Ne rangez jamais de boissons gazeuses
dans le compartiment congélateur.
Risque d’incendie/risques dus au
fluide frigorigène
Dans les tubulures du circuit frigorifique
circule une petite quantité de R600a, un
fluide frigorigène écologique mais
combustible. Il n'abîme pas la couche
d'ozone et n'accroît pas l'effet de serre.
Le fluide frigorigène risque en fuyant de
blesser les yeux ou de s'enflammer.
■ Ne pas endommager les tubulures.
Si les tubulures ont été endommagées :
■ Eloignez l’appareil de toute flamme nue
ou source d’inflammation.
■ Aérez la pièce.
■ Éteignez l’appareil puis débranchez la
fiche de contact de la prise de courant.
■ Appelez le service à la clientèle.
Risque d’incendie
Les blocs multiprises ou blocs
secteur portables peuvent surchauffer et
provoquer un incendie.
■ N’utilisez pas de blocs multiprises ni de
blocs secteur portables derrière
l’appareil.

9 Consignes de sécurité importantes
VEUILLEZ LIRE ET CONSERVER CES CONSIGNES!
fr-ca Consignes de sécurité importantes
32
Risque d’asphyxie
■ Appareils équipés d’une serrure : rangez
la clé hors de portée des enfants.
■ Ne confiez jamais l’emballage et ses
pièces constitutives aux enfants.
Dégâts matériels
Pour éviter des dégâts matériels :
■ Ne vous servez jamais du socle, des
glissières ou des portes comme
marchepieds et ne vous appuyez jamais
dessus.
■ Veillez à ce que les pièces en matière
plastique et les joints de porte soient
exempts d'huile et de graisse.
■ Pour débrancher, ne saisissez que la
fiche mâle, pas le cordon de
branchement.
Poids
L’appareil est très lourd. Il faut être au
moins 2 deux personnes pour installer et
transporter l'appareil.
~ "Installation et branchement"
à la page 34
Avertissements de la Proposition 65 de
l’État de la Californie
Ce produit pourrait contenir un produit
chimique reconnu par l'État de la Californie
comme cancérigène ou ayant des effets
nocifs sur la reproduction. Par conséquent,
l'emballage de votre produit pourrait porter
l'étiquette suivante, comme requis par la
Californie :

Utilisation conforme fr-ca
33
8Utilisation conforme
Utilisation conf or me
Utilisez cet appareil
■ uniquement pour congeler des produits
alimentaires et pour préparer de la glace.
■ Uniquement dans un foyer et dans
l'environnement domestique.
■ Uniquement en conformité avec la présente
notice d'utilisation.
Cet appareil est conçu pour une utilisation jusqu’à
une altitude maximale de 2000 m.
7Protection de
l'environnement
Pr ot ec t i on de l ' envi r onnement
Emballage
Tous les matériaux sont non polluants et
recyclables :
■ Éliminez l’emballage dans le respect
de l’environnement.
■ Veuillez vous informer sur les modes
d'élimination des déchets auprès de votre
revendeur ou de l'administration publique.
Appareil usagé
L'élimination dans le respect de l’environnement
permet de récupérer de précieuses matières
premières.
9 AVERTISSEMENT
LES ENFANTS RISQUE DE S'ENFERMER
DANS L'APPAREIL ET DE S'ASPHYXIER. !
Avant d'envoyer l'appareil au recyclage :
■ Démonter la porte.
■ Pour dissuader les enfants de grimper dans
l’appareil, ne retirez pas les clayettes et les
bacs !
■ Éloignez les enfants de l’appareil qui a
cessé de servir.
9 ATTENTION
LE FLUIDE FRIGORIGÈNE ET DES GAZ
NOCIFS PEUVENT SE DÉGAGER.
Veillez à ne pas endommager les tubulures du
circuit frigorifique, ni l'isolant.
1. Débranchez la fiche de contact de la prise de
courant.
2. Coupez le câble de raccordement secteur.
3. Acheminez l'appareil au service d'élimination
approprié.

fr-ca Installation et branchement
34
5Installation et
branchement
Inst all ati on et br anc hement
Contenu de livraison
Après avoir déballé le produit, inspectez toutes les
pièces pour détecter d’éventuels dégâts dus au
transport.
En cas de réclamation, veuillez vous adresser au
revendeur auprès duquel vous avez acquis l’appareil
ou auprès de notre service à la clientèle.
~ "Service à la clientèle" à la page 56
La livraison comprend les pièces suivantes :
■ Appareil encastrable
■ Équipement (selon le modèle)
■ Matériel de montage
■ Mode d’emploi
■ Notice de montage
■ Carnet de service à la clientèle
■ Pièce annexe de la garantie
■ Informations relatives à la consommation
d’énergie et aux bruits
Données techniques
La plaque signalétique mentionne le fluide
frigorigène, le volume utile ainsi que d'autres
renseignements.
~ "Présentation de l’appareil" à la page 37
Installer l’appareil
Lieu d’installation
Selon le modèle, le poids de l'appareil peut atteindre
460 kg. Le plancher doit être suffisamment stable ; Il
ne doit pas s'affaisser. Renforcez le plancher au
besoin.
Vérifier la cavité d’installation
La cavité doit remplir les critères suivants :
■ L'équerre antibasculement doit être monté
■ La cavité doit avoir une profondeur d'au moins 24
po (610 mm) ou de 25 po (635 mm) pour une
installation affleurante.
■ à angle droit
■ stable – les parois latérales et le plafond doivent
avoir une épaisseur d'au moins 5/8 po (16mm)
et être reliés au plancher ou au mur solidement
■ Profondeur des parois latérales raccourcies d'au
moins 4 po (100 mm)
Installation juxtaposée
Si vous optez pour une installation juxtaposée,
suivez les instructions à cet effet dans le manuel
d'installation.
Si une paroi de séparation est nécessaire entre les
appareils, cette dernière doit avoir une largeur d'au
moins 5/8 po (16 mm).

Installation et branchement fr-ca
35
Économiser de l’énergie
Si vous respectez les instructions suivantes, votre appareil consommera moins de courant.
Remarque :
L’agencement des pièces d’équipement n’a aucune influence sur la consommation d’énergie de
l’appareil.
--------
Installer l’appareil
Mettez l'appareil à l'abri des rayons du soleil. En présence de températures ambiantes basses, l'appareil doit réfri-
gérer moins souvent et il consomme donc moins de courant.
Installer l'appareil à la plus grande distance possible d'un radiateur,
d'une cuisinière et d'autres sources de chaleur :
Minimum 1¼” (3 cm) d'une cuisinière électrique ou à gaz.
Minimum 11¾” (30 cm) d'un appareil de chauffage à l'huile ou au
charbon.
Choisissez un lieu d'installation où règne une température ambiante
d'environ 68 °F (20 °C).
Ne recouvrez et ne bouchez pas les orifices d'aération. L'appareil consomme moins de courant si l'air chaud peut s'échapper.
Aérez quotidiennement la pièce.
Utilisation de l'appareil
N'ouvrez la porte de l'appareil que brièvement. L'air dans l'appareil ne se réchauffe pas aussi fortement. L'appareil
doit réfrigérer plus rarement et consomme de la sorte moins d'électri-
cité.
Transportez les produits alimentaires achetés dans un sac isotherme
et rangez-les rapidement dans l'appareil.
Attendez que les plats chauds aient refroidi avant de les ranger dans
l’appareil.
Pour dégeler les produits congelés, rangez-les dans le compartiment
réfrigérateur pour profiter du froid des produits congelés.
Laissez toujours un peu de place entre les produits alimentaires et la
paroi arrière.
L'air peut circuler de cette manière et l'humidité de l'air demeure
constante.L'appareil doit réfrigérer plus rarement et consomme de la
sorte moins d'électricité.
Emballez hermétiquement les produits alimentaires.
Ne recouvrez et ne bouchez pas les orifices d'aération. L'appareil consomme moins de courant si l'air chaud peut s'échapper.
Une fois par an, passez l'aspirateur au dos de l'appareil.

fr-ca Installation et branchement
36
Avant la première utilisation
1. Retirez la documentation informative, les rubans
adhésifs et la feuille protectrice.
2. Nettoyez l’appareil.
~ "Nettoyage" à la page 52
Raccordement de l’eau
9 ATTENTION
■ L'installation et le raccordement de l'appareil
doit être réalisé par un spécialiste selon les
instructions de montage ci-jointes.
■ Afin d'éviter d'endommager l'appareil ou d'en
perturber le fonctionnement, il est impératif de
le brancher uniquement à une prise d'eau
potable.
■ Installez une soupape d'arrêt afin de prévenir
les dégâts d'eau.
Pression hydraulique de la conduite d'eau potable.
9 ATTENTION
Si la pression hydraulique excède la valeur
maximale, faites installez un limiteur de
pression entre la conduite d'eau potable et le
kit de tuyaux afin d'éviter d'endommager
l'appareil.
Remarque : Une pression hydraulique trop basse
perturbe certaines fonctions de base de l'appareil.
■ Au moins 0,2 Mpa (2 bars /29 psi)
■ Maximum 0,8 Mpa (8 bars / 116 psi)_
Connexion électrique
9 ATTENTION
Ne raccordez pas l’appareil à une fiche
électronique d'économie d'énergie.
Remarque : Vous pouvez raccorder l'appareil à des
onduleurs pilotés par le réseau et pilotés en onde
sinusoïdale.
Les onduleurs pilotés par le réseau s'utilisent sur les
installations photovoltaïques directement raccordées
au réseau public d'électricité. Dans les solutions en
îlot, vous devrez utiliser des onduleurs pilotés en
onde sinusoïdale. Les solutions en îlot, par exemple
sur les bateaux ou les refuges de montage, n'ont
pas de raccordement direct au réseau public
d'électricité.
1. Après l'installation de l'appareil, attendez
au moins 1 heure avant de le raccorder afin
d'éviter d'endommager le compresseur.
2. Assurez-vous que la prise murale est
correctement installée et satisfait aux critères.
Critères pour la prise murale
Charge maximale simultanée
3. Raccordez l'appareil à une prise à proximité.
Cette prise doit rester accessible même une fois
l'appareil installé.
Si l'accès libre est impossible, un dispositif de
coupure omnipolaire doit être installé dans
l'installation à câblage fixe conformément aux
réglementations d'installation.
9 AVERTISSEMENT
RISQUE D’ÉLECTROCUTION !
N'utilisez pas de rallonge, de bloc multiprise
ou d'adaptateur.
L'appareil doit être correctement mis à la
terre.
Ne retirez ni sectionnez jamais le troisième
conducteur (conducteur de mise à la terre)
du cordon d'alimentation.
9 AVERTISSEMENT
RISQUE D’ÉLECTROCUTION !
Si la longueur du cordon d'alimentation est
insuffisante, abstenez-vous à tout prix
d'utiliser une rallonge ou un bloc multiprise.
Contactez plutôt le service à la clientèle pour
des solutions de rechange.
Prise de 110 V ... 120 V
Fil de terre 60 Hz
Fusible 10 A ... 16 A
Appareil 6 A
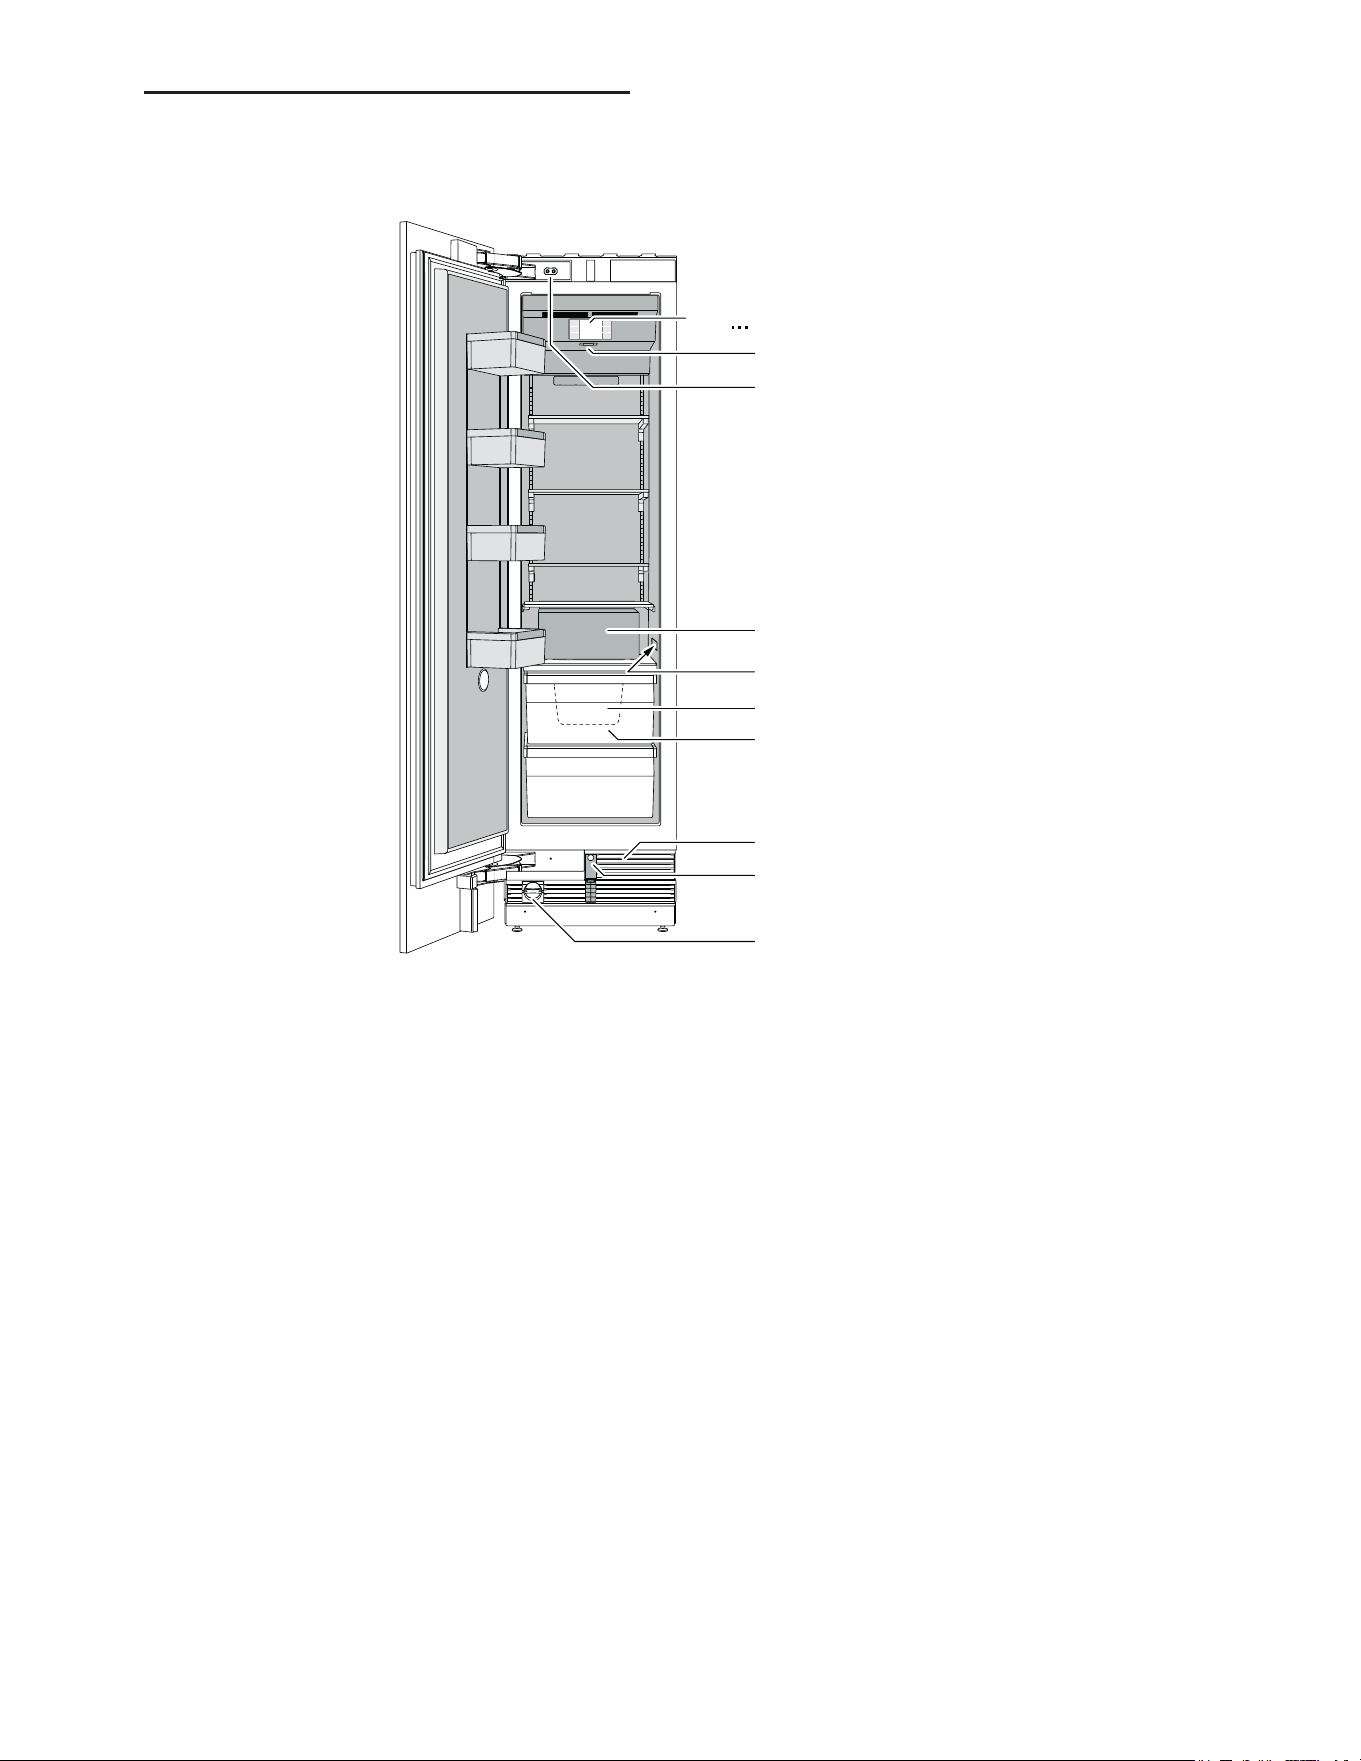
Présentation de l’appareil fr-ca
37
*Présentation de l’appareil
Pr é s e n t a t i o n de l ’ appar ei l
Appareil
6XSHU)UHH]H
@
6HWWLQJV
+
3
;
K
C
-
( ... H Éléments de commande
P Interrupteur principal marche/arrêt
X Amortisseur de porte
` Distributeur de glaçons
h Plaque signalétique
)" Bac à glaçons
)* Bac à produits congelés
)2 Prise d'air
): Ouverture de porte automatique
)J Filtre à eau
fr-ca Présentation de l’appareil
38
Éléments de commande
Menu Paramètres
Pour ouvrir le menu, appuyez sur la touche ".
Dans le menu Paramètres, vous trouverez :
■ Paramètres de l'appareil
■ Verrouillage de nettoyage
■ Production cubes de glace
■ Compteur filtre à eau
■ Mode éco
■ Test automatique
■ Mode Sabbat (si activé)
~ "Utiliser l'appareil" à la page 42
Menu Paramètres de l'appareil
Voici comment atteindre le menu Paramètres de
l'appareil :
1. Appuyez sur la touche ".
2. Naviguez jusqu'au menu Paramètres de
l'appareil à l'aide de la touche (.
3. Appuyez sur la touche 8 pour ouvrir le menu.
Le menu Paramètres de l'appareil contient les sous-
menus et réglages suivants :
■ Luminosité
■ Son actionn. touche
■ Touche volume
■ Volume du signal
■ Verrouillage automatique de nettoyage
■ Ouverture de porte automatique
■ Compteur filtre à eau
■ Mode théâtre
■ Unité de température
■ Langue
■ Réseau domestique
■ Réglages usine
■ Mode démo
■ Mode Sabbat
~ "Utiliser l'appareil" à la page 42
( Champs tactiles
Sous les champs tactiles se trouvent des
sondes. Pour sélectionner une fonction, il
suffit d'appuyer sur le symbole.
0 Affichage de la température dans le
compartiment congélateur
Affiche la température réglée en °C/°F.
8 Touches A/@
Servent à modifier la température.
@ Touche "
Ouvre le menu Réglages.
~ "Menu Paramètres" à la page 38
H Touche Super-congélation
Allume ou éteint la supercongélation.
6XSHU)UHH]H
C
²
5pJODJHV
#
+
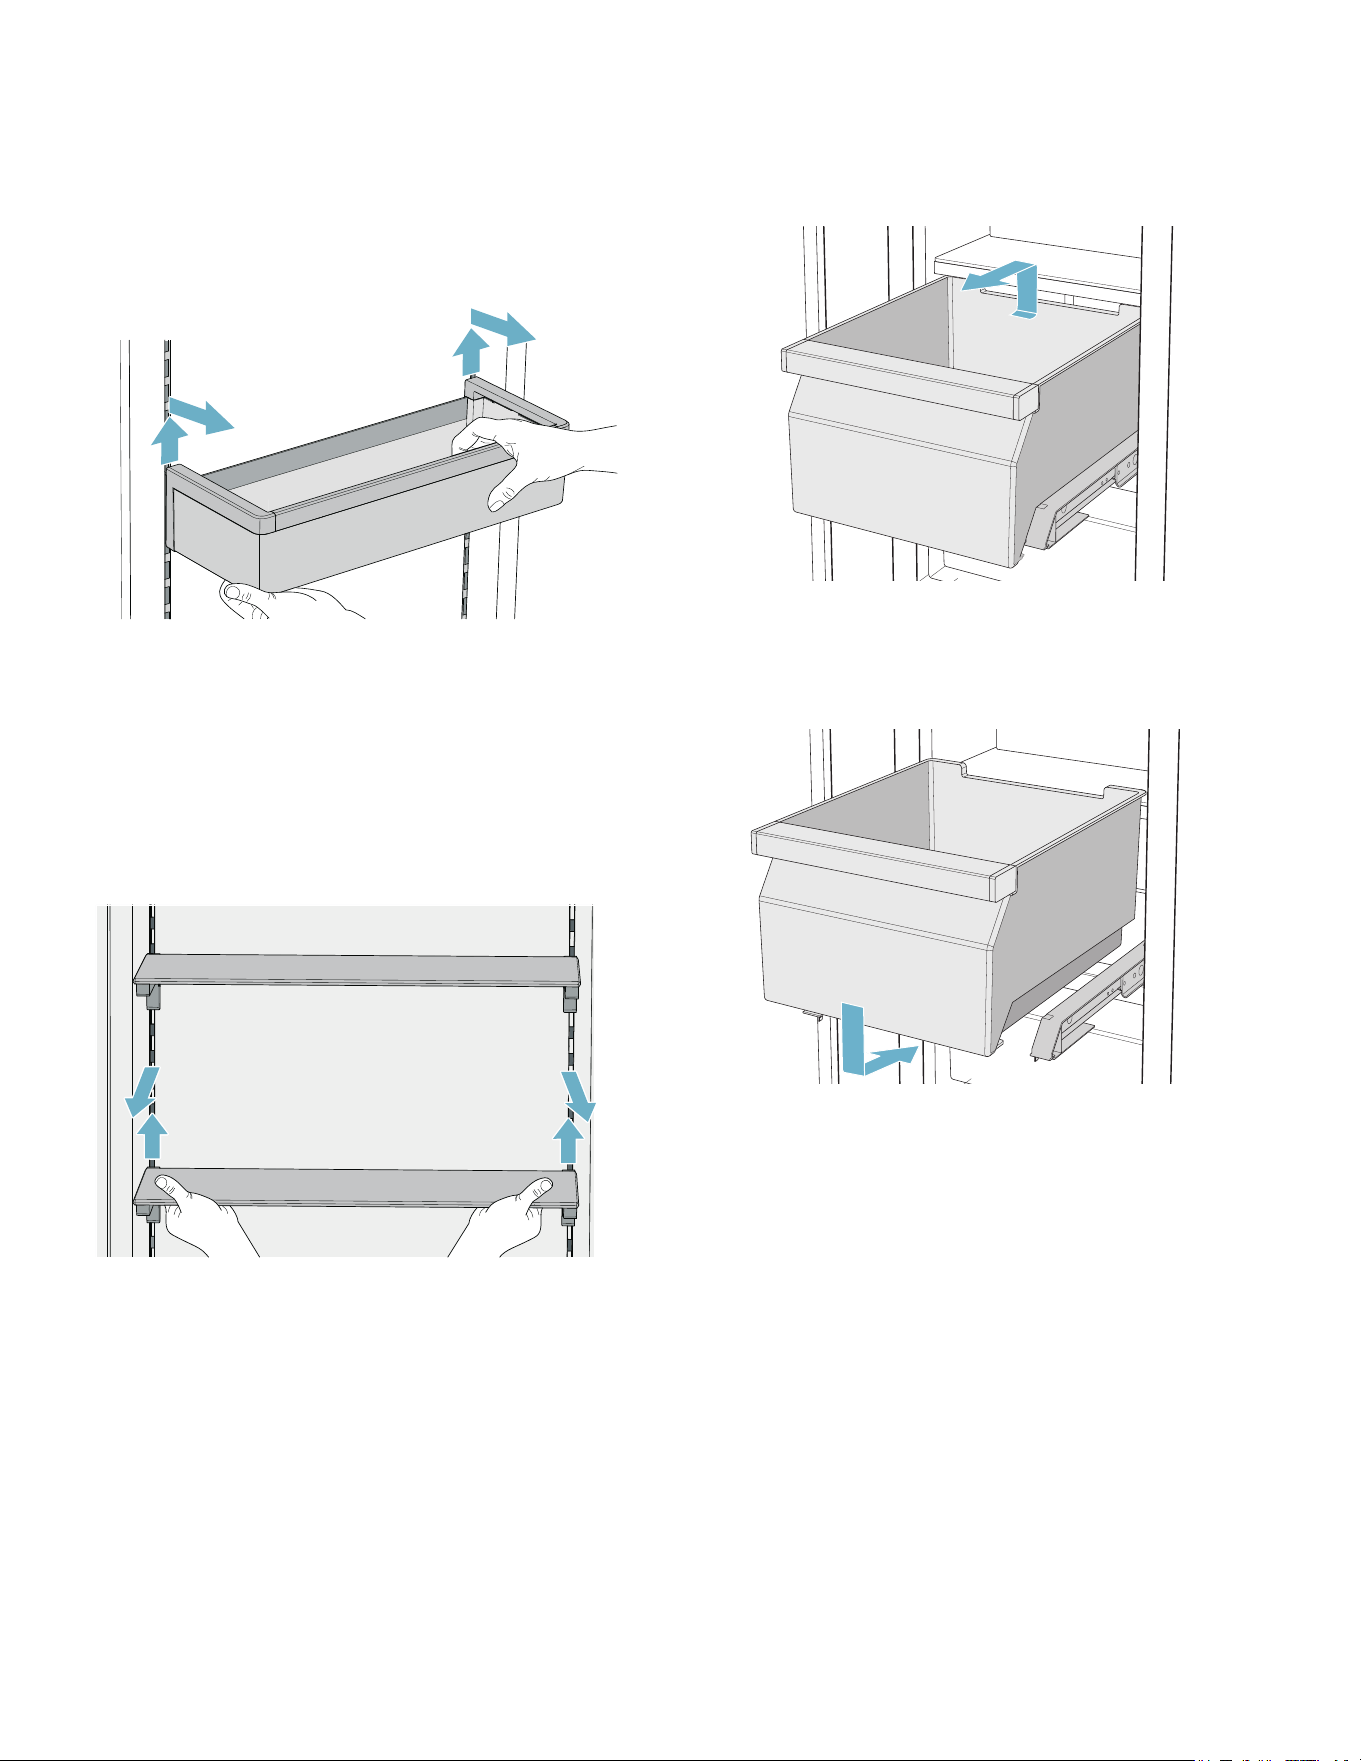
Présentation de l’appareil fr-ca
39
Équipement
(selon le modèle)
Support
Vous pouvez retirer les compartiments et en modifier
la hauteur :
1. Soulevez les compartiments et retirez-les.
2. Pour remettre un compartiment en place,
positionnez les crochets à l'arrière de celui-ci à la
même hauteur afin que le compartiment soit bien
droit.
Remarque : Insérez prudemment le compartiment
afin d'éviter d'égratigner l'appareil.
Clayette
Vous pouvez retirer la clayette et en modifier la
position :
1. Soulevez la clayette et retirez-la.
2. Pour la remettre en place, positionnez les
crochets à l'arrière de la clayette à la même
hauteur afin qu'elle soit bien droite.
Remarque : Posez prudemment la clayette afin
d'éviter d'égratigner l'appareil.
Bac
Vous pouvez retirer le bac :
■ Poussez le bac vers l'arrière,
■ soulevez-le par l'arrière et sortez-le.
Vous pouvez insérer le bac :
■ Sortez complètement les rails de sortie.
■ Posez le bac sur les rails de sortie et poussez-le
dans l'appareil jusqu'à ce qu'il s'enclenche.
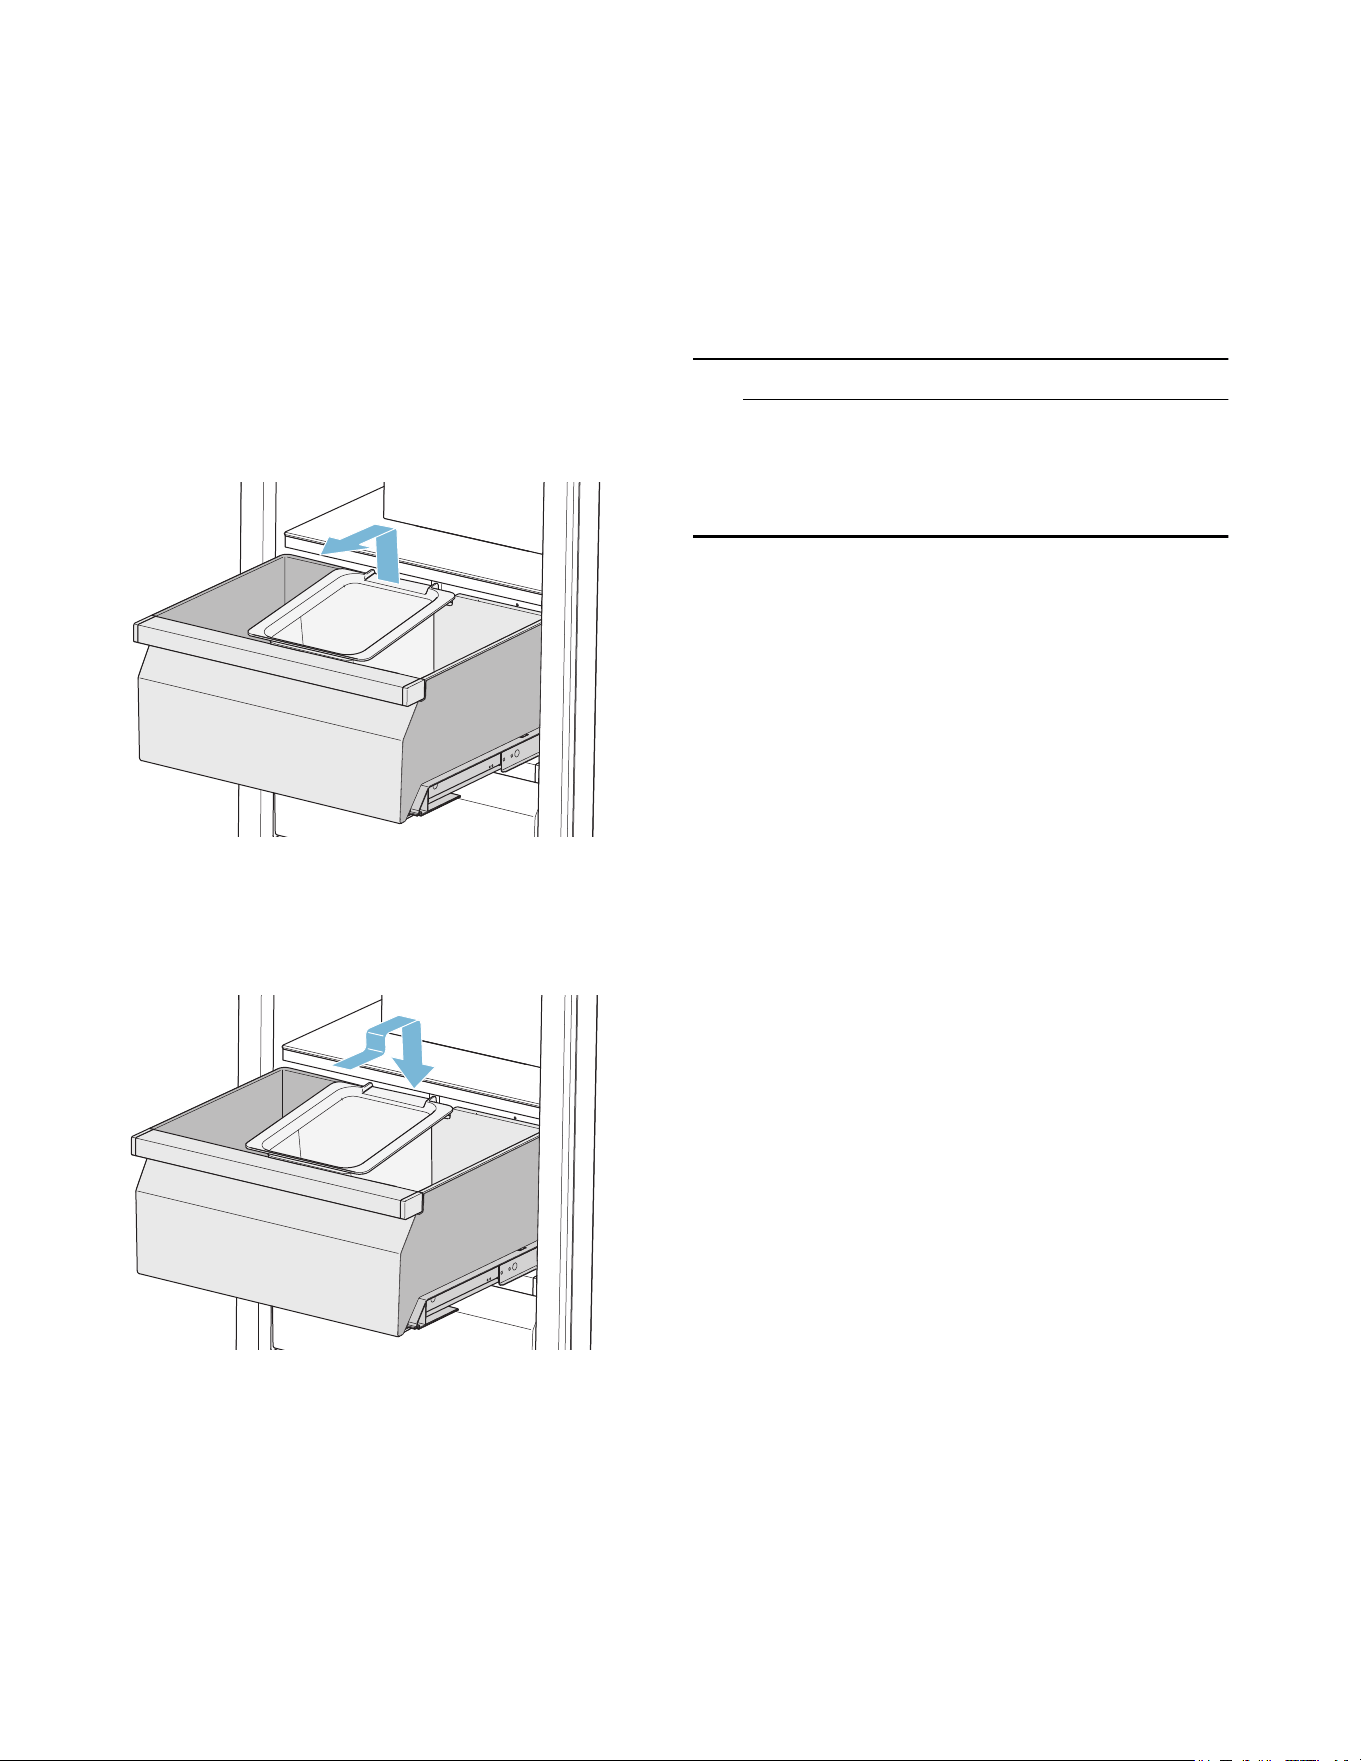
fr-ca Présentation de l’appareil
40
Bac à glaçons
Remarque : Afin d'éviter d'endommager le bac à
glaçons, videz-le toujours complètement avant
d'éteindre l'appareil pour une période prolongée ou
si une panne survient.
Pour retirer le bac à glaçons :
1. Sortez le bac à produits congelés.
Remarque : Si l'angle d'ouverture de la porte est de
90 degrés, vous aurez plus de facilité à accéder au
bac à glaçons si vous retirez d'abord complètement
le bac à produits congelés.
~ "Bac" à la page 39
2. Soulevez l'arrière du bac à glaçons et retirez-le.
Pour remettre le bac à glaçons en place :
1. Sortez le bac à produits congelés.
2. Accrochez le bac à glaçons dans l'évidement
prévu à cet effet sur le bac à produits congelés.
Accumulateurs de froid
En cas de panne de courant ou de problème :
■ L'accumulateur de froid retarde le réchauffement
des produits congelés rangés.
Vous pouvez sortir l'accumulateur de froid pour
maintenir temporairement des produits alimentaires
au frais, par exemple dans un sac isotherme.
Distributeur de glaçons
9 ATTENTION
DOMMAGES À L'APPAREIL!
Ne rangez jamais des bouteilles ou des
aliments dans le réservoir de glaçons, et ce
même pour une courte période. Cela pourrait
bloquer et endommager la machine à glace.
La production de glaçons commence dès que
l'appareil atteint la température réglée.
Remarques
■ La production de glaçons s'arrête
automatiquement lorsque le réservoir de glaçons
est plein.
■ Pour des raisons d’hygiène, jetez tous les
glaçons produits durant les 24 premières heures
avant l’utilisation initiale.
■ Pour des raisons d'hygiène, jetez les 30 à 40
premiers glaçons si vous en avez interrompu la
production pendant plusieurs jours.
Informations sur le lancement et l'arrêt de la
production de glaçons
~ "Lancer et arrêter la production de glaçons"
à la page 43

Présentation de l’appareil fr-ca
41
Filtre à eau
Le filtre à eau doit être remplacé au plus tard après
6 mois.
Si les glaçons goûtent mauvais, jetez tous les
glaçons ainsi que ceux produits durant les 24
prochaines heures. Si les glaçons goûtent toujours
mauvais, changez le filtre à eau.
Remarque : Si vous utilisez un système de filtration
d'eau externe, vous pouvez aussi vous servir de
l'appareil sans filtre à eau.Pour ce faire, remplacez le
filtre à eau par une cartouche filtrante avec
dérivation. Éteignez le compteur du filtre à eau. Il
n'est pas nécessaire de remplacer une cartouche
filtrante avec dérivation.
Adressez-vous au service à la clientèle ou à un
fournisseur spécialisé pour obtenir un nouveau filtre
à eau ou une cartouche filtrante avec dérivation.
Remplacer le filtre à eau par un neuf ou par une
cartouche filtrante avec dérivation
Vous pouvez remplacer le filtre à eau par un neuf ou
par une cartouche filtrante avec dérivation. La
cartouche filtrante avec dérivation peut demeurer
longtemps dans l'appareil; nul besoin de la
remplacer.
Remarque : Après l’installation d’un filtre à eau ou
d'une cartouche filtrante, éliminez tous les glaçons
produits au cours des premières 24 heures.
1. Faire tourner le bouchon du filtre à eau dans le
sens antihoraire.
2. Retirez le filtre à eau.
3. Retirez le bouchon de protection du nouveau
filtre à eau ou de la nouvelle cartouche filtrante
avec dérivation.
4. Retirez le bouchon du filtre à eau usé et le poser
sur le nouveau filtre à eau ou sur la nouvelle
cartouche filtrante avec dérivation.
5. Enfoncez le nouveau filtre à eau ou la nouvelle
cartouche filtrante avec dérivation dans
l’ouverture jusqu’en butée.
Remarque : Le bouchon doit alors être à la
verticale.
6. Faites tourner le filtre à eau ou la cartouche
filtrante avec dérivation dans le sens des aiguilles
d’une montre jusqu’au repère.
Remarque : Si le filtre à eau ou la cartouche filtrante
avec dérivation n’est pas suffisamment vissé, l’eau
qui s’écoule risque de provoquer des dégâts.
7. Au même moment où le filtre à eau est posé :
réinitialisez le compteur du filtre à eau.
Au même moment où la cartouche filtrante avec
dérivation est posée : réinitialisez le compteur du
filtre à eau.
8. Jetez tous les glaçons formés durant les 24
premières heures.
9. Videz l'eau dans le filtre à eau usé.
Remarque : Vous pouvez jeter le filtre à eau usé
avec les ordures ménagères.

fr-ca Utiliser l'appareil
42
1Utiliser l'appareil
Utiliser l ' appar ei l
Allumer l’appareil
1. Actionner l'interrupteur principal marche/arrêt.
L’appareil commence à réfrigérer ; porte en
position ouverte, l’éclairage est allumé.
2. Régler la température souhaitée.
~ "Régler la température" à la page 42
Remarques concernant le fonctionnement de
l’appareil
■ Une fois allumé, l’appareil pourrait prendre
quelques heures à atteindre les températures
réglées. Ne rangez pas de produits alimentaires
tant que la température choisie n'est pas atteinte.
■ Grâce au système NoFrost entièrement
automatique, le compartiment congélateur ne se
couvre pas de givre.
Il n’est pas nécessaire de dégivrer.
■ L’appareil chauffe légèrement une partie de ses
surfaces frontales. Cela prévient la condensation
d’eau dans la zone du joint de porte.
■ Si la porte du compartiment congélateur ne se
laisse pas immédiatement rouvrir après l’avoir
fermée, attendez un moment pour laisser à la
dépression régnant dans le compartiment le
temps de se résorber.
Arrêter et remiser l’appareil
Éteindre l’appareil
■ Appuyez sur l’interrupteur principal Marche /
Arrêt.
L’appareil ne réfrigère plus.
Éteindre l’appareil
9 ATTENTION
Dégradation de la qualité de l'eau
L'alimentation en eau doit être cessé 3 heures
avant que ne soit éteint l'appareil. Cela
préviendra la formation de moisissure en raison
des résidus d'eau.
Si l’appareil doit rester longtemps sans servir :
1. Coupez l'arrivée d'eau à l'appareil et attendez 3
heures.
2. Retirez les aliments de l'appareil.
3. Appuyez sur l’interrupteur principal Marche /
Arrêt.
4. Débranchez la fiche de contact de la prise de
courant ou ramenez le disjoncteur en position
éteinte.
L’appareil ne réfrigère plus.
5. Videz le bac à glaçons et nettoyez-le.
~ "Nettoyage" à la page 52
6. Laissez l'appareil ouvert.
Réglage de la langue
1. Appuyez sur la touche " pour ouvrir le menu
Paramètres.
2. Naviguez jusqu'à Paramètres de l'appareil à
l'aide de la touche (.
3. Appuyez sur la touche 8.
4. Naviguez jusqu'à Langue à l'aide de la touche (.
5. Appuyez sur la touche :.
6. Modifiez la langue selon vos préférences à l'aide
des touches ( ).
7. Appuyez sur la touche 8.
L'affichage redémarre et l'écran d'accueil
apparaît.
Régler l’unité de température
Vous pouvez choisir d'afficher la température en °C
ou en °F.
1° signifie 1 °F
1°C signifie 1 °C
1. Appuyez sur la touche " pour ouvrir le menu
Paramètres.
2. Naviguez jusqu'à Paramètres de l'appareil à
l'aide de la touche (.
3. Appuyez sur la touche 8.
4. Naviguez jusqu'au point de menu Unité de
température avec la touche (.
5. Appuyez sur la touche :.
6. Avec les touches ( ), faites défiler jusqu'à l'unité
souhaitée.
7. Appuyez sur la touche 8.
L'unité est modifiée.
8. Appuyez sur la touche ; pour quitter le menu.
Régler la température
Température recommandée
Compartiment congélateur
■ Actionner la touche @/A jusqu'à ce que la
température souhaitée s'affiche.
Supercongélation
Pendant la supercongélation, le compartiment
congélateur refroidit au maximum.
Activez la supercongélation par exemple :
■ pour congeler des produits alimentaires à cœur
rapidement
■ 4 ...6 heures avant de ranger 2 kg ou plus de
produits alimentaires
Remarque : Si vous avez activé la
supercongélation, l’appareil peut fonctionner plus
bruyamment.
Au bout de 2 jours et ^ environ, l'appareil revient en
mode normal.
Compartiment congélateur : 0 °F (-18 °C)
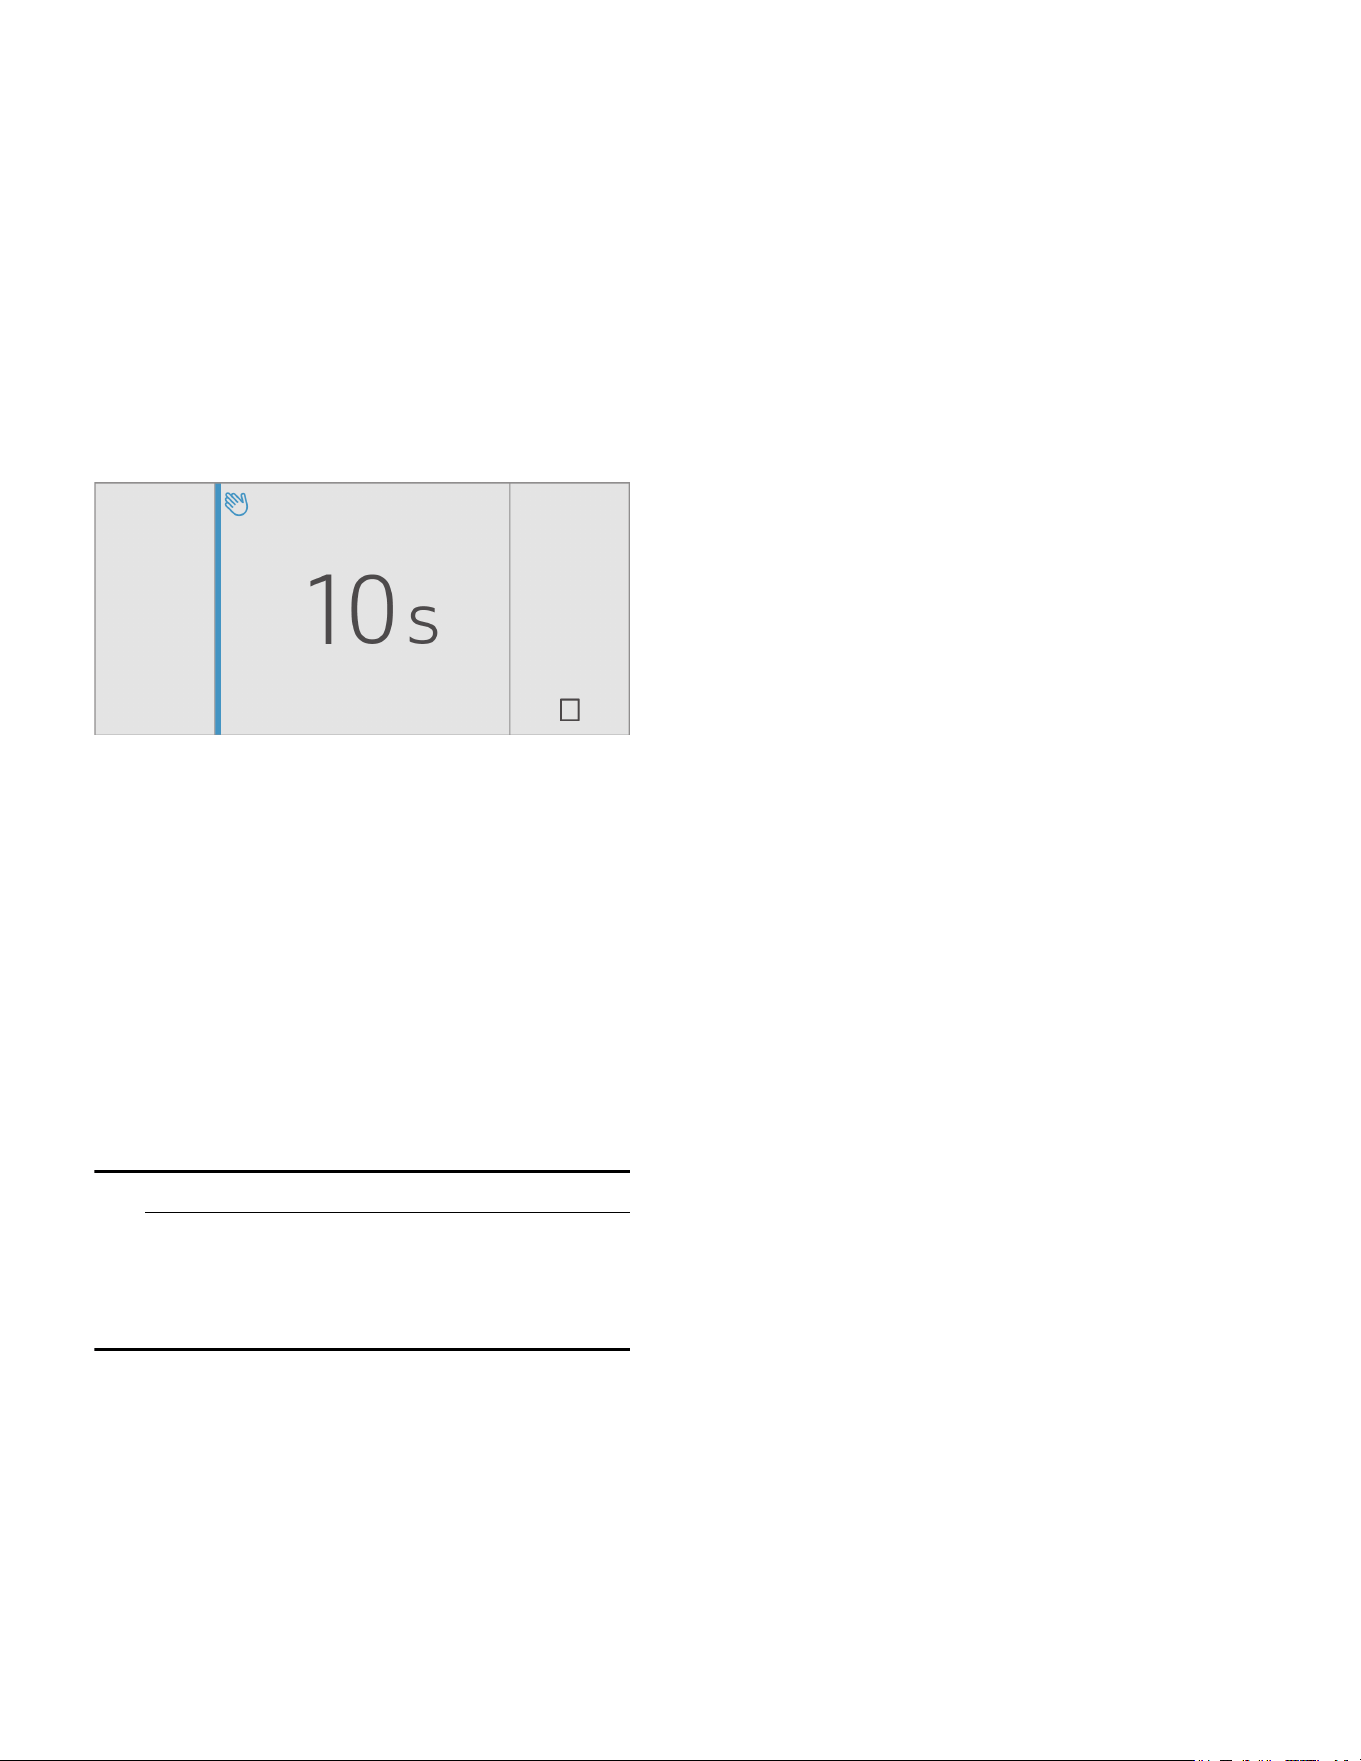
Utiliser l'appareil fr-ca
43
Activer ou désactiver la super-congélation
■ Appuyez sur la touche ]/\.
Verrouillage de nettoyage
Cette fonction désactive pendant 10 secondes la
fonction tactile des éléments de commande. Profitez
de ce moment pour nettoyer l'écran.
~ "Nettoyer l'écran" à la page 52
1. Appuyez sur la touche " pour ouvrir le menu
Paramètres.
2. Appuyez sur la touche <.
L'affichage de nettoyage apparaît et le compte à
rebours démarre.
Verrouillage automatique de nettoyage
Cette fonction vous permet de déterminer si le
verrouillage de nettoyage doit s'activer
automatiquement dès l'ouverture de la porte.
1. Appuyez sur la touche " pour ouvrir le menu
Paramètres.
2. Naviguez jusqu'à Paramètres de l'appareil à
l'aide de la touche (.
3. Appuyez sur la touche 8.
4. Naviguez jusqu'à Verr. auto. pr nettoy. à l'aide
de la touche ).
5. Appuyez sur : pour modifier le réglage.
Lancer et arrêter la production de glaçons
9 ATTENTION
Dommages de l'appareil!
Ne jamais ranger des bouteilles ou des
aliments dans le réservoir de glaçons, et ce
même pour une courte période. Cela pourrait
bloquer et endommager la machine à glace.
La production de glaçon commence dès que
l'appareil atteint la température réglée.
Remarque : La production de glaçon s'arrête
automatiquement lorsque le réservoir de glaçon est
plein.
Activer ou désactiver le distributeur de glaçons
1. Appuyez sur la touche " pour ouvrir le menu
Paramètres.
2. Naviguez jusqu'à Production de cubes de glace
à l'aide de la touche ).
3. Appuyez sur la touche </=.
Réinitialiser de compteur du filtre à eau
Une fois le filtre à eau remplacé, vous devez en
réinitialiser le compteur.
1. Appuyez sur la touche " pour ouvrir le menu
Paramètres.
2. Naviguez jusqu'au point de menu Réinitialiser
compteur filtre à eau à l'aide de la touche ).
3. Confirmez le choix avec la touche 8, puis
confirmer en appuyant de nouveau sur la touche
8.
Remarque : Si vous arrêtez la demande ou si vous
tardez plus de 10 secondes à répondre, le compteur
du filtre à eau n’est pas réinitialisé.
Activer et désactiver le compteur du filtre à eau
Si vous avez remplacé le filter à eau par un filtre à
particules, désactivez le compteur du filtre à eau.
Comme le filtre à particules n'a pas besoin d'être
remplacé, le compteur vous sera inutile.
1. Appuyez sur la touche " pour ouvrir le menu
Paramètres.
2. Naviguez jusqu'au menu Paramètres de
l'appareil à l'aide de la touche (.
3. Appuyez sur la touche 8.
4. Naviguez jusqu’au point de menu Compteur filtre
à eau avec la touche ).
5. Appuyez sur la touche : pour modifier le
réglage.
Mode éco
Le mode éco vous permet d'économiser de l'énergie
lors du fonctionnement de l'appareil.
L'appareil règle les températures automatiques
suivantes :
■ Compartiment congélateur : +3 °F (–16 °C)
Activer ou désactiver le mode éco
1. Appuyez sur la touche " pour ouvrir le menu
Paramètres.
2. Naviguez jusqu'au Mode Eco avec la touche ).
3. Appuyez sur la touche </=.
La température est modifiée, l'écran indique la
nouvelle température. Après avoir désactivé le mode
éco, la température conseillée est rétablie.
Remarque : Vous pouvez également activer ou
désactiver le mode Eco en réglant la température
avec les touches A/@.
Test automatique
Cette fonction lance une analyse des problèmes de
votre appareil.
~ "Autodiagnostic de l’appareil" à la page 56

fr-ca Utiliser l'appareil
44
Régler la luminosité
1. Appuyez sur la touche " pour ouvrir le menu
Paramètres.
2. Naviguez jusqu'à Paramètres de l'appareil à
l'aide de la touche (.
3. Appuyez sur la touche 8.
4. Appuyez sur la touche : pour ouvrir l'option
Luminosité du menu.
5. Réglez la luminosité souhaitée avec les touches (
).
6. Appuyez sur la touche 8.
Le réglage est mémorisé.
7. Appuyez sur la touche ; pour quitter le menu.
Activer ou désactiver le son
d'actionnement des touches
Vous pouvez désactiver ou réactiver le son qui
survient lorsqu'une touche de l'appareil est
actionnée.
1. Appuyez sur la touche " pour ouvrir le menu
Paramètres.
2. Naviguez jusqu'à Paramètres de l'appareil à
l'aide de la touche (.
3. Pour ouvrir le point de menu, appuyez sur 8.
4. Naviguez jusqu'à Son actionn. touches à l'aide
de la touche ).
5. Pour ouvrir le point de menu, appuyez sur :.
6. Sélectionnez le réglage souhaité avec les
touches ( ).
7. Appuyez sur la touche 8.
Le réglage est mémorisé.
8. Appuyez sur la touche ; pour quitter le menu.
Régler le volume du son des touches
Vous pouvez modifier le volume du son qui survient
lorsqu'une touche de l'appareil est actionnée.
1. Appuyez sur la touche " pour ouvrir le menu
Paramètres.
2. Naviguez jusqu'à Paramètres de l'appareil à
l'aide de la touche (.
3. Pour ouvrir le point de menu, appuyez sur 8.
4. Naviguez jusqu'à Volume des touches à l'aide de
la touche ).
5. Pour ouvrir le point de menu, appuyez sur :.
6. Sélectionnez le réglage souhaité avec les
touches ( ).
7. Appuyez sur la touche 8.
Le réglage est mémorisé.
8. Appuyez sur la touche ; pour quitter le menu.
Régler le volume du signal sonore
Vous pouvez régler le volume du signal sonore qui
survient par ex. lorsqu'une alarme est déclenchée.
1. Appuyez sur la touche " pour ouvrir le menu
Paramètres.
2. Naviguez jusqu'à Paramètres de l'appareil à
l'aide de la touche (.
3. Pour ouvrir le point de menu, appuyez sur 8.
4. Naviguez jusqu'à Volume du signal à l'aide de la
touche ).
5. Pour ouvrir le point de menu, appuyez sur :.
6. Sélectionnez le réglage souhaité avec les
touches ( ).
7. Appuyez sur la touche 8.
Le réglage est mémorisé.
8. Appuyez sur la touche ; pour quitter le menu.
Verrouillage automatique de nettoyage
Cette fonction vous permet de déterminer si le
verrouillage de nettoyage doit s'activer
automatiquement dès l'ouverture de la porte.
1. Appuyez sur la touche " pour ouvrir le menu
Paramètres.
2. Naviguez jusqu'à Paramètres de l'appareil à
l'aide de la touche (.
3. Appuyez sur la touche 8.
4. Naviguez jusqu'à Verr. auto. pr nettoy. à l'aide
de la touche ).
5. Appuyez sur : pour modifier le réglage.
Ouverture de porte automatique
L'ouverture automatique de la porte vous aide à
ouvrir cette dernière.
Dès que la fonction se déclenche, l'ouverture
automatique de la porte s'exécute et vous aide à
ouvrir la porte.
9 ATTENTION
La fermeture répétée et prématurée de la porte
finit par user cette dernière et risque de
perturber l'ouverture automatique de la porte.
Ne fermez pas la porte pendant que l'ouverture
automatique de la porte est activée.
Si vous avez fermé la porte malgré ce dernier
avertissement, laissez-la fermée 5 minutes.
L'ouverture automatique de la porte se
réajustera.
Ouvrez le point de menu Ouverture automatique
de la porte :
1. Appuyez sur la touche " pour ouvrir le menu
principal.
2. Naviguez jusqu'au menu Paramètres de
l'appareil à l'aide de la touche (.
3. Pour ouvrir le menu, appuyez sur la touche 8.
4. Avec la touche ), naviguez jusqu'au point de
menu Ouv. porte auto..
5. Appuyez sur la touche : pour modifier le
réglage.
Activer le système Push-to-open (pousser pour
ouvrir)
Si vous ne souhaitez pas avoir de poignée, le
système Push-to-open s'offre à vous. Ce dernier
vous permet d'entrouvrir la porte de votre appareil
en appuyant légèrement dessus.

Utiliser l'appareil fr-ca
45
Remarque : Veuillez noter que l'ouverture
automatique de la porte est désactivée en mode
Sabbat.
1. Ouvrez le point de menu Ouv. porte auto. de la
porte.
2. Sélectionnez Système Push-to-open dans le
menu.
3. Pour ouvrir le point de menu, appuyez sur la
touche 8.
4. Sélectionnez Force nécess. déclen..Cette option
vous permet de régler la force nécessaire au
déclenchement de l'ouverture automatique de la
porte.
5. Sélectionnez Durée d'ouverture.Cette option
vous permet de régler la durée d'entrouverture de
la porte avant qu'elle ne se ferme
automatiquement.
Remarque : Lorsque la porte est entrouverte,
l'appareil vérifie une fois par seconde si elle l'est
toujours.Une fois la durée d'ouverture écoulée,
l'appareil ferme la porte automatiquement.
Activer le système Pull-to-open (tirer pour ouvrir)
Si vous avez posé la poignée, le système Pull-to-
open s'offre à vous. Ce dernier fait en sorte que
votre appareil vous aide à ouvrir la porte dès que
vous tirez sur la poignée.
1. Ouvrez le point de menu Ouv. porte auto. de la
porte.
2. Sélectionnez Système Pull-to-open dans le
menu.
3. Pour ouvrir le point de menu, appuyez sur la
touche 8.
4. Sélectionnez Force nécess. déclen..Cette option
vous permet de régler la force nécessaire au
déclenchement de l'ouverture automatique de la
porte.
Désactiver l'ouverture automatique de la porte.
1. Ouvrez le point de menu Ouv. porte auto. de la
porte.
2. Sélectionnez Arrêt dans le menu.
Activer et désactiver le compteur du filtre
à eau
Si vous avez remplacé le filter à eau par un filtre à
particules, désactivez le compteur du filtre à eau.
Comme le filtre à particules n'a pas besoin d'être
remplacé, le compteur vous sera inutile.
1. Appuyez sur la touche " pour ouvrir le menu
Paramètres.
2. Naviguez jusqu'au menu Paramètres de
l'appareil à l'aide de la touche (.
3. Appuyez sur la touche 8.
4. Naviguez jusqu’au point de menu Compteur filtre
à eau avec la touche ).
5. Appuyez sur la touche : pour modifier le
réglage.
Mode théâtre
Si le mode théâtre est activé, l'éclairage de l'appareil
s'éclaircit lentement à son ouverture et s'assombrit
lentement à sa fermeture.
Activer ou désactiver le mode théâtre
1. Appuyez sur la touche " pour ouvrir le menu
Paramètres.
2. Naviguez jusqu'à Paramètres de l'appareil à
l'aide de la touche (.
3. Pour ouvrir le point de menu, appuyez sur 8.
4. Naviguez jusqu'à Mode théâtre à l'aide de la
touche ).
5. Pour ouvrir le point de menu, appuyez sur :.
6. Choisissez Marche ou Arrêt dans le menu à
l'aide de la touche ).
7. Appuyez sur la touche 8.
Le réglage est mémorisé.
8. Appuyez sur la touche ; pour quitter le menu.
Réinitialiser les réglages d'usine
1. Appuyez sur la touche " pour ouvrir le menu
Paramètres.
2. Naviguez jusqu'à Paramètres de l'appareil à
l'aide de la touche (.
3. Appuyez sur la touche 8.
4. Naviguez jusqu’au point de menu Réglages
usine avec la touche (.
5. Appuyez sur la touche :.
Un signal sonore retentit et un message apparaît
à l'écran pour confirmer la réinitialisation.
6. Appuyez sur la touche 8.
Tous les réglages sont réinitialisés à leur valeur
par défaut.
7. Appuyez sur la touche ; pour quitter le menu.
Activer ou désactiver le mode démo
La fonction de réfrigération de l'appareil est
désactivée. Toutes les autres fonctions demeurent
utilisables.
Remarque : Ne remplissez pas l'appareil de
produits alimentaires en mode démo, car il demeure
à la température de la pièce.
1. Appuyez sur la touche " pour ouvrir le menu
Paramètres.
2. Naviguez jusqu'à Paramètres de l'appareil à
l'aide de la touche (.
3. Appuyez sur la touche 8.
4. Naviguez jusqu'au point de menu Mode démo à
l'aide de la touche (.
5. Appuyez sur la touche :.
6. À l'aide des touches ( ), sélectionnez Activé ou
Désactivé.
7. Appuyez sur la touche 8.
Le réglage est mémorisé.
8. Appuyez sur la touche ; pour quitter le menu.

fr-ca Alarme
46
Mode Sabbat
En mode sabbat, toutes les fonctions non
essentielles sont éteintes afin que vous puissiez
utiliser l'appareil même le jour du Sabbat.
L'appareil éteint les composants suivants :
■ Distributeur de glaçons
■ Signaux sonores
■ Éclairage intérieur
■ Messages affichés à l'écran
■ La luminosité du rétro-éclairage de l'écran
diminue
Activer ou désactiver le mode sabbat
Afficher le mode Sabbat dans le menu Paramètres
Pour activer le mode Sabbat, vous devez d'abord
rendre cette fonction visible dans lesparamètres du
menu :
1. Appuyez sur la touche " pour ouvrir le menu
Paramètres.
2. Naviguez jusqu'au menu Paramètres de
l'appareil à l'aide de la touche (.
3. Appuyez sur la touche 8.
4. Naviguez jusqu'à Mode Sabbat à l'aide de la
touche (.Appuyez sur la touche :.
5. Naviguez jusqu'à Disponible à l'aide de la touche
(.Confirmez avec la touche 8.
6. Appuyez sur la touche ; pour quitter le menu.
La fonction est alors ajoutée au menu Paramètres.
Activer le mode Sabbat
1. Appuyez sur la touche " pour ouvrir le menu
Paramètres.
2. Appuyez sur la touche › pour ouvrir l'écran
Durée mode Sabbat.
3. Sélectionnez un des préréglages ou modifiez la
durée avec les touches A/@.
4. Pour démarrer, appuyez sur la touche <.
L'appareil désactive toutes les fonctions
énoncées.
Désactiver le mode Sabbat
■ Une fois la durée réglée écoulée, l’appareil se
remet en mode normal.
■ Pour mettre fin au mode Sabbat avant que ne
termine de s'écouler cette période, appuyez sur
=.
Réseau domestique
Cette fonction vous permet d'établir une connexion
entre le réfrigérateur et votre terminal mobile.
~ "Home Connect" à la page 47
MAlarme
Al a r me
Alarme de porte
Si la porte de l'appareil reste ouverte pendant une
période prolongée, l'alarme de porte s'allume. Un
message apparaît dans l'affichage.
Désactiver l'alarme de porte
■ Fermer la porte.
Remarque : Pour faire taire l'alarme, il suffit de
confirmer le message sur l'écran. Le message
réapparaît après quelques minutes si la porte est
toujours ouverte.
Alarme de température
Si la température monte trop dans le compartiment
congélateur, l'alarme de température s'allume. Un
message apparaît dans l'affichage. Le message
indique la température la plus chaude ayant régné
dans le compartiment congélateur.
9 ATTENTION
PENDANT LA DÉCONGÉLATION, DES
BACTÉRIES PEUVENT APPARAÎTRE ET LES
ALIMENTS CONGELÉS S'AVARIER.
Ne remettez pas à congeler des produits
alimentaires partiellement ou entièrement
décongelés.
Ne recongelez qu'après avoir les avoir fait cuire
ou rôtir. N’utilisez plus la durée de conservation
dans son intégralité.
Remarque : L’alarme peut s’activer dans les cas
suivants, sans qu'il n'y ait de risque pour les produits
congelés :
■ L'appareil est mis en service ; il ne contient pas
encore de produits alimentaires.
■ De grandes quantités de produits alimentaires
frais ont été rangés.
■ La porte du compartiment congélateur est restée
trop longtemps ouverte.
Éteindre l'alarme de température
1. Assurez-vous que la cause du déclenchement de
l'alarme de température a été écartée.
2. Appuyez sur la touche 8 pour confirmer le
message.
Le message disparaît. Le panneau de commande
affiche de nouveau la température réglée.
A partir de ce moment-là, le système se remet
à déterminer la température la plus élevée
et l'enregistre.

Home Connect fr-ca
47
o Home Connect
Ho me Connect
Cet appareil est compatible Wi-Fi et peut être
commandé à distance via un terminal mobile.
Remarque : Wi-Fi est une marque déposée de la
société Wi-Fi Alliance.
Dans les cas suivants, l’appareil fonctionne comme
un réfrigérateur sans connexion réseau et peut être
manipulé manuellement à l’aide des éléments de
commande :
■ L’appareil n’est pas connecté à un réseau
domestique.
■ Le service Home Connect n’est pas disponible
dans le pays où est installé l’appareil. Vous
trouverez la liste des pays dans lesquels Home
Connect est disponible sur www.home-
connect.com.
Remarque : Respectez les consignes de sécurité
figurant dans la présente notice d’utilisation.
Assurez-vous qu'elles sont également respectées si
vous utilisez l'appareil via l'application Home
Connect alors que vous n'êtes pas à la maison.
~ "Consignes de sécurité importantes"
à la page 30
Observez également les consignes dans
l’application Home Connect.
Configurer le réseau domestique
Remarques
■ Après la mise en marche de l'appareil, attendez
au moins 2 minutes avant de configurer Home
Connect. L'initialisation interne de l'appareil est
alors terminée.
■ Observez la fiche Home Connect fournie avec
l'appareil ou disponible sous
www.thermador.com parmi les notices à
télécharger. Saisissez le numéro E de votre
appareil dans le champ de recherche.
3 étapes de base sont nécessaires pour connecter
votre appareil au réseau domestique WLAN (Wi-Fi).
1. Installez l'application.
2. Connectez le réfrigérateur au réseau domestique
WLAN (Wi-Fi).
3. Connectez le réfrigérateur à l'application
Home Connect.
Lors de la première ouverture du menu, vous êtes
guidé automatiquement à travers la configuration
initiale. Suivez les instructions sur le panneau de
commande. Vous trouverez des informations
complémentaires dans les chapitres suivants.
Le menu Réseau domestique comprend les sous-
menus suivants :
■ Connexion
■ Connecter avec l’application
■ Mise à jour du logiciel
■ Supprimer les paramètres réseau
Ouvrir le menu Réseau domestique
1. Appuyez sur la touche pour ouvrir le menu
Paramètres".
2. Naviguez jusqu'à Paramètres de l'appareil à
l'aide de la touche (.
3. Appuyez sur la touche 8.
4. Naviguez jusqu’au point de menu Réseau
domestique avec la touche (.
5. Appuyez sur la touche :.
Remarque : Lors de la première ouverture du menu,
vous êtes guidé automatiquement à travers la
configuration initiale. Suivez les instructions sur le
panneau de commande.
Configuration de la connexion au réseau
domestique
Lors de la première ouverture du menu, vous êtes
guidé automatiquement à travers la configuration
initiale. Suivez les instructions sur le panneau de
commande.
1. Installez l'application Home Connect sur votre
terminal mobile.
2. Ouvrez le menu Réseau domestique sur le
réfrigérateur.
3. Ouvrez l'application sur le terminal mobile.
4. Connectez-vous à l'application ou enregistrez-
vous si vous ne disposez pas encore d'un accès.
5. Vérifiez si le routeur de votre réseau domestique
comporte une fonction WPS pour la connexion
automatique.
6. Si cette fonction est présente, lancez la
connexion automatique au réseau avec la
touche 8 et suivez les instructions sur le
panneau de commande.
Suivez les instructions sur le panneau de
commande.
7. Lancez une connexion manuelle au réseau si
cette fonction n'est pas présente, si vous avez un
doute quant à sa présence ou en cas d'échec de
la connexion automatique.
Le réfrigérateur génère provisoirement son
propre réseau auquel le terminal mobile est
connecté.
8. Lancez la connexion manuelle au réseau dans
l'application du terminal mobile.
Une fois la connexion établie entre le réfrigérateur et
le terminal mobile, une connexion est établie entre le
réfrigérateur et votre réseau domestique (Wi-Fi).
Remarque : En cas d'impossibilité d'établir la
connexion, vérifiez la qualité de la réception.
~ "Contrôler l'intensité du signal" à la page 47
Contrôler l'intensité du signal
L'intensité du signal est indiquée dans la fenêtre de
démarrage du menu Réseau domestique.Le signal
doit avoir une intensité minimale de 50 %. La
connexion peut être interrompue si l’intensité du
signal est trop faible.

fr-ca Home Connect
48
Améliorer l'intensité du signal
■ Rapprochez davantage le routeur du
réfrigérateur.
■ Assurez-vous que la connexion n’est pas
perturbée par des murs qui font écran.
■ Installez un répéteur pour amplifier le signal.
Connecter le réfrigérateur à l’application
Home Connect
Avec ce menu, vous pouvez connecter votre
réfrigérateur à des terminaux mobiles.
1. Installez l’application Home Connect sur votre
terminal mobile et connectez ou enregistrez-vous.
2. Ouvrez le menu Réseau domestique sur le
réfrigérateur.
3. Naviguez jusqu’au point de menu Connexion à
l'application avec la touche ).
4. Pour ouvrir le point de menu, appuyez sur la
touche :.
5. Confirmez le message pour afficher le
réfrigérateur dans l’application.
6. Ouvrez l’application et attendez que le
réfrigérateur s’affiche.
Confirmez la connexion entre l’application et le
réfrigérateur en appuyant sur Ajouter.
Si le réfrigérateur ne s’affiche pas
automatiquement, cliquez dans l’application sur
Ajouter l’appareil et suivez les instructions. Dès
que votre réfrigérateur s’affiche, ajoutez-le avec +.
7. Suivez les instructions de l’application jusqu’à la
fin de l’opération.
Installer une mise à jour du logiciel Home
Connect
Le réfrigérateur vérifie régulièrement si des mises à
jour du logiciel Home Connect sont disponibles.
La touche Info @ est visible lorsqu'une mise à jour
est disponible.
Installer une mise à jour :
1. Appuyez sur la touche @.
Une fenêtre d'avis avec les étapes d'installation
du nouveau logiciel apparaît.
2. Appuyez sur la touche 8 pour fermer la
remarque.
3. Ouvrez le menu Réseau domestique sur le
réfrigérateur.
4. Naviguez jusqu’au point de menu Mise à jour
logicielle avec la touche ).
5. Pour ouvrir le point de menu, appuyez sur la
touche :.
Remarque : La touche : est visible uniquement en
cas de disponibilité d'une mise à jour.
Le logiciel est installé.
6. Un avis apparaît lorsque l'installation est
terminée.
7. Appuyez sur la touche 8 pour fermer la
remarque.
Accès au service à la clientèle
Lorsque vous contactez le service à la cientèle,
celui-ci peut accéder à votre appareil et à son état
avec votre consentement. Pour ce faire, votre
appareil doit avoir été connecté au réseau
domestique.
Vous trouverez davantage d’informations au sujet de
l’accès service à la clientèle et de sa disponibilité
dans votre pays sous www.home-connect.com, dans
Aide&Soutien.
1. Contactez le service à la clientèle.
~ "Service à la clientèle" à la page 56
2. Confirmez le début de l’accès du service à la
clientèle sur votre appareil dans l’application.
Pendant l’accès du service à la clientèle, le
symbole Ù apparaît sur le panneau de
commande.
3. Dès que le service à la clientèle a collecté les
informations nécessaires, il termine l’accès.
Remarque : Vous pouvez interrompre le diagnostic
à distance de manière précoce en désactivant
l’accès du service à la clientèle dans
l’application Home Connect.
Supprimer les paramètres réseau
Si un problème se présente lors de la tentative de
branchement ou si vous souhaitez brancher
l’appareil à un autre réseau domestique WLAN (Wi-
Fi), les réglages de Home Connect peuvent être
réinitialisés.
1. Ouvrez le menu Réseau domestique sur le
réfrigérateur.
2. Avec la touche ), faites défiler jusqu'au point de
menu Supprimer les paramètres réseau.
3. Pour ouvrir le point de menu, appuyez sur la
touche :.
4. Confirmez le message pour supprimer les
paramètres réseau.
Pour rebrancher ensuite l'appareil au réseau
domestique WLAN (Wi-Fi), refaites la configuration
initiale.
~ "Configuration de la connexion au réseau
domestique" à la page 47

Home Connect fr-ca
49
Activer ou désactiver la connexion au
réseau domestique WLAN (Wi-Fi)
1. Ouvrez le menu Réseau domestique sur le
réfrigérateur.
~ "Ouvrir le menu Réseau domestique"
à la page 47
Remarque : Lors de la première ouverture du menu,
vous êtes guidé automatiquement à travers la
configuration initiale. Suivez les instructions sur le
panneau de commande.
2. Pour ouvrir le point de menu Connexion,
appuyez sur la touche :.
3. Sélectionnez le réglage souhaité avec les
touches ( ).
4. Appuyez sur 8 pour sélectionner le réglage.
Remarque : Si vous éteignez la connexion Home
Connect, vous ne pourrez plus commander votre
électroménager avec votre appareil mobile.
Remarque sur la protection des données
Lors de la première connexion de votre appareil
Home Connect à un réseau domestique WLAN (Wi-
Fi) branché à Internet, votre appareil transmet les
catégories de données suivantes au serveur
Home Connect (premier enregistrement) :
■ Code d’appareil univoque (constitué de clés
d’appareil ainsi que de l’adresse MAC du module
de communication Wi-Fi intégré).
■ Le certificat de sécurité du module de
communication Wi-Fi (pour la protection
informatique de la connexion).
■ La version actuelle du logiciel et du matériel de
l'appareil ménager.
■ L'état d’une précédente réinitialisation éventuelle
des réglages d’usine.
Ce premier enregistrement prépare l’utilisation des
fonctionnalités Home Connect et ne s’avère
nécessaire qu’au moment où vous voulez utiliser les
fonctions Home Connect pour la première fois.
Remarque : Veuillez noter que les fonctionnalités
Home Connect ne sont utilisables qu'avec
l'application Home Connect. Vous pouvez consulter
les informations sur la protection des données dans
l’application Home Connect.

fr-ca Compartiment congélateur
50
WCompartiment
congélateur
Co mpar t i ment c ongél at eur
Le compartiment congélateur sert à :
■ stocker des produits surgelés
■ la préparation de glaçons
■ congeler des produits alimentaires
La température est réglable entre –11 °F (-
24 °C)...et +7 °F (-14 °C).
La congélation vous permet de stocker longtemps
les denrées périssables sans pertes notables
de qualité vu que les basses températures
ralentissent fortement la détérioration ou la stoppent.
L'aspect, l'arôme et l'ensemble des ingrédients
demeurent préservés dans leur très large majorité.
Le temps nécessaire à ce que les produits frais
rangés au congélateur congèlent à cœur dépend
des facteurs suivants :
■ Température réglée
■ Nature du produit alimentaire
■ Degré de remplissage du compartiment
congélateur
■ Quantité et type de stockage
Utiliser l’intégralité du volume de
congélation
Pour loger la quantité maximale de produits
congelés :
■ retirez toutes les pièces d'équipement.
■ Déposez les produits alimentaires directement
sur les clayettes et le fond du compartiment
congélateur.
Achats de produits surgelés
■ Vérifiez que l'emballage est intact.
■ Ne dépassez pas la date de péremption.
■ La température dans le congélateur du
supermarché doit être au maximum de 0 °F (–
18 °C).
■ Ne brisez pas la chaîne de congélation : utilisez
de préférence un sac isotherme pour le transport
puis rangez les produits le plus rapidement
possible dans le compartiment congélateur.
Consignes de rangement
■ Congelez des quantités d'aliments plus
importantes dans le compartiment supérieur.
C'est là qu'ils seront congelés le plus vite et en
douceur.
■ Étalez les produits alimentaires sur une grande
surface dans les compartiments ou les bacs
à produits congelés.
■ Veillez à ce que les produits alimentaires
à congeler n'entrent pas en contact avec d'autres
déjà congelés.
Si nécessaire, réordonnez les produits
alimentaires congelés à cœur déjà présents dans
les bacs.
■ Consigne importante pour que l'air circule de
manière impeccable dans l'appareil :
Insérez le bac à produits congelés jusqu'à la
butée.
Congeler des produits frais
Pour congeler les aliments, n’utilisez que des
aliments frais et d’un aspect impeccable.
Les aliments consommés cuits (y compris au four)
et rôtis se prêtent mieux à la congélation que les
aliments consommés crus.
Avant la congélation, il faut soumettre les aliments
à des processus de préparation différents selon
la variété, pour préserver au mieux leur valeur
nutritive, leur arôme et leur couleur :
■ Légumes : Lavage, broyage, blanchiment.
■ Fruits : Lavage, dénoyautage et épluchage au
besoin ; ajoutez le cas échéant du sucre ou de
l'acide ascorbique en solution.
Vous trouverez des conseils à ce sujet dans la
littérature spécialisée.
Vont au congélateur
■ Pain et pâtisserie
■ Poisson et fruits de mer
■ Viande
■ Le gibier et la volaille
■ Fruits, légumes et herbes
■ Les œufs sans coque
■ Les produits laitiers, par ex. le fromage, le beurre
et le fromage blanc
■ Les plats précuisinés et restes de plats, par
exemple soupes, ragoûts, viande cuite, poisson
cuit, plats à base de pommes de terre, soufflés et
mets sucrés
Dégivrer l’appareil fr-ca
51
Ne vont pas au congélateur
■ Variétés de légumes habituellement dégustées
crues, par exemple les salades ou radis
■ Œufs avec coque ou les œufs cuits durs
■ Raisins
■ Pommes, poires, pêches entières
■ Yaourt, lait caillé, crème acidulée, crème fraîche
et mayonnaise
Emballer les surgelés
La nature correcte de l'emballage et le choix
du matériau conditionnent de manière déterminante
la préservation de la qualité du produit, et évitent
l'apparition de brûlures par le froid.
1. Placez les aliments dans l’emballage.
2. Pressez pour chasser l’air.
3. Fermez hermétiquement l'emballage afin que les
produits alimentaires ne perdent pas leur goût ou
ne sèchent pas.
4. Indiquez sur l’emballage le contenu et la date
de congélation.
Emballage adapté :
■ Feuilles en plastique
■ Feuilles en polyéthylène
■ Feuilles d’aluminium
■ Boîtes de congélation
Moyens de fermeture appropriés :
■ Caoutchoucs
■ Clips en plastique
■ Rubans adhésifs résistants au froid
Emballage non approprié :
■ Papier d’emballage
■ Papier sulfurisé
■ Cellophane
■ Sacs-poubelles et sacs d’achat déjà utilisés
Durée de conservation des aliments congelés à –
18 °C
Décongélation des produits
Il faut adapter la méthode de décongélation au
produit alimentaire concerné et au but d'utilisation
afin de préserver au mieux la qualité du produit.
Méthodes de décongélation :
■ dans le compartiment réfrigérateur (convient
particulièrement aux denrées d'origine animale
comme le poisson, la viande, le fromage et le
fromage blanc)
■ À la température ambiante (pain)
■ Au micro-ondes (produits alimentaires destinés
à une consommation ou une préparation
immédiate)
■ Four / cuisinière (produits alimentaires destinés
à une consommation ou une préparation
immédiate)
9 ATTENTION
Ne remettez pas à congeler des produits
alimentaires partiellement ou entièrement
décongelés.Vous ne pouvez recongeler
qu'après avoir transformé la denrée en plat prêt
à déguster (plat cuit ou rôti).
N'utilisez plus intégralement la durée maximale
de conservation du produit congelé.
=Dégivrer l’appareil
Dégi vr er l ’ appar ei l
Compartiment congélateur
Grâce au système NoFrost entièrement automatique,
le compartiment congélateur ne se couvre pas
de givre. Il n’est plus nécessaire de dégivrer.
Poisson, charcuterie, plats pré-cuisinés,
pâtisseries :
jusqu’à 6 mois
Viande, volaille : jusqu’à 8 mois
Fruits et légumes : jusqu’à 12 mois

fr-ca Nettoyage
52
DNettoyage
Ne t t o y a g e
9 ATTENTION
ÉVITEZ D'ENDOMMAGER L'APPAREIL ET SES
PIÈCES D'ÉQUIPEMENT.
■ N’utilisez aucun produit de nettoyage ni aucun
solvant contenant du sable, du chlorure ou
de l’acide.
■ N’utilisez jamais d’éponges abrasives
ou susceptibles de rayer.
De la corrosion peut apparaître sur les
surfaces métalliques.
■ Ne nettoyez jamais les clayettes et les bacs au
lave-vaisselle.
Ces pièces pourraient se déformer!
Nettoyer l'écran
Suite au changement de températures et à l'humidité
de l'air, les éléments de commande peuvent
s'embuer.
Aux fins du nettoyage, activez le verrouillage de
nettoyage.
~ "Verrouillage de nettoyage" à la page 43
Utilisez un chiffon en microfibres pour le nettoyage.
Nettoyer le compartiment intérieur de
l'appareil
Procédez comme suit :
1. Appuyez sur l’interrupteur principal Marche /
Arrêt.
2. Sortez les produits alimentaires et rangez-les
dans un endroit frais.
Si applicable : Déposez l'accumulateur de froid
sur les produits alimentaires.
3. Ne nettoyez l’appareil qu’avec un chiffon doux,
de l’eau tiède et du produit à vaisselle présentant
un pH neutre.
9 ATTENTION
Veillez à ce que l’eau de rinçage ne pénètre
pas dans le système d’éclairage et qu’elle
ne gagne pas la zone d’évaporation via
l’orifice d’écoulement.
4. Essuyez le joint de porte avec de l'eau claire
et frottez soigneusement pour le sécher.
5. Raccordez à nouveau l'appareil, mettez-le sous
tension et rangez les produits alimentaires.
Nettoyer l’équipement
Pour nettoyer, retirer les pièces variables
de l'appareil.
~ "Équipement" à la page 39
Consignes d'entretien pour les surfaces
en inox
Pour nettoyer les surfaces en inox, n'utilisez que des
nettoyants et un linge spécialement conçus pour ce
type de surface.
Pour obtenir un linge spécialement conçu pour les
surfaces en inox, adressez-vous au service à la
clientèle.
Afin de prévenir les marques à la surface de
l'appareil, il faut essuyer la surface en inox dans la
direction de sa structure.

Bruits fr-ca
53
>Bruits
Br u i t s
Bruits normaux
Bourdonnement : Un moteur tourne, par exemple le
groupe frigorifique, un ventilateur.
Gargouillis, ronflement ou clapotis : Le fluide
frigorigène circule dans les tuyaux.
Cliquetis : Le moteur, les interrupteurs ou les
électrovannes s’allument / s’éteignent.
Craquement : Le dégivrage automatique est en
cours.
Prévenir les bruits
L’appareil ne repose pas d’aplomb : Ajustez
l’appareil à l’aide d’un niveau à bulle. Si nécessaire,
insérez quelque chose sous l'appareil.
Des récipients, clayettes ou rangements vacillent
ou se coincent : Vérifiez les pièces d'équipement
amovibles et replacez-les au besoin.
9Éclairage
Éc l ai r age
Votre appareil est équipé d’un éclairage par LED ne
demandant pas d’entretien.
Seul le service à la clientèle ou des spécialistes
agréés sont autorisés à réparer l'éclairage.
fr-ca Que faire en cas de problème.
54
3 Que faire en de problème.
Que faire en cas de pr obl ème.
Avant d’appeler le service à la clientèle, veuillez vérifier si le tableau ci-dessous ne contient pas déjà la solution
qu'il vous faut.
Appareil
--------
La température réelle diffère fortement de la température réglée.
Éteindre l'appareil pendant 5 minutes.
~ "Arrêter et remiser l’appareil" à la page 42
Si la température est trop élevée, vérifiez-la à nouveau au bout de
quelques heures.
Si la température est trop basse, vérifiez-la à nouveau le jour suivant.
Aucun voyant ne s’allume.
Fiche mâle incorrectement branchée dans la prise de courant. Rebranchez la fiche de contact.
Fusible déclenché. Inspecter les fusibles.
Le courant est en panne. Vérifier la présence de courant.
Le groupe frigorifique s’enclenche de plus en plus souvent et longtemps.
L'appareil a été ouvert fréquemment. N’ouvrez pas l’appareil inutilement.
Les orifices de ventilation sont bouchés. Enlevez les obstacles.
L'appareil est rempli de grandes quantités de produits alimentaires
frais.
Activez la super-réfrigération suffisamment à l'avance.
L’appareil ne réfrigère pas, l’affichage et l’éclairage sont allumés.
Le mode démonstration est activé. Éteignez le mode Vacances.
~ "Activer ou désactiver le mode démo" à la page 45
La porte ne s'ouvre pas en appuyant dessus.
Un mode spécial a désactivé l'ouverture automatique de la porte. Ouvrez la porte en la saisissant par le bas, sous la plaque d'ameuble-
ment, ou désactivez le mode spécial.
~ "Activer ou désactiver le mode sabbat" à la page 46
Le mode Pull-to-open est activé. Réglez l'appareil en mode Push-to-open.
~ "Ouverture de porte automatique" à la page 44
La force nécessaire au déclenchement est trop élevée. Abaissez la force nécessaire au déclenchement.
~ "Ouverture de porte automatique" à la page 44
Fusible déclenché. Inspectez les fusibles.
Le courant est en panne. Vérifier la présence de courant.

Que faire en cas de problème. fr-ca
55
Distributeur de glaçons
--------
Le distributeur de glaçons ne fonctionne pas.
La production de glace a été désactivée. Relancer la production de glace.
Le compartiment congélateur n'est pas assez froid. Abaissez la température.
~ "Utiliser l'appareil" à la page 42
Le bac à glaçons n'est pas correctement mis en place. Remettez en place le bac à glaçons.
Le distributeur de glaçons est en panne. Contactez le service à la clientèle.
~ "Service à la clientèle" à la page 56
Aucune alimentation d'eau. Contrôlez le raccordement à la source d'eau et contactez un installa-
teur au besoin.
La pression de l’eau est basse. Raccordez l'appareil à une conduite dont la pression hydraulique est
suffisante.
Le tube d'entrée est plié. Coupez l'arrivée d'eau, redressez le tube. Remplacez le tube au
besoin.
Les glaçons sont déformés ou trop peu nombreux, la pression de l'eau est inhabituellement faible.
Il y a trop peu de glaçons dans le réservoir si l'appareil vient d'être
allumé ou si le distributeur a servi abondamment.
Il faut environ 24 heures au réservoir à glaçons vide pour se remplir.
La production de glaçon s'arrête automatiquement alors que le réser-
voir de glaçons n'est pas plein.
Ne pas stocker la palette à glace sur les glaçons dans le réservoir à
glaçons. Dans le cas contraire, le capteur ne reconnait pas le niveau
de remplissage réel du réservoir.
La pression de l’eau est basse. Raccordez l'appareil à une conduite dont la pression hydraulique est
suffisante.
Le filtre à eau est bloqué ou doit être remplacé. Changez le filtre à eau.
Le congélateur n'est pas assez froid. Abaissez la température.
~ "Utiliser l'appareil" à la page 42
De l’eau s'écoule de l’appareil.
La prise d'eau n'est pas étanche. Assurez-vous que les raccords sont bien serrés et que le boyau d'eau
est en bonne condition.
Si le boyau d'eau est endommagé, contactez le service à la clientèle
pour le faire remplacer. Tout remplacement doit être effectué par le
service à la clientèle ou une personne dûment qualifiée.N’utilisez que
des pièces de rechange d'origine venant du fabricant.

fr-ca Service à la clientèle
56
4Service à la clientèle
Se r v i c e à la cl i ent èl e
Si le problème persiste, veuillez vous adresser à
notre service à la clientèle. Nous trouverons toujours
une solution adaptée afin d’éviter entre autres des
déplacements inutiles d'un technicien.
Vous trouverez ici ou dans le répertoire de service
les coordonnées du service à la clientèle le plus
proche.
Lors de l’appel, veuillez indiquer le numéro de série
(E-Nr) et le numéro de fabrication (FD) que vous
trouverez sur la plaque signalétique.
~ "Présentation de l’appareil" à la page 37
Faites confiance aux compétences du fabricant.
Vous vous assurerez ainsi que les réparations sont
réalisées par des techniciens dûment formés qui
disposent des pièces de rechange d’origine
convenant à votre appareil électroménager.
Autodiagnostic de l’appareil
Votre appareil comprend un programme
d'autodiagnostic affichant les défauts que votre
service à la clientèle peut corriger.
1. Appuyez sur la touche " pour ouvrir le menu
Paramètres.
2. Naviguez jusqu'au point de menu
Autodiagnostic avec la touche ).
3. Lancer l’autodiagnostic de l’appareil avec la
touche 8.
L'autodiagnostic commence.
4. Toutes les erreurs constatées seront affichées à
l'écran. Veuillez suivre les instructions pour les
corriger.
5. L'appareil redémarre.
6. Pendant 10 secondes, l'écran indiquera que
l'autodiagnostic est terminé.
Après l'autodiagnostic, l'appareil retourne en mode
d'opération normal.
Commande de réparation et conseils en
cas de problèmes
Vous trouverez les données de contact pour tous
les pays dans l’annuaire de service à la clientèle ci-
joint.
--------
États-
Unis
1-800-735-4328 Sans frais aux États-Unis
CANAD
A
1-800-735-4328

es-mx
57
es Índice
es I nst r ucci ones de uso
( Indicaciones de seguridad
importantes . . . . . . . . . . . . . . . . . . . . . . . . . . 59
Definiciones. . . . . . . . . . . . . . . . . . . . . . . . . . . . . . 59
Acerca de este manual . . . . . . . . . . . . . . . . . . . . . 59
Introducción . . . . . . . . . . . . . . . . . . . . . . . . . . . . .59
Limitación del grupo de usuarios . . . . . . . . . . . . .59
Peligro de explosión . . . . . . . . . . . . . . . . . . . . . . .59
Riesgo de descarga eléctrica . . . . . . . . . . . . . . . .60
Peligro de quemaduras por frío . . . . . . . . . . . . . . 60
Peligro de lesiones . . . . . . . . . . . . . . . . . . . . . . . . 60
Peligro de incendio/peligro a causa de
líquido refrigerante . . . . . . . . . . . . . . . . . . . . . . . . 60
Riesgo de incendio . . . . . . . . . . . . . . . . . . . . . . . .60
Peligro de asfixia. . . . . . . . . . . . . . . . . . . . . . . . . .61
Daños materiales . . . . . . . . . . . . . . . . . . . . . . . . . 61
Peso . . . . . . . . . . . . . . . . . . . . . . . . . . . . . . . . . . .61
Advertencias en virtud de la Proposición
65 del estado de California. . . . . . . . . . . . . . . . . .61
8 Uso previsto . . . . . . . . . . . . . . . . . . . . . . . . . 62
7 Protección del medio ambiente. . . . . . . . . . 62
Embalaje . . . . . . . . . . . . . . . . . . . . . . . . . . . . . . . .62
Aparato usado. . . . . . . . . . . . . . . . . . . . . . . . . . . .62
5 Instalación y conexión . . . . . . . . . . . . . . . . . 62
Material entregado . . . . . . . . . . . . . . . . . . . . . . . . 62
Datos técnicos . . . . . . . . . . . . . . . . . . . . . . . . . . .62
Instalar el aparato . . . . . . . . . . . . . . . . . . . . . . . . .62
Verificar el hueco de encastre. . . . . . . . . . . . . . . .62
Instalación side by side. . . . . . . . . . . . . . . . . . . . .62
Ahorrar energía . . . . . . . . . . . . . . . . . . . . . . . . . . .63
Antes del primer uso. . . . . . . . . . . . . . . . . . . . . . . 64
Conexión a la toma de agua. . . . . . . . . . . . . . . . .64
Conexión a la red eléctrica . . . . . . . . . . . . . . . . . .64
* Familiarizándose con el aparato . . . . . . . . . 65
Aparato . . . . . . . . . . . . . . . . . . . . . . . . . . . . . . . . .65
Controles. . . . . . . . . . . . . . . . . . . . . . . . . . . . . . . .66
Equipamiento . . . . . . . . . . . . . . . . . . . . . . . . . . . .67
1 Manejo del electrodoméstico. . . . . . . . . . . . 70
Encender el aparato . . . . . . . . . . . . . . . . . . . . . . .70
Apagar y cerrar el aparato . . . . . . . . . . . . . . . . . .70
Seleccionar el idioma . . . . . . . . . . . . . . . . . . . . . . 70
Ajustar de la unidad de temperatura. . . . . . . . . . . 70
Ajustar la temperatura . . . . . . . . . . . . . . . . . . . . . . 70
Supercongelación . . . . . . . . . . . . . . . . . . . . . . . . .70
Bloqueo de limpieza . . . . . . . . . . . . . . . . . . . . . . .71
Encender o apagar la producción de
cubitos de hielo. . . . . . . . . . . . . . . . . . . . . . . . . . .71
Restablecer el contador del filtro de agua . . . . . . 71
Modo Eco. . . . . . . . . . . . . . . . . . . . . . . . . . . . . . . 71
Autocomprobación . . . . . . . . . . . . . . . . . . . . . . . . 71
Ajustar el brillo del panel de control. . . . . . . . . . . 72
Encender o apagar el tono de pulsación
de las teclas . . . . . . . . . . . . . . . . . . . . . . . . . . . . . 72
Ajustar el volumen de las teclas. . . . . . . . . . . . . . 72
Ajustar el volumen del tono de la señal . . . . . . . . 72
Bloqueo de limpieza automático . . . . . . . . . . . . . 72
Apertura automática de puerta. . . . . . . . . . . . . . . 72
Encender y apagar el contador del filtro
de agua . . . . . . . . . . . . . . . . . . . . . . . . . . . . . . . . 73
Modo Teatro . . . . . . . . . . . . . . . . . . . . . . . . . . . . . 73
Restablecer el ajuste de fábrica . . . . . . . . . . . . . . 73
Encender o apagar el Modo Demo . . . . . . . . . . . 73
Modo Sabbat . . . . . . . . . . . . . . . . . . . . . . . . . . . . 74
Red de internet doméstica . . . . . . . . . . . . . . . . . . 74
M Alarma. . . . . . . . . . . . . . . . . . . . . . . . . . . . . . 74
Alarma de la puerta . . . . . . . . . . . . . . . . . . . . . . . 74
Alarma de temperatura. . . . . . . . . . . . . . . . . . . . . 74
o Home Connect. . . . . . . . . . . . . . . . . . . . . . . . 75
Configurar la red de internet doméstica . . . . . . . . 75
Conectar el refrigerador con la
aplicación Home Connect . . . . . . . . . . . . . . . . . . 76
Instalar la actualización de software de
Home Connect . . . . . . . . . . . . . . . . . . . . . . . . . . . 76
Acceso del servicio al cliente . . . . . . . . . . . . . . . . 76
Borrar los ajustes de red . . . . . . . . . . . . . . . . . . . 76
Activar o desactivar la conexión con la red
doméstica WLAN (Wi-Fi). . . . . . . . . . . . . . . . . . . . 77
Indicaciones sobre protección de datos. . . . . . . . 77
W Congelador . . . . . . . . . . . . . . . . . . . . . . . . . . 77
Aprovechar toda la capacidad de
congelación del aparato. . . . . . . . . . . . . . . . . . . . 77
Al comprar alimentos congelados . . . . . . . . . . . . 77
Al ordenar prestar atención . . . . . . . . . . . . . . . . . 78
Congelar los alimentos frescos . . . . . . . . . . . . . . 78
Descongelar los productos congelados. . . . . . . . 78
= Descongelación . . . . . . . . . . . . . . . . . . . . . . 79
Congelador. . . . . . . . . . . . . . . . . . . . . . . . . . . . . . 79
D Limpiar . . . . . . . . . . . . . . . . . . . . . . . . . . . . . 79
Limpiar la pantalla . . . . . . . . . . . . . . . . . . . . . . . . 79
Limpiar el interior del aparato. . . . . . . . . . . . . . . . 79
Limpiar los accesorios . . . . . . . . . . . . . . . . . . . . . 79
Indicación para la conservación de
superficies de acero inoxidable . . . . . . . . . . . . . . 79

es-mx
58
> Ruidos . . . . . . . . . . . . . . . . . . . . . . . . . . . . . . 80
Ruidos normales . . . . . . . . . . . . . . . . . . . . . . . . . .80
Evitar ruidos . . . . . . . . . . . . . . . . . . . . . . . . . . . . . 80
9 Iluminación . . . . . . . . . . . . . . . . . . . . . . . . . . 80
3 ¿Qué hacer en caso de avería? . . . . . . . . . . 81
Aparato . . . . . . . . . . . . . . . . . . . . . . . . . . . . . . . . .81
Máquina de hielo. . . . . . . . . . . . . . . . . . . . . . . . . .82
4 Servicio al cliente . . . . . . . . . . . . . . . . . . . . . 83
Autoprueba del aparato . . . . . . . . . . . . . . . . . . . . 83
Solicitud de reparación y asesoramiento
en caso de averías . . . . . . . . . . . . . . . . . . . . . . . . 83
9 Indicaciones de seguridad importantes
¡LEER Y CONSERVAR ESTAS INDICACIONES!
Indicaciones de seguridad importantes es-mx
59
(Indicaciones de seguridad importantes
I ndi cac i ones de segur i dad impor t ant es
¡LEER Y CONSERVAR ESTAS INDICACIONES!
Definiciones
9 ADVERTENCIA
Hacier caso omiso de esta advertencia
puede causar lesiones graves o la
muerte.
9 ATENCION
Hacer caso omiso de esta advertencia
puede provocar lesiones leves o
moderadas.
AVISO: Hacer caso omiso de esta
advertencia puede causar daños al
aparato.
Nota: Esto indica información y/o consejos
importantes.
Acerca de este manual
■ Lea y siga las instrucciones de uso y de
montaje. Ellas contienen información
importante sobre la instalación, uso y
mantenimiento del aparato.
■ El fabricante no se hace responsable, si
usted ignora las indicaciones y
advertencias de las instrucciones de uso
y montaje.
■ Guarde todas las instrucciones de uso y
de montaje para futuras consultas y
posteriores propietarios.
Introducción
■ Este aparato cumple las normas
específicas de seguridad para aparatos
eléctricos.
■ La estanqueidad del circuito de
refrigeración viene verificada de fábrica.
Limitación del grupo de usuarios
■ Evite riesgos para los niños y las
personas vulnerables.
■ Este aparato solo podrá ser usado por
niños y personas cuyas facultades
físicas, sensoriales o mentales estén
mermadas o cuya falta de conocimientos
o de experiencia les impida hacer un uso
seguro de los mismos si lo hacen bajo
supervisión de una persona responsable
de su seguridad o hayan sido instruidos
previamente en su uso y hayan
comprendido los peligros que pueden
derivarse del mismo.
■ Se debe vigilar a los niños para
asegurarse de que no jueguen con el
aparato.
Peligro de explosión
■ Si las aberturas de ventilación del
aparato se encuentran cerradas, puede
generarse una mezcla inflamable de aire
y gas si se produce una fuga en el
circuito de enfriamiento.
No cerrar las aberturas de ventilación de
la carcasa del aparato o de la carcasa
de la instalación.
■ Nunca use aparatos eléctricos en el
interior del aparato (por ejemplo,
calefactores o máquinas eléctricas para
hacer hielo).
■ No guarde productos que contengan
gases propelentes o inflamables (por
ejemplo, latas de aerosol), ni tampoco
materiales explosivos en el aparato.
■ Almacene el alcohol de alta graduación
solamente en recipientes herméticos y
en posición vertical.
■ A excepción de las indicaciones del
fabricante, no adoptar medidas
adicionales para acelerar la
descongelación.
9 Indicaciones de seguridad importantes
¡LEER Y CONSERVAR ESTAS INDICACIONES!
es-mx Indicaciones de seguridad importantes
60
Riesgo de descarga eléctrica
Una incorrecta instalación o reparación
puede implicar serios peligros para el
usuario.
■ Al instalar el aparato, asegúrese de que
el cable de conexión a la red eléctrica no
quede atrapado ni se dañe.
■ Para evitar peligros, desconecte el
aparato inmediatamente en caso de que
el cable de conexión esté dañado.
Póngase en contacto con el fabricante, el
Servicio de atención al cliente o con una
persona con una cualificación similar
para que sustituya el cable de red.
■ No utilice nunca tomas de corriente
múltiples ni cables de prolongación o
adaptadores.
■ Antes de que realice trabajos de
mantenimiento o instale el aparato,
desenchúfelo de la red eléctrica o
apague el fusible.
Antes de limpiar el electrodoméstico,
pulsar el interruptor principal para
conexión/desconexión para apagarlo.
Es posible cambiar de lugar las bandejas
de cristal u otras piezas de equipamiento
sin peligro mientras el aparato está
conectado.
■ Nunca corte o retire el tercer conductor
(conductor a tierra) del cable de
conexión a la red eléctrica.
■ Nunca utilice ningún tipo de limpiador de
vapor para derretir la escarcha o limpiar
el aparato. El vapor puede llegar a las
piezas eléctricas y causar un
cortocircuito.
■ El aparato, cables y accesorios
solamente deben ser reparados o
cambiados por el fabricante o por un
proveedor autorizado.
■ Utilice únicamente piezas originales del
fabricante.
El fabricante garantiza que estas piezas
cumplen los requisitos de seguridad.
Peligro de quemaduras por frío
■ Nunca introduzca los alimentos
congelados - inmediatamente después
de sacarlos del congelador -
directamente en la boca.
■ Evite el contacto prolongado de la piel
con los alimentos congelados, el hielo o
los tubos del congelador.
Peligro de lesiones
■ Los envases con bebidas carbonatadas
pueden estallar.
■ No almacene envases con bebidas
carbonatadas en el congelador.
Peligro de incendio/peligro a causa
de líquido refrigerante
En los tubos del circuito de enfriamiento
fluye una pequeña cantidad de un
refrigerante ecológico, pero inflamable
(R600a). No daña la capa de ozono ni
aumenta tampoco el efecto invernadero. Si
el líquido refrigerante sale a chorro puede
inflamarse o provocar lesiones en los ojos.
■ No dañar los tubos.
En caso de daños en los tubos:
■ Mantener las fuentes de fuego o focos
de ignición alejados del aparato.
■ Ventilar el lugar.
■ Apagar el aparato y desconectar el
enchufe.
■ Llamar al Servicio de Atención al Cliente.
Riesgo de incendio
Las tomas de corriente múltiples
portátiles o las fuentes de alimentación
portátiles pueden sobrecalentarse y
provocar incendios.
■ No colocar tomas de corriente múltiples
portátiles ni fuentes de alimentación
portátiles detrás del aparato.
9 Indicaciones de seguridad importantes
¡LEER Y CONSERVAR ESTAS INDICACIONES!
Indicaciones de seguridad importantes es-mx
61
Peligro de asfixia
■ En caso de disponer la unidad de una
cerradura, guardar la llave fuera del
alcance de los niños.
■ No dejar el embalaje o sus partes a los
niños.
Daños materiales
Para evitar daños materiales:
■ No pise, ni se apoye sobre el zócalo,
cajones o puertas.
■ Mantenga las piezas de plástico y juntas
de goma limpias de aceites y grasas.
■ Tirar del enchufe - no del cable de
conexión.
Peso
El aparato es muy pesado. Realizar la
instalación y el transporte del aparato
siempre con un mínimo de 2 personas.
~ "Instalar el aparato" en la página 62
Advertencias en virtud de la Proposición
65 del estado de California
Este producto puede contener un químico
que el Estado de California reconoce como
potencialmente cancerígeno o causante de
daños reproductivos. Por tanto, su producto
debe llevar en su embalaje la siguiente
etiqueta de conformidad con la legislación
de California:

es-mx Uso previsto
62
8Uso previsto
Us o pr evi st o
Use este aparato
■ solo para congelar alimentos, así como para
preparar cubitos de hielo.
■ solo para uso doméstico o en el entorno del
hogar.
■ solo de acuerdo a estas instrucciones de uso.
Este aparato está diseñado para ser utilizado hasta
una altura máxima de 2,000 metros sobre el nivel
del mar.
7Protección del medio
ambiente
Pr o t e c c i ó n del medi o ambi ent e
Embalaje
Todos los materiales son ecológicos y reciclables:
■ Deseche el embalaje conforme a la normativa
medioambiental.
■ Pregunte a su Distribuidor o en su Administración
Pública acerca de los métodos de eliminación.
Aparato usado
Mediante una eliminación respetuosa con el medio
ambiente, se pueden recuperar materias primas
valiosas.
9 ADVERTENCIA
¡LOS NIÑOS SE PUEDEN ENCERRAR Y
ASFIXIAR EN EL APARATO!
Antes de eliminar el aparato usado:
■ Desmontar las puertas.
■ Dejar las bandejas y recipientes dentro dl
aparato, para dificultar que los niños se
suban.
■ Mantenga a los niños lejos de los aparatos
usados.
9 ATENCION
SE PUEDEN ESCAPAR REFRIGERANTES Y
GASES NOCIVOS.
No dañe las tuberías del circuito de
refrigeración y aislamiento.
1. Desconecte el enchufe.
2. Corte el cable de conexión del aparato.
3. Eliminar el aparato correctamente.
5Instalación y conexión
Inst alaci ón y conex i ón
Material entregado
Verifique que las piezas no presentan daños ni
desperfectos debidos al transporte tras
desembalarlas.
Si tiene alguna queja deberá dirigirse al distribuidor
en donde adquirió su electrodoméstico o a nuestro
Servicio de Atención al Cliente.
~ "Servicio al cliente" en la página 83
El envío consta de los siguientes elementos:
■ Aparato para instalación integrada
■ Equipamiento (según modelo)
■ Material de montaje
■ Instrucciones de uso
■ Instrucciones de instalación
■ Cuaderno de Servicio al cliente
■ Suplemento de la garantía
■ Informaciones sobre el consumo de energía y los
ruidos del aparato
Datos técnicos
El refrigerante utilizado, la capacidad útil y otros
datos técnicos se encuentran en la placa de
identificación.
~ "Familiarizándose con el aparato"
en la página 65
Instalar el aparato
Lugar de instalación
El peso de su aparato puede ser de hasta 460 kg,
dependiendo del modelo. El piso debe ser lo
suficientemente estable, no debe ceder por el peso.
Si es necesario, refuerce el piso.
Verificar el hueco de encastre
El hueco debe cumplir con los siguientes criterios:
■ Se deben montar escuadras antivuelco
■ Profundidad del hueco mínima de 24” (610 mm),
para instalación a ras 25” (635 mm)
■ rectangular
■ estable - las paredes laterales y el techo deben
tener un espesor de al menos 5/8" (16 mm) y
estar bien sujetos al suelo o la pared
■ Profundidad mínima de paredes laterales
acortadas 4” (100 mm)
Instalación side by side
En caso de una instalación side by side favor de
tener en cuenta las prescripciones contenidas en las
instrucciones de montaje.
Si es necesaria una pared de separación entre los
aparatos, ésta debe ser al menos de 5/8” (16 mm)
de ancho.

Instalación y conexión es-mx
63
Ahorrar energía
Si sigue estas instrucciones, el aparato consume menos corriente.
Nota:
La disposición de las piezas de equipo no afectará el consumo de energía de aparato.
--------
Instalar el aparato
Proteger el aparato de la luz directa del sol. Cuando la temperatura ambiente es más baja, el aparato enfría con
menos frecuencia, consumiendo menos corriente.
Coloque el aparato a la mayor distancia posible de radiadores, estufas
u otras fuentes de calor:
Distancia mínima de 1¼” (3 cm) con estufas eléctricas o de gas.
Distancia mínima de 11¾” (30 cm) con estufas de aceite o carbón.
Seleccione el lugar de instalación con una temperatura ambiente de
aproximadamente 68 °F (20 °C).
No cubrir u obstruir las aberturas de ventilación. Cuando el aire caliente puede salir, el aparato enfría con menos
frecuencia y por lo tanto consume menos corriente.
Ventilar diariamente la habitación.
Usar el aparato
Abrir la puerta del aparato solo brevemente. El aire en el aparato no se calienta tanto. El aparato debe enfriar con
menos frecuencia y, con ello, consumir menos corriente.
Transporte los alimentos en una hielera y colóquelos inmediatamente
en el aparato.
Dejar enfriar los alimentos o bebidas calientes hasta temperaturas
ambientes antes de introducirlos en el aparato.
Para utilizar el frío de los productos congelados descongele los
productos congelados en el compartimento refrigerador.
Siempre deje un poco de espacio entre los alimentos y el panel
posterior.
El aire puede circular y la humedad del aire permanece constante.El
aparato debe enfriar con menos frecuencia y, con ello, consumir
menos corriente.
Envasar herméticamente los alimentos.
No cubrir ni obstruir las aberturas de ventilación. El aparato consume menos corriente cuando el aire caliente puede
salir.
Aspirar las aberturas de ventilación una vez al año.

es-mx Instalación y conexión
64
Antes del primer uso
1. Retirar el material informativo y eliminar las cintas
adhesivas, así como las láminas protectoras.
2. Limpiar el aparato.
~ "Limpiar" en la página 79
Conexión a la toma de agua
9 ATENCION
■ La instalación y la conexión del aparato deben
ser realizadas por personal especializado de
acuerdo con las instrucciones de instalación
adjuntas.
■ Para evitar daños al aparato y para garantizar
el correcto funcionamiento de la unidad,
conectar el aparato solamente a una tubería
de agua potable.
■ Para evitar daños por agua, se debe instalar
una válvula de cierre.
Presión del agua de la tubería de agua potable
9 ATENCION
Para evitar daños al aparato, se debe instalar
un limitador de presión entre la toma de agua y
el juego de mangueras, si la presión del agua
excede el valor máximo.
Nota: Si la presión del agua es demasiado baja, las
funciones correspondientes del aparato se verán
perjudicadas.
■ Por lo menos 0.2 Mpa (2 bar / 29 psi)
■ Máximo 0.8 Mpa (8 bar / 116 psi)
Conexión a la red eléctrica
9 ATENCION
No conecte el aparato a enchufes de ahorro de
energía electrónicos.
Nota: El aparato se puede conectar a convertidores
conmutados por red o de onda sinusoidal.
Los convertidores conmutados por red se emplean
en las instalaciones fotovoltaicas conectadas
directamente a la red pública de abastecimiento de
corriente eléctrica. En instalaciones aisladas
deberán emplearse los convertidores de onda
sinusoidal. Las instalaciones aisladas, por ejemplo
en barcos o refugios de montaña, no tienen
conexión directa a la red pública de corriente
eléctrica.
1. Después de instalar el aparato, esperar al menos
1 hora antes de conectarlo, para evitar daños en
el compresor.
2. Asegúrese de que la toma de corriente se ha
instalado correctamente y cumple con los
requerimientos exigidos.
Requisitos para las tomas de corriente
Carga simultánea máxima
3. Conecte el aparato a una toma de corriente
cerca del aparato.
La toma de corriente debe estar fácilmente
accesible después de la instalación del aparato.
En caso de que no pueda quedar accesible, se
deberá instalar un dispositivo de separación
omnipolar en la instalación eléctrica fija de
acuerdo con las normas de instalación.
9 ADVERTENCIA
¡RIESGO DE DESCARGA ELÉCTRICA!
No utilice nunca tomas de corriente
múltiples, ni cables de prolongación o
adaptadores.
El aparato debe estar conectado a tierra
adecuadamente.
Nunca corte o retire el tercer conductor
(conductor a tierra) del cable de conexión a
la red eléctrica.
9 ADVERTENCIA
¡RIESGO DE DESCARGA ELÉCTRICA!
Si la longitud del cable de conexión a la red
eléctrica no es suficiente, no utilice nunca ni
tomas de corrientes múltiples ni cables de
prolongación. Contacte al Servicio de
atención al cliente para mayor información.
Toma de corriente de 110 V ... 120 V
Conductor de protección 60 Hz
Fusible 10 A ... 16 A
Aparato 6 A
Familiarizándose con el aparato es-mx
65
*Familiarizándose con el
aparato
Fami l i ar i zándose con el apar at o
Aparato
6XSHU)UHH]H
@
6HWWLQJV
+
3
;
K
C
-
( ... H Controles
P Interruptor principal Encendido/Apagado
X Amortiguador de puerta
` Máquina de hielo
h Placa de características
)" Depósito para cubitos de hielo
)* Recipiente para productos congelados
)2 Abertura de ventilación
): Apertura automática de puerta
)J Filtro de agua
es-mx Familiarizándose con el aparato
66
Controles
Menú Ajustes
Para abrir el menú pulsar la tecla ".
En el menú Ajustes encontrará:
■ Configuración de electrodoméstico
■ Bloqueo de limpieza
■ Producción de cubitos de hielo
■ Contador filtro de agua
■ Modo Eco
■ Autocomprobación
■ Modo Sábado (si está activado)
~ "Manejo del electrodoméstico" en la página 70
Menú Configuración de electrodoméstico
Así accede al menú Configuración de
electrodoméstico:
1. Pulsar la tecla ".
2. Con la tecla ( desplazarse al
menú Configuración de electrodoméstico.
3. Abrir el menú con la tecla 8.
En el menú Configuración de electrodoméstico
encontrará los siguientes submenús y posibilidades
de ajuste:
■ Brillo
■ Sonido pulsación tecla
■ Volumen de tecla
■ Vol. sonido de señal
■ Bloq. auto. limpieza
■ Apertura automática de la puerta
■ Contador filtro de agua
■ Modo Teatro
■ Unidad de temperatura
■ Idioma
■ Red doméstica
■ Ajustes de fábrica
■ Modo Demo
■ Modo Sabbat
~ "Manejo del electrodoméstico" en la página 70
( Campos táctiles
Bajo los campos táctiles, hay sensores.
Tocar el ícono llama a la función
correspondiente.
0 Indicación de la temperatura del congelador
Muestra la temperatura programada en °C/
°F.
8 Teclas A/@
Sirven para cambiar la temperatura.
@ Tecla "
Abre el menú Ajustes.
~ "Menú Ajustes" en la página 66
H Tecla súper congelación
Enciende o apaga súper congelación.
6XSHU)UHH]H
C
²
$M XVWHV
#
+
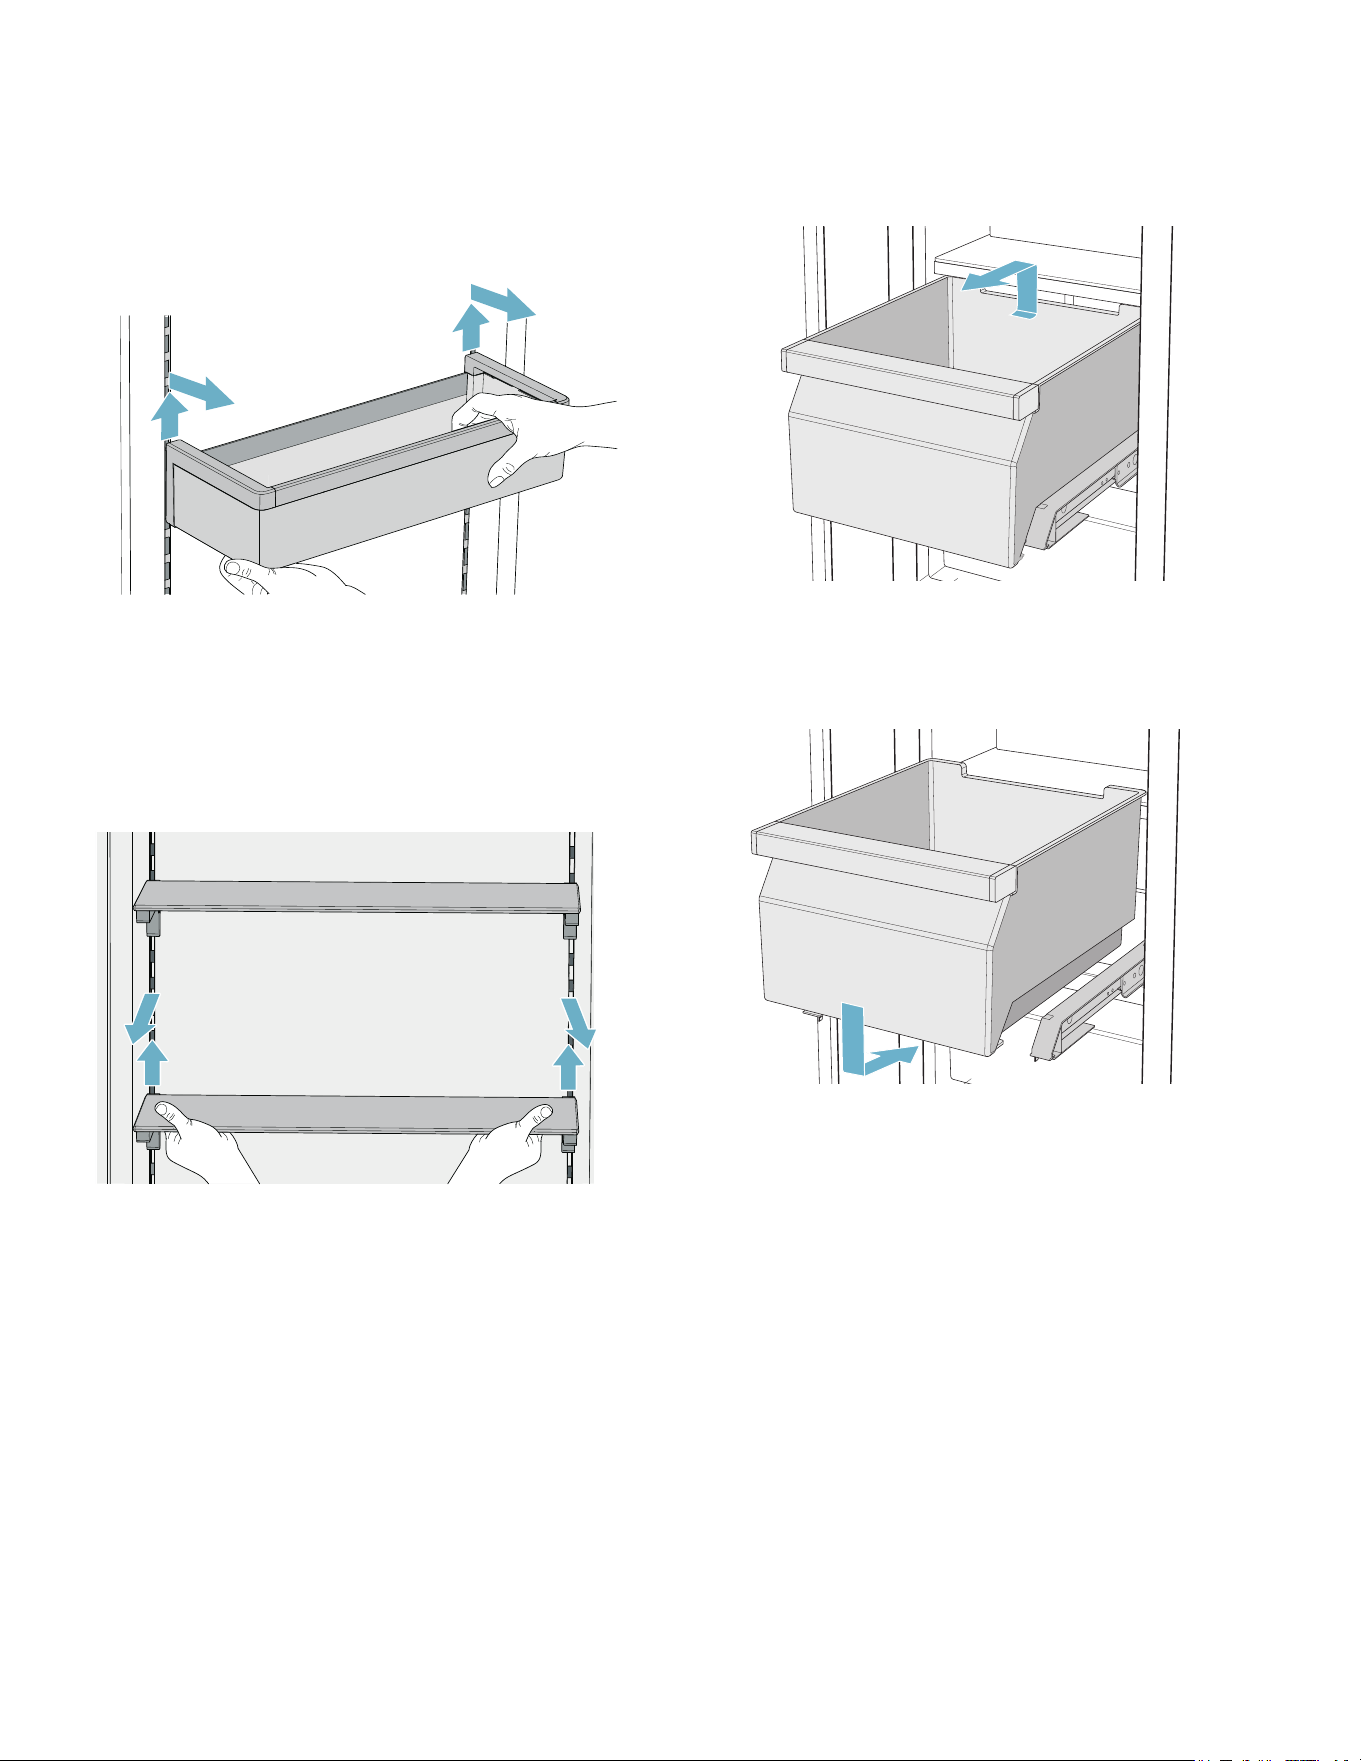
Familiarizándose con el aparato es-mx
67
Equipamiento
(no disponible en todos los modelos)
Estantes
Puede sacar los estantes y variar su altura:
1. Levantar el estante y sacarlo.
2. Al colocarlo, inserte los ganchos en la parte
posterior del estante a la misma altura, de modo
que el estante quede recto.
Nota: Coloque el estante con cuidado, para no
rayar en el aparato.
Bandeja
Puede sacar y variar la bandeja:
1. Levantar la bandeja y sacarla.
2. Al colocarla, inserte los ganchos en la parte
posterior de la bandeja a la misma altura, de
modo que la bandeja quede recta.
Nota: Coloque la bandeja con cuidado, para no
rayar en el aparato.
recipientes
Para retirar el recipiente:
■ Presione el recipiente hacia atrás,
■ Levante el recipiente por detrás y extráigalo.
Para colocar el recipiente:
■ Extraiga completamente los carriles telescópicos.
■ Coloque el recipiente en los carriles telescópicos
y empújelo en el aparato hasta que encastre.
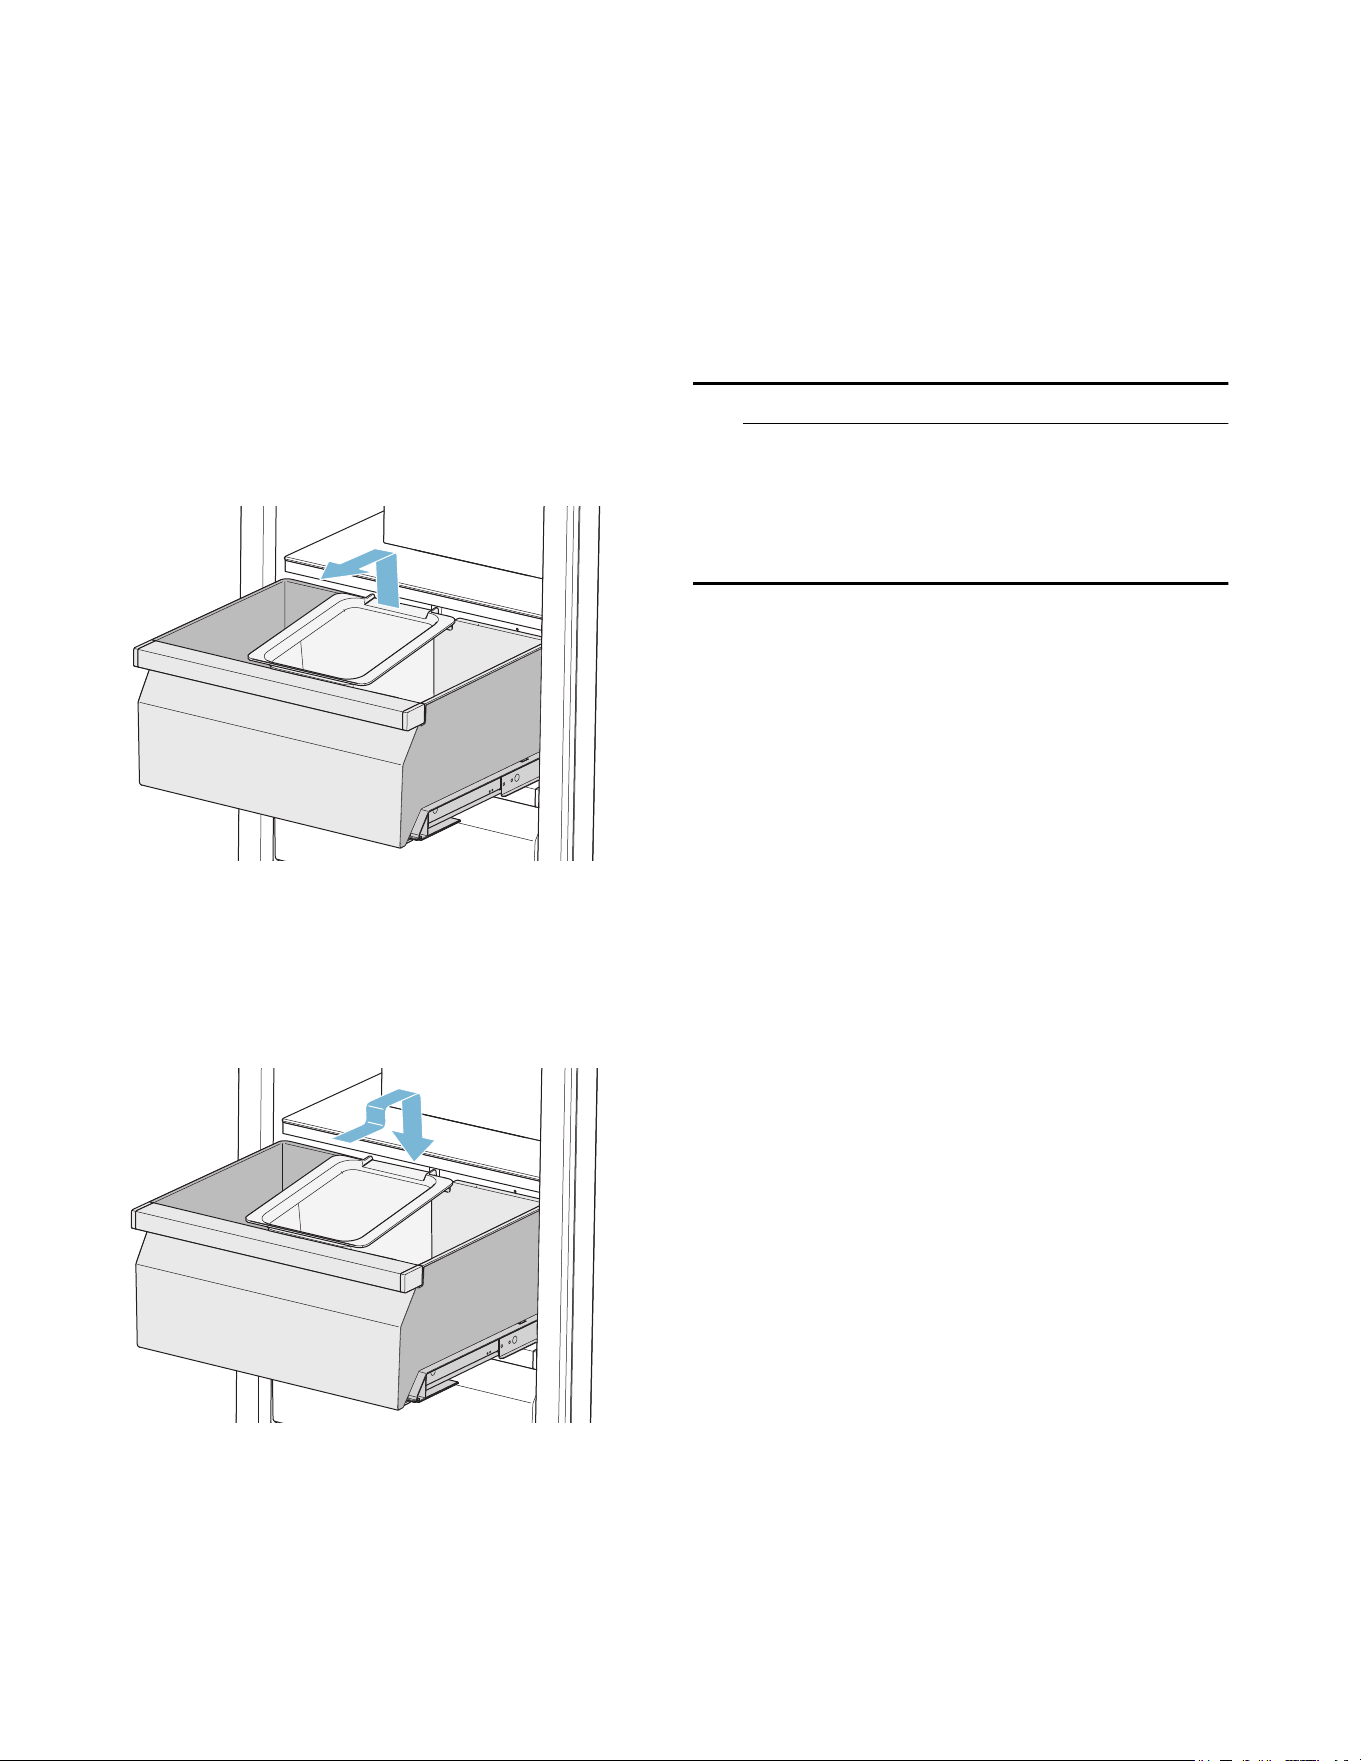
es-mx Familiarizándose con el aparato
68
Depósito para cubitos de hielo
Nota: Para evitar daños en el depósito para cubitos
de hielo, vacíelo completamente si va a desconectar
el aparato un tiempo prolongado o si ocurre un fallo
de corriente eléctrica.
Cómo extraer el depósito para cubitos de hielo:
1. Extraer el recipiente para productos congelados.
Nota: En caso de un ángulo de apertura de la
puerta de 90°, se tiene un mejor acceso al depósito
para cubitos de hielo si se extrae previamente el
recipiente para productos congelados.
~ "recipientes" en la página 67
2. Levantar el depósito para cubitos de hielo por
detrás y extraerlo.
Cómo volver a colocar el depósito para cubitos de
hielo:
1. Extraer el recipiente para productos congelados.
2. Enganchar el depósito para cubitos de hielo en la
entalladura del recipiente para productos
congelados prevista para ello.
Acumulador de frío
En caso de corte de corriente o avería:
■ Los acumuladores de frío retrasan el
calentamiento de los productos congelados
almacenados.
Puede sacar los acumuladores de frío para
mantener los alimentos temporalmente frescos, por
ejemplo, en una hielera portátil.
Máquina de hielo
9 ATENCION
¡DAÑOS EN EL APARATO!
No almacene nunca botellas o alimentos en los
recipientes de los cubitos de hielo, ni siquiera
por un corto período de tiempo. Debido a esto,
se puede bloquear la máquina de hielo y
dañarse.
La producción de hielo se inicia tan pronto como el
aparato alcance la temperatura establecida.
Notas
■ La producción de hielo se detiene
automáticamente cuando el recipiente está lleno
de hielo.
■ Antes de utilizar el aparato por primera vez le
recomendamos por motivos de higiene desechar
los cubitos de hielo que se hayan producido en
las primeras 24 horas.
■ Si detiene la producción de cubitos de hielo por
varios días, por motivos de higiene, deseche los
primeros 30-40 cubitos de hielo.
Información para encender o apagar la producción
de cubitos de hielo
~ "Encender o apagar la producción de cubitos de
hielo" en la página 71
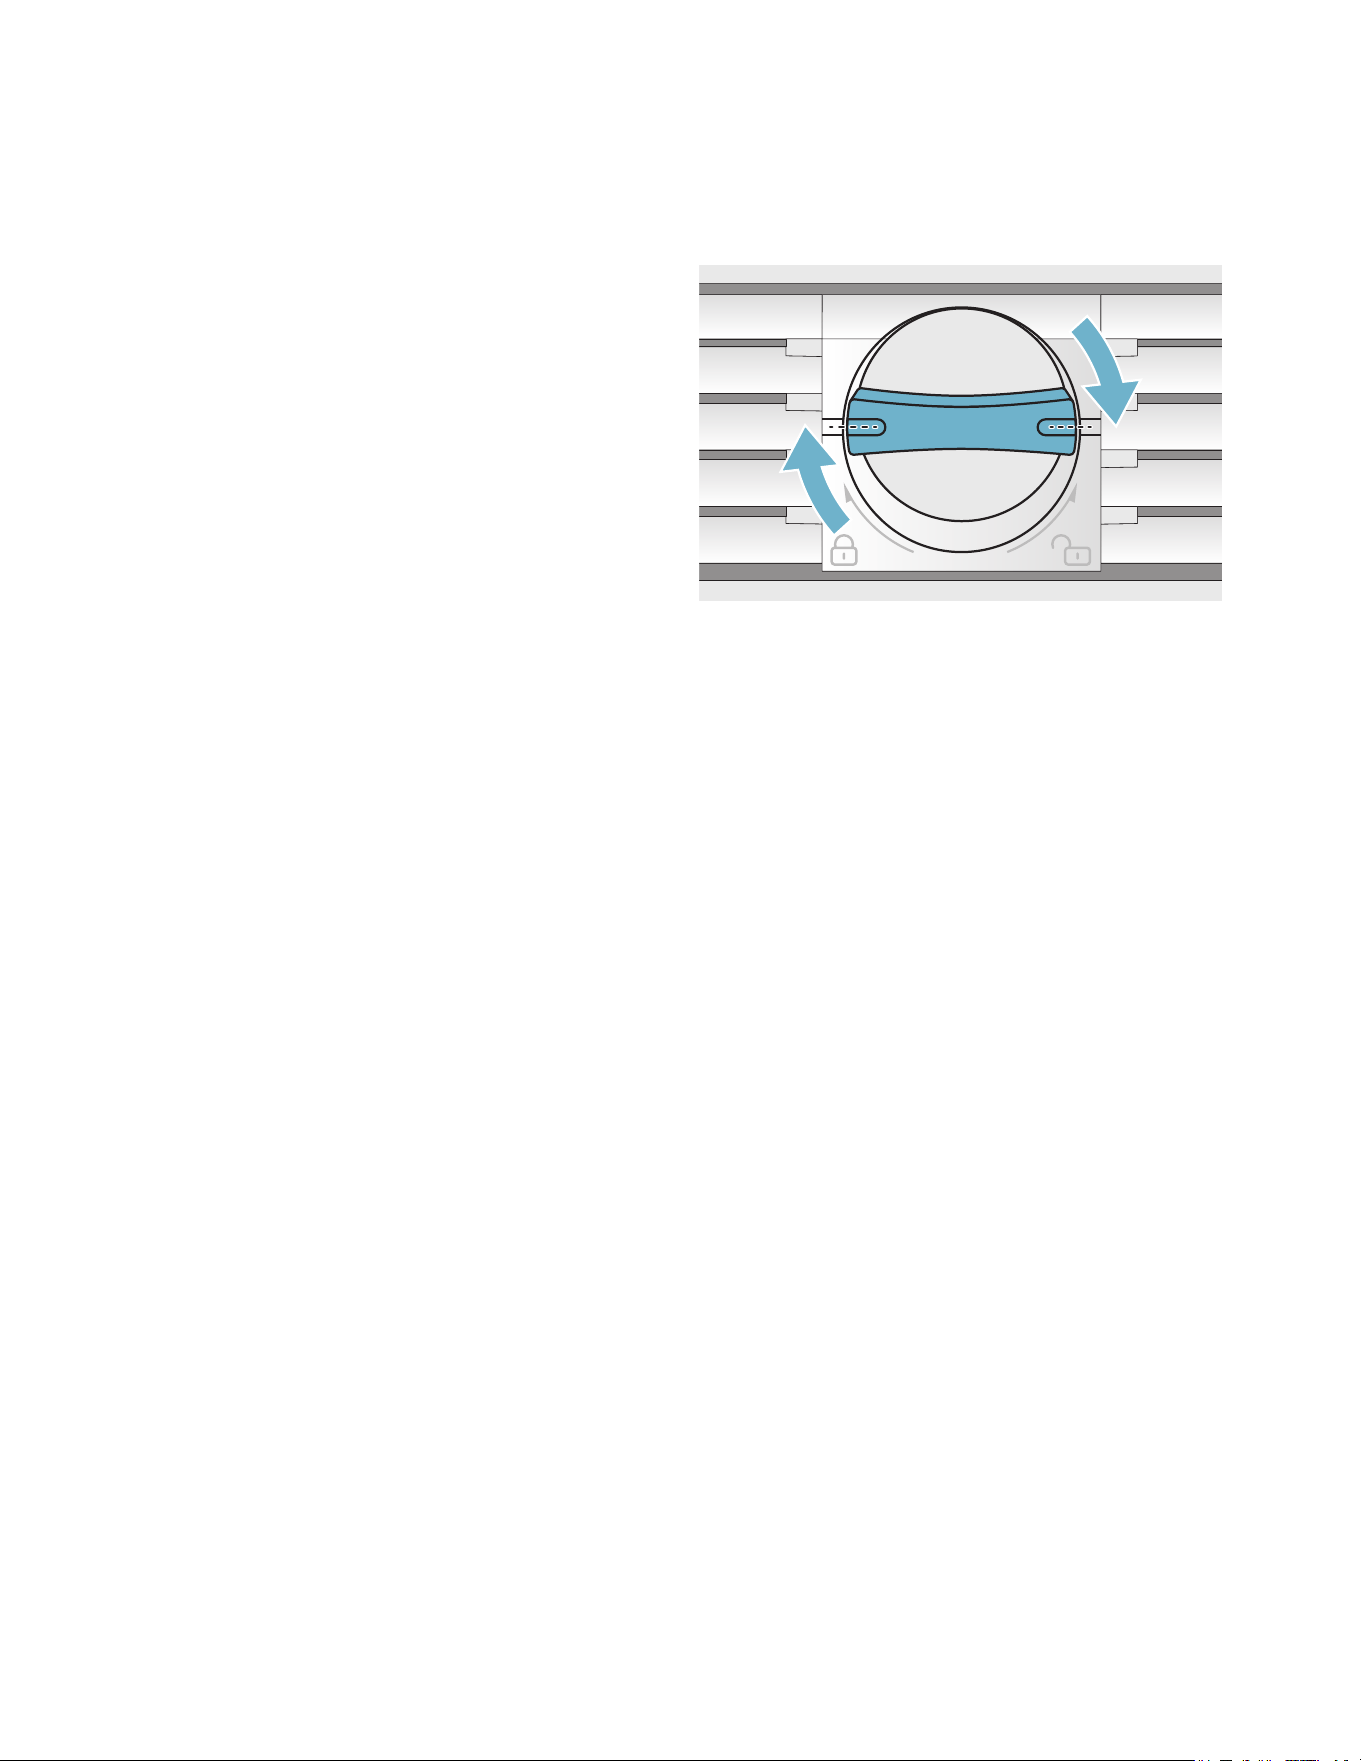
Familiarizándose con el aparato es-mx
69
Filtro de agua
Debe reemplazar el filtro de agua, a más tardar,
después de 6 meses.
Si el hielo sabe desabrido, deseche los cubitos de
hielo restantes y los que se produzcan en las
próximas 24 horas. Si después de eso el hielo sigue
sabiendo desabrido, cambie el filtro del agua.
Nota: Si usa un sistema externo de filtro de agua,
puede utilizar el aparato también sin un filtro de
agua interno.Para ello cambie el filtro de agua por
un cartucho de filtro con bypass. Apague el
contador de filtro de agua. No es necesario cambiar
el cartucho de filtro con bypass.
Puede obtener un nuevo filtro de agua o un cartucho
de filtro con bypass a través del Servicio al cliente o
de un distribuidor.
Cambiar el filtro de agua o sustituirlo por un
cartucho de filtro con bypass
Se puede cambiar el filtro de agua o sustituirlo por
un cartucho de filtro con bypass. El cartucho de filtro
con bypass puede quedarse permanentemente en
el aparato, no necesita cambiarse.
Nota: Después de montar un filtro de agua o un
cartucho de filtro con bypass, desechar todos los
cubitos de hielo producidos en las primeras
24 horas.
1. Girar la tapa del filtro de agua en el sentido
contrario a las manecillas del reloj.
2. Sacar el filtro de agua.
3. Retirar la tapa del nuevo filtro de agua o del
nuevo cartucho de filtro con bypass.
4. Retirar la cubierta del filtro de agua usado y
colocarla sobre el nuevo filtro de agua o el nuevo
cartucho de filtro con bypass.
5. Empujar el nuevo filtro de agua o el nuevo
cartucho de filtro con bypass en la apertura del
filtro hasta el tope.
Nota: La tapa tiene que estar vertical.
6. Girar el filtro de agua o el cartucho de filtro con
bypass en el sentido de las manecillas del reloj
hasta la marca.
Nota: Si no gira el filtro de agua o el cartucho de
filtro con bypass lo suficiente, se pueden producir
daños por el agua saliente.
7. Si se monta un filtro de agua: restablecer el
contador de filtro de agua.
Si se monta un cartucho de filtro con bypass:
apagar el contador de filtro de agua.
8. Desechar los cubitos de hielo que se produzcan
en las primeras 24 horas.
9. Drenar el agua del filtro de agua usado.
Nota: Puede desechar el filtro de agua usado con
la basura del hogar.

es-mx Manejo del electrodoméstico
70
1Manejo del
electrodoméstico
Manej o del el ect r odomést i co
Encender el aparato
1. Pulse el interruptor principal de encendido/
apagado.
El aparato comienza a enfriar, y la iluminación se
enciende cuando la puerta está abierta.
2. Ajustar la temperatura deseada.
~ "Ajustar la temperatura" en la página 70
Advertencias relativas al funcionamiento del
aparato
■ Después de encenderlo, el aparato puede
necesitar varias horas hasta alcanzar las
temperaturas ajustadas. No introducir alimentos
en el aparato antes de alcanzar las temperaturas
seleccionadas.
■ Debido al sistema completamente automático
NoFrost, el congelador permanece libre de hielo.
La descongelación no es necesaria.
■ Los lados frontales del compartimento se
calientan en parte ligeramente. Esto evita la
condensación en la zona de la junta de la puerta.
■ En caso de no poder abrir la puerta del
congelador inmediatamente después de cerrarla,
aguarde unos instantes hasta que el vacío
generado se haya igualado.
Apagar y cerrar el aparato
Apagar el aparato
■ Pulse el interruptor principal de encendido/
apagado.
El aparato deja de enfriar.
Desconectar el aparato
9 ATENCION
Reducción la calidad del agua
El suministro de agua debe estar apagado 3
horas antes de desconectar el aparato. Así se
evita la formación de moho por el agua
estancada.
Cuando no utilice el aparato por un período
prolongado:
1. Interrumpir el suministro de agua al aparato y
esperar durante 3 horas.
2. Sacar los alimentos.
3. Pulse el interruptor principal de encendido/
apagado.
4. Desconectar el enchufe o apagar el fusible.
El aparato deja de enfriar.
5. Vaciar el depósito de los cubitos de hielo y
limpiar el aparato.
~ "Limpiar" en la página 79
6. Dejar el aparato abierto.
Seleccionar el idioma
1. Pulse la tecla " para abrir el menú Ajustes.
2. Con la tecla (, desplazarse a la opción de menú
Configuración de electrodoméstico.
3. Pulse la tecla 8.
4. Con la tecla (, desplazarse a la opción de menú
Idioma.
5. Pulse la tecla :.
6. Con las teclas ( ), desplazarse al idioma
deseado.
7. Pulse la tecla 8.
La pantalla se reinicia, aparece la pantalla de
inicio.
Ajustar de la unidad de temperatura
Puede elegir entre la unidad °C y °F.
1° significa 1 °F
1°C significa 1 °C
1. Pulsar la tecla " para abrir el menú Ajustes.
2. Con la tecla ( desplazarse a la opción de
menú Configuración de electrodoméstico.
3. Pulsar la tecla 8.
4. Con la tecla ( desplazarse a la opción de
menú Unidad de temperatura.
5. Pulsar la tecla :.
6. Con las teclas ( ) desplazarse a la unidad
deseada.
7. Pulsar la tecla 8.
La unidad se cambiará.
8. Pulsar la tecla ; para salir del menú.
Ajustar la temperatura
Temperatura recomendada
Congelador
■ Pulsar la tecla @/A repetidas veces hasta que la
indicación muestre la temperatura deseada.
Supercongelación
Mediante esta función se enfría el congelador hasta
alcanzar la temperatura más baja posible.
Conectar la función de supercongelación, p. ej.:
■ para congelar los alimentos rápidamente hasta el
núcleo
■ 4 ... 6 horas antes de introducir alimentos frescos
a partir de una cantidad superior a 2 kg
Nota: Si la función de supercongelación está
activada, puede haber aumento de ruido.
Después de aproximadamente 2 ^ días, el equipo
pasa a la operación normal.
Encender o apagar súper congelación
■ Pulsar la tecla ]/\
Congelador: 0 °F (-18 °C)

Manejo del electrodoméstico es-mx
71
Bloqueo de limpieza
Con esta función apaga la función táctil de los
controles durante 10 segundos. Durante este
tiempo, puede limpiar la pantalla.
~ "Limpiar la pantalla" en la página 79
1. Pulsar la tecla " para abrir el menú Ajustes.
2. Pulsar la tecla <.
El mensaje de limpieza aparece y empieza la cuenta
atrás.
Bloqueo de limpieza automático
Con esta función puede seleccionar, si se enciende
el bloqueo de limpiez automáticamente cuando se
abre la puerta.
1. Pulsar la tecla " para abrir el menú Ajustes.
2. Con la tecla ( desplazarse a la opción de
menú Configuración de electrodoméstico.
3. Pulsar la tecla 8.
4. Con la tecla ) desplazarse a la opción de
menú Bloq. auto. limpieza.
5. Para cambiar el ajuste pulsar la tecla :.
Encender o apagar la producción de
cubitos de hielo
9 ATENCION
¡Daños en el aparato!
Nunca almacene botellas o alimentos en los
recipientes de los cubitos de hielo, ni siquiera
por un corto periodo de tiempo. De este modo,
se puede bloquear la máquina de hielo y
dañarse.
La producción de hielo se inicia tan pronto como el
aparato alcance la temperatura establecida.
Nota: La producción de hielo se detiene
automáticamente cuando el recipiente está lleno de
hielo.
Encender o apagar la máquina de hielo
1. Pulse la tecla ", para abrir el menú Ajustes.
2. Con la tecla ) desplazarse a la opción del menú
Producción de cubitos de hielo.
3. Pulsar la tecla </=.
Restablecer el contador del filtro de agua
Después de cambiar el filtro de agua debe
restablecer el contador de filtro de agua.
1. Pulsar la tecla " para abrir el menú Ajustes.
2. Con la tecla ) desplazarse a la opción de
menú Restablecer contador de filtro de agua.
3. Confirmar con la tecla 8, volver a confirmar la
consulta con la tecla 8.
Nota: Si cancela la solicitud o deja pasar más de
10 segundos antes de pulsar la tecla, el contador
del filtro de agua no se restablecerá.
Encender y apagar el contador del filtro de agua
Cuando haya reemplazado el filtro de agua por un
filtro antipartículas, apague el contador de filtro de
agua. En este caso no se requiere, ya que el filtro
antipartículas no se tiene que reemplazar.
1. Pulsar la tecla " para abrir el menú Ajustes.
2. Con la tecla ( desplazarse al
menú Configuración de electrodoméstico.
3. Pulsar la tecla 8.
4. Con la tecla ) desplazarse a la opción de menú
Contador de filtro de agua.
5. Para cambiar el ajuste, pulsar la tecla :.
Modo Eco
Con el Modo Eco se conmuta el aparato al
funcionamiento de ahorro de energía.
El aparato ajusta automáticamente las siguientes
temperaturas:
■ Congelador: +3 °F (–16 °C)
Modo Eco encender o apagar
1. Pulsar la tecla " para abrir el menú Ajustes.
2. Con la tecla ) desplazarse a la opción de menú
Modo Eco.
3. Pulsar la tecla </=.
La temperatura se cambia, el display muestra la
nueva temperatura. Al apagar el modo Eco se
ajustará la temperatura recomendada.
Nota: Usted puede activar o desactivar el Modo
Eco, ajustando la temperatura con las teclas A/@.
Autocomprobación
Con esta función inicia el análisis de errores de su
dispositivo.
~ "Autoprueba del aparato" en la página 83

es-mx Manejo del electrodoméstico
72
Ajustar el brillo del panel de control
1. Pulsar la tecla " para abrir el menú Ajustes.
2. Con la tecla ( desplazarse a la opción de
menú Configuración de electrodoméstico.
3. Pulsar la tecla 8.
4. Para abrir la opción del menú Luminosidad,
pulsar la tecla :.
5. Con las teclas ( ) ajustar el brillo deseado.
6. Pulsar la tecla 8.
El ajuste se guarda.
7. Pulsar la tecla ; para salir del menú.
Encender o apagar el tono de pulsación
de las teclas
Usted puede apagar y volver a encender los tonos
que se producen al pulsar las teclas.
1. Pulsar la tecla " para abrir el menú Ajustes.
2. Con la tecla ( desplazarse a la opción de
menú Configuración de electrodoméstico.
3. Para abrir la opción de menú pulsar la tecla 8.
4. Con la tecla ) desplazarse a la opción de
menú Sonido pulsación tecla.
5. Para abrir la opción de menú pulsar la tecla :.
6. Con las teclas ( ) seleccionar el ajuste deseado.
7. Pulsar la tecla 8.
El ajuste se guarda.
8. Pulsar la tecla ; para salir del menú.
Ajustar el volumen de las teclas
Usted puede ajustar el volumen de los tonos que se
producen al pulsar las teclas.
1. Pulsar la tecla " para abrir el menú Ajustes.
2. Con la tecla ( desplazarse a la opción de
menú Configuración de electrodoméstico.
3. Para abrir la opción de menú pulsar la tecla 8.
4. Con la tecla ) desplazarse a la opción de
menú Volumen de tecla.
5. Para abrir la opción de menú pulsar la tecla :.
6. Con las teclas ( ) seleccionar el ajuste deseado.
7. Pulsar la tecla 8.
El ajuste se guarda.
8. Pulsar la tecla ; para salir del menú.
Ajustar el volumen del tono de la señal
Usted puede ajustar el volumen de los tonos de la
señal, que se producen por ejemplo, por las
alarmas.
1. Pulsar la tecla " para abrir el menú Ajustes.
2. Con la tecla ( desplazarse a la opción de
menú Configuración de electrodoméstico.
3. Para abrir la opción de menú pulsar la tecla 8.
4. Con la tecla ) desplazarse a la opción de
menú VolumenVolumen sonido de señal.
5. Para abrir la opción de menú pulsar la tecla :.
6. Con las teclas ( ) seleccionar el ajuste deseado.
7. Pulsar la tecla 8.
El ajuste se guarda.
8. Pulsar la tecla ; para salir del menú.
Bloqueo de limpieza automático
Con esta función puede seleccionar, si se enciende
el bloqueo de limpiez automáticamente cuando se
abre la puerta.
1. Pulsar la tecla " para abrir el menú Ajustes.
2. Con la tecla ( desplazarse a la opción de
menú Configuración de electrodoméstico.
3. Pulsar la tecla 8.
4. Con la tecla ) desplazarse a la opción de
menú Bloq. auto. limpieza.
5. Para cambiar el ajuste pulsar la tecla :.
Apertura automática de puerta
La apertura automática de la puerta le ayuda a abrir
la puerta.
En cuanto activa la función, la apertura automática
de la puerta se despliega y le ayuda a abrir la
puerta.
9 ATENCION
El cierre prematuro repetido de la puerta
conduce al desgaste o falla de la apertura
automática de la puerta.
No cierre la puerta mientras la apertura
automática de la puerta todavía está
desplegada.
No obstante, si cerró la puerta, déjela cerrada
por 5 minutos. La apertura automática de la
puerta se realinea nuevamente.

Manejo del electrodoméstico es-mx
73
Abrir la opción de menú Apertura autom. puerta:
1. Pulsar la tecla " para abrir el menú principal.
2. Con la tecla ( desplazarse al
menú Configuración de electrodoméstico.
3. Para abrir el menú pulsar la tecla 8.
4. Con la tecla ) desplazarse a la opción de
menú Apertura autom. puerta.
5. Para cambiar el ajuste pulsar la tecla :.
Encender el sistema Push to open
En una situación de instalación sin asas se puede
elegir el sistema Push to open. Con ello, su aparato
entreabre la puerta cuando esta se presiona
levemente.
Nota: Tenga en cuenta que la apertura automática
de puerta se desactiva al encenderse el Modo
Sabbat.
1. Abrir la opción de menú Apertura autom. puerta.
2. Seleccionar la opción de menú Sistema Push to
open.
3. Para abrir la opción de menú pulsar la tecla 8.
4. Seleccionar Potenciar energía.Aquí se puede
ajustar el esfuerzo necesario para accionar la
apertura automática de la puerta.
5. Seleccionar Duración de apertura.Aquí se puede
establecer cuánto tiempo permanecerá la puerta
un poco abierta antes de cerrarse
automáticamente.
Nota: Si la puerta permanece entreabierta, el
aparato comprueba una vez por segundo si la
puerta está todavía abierta.Después de transcurrida
la duración de apertura ajustada, el aparato cierra la
puerta automáticamente.
Encender el sistema Pull to open
En una situación de instalación con asas, se puede
elegir el sistema Pull to open. Con ello, su aparato le
ayuda a abrir la puerta en cuando tira del asa.
1. Abrir la opción de menú Apertura autom. puerta.
2. Seleccionar la opción de menú Sistema Pull to
open.
3. Para abrir la opción de menú pulsar la tecla 8.
4. Seleccionar Potenciar energía.Aquí se puede
ajustar el esfuerzo necesario para accionar la
apertura automática de la puerta.
Desactivar la apertura automática de la puerta
1. Abrir la opción de menú Apertura autom. puerta.
2. Seleccionar la opción de menú Desactiv..
Encender y apagar el contador del filtro de
agua
Cuando haya reemplazado el filtro de agua por un
filtro antipartículas, apague el contador de filtro de
agua. En este caso no se requiere, ya que el filtro
antipartículas no se tiene que reemplazar.
1. Pulsar la tecla " para abrir el menú Ajustes.
2. Con la tecla ( desplazarse al
menú Configuración de electrodoméstico.
3. Pulsar la tecla 8.
4. Con la tecla ) desplazarse a la opción de menú
Contador de filtro de agua.
5. Para cambiar el ajuste, pulsar la tecla :.
Modo Teatro
Con el Modo Teatro encendido, la iluminación se va
aclarando lentamente al abrir el aparato y se
obscurece lentamente al cerrar el aparato.
Activar o desactivar el Modo Teatro
1. Pulsar la tecla " para abrir el menú Ajustes.
2. Con la tecla ( desplazarse a la opción de
menú Configuración de electrodoméstico.
3. Para abrir la opción de menú pulsar la tecla 8.
4. Con la tecla ) desplazarse a la opción del
menú Modo Teatro.
5. Para abrir la opción de menú pulsar la tecla :.
6. Con la tecla ) desplazarse a la opción de
menú Encendido o Apagado.
7. Pulsar la tecla 8.
El ajuste se guarda.
8. Pulsar la tecla ; para salir del menú.
Restablecer el ajuste de fábrica
1. Pulsar la tecla " para abrir el menú Ajustes.
2. Con la tecla ( desplazarse a la opción de
menú Configuración de electrodoméstico.
3. Pulsar la tecla 8.
4. Con la tecla ( desplazarse a la opción de
menú Ajustes de fábrica.
5. Pulsar la tecla :.
Suena una señal y aparece un mensaje para
confirmar el reinicio.
6. Pulsar la tecla 8.
Todos los ajustes se restablecen a los ajustes de
fábrica.
7. Pulsar la tecla ; para salir del menú.
Encender o apagar el Modo Demo
La función de refrigeración del aparato se apaga.
Todas las demás funciones se pueden utilizar.
Nota: En el Modo Demo no almacenar alimentos, el
aparato permanecerá a temperatura ambiente.
1. Pulsar la tecla " para abrir el menú Ajustes.
2. Con la tecla ( desplazarse a la opción de
menú Configuración de electrodoméstico.
3. Pulsar la tecla 8.
4. Con la tecla ( desplazarse a la opción de
menú Modo Demo.
5. Pulsar la tecla :.
6. Con las teclas ( ) seleccionar el
ajuste Encendido o Apagado
7. Pulsar la tecla 8.
El ajuste se guarda.
8. Pulsar la tecla ; para salir del menú.

es-mx Alarma
74
Modo Sabbat
Con este modo se desconectan todas las funciones
que no son necesarias para que también pueda
usar el aparato en Sabbat.
El aparato detiene lo siguiente:
■ Máquina de hielo
■ Señales acústicas
■ Iluminación interior
■ Mensajes que aparecen en pantalla
■ Se reduce la luz de fondo de la pantalla
Activar o desactivar el Modo Sábado
Mostrar el Modo Sabbat en el menú Ajustes
Para poder utilizar el Modo Sabbat, primero necesita
visualizar la función en el Menú Ajustes:
1. Pulsar la tecla " para abrir el menú Ajustes.
2. Con la tecla ( desplazarse al
menú Configuración de electrodoméstico.
3. Pulsar la tecla 8.
4. Con la tecla ( desplazarse a la opción de
menú Modo Sabbat.Pulsar la tecla :.
5. Con la tecla ( desplazarse a la opción de
menú Disponible.Confirmar con la tecla 8.
6. Pulsar la tecla ; para salir del menú.
La función se añade al menú Ajustes.
Activar el Modo Sabbat
1. Pulsar la tecla " para abrir el menú Ajustes.
2. Pulsar la tecla › para abrir la vista Duración
Modo Sabbat.
3. Seleccione uno de los ajustes preestablecidos o
modifique la duración con las teclas A/@.
4. Para iniciar pulsar la tecla <.
El aparato apaga todas las funciones
mencionadas.
Apagar el Modo Sabbat
■ Después de concluido el tiempo programado, el
aparato vuelve al funcionamiento normal.
■ Para terminar el Modo Sabbat antes de que
concluya la hora programada, pulsar la tecla =.
Red de internet doméstica
Con esta función usted puede establecer una
conexión entre el aparato para refrigeración y su
dispositivo móvil.
~ "Home Connect" en la página 75
MAlarma
Al a r ma
Alarma de la puerta
Si la puerta del aparato permanece abierta durante
un tiempo prolongado, se activa la alarma de la
puerta. Aparece un mensaje en el panel de control.
Apagar la alarma de la puerta
■ Cerrar la puerta.
Nota: Para silenciar la alarma de la puerta, es
suficiente confirmar el mensaje en el panel de
control. Si la puerta está todavía abierta después de
unos minutos, el mensaje vuelve a aparecer.
Alarma de temperatura
Si se pone demasiado caliente el congelador, se
activará la alarma de temperatura. Aparece un
mensaje en el panel de control. En el mensaje
aparece la temperatura más alta que ha prevalecido
en el congelador.
9 ATENCION
DURANTE LA DESCONGELACIÓN DE LOS
ALIMENTOS PUEDEN APARECER BACTERIAS
QUE PUEDEN ECHARLOS A PERDER
No volver a congelar los alimentos que se
hayan descongelado o empezado a
descongelar.
Solo después de cocinarlos o freírlos, se
podrán volver a congelar. El período máximo
de almacenamiento ya no se podrá utilizar.
Nota: Sin peligro para los alimentos, la alarma
puede activarse en los siguientes casos:
■ El aparato se pone en funcionamiento, pero no
hay alimentos almacenados.
■ Se han almacenado grandes cantidades de
alimentos.
■ La puerta del congelador estuvo abierta por
mucho tiempo.
Apagar la alarma de temperatura
1. Asegúrese de que se ha corregido la causa para
la alarma de temperatura.
2. Para confirmar el mensaje, pulse la tecla 8.
El mensaje desaparece. El panel de control
muestra nuevamente la temperatura establecida.
A partir de este momento se vuelve a determinar la
temperatura más elevada, quedando esta
almacenada.

Home Connect es-mx
75
o Home Connect
Ho me Connect
Este aparato funciona con Wi-Fi y puede controlarse
de forma remota a través de un dispositivo móvil.
Nota: Wi-Fi es una marca registrada de Wi-Fi
Alliance.
El aparato funciona, en los siguientes casos, como
un aparato para refrigeración sin conexión a la red
doméstica y se puede seguir manejando
manualmente a través de los mandos:
■ El aparato no está conectado a una red
doméstica.
■ El servicio Home Connect no se ofrece en el país
en el que está instalado el aparato. Encontrará
una lista de los países en los que se ofrece
Home Connect en www.home-connect.com.
Nota: Tenga en cuenta las indicaciones de
seguridad de este manual. Asegúrese de
respetarlas también cuando utiliza el aparato
mediante la aplicación Home Connect desde fuera
de casa.
~ "Indicaciones de seguridad importantes"
en la página 59
Tenga en cuenta también las instrucciones de la
aplicación Home Connect.
Configurar la red de internet doméstica
Notas
■ Después de conectar el aparato, espere al
menos 2 minutos antes de configurar
Home Connect. Solo entonces concluye la
inicialización interna del aparato.
■ Tenga en cuenta la hoja adjunta de
Home Connect que acompaña al aparato o que
está disponible para su descarga
en www.thermador.com en la sección de las
instrucciones. Para ello, introduzca el número de
producto (E-Nr.) de su aparato en el cuadro de
búsqueda.
Para conectar su aparato a la red doméstica WLAN
(Wi-Fi) son necesarios 3 pasos básicos.
1. Instalar la aplicación.
2. Conectar el refrigerador a la red doméstica
WLAN (Wi-Fi).
3. Conectar el refrigerador con la
aplicación Home Connect.
Al abrir el menú por primera vez, usted será guiado
automáticamente a través de la configuración inicial.
Siga las instrucciones del panel de mando. En los
siguientes capítulos encontrará mayor información.
En el menú Red doméstica encuentra los siguientes
submenús:
■ Conexión
■ Conectar con la aplicación
■ Actualización de software
■ Borrar los ajustes de red
Abrir el menú Red doméstica
1. Para abrir el menú Ajustes pulsar la tecla ".
2. Con la tecla ( desplazarse a la opción de
menú Configuración de electrodoméstico.
3. Pulsar la tecla 8.
4. Con la tecla ( desplazarse a la opción de menú
Red doméstica.
5. Pulsar la tecla :.
Nota: Al abrir el menú por primera vez, usted será
guiado automáticamente a través de la
configuración inicial. Siga las instrucciones del
panel de mando.
Configuración de la conexión con la red doméstica
Al abrir el menú por primera vez, usted será guiado
automáticamente a través de la configuración inicial.
Siga las instrucciones del panel de mando.
1. Instalar la aplicación Home Connect en su
dispositivo móvil.
2. En el aparato para refrigeración abrir el menú
Red doméstica.
3. Abrir la aplicación en el dispositivo móvil.
4. Iniciar sesión en la aplicación o registrarse si
todavía no se ha creado un acceso.
5. Comprobar en el router de la red doméstica si
existe una función WPS para la conexión
automática.
6. Si dicha función está disponible, iniciar la
conexión automática a la red con la tecla 8 y
seguir las instrucciones del panel de mando.
Siga las instrucciones del panel de mando.
7. Iniciar la conexión manual a la red cuando la
función mencionada no esté disponible o no esté
seguro de ello, o cuando haya fallado la
conexión automática a la red.
El aparato para refrigeración genera
temporalmente una red propia a la que se
conecta el dispositivo móvil.
8. Iniciar la conexión manual a la red en la
aplicación del dispositivo móvil.
Tan pronto como el aparato para refrigeración esté
conectado al dispositivo móvil, se establecerá una
conexión entre el aparato para refrigeración y la red
doméstica (Wi-Fi).
Nota: Si no es posible establecer la conexión,
compruebe si hay suficiente recepción.
~ "Comprobar la intensidad de la señal"
en la página 75
Comprobar la intensidad de la señal
La intensidad de la señal se muestra en la ventana
inicial del menú Red doméstica.El valor de
intensidad de la señal debería ser del 50 % como
mínimo. Si la intensidad de la señal es demasiado
baja, se puede interrumpir la conexión.
Mejorar la intensidad de señal
■ Coloque el router más cerca del aparato para
refrigeración.
■ Asegúrese de que la conexión no está
interrumpida por paredes de apantallamiento.
■ Instale un repetidor para intensificar la señal.

es-mx Home Connect
76
Conectar el refrigerador con la
aplicación Home Connect
Con este menú usted puede conectar su
refrigerador con otros dispositivos móviles.
1. Instalar la aplicación Home Connect en el
dispositivo móvil y registrarse o iniciar sesión.
2. En el refrigerador abrir el menú Red doméstica.
3. Con la tecla ) desplazarse a la opción de menú
Conectar con la aplicación.
4. Para abrir la opción de menú, pulsar la tecla :.
5. Confirme el mensaje para mostrar el refrigerador
en la aplicación.
6. Abrir la aplicación y esperar hasta que se
muestre el refrigerador.
Con Añadir confirmar la conexión entre la
aplicación y el refrigerador.
Si el refrigerador no se muestra
automáticamente, hacer clic en la aplicación
en Añadir aparato y seguir las instrucciones. En
cuanto se muestre el refrigerador, añadirlo con +.
7. Seguir las instrucciones de la aplicación hasta
que el proceso haya finalizado.
Instalar la actualización de software de
Home Connect
El refrigerador comprueba en intervalos regulares si
existen actualizaciones para el software de Home
Connect.
La tecla Información @ solo es visible cuando hay
una actualización disponible.
Instalar actualización:
1. Pulsar la tecla @.
Se abre una ventana de notificación con los
pasos necesarios para la instalación del nuevo
software.
2. Pulsar la tecla 8 para cerrar la nota.
3. En el refrigerador abrir el menú Red doméstica.
4. Con la tecla ) desplazarse a la opción de menú
Actualización de software.
5. Para abrir la opción de menú, pulsar la tecla :.
Nota: La tecla : solo es visible cuando hay una
actualización disponible.
Se instalará el nuevo software.
6. En cuanto finalice la instalación aparece una
nota.
7. Pulsar la tecla 8 para cerrar la nota.
Acceso del servicio al cliente
Cuando se ponga en contacto con el servicio al
cliente, este podrá acceder a su aparato y registrar
su estado con su previo consentimiento. Para ello, el
aparato debe estar conectado a la red doméstica.
Puede encontrar más información sobre el acceso
de servicio al cliente y la disponibilidad del mismo
en su país en www.home-connect.com, en la
sección Ayuda y asistencia.
1. Contactar al servicio al cliente.
~ "Servicio al cliente" en la página 83
2. Confirmar en la aplicación el inicio del acceso de
servicio al cliente.
Durante el acceso de servicio al cliente aparece
el símbolo Ù en el panel de mando.
3. En cuanto el servicio al cliente haya reunido la
información necesaria, se desconectará de su
aparato.
Nota: Usted puede interrumpir el diagnóstico
remoto antes de tiempo desconectando el acceso
de servicio al cliente en la aplicación Home
Connect.
Borrar los ajustes de red
Si al intentar establecer la conexión se produce un
problema o si desea registrar el aparato en otra red
doméstica WLAN (Wi-Fi), los ajustes de Home
Connect pueden restablecerse.
1. En el refrigerador abrir el menú Red doméstica.
2. Con la tecla ) desplazarse a la opción de menú
Borrar los ajustes de red.
3. Para abrir la opción de menú, pulsar la tecla :.
4. Confirme el mensaje para borrar los ajustes de
red.
Para volver a conectar el aparato con la red
doméstica WLAN (Wi-Fi), ejecute de nuevo la
configuración inicial.
~ "Configuración de la conexión con la red
doméstica" en la página 75

Congelador es-mx
77
Activar o desactivar la conexión con la red
doméstica WLAN (Wi-Fi)
1. En el aparato para refrigeración abrir el menú
Red doméstica öffnen.
~ "Abrir el menú Red doméstica"
en la página 75
Nota: Al abrir el menú por primera vez, usted será
guiado automáticamente a través de la
configuración inicial. Siga las instrucciones del
panel de mando.
2. Para abrir la opción de menú Conexión, pulsar la
tecla :.
3. Con las teclas ( ) seleccionar el ajuste deseado.
4. Para seleccionar el ajuste pulsar la tecla 8.
Nota: Si desactiva la conexión Home Connect, ya
no podrá manejar su aparato a través del dispositivo
móvil.
Indicaciones sobre protección de datos
Al conectar por primera vez su aparato
Home Connect a una red doméstica asociada a
internet WLAN (Wi-Fi), el aparato transmite las
siguientes categorías de datos al
servidor Home Connect (registro inicial):
■ Identificación unívoca del aparato (compuesta
por la clave del aparato y la dirección MAC del
módulo de comunicación Wi-Fi utilizado).
■ Certificado de seguridad del módulo de
comunicación Wi-Fi (para la protección técnica
de la información de la conexión).
■ Las versiones actuales del software y hardware
del electrodoméstico.
■ El estado de un posible restablecimiento previo a
los ajustes de fábrica.
El registro inicial prepara la utilización de las
funciones Home Connect y solo es necesario la
primera vez que se vayan a utilizar las funciones
Home Connect.
Nota: Tenga en cuenta que las funciones
Home Connect solo se pueden utilizar en conexión
con la aplicación Home Connect. Se puede
consultar la información relativa a la protección de
datos en la aplicación Home Connect.
WCongelador
Congel ador
El congelador es adecuado para:
■ El almacenamiento de alimentos congelados
■ La producción de cubitos de hielo
■ Congelar alimentos
La temperatura se puede ajustar desde –11 °F (-
24 °C)...hasta +7 °F (-14 °C).
Mediante el almacenamiento en congelación, puede
conservar los alimentos perecederos durante largo
tiempo sin que sufran prácticamente pérdidas en su
calidad, debido a que las bajas temperaturas
ralentizan fuertemente o incluso detienen los
procesos de deterioro. La apariencia, el aroma y
todos los ingredientes valiosos se conservan, en su
mayor parte.
El intervalo de tiempo entre el almacenamiento de
los alimentos frescos y la congelación tota depende
de los siguientes factores:
■ temperatura ajustada
■ tipo de alimento
■ Cantidad de alimentos guardados en el
congelador
■ Cantidad y tipo del almacenamiento
Aprovechar toda la capacidad de
congelación del aparato
Para introducir la mayor cantidad de productos
congelados:
■ Retirar todas las piezas de equipamiento.
■ Colocar los alimentos directamente sobre la
bandeja y el piso del congelador.
Al comprar alimentos congelados
■ Asegúrese de que el envase no está dañado.
■ Tenga en cuenta la fecha de caducidad.
■ La temperatura en el mostrador de ventas debe
ser 0 °F (-18 °C) o más fría.
■ No debe interrumpirse la cadena de frío:
transporte los alimentos congelados en una
bolsa térmica y póngalos rápidamente en el
congelador.

es-mx Congelador
78
Al ordenar prestar atención
■ Congelar las cantidades más grandes de
alimentos en el estante superior.
Allí se congelan particularmente rápido y en
forma óptima.
■ Colocar los alimentos distribuyéndolos
ampliamente en los compartimentos o
recipientes del congelador.
■ Los alimentos congelados no deben entrar en
contacto con los alimentos frescos que se
desean congelar.
En caso necesario, vuelva a apilar los alimentos
congelados en los recipientes del congelador.
■ Para asegurar una buena circulación de aire en
el aparato, es importante:
Introducir los recipientes del congelador hasta el
tope.
Congelar los alimentos frescos
Para congelar utilice únicamente alimentos frescos y
en buen estado.
Los alimentos que se consumen cocidos, fritos u
horneados son más adecuados para la congelación
que los alimentos que se consumen crudos.
Antes de congelar, se deben llevar a cabo los
procesos de preparación según el tipo de alimento
para preservar el valor nutritivo, el aroma y el color
de la mejor forma posible:
■ Verdura: lavarla, picarla, escaldarla.
■ Fruta: lavarla, quitarle las semillas y
eventualmente pelarla. Dado el caso, añadirle
azúcar o una solución de ácido ascórbico.
Encontrará las indicaciones en la bibliografía
especializada.
Alimentos adecuado para congelar
■ Productos de panadería
■ Pescado y mariscos
■ Carne
■ Carnes de caza y aves de corral
■ Verduras, frutas y hierbas
■ Huevos sin cáscara
■ Productos lácteos tales como queso, mantequilla
y requesón
■ Platos cocinados y sobras de comida, como por
ejemplo sopas, estofados, carnes o pescados
cocinados, platos de patatas, guisos y postres
Alimentos no adecuados para congelar
■ Verduras que se consumen normalmente crudas,
como por ejemplo lechugas o rabanitos
■ Huevos con su cáscara o huevos duros
■ Uvas
■ Manzanas enteras, peras y melocotones
■ Yogur, leche agria, crema agria, crema fresca y
mayonesa
Envasado de los productos congelados
El tipo correcto de los envases y materiales son
determinantes en gran medida para conservar la
calidad del producto y evitar el desarrollo de las
quemaduras por congelación.
1. Introducir los alimentos en el envase.
2. Eliminar el aire.
3. Sellar el envase herméticamente, para que los
alimentos no pierdan su sabor o se deshidraten.
4. Etiquetar los envases con el contenido y la fecha
de congelación.
Materiales indicados para el envasado:
■ Película plástica
■ Rollos de película de polietileno (PE)
■ Papel de aluminio
■ Recipientes para congelar
Cierres adecuados:
■ Anillos de goma
■ Clips de plástico
■ Cinta adhesiva no congelable
Materiales no apropiados para el envasado:
■ Papel de estraza
■ Papel de pergamino
■ Celofán
■ Bolsas de basura y bolsas de compra ya usadas
Tiempo de conservación de los productos
congelados a 0 °F (-18 °C)
Descongelar los productos congelados
El método de descongelación se deberá adaptar al
tipo de alimento y al objetivo de utilización, para
mantener la calidad del producto lo mejor posible.
Métodos de descongelación:
■ en el compartimento refrigerador (especialmente
adecuado para alimentos de origen animal como
pescado, carne, queso)
■ a temperatura ambiente (pan)
■ microondas (alimentos para ser preparados y
consumidos de forma inmediata)
■ horno/estufa (alimentos para ser preparados y
consumidos de forma inmediata)
9 ATENCION
No volver a congelar los alimentos que se
hayan descongelado o empezado a
descongelar.Solo los podrá volver a congelar
después de haberlos preparado (cocido o
frito).
Ya no se debe utilizar el tiempo máximo de
almacenamiento de los productos congelados.
Pescado, embutidos, comidas preparadas,
productos de panadería:
hasta 6 meses
Aves de corral, carne: hasta 8 meses
Fruta, verdura: hasta 12 meses
Descongelación es-mx
79
=Descongelación
Desc ongel aci ón
Congelador
Debido al sistema completamente automático
NoFrost, el congelador permanece libre de hielo. La
descongelación ya no es necesaria.
DLimpiar
Li mpi ar
9 ATENCION
EVITAR DAÑOS AL APARATO Y PIEZAS DEL
EQUIPAMIENTO.
■ No utilizar detergentes y disolventes que
contengan arena, cloro o ácidos.
■ No emplear esponjas abrasivas.
En las superficies metálicas podría producirse
corrosión.
■ No limpiar nunca las bandejas y recipientes en
el lavavajillas.
Las piezas pueden deformarse.
Limpiar la pantalla
Debido al cambio de temperaturas y de la humedad
del aire podrían empañarse los controles.
Para la limpieza, active el bloqueo para limpieza.
~ "Bloqueo de limpieza" en la página 71
Para la limpieza utilice un paño de microfibra limpio.
Limpiar el interior del aparato
Proceder como se indica a continuación:
1. Pulse el interruptor principal de encendido/
apagado.
2. Retirar los alimentos y guardarlos en un lugar
frío.
Cuando estén disponibles: Coloque los
acumuladores de frío sobre los alimentos.
3. Limpie el aparato con un paño suave, agua
templada y un poco de jabón líquido de pH
neutro.
9 ATENCION
El agua de lavado no debe entrar en la
iluminación o por el agujero de drenaje a la
zona de evaporación.
4. Limpie la junta de la puerta con agua limpia y
séquela bien.
5. Vuelva a encender el aparato e introduzca los
alimentos.
Limpiar los accesorios
Para la limpieza, extraer los elementos variables del
aparato.
~ "Equipamiento" en la página 67
Indicación para la conservación de
superficies de acero inoxidable
Para la conservación y limpieza de las superficies
de acero inoxidable sólo utilice productos de
limpieza apropiados para acero inoxidable y un
paño de limpieza para acero inoxidable.
Puede adquirir un paño de limpieza apropiado para
acero inoxidable a través del servicio posventa.
La conservación de la superficie de acero inoxidable
debe realizarse en dirección de la estructura a fin de
evitar arañazos visibles.

es-mx Ruidos
80
>Ruidos
Ru i d o s
Ruidos normales
Zumbido: Un motor está en marcha, por ejemplo,
unidad de refrigeración, ventilador.
Burbujear. zumbar o borbotear: el refrigerante fluye
a través de los tubos.
Cliquear: motor, interruptor o válvulas de solenoide,
un interruptor de encendido o apagado.
Crujir: Se está realizando la descongelación
automática.
Evitar ruidos
El aparato está desnivelado: Nivelar el aparato con
ayuda de un nivel de burbuja. Calzar el aparato en
caso necesario.
Los recipientes, bandejas o estantes vibran o
están atascados: Verificar los elementos
desmontables y, en caso necesario, colocarlos
nuevamente.
9Iluminación
Il uminación
Su aparato está equipado con una iluminación LED
exenta de mantenimiento.
Sólo el Servicio al cliente o el personal autorizado
puede reparar la iluminación.

¿Qué hacer en caso de avería? es-mx
81
3 ¿Qué hacer en caso de avería?
¿Qué hac er en caso de aver í a?
Antes de llamar al Servicio al cliente, intente solucionar el problema, utilizando esta tabla.
Aparato
--------
La temperatura difiere considerablemente del valor ajustado.
Apagar el aparato durante 5 minutos.
~ "Apagar y cerrar el aparato" en la página 70
Si la temperatura es demasiado alta, vuelva a comprobarla después
de unas pocas horas.
Si la temperatura es demasiado baja, vuelva a comprobarla al día
siguiente.
No se ilumina ninguna indicación.
El enchufe no está correctamente insertado. Conectar el enchufe.
El fusible se fundió. Compruebe los fusibles.
Se interrumpió el suministro eléctrico. Verificar si hay corriente.
El refrigerador se enciende con más frecuencia y durante más tiempo.
El aparato se ha abierto con demasiada frecuencia. No abrir la puerta del aparato innecesariamente.
Las rejillas de ventilación están cubiertas. Eliminar la causa de la obstrucción.
Se colocaron grandes cantidades de alimentos frescos en el interior. Activar con suficiente tiempo de antelación la función super frío.
El aparato no enfría, se iluminan la pantalla y la iluminación.
El Modo Demo está activado. Desactive el Modo Demo.
~ "Encender o apagar el Modo Demo" en la página 73
La puerta no se abre al presionarla.
Un modo especial ha desconectado la apertura automática de la
puerta.
En ese caso, tire desde abajo por debajo de la placa del mueble para
abrir la puerta o desconecte el modo especial.
~ "Activar o desactivar el Modo Sábado" en la página 74
El sistema jalar-para-abrir está conectado. Cambie el aparato al sistema empujar-para-abrir.
~ "Apertura automática de puerta" en la página 72
La potencia necesaria de desbloqueo está ajustada a una fuerza
excesiva.
Seleccione un ajuste más bajo para la potencia necesaria de
desbloqueo.
~ "Apertura automática de puerta" en la página 72
El fusible se fundió. Compruebe los fusibles.
Se interrumpió el suministro eléctrico. Verificar si hay corriente.

es-mx ¿Qué hacer en caso de avería?
82
Máquina de hielo
--------
La máquina de hielo no funciona.
Se desactivó la producción de hielo. Encender la producción de hielo.
El congelador está demasiado caliente. Fije la temperatura más fría.
~ "Manejo del electrodoméstico" en la página 70
El depósito para cubitos de hielo no está colocado correctamente. Coloque el depósito para cubitos de hielo correctamente.
La máquina de hielo no tiene corriente. Llamar al Servicio al cliente.
~ "Servicio al cliente" en la página 83
No llega nada de agua. Compruebe la conexión de agua y, si es necesario, póngase en
contacto con el instalador.
La presión del agua es demasiado baja. Conecte el aparato solo a líneas con suficiente presión de agua.
Hay un doblez en la manguera de agua. Cierre el suministro de agua, enderece el doblez. En caso necesario,
cambie la manguera de agua.
Muy pocos cubitos de hielo o deformados, menos presión de agua de lo habitual.
Después del encendido o de haber retirado varios cubitos de hielo,
hay muy pocos cubitos de hielo en el depósito para cubitos.
Un depósito para cubitos de hielo vacío, se tarda aproximadamente
24 horas en llenarse.
La producción de hielo se detiene automáticamente pero el depósito
para cubitos todavía no está lleno.
No se debe guardar la pala para hielo sobre el hielo del depósito para
cubitos. De lo contrario el sensor no reconoce el nivel real de llenado
del depósito.
La presión del agua es demasiado baja. Conectar el aparato solo a líneas con suficiente presión de agua.
El filtro de agua está bloqueado o necesita cambiarse. Cambiar el filtro de agua.
El congelador está demasiado caliente. Fije la temperatura más fría.
~ "Manejo del electrodoméstico" en la página 70
Sale agua del aparato.
La conexión de agua es inestanca. Compruebe que las conexiones estén firmemente apretadas y la
manguera de agua se encuentre en buen estado.
Si la manguera de agua está dañada, póngase en contacto con el
servicio al cliente para sustituirla. La sustitución puede ser efectuada
por un representante del servicio al cliente o por una persona con una
cualificación similar.Utilice sólo piezas originales del fabricante.

Servicio al cliente es-mx
83
4Servicio al cliente
Se r v i c i o al c l i ent e
En caso de no poder reparar la avería, póngase en
contacto con el Servicio al cliente. Siempre
encontramos una solución adecuada, y también
evitamos visitas innecesarias de los técnicos.
Los datos de contacto de los centros de servicio
más cercanos se pueden encontrar aquí o en el
directorio adjunto de servicios al cliente.
Al llamar por favor indique el número de producto
(E-Nr.) y el número de fabricación (FD) de su
unidad, que se encuentran en la placa de
características del aparato.
~ "Familiarizándose con el aparato"
en la página 65
Confíe en la experiencia del fabricante. De este
modo, estará seguro de que la reparación es
realizada por personal técnico especializado, que
además, dispone de las piezas de repuesto
originales para su electrodoméstico.
Autoprueba del aparato
Su aparato dispone de un programa automático de
autoprueba que le indica las fallas, que su Servicio
al cliente puede solucionar.
1. Pulsar la tecla " para abrir el menú Ajustes.
2. Con la tecla ) desplazarse a la opción de
menú Autocomprobación.
3. Iniciar la autocomprobación con la tecla 8.
Comienza la autocomprobación.
4. Si existen errores, se mostrarán. En ese caso,
siga las instrucciones.
5. El aparato se reinicia.
6. Durante 10 segundos aparece el mensaje de
que la autocomprobación se ha completado.
Después de finalizar la autocomprobación, el
aparato vuelve al modo de funcionamiento normal.
Solicitud de reparación y asesoramiento
en caso de averías
Los datos de contacto de todos los países los
encontrará en el directorio adjunto de Servicio al
cliente.
--------
EE.UU. 1-800-735-4328 Llamada gratis en los EE.UU.
CA 1-800-735-4328

1901 Main Street, Suite 600, Irvine, CA 92614 • 1-800-735-4328
www.thermador.com • © 2020 BSH Home Appliances Corporation
8001153821
en-us, fr-ca, es-mx (0010)
*8001153821*