Loading ...
Loading ...
Loading ...
6
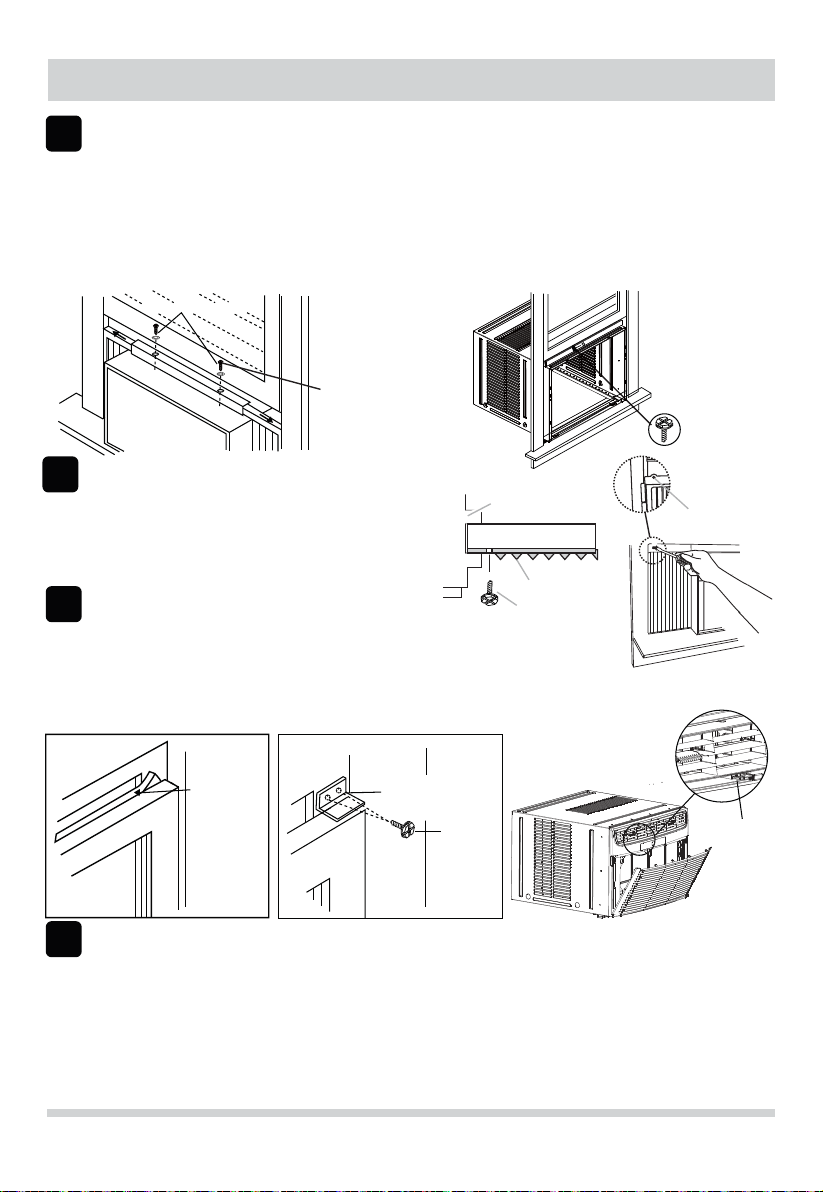
Extend Window Filler Panels and attach to top angle rail:
6
Installation Instructions
1. Carefully raise window to expose filler panel locking screws on top angle rail. Loosen screws so filler panels slide
easily.
2. Extend panels to fill window opening completely. TLJKWHQORFNLQJVFUHZVRQWRS),*
&ORVHZLQGRZEHKLQGWRSDQJOHUDLO
$WWDFKWKHWRSDQJOHUDLOWRZLQGRZIUDPH8VHDƎGULOOELWWRGULOORQHKROHWKURXJKWKHKROHLQWKHPLGGOHRIWRS
DQJOHUDLOLQWRWKHZLQGRZIUDPHDQGGULYHRQHƎ+(;+($'ORFNLQJVFUHZWKURXJKWKHKROHLQWKHPLGGOHRIWRS
DQJOHUDLOLQWRWKHZLQGRZIUDPHDVVKRZQ),*
Install Window Sash Seal and Safety Lock
8
1. TULPZLQGRZVDVKVHDOWRILWZLQGRZZLGWK,QVHUWLWLQWR
VSDFHEHWZHHQXSSHUDQGORZHUVDVKHVDVVKRZQ),*
2. $WWDFKULJKWDQJOHVDIHW\ORFNWRWRSZLQGRZVDVKDV
VKRZQ),*
,IQHFHVVDUyWULPZHDWKHUVHDOVWRQHHGHGOHQJWKSHHO
ofISURWHFWLYHEDFNLQJDQGXVHWRSOXJDQ\JDSV6HH)LJ%
Install Air Conditioner into Cabinet and Install Front Panel to Unit
9
1. Lift air conditioner and carefully slide into cabinet.
2. CAUTION: Do not push on controls OR finned coils.
%HVXUHDLUFRQGLWLRQHULVILUPO\VHDWHGWRZDUGVUHDURIFDELQHW
Reconnect electronics plug if present. Position vent control lever so that it will thread into its channel in the front
SDQHOVHH),*+RRNIURQWSDQHOWRSWDEVLQWRVORWVRQFDELQHWWRSDQGURWDWHIURQWSDQHOGRZQVRWKDWVLGHWDEV
VQDSLQWRSODFHRQFDELQHW,QVHUWSUHYLRXVO\UHPRYHGVFUHZVWKURXJKIURQWSDQHODQGLQWRDLUFRQGLWLRQHr.
,QVHUWDLUFRQGLWLRQHUILOWHr5HLQVWDOOWKHIURQWJULOOHE\KRRNLQJERWWRPWDEVLQWRVORWVRQ)URQW3DQHOERWWRPWKHQ
rotating grille up to snap into place.
WINDOW
SASH SEAL
FIG.19
$Ǝlong hex head screw
%OHIWKDQG:LQGRZ)LOOHU
Panel Top Leg
C. Window channel
$Ǝlong hex head screw
1. Extend the window filler panels out against the window frame.
8VHDGULOOELWWRGULOODVWDUWHUKROHWKURXJKWKHKROHLQWKH
top leg of each window filler panel and into the window sash
)LJ$DQG)LJ%&RQQHFWZLWKRQHlong hex head
screw.
Attach Window Filler Panels to Window Frame
7
$
),*%
SAFETY LOCK
FIG.20
ƎORQJ
hex-head
screws
C
%
),*$
$
:LQGRZ6DVK
9ent control
correct location
),*
LOCKING SCREWS
FIG.16
Ǝ/RFNLQJ6FUHZ
and Washer
ƎORQJ
+(;+($'
6&5(:
FIG. 17
Loading ...
Loading ...
Loading ...