Loading ...
Loading ...
Loading ...
20
21
PL
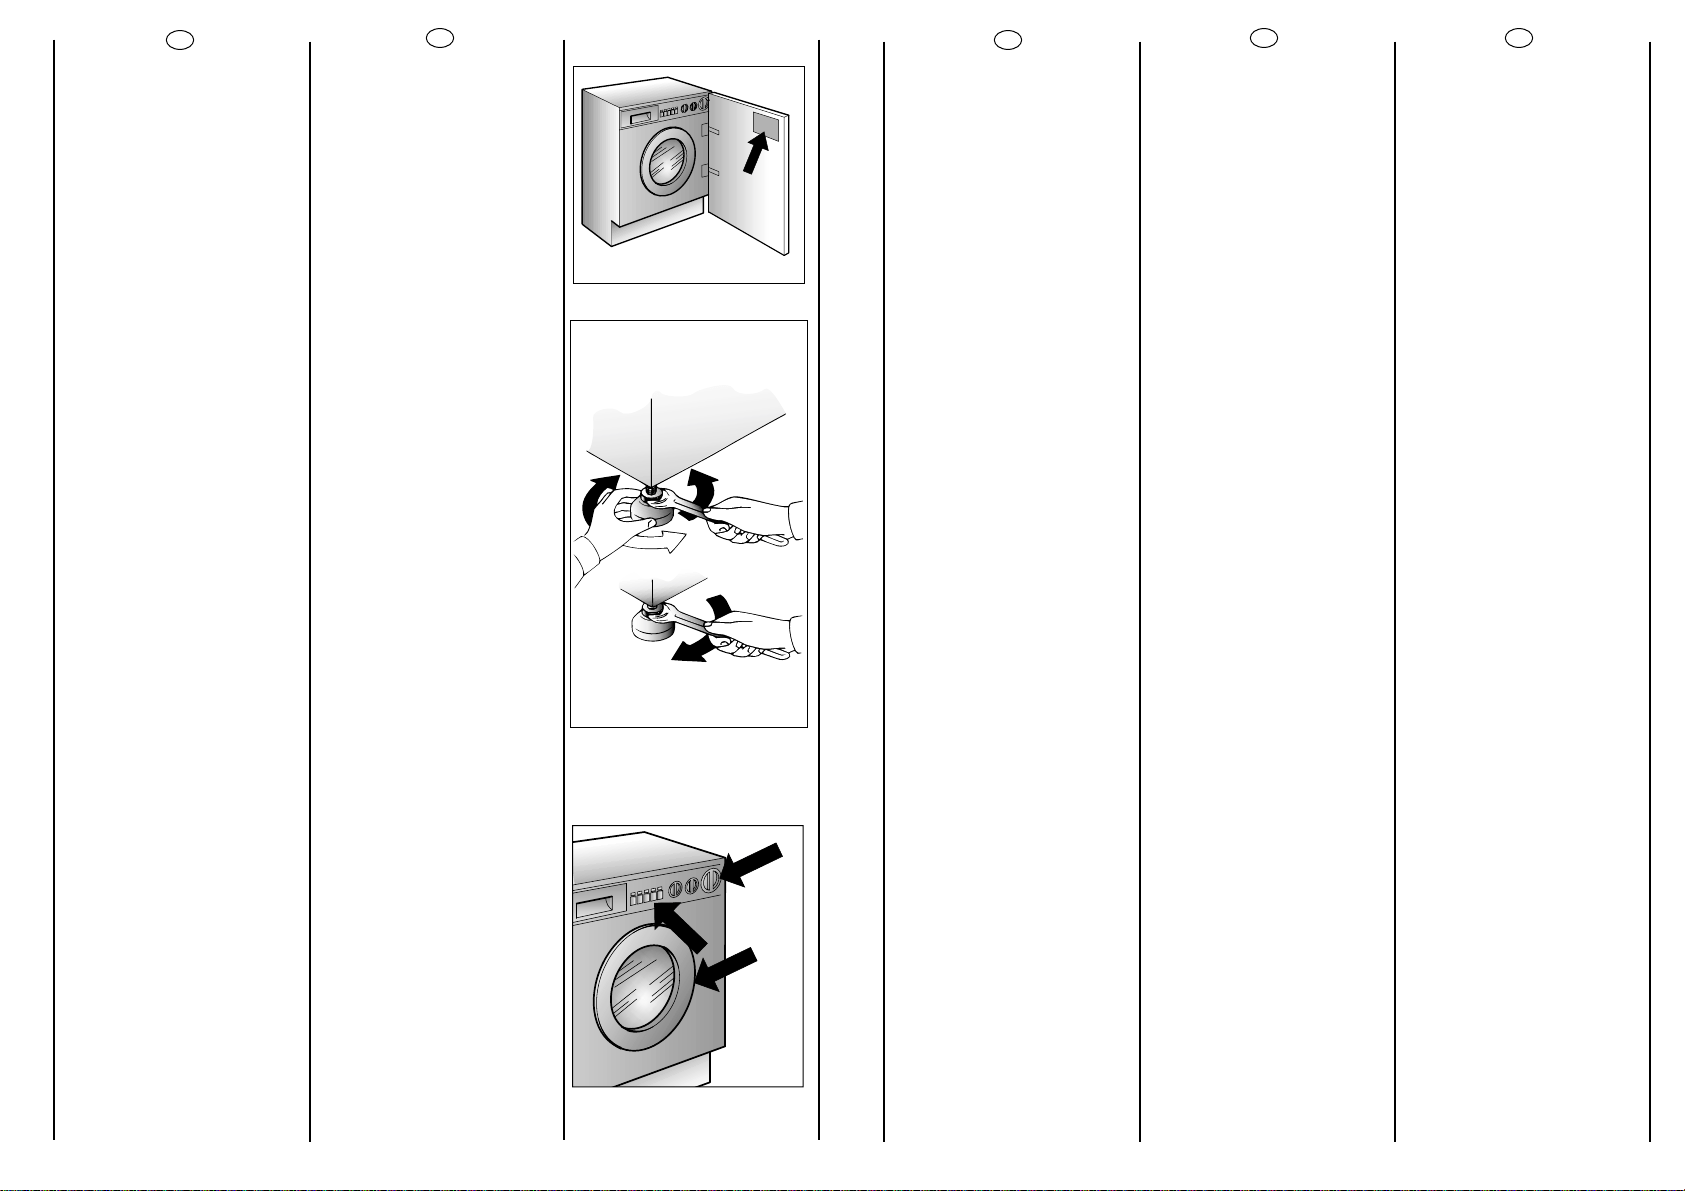
Samoprzylepnå etykietkë, w
odpowiednim jëzyku, prosimy
umieéciç tak jak pokazano
na rysunku.
Wypoziomowaç pralkë
manipulujåc jej przednimi
nóãkami.
aa))
Przekrëciç w kierunku
zgodnym z kierunkiem
wskazówek zegara nakrëtkë
blokujåcå nóãkë pralki.
bb))
Przekrëciç nóãkë
podnoszåc jå lub
opuszczajåc, tak aby
uzyskaç doskonaäe
przyleganie do podäoãa.
cc))
Zablokowaç nóãkë
przykrëcajåc nakrëtkë w
kierunku przeciwnym do
ruchu wskazówek zegara, aã
bëdzie przylegaäa do dna
pralki.
Upewnij sië, ãe przycisk
wäåczajåcy pralkë (C) nie
jest wciéniëty.
Upewnij sië, ãe wszystkie
pokrëtäa så ustawione w
pozycji „0”, a drzwiczki pralki
så zamkniëte.
Wäoãyç wtyczkë kabla
zasilajåcego do gniazda
sleciowego.
Po zainstalowaniu,
urzådzenie naleãy ustawiç w
pozycji zapewniajåcej
swobodny dostëp do
kontaktu (wtyczki).
Wciénij przycisk wäåczajåcy
pralkë (C). Spowoduje to
zapalenie sië lampki
sygnalizujåcej zasilanie (N).
Jeéli kontrolka nie zapali sië
naleãy poszukaç przyczyny
na liécie podanej w rozdziale
„Lokalizacja usterek”.
NL
Verwijder de verklaring van
symbolen en plak die op de
binnenkant van de deur
zoals aangegeven.
Zet de machine waterpas
door middel van de
voorvoetjes.
a) Kontra moer losdraaien
b) Apparaatwaterpas
zetten m.b.v. verstelbare
voeten (maak eventueel
gebruik van een waterpas)
c) Kontra moer weer
vastdraaien.
Zorg er voor dat de
Aan/uit toets (C) niet is
ingedrukt.
Controleer of alle knoppen
op “0” staan en of de vulder
gesloten is.
Steek de stekker in het
stopcontact.
Na installatie, plaatst u het
apparaat zo, het
stopcontact makkelijk
toegangbaar is.
Druk de startknop (C ) in. Het
‘aan’ lampje (N) gaat nu
branden.Als het lampje niet
brand kijk dan bij Hoofdstuk:
Storingzoeker.
PT
Cole a tabela de programas
autocolante em “Portugues”
do lado interior da porta.
Nivele a máquina regulando
a altura dois pés dianteiros.
a) Rode a porca no sentido
dos ponteiros do relógio
para soltar a rosca de
fixação do pé.
b) Rode a pé para o erguer
ou baixar até estar
firmemente assente no chão.
c) Fixe o pé nessa posição
rodando a porca no sentido
contrário co dos ponteiros
do relógio até embater no
fundo da máquina.
Assegure-se de que a tecla
de ligar/desligar (C) não
esteja premida.
Assegure-se de que todos os
botões da máquina estejam
colocados na posição “0” e
de que a porta da máquina
esteja fechada.
Ligue a máquina à corrente,
inserindo a ficha do
respectivo cabo de
alimentação na tomada.
Depois da instalação, os
acessórios devem estar
posicionados, pelo que a
tomada deve estar num
local acessível.
Pressione a tecla de
ligar/desligar (C).O
indicador luminoso de que a
máquina está ligada (N)
iluminar-se-á. Se, porém, este
indicador luminoso não se
acender deverá consultar o
capítulo “Eliminação de
Avarias”.
A
B
C
DE
EN
Den Aufkleber der
Programmlegende in
deutscher Sprache
abtrennen und wie gezeigt
im Inneren der Klappe
anbrinen.
Ausrichten der Maschine
über die vorderen
Verstellfüße
a) Kontermuttern im
Uhrzeigersinn lösen.
b) Standfuß einregulieren, bis
das Gerät genau
ausgerichtet ist (möglichst
mit der Wasserwaage
justieren!).
c) Kontermuttern (gegen
den Uhrzeigersinn) festziehen.
Wichtig: Sollte das Gerät auf
einen Sockel aufgestellt
werden,ist es durch eine
Sockelbefestigung zu sichern.
Erkundigen Sie sich bitte
hierfür im Fachhandel.
Der Hersteller haftet nicht für
unsachgemäße Aufstellung
und Installation.
Sicherstellen, daß die Start-
Stop-Taste (C) nicht gedrückt
ist.
Sicherstellen, daß alle
Schalter auf “0” stehen, und
das Bullauge geschlossen ist.
Stecker einstecken.
Nach der Installation muß der
Anschluß zugänglich sein.
Bei Betätigen der “START”
Taste leuchtet die
Leuchtanzeige auf. Sollte dies
nicht der Fall sein, bitte im
Kapitel “Fehlersuche”
nachsehen.
Remove the key in “English”
and apply to the inside of
the door as indicate.
Use front feet to level the
machine with the floor.
a) Turn the nut clockwise to
release the screw adjuster of
the foot.
b) Rotate foot to raise or
lower it until it stands firmly on
the ground.
c) Lock the foot in position
by turning the nut anti-
clockwise until it comes up
against the bottom of the
machine.
Ensure that the Off/On
button (C) is not pressed.
Ensure that all the knobs are
on the “0” position and that
the door is closed.
Insert the plug.
After installation, the
appliance must be
positioned so that the plug is
accessible.
Press the START (C) button.
The power on (N) light will
light up.
If this does not light up see
faults search.
Loading ...
Loading ...
Loading ...