Loading ...
Loading ...
Loading ...
TROUBLESHOOTING
Solution:
Problem:
Unit will not light, no grid voltage
Unit will not light, grid has voltage
-Make sure unit is plugged into a working outlet
Unit has constant zapping on one or several areas of the grid
Unit has low zapping
-Be sure bulb is inserted properly, 4 prongs are connected into unit
-Replace bulb if necessary
- Clean unit per the “Cleaning” section of the manual
- Insect population may be low, but zapper is working, look for dead insect remains
in the unit to confirm
-Try moving the unit to a different location per “Choosing a Location” section of the manual
If the above troubleshooting does not solve the problem, please call consumer relations at 866-629-6652 or visit www.greenscapesinc.net
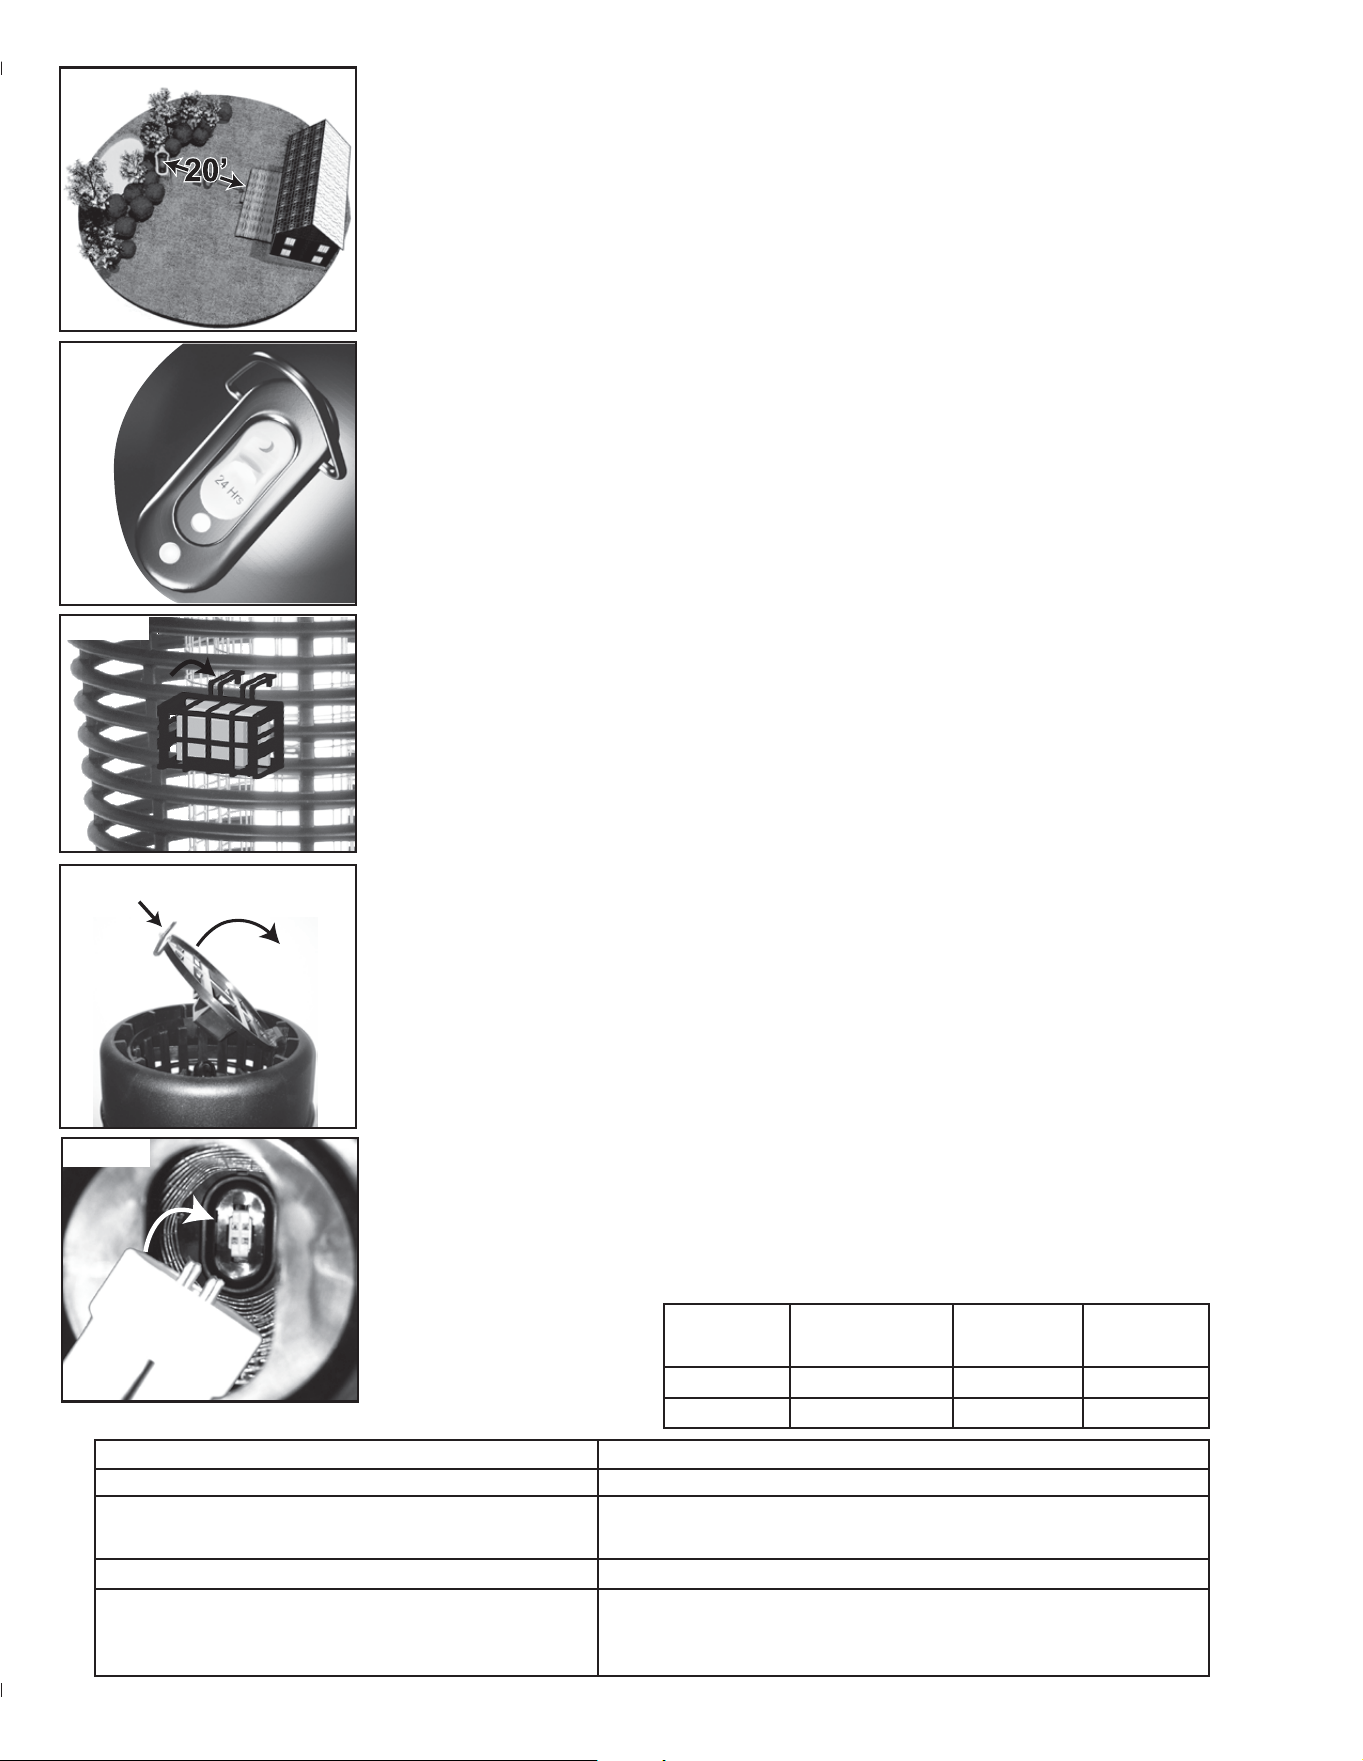
CHOOSING A LOCATION (Figure 1)
When selecting a location, you want to remember the insects will be attracted to the unit so do not put the unit
near human activity. Choose a location at least 20 feet away from the area you are trying to protect. If there is a
water source nearby, place the unit between you and the water because water is often a breeding ground for
flying insect pests.
INSTALLATION AND OPERATION
1. Unpack unit, save all packaging material for off-season storage.
2. Select the proper location to hang your unit using the information above choosing a location
3. Hang the unit approximately 5 - 7 feet above the ground from a tree, mounting pole or other free standing
object. Never mount the unit from house or other building.
4. Plug cord into a compatible extension cord rated for outdoor use.
5. The unit will be on once it is connected to an electrical source. This unit does not have an “on/off” switch.
Please allow up to 3 minutes for the bulb to light completely.
6. This unit is designed to withstand moderate rain but should be taken down and stored indoors during severe weather.
7. It is recommended that this unit be put to use in early spring and left out until late fall to maximize effects.
8. Using the available lure will add to the effectiveness of the unit to attract more insects to the unit.
9. Deluxe and MAX versions (BZ-40DX/MAX) have 2 settings-24 Hour Operation or Dusk to Dawn Sensor
Operation(Figure 2)
a. To select 24 Hour Operation, slide the yellow button on the cap down into the “24 Hrs” mode. The unit will
remain on 24 hours a day.
b. To select Dusk to Dawn Sensor Operation, slide the yellow button on the cap up into the “Half Moon” mode.
The unit will turn on automatically at dusk, operate through the night and turn off in the morning.
INSTALLING THE BLACK FLAG MOSQUITO OCTENOL LURE (Figure 3)
You will find a Mosquito octenol lure included with the Bug Zapper Unit. Remove the lure clip from the pouch.
Attach clip to outer grid of the zapper, any position on zapper grid is good. Zapper effectiveness is increased by
luring mosquitoes and biting flies to it. Replace lure clip after every 30 days for best results. The universal fit
mosquito octenol lure clip will fit on most Bug Zapper brands. To remove the clip simply push up the 2 prongs
against the top of the grid and pull out.
CHANGING BULBS (Figures 4 & 5)
Use replacement bulbs. These bulbs should be replaced annually to maintain optimal UV effectiveness.
Even though the bulb’s light may be visible to you, its ability to attract insects diminishes over time. If the bulb
fails to light or the color of the light changes to yellow or orange it is time to replace the bulb.
1. Unplug and remove entire unit from hanging position.
2. Turn unit upside down, open the bulb base by pushing the latch towards the center of the unit and lifting the
base up, remove old bulb.
3. Insert the new bulb making sure it is properly seated in the socket.
4. Close the bulb base by snapping it back into place.
5. Place unit back into the hanging position and plug back into the outlet.
Note: If unit fails to light after replacing bulb, take unit down and remove the bulb and reseat 4 prongs of bulb into socket.
CLEANING
As the unit kills insects, most of the insect remains will be vaporized or fall down through the unit. Some
remains may be left on the grids and over time may reduce the effectiveness of this device. Make sure to
regularly clean your unit to achieve maximum effectiveness. The time in between each cleaning will vary
depending on your insect populations. Check your unit frequently and clean any insect remains you see.
1. Unplug and remove entire unit from hanging position.
2. Remove bulb from unit to avoid damage (see above instructions).
3. Using a small brush or stick, gently remove any insect remains from outer casing and inner grids by
inserting into each horizontal grid slot and moving side to side.
4. If available, you may use a portable hair dryer or compressed air to clean out your unit.
5. Never use water to clean your unit, water could damage the electrical components.
6. Be very careful not to move the grids from the seatings.
7. Once the unit is clean, replace the bulbs, return the unit to the hanging position and reconnect to power source.
SOLUCIÓN DE PROBLEMAS
Solution:
Problema:
La unidad no se enciende, no hay tensión de red
La unidad no se enciende, la rejilla tiene voltaje
-Asegúrese que la unidad está conectada a una toma de corriente
La unidad tiene la electrocución constante en una o más áreas de la red
la unidad tiene poco o ningún insecto matar
-Asegurese que la bombilla esté correctamente instalada, y que los 4 pasadores están
conectados a la unidad
-Reemplace la bombilla si es necesario
- Limpie la unidad utilizando las instrucciones de "limpieza" del manual
-La población de insectos puede ser baja, pero el exterminador de insectos
continua trabajando, busque insectos muertos en la unidad para confirmar.
-Trate de mover la unidad a otro lugar utilizando las instrucciones de
"Selección de una ubicación" del manual
Si la solución anterior no resuelve el problema, por favor llame al servicio al cliente 866-629-6652 o visite www.greenscapesinc.net
ELECCIÓN DE UN LUGAR (Figura 1)
Al elegir el lugar, es bueno recordar que los insectos serán atraídos a la unidad por esta razon no coloque la unidad cerca
de la actividad humana. Elija un lugar por lo menos 20 pies de distancia de la zona que están tratando de proteger. Si hay
una fuente de agua cercana, coloque la unidad entre usted y el agua porque el agua es a menudo un caldo de cultivo para
insectos voladores.
NSTALACIÓN Y FUNCIONAMIENTO
1. Desempaque la unidad, guarde todos los materiales de empaque para el almacenamiento de la unidad en fuera de temporada.
2. Seleccione el lugar adecuado para colgar su unidad utilizando la información anterior de elegir el lugar
3. Cuelgue la unidad aproximadamente 5 a 7 pies sobre el suelo de un árbol, poste u otro tipo de objeto libre de pie.
Nunca instale la unidad en la casa o edificio.
4. Enchufe el cable en un cable de extensión compatible clasificado para uso en exteriores.
5. La unidad será encendida una vez que está conectado a un toma eléctrica. Esta unidad no tiene un "on / off". Por favor,
espere hasta 3 minutos para que la bombilla prenda por completo.
6. Esta unidad está diseñada para soportar lluvias moderadas pero debe desmontarse y guardarse en el interior durante el mal tiempo.
7. Se recomienda que esta unidad se empieze a utilizar en primavera y se deje afuera hasta finales de otoño para
maximizar los efectos.
8. Utilizando el señuelo disponible intencificara la eficacia de la unidad para atraer más insectos.
9. Versions de lujo y MAX (BZ-40DX/MAX) tener 2 opciones - Operación de 24 Horas o el atardecer hasta el amanecer
del sensor de la operación (Figura 2)
a. Para seleccionar las 24 horas de funcionamiento, deslice el botón amarillo en la tapa hacia abajo en las "24 Horas" de
modo. La unidad permanecerá en las 24 horas del día.
b. Para seleccionar el atardecer hasta el amanecer del sensor de la operación, deslice el botón amarillo en la tapa hacia
arriba en la "Media Luna" modo. La unidad se encenderá automáticamente al atardecer, funcionando a través de la noche
y se apagará en la mañana.
INSTALACIÓN DE LA RED BANDERA DE MOSQUITOS NEGRO OCTENOL (Figura 3)
Va a encontrar un señuelo octenol mosquito incluido en la Unidad. Retire el clip de atraer de la bolsa. Fije el gancho a la
red exterior de la unidad. cualquier posición en la parrilla de la unidad es correcta. la de la unidad aumenta atrayendo
mosquitos y moscas que pican hacia ella. Vuelva a colocar el clip de atraer después cada 30 días para obtener mejores
resultados. El clip de ajuste universal octenol para atraer a los mosquitos cabe en la mayoría de marcas de exterminador
electrico de mosquitos. Para retirar el clip empuje hacia arriba las 2 puntas contra la parte superior de la rejilla y
luegosaque el clip.
CAMBIO DE BOMBILLAS (Figuras 4 y 5)
Utilice bombillas de repuesto. Estas bombillas se cambia todos los años para mantener la eficacia óptima UV.
A pesar de que la luz de la bombilla puede ser visible para usted, su capacidad de atraer insectos disminuye con el tiempo.
Si la lámpara no se enciende o el color de la luz cambia a amarillo o naranja quiere decir que es hora de cambiar el foco.
1. Desenchufe y retire la unidad completa de su posición colgante.
2. Apagar la unidad boca abajo, abra la base de la bombilla presionando el pasador hacia el centro de la unidad y
levantandolo de la base hacia arriba, retire el foco que se va a remplazar.
3. Inserte la nueva bombilla asegurándose de que esté bien asentado en el zócalo.
4. Cierre la base de la bombilla hasta que haga un click.
5. Coloque la unidad de nuevo en su posición colgante y el enchufe al toma.
Nota: Si la unidad no se enciende después de reemplazar el foco, desmonte la unidad, retire la bombilla y vuelva a
colocar los 4 pasadores de la bombilla en el casquillo.
LIMPIEZA
Como la unidad mata a los insectos, la mayoría de los restos de insectos se evapora o se caen a través de la unidad.
Algunos restos pueden quedar en las redes y con el tiempo puede reducir la eficacia de este dispositivo. Asegúrese de
limpiar periódicamente la unidad para lograr la máxima eficacia. El tiempo entre cada limpieza variará dependiendo de sus
poblaciones de insectos. Revise su unidad con frecuencia y limpie cualquier insecto que sea visible..
1. Desenchufe y retire la unidad completa de su posición colgante.
2. Quite el foco de la unidad para evitar daños utilizando las instrucciones de "cambio de bombilla" del manual.
3. Use un cepillo pequeño o un palo, retire con cuidado cualquier resto de insecto de la cubierta externa y de las redes
internas mediante la inserción en cada ranura de la rejilla horizontal y moviendo de lado a lado.
4. Si esta disponible, usted puede utilizar un secador de pelo o aire comprimido para limpiar su unidad.
5. Nunca utilice agua para limpiar su unidad, el agua puede dañar los componentes eléctricos.
6. Tenga mucho cuidado de no mover las redes de su posicion original.
7. Una vez que la unidad esté limpia, sustituir las bombillas, devolver la unidad a la posición para colgar y volver a conectar la fuente de energía.
Figure 1
Figure 2
Figure 4
1
2
Figure 3
Figure 5
Figura 1
Figura 2
Figura 4
1
2
Figura 3
Figura 5
Model Lamp Model Manufacturer Lamp Parameter
Type 1 (BZ-15N
and BZ-20)
Type 2 (BZ-40)
ZW15D20A-U190
ZW40D20A-U305W
Cnlight Co. Ltd.
Cnlight Co. Ltd.
55.5V, 6.8W
78 .5 V, 16.1W
Type 3 (BZ-40DX)
Type 5 (BZ-40MAX)
ZW40D20A-U305P Cnlight Co. Ltd. 78 .5 V, 16.1W
Tipo 1 (BZ-15N
and BZ-20)
Tipo 2 (BZ-40)
ZW15D20A-U190
ZW40D20A-U305W
Cnlight Co. Ltd.
Cnlight Co. Ltd.
55.5V, 6.8W
78 .5 V, 16.1W
Tipo 3 (BZ-40DX)
Tipo 5 (BZ-40MAX)
ZW40D20A-U305P Cnlight Co. Ltd. 78 .5 V, 16.1W
Please use only the following
lamp model by Cnlight Co. Ltd.
for lamp replacement:
Modelo Modelo De La Lámpara Fabricante Lámpara De Parámetro
Por favor, utilice sólo las
siguientes modelo de la lámpara
por la Cnlight Co. Ltd. para la
sustitución de la lámpara: