User Manual for Washer
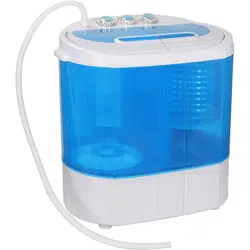
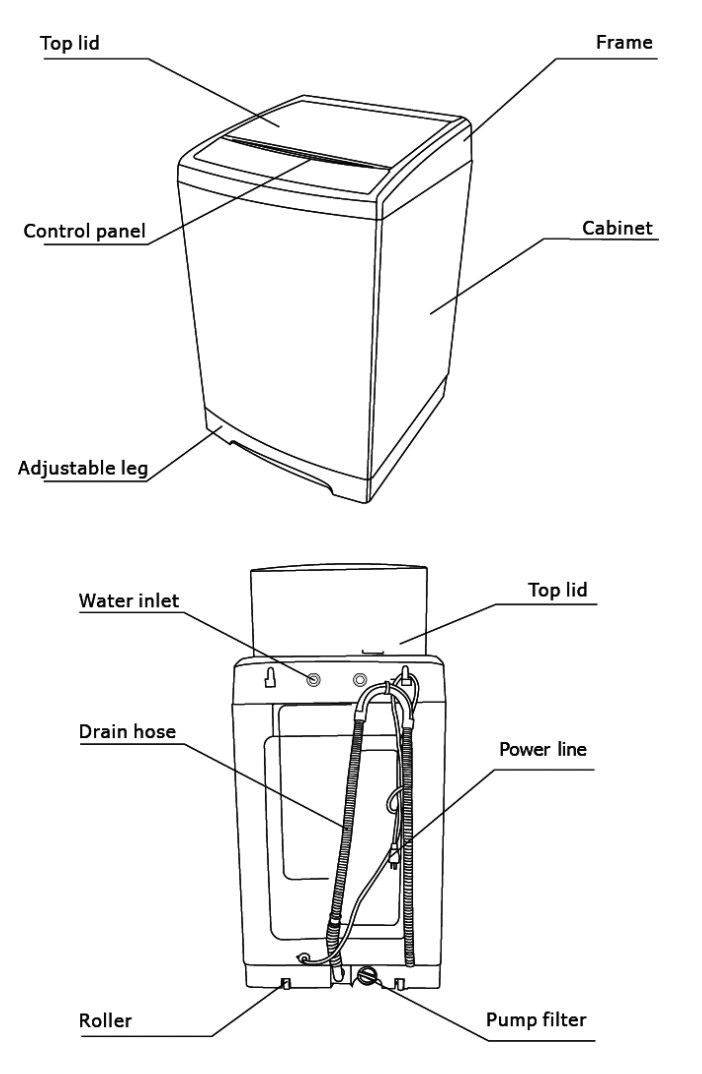
PARTS & FEATURES
CONTROL PANEL
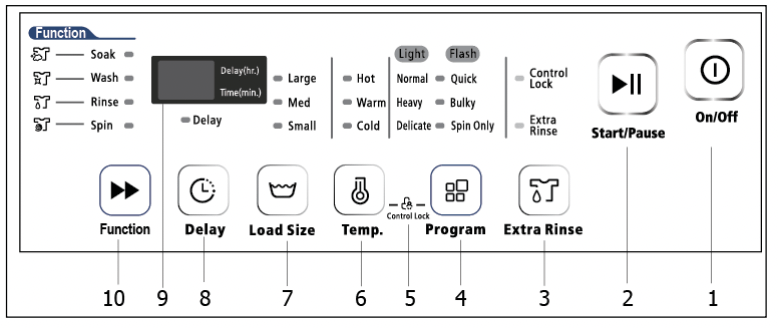
1 POWER ON / OFF BUTTON
2 START / PAUSE BUTTON
3 EXTRA RINSE OPTION SELECTOR BUTTON
4 AUTOMATIC WASH PROGRAM SELECTOR BUTTON
NORMAL / QUICK / HEAVY
BULKY / DELICATE / SPIN ONLY
5 CONTROL PANEL LOCK
(PRESS AND HOLD TEMP AND PROGRAM BUTTONS SIMULTANEOUSLY)
6 WASH TEMPERATURE SELECTOR BUTTON
HOT / WARM / COLD
7 LOAD SIZE SELECTOR BUTTON
LARGE / MEDIUM / SMALL
8 DELAY WASH PROGRAM SELECTOR BUTTON
9 ELECTRONIC DISPLAY WINDOW
10 FUNCTION (CYCLE) SELECTOR BUTTON
SOAK / WASH / RINSE / SPIN
OPERATING YOUR PORTABLE WASHER
PREPARATION
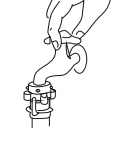
1. Connect the water inlet hose to the water faucet. Don’t switch on the power if the water pressure is lower than 0.05MPa and higher than 0.5MPa.
2. Ensure the drain hose has been installed properly.
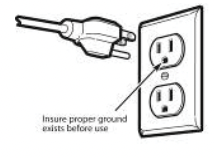
3. Insert the plug into the socket. For safety the plug should have ground connection.
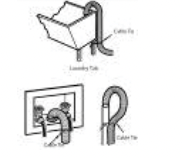
4. Insert the end of drain hose into the hook shelf, and hang the drain hose over a drain outlet.
5. Open the water faucet.
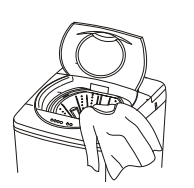
6. Put the wash load into the tub evenly.
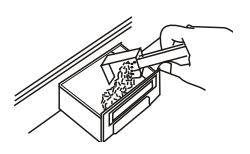
7. Add the suitable quantity detergent into the detergent case.
8. Close the lid. Otherwise the washer will not wash or spin, and alarm will sound.
BEFORE WASHING
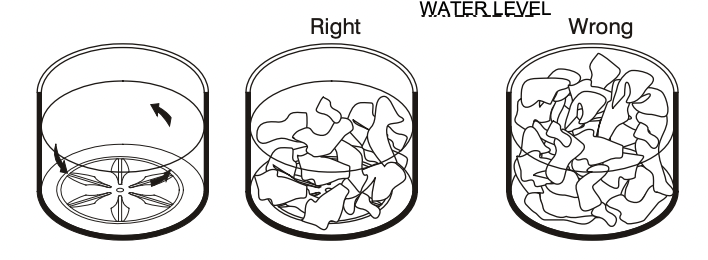
Prepare the wash load. Mix large and small articles in a load to get the best washing results. Drop articles loosely into the inner tub. Do not pack articles in or wrap them. Articles should move freely through the wash water for best cleaning results. Articles should rollover, sink and then reappear.
When washing very large articles, do not fill inner tub as full as with other loads. The water level in your washer should fit the size of your wash load. Small load will use lower water levels. There must be enough water in the inner tub to allow articles to move and turn over freely. Overloading the inner tub can result in poor washing and rinsing. Overloading may also cause wrinkling and tearing of articles.
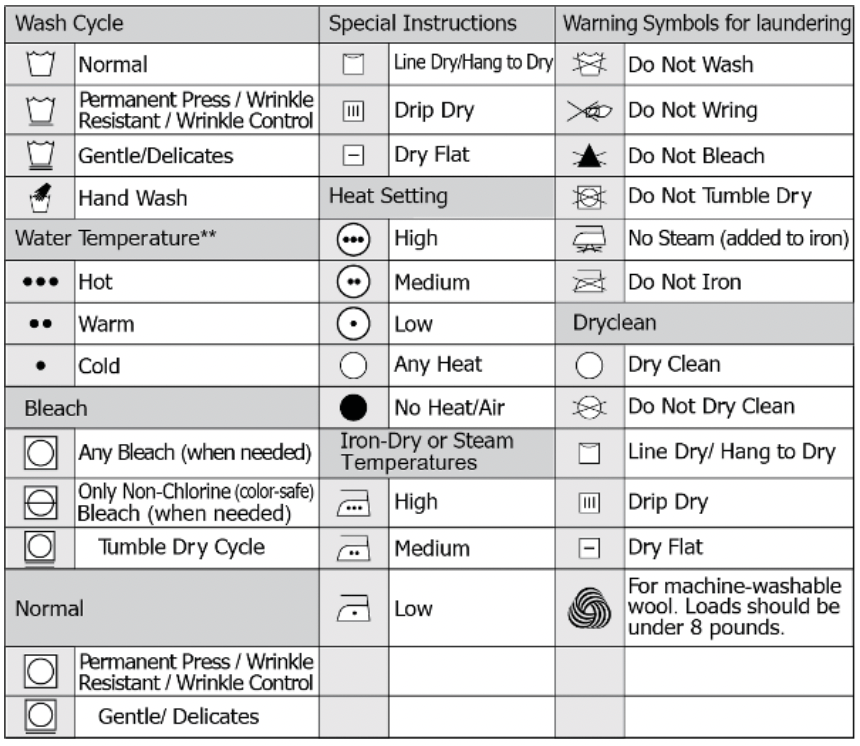
Make sure that you follow all manufacturer instructions for washing:
OPERATING INSTRUCTIONS
PRESS THE POWER BUTTON.
PRESS THE WATER LEVEL BUTTON.
Choose appropriate water level according to wash load quantity.
WATER TEMPERATURE CHOICE.
Press the water temperature selection button, you can choose from cold, warm, and/or hot water.
NOTE: The washer will provide a cold rinse in all TEMPERATURE settings
| Indicator Light Shown |
Description |
| COLD |
When the “COLD” indicator light is ON, it means the washing machine will only use water supplied by the cold water inlet. |
| HOT |
When the “HOT” indicator light is ON, it means the washing machine will only use water supplied by the hot water inlet |
| WARM |
When the “WARM” indicator light is ON, it means the washing machine will use water supplied by both the cold and hot water inlets |
IMPORTANT: A single cold hose system does not allow the washing machine to automatically (select) regulate incoming water temperatures to match those listed on the control panel such as WARM or HOT.
PRESS THE FUNCTIONS SELECTION BUTTON.
Choose the desired function and then the corresponding indicator blink.
PRESS DOWN START/PAUSE BUTTON ONCE AND THE MACHINE WILL BEGIN OPERATION.
Please press this button to stop the normal operation, if it continues to work, press it again. Water level can be reset during the normal operation. If the higher water level is selected, the machine will operate after refilling the water level selected.
MANUAL FUNCTIONS SELECTION (CUSTOM WASHING CYCLE)
WASH ONLY
- Press down the power button.
- Press the Function button until only the WASH indicator is ON.
- Press the water temp button to select the water temperature.
- Press the water level button to select the appropriate water level setting.
- Press the START/PAUSE to start the course. And the LED display will show the remaining time of the entire course.
WASH AND RINSE
- Press down the power button.
- Press the Function button until the WASH & RINSE indicators are ON.
- Press the water temp button to select the water temperature.
- Press the water level button to select the appropriate water level setting.
- Press the START/PAUSE to start the course. And the LED display will show the remaining time of the entire course.
RINSE AND SPIN
- Press down the POWER button.
- Press the Function button until the RINSE & SPIN indicators are ON.
- Press the water level button to select the appropriate water level setting.
- Press the START/PAUSE to start the course. And the LED display will show the remaining time of the entire course.
SOAK, WASH, RINSE AND SPIN
- Press down the power button.
- Press the Function button until the SOAK, WASH, RINSE AND SPIN indicators are ON.
- Press the water temp button to select the water temperature.
- Press the water level button to select the appropriate water level setting.
- Press the START/PAUSE to start the course. And the LED display will show the remaining time of the entire course.
WASH, RINSE AND SPIN
- Press down the power button.
- Press the Function button until the WASH, RINSE AND SPIN indicators are ON.
- Press the water temp button to select the water temperature.
- Press the water level button to select the appropriate water level setting.
- Press the START/PAUSE to start the course. And the LED display will show the remaining time of the entire course.
SPIN ONLY
- Press down the power button.
- Press the Function button to select the SPIN function until only SPIN indicator is ON.
- Press the START/PAUSE to start the course. And the LED display will show the remaining time of the entire course.
To select one of the pre-programmed automatic wash cycles follow the instructions as shown on the following pages:
- Press the power button.
- Press the program button to select the appropriate program until the indicator light is ON. (NORMAL is the default program)
- Press the water temp button to select the water temperature. (The default setting is cold water).
- Press the water level button to select the appropriate water level setting.
- Press the START/PAUSE to start the course. And the LED display will show the remaining time of the entire course.
Close the lid, or the washing machine will buzz during wash and spin cycle. In the event the clothing loaded becomes unbalanced, the safety switch will be triggered causing the washing machine to automatically refill with water to adjust the imbalance.
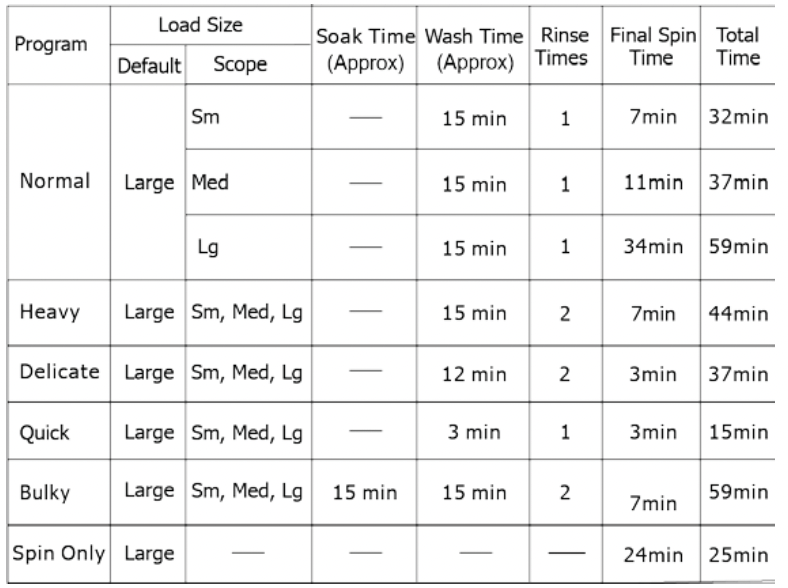
AUTOMATIC WASH PROGRAMS
Note:
- Clothes easily discolored should be washed separately so as to prevent inter-dyeing.
- If you want to change a selected program, press the POWER button first to turn the unit off, then press the POWER button again to turn the unit back on, then press the Program button to select the new cycle before pushing START/PAUSE button.
- When the Rinse and Spin functions are ON, do not use detergent.
- If you want to drain the water during washing, press the POWER button first to turn the unit off, then press the POWER button again to turn the unit back on, then select the SPIN function. Press START/PAUSE button again to restart.
DELAY START (PRESET) SETTING
Select this option when you would like to load the washer but not run the wash cycle until a later time.
Note:
As washing machines and other appliances are considered to present a potential child entrapment danger; you should never run a wash cycle when you are not present for either the entire or major portion of the cycle.
- Press down the power button.
- Load the washing machine and select the appropriate wash program.
- Press DELAY button continuously to select the delay start time. (From 1 hour to 48 hours)
- Close the lid completely.
- Press START/PAUSE button to start the course.
CONTROL PANEL - CHILD SAFETY LOCK
If you have small children, it is recommended that you activate this setting every time you use the washing machine as children can be attracted to and enticed to play with the washing machine.
- Select the desired washing program as described previously in this manual
- Select the appropriate program and press START/PAUSE button to start the washing machine.
- Press and hold both the TEMP and PROGRAM buttons until you hear a “BEEP” sound (approximately 3 seconds) and the CONTROL LOCK indicator is illuminated.
- The “CL” indicator and remaining wash time will display.
- While the control lock is activated the only buttons that will function will be the Power ON/OFF and the buttons to de-activate the control lock function.
- To de-activate the child lock function simply press and hold the TEMP and PROGRAM buttons again.
ADDING / REMOVING CLOTHING AFTER THE CYCLE HAS STARTED
Your washing machine is equipped with a safety system that will stop the machine when the lid is opened during a wash cycle or will prevent a wash cycle to start.
THE MACHINE WILL NOT OPERATE WITH THE TOP LID OPEN, CLOSE THE LID AND PRESS THE START / PAUSE BUTTON.
To add or remove clothing to/from a wash cycle follow the steps below:
- Open the lid, the machine will stop (all indicators on the control panel will turn off).
- Add or remove the clothing as needed.
- Close the lid.
- Press the Power START / PAUSE button to continue the previous wash cycle.
CARE AND MAINTENANCE
CLEANING YOUR PORTABLE WASHER
- Clean the surface of your portable washer regularly with soft fabric.
- Clean the inner tub regularly, especially immediately after starch or bleach operation.
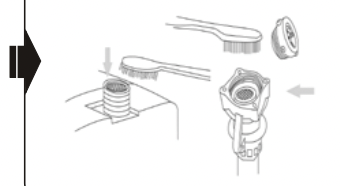
- Clean the filter in the inlet valve or inlet hose regularly in order to prevent it from clogging.
1. Unplug the power cord.
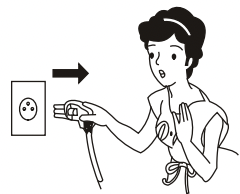
2. Remove the inlet hose and clean the filter with a brush.
- Clean the surface of the washing machine with a soft cloth regularly.
- Clean the inner tub regularly, especially after washing starched or bleached laundry.
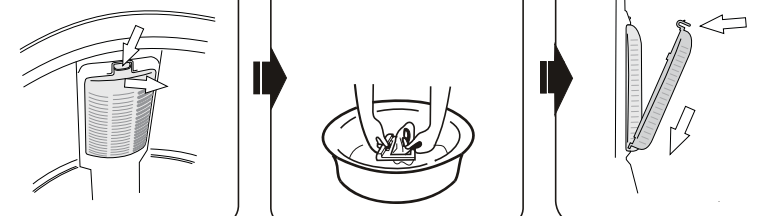
1. Pull upward to remove the and outward to remove the lint filter.
2. Clean and rinse it thoroughly
3. Reinstall.
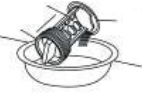
CLEANING THE LINT FILTER IN THE DRAIN PUMP
1. Place a dish or bowl below the pump filter assembly to collect the water
2. Drain the water tram the pump.

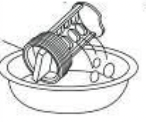
3. Slowly tum the filter counter clockwise to open and drain the water.
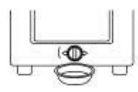
4. Pull the filter assembly outward and remove
5. Clean the filter
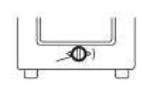
6. Once clean align the filter assembly to its orginal pasition and re-install.
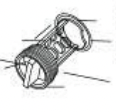
7. Tighten the filter assembly by turing dockwise. Be sure the filter is installed correctly and tightly sealed before using the washer
NOTICE:
If the drain filter is not cleaned frequently (approximately after every 10 uses). Drain problems may arrise.
PROBLEMS WITH YOUR PORTABLE WASHER?
You can solve many common portable washer problems easily, saving you the cost of a possible service call. Try the suggestions below to see if you can solve the problem before calling the servicer.
TROUBLESHOOTING GUIDE
| PROBLEM |
POSSIBLE CAUSE |
| Washer does not operate. |
Not plugged in.
The circuit breaker tripped or a blown fuse.
The lid is not closed.
Make sure the water source is turned on.
|
| No water or insufficient water supply. |
The water source faucet is not turned on.
The water source hose is frozen.
The water intake hose is bent.
The filter on the water intake hose is clogged.
|
| The washing machine does not drain. |
The drain hose is squashed or bent. |
| Washing machine vibrates or is too noisy. |
Check to assure that the washer is level.
The washing machine is touching another object.
The laundry load is not balanced.
|
| Washing machine does not spin. |
The lid is not closed.
The washer is not on a level surface.
|
|
Display shows Error Code “E 1”
Description: Malfunction in the Water Supply Valve
|
No water,
Water supply valve time-out,
Water valve is clogged.
|
|
Display shows Error Code “E 2”
Description: Water Drainage Issue.
|
Water drain pump malfunction. |
|
Display shows Error Code “E 3”
Description: Top Lid is Open
|
The machine will not operate with the top lid open.
Close the top lid and press the START / PAUSE button to continue.
|
|
Display shows Error Code “E 4”
Description: Unit is unbalanced
|
Wash load is unbalanced.
Open the top lid, rebalance the load, close the lid and press the START / PAUSE button to continue.
|