Loading ...
Loading ...
Loading ...
5
2. Setting up the monitor
2. Setting up the monitor
2.1 Installation
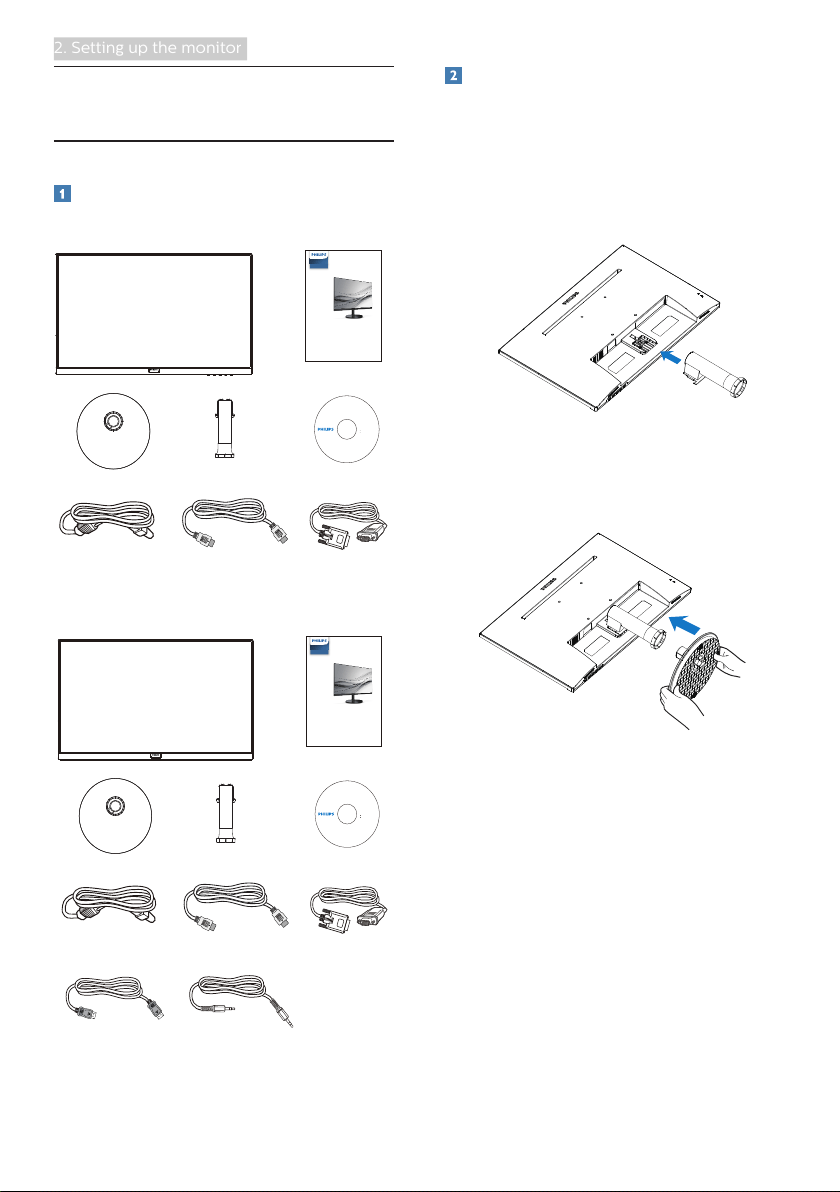
Package contents
241V8/241V8W/241V8L
* VGA
Power
*CD
2
0
2
0
©
T
O
P
V
i
c
t
o
r
y
I
n
v
e
s
t
m
e
n
t
s
L
t
d
.
A
l
l
r
i
g
h
t
s
r
e
s
e
r
v
e
d
.
U
n
a
u
t
h
o
r
i
z
e
d
d
u
p
l
i
c
a
t
i
o
n
i
s
a
v
i
o
l
a
t
i
o
n
o
f
a
p
p
l
i
c
a
b
l
e
l
a
w
s
.
M
a
d
e
a
n
d
p
r
i
n
t
e
d
i
n
C
h
i
n
a
.
V
e
r
s
i
o
n
This product has been manufactured by and is
sold under the responsibility of Top Victory
Investments Ltd., and Top Victory Investments
Ltd. is the warrantor in relation to this product.
Philips and the Philips Shield Emblem are
registered trademarks of Koninklijke Philips N.V.
and are used under license.
Contents:
Drivers
User’s Manual
User’s Manual
www.philips.com/welcome
使用产品前请阅读使用说明
保留备用
Monitor
* HDMI
V Line
241V8/242V8
Start
Quick
Register your product and get support at
www.philips.com/welcome
241V8LA/242V8A/242V8LA
* VGA
Power
*CD
2
0
2
0
©
T
O
P
V
i
c
t
o
r
y
I
n
v
e
s
t
m
e
n
t
s
L
t
d
.
A
l
l
r
i
g
h
t
s
r
e
s
e
r
v
e
d
.
U
n
a
u
t
h
o
r
i
z
e
d
d
u
p
l
i
c
a
t
i
o
n
i
s
a
v
i
o
l
a
t
i
o
n
o
f
a
p
p
l
i
c
a
b
l
e
l
a
w
s
.
M
a
d
e
a
n
d
p
r
i
n
t
e
d
i
n
C
h
i
n
a
.
V
e
r
s
i
o
n
This product has been manufactured by and is
sold under the responsibility of Top Victory
Investments Ltd., and Top Victory Investments
Ltd. is the warrantor in relation to this product.
Philips and the Philips Shield Emblem are
registered trademarks of Koninklijke Philips N.V.
and are used under license.
Contents:
Drivers
User’s Manual
User’s Manual
www.philips.com/welcome
使用产品前请阅读使用说明
保留备用
Monitor
* HDMI
* Audio cable
V Line
241V8/242V8
Start
Quick
Register your product and get support at
www.philips.com/welcome
* DP
(242V8A/242V8LA)
*Different according to region.
Install the base
1. Place the monitor face down on
soft and smooth surface taking care
to avoid scratching or damaging
the screen. Attach/Slide the base
column with the monitor until it
clicks into position.
2. Hold the monitor base stand with
both hands and firmly insert the
base stand into the base column.
Loading ...
Loading ...
Loading ...