
Loading ...
Installation
English
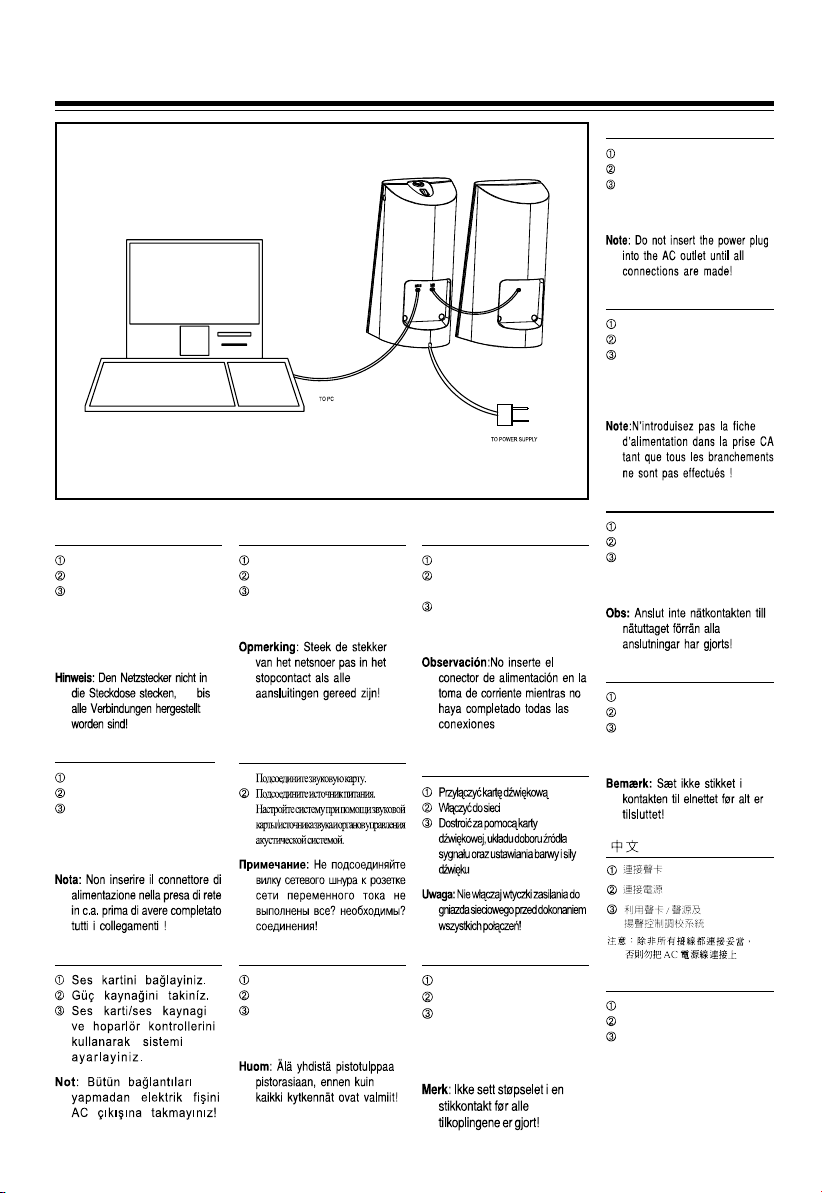
À Connect soundcard.
Á Connect the power supply.
 Tune the system using sound
card/sound source and speaker
controls.
Note: Do not insert the power plug
into the AC outlet until all
connections are made!
Francais
À
Connectez la carte sonore.
Á
Branchez l'alimentation.
Â
Accordez le système à l'aide
de la carte sonore/source
sonore et des commandes des
enceintes.
Note:Nintroduisez pas la fiche
dalimentation dans la prise CA
tant que tous les branchements
ne sont pas effectués !
Swedish
À
Anslut ljudkortet.
Á
Anslut strömförsörjningen.
Â
Ställ in systemet med hjälp av
ljudkort/ljudkälla och
högtalarkontroller.
Obs: Anslut inte nätkontakten till
nätuttaget förrän alla
anslutningar har gjorts!
Danish
À
Tilslut lydkort.
Á
Tilslut strømforsyning.
Â
Indstil systemet ved hjælp af
lydkort/lydkilde og
højttalerregüleringen.
Bemærk: Sæt ikke stikket i
kontakten til elnettet før alt er
tilsluttet!
Portuguese
À
Ligue a placa de som.
Á
Ligue a alimentação eléctrica.
Â
Ajuste o sistema utilizando a
placa de som/fonte de som e
controlos das colunas.
Nota: Não introduza a ficha
eléctrica na tomada antes de
fazer todas as ligações!
Norwegian
À
Kople til lydkortet.
Á
Kople til strømforsyningen
.
Â
Finjuster systemet ved å
regulere innstillingene for
lydkortet/lydkilden og
høyttalerne.
Merk: Ikke sett støpselet i en
stikkontakt før alle
tilkoplingene er gjort!
Finnish
À
Yhdistä äänikortti.
Á
Kytke virta.
Â
Viritä järjestelmä
äänikortin, äänilähteen
ja kaiuttimen säätimillä.
Huom: Älä yhdistä pistotulppaa
pistorasiaan, ennen kuin
kaikki kytkennät ovat valmiit!
Turkish
À Ses kartini baðlayiniz.
Á Güç kaynaðini takiníz.
 Ses karti/ses kaynagi
ve hoparlör kontrollerini
kullanarak sistemi
ayarlayiniz.
Not: Bütün baðlantýlarý
yapmadan elektrik fiþini
AC çýkýþýna takmayýnýz!
Italiano
À
Collegare la scheda audio.
Á
Collegare l'alimentazione.
Â
Sintonizzare il sistema
utilizzando la scheda audio/
sorgente e i comandi delle
casse acustiche.
Nota: Non inserire il connettore di
alimentazione nella presa di rete
in c.a. prima di avere completato
tutti i collegamenti !
Russian
➀
Ïîäñîåäèíèòå çâóêîâóþ êàðòó.
Á
Ïîäñîåäèíèòå èñòî÷íèê ïèòàíèÿ.
➂
Íàñòðîéòå ñèñòåìó ïðè ïîìîùè çâóêîâîé
êàðòû/èñòî÷íèêà çâóêà è îðãàíîâ óïðàâëåíèÿ
àêóñòè÷åñêîé ñèñòåìîé.
Ïðèìå÷àíèå: Íå ïîäñîåäèíÿéòå
âèëêó ñåòåâîãî øíóðà ê ðîçåòêå
ñåòè ïåðåìåííîãî òîêà íå
âûïîëíåíû âñå? íåîáõîäèìû?
ñîåäèíåíèÿ!
Polish
À
Przyùàczyã kartæ dêwiækowà
Á
Wùàczyã do sieci
Â
Dostroiã za pomocà karty
dêwiækowej, ukùadu doboru êródùa
sygnaùu oraz ustawiania barwy i siùy
dêwiæku
Uwaga: Nie wùàczaj wtyczki zasilania do
gniazda sieciowego przed dokonaniem
wszystkich poùàczeñ!
Español
À
Conecte la tarjeta de sonido.
Á
Conecte el suministro de
alimentación.
Â
Ajuste el sistema con los
controles del altavoz y de la
tarjeta/fuente de sonido.
Observación:No inserte el
conector de alimentación en la
toma de corriente mientras no
haya completado todas las
conexiones
Nederlands
À
Sluit de geluidskaart aan.
Á
Sluit de voeding aan.
Â
Stel het systeem in met de
regelaars voor de geluidskaart/
geluidsbron en de luidsprekers.
Opmerking: Steek de stekker
van het netsnoer pas in het
stopcontact als alle
aansluitingen gereed zijn!
Deutsch
À
Schließen Sie die Soundkarte an.
Á
Schließen Sie das Netzteil an.
Â
Stellen Sie das System mit Hilfe
der Soundkarte oder einer anderen
Klangquelle und den
Bedienungselementen der
Lautsprecher ein.
Hinweis: Den Netzstecker nicht in
die Steckdose stecken, bis
alle Verbindungen hergestellt
worden sind!
À
Â
Á
1
32
4 5
~
EXPLANATION
~
1) Headphone
For private listening a headphone can be
connected
2) Power On/Off
To switch on or off power
3) Rotary Volume Control
To adjust the volume higher or lower
4) Line In
To connect the fixed Line In cable to the soundcard/
sound source
5) Power
To connect to power supply
The socket-outlet shall be installed near the
equipment and shall be easily accessible.
Important notes for users in the U.K.
Mains plug
This apparatus is fitted with an approved 13 Amp plug.
To change a fuse in this type of plug proceed as follows:
1 Remove fuse cover and fuse.
2 Fix new fuse which should be a BS1362 5 Amp, A.S.T.A. or
BSI approved type.
3 Refit the fuse cover.
If the fitted plug is not suitable for your socket outlets, it should
be cut off and an appropriate plug fitted in its place. If the mains
plug contains a fuse, this should have a value of 5 Amp. If a
plug without a fuse is used, the fuse at the distribution board
should not be greater than 5 Amp.
Note: The severed plug must be disposed of to avoid a
possible shock hazard should it be inserted into a 13 Amp
socket elsewhere.
How to connect a plug
The wires in the mains lead are coloured with the following
code: blue = neutral (N), brown = live (L). As these colours
may not correspond with the colour markings identifying the
terminals in your plug, proceed as follows:
Connect the blue wire to the terminal marked N or coloured
black.
Connect the brown wire to the terminal marked L or coloured
red.
Do not connect either wire to the earth terminal in the plug,
marked E (or ) or coloured green (or green and yellow).
Before replacing the plug cover, make certain that the cord
grip is clamped over the sheath of the lead - not simply over
the two wires.
Copyright in the U.K.
Recording and playback of material may require consent.
See Copyright Act 1956 and The Performer's Protection Acts
1958 to 1972.
Norge
Typeskilt finnes på apparatens underside.
Observer: Nettbryteren er sekundert innkoplet. Den
innebygde netdelen er derfor ikke frakoplet nettet så lenge
apparatet er tilsluttet nettkontakten.
For å redusere faren for brann eller elektrisk støt, skal
apparatet ikke utsettes for regn eller fuktighet.
Deutschland
Hiermit wird bescheinigt, daß dieses Gerät in
Übereinstimmung mit den Bestimmungen der
Amtsblattverfügung 1046/1984 funkentstört ist.
Der Deutschen Bundespost wurde das Inverkehrbringen
dieses Gerätes angezeigt und die Berechtigung zur
Überprüfung der Serie auf Einhaltung der Bestimmungen
eingeräumt.
MMS 221 w cloth.p65 4/23/04, 1:16 PM2