Documents: Go to download!
User Manual
- User Manual - (English, Spanish)
- Energy Guide - (English)

- USING THE AIR CONDITIONER
- CARE AND CLEANING
- INSTALLATION INSTRUCTIONS
- Troubleshooting Tips
Table of contents
OWNER’S MANUAL Window Air Conditioner
USING THE AIR CONDITIONER
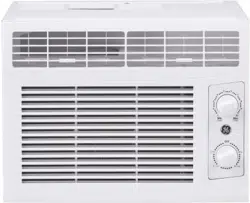
Controls
Features and appearance will vary.
Controls
1. Temperature Control
- This determines how much cooling is provided. Max Cool - 10 provides the most cooling and Min Cool - 1 provides the least.
- Cooling Descriptions
- For Normal Cooling—Select 4-7 on the dial with HCool r LCool selected.
- For Maximum Cooling—Select 8-10 on the dial with HCool selected.
- For Quieter and Nighttime Cooling—Select 1-3 on the dial with LCool selected.
2. Mode Control
- HCool and LCool provide cooling with different fan speeds.
- HFan and LFan provide circulation and filtering without cooling.
NOTE: If you move the Temperature control from a cool setting to a fan setting or power off the unit while cooling, wait at least 3 minutes before switching back to a cool setting.
Air Direction
- Use the lever to adjust the air direction left to right
CARE AND CLEANING
Do Not Operate in Freezing Outdoor Conditions
- This cool-only air conditioner was not designed for freezing outdoor conditions. It must not be used when the outdoor temperature is below freezing (32°F).
Grille and Case
- Turn the air conditioner off and remove the plug from the wall outlet before cleaning.
- To clean, use water and a mild detergent. Do not use bleach or abrasives.
Air Filter
- The air filter behind the front grille should be checked and cleaned at least every 30 days or more often if necessary.
- To remove:
- Slide the filter from the left side of the unit. Remove the filter.
- Clean the filter with warm, soapy water. Rinse and let the filter dry before replacing it. Do not clean the filter in a dishwasher.
CAUTION: DO NOT operate the air conditioner without a filter because dirt and lint will clog it and reduce performance.
Outdoor Coils
- The coils on the outdoor side of the air conditioner should be checked regularly. If they are clogged with dirt or soot, they may be professionally cleaned.
INSTALLATION INSTRUCTIONS
BEFORE YOU BEGIN
Read these instructions completely and carefully.
- IMPORTANT – Save these instructions for local inspector’s use.
- IMPORTANT – Observe all governing codes and ordinances.
- Note to Installer – Be sure to leave these instructions with the Consumer.
- Note to Consumer – Keep these instructions for future reference.
- Skill level – Installation of this appliance requires basic mechanical skills.
- Completion time – Approximately 1 hour
- We recommend that two people install this product.
- Proper installation is the responsibility of the installer.
- Product failure due to improper installation is not covered under the Warranty.
- You Must use all supplied parts and use proper installation procedures as described in these instructions when installing this air conditioner
ELECTRICAL REQUIREMENTS
These models require a 115/120-volt AC, 60-Hz grounded outlet protected with a 15-amp time-delay fuse or circuit breaker. The 3-prong grounding plug minimizes the possibility of electric shock hazard. If the wall outlet you plan to use is only a 2-prong outlet, it is your responsibility to have it replaced with a properly grounded 3-prong wall outlet.
CAUTION
- Do not, under any circumstances, cut or remove the third (ground) prong from the power cord.
- Do not change the plug on the power cord of this air conditioner.
- Aluminum house wiring may present special problems—consult a qualified electrician.
Power cord includes a current interrupter device. A test and reset button is provided on the plug case. The device should be tested on a periodic basis by first pressing the TEST button and then the RESET button while plugged into the outlet. If the TEST button does not trip or if the RESET button will not stay engaged, discontinue use of the air conditioner and contact a qualified service technician
PARTS INCLUDED (Appearance may vary)
1. WINDOW REQUIREMENTS
- These instructions are for a standard double-hung window. You will need to modify them for other types of windows.
- The air conditioner can be installed without the side curtain panels if needed to fit in a narrow window. See the window opening dimensions.
- All supporting parts must be secured to firm wood, masonry or metal.
- The electrical outlet must be within reach of the power cord.
- Follow the dimensions in the table and illustration for your model.
2. STORM WINDOW REQUIREMENTS
A storm window frame will not allow the air conditioner to tilt toward the outside, and will keep it from draining properly. To adjust for this, attach a piece of wood to the sill.
WOOD PIECES
- WIDTH: 2"
- ENGTH: Long enough to fit inside the window frame.
- THICKNESS: To determine the thickness, place a piece of wood on the sill to make it ½" higher than the top of the storm window frame or the vinyl frame.
- Attach securely with nails or screws provided by the installer.
3. PREPARE THE AIR CONDITIONER
A. Install the top mounting rail with 3 Type A screws
B. Slide the side curtain panels into the side panel rails.
C. Slide left and right side curtain frames into top and bottom rails. Make sure that side curtains snap into side of the frames.
4. INSTALL THE AIR CONDITIONER IN THE WINDOW
A. Measure the width of the window opening and mark the center line on the inside window sill. Place the unit in the window. Lower the window to hold unit in place.
B. Set the air conditioner in the window so that is centered. Place the air conditioner so that front edge of the bottom mounting rail is against the back edge of the sill.
C. Install the side bracket into the unit and into the window sill using two 1” wood screws provided. repeate on other side.
D. Bring the window down so that the front edge of the top mounting is in front of the window. Make sure that the air conditioner is level or tilting slightly to the outside.
E. Extend the curtain panels until they fill the window. Mark the location of the holes in each corner. Use the drill and 1/8" drill bit to drill pilot holes. Use 4 type B screws to secure the side panels in place.
5. INSTALL WINDOW LOCKING BRACKET AND FOAM TOP WINDOW GASKET
Use Type B Screw to install the window lock bracket on top of the bottom window
A. CAUTION: To prevent broken glass or damage to windows, on vinyl or other similarly constructed windows, attach the window locking bracket to the window side jamb with one Type B screw.
B. Cut the foam top window gasket to the window width.
C. Stuff the foam between the glass and the window to prevent air and insects from getting into the room.
NOTE: If the gasket supplied does not fit your window, obtain appropriate material locally to provide a proper installation seal.
Troubleshooting Tips
... Before you call for service
Save time and money! Review the charts on the following pages first and you may not need to call for service.
| Problem | Possible Cause | What To Do |
| Air conditioner does not start. | The unit is unplugged. | Make sure the air conditioner plug is pushed completely into the outlet. |
The fuse is blown/circuit breaker is tripped. | Check the house fuse/circuit breaker box and replace the fuse or reset the breaker. | |
| Power Failure. | The unit will automatically restart in the setting last used after the power is restored. There is a protective time delay (approximately 3 minutes) to prevent tripping of the compressor overload. For this reason, the unit may not start normal cooling for 3 minutes after it is turned back on. | |
| The current interrupter device is tripped. | Press RESET button located on the power cord plug. If the RESET button will not stay engaged, discontinue use of the air conditioner and contact a qualified service technician. | |
| Air conditioner does not cool as it should. | Indoor airflow is restricted. | Make sure there are not curtains, blinds or furniture blocking the front of the air conditioner. |
| The temp control may not be set properly. | Turn the temperature control to a higher number. | |
| The air filter is dirty. | Clean the filter at least every 30 days. See Care and Cleaning section. | |
| The room may have been hot. | When the air conditioner is first turned on, you need to allow time for the room to cool down. | |
| Cold air is escaping. | Check for open furnace registers and cold air returns. | |
| Cooling coils have iced up. | See “Air conditioner freezing up” below. | |
| Air conditioner freezing up | Ice blocks the air flow and stops the air conditioner from cooling the room. | On models with control knobs, set the mode control at High Fan or High Cool with the Temp at 1 or 2. |
| Water drips outside | Hot, humid weather. | This is normal. |
| Water drips inside | The air conditioner is not tilted to the outside. | For proper disposal, make sure the air conditioner slants slightly from the case front to the rear. |
| Water collects in base pan | Moisture removed from air and drain into base pan. | This is normal for a short period in areas with little humidity; normal for a longer period in very humid areas. |
Normal Operating Sounds
- You may hear a pinging noise caused by water being picked up and thrown against the condenser on rainy days or when the humidity is high. This design feature helps remove moisture and improve efficiency
- You may hear the thermostat click when the compressor cycles on and off
- Water will collect in the base pan duringhigh humidity or on rainy days. The water may overflow and drip from the outdoor sideof the unit
- The fan may run even when the compressor does not
- Water droplets being thrown against the outside coils can make a pinging noise. This helps cool the condenser. You can reduce this noise by removing the subbase water plug.
- To ensure maximum efficiency it is recommended to check to ensure the rubber drain plug is properly inserted. This plug may be removed during operation to minimize water in the back of the unit; however. removing it will lower the efficiency of your unit.
NOTE: Do not drill hole in the base pan.
See other models: GDF535PGRWW GDF535PGRBB GDF535PGRCC GDF535PSRSS AZ45E12DAB
