
1
Smart Security Cameras
User Manual

2
Contents
1. Accounts and Sharing
.....................................................................
4
1.1. Failure to log in
.............................................................................................................
4
1.2. What do I do if I forget my Password?
.........................................................................
4
1.3. How can I change passwords?
.....................................................................................
5
1.4. How can I share my device(s) with others?
.................................................................
5
1.5. How can I stop sharing devices with others?
..............................................................
6
1.6. How can I Access Control of Shared Devices?
.............................................................
6
2. Installation and Connection
............................................................
6
2.1. How can I add a device?
...............................................................................................
6
2.2. What do the different status light colors mean?
.........................................................
8
2.3. Voice prompt description
.............................................................................................
8
2.4. My device appears disconnected or offline, what should I do?
.................................
9
2.5. How to connect the device to a new router
................................................................
9
2.6. How to remove a device
............................................................................................
10
3. Cloud Service
.................................................................................
10
3.1. What is Cloud Service?
...............................................................................................
10
3.2. What are the mechanisms behind Cloud Service’s recording and saving?
...............
11
3.3. What are the differences between using cloud storage and SD card storage?
........
12
3.4. What types of Cloud Service plans are available?
.....................................................
12
3.5. How is the Cloud Service activated?
..........................................................................
12
3.6. What should I do if the Cloud Service is unavailable after the subscription?
..........
12
3.7. How can I download the videos from the cloud?
......................................................
13
3.8. Why is the duration of each video in the library 12 seconds?
..................................
13
3.9. What does ”Cloud storage time” mean?
...................................................................
14
3.10. Can I put the Cloud Service on hold and extend the end date of my subscription?
.
14
3.11. How do I get a trial plan?
............................................................................................
14
3.12. How can I subscribe to the Cloud Service?
.................................................................
14
3.13. How do I check my current Cloud Service plans?
......................................................
15
3.14. Can I subscribe an additional plan when I already have an existing one? How is the
service time calculated?
............................................................................................................
15
3.15. Is a subscription to a Cloud Service plan refundable?
...............................................
15
3.16. How do I use the activation code?
.............................................................................
15
3.17. How can I cancel an auto-renewal plan?
....................................................................
16
3.18. Can I transfer a cloud service plan from one camera to another?
............................
16
4. Facial Recognition
.........................................................................
17
4.1. What is face recognition?
..........................................................................................
17

3
4.2. How can I get face recognition on my device?
..........................................................
17
4.3. How can I turn on / off face recognition?
..................................................................
17
4.4. How do I use the face recognition feature?
..............................................................
17
4.5. Why can't a face be recognized?
...............................................................................
19
4.6. Can I delete face data?
...............................................................................................
21
5. Hardware and settings
..................................................................
22
5.1. The video picture is upside down
..............................................................................
22
5.2. Abnormal Video screen
..............................................................................................
22
5.3. What can I do if the live stream is blurry?
.................................................................
23
5.4. Why can’t I receive notifications on my phone?
.......................................................
23
5.5. What can I do? I am receiving too many notifications.
.............................................
24
5.6. How to set Activity zones
...........................................................................................
24
5.7. Why the device is moving around its own and hears a strange sound from it?
......
24
5.8. Why my device is not working/defective?
................................................................
24
5.9. Why can’t I see any Alert events in the Library or on the timeline?
......................
24
6. SD card
...........................................................................................
26
6.1. Why can’t the app detect the SD card?
.....................................................................
26
6.2. Why can’t I see any videos on the timeline after inserting the SD card?
.................
27
6.3. How long can videos be stored on my SD card?
........................................................
27
7. Firmware update
...........................................................................
28
7.1. OTA (Over The Air) Firmware Update
........................................................................
28
7.2. How can I Manually Update Firmware?
....................................................................
28
8. Misc.
...............................................................................................
29
8.1. Why am I hearing unusual sounds during audio talk or live video?
.........................
29
8.2. How can I check my login history?
.............................................................................
29
8.3. View video on the web browser
................................................................................
29
8.4. How can I use my device with Amazon Alexa?
..........................................................
30
8.4.1 Download Amazon Alexa
.........................................................................................
30
8.4.2. Find blurams Skill
....................................................................................................
30
8.4.3. Enable blurams Skill
................................................................................................
31
8.4.4. Discover device
.......................................................................................................
31
8.4.5. Voice control
...........................................................................................................
32
8.4.6. Disable blurams Skill
...............................................................................................
33
8.5. How can I use my device with Google Assistant?
......................................................
33
8.5.1. Download the Google Home app
...........................................................................
33
8.5.2. Set up your Google device
......................................................................................
34
8.5.3. Link blurams
............................................................................................................
34
8.5.4. Unlink blurams
........................................................................................................
35
8.5.5. Voice control
...........................................................................................................
37

4
Support
For product updates or other support, please email support@blurams.com.
1. Accounts and Sharing
1.1. Failure to log in
In the event that you are unable to log in, make sure your phone network connection is normal.
You can visit a commonly used website via your system browser to check whether it opens
normally.
You can otherwise fix the problem based on the different prompts you will see:
1. Prompt "Account does not Exist"
Please make sure you have registered this account before, if not, please register first. If the
account is already registered, please check that the account name you entered is correct.
2. Prompt "Password Error"
Please enter the password and retry. You can view the entered password by tapping the eye icon
on the right side of the password inbox.
If you still fail to log in after several attempts, you can reset your account password through the
"Forget Password" option on the login page. You will receive an email with instructions on how to
set up a new password. Simply follow the email’s instructions to set up a new password. If you
don’t seem to receive the email, please check your spam, trash and/or junk mail folders.
3. Prompt "Account is locked"
If you fail to log in due to entering the wrong password too many times, your account will be
temporarily frozen for security purposes, and you won’t be allowed to make any log-in attempts
for a 15 minute period.
4. Prompt "Account is not activated"
The account has not been activated, check the account activation email in your mailbox and
follow the instructions to activate the account. If there is no account activation email, please
check your spam, trash and/or junk mail folders. If there is still no email in any of these folders,
try to re-register the account.
If the problem is not one of the above, please try to update the app to its latest version from the
App Store or Google Play. Also try restarting the phone, or reinstalling the app. If your problem is
still not resolved, feel free to contact us for assistance.
1.2. What do I do if I forget my Password?
You can reset your account password through the "Forget Password" option on the login page.

5
You will receive an email with instructions on how to set up a new password. Simply follow the
email’s instructions to set up a new password for the account. If you don’t seem to receive it,
please check your spam, trash and/or junk mail folders.
1.3. How can I change passwords?
If you can login to the app, go to [Me]. Tap the setting icon in the upper right corner of the page
[Preferences/Settings] " ” and tap [Change password].
If you can’t log in, you can reset your account password through the "Forget Password" option on
the login page. You will receive an email with instructions on how to set up a new password.
Simply follow the email’s instructions to set up a new password for the account. If you don’t
seem to receive it, please check your spam, trash and/or junk mail folders.
To ensure the security of your account, the password you choose must meet the following
conditions:
1. The password’s length should be between 6 and 26 characters
2. The password must contain at least one uppercase letter, one lowercase letter and a number.
1.4. How can I share my device(s) with others?
If your family or friends also need access to the device(s) under your account, you can do this the
following ways:
1. Allow them to log in with the same account
Tell your friend or family member to download the
“
blurams
”
app on their phone, and then let
them log in with your account name and password so that they can see your devices.
By logging in this way, their privileges and permissions are the same as yours, including privileges
such as deleting devices, turning off devices, downloading videos, etc. Before sharing your
account with others, please make sure that you trust them with these privileges.
2. Share your device(s) with other accounts
If you don't want to share your account directly with family or friends, then you can share a
specified device with your family or friends through the device sharing option.
Your friend or family member needs to have registered an account on the “blurams” APP. To find
the device sharing option, on your own account, enter the device live page, tap the button in the
upper right corner of the page, and then go to Preferences-> Device Sharing-> Invite Family. Enter
his/her blurams account. The device will be directly displayed in the device list of the account of
your friend/family member.
In this way, your family member or friend only has access to basic functions (the ones you
allowed), such as real-time video, voice intercom, screenshots, historical videos. He (she) cannot
modify device settings.

6
1.5. How can I stop sharing devices with
others?
If you want to stop sharing the device with others, go to the device’s page, select
[Preferences/Settings] " ” -> [Device sharing]. Choose the account and tap the “Delete" button
on the detail page to cancel the sharing.
If you want to delete the device that others have shared with you, enter the device live page and
then click the “Cancel Share” button in the upper right corner of the page.
1.6. How can I Access Control of Shared
Devices?
When sharing the device with others, you can set different access options for them. The
following access settings are currently supported:
1. Live broadcast
Live broadcast permissions include basic functions such as viewing live videos, voice intercom,
screenshots, and locally recorded video. If you want to share your device with family or friends,
live broadcast is indispensable.
2. Playback
Playback permissions means that the person you shared your device with can view the historical
videos of the device, including screenshots and locally recorded videos.
Currently, we only support historical video playback viewing from the cloud storage. Viewing
videos on the SD card is not supported.
3. PTZ
For PTZ-enabled devices, you can additionally set PTZ control options for the device.
With access to PTZ control, the person you share with can arbitrarily adjust the camera lens
orientation. The lens may be adjusted to an improper angle, so please be careful with whom you
share the PTZ control function.
2. Installation and Connection
2.1. How can I add a device?
Different device models need to be added in different ways depending on your smart phone and
device model, there are two ways to add devices: using a QR code and using the AP mode. Before
you start adding devices, please note the following points:
a. Make sure the device is On and the red light is flashing; please use the original power adapter

7
and cord to avoid issues such as insufficient power supply.
b. Make sure the network connection is normal. Please connect your phone to a stable Wi-Fi
connection, and use the phone's system browser to visit a website and check whether the
network connection is good.
c. Make sure the phone and the device are under the same 2.4GHz Wi-Fi Network (the device
does not currently support 5GHz/5G). If you are using a dual-band router, you can log in to the
router's background control panel to enable a 2.4GHz/2.4G Wi-Fi connection, or contact the
router's provider to inquire how to enable it.
d. Place the device close to the router.
Please note that during the process of adding a device, the App needs permissions to get the
Wi-Fi information of the phone. Due to privacy limitations of the Android and iOS systems,
obtaining the Wi-Fi information also requires the position/location permission from your phone.
Please agree to authorize the permissions. If you have refused to grant location permission, you
can reauthorize it in the following way:
a. iOS users: System Settings -> blurams -> Location -> Select “While Using”
b. Android users: System Settings -> Applications -> blurams -> Permissions -> Open "Location"
1. QR Code
1. On the device list of the app, tap the "+" sign in the upper right corner.
2. Select the device you're going to add.
3. Press and hold the RESET button until the indicator light of the device changes to a blinking red
light, or you hear a beep.
4. Make sure that the Wi-Fi is a 2.4G network. Enter the Wi-Fi password and connect it with
camera.
5. Have the device scan the the QR code generated on the phone, and keep a proper distance
until the camera’s indicator light changes to a blinking green light, or you hear two beeps.
6. After scanning the QR code successfully, the device will start to connect to the Wi-Fi and server
and finish its setup.
2. AP Mode
1. On the device list of the app, tap the "+" sign in the upper right corner.
2. Select the device you're going to add
3. Press and hold the RESET button until the indicator light of the device changes to a blinking red
light, or you hear a beep.
4. Go to the phone’s Setting -> Wi-Fi and connect your phone to a Wi-Fi named “CC_xxxxxxx”
5. After the connection is successful, return to the Blurams APP to display the Wi-Fi list scanned
by the device.
6. Select the Wi-Fi to which the device will be connected and enter the password
7. After clicking Next, the device will start to connect to the Wi-Fi and server and complete the
setup.

8
2.2. What do the different status light colors
mean?
Status lights are an important tool that can help you find out what a given problem is. They can
be divided into the following types:
1. The indicator light is off
If the indicator light is off, the indicator was turned off by the user or the device is not currently
powered on. If it was turned off by the user, you can go to the device's [Preferences/Settings] " ”
on your app and turn on the indicator light switch; if the status of the indicator light on the
device's [Preferences/Settings] " ” is on, check whether the device is connected normally to a
power source.
2. The red light is on
If the red light is on, the device has not been added or the device is offline. Please try adding the
device again.
3. The red light is blinking
If the red light is blinking, the device is attempting to connect to the network, the device will
attempt to scan the QR code or will wait for your smart phone to connect to the AP hotspot of
the device.
4. The green light is on
If the green light is on, the device is working well and isn’t encountering any issue.
5. The green light is blinking
If the green light is blinking, the device is trying to connect to the Wi-Fi or trying to connect to
the server. This status will appear when the device is turned back on after having been turned off,
or while trying to reconnect after having been disconnected. This status will also appear during
the process of adding a device.
2.3. Voice prompt description
In the process of adding a device, in order to let users know the current status of the device, the
device will play some sound or voice prompts informing you of the status and progress of the
device. These include the following.
1. One "Beep"
After pressing the "RESET" button of the device for a long time, a "beep" sound will be emitted,
indicating that the device has entered the network configuration mode.
2. Two “beeps”
When the device scans the QR code or the phone transmits Wi-Fi information to the device
through the AP mode, it will emit two beeps, indicating that the device has received a request to
add a device.
3. "Camera is having trouble finding your network, please check your network name again and
move the camera closer to your router"
This means that the device cannot find and connect to the Wi-Fi, and it will not be added to the

9
account, you need to retry adding the device. When re-adding the device, check the following:
a. The connected Wi-Fi is a 2.4G Wi-Fi network, not a 5G Wi-Fi network
b. You entered the correct Wi-Fi password
c. The device is close to the router
4. "Camera is having trouble connecting to the network, please try re-entering your password"
The Wi-Fi name and password you entered do not match. Please try to add the device again and
make sure the Wi-Fi name and password you entered are correct.
5. "Camera is having trouble finding your network, please try moving camera closer to your
router"
The Wi-Fi signal is weak, please try adding the device after placing the device close to the router.
6. "Wi-Fi connection successful, camera is trying to connect the server."
The device has successfully connected to Wi-Fi and will try to request a connection to the server
7. "Wi-Fi network error, the camera is having trouble connecting to the network, please try again
later"
The device failed to connect to the server. Please check whether the Wi-Fi network can connect
to the Internet normally.
8. "Configuration is complete, please wait for the camera online"
The device has been added successfully. You can start using the device after completing the rest
of the configuration process according to the prompts.
2.4. My device appears disconnected or
offline, what should I do?
If the device shows that it is disconnected or offline, please do the following:
a. Check that the router to which the device is connected can access the Internet properly.
Please connect your phone to the same router, and visit a commonly used website via your
system browser to check whether it opens normally.
b. The device needs to be connected to a 2.4G wireless network, not 5G. You can log in to the
console of the router to enable the 2.4G wireless network, or you can contact the manufacturer
of the router to inquire how to enable the 2.4G wireless network.
c. Make sure the Wi-Fi account and password you entered are correct. If you have changed the
name or password of the Wi-Fi, please re-add the device.
d. Please place the device close to the router and clear the area between the device and the
router.
e. Since a single router can only support a limited number of devices at the same time, please
try to disconnect other devices before adding new devices.
2.5. How to connect the device to a new router
When you need to move a device to a new location, or you start using a new router, you can
connect the device to the new router in the following ways:
1. If the device is offline:

10
If the device is offline, you can only connect the device to the new router by re-adding the device.
You can connect the device to the new router through the [Troubleshooting] button on the
device list, [Update Wi-Fi] in the [Preferences/Settings] " ", or by adding a new device.
2. If the device is online:
When the device is online, you can go to the device's [Preferences/Settings] " ” -> [Network
Info] -> [Update Wi-Fi] to connect the device to the new router. After entering this section, the
available Wi-Fi list scanned by the device will be automatically loaded. Select the Wi-Fi to which
you need the device to connect and enter the password, and this Wi-Fi information will be sent
to the device. The device will then try to connect to the new Wi-Fi.
It is also possible, even when the device is online, to connect the device to the new Wi-Fi by
adding the device again.
2.6. How to remove a device
When you need to transfer a device to another account, or return it back, please delete the
device from your account. You can delete the device by selecting the "Remove Device" option on
the device's [Preferences/Settings] " ” .
If the device is associated to a Cloud Service, when the device is removed, the Cloud Service will
be unassociated from this device. This will not affect your other devices.
You can manage all Cloud Services under your account through "Me" -> "Cloud Service" -> "My
Cloud Service".
3. Cloud Service
3.1. What is Cloud Service?
Cloud Service is a service that saves the device's videos to the cloud server, and includes
additional features such as face recognition (supported by some device models), favorite videos,
and video sharing.
The cloud video function uses bank-level AES256 security encryption technology and has five
security protection guarantees, includes terminal security enhancement, data transmission, cloud
storage, carrier-grade computer room management and global security certification.
After subscribing to Cloud Service, you will get the following features:
1. The device will support 24/7 continuous video recording which will be saved to the cloud, you
can quickly play back any of your videos anytime, anywhere as long as they are saved.
2. The device will support the face recognition function (supported by some device models). You
can add tags such as family, friends, and delivery people to the faces recognized by the device,
and you can quickly find videos which contain people’s faces as the videos are cataloged by the
faces present on the video.
3. The device will get additional storage space for cloud video collections. You can save wonderful

11
videos to its collection space. These videos will be saved permanently even if your Cloud Service
expires.
4. You can share interesting videos recorded on the cloud to third-party social platforms.
Cloud services can be classified in the two following ways:
1. According to the duration of the video storage
The length of time a video is saved represents the longest number of days a video has been
stored in the cloud. For example, for a 7-day cloud service, a video can be stored in the cloud for
a maximum of 7 days. The cloud will automatically delete videos older than 7 days and then
continue to save newly uploaded videos.
2. According to the validity period of the service
The validity period of the service indicates the length of time that the cloud service can be used.
The validity period of a monthly cloud service is 1 month, and the validity period of an annual
cloud service is 1 full year. Therefore, if a user purchases a monthly Cloud Service on October 3
rd
,
then the expiration date of this cloud service will be on the 2nd of the next month, that is,
November 2
nd
. The same applies to the annual plan, which is valid until the next year.
During the validity period of the Cloud Service, the cloud will automatically delete videos longer
than the saved time according to the video storage duration of the Cloud Service, and then save
the newly uploaded videos in a loop until the validity period is reached.
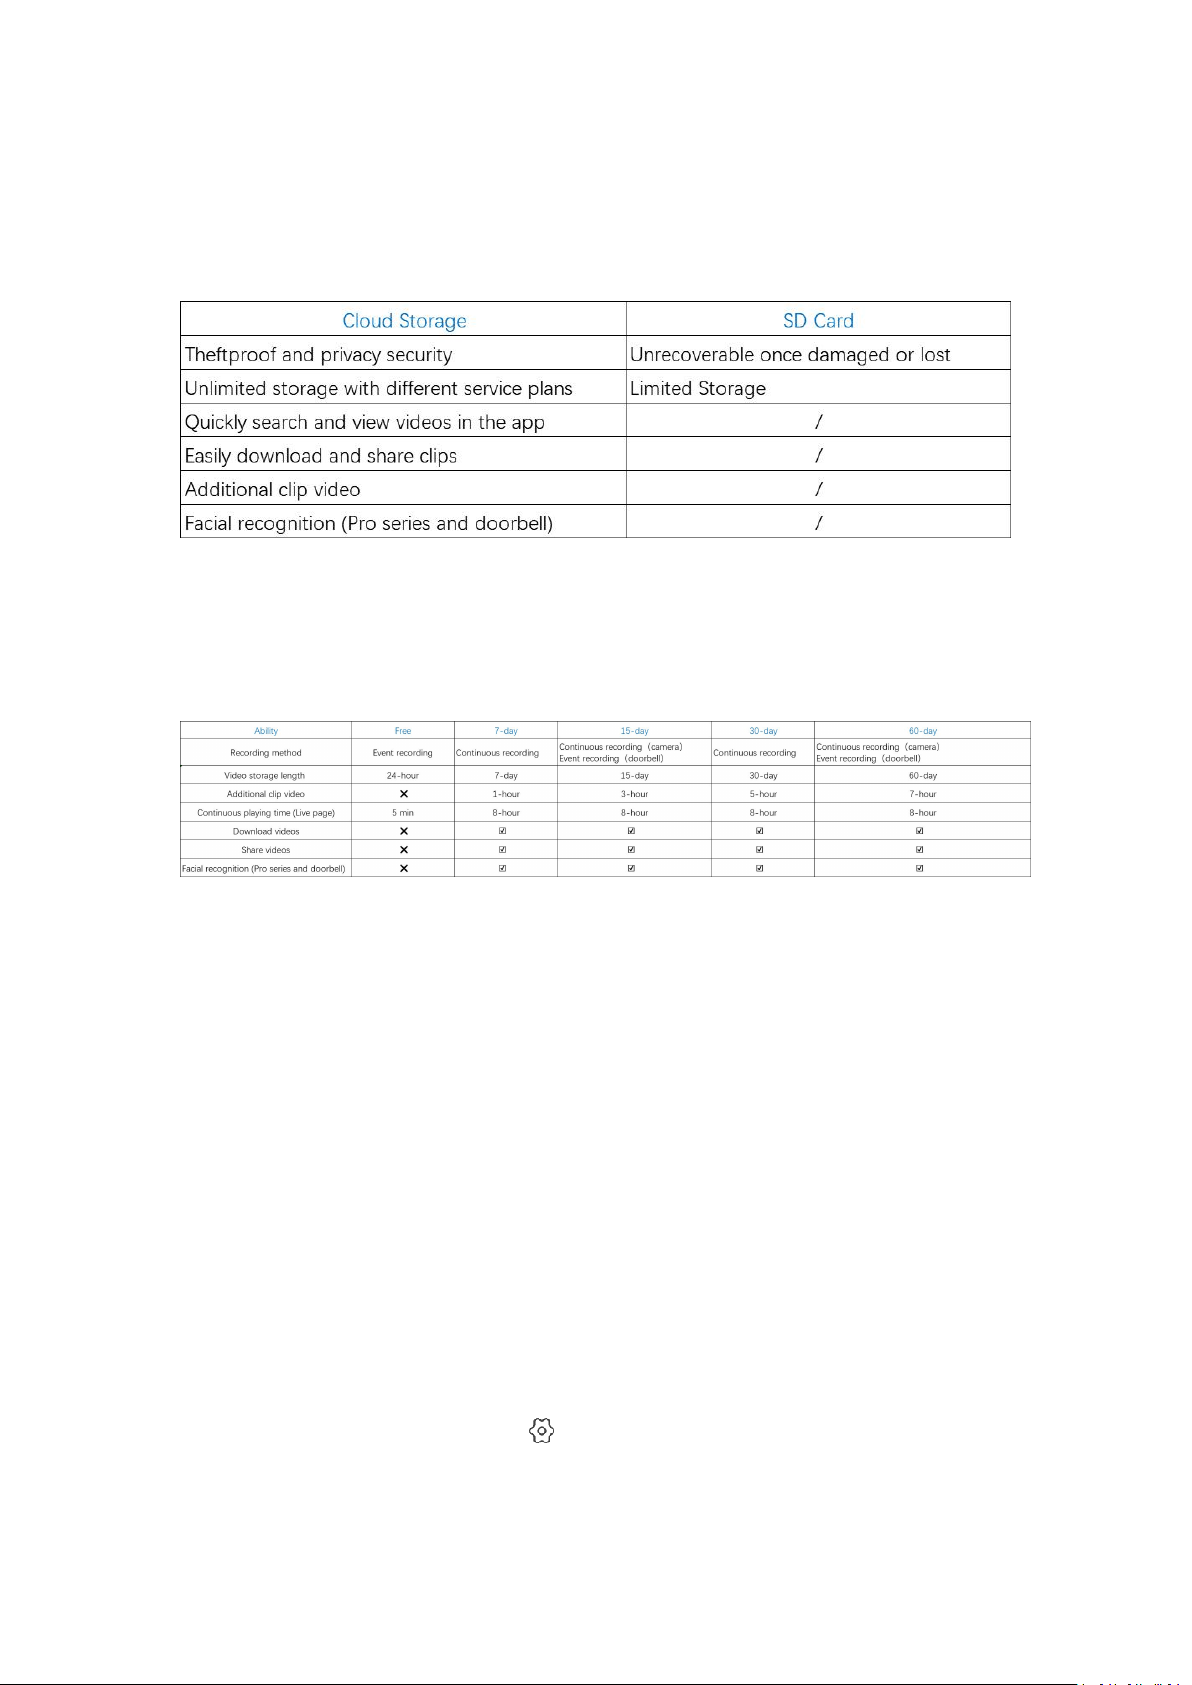
3.2. What are the mechanisms behind Cloud Service’s
recording and saving?
Different Cloud Service plans provide different options when it comes to recording methods used,
video storage length and service duration.
Definitions:
1. Recording methods:
1) Event recording: the camera will automatically begin to record whenever the camera detects
motion, sound and human faces. Blurams cameras provide free lifetime 24-hour event recording.
2) Continuous recording: the camera will conduct 24-hour all day continuous recording and
uploading to the cloud for as long as the camera is online and the network is stable.
2. Video storage length:
The video storage length refers to the longest number of days a video has been stored in the
cloud. For example, with a 7-day Cloud Service, the cloud automatically deletes videos older than
7 days and then continues to save newly uploaded videos, it always keeps the last 7 days of
videos.
3. Cloud Service validity period:
The validity period refers to how long you can use the Cloud Service after activation. For example,
if the one month 7-day Cloud Service is activated at 00:00 on January 1
st
, 2020, the validity period
is one natural month, from 00:00 on January 1
st
, 2020 to 00:00 on February 1
st
, 2020.
12
3.3. What are the differences between using cloud storage
and SD card storage?
3.4. What types of Cloud Service plans are
available?
3.5. How is the Cloud Service activated?
The service is activated immediately after subscription (if the device is currently associated with a
plan, the new plan will be activated after your current plan expires).
3.6. What should I do if the Cloud Service is unavailable
after the subscription?
In general, the Cloud Service will be activated within 5 minutes after subscription. If not, please
try to following steps:
1. Check whether the service is associated to the device:
Go to [Me]-[Cloud Service], if the service plan isn’t associated to the device you want, please
choose that device and associate it to the Cloud Service.
2. Check whether the cloud recording option is turned on:
Go to the device [Preferences/Settings] " ” -> [Storage], turn on [Record video to cloud]. If it’s
turned off, your videos won’t be saved to the cloud.
3. Check the video timeline data source:
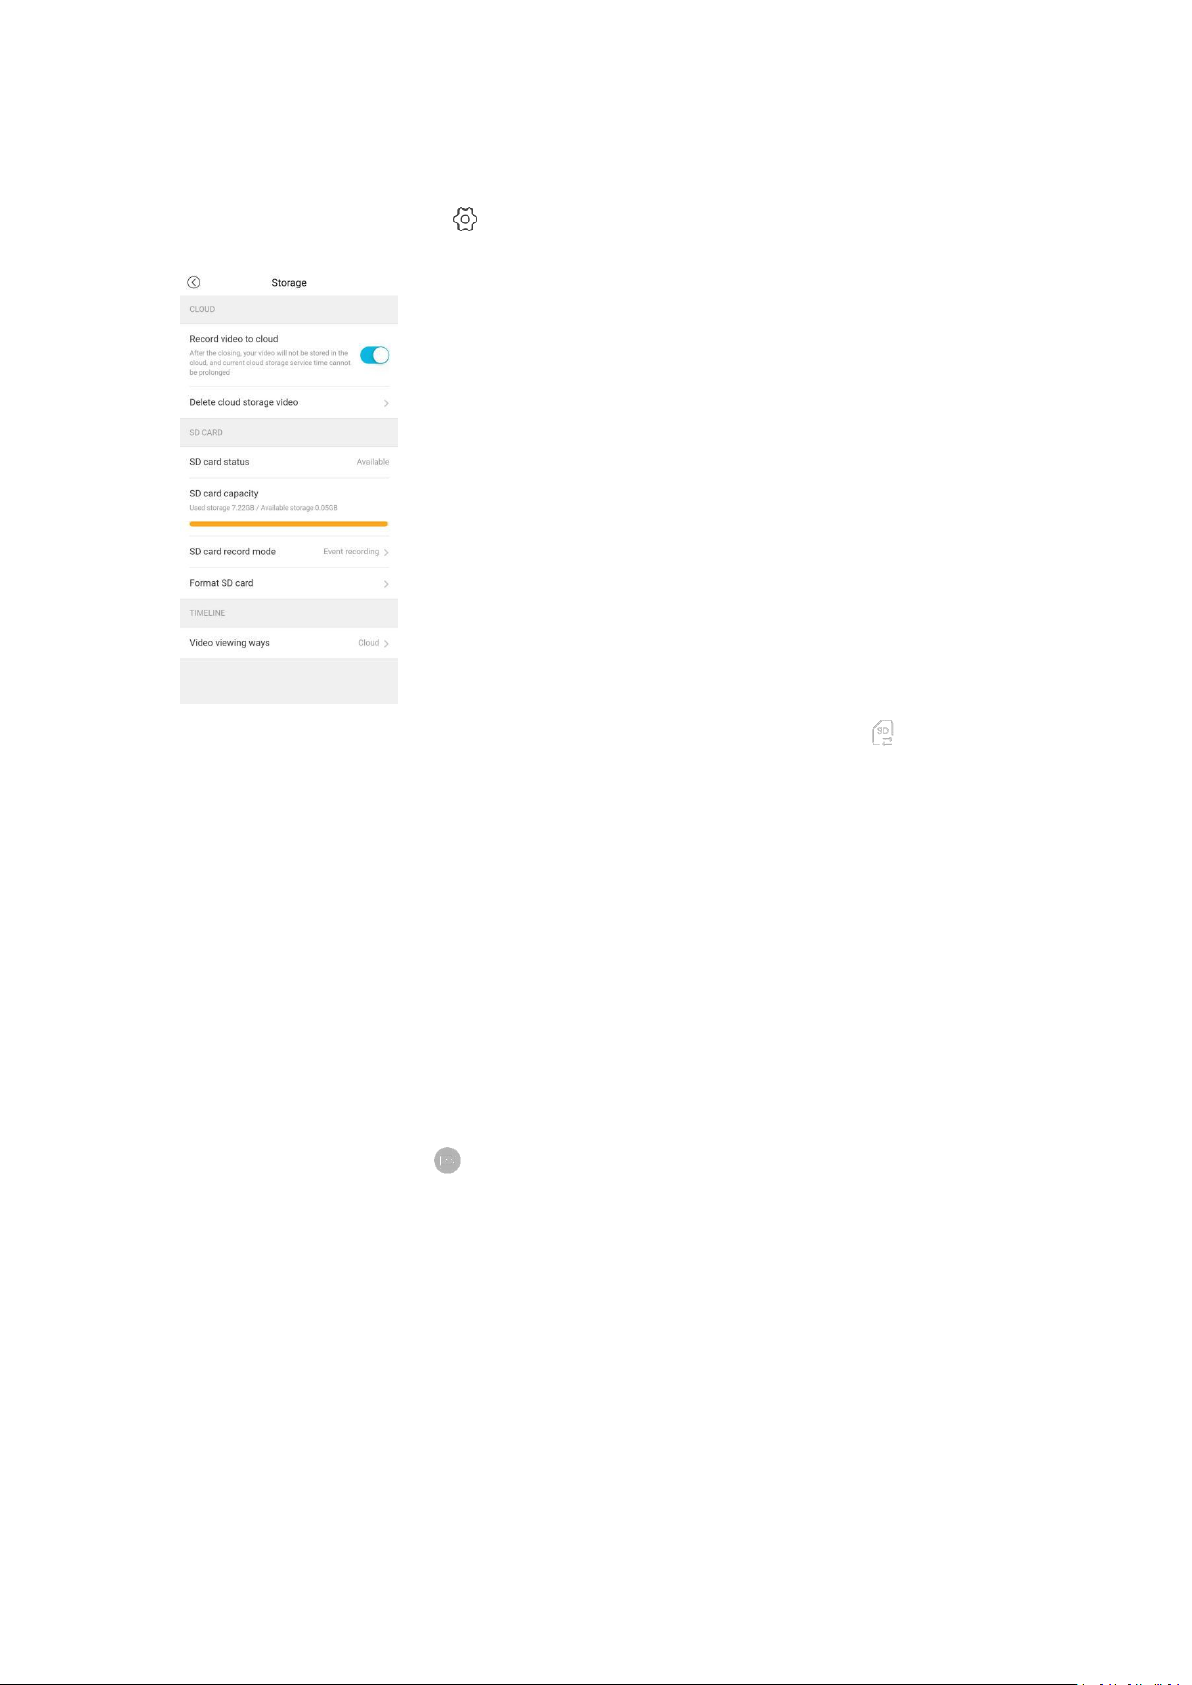
13
On the video broadcast timeline, it is possible to see the data of both videos from the cloud or
from the SD card. Change the video upload method to “cloud” by doing one of the following:
Go to [[Preferences/Settings] " ” -> [Storage] and make sure that [Video viewing ways] is
cloud.
You can also switch the video viewing method on the live page by clicking the
“ ”
button.
If this issue still persists, please email support@blurams.com with the MAC address of the device
and a screenshot of your Paypal payment.
3.7. How can I download the videos from the
cloud?
Downloading videos from the cloud can be done different ways:
1. Go to [Library] page, choose a video clip and click it to download it.
2. Go to [Me]-[Favorites], tap [Favorites] to see all your favorite videos. Choose a video clip and
click to download it.
3. Go to the live page, tap the button, and it will record real-time videos directly.
3.8. Why is the duration of each video in the
library 12 seconds?
If the device is not subscribed to a Cloud Service or the Cloud Service expires, the system will give
the device a lifetime valid event recording Cloud Service by default. The Cloud Service supports
the storage of events that happened in the last 24 hours to the cloud. The length of each event is
about 12 seconds.
If you want to view the full video of the entire event, you can subscribe the device to Cloud

14
Services. If you do not want to save the video to the cloud, you can go to the device's
[Preferences/Settings] " ” -> [device storage] and turn off [cloud video recording]. Once this is
done, the platform will no longer save video files uploaded by the device.
The cloud media library does not support displaying the videos saved on the SD card. You can
enter the “Playback” page of the device to play the videos on the SD card, or insert the SD card
into a computer to view the videos.
3.9. What does “Cloud storage time” mean?
You can add special or interesting event videos to your favorites. These videos will be stored in
the cloud. The clipvideo length means the amount of time that an event took place.
3.10. Can I put the Cloud Service on hold and extend the end
date of my subscription?
Any cloud recording subscription will keep counting down once activated. It cannot be put on
hold even by deleting the device or turning off cloud recording.
3.11. How do I get a trial plan?
Each device comes with a one month free Cloud Service trial after setting up. Follow the
instructions to set up your device and you can get a 1 month free trial.
If you didn't activate the free trial when you set up the device, you still have access to it by
tapping on the icon of the device card in the [Device] page.
3.12. How can I subscribe to the Cloud Service?
Go to ”Device” page and tap the “ ” icon on the lower right corner of the device card, then you
can enter into the Cloud Service page of this device.
Payment methods are by credit card or Paypal.
If you pay by credit card, each payment will be a one-time subscription. For example, if you
subscribed to a monthly Cloud Service, it will only be valid for one month and will expire after
one month. You will need to resubscribe the device to the Cloud Service manually.
If you pay by PayPal, the purchase of the service will be done with automatic renewals. After the
Cloud Service expires, PayPal will automatically renew. For example, if you purchased a monthly
Cloud Service, and the Cloud Service expires one month later, PayPal will automatically renew the
Cloud Service for the next month and automatically extend the validity period of the Cloud
Service, eliminating the need to manually resubscribe each month.
Note: One Cloud Service can be transferred to different devices as needed, but it is limited to one

15
device at a given time. If you need to use the cloud on multiple devices under one account
simultaneously, you need to subscribe Cloud Services for each camera.
3.13. How do I check my current Cloud Service
plans?
Go to [Me] -> [My Cloud Service], and you will be able to view all Cloud Service plans.
On the Cloud Service list page, you can associate a Cloud Service to a device, or unassociate a
Cloud Service from a device, and then associate it to another device.
3.14. Can I subscribe an additional plan when I already have
an existing one? How is the service time calculated?
If your device is already bundled with a Cloud Service that is not automatically renewed, you can
continue to subscribe to new ones. The new Cloud Service will automatically take effect after the
current one expires;
if your device is already bundled with a Cloud Service that automatically renews, you need to
unbundle the current Cloud Service or cancel the automatic renewals before you subscribe to a
new one.
3.15. Is a subscription to a Cloud Service plan refundable?
Cloud Service is a type of virtual service and can’t be terminated once activated. Our Cloud
Service plans cannot be refunded or exchanged after subscribing. If any problem occurs while
using Cloud Services, please email support@blurams.com.
3.16. How do I use the activation code?
Tap the “ ” icon of the device on the [Device] page and enter the Cloud Service page. Find the
[Pay by activation code].
If the device isn’t associated with any plan, the code will take effect immediately ;
if the device is associated with a plan which is not automatically renewed, the code will take
effect after the current plan expires;
If the device is associated with a plan which is automatically renewed, you cannot use a code
until you disassociate it from this plan or you cancel your auto-renewal subscription. Please enter
the web client to cancel the auto-renew Cloud Service plan.
16
3.17. How can I cancel an auto-renewal plan?
If you want to cancel an auto-renewal service plan, please do one of the following:
1. Method 1:
Login to PayPal's official website: link: https://www.paypal.com/myaccount/autopay/
Cancelation Steps:
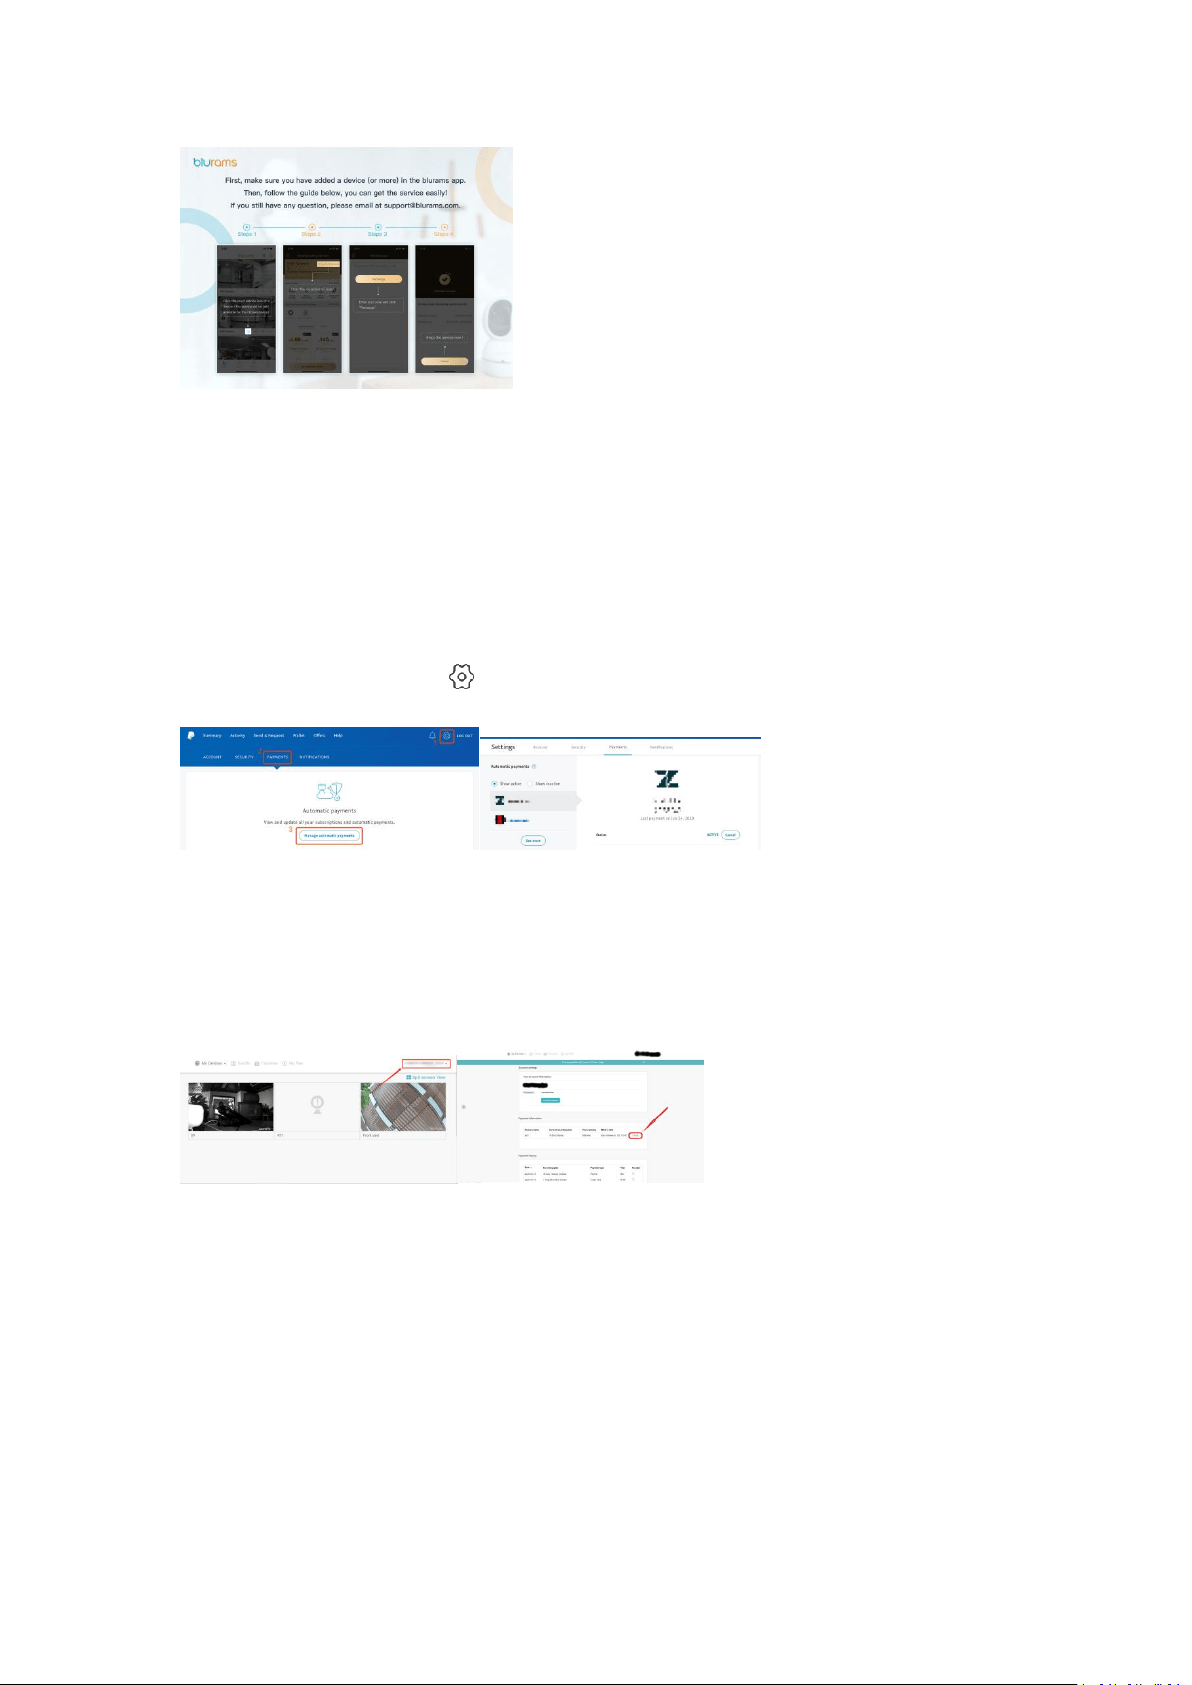
1. Login to your PayPal account on your PC:
2. Click [Preferences/Settings] " ” -> [Payments] -> [Manage automatic payments], then find
your renewal plan and click “cancel” .
2.Method 2:
Log in to the blurams web client at https://client.blurams.com/login
Cancelation Steps:
1. Log in to your blurams account on the PC WebClient.
2. Click the top-right option (see picture below) and follow the following steps: [Account] ->
[Account info] -> [Payment Information], find the renewal plan, and click “cancel”.
3.18. Can I transfer a cloud service plan from one camera to
another?
Go to [Me] - [My Cloud Service] in which you can associate or disassociate a service plan with a
device.
Please note that we do not support the transfer of plans between devices in the following two
situations:
1. You are using a free trial Cloud Service plan

17
2. The devices are under different accounts
4. Facial Recognition
4.1. What is face recognition?
Face recognition is a camera-based value-added service that provides more security and a more
complete smart camera experience. Face recognition helps protect your family and record
important moments. Furthermore, Blurams guarantees to protect the security and privacy
of the user’s information and data. Face detection and identification data recorded by your
Blurams camera can only be viewed and used by the user after logging into the Blurams system,
which is secured and which requires user authentication. Although face recognition works in
most circumstances, it is possible that due to the camera angle and the surrounding environment,
the face detection and recognition functions cannot always work normally. For these reasons we
cannot guarantee that these functions will always operate as intended.
4.2. How can I get face recognition on my device?
At present, the face recognition function is only supported on the Blurams PRO series and is not
supported on the LITE series. If your device is a PRO series device (including Snowman), you can
turn on the face recognition function after you try the Cloud Service in the APP or after you
subscribe to the Cloud Service. If you subscribe to a Cloud Service prepaid card containing face
recognition and bind it to your device, you can also turn on the face recognition function.
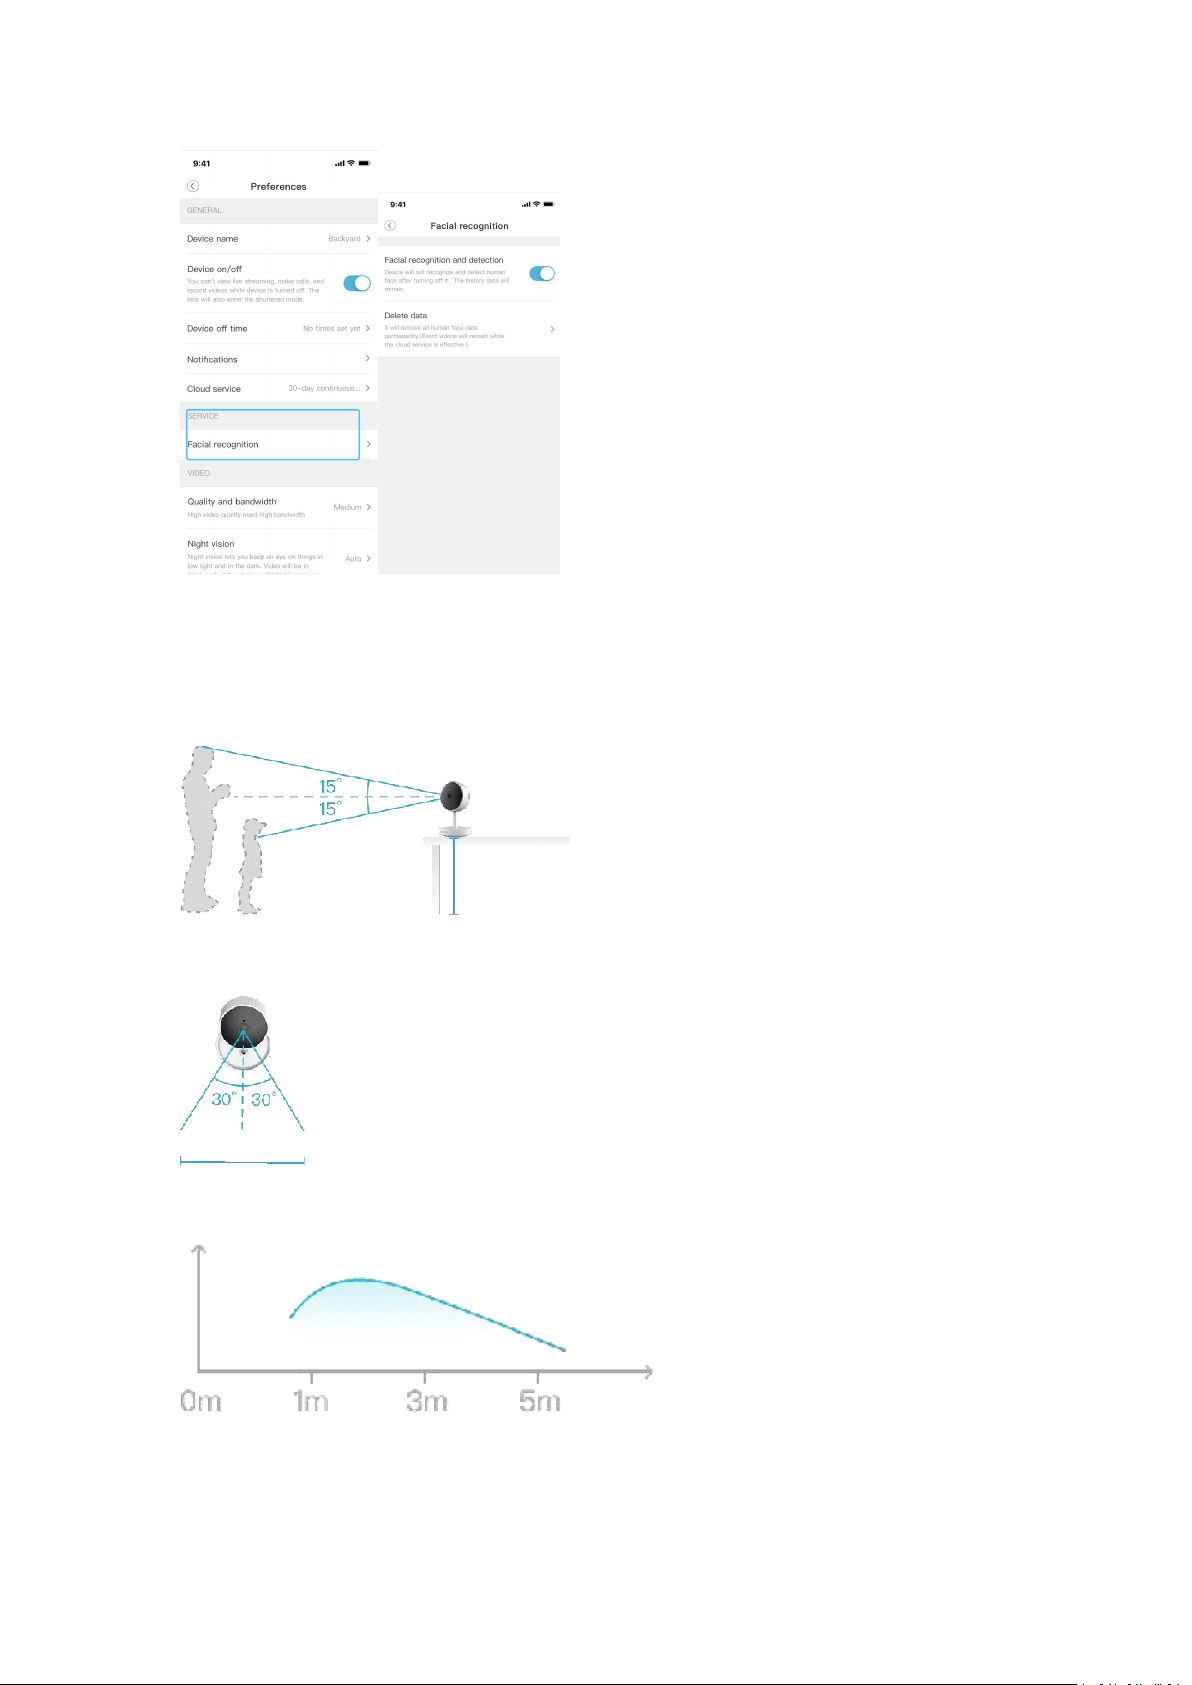
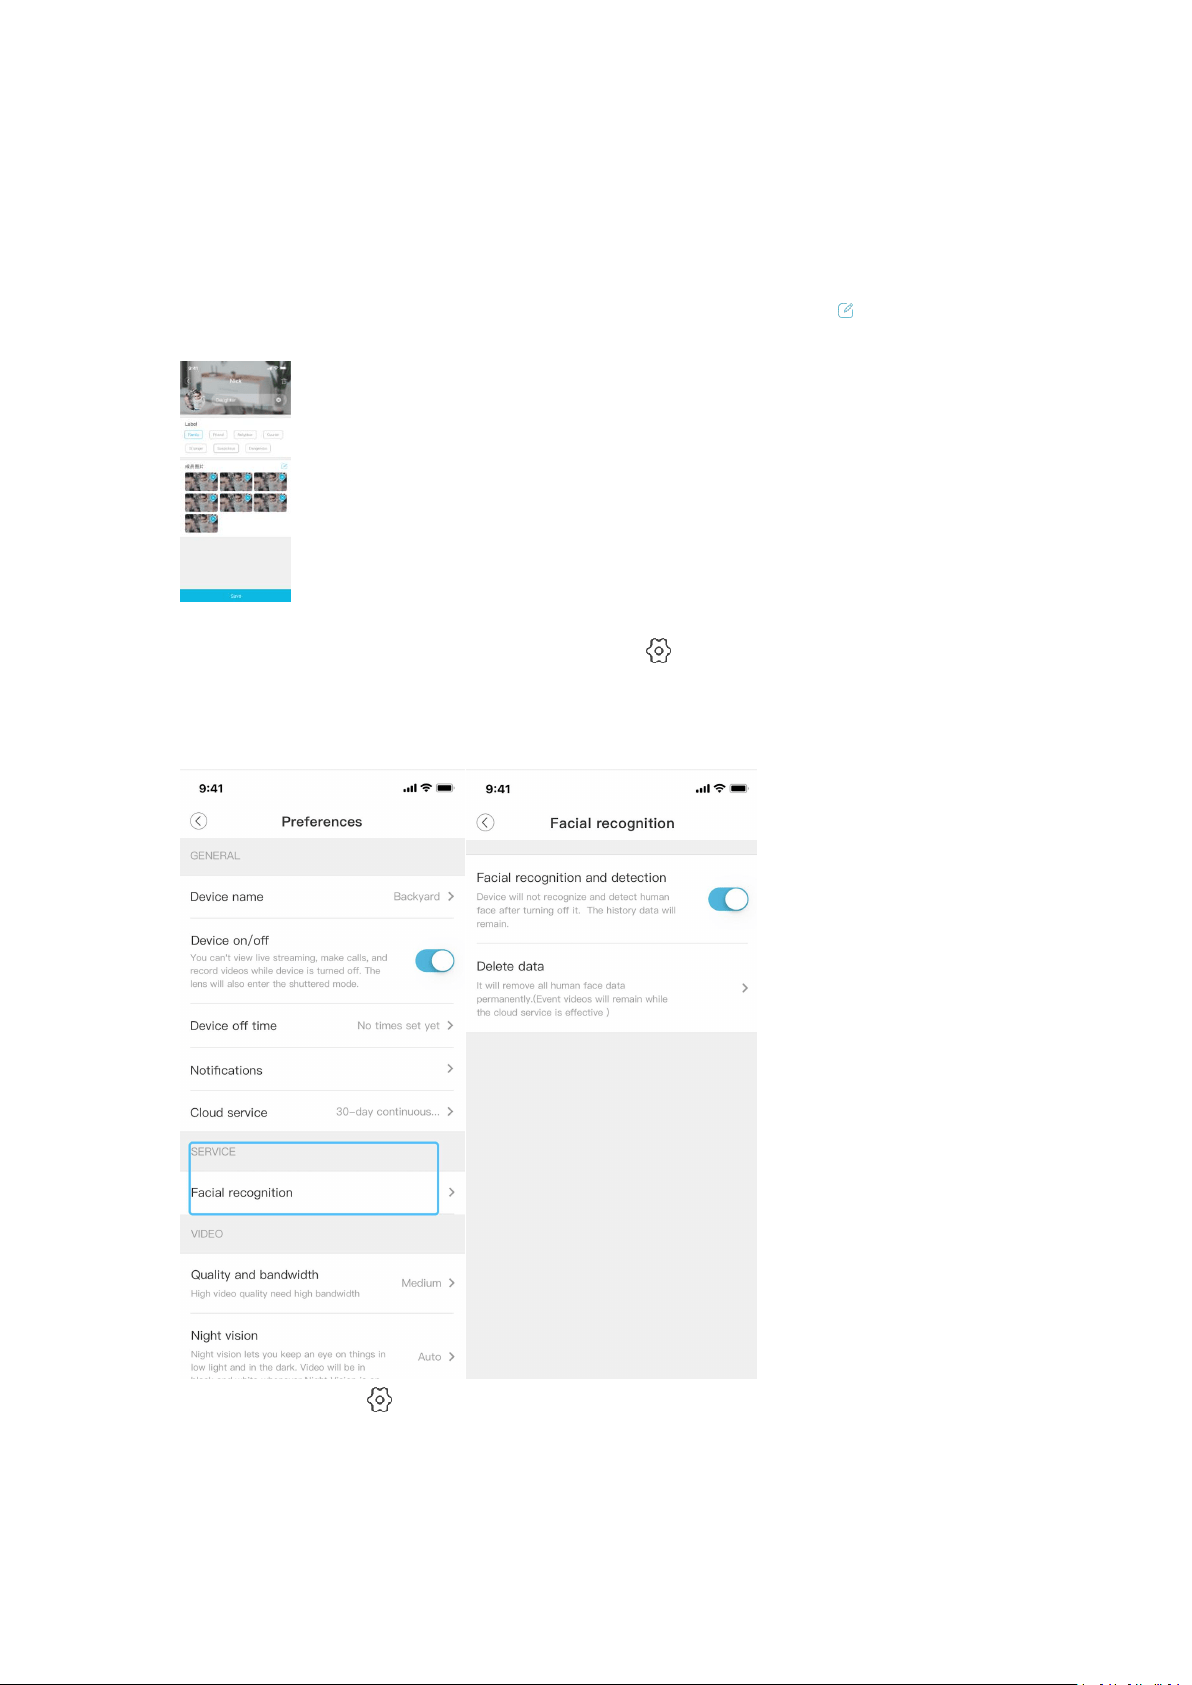
4.3. How can I turn on / off face recognition?
After you subscribe a Cloud Service for your device, in order to protect user privacy, the device
will not enable face recognition by default. You can go to the device's [Preferences/Settings] " ”
-> [Face recognition] to view the status of the [Face recognition and detection] option. You can
choose to turn this feature on or off.
4.4. How do I use the face recognition feature?
After you subscribe to a Cloud Service plan and enable the face recognition function, the face
recognition function will be enabled within 5 minutes.
After the device detects and recognizes a face, you can use the face function by going through
one of the following two portals:
1. Enter from the device list
After a device recognizes a face, it will display the face pictures of the 3 people who have
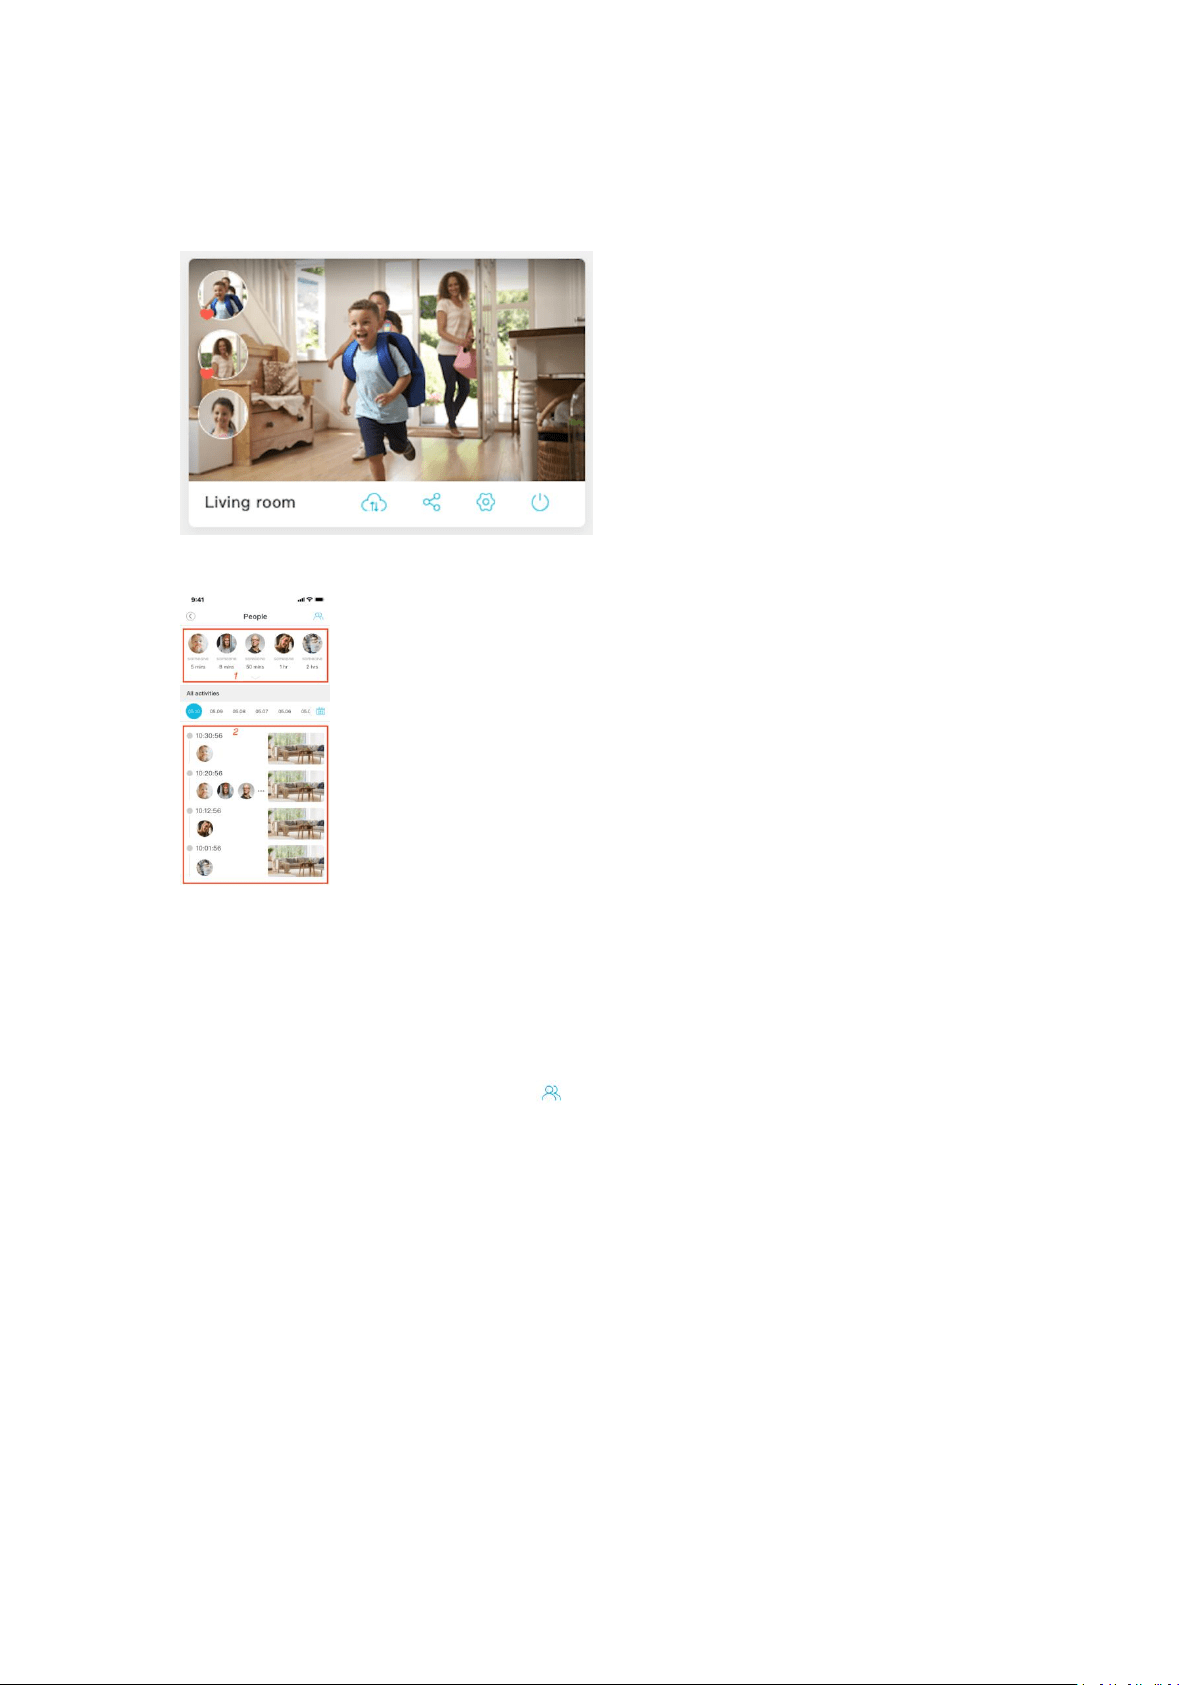
18
appeared recently in the upper left corner of the display picture (as shown below). You can enter
the “Family Moment” page by clicking one of the face thumbnails to view associated facial
recognition event videos.
After entering the “Family Moment” page, you can see the interface as shown below.
The top area (area 1) displays the list of all human faces recently recognized by the device, and
area 2 displays the associated face recognition event videos from the device. After you select one
of the person's face in the area 1 list, area 2 will filter out event videos and only keep those that
contain this face.
Click on one of the events in area 2 to view the corresponding video.
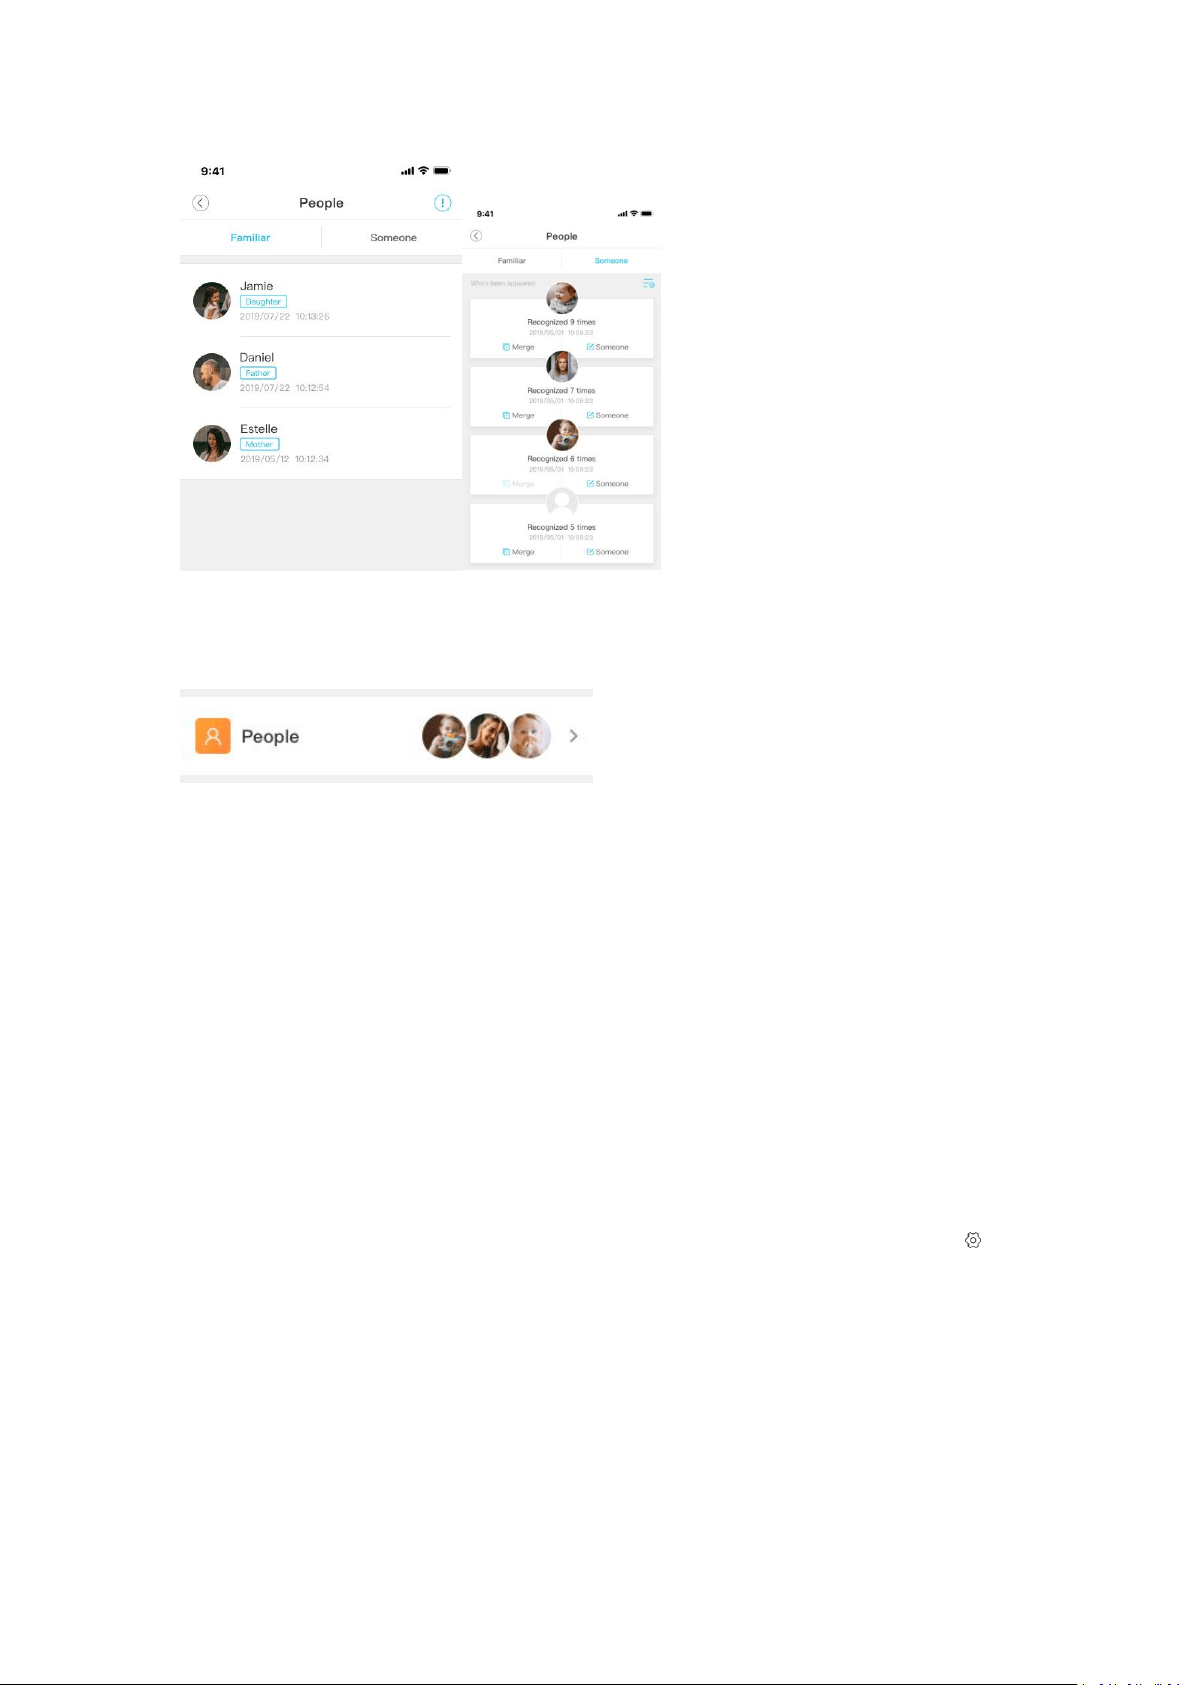
On the “Family Moment” page, tap the " " button in the upper right corner to enter the face
management page, as shown below.
19
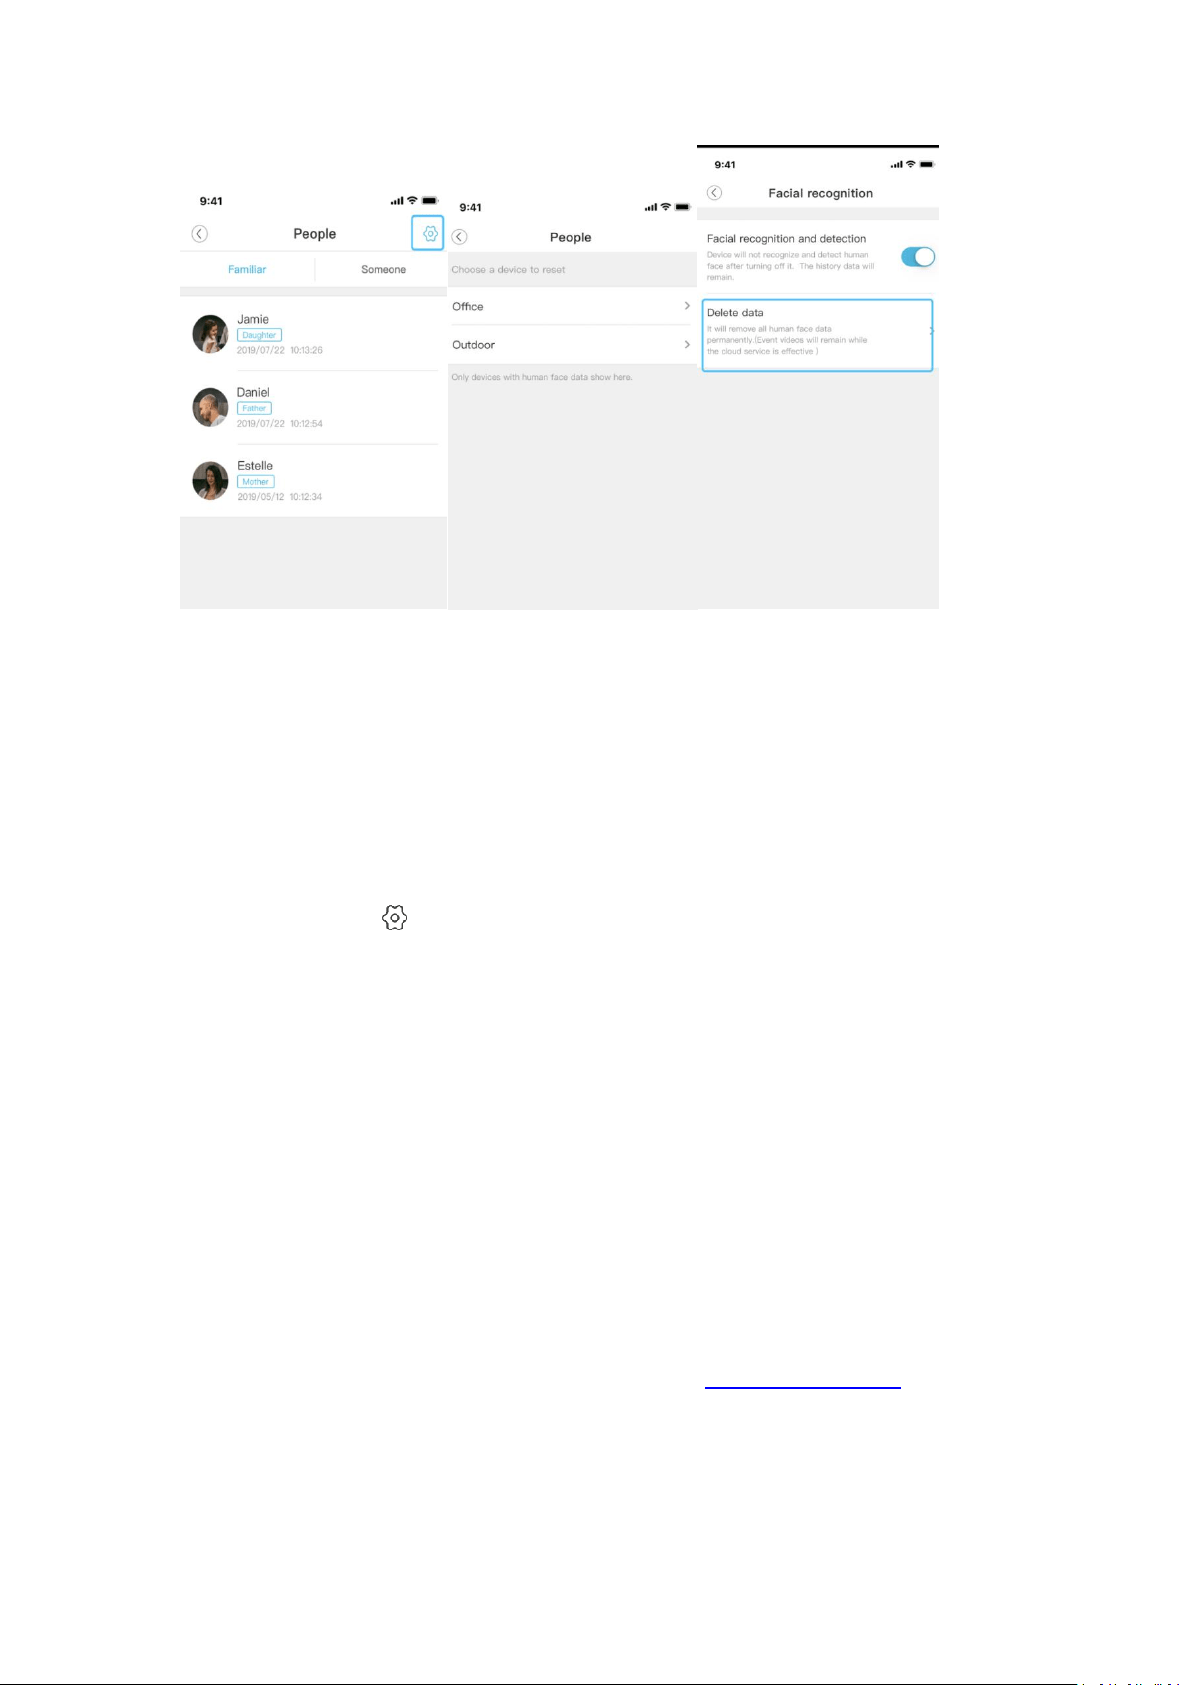
2. Enter from Discover
When a device has a face recognized on the account, the [People] option on the [Discover] page
will display the 3 most recently recognized faces, as shown below.
After clicking, you can also enter the management interface of the face list. In this interface, you
can directly manage the faces recognized by all devices under your account.
4.5. Why can't a face be recognized?
If your PRO device is unable to recognize a face after being bound to the Cloud Service, please try
the following to troubleshoot the problem:
1. Make sure the device is bound to the Cloud Service and that the validity period hasn’t expired
You can view the list of all cloud services under your account through [My] -> [My Cloud Service].
If the device is not bound to a Cloud Service, please select a Cloud Service with a validity period
that hasn’t expired or subscribe to a new Cloud Service plan. Bind it to the device.
2. Make sure the face recognition is turned on
After you subscribe to a Cloud Service for your device, to protect user privacy, the device doesn’t
enable face recognition by default. To enable it, go to the device's [preferences/settings] “ ” ->
"Facial recognition" and turn the "Facial recognition and detection" option on. Only when this
option is turned on will the facial recognition function be officially enabled.
20
3. Try changing the location of the device a few times
a. Please make sure that the height of the face of the person to be recognized is located at angle
no less than 15° down and no more than 15° up from the camera (see picture below), so that the
camera can most effectively recognize a person’s facial features.
b. Please be centered, do not move too far to the left or to the right (no farther away than a 30
°
angle on each side).
c. Please make sure that the face to be identified is within 1 to 3 meters away from from the
device, so that the features can be most effectively recognized.
21
4.6. Can I delete facial data?
Methods to delete facial data are as follows:
1. To delete a single face:
Go to [Discover] -> [People], tap a face picture and view the detail page. Tap” ”, and you will now
be able to delete pictures and facial data.
2. To delete all facial data on a device:
Go to [Device] and tap the [Preferences/Settings] " ” icon of the device. Then find the
[SERVICE] heading and tap on [Facial recognition]. Enter the page and tap the button [delete
data].
This will erase human facial data on the device and there won’t be any way to recover this data.
You can also tap the " " button in the upper right corner of the Facial recognition management
page [People] (see pictures below), and then select a device on the list to enter this device's
Facial recognition page. You can also delete all the face data of the device this way.
22
5. Hardware and settings
5.1. The video picture is upside down
If you find that the video on your phone is upside down, it is probably due to the device being
installed with its top facing down and its bottom facing up. Please enter the device's
[Preferences/Settings] " ” and tap on the [Rotate 180°] option to correct the video picture.
5.2. Abnormal Video screen
1. The Video screen becomes black and white
The device automatically turns night vision mode on or off according to the brightness of the
surrounding environment by default. When the device enters the night vision mode, the device
will turn on the infrared light. At this time, the video screen will turn black and white, so that the
surrounding scenes and things can be clearly seen in a dark environment.
If the video screen appears black and white even when the ambient light level is sufficiently
bright, please check whether the night vision mode is set on. If it is, turn it off and restart the
device.
2. Abnormal Video screen
If the video screen shows other colors, please try to restart the device, and check if the playback
video works fine. If the problem persists, please contact us at support@blurams.com .

23
5.3. What can I do if the live stream is blurry?
If the device’s live stream is blurry, try doing the following:
1. Please make sure the protective film on the device lens has been removed, and wipe the lens
clean.
2. Please enter the device live page, switch the video quality to FHD mode (please note that after
switching to Full High Definition mode, higher upload network speed on the device side and
higher downstream bandwidth support on the phone side are required).
5.4. Why can’t I receive notifications on my phone?
If the device detects an alert event (such as an abnormal motion, abnormal sounds, etc.), but the
phone doesn’t receive the corresponding alert notification, it might be because the phone isn’t
connected to the Internet or push notification permissions haven’t been enabled. Please make
sure that the phone can access the Internet and that push notification permissions have been
enabled for blurams.
Please do the following to enable permissions to receive blurams notifications:
1. Android phone
a. Open the phone’s “Setting”
b. Tap App Notifications
c. Tap the blurams App
d. Enable permissions for push notifications
Different phones will have different settings. You can contact the phone manufacturer for advice.
2. iOS phone
a. Open "Settings"
b. Scroll down and tap the blurams App
c. Tap the notifications option
d. Turn on "Allow notifications"
If the above configurations are correct but you still can’t receive alert notifications, please enter
the device’s [Preferences/Settings] " ” -> [Notifications] on the blurams app to access the
following options and do the following:
a. Turn on Allow notifications
b. Turn on event types that need to receive notifications (such as Motion detection, Sound
detection, etc.).
c. Tap [Stop notification time] and check if a time period (schedule) when notifications wouldn’t
be pushed was added. Delete this “schedule” to receive push notifications during that time
period again.
d. Tap [How often to send] and change the length of the intervals to shorter ones to receive
notifications more frequently.
24
5.5. I am receiving too many notifications, what can I do?
When the device detects something (such as unusual motions, sounds, human shapes, human
faces, etc.), it will push a notification to your phone. If you want to reduce the number of
received notifications, please do one of the following:
1. Reduce the frequency of notifications
Please enter the device’s [Preferences/Settings] " ” -> [Notifications] -> [How often to send]
to change the time interval for receiving notifications. Set longer intervals between notifications
to reduce interference.
2. Add a schedule during which you will stop receiving notifications
Please enter the device’s [Preferences/Settings] " ” -> [Notifications]-> [Stop Notification
Time] to add a period of time when you don’t need to receive notifications.
3. Do not send some types of push notifications
Please enter the device’s [Preferences/Settings] " ” -> [Notification], and then tap on [Motion
detection], [Sound detection], [Someone appears] or [Familiar appears] to turn off the
notifications you don’t need.
If you don’t want to completely turn off sound detection and motion detection, you can reduce
the camera’s sensitivity to receive fewer notifications.
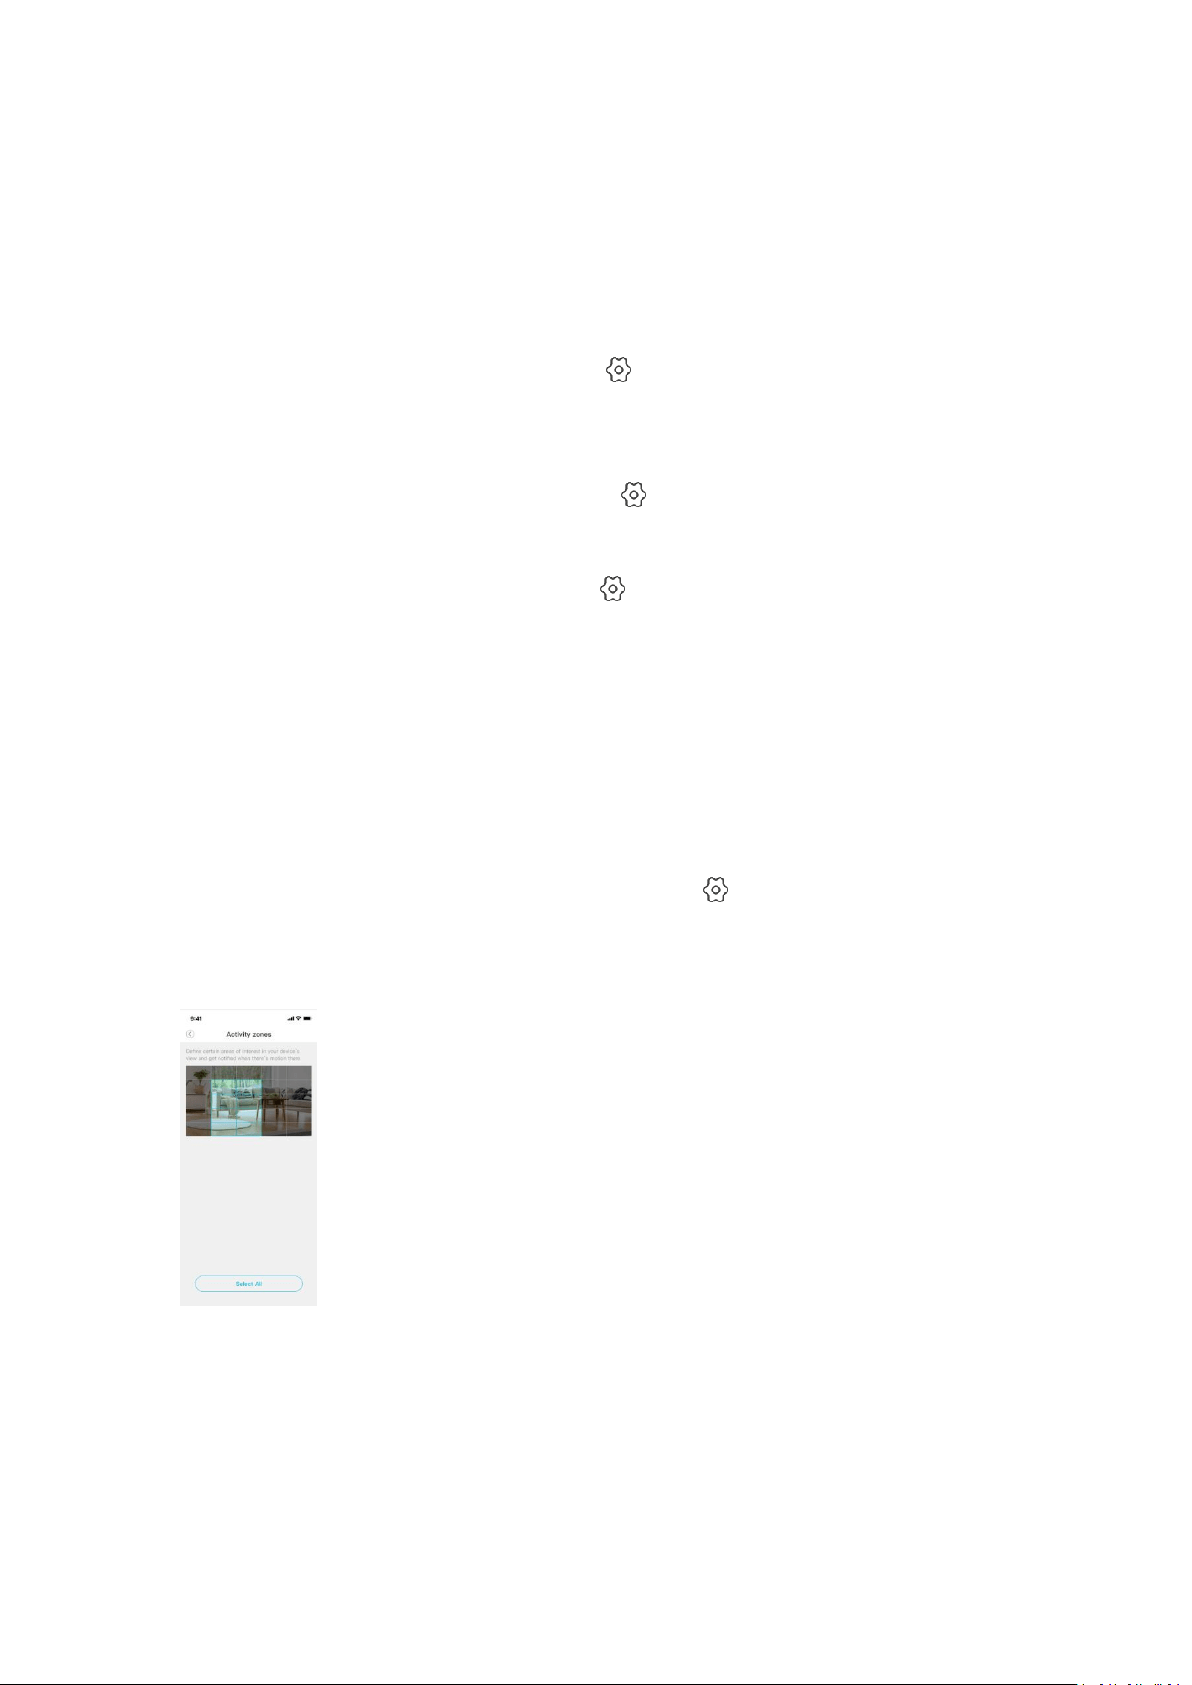
5.6. How to set Activity zones
If you prefer to receive motion detection notifications only for a certain area of the device’s field
of view, please enter the device’s [Preferences/Settings] " ” -> [Notification] -> [Motion
detection] -> [Activity zones], you can select certain areas of interest called “Activity Zones” in the
device’s field of view, as shown on the picture below. Notifications will be sent when there is
motion detected in that area.

25
5.7. Why the device is moving around its own and hears a
strange sound from it?
Please check the recent login history of your account through tapping [Me] -> [Preferences]
"
”
-> [Security Center] on your app, it'll show which user login your account.
Also, please check if you had shared the device with others by entering the device setting
option [Preferences] " ” -> [Device sharing] to check it, or contact
support@blurams.com for advice.
Please rest assured, our service is used with the superior AES256 security encryption technology
of the bank, having five security protection guarantees, that is, terminal security reinforcing, data
transmission, cloud storage, operator-level machine room management, and global security
certification. We promise to protect your privacy and always keep you feel safe.
5.8. Why my device is not working/defective?
If the device didn’t work, Please provide the following information to us:
- The MAC address of the camera. You can find it on the App: Preferences --> Technical Info
-->MAC address
- Your blurams login account ( email address )
- A screenshot of the invoice of your purchase or the order page, and your current shipping
address
Please take the following step to troubleshoot the issue
1, The indicator light is on
If the device indicator light is on, it means the power adapter and the power cord is fine, please
try to press the reset button about 10-20s until see the red light flashing, then please try to reset
up the device.
If the device indicator light is solid green or solid red light, please contact
the support@blurams.com for advice.
2, The indicator is off
If the device indicator is off, please try to make sure the power supply is normal and please try to
use the original power adapter and power cord, If the device still can't power please note the
power adapter minimum output is 5V/1A (A21C: 5V/2A), if the device indicator is on using

26
another power adapter and power cable, it should be the defective power adapter and cord. If
the device still can't show the indicator lights. Please contact the support@blurams.com for
advice.
5.9. Why can’t I see any Alert events in the Library or on
the timeline?
The device supports both cloud recording and SD card recording mode. The timeline displays
videos that are in the cloud by default. If you switch to the SD card mode by mistake, please try
to use one of the following ways:
Enter the device’s [Preferences] " ” -> [Storage] -> [Video viewing ways] and select the SD
card.
Enter the live page, tap the " " button to switch the timeline to the cloud mode.
If you can't see the past events in the Library, please try to switch the video recording mode to
the Cloud through the device’s [Preferences/Settings] " ” -> [Storage] -> [Record video to
Cloud].
Please try to reboot the device in the device’s [Preferences] " ” -> [Technical Info] -> [Reboot
Device]. Please wait a moment to get it to update, If you still can't see the events in the Library
after reboot the device, please try to replug the device.
If you still can't see it, please make sure if you have chosen the right device and date.
6.
SD card
6.1. Why can’t the app detect the SD card?
a. Please make sure the SD card works properly by testing the write and read files functions on a
computer via a SD card reader, then insert the SD card in the device.
b. Please power off the device before inserting the SD card.
c. The device only supports FAT32 format SD card. Please format the SD card into FAT32 format
on your computer before inserting it into the device.

27
d. The SD card capacity is 8GB ~ 128GB.
6.2. Why can’t I see any videos on the timeline after
inserting the SD card?
The device supports both cloud recording and SD card recording mode. The timeline displays
videos which are in the cloud by default. If you need to view the video on the SD card, please
switch the viewing way to SD card using one of the following ways:
1. Enter the device’s [Preferences/Settings] " ” -> [Storage] -> [Video viewing ways] and select
the SD card.
2. Enter the live page, tap the " " button to switch the timeline to the SD card mode.
In addition, you can switch the video recording mode on the SD card through the device’s
[Preferences/Settings] " ” -> [Storage] -> [SD card record mode].
The following recording modes are supported:
1. Not recording
The device will no longer record video data to the SD card.
2. Event recording
The device will record video data to the SD card only when an event is detected.
3. All day recording
If the SD card is inserted into the device, the device will record video data to the SD card at all
times even when the device is not connected to the network. However, the SD card might be
damaged over time if this mode is used for long periods of time as this engages the card
continually.
6.3. How long can videos be stored on my SD card?
The storage space occupied by a video file is calculated as follows:
Video footprint = (video bit rate / 8) x time length.
For example, if a device takes videos at Full HD resolution (1920x1080 pixels), the highest bit rate
of the video will be 1.5Mbps, and the space occupied by a continuously uninterrupted video
recorded in one day will be:
Video occupied space = (1.5Mbps / 8) x 24 x 60 x 60 = 16200MB ≈ 15.8GB.
If you are using a 128GB SD card, the number of days of video data that can be stored will be:
128 / 15.8 ≈ 8.1 days.
This means that after 8.1 days, the earlier videos will start to be overwritten.
The same 128GB SD card can continuously record high-definition (bit rate of about 1Mbps) video
for about 12.2 days, and can continuously record standard-definition (bit rate of about 512Kbps)
video for about 24.3 days.
Please refer to the table below for more information on how long videos can be stored on the SD
card

28
Please not that if the recording method of the SD card is set to event recording, the SD card will
not be filled as fast as the table shows.
Finally, please keep in mind that regardless of the resolution chosen, when the SD card storage
space is used up, the newly recorded video will automatically overwrite the oldest video.
Time Needed (in days) to Fill SD cards of Different Sizes at Different Resolutions.
8Gb
16Gb
32Gb
64Gb
128Gb
FHD
0.5
1
2
4
8.1
SD
0.75
1.5
3
6.1
12.2
720p
1.5
3
6.1
12.2
24.3
7. Firmware update
7.1. OTA (Over The Air) Firmware Update
Online updates allow you to check the latest firmware version online for a given device.
Whenever we provide a major new feature or fix an important issue for your hardware, we
release an update to the device.
If your device is an upgradeable firmware model, you can see a firmware update prompt on the
device List window of the app. Tap [Update Now] to see the details of this update. You can also
go to the [Preferences/Settings] " " -> [Technical Info] section of the blurams app to check
whether there is a new firmware version available. Tap [Update Now] to start the update. Make
sure your app is running while waiting for the upgrade to complete. To avoid unknown problems,
while the update is happening, do not minimize or close the app, shut down the device or
interrupt the update.
7.2. How can I manually update firmware?
If your device encounters an unrecoverable failure, you can manually update the device to its
latest firmware version.
1. Have ready the following:
a. Networked Computer
b. TF card (Micro SD card)
c. TF card reader
2. Steps:
a. Format the TF card to FAT32 (file system) via a card reader.
b. Obtain the latest firmware file from support@blurams.com.
c. Copy this unzipped file to the root directory of the TF card (Micro SD card).
d. Safely remove the card reader from the computer, insert the TF card into the camera, and
then turn on the device.
e. The camera will start to update automatically. While processing the update, the status light

29
will be green and blink fast. Once the upgrade is finished,the indicator light will remain green
and steady. The whole process normally takes 2 ~ 3 minutes, after which the camera will
automatically restart, while the camera is restarting, the indicator light will turn red and blink.
Caution: During the update process, DO NOT CUT OFF POWER TO THE DEVICE, AS THE CAMERA
WILL CRASH IF POWER IS CUT OFF.
8. Misc.
8.1. Why am I hearing unusual sounds during audio talk or
live video?
If you cannot hear any sound from the device when using the “two-way talk” function or the “live
video” function, please check whether the app has been granted access to the microphone, and
turn up the volume. Please keep as close to the microphone as possible while talking.
If you hear weird echos when watching a live video or doing a two-way talk, try moving your
phone away from the device or turning down the volume.
If there is no sound when playing a video, please make sure the phone is not set to silent mode
and turn up the volume.
8.2. How can I check my login history?
If you have shared your account with your friends or family, or you are not sure if your account
information has been leaked, then you may want to check the recent login history of your
account, you can view your device information and history through tapping [Me] ->
[Preferences/Settings] " ” -> [Security Center] on your app.
8.3. View video on the web browser
If you need to view videos on your computer, then you can use a web browser to login to
https://client.blurams.com/login. Through this website you can view the device's live videos,
cloud history videos, and part of the preferences.
This website is fully compatible with Chrome, Firefox, and Edge.
30
8.4. How can I use my device with Amazon
Alexa?
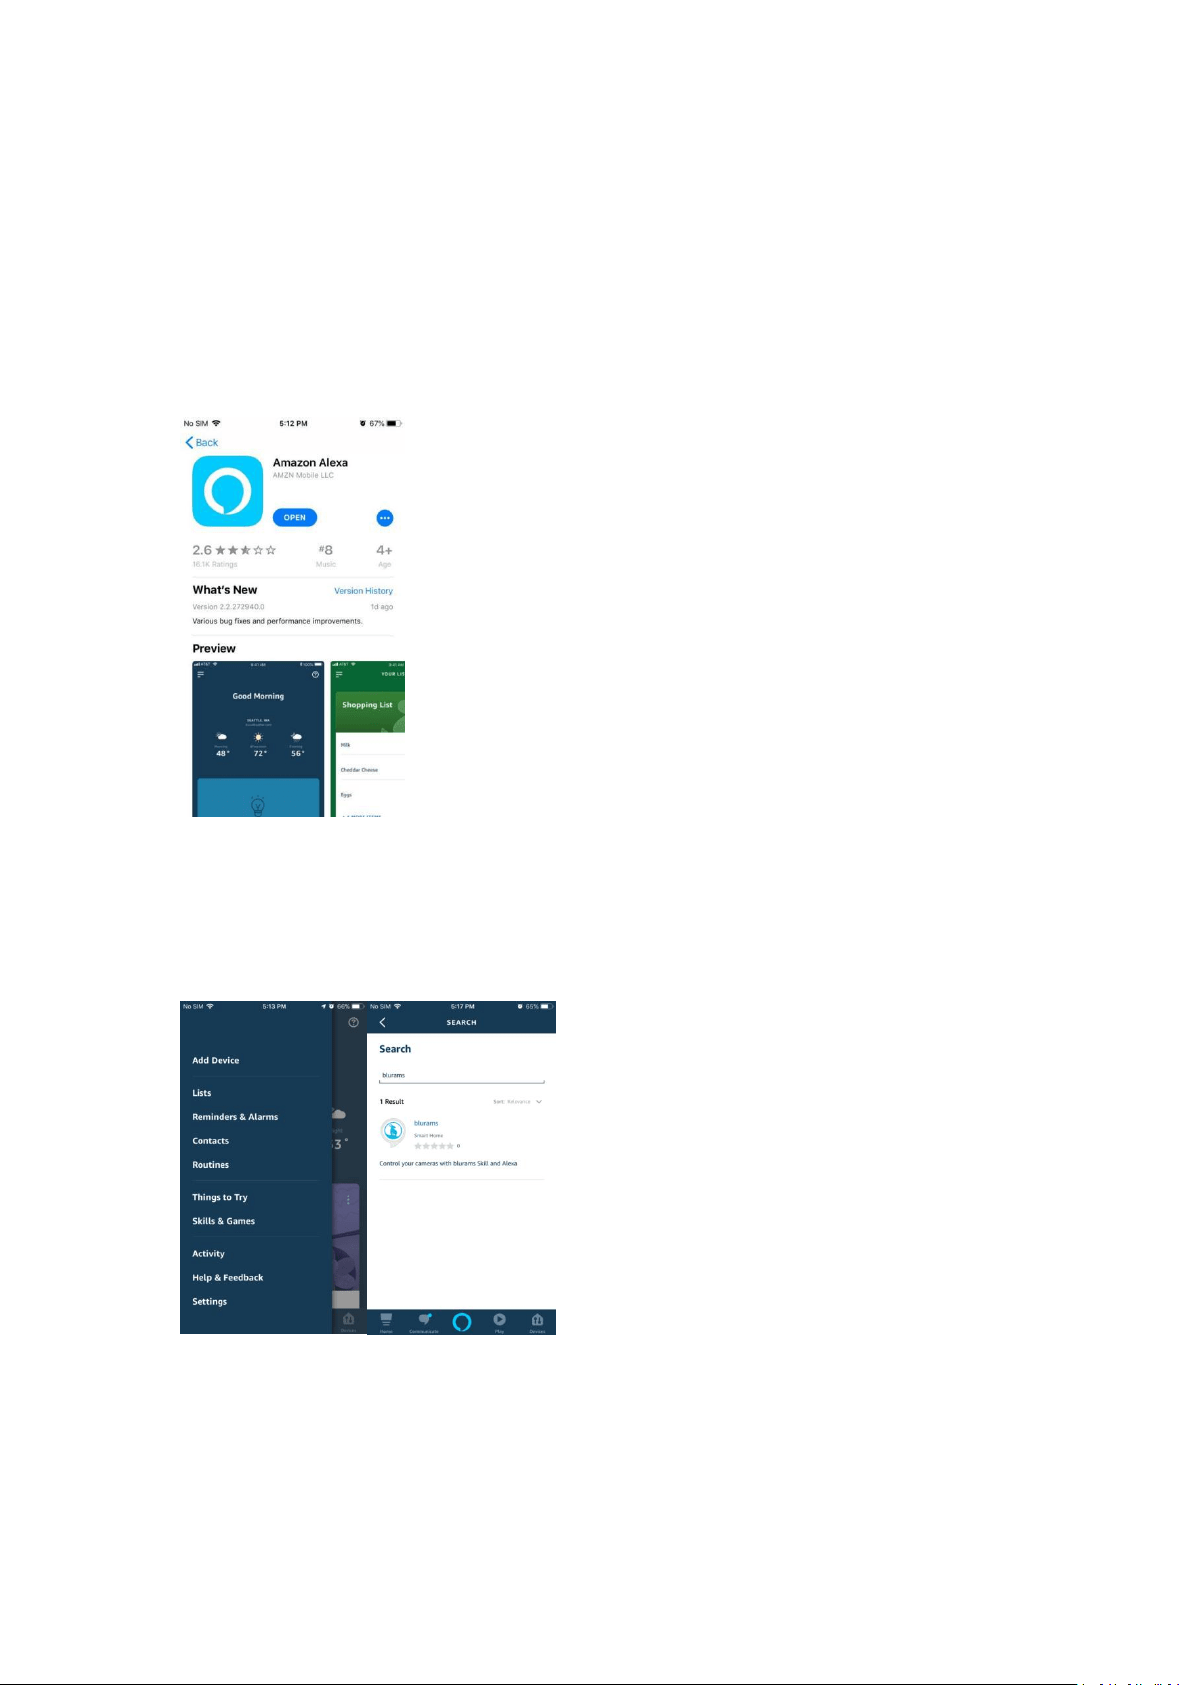
8.4.1 Download Amazon Alexa
Download and install the "Amazon Alexa" app on the App Store or Google Play.
8.4.2. Find blurams Skill
Login to the Amazon Alexa app, open the sidebar from the top left corner and enter the "Skills &
Game" page, search for "blurams" in the search bar to find the blurams skills.
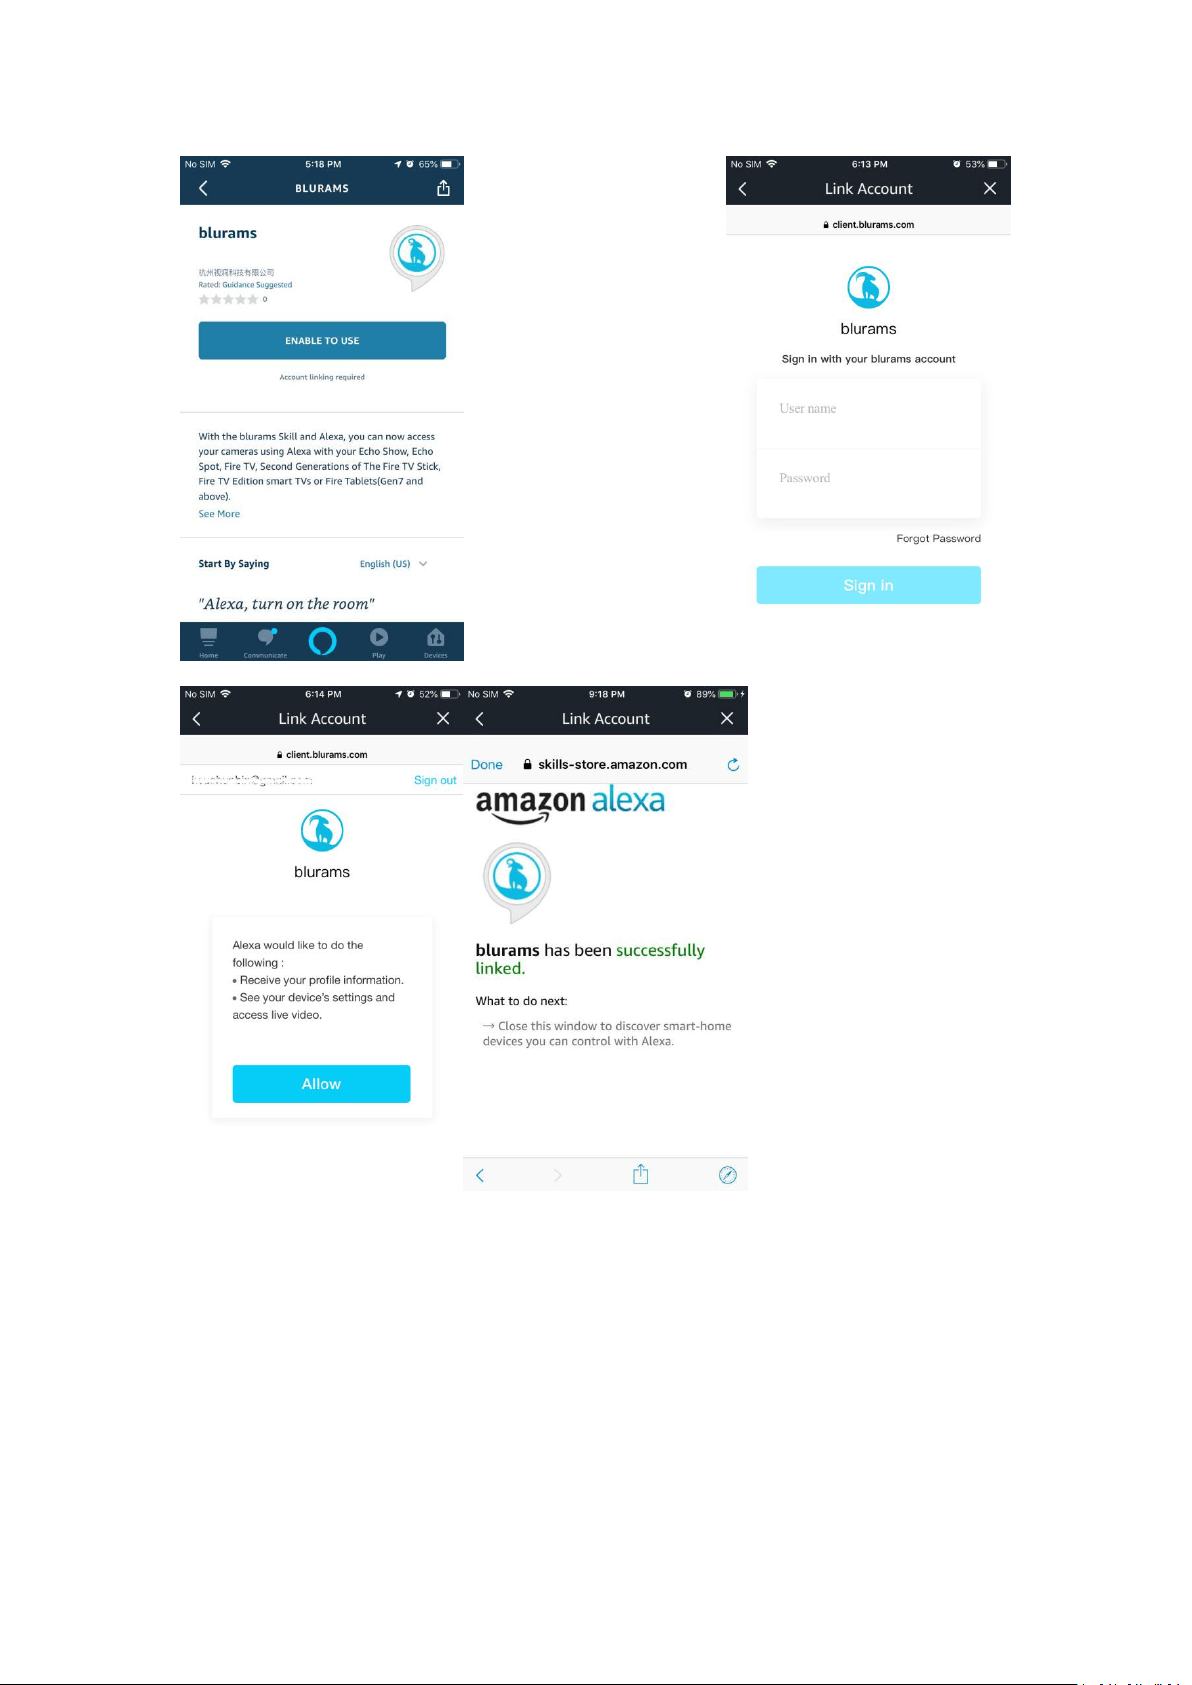
8.4.3. Enable blurams Skill
In the search result page, click "blurams Skill" and go to Skill page, click "ENABLE" and follow the
instructions to link Amazon to your blurams account.
31
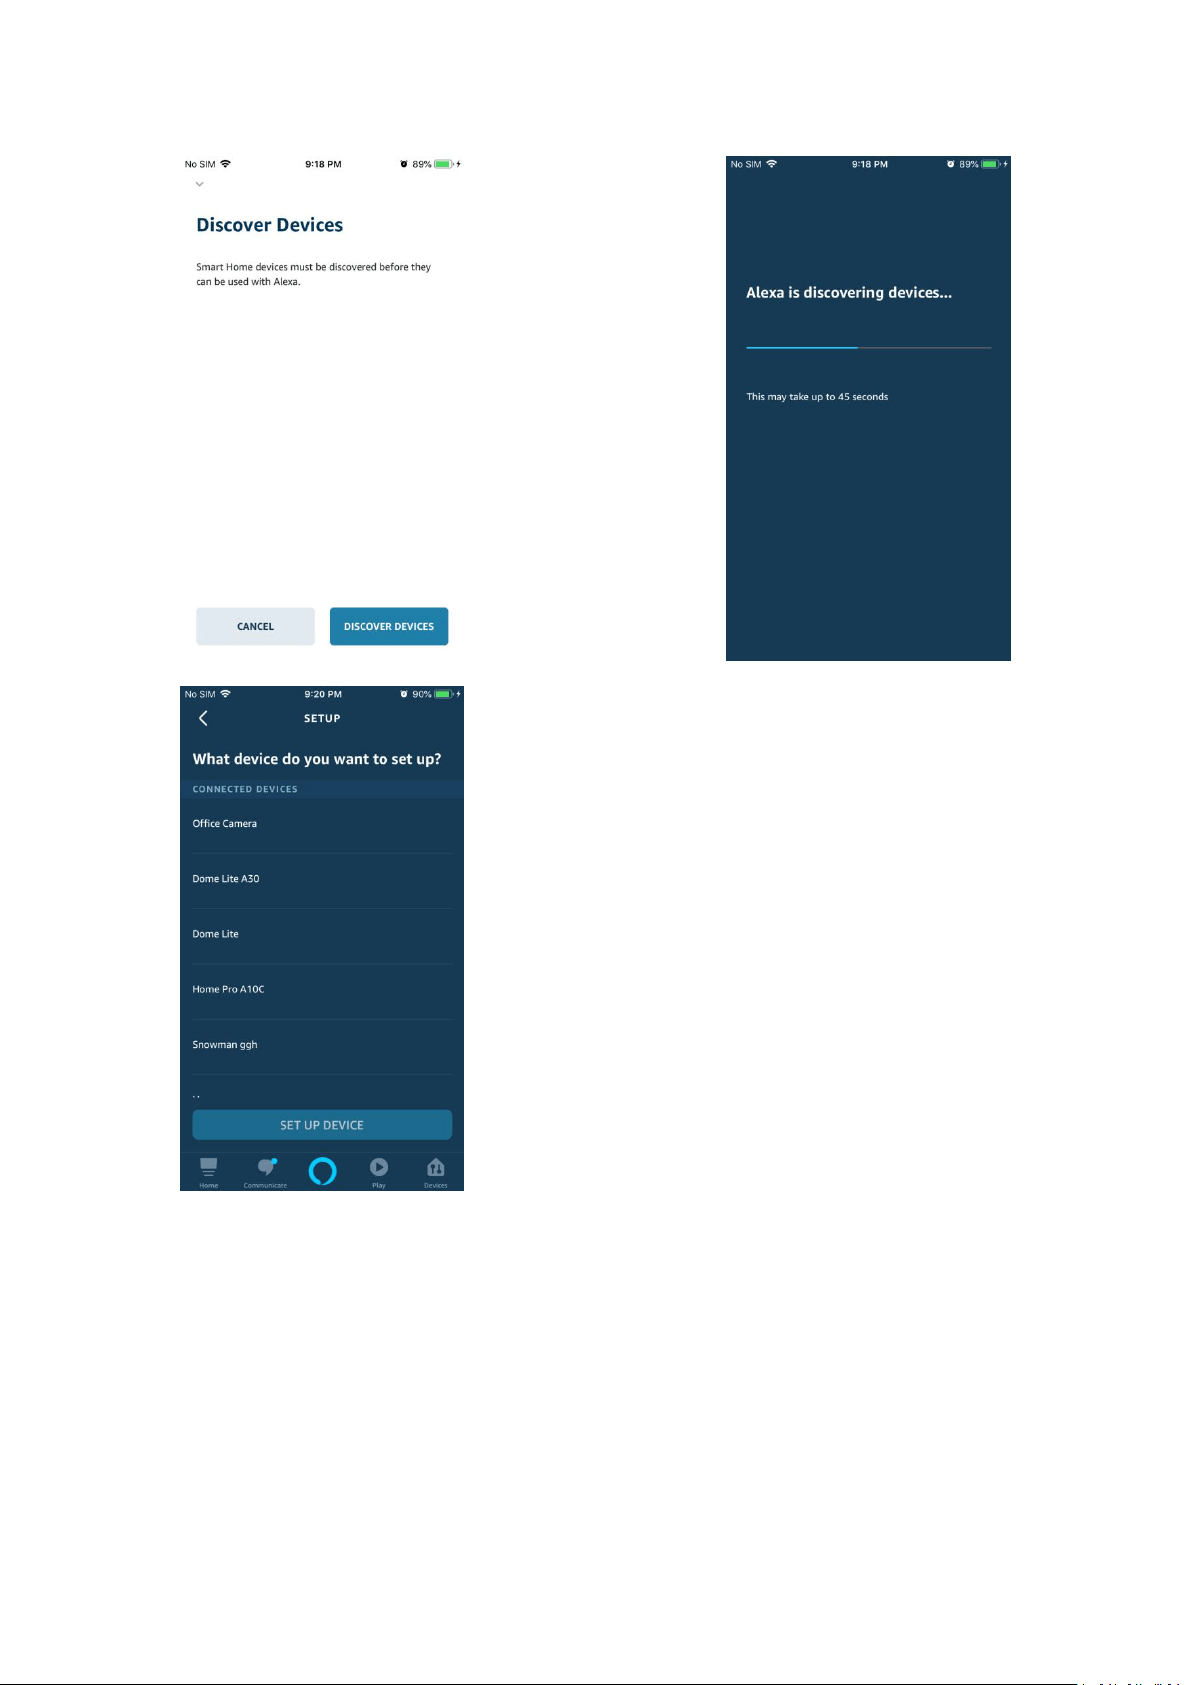
8.4.4. Discover device
If the accounts are successfully linked, the Amazon Alexa App will start to discover devices. After
waiting for a moment, all devices that have been discovered will be listed automatically.
32
8.4.5. Voice control
After discovering devices, you can control these devices through Amazon Echo series products.
Currently they supports voice commands such as
:
1. Alexa, turn on the room.
2. Alexa, show the room.
3. Alexa, stop.
33
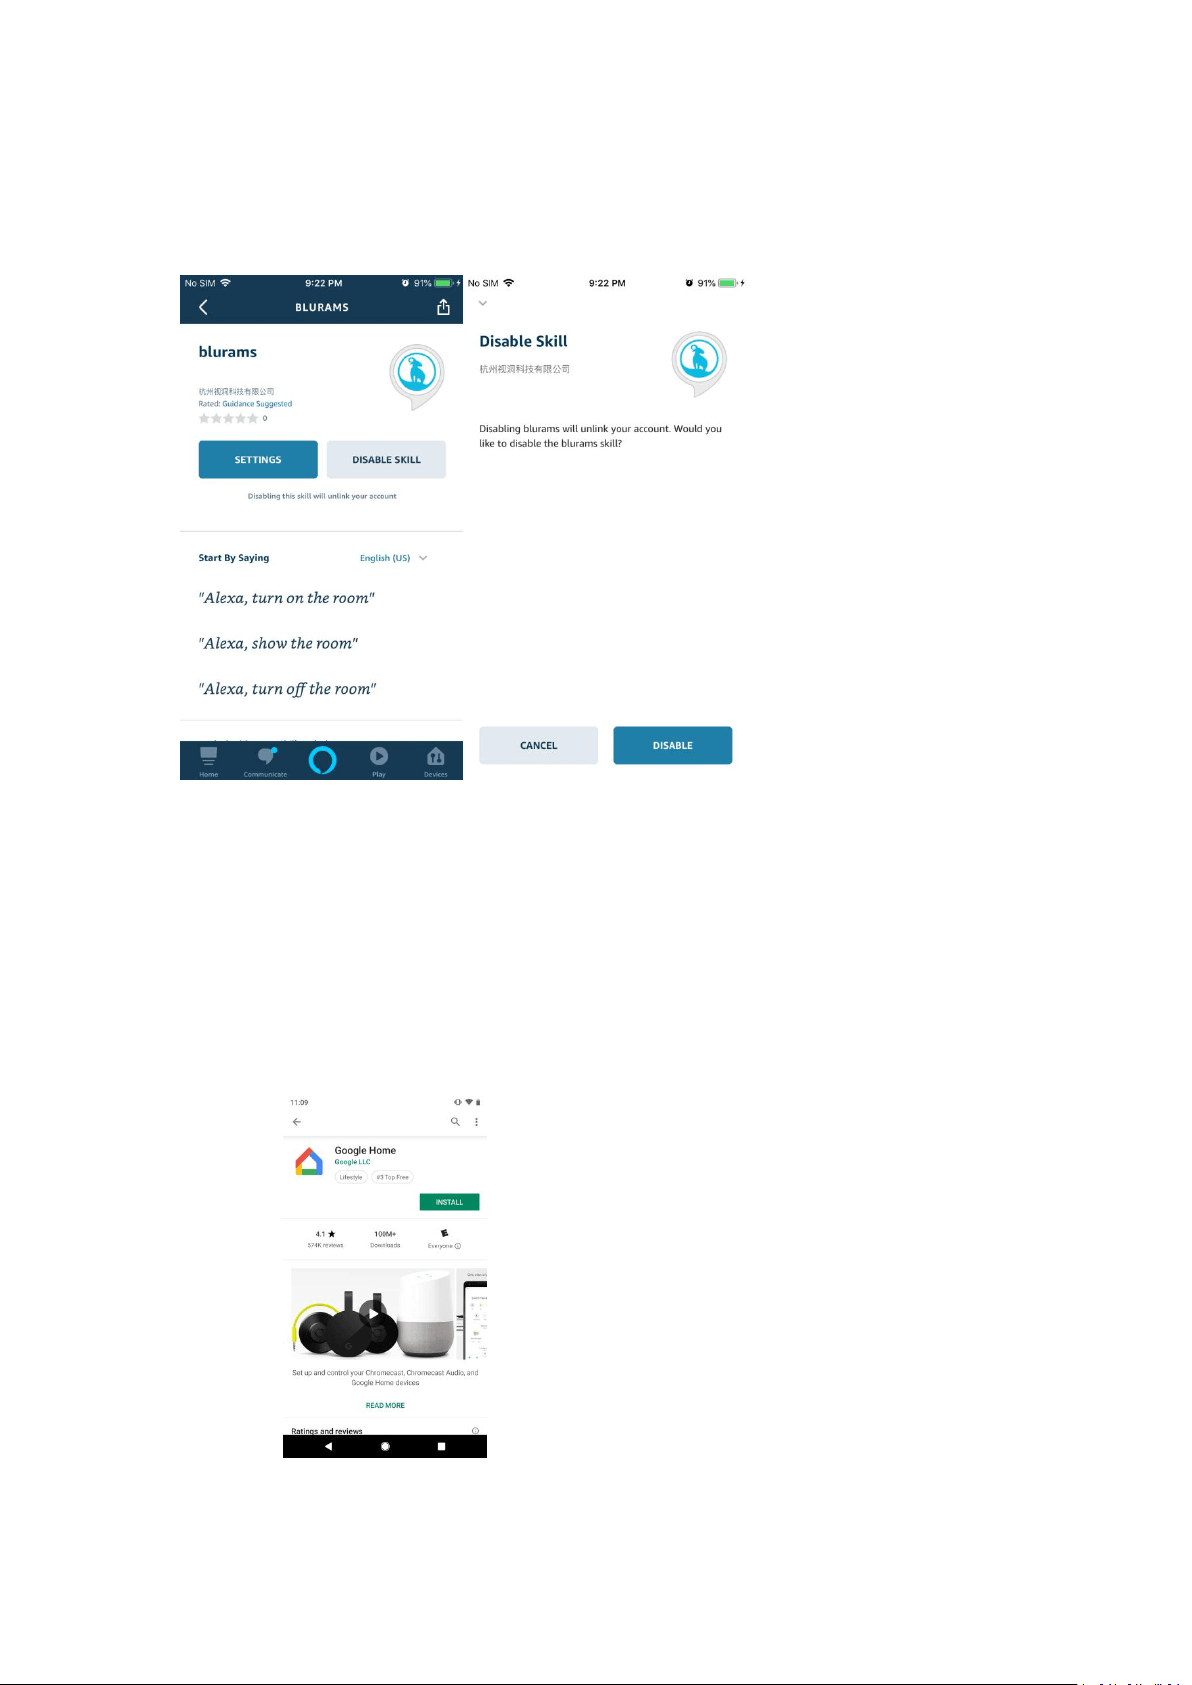
8.4.6. Disable blurams Skill
Click "DISABLE SKILL" on the Skill homepage to disable blurams skill.
8.5. How can I use my device with Google
Assistant?
8.5.1. Download the Google Home app
On your mobile device or tablet, download the Google Home app.
Google Home

34
8.5.2. Set up your Google device
If you haven't set up your Chromecast and speaker or display, follow the steps below. If you have
already set up these devices, you can skip this step.
1. Chromecast: https://support.google.com/chromecast/answer/2998456
2. Google Nest or Home speaker or display:
https://support.google.com/googlenest/answer/7029485
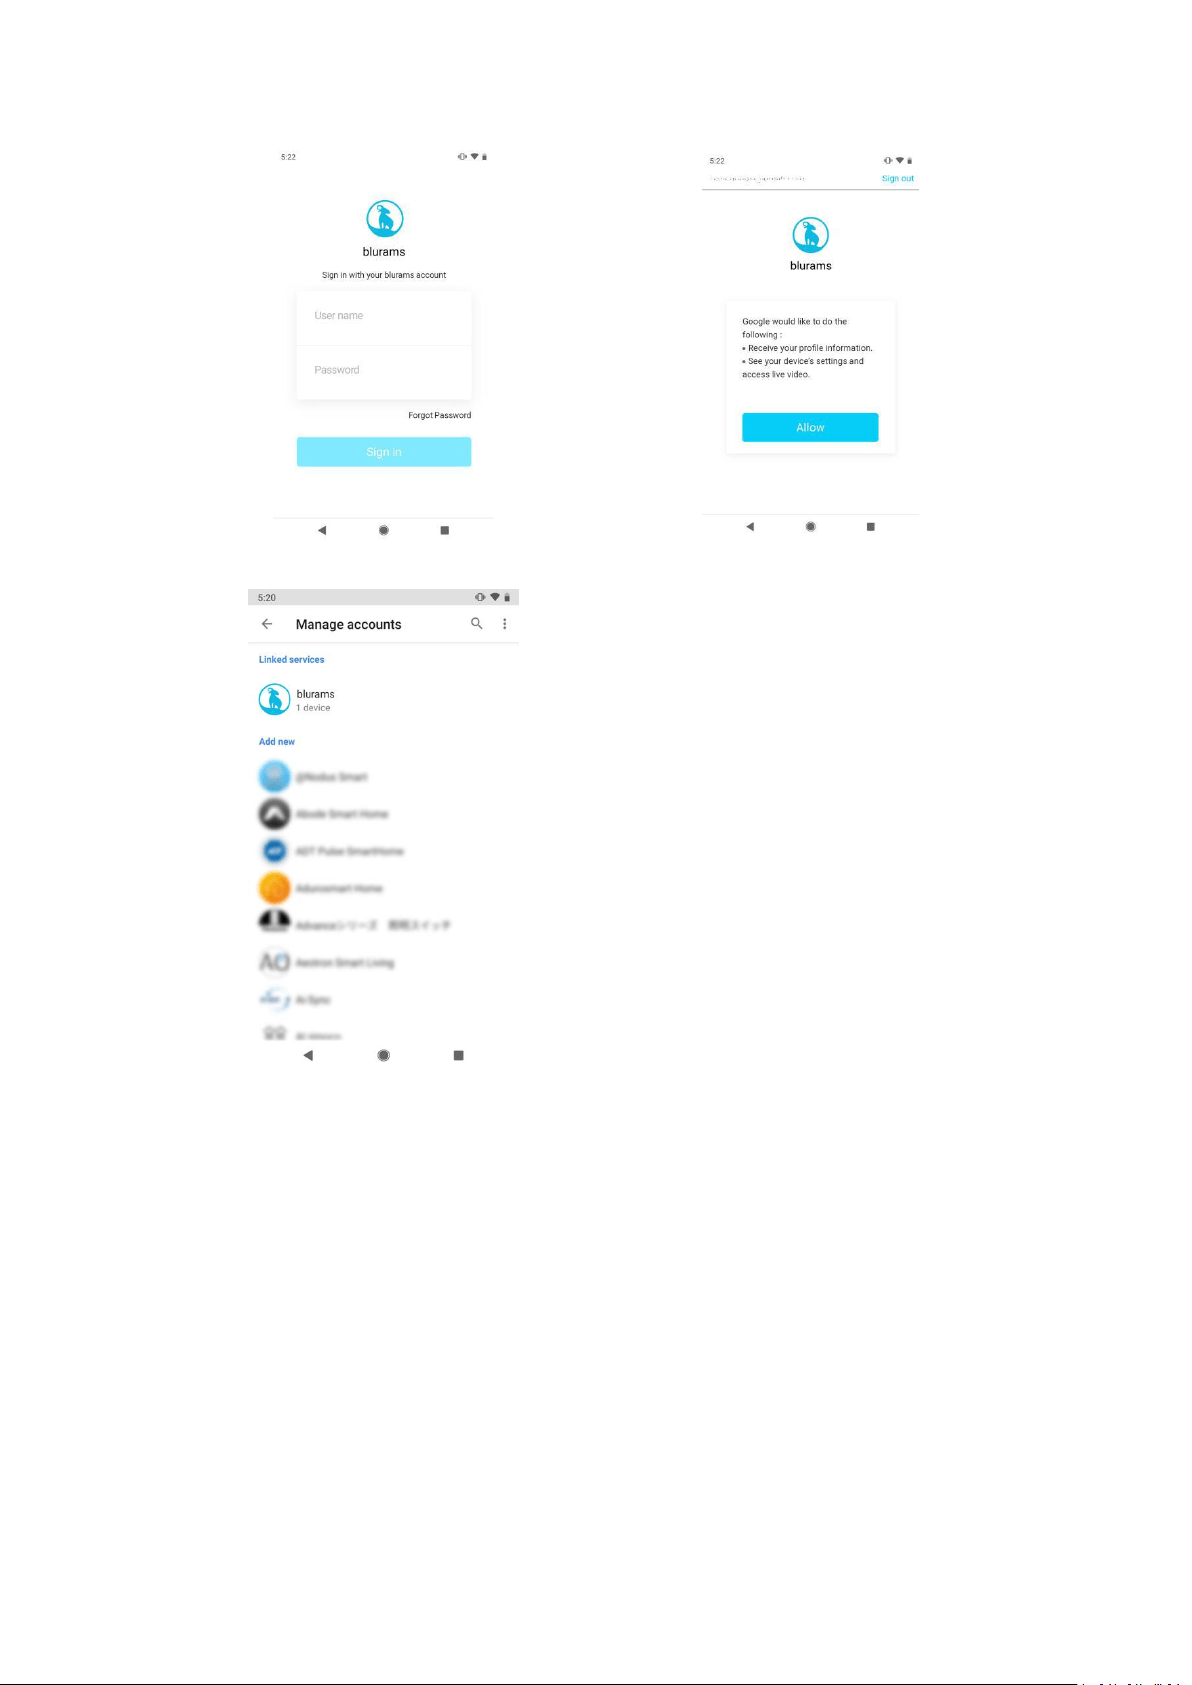
8.5.3. Link blurams
1. Open the Google Home app.
2. Tap Add -> Set up device -> Works with Google.
3. Search "blurams".
4. Tap "blurams" service.
5. Sign in to the service with your blurams account.
Home Screen
Add and Manage
Set Up
Search "blurams"
35
Sign In
Permission Request
Success
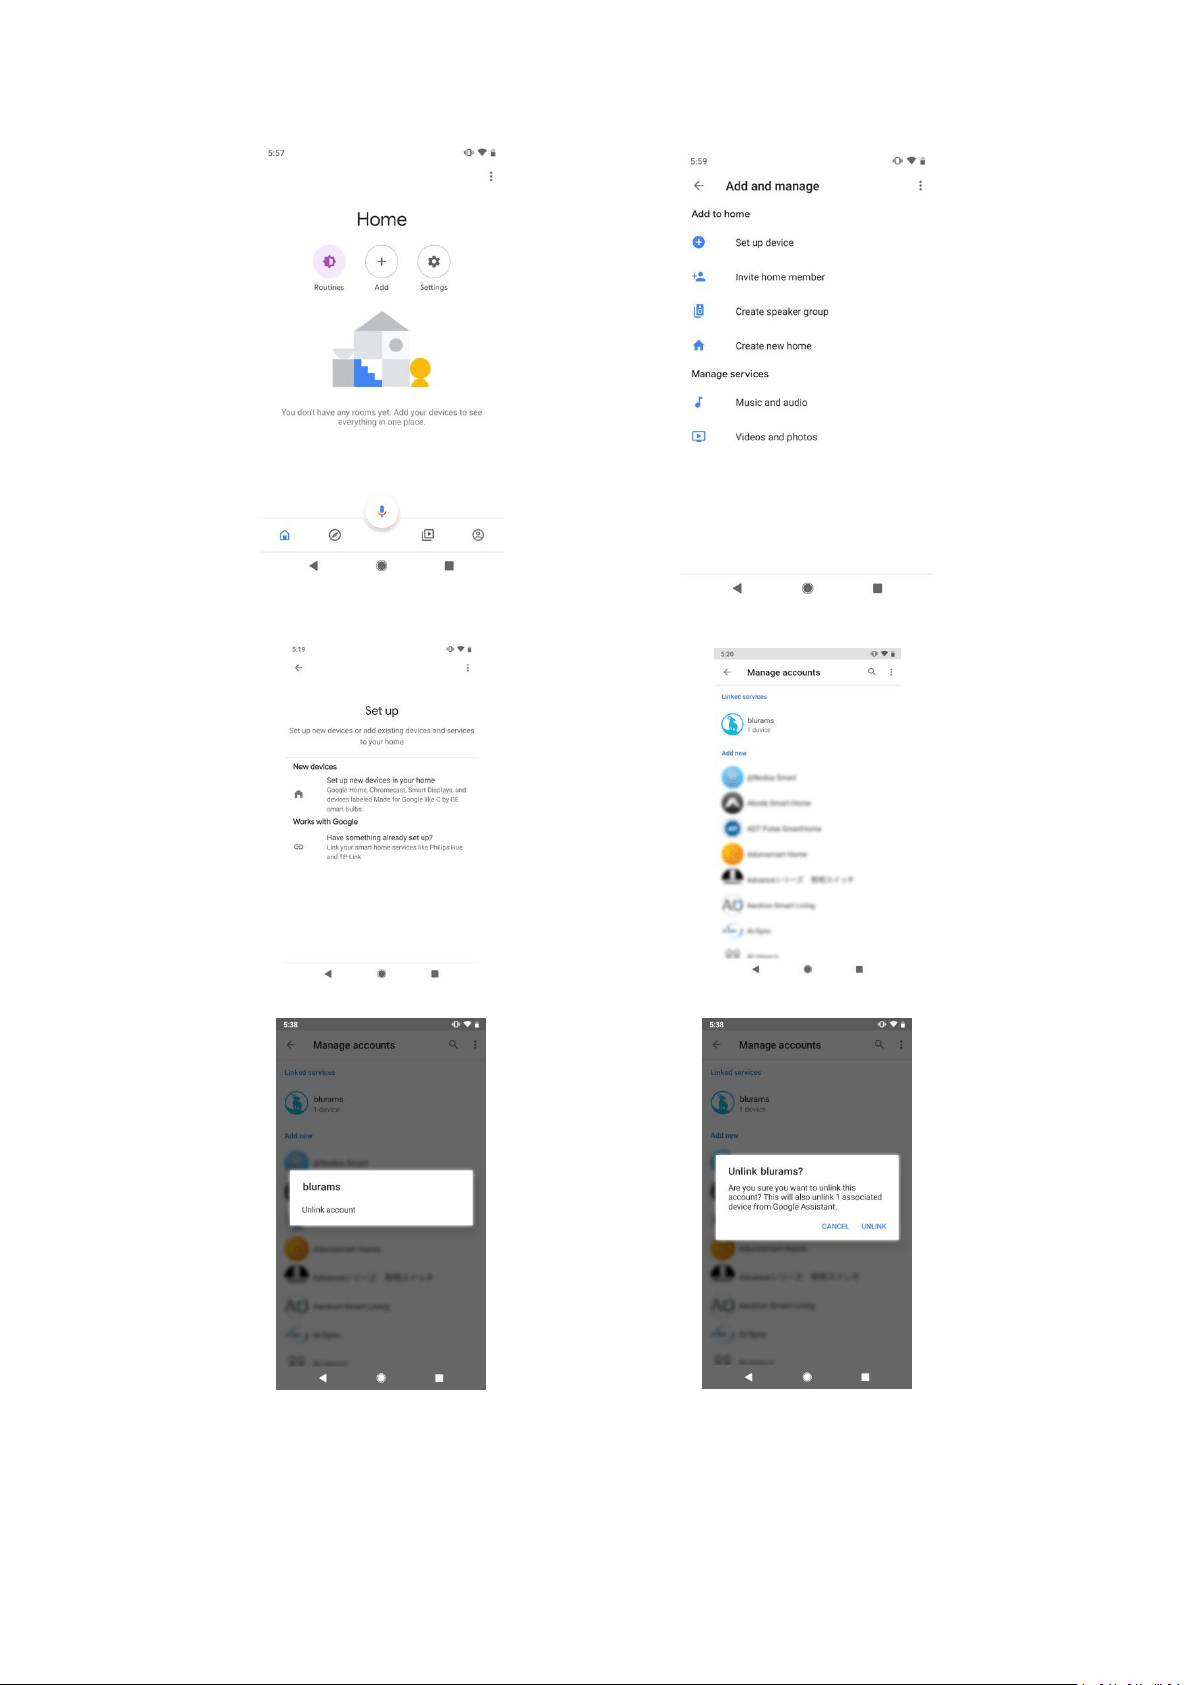
8.5.4. Unlink blurams
1. Open the Google Home app.
2. Tap Add -> Set up device -> Works with Google.
3. Tap "blurams" service below "Linked services".
4. Tap "Unlink account" and then confirm you want to unlink.
36
Home Screen
Add and Manage
Set Up
Blurams Service
Unlink Account
Confirm to Unlink

37
8.5.5. Voice control
Use these commands to control your devices:
1. OK Google, Show [camera name] on [Chromecast device name]
2. OK Google, Stop [TV/Chromecast device name]
Founded at the end of 2018, Blurams specializes in the research and development of smart AI
security cameras, cloud services and facial recognition.
Now, Blurams is regarded as one of the world’s most trusted and respected technology brand,
leading the way with innovative, high-quality products and a world-class supply chain.
Blurams prides itself on its channel network knowledge and its strong relationships with major
retail chains in the US, Australia, the UAE, the UK, Spain, Canada, Singapore, Indonesia, Taiwan,
Thailand and other markets.