Safety Instructions . . . . . . . . . . . 2, 3
Operating Instructions
Control Panel . . . . . . . . . . . . . . . . . . . . .4–5
Features . . . . . . . . . . . . . . . . . . . . . . . . .6–8
Loading and Using
the Washer . . . . . . . . . . . . . . . . . . . . .9, 10
Installation Instructions
Before You Begin . . . . . . . . . . . . . . .11–13
Step-by-Step Instructions . . . . . .13–16
Troubleshooting Tips . . . . . .17–19
Consumer Support
Consumer Support . . . . . . . . . . . . . . . . .22
Warranty (Canada) . . . . . . . . . . . . . . . . 21
Warranty (U.S.) . . . . . . . . . . . . . . . . . . . . 20
GEAppliances.com
+.?52>?
Profile
Write the model and serial
numbers here:
Model # ______________
Serial # ______________
You can find them on the
rear cover of the washer
backsplash.
Owner’s Manual
and Installation
Instructions
n Install or store where it will not be exposed to
temperatures below freezing or exposed to the
weather.
n Properly ground washer to conform with all governing
codes and ordinances. Follow details in Installation
Instructions.
IMPORTANT SAFETY INFORMATION.
READ ALL INSTRUCTIONS BEFORE USING.
WARNING!
58?5;89',+:?:.+/4,583':/54/4:./93'4;'23;9:(+,5225=+*:53/4/3/@+:.+8/91
5,,/8+58+>6259/54+2+):8/)9.5)158:568+<+4:6856+8:?*'3'-+6+8954'2/40;8?58
25995,2/,+
%#!#!"#&
$4*+8)+8:'/4)54*/:/549.?*85-+4-'93'?(+685*;)+*/4'=':+8.+':+8:.':.'945:(++4;9+*,58:=5=++19
58358+?*85-+4-'9)'4(++>6259/<+;4*+8:.+9+)/8);39:'4)+9
If the hot water has not been used for two weeks or more, prevent the possibility of damage or injury by turning on
all hot water faucets and allowing them to run for several minutes. Do this before using any electrical appliance
which is connected to the hot water system. This simple procedure will allow any built-up hydrogen gas to escape.
Since the gas is flammable, do not smoke or use an open flame or appliance during this process.
! !"##
#./9='9.+83;9:(+6856+82?/49:'22+*'4*25)':+*/4'))58*'4)+=/:.:.+49:'22':/5449:8;):/549(+,58+/:/9;9+*
49:'22':/5449:8;):/549'8+/4)2;*+*/4:.+(')15,:./93'4;'2
n Keep the area underneath and around your
appliances free of combustible materials such as
lint, paper, rags and chemicals.
n Close supervision is necessary if this appliance is
used by or near children. Do not allow children to
play on, with or inside this or any other appliance.
&$!$!&!
2
Consumer Support Troubleshooting Tips Operating Instructions Safety Instructions
Installation
Instructions
3
Consumer Support
Troubleshooting Tips
Operating InstructionsSafety Instructions
Installation
Instructions
n Never reach into washer while it is moving.
Wait until the machine has completely stopped
before opening the lid.
n Do not mix chlorine bleach with ammonia or
acids such as vinegar and/or rust remover. Mixing
different chemicals can produce a toxic gas
which may cause death.
n Do not wash or dry articles that have been
cleaned in, washed in, soaked in or spotted
with combustible or explosive substances (such as
wax, oil, paint, gasoline, degreasers, dry-cleaning
solvents, kerosene) which may ignite or explode.
Do not add these substances to the wash water.
Do not use or place these substances around
your washer or dryer during operation.
n The laundry process can reduce the flame
retardancy of fabrics. To avoid such a result,
carefully follow the garment manufacturer’s
wash and care instructions.
n To minimize the possibility of electric shock,
unplug this appliance from the power supply
or disconnect the washer at the building’s
distribution panel by removing the fuse or
switching off the circuit breaker before
attempting any maintenance or cleaning.
NOTE: Pressing the START/PAUSE or POWER
button does NOT disconnect the appliance
from the power supply.
n Never attempt to operate this appliance if it is
damaged, malfunctioning, partially disassembled,
or has missing or broken parts, including a
damaged cord or plug.
%$"#%"!
n Turn off water faucets to relieve pressure on
hoses and valves and to minimize leakage if
a break or rupture should occur. Check the
condition of the fill hoses; they should be
replaced every 5 years.
n Before discarding a washer, or removing it
from service, remove the washer lid to prevent
children from hiding inside.
n Do not attempt to repair or replace any part of
this appliance unless specifically recommended
in this Owner’s Manual, or in published user-repair
instructions that you understand and have the
skills to carry out.
n Do not tamper with controls.
%#$"
!%#""#&!#!$&
SAVE THESE INSTRUCTIONS
$9+:./9
'662/'4)+
542?,58/:9
/4:+4*+*
6;8659+'9
*+9)8/(+*/4
:./9=4+8C9
'4;'2
GEAppliances.com
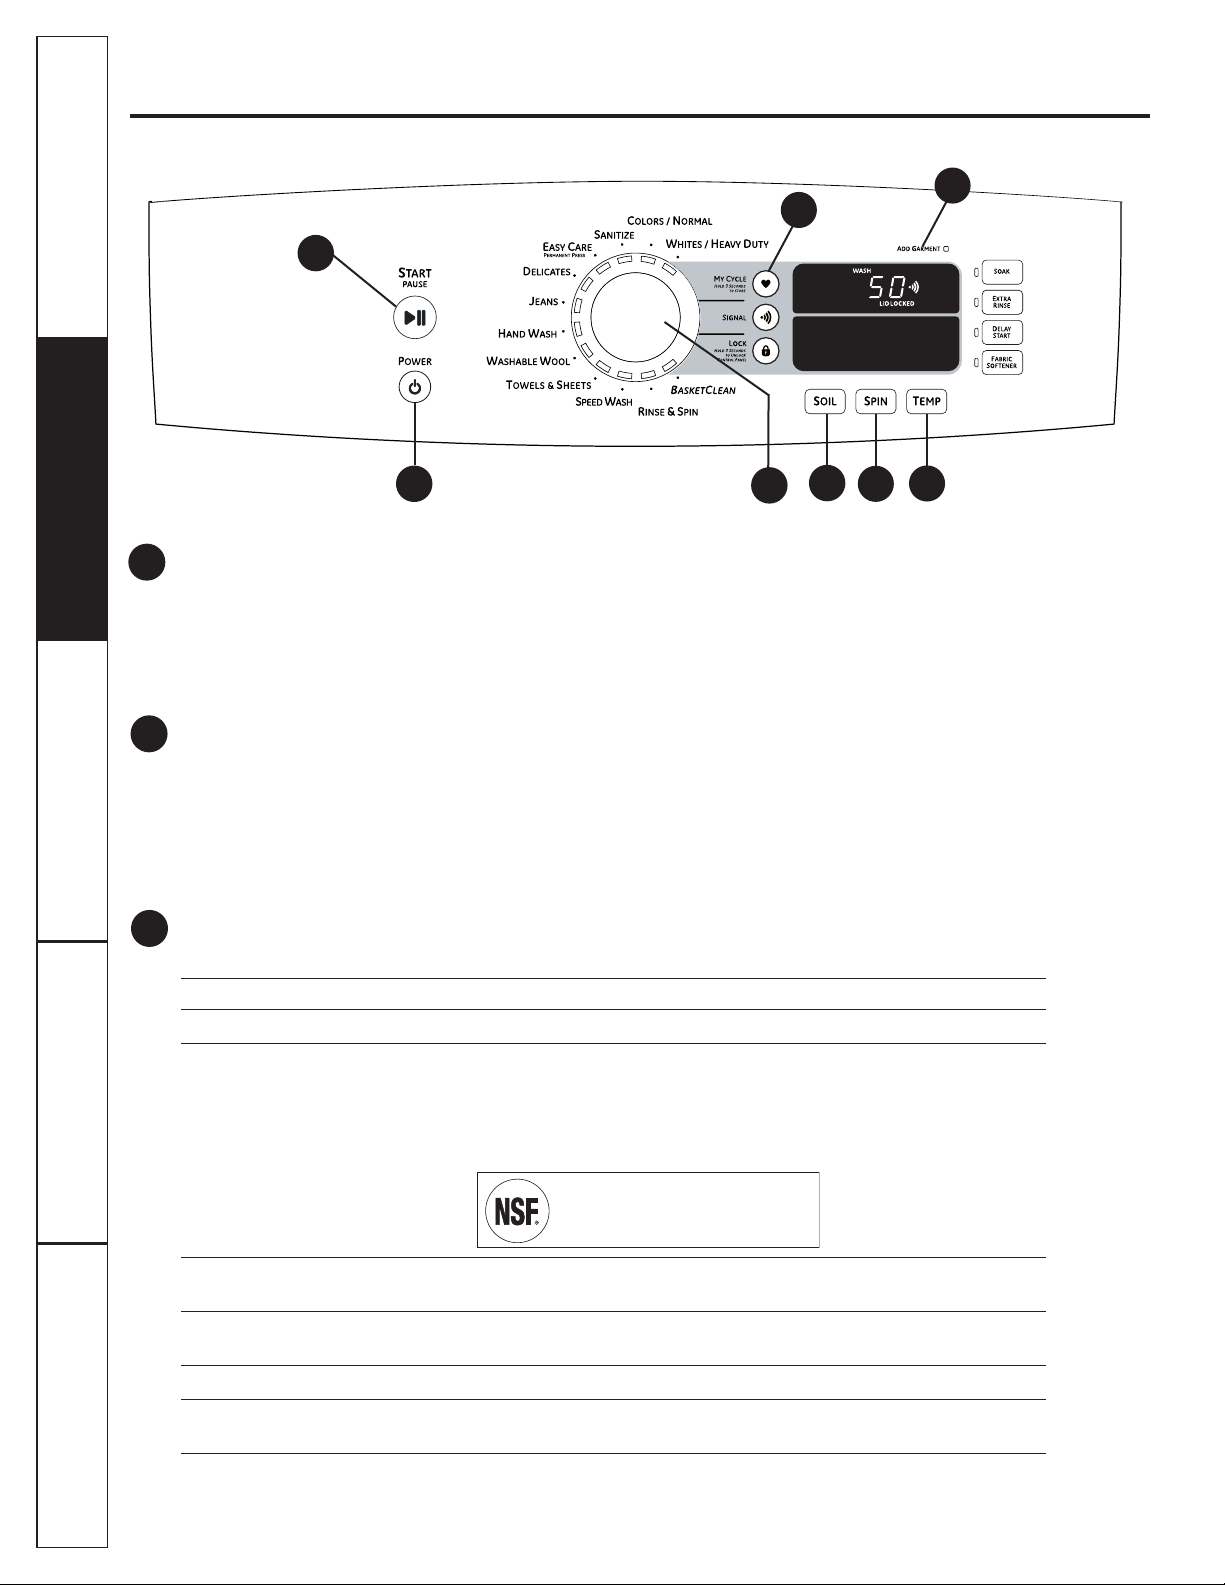
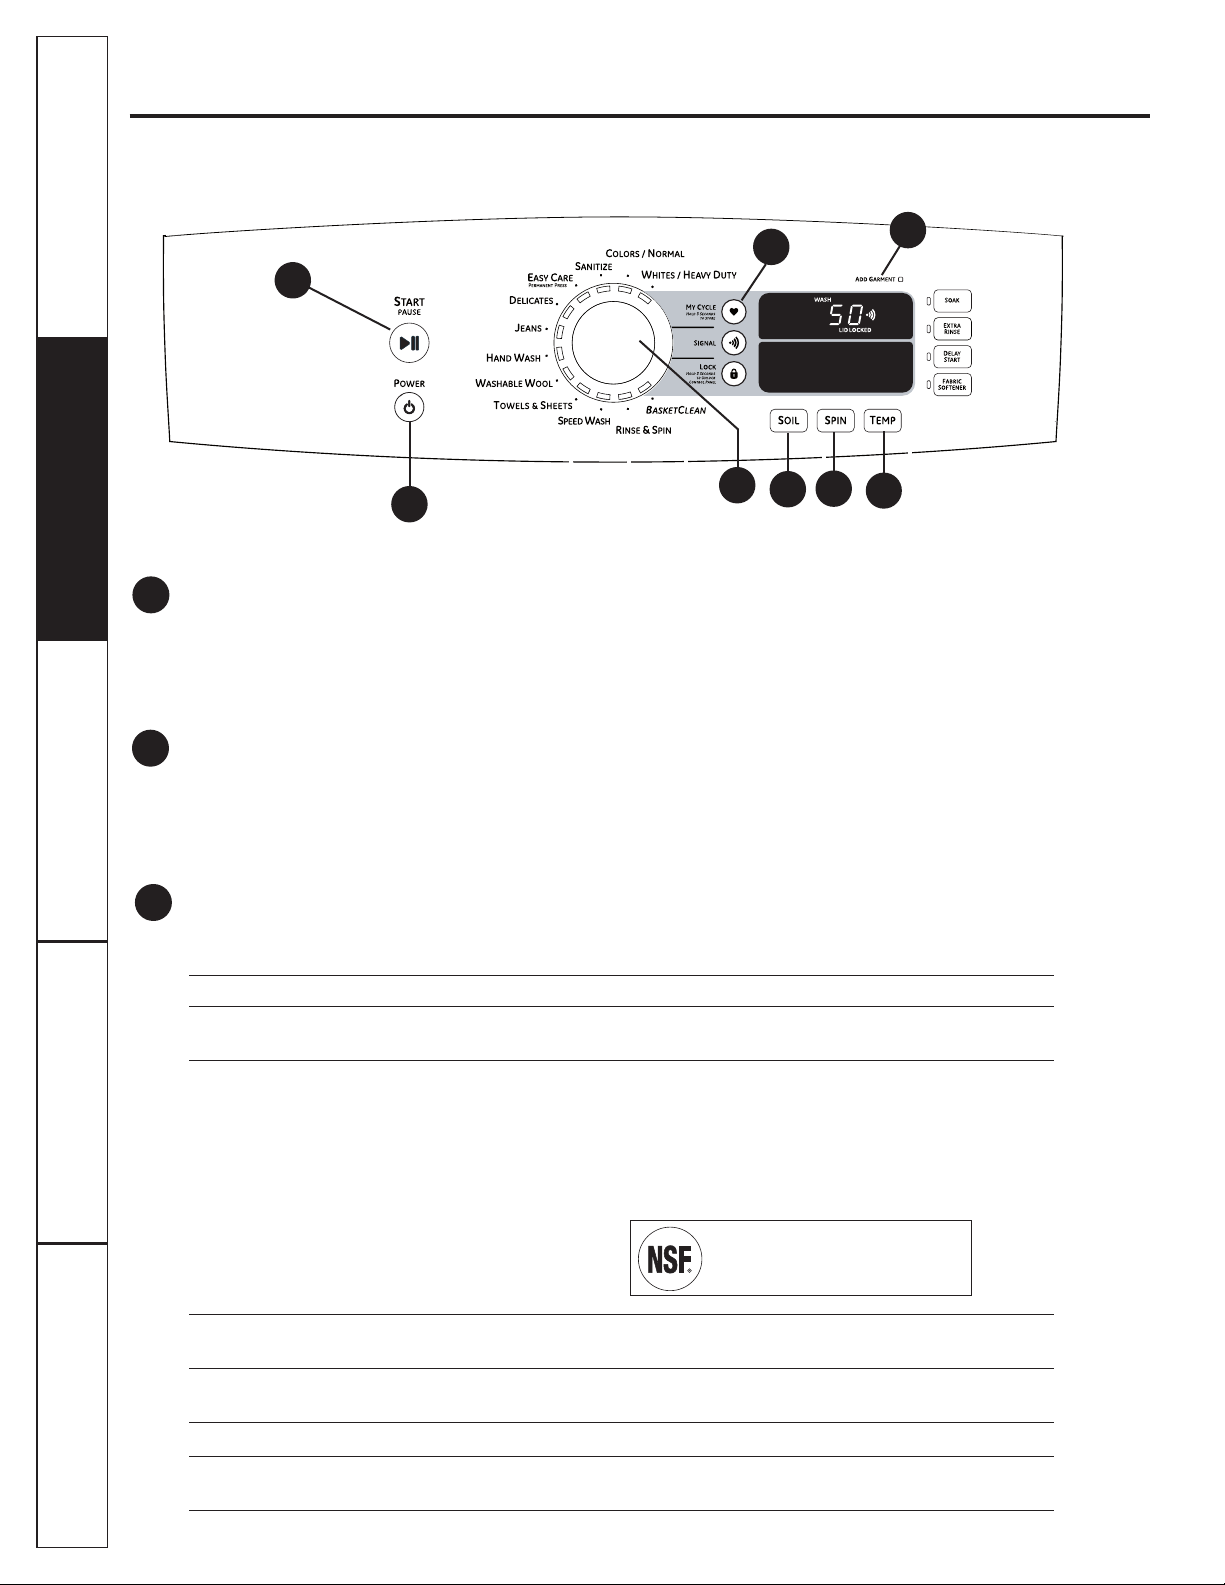
About the washer control panel.
4
Consumer Support Troubleshooting Tips Operating Instructions Safety Instructions
Installation
Instructions
Power
Press to “wake up” the display. If the display is active, press to put the washer into idle mode.
NOTE: 8+99/4-POWER *5+945:*/9)544+)::.+'662/'4)+,853:.+65=+89;662?
NOTE: ,:.+='9.+88+3'/49/*2+,583/4;:+9',:+8:;84/4-:.+='9.+85,,:.+=':+8/4:.+:;(=/22
*8'/4
START/PAUSE
Press to start a wash cycle. If the washer is running, pressing it once will pause the washer. Press
again to restart the wash cycle.
NOTE: ,:.+='9.+8/96';9+*'4*:.+)?)2+/945:8+9:'8:+*=/:./4.5;89:.+='9.+8=/22:;845,,
+,58++4:+8/*2+9:':+=/22*8'/4:.+=':+85;:
Wash Cycles
The wash cycles are optimized for specific types of wash loads. The chart below will help you match
the wash setting with the loads. The GentleClean
™
lifters lightly tumble the clothes into the water and
detergent solution to clean the load.
+('*,)(,
For heavily soiled white cottons, household linens, work and play clothes.
# #&'"#&! For colorfast cottons, household linens, work and play clothes.
'"(- Use to sanitize and kill more than 99% of many bacteria found in home laundry. This is a
cycle with an extra heavy soil setting and uses an extra heater to heat water to 140º F.
;:;@A?2C6@512860.@23./2>60?
* The SANITIZE Cycle is Certified by "4:+84':/54'2,583+82?':/54'2"'4/:':/54
5;4*':/54:5" 85:5)52 "'4/:/@':/54 +8,583'4)+5,!+9/*+4:/'225:.+9
%'9.+89
',& For wrinkle-free and permanant press items
(PERMANANT PRESS)
(' For lingerie and special-care fabrics with light to normal soil. Provides gentle tumbling and
soak during wash and rinse.
"' For use with jeans or denim fabrics.
"+' For items labeled hand-washable with light soils. Provides gentle rocking to mimic the
handwashing action.
1
2
5
3
1
4
Control Panel #.85;-.5;::./93'4;'2,+':;8+9'4*'66+'8'4)+3'?<'8?,853?5;835*+2
2
3
6
7
8
Protocol P172-07
Sanitization Performance of Residential and
Commercial, Family Sized Clothes Washers

Soil Level
Changing the SOIL LEVEL increases or decreases the wash agitation to remove different amounts of soil.
To change the SOIL LEVEL, press the SOIL LEVEL button until you have reached the desired setting.
You can choose between Extra Light, Light, Normal, Heavy or Extra Heavy soil.
Spin Speed
Changing the SPIN SPEED changes the final spin speed of the cycles. Always follow the fabric manufacturer’s care
label when changing the SPIN SPEED.
To change the SPIN SPEED, press the SPIN SPEED button until you have reached the desired setting. Higher spin
speeds are not available on certain cycles, such as Delicates.
Higher spin speeds remove more water from the clothes and will help reduce dry time, but may also increase the
possibility of setting wrinkles on some fabrics.
Temperature
Adjust to select the proper water temperature for the wash cycle.
Follow the fabric manufacturer’s care label when selecting the wash temperature.
To change the wash temperature, press theTEMP button until you have reached the desired setting.
NOTE: 5:'22:+36+8':;8+9+::/4-9'8+'<'/2'(2+54+').)?)2+9+2+):/54
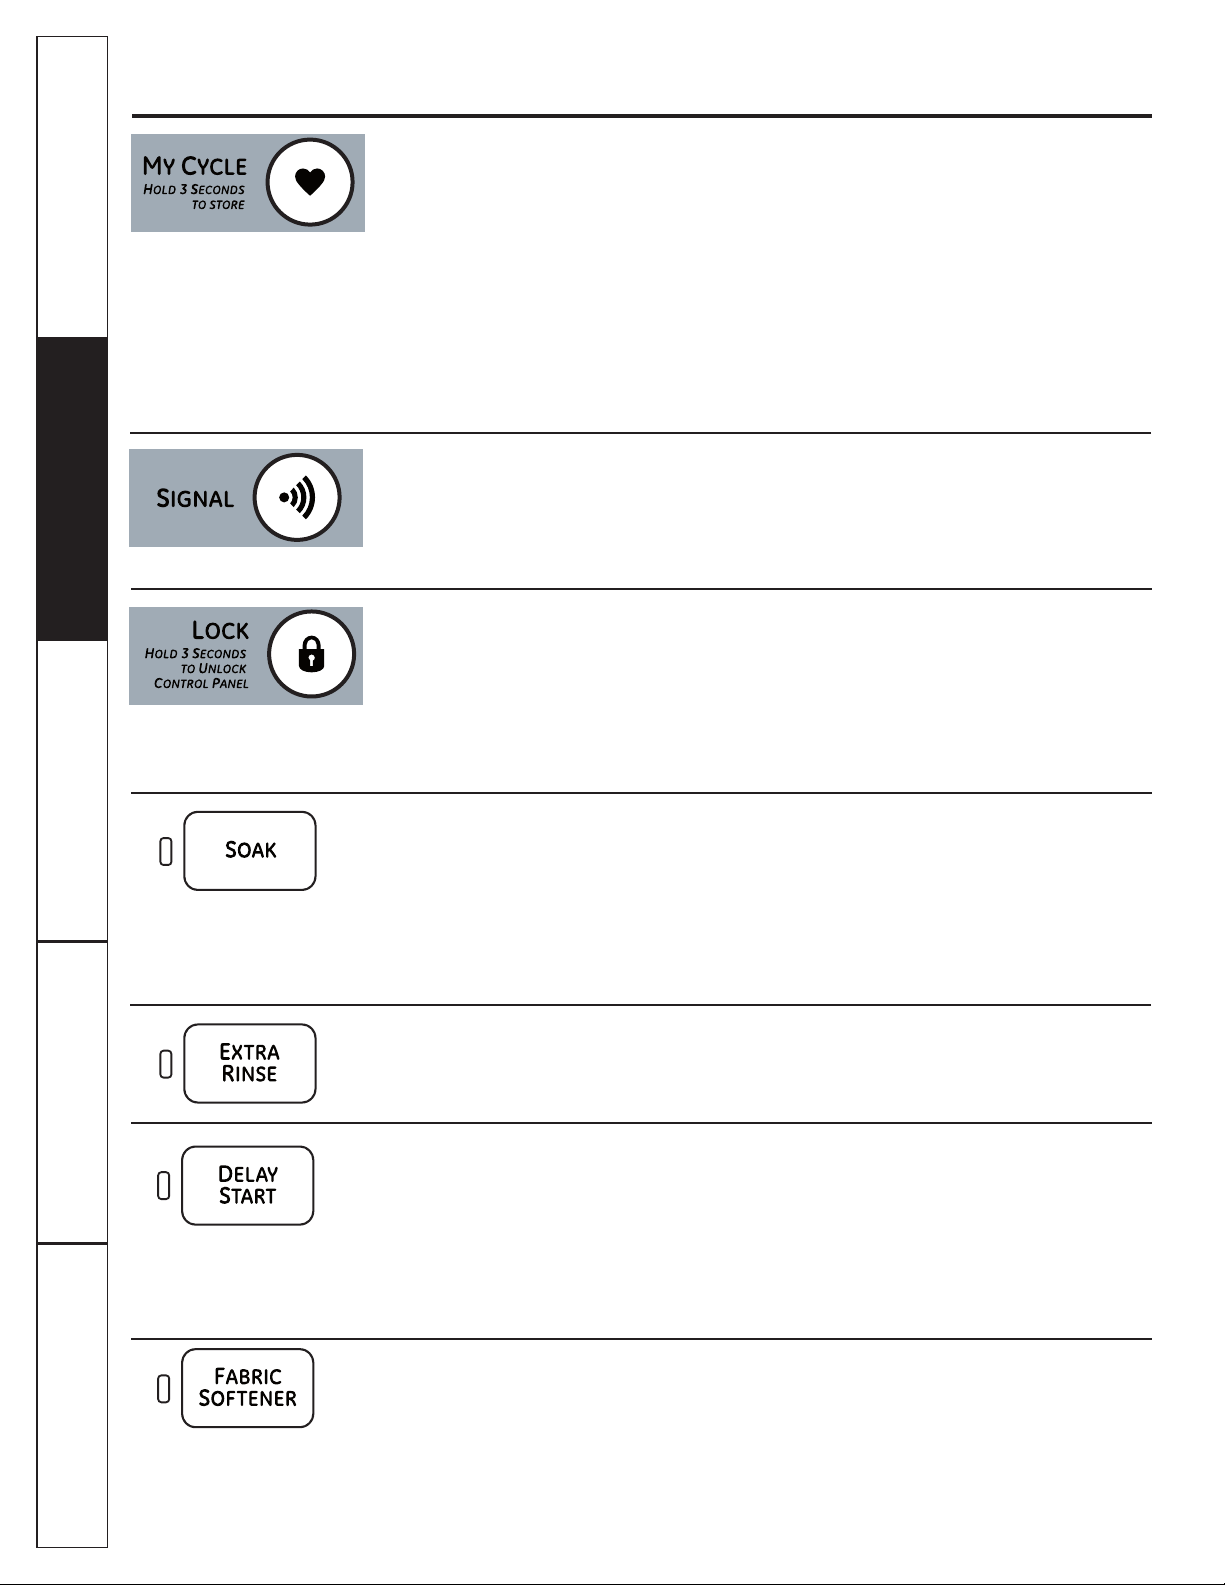
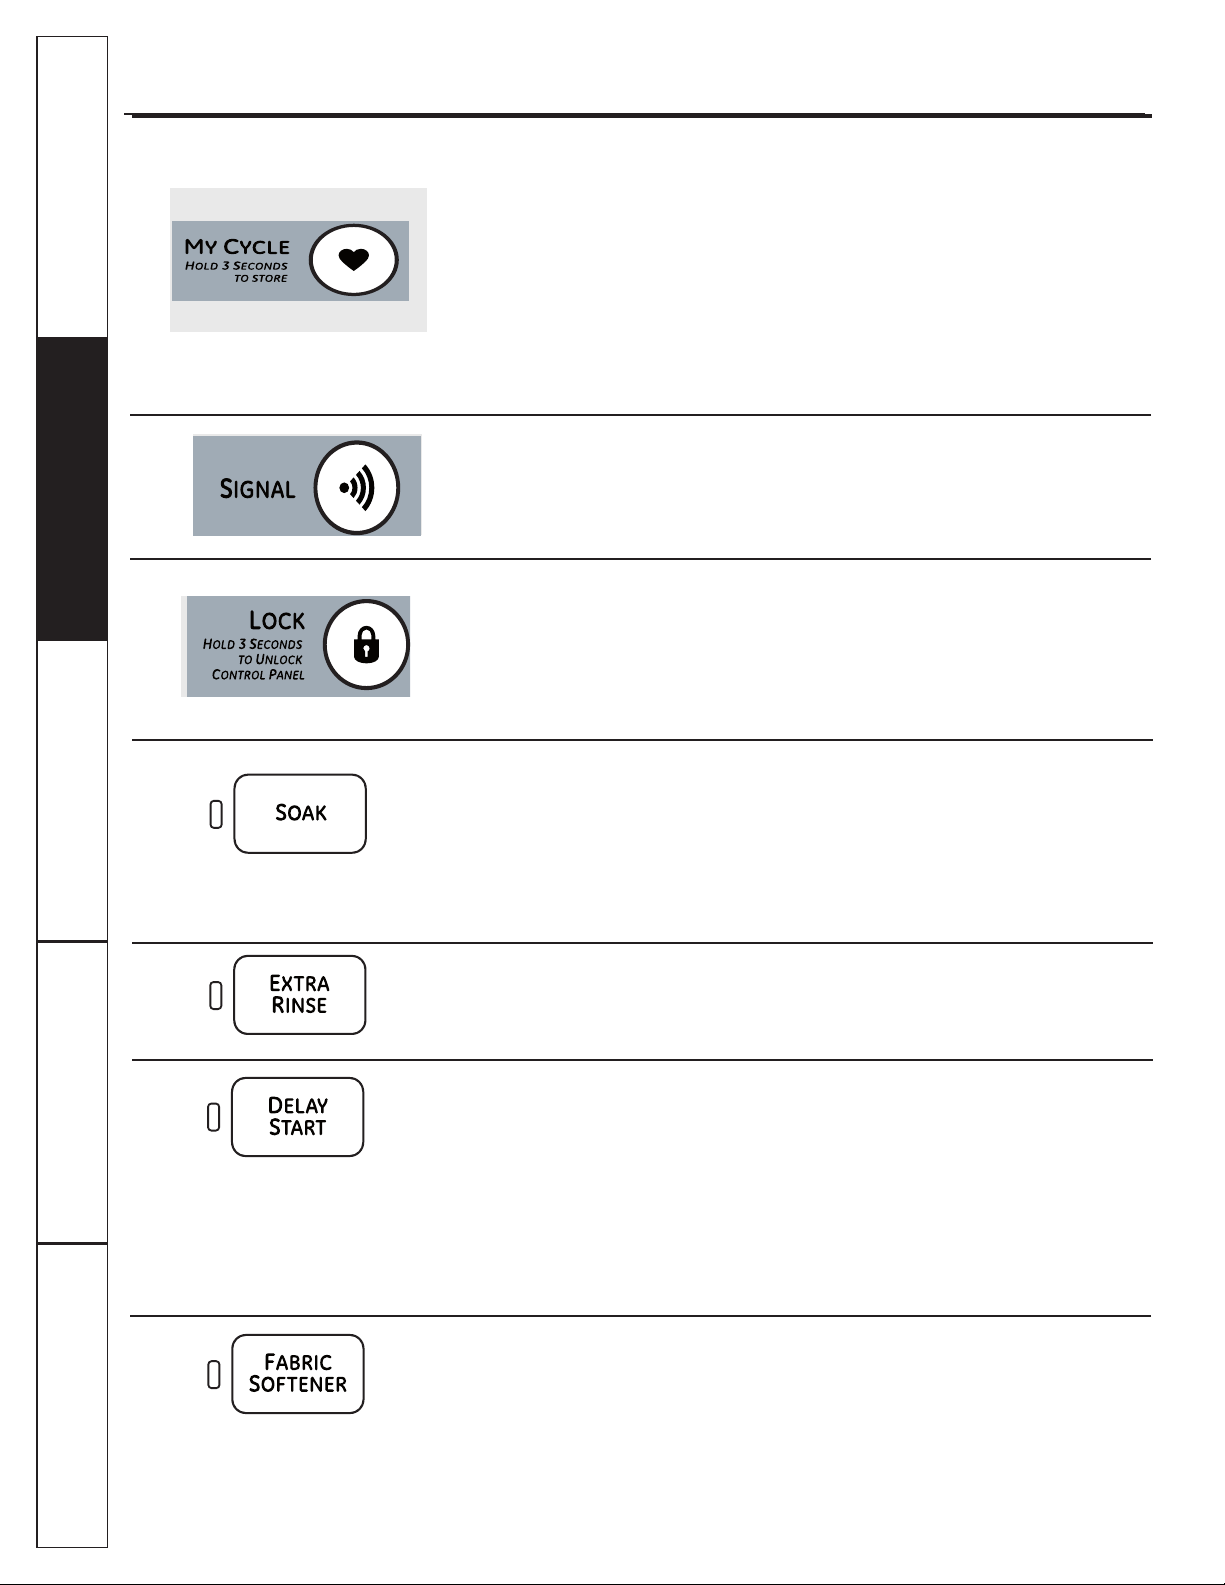
My Cycles
Set up your favorite combination of settings and save them here for one touch recall.
These custom settings can be set while a cycle is in progress.
To store a MY CYCLES combination of settings:
1. Select your washing cycle (except BASKET CLEAN).
2. Change SOIL, SPIN and TEMP settings to fit your needs.
3. Select any washer OPTIONS you want (except SIGNAL).
4. Press and hold the pad for three seconds to store your selection. A beep will sound
and the pad will light up.
To recall your stored MY CYCLES combination:
Press the MY CYCLES button before washing a load.
To change your stored MY CYCLES combination:
Follow steps 1–4 in “To store a MY CYCLES combination of settings”.
Add Garment
The add garment indicator light is illuminated to inform you that the washer is in the proper cycle to add
garments for best performance. If you add garments when the light is off it may cause unsatisfactory
performance.
To add garments when ADD GARMENT light is illuminated:
1. Press START/PAUSE
2. Open lid after unlocked
3. Add garments
4. Close lid
5. Press START/PAUSE to resume wash cycle.
NOTE: If the washer remains idle for 2 hours after pausing the cycle, the water in the tub will drain.
4
5
6
5
GEAppliances.com
Consumer Support
Troubleshooting Tips
Operating InstructionsSafety Instructions
Installation
Instructions
7
8
+' For the washing of machine washable wool products, provided that they are washed
+## according to the instructions on the garment label. When selecting this cycle, you must use
a detergent suitable for washing wool.
(#+ ''(' For towels, sheets, comfortors and pillows
'$+' For lightly soiled items that are needed in a hurry. Cycle time is approximately 35 minutes,
depending on selected options.
&"''$" To quickly rinse out any items at any time.
'( " Use for cleaning the basket of residue and odor. Recommended use of once per month
Wash
Cycles
(cont)
Consumer Support Troubleshooting Tips Operating Instructions Safety Instructions
Installation
Instructions
About the washer features.
NOTE: +':;8+93'?45:(+'<'/2'(2+54'22='9.+835*+29
Signal
Alerts you that the cycle is complete.
The clothes should be removed when the
beeper goes off so wrinkles don’t set in.
Press SIGNAL to select low or high volume,
or to turn the beeper off.
The beeper will continue to sound every
2 minutes (maximum of 4 times).
Soak
Soak is an extra wash before the main wash.
Use it for heavily soiled clothes or for clothes
with a care label that recommends soaking
before washing.
Be sure to add high-efficiency detergent, or
the proper wash additive to the soak
dispenser.
NOTES:
A%.+49+2+):/4-95'1/:/98+)533+4*+*
:5;9+65=*+8*+:+8-+4:/4:.+3'/4='9.
*+:+8-+4:)536'8:3+4:
A#.+3'>/3;395'1:/3+/9.5;89
Extra Rinse
Use an extra rinse when additional rinsing is
desired to remove excess dirt and detergent
from soiled loads.
Delay Start
You can delay the start of a wash cycle
for up to 24 hours. Press the DELAY START
button to choose the number of hours you
want to delay the start of the cycle, then
press the START button. The machine will
count down and start automatically at the
correct time.
NOTE: ,?5;56+4:.+2/*=.+4:.+*+2'?
/9)5;4:/4-*5=4:.+3')./4+=/22+4:+8:.+
6';9+9:':+&5;3;9:)259+:.+2/*'4*68+99
START '-'/4/458*+8:58+9:'8::.+)5;4:*5=4
MY CYCLE
To save a favorite cycle, set the desired
settings for wash cycle, soil level, spin speed
and wash temp settings and hold down the
MY CYCLE button for 3 seconds. A beep will
sound to indicate the cycle has been saved.
To use your custom cycle, press the
MY CYCLE button before washing a load.
To change the saved cycle, set the desired
settings and hold down the MY CYCLE button
for 3 seconds.
NOTE: %.+4;9/4-MY CYCLE='9.56:/549
)'445:(+35*/,/+*',:+8:.+)?)2+.'9(++4
9:'8:+*
NOTE: ,?5;).'4-+='9.56:/549=/:.
MY CYCLE (+,58+9:'8:/4-:.+)?)2+:.+
MY CYCLE 2/-.:=/22:;845,,'4*?5;=/22
(+8+:;84+*:5:.+('9+)?)2+
6
Lock
You can lock the controls to prevent any
selections from being made. Or you can lock
the controls after you have started a cycle.
./2*8+4)'445:'))/*+4:'22?9:'8::.+
='9.+8(?:5;)./4-6'*9=/:.:./956:/54
9+2+):+*
To lock the washer, press the LOCK button. To
unlock the washer, press and hold the LOCK
button for 3 seconds.
When the lock function is enabled, the red
lock icon will appear in the upper display.
Fabric Softener
Select FABRIC SOFTENER button to change
the final rinse type from spray rinse, to deep
rinse. This works best when used with liquid
fabric softener. Fabric softener is displayed
during the final rinse.
NOTES:
A58(+9:6+8,583'4)+=/:.
# #&'"#&! 58WHITES/HEAVY
DUTY 9+2+):,'(8/)95,:+4+858+>:8'8/49+
A,+>:8'8/49+/99+2+):+*/49:+'*5,,'(8/)
95,:+4+8,'(8/)95,:+4+8=/22(+*/962'?+*
*;8/4-:.++>:8'8/49+)?)2+

GEAppliances.com
Consumer Support
Troubleshooting Tips
Operating InstructionsSafety Instructions
Installation
Instructions
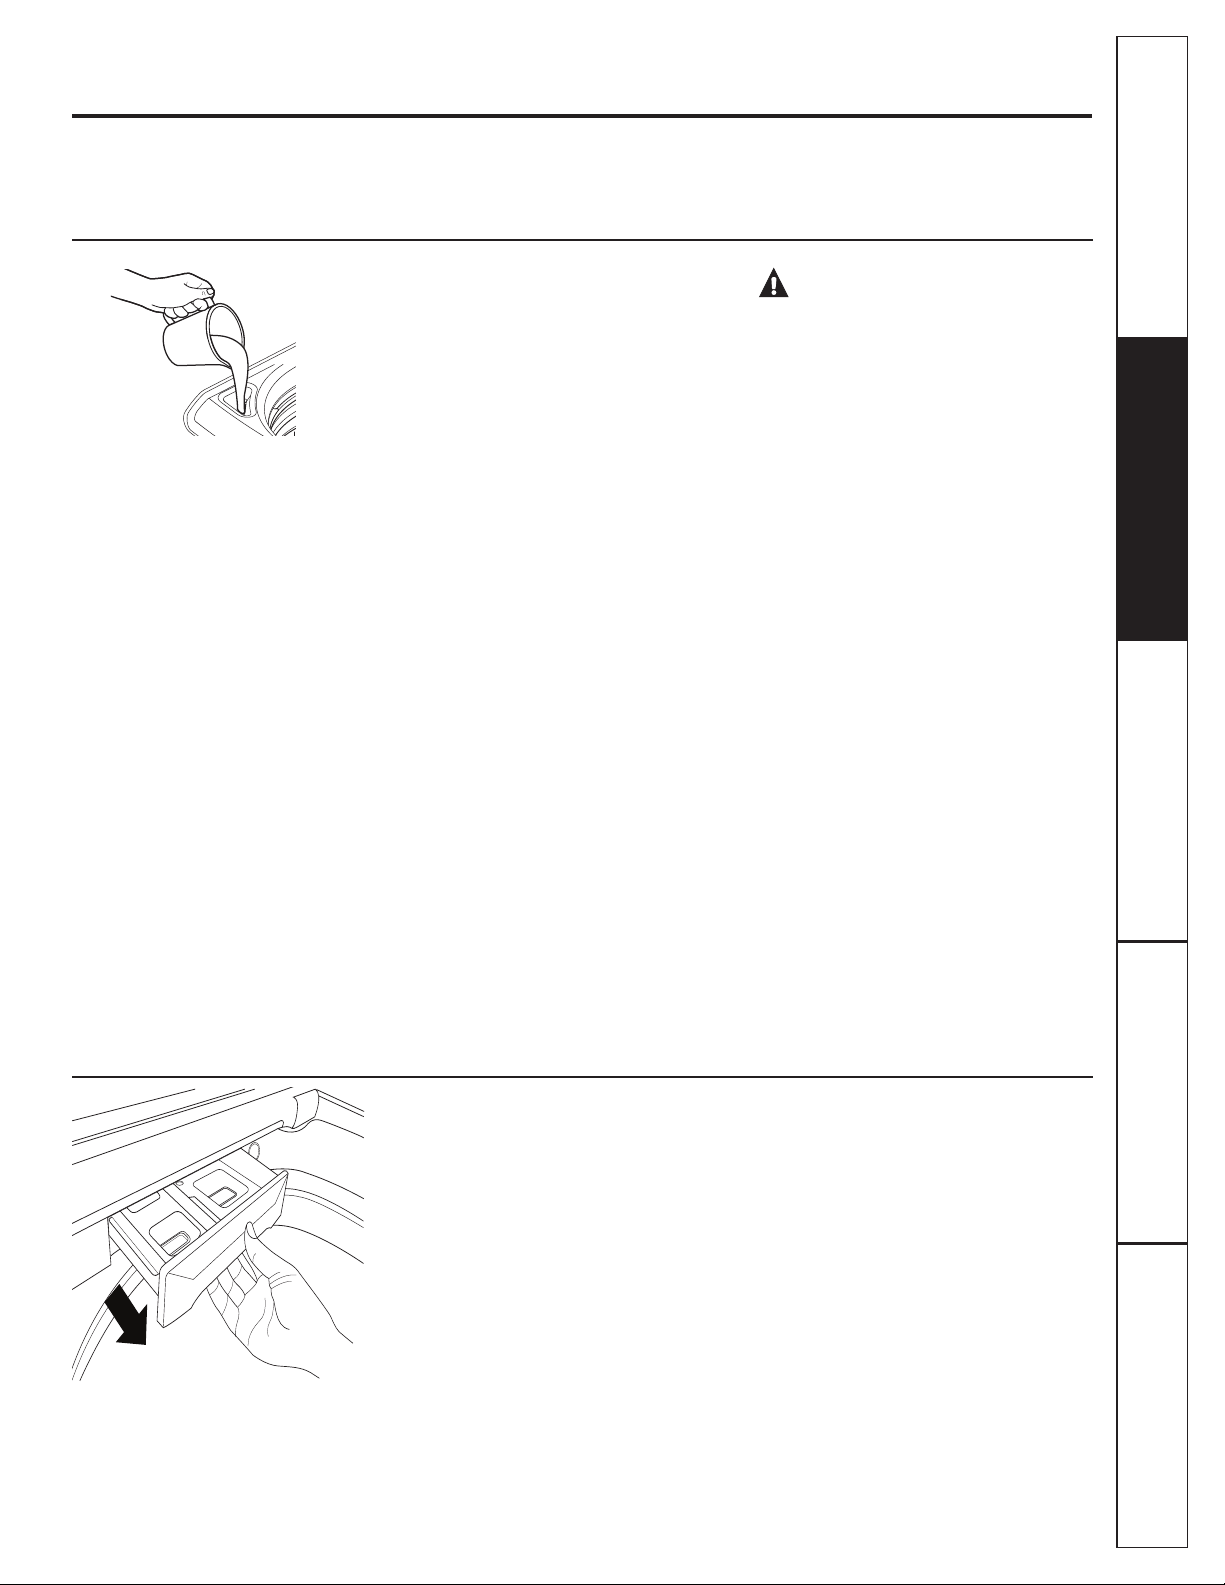
Using the Liquid Bleach
Dispenser
The bleach dispenser automatically
dilutes and dispenses liquid chlorine
bleach at the proper time in the wash
cycle.
Check clothing care labels for special
instructions.
Measure liquid bleach carefully,
following instructions on the bottle.
• Never pour undiluted liquid chlorine
bleach directly onto clothes or into
the wash basket.
• Do not pour powdered bleach into
bleach dispenser. Do not place load
items on top of the bleach dispenser
when loading and unloading the
washer.
• Avoid overfilling or splashing
when adding bleach to the
dispenser. The maximum capacity
of the bleach dispenser is one cup
of bleach per wash cycle. Overfilling
could result in early dispensing of
bleach.
Before starting the washer, pour
measured amount of bleach directly
into bleach dispenser. If you prefer to
use powdered bleach, add it into the
wash basket directly before adding
clothes.
WARNING!
Do not mix
chlorine bleach with ammonia or acids
such as vinegar and/or rust remover.
Mixing can produce a toxic gas which
may cause death.
The manufacturer’s recommended
amount of undiluted bleach goes into the
bleach dispenser. During the final
“Infusor” wash action, the bleach is added
to the wash load. This ensures
performance won’t be diminished. Two
sequential flushes through the bleach
dispenser completely remove the bleach
from the dispenser. Any residual liquid left
in the dispenser at the end of the cycle is
water, not bleach. To prevent self-
siphoning of the bleach into the wash
basket and damage to your clothes,
never add more than the maximum fill
level marked on the dispenser.
Also keep clothes away from the bleach
dispenser so they don’t absorb any
bleach droplets left around the bleach
dispenser.
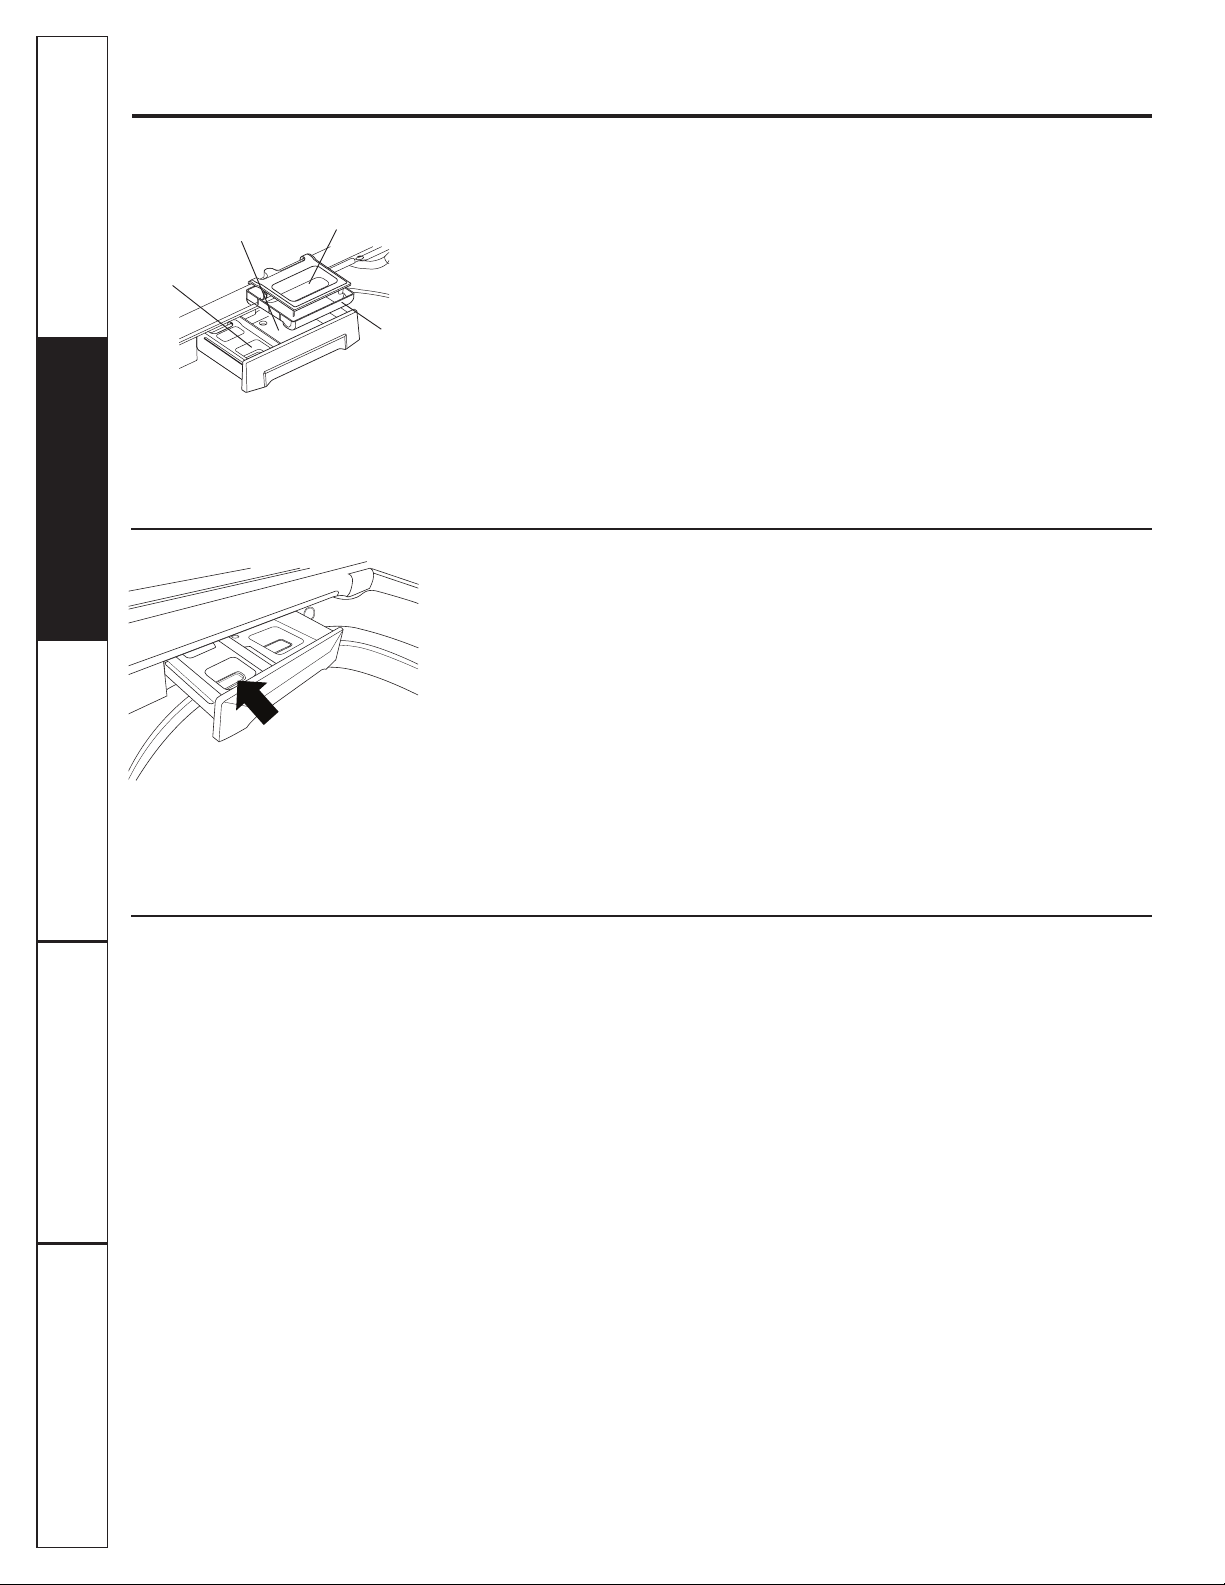
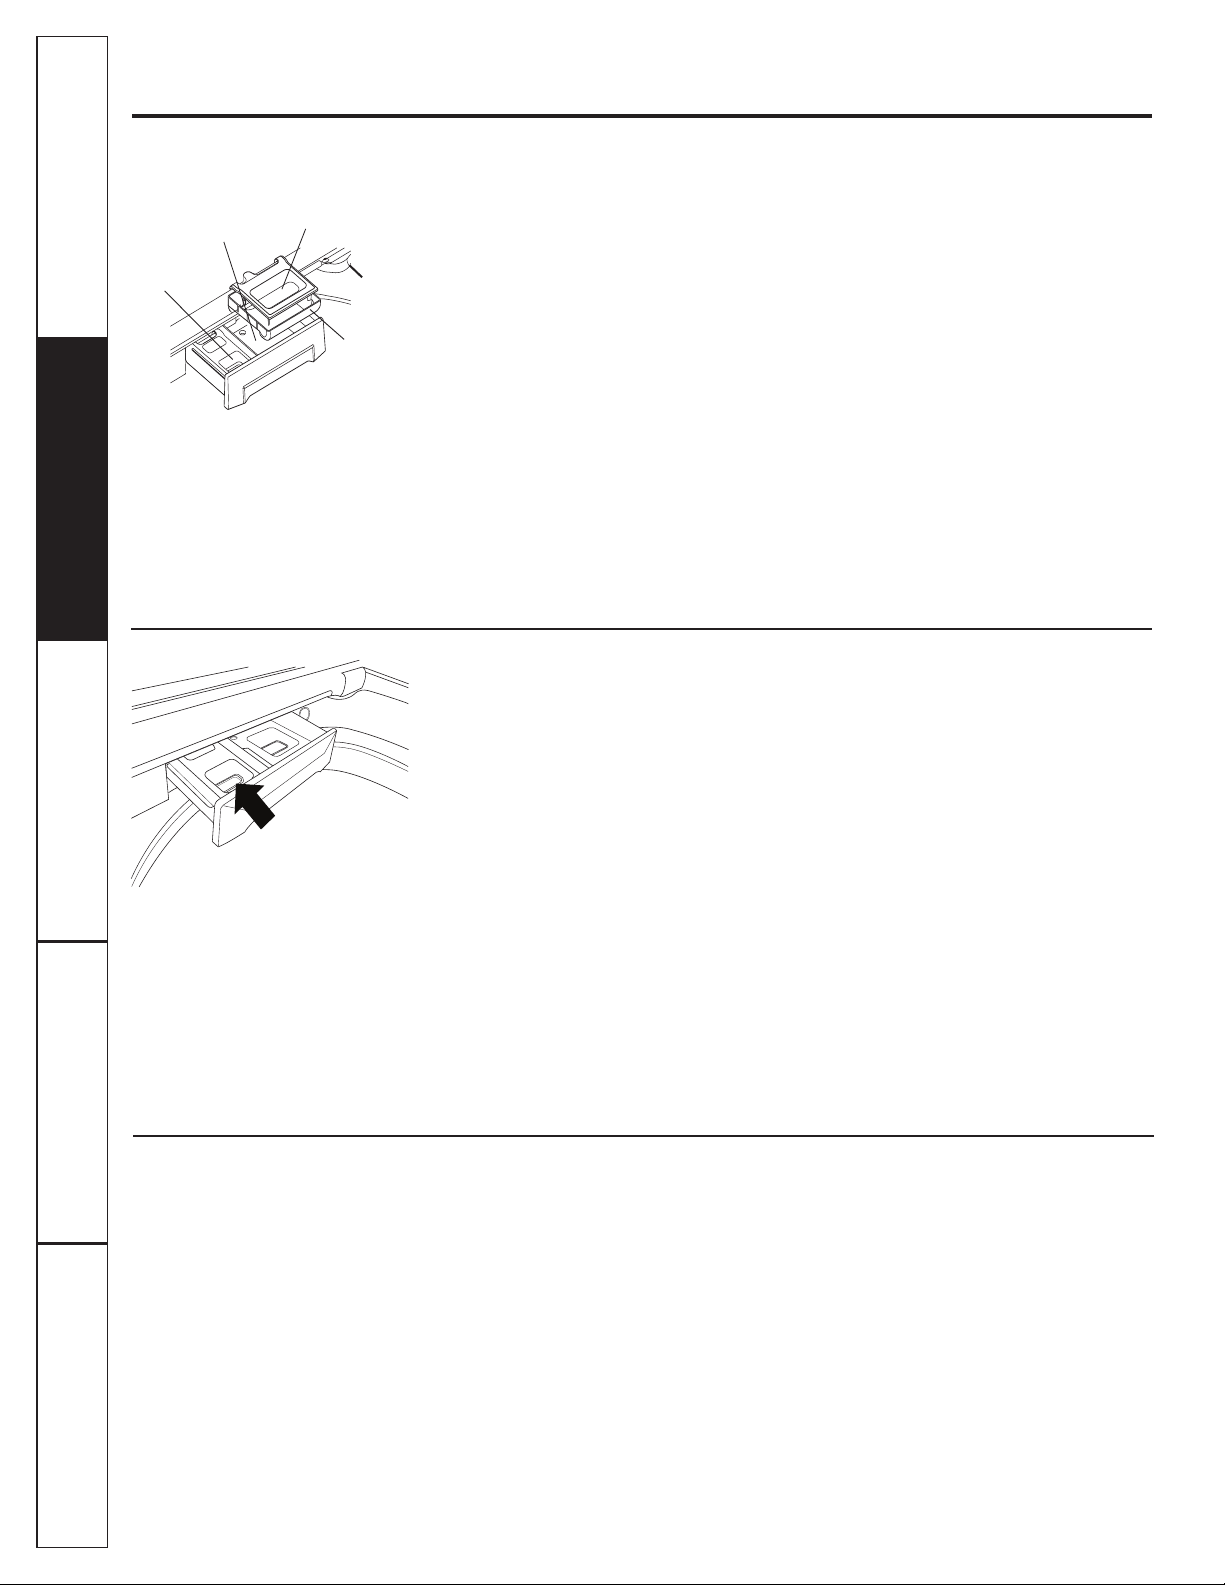
Using the Dispenser Drawer
The dispenser drawer contains
2 compartments:
G Liquid Fabric Softener
• Liquid or Powder Low-Sudsing,
High-Efficiency Detergent
The dispenser automatically dispenses
additives at the proper time in the wash
cycle.
Slowly open the dispenser drawer by
pulling out the drawer until it stops.
After adding laundry products, slowly
close the dispenser drawer. Closing the
drawer too quickly could result in early
dispensing of additives.
• Avoid overfilling or splashing when
adding laundry products to the
dispenser. Doing so could result in
early dispensing of laundry products.
At the end of the cycle, you may see
water in the compartments. This is part
of the normal operation of the washer.
NOTE: Do not use bleach in the dispenser
drawer.
7
TIDAL WAVE Wash System
Your washer has an innovative washing
system which uses rapid spinning
motion and an angled spray to pull
water through faberic. The TIDAL WAVE
Wash system provides a gentler and
more thorough cleaning.
TIDAL WAVE Wash is avaiable only
during COLORS/NORMAL and
WHITES/HEAVY DUTY cycles.
Consumer Support Troubleshooting Tips Operating Instructions Safety Instructions
Installation
Instructions
About the washer features.
NOTE: +':;8+93'?45:(+'<'/2'(2+54'22='9.+835*+29
8
Adding Detergent
NOTE: Use only low-sudsing,
high-efficiency detergent such as
Tide
®
HE.
Add measured detergent to the detergent
compartment of the dispenser drawer.
• Do not exceed the maximum fill line.
Detergent is flushed through the
dispenser at the beginning of the wash
phase. Either powdered or liquid
detergent can be used.
When using liquid detergent, make sure
the detergent box and insert are in place.
For powdered detergent, remove both
the detergent box and insert. Powdered
detergent will not dispense with the
detergent box and insert in place.
Detergent usage may need to be
adjusted for water temperature, water
hardness, size and soil level of the load.
Avoid using too much detergent in your
washer, as it can lead to oversudsing and
detergent residue being left on the
clothes.
Adding Fabric Softener
If desired, pour the recommended
amount of liquid fabric softener into the
left-hand compartment. Use only liquid
fabric softener.
Dilute with water to the maximum fill line.
• Do not exceed the maximum fill line.
Overfilling can cause early dispensing
of the fabric softener, which could stain
clothes.
NOTE: Do not pour fabric softener directly
on the wash load. It may stain the clothes.
Main Wash
Liquid Detergent
Compartment
Insert
Main Wash
Powder Detergent
Compartment
Liquid Fabric
Softener
Compartment
Always follow fabric manufacturer’s care label when laundering.
Bleach
symbols
Any bleach
(when needed)
Only non-chlorine bleach
(when needed)
Do not bleach
Bleach Labels
Category Target Temperature
Cold 65°F
Warm 95°F
Hot 120°F
Sanitize 140°F
NOTE: Use HE (high-efficiency) labeled
detergent. HE detergents are available that
provide good cleaning performance in hot,
warm or cold water temperatures.
Loading and Using the Washer. GEAppliances.com
Consumer Support
Troubleshooting Tips
Operating InstructionsSafety Instructions
Installation
Instructions
9
Sorting Wash Loads
Sort by color (whites, lights, colors), soil
level, fabric type (sturdy cottons, easy
care, delicates) and whether the fabric
produces lint (terry cloth, chenille) or
collects lint (velveteen, corduroy).
Loading the Washer
Load dry items evenly and loosely,
around the outside of the basket.
Overloading may negativley impact the
wash performance and can result in
leakage.
Bulky items should be placed as far down
in the wash basket as possible for optimal
results.
Always place buoyant items at the
bottom of the wash basket.
The washer will automatically detect the
load size. Because of the high-efficiency
wash system, the water level may not
completely cover the load.
• Do not wash fabrics containing
flammable materials (waxes,
cleaning fluids, etc.)
• The washer will not fill or operate
with the lid open.
• Do not load items over the tub.
Fabric Care Labels
Below are fabric care label “symbols” that
affect the clothing you will be laundering.
Washer Temperature Ranges

Consumer Support Troubleshooting Tips Operating Instructions Safety Instructions
Installation
Instructions
10
Proper Use of Detergent
Using too much detergent is a common
cause of laundry problems. Today’s
detergents are formulated to be effective
without highly visible sudsing. Be sure to
carefully read and follow manufacturer’s
recommendations for how much
detergent to use in your wash. You can
use less detergent if you have soft water,
a smaller load or a lightly soiled load.
NOTE: Use only low-sudsing, high-
efficiency detergent such as Tide
®
HE.
Care and Cleaning
of the Washer
Lid: Wash with a damp cloth on the
outside and inside and dry with a soft
cloth.
Wash Basket: Leave the lid open after
washing to allow moisture to evaporate. If
you want to clean the basket, use a clean
soft cloth dampened with liquid detergent;
then rinse. (Do not use harsh or gritty
cleaners.)
Fill Hoses: Hoses connecting washer to
faucet should be replaced every 5 years.
Exterior: Immediately wipe off any spills.
Wipe with damp cloth. Do not touch the
surface or the display with sharp objects.
Moving and Storage: Ask the service
technician to remove water from drain
pump and hoses. For more information,
visit GEAppliances.com or call
800.GE.CARES (800.432.2737). Do not
store the washer where it will be exposed
to the weather.
Long Vacations: Be sure water supply is
shut off at faucets. Drain all water from
hoses if weather will be below freezing.
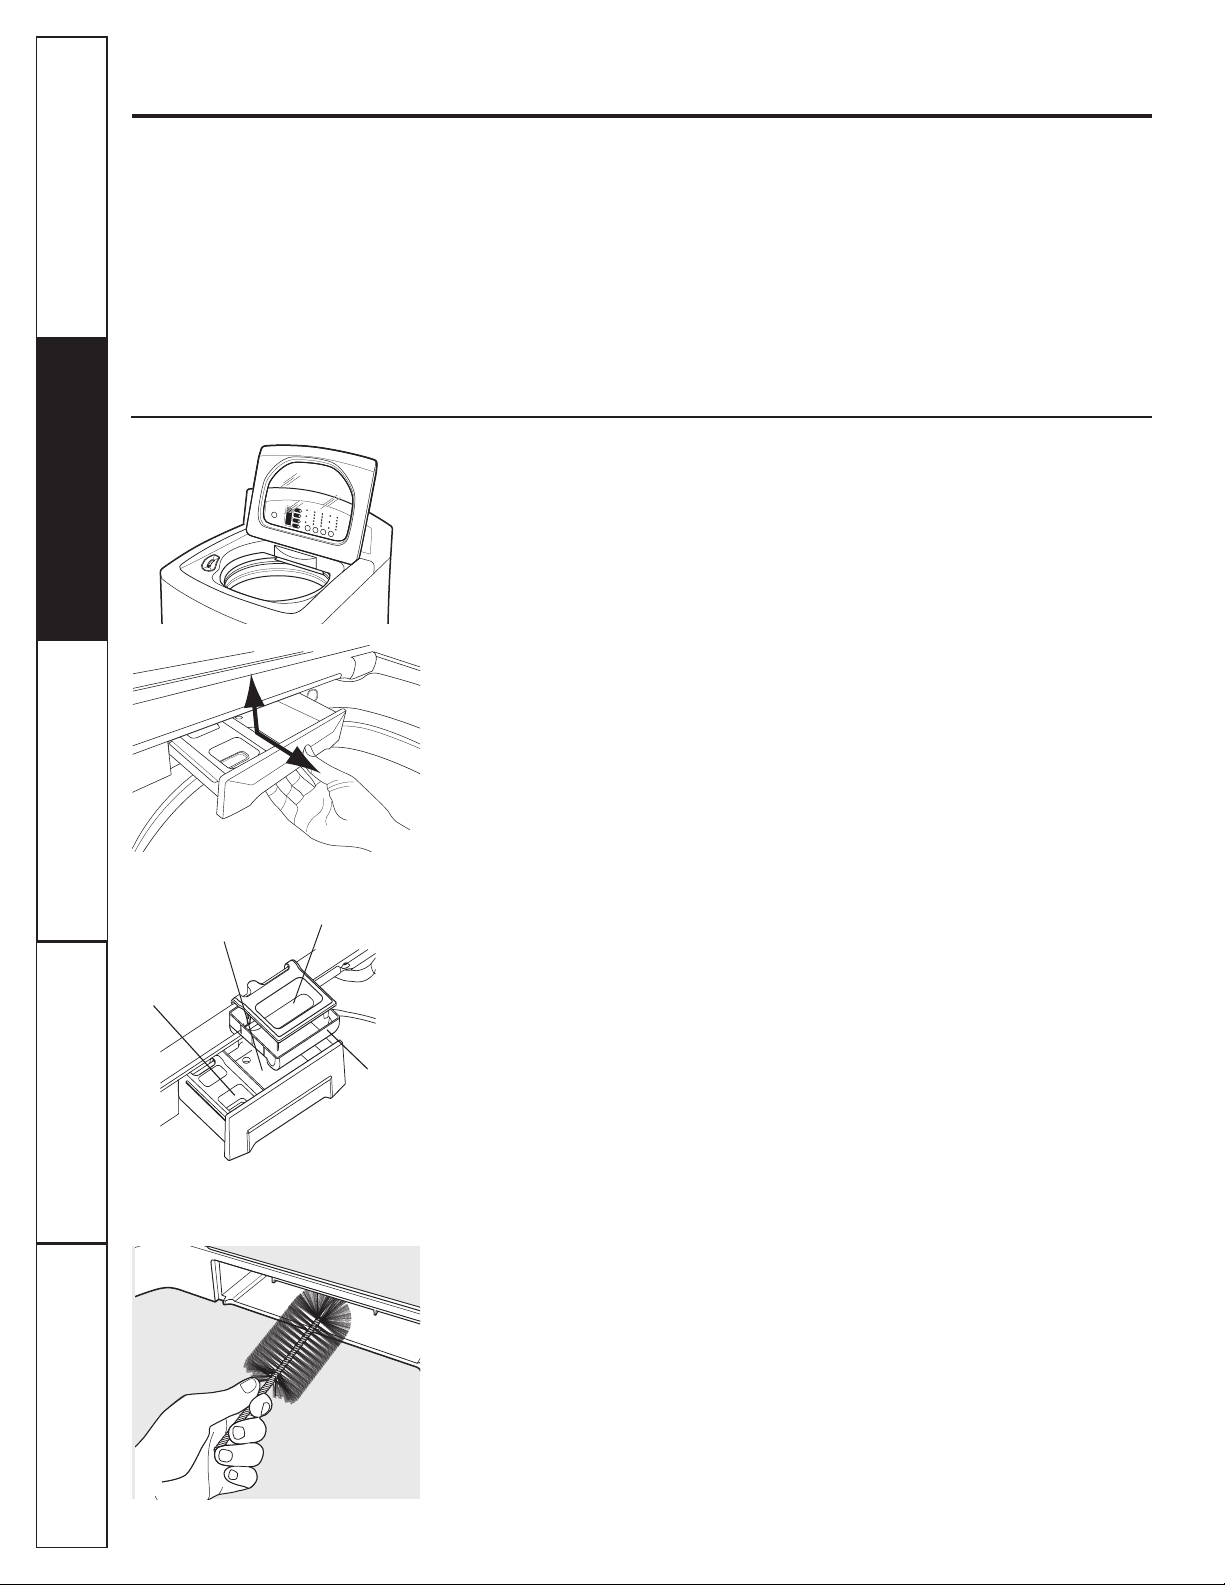
Dispenser Drawer: Detergent and fabric
softener may build up in the dispenser
drawer. Residue should be removed
once or twice a month.
Remove the drawer by pulling it
straight out until it stops. Lift up
on the front of the drawer and
pull it out.
Remove the inserts from the
3 compartments; rinse the inserts
and the drawer with warm water
to remove traces of accumulated
laundry products.
To clean the drawer opening, use a
small, non-metal brush to clean the
recess. Remove all residue from the
upper and lower parts of the recess.
Return the inserts to the proper
compartments and replace the drawer.
Loading and Using the Washer.
Main Wash
Liquid Detergent
Compartment
Insert
Main Wash
Powder Detergent
Compartment
Liquid Fabric
Softener
Compartment
#&,#)"
&2.1@52?26:?@>A0@6;:?0;9<82@28E.:10.>23A88E
G
!$#&("( HSave these instructions for
local electrical inspector’s use.
G
!$#&("( HObserve all governing
codes and ordinances.
instructions with the Consumer.
G ";@2@;;:?A92>HKeep these instructions for
future reference.
G '768882B28
– Installation of this appliance requires
basic mechanical skills.
G Proper installation is the responsibility of the
installer.
G Product failure due to improper installation is not
covered under the Warranty
.
:[email protected].@6;: +.?52>
:?@>A0@6;:?
%A2?@6;:?.88&';>B6?6@;A>+2/?6@2.@<<86.:02?0;9
:.:.1.0.88;>B6?6@42.<<86.:02?0.
$ )!"&%)&!"('
#&,#)&'(,
(& &%)&!"('
)(#" HFor personal safety, do
not use an extension cord or adapter plug with
this appliance. Do not, under any circumstances,
cut or remove the third grounding prong from the
power cord. Follow national electrical codes and
ordinances. This appliance must be supplied with
the voltage and frequency indicated on the rating
plate (located on the rear cover of the backsplash),
and connected to an individual, properly grounded
branch circuit, protected by a 15- or 20-amp circuit
breaker or time-delay fuse. If the electric supply
provided does not meet the above requirements,
call a licensed electrician.
+(&$&'')&HMust be 10 psi minimum to
120 psi maximum.
+(&(!$&()&HHousehold water heater
should be set to deliver water at 120° to 150°F
(50° to 66°C) TO THE WASHER.
')(#* *'HBoth hot and cold shutoff
valves (faucets) should be supplied.
&"HWater may be drained into standpipe
or set tub. Discharge height !)'("#( ''
(""' and no more than 8 feet above
the base of the washer. Standpipe must be 1
1
⁄2
inches minimum inside diameter and must be
open to atmosphere.
&#)"""'(&)(#"'
This appliance must be grounded. In the event of
malfunction or breakdown, grounding will reduce
the risk of electric shock by providing a path of
least resistance for electric current. This appliance
is equipped with a cord having an equipment-
grounding conductor and a grounding plug.
The plug must be plugged into an appropriate
outlet that is properly installed and grounded in
accordance with all local codes and ordinances.
+&"" HImproper connection
of the equipment-grounding conductor can result
in a risk of electric shock. Check with a qualified
electrician or serviceman if you are in doubt as to
whether the appliance is properly grounded. Do not
modify the plug provided with the appliance—if it
will not fit the outlet, have a proper outlet installed
by a qualified electrician.
:[email protected].@6;::?@>A0@6;:?
+'& #(#"
The washer must be installed on firm flooring to
minimize vibration during the spin cycle.
Concrete flooring is best, but a wood floor is
sufficient, provided floor support meets FHA
standards. The washer should not be installed
on rugs or exposed to weather.
Minimum clearance between washer and adjacent
walls or other surfaces:
G 1” either side
G 2” front
G 4” rear
Minimum vertical space from floor to overhead
shelves, cabinets, ceilings, etc., is 58”.
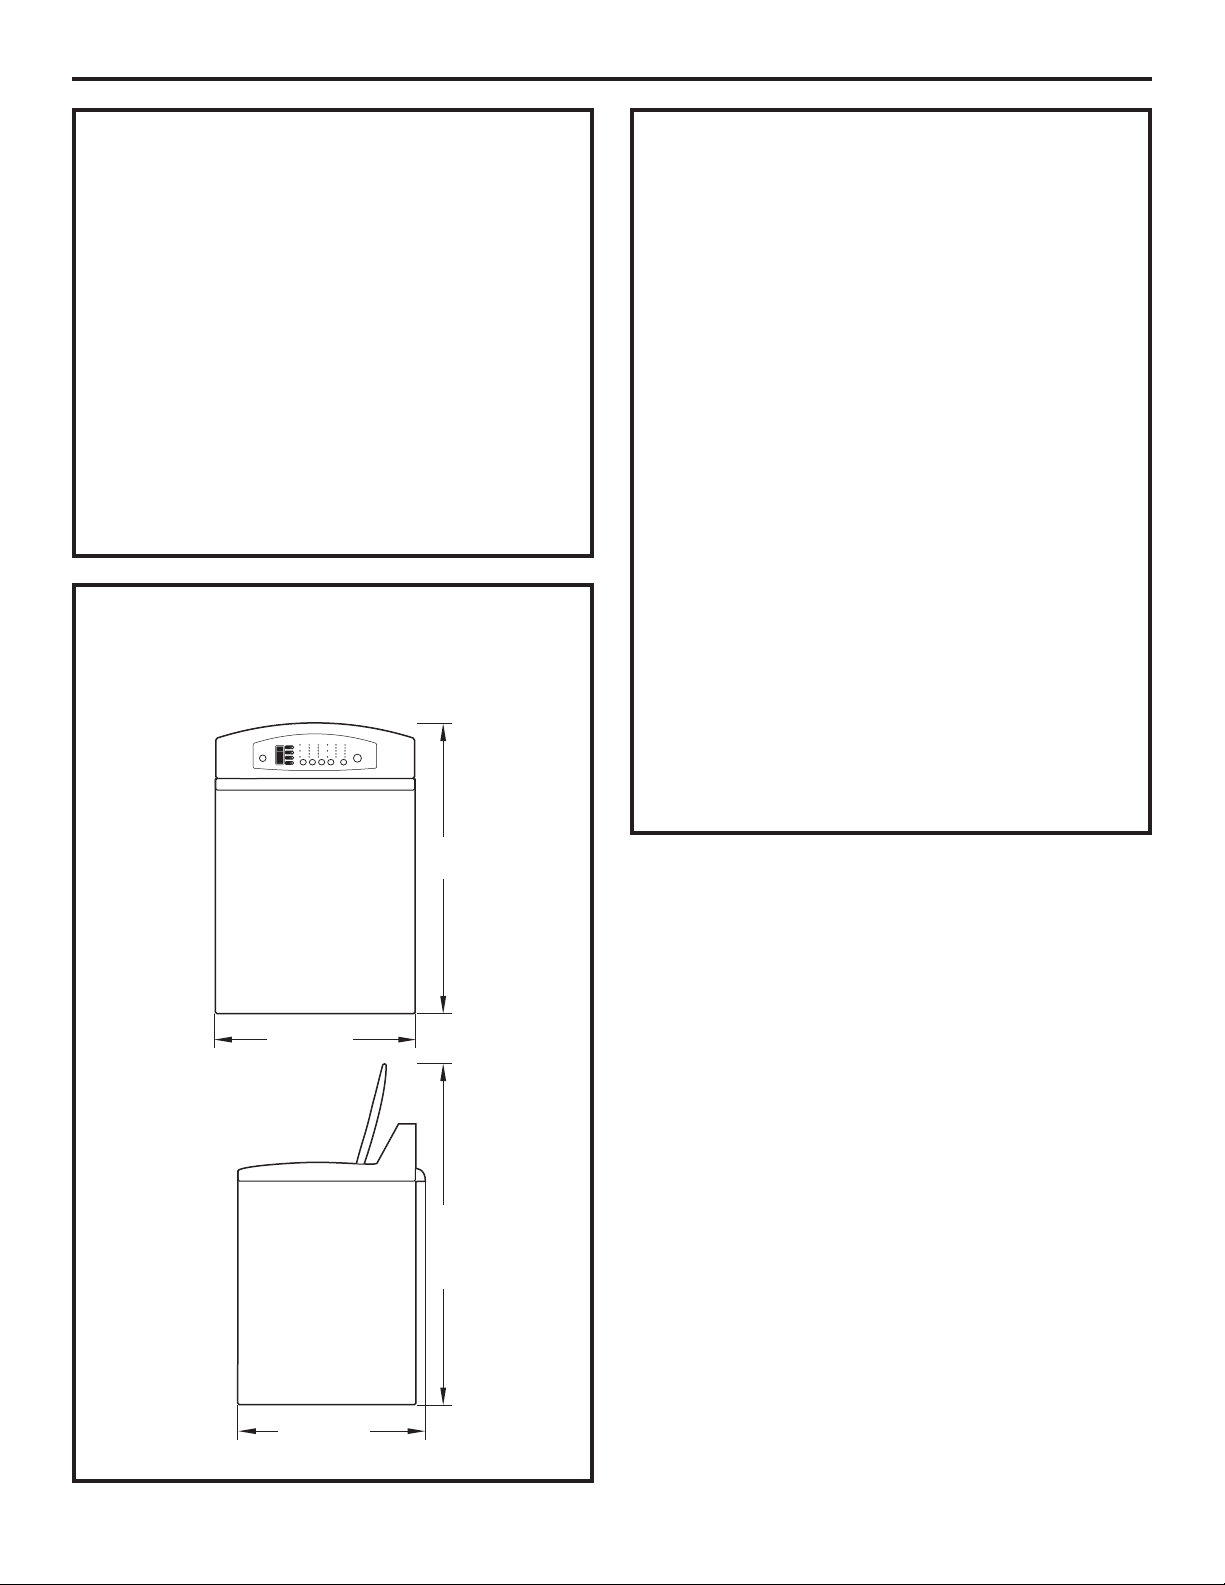
+'&!"'#"'
27”
(68.6 cm)
45
1
⁄8”
(114.6 cm)
57
1
⁄8”
(145.1 cm)
(with lid
open
)
28
7
⁄8”
(73.3 cm)
Side View
Front View
&%)&!"('#& #*#&
#'("'( (#"
Your washer is approved for installation in an
alcove or closet, as stated on a label on the back
of the machine.
Minimum clearance between washer and adjacent
walls or other surfaces:
G 1” either side
G 2” front
G 4” rear
Minimum vertical space from floor to overhead
shelves, cabinets, ceilings, etc., is 58”.
Closet doors must be louvered or otherwise
ventilated and have at least 60 square inches of
open area for washer only, or if the closet contains
both a washer and a dryer, door must contain at
least 120 square inches of open area equally
distributed. Air openings are required to be
unobstructed when a door is installed. A louvered
door with equivalent air openings for the full length
of the door is acceptable.
"#(The clearances stated on this label
are minimums. Consideration must be given to
providing adequate clearances for installing and
servicing.
qAdjustable Pliers
qCarpenter’s Level
:[email protected].@6;::?@>A0@6;:?
$&('" )
qWater Hoses (2)
qCable Tie
(## ',#)+ "
)"$(+'&
)"$(+'&#"(
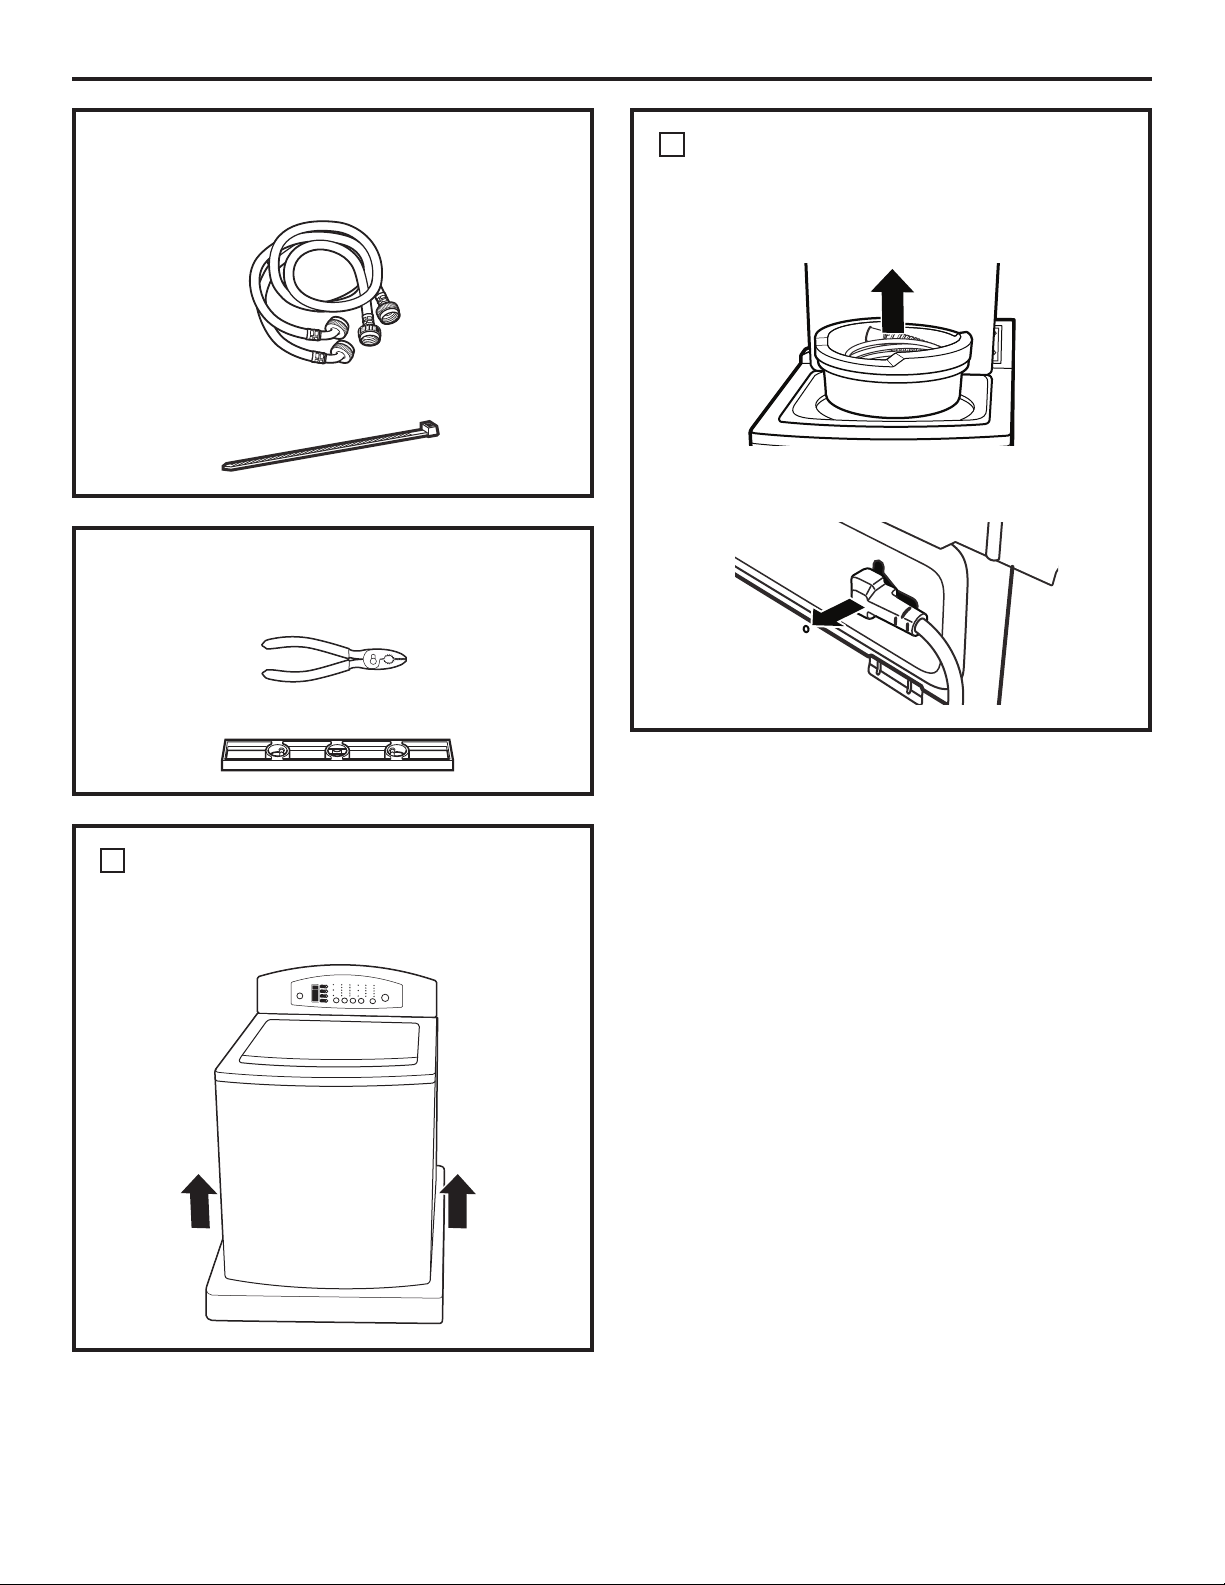
Remove the Styrofoam block containing the
Owner’s Manual, parts, water hoses and laundry
product samples.
Remove the power cord from the back of the
washer.
After the washer is in the home, remove the carton
and Styrofoam shipping base from the washer.
:[email protected].@6;::?@>A0@6;:?
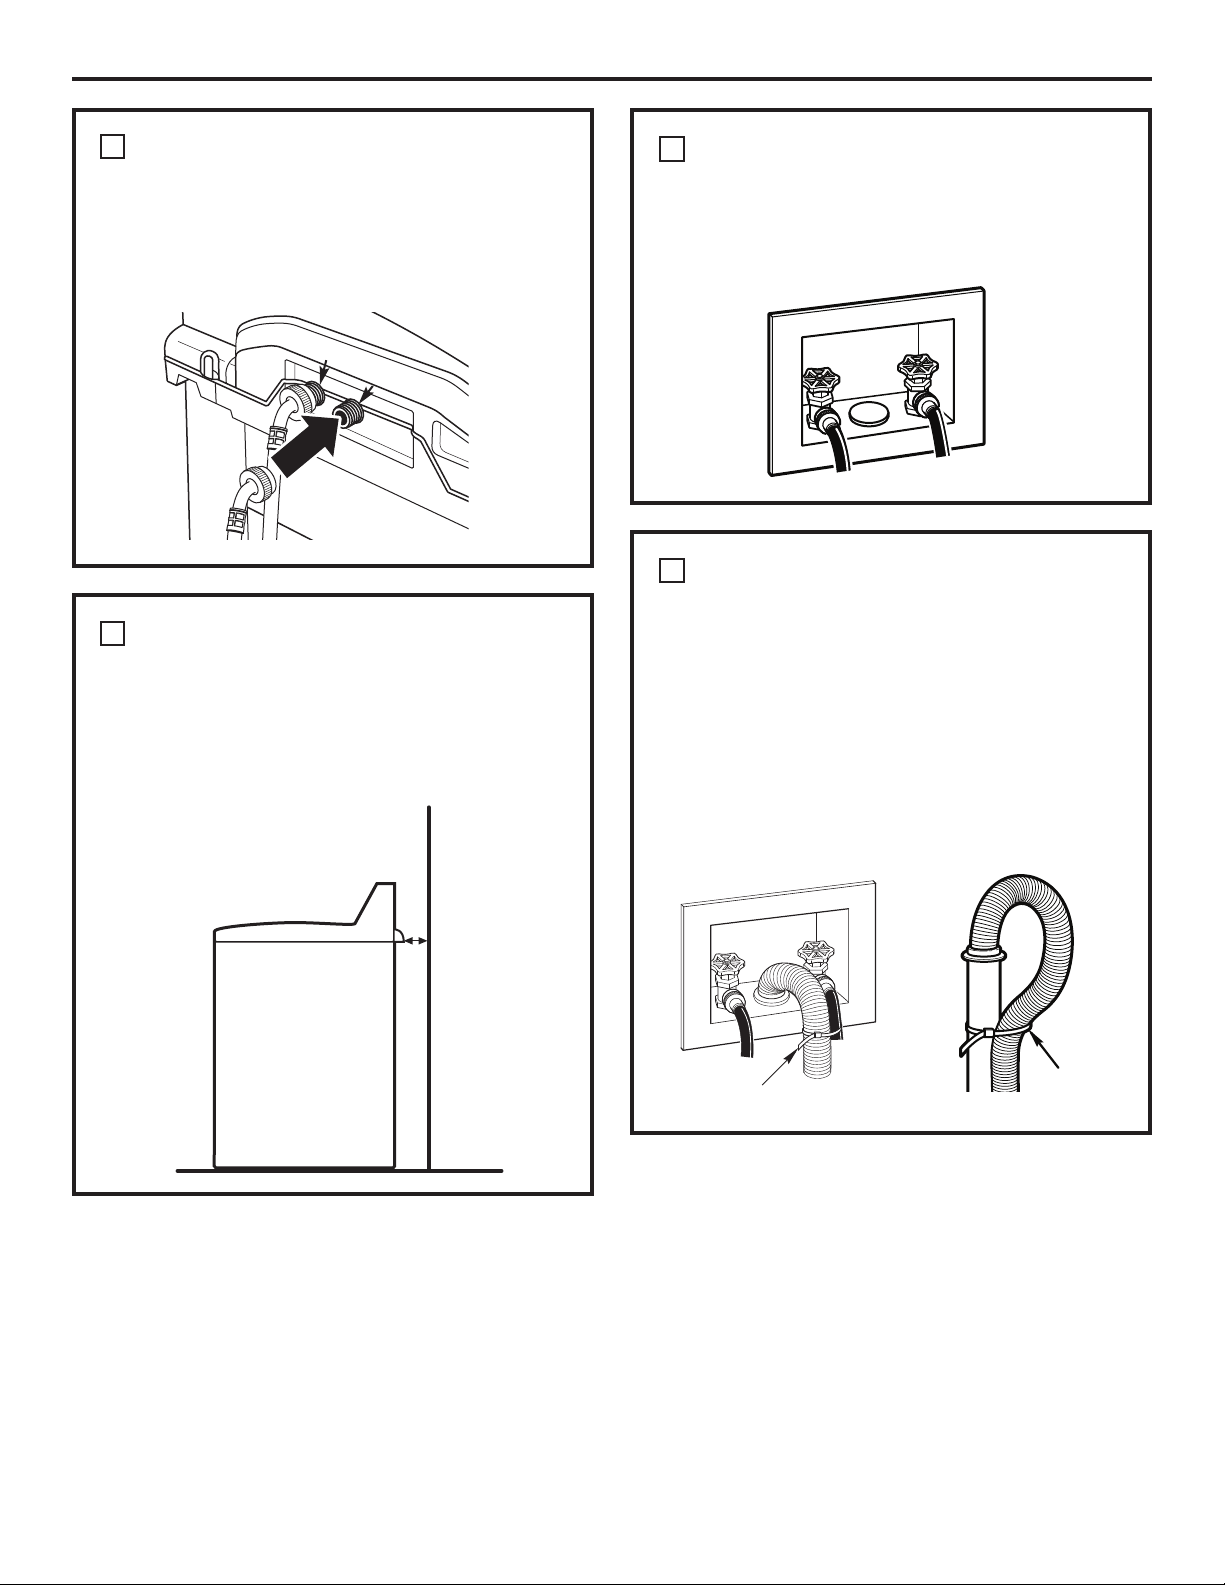
((+(&#''(#+'&
Thread the hot water hose onto the washer hot
water connection (ORANGE) and the cold water
hose onto the cold water connection (BLUE).
Hand tighten; then make an additional 1/8
turn with pliers.
Hot
Cold
!#*+'& #'
(##)')( ('
Move the washer as close to the final location as
possible, leaving enough room to make water, drain
and electrical connections to the home.
The minimum required rear clearance is 4)”.
#""(+(&#''
(##)')( ('
Connect the water hoses to the HOT and COLD
water valves of your home. Hand tighten, plus
make an additional 1/4 turn with pliers.
((&"#'
(##)'&"
Firmly insert the free end of the drain hose
into the drain opening of your home. Make sure
the soft rubber end is completely inside the drain
opening.
G If the water valves and drain are built into the
wall, fasten the drain hose to one of the water
hoses with the cable tie (ribbed side on inside).
G If your drain is a standpipe, fasten the drain hose
to the standpipe with the cable tie provided.
Cable Tie
Cable Tie
4”
:[email protected].@6;::?@>A0@6;:?
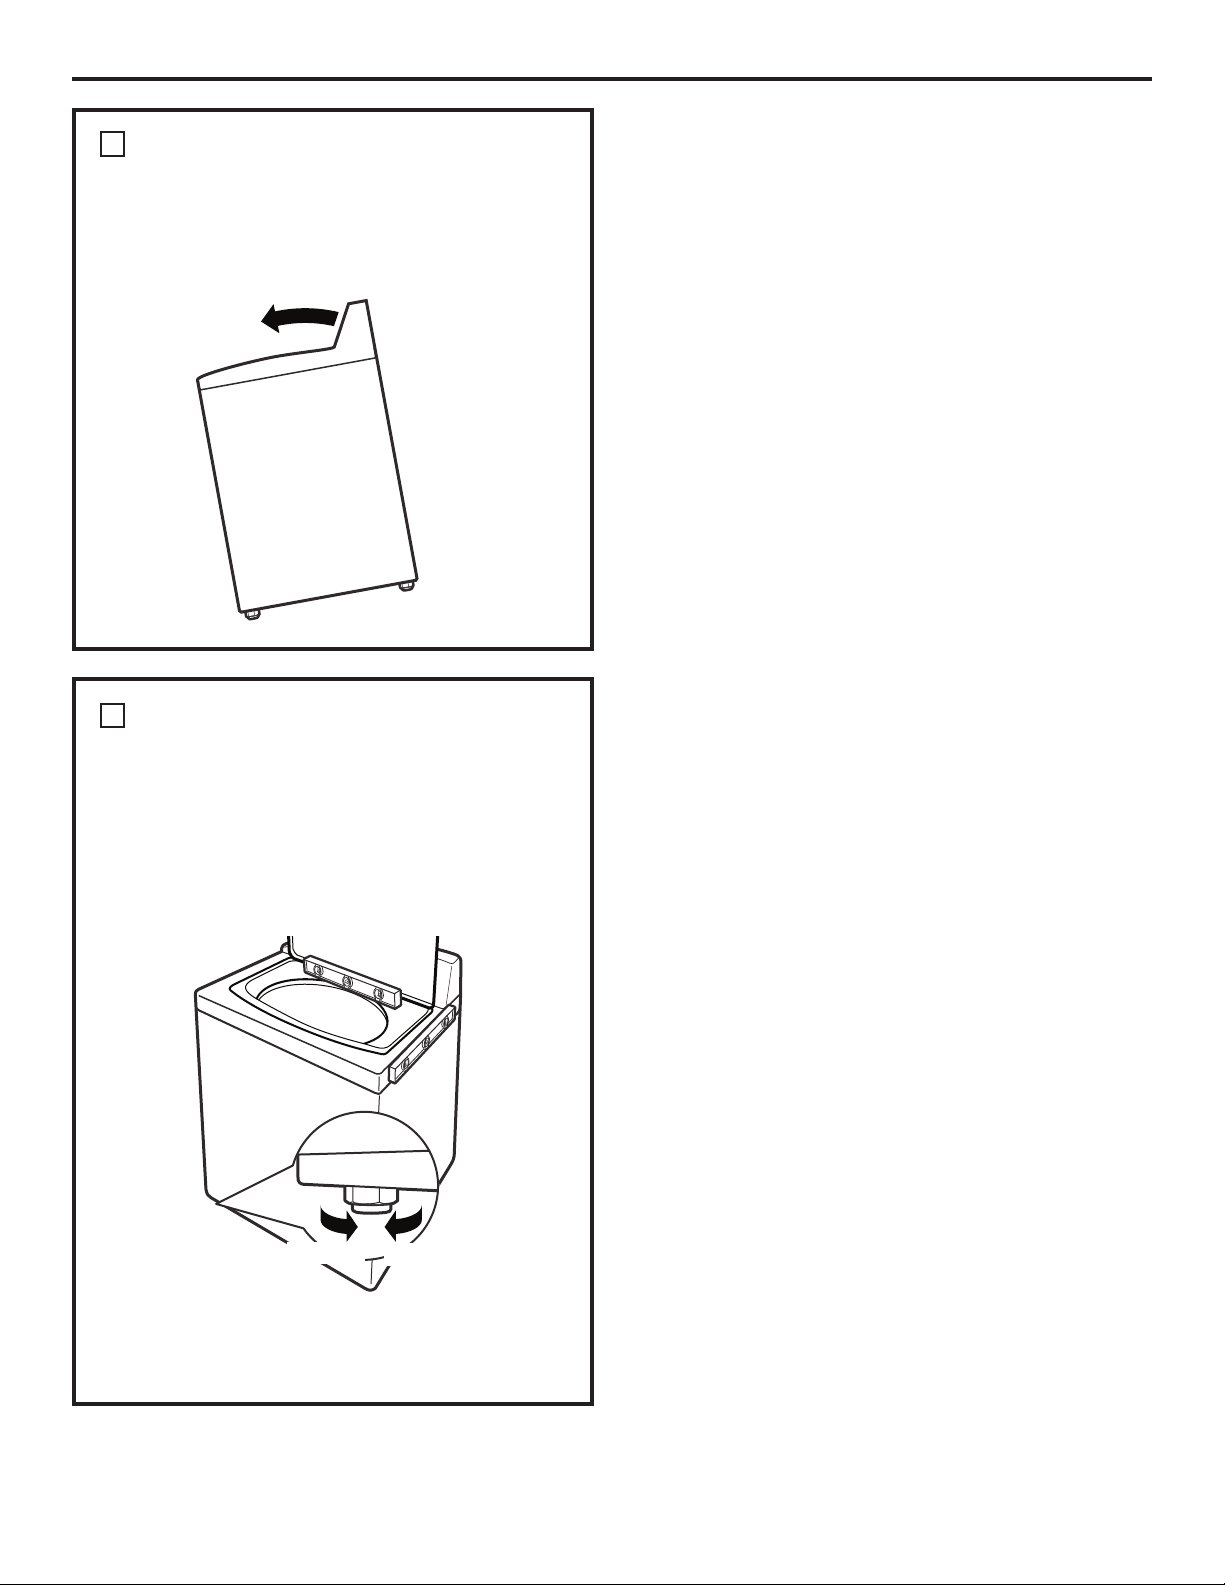
* (+'&
Move the washer into final position.
G To check if the washer is level side to side,
open the lid and place a level at the back of
the opening above the dispenser drawer.
G To check if the washer is level front to back,
place a level at the side of the washer on the
edge where the cabinet side meets the top cover.
If the washer is not level, adjust the front leveling
legs. Turn clockwise to raise, counterclockwise to
lower.
'(&& '
Tilt the washer forward (pivot on front legs)
about 4 to 6 inches and gently lower the rear legs
back onto the floor. This action will set rear leg
adjustments to correspond to front settings.
Lower
Raise

$ )"+'&
:[email protected].@6;::?@>A0@6;:?
+'&'(&()$
Press the $#+& button.
"#(If the washer has been exposed to
temperatures below freezing for an extended
period of time, allow it to warm up before pressing
$#+&. Otherwise, the display will not come on.
The washer is now ready for use.
'&*"
+&"" H ./28.88C6>2?<>6;>
@;16?0;::20@6;:C52:?2>B606:40;:@>;8?
+6>6:42>>;>?0.:0.A?269<>;<2>.:1
1.:42>;A?;<2>.@6;:.3@2>
?2>B606:46:[email protected].@6;:
For replacement parts and other information,
refer to the Owner’s Manual for servicing phone
numbers.

Before you call for service… GEAppliances.com
#85;(2+9.55:/4-#/69
"'<+:/3+'4*354+?!+</+=:.+).'8:954:.+
,5225=/4-6'-+9,/89:'4*?5;3'?45:4++*:5)'22,58
9+8</)+
17
Consumer Support
Troubleshooting Tips
Operating InstructionsSafety Instructions
Installation
Instructions
Problem Possible Cause What To Do
Washer won’t ;:@>;8<.:286?.?822< G This is normal. Press POWER.
operate
+.?52>6?A:<8A4421 G Make sure cord is plugged securely into a working
outlet.
+.@2>?A<<8E6?@A>:21;33 G Turn both hot and cold faucets fully on.
;:@>;8?.>2:;@?2@<>;<2>8E G Make sure the cycle was set correctly, close the lid and
press START
616?;<2:I?.32@E32.@A>2 G Close lid and reset cycle, to the beginning if necessary.
$>2B2:@?@52C.?52>3>;936886:4
.:1;<2>.@6:4C52:8616?A<
6>0A6@/>2.72>3A?26? G Check house circuit breakers/fuses. Replace fuses or
@>6<<21/8;C: reset breaker. Washer should have separate outlet.
820@>;:60?:221@;/2>2?2@ G Unplug washer, wait 2 minutes, plug back in and
press POWER.
START C.?:;@<>2??21.3@2>. G Press START.
0E082C.??2@
D@>2928E8;CC.@2><>2??A>2 G Press START again.
+.?52>6?@;;0;81 G If the washer has been exposed to temperatures
below freezing for an extended period of time, allow
it to warm up before pressing POWER. Otherwise,
the display will not come on.
Water not filling 68@2>08;4421;>36885;?2?9.E G Make sure that the water valve filters (blue and
properly /276:721 orange screen must be free of solids) on the unit
are not clogged. Turn off water and check filter by
disconnecting hose at machine. Check that fill hoses
are not kinked or clogged.
:2>4E2336062:0E G This is an energy-efficient washer. As a result, the
temperature settings for this washer may be different
than non-energy-efficient washers.
:?A336062:@C.@2>?A<<8E G Make sure that the water supply is turned on.
Make sure that the water faucets are turned to their
completely open positions.
(52C.?52>8616?;<2: G The washer lid must be closed for all washer cycle
operations. If the lid is opened during washer
operation, all functions will stop, including water
filling.
:0;>>20@36885;?20;::20@6;: G Make sure that the fill hoses connect the hot water
supply to the hot inlet on the washer, and the cold
water supply to the cold inlet on the washer (hot to
hot, cold to cold).
+.@2>3688;<@696F.@6;: G Water may not cover the top level of the clothes. This
is normal for this high-efficiency washer. The water fill
is optimized by the system for best wash performance.
Washer will not 6:7211>.6:5;?2;>1>.6:G Ensure that the drain hose is not kinked. Per the
drain water 8;0.@2156452>@5.: recommended installation instructions, the drain outlet
standing in the tub ’ ./;B238;;> cannot be over 8’ above the floor.
Problem Possible Cause What To Do
Water leaks every load ;?2?:;@6:?@.88210;>>20@8E G Check all fill and drain hose connections to ensure that they
are tight and secure.
Water leaks #B2>?A1?6:4;312@2>42:@ G Oversudsing may create leaks, and may be caused by
the type and amount of detergent used. High-efficiency
detergent is recommended. Make sure that detergent
and any additives are put into the correct dispenser bins.
Follow the detergent manufacturer’s recommendations
for the amount of detergent, but try using less detergent,
If too many garments are loaded in the tub, the water can
overflow out of the tub during wash. Never load clothes above
the tub. Be especially cautious when pillows or comforters are
loaded in the machine. These type of buoyant items should be
placed at the bottom of the washer basket.
Incomplete or no 2@2>42:@/6:?08;44213>;9 G Make sure that detergent and additives are put into
dispensing of detergent 6:0;>>20@36886:4 the correct dispenser bins. If liquid detergent is used,
make sure that the liquid detergent insert box is in the
dispenser bin. If powdered detergent is used, make sure
that the liquid detergent insert box is not used. Liquids
must be put in the fabric softener bin.
For all detergent types, always make sure that the
dispenser box is fully closed before the start of the cycle.
(;;9A0512@2>42:@A?21 G Make sure that the suggested amount of detergent is
used per the manufacturer’s recommendations. You may
also dilute the detergent with water to the maximum
fill line on the bin to avoid clogging. High-efficiency
detergent is recommended for this washer.
:?A336062:@C.@2>?A<<8E G Make sure that the water supply is turned on. Make sure that
the water faucets are turned to their completely open positions.
";>9.8>2?61A2 G Normal operation. Residue may remain in the bins of
the dispenser box. The dispenser box may be removed
for occasional cleaning with warm water and a scrub
brush. The liquid detergent insert box and siphon
caps may also be removed from the detergent bin for
occasional cleaning. Remember that only liquid may be
used in the fabric softener bin. Powder will not dispense
from the fabric softener bin.
Premature 82.05/6:3688213;>3A@A>28;.1 G You cannot store bleach in the dispenser for future use.
dispensing The bleach bin will be dispensed every load for optimal
of bleach safety of the washer.
#B2>36886:4@52/82.05/6: G Overfilling the bin with bleach may lead to premature
dispensing. There is a maximum fill line indicated on
the bleach bin to help avoid overfilling.
Clogging of bleach 82.05/6:6?:;@?2.@21 G Make sure that the bleach cover is properly seated and
snapped into place before the start of the cycle.
:?A336062:@082.:6:4 G You may remove and clean the bleach cover with warm
water and a scrub brush to clear clogging.
Poor stain removal $>2?;.7:;@?2820@21 G When stain inspector is used, presoak temperature and time
are automatically selected. If you choose not to use the stain
inspector, we recommend that you select presoak when
defining your wash cycle. Always make sure that any additives,
such as your high-efficiency liquid detergent, are added
before starting the cycle. Always reference your clothes
care label before treating stains.
•
(;;9.:E4.>92:@?
8;.121
18
Before you call for service…
Consumer Support Troubleshooting Tips Operating Instructions Safety Instructions
Installation
Instructions

19
Consumer Support
Troubleshooting Tips
Operating InstructionsSafety Instructions
Installation
Instructions
(523;88;C6:4.>2:;>9.8?;A:1?E;A9.E52.>
GEAppliances.com
Sound Description
Repeated starting and G The HydroWash
™
action spins the wash basket in one direction, then pauses and spins in
stopping the opposite direction to clean your items.
Sound of water being G The washer adapts to the load size and type to add more water to the cycle as needed.
added after the washer
G The wash load may be unbalanced. If the washer senses that the load is unbalanced, it will
has already been
stop and refill to redistribute the load.
operating
G The washer may be diluting laundry additives to add to the wash load.
Clicking sound during G The washer will make a series of clicking noises as it changes the cleaning mode.
the wash cycle
High-pitched noise during G The wash basket spins faster to remove moisture from the load.
the spin cycle
Water flushing sound G The washer is diluting laundry additives to add to the wash load. Wash Boost additives
are dispensed during presoak. Detergent is dispensed at the beginning of the wash cycle.
Bleach is dispensed during the main wash. Fabric softener is dispensed during the final
rinse.
Humming noise during G The pump is operating to remove water from the basket.
draining
Pinging noise during the G The washer has special rinse features to remove detergent residue from the load after the
spin or rinse cycle main wash cycle.
Water sloshing sound G A liquid in the balance ring around the wash basket helps the basket spin smoothly.
when washer is turned
off and tub is rotated
Normal Operating Sounds
Problem Possible Cause What To Do
The display shows: 618;07?C6@052>>;> • Make sure that the lid is closed and press the START/PAUSE
button. The washer will not spin unless the lid is locked
(LID LOCKED will appear in the display).
• If the lid is closed and the lid lock error message is
displayed, call for service.
):/.8.:0212@20@6;:, your washer has • Allow the machine to continue it’s cycle.
detected an unbalanced load. • Washer will continue to re-balance the load by adding
Articles of clothing may cause an out of more water and agitating to better redistribute the clothing.
balance. Your washer will attempt to • This Code is displayed for informational purpose only.
rebalance by adding more water and • See Loading the washer section in this Use and care Guide.
agitating to redistribute the clothing and
then restart the spin cycle.
NOTE: ,'4+88583+99'-+/9*/962'?+*,583/4;:+9:.+=':+8/4:.+:;(=/22';:53':/)'22?*8'/44)+:.+='9.+8
/4/:/':+9*8'/4/4-'22,;4):/549=/22(+9;96+4*+*;4:/2*8'/4/4-/9)5362+:+
20
Consumer Support Troubleshooting Tips Operating Instructions Safety Instructions
Installation
Instructions
For The Period Of: We Will Replace:
GE Washer Warranty. 58);9:53+89/4:.+$4/:+*":':+9
22='88'4:?9+8</)+685</*+*(?5;8'):58?"+8</)++4:+89
58'4';:.58/@+*;9:53+8'8+
B
:+).4/)/'4#59).+*;2+9+8</)+
542/4+</9/:;9':662/'4)+9)5358)'22!"
2+'9+.'<+9+8/'24;3(+8'4*35*+24;3(+8
'<'/2'(2+=.+4)'22/4-,589+8</)+
#./9='88'4:?/9+>:+4*+*:5:.+58/-/4'26;8).'9+8'4*'4?9;))++*/4-5=4+8,58685*;):96;8).'9+*,58.53+;9+
=/:./4:.+$",:.+685*;):/925)':+*/4'4'8+'=.+8+9+8</)+(?';:.58/@+*"+8</)+8/945:'<'/2'(2+?5;3'?
(+8+96549/(2+,58':8/6).'8-+58?5;3'?(+8+7;/8+*:5(8/4-:.+685*;)::5'4;:.58/@+*"+8</)+25)':/54,58
9+8</)+42'91':.+='88'4:?+>)2;*+9:.+)59:5,9./66/4-589+8</)+)'229:5?5;8.53+
"53+9:':+9*545:'225=:.++>)2;9/54582/3/:':/545,/4)/*+4:'258)549+7;+4:/'2*'3'-+9#./9='88'4:?-/<+9?5;
96+)/,/)2+-'28/-.:9'4*?5;3'?'295.'<+5:.+88/-.:9=./).<'8?,8539:':+:59:':+#5145==.':?5;82+-'28/-.:9
'8+)549;2:?5;825)'2589:':+)549;3+8',,'/895,,/)+58?5;89:':+C9::584+?+4+8'2
n '2>B602@>6<?@;E;A>5;92@;@2.05E;A5;C@;A?2
@52<>;1A0@
n 9<>;<2>6:?@.88.@6;:
n .68A>2;3@52<>;1A0@636@6?./A?2196?A?21;>A?213;>
;@52>@5.:@526:@2:121<A><;?2;>A?210;992>06.88E
n &2<8.0292:@;35;A?23A?2?;>>2?2@@6:4;306>0A6@
/>2.72>?
n .9.42@;@52<>;1A0@0.A?21/E.00612:@36>238;;1?
;>.0@?;3;1
n :0612:@.8;>0;:?2=A2:@6.81.9.420.A?21/E<;??6/82
12320@?C6@5@56?.<<86.:02
What Is Not Covered (in the United States):
Warrantor: General Electric Company. Louisville, KY 40225
":'62+?5;88+)+/6:.+8+
855,5,:.+58/-/4'26;8).'9+
*':+/94++*+*:55(:'/49+8</)+
;4*+8:.+='88'4:?
One Year Any part of the washer which fails due to a defect in materials or workmanship. During this
853:.+*':+5,:.+ limited one-year warranty, GE will also provide, free of charge, all labor and related service
58/-/4'26;8).'9+ costs to replace the defective part.
Second through The suspension rod and spring assembly, and main electronic control board if any of these parts
Fifth Year should fail due to a defect in materials or workmanship. GE will also replace the washer lid or
853:.+*':+5,:.+ cover if they should rust under operating conditions. During this additional three-year limited
58/-/4'26;8).'9+ warranty, you will be responsible for any labor or related service costs.
Second through The direct drive motor and outer washer tub if any of these parts should fail due to a defect in
Tenth Year materials or workmanship. During this additional eight-year limited warranty, you will be
853:.+*':+5,:.+ responsible for any labor or related service costs.
58/-/4'26;8).'9+
Lifetime of Product The washer basket if it should fail due to a defect in materials or workmanship. During this
853:.+*':+5,:.+ product lifetime limited warranty, you will be responsible for any labor or related service costs.
58/-/4'26;8).'9+
EXCLUSION OF IMPLIED WARRANTIES—Your sole and exclusive remedy is product repair as provided in this Limited
Warranty. Any implied warranties, including the implied warranties of merchantability or fitness for a particular
purpose, are limited to one year or the shortest period allowed by law.
21
Consumer Support
Troubleshooting Tips
Operating Instructions
Safety Instructions
Installation
Instructions
GE Washer Warranty. 58);9:53+89/4'4'*'
22='88'4:?9+8</)+685</*+*(?5;8'):58?"+8</)++4:+8958'4';:.58/@+*
:+).4/)/'4589+8</)+)'22
2+'9+.'<+9+8/'24;3(+8'4*35*+24;3(+8'<'/2'(2+=.+4)'22/4-,589+8</)+
n '2>B602@>6<?@;E;A>5;92@;@2.05E;A5;C@;A?2
@52<>;1A0@
n 9<>;<2>6:?@.88.@6;:1286B2>E;>9.6:@2:.:02
n .68A>2;3@52<>;1A0@636@6?./A?2196?A?21;>A?213;>
;@52>@5.:@526:@2:121<A><;?2;>A?210;992>06.88E
n .9.42.3@2>1286B2>E
n &2<8.0292:@;35;A?23A?2?;>>2?2@@6:4;306>0A6@
/>2.72>?
n .9.42@;@52<>;1A0@0.A?21/E.00612:@36>238;;1?
;>.0@?;3;1
n :0612:@.8;>0;:?2=A2:@6.81.9.420.A?21/E<;??6/82
12320@?C6@5@56?.<<86.:02
n $>;1A0@:;@.002??6/82@;<>;B612>2=A6>21?2>B602
What Is Not Covered (in Canada):
Warrantor: MABE CANADA INC.
WARRANTOR IS NOT RESPONSIBLE FOR CONSEQUENTIAL DAMAGES.
#./9='88'4:?/9+>:+4*+*:5:.+58/-/4'26;8).'9+8'4*'4?9;))++*/4-5=4+8,58685*;):96;8).'9+*,58
.53+;9+=/:./4'4'*'4.53+='88'4:?9+8</)+=/22(+685</*+*/4'8+'9=.+8+/:/9'<'/2'(2+'4**++3+*
8+'954'(2+(?'(+:5685</*+
EXCLUSION OF IMPLIED WARRANTIES—Your sole and exclusive remedy is product repair as provided in this Limited
Warranty. Any implied warranties, including the implied warranties of merchantability or fitness for a particular
purpose, are limited to one year or the shortest period allowed by law.
For The Period Of: We Will Replace:
One Year Any part of the washer which fails due to a defect in materials or workmanship. During this
853:.+*':+5,:.+ limited one-year warranty, GE will also provide, free of charge, all labor and related service
58/-/4'26;8).'9+ costs to replace the defective part.
Second through The suspension rod and spring assembly, and main electronic control board if any of these parts
Fifth Year should fail due to a defect in materials or workmanship. GE will also replace the washer lid or
853:.+*':+5,:.+ cover if they should rust under operating conditions. During this additional three-year limited
58/-/4'26;8).'9+ warranty, you will be responsible for any labor or related service costs.
Second through The direct drive motor and outer washer tub if any of these parts should fail due to a defect in
Tenth Year materials or workmanship. During this additional eight-year limited warranty, you will be
853:.+*':+5,:.+ responsible for any labor or related service costs.
58/-/4'26;8).'9+
Lifetime of Product The washer basket if it should fail due to a defect in materials or workmanship. During this
853:.+*':+5,:.+ product lifetime limited warranty, you will be responsible for any labor or related service costs.
58/-/4'26;8).'9+
22
Consumer Support.
662/'4)+9%+(9/:+
In the U.S.: GEAppliances.com
Have a question or need assistance with your appliance? Try the GE Appliances Website 24 hours a day,
any day of the year! For greater convenience and faster service, you can now download Owner’s Manuals,
order parts or even schedule service on-line. :.:.1.CCC42.<<86.:02?0.
").+*;2+"+8</)+ In the U.S.: GEAppliances.com
Expert GE repair service is only one step away from your door. Get on-line and schedule your service at your
convenience any day of the year! Or call 800.GE.CARES (800.432.2737) during normal business hours.
:.:.1.0.88
!+'2/,++9/-4":;*/5 In the U.S.: GEAppliances.com
GE supports the Universal Design concept—products, services and environments that can be used by people of all
ages, sizes and capabilities. We recognize the need to design for a wide range of physical and mental abilities and
impairments. For details of GE’s Universal Design applications, including kitchen design ideas for people with disabilities,
check out our Website today. For the hearing impaired, please call 800.TDD.GEAC (800.833.4322).
:.:.1. contact: Manager, Consumer Relations, Mabe Canada Inc.
Suite 310, 1 Factory Lane
Moncton, N.B. E1C 9M3
>:+4*+*%'88'4:/+9 In the U.S.: GEAppliances.com
Purchase a GE extended warranty and learn about special discounts that are available while your warranty is still
in effect. You can purchase it on-line anytime, or call 800.626.2224 during normal business hours. GE Consumer Home
Services will still be there after your warranty expires. :.:.1.0.88
'8:9'4*))+9958/+9 In the U.S.: GEAppliances.com
Individuals qualified to service their own appliances can have parts or accessories sent directly to their homes
(VISA, MasterCard and Discover cards are accepted). Order on-line today, 24 hours every day or by phone at
800.626.2002 during normal business hours.
Instructions contained in this manual cover procedures to be performed by any user. Other servicing generally
should be referred to qualified service personnel. Caution must be exercised, since improper servicing may cause
unsafe operation.
Customers 6:.:.1.should consult the yellow pages for the nearest Mabe service center, or call 1.800.661.1616.
54:'):$9 In the U.S.: GEAppliances.com
If you are not satisfied with the service you receive from GE, contact us on our Website with all the details including your
phone number, or write to: General Manager, Customer Relations
GE Appliances, Appliance Park
Louisville, KY 40225
:.:.1.CCC42.<<86.:02?0. or write to: Director, Consumer Relations, Mabe Canada Inc.
Suite 310, 1 Factory Lane
Moncton, N.B. E1C 9M3
!+-/9:+8&5;8662/'4)+ In the U.S.: GEAppliances.com
&246?@2>E;A>:2C.<<86.:02;:86:2I.@E;A>0;:B2:62:02 Timely product registration will allow for enhanced
communication and prompt service under the terms of your warranty, should the need arise. You may also
mail in the pre-printed registration card included in the packing material. :.:.1.CCC42.<<86.:02?0.
8/4:+*/458+'

Mesures de sécurité
Fonctionnement
0A02CMA8BC8@D4B \
70A64<4=C4CDC8;8B0C8>=
34;0;0E4DB4
&0==40D342>=CAQ;4\
Installation
E0=C342><<4=24A \
=BCAD2C8>=B?0BJ?0B \
Conseils de dépannage \
Soutien au consommateur
0A0=C84
(>DC84=0D2>=B><<0C4DA
www.electromenagersge.ca
.B2A?2?
49-90404 09/13/10 GE
Profile
Inscrivez ici les numéros
de modèle et de série :
Modèle # ________________
Série # __________________
+>DB?>DE4H;4BCA>DE4ABDA
;42>DE4A2;40AA8NA43D3>BB4A4C
34;0;0E4DB4
Manuel
d’utilisation
et d’installation

n
=BC0;;4H>D?;024HE>CA4;0E4DB430=BD=4=3A>8C>R
4;;4=^4BC?0B4F?>BM4J34BC4<?MA0CDA4B8=5MA84DA4B
JHMA>346AM24=C86A034>DJ3D<0DE08BC4<?B
n
#4CC4H184=J;0C4AA4;0;0E4DB42>=5>A<M<4=CJC>DB
;4B2>34B4C;4B>A3>==0=24B4=E86D4DA(D8E4HC>DB
;4B3MC08;B34B8=BCAD2C8>=B3^8=BC0;;0C8>=
RENSEIGNEMENTS IMPORTANTS EN MATIÈRE DE SÉCURITÉ.
LISEZ TOUTES LES INSTRUCTIONS AVANT D’UTILISER VOTRE LAVEUSE.
AVERTISSEMENT!
Pour votre sécurité, vous devez suivre les instructions contenues
dans ce manuel, pour réduire le danger d’incendie ou d’explosion,
de secousse électrique et pour empêcher les dommages matériels,
les blessures corporelles ou les pertes de vie humaine.
SÉCURITÉ DU CHAUFFE-EAU
Dans certaines conditions, un chauffe-eau peut produire de l’hydrogène gazeux si on ne l’a pas utilisé pendant plus
de deux semaines. Dans ces conditions, l’hydrogène gazeux peut exploser.
(8E>DB=^0E4H?0BDC8;8BM;4270D55440D?4=30=C34DFB4<08=4B>D?;DB4<?O274HC>DC3><<064>D1;4BBDA4
?>BB81;44=>DEA0=CC>DB;4BA>18=4CB3^40D270D344C4=;4B;08BB0=C2>D;4A?4=30=C?;DB84DAB<8=DC4B08C4B24;0
0E0=C3^DC8;8B4AC>DC0??0A48;M;42CA><M=064A1A0=27M0DBGBCN<43^40D270D344CC4?A>2M3DA4B8<?;4?4A<4C
JC>DC4022D<D;0C8>=3^7G3A>6N=460H4DF34B^M270??4A><<42460H4BC8=5;0<<01;4=45D<4H90<08B>D
=^DC8;8B4H90<08B345;0<<4E8E4>D3^0??0A48;M;42CA><M=064A?4=30=C24CC4?A>2M3DA4
BONNE INSTALLATION
Vous devez bien installer et placer cette laveuse, conformément aux instructions d’installation, avant de l’utiliser.
Les instructions d’installation sont disponibles au verso de ce manuel.
n $42>=B4AE4H0D2D=<0C4A80D2><1DBC81;42><<4
34;0270A?843D?0?84A34B27855>=B>D34B?A>3D8CB
278<8@D4B4=34BB>DB>DJ?A>F8<8CM34E>CA4
;0E4DB4
n +>DB34E4HBDAE48;;4A2>=BC0<<4=CE>CA4;0E4DB4
B8E>DB;^DC8;8B4HJ?A>F8<8CM3^4=50=CB>DB834B
4=50=CB;^DC8;8B4=C$4?4A<4CC4H90<08BJ34B
4=50=CB349>D4A0E42>D30=B24C0??0A48;
>D0E42C>DC0DCA40??0A48;M;42CA><M=064A
VOTRE AIRE DE LESSIVE
Soutien au
consommateur
Conseils de dépannage Fonctionnement Mesures de sécuritéInstallation
Soutien au
consommateur
Conseils de dépannage
FonctionnementMesures de sécurité Installation
n $^4BB0G4H90<08B3^>DEA8AE>CA4;0E4DB4@D0=3
4;;45>=2C8>==4CC4=34H@D4;0<0278=4B>8C
2><?;NC4<4=C0AAOCM4?>DA>DEA8A;42>DE4A2;4
n $4<M;0=64H90<08B3^40D3490E4;0D27;>A4
0E4234;^0<<>=80@D4>D34B02834B2><<4
3DE8=086A44C>D34;^0=C8A>D8;;4"4<M;0=64
343855MA4=CB?A>3D8CB278<8@D4B?4DC?A>3D8A4
34B60HC>F8@D4B@D8?4DE4=C20DB4A;0<>AC
n $4;0E4H90<08B>D=4508C4B90<08BBM274A
34B0AC82;4B@D8>=CMCM=4CC>GMB;0EMBCA4<?MB
>D<>D8;;MB30=B34BBD1BC0=24B2><1DBC81;4B
>D4F?;>B8E4B2><<4;028A4;^7D8;4;0?48=CDA4
;^4BB4=24;4BBD1BC0=24B3M6A08BB0=C4B
;4BB>;E0=CB34=4CC>G064JB42;4?MCA>;4
@D8?4DE4=C1AS;4A>D4F?;>B4A$^09>DC4H90<08B
24BBD1BC0=24BJ;^40D34;0E064$^DC8;8B4H90<08B
>D=4?;024H90<08B24BBD1BC0=24BJ?A>F8<8CM
34E>CA4;0E4DB4>D34E>CA4BM274DB4?4=30=C
;4DA5>=2C8>==4<4=C
n "0?A>2M3DA434;4BB8E064?4DCAM3D8A4
;0AMB8BC0=240DF5;0<<4B34BC8BBDB&>DAME8C4A
24;0BD8E4HB>86=4DB4<4=C;4B8=BCAD2C8>=B34
;0E0644C34B>8=B3D501A820=C34EOC4<4=CB
n &>DAAM3D8A4;4A8B@D434B42>DBB4M;42CA8@D4
3M1A0=274HE>CA4;0E4DB434B0?A8B4<DA0;4>D
3M1A0=274H;0;0E4DB40D=8E40D3D?0==40D34
38BCA81DC8>=34;^8<<4D1;44=4=;4E0=C;45DB81;4
>D4=508B0=C10B2D;4A;438B9>=2C4DA0E0=C
3^4=CA4?A4=3A4C>DC4=CA4C84=>D=4CC>G064
NOTE : +>DB:2 3M1A0=274H<.? E>CA40??0A48;
34B>=0;8<4=C0C8>=M;42CA8@D44=0??DG0=CBDA
;41>DC>=()')&*(>D&%,'0;8<4=C0C8>=
n $^4BB0G4H90<08B34508A45>=2C8>==4AE>CA4
;0E4DB4B84;;44BC4=3><<06M4B84;;4=4
5>=2C8>==4?0B184=B84;;44BC?0AC84;;4<4=C
3M<>=CM4>DB84;;4034B?8N24B<0=@D0=C4B
>D20BBM4B4=?0AC82D;84AB058274>DB>=2>A3>=
3^0;8<4=C0C8>=4=3><<06M
QUAND VOUS UTILISEZ VOTRE LAVEUSE
n 4A<4H;4BA>18=4CB3^40D?>DAAM3D8A4;0?A4BB8>=
BDA;4BCDG0DF4C;4BA>18=4CB4C?>DAAM3D8A4
;05D8C4B^8;B4?A>3D8CD=420BBDA4>DD=4AD?CDA4
+MA8584H;^MC0C34BCDG0DF3^0;8<4=C0C8>=E>DB
34E4H;4BA4<?;024AC>DB;4B0=B
n E0=C3494C4AD=4;0E4DB4>D34;0<4CCA4
7>ABB4AE8244=;4E4HB>=2>DE4A2;4?>DA
4<?O274A;4B4=50=CB34B420274A3430=B
n $^4BB0G4H90<08B34AM?0A4A>D34A4<?;024A
D=4?8N2434E>CA4;0E4DB4J<>8=B@D424
=4B>8CB?M2858@D4<4=CA42><<0=3M30=B
24#0=D4;3D?A>?A8MC08A4>D30=B34B
8=BCAD2C8>=B34AM?0A0C8>=B?0A;^DC8;8B0C4DA
?D1;8M4B@D4E>DB2><?A4=4H4C?>DA;4B@D4;;4B
E>DB?>BBM34H;4B2><?MC4=24B=M24BB08A4B
n $450DBB4H90<08B;4B2>=CAQ;4B
QUAND VOUS NE L’UTILISEZ PAS
LISEZ ET SUIVEZ SOIGNEUSEMENT CES
RENSEIGNEMENTS EN MATIÈRE DE SÉCURITÉ.
CONSERVEZ CES INSTRUCTIONS
N’utilisez
votre
laveuse
qu’aux fins
prévues
décrites
dans ce
manuel du
propriétaire.
www.electromenagersge.ca
Le panneau de contrôle de votre laveuse.
Soutien au
consommateur
Conseils de dépannage Fonctionnement Mesures de sécuritéInstallation
Panneau de contrôle
Dans ce manuel, les caractéristiques et l’apparence peuvent varier selon votre modèle.
1
2
6
3
5
1
4
2
3
POWER(alimentation)
??DG4H?>DA02C8E4A;^055827064(8;^0558270644BC02C850??DG4H?>DA<4CCA4;0;0E4DB44=<>343^0CC4=C4
REMARQUE : Vous ne débranchez pas votre appareil de l’alimentation électrique en appuyant sur POWER (alimentation).
REMARQUE : Si la laveuse demeure inactive pendant 4 minutes après l'avoir arrêtée, l'eau dans la
cuve sera vidangée.
START/PAUSE
??DG4HBDA?>DA;0=24AD=2G2;434;0E064(8;0;0E4DB44BC4=<0A2744=0??DG0=CD=45>8BB4<4C
4=?0DB4;0A>=34;;4??DG4HJ=>DE40D?>DAA4;0=24A;42G2;434;0E064
REMARQUE : Si la laveuse a été mise en mode pause et que le programme n'a pas été remis en
marche dans un délai de deux heures, la laveuse s'éteint. Mais auparavant, l'eau dans la cuve
sera vidangée.
Cycles de lavage
"4B2G2;4BB>=C>?C8<8BMB?>DA34B20CM6>A84B?0AC82D;8NA4B34270A64B34;0E064"4C01;40D2834BB>DBE>DB0834A0
JCA>DE4AD=AM6;06434;0E064@D82>AA4B?>=3JE>CA4270A6434;0E064"4B?0;4BM;ME0CA824B4=C;4;40=
W
5>=C
3M;820C4<4=C2D;1DC4A;4BEOC4<4=CB30=B;0B>;DC8>=3^40D4C343MC4A64=C?>DA;4B;0E4A
!&"(%&
&>DA;0E08BB4;;4CANBB0;42>C>=1;0=2;8=6434<08B>=EOC4<4=CB34CA0E08;4C9>D4A
"((%&!"% &>DA;4B2>C>==034B342>D;4DA;4;8=6434<08B>=;4BEOC4<4=CB34CA0E08;4C3494DCANB
J;M6NA4<4=CB0;4B
E46K:6=A2 &>DA3MB8=542C4A4CM;8<8=4A?;DB3434B=><1A4DB4B102CMA84B?AMB4=C4B30=B;0
;4BB8E43><4BC8@D4;B068C3D=?A>6A0<<43>CM3D=AM6;064BD??;M<4=C08A4?>DA;0
;4BB8E4CANBB0;44C@D8DC8;8B4D=M;M<4=C270D550=C?>DA?>AC4A;0C4<?MA0CDA434;40DJ
TT
!A@686?2F<.?02<>;4>.992<;A>8.B2>12?@6??A?1K860.@?
"4?A>6A0<<4($).4BC24AC858M2>=5>A<40D?A>C>2>;4&\X(0=8C8H0C8>=
&4A5>A<0=24>5'4B834=C80;;>C74B,0B74ABY34;0$(=C4A=0C8>=0;0=284==4<4=C;0
$0C8>=0;(0=8C0C8>=>D=30C8>=
!'%'! &>DA;4B0AC82;4B8=5A>8BB01;4B4C=4F8640=C0D2D=A4?0BB064
&&'_)&'#$$)
' &>DA;4BC8BBDB3M;820CB?4D>D=>A<0;4<4=CB0;4B"0;0E4DB4CA4<?44CA4<D43>D24<4=C?4=30=C
;4;0E0644CA8=L064
!& &>DA;0E4A;4B940=B>D;4B0AC82;4B4=34=8<
)P ! &>DA;4B0AC82;4BMC8@D4CMB;0E064J;0<08=?4DB0;4B"0;0E4DB4A4<D464=C8<4=C?>DA8<8C4A
;4;0E064J;0<08=
Protocol P172-07
Sanitization Performance of Residential and
Commercial, Family Sized Clothes Washers
7
8
Cycles
de lavage ;:@ !%) &>DA;0E4A;4B?A>3D8CB;08=84AB;0E01;4BJ;0<0278=4J2>=38C8>=@D424B
?A>3D8CB8;BB>84=C;0EMB2>=5>A<M<4=C0DF8=BCAD2C8>=B34;^MC8@D4CC43D
EOC4<4=C=27>8B8BB0=C242G2;4E>DB34E4HDC8;8B4AD=3MC4A64=C0??A>?A8M
?>DA;0E4A;0;08=4
&2>B62@@2?2@1>.<? &>DA;4BB4AE84CC4B;4B3A0?B;4BM3A43>=B4C;4B>A48;;4AB
)%# &>DA0AC82;4B;M6NA4<4=CB0;4B@D^8;50DC;0E4A4=E8C4BB4"03DAM43D2G2;44BC
3^4=E8A>=<8=DC4BB4;>=;4B>?C8>=B27>8B84B
%!G&&"%&>DAA8=24AA0?834<4=C;4B0AC82;4B=^8<?>AC4@D0=3
!2@@;E.421A<.:62> &>DAM;8<8=4A;4BAMB83DB4C;4B>34DAB3D?0=84A(>=DC8;8B0C8>=4BC
A42><<0=3M4D=45>8B?0A<>8B
Niveau de saleté
=270=640=C;4$+*(")IE>DB0D6<4=C4H>D38<8=D4H;03DAM434;0E064?>DA4=;4E4A38E4AB<>=C0=CB34B0;4CM
&>DA270=64A;4$+*(")I0??DG4HBDA;41>DC>=SOIL LEVEL (NIVEAU DE SALETÉ) 9DB@D^0DAM6;0643MB8AM
+>DB?>DE4H27>8B8A4=CA4"867C?4DB0;4$>A<0;=>A<0;>D40EG(>8;EA08<4=CB0;4
Vitesse d’essorage
=270=640=C;0+)((^((%'E>DB270=64H;0E8C4BB434;^4BB>A06458=0;34B2G2;4B(D8E4HC>D9>DAB
;4B8=BCAD2C8>=B34;^MC8@D4CC43D501A820=C?>DA270=64A;0+)((^((%'
&>DA270=64A;0+)((^((%'0??DG4HBDA;41>DC>=SPIN SPEED (VITESSE D’ESSORAGE 9DB@D^0DAM6;0643MB8AM
"4BE8C4BB4B3^4BB>A064;4B?;DBA0?834B=4B>=C?0B>554AC4B?>DA24AC08=B2G2;4B2><<4;42G2;43M;820CB
"4BE8C4BB4B3^4BB>A064?;DBA0?834B4=;NE4=C?;DB3^40D34BEOC4<4=CB4C0834=CJAM3D8A4;4C4<?B34BM27064
<08B0D6<4=C4=CM60;4<4=C;0?>BB818;8CM345A>8BB4A24AC08=BC8BBDB
Température
'M6;4H?>DABM;42C8>==4A;0C4<?MA0CDA434;40D?>DA;42G2;434;0E064
(D8E4H;MC8@D4CC434=CA4C84=3D501A820=C3DC8BBD;>AB34;0BM;42C8>=34;0C4<?MA0CDA434;0E064
&>DA270=64A;0C4<?MA0CDA434;0E0640??DG4HBDA;41>DC>=C74)#&9DB@DJ24@D4E>DB0E4H0CC48=C;4AM6;064
3MB8AM
REMARQUE : not tous les réglages de température sont disponibles sur chaque sélection du cycle.
Mon programme
&A>6A0<<4HE>CA42><18=08B>=?AM5MAM434AM6;064B4C2>=B4AE4H;04=<M<>8A4?>DA;0A0??4;4A4=0??DG0=CBDAD=4B4D;4
C>D2744BAM6;064B?4AB>==0;8BMB?4DE4=COCA4?A>6A0<<MB?4=30=C@DD=?A>6A0<<434;0E0644BC4=2>DAB
Pour conserver en mémoire une combinaison de réglages pour la fonction MY CYCLE
7>8B8BB4HE>CA4?A>6A0<<434;0E064B0D5(!)"$
#>38584H;4BAM6;064B?>DA;4NIVEAU DE SALETÉ;'ESSORAGE 4C;0TEMPÉRATURE B4;>=E>B14B>8=B
(M;42C8>==4HC>DC40DCA4OPTION 34;0E064@D4E>DB3MB8A4HB0D5SIGNAL
??DG4H2>=C8=D4;;4<4=CBDA;0C>D274//////?4=30=CB42>=34B?>DA2>=B4AE4AE>CA4BM;42C8>=4=<M<>8A4*=B86=0;
B>=>A4B4508C4=C4=3A44C;0C>D274B0;;D<4
Pour rappeler la combinaison de réglages MY CYCLE entrée en mémoire :
??DG4HBDA;0C>D274#-""0E0=C34;0E4AD=41A0BBM4
Pour modifier la combinaison de réglages MY CYCLE conservée en mémoire :
(D8E4H;4BMC0?4BJ34;0B42C8>=XPour conserver en mémoire une combinaison de réglages pour la fonction MY CYCLEY
Ajout de vêtements
"4E>G0=CAjout de vêtements B0;;D<4?>DAE>DB8=38@D4A@D4?>DA>1C4=8AD=A4=34<4=C>?C8<D<24BC<08=C4=0=C;4
<><4=C309>DC4AC>DC0AC82;4>D1;8M(8E>DB09>DC4H34B0AC82;4B?4=30=C@D424E>G0=C4BCMC48=CE>DB?>DAA84H>1C4=8A34B
AMBD;C0CB34;0E064=>=B0C8B508B0=CB
&>DA09>DC4A34B0AC82;4B;>AB@D4;4E>G0=CADD GARMENT 4BC0;;D<M
??DG4HBDA;0C>D274START/PAUSE
%DEA4H;42>DE4A2;4D=45>8B@D8;4BC3ME4AA>D8;;M
9>DC4H;4B0AC82;4B
'454A<4H;42>DE4A2;4
??DG4H34=>DE40DBDA;0C>D274START/PAUSE ?>DA?>DABD8EA4;4?A>6A0<<434;0E064
REMARQUE (8;0;0E4DB434<4DA48=02C8E4?4=30=C34DF74DA4B0?ANB0E>8A<8B;4?A>6A0<<434;0E0644=?0DB4;40D34;0
2DE4B4A0E830=6M4
4
5
6
www.electromenagersge.ca
Soutien au
consommateur
Conseils de dépannage
FonctionnementMesures de sécurité Installation
Soutien au
consommateur
Conseils de dépannage Fonctionnement Mesures de sécuritéInstallation
Les caractéristiques de votre laveuse.
REMARQUE : Certaines caractéristiques peuvent ne pas être offertes sur tous les modèles de laveuses.
Serrure
+>DB?>DE4HE4AA>D8;;4A;4B2>=CAQ;4B?>DA
ME8C4AC>DC4BM;42C8>=B3OCA4508C4%DE>DB
?>DE4HE4AA>D8;;4A;4B2>=CAQ;4B0?ANB0E>8A
2><<4=2MD=2G2;4
4=50=CB=4?4DE4=C?0B022834=C4;;4<4=C
4=<0A274;0;0E4DB44=0??DG0=CBDA;4B
C>D274B0E4224CC4>?C8>=BM;42C8>==M
&>DAE4AA>D8;;4A;4B2><<0=34B34;0
;0E4DB40??DG4HBDA;0C>D274"%!&>DA
3ME4AA>D8;;4A;4B2><<0=34B0??DG4H
2>=C8=D4;;4<4=CBDA;0C>D274"%!
?4=30=CB42>=34B
">AB@D4;05>=2C8>=34E4AA>D8;;0644BC
02C8EM;4A>D6482Q=4A4?AMB4=C0=CD=
2034=0B0??0A0PC30=B;M2A0=BD?MA84DA
Soak (Prélavage)
&AM;0E0644BCD=;0E064BD??;M<4=C08A4
0E0=C;4;0E064?A8=28?0;*C8;8B4H;4
?>DA;4BEOC4<4=CBCANBB0;4B>D?>DA
;4BEOC4<4=CB3>=C;^MC8@D4CC4
A42><<0=34D=?AM;0E0640E0=C
;4;0E064BBDA4HE>DB3^09>DC4A3D
3MC4A64=CJA4=34<4=CM;4EM>D;41>=
0338C8534;0E0640D38BCA81DC4DA34
?AM;0E064
REMARQUES :
• En choisissant le prélavage, il est
recommandé d’utiliser un détergent
en poudre dans le compartiment de lavage
principal (détergent).
• La durée maximale de trempage est
de 3 heures.
Extra Rinse
*C8;8B4HD=A8=L064BD??;M<4=C08A4
@D0=38;50DC30E0=C064A8=24A?>DA
4=;4E4A;0B0;4CM4C;43MC4A64=C
BD??;M<4=C08A4B<8B?>DA3D;8=64
EA08<4=CB0;4
Delay Start (mise en marche
retardée)
+>DB?>DE4HA4C0A34A;0<8B44=<0A274
3^D=2G2;434;0E0649DB@D^J74DA4B
??DG4HBDA;41>DC>=DELAY START
(mise en marche retardée) ?>DA27>8B8A
;4=><1A43^74DA4B@D4E>DBE>D;4H
0CC4=3A4?>DA2><<4=24A;42G2;4
34;0E064?D8B0??DG4HBDA;41>DC>=
START (mise en marche)"0<0278=4
2><?C40DC><0C8@D4<4=C;4C4<?B
3^0CC4=C4?D8BB4<4C4=<0A274
0DC><0C8@D4<4=CJ;^74DA43MB8AM4
REMARQUE : Si vous ouvrez la porte
pendant que la machine compte à
rebours le temps qui reste avant la mise
en marche, la machine fait une PAUSE
(pause). Vous devez refermer la porte et
appuyer à nouveau sur le bouton START
(mise en marche) pour recommencer
le compte à rebours.
MY CYCLE (FAVORI)
&>DAB0DE460A34AD=2G2;450E>A8
27>8B8BB4H;4AM6;0643MB8AM?>DA;42G2;4
34;0E064;4346AM34B>D8;;DA4;0E8C4BB4
34A>C0C8>=4C;0C4<?MA0CDA434;^40D
4C0??DG4HBDA;41>DC>=MY CYCLE
(FAVORI) ?4=30=CB42>=34B*=B86=0;
B>=>A4B4508C4=C4=3A4?>DA8=38@D4A@D4
;42G2;44BCB0DE460A3M
&>DADC8;8B4AE>CA42G2;4?4AB>==0;8BM
0??DG4HBDA;41>DC>=MY CYCLE (FAVORI)
0E0=C34;0E4AD=4270A64
&>DA270=64A;42G2;4B0DE460A3M
27>8B8BB4H;4AM6;0643MB8AM4C0??DG4H
BDA;41>DC>=MY CYCLE (FAVORI) ?4=30=C
B42>=34B
REMARQUE : Quand vous utilisez MY CYCLE
(FAVORI), vous ne pouvez pas modifier
les options de lavage une fois que
le cycle a commencé.
REMARQUE : Si vous changez les options
de lavage avec MY CYCLE (FAVORI) avant
le début du cycle, le voyant MY CYCLE
(FAVORI) s’éteindra et vous reviendrez
au cycle de base.
Signal sonore
4B86=0;B>=>A4E>DB0E4AC8C;>AB@D4;4
?A>6A0<<44BCC4A<8=M'4C8A4H;4B
EOC4<4=CB34;0??0A48;;>AB@D4;4B86=0;
B>=>A4B0AAOC4058=3ME8C4A;05>A<0C8>=
3450DF?;8B
??DG4HBDA;0C>D274($"?>DA
27>8B8A;4E>;D<45081;4>DM;4EM>D
?>DA0AAOC4A;4B86=0;B>=>A4
4B86=0;B>=>A4B4508C4=C4=3A4C>DC4B
;4B<8=DC4B?>DAD=<0F8<D<34
5>8B
Assouplissant liquide
??DG4HBDA;0C>D274FABRIC
SOFTENER ?>DA<>38584A;4CG?434
A8=L06458=0;24BCJ38A4D=A8=L0644=
?A>5>=34DA0D;84D3D=A8=L064?0A
E0?>A8B0C8>=4CC45>=2C8>=3>8COCA4
DC8;8BM40E4234;0BB>D?;8BB0=C;8@D834"4
E>G0=CFABRIC SOFTENER B0;;D<4
?4=30=C;4A8=L06458=0;4=;4E4A;0B0;4CM
4C;43MC4A64=C
REMARQUES :
&>DAD=A4=34<4=C>?C8<0;0E42;4
?A>6A0<<4COLORS/NORMAL >D
WHITES/HEAVY DUTYBM;42C8>==4H
;>?C8>=FABRIC SOFTENER >DEXTRA
RINSEBD??;M<4=C08A4B<8B?>DA3D;8=64
EA08<4=CB0;4
(8E>DB27>8B8BB4H;>?C8>=EXTRA RINSE
0D;84D34;>?C8>=FABRIC SOFTENER;4
E>G0=CFABRIC SOFTENER B0;;D<4
?4=30=C;42G2;434A8=L064
BD??;M<4=C08A4
www.electromenagersge.ca
Soutien au
consommateur
Conseils de dépannage
FonctionnementMesures de sécurité Installation
Utilisation du distributeur d’eau
de Javel liquide
Le distributeur d’eau de Javel dilue et
diffuse automatiquement l’eau de Javel
liquide au moment approprié pendant
le cycle de lavage.
+MA8584H;4BMC8@D4CC4B3^4=CA4C84=
34BEOC4<4=CB?>DA2>==0PCA4;4B
8=BCAD2C8>=BB?M280;4B;4B2>=24A=0=C
#4BDA4HB>86=4DB4<4=C;^40D34 0E4;
;8@D8344=A4B?42C0=C;4B8=BCAD2C8>=B
34;01>DC48;;4
U Ne versez jamais d’eau de Javel
liquide non diluée directement sur
les vêtements ou dans le tambour
de lavage.
• Ne versez pas d’eau de Javel en
poudre dans le distributeur d’eau
de Javel.Ne placez pas de
vêtements sur le dessus du
distributeur pendant le chargement
et le déchargement de la laveuse.
• Évitez un excédent de remplissage
ou les éclaboussures lors de l’ajout
d’eau de Javel dans le distributeur.
La capacité maximale du
distributeur d’eau de Javel est d’une
tasse d’eau de Javel par cycle de
lavage. Un excédent de remplissage
peut entraîner une distribution
prématurée de l’eau de Javel.
E0=C343M<0AA4A;0;0E4DB4E4AB4H
;0@D0=C8CM0??A>?A8M43^40D34 0E4;
38A42C4<4=C30=B;438BCA81DC4DA3^40D
34 0E4;(8E>DB?AM5MA4HDC8;8B4A34
;^40D34 0E4;4=?>D3A409>DC4H;0
38A42C4<4=C30=B;4C0<1>DA34
;0E0640E0=C3^G?;024A;4;8=64
AVERTISSEMENT !
Ne mélangez pas l’eau de Javel avec de
l’ammoniaque ou de l’acide comme du
vinaigre et/ou un détachant antirouille.
Un tel mélange est susceptible de
produire un gaz toxique qui peut
entraîner la mort.
"0@D0=C8CM3^40D34 0E4;=>=38;DM4
A42><<0=3M4?0A;4501A820=C4BCE4ABM4
30=B;438BCA81DC4DA3^40D34 0E4;
&4=30=C;034A=8NA402C8>=34;0E064
X8=5DB8>=Y;^40D34 0E4;4BC09>DCM4
J;0270A6434;0E0644;060A0=C8C
D=4>?C8<8B0C8>=34B4B?4A5>A<0=24B
4DF270BB4B3^40DBM@D4=C84;;4B30=B
;438BCA81DC4DA3^40D34 0E4;4=CA0P=4=C
;0C>C0;8CM34;^40D34 0E4;)>DCAMB83D
;8@D83430=B;438BCA81DC4DAJ;058=3D
2G2;44BC34;^40D4C=>=34;^40D34 0E4;
&>DAME8C4AD=B8?7>==0648=3M?4=30=C
34;^40D34 0E4;30=B;4C0<1>DA34
;0E064@D8?>DAA08C4=3><<064AE>CA4
;8=64=^09>DC4H90<08B?;DB@D4;4=8E40D
<0F8<0;34A4<?;8BB0648=38@DMBDA
;438BCA81DC4DA
#08=C4=4H0DBB8;4;8=64M;>86=M3D
38BCA81DC4DA3^40D34 0E4;058=@D^8;
=4A4L>8E4?0B3^M2;01>DBBDA4B3^40D
34 0E4;0DC>DA3D38BCA81DC4DA3^40D
34 0E4;
Utilisation du tiroir distributeur
"4C8A>8A38BCA81DC4DA2>=C84=C
2><?0AC8<4=CB
O 3>D28BB0=C;8@D834
O MC4A64=C;8@D834>D4=?>D3A4J70DC
A4=34<4=C4C?4D<>DBB0=C
O 338C85B;8@D83434?AM;0E064
Le distributeur diffuse automatiquement
les additifs au moment approprié
pendant le cycle de lavage.
%DEA4H3>D24<4=C;4C8A>8A38BCA81DC4DA
4=;4C8A0=C9DB@D^J24@D^8;E84==44=
1DCM4
?ANB0E>8A09>DCM;4B?A>3D8CB34
;0E06454A<4H3>D24<4=C;4C8A>8A
38BCA81DC4DA*=454A<4CDA4CA>?A0?834
3DC8A>8A?>DAA08C4=CA0P=4AD=4
38BCA81DC8>=?AM<0CDAM434B0338C85B
U IE8C4HD=4F2M34=C34A4<?;8BB064>D
;4BM2;01>DBBDA4B;>AB34;^09>DC34B
?A>3D8CB34;0E06430=B;438BCA81DC4DA
4;0?>DAA08C4=CA0P=4AD=438BCA81DC8>=
?AM<0CDAM434B?A>3D8CB34;0E064
Z;058=3D2G2;48;4BC?>BB81;4@D4
34;^40DA4BC430=B;4B2><?0AC8<4=CB
4;0508C?0AC843D5>=2C8>==4<4=C=>A<0;
34;0;0E4DB4
REMARQUE : $^DC8;8B4H?0B3^40D34 0E4;
30=B;4C8A>8A38BCA81DC4DA
+>CA4;0E4DB44BC3>CM43D=BGBCN<434
;0E0648==>E0C4DA@D8508C0??4;JD=
4BB>A064A0?8344CJD=4E0?>A8B0C8>=
340DJD=0=6;43MC4A<8=M058=@D4
;40DCA0E4AB4;4BC8BBDB"4BGBCN<434
;0E064)",+0BBDA4D=;0E064
?;DB45582024<08B4=3>D24DA
"02C8>=34;0E064)",+=4B0??;8@D4
@D0DF?A>6A0<<4B%"%'($%'#"4C
,)(+-*)-
(GBCN<434;0E064)",+
=B4AC
>PC4J3MC4A64=C
Soutien au
consommateur
Conseils de dépannage Fonctionnement Mesures de sécuritéInstallation
Les caractéristiques de votre laveuse.
REMARQUE : Certaines caractéristiques peuvent ne pas être offertes sur tous les modèles de laveuses.
Ajout de détergent
REMARQUE : *C8;8B4HD=8@D4<4=C3D
3MC4A64=CJ70DCA4=34<4=C4C?4D
<>DBB0=C2><<4)834
V
9>DC4HD=4<4BDA4343MC4A64=C30=B
;42><?0AC8<4=CJ3MC4A64=C3DC8A>8A
38BCA81DC4DA
U Ne dépassez pas la ligne
de remplissage maximal.
"43MC4A64=C4BC270BBM3D38BCA81DC4DA
0D3M1DC34;0?70B434;0E064;4BC
?>BB81;43^DC8;8B4A3D3MC4A64=C;8@D834
>D4=?>D3A4
(8E>DBDC8;8B4H3D3MC4A64=C;8@D834
0BBDA4HE>DB@D4;01>PC4J3MC4A64=C
4C;^8=B4ACB>=C4=?;02430=B
;42><?0AC8<4=C&>DA;43MC4A64=C
4=?>D3A44=;4E4H;01>PC4J3MC4A64=C4C
;^8=B4AC3D2><?0AC8<4=CLa distribution
du détergent en poudre ne s’effectuera
pas si la boîte à détergent et l’insert sont
en place dans le compartiment.
;?4DCOCA4=M24BB08A43^09DBC4A
;^DC8;8B0C8>=3D3MC4A64=C4=5>=2C8>=
34;0C4<?MA0CDA44C34;03DA4CM34;^40D
>D34;0C08;;44C3D=8E40D34B0;4CM
34;0270A64IE8C4H3^DC8;8B4ACA>?34
3MC4A64=C30=BE>CA4;0E4DB420A24;0
?4DC?A>3D8A4D=401>=30=2434<>DBB4
4C4=CA0P=4A;0?AMB4=2434AMB83D34
3MC4A64=CBDA;4;8=64
Ajout d’adoucissant liquide
(814B>8=E4AB4H;0@D0=C8CM
A42><<0=3M43^03>D28BB0=C;8@D834
30=B;42><?0AC8<4=C3460D274
*C8;8B4HD=8@D4<4=C34;^03>D28BB0=C
;8@D834
8;D4H0E4234;^40D9DB@D^J;0;86=4
34A4<?;8BB064<0F8<0;
U Ne dépassez pas la ligne
de remplissage maximal.
*=4F2M34=C34A4<?;8BB064?4DC
?A>E>@D4AD=438BCA81DC8>=?AM<0CDAM4
34;^03>D28BB0=C4C?0A2>=BM@D4=CC0274A
;4BEOC4<4=CB
REMARQUE : $4E4AB4H?0B38A42C4<4=C
;^03>D28BB0=C30=B;4C0<1>DA34;0E064
;?4DCC0274A;4BEOC4<4=CB
><?0AC8<4=C?>DA
;0BB>D?;8BB0=C;8@D834
><?0AC8<4=C?>DA
;43MC4AB85;8@D83
><?0AC8<4=C?>DA;4
3MC4AB854=?>D3A4
Suivez toujours l’étiquette du fabricant de tissus pour laver.
Symboles
d’eau
de Javel
Toutes les eaux
de Javel
(si nécessaire)
Eaux de Javel sans chlore
(si nécessaire)
Ne pas utiliser
d’eau de Javel
Etiquettes d’eau de Javel
Catégorie Température cible
0D5A>8343DA>18=4C TT
A>834 TT
)8N34 TT
70D34 TT
REMARQUE : *C8;8B4HD=3MC4A64=C7><>;>6DM70DC
A4=34<4=C"4B3MC4A64=CBB>=C24DF@D85>DA=8BB4=C34
1>==4B?4A5>A<0=24B34=4CC>G064J34BC4<?MA0CDA4B3^40D
270D34C8N344C5A>834
Chargement et utilisation de la laveuse. www.electromenagersge.ca
Soutien au
consommateur
Conseils de dépannage
FonctionnementMesures de sécurité Installation
Tri des charges de lavage
)A84H?0A2>D;4DA1;0=22;08A2>D;4DA
=8E40D34B0;4CMCG?434C8BBD2>C>==034
B>;834B>8=5028;43M;820C?A>3D2C8>=34
?4;D274BC8BBDM?>=64274=8;;4>D
2>;;42C434?4;D274BE4;>DC8=4E4;>DAB
Chargement de la laveuse
M?>B4H;4B0AC82;4BB42BD=85>A<M<4=C
0D5>=34CE4AB;4FCMA84DA3DC0<1>DA34
;0E064(8E>DBBDA270A64H;0;0E4DB4
24;0?>DAA08C05542C4A;45582028CM3D;0E064
4C?A>E>@D4A34B5D8C4B
"4B0AC82;4BE>;D<8=4DF3>8E4=COCA4
?;02MB0DBB810B@D4?>BB81;430=B;4
C0<1>DA34;0E064?>DA34<48;;4DAB
AMBD;C0CB
&;024HC>D9>DAB;4B0AC82;4B5;>CC0=CB0D
5>=33DC0<1>DA34;0E064
"0;0E4DB43MC42C40DC><0C8@D4<4=C;0
6A>BB4DA34;01A0BBM4=A08B>=3D
BGBCN<434;0E064J70DCA4=34<4=C8;
4BC?>BB81;4@D4;40D=4A42>DEA4?0B
2><?;NC4<4=C;01A0BBM430=B;0??0A48;
U Ne lavez pas de tissus contenant
des matériaux inflammables (cires,
liquides de nettoyage, etc.)
U La laveuse ne se remplira pas
ou ne fonctionnera pas avec
le couvercle ouvert.
U`La quantité d'articles placés dans
l'appareil ne doit pas dépasser la
partie supérieure du tambour de
lavage.
Etiquettes de tissus
"4BBG<1>;4BBD8E0=CB34C8BBDB
B4CA>DE4=CBDA;4BEOC4<4=CB@D4E>DB
0;;4H;0E4A
Plage de températures
de la laveuse
Soutien au
consommateur
Conseils de dépannage
Fonctionnement Mesures de sécuritéInstallation
Utilisation correcte du détergent
*=4DC8;8B0C8>=343MC4A64=CCA>?
01>=30=C44BCD=420DB42;0BB8@D4
34B?A>1;N<4B34;0E064"4B3MC4A64=CB
3^0D9>DA3^7D8B>=C2>=LDB?>DAOCA4
45582024BB0=B<>DBB4A34<0=8NA4
E8B81;4BBDA4HE>DB34;8A40CC4=C8E4<4=C
4C34
A4B?42C4A;4BA42><<0=30C8>=B3D
501A820=C2>=24A=0=C;0@D0=C8CM34
3MC4A64=CJDC8;8B4A?>DAE>CA4;4BB8E4
+>DB?>DE4HDC8;8B4A<>8=B343MC4A64=C
B8E>CA440D4BC3>D244CB8;0270A64
4BCAM3D8C4>D?4DB0;4
REMARQUE : *C8;8B4HD=8@D4<4=C3D
3MC4A64=CJ70DCA4=34<4=C4C?4D
<>DBB0=C2><<4)834
V
Entretien et nettoyage
de la laveuse
Couvercle : "0E4H;40E42D=27855>=
7D<834J;^4FCMA84DA4CJ;^8=CMA84DA?D8B
BM274H;40E42D=27855>=3>DF
Tambour de lavage : "08BB4H;42>DE4A2;4
>DE4AC0?ANBD=4;4BB8E4?>DA;08BB4A
;^7D<838CMB^ME0?>A4A(8E>DBB>D708C4H
=4CC>G4A;4C0<1>DADC8;8B4HD=27855>=
3>DF7D<42CM3^D=3MC4A64=C;8@D834?D8B
A8=24H;4$^DC8;8B4H?0B34=4CC>G0=CB
2>AA>B85B>D01A0B85B
Tuyaux d’alimentation : "4BCDG0DF34
A022>A34<4=C34;0;0E4DB40DFA>18=4CB
3>8E4=COCA4A4<?;02MBC>DB;4B0=B
Extérieur : BBDG4H8<<M380C4<4=CC>DC
3M1>A34<4=CBBDG4H0E42D=27855>=
7D<834$4C>D274H?0B;0BDA5024>D
;^M2A0=0E4234B>194CB?>8=CDB
Transport et stockage : 4<0=34HJ
D=C427=8284=34B4AE8243^4=;4E4A;^40D
34;0?><?434E830=644C34BCDG0DF
&>DA4=B0E>8A?;DB2>=BD;C4H
www.electromenagersge.ca >D
0??4;4H;4$4BC>2:4H?0B
;0;0E4DB430=BD=4=3A>8C4F?>BM
0DF8=C4<?MA84B
Absences prolongées : BBDA4HE>DB
@D4;^0;8<4=C0C8>=4=40D4BC2>D?M40D
=8E40D34BA>18=4CB+830=64HC>DC4;^40D
34BCDG0DFB^8;4F8BC4D=A8B@D43464;
Tiroir distributeur : "43MC4A64=C4C
;^03>D28BB0=C?4DE4=CB4B>;838584A30=B
;4C8A>8A38BCA81DC4DA"4BAMB83DB3>8E4=C
OCA4M;8<8=MBD=4>D34DF5>8B?0A<>8B
%DEA4H;4C8A>8A4=;4C8A0=C9DB@D^J24
@D^8;E84==44=1DCM4(>D;4E4H;^0E0=C
3DC8A>8AE4AB;470DC4CB>AC4H;434
B>=;>64<4=C
=;4E4H;4B8=B4ACB34B
2><?0AC8<4=CBA8=24H;4B8=B4ACB
4C;4C8A>8A0E4234;^40D270D34?>DA
BD??A8<4A;4BCA024B34B?A>3D8CB34
;0E064022D<D;MB
&>DA=4CC>G4A;4;>64<4=C3DC8A>8A
DC8;8B4HD=4?4C8C41A>BB4=>=
<MC0;;8@D4?>DA=4CC>G4A;^4<1A0BDA4
I;8<8=4HC>DB;4BAMB83DB34B?0AC84B
BD?MA84DA4B4C8=5MA84DA4B34
;^4<1A0BDA4
'4?;024H;4B8=B4ACB30=B
;4B2><?0AC8<4=CB2>AA4B?>=30=CB
?D8B8=BC0;;4H;4C8A>8A
Chargement et utilisation de la laveuse.
><?0AC8<4=C?>DA
;0BB>D?;8BB0=C;8@D834
=B4AC
><?0AC8<4=C?>DA
;43MC4AB85;8@D83
><?0AC8<4=C?>DA;4
3MC4AB854=?>D3A4
)!'" !%
6?2F02?6:?@>A0@6;:?2:@6L>292:@2@
?;64:2A?292:@
O
#"%'!'Q >=B4AE4H
24B8=BCAD2C8>=B?>DA;^8=B?42C4DA;>20;
O
#"%'!'Q %1B4AE4HC>DB;4B2>34B
4C;4B>A3>==0=24B4=E86D4DA
O !;@2I8S6:[email protected].@2A>Q BBDA4HE>DB
34;08BB4A24B8=BCAD2C8>=B0D2>=B><<0C4DA
O !;@2.A0;:?;99.@2A>Q >=B4AE4H
24B8=BCAD2C8>=BJC8CA434AM5MA4=24
O !6B2.A120;9<K@2:02?\"^8=BC0;;0C8>=34
24C0??0A48;M;42C><M=064A=M24BB8C434B
2><?MC4=24B<M20=8@D4B4CM;42CA8@D4B3410B4
O "^8=BC0;;0C4DA4BCA4B?>=B01;434184=8=BC0;;4A
24C0??0A48;
O )>DC4?0==434?A>3D8C3D4JD=4<0DE08B4
8=BC0;;0C8>==^4BC?0B2>DE4AC4?0A;060A0=C84
:?@>A0@6;:?
.B2A?2
1S6:[email protected].@6;:
*#'
2?=A2?@6;:?<<282F82;A)6?6@2F:;@>2?6@2*2/I8S.1>2??2CCC2820@>;92:.42>?420.
+!&#" %
#"(%)"'%&H(%'H
+!&H'%$(&
&!% Q&>DA
;0BM2DA8CM34B?4AB>==4B=^DC8;8B4H?0B34A0;;>=64
3^0;8<4=C0C8>=>D3^030?C0C4DA34?A8B40E4224C
0??0A48;$42>D?4H?0BB>DB0D2D=?AMC4FC4>D
=^4=;4E4H?0B;0CA>8B8N<41A>27434<8B4J;0C4AA4
3D2>A3>=3^0;8<4=C0C8>='4B?42C4H;4B=>A<4B
4C;4BAM6;4<4=C0C8>=BM;42CA8@D4B=0C8>=0;4B
4C0??0A48;3>8COCA40;8<4=CM0E42;0C4=B8>=4C
;05AM@D4=24<4=C8>==M4BBDA;0?;0@D4B86=0;MC8@D4
B8CDM4BDA;42>DE4A2;40AA8NA43D3>BB4A4C4C
A022>A3MJD=28A2D8C3^0;8<4=C0C8>=8=38E83D4;
2>AA42C4<4=C<8BJ;0C4AA44C?A>CM6M?0A
D=38B9>=2C4DA34>D0<?NA4B>DD=5DB81;4
2>DBB8=4C(8;^0;8<4=C0C8>=M;42CA8@D45>DA=84=^4BC
?0B2>=5>A<4B0DF4F864=24B2834BBDB2>=C02C4H
D=M;42CA8284=@D0;858M
#%&&"!S(Q>8COCA42><?A8B44=CA4?B8
4C?B8
' #H%'(%S(Q"4270D55440D
3><4BC8@D43>8COCA4AM6;M?>DA3M;8EA4A34;^40D
2><?A8B44=CA4T4CTT4CT
Z""+*(
)!!&% '(%Q4BE0==4B3454A<4CDA4
A>18=4CB3^40D270D344C5A>8343>8E4=COCA4
8=BC0;;M4B
)!Q"^40D34;0E064?4DCOCA4E830=6M4
30=BD=42>;>==43^0;8<4=C0C8>=>DD=42DE4
"070DC4DA34E830=64!"'#&T'%
!H%(%P #"(& 4CBD?MA84DA4
J<?843B0D34BBDB3DB>2;434;0;0E4DB4
"02>;>==43^0;8<4=C0C8>=3>8C0E>8AD=380<NCA4
8=C4A=4<8=8<0;342<?>D24B4COCA4
>DE4AC4J;^08A;81A4
!&'%('"!& &P'%%
4C0??0A48;3>8COCA4A022>A3MJ;0C4AA40=B
;^ME4=CD0;8CM3^D=3GB5>=2C8>==4<4=C>D3^D=4
?0==4;0<8B4J;0C4AA4AM3D8A0;4A8B@D43427>2
M;42CA8@D44=5>DA=8BB0=C0D2>DA0=CM;42CA8@D4
D=274<8=34<>8=3A4AMB8BC0=244C0??0A48;4BC
M@D8?M3^D=2>A3>=<D=83^D=2>=3D2C4DA34<8B4
J;0C4AA434;^0??0A48;4C3^D=45827434<8B4J;0
C4AA4"0582743>8COCA41A0=27M430=BD=4?A8B4
0??A>?A8M44;;4<O<42>AA42C4<4=C8=BC0;;M4
4CA022>A3M4J;0C4AA42>=5>A<M<4=CJC>DC4B
;4B=>A<4B4CAM6;4<4=C0C8>=B;>20;4B
)%'&& !'Q
*=A022>A34<4=C8=2>AA42C3D2>=3D2C4DA34
<8B4J;0C4AA434;^0??0A48;?4DC4=CA0P=4AD=A8B@D4
3427>2M;42CA8@D4>=BD;C4HD=M;42CA8284=>D
D=C427=8284=@D0;858MB8E>DB0E4HD=3>DC4BDA
;0<8B4J;0C4AA42>AA42C434;^0??0A48;$4<>38584H
?0B;0582745>DA=840E42;^0??0A48;]B824;;428=^4BC
?0B030?CM4J;0?A8B4508C4B8=BC0;;4AD=4?A8B4
2>AA42C4?0AD=M;42CA8284=@D0;858M
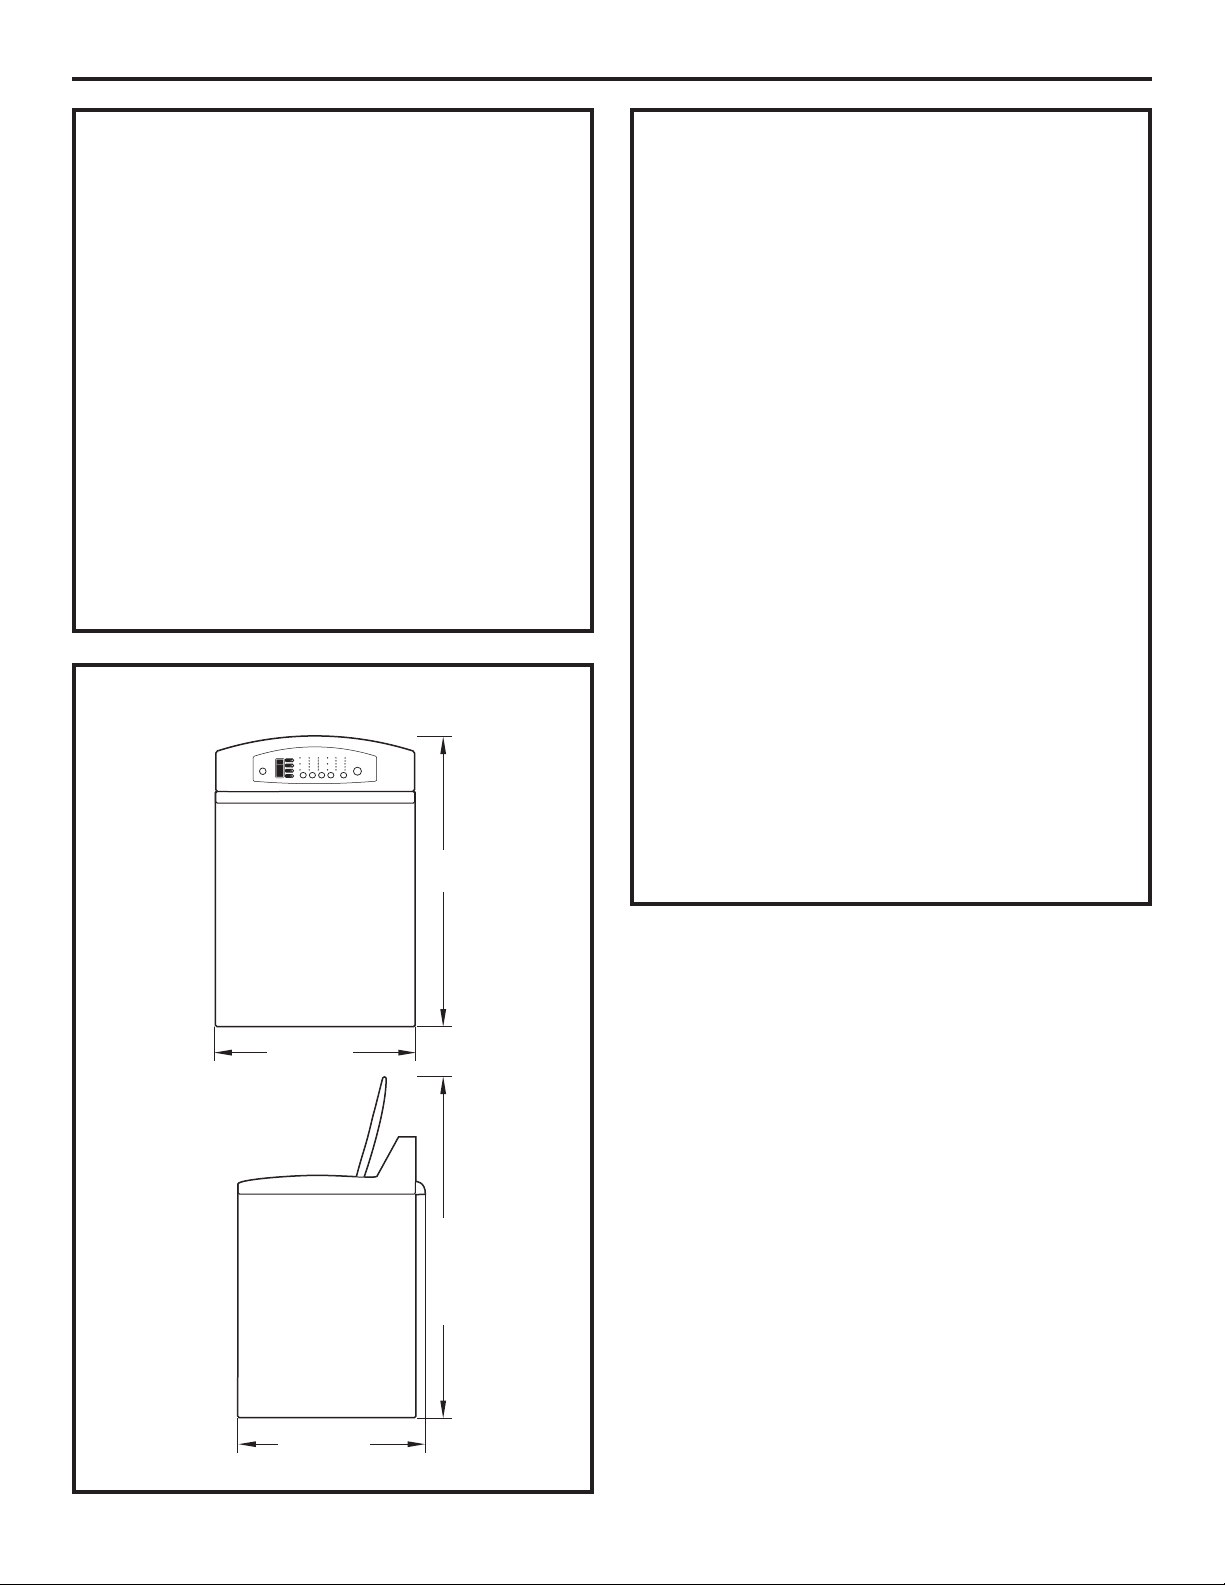
:?@>A0@6;:?1S6:[email protected].@6;:
# !')(&
"0;0E4DB43>8COCA48=BC0;;M4BDAD=B>;BC01;4
?>DA<8=8<8B4A;4BE81A0C8>=B?4=30=C;42G2;4
3^4BB>A064
"4BB>;B4=1MC>=B>=C;4B<48;;4DAB<08B
D=?;0=274A4=1>8B4BCBD558B0=CJ2>=38C8>=
@D4;4B>D10BB4<4=C3424?;0=274AA4B?42C4=C
;4B=>A<4B"0;0E4DB4=43>8C?0BOCA4
8=BC0;;M4BDAD=C0?8B>D4F?>BM40DF8=C4<?MA84B
B?024;81A4<8=8<0;4=CA4;0;0E4DB44C;4B<DAB
039024=CB>D3^0DCA4BBDA5024B
O 2<?>34270@D42QCM
O 2< ?>J;^0E0=C
O 2< ?>J;^0AA8NA4
"^4B?024;81A4<8=8<0;4=70DC4DA3DB>;0DF
MC06NA4B?;020A3B?;05>=3B4C20D34BBDB4BC
342< ?>
!&"!&)(&
2<
?>
2<
a?>
2<
a ?>
0E42;4
2>DE4A2;4
>DE4AC
2<
a ?>
+D4;0CMA0;4
+D40E0=C
+!&#"(%(!!&''"!
!&'%H
+>CA4;0E4DB44BC7><>;>6DM4?>DAD=48=BC0;;0C8>=
4=20BCAM42><<48=38@DMBDA;^MC8@D4CC4B8CDM4J
;^0AA8NA434;0<0278=4
B?024;81A4<8=8<0;4=CA4;0;0E4DB44C;4B<DAB
039024=CB>D3^0DCA4BBDA5024B
O 2<?>34270@D42QCM
O 2< ?>J;^0E0=C
O 2< ?>J;^0AA8NA4
"^4B?024;81A4<8=8<0;4=70DC4DA3DB>;0DF
MC06NA4B?;020A3B?;05>=3B4C20D34BBDB4BC
342< ?>
"4B?>AC4B34;0=82743>8E4=COCA409>DAM4B>D
B8=>=E4=C8;M4B4C4;;4B3>8E4=C38B?>B4A3^0D<>8=B
2<20AAM?>D24B20AAM3^>DE4ACDA4?>DA
;0;0E4DB4D=8@D4<4=C>DB8;0=827401A8C4
D=4;0E4DB44CD=4BM274DB4;0?>AC43>8C38B?>B4A
3^0D<>8=B2<20AAM?>D24B20AAM
3^>DE4ACDA4AM?0AC8BM@D8C01;4<4=C"4B>A85824B
3^0MA0C8>==43>8E4=C?0BOCA4>1BCADMB;>AB@D4
;0?>AC44BC8=BC0;;M4*=4?>AC409>DAM40E4234B
>A85824B3^0MA0C8>=M@D8E0;4=CBBDA;0;>=6D4DA
4=C8NA434;0?>AC44BC0224?CM4
% %$("4B4B?024B;81A4B8=38@DMBBDA24CC4
MC8@D4CC4B>=C34B<8=8<0DF;4BC=M24BB08A434
?AME>8A34B4B?024B;81A4B0??A>?A8MB?>DA
;^8=BC0;;0C8>=4C;^4=CA4C84=34;0<0278=4
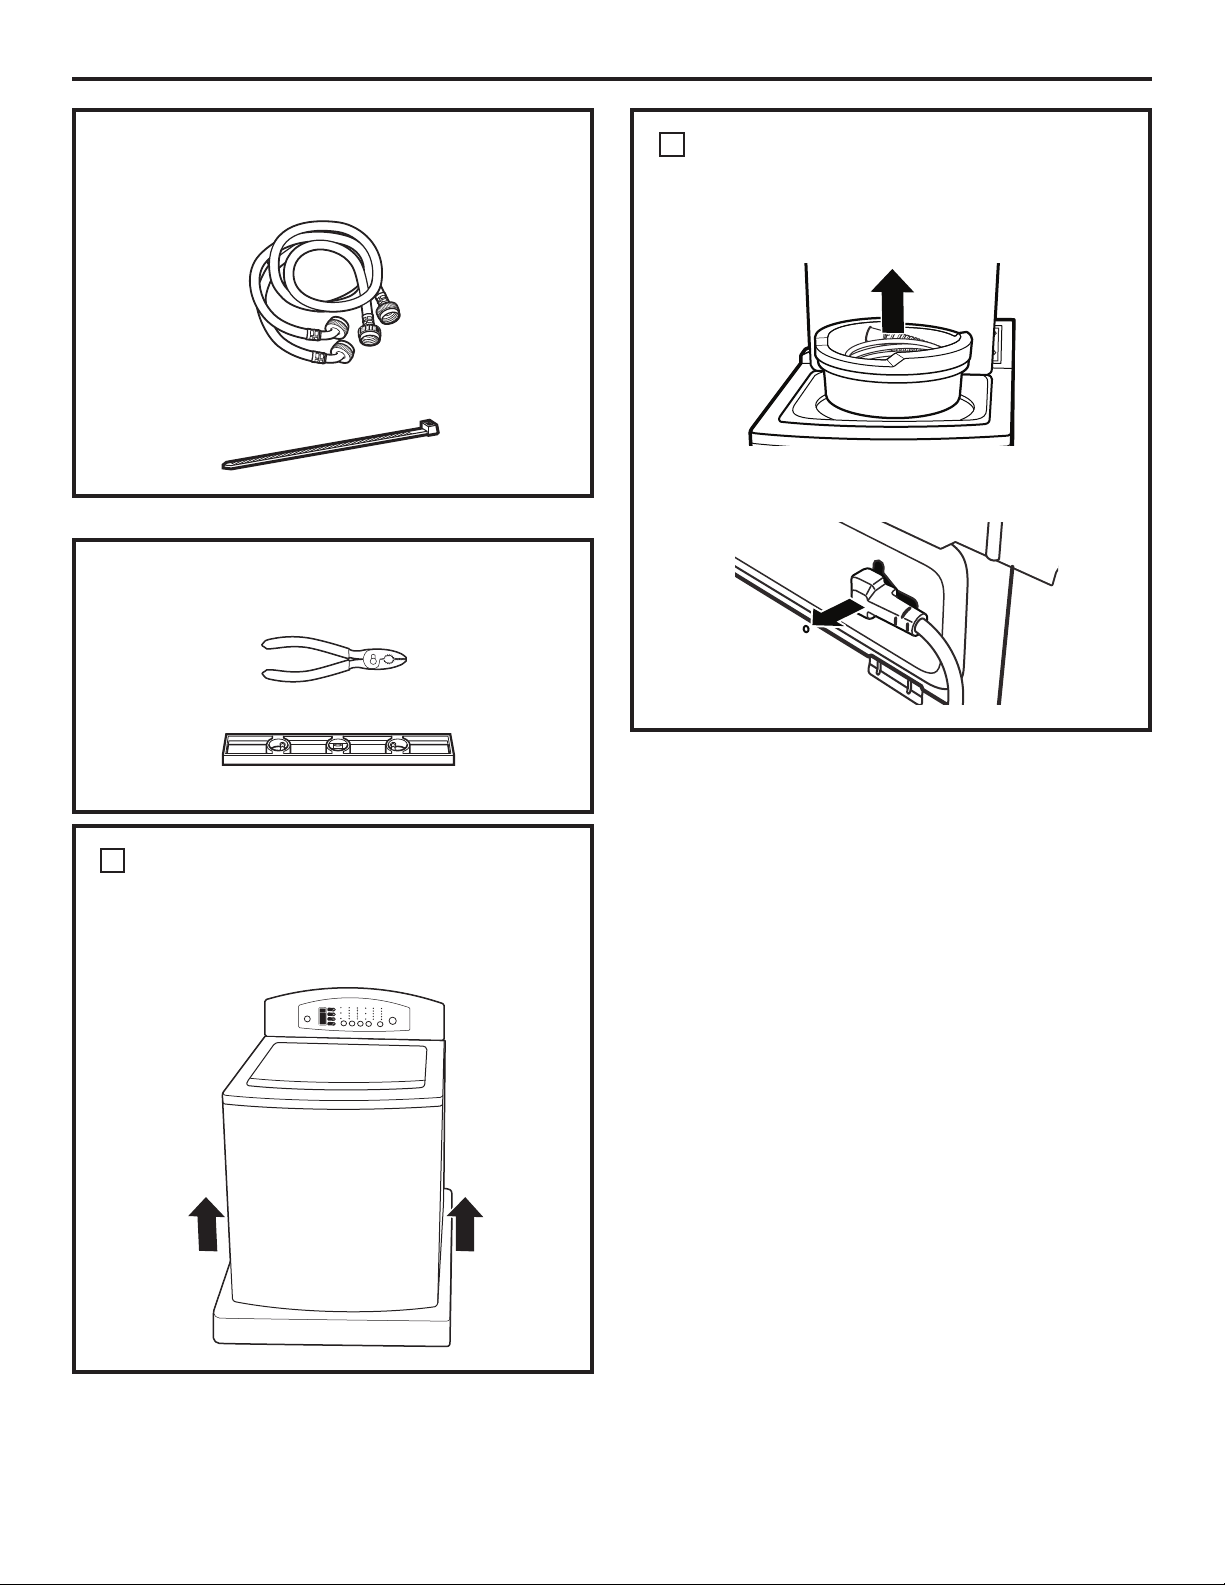
n &8=24<D;C8?A8B4J2AM<08;;NA4
n $8E40DJ1D;;4
:?@>A0@6;:?1S6:[email protected].@6;:
#U&!(&&
n )DG0DF3^40D
n CC0274342K1;4
"('!H&&%
H-)(&
H-)(&&('
=;4E4H;41;>24=(CGA>5>0<2>=C4=0=C;4<0=D4;
3^DC8;8B0C8>=;4B?8N24B;4BCDG0DF3^40D4C
;4BM270=C8;;>=B34B?A>3D8CB34;0E064
(>AC4H;42>A3>=3^0;8<4=C0C8>=34;^0AA8NA4
34;0;0E4DB4
?ANB;0;8EA08B>=34;0;0E4DB4J3><828;4
B>AC4H;0;0E4DB43D20AC>=3^4<10;;0644C
3DB>2;43^4F?M38C8>=4=(CGA>5>0<
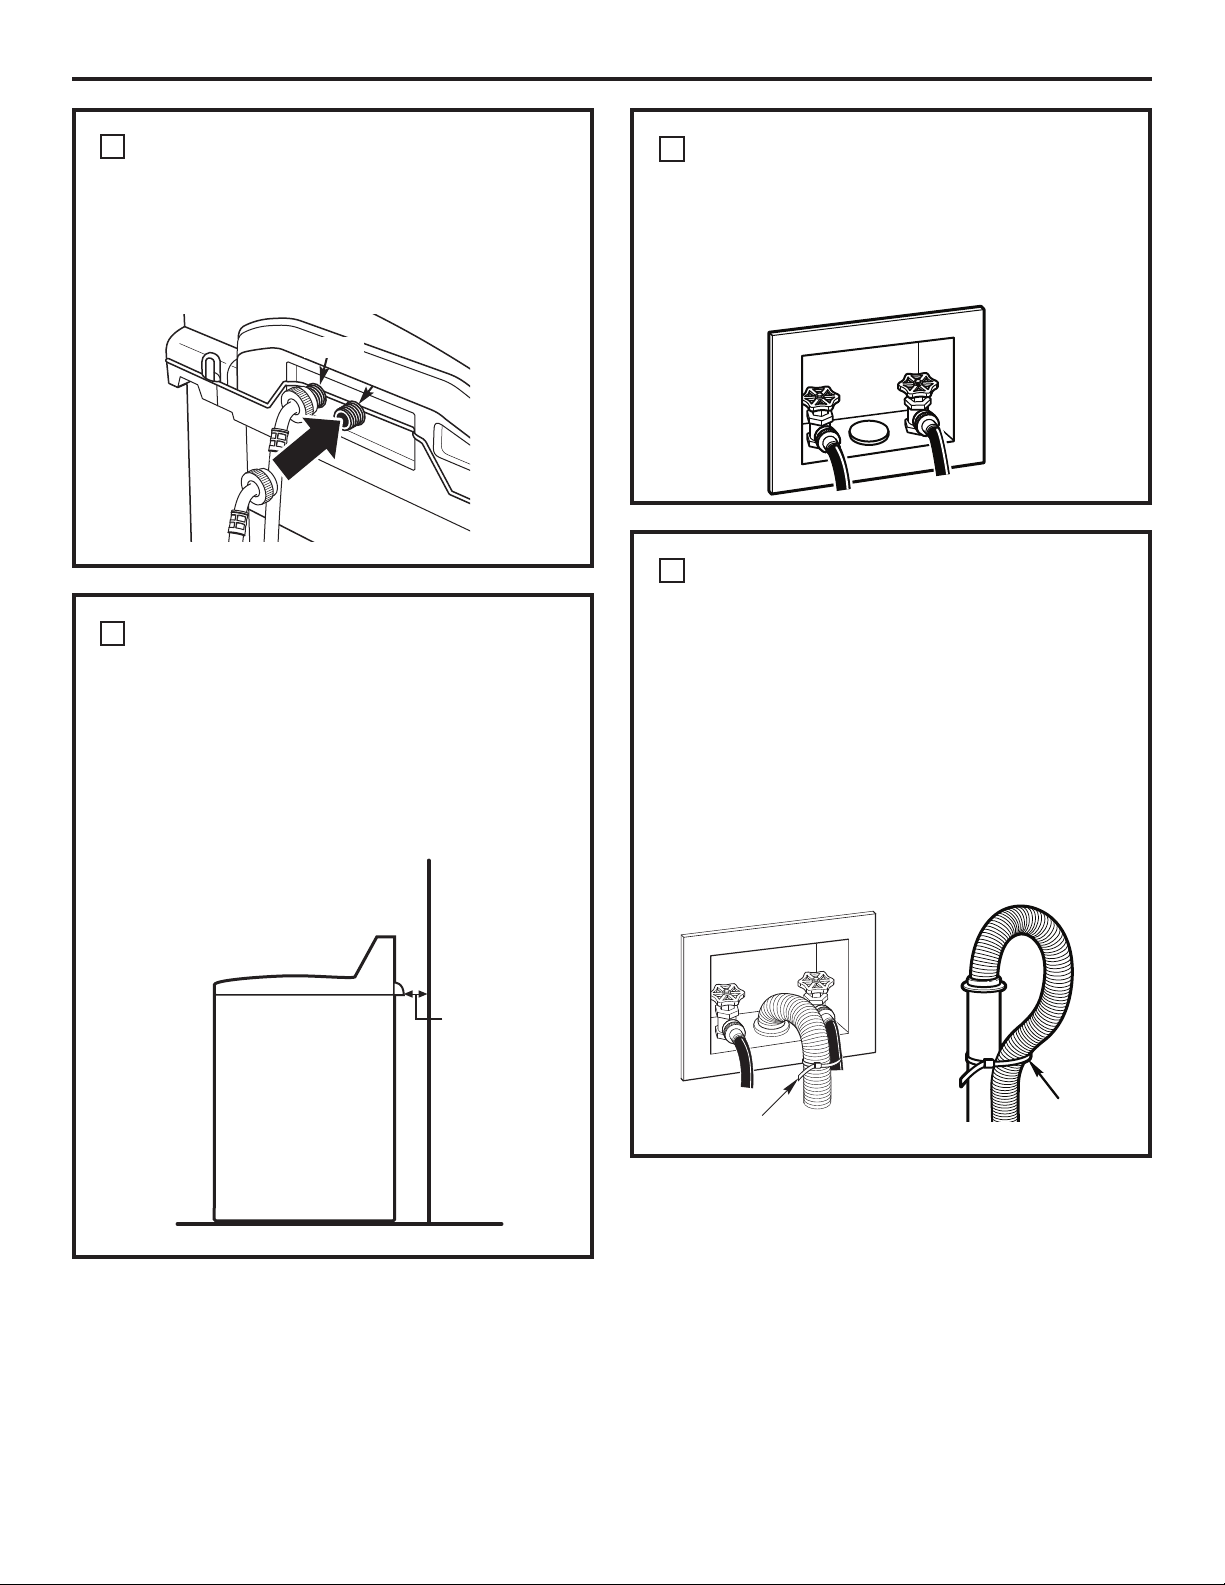
:?@>A0@6;:?1S6:[email protected].@6;:
+-&'(,(+S(P)(&
+8BB4H;4CDG0D3^40D270D34BDA;4A022>A33^40D
270D34%'$34;0;0E4DB44C;4CDG0D3^40D
5A>834BDA;4A022>A33^40D5A>834"*(4AA4H
J;0<08=4=BD8C445542CD4HD=34C>DA
BD??;M<4=C08A40E4234B?8=24B
A>83
H#-)(&P#%"+ 'H
(%H&(" &'$(
M?;024H;0;0E4DB40DBB8?ANB@D4?>BB81;434
B>=4<?;024<4=C58=0;4=;08BB0=CBD558B0<<4=C
3^4B?024?>DA45542CD4A;4B1A0=274<4=CB4C;4B
A022>A34<4=CB3^40D34E830=644C3^M;42CA828CM
"^4B?024;81A4<8=8<0;A4@D8BJ;^0AA8NA4
34;0;0E4DB44BC342<?>
%!-&'(,(+S(
(%H&(" &'$(
A0=274H;4BCDG0DF3^40D0DFE0==4B
3^0;8<4=C0C8>=4=40D*4C'%34E>CA4
<08B>=(4AA4HJ;0<08=4=BD8C445542CD4HD=
34C>DABD??;M<4=C08A40E4234B?8=24B
+-'(,()!
P)!" &'$(
=BMA4H54A<4<4=C;^4FCAM<8CM;81A43DCDG0D34
E830=6430=B;^>A8582434E830=6434E>CA4<08B>=
BBDA4HE>DB@D4;^4FCAM<8CM4=20>DC27>D24BC
4=C8NA4<4=C8=BMAM430=B;^>A8582434E830=64
O (8;4BE0==4B3^40D4C;^>A8582434E830=64B>=C
4=20BCAMB30=B;4<DA58F4H;4CDG0D34E830=64
J;^D=34BCDG0DF3^40D0E42;42>;;84A2QCM
=4AEDAMJ;^8=CMA84DA
O (8E>CA4E830=644BCD=42>;>==43^0;8<4=C0C8>=
58F4H;4CDG0D34E830=64J;02>;>==40E42
;42>;;84A5>DA=8
>;;84A
>;;84A
2<?>
70D3
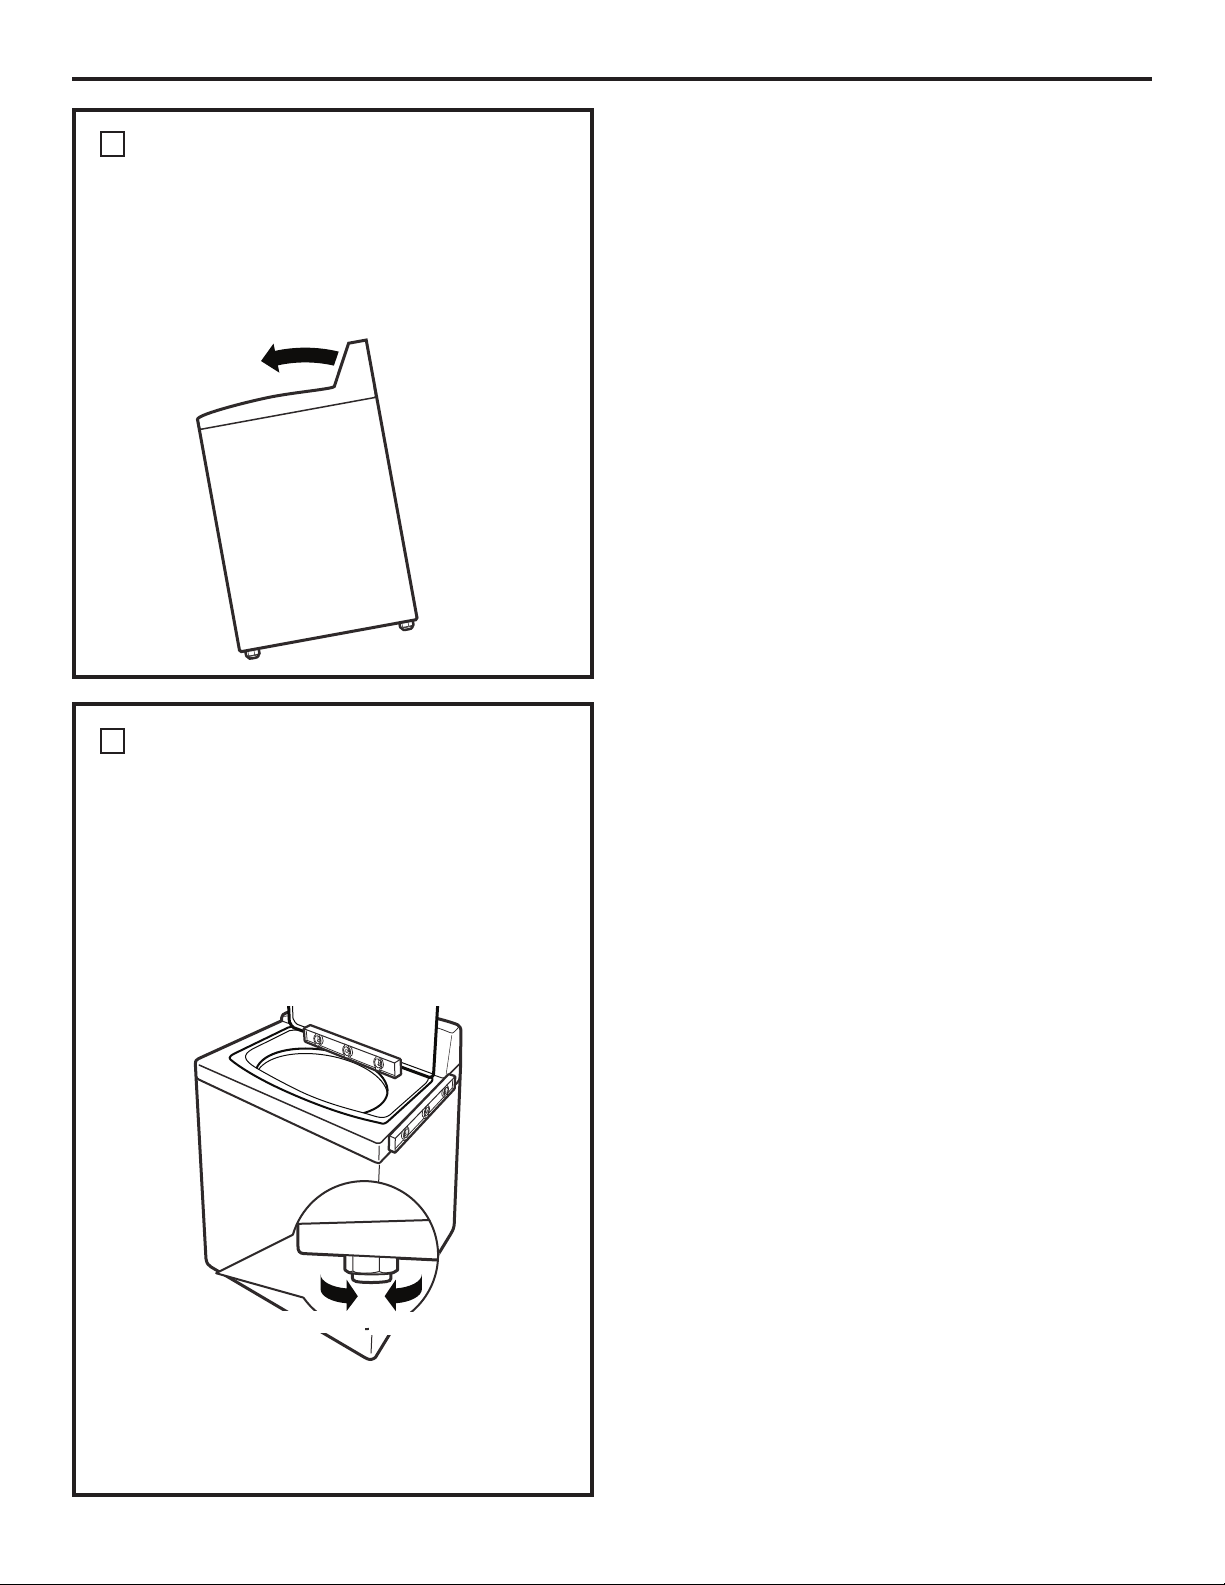
:?@>A0@6;:?1S6:[email protected].@6;:
''-)(&!)(
M?;024H;0;0E4DB4BDAB0?>B8C8>=58=0;4
O &>DAEMA8584AB8;0;0E4DB44BC34=8E40D
;0CMA0;4<4=C>DEA4H;42>DE4A2;44C?;024H
D==8E40DJ;^0AA8NA434;^>DE4ACDA40D34BBDB
3DC8A>8A38BCA81DC4DA
O &>DAEMA8584AB8;0;0E4DB44BC34=8E40D
24=CA0;4<4=C?;024HD==8E40DBDA;41>A3;0CMA0;
34;0;0E4DB4J;0270A=8NA43D208BB>=4C3D
2>DE4A2;4BD?MA84DA
(8;0;0E4DB4=^4BC?0B34=8E40DAM6;4H;4B?0CC4B
34=8E4;;4<4=C0E0=C)>DA=4H;4B30=B;4B4=B
7>A08A4?>DA<>=C4A4C30=B;4B4=B0=C87>A08A4
?>DA108BB4A
%H-&#''&%%U%
=2;8=4H;0;0E4DB4E4AB;^0E0=C4=?8E>C0=C
BDA;4B?0CC4B0E0=C3^4=E8A>=J2<
J?>D24B?D8BA4?>B4H3>D24<4=C
;4B?0CC4B0AA8NA4BDA;4B>;4CC402C8>=AM6;4A0
;4B?0CC4B0AA8NA4?0AA0??>AC0DAM6;06434B
?0CC4B0E0=C
08BB4A
#>=C4A
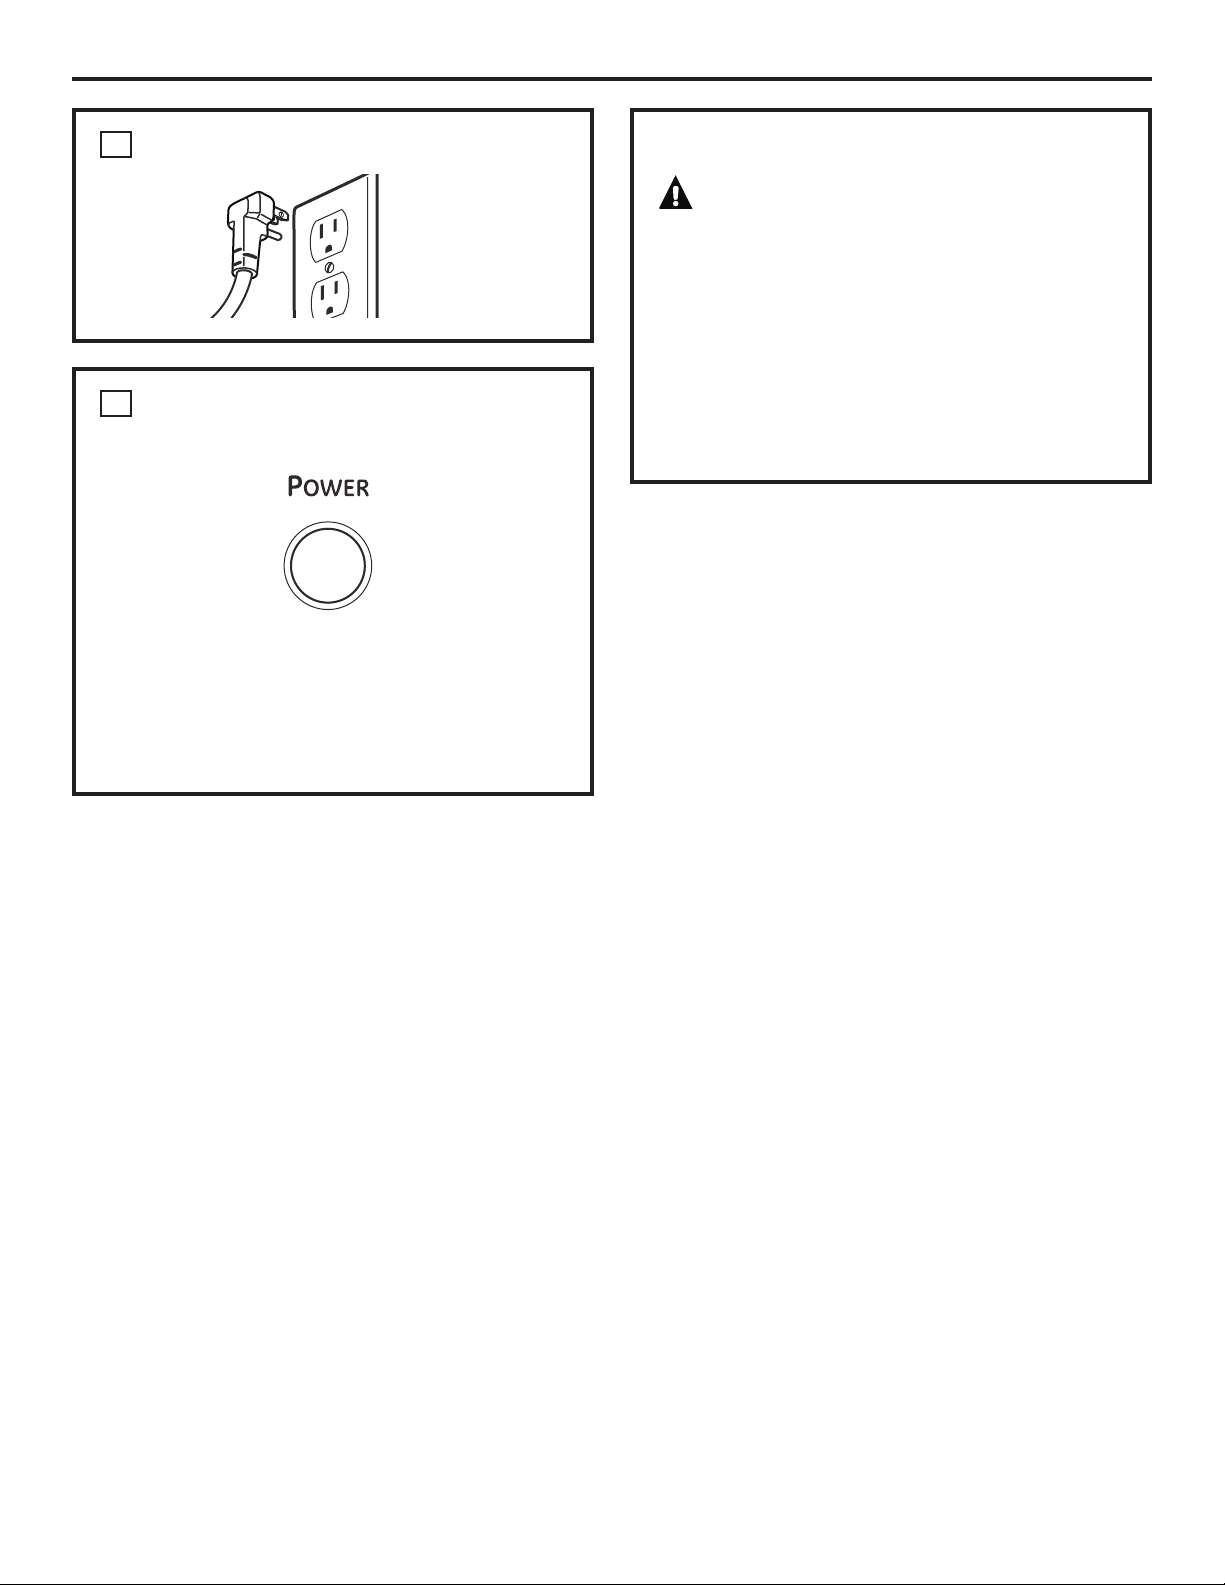
%!-)(&
:?@>A0@6;:?1S6:[email protected].@6;:
H %%)(&
??DG4HBDA;0C>D274#"*% 0;8<4=C0C8>=
% %$((8;0;0E4DB40MCM4F?>BM4J
34BC4<?MA0CDA4B3464;?4=30=CD=4?MA8>34
?A>;>=6M4;08BB4H;0B4AM270D554A0E0=C3^0??DG4A
BDA#"*% 0;8<4=C0C8>=(8=>=;^M2A0=
=4B^0;;D<4A0?0B
"0;0E4DB44BC<08=C4=0=C?AOC4J;^4<?;>8
!'!!
)%'&& !'QH@6=A2@2F
@;A?82?0J/82?.B.:@1282?1K/>.:052>
<;A>82?0;:@>N82?129.6:@2:.:02
2?2>>2A>?120J/8.42<2AB2:@<>;B;=A2>
A:1E?3;:0@6;::292:@2@A:3;:0@6;::292:@
1.:42>2AD.<>L?A:26:[email protected].@6;:
9.6:@2:.:02
&>DA;4B?8N24B3MC027M4B4C;4B0DCA4B
8=5>A<0C8>=B2>=BD;C4H;4<0=D4;3^DC8;8B0C8>=?>DA
2>==0PCA4;4B=D<MA>B34CM;M?7>=43DB4AE824
0?ANBE4=C4

Soutien au
consommateur
Conseils de dépannage
FonctionnementMesures de sécurité Installation
Avant d’appeler un réparateur… www.electromenagersge.ca
Conseils de dépannage—Économisez du temps et de l’argent!
Consultez d’abord les tableaux qui suivent et vous pourrez
peut-être éviter de faire appel à un réparateur.
Problème Causes possibles Correctifs
La laveuse 2<.::2.A120;99.:12?2?@6:.0@63 O ^4BC=>A<0;??DG4HBDAPOWER (alimentation)
ne fonctionne pas
.8.B2A?22?@1K/>.:05K2 O BBDA4HE>DB@D4;42>A3>=4BC2>AA42C4<4=C1A0=27M30=B
D=4?A8B4B42C4DA
S.8692:@.@6;:2:2.A2?@0;A<K2 O %DEA4H4=6A0=3;4BA>18=4CB3^40D270D344C5A>834
2?0;99.:12??;:@9.80;:364A>K2? O BBDA4HE>DB@D4;42G2;44BC2>AA42C4<4=CBM;42C8>==M
54A<4H;42>DE4A2;44C0??DG4HBDASTART (démarrage)
20;AB2>0822?@;AB2>@R92?A>2 O 4A<4H;42>DE4A2;44CAM8=8C80;8B4H;42G2;434?D8B;43M1DC
12?K0A>6@K20;AB2>082;AB2>@ B8=M24BB08A4
29<M0528.8.B2A?212?2>29<86>
2@123;:0@6;::2>
216?7;:0@2A>3A?6/822?@ O +MA8584H;4B38B9>=2C4DAB4C;4B5DB81;4B34;0<08B>='4<?;024H
1K?.>9K4>688K ;4B5DB81;4B6A8;;MB>DAM0A<4H;4B38B9>=2C4DAB"0;0E4DB43>8C
38B?>B4A3^D=4?A8B48=3M?4=30=C4
82?@:K02??.6>212>K6:6@6.86?2> O M1A0=274H;0;0E4DB4?0C84=C4H<8=DC4BA41A0=274H;04C
8206>0A6@K820@>;:6=A2 0??DG4HBDAPOWER (alimentation)
.@;A052START 1K9.>>.42:S.<.? O ??DG4HBDASTART (démarrage)
K@K2:3;:0K2.<>L?8.?K820@6;:1SA:0E082
#>2??6;:1S2.A2D@>M9292:@3.6/82 O ??DG4H34=>DE40DBDASTART (démarrage)
.8.B2A?22?@@>;<3>;612 O (8;0;0E4DB40MCM4F?>BM4J34BC4<?MA0CDA4B3464;
?4=30=CD=4?MA8>34?A>;>=6M4;08BB4H;0B4AM270D554A
0E0=C3^0??DG4ABDAPOWER (alimentation)(8=>=;^M2A0=
=4B^0;;D<4A0?0B
L’eau n’arrive pas 2368@>22?@;/?@>AK;A82?@AE.AD O BBDA4HE>DB@D4;4B58;CA4B34BA022>A3B3^40D;4B2A81;4B1;4D
correctement 1S.8692:@.@6;:<2AB2:@M@>2B>688K? 4C>A0=643>8E4=COCA4?A>?A4B34;0<0278=4=4B>=C?0B
>1BCADMB>D?4H;^40D4CEMA8584H;458;CA44=3M1A0=270=C
;4CDG0D34;0<0278=4+MA8584H@D4;4BCDG0DF3^0;8<4=C0C8>=
=4B>=C?0BEA8;;MB>D1>D27MB
.6/820;:?;99.@6;: O ;B^068C3^D=4;0E4DB4J5081;42>=B><<0C8>=M=4A6MC8@D4
&0A2>=BM@D4=C;4BAM6;064B34C4<?MA0CDA43424CC4
<0278=4?4DE4=COCA43855MA4=CB3424DF34B;0E4DB4B
2;0BB8@D4B
8692:@.@6;:2:2.A6:?A336?.:@2 O BBDA4HE>DB@D4;^0;8<4=C0C8>=4=40D4BC38B?>=81;4
BBDA4HE>DB@D4;4BA>18=4CB3^40DB>=C>DE4ACB4=6A0=3
20;AB2>082128.8.B2A?22?@;AB2>@ O "42>DE4A2;434;0;0E4DB43>8COCA454A<M?>DA;41>=
5>=2C8>==4<4=C34C>DB;4B2G2;4B34;0E064(8;42>DE4A2;4
4BC>DE4AC?4=30=CD=2G2;434;0E064C>DC4B;4B5>=2C8>=B
B^0AAOC4=CG2><?A8B;4A4<?;8BB0644=40D
>.:05292:@6:0;>>20@12?@AE.AD O BBDA4HE>DB@D4;4BCDG0DF3^0;8<4=C0C8>=2>==42C4=C
1S.8692:@.@6;: ;^0;8<4=C0C8>=4=40D270D340DA022>A33^40D270D34
34;0;0E4DB44C;^0;8<4=C0C8>=4=40D5A>8340DA022>A33^40D
5A>834270D3BDA270D34C5A>83BDA5A>83
"<@696?.@6;:1A>29<86??.422:2.A O "^40D?4DC=4?0BA42>DEA8A;470DC34;0270A64^4BC=>A<0;
?>DAD=4;0E4DB4J5081;42>=B><<0C8>="4A4<?;8BB064
4=40D4BC>?C8<8BM?0A;4BGBCN<4?>DA34<48;;4DA4B
?4A5>A<0=24B34;0E064
La laveuse 'AE.A12B61.:42B>688K;A O BBDA4HE>DB@D4;4CDG0D34E830=64=^4BC?0BEA8;;M
ne se vidange pas— ;>6360212B61.:42?6@AKI<8A? >=5>A<M<4=C0DF8=BCAD2C8>=B3^8=BC0;;0C8>=;^>A8582434
l’eau reste dans 129<621?.A12??A?1A?;8 E830=64=4?4DC?0BB4B8CD4AJ?;DB34<?843B
0D34BBDB3DB>;
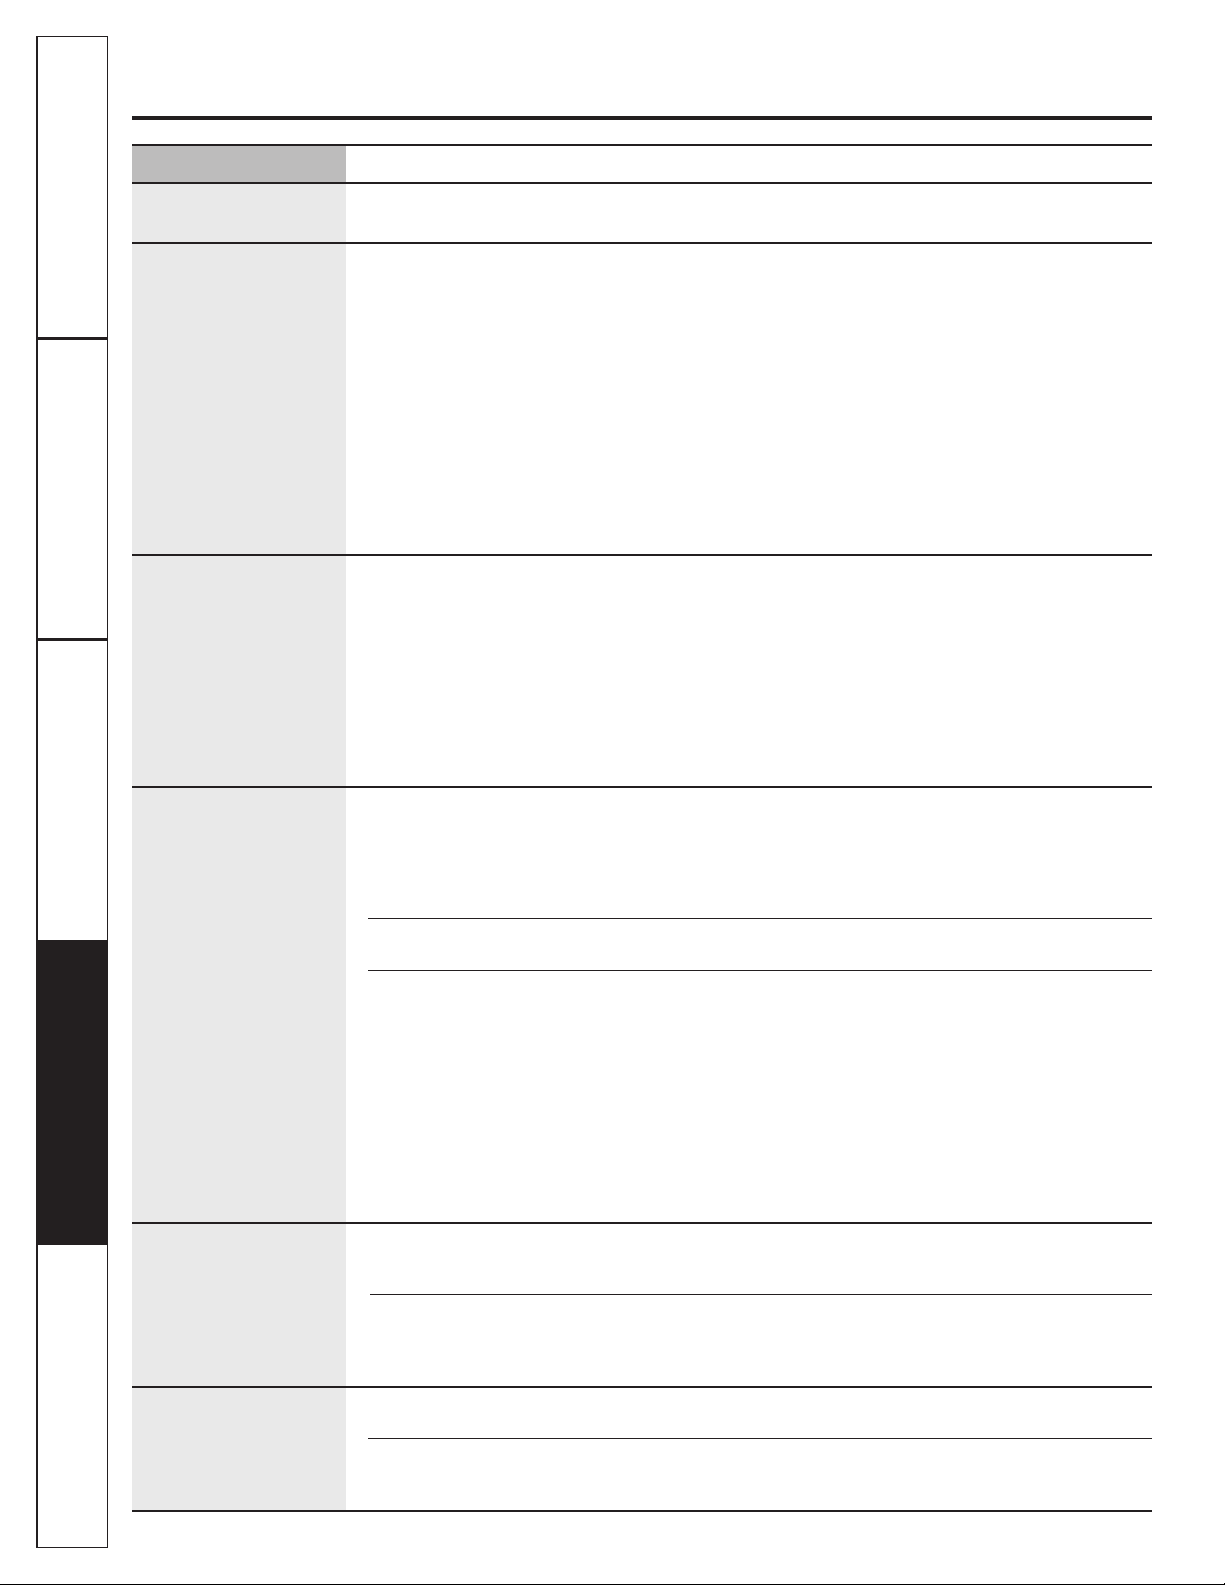
Soutien au
consommateur
Conseils de dépannage Fonctionnement Mesures de sécuritéInstallation
Avant d’appeler un réparateur…
Problème Causes possibles Correctifs
Fuites d’eau à chaque 2?@AE.AD:2?;:@<.?9;:@K? O +MA8584HB8C>DB;4BA022>A3B34BCDG0DF3^0;8<4=C0C8>=4C34
lavage 0;>>20@292:@ E830=64B>=C58FMB4CB4AAMB
Fuites d’eau ;A??2./;:1.:@2 O *=401>=30=2434<>DBB4?4DC?A>E>@D4A34B5D8C4B4C?A>E4=8A
3DCG?44C34;0@D0=C8CM343MC4A64=CDC8;8BM;4BCA42><<0=3M
3^DC8;8B4AD=3MC4A64=CJ70DCA4=34<4=CBBDA4HE>DB@D4
;43MC4A64=C4C;4BME4=CD4;B0338C85BB>=CE4ABMB30=B
;4B1>=B2><?0AC8<4=CB3DC8A>8A38BCA81DC4DA'4B?42C4H
;4BA42><<0=30C8>=B3D501A820=C2>=24A=0=C;0@D0=C8CM
343MC4A64=C<08B4BB0G4H3^4=DC8;8B4A<>8=B=>C0<<4=C
B8D=2>=38C8>==4DA>DD=03>D28BB4DA3^40D4BCDC8;8BM
O(8E>DB?;024HCA>?34EOC4<4=CB30=B;4C0<1>DA34;0E064
;40D?4DC3M1>A34A3DC0<1>DA?4=30=C;4;0E064"0@D0=C8CM
34EOC4<4=CB?;02MB30=B;0??0A48;=43>8C90<08B3M?0BB4A;0
?0AC84BD?MA84DA43DC0<1>DA4BC?0AC82D;8NA4<4=C;420B
;>AB@D4E>DB?;024H30=B;0;0E4DB434B>A48;;4AB>D34B
M3A43>=B4B0AC82;4B>=CC4=30=24J5;>CC4A4C3>8E4=COCA4
?;02MB0D5>=33DC0<1>DA34;0E064
Aucune distribution ou 2?0;9<.>@692:@?128.B.42?;:@ O BBDA4HE>DB@D4;43MC4A64=C4C;4BME4=CD4;B0338C85BB>=C
distribution partielle /;A05K?<.>12?>29<86??.42? E4ABMB30=B;4B1>=B2><?0AC8<4=CB3DC8A>8A38BCA81DC4DA
de détergent 6:0;>>20@? (8E>DBDC8;8B4H3D3MC4AB854=?>D3A40BBDA4HE>DB34=;4E4A;0
1>PC4J3MC4A64=C4C;8=B4AC"0BB>D?;8BB0=C;8@D8343>8COCA4?;02M
30=B;42><?0AC8<4=C?>DA;0BB>D?;8BB0=C(8E>DBDC8;8B4H3D
3MC4A64=C4=?>D3A40BBDA4HE>DB@D4;01>PC4J3MC4A64=C4C
;^8=B4AC=4B>=C?0B<>=CMB30=B;42><?0AC8<4=C3DC8A>8A
38BCA81DC4DA"4B;8@D834B3>8E4=COCA4E4ABMB30=B;4B
2><?0AC8<4=CBJ03>D28BB0=C4C?AM;0E064&>DAC>DB;4BCG?4B34
3MC4A64=C0BBDA4HE>DBC>D9>DAB@D4;4C8A>8A38BCA81DC4DA4BC
2><?;NC4<4=C54A<M0E0=C;43M<0AA0643D2G2;4
'>;<121K@2>42:@A@686?K O BBDA4HE>DB@D4;0@D0=C8CM343MC4A64=CDC8;8BM4A4B?42C4
;4BA42><<0=30C8>=B3D501A820=C+>DB?>DE4H0DBB8
38;D4A;43MC4A64=C0E4234;^40D9DB@D^J;0;86=434
A4<?;8BB064<0F8<0;3D2><?0AC8<4=C?>DAME8C4A
;4B>1BCAD2C8>=B;4BCA42><<0=3M3^DC8;8B4AD=3MC4A64=C
J70DCA4=34<4=C30=B24CC4;0E4DB4
8692:@.@6;:2:2.A6:?A336?.:@2 O BBDA4HE>DB@D4;^0;8<4=C0C8>=4=40D4BC38B?>=81;4
BBDA4HE>DB@D4;4BA>18=4CB3^40DB>=C>DE4ACB4=6A0=3
%K?61A:;>9.8 O >=2C8>==4<4=C=>A<0;*=AMB83D?4DCA4BC4A30=B
;4B2><?0AC8<4=CB3DC8A>8A38BCA81DC4DA"4C8A>8A38BCA81DC4DA
?4DCOCA43M<>=CM?>DAD==4CC>G064?>=2CD4;0E42
34;^40D270D344CD=41A>BB434=4CC>G064"01>PC4
J3MC4A64=C4C;^8=B4AC08=B8@D4;4B20?BD;4B3DB8?7>=
?4DE4=C0DBB8OCA43M<>=CMB3DC8A>8A38BCA81DC4DA?>DA
D==4CC>G064?>=2CD4;$^>D1;84H?0B@D4B4D;B34B;8@D834B
?4DE4=COCA4E4ABMB30=B;4B2><?0AC8<4=CBJ03>D28BB0=C
4C?AM;0E0644B2><?0AC8<4=CB=4?4DE4=C?0B38BCA81D4A
34?>D3A4$>D1;84H?0B@D4B4D;B;4B;8@D834B?4DE4=COCA4
?;02MB30=B;42><?0AC8<4=C?>DA;0BB>D?;8BB0=C4
2><?0AC8<4=C=4?4A<4C?0B;038BCA81DC8>=34?A>3D8C4=?>D3A4
Distribution %29<86??.421A16?@>6/A@2A> O +>DB=4?>DE4H?0BBC>2:4A3^40D34 0E4;30=B;438BCA81DC4DA
prématurée d’eau 1S2.A12.B28<;A>A:3A@A> ?>DAD=4DC8;8B0C8>=D;CMA84DA4"438BCA81DC4DA3855DB4A0;^40D34
de Javel 8.B.42 0E4;J270@D4;0E064?>DAD=4BM2DA8CM>?C8<0;434;0;0E4DB4
D0K12:@12>29<86??.42 O *=A4<?;8BB0644F2M34=C08A43D38BCA81DC4DA?4DC?A>E>@D4A
1A16?@>6/A@2A>1S2.A12.B28 D=43855DB8>=?AM<0CDAM434;^40D34 0E4;;4F8BC4D=4;86=434
A4<?;8BB064<0F8<0;30=B;438BCA81DC4DA?>DAME8C4AD=4F2M34=C
34A4<?;8BB064
Obstruction d’eau 216?@>6/A@2A>1S2.A12.B28 O BBDA4HE>DB@D4;42>DE4A2;43D38BCA81DC4DA3^40D34 0E4;4BC
de Javel :S2?@<.?0;>>20@292:@32>9K 2>AA42C4<4=C54A<M4C58FM4=?;0240E0=C;43M<0AA0643D2G2;4
!2@@;E.426:?A336?.:@ O +>DB?>DE4H3M<>=C4A4C=4CC>G4A;42>DE4A2;43D38BCA81DC4DA
3^40D34 0E4;0E4234;^40D270D344CD=41A>BB434=4CC>G064
?>DAM;8<8=4A;4B>1BCAD2C8>=B
'>;<12BM@292:@?1.:?8.<<.>268
Nettoyage des taches #>K8.B.42:;:?K820@6;::K O ">AB@D4;42G2;48=B?42C4DA34C0274B4BCDC8;8BM;0C4<?MA0CDA4
insuffisant 4C;03DAM43D?AM;0E064B>=C0DC><0C8@D4<4=CBM;42C8>==M4B
(8E>DB27>8B8BB4H34=4?0BDC8;8B4A;42G2;4=B?42C4DA34C0274B
=>DBE>DBA42><<0=3>=B34BM;42C8>==4AD=?AM;0E064;>AB34
;02>=586DA0C8>=3D2G2;434;0E064BBDA4HE>DBC>D9>DAB@D4
34B0338C85B2><<4E>CA43MC4A64=CJ70DCA4=34<4=CB>=C
09>DCMB30=B;42><?0AC8<4=CJ?AM;0E0640E0=C;43M<0AA064
3D2G2;4>=BD;C4HC>D9>DAB;4BMC8@D4CC4B3^4=CA4C84=34B
EOC4<4=CB0E0=C;4CA08C4<4=C34BC0274B
L'écran affiche : >>2A>12B2>>;A688.421A0;AB2>082 ` BBDA4HE>DB@D4;42>DE4A2;44BC54A<M4C0??DG4HBDA;0C>D274
()')&*("0;0E4DB4=4?0BB4?0B4=<>3434BB>A064C0=C
@D4;42>DE4A2;4=4BC?0BE4AA>D8;;M;4<4BB064""%!
B0558274J;M2A0=
` (8;42>DE4A2;44BC54A<M4C@D4;4<4BB06434AA4DA34E4AA>D8;;064
3D2>DE4A2;4B05582740??4;4HD=AM?0A0C4DA
REMARQUE : ">AB@DD=<4BB06434AA4DAB0558274?4=30=C<8=DC4B;40D30=B;02DE434;0;0E4DB4B4E830=640DC><0C8@D4<4=C">AB@D4;0
;0E4DB40<>A24;0E830=6434;40DC>DC4B;4B5>=2C8>=BB>=CBDB?4=3D4B9DB@DJ24@D4;0E830=64B>8CC4A<8=M4
Soutien au
consommateur
Conseils de dépannage
FonctionnementMesures de sécurité Installation
www.electromenagersge.ca
Bruit Description
Démarrages et arrêts O "05>=2C8>=G3A>,0B7W508CC>DA=4A;4C0<1>DA34;0E06430=BD=B4=B?D8B;^0AAOC44C;4508C
répétés C>DA=4A30=B;^0DCA4B4=B?>DA<84DF=4CC>G4AE>CA4;8=64
Bruit d’un ajout d’eau O "0;0E4DB4B^030?C4J;0C08;;44C0DCG?434270A64?>DA09>DC4A?;DB3^40D0D2G2;4B814B>8=
après que la laveuse
O "0270A6434;0E064?4DCOCA43MBM@D8;81AM4(8;0;0E4DB43MC42C4@D4;0270A644BC
a commencé
3MBM@D8;81AM44;;4B^0AAOC44CB4A4<?;8C?>DAAMM@D8;81A4A;0270A64
à fonctionner
O "0;0E4DB4?4DC38;D4A;4B0338C85B34;0E064J09>DC4AJ;0270A6434;0E064
Cliquetis pendant O "0;0E4DB4M<4CCA0D=4BMA84342;8@D4C8B;>AB3D270=64<4=C34<>3434=4CC>G064
le cycle de lavage
Bruit aigu pendant O "4C0<1>DA34;0E064C>DA=4?;DBA0?834<4=C?>DAME02D4A;^7D<838CM34;0270A64
le cycle d’essorage
Bruit d’eau courante O "0;0E4DB44BC4=CA08=3438;D4A;4B0338C85B34;0E064J09>DC4AJ;0270A6434;0E064"4B
0338C85B34?AM;0E064B>=C38BCA81DMB?4=30=C;4?AM;0E064"43MC4A64=C4BC38BCA81DM0D3M1DC
3D2G2;434;0E064"^40D34 0E4;4BC38BCA81DM4?4=30=C;4;0E064?A8=28?0;"^03>D28BB0=C4BC
38BCA81DM?4=30=C;4A8=L06458=0;
Bourdonnement pendant O "0?><?44BC4=02C8>=?>DAME02D4A;^40D3DC0<1>DA
la vidange
Tintement pendant O "0;0E4DB438B?>B4345>=2C8>=B34A8=L064B?M280;4B?>DAM;8<8=4A;4BAMB83DB343MC4A64=C34
le cycle de rinçage ;0270A640?ANB;42G2;434;0E064?A8=28?0;
ou d’essorage
Bruit de débordement O *=;8@D83430=B;^0==40D3^M@D8;81A0640DC>DA3DC0<1>DA34;0E0640834;4C0<1>DAJC>DA=4A
d’eau lorsque l’eau est 4=3>D24DA
coupée et que la cuve
tourne
Bruits normaux de fonctionnement
1K@20@6;:1A:1K?K=A686/>2 U"08BB4A;0;0E4DB4?>DABD8EA4B>=2G2;4
E>CA4;0E4DB403MC42CMD=4270A64<0;U"0;0E4DB4C4=C4A034AMM@D8;81A4A;0270A644=09>DC0=C?;DB
M@D8;81AM4"4B0AC82;4B8=38E83D4;B?4DE4=C340D4C068C0=C;4BEOC4<4=CB?>DAAMC01;8AD=4<48;;4DA438BCA81DC8>=
?A>E>@D4AD=3MBM@D8;81A4+>CA4;0E4DB4U 42>34B0558274D=8@D4<4=C?>DA5>DA=8A34B8=5>A<0C8>=B
C4=C4A034AMM@D8;81A4A;0270A644= U >=BD;C4H;4270?8CA43D270A64<4=C34;0;0E4DB430=B24
09>DC0=C?;DB340D4C4=068C0=C;4B <0=D4;34;DC8;8B0C4DA4C6D83434=CA4C84=
EOC4<4=CB34<0=8NA4JAMC01;8A;4DA
38BCA81DC8>=?>DA4=BD8C4A4?A4=3A4;4
2G2;434BB>A064

Notes.
Soutien au
consommateur
Conseils de dépannage Fonctionnement Mesures de sécuritéInstallation
Soutien au
consommateur
Conseils de dépannage
Fonctionnement
Mesures de sécurité
Installation
Garantie de laveuse GE.
Tout le service sous garantie est fourni par nos Centres de service de fabrique ou par un technicien
autorisé. Pour le service, appelez le 1.800.561.3344.
Veuillez fournir le numéro de série et le numéro de modèle lorsque vous appelez pour obtenir
le service.
n 2?3>.6?121K<8.0292:@?IB;@>29.6?;:<;A>B;A?
.<<>2:1>2IA@686?2>B;@>2<>;1A6@
n (:29.AB.6?26:?@.88.@6;:86B>.6?;:;A2:@>2@62:
n (:2<.::21A<>;1A6@?6028A6062?@9.8@>.6@K9.8A@686?K
;AA@686?KI12?36:?.A@>2?=A202882?.AD=A2882?682?@
12?@6:K;AA@686?K0;992>06.8292:@
n 2?1;99.42?.<>L?8.86B>.6?;:
n (:26:?@.88.@6;:6:0;>>20@2
n 2>29<8.0292:@123A?6/82?128.9.6?;:;A8.>296?2
2:9.>0521SA:16?7;:0@2A>
n 2?1;99.42?.A<>;1A6@0.A?K?<.>A:.00612:@
A:6:02:162A:26:;:1.@6;:;AA:20.@.?@>;<52:.@A>2882
n ';A@1;99.426:16>20@;A0;:?K0A@630.A?K<.>
12?<.::2?<;??6/82?1202@.<<.>268K820@>;9K:.42>
n 2?2>B602?S682?@69<;??6/821S.B;6>.00L?.A<>;1A6@<;A>
023.6>2
Ce qui n’est pas couvert (au Canada) :
0A0=C#$$
"'$)$^()&('(&%$("(%##($')(
Cette garantie est offerte à l'acheteur initial, ainsi qu'à tout propriétaire subséquent d'un produit acheté
en vue d'une utilisation domestique au Canada. Le service à domicile en vertu de la garantie sera fourni dans
les régions où il est disponible et où Mabe estime raisonnable de le fournir.
EXCLUSION DE GARANTIES IMPLICITES – Votre seul et unique recours est la réparation du produit selon
les dispositions de cette Garantie limitée. Toutes les garanties implicites, incluant les garanties de
commercialité et d’adéquation à un usage spécifique, sont limitées à une année ou à la période
la plus courte autorisée par la législation.
Un an Toute pièce 34;0;0E4DB4@D8C><144=?0==4J20DB43^D=E82434<0CMA80D>D34<08=
À partir de la date 3^[DEA4&4=30=C24CC4 garantie limitée d’un an, 5>DA=8CM60;4<4=Cgratuitement,
de l’achat original C>DB;4B5A08B34<08=3^[DEA44C34B4AE824B2>==4F4B?>DAA4<?;024A;0?8N243M542CD4DB4
Deux à cinq ans La tringle de suspension et l’ensemble des ressorts, et le circuit électronique principal B8;^D=4
À partir de la date 3424B?8N24BC><144=?0==4J20DB43^D=E82434<0CMA84;>D34<08=3^[DEA4 A4<?;024A0
de l’achat original 0DBB8 ;4 couvercle ou le capot de la laveuse B834;0A>D8;;40??0A0PC30=B34B2>=38C8>=B=>A<0;4B
345>=2C8>==4<4=C&4=30=C24CC4 garantie limitée supplémentaire de trois ans, ;4B5A08B34
B4AE824>D34<08=3^[DEA42>AA4B?>=30=CBB4A>=CJE>CA4270A64
Deux à dix ans Le moteur de transmission direct et la cuve extérieure du tambour B8;^D=43424B?8N24B
À partir de la date C><144=?0==4J20DB43^D=E82434<0CMA84;>D34<08=3^[DEA4&4=30=C24CC4garantie limitée
de l’achat original supplémentaire de huit ans, ;4B5A08B34B4AE824>D34<08=3^[DEA42>AA4B?>=30=CBB4A>=C
JE>CA4270A64
Durée de vie du produit Le tambour de lavage B824CC4?8N24C><144=?0==4J20DB43^D=E82434<0CMA84;>D34
À partir de la date <08=3^[DEA4&4=30=C24CC4 garantie limitée sur la durée de vie du produit, ;4B5A08B34B4AE824
de l’achat original >D34<08=3^[DEA42>AA4B?>=30=CBB4A>=CJE>CA4270A64
Pour une période de : Nous remplacerons :
Imprimé à la Corée
Soutien au consommateur.
Site Web appareils électroménagers GE
www.electromenagersge.ca
+>DB0E4HD=4@D4BC8>=>DE>DB0E4H14B>8=3^0834?>DAE>CA40??0A48;M;42CA><M=064A>=C02C4H=>DB?0A
=C4A=4C0DB8C4CCC2820@>;92:.42>?420. 74DA4B?0A9>DAC>DB;4B9>DAB34;^0==M4
Service de réparations 1.800.561.3344
(4AE82434AM?0A0C8>=B4BCC>DC?ANB34E>DB
&>DA508A4AM?0A4AE>CA4M;42CA><M=064A8;BD558C34=>DBCM;M?7>=4A
Studio de conception réaliste
(DA34<0=34?4DC5>DA=8AD=41A>27DA4BDA;^0<M=064<4=C3^D=42D8B8=4?>DA;4B?4AB>==4B
J<>18;8CMAM3D8C4
I2A8E4H 8A42C4DA'4;0C8>=B0E42;4B2>=B><<0C4DAB#0140=030=2
DA40D02C>AG"0=4
#>=2C>=$#
Prolongation de garantie www.electromenagersge.ca
274C4HD=2>=CA0C3^4=CA4C84=0E0=C@D4E>CA460A0=C84=^4F?8A44C1M=M58284H3^D=A0108BBD1BC0=C84;
8=B8;4B4AE8240?ANBE4=C4B4A0C>D9>DAB;J0?ANB4F?8A0C8>=34;060A0=C84
)6?6@2F:;@>2?6@2*2/;A.<<282F:;A?.A
Pièces et accessoires
4DF@D83MB8A4=CAM?0A4A4DF<O<4B;4DABM;42CA><M=064AB?4DE4=CA424E>8A?8N24B4C0224BB>8A4B
38A42C4<4=CJ;0<08B>=20AC4B+(#0BC4A0A34C8B2>E4A0224?CM4B
Les directives stipulées dans le présent manuel peuvent être effectuées par n’importe quel utilisateur.
Les autres réparations doivent généralement être effectuées par un technicien qualifié. Soyez prudent,
car une réparation inadéquate peut affecter le fonctionnement sécuritaire de l’appareil.
+>DBCA>DE4A4H30=B;4B?064B90D=4B34E>CA40==D08A4;4=D<MA>3D4=CA434B4AE824#014;4?;DB?A>274
DCA4<4=C0??4;4H=>DB0D
Contactez-nous
(8E>DB=^OC4B?0BB0C8B508C3DB4AE8240?ANBE4=C43>=CE>DB0E4H1M=M5828M
#>296L>292:@ 2><<D=8@D4H0E42;4B64=B@D8>=CAM?0AME>CA40??0A48;
:?A6@2 B8E>DB=^OC4BC>D9>DAB?0BB0C8B508C4=E>G4HC>DB;4B3MC08;B\=D<MA>34CM;M?7>=42><?A8B\0D
8A42C4DA'4;0C8>=B0E42;4B2>=B><<0C4DAB#0140=030=2
DA40D02C>AG"0=4
#>=2C>=$#
Inscrivez votre appareil électroménager www.electromenagersge.ca
:?0>6B2FB;@>2.<<.>268K820@>;9K:.42>2:16>20@.A??6@N@=A2<;??6/82 4;00<M;8>A4A0=>B
2><<D=820C8>=B4C=>CA4B4AE8240?ANBE4=C4+>DB?>DE4HM60;4<4=C=>DB4=E>G4A?0A;0?>BC4
;45>A<D;08A43^8=B2A8?C8>=9>8=CJE>CA43>2D<4=C0C8>=