
Ref. NC00010232
JPM & Associés • marketing-design-communication • 04/2009
FUZZYLOGIC_NC00010232:NOTICE 8/04/09 12:29 Page A1

www.groupeseb.com
EN
RICE COOKER
FUZZY LOGIC
ZH
MS
TH
FUZZYLOGIC_NC00010232:NOTICE 8/04/09 12:29 Page A2
13
15
14
8
7
S
FUZZYLOGIC_NC00010232:NOTICE 8/04/09 12:29 Page 1
2
Features
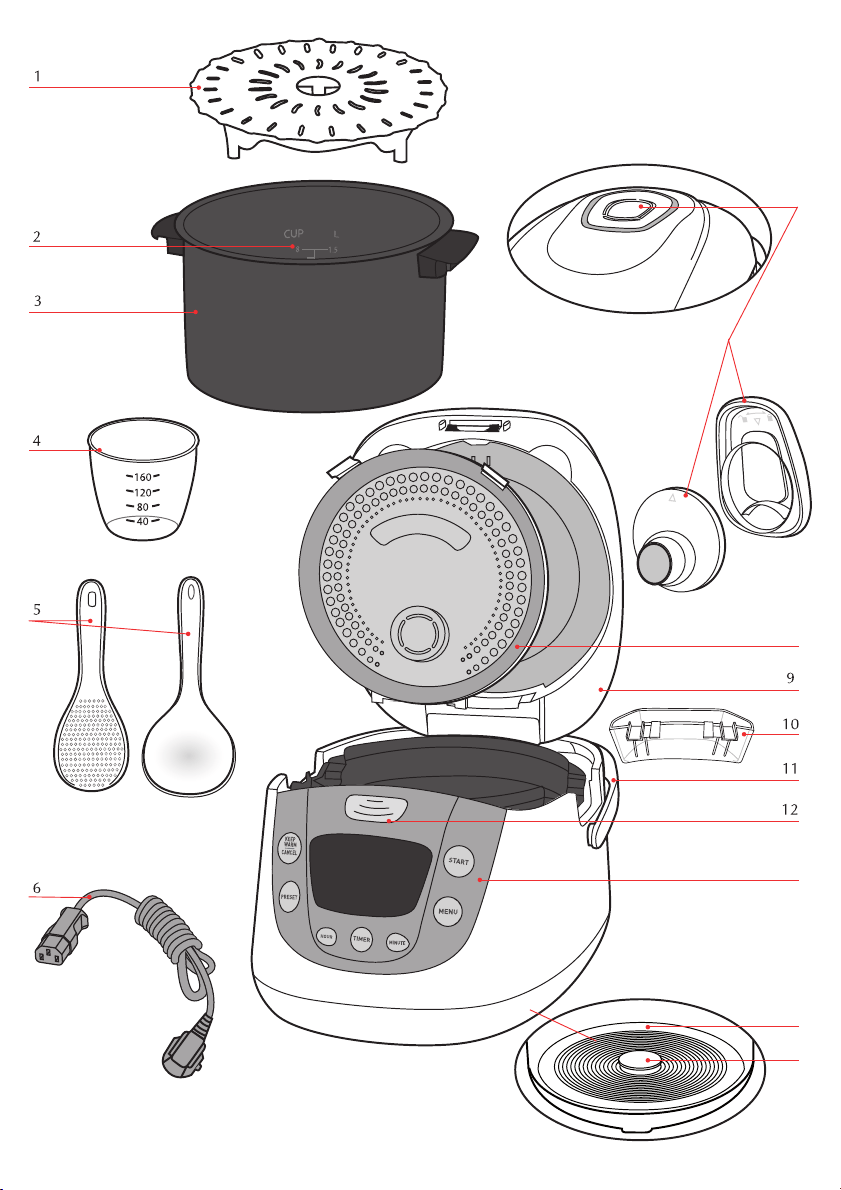
Description of the drawing
1 Steam tray
2 Graduation for water and rice
3 Removable non-stick bowl
4 Measuring cup
5 Spoons
6 Power cord
7 Micro pressure valve
8 Removable inner steam shield
9 Lid
10 Condensation collector
11 Handle
12 Lid opening button
13 Control box
14 Hotplate
15 Sensor
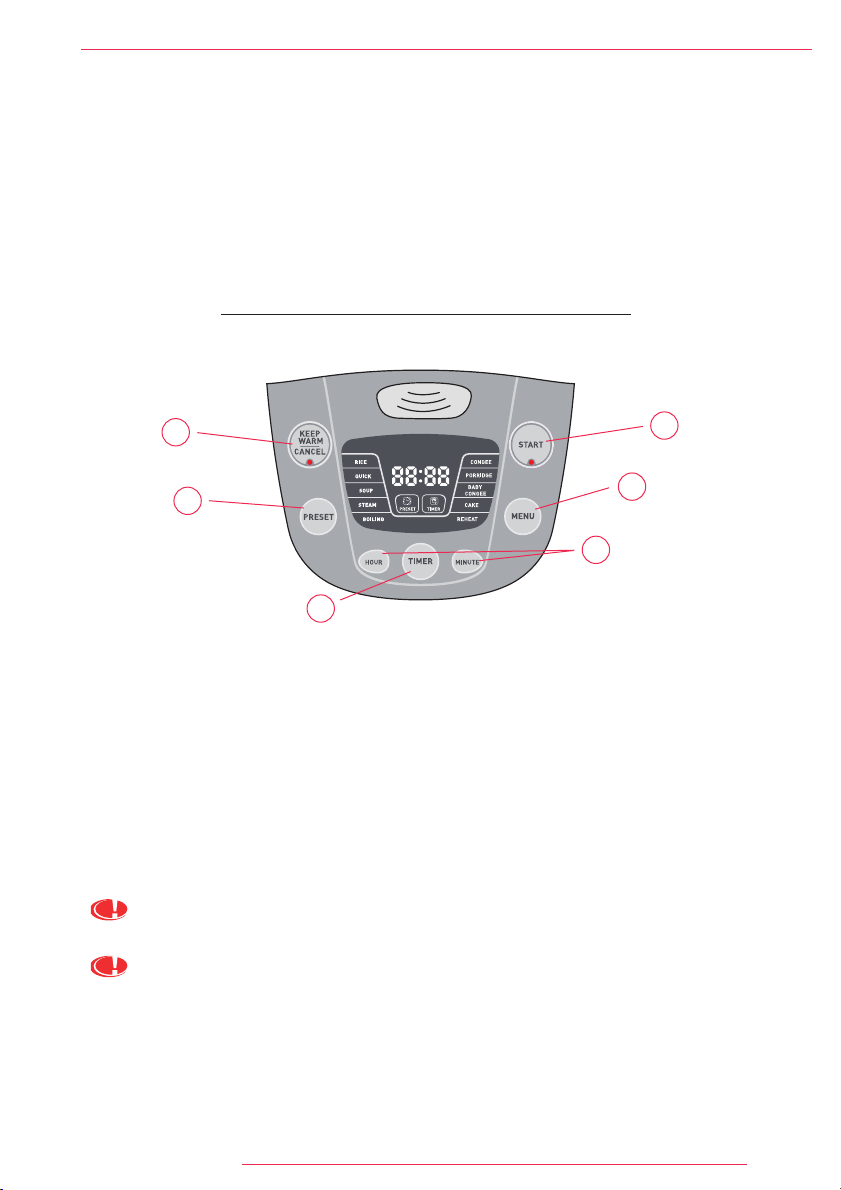
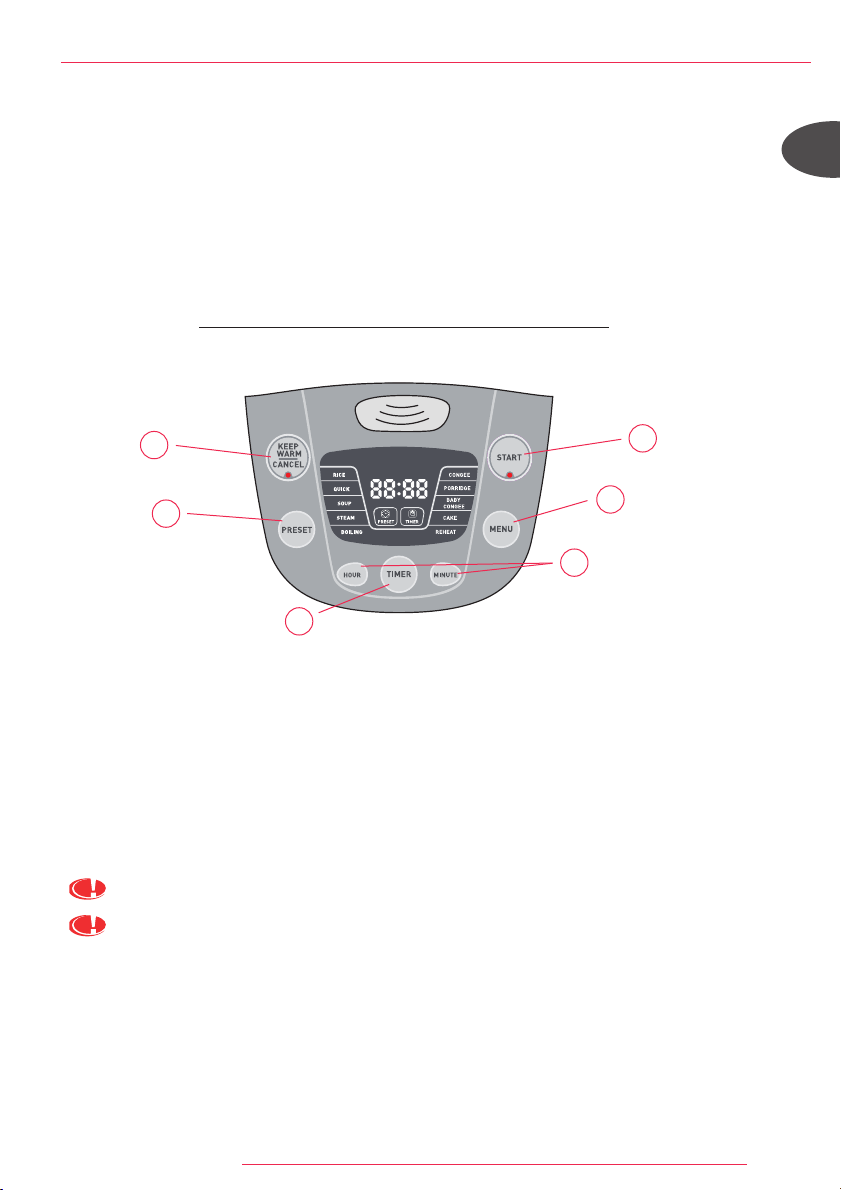
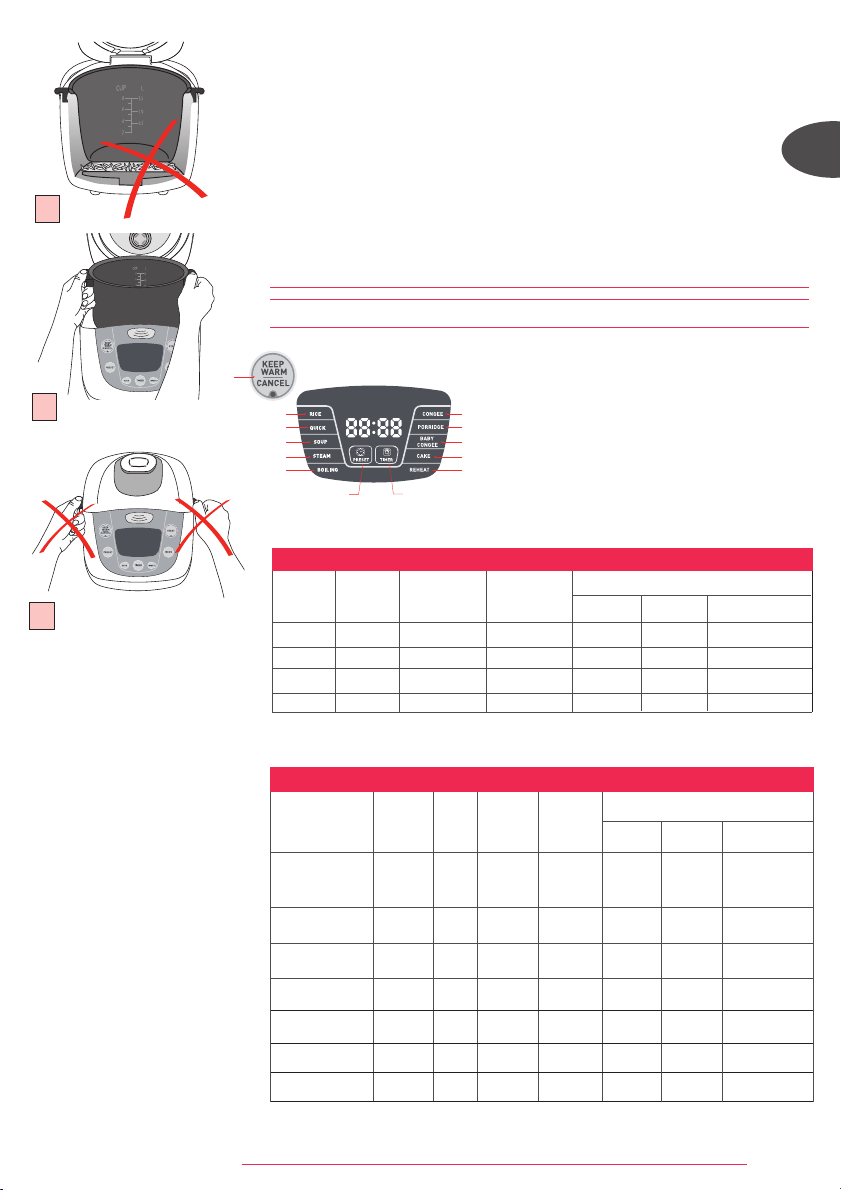
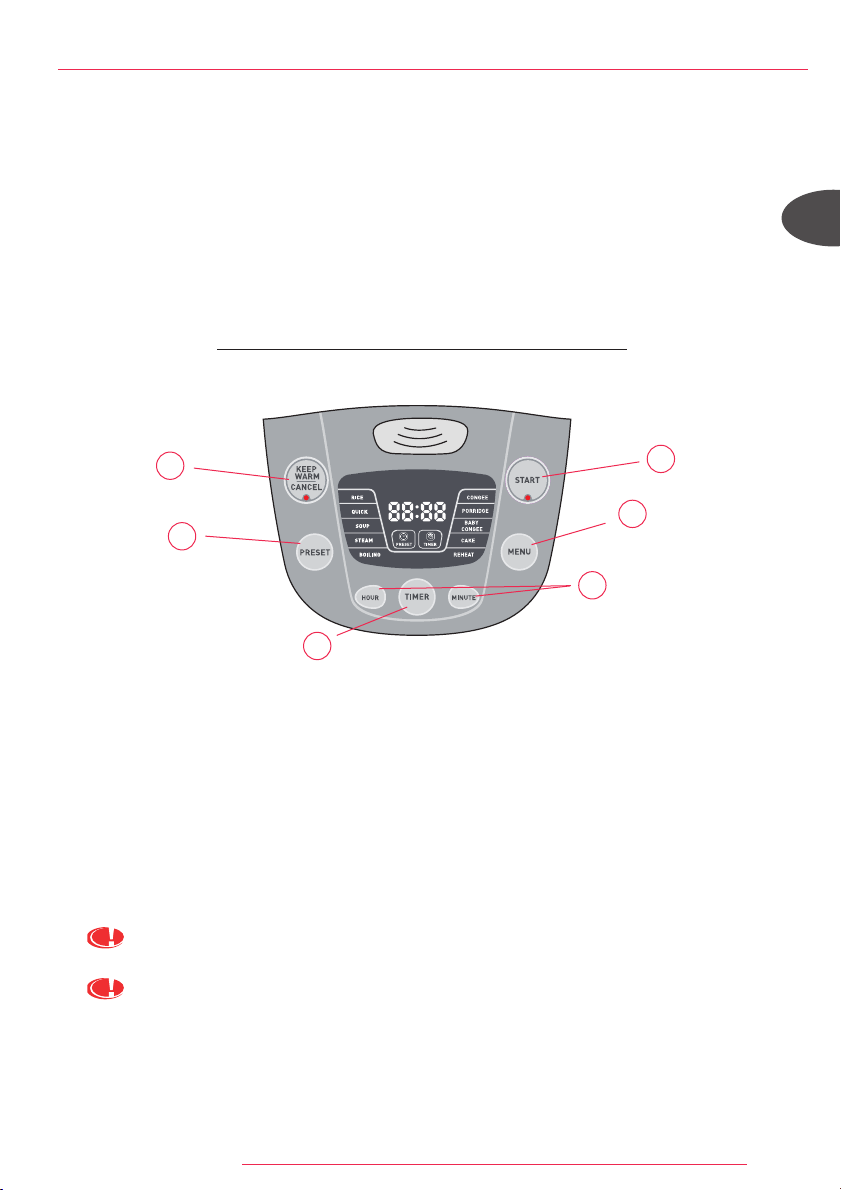
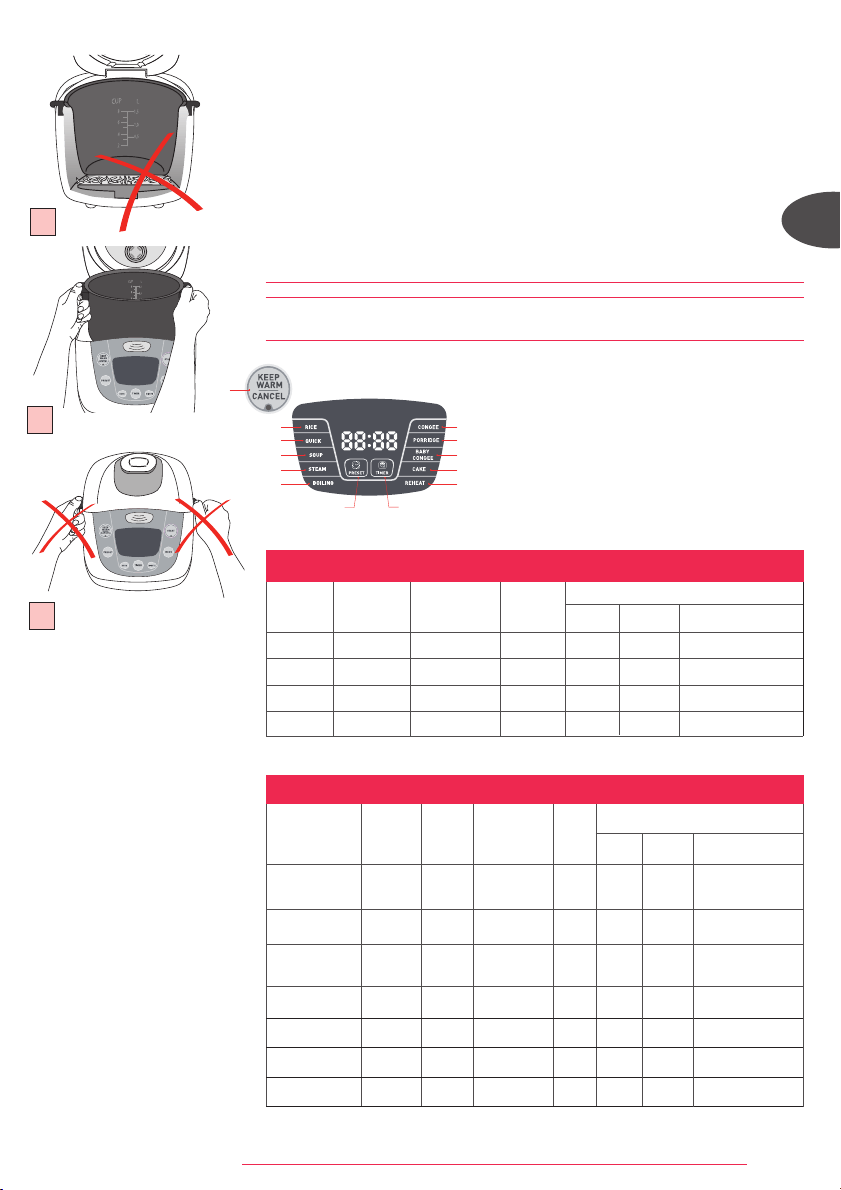
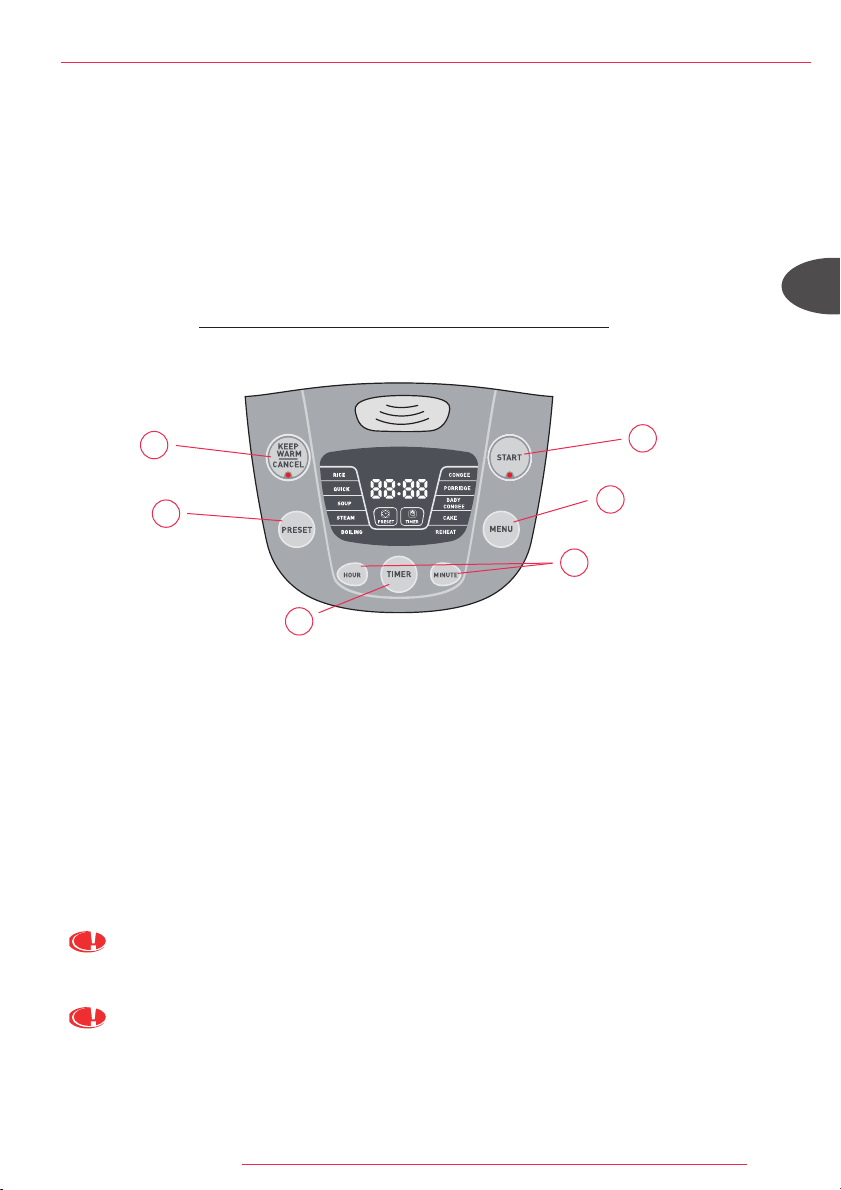
Description of functions
A START: Starts the selected cooking menu (the light switches on).
B KEEP WARM/CANCEL: keep warm function works automatically after each cooking period. Press of this
button will lead cancellation of selected cooking functions.
C MENU: Press this button to select the wished menu : Rice cooking, Quick cooking, Soup cooking, Steam
cooking, Boiling water cooking, Congee cooking, Porridge cooking, Baby congee cooking, Cake cooking,
Reheat.
D PRESET: Selection of the delayed start for all the functions except BOILING, CAKE and REHEAT functions. The
time chosen will be the cooking end time. Use the "HOUR" and "MINUTE" buttons to change the cooking end
time you wish. The setting for Minutes is in 10 minute increments each press, it's in 1h increment for Hours.
E TIMER: Selection of the cooking time for SOUP, STEAM, CONGEE, PORRIDGE and BABY CONGEE functions. A
default time appears, you can modify this time thanks to the "TIMER", "HOUR" and "MINUTE" buttons.
F HOUR AND MINUTE: Allows the adjustment of the cooking time and the delayed start.
For the functions which can be set by PRESET and TIMER(SOUP/STEAM/CONGEE/PORRIDGE/BABY
CONGEE), you must set TIMER first.
For SOUP, STEAM, CONGEE, PORRIDGE and BABY CONGEE: When you press Start, the LED indicates the
remaining cooking time with count down by each minute.
B
C
D
E
F
A
FUZZYLOGIC_NC00010232:NOTICE 8/04/09 12:29 Page 2
3
Product
This rice cooker is equipped with 13 functions: Rice cooking, Quick cooking, Soup
cooking, Steam cooking, Boiling water rice cooking, Congee cooking, Porridge
cooking, Baby congee cooking, Cake cooking, Reheat, Keep warm, Timer and Preset.
At the end of the cooking period, the appliance will automatically switch over to keep
warm which will last up to 24h.
Before first use
Read the instructions and carefully follow the operating method.
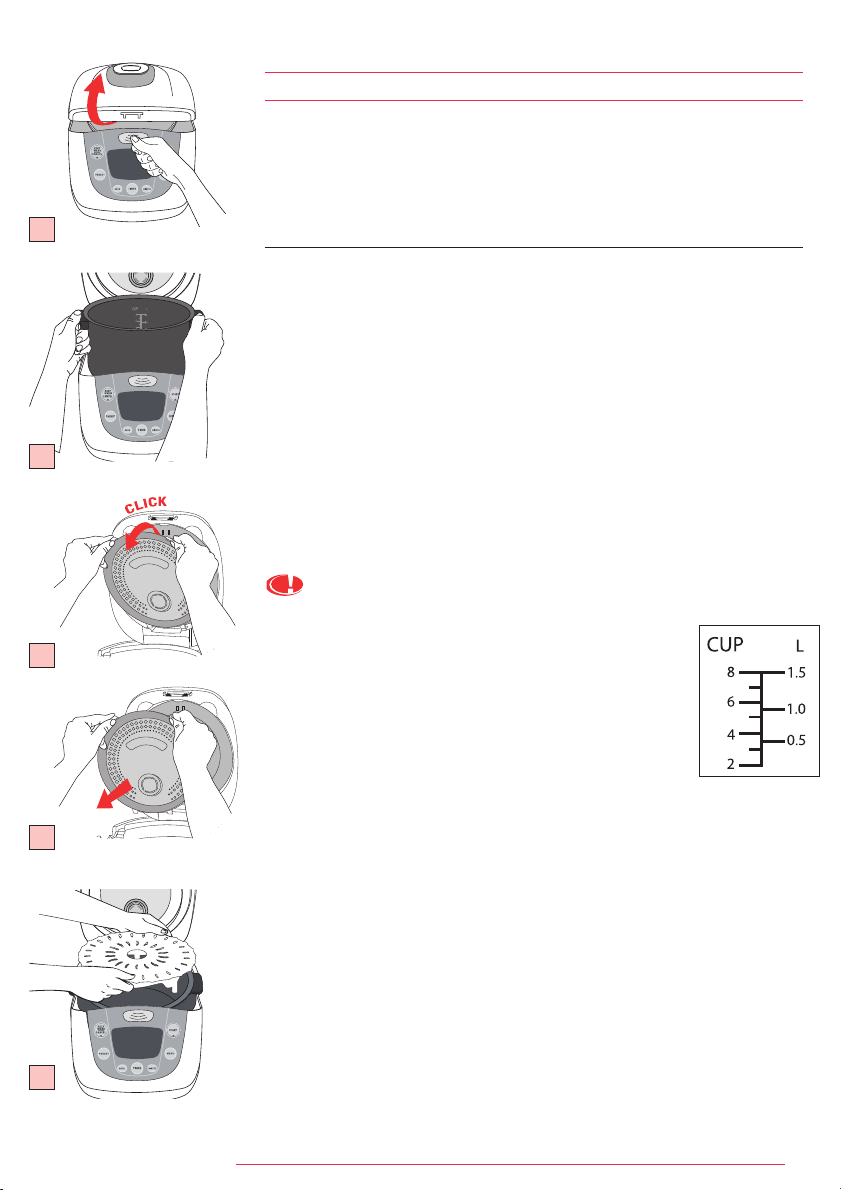
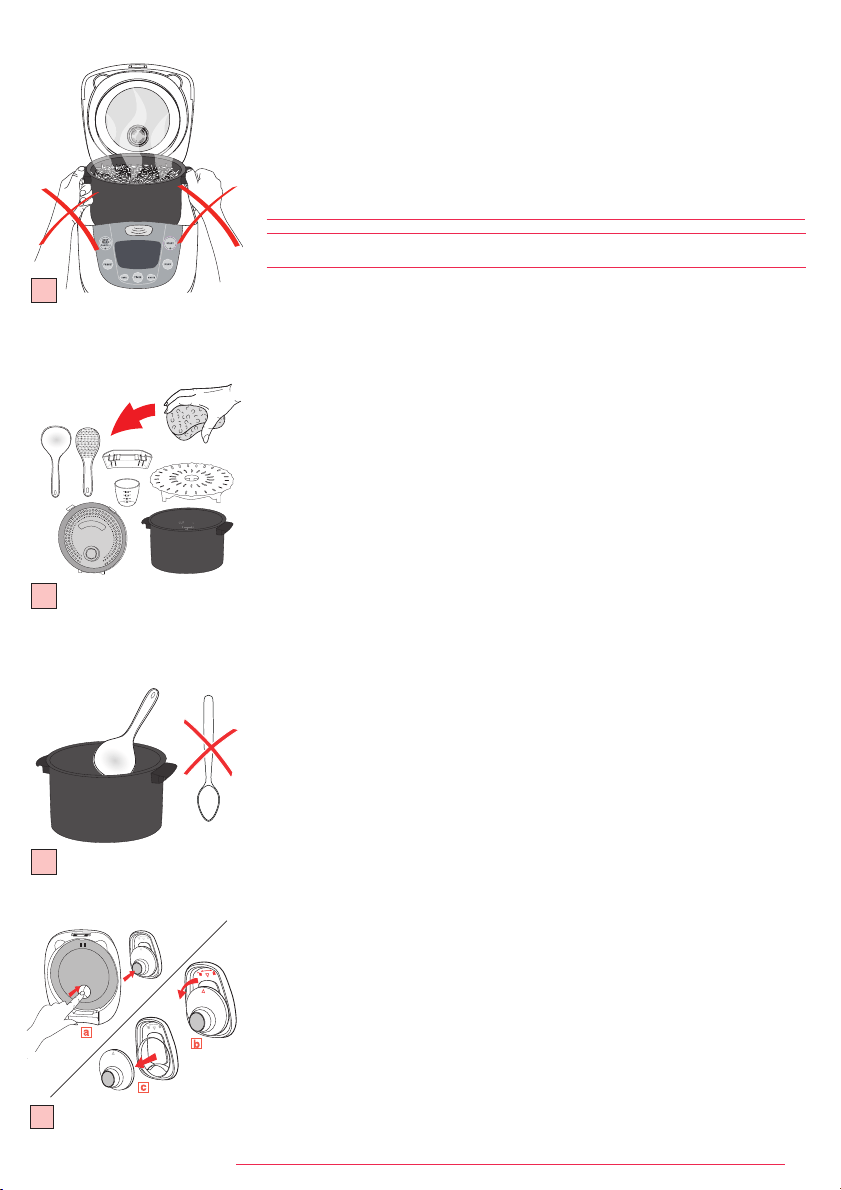
Unpack the appliance
• Remove the appliance from the packaging and unpack all the accessories as well
as the printed documents.
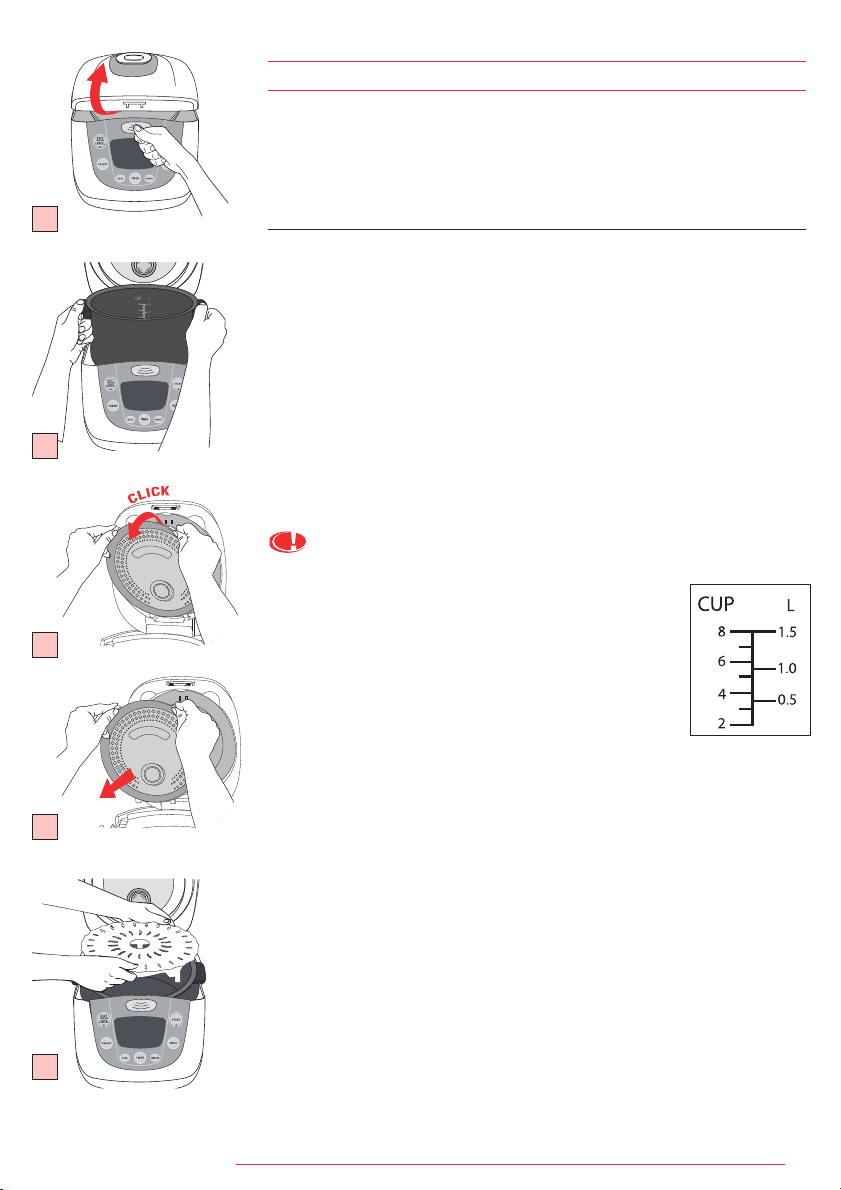
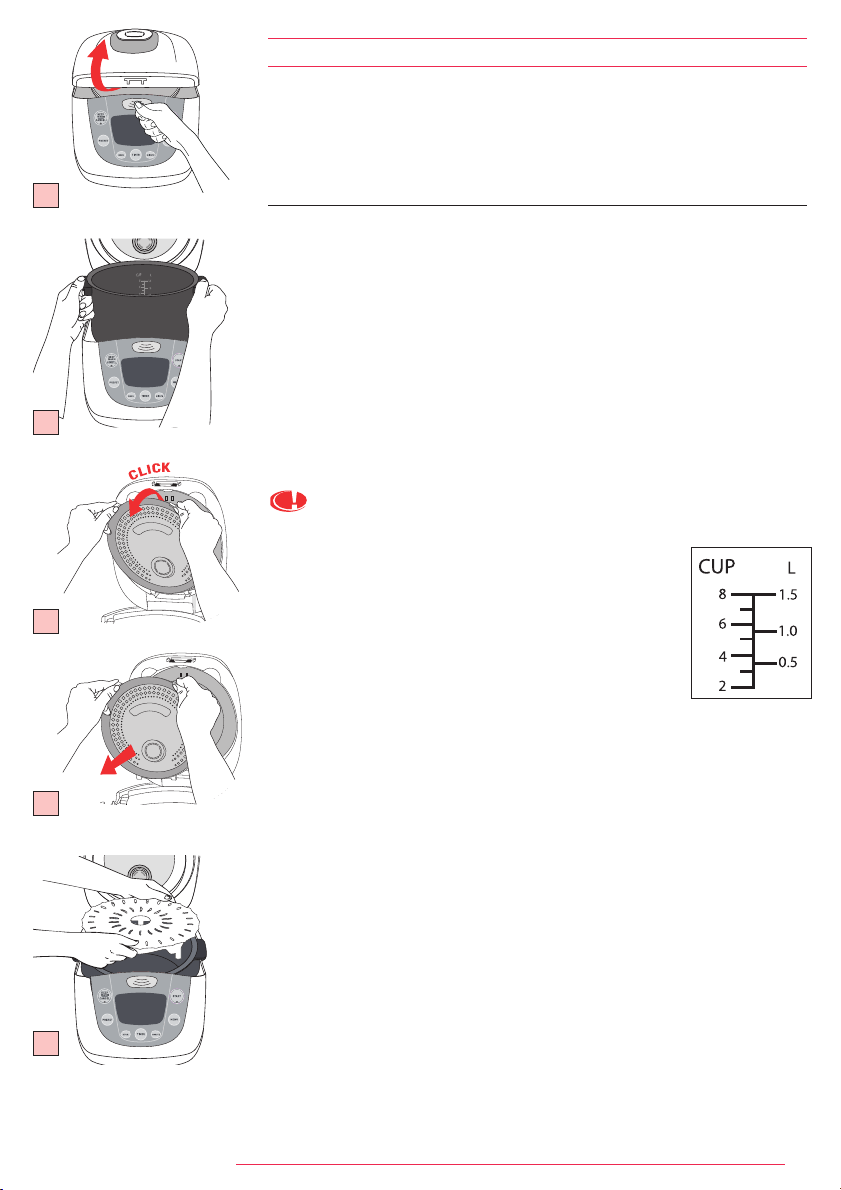
• Open the lid by pushing the opening button located on the housing. Fig. 1
• Remove the non-stick bowl, the steam valve and the steam shield. Fig. 3a et 3b
• Clean the bowl, the steam valve and the steam shield with a sponge and washing-
up liquid.
• Dry off carefully.
• Put all the elements back in their original position.
Install the detachable cord.
Never add ingredients or water higher than the highest level mark.
Measuring the ingredients-max capacity of the container.
• The graduated markings on the inside of the bowl are given
in litres and cups, these are used for measuring the amount
of water when cooking rice.
• The plastic measuring cup provided with your appliance is for
measuring rice and not water. 1 level measuring cup of rice
weighs about 150g.
• Fill with water up to the CUP mark printed in the bowl
corresponding to the number of measuring cups put in the
bowl.
Preparation before cooking
When cooking rice:
• It is better not to rinse rice directly inside the bowl in order to avoid scuffing
non-sticking coating of inner pot or deformation of pot body by impact.
• Put the already rinsed rice into the bowl and fill it with water to the corresponding
water level (The graduations in cups).
• The water quantity can be adjusted depending on your taste.
When steam cooking:
• The quantity of water must be appropriate to avoid water overflowing up to the
steam tray.
• Place the steam tray on bottom of the bowl. Fig. 4
• Add the ingredients.
PREPARATION
1
2
3a
3b
4
FUZZYLOGIC_NC00010232:NOTICE 8/04/09 12:29 Page 3
4
EN
For all uses:
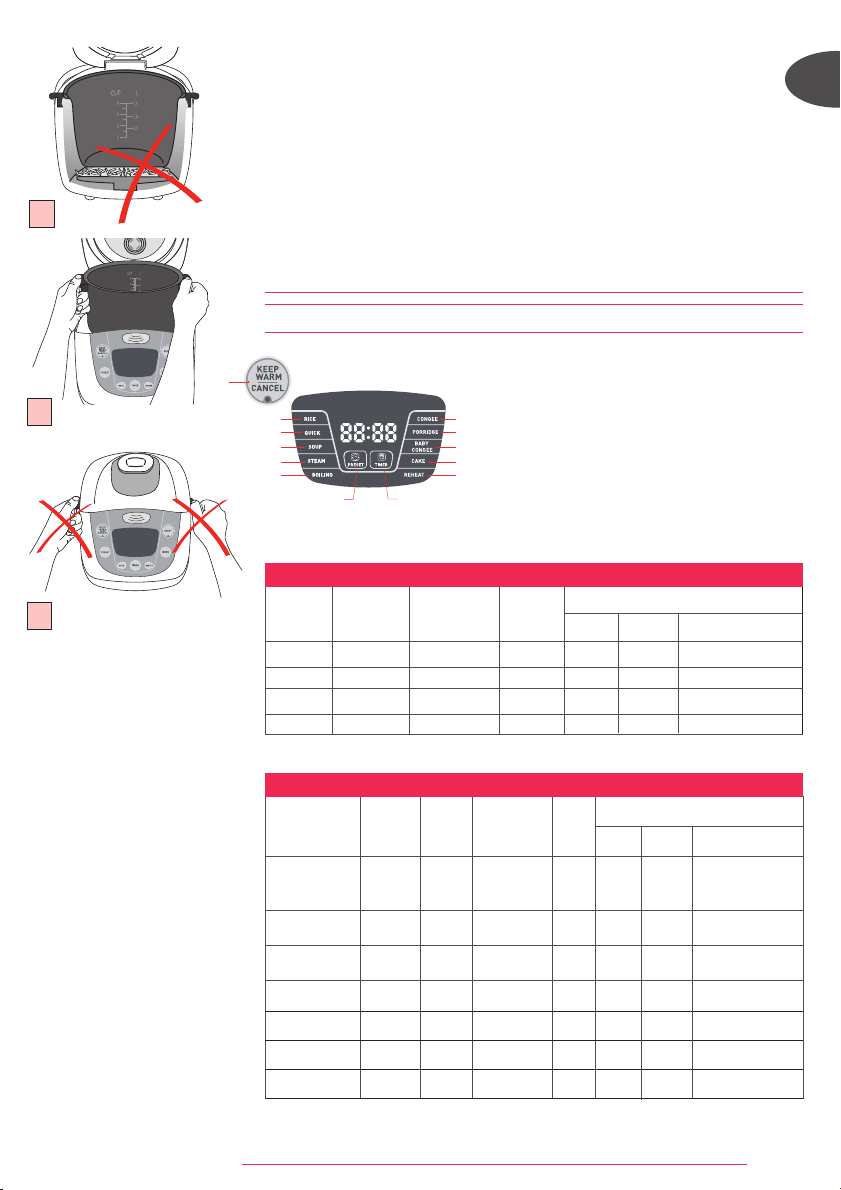
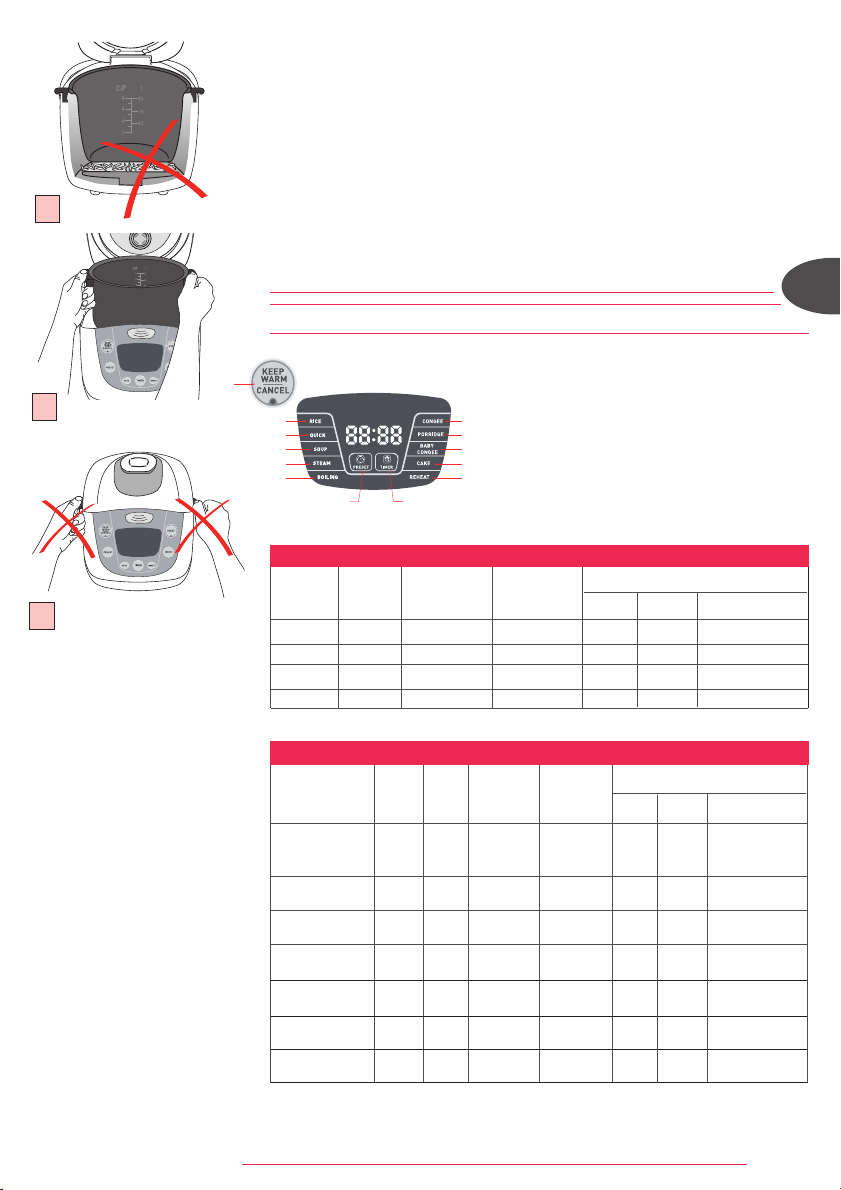
• Carefully wipe the outside of the bowl (especially the bottom). Make sure that
there are no foreign residues or liquid underneath the bowl and on the heating
element. Fig.5
• Place the bowl into the appliance, making sure that it is correctly positioned. Fig.6
Make sure that the sensor moves when you put the bowl on it.
• Make sure that the steam shield is correctly in position.
• Close and lock the lid.
• Plug in the appliance.
• Do not switch on the appliance until all the above stages have been completed.
• Do not transport the rice cooker with side handles of cooking bowl. Fig.7
COOKING
1. Rice cooking
2. Quick cooking
3. Soup cooking
4. Steam cooking
5. Boiling water rice
cooking
6. Congee cooking
7. Porridge cooking
8. Baby congee cooking
9. Cake cooking
10. Reheat cooking
11. Keep warm function
12. Timer function
13. Preset function
5
*The rice cooker will automatically determine the exact cooking time depending on the quantity of
water and rice placed in the bowl.
Type o f rice
Measuring
cups
Weight
of rice
Water level
in the bowl
( + rice)
Serves
Approximative cooking time*
Rice Quick Boiling water rice
Round white rice
(Italian rice often
a stickier rice)
4 600 g 4 cup mark 5/6per. 49 min 39 min 35 min
Whole grain
Brown rice
4 600 g 4,5 cup mark 5/6per. 49 min 44 min 38 min
Risotto rice
(Arborio type)
4 600 g 4 cup mark 4/5per. 49 min 40 min 35 min
Glutinous rice 4 620 g 4 cup mark 5/6per. 46 min 38 min 34 min
Brown rice 4 570 g 4,5 cup mark 5/6per. 50 min 42 min 39 min
Japanese rice 4 580 g 4 cup mark 5/6per. 49 min 39 min 35 min
Fragrant rice 4 640 g 4 cup mark 5/6per. 44 min 41 min 34 min
COOKING GUIDE FOR OTHER TYPES OF RICE
Measuring
cups
Weight
of white rice
Water level
in the bowl
( + rice)
Serves
Approximative cooking time*
Rice Quick Boiling water rice
2 300 g 2 cup mark 3/4per. 44 min 36 min 32 min
4 600 g 4 cup mark 5/6per. 49 min 42 min 36 min
6 900 g 6 cup mark 8/10per. 53 min 45 min 36 min
8 1200 g 8 cup mark 11/14per. 58 min 45 min 38 min
COOKING GUIDE FOR WHITE RICE - 8 CUPS
• Rinse the rice thoroughly before cooking except for risotto rice.
• Rinse the rice thoroughly before cooking.
2
1
3
4
5
6
7
12
13
8
9
10
11
6
7
FUZZYLOGIC_NC00010232:NOTICE 8/04/09 12:29 Page 4
5
x3
x2
x1
x4
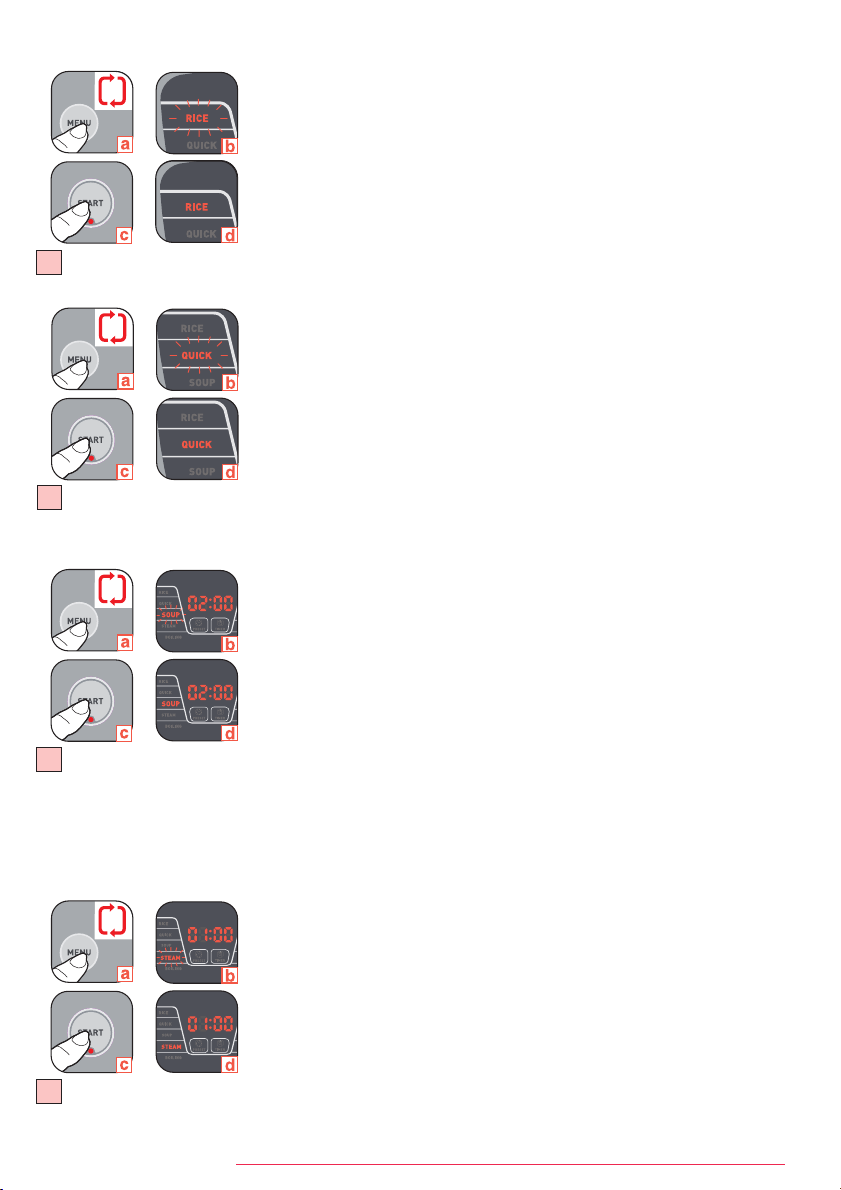
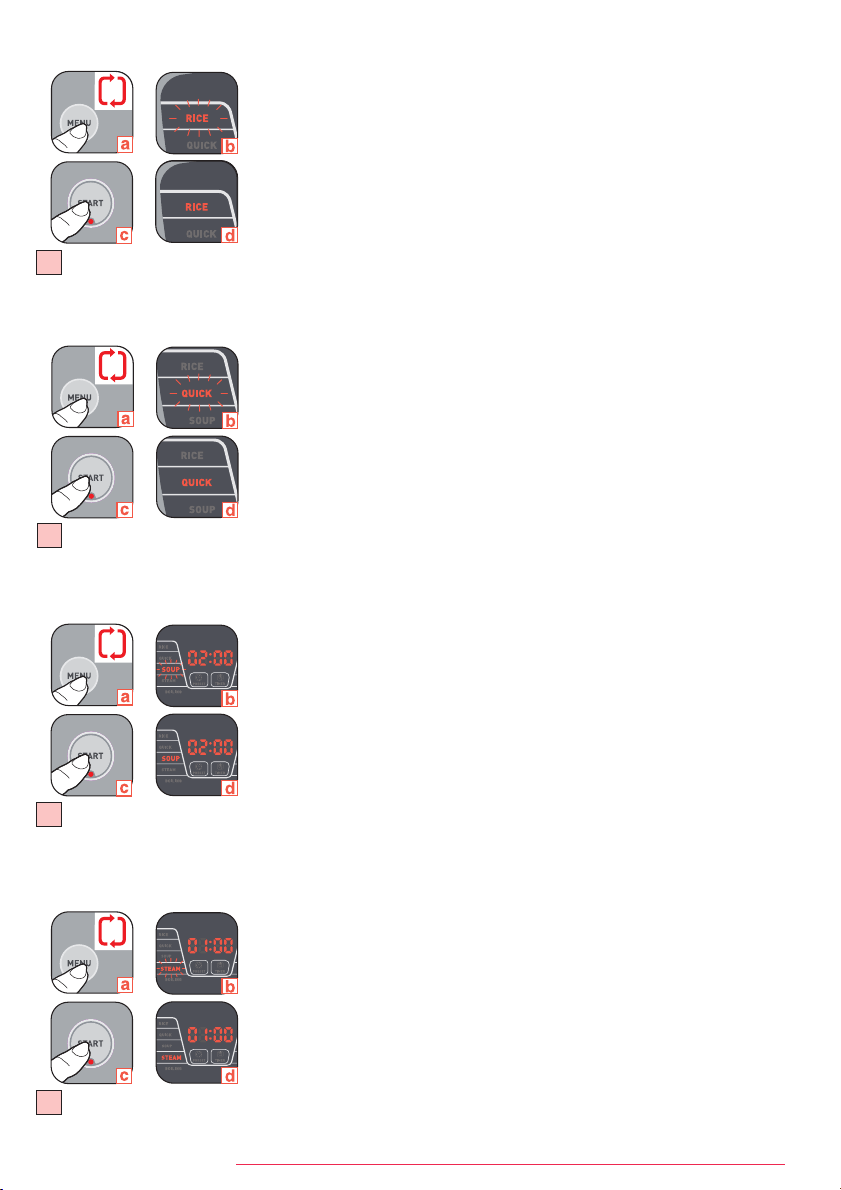
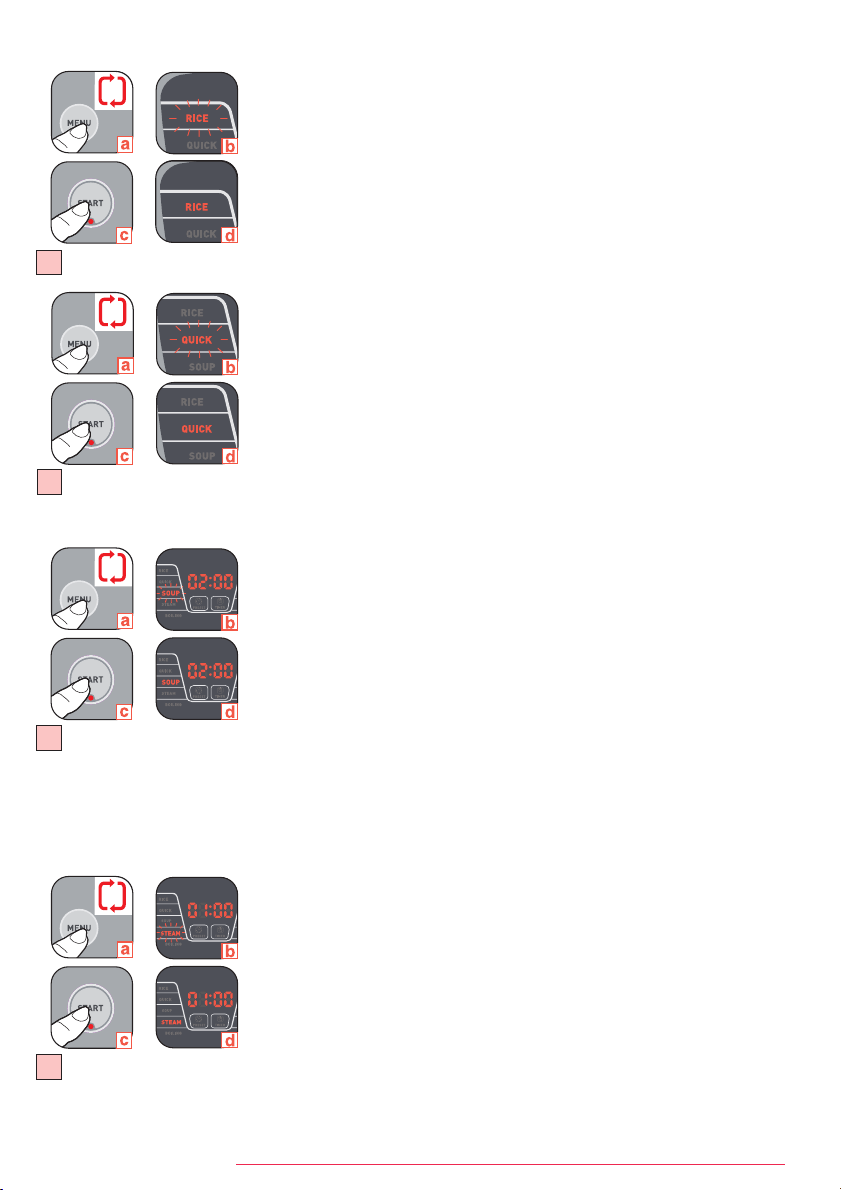
1. Rice cooking - Fig. 8
• Pour the required quantities of rice and water into the bowl.
• Close the lid.
• Plug in the appliance.
• Choose the menu "RICE" using the menu button
(a). The orange back light of "RICE"
position in LED screen flashes
(b). The red "START" button indicate light flashes.
• Press start
(c). The orange back light of "RICE" position in LED screen (d) and the red
"START" button indicate light remain steady. The appliance will switch on.
• At the end of the cooking period, the appliance will automatically switch over to keep
warm, the green "KEEPWARM/CANCEL" indicate light is on, display shows "b".
2. Quick cooking - Fig. 9
• Pour the required quantities of rice and water into the bowl.
• Close the lid.
• Plug in the appliance.
• Choose the menu "QUICK" using the menu button
(a). The orange back light of "QUICK"
position in LED screen flashes
(b). The red "START" button indicate light flashes.
• Press start
(c). The orange back light of "QUICK" position in LED screen (d) and the red
"START" button indicate light remain steady. The appliance will switch on.
• At the end of the cooking period, the appliance will automatically switch over to keep
warm, the green "KEEPWARM/CANCEL" indicate light is on, display shows "b".
3. Soup cooking - Fig. 10
• Pour the ingredients into the bowl.
• Close the lid.
• Plug in the appliance.
• Choose the menu "SOUP" using the menu button
(a). The orange back light of "SOUP"
position in LED screen flashes
(b). The "START" button indicate light flashes.
• You can adjust the cooking time. The cooking time indicated by default is of 2h
(b). You
can choose the cooking time by pressing "TIMER", "HOUR" and "MINUTE". The cooking
time cannot exceed 4h. The Timer range is 1h30 to 4h.
• Press start
(c). The orange back light of "SOUP" position in LED screen (d) and the
"START" button indicate light remain steady. The appliance will switch on.
• After pressing Start, the LED indicates the remaining time of cooking with count down
by minute.
• At the end of the cooking period, the appliance will automatically switch over to keep
warm, the "KEEPWARM/CANCEL" indicate light is on, display shows "b".
4. Steam cooking - Fig. 11
• Add appropriate water in the bowl.
• Put the steam tray in the bottom of the bowl and then add the ingredients.
• Close the lid.
• Plug in the appliance.
• Choose the menu "STEAM" using the menu button
(a). The orange back light of
"STEAM" position in LED screen flashes
(b). The "START" button indicate light flashes.
• You can adjust the cooking time. The cooking time indicated by default is of 1h
(b). You
can choose the cooking time by pressing "TIMER", "HOUR" and "MINUTE" . The cooking
time cannot exceed 2h. The Timer range is 40 minutes to 2h.
• Press start
(c). The orange back light of "STEAM" position in LED screen (d) and the
"START" button indicate light remain steady. The appliance will switch on.
• After pressing Start, the LED indicates the remaining time of cooking with count down
by minute.
• At the end of the cooking period, the appliance will automatically switch over to keep
warm, the "KEEPWARM/CANCEL" indicate light is on, display shows "b".
8
9
10
11
FUZZYLOGIC_NC00010232:NOTICE 8/04/09 12:29 Page 5

6
EN
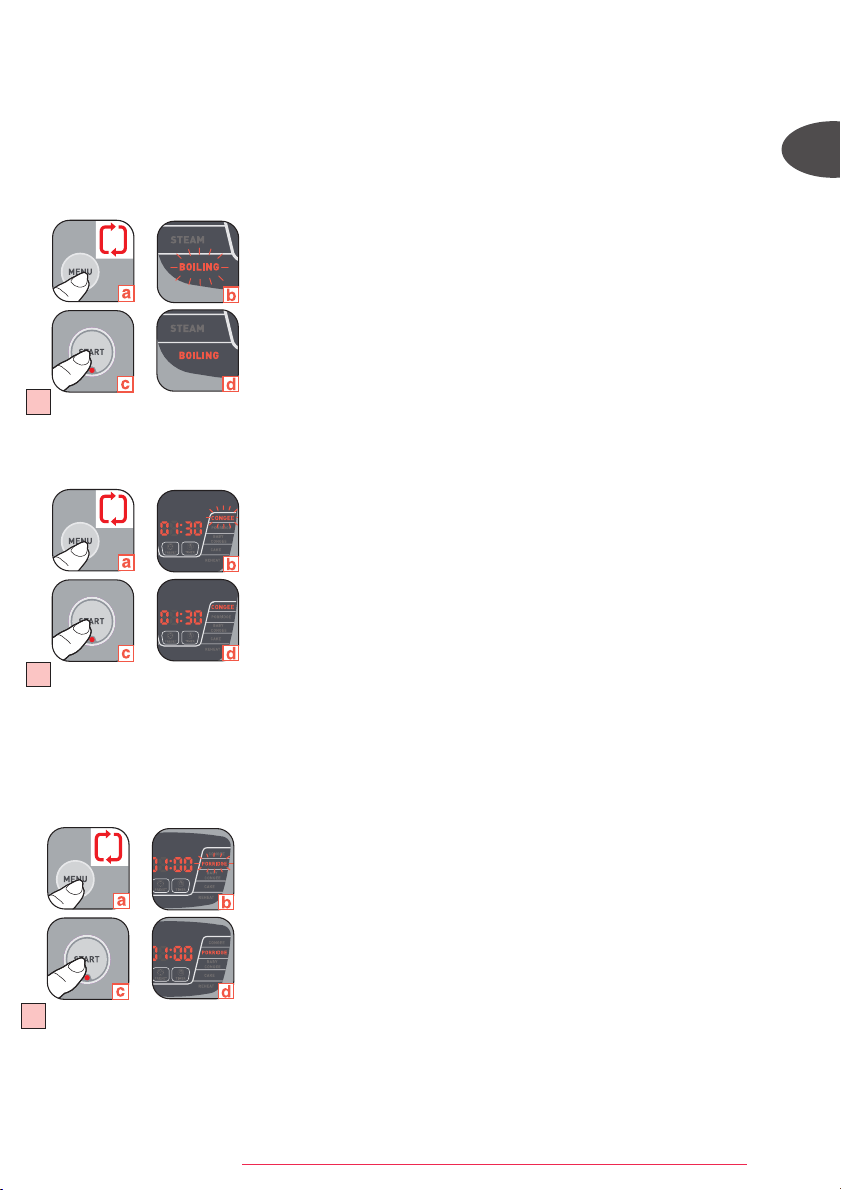
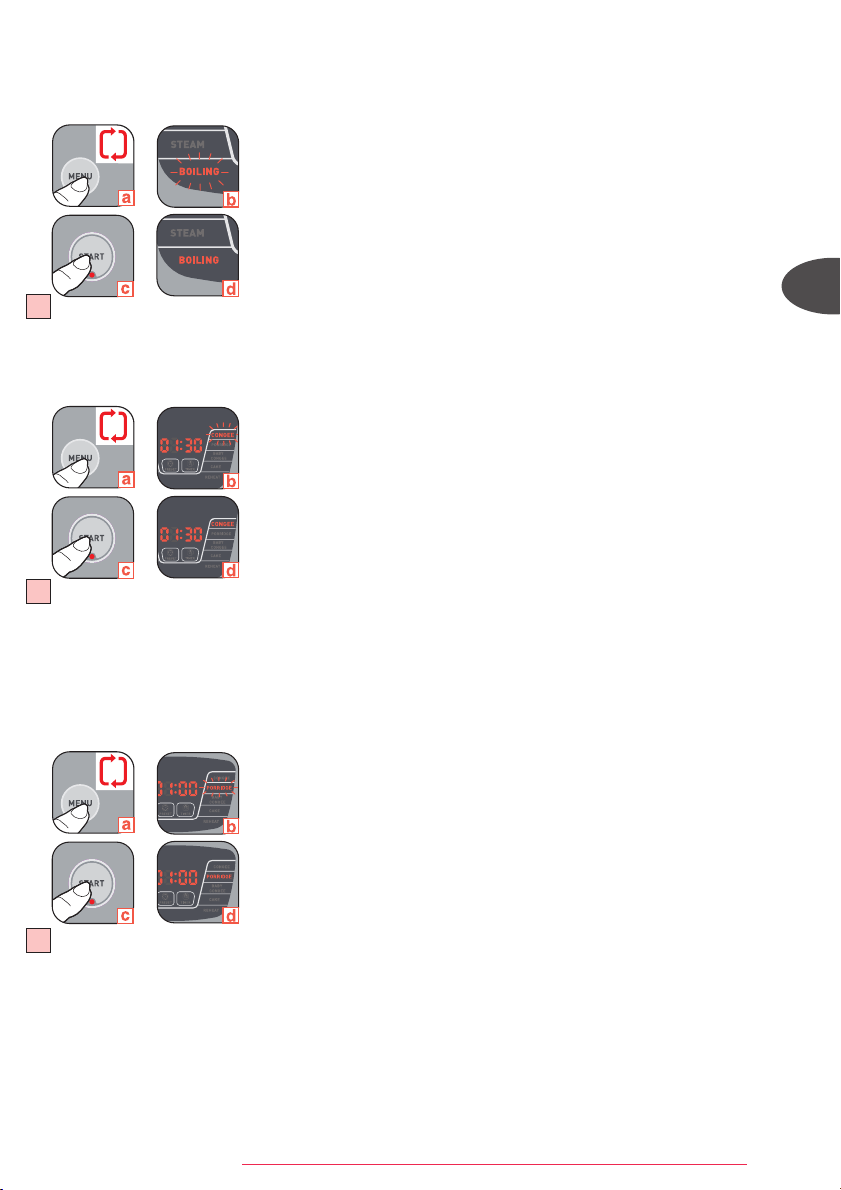
5. Boiling water rice cooking - Fig. 12
• Pour the required quantities of rice and boiling water into the bowl.
• Close the lid.
• Plug in the appliance.
• Choose the menu "BOILING" using the menu button
(a). The orange back light of "BOILING"
position in LED screen flashes
(b). The "START" button indicate light flashes.
• Press start
(c). The orange back light of "BOILING" position in LED screen (d) and the
"START" button indicate light remain steady. The appliance will switch on.
• At the end of the cooking period, the appliance will automatically switch over to keep
warm, the "KEEPWARM/CANCEL" indicate light is on, display shows "b".
6. Congee cooking - Fig. 13
• Pour the required quantities of rice and water into the bowl.
• Close the lid.
• Plug in the appliance.
• Choose the menu "CONGEE" using the menu button
(a). The orange back light of "CONGEE"
position in LED screen flashes
(b). The "START" button indicate light flashes.
• You can adjust the cooking time. The cooking time indicated by default is of 1h30
(b).
You can choose the cooking time by pressing "TIMER", "HOUR" and "MINUTE" . The
cooking time cannot exceed 2h30. The Timer range is 1h10 to 2h30.
• Press start
(c). The orange back light of "CONGEE" position in LED screen (d) and the
"START" button indicate light remain steady. The appliance will switch on.
• After pressing Start, the LED indicates the remaining time of cooking with count down by
minute.
• At the end of the cooking period, the appliance will automatically switch over to keep
warm, the "KEEPWARM/CANCEL" indicate light is on, display shows "b".
7. Porridge cooking - Fig. 14
• Pour the required quantities of rice and water into the bowl.
• Close the lid.
• Plug in the appliance.
• Choose the menu "PORRIDGE" using the menu button
(a). The orange back light of
“PORRIDGE” position in LED screen flashes
(b). The "START" button indicate light flashes.
• Adjust the cooking time. The cooking time indicated by default is of 1h00
(b). You can
choose the cooking time by pressing "TIMER", "HOUR" and "MINUTE". The cooking
time cannot exceed 1h30. The Timer range is 50 minutes to 1h30.
• Press start
(c). The orange back light of "PORRIDGE" position in LED screen (d) and
the "START" button indicate light remain steady. The appliance will switch on.
• After pressing Start, the LED indicates the remaining time of cooking with count down
by minute.
• At the end of the cooking period, the appliance will automatically switch over to keep
warm, the "KEEPWARM/CANCEL" indicate light is on, display shows "b".
14
13
12
x5
x6
x7
FUZZYLOGIC_NC00010232:NOTICE 8/04/09 12:29 Page 6
7
15
16
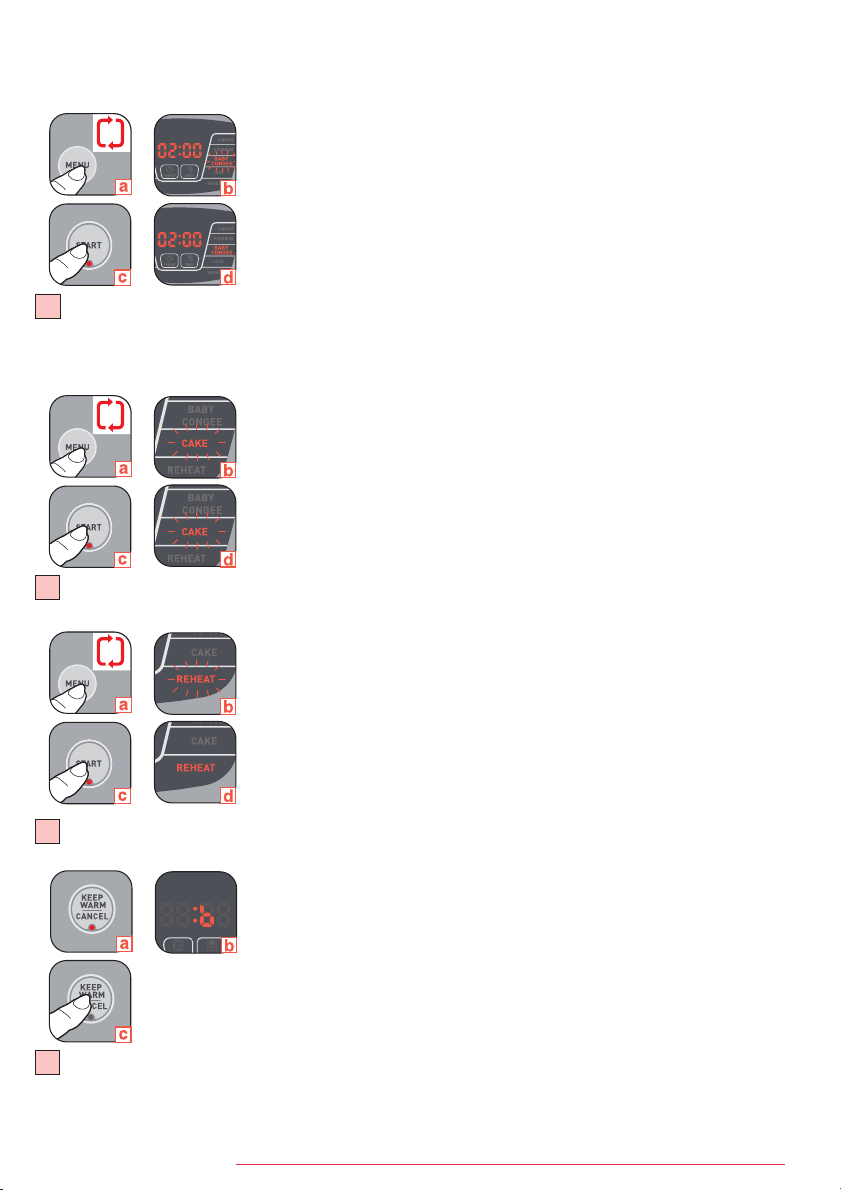
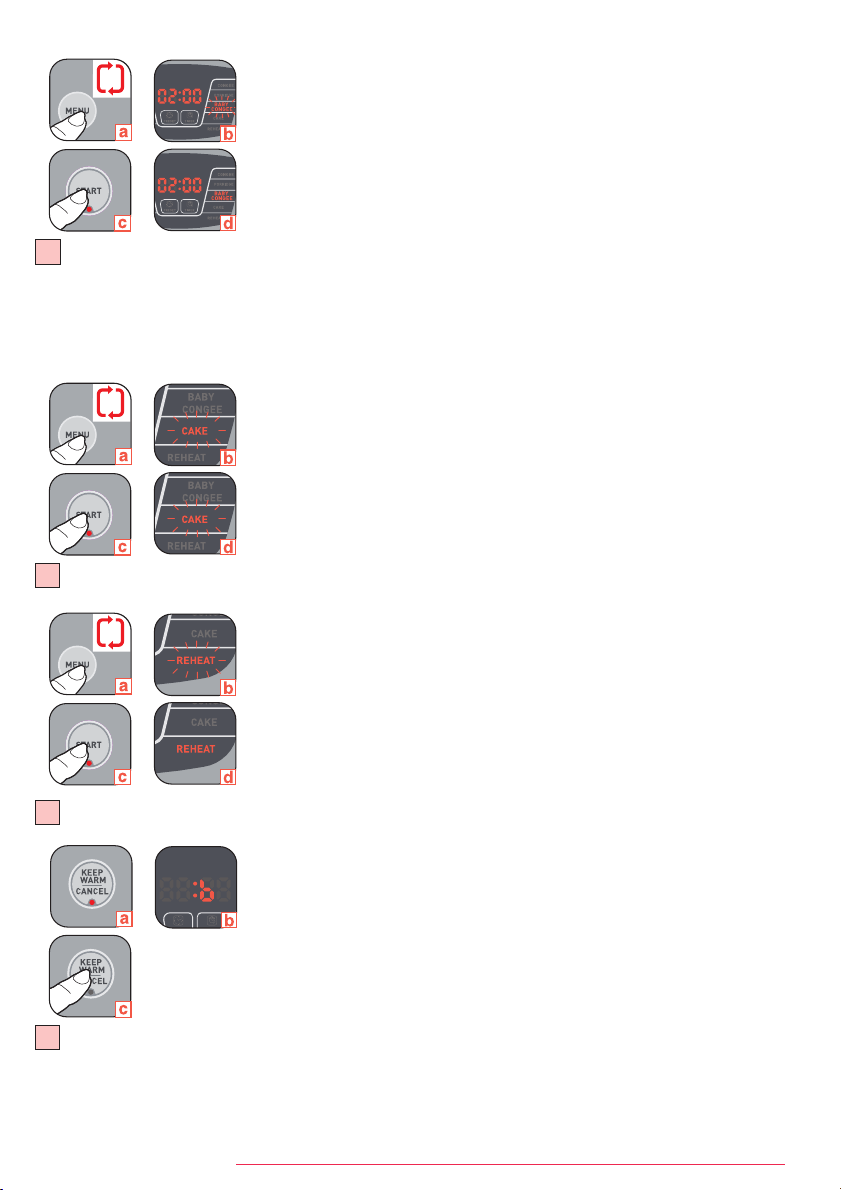
8. Baby congee cooking - Fig. 15
• Pour the ingredients into the bowl.
• Close the lid.
• Plug in the appliance.
• Choose the menu "BABY CONGEE" using the menu button
(a). The orange back light of
"BABY CONGEE" position in LED screen flashes
(b). The "START" button indicate light
flashes.
• Adjust the cooking time. The cooking time indicated by default is of 2h
(b). You can
choose the cooking time by pressing "TIMER", "HOUR" and "MINUTE". The cooking
time cannot exceed 2h30. The Timer range is 1h30 to 2h30.
• Press start
(c). The orange back light of "BABY CONGEE" position in LED screen (d)
and the "START" button indicate light remain steady. The appliance will switch on.
• After pressing Start, the LED indicates the remaining time of cooking with count down
by each minute.
• At the end of the cooking period, the appliance will automatically switch over to keep
warm, the green "KEEPWARM/CANCEL" indicate light is on, display shows "b".
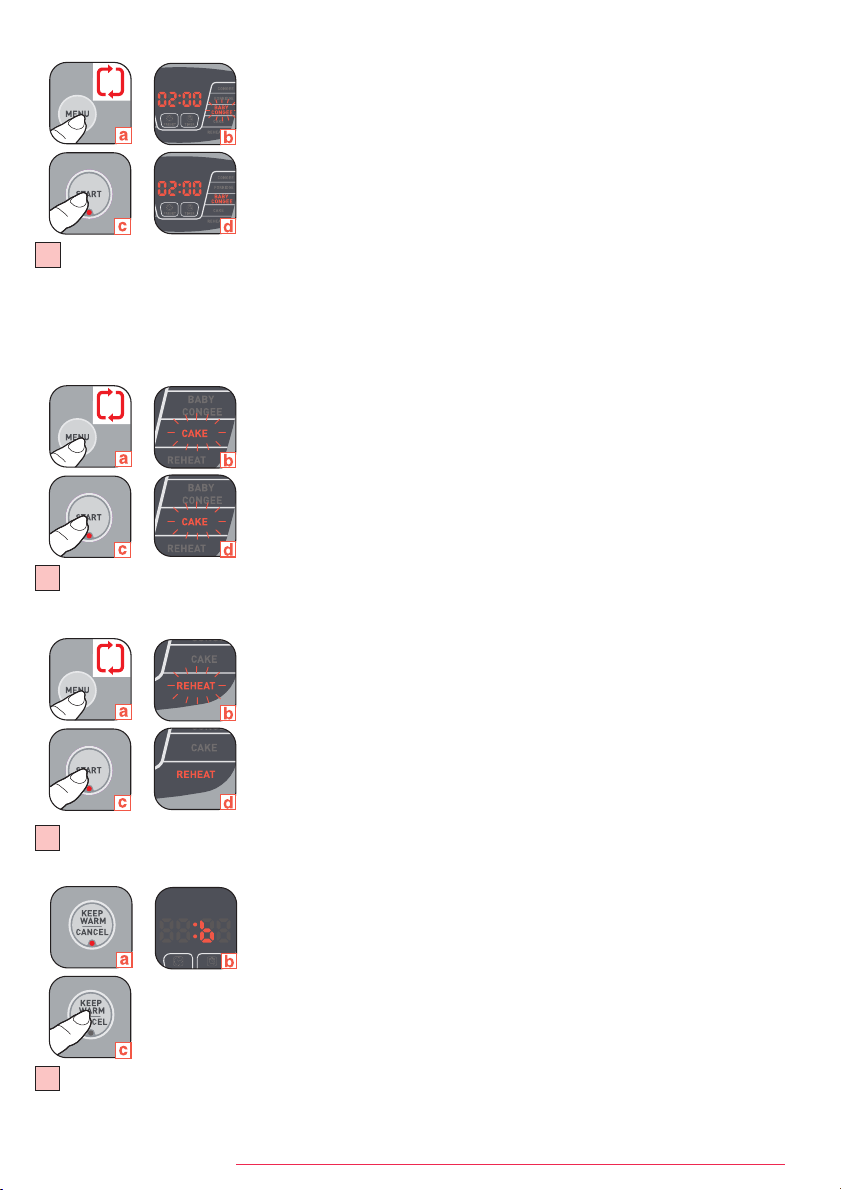
9. Cake cooking - Fig. 16
• Pour the ingredients into the bowl.
• Close the lid.
• Plug in the appliance.
• Choose the menu "CAKE" using the menu button
(a). The orange back light of "CAKE"
position in LED screen flashes
(b). The "START" button indicate light flashes.
• Press start
(c). The orange back light of "CAKE" position in LED screen (d) and the
"START" button indicate light remain steady. The appliance will switch on.
• At the end of the cooking period, the appliance will automatically switch over to keep
warm, the "KEEPWARM/CANCEL" indicate light is on, display shows "b".
10. Reheat - Fig. 17
• Pour ingredients into the bowl.
• Close the lid.
• Plug in the appliance.
• Choose the menu "REHEAT" using the menu button
(a). The orange back light of "REHEAT"
position in LED screen flashes
(b). The "START" button indicate light flashes.
• Press start
(c). The orange back light of "REHEAT" position in LED screen (d) and the
"START" button indicate light remain steady. The appliance will switch on.
• At the end of the cooking period, the appliance will automatically switch over to keep
warm, the "KEEPWARM/CANCEL" indicate light is on, display shows "b".
11. Keep warm function - Fig. 18
• On completion of cooking, irrespective of the cooking mode chosen, the rice cooker
passes automatically to the Keep warm function
(a), the "KEEPWARM/CANCEL"
indicate light is on, display shows "b"
(b).
• The food is thus kept warm and ready to serve until 24h.
• To switch off this function at any time, press "KEEP WARM/CANCEL"
(c).
12. Timer function
• You have the possibility to adjust the cooking time by pressing the "TIMER" button
(for SOUP, STEAM, CONGEE, PORRIDGE, BABY CONGEE functions).
• After choosing the Menu, press the "TIMER" button and then select the the cooking
time with "HOUR" and "MINUTE" buttons.
• Press start to commence the programme.
18
17
x8
x9
x10
2
FUZZYLOGIC_NC00010232:NOTICE 8/04/09 12:29 Page 7
8
EN
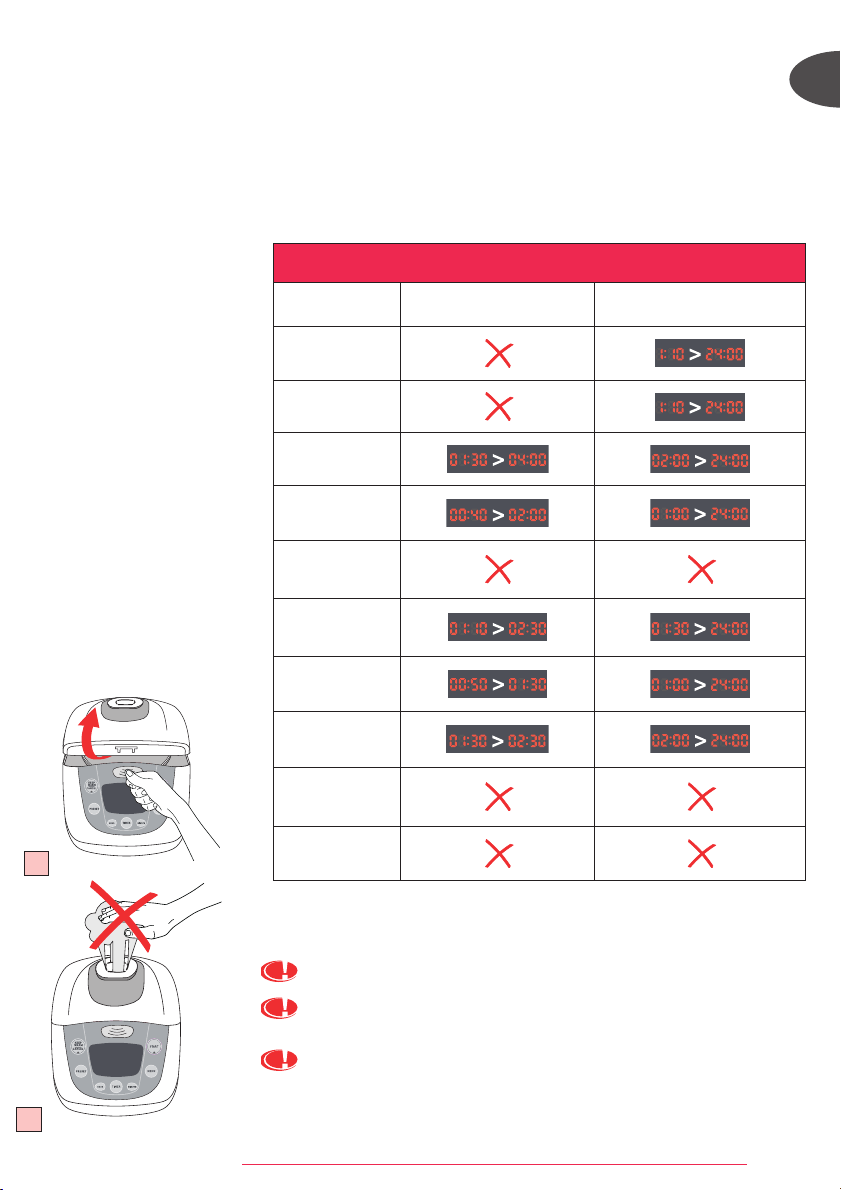
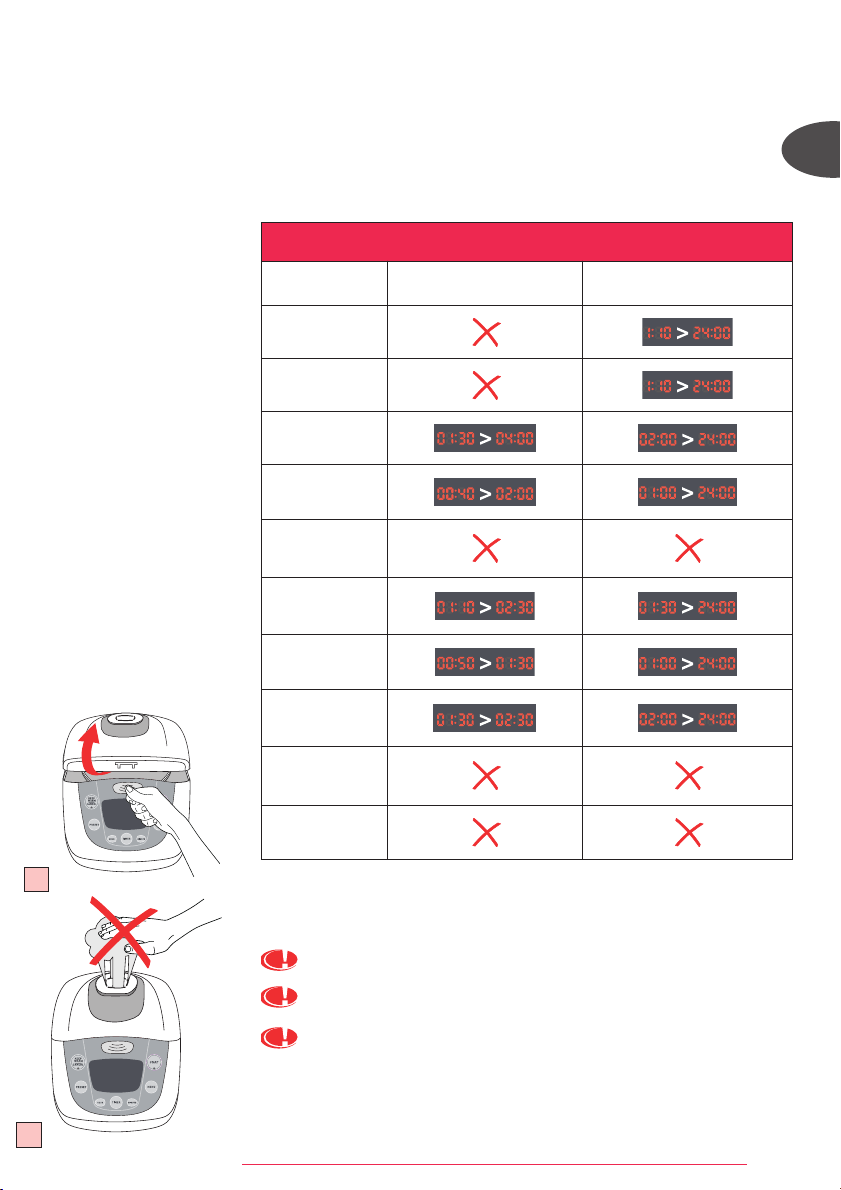
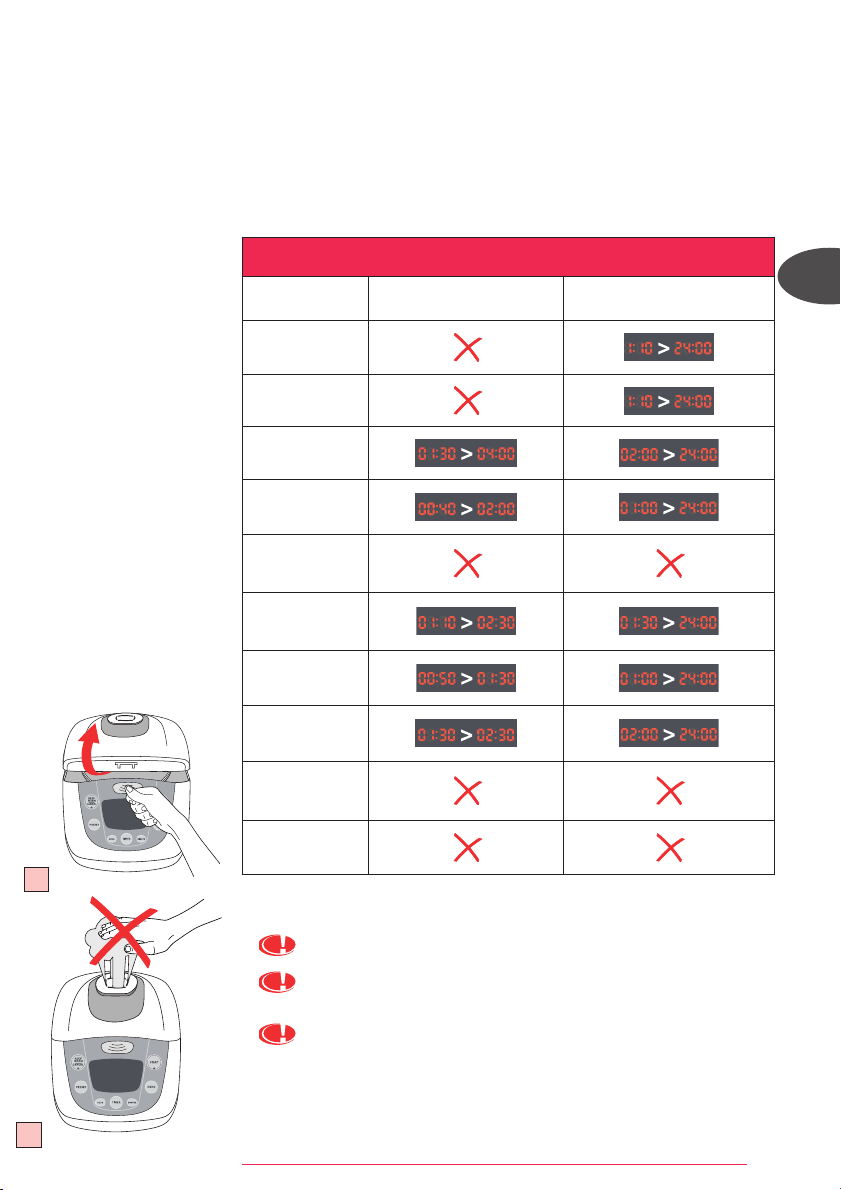
13. Preset function
• You have the possibility to adjust the time of the end of the cooking period by
pressing the "PRESET" button.
• Choose the Menu and set the cooking timer you want (for SOUP, STEAM, CONGEE,
PORRIDGE, BABY CONGEE functions). press "PRESET" and then select the end of
cooking time with "HOUR" and "MINUTE" buttons.
• Press start to commence the programme.
• With the preset function do not use recipes which contain the ingredient which could spoil or stale.
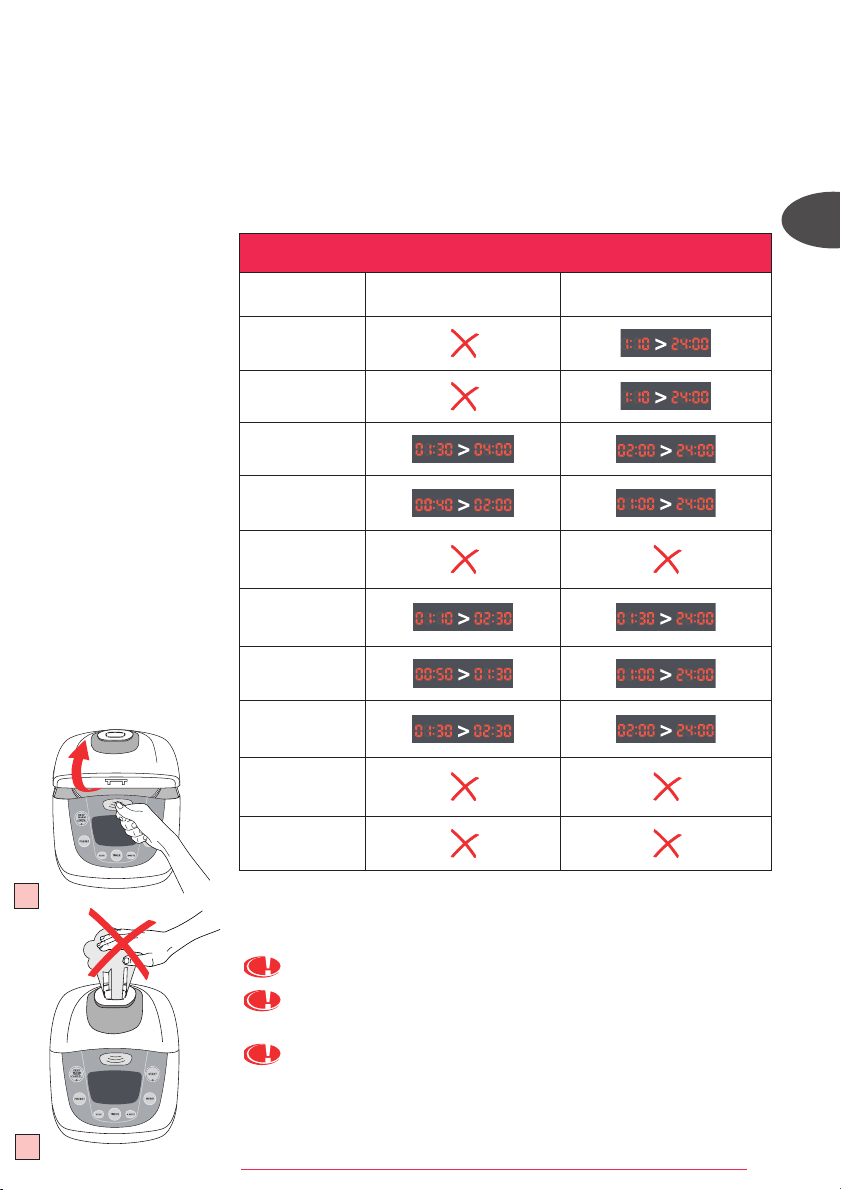
• The table below gives you the time you can set for "TIMER" and "PRESET" functions.
19
GUIDE FOR TIMER AND PRESET
MENU
TIMER
PRESET
RICE
QUICK
SOUP
STEAM
BOILING
CONGEE
PORRIDGE
BABY CONGEE
CAKE
REHEAT
On completion of cooking
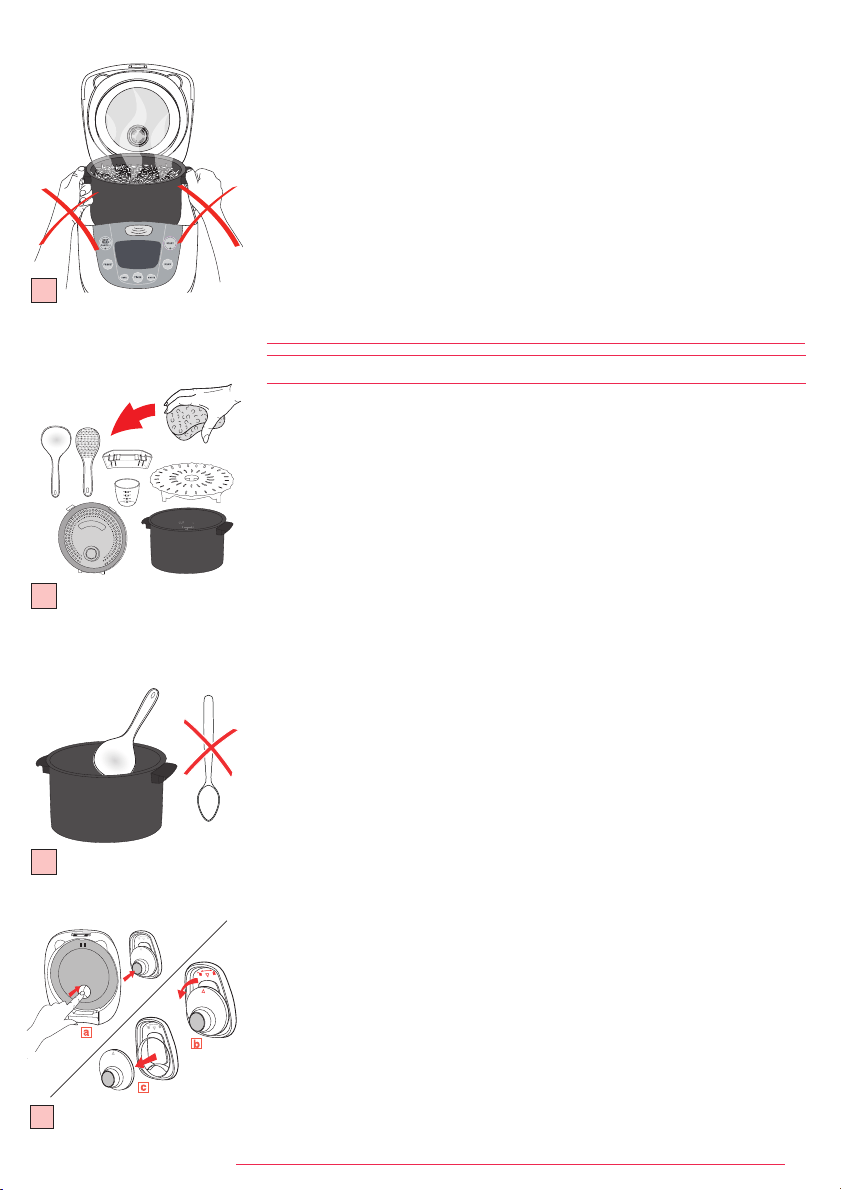
• Open the lid. Fig. 19
The escaping steam is very hot.
Never place your hand on the steam exhaust during cooking, as there is a
danger to burn yourself. Fig. 20
Glove must be used when manipulating the cooking bowl and steam tray. Fig. 21
20
FUZZYLOGIC_NC00010232:NOTICE 8/04/09 12:29 Page 8

9
Cleaning the bowl, the condensation collector, the steam tray and the steam shield. Fig. 22
• Use hot water liquid soap and a sponge to clean the bowl, the condensation
collector, the steam tray and the steam shield. Scouring powders and metal
sponges are not recommended.
• If food has stuck to the bottom, allow the bowl to soak for a while before washing it.
• Dry the bowl carefully.
• Do not immerse the appliance in water nor pour water into it.
• After each use empty and clean the condensation collector.
You can also wash the bowl, the steam tray and the steam shield in the bottom shelf
of a dishwasher.
For the bowl, carefully follow the instructions below:
• When putting into the machine, be careful not to damage the inside coating on the
dishwasher racks.
• So as to keep the non stick quality for as long as possible, it is recommended not
to cut food in it.
• Make sure you put the bowl back into the rice cooker.
IMPORTANT
The brown marks and scratches that may appear after many hours of use are not a
problem. We guarantee that the non stick coating COMPLIES WITH THE RULES on
materials suitable for contact with food.
Taking care of the bowl
• Use the plastic spoon provided or a wooden spoon and not a metal one so as to avoid
damaging the bowl surface. Fig. 23
• To avoid any risk of corrosion, do not pour vinegar into the bowl.
• The color of the bowl surface may change after using for the first time or after
longer use. This change in color is due to the action of steam and water and does
not have any effect on the use of the Rice cooker, nor is it dangerous for your health.
It is perfectly safe to continue using it.
Cleaning the micro pressure valve
• When clean the micro-pressure valve, please remove it from the lid – Fig. 24 (a)
and open it by rotating in the direction of "open"– Fig. 24 (b-c). After cleaning it,
please wipe dry it and meet the two triangle in the two parts together – Fig. 24 (b),
and rotate it in the direction of "close" until you heard "ka", then put it back to the
lid of the rice cooker.
Cleaning and care of the other parts of the appliance
• Clean the outside of the Rice cooker, the inside of the lid and the cord with a damp
cloth and wipe dry. Do not use aggressive or abrasive products.
• Do not use water to clean the inside of the appliance.
CLEANING AND MAINTENANCE
22
23
24
• Serve the food using the plastic spoon provided with your appliance and reclose the lid.
• The food remaining in the container will keep warm for any second serving in the
coming 24 hours.
• Press "KEEP WARM/CANCEL".
• Unplug the appliance.
Some recommendations for better results with the cooking of rice:
• Measure out the rice and wash it under running water in a separate receptacle.
Then place the rice into the bowl together with the corresponding quantity of water.
• Make sure that the rice is well distributed around the whole surface of the Rice
cooker, in order to allow even cooking.
• On completion of cooking, when the keep warm function is selected, stir the rice and then
leave it in the rice cooker for a few minutes longer in order to get perfectly cooked rice.
21
FUZZYLOGIC_NC00010232:NOTICE 8/04/09 12:29 Page 9
10
ZH
特點:
零件說明
1 蒸架
2 水及米刻度
3 可拆式不黏塗層內鍋
4 量杯
5 湯勺
6 電源線
7 微壓閥
8 可拆式蒸氣蓋
9 煲蓋
10 露水收集器
11 手挽
12 煲蓋開啟掣
13 控制面板
14 加熱板
15 感應器
功能說明:
A 「開始」:啟動所選的煮食功能(指示燈亮著)。
B 「保溫/取消」:每次煮食結束後, 自動啟動保溫功能。按此鍵將取消所選的煮食功能。
C 「功能」:按此鍵, 選擇所需功能:煮飯、快煮、煲湯、蒸煮、煲水煮、煲粥、稀飯、嬰兒粥、
焗蛋糕及翻熱。
D 「預設」:適用於除煲水煮、焗蛋糕及翻熱功能外的其他功能的延時煮飯。
所選時間為煮食結束的時間。使用「時」及「分」調較所需的煮食結束時間。每按一下「分」將設
定10分鐘, 而每按一下「時」則為1小時。
E 「時間掣」:適用於調較煲湯、蒸煮、煲粥、稀飯及嬰兒粥功能的煮食時間。
設定煮食時間顯示後, 可以使用「時間掣」、「時」及「分」來調較所需時間。
F 「時」及「分」:調較煮食時間及延時煮飯時間。
可以透過「預設」及「時間掣」設定的功能(煲湯/蒸煮/煲粥/稀飯/嬰兒粥), 必須先設定時間。
煲湯、蒸煮、煲粥、稀飯及嬰兒粥功能:按「開始」後, LED
顯示屏會以每分鐘倒數計時方式顯示餘下煮食時間。
B
C
D
E
F
A
FUZZYLOGIC_NC00010232:NOTICE 8/04/09 12:29 Page 10
11
產品
本電飯煲具備13種功能:煮飯、快煮、煲湯、蒸煮、煲水煮、煲粥、稀飯、
嬰兒粥、焗蛋糕、翻熱、保溫、時間調較及預設功能。
煮食結束後, 電飯煲會自動開始保溫, 並持續保溫24小時。
初次使用前
敬請仔細閱讀本說明書, 並小心依照使用方法。
電飯煲開封:
• 從包裝中取出電飯煲, 拆除各配件及包裝資料。
• 按手挽上的按鈕, 打開電飯煲蓋。(圖1)
• 取出不黏塗層內鍋、蒸氣閥及蒸氣蓋。(圖3a及3b)
• 用海綿及洗潔精清洗不黏塗層內鍋、蒸氣閥及蒸氣蓋。
• 小心擦乾。
• 將所有配件裝回原來位置。
插上電源線。
切勿於內鍋中加入超過內鍋中的最高水位的食材或水。
測量食材 - 內鍋的最大容量。
• 不黏塗層內鍋內側設有「升」及「杯」兩種刻度標記,
用於煮飯時測量水的份量。
• 電飯煲附帶的塑膠杯用以量米而不是水。
1量杯平杯的米約重150克。
• 根據內鍋食材的量杯數量, 加水到所對應的內鍋中
「杯」的刻度位置。
煮食前的準備
煮飯時:
• 盡量避免直接於內鍋中洗米, 以免破壞內鍋的不粘塗層或使鍋身變形。
• 將洗好的米加入內鍋, 加水到相應水位(杯的刻度)。
• 可根據個人口味調節水量。
蒸煮時:
• 添加適當水量, 以免水溢出蒸架。
• 將蒸架放於內鍋的底部。(圖4)
• 加入食材。
使用前的準備
1
2
3a
3b
4
FUZZYLOGIC_NC00010232:NOTICE 8/04/09 12:29 Page 11
12
ZH
日常使用:
• 仔細擦拭內鍋外部(尤其是煲底)。
確保煲底及發熱配件上沒有殘留物或者液體。(圖5)
• 將內鍋加入電飯煲內, 確保內鍋位置正確(圖6)。
確保當內鍋置於感應器上時, 其運行正常。
• 確保蒸氣蓋位置正確。
• 關上並扣好電飯煲蓋。
• 電飯煲插上電源。
• 步驟全部完成後電飯煲方可通電。
• 切勿使用內鍋的手挽運送飯煲(圖7)
煮食
1 煮飯
2 快煮
3 煲湯
4 蒸煮
5 煲水煮
6 煲粥
7 稀飯
8 嬰兒粥
9 焗蛋糕
10 翻熱
11 保溫功能
12 時間調較
13 預設功能
5
米的類型 量杯
白米重
量
內鍋中的
水位
(加入米)
可供享用
人數
大約烹調時間
*
煮飯功能 快煮功能 煲水煮
圓白大米
(意大利大米–
通常為較黏身米)
4
600 克 4 杯刻度
5 到 6 人
49 min 39 min 35 分鐘
全粒糙米
4
600 克
4,5
杯刻度
5 到 6 人
49 min 44 min 38 分鐘
意大利米
(短圓梗米)
4
600 克 4 杯刻度
4 到 5 人
49 min 40 min 35 分鐘
糯米
4
620 克 4 杯刻度
5 到 6 人
46 min 38 min 34 分鐘
糙米
4
570 克
4,5
杯刻度
5 到 6 人
50 min 42 min 39 分鐘
日本米
4
580 克 4 杯刻度
5 到 6 人
49 min 39 min 35 分鐘
香米
4
640 克 4 杯刻度
5 到 6 人
44 min 41 min 34 分鐘
不同種類米的烹調方法
白米的量
杯數量
白米重量
內鍋中的水位
(加入米)
可供享用人數
大約烹調時間
*
煮飯功能 快煮功能 煲水煮
2
300 克 2 杯刻度
3 到4人
44 分鐘 36 分鐘 32 分鐘
4
600 克 4 杯刻度
5 到 6 人
49 分鐘 42 分鐘 36 分鐘
6
900 克 6 杯刻度
8 到 10 人
53 分鐘 45 分鐘 36 分鐘
8
1200 克 8 杯刻度
11 到 14 人
58 分鐘 45 分鐘 38 分鐘
白米的烹調方法 - 8 杯米
• 除了意大利米外, 米煮前應徹底淘洗。
• 米煮前應徹底淘洗。
2
1
3
4
5
6
7
12
13
8
9
10
11
6
*電飯煲根據不黏塗層內鍋中米量和水量自行決定準確的烹調時間。
7
FUZZYLOGIC_NC00010232:NOTICE 8/04/09 12:29 Page 12
13
x3
x2
x1
x4
1. 煮飯(圖8)
• 將所需份量的米及水加入內鍋中。
• 關上電飯煲蓋。
• 電飯煲插上電源。
• 選擇「功能」中的「煮飯」功能(a)。
LED顯示屏上「煮飯」位置的橙色背景燈會閃亮(b)。「開始」的紅色指示
燈亦會閃亮。
• 按「開始」(c)。LED顯示屏「煮飯」位置的橙色背景燈(d)及
「開始」的紅色指示燈保持亮著。電飯煲接通電源。
• 當煮食過程結束, 電飯煲會自動進行保溫, 綠色的「保溫/取消」
指示燈亮著, 顯示屏顯示“b”。
2. 快煮(圖9)
• 將所需份量的米及水加入內鍋中。
• 關上電飯煲蓋。
• 電飯煲插上電源。
• 選擇「功能」中的「快煮」功能
(a)。LED顯示屏上「快煮」
位置的橙色背景燈會閃亮(b)。「開始」的紅色指示燈亦會閃亮。
• 按「開始」(c)。LED顯示屏「快煮」位置的橙色背景燈(d)及「開始」
的紅色指示燈保持亮著。電飯煲接通電源。
• 當煮食過程結束, 電飯煲會自動進行保溫, 綠色的「保溫/取消」
指示燈亮著, 顯示屏顯示“b”。
3. 煲湯(圖10)
• 將食材加入內鍋中。
• 關上電飯煲蓋。
• 電飯煲插上電源。
• 選擇「功能」中的「煲湯」功能
(a)。LED顯示屏上「煲湯」
位置的橙色背景燈會閃亮(b)。「開始」指示燈亦會閃亮。
• 煮食時間可以調較。設定煲湯時間為2小時(b)。煮食時間可以透過
「時間掣」、「時」及「分」調較。煮食時間切勿超過4小時。「時間掣」
的調較範圍為1小時30分鐘至4小時。
• 按「開始」(c)。LED顯示屏「煲湯」位置的橙色背景燈(d)及「開始」
的紅色指示燈保持亮著。電飯煲接通電源。
• 按「開始」後, LED顯示屏會以每分鐘倒數計時方式顯示餘下煮食時間。
• 當煮食過程結束, 電飯煲會自動進行保溫, 「保溫/取消」指示燈亮著,
顯示屏顯示“b”。
4. 蒸煮(圖11)
• 將適量的水加入內鍋中。
• 將蒸架置於內鍋底部, 加入食材。
• 關上電飯煲蓋。
• 電飯煲插上電源。
• 選擇「功能」中的「蒸煮」功能
(a)。LED顯示屏上「蒸煮」
位置的橙色背景燈會閃亮(b)。「開始」指示燈亦會閃亮。
• 煮食時間可以調較。設定蒸煮時間為1小時
(b)。煮食時間可以透過
「時間掣」、「時」及「分」調較。煮食時間切勿超過2小時。「時間掣」
的調較範圍為40分鐘至2小時。
8
9
10
11
1
FUZZYLOGIC_NC00010232:NOTICE 8/04/09 12:29 Page 13
14
ZH
• 按「開始」(c)。LED顯示屏「蒸煮」位置的橙色背景燈(d)及「開始」
指示燈保持亮著。電飯煲接通電源。
• 按「開始」後, LED顯示屏會以每分鐘倒數計時方式顯示餘下煮食時間。
• 當煮食過程結束, 電飯煲會自動進行保溫, 「保溫/取消」指示燈亮著,
顯示屏顯示“b”。
5. 煲水煮(圖12)
• 將所需份量的米及水加入內鍋中。
• 關上電飯煲蓋。
• 電飯煲插上電源。
• 選擇「功能」中的「煲水煮」功能
(a)。LED顯示屏上「煲水煮」
位置的橙色背景燈會閃亮(b)。「開始」指示燈亦會閃亮。
• 按「開始」(c)。LED顯示屏「煲水煮」位置的橙色背景燈(d)及「開始」
指示燈保持亮著。電飯煲接通電源。
• 當煮食過程結束, 電飯煲會自動進行保溫, 「保溫/取消」指示燈亮著,
顯示屏顯示“b”。
6. 煲粥(圖13)
• 將所需份量的米及水加入內鍋中。
• 關上電飯煲蓋。
• 電飯煲插上電源。
• 選擇「功能」中的「煲粥」功能
(a)。LED顯示屏上「煲粥」
位置的橙色背景燈會閃亮(b)。「開始」指示燈亦會閃亮。
• 煮食時間可以調較。設定煲粥時間為1小時30分鐘(b)。煮食時間可以透過
「時間掣」、「時」及「分」調較。煮食時間切勿超過2小時30分鐘。
「時間掣」的調較範圍為1小時10分鐘至2小時30分鐘。
• 按「開始」(c)。LED顯示屏(d)「煲粥」位置的橙色背景燈及「開始」
指示燈保持亮著。電飯煲接通電源。
• 按「開始」後, LED顯示屏會以每分鐘倒數計時方式顯示餘下煮食時間。
• 當煮食過程結束, 電飯煲會自動進行保溫, 「保溫/取消」指示燈亮著,
顯示屏顯示“b”。
7. 稀飯(圖14)
• 將所需份量的米及水加入內鍋中。
• 關上電飯煲蓋。
• 電飯煲插上電源。
• 選擇「功能」中的「稀飯」功能
(a)。LED顯示屏上「稀飯」
位置的橙色背景燈會閃亮(b)。「開始」指示燈亦會閃亮。
• 調較煮食時間。設定稀飯的時間為1小時
(b)。煮食時間可以透過
「時間掣」、「時」及「分」調較。煮食時間切勿超過1小時30分鐘。
「時間掣」的調較範圍為50分鐘至1小時30分鐘。
• 按「開始」(c)。LED顯示屏「稀飯」位置的橙色背景燈(d)及
「開始」指示燈保持亮著。電飯煲接通電源。
• 按「開始」後, LED
顯示屏會以每分鐘倒數計時方式顯示餘下煮食時間。
• 當煮食過程結束, 電飯煲會自動進行保溫, 「保溫/取消」
指示燈亮著, 顯示屏顯示“b”。
14
13
12
x5
x6
x7
FUZZYLOGIC_NC00010232:NOTICE 8/04/09 12:29 Page 14
15
15
16
8. 嬰兒粥(圖15)
• 將食材加入內鍋中。
• 關上電飯煲蓋。
• 電飯煲插上電源。
• 選擇「功能」中的「嬰兒粥」功能(a)。LED顯示屏上「嬰兒粥」
位置的橙色背景燈會閃亮(b)。「開始」指示燈亦會閃亮。
• 調較煮食時間。設定嬰兒粥的時間為2小時(b)。煮食時間可以透過
「時間掣」、「時」及「分」調較。煮食時間切勿超過2小時30分鐘。
「時間掣」的調較範圍為1小時30分鐘至2小時30分鐘。
• 按「開始」(c)。LED顯示屏(d)「嬰兒粥」位置的橙色背景燈及「開始」
指示燈保持亮著。電飯煲接通電源。
• 按「開始」後, LED顯示屏以倒計的方式顯示剩餘煮食時間。
• 當煮食過程結束, 電飯煲會自動進行保溫, 綠色的「保溫/取消」
指示燈亮著, 顯示屏顯示“b”。
9. 焗蛋糕(圖16)
• 將食材加入內鍋中。
• 關上電飯煲蓋。
• 電飯煲插上電源。
• 按「功能」選擇「蛋糕」功能(a)。LED顯示屏上「蛋糕」
位置的橙色背景燈會閃亮(b)。「開始」指示燈亦會閃亮。
• 按「開始」(c)。LED顯示屏(d)「蛋糕」位置的橙色背景燈及「開始」
指示燈保持亮著。電飯煲接通電源。
• 當煮食過程結束, 電飯煲會自動開始保溫, 「保溫/取消」指示燈亮著,
顯示屏顯示“b”。
10. 翻熱(圖17)
• 將食材加入內鍋中。
• 關上電飯煲蓋。
• 電飯煲插上電源。
• 選擇「功能」中的「翻熱」功能
(a)。LED顯示屏上「翻熱」
位置的橙色背景燈會閃亮(b)。「開始」指示燈亦會閃亮。
• 按「開始」(c)。LED顯示屏「翻熱」位置的橙色背景燈(d)及「開始」
指示燈保持亮著。電飯煲接通電源。
• 當煮食過程結束, 電飯煲會自動進行保溫, 「保溫/取消」指示燈亮著,
顯示屏顯示“b”。
11. 保溫功能(圖18)
• 煮食過程完成後, 無論選定任何一種煮食模式, 電飯煲都會自動進入
「保溫」功能
(a), 「保溫/取消」指示燈亮著, 顯示屏顯示“b”(b)。
• 食物處於保溫狀態達24小時。
• 按「保溫/取消」即可取消保溫功能
(c)。
12. 時間掣功能
• 按「時間掣」以調較煮食時間(煲湯、蒸煮、煲粥、稀飯及嬰兒粥功能)。
• 選擇「功能」後, 按「時間掣」並選擇「時」及「分」選擇煮食時間。
• 按「開始」啟動程式。
18
17
x8
x9
x10
2
FUZZYLOGIC_NC00010232:NOTICE 8/04/09 12:29 Page 15
16
ZH
13. 預設功能
• 按「預設」以調較煮食過程的結束時間。
• 選擇「功能」設定所需的煮食時間(煲湯、蒸煮、煲粥、稀飯及嬰兒粥功能)。
按「預設」, 並利用「時」及「分」選擇煮食的結束時間。
• 按「開始」啟動程式。
• 使用「預設」功能時, 切勿烹煮容易變質或腐壞的食材。
• 以下列表提供「時間掣」及「預設」功能的設定時間。
19
煮食完成
• 打開煲蓋(圖19)
溢出的蒸氣非常高溫。
煮食過程中切勿將手放於排氣口, 以免燙傷。(圖20)
使用不黏內鍋及蒸架時必須使用隔熱手套。(圖21)
20
時間掣及預設指示
功能 時間掣 預設
煮飯
快煮
煲湯
蒸煮
煲水煮
煲粥
稀飯
嬰兒粥
焗蛋糕
翻熱
FUZZYLOGIC_NC00010232:NOTICE 8/04/09 12:29 Page 16

17
清洗內鍋、露水收集器、蒸架及蒸氣蓋。(圖22)
• 用熱水、洗潔精及海綿清洗內鍋、露水收集器、蒸架及蒸氣蓋。
不建議使用去污粉及金屬百潔布。
• 如果煲底黏有食物, 清洗前先將內鍋浸泡一會。
• 小心擦乾內鍋。
• 切勿將電飯煲置於水中, 或倒入水。
• 每次使用後, 將露水收集器清空和清洗乾淨。
內鍋、蒸架及蒸氣蓋亦可放進洗碗機底層清洗。
請按照以下指示小心清洗內鍋:
• 將內鍋放進洗碗機時, 小心放於洗碗機架上, 以免損壞內鍋的不黏塗層。
• 為保持內鍋的不黏特性, 建議切勿在煲中切食物。
• 確保將內鍋放回電飯煲內。
重要提示:
電飯煲使用一段時間後可能出現啡色蹟、刮痕, 這並不會造成問題。本公司
保證不黏塗層符合有關接觸食物的合適材料的各項規定。
內鍋的保養
• 使用附帶的塑膠湯勺或木湯勺, 盡量避免使用金屬器具,
以免損壞內鍋表面。(圖23)
• 為防止腐蝕, 切勿將醋加入內鍋中。
• 初次使用或多次使用後, 內鍋表面的顏色可能會產生變化。
這是由於蒸氣及水造成,不會影響電飯煲的使用, 亦不會對人體有害。
可繼續放心使用電飯煲。
清洗微壓閥
• 清洗時, 請將微壓閥從煲蓋上取下(圖24)
(a), 然後沿「開)」
方向旋轉以將其打開(圖24) (b-c)。清洗完畢後, 擦乾微壓閥,
並對準兩個配件上的三角形(圖24)
(b), 沿「關閉」方向旋轉,直至「卡」一聲,
然後將其放回電飯煲蓋。
電飯煲其他配件的清洗及保養
• 用濕布擦拭電飯煲外部、煲蓋內側及電源線, 然後擦乾。
切勿使用腐蝕性或具磨損性的清潔產品。
• 切勿用水清洗電飯煲內部。
清洗及維護
23
24
• 用電飯煲附設的膠湯勺將食物取出, 然後再蓋上煲蓋。
• 內鍋中的食物則會持續保溫達24小時。
• 按「保溫/取消」。
• 拔出電飯煲電源。
達到煮飯最佳效果的建議:
• 米量好後, 放於另外的容器用水沖洗。
然後將洗淨的米及相應份量的水加入內鍋中。
• 確保米平均攤鋪在煲中以達致煮食均勻。
• 煮食過程完成後會進行保溫, 攪拌米飯後再於煲中多放數分鐘,
以令米飯更香。
22
21
FUZZYLOGIC_NC00010232:NOTICE 8/04/09 12:29 Page 17
18
TH
1
2
3
4
5
6
7 -
8 ()
9
10
11
12
13
14
15
A : ()
B /:
C : ( )
D :
10 1
E :
F :
(////)
B
C
D
E
F
A
FUZZYLOGIC_NC00010232:NOTICE 8/04/09 12:29 Page 18
19
13
()
24
•
• ( 1)
• -
( 3a 3b)
• -
•
•
•
•
150
•
:
•
•
•
:
•
• ( 4)
•
1
2
3a
3b
4
FUZZYLOGIC_NC00010232:NOTICE 8/04/09 12:29 Page 19
20
EN
EN
TH
EN
:
• ()
( 5)
• ( 6)
•
•
•
•
• ( 7)
1.
2.
3.
4.
5.
6.
7.
8.
9.
10.
11.
12.
13.
5
*
()
()
*
(Round white rice)
4 600 4 5-6 49 39 35
4 600 4.5 5-6 49 44 38
()
4 600 4 4-5 49 40 35
4 620 4 5-6 46 38 34
4 570 4.5 5-6 50 42 39
4 580 4 5-6 49 39 35
4 640 4 5-6 44 41 34
()
()
*
2
300 2 3-4 44 36 32
4
600 4 5-6 49 42 36
6
900 6 8-10 53 45 36
8
1200 8 11-14 58 45 38
- 8 (1.8 )
•
•
2
1
3
4
5
6
7
12
13
8
9
10
11
6
7
FUZZYLOGIC_NC00010232:NOTICE 8/04/09 12:29 Page 20
21
x3
x2
x1
x4
1. ( 8)
•
•
•
• (a) (b)
• (c) (d)
•
/ b
2. ( 9)
•
•
•
• (a) (b)
• (c) (d)
•
/ b
3. ( 10)
•
•
•
• (a) (b)
• 2 (b)
4
1 30 4
• (c) (d)
•
•
/ b
4. ( 11)
•
•
•
•
• (a) (b)
• 1 (b)
2
40 2
• (c) (d)
•
•
/ b
8
9
10
11
FUZZYLOGIC_NC00010232:NOTICE 8/04/09 12:29 Page 21

22
EN
EN
TH
EN
5. ( 12)
•
•
•
• (a) (b)
• (c) (d)
•
/ b
6. ( 13)
•
•
•
• (a) (b)
• 1 30 (b)
2
30 1 10 2 30
• (c) (d)
•
•
/ b
7. ( 14)
•
•
•
• (a) (b)
• 1 (b)
1 30
50 1 30
• (c) (d)
•
•
/ b
14
13
12
x5
x6
x7
FUZZYLOGIC_NC00010232:NOTICE 8/04/09 12:29 Page 22
23
15
16
8. ( 15)
•
•
•
• (a) (b)
• 2 (b)
2 30
1 30 2 30
• (c) (d)
•
•
/ b
9. ( 16)
•
•
•
• (a) (b)
• (c) (d)
•
/ b
10. ( 17)
•
•
•
• (a) (b)
• (c) (d)
•
/ b
11. () ( 18)
•
/ b
• 24
• / (c)
12.
• "" (
)
• "" ""
""
•
18
17
x8
x9
x10
1
2
FUZZYLOGIC_NC00010232:NOTICE 8/04/09 12:29 Page 23
24
EN
EN
TH
13.
•
• (
)
•
•
•
19
• ( 19)
( 20)
( 21)
20
FUZZYLOGIC_NC00010232:NOTICE 8/04/09 12:29 Page 24
25
( 22)
•
•
•
•
•
•
•
•
•
( 23)
•
•
-
• - ( 24) (a)
( 24) (b-c)
•
•
23
24
•
• 24
• /
•
•
•
•
2-3
22
21
FUZZYLOGIC_NC00010232:NOTICE 8/04/09 12:29 Page 25
26
MS
Ciri-ciri
Keterangan gambarajah
1 Dulang kukusan
2 Pembahagi air dan nasi
3 Mangkuk masakan tidak lekat
4 Cawan penyukat
5 Senduk
6 Wayar kuasa
7 Injap tekanan mikro
8 Pelindungan wap boleh tanggal
9 Penutup
10 Pengumpul wap
11 Pemegang
12 Butang penutup
13 Kotak kawalan
14 Plat panas
15 Sensor
Keterangan Fungsi
A MULA: Memulakan menu masakan yang telah dipilih (lampu akan menyala).
B KEKAL PANAS/BATAL: Fungsi kekal panas akan dimulakan secara automatik selepas selesai memasak.
Menekan butang ini akan membatalkan fungsi memasak yang telah dipilih.
C MENU: Tekan butang ini untuk untuk memilih menu yang dikehendaki : Memasak nasi, Masakan ringkas,
Memasak sup, Mengukus, Mendidih, Memasak bubur, Memasak bubur bayi, Memasak kek, Memanas semula.
D PRESET: Pilihan permulaan boleh tangguh untuk semua fungsi kecuali, DIDIH, KEK dan MEMANAS SEMULA.
Masa yang dipilih merupakan masa tamat memasak. Guna butang “JAM” dan “MINIT” untuk menukar masa
tamat memasak yang anda kehendaki. Setiap kali butang Minit ditekan, anda akan menambah 10 minit dan
setiap kali butang “JAM” ditekan, anda akan menambah 1 jam.
E PENENTU MASA: Pilihan masa memasak untuk fungsi SUP, KUKUS, BUBUR CAIR, BUBUR LIKAT dan BUBUR
BAYI. Masa yang telah ditentukan akan dipaparkan dan ia boleh diubahsuai dengan menekan butang
“PENENTU MASA”, “JAM” dan “MINIT”.
F JAM DAN MINIT: Membolehkan pengubahsuaian masa memasak dan permulaan boleh tangguh.
Untuk fungsi yang boleh ditentukan dengan menggunakan PRESET dan PENENTU MASA
(SUP/KUKUS/BUBUR CAIR/BUBUR LIKAT/BUBUR BAYI), anda hendaklah menentukan PENENTU MASA
terlebih dahulu.
Untuk SUP, KUKUS, BUBUR CAIR, BUBUR LIKAT dan BUBUR BAYI: Apabila menekan butang Mula, LED akan
menunjukkan baki masa dan pengiraan akan ditolak minit demi minit.
B
C
D
E
F
A
FUZZYLOGIC_NC00010232:NOTICE 8/04/09 12:29 Page 26

27
Produk
Periuk nasi ini dilengkapi dengan 13 fungsi. Memasak nasi, Masakan ringkas,
Memasak sup, Mengukus, Mendidih, Memasak bubur cair, Memasak bubur likat,
Memasak bubur bayi, Memasak kek, Memanas semula, Kekal panas, Penentu masa
dan Preset. Setelah selesai memasak, peralatan akan bertukar ke mod kekal panas
secara automatik yang tahan sehingga ke 24 jam.
Sebelum penggunaan kali pertama
Baca arahan dan ikut kaedah penggunaan dengan berhati-hati.
Keluarkan peralatan
• Keluarkan peralatan daripada bungkusan dan alihkan aksesori dan sebarang
dokumen daripada peralatan.
• Buka penutup dengan menekan butang pembuka yang terletak di atas peralatan. Rajah 1
• Alihkan mangkuk masakan tidak lekat, injap wap dan pelindung wap. Rajah 3a dan
3b
• Cuci mangkuk masakan, injap wap dan pelindung wap dengan span dan cecair
pencuci.
• Keringkan dengan berhati-hati.
• Letakkan kembali semua bahagian ke kedudukan asal.
Sambungkan wayar boleh tanggal.
Jangan tambahkan bahan-bahan masakan atau air melebihi paras air
maksimum.
Menyukat bahan-bahan – kapasiti mangkuk yang maksimum.
• Penanda di dalam mangkuk adalah dalam ukuran liter dan
cawan untuk mengukur sukatan air semasa memasak nasi.
• Cawan penyukat plastik yang disediakan adalah untuk
menyukat beras dan bukan untuk menyukat air. 1 paras sukatan
beras adalah bersamaan dengan 150g.
• Isikan air sehingga ke tanda CAWAN di dalam mangkuk
masakan di mana ia adalah sama dengan cawan penyukat
yang disertakan di dalam mangkuk.
Penyediaan sebelum memasak
Semasa memasak nasi:
• Adalah disarankan untuk tidak membilas beras secara langsung di dalam mangkuk
masakan untuk mengelakkan goresan pada lapisan tidak lekat mangkuk dan untuk
mengelakkan sebarang perubahan bentuk mangkuk masakan.
• Tuangkan kuantiti beras you dikehendaki ke dalam mangkuk dan isikan air sehingga
paras air (Petanda pada cawan).
• Kuantiti air boleh diubahsuai mengikut citarasa anda.
Semasa mengukus:
• Kuantiti air hendaklah sesuai untuk mengelakkan air melimpah ke dulang kukusan.
• Letakkan dulang kukusan di dasar mangkuk masakan. Rajah 4
• Masukkan bahan-bahan masakan.
PENYEDIAAN
1
2
3a
3b
4
FUZZYLOGIC_NC00010232:NOTICE 8/04/09 12:29 Page 27
28
MS
Untuk semua penggunaan:
• Lap bahagian luar mangkuk masakan (terutamanya di bahagian bawah).
Pastikan tiada sebarang bendasing atau cecair di bawah mangkuk dan di atas
elemen pemanas. Rajah. 5
• Letakkan mangkuk masakan di dalam peralatan dan pastikan ia diletakkan pada
kedudukan yang tepat. Rajah 6
• Pastikan sensor bergerak apabila anda meletakkan mangkuk masakan ke atasnya.
• Pastikan pelindung wap diletakkan pada kedudukan yang betul.
• Tutup dan kunci penutup.
• Sambungkan plag peralatan.
• Jangan pasangkan suis peralatan sehingga semua langkah di atas telah
dilengkapkan.
• Jangan alihkan periuk nasi dengan pemegang tepi. Fig 7
MEMASAK
1. Memasak nasi
2. Masakan ringkas
3. Memasak sup
4. Mengukus
5. Mendidih
6. Memasak bubur cair
7. Memasak bubur likat
8. Memasak bubur bayi
9. Memasak kek
10. Memanas semula
11. Fungsi kekal panas
12. Fungsi penentu
masa
13. Fungsi preset
5
Jenis beras
Cawan
pengukat
Berat
beras
Paras air
dalam
mangkuk
(+ beras)
Hidangan
Anggaran masa memasak*
Nasi Ringkas Air nasi
Beras putih bulat
(Beras Itali - biasanya
lebih melekat)
4 600 g
Paras 4
cawan
5/6hidangan 49 min 39 min 35 min
Beras perang
wholegrain
4 600 g
Paras 4,5
cawan
5/6hidangan 49 min 44 min 38 min
Beras risotto
(Jenis Arborio)
4 600 g
Paras 4
cawan
4/5hidangan 49 min 40 min 35 min
Beras pulut 4 620 g
Paras 4
cawan
5/6hidangan 46 min 38 min 34 min
Beras perang 4 570 g
Paras 4,5
cawan
5/6hidangan 50 min 42 min 39 min
Beras jepun 4 580 g
Paras 4
cawan
5/6hidangan 49 min 39 min 35 min
Beras wangi 4 640 g
Paras 4
cawan
5/6hidangan 44 min 41 min 34 min
PANDUAN MEMASAK UNTUK JENIS BERAS YANG LAIN
Sukatan
beras putih
(cawan)
Berat
beras putih
Paras air dalam
mangkuk
(+ beras)
Hidangan
Anggaran masa memasak*
Nasi Ringkas Air nasi
2 300 g Paras 2 cawan 3/4hidangan 44 min 36 min 32 min
4 600 g Paras 4 cawan 5/6hidangan 49 min 42 min 36 min
6 900 g Paras 6 cawan 8/10hidangan 53 min 45 min 36 min
8 1200 g Paras 8 cawan 11/14hidangan 58 min 45 min 38 min
PANDUAN MEMASAK UNTUK BERAS PUTIH - 8 CAWAN
• Cuci beras sepenuhnya sebelum memasak kecuali beras risotto.
• Cuci beras sepenuhnya sebelum memasak.
2
1
3
4
5
6
7
12
13
8
9
10
11
6
*Periuk nasi akan menentukan masa memasak secara automatik bergantung kepada kuantiti
air dan beras di dalam mangkuk.
7
FUZZYLOGIC_NC00010232:NOTICE 8/04/09 12:29 Page 28

29
x3
x2
x1
x4
1. Memasak nasi – Rajah 8
• Tuangkan beras dan air ke dalam mangkuk.
• Tutup penutup.
• Sambungkan plag peralatan.
• Pilih menu “NASI” pada butang menu (a). Lampu berwarna oren di belakang
“NASI” akan berkelip pada skrin LED (b). Lampu penunjuk butang “MULA”
berwarna merah akan berkelip.
• Tekan mula (c). Lampu berwarna oren di belakang “NASI” pada skrin LED (d) dan
butang “MULA” berwarna merah akan kekal stabil. Peralatan akan dimulakan.
• Setelah selesai memasak, peralatan akan bertukar ke kekal panas secara
automatik, lampu penunjuk “KEKAL PANAS/BATAL” berwarna hijau akan menyala,
paparan akan menunjukkan “b”.
2. Masakan ringkas – Rajah 9
• Tuangkan beras dan air ke dalam mangkuk.
• Tutup penutup.
• Sambungkan plag peralatan.
• Pilih menu “RINGKAS” pada butang menu (a). Lampu berwarna oren di belakang
“RINGKAS” akan berkelip pada skrin LED (b). Lampu penunjuk butang “MULA”
berwarna merah akan berkelip.
• Tekan mula (c). Lampu berwarna oren di belakang “RINGKAS” pada skrin LED (d)
dan butang “MULA” berwarna merah akan kekal stabil. Peralatan akan dimulakan.
• Setelah selesai memasak, peralatan akan bertukar ke kekal panas secara
automatik, lampu penunjuk “KEKAL PANAS/BATAL” berwarna hijau akan menyala,
paparan akan menunjukkan “b”.
3. Memasak sup – Rajah 10
• Tuangkan bahan-bahan ke dalam mangkuk.
• Tutup penutup.
• Sambungkan plag peralatan.
• Pilih menu “SUP” pada butang menu (a). Lampu berwarna oren di belakang “SUP”
akan berkelip pada skrin LED (b). Lampu penunjuk butang “MULA” berwarna
merah akan berkelip.
• Anda boleh mengubahsuai masa memasak. Masa memasak yang telah ditentukan
ialah 2 jam (b). Anda boleh memilih masa memasak dengan menekan butang
“PENENTU MASA”, “JAM” dan “MINIT”. Masa memasak tidak boleh melebihi 4
jam. Julat Penentu Masa ialah di antara 1 jam 30 minit ke 4 jam.
• Tekan mula (c). Lampu berwarna oren di belakang “SUP” pada skrin LED (d) dan lampu
penunjuk butang “MULA” berwarna merah akan kekal stabil. Peralatan akan dimulakan.
• Setelah menekan butang Mula, LED akan menunjukkan baki masa memasak yang
dikira minit demi minit.
• Setelah selesai memasak, peralatan akan bertukar ke kekal panas secara
automatik, lampu penunjuk “KEKAL PANAS/BATAL” berwarna hijau akan menyala,
paparan akan menunjukkan “b”.
4. Mengukus – Rajah 11
• Tambahkan air secukupnya ke dalam mangkuk.
• Letakkan dulang kukusan ke dasar mangkuk dan masukkan bahan-bahan masakan.
• Tutup penutup.
• Sambungkan plag peralatan.
• Pilih menu “KUKUS” pada butang menu (a). Lampu berwarna oren di belakang
“KUKUS” akan berkelip pada skrin LED (b). Lampu penunjuk butang “MULA”
berwarna merah akan berkelip.
• Anda boleh mengubahsuai masa memasak. Masa memasak yang telah ditentukan
ialah 1 jam (b). Anda boleh memilih masa memasak dengan menekan “PENENTU
MASA”, “JAM” dan “MINIT”. Masa memasak tidak boleh melebihi 2 jam. Julat
Penentu masa ialah di antara 40 minit ke 2 jam.
• Tekan mula
(c). Lampu berwarna oren di belakang “KUKUS” pada skrin LED (d) dan lampu
penunjuk butang “MULA” berwarna merah akan kekal stabil. Peralatan akan dimulakan.
• Setelah menekan butang “MULA”, LED akan menunjukkan baki masa memasak
yang dikira minit demi minit.
8
9
10
11
FUZZYLOGIC_NC00010232:NOTICE 8/04/09 12:29 Page 29
30
MS
• Setelah selesai memasak, peralatan akan bertukar ke kekal panas secara
automatik, lampu penunjuk “KEKAL PANAS/BATAL” berwarna hijau akan menyala,
paparan akan menunjukkan “b”.
5. Mendidih – Rajah 12
• Tuangkan beras dan air mendidih ke dalam mangkuk.
• Tutup penutup.
• Sambungkan plag peralatan.
• Pilih menu “DIDIH” pada butang menu (a). Lampu berwarna oren di belakang “DIDIH”
akan berkelip pada skrin LED (b). Lampu penunjuk butang “MULA” berwarna merah
akan berkelip.
• Tekan mula (c). Lampu berwarna oren di belakang “DIDIH” pada skrin LED (d)
dan lampu penunjuk butang “MULA” berwarna merah akan kekal stabil. Peralatan
akan dimulakan.
• Setelah selesai memasak, peralatan akan bertukar ke kekal panas secara
automatik, lampu penunjuk “KEKAL PANAS/BATAL” akan menyala, paparan akan
menunjukkan “b”.
6. Memasak Bubur Cair – Rajah 13
• Tuangkan beras dan air ke dalam mangkuk.
• Tutup penutup.
• Sambungkan plag peralatan.
• Pilih menu “BUBUR CAIR” pada butang menu (a). Lampu berwarna oren di
belakang “BUBUR CAIR” akan berkelip pada skrin LED (b). Lampu penunjuk butang
“MULA” berwarna merah akan berkelip.
• Anda boleh mengubahsuai masa memasak. Masa memasak yang telah ditentukan
ialah 1 jam 30 minit (b). Anda boleh memilih masa memasak dengan menekan
“PENENTU MASA, “JAM” dan “MINIT”. Masa memasak tidak boleh melebihi 2 jam
30 minit. Julat Penentu Masa ialah di antara 1 jam 10 minit ke 2 jam 30 minit.
• Tekan mula (c). Lampu berwarna oren di belakang “BUBUR CAIR” pada skrin LED
(d) dan lampu penunjuk butang “MULA” berwarna merah akan kekal stabil.
Peralatan akan dimulakan.
• Setelah menekan butang “MULA”, LED akan menunjukkan baki masa memasak
yang dikira minit demi minit.
• Setelah selesai memasak, peralatan akan bertukar ke kekal panas secara automatik,
lampu penunjuk “KEKAL PANAS/BATAL” akan menyala, paparan akan menunjukkan “b”.
7. Memasak Bubur Likat – Rajah 14
• Tuangkan beras dan nasi ke dalam mangkuk.
• Tutup penutup.
• Sambungkan plag peralatan.
• Pilih menu “BUBUR LIKAT” pada butang menu (a). Lampu berwarna oren di
belakang “BUBUR LIKAT” akan berkelip pada skrin LED (b). Lampu penunjuk butang
“MULA” berwarna merah akan berkelip.
• Anda boleh mengubahsuai masa memasak. Masa memasak yang telah ditentukan
ialah 1 jam (b). Anda boleh memilih masa memasak dengan menekan “PENENTU
MASA”, “JAM” dan “MINIT”. Masa memasak tidak boleh melebihi 1 jam 30 minit.
Julat Penentu Masa adalah di antara 50 minit ke 1 jam 30 minit.
• Tekan mula (c). Lampu berwarna oren di belakang “BUBUR LIKAT” pada skrin LED
(d) dan lampu penunjuk butang “MULA” berwarna merah akan kekal stabil.
Peralatan akan dimulakan.
• Setelah menekan butang “MULA”, LED akan menunjukkan baki masa memasak
yang dikira minit demi minit.
• Setelah selesai memasak, peralatan akan bertukar ke kekal panas secara automatik,
lampu penunjuk “KEKAL PANAS/BATAL” akan menyala, paparan akan menunjukkan “b”.
14
13
12
x5
x6
x7
FUZZYLOGIC_NC00010232:NOTICE 8/04/09 12:29 Page 30

31
15
16
8. Memasak Bubur Bayi – Rajah 15
• Tuangkan bahan-bahan ke dalam mangkuk.
• Tutup penutup.
• Sambungkan plag peralatan.
• Pilih menu “BUBUR BAYI” pada butang menu (a). Lampu berwarna oren di
belakang “BUBUR BAYI” akan berkelip pada skrin LED (b). Lampu penunjuk butang
“MULA” berwarna merah akan berkelip.
• Anda boleh mengubahsuai masa memasak. Masa memasak yang telah ditentukan
ialah 2 jam (b). Anda boleh memilih masa memasak dengan menekan “PENENTU
MASA”, “JAM” dan “MINIT”. Masa memasak tidak boleh melebihi 2 jam 30 minit.
Julat Penentu Masa adalah di antara 1 jam 30 minit ke 2 jam 30 minit.
• Tekan mula (c). Lampu berwarna oren di belakang “BUBUR BAYI” pada skrin LED
(d) dan lampu penunjuk butang “MULA” berwarna merah akan kekal stabil.
Peralatan akan dimulakan.
• Setelah menekan butang “MULA”, LED akan menunjukkan baki masa memasak
yang dikira minit demi minit.
• Setelah selesai memasak, peralatan akan bertukar ke kekal panas secara automatik,
lampu penunjuk “KEKAL PANAS/BATAL” akan menyala, paparan akan menunjukkan “b”.
9. Memasak Kek – Rajah 16
• Tuangkan bahan-bahan ke dalam mangkuk.
• Tutup penutup.
• Sambungkan plag peralatan.
• Pilih menu “KEK” pada butang menu
(a). Lampu berwarna oren di belakang “KEK”
akan berkelip pada skrin LED (b). Lampu penunjuk butang “MULA” berwarna merah
akan berkelip.
• Tekan mula (c). Lampu berwarna oren di belakang “KEK” pada skrin LED (d) dan
lampu penunjuk butang “MULA” berwarna merah akan kekal stabil. Peralatan akan
dimulakan.
• Setelah selesai memasak, peralatan akan bertukar ke kekal panas secara automatik,
lampu penunjuk “KEKAL PANAS/BATAL” akan menyala, paparan akan menunjukkan “b”.
10. Memanas Semula – Rajah 17
• Tuangkan bahan-bahan ke dalam mangkuk.
• Tutup penutup.
• Sambungkan plag peralatan.
• Pilih menu “MEMANAS SEMULA” pada butang menu
(a). Lampu berwarna oren di
belakang “MEMANAS SEMULA” akan berkelip pada skrin LED (b). Lampu penunjuk
butang “MULA” berwarna merah akan berkelip.
• Tekan mula (c). Lampu berwarna oren di belakang “MEMANAS SEMULA” pada
skrin LED (d) dan lampu penunjuk butang “MULA” berwarna merah akan kekal
stabil. Peralatan akan dimulakan.
• Setelah selesai memasak, peralatan akan bertukar ke kekal panas secara automatik,
lampu penunjuk “KEKAL PANAS/BATAL” akan menyala, paparan akan menunjukkan “b”.
11. Fungsi Kekal Panas - Rajah 18
• Setelah selesai memasak, tanpa mengambil kira mana-mana mod memasak yang telah
dipilih, periuk nasi akan bertukar ke fungsi kekal panas secara automatik
(a), lampu
penunjuk “KEKAL PANAS/BATAL” akan menyala, paparan akan menunjukkan “b” (b).
• Makanan akan kekal panas sehingga ke 24 jam.
• Untuk memadamkan fungsi ini pada bila-bila masa, tekan “KEKAL PANAS/BATAL” (c).
12. Fungsi PENENTU MASA
• Anda boleh mengubahsuai masa masakan dengan menekan butang “PENENTU
MASA” ( untuk sup, kukus, bubur cair, bubur likat, bubur bayi).
• Selepas memilih fungsi yang dikehendaki, tekan “ PENENTU MASA” and menekan
butang “JAM” dan “ MINIT”.
• Tekan mula untuk memulakan program berkenaan.
18
17
x8
x9
x10
2
FUZZYLOGIC_NC00010232:NOTICE 8/04/09 12:29 Page 31
32
13. Fungsi Preset
• Anda boleh mengubahsuai masa tamat memasak dengan menekan butang “PRESET”.
• Pilih menu dan tentukan masa yang dikehendaki (untuk fungsi SUP, KUKUS, BUBUR
CAIR, BUBUR LIKAT, BUBUR BAYI). Tekan “PRESET” dan kemudian pilih masa tamat
memasak dengan menekan butang “JAM” dan “MINIT”.
• Tekan mula untuk memulakan program berkenaan.
• Dengan fungsi preset, jangan gunakan resepi yang mengandungi bahan-bahan yang
mudah rosak atau basi.
• Jadual dibawah memberi panduan untuk menentukan fungsi penentu masa dan “PRESET”.
19
Setelah selesai memasak
• Buka penutup. Rajah 19
Wap yang keluar adalah sangat panas.
Jangan letakkan tangan di atas corong wap semasa memasak kerana bahaya
melecur. Rajah 20
Sarung tangan mesti digunakan semasa mengalikan mangkuk masakan dan bakul
kukus. Fig.21
20
MS
PANDUAN PENENTU MASA DAN PRESET
MENU
PENENTU MASA
PRESET
NASI
RINGKAS
SUP
KUKUS
DIDIH
BUBUR CAIR
BUBUR LIKAT
BUBUR BAYI
KEK
MEMANAS SEMULA
FUZZYLOGIC_NC00010232:NOTICE 8/04/09 13:13 Page 32
33
Cuci mangkuk, pengumpul wap, bakul kukus dan pelindung wap. Fig.22
• Gunakan air panas bersabun untuk mencuci mangkuk, pengumpul wap, bakul kukus dan
pelindung wap. Serbuk pencuci dan span keluli tidak disarankan
• Jika makanan melekat di dasar mangkuk, rendamkannya seketika sebelum
mencuci.
• Keringkan mangkuk masakan dengan berhati-hati.
• Jangan rendamkan peralatan di dalam air atau menuangkan air ke atasnya.
• Selepas setiap pengunaan, kosong dan bersihkan pengumpul wap.
Anda juga boleh mencuci mangkuk, dulang kukusan dan pelindung wap dalam rak
paling bawah pencuci pinggan.
Untuk mangkuk masakan, ikut langkah-langkah di bawah dengan betul:
• Apabila meletakkan mangkuk di dalam mesin pencuci pinggan, berhati-hati supaya
tidak merosakkan lapisan tidak lekat.
• Jangan potong makanan di dalam mangkuk masakan supaya tidak merosakkan
lapisan tidak lekat.
• Pastikan anda meletakkan kembali mangkuk ke dalam periuk nasi.
PENTING
Apa sahaja kesan perang dan calar yang mungkin kelihatan selepas beberapa jam
digunakan adalah tidak menjadi masalah. Kami menjamin yang lapisan tidak lekat
adalah MEMA
TUHI PERATURAN pengendalian bahan-bahan yang sesuai digunakan
dengan makanan.
Menjaga mangkuk tidak lekat
• Gunakan alatan memasak plastik atau kayu dan bukan yang diperbuat daripada
keluli apabila mengacau atau menghidang makanan untuk mengelakkan
permukaan mangkuk daripada sebarang kerosakan. Rajah 23
• Untuk mengelakkan mangkuk daripada berkarat, jangan masukkan cuka ke
dalamnya.
• Warna permukaan mangkuk mungkin berubah selepas penggunaan kali pertama
atau selepas digunakan untuk satu jangkamasa tertentu. Perubahan warna ini
adalah disebabkan oleh tindakbalas di antara wap dan air dan tidak akan
mengakibatkan sebarang kesan terhadap penggunaan periuk nasi dan tidak
membahayakan kesihatan. Ia masih selamat untuk digunakan.
MENCUCI DAN MENYELENGGARA
23
24
• Hidangkan makanan menggunakan senduk plastik yang disertakan bersama
dengan peralatan dan tutup semula penutup periuk nasi.
• Baki makanan di dalam periuk nasi akan kekal panas sehingga ke 24 jam.
• Tekan “KEKAL PANAS/BATAL”.
• Tanggalkan plag peralatan.
Cadangan untuk memperolehi nasi yang lebih baik.
• Sukat beras dan cuci di bawah air yang mengalir di dalam bekas yang berasingan.
Kemudian masukkan beras ke dalam mangkuk masakan bersama-sama dengan air
dalam sukatan yang bersesuaian.
• Pastikan beras disebarkan dengan sekata di atas permukaan mangkuk masakan
untuk masakan yang sekata.
• Setelah selesai memasak, apabila fungsi Kekal Panas dipilih, kacau nasi dan
biarkan di dalam periuk nasi seketika untuk memperolehi nasi yang sempurna.
22
21
FUZZYLOGIC_NC00010232:NOTICE 8/04/09 13:13 Page 33

34
Mencuci injap tekanan mikro
• Apabila mencuci injap tekanan mikro, sila alihkan daripada penutup – Rajah 24 (a) dan
buka dengan memutarnya ke arah “buka” – R
ajah 24 (b-c). Selepas mencuci, sila
keringkannya dan cantumkan kedua-dua segitiga bersama – Rajah 24 (b) dan putarkan
ke arah “tutup” sehingga bunyi “ka” kedengaran kemudian letakkan ia kembali ke
dalam penutup periuk nasi.
Mencuci dan menjaga bahagian-bahagian lain peralatan
• Cuci bahagian luar periuk nasi, bahagian dalam penutup dan wayar dengan kain lembap
dan keringkan. Jangan gunakan produk yang kesat.
• Jangan gunakan air untuk mencuci bahagian dalam peralatan.
MS
FUZZYLOGIC_NC00010232:NOTICE 8/04/09 13:13 Page 34

