Loading ...
Loading ...
3
STEP-BY-STEP INSTALLATION INSTRUCTIONS (cont.)
Select Location
Select a location for the filter that is:
■
protected from freezing.
■
not exposed to direct sunlight.
It is recommended that a shut-off valve be placed on both sides
of the filter.
It is recommended that a mounting bracket be used.
Install Fittings
Instructions are for installing fittings for the HDKIT or similar
fittings onto copper plumbing. If the unit is to be installed on
any other type of tubing (plastic, PVC, galvanized), different
hardware must be purchased. See instructions with additional
hardware purchased or consult a qualified plumber.
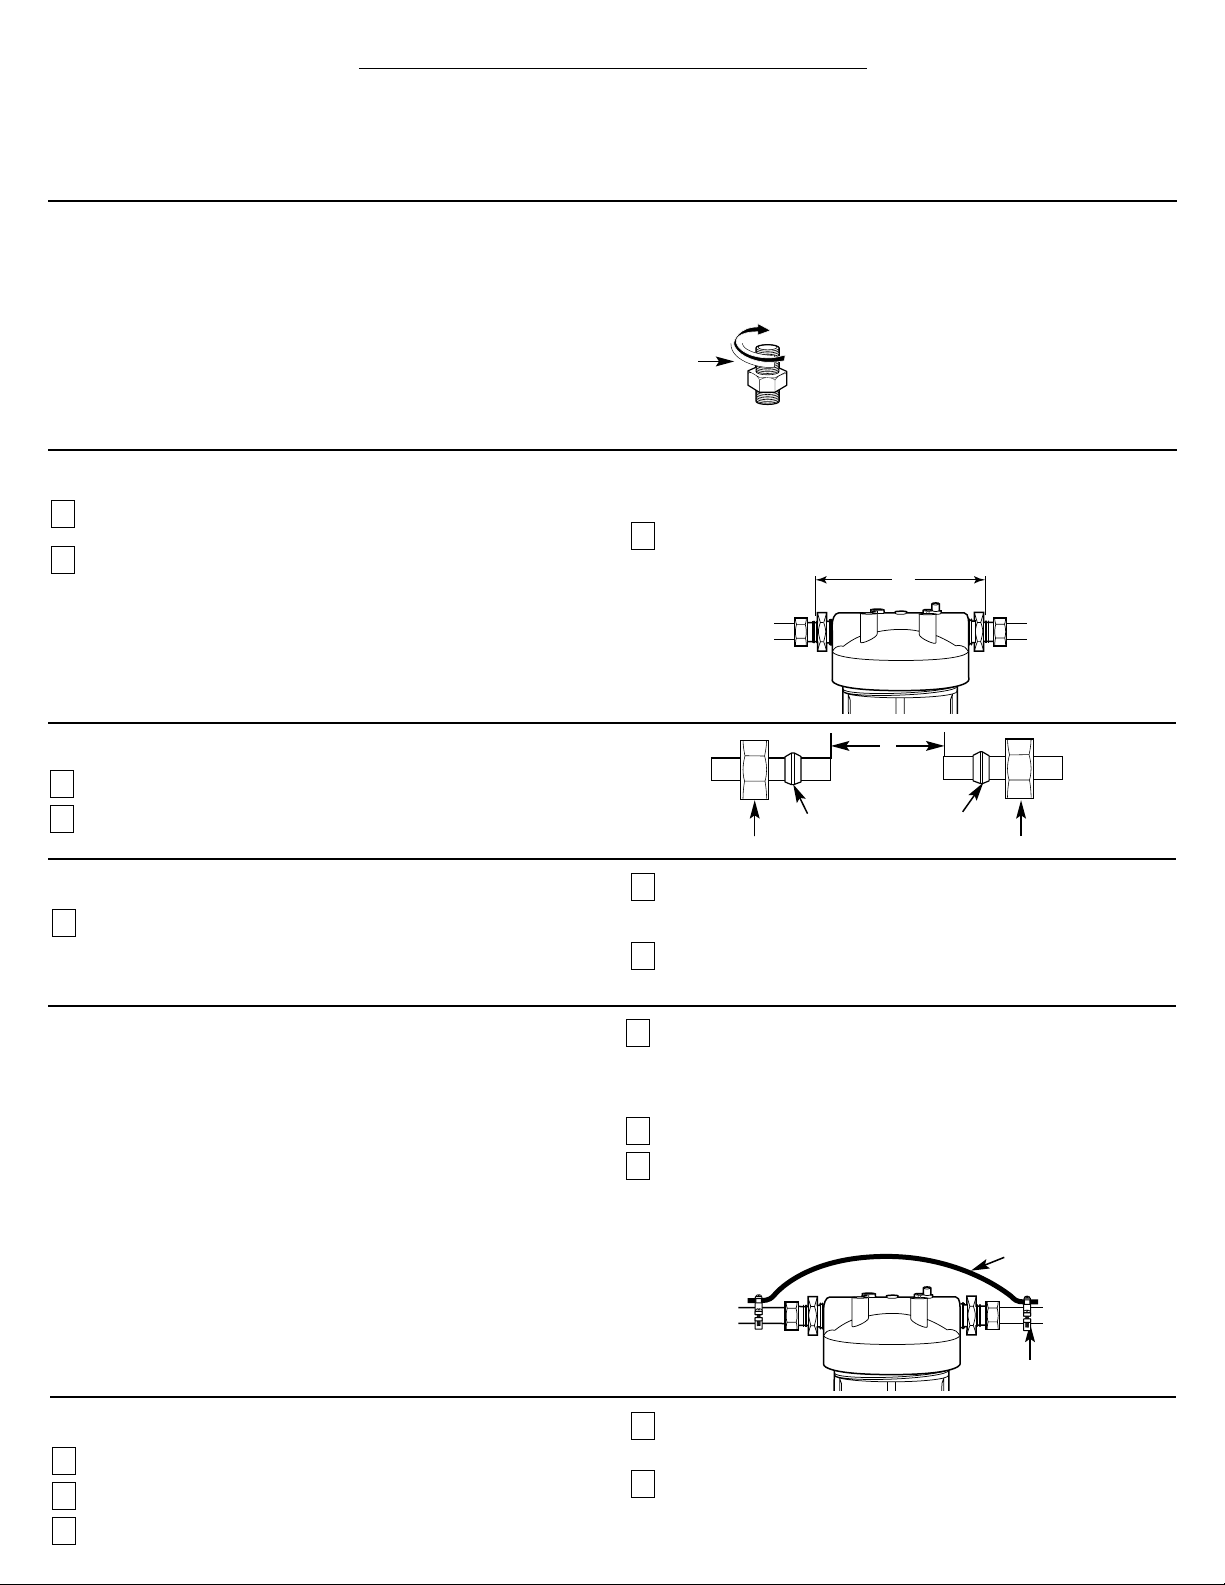
Apply 4 or 5 wraps of Teflon tape, in a clockwise direction,
to the pipe threads (coarse) of each adapter. DO NOT use
joint compound on any parts connecting to filter housing.
Assemble an adapter to the inlet and outlet of the head. Start
each fitting by hand to make sure they don’t cross thread.
Use an adjustable wrench firmly. DO NOT OVERTIGHTEN.
About one to two thread(s) should remain visible.
Cut Water Line
Turn off water supply and open a nearby faucet to drain
water out of pipes.
Remove the nut and brass ferrule from both compression
fittings and set aside. Using a tape measure or ruler,
measure the distance “D” as shown.
■ NOTE: I
t is recommended that the shut-off valve be placed
before and after the filter as shown in the Installation
Overview illustration.
■ Select the location for the filter. Mark the distance “D”
on the pipe.
Using a pipe cutter or hacksaw, cut pipe. Sand (file) cut
ends of pipe to assure that they are square and smooth.
3
2
1
Installing the Unit
Align filter assembly with pipe ends making certain that
the incoming water supply is going into the filter opening
marked “IN”. It may be necessary to spread the pipe ends
apart to install filter assembly.
Using two adjustable wrenches, hold incoming adapter
securely with one wrench and tighten nut with second
wrench. Repeat this procedure for outgoing adapter.
If necessary, support the water pipe on either side of the
filter unit.
3
2
1
Final Check
Install filter (see Filter Cartridge Replacement Section).
Slowly turn on water supply.
Check entire system for leaks.
If leaking, shut off water pressure and tighten or reseal
fittings.
After installation, flush the cartridge for 10 minutes,
wait one hour, then flush again for 10 minutes before
using the water.
5
4
3
2
1
Teflon tape
D
Attach Fittings to Water Line
Slip a compression nut onto each pipe.
Next, slip the brass ferrule onto each pipe.
2
1
Nut
Brass ferrule
Nut
Brass ferrule
D
Installing the Ground Wire
IMPORTANT: A copper or galvanized house cold water pipe
is often used to ground electrical outlets in the home.
Grounding protects you from electrical shock. The water filter
housing may have broken this ground path. To restore
connection, install an 18″ long, 6-gauge copper wire across
the filter, tightly clamped using UL approved 1/2″–1″ bronze
grounding clamps at both ends as shown. Zinc clamps should
not be used on copper plumbing. Wire and clamps may be
purchased separately from your local hardware store, or are
available by visiting our Website at www.GEAppliances.com
or from Parts and Accessories, call 800.626.2002 (U.S.) or
800.663.6060 (Canada)—order part number HDKIT.
Clean copper pipe and ends of wire with emery paper.
Bare wire is recommended. If insulated wire is used,
it should be stripped 3/4″ at each end before cleaning
with emery paper.
Attach bronze clamps to copper pipe. Tighten screws.
Attach wire to clamps as shown. Tighten screws.
NOTE: I
f your house plumbing is plastic, it would not be used
as a grounding path, and this step should be skipped.
3
2
1
Clamp
Ground wire
Loading ...
Loading ...
Loading ...