JP
EN
BODSQ708-104
使用説明書/困ったときには/安全にご使用いただくために
User’s Guide/Trouble shooting/Safety precautions
Ver. 2.0

2
JP
© 2017 FUJIFILM Corporation. All rights reserved.
日本語:
3ページから37ページをご覧ください。
ENGLISH:
See pages 39 to 74.

3
JP
日本語
目次
この説明書はお読みになった後で、いつでも
見られるところに必ず保管してください。
カメラをお使いになる前に.........................4
各部の名称..................................................5
液晶モニターの表示...................................6
セレクターボタンの使いかた.......................... 6
コマンドダイヤルの使いかた.......................... 6
ストラップを取り付ける...............................7
ハンドストラップを取り付ける......................... 7
ショルダーストラップ(別売)を取り付ける...... 7
バッテリーを入れる/充電する.................. 8
バッテリーを入れる.......................................... 8
バッテリーを充電する...................................... 8
充電状態の表示について................................ 8
電源を入れる/切る.....................................9
バッテリー残量の確認方法............................. 9
初期設定を行う........................................ 10
シャッターボタンの機能設定について.........11
フィルムパックを入れる/取り出す......... 12
フィルム パックを 入 れる .................................12
フィルムパックを取り出す.............................12
プリントモードについて........................... 13
基本的な撮影と再生................................ 14
撮影する.........................................................14
撮影した画像を再生する...............................15
再生画面の表示を変更する..........................15
プリントする.............................................. 16
画像エフェクト.......................................... 17
フィルター......................................................17
明るさ調整.....................................................18
ビネット..........................................................18
いろいろな撮影........................................ 19
AF/AEロックを使用して撮影する...............19
セルフタイマーを使用して撮影する............19
フラッシュを使用して撮影する.....................20
モードを切り替えて撮影する................... 21
撮影モードの選び方......................................21
プリント履歴からプリントする
(リプリント).............................................. 22
メモリーカードを使用する....................... 23
メモリーカードを入れる................................23
他のカメラで撮影した写真をプリントする...23
メニューを使いこなす.............................. 24
撮影メニュー..................................................24
再生メニュー..................................................25
セットアップメニュー ......................................26
仕様.......................................................... 27
このようなときは..................................... 29
安全にご使用いただくために.................. 32
バッテリーの取り扱いについて............... 35
アフターサービスについて..................... 37
4
JP
カメラをお使いになる前に
カメラをお使いになる前に、以下を確認してください。
!
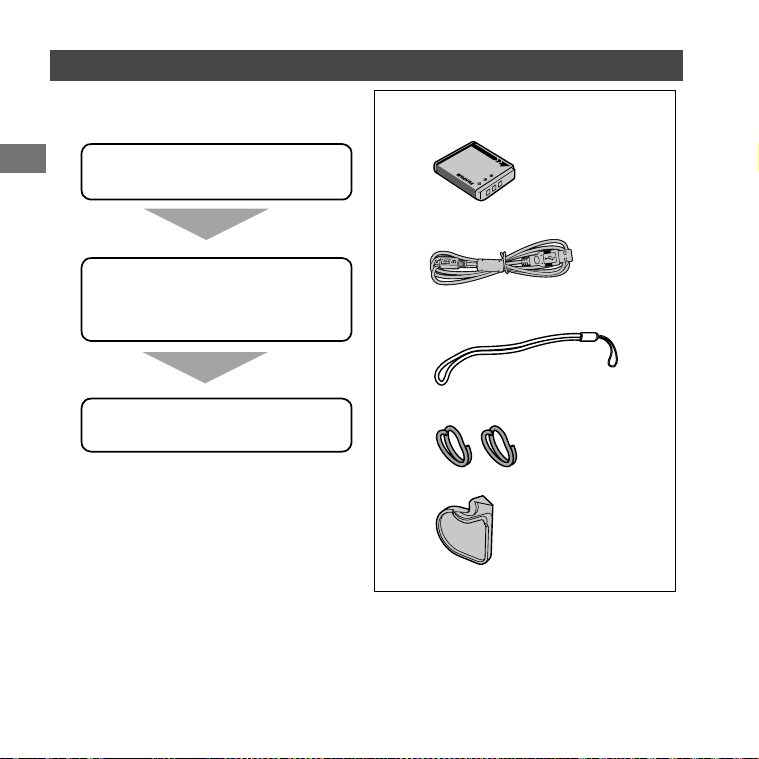
箱の中の付属品がすべてそろって
いるか確認してください。
カメラを安全に使用するため
に、「安全にご使用いただくた
めに」(32ページ)および
「バッテリーの取り扱いにつ
いて」(35ページ)をお読
みください。
~
Ÿ
本マニュアルをよくお読みの上、
カメラをお使いください。
!
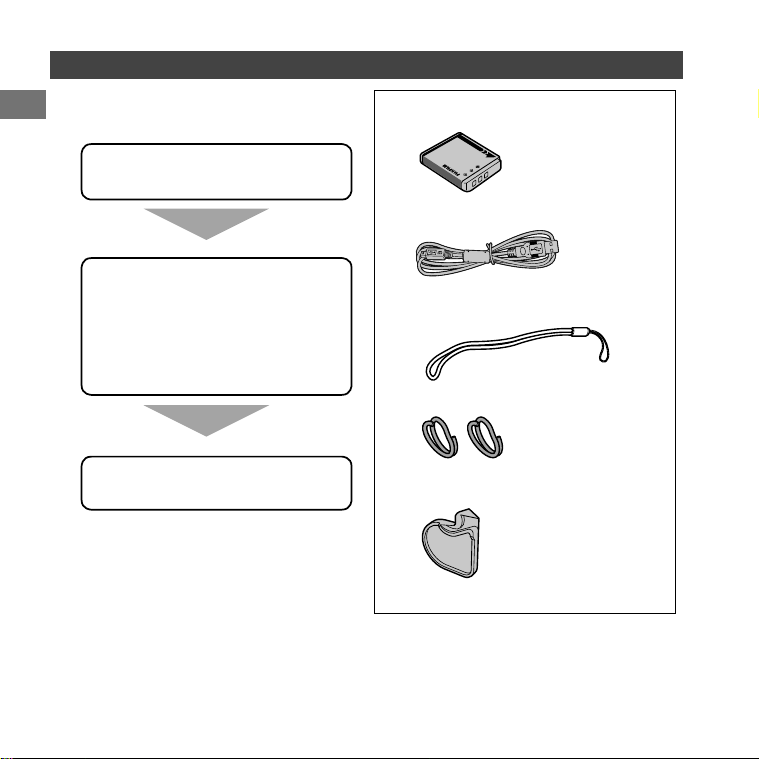
付属品一覧
•充電式バッテリーNP-50(1個)
•充電用USBケーブル(1本)
•ハンドストラップ(1本)
•ストラップリング(2個)
•補助具(1個)
•使用説明書(本書)

5
JP
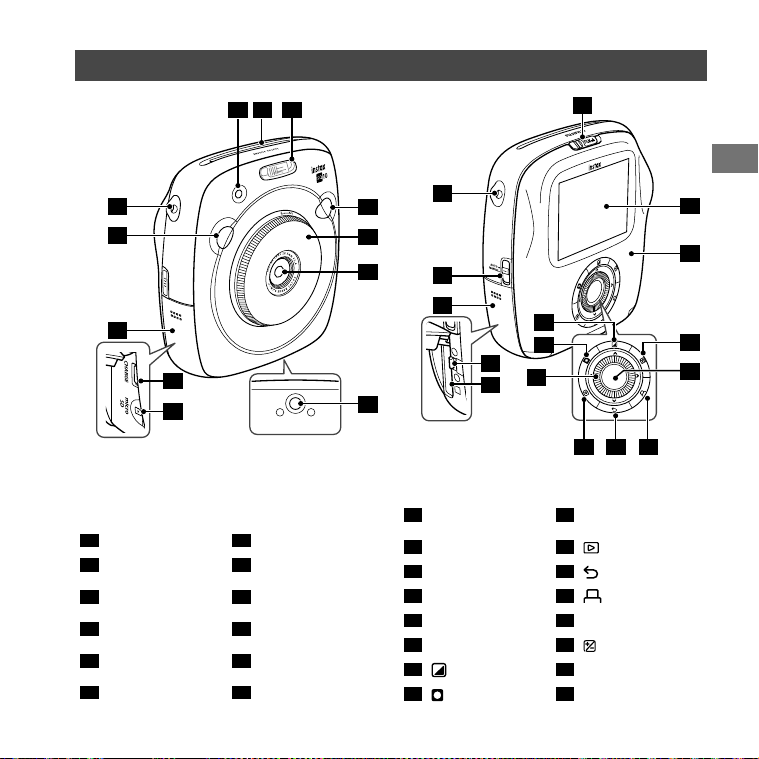
各部の名称
前面 背面
1
フラッシュ
7
充電用USB端子
2
フィルム排出口
8
マイクロSDカード
スロット
3
AF補助光/セルフタ
イマーランプ
9
三脚ねじ穴
(三脚は別売)
4
ストラップ取り付け部
10
レンズ
5
シャッターボタン(右)
11
レンズリング
(電源スイッチ)
6
カードスロットカバー
12
シャッターボタン(左)
1
フィルムドアロック
9
セレクターボタン/
コマンドダイヤル
2
ストラップ取り付け部
10
(再生)ボタン
3
プリントモード
切り替えスイッチ
11
(戻る)ボタン
4
バッテリーカバ ー
12
(プリント)ボタン
5
バッテリー取り外し
つまみ
13
MENU/OKボタン
6
バッテリー挿入部
14
(明るさ)ボタン
7
(フィルター)ボタン
15
フィルムドア
8
(ビネット)ボタン
16
液晶モニター(LCD)
1
12
11
3 2
1
4
3
2
10
8
9
11 12
13
16
14
7
15
7
8
9
10
4
5
6
6
5
6
JP
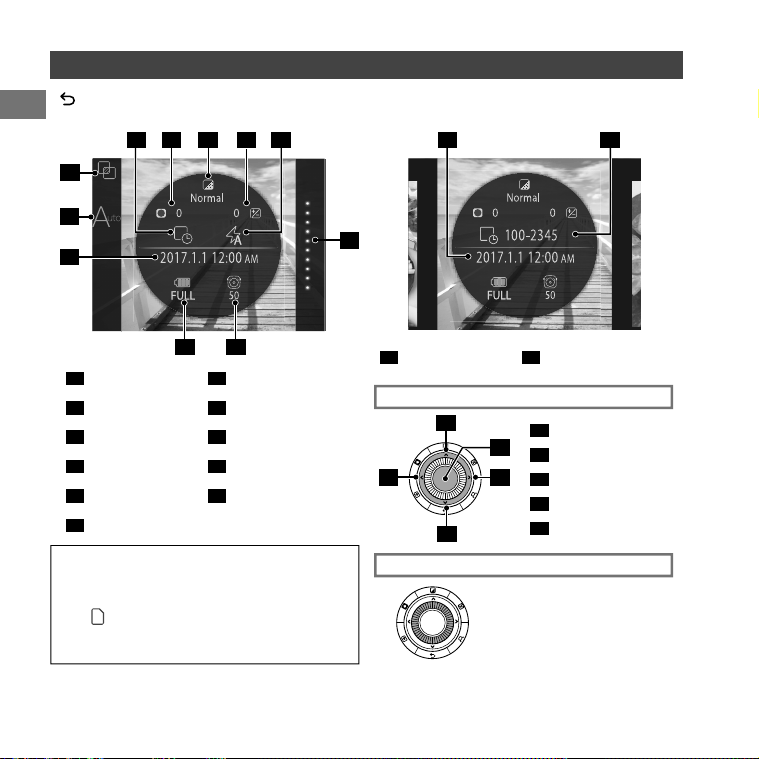
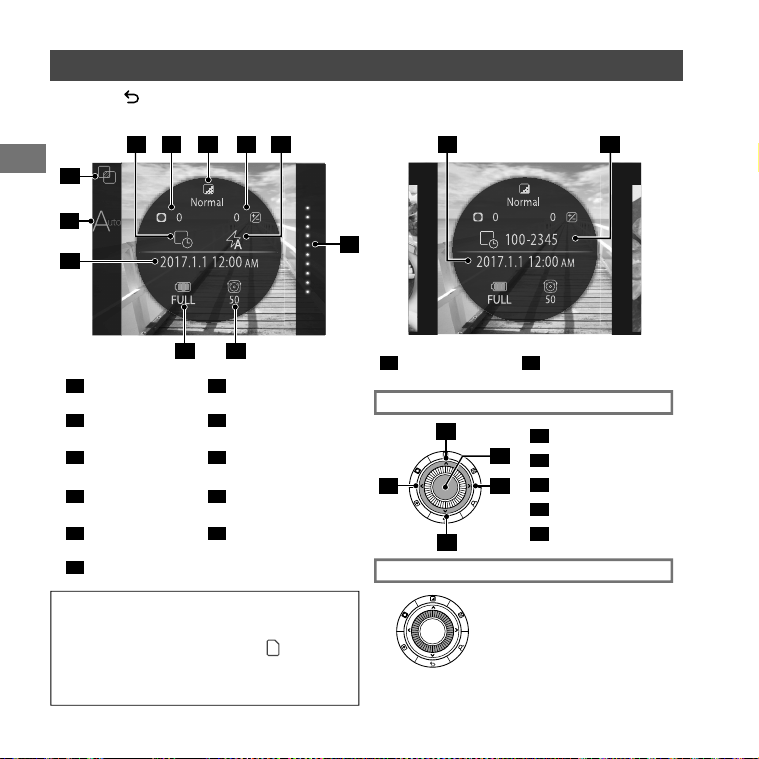
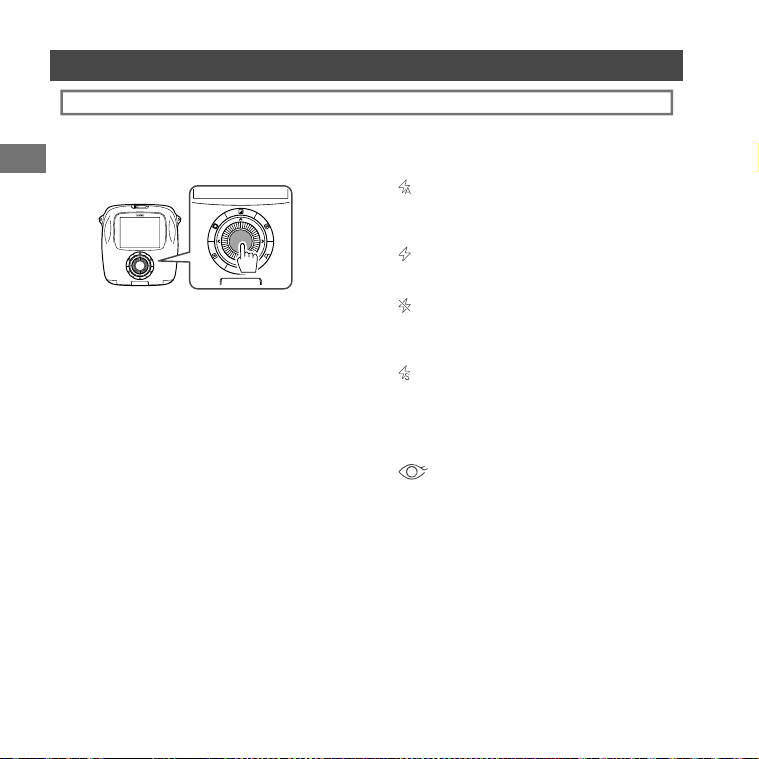
液晶モニターの表示
撮影時
再生時
1
フラッシュ
(20ページ)
7
プリントモード
(13ページ)
2
明るさ調整
(18ページ)
8
現在の日付・時刻
(26ページ)
3
フィルタ ー
(17ページ)
9
バッテリー残量表示
(9ページ)
4
ビネット
(18ページ)
10
撮影可能枚数
*3
(14ページ)
5
日付書き込み
*1
(26ページ)
11
フィルム残量表示
(16ページ)
6
撮影モード
*2
(21ページ)
1
コマNO.
2
撮影日・時刻
*1書き込みの設定がオフになっているときは、グレーで
表示されます。
*2
スタンダード
を選んでいるときは表示されません。
*3メモリーカードを使用しているときは、枚数表示の上
に
が表示されます。
撮影可能枚数が10枚以下になると、枚数表示の上の
アイコンが赤く表示されます。
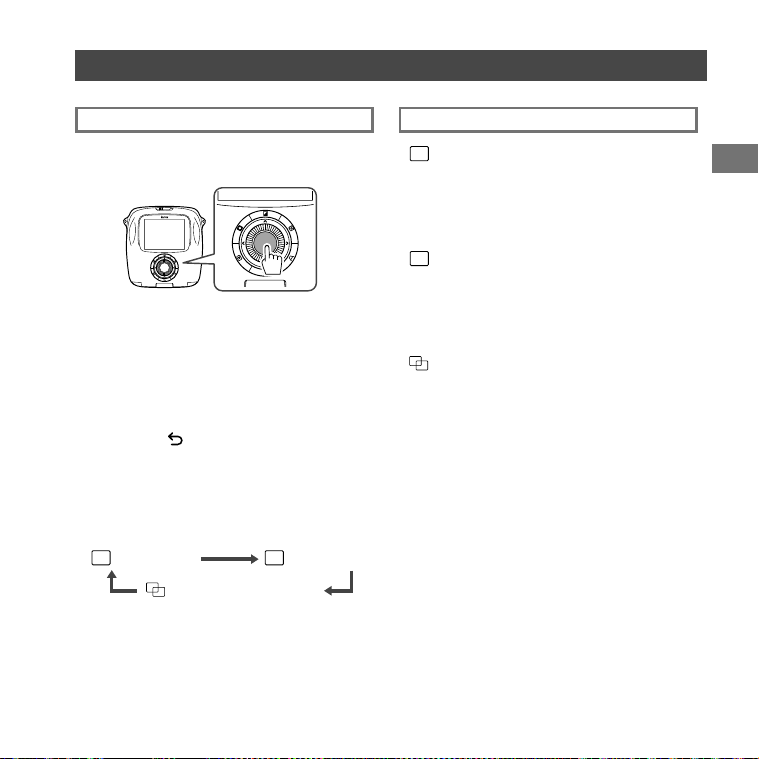
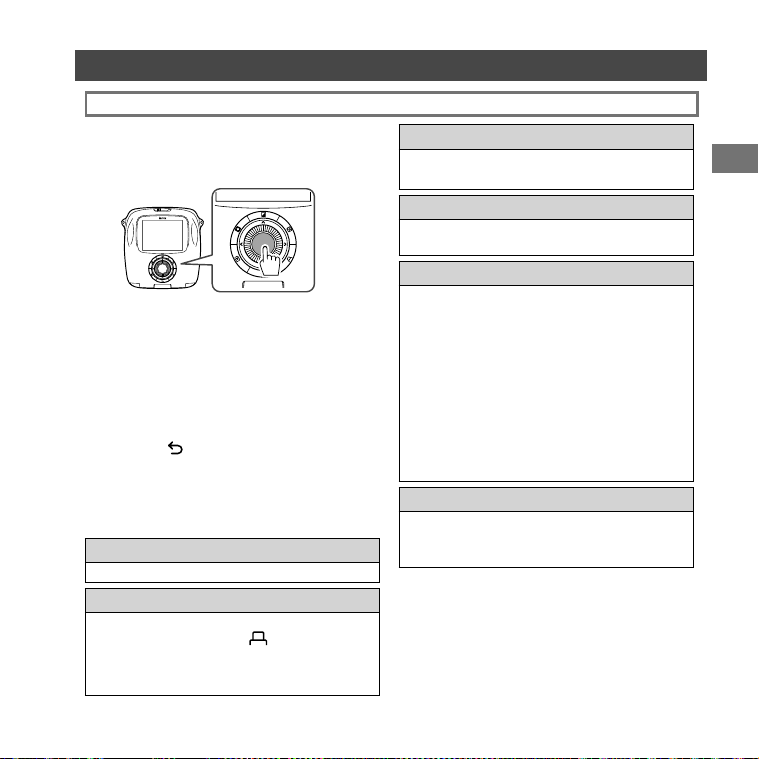
セレクターボタンの使いかた
1
6上に移動します。
2
8左に移動します。
3
7下に移動します。
4
9右に移動します。
5
選択を決定します。
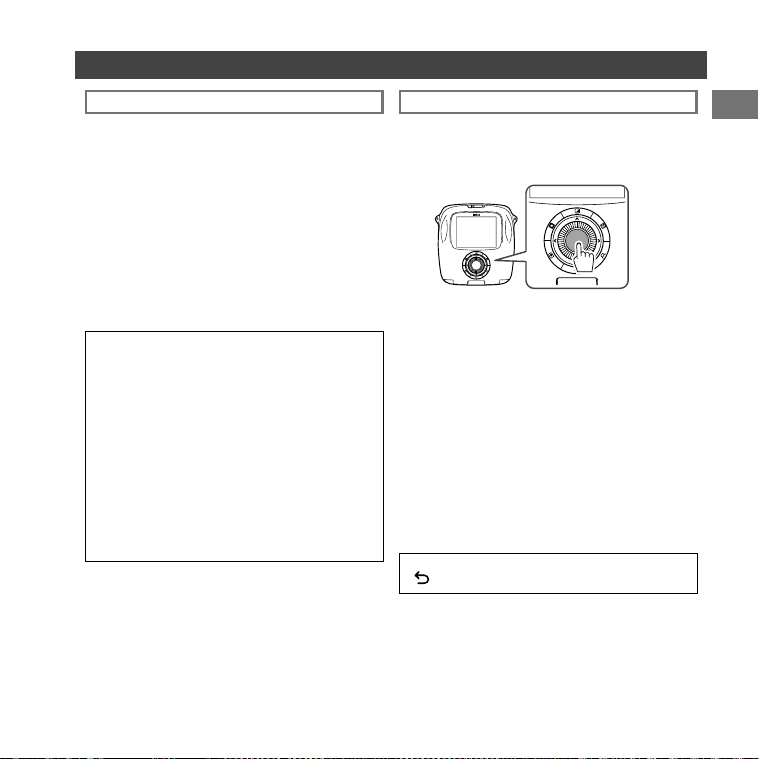
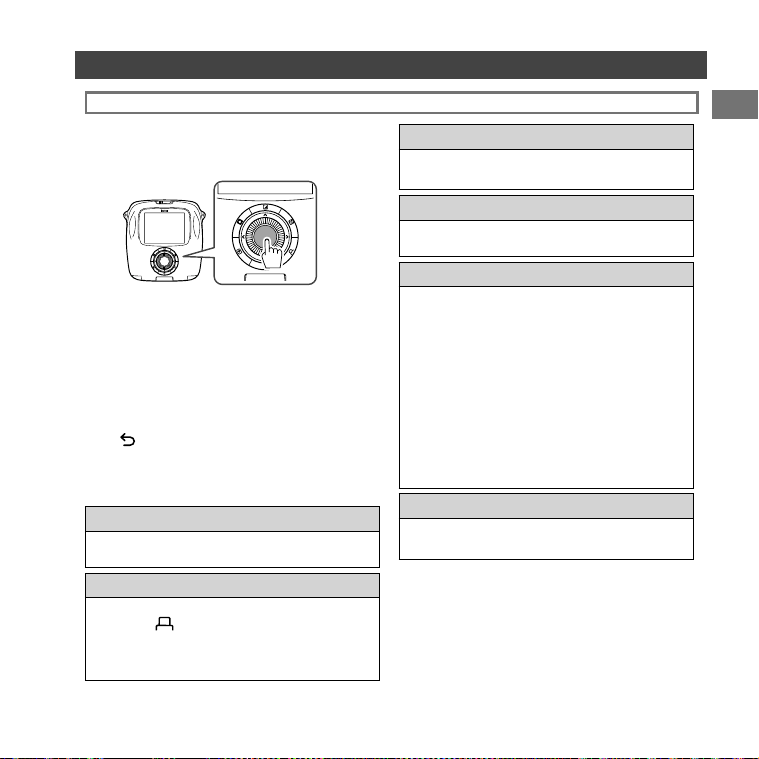
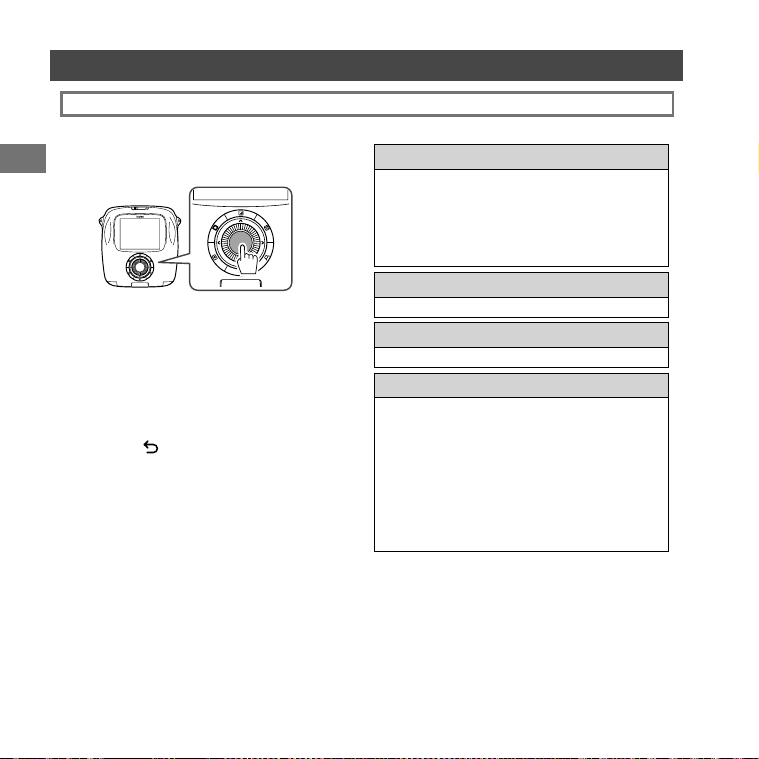
コマンドダイヤルの使いかた
コマンドダイヤルは以下のときに使用
します。
•メニューや項目の選択
•再生画面の表示の変更
(15ページ)
•画像エフェクトの設定値の調整
(17ページ、18ページ)
(戻る)ボタンを押すと表示されます。
8
9
5
10
24
7
1
3
1
2
11
5
1
3
2
4
6
7
JP
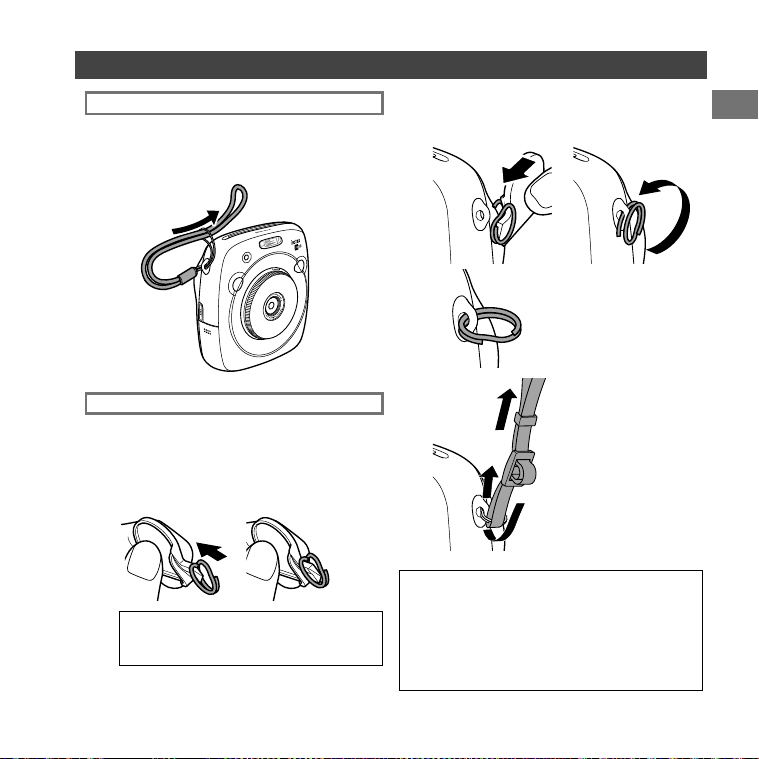
ストラップを取り付ける
ハンドストラップを取り付ける
下図のように取り付けます。
•落下防止のため、持ち運んだり撮影したりするときは、
ハンドストラップに手首を通してください。
カメラにショルダーストラップを取り付ける前に、ストラッ
プリングをカメラに取り付けます。
~
ストラップリングを取り付け補助具およびストラップ
リング の 向きに注 意して、図 のようにストラップリン
グの切り込みを広げます。
ストラップリング取り付け補助具は、カメラから
ストラップリングを取り外すときも使用しますの
で、大切に保管してください。
ショルダーストラップ(別売)を取り付ける
Ÿ
ストラップリングの切り込みを、ストラップ通し穴に引
っ掛けます。手を添えながら、ストラップリング取り付
け補助具を抜き取ります。
!
ストラップリングを回転させ、
カチッと音がするまで完全に
通します。
注意
•ショルダーストラップは肩にかけて使用し、首にはかけ
ないでください。
•ストラップがフィルム出口にかぶさらないように注意し
てください。
•使用するにつれて、ストラップ通し穴がすり減ったり、塗
装が落ちたりする場合があります。
⁄
ショル ダ ー ストラップをストラ
ップリングに通します 。
8
JP
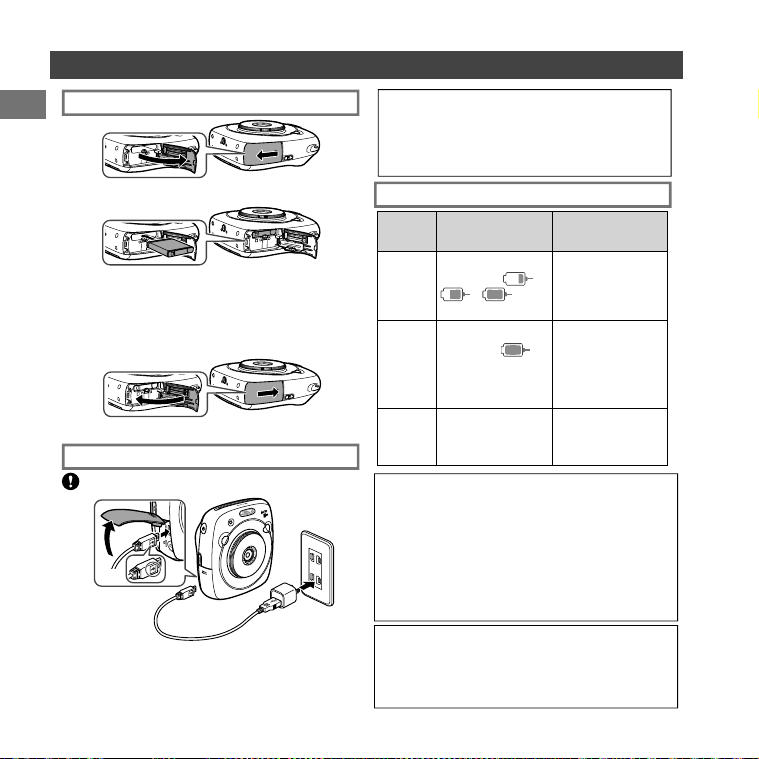
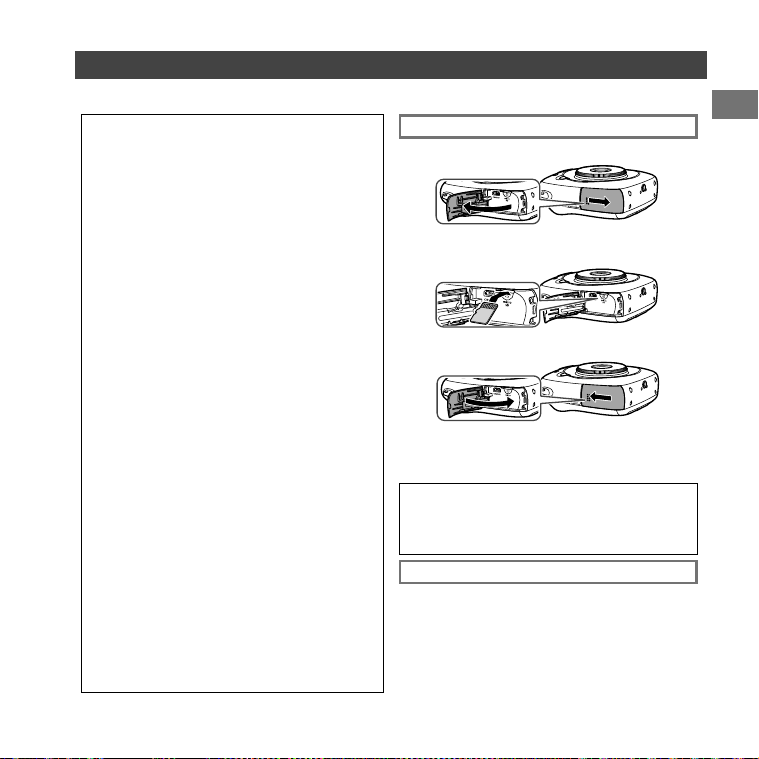
バッテリーを入れる/充電する
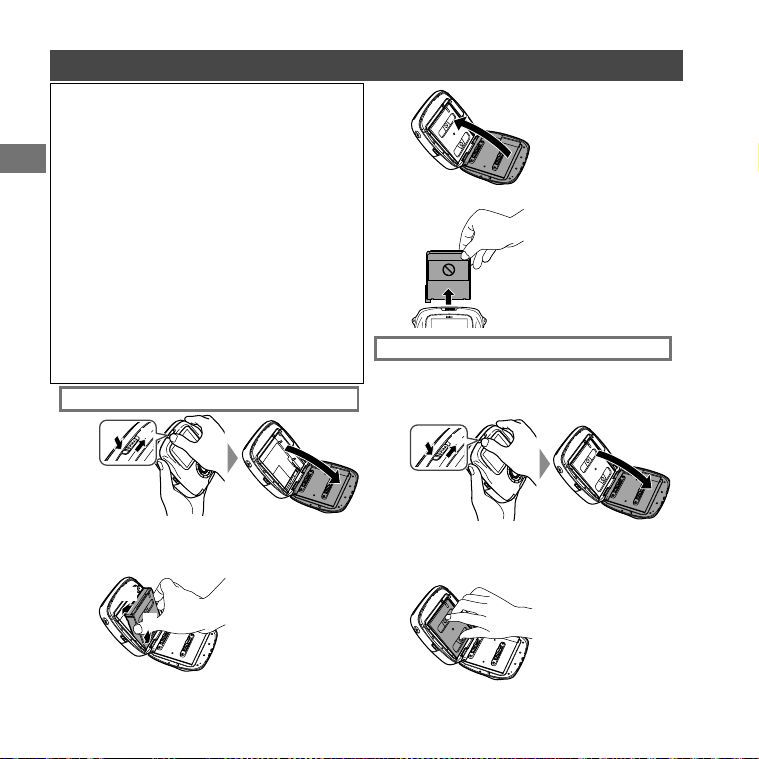
電池蓋をスライドさせて開けます。
バッテリー の 矢 印 に 従ってバッテリーを 入 れま す 。
バッテリーの黄色い線が、カメラの マークと合って
いるかを確認してください。
• バッテリーを取り出すときは、バッテリー取り外し
つまみを動かしてロックを外してください。
~
Ÿ
!
電池蓋を閉じます。
カメラとご使用のスマートフォンなどのACパワーアダプ
ターを、付属のUSBケーブルで接続し、ACパワーアダプ
ターを屋内のコンセントにつなぎます。
パソコンから充電するときは:
•USBハブやキーボードを経由せずに、直接カメラとパ
ソコンを接続してください。
•充電中にパソコンが休止状態(スリープ状態)になると、
充電が中止されます。充電を続ける場合は、パソコンの
休止状態(スリープ状態)を解除したあと、USBケーブ
ルを接続しなおしてください。
•パソコンの仕様や設定、または状態によって、バッテリ
ーを充電できないことがあります。
•定格出力がDC5.0V、1000mAのACパワーアダ
プターを使用してください。
• バッテリーを充電している間でも、撮影、プリントする
ことができます。
•充電時間の目安は約3〜4時間です。
注意
•工場出荷時にバッテリーはフル充電されていません。ご
使用になる前に必ず充電してください。
•バッテリーについてのご注意は「バッテリーの取り扱い
について」(35ページ)を参照してください。
バッテリーを入れる
バッテリーを充電する
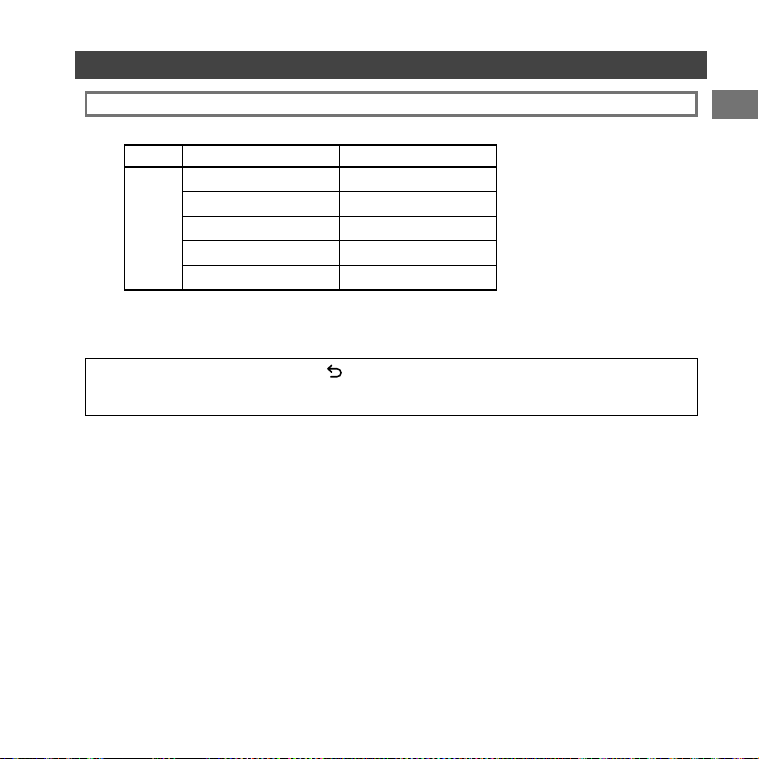
充電の
状態
カメラの電源が
オンのとき
カメラの電源が
オフのとき
充電中
液晶モニターの右下
にアイコン(
→
→ )が表
示されます。
AF補助光/セルフタ
イマーランプが点灯
します。
充電完了
液晶モニターの右下
にアイコン(
)が
表示されます。
(USBケーブルを
抜くと消えます。)
AF補助光/セルフタ
イマーランプが消灯
します。
(USBケーブルが
接続された状態)
充電
エラー
液晶モニターにエラ
ーメッセージが表示
されます。
AF補助光/セルフタ
イマーランプが点滅
します。
充電状態の表示について
USBケーブルの端子の向きに注意してください。
9
JP
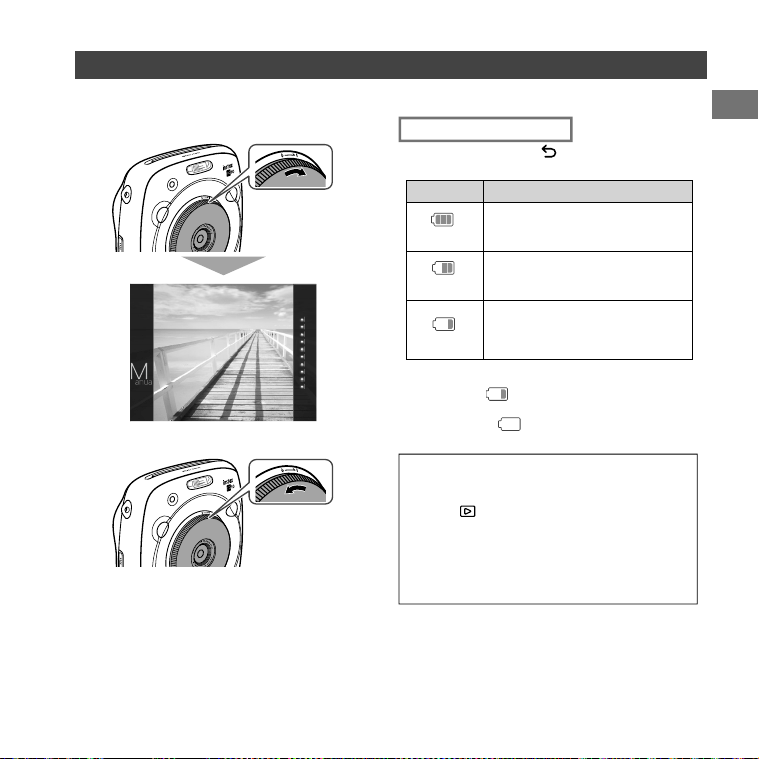
電源を入れる/切る
レンズリング(電源スイッチ)を時計回りに回すと電源が入ります。反時計回りに回すと電源が切れます。
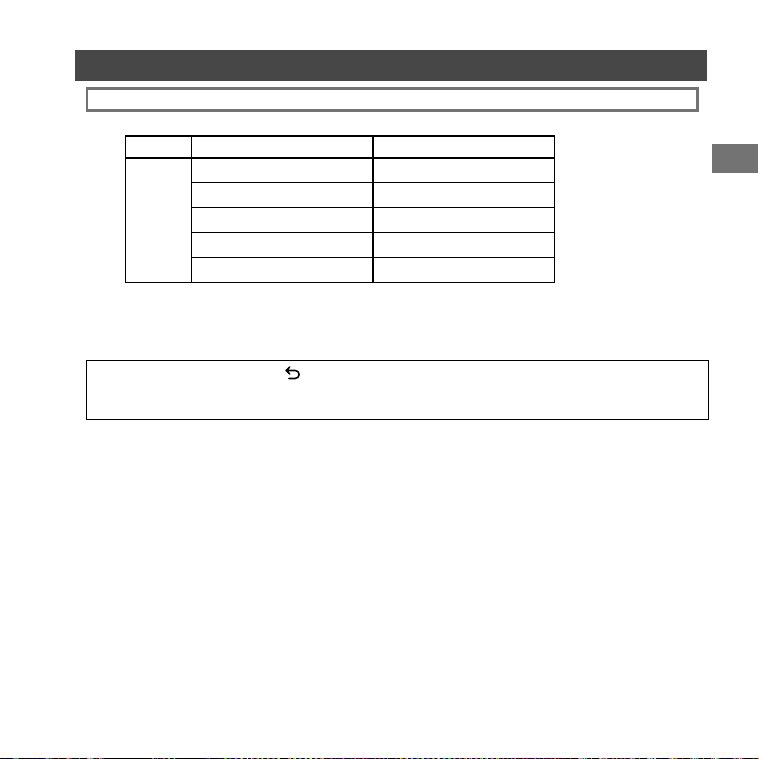
バッテリー残量の確認方法
撮影画面または再生画面で (戻る)ボタンを押すと、
液晶モニターにバッテリー残量が表示されます。
表示 バッテリーの残量
)8//
残量が十分にあります。
0,'
残量が半分以下です。充電することを
おすすめします
(8ページ)。
/2:
残量が不足しています。できるだけ早
く充電してください
(8ページ)。
•一定時間操作を行わなかった場合、カメラの電源が自
動的に切れます。電源が切れるまでの時間を設定する
こともできます(26ページ)。
•撮影中に
(再生)ボタンを押すと再生画面が表示さ
れ、再生モードになります。
•再生中にシャッターボタンを全押しすると撮影画面が
表示され、撮影モードになります。
•レンズに指紋や汚れが付かないようにご注意くださ
い。撮影画像の画質低下の原因になります。
電源が入り、撮影画面が表示されます。
電源が切れます。
R バッテリー残量が不足すると、液晶モニターの右下に
もアイコン(
)が表示されます。
バッテリー残量が完全になくなると、液晶モニター全
体にアイコン(
(03
)が表示され、電源が切れます。

10
JP
初期設定を行う
ご購入後初めて電源を入れたときは、使用する言語や日時などは設定されていません。以下の手順で、使用する言語や日
時などの初期設定を行います。
この設定は後から設定することもできます。後から設定する場合や設定をやり直したい場合は、26ページを参照して
ください 。
~
Ÿ
!
⁄
電源を入れると、言語設定画面が表示されます。
使用する言語を選び、MENU/OKボタンまたは
9
を押します。
言語が設定され、日時設定画面が表示されます。
年月日の並び順を設定し、MENU/OKボタン
または
9
を押します。
年、月、日、時、分を設定し、MENU/OKボタン
または
9
を押します。
89
で設定する項目(年、月、日、時、分)を
選び、
67
で設定する数字を選びます。
@
左右のシャッターボタンの機能を設定します。
設定のしかた、設定の組み合わせは、11ペー
ジを参照してください。
並び順は以下から選びます。
•年/月/日
•月/日/年
•日/月/年
並び順が設定され、年、月、日、時、分を設定する画
面が表示されます。
MENU/OKボタンを押します。
¤
11
JP
•設定をしない場合は、表示される画面ごとに (戻る)ボタンを押してください。撮影画面に移動します。
• バッテリーを取り外してしばらく保管すると、設定した内容がクリアされる場合があります。その場合は、言語設定画
面が表示されますので、設定をし直してください。
初期設定を行う
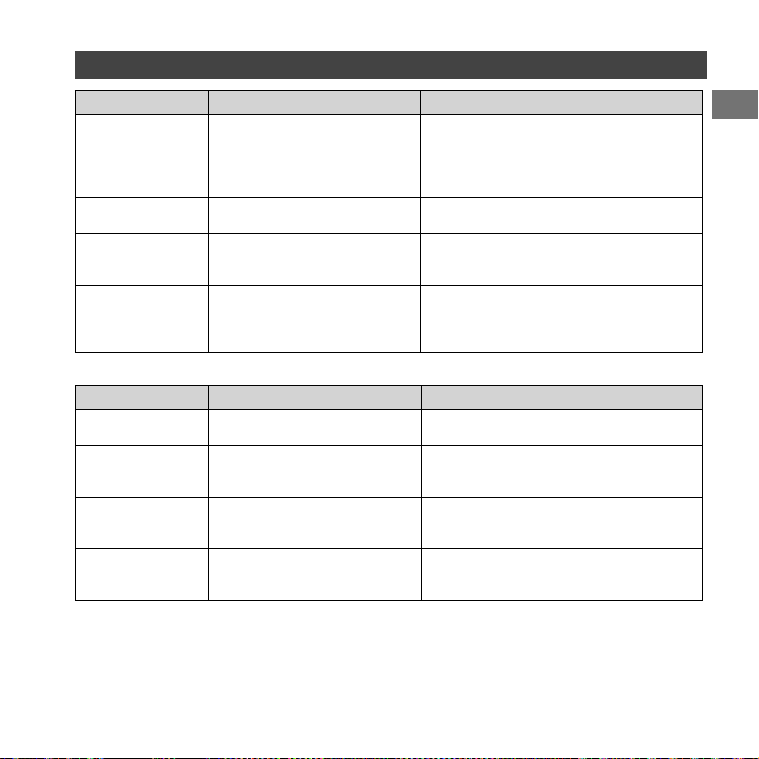
シャッターボタンの機能設定について
左右それぞれのシャッターボタンの機能を、以下の組み合わせから選ぶことができます。
シャッターボタン(右) シャッターボタン(左)
機能
シャッターボタン シャッターボタン
シャッターボタン 撮影モード切り替えボタン
シャッターボタン 無効
撮影モード切り替えボタン シャッターボタン
無効 シャッターボタン
初期設定では、右のボタンにシャッターボタン、左のボタンに撮影モード切り替えの機能が割り当てられています。
シャッターボタン設定画面が表示されているときに、
89
で機能の組み合わせを選び、MENU/OKボタンを押してく
ださい。
12
JP
フィルムパックを入れる/取り出す
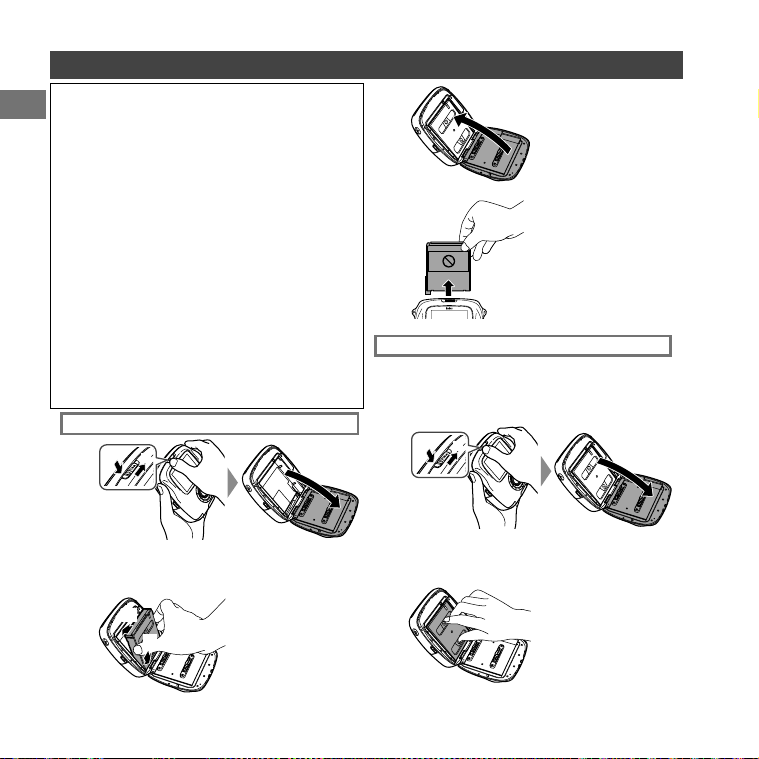
注意
フィルムを使い切るまでは、フィルムドアを開けな
いで下さい。途中で開けると、フィルムが感光して
白くなり、写真が写りません。
•フィルムパックを入れるときは、フィルムパック背面の2カ
所の長方形の穴は絶対に押さないでください。
•有効期限を過ぎたフィルムは絶対に使用しないでくださ
い(故障の原因となります)。
富士フイルムインスタントフィルムinstaxSQUARE
をご使用ください。instaxminiフィルムやinstaxWIDE
フィルムはご使用になれませんので、ご注意ください。
フィルムパックについて
•フィルムパックには1枚の黒色のフィルムカバーと10枚
のフィルムが収納されています。
•フィルムパックはカメラに入れる直前に内装袋から取り
出してください 。
•フィルムドアを閉めると、フィルムカバーが自動的に排出
されます。
詳細は、富士フイルムインスタントフィルムinstax
SQUAREの取扱説明を参照してください。
~
Ÿ
フィルムパックの左右を
持ち、フィル ム パックの 下
をフィルム室の下の溝に
合わせてから(1)、まっす
ぐ押し込 むようにフィルム
パックを入 れます(2)。
⁄
!
フィルムドアロックがカ
チッと止まるまで 押し込
んで、フィル ムドアを閉
めます。
フィルムドアを閉めると、自
動的にフィルムカバー(黒
色)が排出されるので取り除
きます。
フィルム が なくなると、撮影画面右のドットがすべてグレー
で表示されます(16ページ)。
フィルム パックを 取り出してくださ い 。
フィルムパックの長方形
の穴をつまみ、フィルム
パックを引き出します。
フィルムパックを取り出す
~
Ÿ
フィル ム パックを入 れる
2
1
1
2
1
2
フィルムドアロックのボタンを押しながら(1)、フィ
ルムドアが少し開くまでレバーを右にスライド(2)
させてください。
フィルムドアロックのボタンを押しながら(1)、フィ
ルムドアが少し開くまでレバーを右にスライド(2)
させてください。
13
JP
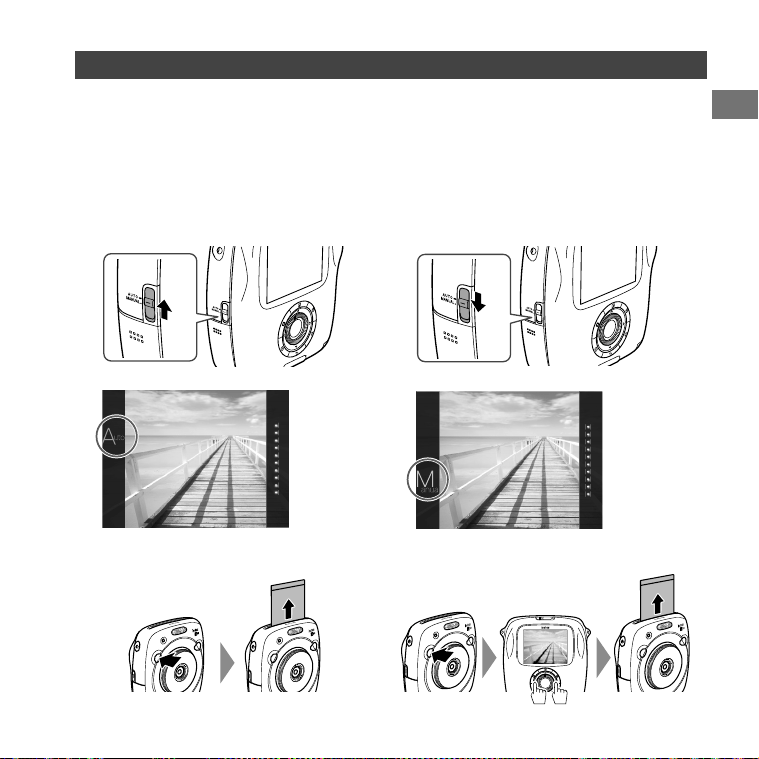
プリントモードについて
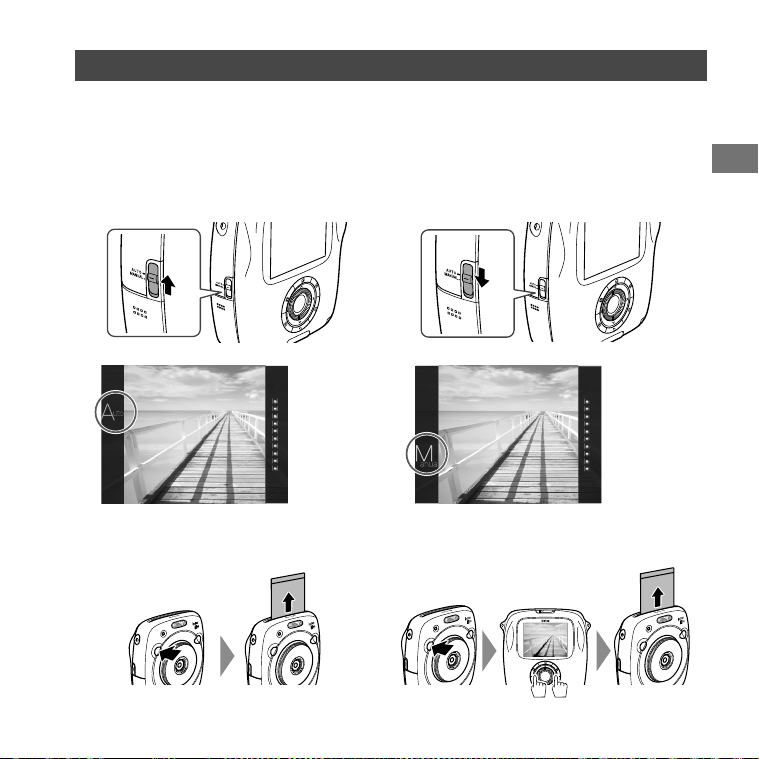
■オートプリントモード
カメラ側面のプリントモード切り替えスイッチを
「AUTO」に合わせます。
プリントモードには以下の2つがあります。
•
オートプリントモード
•
マニュアルプリントモード(初期設定)
オートプリントモードを選んでいるときは、撮影した画像をメモリーに保存したあと、すぐにプリントします 。
マニュアルプリントモードを選んでいるときは、撮影した画像はメモリーに保存され、撮影後に画像を選んでプリントし
ます。
撮影した画像をメモリーに保存し、撮影後に画像を選んで
プリントします(すぐにプリントはされません)。
撮影した画像をメモリーに保存し、すぐにプリントします 。
撮影画面に以下のアイコンが表示されます。
■マニュアルプリントモード(初期設定)
カメラ側面のプリントモード切り替えスイッチを
「MANUAL」に合わせます。
撮影画面に以下のアイコンが表示されます。
14
JP
基本的な撮影と再生
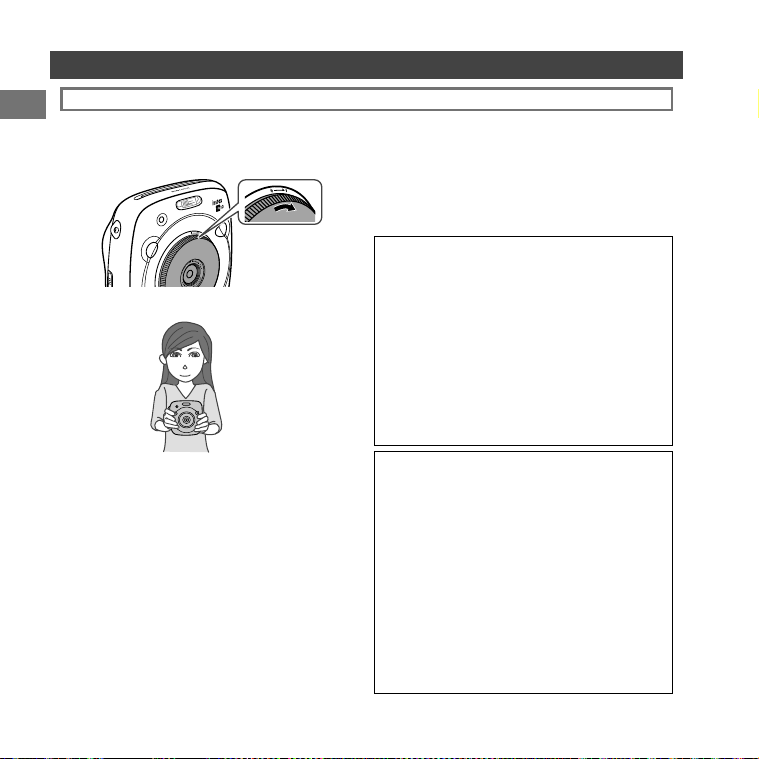
撮影する
ここでは、撮影の基本的な操作を説明します。
~
レンズリング(電源スイッチ)を時計回りに回して電
源を入れます。
Ÿ
⁄
!
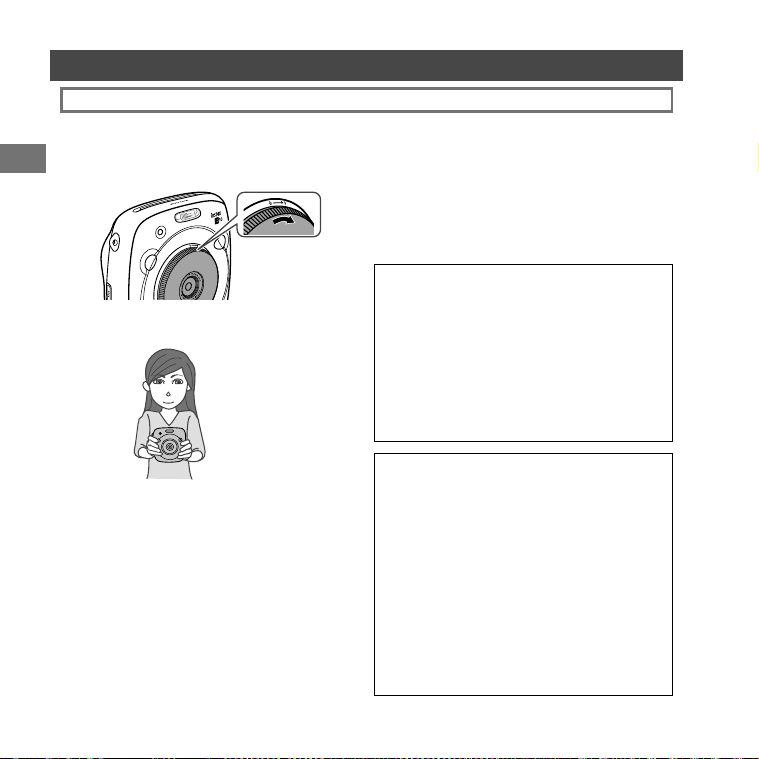
カメラを構え、構図を決めます。
シャッターボタンを半押しして、被写体にピントを
合わせます。
•ピントが合ったとき
ピピッと音が鳴り緑色のAFフレームが液晶モニ
ターに表示されます。
•ピントが合わないとき
赤色のAFフレームが液晶モニターに表示されま
す。構図を変えるか、AF/AEロックを使用してく
ださい(19ページ)。
シャッターボタンを半押ししたまま、さらに深く押し
込みます(全押しします)。
写真が撮影され、画像が内蔵メモリーに保存さ
れます。
•オートプリントモードに設定されている場合は、撮
影画像がプリントされます(13ページ)。
•撮影するときは脇を締め、カメラを両手 でしっかりと
持ってください 。
• シャッターボタンを押すときは、撮影レンズに触れな
いように注 意してください 。
•シャッターボタンを全押しするときは、カメラが動い
て手ブレが起きないように、静かに押し込んでくだ
さい。
•指やストラップがフラッシュ、レンズ、フィルム排出口
に掛 からないように注 意してください 。
•暗い場所では、シャッターボタンを全押ししたときに
フラッシュが発光することがあります。フラッシュが
発 光しな いように、フラッシュの設定を変更できます
(20ページ)。
必要に応じて撮影モードを選んだり、エフェクトな
どの設定をします。
(17ページ〜21ページ)
@
内蔵メモリーについての注意
•内蔵メモリーがいっぱいになると、シャッタ ー が 切 れ
ず、撮影ができません。画像を削除するか、メモリーカ
ード を 使 用し て くだ さ い 。
•内蔵メモリーには約50枚、メモリーカードを使用する
と、1GBあたり約1000枚の画像を保存できます。
•内蔵メモリー内の画像は、カメラ本体の故障などによ
りデータが壊 れたり、消失したりすることがあります。
大切な画像は別のメディア(ハードディスク、CD-
R、CD-RW、DVD-Rなど)にコピーして、バックアップ
保存されることをお勧めします。
•カメラを修理にお出しになった場合、内蔵メモリー内
のデータについては保証できません。
•カメラ修理の際、内蔵メモリー内のデータを確認させ
ていただく場合があります。
15
JP
基本的な撮影と再生
撮影した画像を再生する
撮影した画像を液晶モニターで再生できます。撮影の前に
は、試し撮りをして画 像を確 認してください。
~
Ÿ
再生画面の表示を変更する
画像を拡 大して表示したり、液晶モニターに表示する画像
のコマ数を変更したりすることができます。
■画像を拡大して表示する
コマンドダイヤルを時計回りに回すと、画像を拡大して
表示します。
•
6789
ボタンで、表示する範囲を移動でき
ます。
•MENU/OKボタンまたは
(戻る)ボタンを押すと、
拡大表示がキャンセルされます。
•画像を拡大した状態でプリントすることもできます
(16ページ)。
■表示する画像のコマ数を変更する
コマンドダイヤルを反時計回りに回すと、画像が1コマ
表示から、4コマ、9コマ表示に切り替わります。
•コマンドダイヤルを時計回りに回すと、表示が4コマ
→1コマに切り替わります。
•MENU/OKボタンまたは
(戻る)ボタンを押す
と、1コマ表示に切り替わります。
•4コマまたは9コマ表示の状態でプリントすることも
できます(16ページ)。
通常表示 拡大表示
1コマ表示 4コマ表示 9コマ表示
(再生)
ボタンを押します。
8
または
9
を押して、プリントしたい画像を選び
ます。
最後に撮影した画像が表示されます。
8
を押すと、前の画像が表示されます。
9
を押すと、次の画像が表示されます。
•シャッターボタンを全押しすると、撮影画面に戻
ります。
16
JP
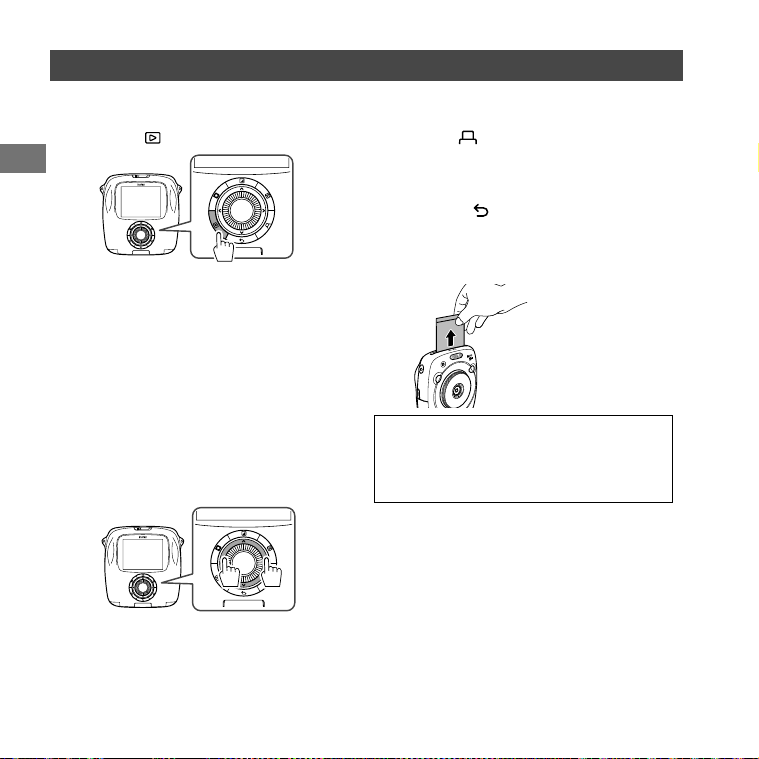
プリントする
撮影した画像は、以下の手順でプリントできます。
•オートプリントモードに設定されているときは、撮影後す
ぐに画像がプリントされます(13ページ)。
~
Ÿ
⁄
!
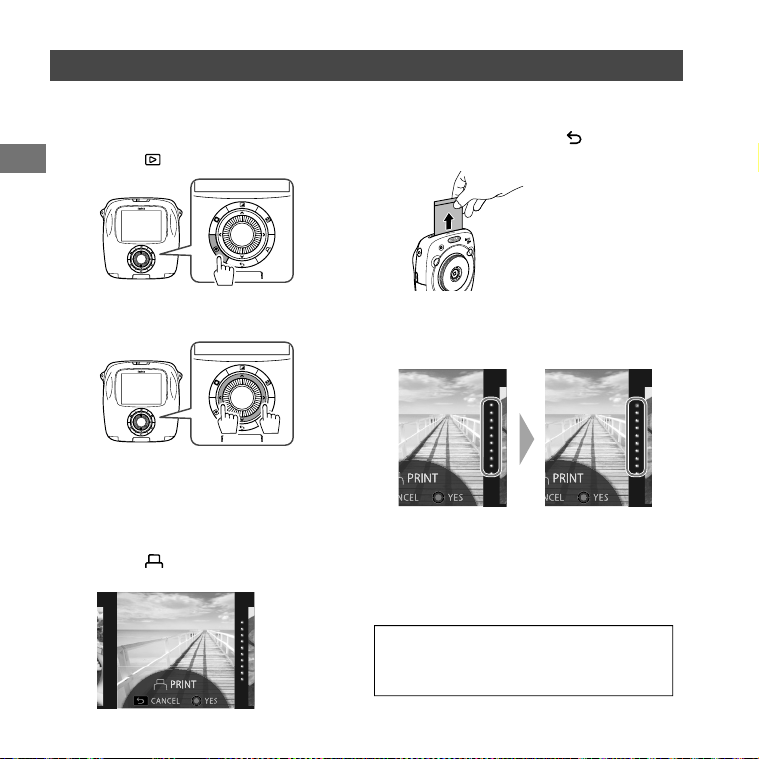
(プリント)ボタンを押します。
以下の画面が表示されます。
@
MENU/OKボタンを押します。
プリントが始まります。
•プリントをキャンセルするには、 (戻る)ボタン
を押します。
¤
フィルム を 排 出 する音 が
止まってから、送り出され
たフィルムの先端を持っ
て取り出します。
•フィルムの取り扱いについては、富士フイルムインス
タントフィルムinstaxSQUAREの取扱説明を参照
してください。
•フィルムの現像時間は約90秒です(気温によって時
間は変動します)。
R 画像を拡大してプリントしたり、4コマ、9コマを1枚の
フィルム にプリントしたりすることも で きま す 。手順2で
画像が表示されているときに、コマンドダイヤルで表示
を切り替えます(15ページ)。
必要に応じて画像を調整、加工します。
(17ページ、18ページ)
■フィルム残量表示について
フィルム残量は画面右のドットで表示します。
プリントが1枚終了するごとに、ドットが1つずつグレー
表示になります。
•フィルム残量が2枚になると、ドットが赤く表示
されます。
8
を押すと、前の画像が表示されます。
9
を押すと、次の画像が表示されます。
(再生)
ボタンを押します。
最後に撮影した画像が表示されます。
8
または
9
を押して、プリントしたい画像を選び
ます。
17
JP
撮影または再生画面を表示中に、背面のボタンで画像エフェクトのメニューを直接選んで、画像を調整・加工することが
できます。
画像エフェクト
フィルタ ー
~
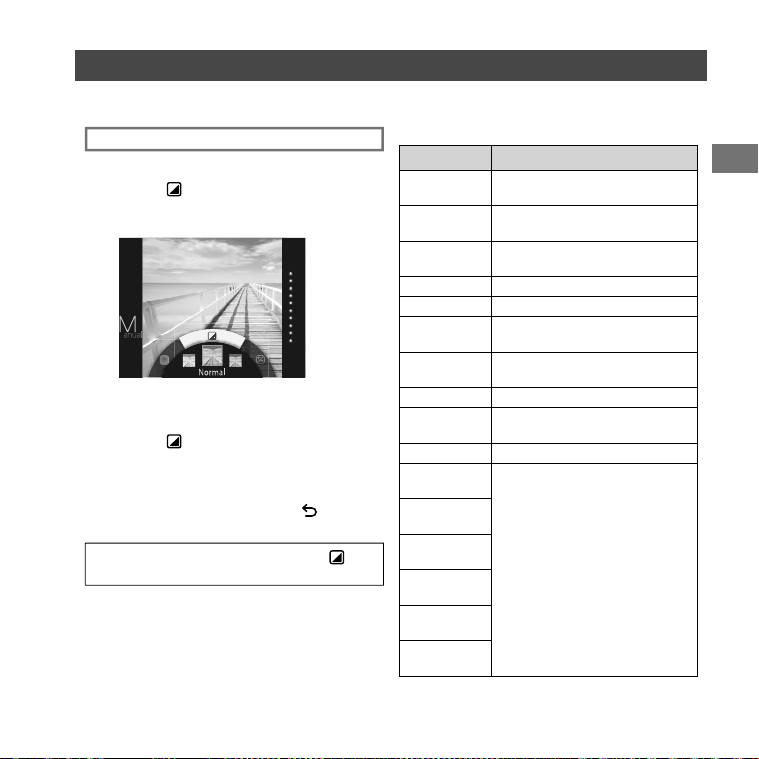
撮影または再生画面で (フィルター)ボタンを
押します。
以下の画面が表示されます。
Ÿ
コマンドダイヤルでフィルターの種類を選びます。
詳細は右の表を参照してください。
!
もう一度、 (フィルター)ボタンを押します。
効果が反映され、元の画面に戻ります。
•MENU/OKボタンまたは
(戻る)ボタンを押し
ても、元の画面に戻ります。
•効果をリセットする場合は、 (フィルター)ボタンを
長押ししてください。
以下の手順でフィルターの種類を選びます。
■フィルターの種類
種類 効果
Cornelius コントラストを強めます。
Monochrome
スタンダードなモノクロフィルターです。
Luna 全体の明度と彩度を高めます。
Immerse コントラストを強めると共に彩度を
高めます。
Amber 彩度を落とし、懐かしい印象を写真に
加えます。
Marmalade 強い赤味と共に、中心を明るく、周辺
を暗くする効果があり、写真に年月を
経て日焼けした印象を加えます、
Martini
少しのヴィンテージ感を加えると共
に、肌色がより滑らかに再現されます。
Sepia 時間が経ち色あせた写真を再現しま
す。レトロ感やノスタルジックな雰囲
気を演出したい場合に適しています。
Roppongi 写真に明るさと柔らかさを加えます。
Highline
写真に黄色みがかったレトロな雰囲気を
加えると共に、肌色を綺麗に見せます。
パートカラー
(レッド)
特定の色域(カッコ内の色)だけを残
し、残りをモノクロにします。
パートカラー
(オレンジ)
パートカラー
(イエロー)
パートカラー
(グリーン)
パートカラー
(ブルー)
パートカラー
(パープル)
18
JP
画像エフェクト
明るさ調整
以下の手順で画像の明るさを調整します。
~
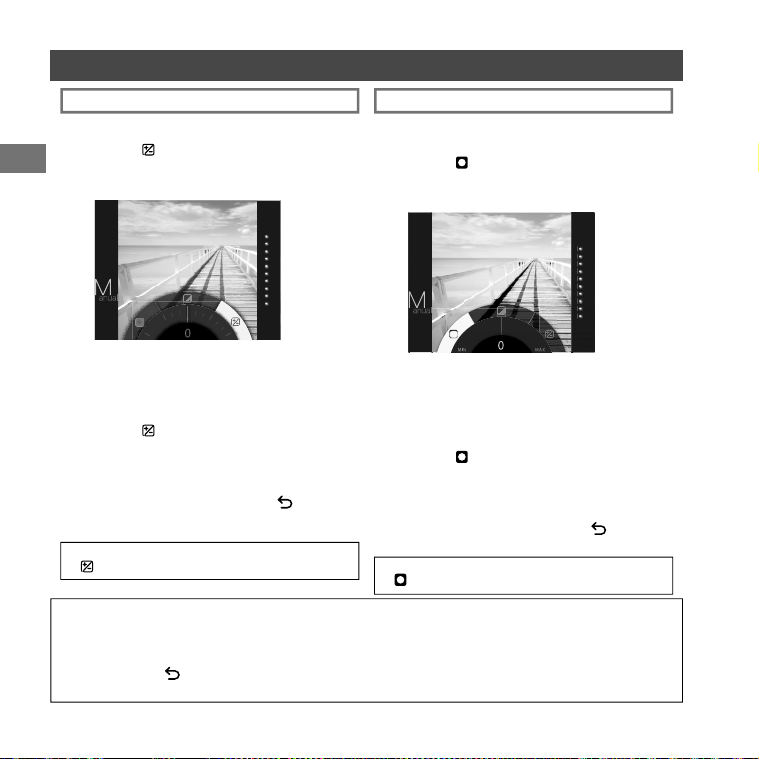
撮影または再生画面で (明るさ)ボタンを押し
ます。
以下の画面が表示されます。
Ÿ
コマンドダイヤルで明るさを調整します。
コマンドダイヤルを時計回りに回すと明るくなり、
反時計回りに回すと暗くなります。
!
もう一度、(明るさ)ボタンを押します。
調整結果が反映され、元の画面に戻ります。
•MENU/OKボタンまたは
(戻る)ボタンを押
しても、元の画面に戻ります。
•調整結果をリセットする場合は、(明るさ)ボタンを
長押ししてください。
ビネット
画像の四隅の明るさを調整します。以下の手順で明るさ
を調整します。
~
撮影または再生画面で (ビネット)ボタンを押し
ます。
以下の画面が表示されます。
Ÿ
!
もう一度、(ビネット)ボタンを押します。
調整結果が反映され、元の画面に戻ります。
•MENU/OKボタンまたは
(戻る)ボタンを押
しても、元の画面に戻ります。
•効果をリセットする場合は、(ビネット)ボタンを
長押ししてください。
コマンドダイヤルで画像の四隅の明るさを調整
します。
コマンドダイヤルを時計回りに回すと画像の四隅
が暗くなり、反時計回りに回すと明るくなります。
画像エフェクトについて:
•それぞれの調整結果、効果は、撮影後も保持されます。ただし、本機以外の機器(パソコンなど)で画像を再生した場合
は、調整結果、効果は反映されません。
•エフェクト、明るさ調整、ビネットは組み合わせて使用することができます。
•組み合わせて使用しているときに、すべての効果をリセットする場合は、
(戻る)ボタンを長押ししてください。
•被写体やカメラの設定によっては、画像が粗くなったり、意図した明るさや色味にならない場合があります。
19
JP
いろいろな撮影
AF/AEロックを使用して撮影する セルフタイマーを使用して撮影する
シャッターボタンを半押しし続けてピントを固定することを
「AFロック」、明るさを決めて固定することを「AEロック」
といいます。被写体を画面の中央以外に配置して撮影し
たいときに便利です。
~
Ÿ
!
シャッターボタンを半押しして、ピントを合わせたい
被写体にピントを合わせます。
シャッターボタンを半押ししたまま構図を変えます。
シャッターボタンを全押しして、撮影します。
以下の被写体を撮影するときは、ピントが合いにくくな
ることがありますので、AE/AFロックを使用して撮影す
ることをお勧めします。
•鏡や車のボディなど光沢のある被写体
•高速で移動する被写体
•ガラス越しの被写体
•髪の毛や毛皮などの暗い色で、光を反射せずに吸収
する被写体
•煙や炎などの実体のない被写体
•背景との明暗差が少ない被写体(背景と同色の服を
着ている人物など)
•AFフレーム内にコントラスト差が大きいものがあり、
その前後に被写体がある場合(コントラストの強い背
景の前の被写体など)
撮影者を含めた集合写真や、シャッターボタンを押すとき
にカメラが動くのを防ぐための撮影に使用します。
~
Ÿ
!
撮影画面で、MENU/OKボタンを押します。
セルフタイマー
を選び、MENU/OKボタンを
押します。
撮影メニューが表 示されます。
シャッターボタンを全押します。
•
10秒を選んだ場合:
シャッターボタンを押すと、AF補助光/セルフ
タイマーランプが点灯し、撮影の3秒前に点
滅します。
•
2秒を選んだ場合:
シャッターボタンを押すと、AF補助光/セルフ
タイマーランプが点滅します。
⁄
10秒
または
2秒
を選び、MENU/OKボタンを
押します。
•セルフタイマーを途中でキャンセルする場合は、
(戻る)ボタンを押します。
20
JP
いろいろな撮影
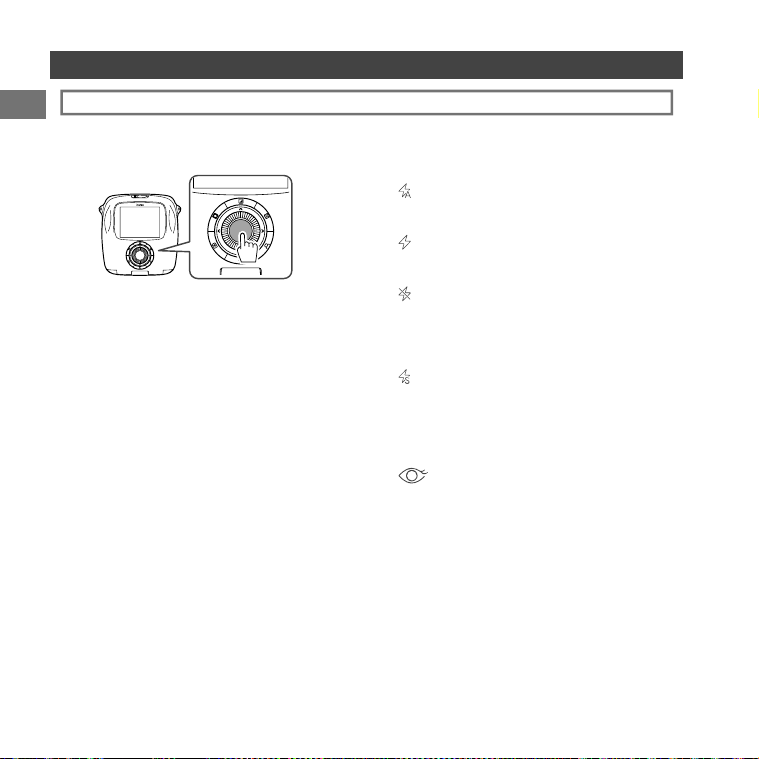
フラッシュを使用して撮影する
夜や暗い室内などで撮影をするときは、フラッシュを使用して撮影してください。
~
Ÿ
!
撮影画面で、MENU/OKボタンを押します。
フラッシュ
を選び、MENU/OKボタンを押します。
撮影メニューが表 示されます。
シャッターボタンを押して撮影します。
⁄
フラッシュの設定を選び、MENU/OKボタンを
押します。
フラッシュの設定の詳細は右を参照してください。
■フラッシュの設定
以下の設定から選びます。
•
オートフラッシュ
周囲が暗い場合は、自動でフラッシュが発光します。
ほとんどの状況に適した設定です。
•
強制発光
周囲の明るさにかかわらず、フラッシュが発光します。
逆光で被写体が暗くなっているときに使用します。
•
発光禁止
周囲が暗いときでも、フラッシュを発光しません。フ
ラッシュ撮影が禁止されている場所などでの撮影に
適しています。
暗いときには三脚の使用をお勧めします。
•
スローシンクロ
スローシャッターのフラッシュ撮影(スローシンクロ)
になり、暗い場所で背景と人物をより明るく写すこと
ができます。
明るい場所で使用すると、露出オーバーになること
があります。
•
赤目スロー
暗い場所でフラッシュ撮影をするときに、フラッシュ
の光が目の中で反射することで、瞳が赤く写る「赤目
現象」を軽減します。
この設定を選んでいるときは、フラッシュが発光する
前に、赤目を軽減するために予備発光を行います。
21
JP
モードを切り替えて撮影する
被写体や撮影の目的に応じて、いろいろな設定を選ぶことができます。
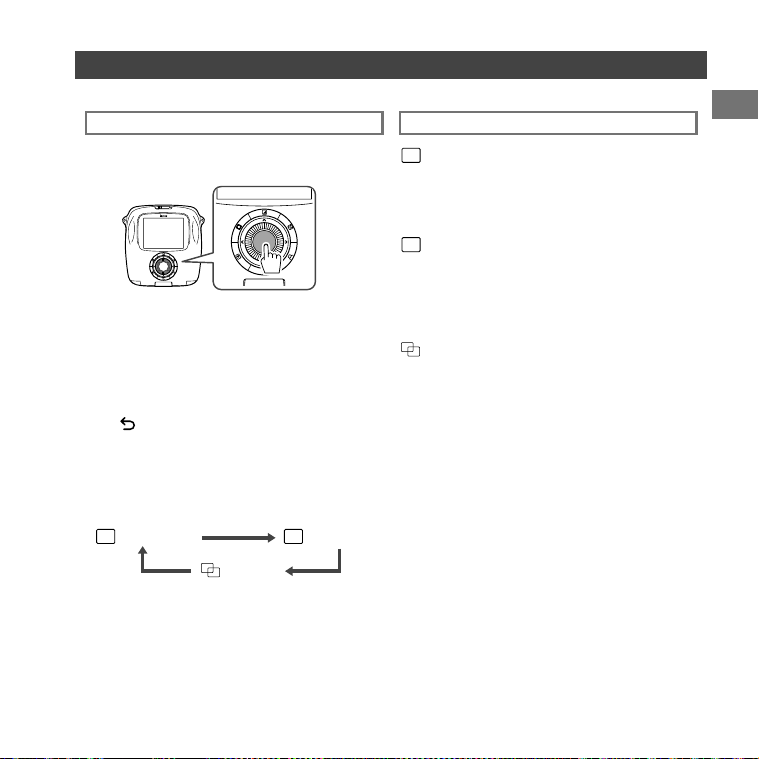
撮影モードの選び方
以下の手順で撮影モードを選びます。
撮影モード
67'
スタンダード
通常の撮影に使用します。
周辺が暗いときは、自動でフラッシュが発光します。
フラッシュを発光しないように設定することもできます
(20ページ)。
凴
バルブ撮影
シャッターボタンを押している間、シャッタ ー が 開 きま す 。
夜景などの撮影に使用します。このモードを使用するとき
は、テーブルや三脚などでカメラを固定してください。
•周囲の明るさに応じて、シャッターボタンを押す時間を
調整してください。
二重露光
2回シャッターを切り、1つの画像で2つの画像を撮影し
ます。1つ目の被写体を撮影したあとに、2つ目の被写体
を撮影します。液晶モニターの指示に従って操作してく
ださい。
67'
スタンダード
凴
バルブ撮影
二重露光
~
Ÿ
!
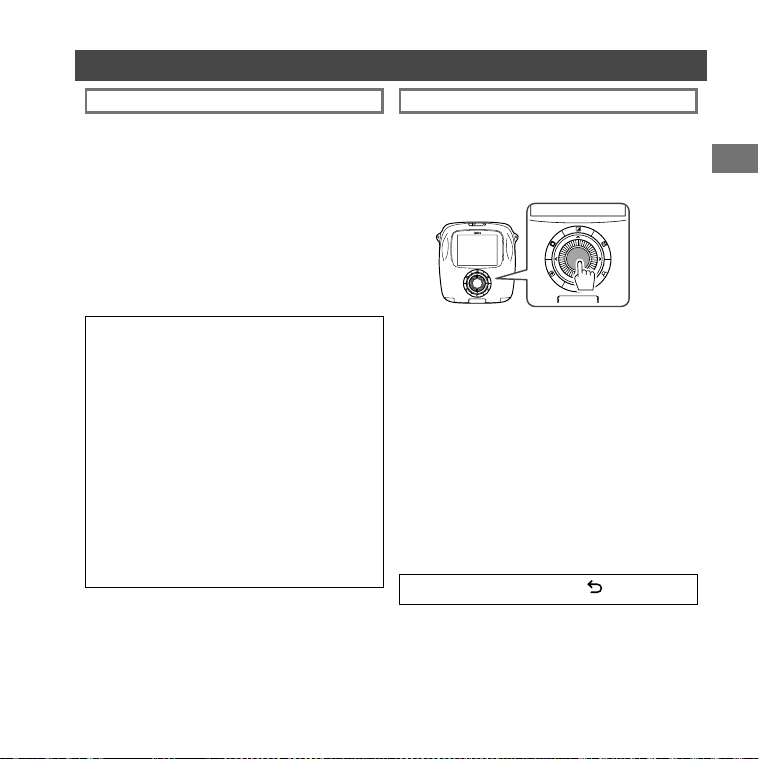
撮影画面で、MENU/OKボタンを押します。
撮影モード
を選び、MENU/OKボタンまたは
9
を押します。
撮影メニューが表 示されます。
(戻る)ボタンを押します。
撮影画面に戻ります。
⁄
設定を変更し、MENU/OKボタンを押します。
変更した内容に設定されます。
R シャッターボタンで撮影モードを選ぶときは、シャッタ
ーボタンを押すごとに、撮影モードが以下のように切り
替わります。
22
JP
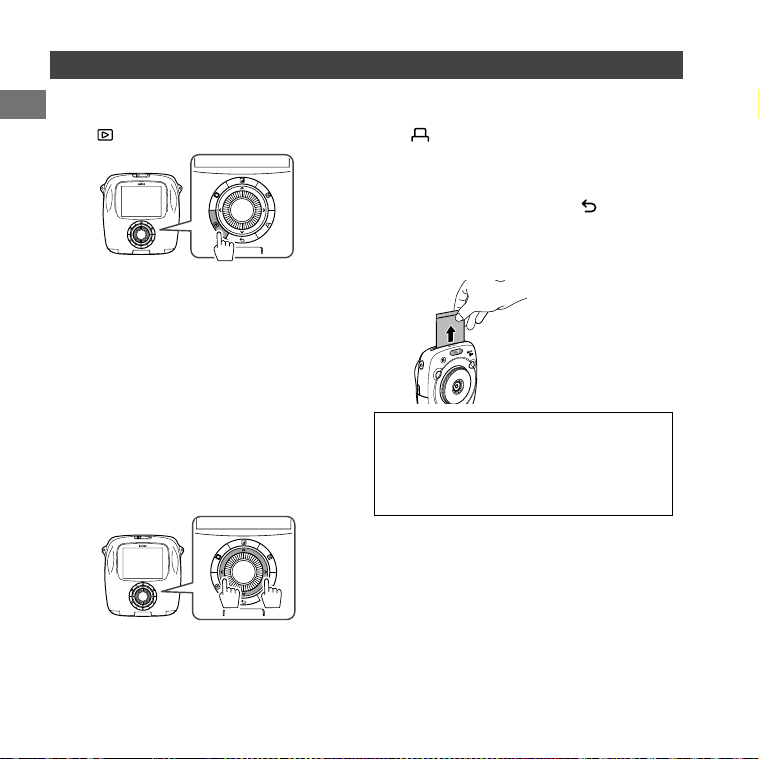
プリント履歴からプリントする(リプリント)
過去にプリントした画像を呼び出して、そのときの設定(画像エフェクトなど)を保持してプリントすることができます。以下
の手順で操作します。
~
(再生)
ボタンを押します。
Ÿ
MENU/OKボタンを押します。
再生メニューが表 示されます。
!
⁄
プリント履歴を選び、MENU/OKボタンを押します。
画像を選ぶ画面が表示されます。
•最新の50枚まで、プリント履歴が保存されて
います。
•プリント履歴が50枚を超えると、古い履歴は上
書きされます。
@
8
または
9
を押して、プリントしたい画像を選び
ます。
MENU/OKボタンを押します。
プリントが始まります。
•プリントをキャンセルするには、 (戻る)ボタン
を押します。
#
フィルム を 排 出 する音 が 止 まって から 、送り出され
たフィルムの先端を持って取り出します。
•プリント履歴をメモリーカードに保存することはでき
ません。
•内蔵メモリーをフォーマットすると、プリント履歴はす
べて削除されます(26ページ)。
•プリント履歴の画像を編集したり、エフェクトをかけた
りすることはできません。
最後に撮影した画像が表示されます。
8
を押すと、前の画像が表示されます。
9
を押すと、次の画像が表示されます。
•4コマ、9コマ表示に切り替えることもできます。
(プリント)ボタンを押します。
¤
23
JP
メモリーカードを使用する
本機は内蔵メモリーに約50枚の画像を保存できますが、メモリーカードを使用すると、より多くの画像を保存できます。
メモリーカードを入れる
メモリーカードについての注意
• このカメラに対応しているメモリーカードはmicroSDカ
ードまたはmicroSDHCカードです。指定以外のメモリー
カードをご使用になると、カメラの故障の原因になります。
•メモリーカードは小さいため、乳幼児が誤って飲み込
む可能性があります。乳幼児の手の届かない場所に保
管してください 。万が一、乳幼児が飲み込んだ場合は、
ただちに医師と相談してください。
•メモリーカードのフォーマット中や、データの記録/消
去中は、カメラの電源をオフにしたり、メモリーカード
を取り出したりしないでください 。カード損傷の原因に
なることがあります。
•強い静電気、電気的ノイズの発生しやすい環境でのご
使用、保管は避けてください。
•静電気を帯びたメモリーカードをカメラに入れると、カメ
ラが誤作動する場合があります。このような場合はいっ
たん電源を切ってから、再び電源を入れ直してください。
• ズボンのポケットなどにメモリーカードを入れないでくださ
い。座ったときに大きな力が加わり、壊れる恐れがあります。
•長時間ご使用になった後、取り出したメモリーカードが温
かくなっている場合がありますが、故障ではありません。
• メモリーカードにラベルなどを貼らないでください。はがれ
たラベルが、カメラの誤動作の原因になることがあります。
メモリーカードをパソコンで使用する場合の注意
•未使用のメモリーカードや、パソコンやその他の機器
で使用したメモリーカードは、必ずカメラでフォーマッ
トしてからご使用ください。
•メモリーカードをカメラでフォーマットして撮影、記録
すると、自動的にフォルダが作成されます。パソコンで
メモリーカードのフォルダ名、ファイル名の変更、消去
などの操作を行わないでください。メモリーカードをカ
メラで使 用できなくなることがあります。
•画像ファイルの消去はカメラで行ってください。
•画像ファイルを編集する場合は、画像ファイルをハード
ディスクなどにコピー または 移 動し、コピーまたは移動
した画像ファイルを編集してください。
注意
•メモリーカードを取り出すときに、押し込んだ指を急
に放すと、メモリーカードが飛び出すことがあります。
指は静かに放してください。
R メモリーカードを取り出すときは、メモリーカードを指
で押し込み、ゆっくり指を戻してください。ロックが 外 れ
て、取り出すことができます。
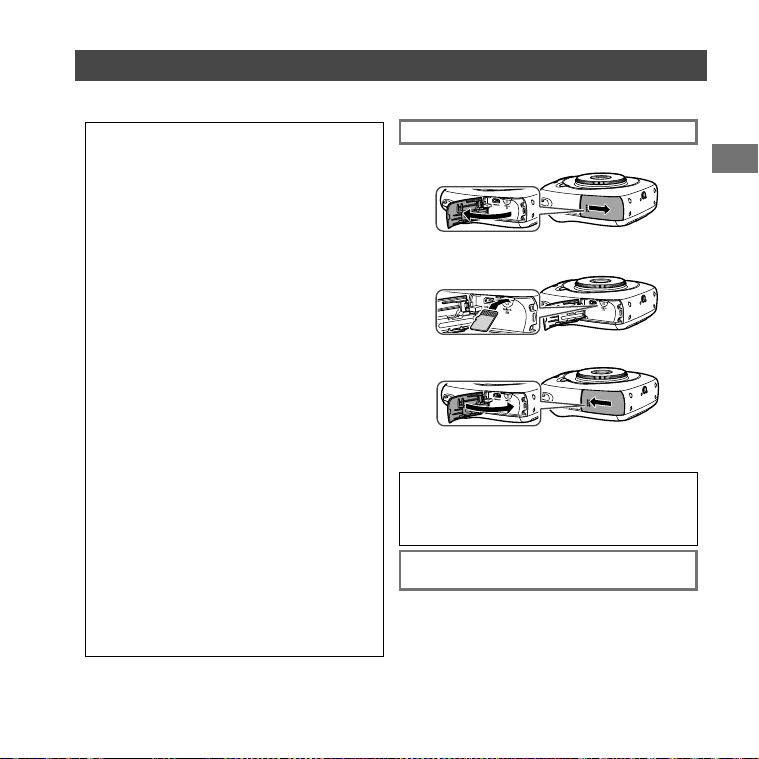
図のように正しい向きで、「カチッ」と音がするまで
メモリーカードを奥まで差し込みます。
カードスロットカバーをスライドさせて開けます。
~
Ÿ
!
カードスロットカバーを閉じます。
他のカメラで撮影した写真をプリントする
他のカメラで撮影した写真を、メモリーカードに入れて
プリントすることができます。ただし、以下の条件があ
ります。
•画像ファイルはフォルダに入れずに、ドライブの直下に
コピーしてください。
• ファイル名は8文字(前半4文字がAからZの大文字のアル
ファベット、後半4文字が0から9の数字)にしてくだ さ い 。

24
JP
■撮影メニュー一覧
撮影モード
撮影目的や状況に適した撮影モードを設定します
(21ページ)。
•
シャッタ ー ボ タン 設 定
で、どちらかのシャッターボタン
に撮影モード切り替えの機能を割り当てた場合は、そ
のボタンを繰り返し押しても、撮影モードを変更する
ことができます。
フラッシュ
フラッシュを使用して撮影するときの設定をします
(20ページ)。
セルフタイマー
セルフタイマーを使用して撮影するときの設定をします
(19ページ)。
AF補助光
ON
を選ぶと、シャッターボタンを半押ししてからピント
が合うまでの間AF補助光が発光し、暗い被写体のピン
トを合わせやすくします。
設定:ON/OFF
• シーンによっては、発光してもピントが合いづらいこ
とがあります。
•被写体に近づいた撮影では、AF補助光の効果が十分
に得られない場合があります。
•人の目に近づけて発光させないでください。
メニューを使いこなす
以下の手順で撮影メニューを設定・変更します。
~
Ÿ
!
撮影画面で、MENU/OKボタンを押します。
変更する項目を選び、設定を変更します。
撮影メニュー
メニューが表示されます。
(戻る)ボタンを押します。
撮影画面に戻ります。
⁄
MENU/OKボタンを押します。
変更した内容に設定されます。
25
JP
メニューを使いこなす
■再生メニュー一覧
プリント
MENU/OKボタンを押すと、プリントを開始します
(16ページ)。
プリント履歴
過去にプリントした画像を最大50枚まで表示します。
画像を選び、
(プリント)
ボタンを押すと、プリントを
開始します(22ページ)。
MENU/OKボタンを押すと、プリント履歴を1コマずつ
消去できます。
以下の手順で再生メニューを設定・変更します。
~
Ÿ
!
再生画面で、MENU/OKボタンを押します。
変更する項目を選び、設定を変更します。
再生メニュー
メニューが表示されます。
(戻る)ボタンを押します。
再生画面に戻ります。
⁄
MENU/OKボタンを押します。
変更した内容に設定されます。
消去
画像を1コマづつ消去したり、全コマまとめて消去します。
設定:1コマ/全コマ
画像回転
画像を90度単位で回転して表示します。
コマンドダイヤルで操作します。
画像コピー
画像を内蔵のメモリーからメモリーカードへ、またはメ
モリーカードから内蔵のメモリーにコピーします。
以下の手順で行います。
1MENU/OKボタンまたは
9
を押します。
2コピー先を選び、MENU/OKボタンまたは
9
を押
します。
3
1コマ
または
全コマ
を選び、MENU/OKボタンまた
は
9
を押します。
全コマ
を選んだ場合は、コピーが開始されます。
1コマ
を選んだ場合は、手順4に進みます。
4コピーする画像を選び、MENU/OKまたは
9
を
押します。
縦横自動回転再生
ONを選ぶと、再生画面で画像を回転させて表示します。
設定:ON/OFF
26
JP
メニューを使いこなす
■セットアップメニュー一覧
日時設定
日付と時刻を設定します(10ページ)。
日付書き込み
ON
を選ぶと、写真の右下に撮影日を印刷します。日付
の並びは、
日時設定
での設定が反映されます。
言語/LANG.
液晶モニターに表示する言語を設定します。
以下の手順でセットアップメニューを設定・変更します。
~
Ÿ
!
撮影画面または再生画面で、MENU/OKボタン
を押します。
変更する項目を選び、設定を変更します。
セットアップメニュー
メニューが表示されます。
(戻る)ボタンを押します。
撮影画面に戻ります。
⁄
MENU/OKボタンを押します。
変更した内容に設定されます。
操作音量
操作音、シャッター音、起動音の音量を設定します。
設定:OFF/1/2/3
音を消したい場合は、
OFF
を選びます。
シャッタ ー ボ タン 設 定
左右のシャッターボタンの機能を設定します
(11ページ)。
自動電源OFF
カメラを操作しなかったときに、自動で電源がオフにな
るまでの時間を設定します。
設定:5分/2分/OFF
リセット
設定値を工場出荷時の設定に戻します。
日時設定
で設定した日付と時刻はリセットされません。
フォー マット
カメラ内蔵のメモリー、またはカードスロットに挿入され
ているメモリーカードを初期化します。保存されている
画像はすべて削除されます。
バージョンアップ
ファームウェアのバージョンアップを行います。
ファームウェアを記録したメモリーカードをカードスロッ
トに挿入し、画面の指示に従って操作してください。
最新のファームウェアは富士フイルムのウェブサイトか
らダウンロードしてください。

27
JP
仕様
カメラ機能
撮像素子 1/4型CMOS原色フィルター採用
記録画素数(ピクセル) 1920×1920
記録メディア 内蔵メモリー、microSD/microSDHCメモリーカード
記録枚数 内蔵メモリー:約50枚
microSD/microSDHCメモリーカード:1GBあたり約1000枚
記録方式 DCF準拠ExifVer.2.3JPEG準拠、PIM対応
焦点距離 28.5mm固定(35mmフィルム換算)
絞り F2.4
オートフォーカス シングルAF(TTLコントラストAF、AF補助光付)
撮影可能距離 10cm〜∞
シャッタースピード 1/29500秒〜1/2秒(自動切換)、バルブモード最大10秒
撮影感度 ISO100〜1600(自動切換)
露出制御 プログラムAE
測光方式 TTL256分割測光、マルチ測光
ホワイトバランス オート
フラッシュ オート/強制発光/発光禁止/スローシンクロ/赤目補正
撮影可能範囲:約50cm〜8m
撮影モード 通常、二重露光、バルブモード
セルフタイマー 約10秒/約2秒
画像エフェクト フィルタ ー(16種)、明るさ調整、ビネット
再生時機能 トリミング 、マルチ再生

28
JP
仕様
プリント機能
使用フィルム 富士フイルムインスタントフィルムinstaxSQUARE(別売)
フィルム枚数 10枚/パック
フィルムサイズ 86mm×72mm
画面サイズ 62mm×62mm
プリント画素数 800×800ドット
プリント解像度 12.5ドット/mm(318dpi、80μmドットピッチ)
プリント階調 RGB各色256階調
プリント可能画像フォーマット JPEG(画像編集・加工ソフトで保存したJPEGファイルの一部は、表示・プリントで
きない場合があります。)
プリント出力時間 約12秒
プリントタイミング 撮影直後プリント/選択後プリント
プリント機能 本体内メモリー画像+microSDカード内画像
リプリント 50枚前の出力まで
プリント履歴に保存されている画像(50枚まで)について再プリント可能
デジタルズーム プリント時2.4倍(出力画素数800×800)までズーム可
フイルム検出機能 あり(装着時自動排出)
その他
液晶モニター 3.0型TFTカラー液晶モニター
画素数:約46万ドット
入出力端子 マイクロUSB(充電専用)
バッテリー NP-50
充電機能 内蔵
プリント可能枚数 約160枚(フル充電から)
*注意:使用条件により、プリント枚数は異なります。
充電時間 約3〜4時間(0.5AUSBポート使用時)
*気温によって異なります。
サイズ 119mm×47mm×127mm( W×D×H )
重量 450g(フィルムパック、バッテリーを含む)
*上記の仕様は、性能向上のため変更する場合があります。

29
JP
このようなときは
故障とお考えになる前に、もう一度お調べください。処置を行っても改善されない場合は、弊社サービスセンターに修理を
ご依頼ください。
または下記のウェブサイトにアクセスしてください。
富士フイルムホームページ:http://fujifilm.jp/
使用中このようなときは…
このようなときは 考えられる原因 こうしてください
電源が入らない。 ①
バッテリーが消耗している。
②
バッテリーの入れ方が間違っている。
①バッテリーを充電してください。
②バッテリーを正しく入れてください。
バッテリーの消耗が
早い。
①非常に寒いところでカメラを使用し
ている。
②バッテリーの端子が汚れている。
③
同じバッテリーを長期間使用している。
①バッテリーをポケットなどで温めておいて、撮影の
直前にバッテリーを入れてください。
②バッテリーをいったん取り出して、端子部分を乾い
たきれいな布でふいてから、入れ直してください。
③バッテリーの寿命の可能性があります。新品のパ
ッテリーと交 換してくださ い 。
使用中に電源が切
れた。
●バッテリー残量が少なくなっている。 ●充電済みのバッテリーと交換してください。
バッテリーの充電が始
まらない。
①バッテリーが入っていない。
②バッテリーの向きを間違えている。
③
ACパワーアダプターのプラグが、正
しくコンセントに接続されていない。
①バッテリーを入れてください。
②バッテリーを正しい向きで入れ直してください。
③プラグを正しくコンセントに接続してください。
バッテリーの充電に時
間がかかりすぎる。
●非常に寒いところでバッテリーを充
電している。
●低温時は、充電に時間がかかる場合があります。
充電中にAF補助光/セ
ルフタイマーランプが
点滅する、または液晶モ
ニターにエラーメッセ
ージが表示され、充電
できない。
①バッテリーの端子が汚れている。
②バッテリーの寿命またはバッテリー
が故障している。
③バッテリーの温度が高すぎる、また
は低すぎる。
①バッテリーをいったん取り出して、端子部分を乾い
たきれいな布でふいてから、入れ直してください。
バッテリーを正しい向きで入れ直してください。
②新品のバッテリーと交換してください。それでも
充電できないときは、弊社サポートセンターにお
問い合わせください。
③バッテリーの温度が安定してから、再度充電し直し
てください。

30
JP
このようなときは
このようなときは 考えられる原因 こうしてください
液晶モニターに日本語
以外の言語が表示され
ている。
●セットアップメニューの言語/
LANG.の設定が日本語以外に設定
されている。
●設定を
日本語
にしてくださ い 。
シャッターボタンを押し
ても撮影できない。
①電源が切れている。
②バッテリー残量が少なくなっている。
③内部メモリーまたはメモリーカード
がいっぱいになっている。
④フォーマットされていないメモリー
カードを使用している。
5メモリーカードの接触面(金色の部
分)が汚れている。
6メモリーカードが壊れている。
①電源を入れてください。
②バッテリーを充電してください。
③新しいメモリーカードを入れるか、不要な画像を
削除してください。
④本機でフォーマットしたメモリーカードを使用して
ください 。
5メモリーカードの接触面を乾いた柔らかい布でふ
いてください。
6新品のメモリーカードを入れてください。
撮影後、映像が消えて
画面が黒くなった
●フラッシュを使用して撮影した。 ●フラッシュを充電するために画面が黒くなること
がありますので、そのままお待ちください。
ピントが合わせられ
ない。
●
ピントが合いにくい被写体(19
ページ)を撮影しようとしている。
●AF/AEロックを使用して撮影してください。
フラッシュが発光し
ない。
①フラッシュの充電中に撮影した。
2フラッシュの設定で
発光禁止
が選ば
れている。
③バッテリー残量が少なくなっている。
①フラッシュの充電が完了してからシャッターボタン
を押してください。
2
発光禁止
以外の設定を選んでください
(20ページ)。
③充電済みのバッテリーと交換してください。
フラッシュが発光したの
に、画像が暗い。
①被写体から離れすぎている。
②
フラッシュを指などでふさいでいた。
①
フラッシュ撮影が可能な距離内で撮影してください。
②カメラを正しく構えてください。
画像がぼやけている。 ①
レンズに指紋などの汚れが付いている。
②撮影時にAFフレームが赤く表示さ
れていた。
①レンズを清掃してください。
②AFフレームが緑色になっていることを確認して撮
影してください 。
画像に点状のノイズが
写っている。
●気温の高い場所でバルブなどの長
時間露光で撮影した。
●撮像素子(CCD)の特性によるもので、故障では
ありません。
カメラが正常に作動し
ない。
①一時的に誤作動を起こしている。
②バッテリーが消耗している。
①バッテリーをいったん取り外して、再度入れ直して
ください 。
それでも正常に作動しない場合は、弊社修理サー
ビスセンターに修理をご依頼ください。
②充電済みのバッテリーと交換してください。
31
JP
このようなときは
このようなときは 考えられる原因 こうしてください
フィルム パックが 入らな
い、またはスムーズに入
らない。
①装着しようとしているフィルムパック
がこのカメラに適合しない。
②
入れ方が正しくない。
①富士フイルムインスタントフィルムinstax
SQUAREを使用してください(他のフィルムは使
用できません)。
②
フィルムパックの黄色のマークとカメラの位置合わ
せマーク(黄色)を合わせて入れてください。
フィルム カバ ー が 排 出
されない。
●フィルムパックが認識されない。 ●フィルムパックをいったん取り出し、入れ直してく
ださい。
フィルムが最後まで排
出されない。
●振動や落下などの衝撃で、フィル ム
がずれた。
①
フィルムの先端を持ち、少し強く引っ張ってください 。
②もう一枚プリントしてくだ さ い 。次のフィルムが押
し出して排出されます。
フィルム が 排 出 さ れ
ない。
①振動や落下などの衝撃で、フィル ム
がずれている。
②フィルムが詰まった。
①新しいフィルムパックを入れてください。
②バッテリーを入れ直してください。それでも改善
されない場合は、詰まったフィルムを取り除いて
から、新しいフィルムパックを入れてください 。
プリントがこのようなときは…
このようなときは 考えられる原因 こうしてください
日付が正しく印刷され
ない。
●日付が正しく設定されていない。 ●日時設定をやり直してください
(10ページ)。
出来上がった写真の一
部または全部が白くな
っている。
●フィルムが残っている途中で裏ぶた
を開けた。
●
フィルムを使い切るまで、裏ぶたを開けないでくだ
さい。フィルムが残っている状態で裏ぶたを開けると
フィルムが感光して、感光した部分が白くなります。
画面にむらがある。 ①
プリントされた直後に圧力がかかった。
②プリントがスムーズに送り出されな
かった。
①プリントを振る、曲げる、折る、押さえるなどしない
でください。
②プリント出口をふさがないでください。
プリントの下側に黒い
線が入る。
●振動や落下などの衝撃で、フィル ム
がずれた。
●画像を再度プリントしてくださ い 。それでも解決し
ない場合は、新しいフィルムパックをセットしてく
ださい。
32
JP
安全にご使用いただくために
●この製品および付属品は、写真撮影・プリント以外の目的に使用しないでください。
●製品の安全性には十分配慮しておりますが、下記の内容をよくお読みの上、正しくご使用ください。
●この説明書はお読みになった後で、いつでも見られるところに必ず保管してください。
警 告
注 意
この表示を無視して誤った取り扱いをすると、人が死亡また
は重傷を負う可能性が想定される内容を示しています。
この表示を無視して誤った取り扱いをすると、人が傷害を
負う可能性が想定される内容または、物的損害の発生が
想定される内容を示しています。
警 告
カメ ラ(バッテリー)が熱くなる、煙が出る、焦げ臭いなどの異常を感じたときは、ただちにバッテリーを取り出し、USB
ケーブルを抜いてください。発火ややけどの原因となります。(バッテリーを取り出す際やUSBケーブルを抜く際、やけ
どには十分ご注意ください)
カメ ラ を 水 中 に 落 としたり、内部に水または金属や異物などが入ったときは、ただちにバッテリーやUSBケーブルを外
してください。発熱・発火の原因となります。
引火性の高いガスが充満している場所や、ガソリン・ベンジン・シンナーなどの近くでカメラを使用しないでください。爆
発や発火・やけどの原因となります。
バッテリーの分解、加熱、火中への投入、充電、ショート 、落としたり、衝撃を加えないでください。破裂の原因となります。
指定以外のバッテリーを使わないでください。発熱・発火の原因となります。
バッテリーは乳幼児の手の届かないところに置いてください。乳幼児が誤って飲み込む原因となります。万一飲み込ん
だ場合には、ただちに医師の診察を受けてください。
指定以外のバッテリーを使用しないでください。また、表示された電源電圧以外の電圧で使用しないでください。発熱・
発火の原因となります。
注 意
絶対に分解しないでください。けがの原因となることがあります。
故 障した 場 合 は 、絶対に自分で修理しようとせずに、お買い上げ店にご相談ください。
落下などにより内部が露出したときは、絶対に触れないでください。けがの原因となることがあります。
フィル ムドア内部の部品、突起物には触れないで下さい。けがや故障の原因となることがあります。
カメラ を ぬ れ た 手 で 触 ら な い でくだ さ い 。感電の原因となることがあります。
バッテリー の CDを誤って装てんしないようにご注 意くださ い 。バッテリーの破裂、液もれにより、発火、けがや周囲を
汚損する原因となることがあります。
旅行などで長期間、カメラをご使用にならないときは、バッテリーやUSBケーブルを外してください。火災の原因とな
ることがあります。
USBケーブルを接続したままカメラを移動しないでください。USBケーブルが傷つき、火災・感電の原因となること
があります。
小さいお子様の手の届くところに置かないでください。けがの原因になることがあります。
本製品を布や布団でおおったりしないでください。熱がこもりケースが変形し、火災の原因になることがあります。
カメラ を 使 用 す るとき は 、必ずバッテリーカバーを閉じてください。バッテリーカ バ ー が 開 い て いると、けがの原因とな
ることがあります。
33
JP
このマークは、安全性、衛生、環境及び消費者保護に関するEU(欧州連合)の要求事項を、製品が満足して
いることを証明するものです。(CEとはヨーロッパ認定(ConformitéEuropéenne)の略)
取扱上のお願い
カメラの取り扱い
1カメラは精密機械ですから、水にぬらしたり、落としたりしてショックを 与 え な い でくだ さ い 。また、砂の掛かりやすいとこ
ろには置かないでください。
2市販のストラップをご使用になる場合は、ストラップの強度をご確認の上、ご使用ください。携帯電話、PHS用ストラップ
は軽量機器用ですので、ご使用の際は特にご注意ください。
3三脚を使用するときは、三脚の強度をご確認の上、カメラ本体ではなく三脚の方を回して取り付けてください。三脚を取
り付ける際は、三脚のねじを回しすぎたり、無理な力を加えないようご注意ください。また、カメラを三脚に取り付けたま
ま持ち運ばないでください。けがをしたり、カメラを破損 する恐れがあります。
4長期間お使いにならないときは、バッテリーを取り出して、湿気、熱、ほこりの影響の少ないところに保管してください。
5汚れをふき取るのにシンナー、アルコールなどの溶剤は使用しないでください。
6フィルム室に汚れやほこりがあると、プリントの仕上がりに影響します。フィルム室に汚れやほこりがつかないようにご注
意ください。
7閉めきった自動車の中や、高温の場所、湿気のある場所、海岸などに長時間放置しないでください。
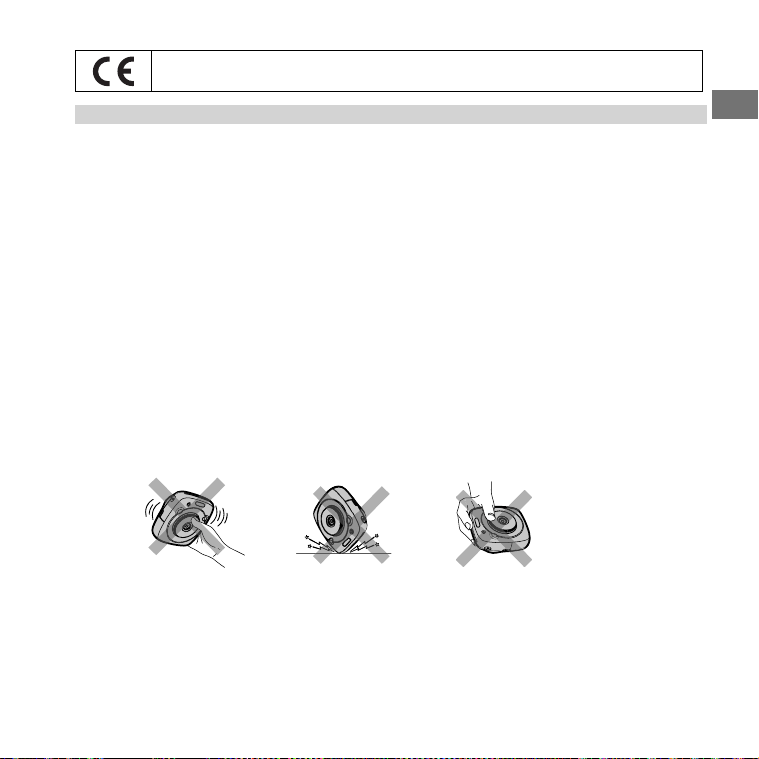
8ナフタリンなど防虫剤のガスは、カメラにもフィルムにも有 害ですから、たんすなどへの収納は避けてください。
9このカメラはマイクロコンピューターによって制御されているため、ごくまれにカメラが誤作動する場合があります。この
ようなときは、電池をいったん取り出し、しばらくしてから再度入れ直して下さい 。
0このカメラの使用温度範囲は+5℃から+40℃です。
-プリントされる場合は、著作権、肖像権、プライバシーなどの他人の権利を侵害したり、公序良俗に反したりしないように
十分ご配慮ください。他人の権利を侵害する行為、公序良俗に反する行為や迷惑行為は、法令による処罰の対象や損害
賠償請求の対象となります。
印刷中の注意事項
34
JP
フィルム、プリントの取り扱い
フィルム 、写真の取り扱いかたについては、富士フイルムインスタントフィルムinstaxSQUAREの取扱説明を参照して
ください 。
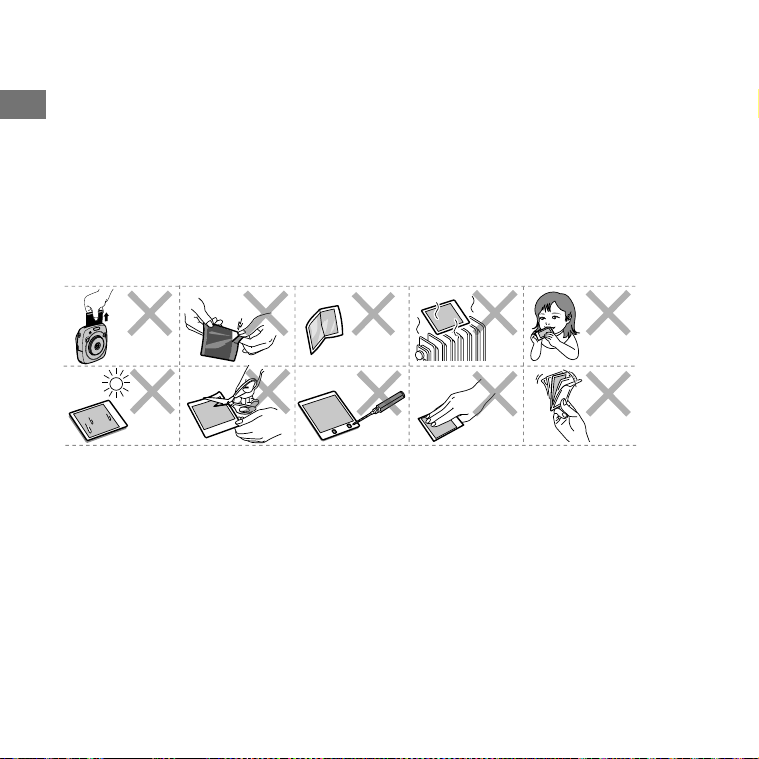
1フィルムは、涼しい乾燥した場所に保管してください。特に閉め切った自動車の中などの極端に高温の場所に長時間放置
しないでください。
2カメラに入れたフィルムは、できるだけ早くプリントしてくださ い 。
3
フィルムを極端に温度の低い場所や高い場所に置いてしまった場合は、通常の温度になじんでからプリントしてくださ い 。
4フィルムは有効期限内にお使いください。
5空港の預け入れ荷物検査などでの強いX線照射を避けてください。未使用のフィルムにカブリなどの影響が出る場合が
あります。手荷物としての機内持ち込みをおすすめします(詳しくは各空港でご確認ください)。
6プリントは強い光を避け、涼しく乾燥した場 所に保 存してください。
7フィルムに穴をあけたり、破いたり、切ったりしないでください。フィルムが損傷した場合は、使用しないでください。
フィルムや出来上がった写真を取り扱うときの注意
詳細は、富士フイルムインスタントフィルムinstaxSQUAREの取扱説明を参照してください。
35
JP
バッテリーの取り扱いについて
●製品の安全性には十分配慮しておりますが、下記の内容をよくお読みの上、正しくご使用ください。
警 告
注 意
この表示を無視して誤った取り扱いをすると、人が死亡また
は重傷を負う可能性が想定される内容を示しています。
この表示を無視して誤った取り扱いをすると、人が傷害を
負う可能性が想定される内容または、物的損害の発生が
想定される内容を示しています。
警 告
禁止
指定外の方法でバッテリーを使用しない。
バッテリー は極 性(
CD
)表示どおりに入れてください。
禁止
バッテリーを分解、加工、加熱しない。/バッテリーを落としたり、衝撃を加えない。/バッテリーをショートさせない。/
バッテリーを金属製品と一緒に保管しない。/バッテリーを指定以外の充電器で充電しない。/バッテリーを火気に近
づけたり火の中に入れたりしない。/バッテリーを水にぬらさない。
バッテリーの破裂・液漏れにより、火災・けがの原因になります。
禁止
表示された電源電圧以外の電圧で使用しない。
火災の原因になります。
禁止
バッテリーの液が漏れて、目に入ったり、皮膚や衣服に付着したときは、失明やけがの恐れがあるので、ただちにき
れいな水で洗い流し、すぐに医師の治療を受ける。
強制
バッテリーが正しく交換されていないと、爆発の危険があります。交換には指定されているバッテリーだけを使用し
てください。
強制
使用済みのバッテリーを廃棄する場合は、以下のようにする。
• 端子部にセロハンテープなどの絶縁テープをはってから廃棄してください。他の金属や電池と混じると発火、破
裂の原因になります。
注 意
強制
お手入れの際や長時間使用しないときは、バッテリーを外す。
火災・感電の原因になることがあります。
強制
異常が起きたら電源を切り、バッテリーを外す。
煙が出ている、異臭がするなど異常状態のまま使用すると、火災・感電の原因になります。
• お買上げ店にご相談ください。
電源についてのご注意
バッテリーを上手に長くお使いいただくため、下記をお読みください。使い方を誤ると、バッテリーの寿命が短くなるばかり
か、液漏れ、発熱・発火の恐れがあります。
※バッテリーは出荷時にはフル充電されていません。お使いになる前に必ず充電してください。
※バッテリーを持ち運ぶときは、カメラに取り付けるか、ソフトケースに入れてください。

36
JP
■バッテリーの特性
• バッテリーは使わなくても、少しずつ放電しています。カメラを使用する直前(1〜2日前)に充 電したバッテリーを用 意し
てください。
• バッテリーを長く持たせるには、できるだけこまめに電源を切ることをおすすめします。
•
寒冷地や低温時ではプリントできる枚数が少なくなります。充電済みの予備バッテリーをご用意ください。また、使用時間を
長くするために、バッテリー を ポケットなどに入れて温かくしておき、
カメラを使 用する
直前にカメラに取り付けてください。
カイロをお使いになる場合は、直接バッテリーに触れないようにご注意ください。
■充電について
• 付属のUSBケーブルを使用して充電できます。
- 充電は周囲の温度が+5℃〜+40℃の範囲で可能です。この範囲外では充電できないことがあります。
- +10℃〜+35℃の温度範囲外で充電する場合、バッテリーの性能を劣化させないために充電時間が長くなることが
あります。充電は+10℃〜+35℃の温度範囲で行ってください。
• 充電式リチウムイオンバッテリーは充電の前に放電したり、使い切ったりする必要はありません。
• 充電が終わったあとや使用直後に、バッテリーが熱を持つことがありますが、異常ではありません。
• 充電が完了したバッテリーを再充電しないでください。
■バッテリーの寿命について
常温で使用した場合、約300回繰り返して使えます。使用できる時間が著しく短くなったときは、バッテリーの寿命です。新
しいバッテリーをお買い求めください。
■保存上のご注意
• 充電された状態で長期間保存すると、特性が劣化することがあります。しばらく使わない場合は、使い切った状態で保存
してください。
• 使用しないときは必ずバッテリーをカメラから取り外してください。
•
涼しいところで保 存してください。
-
周囲の温度が+15℃〜+25℃くらいの乾燥したところをおすすめします。
- 暑いところや極端に寒いところは避けてください。
■使用上のご注意
• バッテリーにラベルなどをはらないでください。
カメラ
から取り出せなくなることがあります。
• 外装ラベルを破ったり、はがしたりしないでください。
• 端子は常にきれいにしておいてください。
•
長時間高温の場所に置かないでください。また、長時間使用していると、カメラ本体やバッテリーが熱を帯びますが、故障
ではありません。
■小形充電式電池のリサイクルについて
小形充電式電池(リチウムイオンバッテリーまたはニッケル水素電池など)はリサイクル可能な貴重な資源
です。ご使用済みの電池は、端子を絶縁するためにセロハンテープなどをはるか、個別にポリ袋に入れて最
寄りのリサイクル協力店にある充電式電池回収BOXに入れてください。詳細は、「一般社団法人JBRC」
のホームページをご参照ください。http://www.jbrc.net/hp/contents/jbrc/index.html
■本製品が取得している認証関連のマークは、フィルムパック室内に表示されています。

37
JP
アフターサービスについて
お手持ちの製品が故障した場合には、次の要領で修理させていただきます。
ご購入店または富士フイルムフィルムカメラお客さま相談窓口にお申し出ください。
それ以外の責は、ご容赦いただきます。なお、保証、使い方などのご不明な点につきましても、
富士フイルムフィルムカメラお客さま相談窓口をご利用ください。
●無料修理
故障した製品についてはご購入年月日、購入店名の記入された、ご購入日より 1年以内の保証書が添付されて
いる場合には、保証書に記載されている内容の範囲内で、無料修理させていただきます。
*詳しくは、製品保証規定をご覧ください。
●有料修理
保証期間を過ぎた修理は、原則として有料となります。保証期間内であっても、製品保証規定の「2.」の場合は
すべて有料となります。また運賃諸掛かりは、お客様にてご負担願います。
●修理不能
浸(冠)水、強度の衝撃、その他で損傷がひどく、故障前の性能に復元できないと思われるもの、および部品の
手当が困難なものなどは修理できない場合もありますので、富士フイルムフィルムカメラお客さま相談窓口に
お問い合わせください。
●修理部品の保有期間
この製品の補修用部品は、製造打ち切り後 5 年を目安に保有しておりますので、この期間中は原則として修理を
お引き受けいたします。
●修理ご依頼に際してのご注意
1.保証規定による修理をお申し出になる場合には、必ず保証書を添えてください。
2.ご購入店や弊社サービスステーションで、ご指定の修理箇所、故障内容を詳しくご説明ください。故障の状態に
よっては、事故となったフィルムなどを添えてくださると修理作業の参考になります。
3.修理箇所のご指定がないときは、弊社では各部点検をはじめ品質、性能上必要と思われるすべての箇所を修理し
ますので、料金が高くなることがあります。
4.修理に関係のない付属品類は、紛失などの事故を避けるため、修理品から取り外してお手もとに保管してくださ
い。
5.修理のために製品を郵送される場合は、ご購入時の外箱などに入れてしっかり包装し、必ず書留小包でお送りく
ださい。
6.修理期間は故障内容により多少違いますが、普通修理品の場合は弊社サービスステーションで、お預かりしてか
ら通常 7〜10日位をご予定ください。
●海外旅行中の故障
本製品の保証書は国内に限り有効です。万一、海外旅行中に故障や不具合が生じた場合は、帰国された後、
富士フイルムフィルムカメラお客さま相談窓口にお問い合わせください。

38
JP
MEMO
39
EN
ENGLISH
Contents
After reading this User’s Guide, keep it in a safe, easy to
nd place where you can refer to it if needed.
Before Use ................................................40
Part Names ..............................................41
Display on the LCD Monitor ..............42
Using the selector buttons ............................42
Using the command dial ................................42
Attaching the Strap ..............................43
Attaching the Hand Strap ..............................43
Attaching the Shoulder Strap
(Purchased Separately) ..................................43
Inserting/Charging the Battery ........44
Inserting the Battery ........................................44
Charging the Battery .......................................44
Charging status indication ............................44
Turning the Camera on/o ................45
Checking Remaining Battery Life................45
Performing Initial Settings .................46
Function Setting for the Shutter Button...47
Loading/Removing the INSTAX
SQUARE Film Pack .................................48
Loading the Film Pack .....................................48
Unloading a Used Film Pack .........................48
Print Mode ...............................................49
Basic Photography and Playback ....50
Taking a Picture .................................................50
Viewing Images .................................................51
Changing the Playback Display ...................51
Printing .....................................................52
Image E ects ..........................................53
Filter ....................................................................... 53
Adjusting the Brightness ...............................54
Vignette ................................................................ 54
More on Photography .........................55
Using AF/AE Lock ..............................................55
Using the Self Timer .........................................55
Using the Flash ..................................................56
Changing the Shooting Mode .........57
Selecting a Shooting Mode ...........................57
Printing from Print History
(Reprint)...................................................58
Using a Memory Card ..........................59
Inserting the Memory Card ...........................59
Printing Images Taken with
another Camera.................................................59
Menus .......................................................60
Shooting Menu ..................................................60
Playback Menu ..................................................61
Setup Menu ........................................................62
SPECIFICATIONS ....................................63
TROUBLE SHOOTING ...........................65
IMPORTANT SAFETY NOTICE ............68
Handling the Battery ...........................72
40
EN
Before Use
Before using the camera, check the following.
!
Make sure supplied accessories are
included in the package.
Read "IMPORTANT SAFETY NOTICE"
(Page 68) and "Handling the
Battery" (Page 72) for safety use.
~
Ÿ
Read this User's Guide before
using the camera.
!
Supplied Accessories
• NP-50 rechargeable battery (1)
• USB cable for charging (1)
• Hand strap (1)
• Strap rings (2)
• Clip attaching tool (1)
• User's Guide (1)
41
EN
Part Names
Front Rear
1
Flash
7
USB port for charging
2
Film ejection slot
8
Micro SD card slot
3
AF-assist illuminator/
Self timer lamp
9
Tripod socket (Tripod
sold separately)
4
Strap eyelet (s)
10
Lens
5
Shutter button (Right)
11
Lens ring
(Power switch)
6
Card slot cover
12
Shutter button (Left)
1
Film door lock
9
Selector button/
Command dial
2
Strap eyelet (s)
10
(Playback) button
3
Print mode selector
11
(Back) button
4
Battery-chamber cover
12
(Print) button
5
Battery latch
13
MENU/OK button
6
Battery chamber
14
(Brightness) button
7
(Filter) button
15
Film door
8
(Vignette) button
16
LCD Monitor
1
12
11
3 2
7
8
9
10
4
5
6
1
4
3
2
10
8
9
11 12
13
16
14
7
15
6
5
42
EN
Display on the LCD Monitor
Shooting
Playback
1
Flash mode
(Page 56)
7
Print mode
(Page 49)
2
Brightness adjustment
(Page 54)
8
Current date/time
(Page 62)
3
Filter
(Page 53)
9
Battery level
(Page 45)
4
Vignette
(Page 54)
10
Number of available
frames
*3
(Page 50)
5
Date/time print
setting
*1
(Page 62)
11
Film remaining
(Page 52)
6
Shooting mode
*2
(Page 57)
1
Frame number
2
Shooting date/time
*1 The icon is displayed in gray when the date/time print
setting is disabled.
*2 Not displayed when
STANDARD
is selected.
*3 When a memory card is inserted, the
icon appears
on the number.
If the number of available frames is under 10, the icon
on the number turns red.
Using the selector buttons
1
6Move cursor up
2
8Move cursor left
3
7Move cursor down
4
9Move cursor right
5
Confirms selection
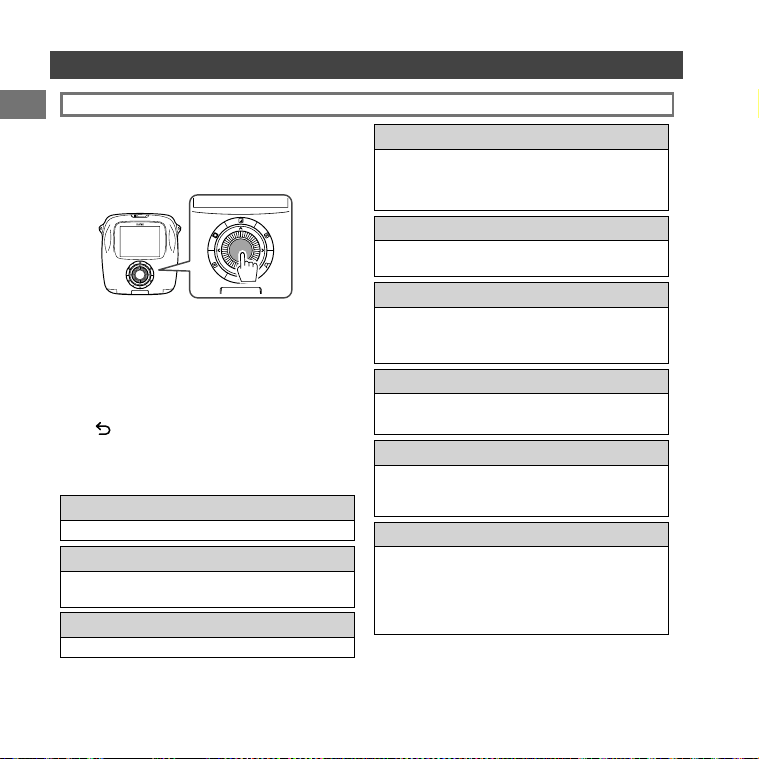
Using the command dial
Use the command dial on the following
occasions.
• Selecting a menu or item
• Changing playback display
(Page 51)
• Adjusting the value of image effect
(Pages 53 and 54)
Pressing the (Back) button displays information below.
9
5
10
24
7
1
3
11
1
2
5
1
3
2
4
6
8
43
EN
Attaching the Strap
Attaching the Hand Strap
~
Attaching the Shoulder Strap
(Purchased Separately)
Ÿ
!
⁄
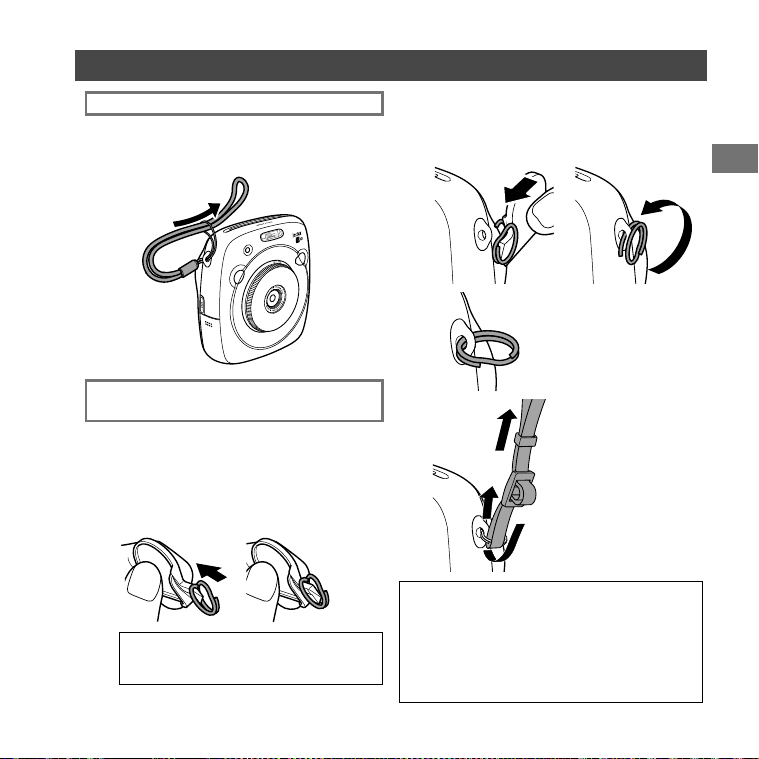
Attach the strap as illustrated below.
• When you carry or use the camera, put the strap around
your wrist so that the camera does not drop.
Attach the strap clips to the camera, then attach the
shoulder strap.
Open a strap clip.
Use the clip attaching tool to open a strap clip as
shown.
Keep the tool in a safe place. You will need it to
open the strap clips when removing the shoulder
strap.
Place the shoulder strap clip on each
strap eyelet.
Hook the strap eyelet in the clip opening. Remove the
tool using the other hand to keep the clip in place.
Pass the clip through
each strap eyelet.
Rotate the clip fully through the
eyelet until it clicks closed.
Pass the shoulder
strap through each
clip.
Caution
• Use the strap only as a shoulder strap. Do not put the
shoulder strap around your neck.
• Be careful so that the shoulder strap does not obstruct
the film ejection slot.
• Strap eyelets may become worn or color may become
faded as you are attaching the shoulder strap.
44
EN
Inserting/Charging the Battery
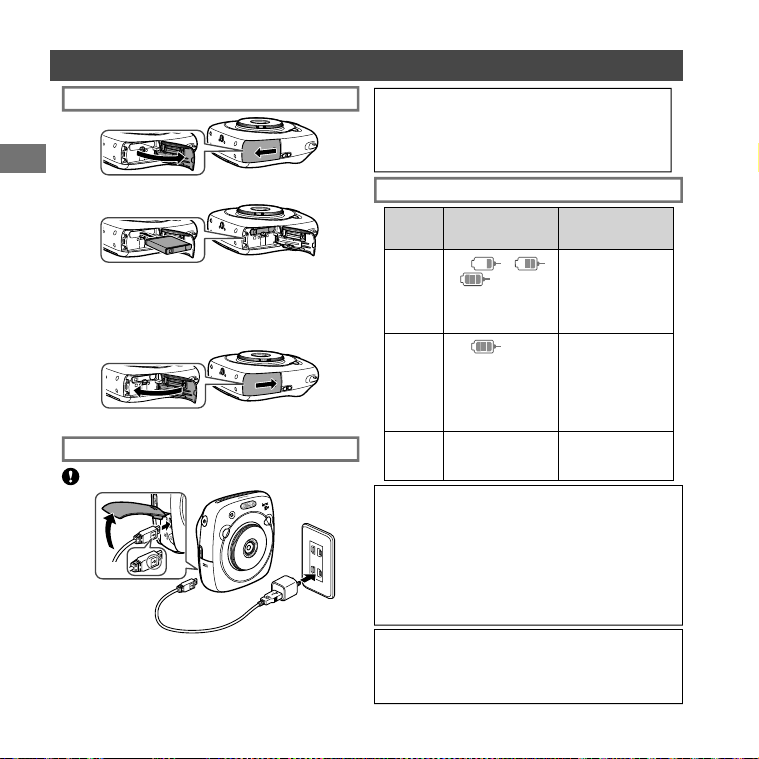
Slide the battery cover to open.
Insert the battery according to the arrow on it.
Make sure the yellow line on the battery aligns with
the mark on the camera.
• To remove the battery, press the battery latch to
the side, and slide the battery out of the camera.
~
Ÿ
!
Close the battery cover.
Caution
• The battery is not charged fully at shipment. Be sure to
charge it before using the camera.
• Read the cautions in “Handling the battery“. (Page 72)
Inserting the Battery
Charging the Battery
Connect the camera and an AC power adapter supplied
with your smartphone using the supplied USB cable, then
connect the AC power adapter to an indoor power outlet.
• Use an AC adapter to meet the rated output below:
DC 5.0 V/1000 mA
• You can take a picture or print an image while
charging is in progress.
• Charging time is approximately three to four hours.
Charging from a PC:
• Connect the camera and PC directly. Do not connect
them via a keyboard or USB hub.
• If the PC enters the sleep mode while charging is in
progress, charging will stop. If you continue charging,
resume the PC and reconnect the USB cable.
• You may not be able to charge the camera from a PC
depending on your PC specifications, settings, or status.
Charging status indication
Status
While camera
is on
While camera
is o
While
charging
The (
->
-> ) icon
appears on the lower
right of the LCD
monitor.
AF illuminator/Self
timer lamp lights up.
Charging
finished
The (
) icon
appears on the lower
right of the LCD
monitor. (Goes off
when disconnecting
the USB cable.)
AF illuminator/Self
timer lamp goes off.
(The USB cable is
connected.)
Charging
error
An error message
appears on the LCD
monitor.
AF illuminator/Self
timer lamp flashes.
Be careful of the orientation.
45
EN
Turning the Camera on/o
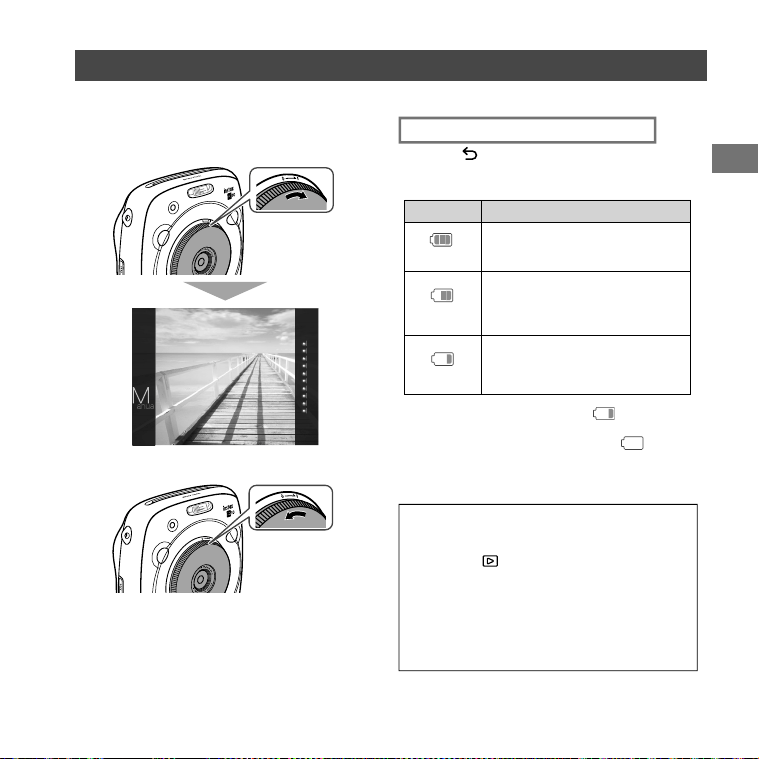
To turn the camera on, turn the lens ring (power switch) clockwise. To turn it off, turn the switch counterclockwise.
Checking Remaining Battery Life
Pressing the (Back) button on the shooting/playback
screen displays remaining battery life on the LCD
monitor.
• If no operation occurs for a certain period of time, the
camera turns off automatically. You can specify the
length of time before the camera turns off. (Page 62)
• Pressing the
(Playback) button displays the
playback screen and changes to the playback mode.
• Pressing the shutter button fully during the playback
mode displays the shooting screen and changes to the
shooting mode.
• Fingerprints and other marks on the lens can affect
pictures. Keep the lens clean.
The camera turns on and shooting screen
appears.
The camera turns off.
Indication Remaining battery life
)8//
Battery is partially discharged.
0,'
Battery is more than half discharged.
Charging the battery is recommended.
(Page 44)
/2:
Battery level is low. Charge as soon as
possible. (Page 44)
R When the battery level is low, the ( ) icon appears
on the lower right of the LCD monitor.
When no battery capacity remains, the (
(03
) icon
appears enlarged on the LCD monitor and the camera
turns off.
46
EN
Performing Initial Settings
The language, date, and time are not specified when the camera is turned on for the first time. Follow the procedure below
to specify them.
You can specify these settings at any time. See page 62 if you perform these settings later or
change them.
~
Ÿ
!
⁄
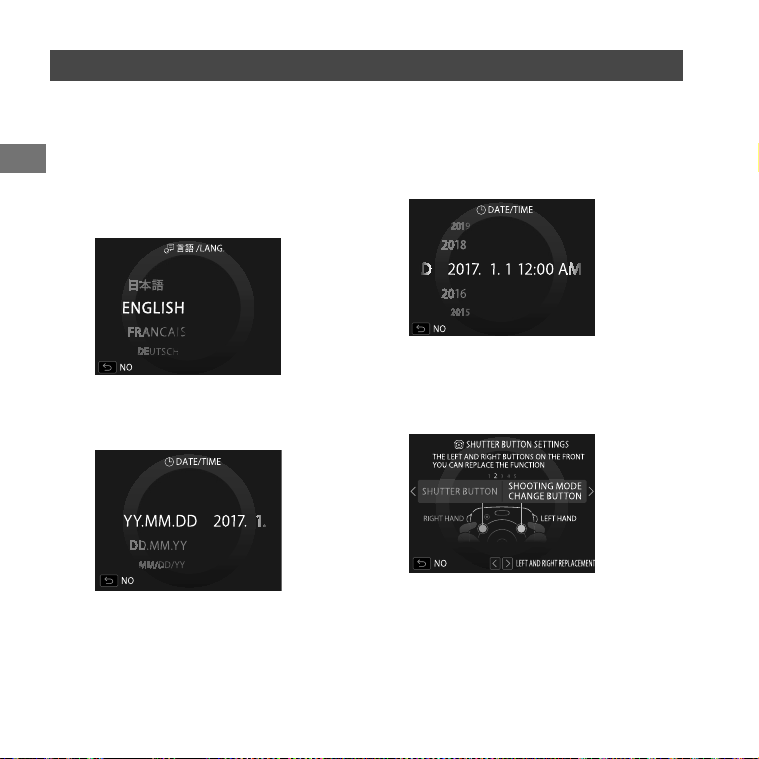
Turning the camera on displays the language
selection screen.
Select a language, then press the MENU/OK
button or
9
.
The language is specified and the DATE/TIME
screen appears.
Specify the order, then press the MENU/OK
button or
9.
Select one of the orders below.
• year/month/day
• month/day/year
• day/month/year
The order is specified and the screen to specify the
year, month, day, hour, and minute appears.
Specify the year, month, day, hour, and minute,
then press the MENU/OK button or
9.
Use
89
to select an item (year, month, day,
hour, or minute) to specify, then use
67
to
set the value.
@
Specify the function of shutter buttons.
For details, see page 47.
¤
Press the MENU/OK button.
47
EN
• If you skip this procedure, press the (Back) button when each screen appears. The shooting screen appears.
• If the battery is removed for an extended period of time, the setting values may be cleared. In this case, the language
selection screen appears. Perform settings again.
Performing Initial Settings
Function Setting for the Shutter Button
Assign a function to each of the shutter buttons from the combinations on the table below.
Shutter button (Right) Shutter button (Left)
Function
Shutter button Shutter button
Shutter button Shooting mode switching button
Shutter button OFF
Shooting mode switching button Shutter button
OFF Shutter button
By default, shutter button function is assigned to the right shutter button, and shooting mode switching function to the
left.
Use
89
to select the combination when the
SHUTTER BUTTON SETTINGS
screen is displayed, then press the MENU/
OK button.
48
EN
Loading/Removing the INSTAX SQUARE Film Pack
~
Ÿ
⁄
!
Unloading a Used Film Pack
~
Ÿ
Loading the Film Pack
Caution
Do not open the back cover until you have used
up the film; otherwise, the rest of the film is
exposed and turns white. The film can no longer
be used.
• When you load the film pack, never press the two
rectangular holes on the back of the film pack.
• Never use a film pack beyond its shelf life; otherwise, it
may damage the camera.
Use FUJIFILM Instant Film “instax SQUARE” only.
The instax mini film or instax WIDE film cannot be used.
Notes on the film pack
• Each FUJIFILM Instant Film “instax SQUARE” pack contains
1 black film protective cover and 10 film sheets.
• Do not remove the film pack from its inner bag before
loading it into the camera.
• The film cover is ejected automatically when the back
cover is closed.
For details, refer to the instructions and warnings on
FUJIFILM Instant Film "instax SQUARE".
Hold both sides of the
film pack, align the
bottom of the film pack
on the groove of the film
chamber (1), then insert
it straight (2).
Close the back cover.
Make sure the back cover
lock clicks into place.
The film cover (black) is
ejected automatically when
the back cover is closed.
Remove the film cover from
the film ejection slot.
When no film is left, all dots on the right of the shooting
screen are displayed in gray. (Page 52)
Unload the film pack.
Grasp the rectangular
holes on the film pack,
then pull it out straight.
2
1
1
2
1
2
Press and hold the button of the film door lock (1),
then slide the lever to the right (2) until the film
door opens slightly.
Press and hold the button of the film door lock (1),
then slide the lever to the right (2) until the film
door opens slightly.
49
EN
Print Mode
■ Auto Print Mode
Switch the print mode selector on the side to "AUTO".
Two print modes are available.
• Auto print mode
• Manual print mode (initial setting)
When the auto print mode is selected, printing starts immediately after the image is saved in the memory.
When the manual print mode is selected, the image is saved in the memory. You can select and print images later.
The image is saved in the memory. You can select and print
images later instead of printing them immediately.
Printing starts immediately after the image is saved in the
memory.
The icon below appears on the shooting screen.
■ Manual Print Mode (initial setting)
Switch the print mode selector on the side to “MANUAL”.
The icon below appears on the shooting screen.
50
EN
Basic Photography and Playback
Taking a Picture
This section describes basic operation for photography.
~
Turn the lens ring (power switch) clockwise to turn
the camera on.
Ÿ
⁄
!
Hold the camera and confirm the desired
composition of the final image.
Press the shutter button halfway to focus.
• If the camera is able to focus:
The camera beeps and the green focus frame
appears on the monitor.
• If the camera is unable to focus:
The red focus frame appears on the monitor.
Change the composition or use focus lock. (Page
55)
Lightly press the shutter button the rest of the way
down to take the picture.
The picture is taken and it is saved in the camera’s
memory.
• If the print mode is set to auto print mode, the
image will be printed. (Page 49)
• When you take a picture, hold the camera with both
hands and brace your elbows against your sides.
• Be careful not to touch the lens surface when you
press the shutter button.
• When you press the shutter button fully, press it
lightly.
• Be careful that your fingers or the strap do not cover
the flash, lens, or film ejection slot.
• If a subject is poorly lit, the flash may fire when the
picture is taken. You can change the flash setting to
disable flashing. (Page 56)
Select the shooting mode or perform the steps to
select your image effects. (Pages 53 to 57)
@
Cautions on the camera’s memory
• When the memory becomes full, the shutter will not
release and you cannot take a picture. Delete the
images in the memory or use another memory card.
• You can save up to 50 images in the memory. 1000
images per 1 gygabyte can be saved if you use a
memory card.
• Images in the memory may be damaged or lost if the
camera has any trouble. We recommend you store
important image files as backup using other media
(e.g. Hard disk, CD-R, CD-RW, or DVD-R, etc.).
• If you ask for repair, we do not guarantee the safety of
images in the memory.
• While the camera is being repaired, note that we may
check the contents of images in the memory.

51
EN
Basic Photography and Playback
Viewing Images
Images can be viewed on the monitor. Take a test shot and
check the results before printing a picture.
~
Press the (Playback) button.
Ÿ
Press
8
or
9
to select an image to view.
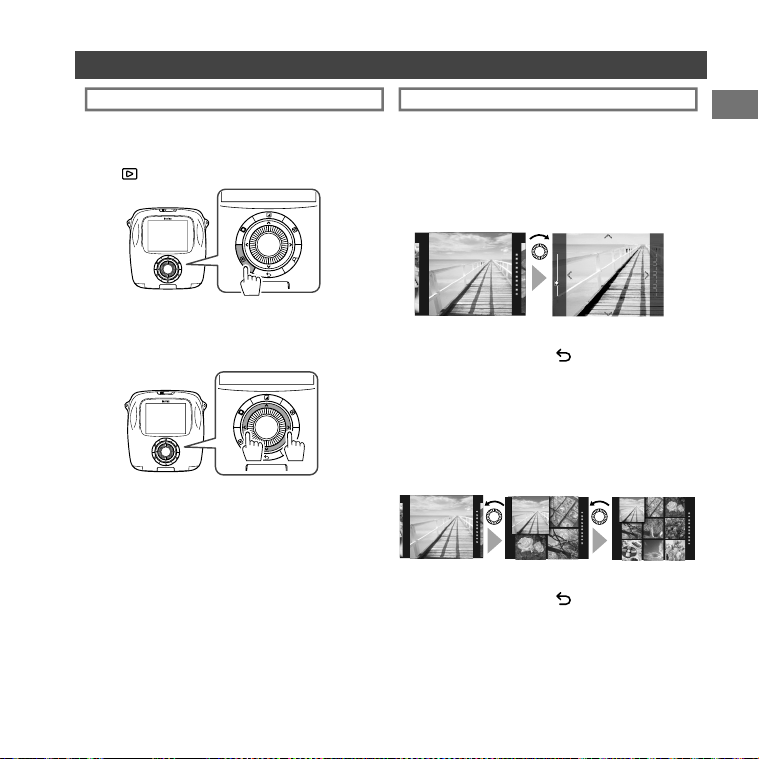
Changing the Playback Display
You can zoom in on the image on the monitor or change
the number of images displayed at a time.
■ Zooming in on image
You can zoom in on an image on the monitor by turning
the command dial clockwise.
• Use
6789
buttons to move the view area.
• Pressing the MENU/OK button or
(Back) button
cancels zooming.
• You can print an image while it is zoomed in. (Page
52)
■ Changing the number of images on the
monitor
You can change the number of images on the monitor
displayed at a time. Turning the command dial
counterclockwise changes the number of images (one,
four, or nine).
• Turning the command dial clockwise changes the
number of images (four or one).
• Pressing the MENU/OK button or
(Back) button
cancels the multiple image display.
• You can print an image while four or nine images are
displayed. (Page 52)
Normal Zoom
One image Four images Nine images
The most recent image will be displayed.
Pressing
8
displays a previous image.
Pressing
9
displays a next image.
• Pressing the shutter button fully returns to the
shooting screen.
52
EN
Printing
Print an image following the steps below.
• When the auto print mode is selected, the image will be
printed immediately after it is taken. (Page 49)
~
Ÿ
⁄
!
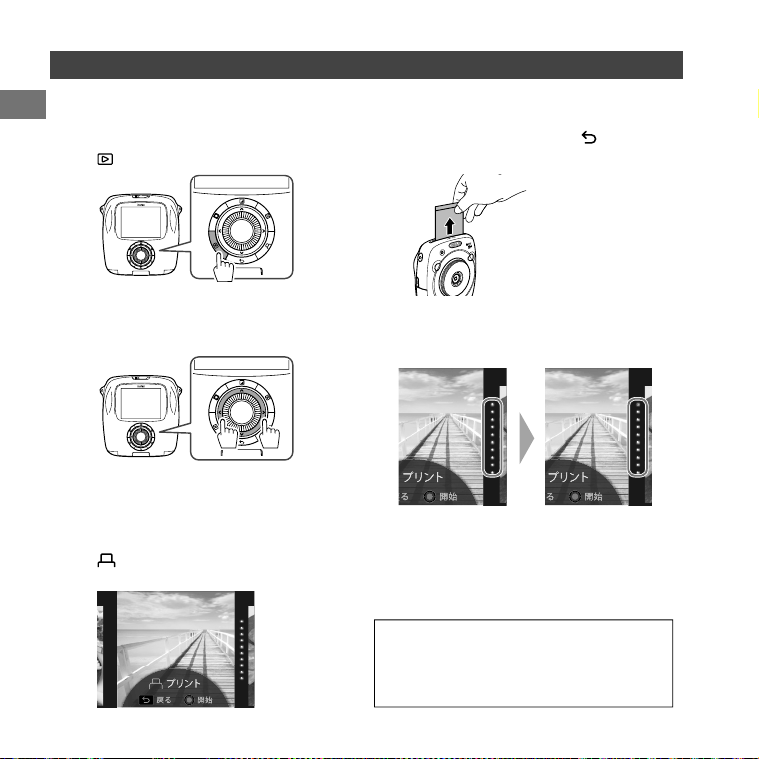
Press the (Print) button.
The screen below appears.
@
Press the MENU/OK button.
Printing starts.
• To cancel printing press the
(Back) button.
¤
Adjust the image effect as necessary.
(Pages 53 and 54)
■ Film remaining indication
Dots on the right of the monitor indicates the number
of remaining films.
One dot turns gray every time you print an image.
• When there are only two films left, dots turns
red.
When the film has been
ejected (the camera stops
making a sound), grab the
edges of the film, then take
it out.
R You can print an image that is zoomed in or print four
or nine images on one film. Use the command dial to
change to the multiple image display on step 2 when
the image to print is displayed. (Page 51)
• For details on taking out the film, refer to the instructions and
warnings on the FUJIFILM Instant Film “instax SQUARE” pack.
• The development time is approximately 90 seconds. (The
time varies depending on the ambient temperature.)
Press the (Playback) button.
The most recent image will be displayed.
Press
8
or
9
to select an image to view.
Pressing
8
displays a previous image.
Pressing
9
displays a next image.
53
EN
Filter
Image E ects
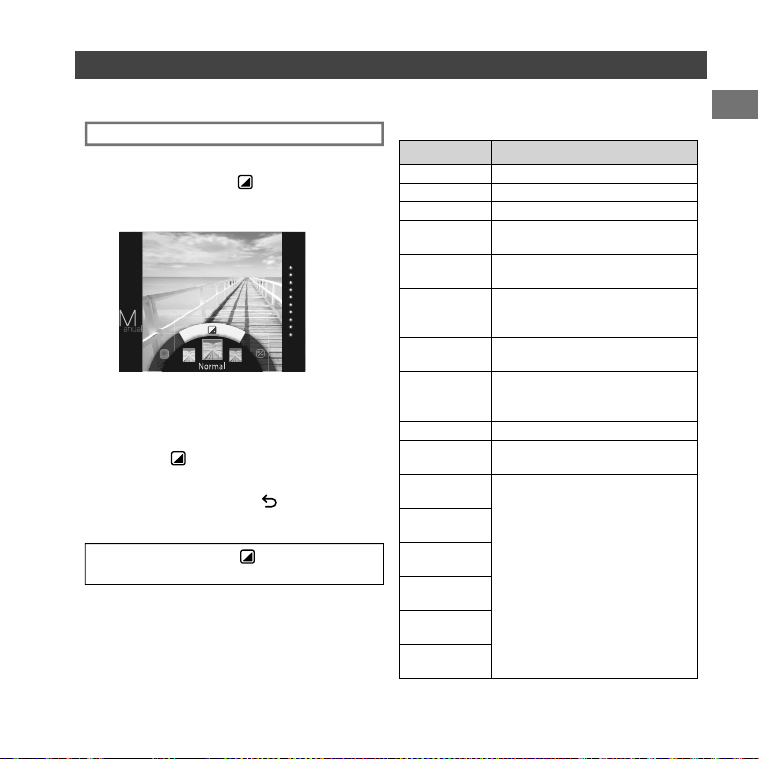
~
Press the (Filter) button while shooting/playback
screen is displayed.
The screen below appears.
Ÿ
Use the command dial to select a filter.
For details on each filter see the table on the right.
!
Press the (Filter) button again.
The filter effect is applied to the image and returns
to the previous screen.
• You can also return to the previous screen by
pressing the MENU/OK button or
(back)
button.
• To cancel the filter effect, press and hold the (Filter)
button.
Follow the steps below to select a filter.
■ Filter e ects you can use
Type Details
Cornelius Intensifies shadows and brightens
highlights to the image.
Monochrome Turns your image into basic
monochrome.
Luna Brightens the image and intensifies
all colors.
Immerse
Adds saturation and shadows.
Amber Adds saturation and shadows.
Marmalade Adds a strong red tint and a burnt
edge to the image.
Martini Smooths skin tones with a slight
vintage feel.
Sepia Strong taste of old school
Roppongi Adds brightness and warmth to the
image.
Highline Intensifies shadows with yellow tint.
PARTIAL COLOR
(RED)
Areas of the image that are the
selected color are recorded in that
color. All other areas of the image are
recorded in black-and-white.
PARTIAL COLOR
(ORANGE)
PARTIAL COLOR
(YELLOW)
PARTIAL COLOR
(GREEN)
PARTIAL COLOR
(BLUE)
PARTIAL COLOR
(PURPLE)
You can select an effect menu directly by pressing a button on the rear to adjust the image effect while the shooting/
playback screen is displayed.
54
EN
Image E ects
Adjusting the Brightness Vignette
~
Ÿ
!
~
Ÿ
!
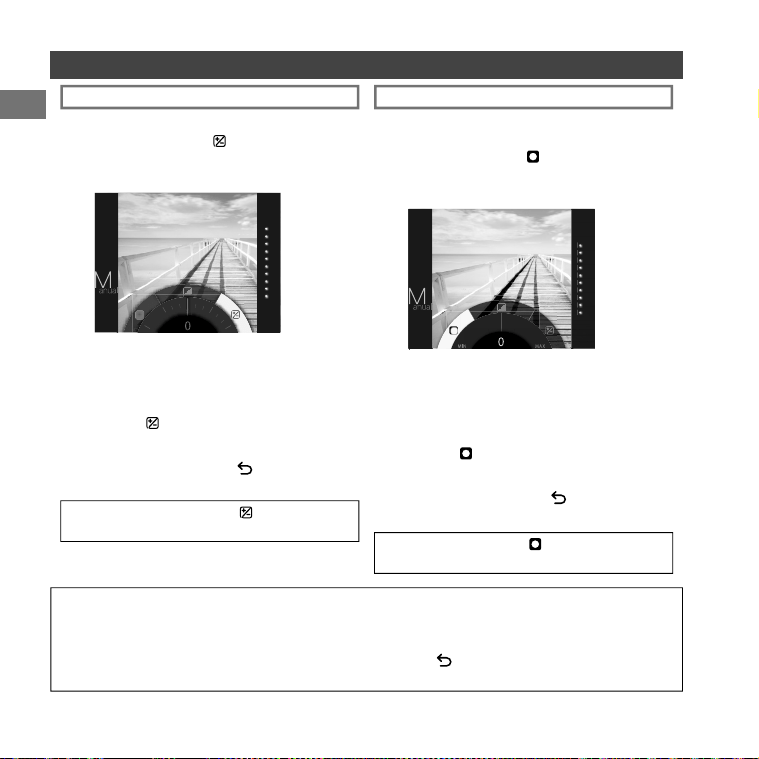
Follow the steps below to adjust the brightness.
Press the
(Brightness) button while shooting/
playback screen is displayed.
The screen below appears.
Use the command dial to adjust the brightness.
Turn the command dial clockwise to brighten the
image, and turn the dial counterclockwise to darken
it.
Press the
(Brightness) button again.
The adjusted brightness is applied to the image and
returns to the previous screen.
• You can also return to the previous screen by
pressing the MENU/OK button or
(back)
button.
• To cancel the adjusted brightness, press and hold the
(Brightness) button.
Adjust the brightness of four corners on the image. Follow
the steps below to adjust the brightness.
Press the
(Vignette) button while shooting/
playback screen is displayed.
The screen below appears.
Use the command dial to adjust the brightness of
the four corners.
Turn the command dial clockwise to darken the
corners, and turn the dial counterclockwise to
brighten them.
Press the
(Vignette) button again.
The adjusted brightness is applied to the image and
returns to the previous screen.
• You can also return to the previous screen by
pressing the MENU/OK button or
(back)
button.
• To cancel the adjusted brightness, press and hold the
(Vignette) button.
Notes on image effects:
• Each adjusted value or effect remains after you take a picture. However, it will be disabled when you view the image on a
device (e.g. computer) other than this camera.
• You can apply multiple effects to one image.
• Press and hold the
(Back) button to cancel all adjusted values or effects.
• Depending on the subject or camera settings, images may (in some cases) be grainy or vary in brightness and hue.
55
EN
More on Photography
Using AF/AE Lock Using the Self Timer
Use "AF/AE lock" to lock focus/exposure by pressing the
shutter button halfway. AF/AE lock is useful when you take
a picture with off-center subjects.
~
Ÿ
!
Position the subject to focus on the center, then
press the shutter button halfway.
Decide the composition with the shutter button
pressed halfway.
Press the shutter button all of the way down to take
the picture.
Use the self timer to include a photographer in a group
photo or to reduce blur when the shutter button is pressed.
~
Ÿ
!
Press the MENU/OK button on the shooting
screen.
Select
SELF-TIMER
, then press the MENU/OK
button.
The shooting menu appears.
Press the shutter button fully.
• When you select
10 SEC
:
When you press the shutter button, the AF-assist
illuminator/Self timer lamp lights up, and then it
flashes 3 seconds before shooting.
• When you select
2 SEC
:
When you press the shutter button, the AF-assist
illuminator/Self timer lamp flashes.
⁄
Select
10 SEC
or
2 SEC
, then press the MENU/OK
button.
• To cancel the self timer, press the (Back) button.
As the camera may be unable to focus on the
subjects listed below, we recommend you use AF/
AE lock.
• Very shiny subjects such as mirrors or car bodies
• Fast moving subjects
• Subjects photographed through a window or other
reflective object
• Dark subjects and subjects that absorb rather than
reflect light, such as hair or fur
• Insubstantial subjects, such as smoke or flame
• Subjects that show little contrast with the
background (e.g. subjects that are the same color as
the background)
• Subjects positioned in front of or behind a high-
contrast object that is also in the focus frame (e.g. a
subject photographed against a backdrop of highly
contrasting elements)
56
EN
More on Photography
Using the Flash
Use the flash when shooting at night or indoors under low light.
~
Ÿ
!
Press the shutter button to shoot.
⁄
Select the flash setting, then press the MENU/OK
button.
See the right column for details on each flash
setting.
■ Flash settings
Select one of the settings below.
•
AUTO FLASH
The flash fires automatically when the camera
recognizes it is dark. Recommended in most
situations.
•
FORCED FLASH
The flash always fires regardless of the brightness of
the subject. Use this setting for backlit subjects.
•
SUPPRESSED FLASH
The flash does not fire even when the subject is poorly
lit. Recommended when using a flash is prohibited.
We recommend you use a tripod when it is dark.
•
SLOW SYNCHRO
As the flash fires with slow shutter (slow synchro) in a
dark place, the background and subject in front of it
are photographed brightly.
Note that the picture may be overexposed if you use
this setting in a bright place.
•
RED EYE & SLOW
This setting minimizes "red-eye", which is caused
by the flash reflecting from the retinas of portrait
subjects when you use flash in a dark place.
When you select this setting, the flash fires several
times as a pre-flash to minimize red-eye.
Press the MENU/OK button on the shooting
screen.
The shooting menu appears.
Select
FLASH
, then press the MENU/OK button.
57
EN
67'
STANDARD
Select for normal photography.
The flash fires automatically when the camera recognizes
it is dark.
You can select a setting so that the flash does not fire.
(Page 56)
凴
BULB MODE
The shutter is kept open while the shutter button is
pressed. Use when shooting a night view. Using a table or
tripod is necessary.
• Adjust the time to press the shutter button according to
the brightness.
DOUBLE EXPOSURE
Press the shutter button twice to shoot two subjects in one
picture. After you shoot the first subject, shoot the second.
Follow the instructions on the monitor.
67'
STANDARD
凴
BULB MODE
DOUBLE EXPOSURE
Changing the Shooting Mode
Selecting a Shooting Mode Shooting Mode
Select a shooting mode according to the subject or purpose.
Follow the steps below to select a shooting mode.
~
Ÿ
!
Press the MENU/OK button on the shooting screen.
Select
SHOOTING MODE
, then press the MENU/OK
button or
9
.
The shooting menu screen appears.
Press the
(Back) button.
The LCD monitor returns to the shooting screen.
⁄
Select the shooting mode, then press the MENU/
OK button.
The changed setting is applied.
R When you use another shutter button to select a
shooting mode, the mode switches every time you press
the shutter button.
58
EN
Printing from Print History (Reprint)
Print an image with the same settings (e.g. image effect) as those specified when you printed the image in the past.
Follow the steps below for operation.
Ÿ
!
@
#
⁄
~
Press the (Playback) button.
The most recent image will be displayed.
Press the MENU/OK button.
The playback menu appears.
Select
PRINT HISTORY
, then press the MENU/OK
button.
The screen to select an image appears.
• The latest 50 print histories are stored in the
memory.
• If the print histories exceed 50, new print history
overwrites the oldest one.
Press
8
or
9
to select an image to print.
Pressing
8
displays a previous image.
Pressing
9
displays a next image.
• You can select a view with four or nine frames.
Press the MENU/OK button.
Printing starts.
• Press the
(Back) button to cancel printing.
When the film has been ejected (the camera stops
making a sound), grab the edges of the film, then
take it out.
• You cannot save the print history on a memory card.
• All print histories are deleted if you initialize the
memory. (Page 62)
• You cannot edit or apply effects on the images in the
print history.
Press the
(Print) button.
¤
59
EN
Using a Memory Card
Inserting the Memory Card
As shown below, slide in the memory card until it
clicks into place at the back of the slot.
Slide the card slot cover to open.
~
Ÿ
!
Close the card slot.
This camera can save approximately 50 images in the memory. However, using a memory card enables you to save more
images.
Caution on the memory card
• Micro SD/micro SDHC cards have been approved
for use in this camera. Using cards other than those
specified could damage the camera.
• Memory cards are small and can be swallowed; keep
out of reach of children. If a child swallows a memory
card, seek medical assistance immediately.
• Do not turn the camera off or remove the memory
card while the memory card is being formatted or
data are being recorded or deleted from the card.
Failure to observe this precaution could damage
the card.
• Avoid using or storing memory cards in an
environment where strong static electricity or electric
noise is generated.
• If you insert a memory card charged with static
electricity into the camera, it may cause malfunction.
In this case, turn the camera off and turn it on again.
• Do not put memory cards in a pocket; otherwise,
strong force will be applied and can cause damage.
• When you remove the memory card after using
the camera for a long time, the card may be warm.
However, this is not malfunction.
• Do not affix labels to memory cards. Peeling labels
can cause camera malfunction.
Caution when using the memory card
on computer
• Format memory cards before first use, and be sure
to reformat all memory cards after using them in a
computer or other device.
• Folders are created automatically if you use a memory
card formatted with the camera. Do not change the
folder/file name or delete a folder using a computer;
otherwise, you cannot use the memory card.
• Use the camera to delete image files.
• Edit an image file after copying or moving it to a hard
disk. Avoid editing an original image file.
R To remove the memory card, press it in and release it
slowly. The card can be removed by hand.
Caution
• When you remove the memory card, press it with
your finger and release the card gently; otherwise the
card could come out of the slot too quickly.
Printing Images Taken with another
Camera
You can print images taken with another camera by
inserting a memory card containing the images. However,
they should meet the conditions below.
• Copy images to print to the root directory instead of
copying them to a folder.
• The file name should consist of four capital letters (A to
Z) followed by four numeric characters.
60
EN
■ Items on the shooting menu
SHOOTING MODE
Select a shooting mode according to the purpose or
situation. (Page 57)
• You can also use a shutter button to which you assign
the shooting mode switch function on
SHUTTER
BUTTON SETTINGS
. Press the button repeatedly to
choose a shooting mode.
FLASH
Select a setting for flash photography. (Page 56)
SELF-TIMER
Select a setting when using the self timer. (Page 55)
AF ILLUMINATOR
If you select
ON
, the AF-assist illuminator lights up while
focusing to assist auto focus when it is dark.
Option:
ON
/
OFF
• The camera may be unable to focus using the AF-
assist illuminator in some cases.
• When you are close to the subject, the AF-assist
illuminator may not be as effective as you expect.
• Avoid shining the AF-assist illuminator directly into
your subject's eyes.
Menus
Follow the steps below to specify/change the shooting
menu.
~
Ÿ
!
Press the MENU/OK button on the shooting screen.
Select the setting item to change and change the
setting.
Shooting Menu
The menu screen appears.
Press the
(Back) button.
The LCD monitor returns to the shooting screen.
⁄
Press the MENU/OK button.
The changed setting is applied.
61
EN
Menus
■ Items on the playback menu
PRINT
Press the MENU/OK button to start printing. (Page 52)
PRINT HISTORY
Display up to 50 images you printed in the past.
Select an image, then press the
(Print) button to start
printing. (Page 58)
Pressing the MENU/OK button allows you to delete an
image in the print history one by one.
Playback Menu
ERASE
Delete an image one by one or delete all at one time.
Option:
FRAME
/
ALL FRAMES
IMAGE ROTATE
Rotate an image by 90 degrees.
Use the command dial for operation.
COPY
Copy images in the camera's memory to a memory card
and vice versa.
Follow the procedure below.
1 Press the MENU/OK button or
9
.
2 Select the destination, then press the MENU/OK
button or
9
.
3 Select
FRAME
or
ALL FRAMES
, then press the MENU/
OK button or
9
.
Copying starts if you select
ALL FRAMES
.
Proceed to step 4 if you select
FRAME
.
4 Select an image to copy, then press the MENU/OK
button or
9
.
AUTOROTATE PB
If you select
ON
, an image rotates on the playback
screen.
Option:
ON
/
OFF
Follow the steps below to specify/change the playback
menu.
~
Ÿ
!
Press the MENU/OK button on the playback screen.
Select the setting item to change and change the
setting.
The menu screen appears.
Press the
(Back) button.
The LCD monitor returns to the playback screen.
⁄
Press the MENU/OK button.
The changed setting is applied.
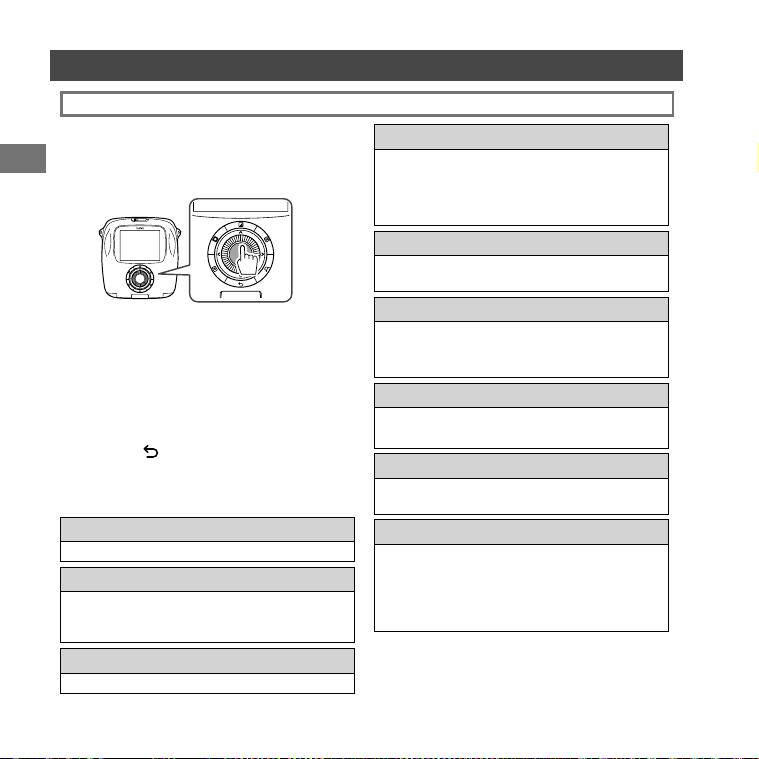
62
EN
Menus
■ Items on the setup menu
DATE/TIME
Specify date and time. (Page 46)
DATE STAMP
If you select
ON
, the date of recording is printed on the
lower right of the picture. The settings on
DATE/TIME
affect the order of year/month/day.
言語/LANG.
Specify the language displayed on the monitor.
Setup Menu
OPERATION VOL.
Adjust the volume of the operation, shutter, or startup
sound.
Option:
OFF
/
1
/
2
/
3
Select
OFF
to disable sounds.
SHUTTER BUTTON SETTINGS
Assign the function for the left/right shutter button.
(Page 47)
AUTO POWER OFF
Select the length of time before the camera turns off
automatically if no operations are performed.
Option:
5 MIN
/
2 MIN/OFF
RESET
Reset all settings to default values.
The date and time specified on
DATE/TIME
are not reset.
FORMAT
Initialize camera's memory or a memory card inserted in
the card slot. All saved images will be deleted.
FIRMWARE UPGRADE
Update the firmware.
Save the firmware on a memory card in advance, insert
it in the card slot, and then follow the instructions on
the monitor.
Download the latest firmware from our website.
Follow the steps below to specify/change the setup
menu.
~
Ÿ
!
Press the MENU/OK button on the shooting/
playback screen.
Select the setting item to change and change the
setting.
The menu screen appears.
Press the
(Back) button.
The LCD monitor returns to the shooting screen.
⁄
Press the MENU/OK button.
The changed setting is applied.

63
EN
SPECIFICATIONS
Camera
Image sensor 1/4-in., CMOS with primary color lter
E ective pixels 1920 x 1920
Storage media Built-in memory, microSD/microSDHC memory card
Recording capacity Built-in memory: Approx. 50 les
microSD/microSDHC memory card: Approx. 1000 les per 1 gigabyte
File system Compliant with Design Rule for Camera File System (DCF), Exif Ver.2.3, Com-
pliant with JPEG and PIM
Focal length Fixed as 28.5 mm (35-mm format equivalent)
Aperture F2.4
Auto focus system Single AF (Contrast-detect TTL, equipped with AF illuminator)
Focus range 10cm to ∞
Shutter speed 1/29500 sec. to 1/2 sec. (Auto), maximum 10 sec. in Bulb mode
Sensitivity ISO 100 to 1600 (Auto)
Exposure control Programmed AE
Metering 256-segment through the lens (TTL) metering, Multi metering
White balance Auto
Flash Auto/Compulsory ash/Suppressed ash/Slow synchro/Red-eye removal
E ective range: Approx. 50 cm to 8 m
Shooting mode Standard, Double exposure, Bulb mode
Self-timer Approx. 10 sec./Approx. 2 sec.
Image e ect 16 Filters, Brightness adjustment, Vignette
Playback function Trimming, Multi image playback

64
EN
SPECIFICATIONS
Printer
Film FUJIFILM Instant Film “instax SQUARE” (Purchased separately)
Photo capacity 10 prints/pack
Film size 86 mm x 72 mm
Image size 62 mm x 62 mm
Supported image size 800 x 800 dots
Printing solution 12.5 dots/mm (318 dpi, 80 μm dot pitch)
Printing levels 256 levels per color (RGB)
Supported image format JPEG (Some images saved with a photo editing/processing software may
not be displayed or printed.)
Printing time Approx. 12 seconds
Print timing Printing shortly after shooting/Printing after selecting image
Printing function Images on built-in memory/micro SD card
Reprint Printable up to the past 50 prints
(Up to 50 images stored in print history)
Digital zoom Up to 2.4 X in printing (Output pixels: 800 x 800)
Film detection Yes (Automatic ejection when inserted)
Others
LCD monitor 3.0-in. (7.6 cm) TFT color LCD monitor
Pixels: Approx. 460k-dots
Input/Output terminals Micro USB (For charging only)
Battery NP-50
Charging function Built-in
Printing capacity Approx. 160 prints (From when the battery is charged fully)
* Varies depending on the conditions of use.
Charging time Approx. 3 to 4 hours (Using 0.5 A USB port)
* Varies depending on air temperature.
Dimension 119 mm x 47 mm x 127 mm (W x D x H)
Weight 450 g (includes lm pack and battery)
* Speci cations above are subject to change for improvement.

65
EN
TROUBLE SHOOTING
Review below if you think the camera has some trouble. If you cannot find the solution, contact a FUJIFILM
authorized distributor.
Or visit our website below.
FUJIFILM website: http://fujifilm.com/
During operation
Problem Possible Causes Solution
The camera cannot be
turned on.
① The battery power is low.
② The battery is not inserted correctly.
① Charge the battery fully.
② Insert the battery correctly.
The battery runs out
too fast.
① You are using the camera in a very
cold place.
② The battery terminals are dirty.
③ You are using the same battery for a
long period of time.
① Put the battery in your pocket to warm it, and
insert it immediately before you use the camera.
② Remove the battery, clean the terminals with a
dry and clean cloth, then reinsert the battery.
③ The battery has reached the end of its charging
life. Replace with a new battery.
The camera turns off
during operation.
● The battery is running out. ● Replace with a fully-charged battery.
The battery charge does
not start.
① The battery is not inserted.
② The battery orientation is wrong.
③ The AC power adapter plug is not
connected to the indoor power
outlet correctly.
① Insert the battery.
② Reinsert the battery in the correct orientation.
③ Plug in the AC power adapter to the indoor power
outlet correctly.
It takes long to charge
the battery.
● You are charging the battery in a
very cold place.
● It may take long to charge the battery when it is
cold.
During the battery
charge, the AF-assist
illuminator/Self timer
lamp flashes, or an error
message appears on the
LCD monitor, indicating
that the battery cannot
be charged.
① The battery terminals are dirty.
② The battery has reached the end
of its charging life, or it has broken
down.
③ The battery is too warm or too cold.
① Remove the battery, clean the terminals with a
dry and clean cloth, then reinsert the battery.
Insert it in the correct orientation.
② Replace with a new battery. If this does not solve
the problem, contact a FUJIFILM authorized
distributor.
③ Charge the battery again when the battery is
stable in its temperature.

66
EN
TROUBLE SHOOTING
Problem Possible Causes Solution
An unintended
language appears on
the monitor.
● The
言語/LANG.
setting on the
setup menu is not correct.
● Select your language on the menu.
No picture is taken
when the shutter
button is pressed.
① The camera is not turned on.
② The battery is running out.
③ The camera’s memory or memory
card is full.
④ The memory card is not formatted.
5 The memory card contact (gold
part) is dirty.
6 The memory card is damaged.
① Turn the camera on.
② Charge the battery fully.
③ Insert a new memory card or delete images.
④ Use a memory card formatted with this camera.
5 Clean the memory card contact with a dry and
soft cloth.
6 Insert a new memory card.
The monitor went dark
after shooting.
● The ash res for shooting. ● The monitor may darken while the ash charges.
Wait for the ash to charge.
The camera does not
focus.
● The subject is not suited for auto
focus. (Page 55)
● Use AF/AE lock.
The flash does not fire.
① You tried to shoot while the ash is
being charged.
2
SUPPRESSED FLASH
is selected for
FLASH
.
③ The battery is running out.
① Press the shutter button after the ash has been
charged.
2 Select the ash setting other than
SUPPRESSED
FLASH
. (Page 56)
③ Replace with a fully-charged battery.
The flash does not fully
light the subject.
① The subject is not in range of the
ash.
② The ash window is obstructed.
① Position the subject in range of the ash.
② Hold the camera correctly.
Images are blurred.
① The lens is dirty.
② The focus frame is red when you
take a picture.
① Clean the lens.
② Make sure the focus frame is green before you
take a picture.
Images are blotchy.
● A slow shutter speed (e.g. bulb) is
selected at high temperatures.
● This is due to the characteristics of a CCD and
does not indicate a malfunction.
The camera is
unresponsive.
① Malfunction occurs temporarily.
② The battery is running out.
① Remove the battery and reinsert it.
If this does not solve the problem, contact a
FUJIFILM authorized distributor.
② Replace with a fully-charged battery.
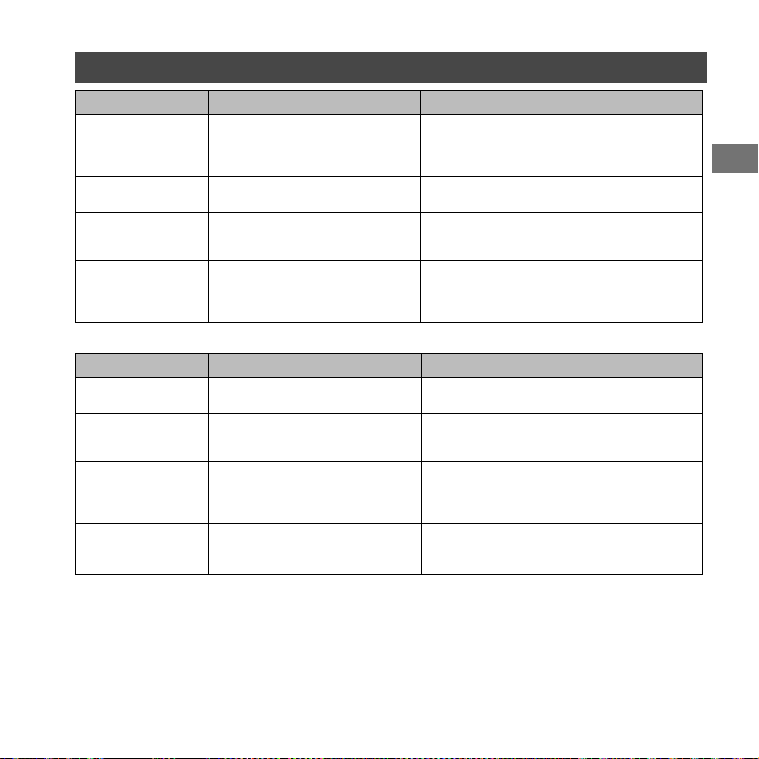
67
EN
TROUBLE SHOOTING
Problem Possible Causes Solution
The film pack cannot
be loaded, or cannot be
loaded easily.
① The lm pack is not for your camera.
② The lm pack is not being loaded
correctly.
① Use FUJIFILM Instant Film “instax SQUARE” only.
(No other lms can be used.)
② Match the yellow line on the lm pack with the
yellow positioning mark in your camera.
The film cover cannot
be ejected.
● The camera cannot recognize the
lm pack.
● Remove the lm pack and load it again.
The film cannot be
ejected to the end.
● The camera shakes or has been
dropped and the lm has become
misaligned.
① Grasp the edge of the lm and pull it out.
② Performing another printing operation pushes
the jammed lm out.
The film pack cannot be
ejected.
① The camera shakes or has been
dropped and the lm is misaligned.
② The lm has been jammed.
① Load a new lm pack.
② Turn the camera o and on again. If this does not
solve the problem, remove the jammed lm and
load a new lm pack.
Printed pictures
Problem Possible Causes Solution
The correct date is not
printed.
● The date setting is not correct. ● Perform date setting again. (Page 62)
Part or whole finished
print is white.
● The back cover was opened before
you used up all the lms.
● Do not open the back cover until you have used
up the lm; otherwise, the rest of the lm may be
exposed and ruined for use.
The picture is blurred.
① Pressure was applied to the picture
immediately after it came out from
the printer.
② The picture did not come out easily.
① Do not shake, bend, fold, or press the print.
② Do not cover the lm ejection slot.
A black line is printed
on the bottom of the
finished print.
● The camera shakes or has been
dropped and the lm has become
misaligned.
● Print the image again. If this does not solve the
problem, load a new lm pack.

68
EN
IMPORTANT SAFETY NOTICE
This product has been designed with safety in mind, and to provide safe service when handled correctly and in accordance
with the User’s Guide and instructions. It is important that both the product and the INSTAX lm are handled properly
and used only to print pictures as instructed in this User’s Guide and in the INSTAX mini lm instructions. For your ease
and safety, please follow what is written in this User’s Guide. It is also a good idea to keep this User’s Guide in a safe, easy
to nd place where you can refer to it if needed.
WARNING
This symbol indicates danger, which could result in injury or death. Please follow these instructions.
WARNING
If the camera (or batteries) become hot, emit smoke or a burnt smell or otherwise seem abnormal, immediately
remove the batteries. Faults of this nature could start a re and cause burns. (Take particular care to avoid burns
when removing the batteries or pull out the USB cable.)
If the camera is dropped into water or if water or metal or other foreign objects get inside the camera,
immediately remove the batteries, disconnect the AC power adapter and unplug the AC power adapter from the
power outlet. Faults of this nature could cause the camera to overheat or catch re.
Do not use this camera in places where there is ammable gas or near open gasoline, benzine, paint thinner or
other unstable substances which can give o dangerous vapors. Faults of this nature could cause the camera to
explode or catch re and cause burns.
Never take the batteries apart. Do not subject them to heat, throw them into an open re, attempt to recharge them,
short-circuit them, drop them, or apply impact to them. Doing so could cause the batteries to explode.
Use only the type of batteries speci ed in your camera’s User’s Guide. Faults of this nature could cause the camera
to overheat or catch re.
Make sure batteries are stored in a safe, secure place and well out of the reach of any infants, young children or pets. The
batteries could be accidentally swallowed by young children or pets. If this occurs, immediately seek medical treatment.
Only use the speci ed battery designated for use with the camera. In addition, do not use the camera with a power
supply voltage other than that indicated. Using other batteries could cause the camera to overheat or catch re.
69
EN
WARNING
Never attempt to take this product apart. You may be injured.
If anything is wrong with the camera, never attempt to repair it by yourself. You may be injured.
If this product is dropped or damaged so that the inside is showing, do not touch it. Contact your FUJIFILM dealer.
Do not touch any parts or projecting parts inside the back cover. You may be injured.
Never get this product wet or handle it with wet hands. Doing so may result in an electric shock.
Do not mix new and old batteries or batteries of di erent types. Also make sure that the battery C and D polarities
are correct. A damaged battery or electrolyte leakage may cause a re, injury, and contaminate the environment.
If the camera will be left unused for a long period (because you are traveling, etc), remove the batteries,
disconnect the AC power adapter and unplug the USB cable. Failing to do so could cause a re.
Do not move the camera while the USB cable is still connected to it. Doing so could damage the USB cable and
cause a re or electric shock.
Keep out of the reach of small children. This product could cause injury in the hands of a child.
Do not cover or wrap the camera or the AC power adapter in a cloth or blanket. This can cause heat to build up and
distort the casing or cause a re.
When using the camera, make sure that the battery cover is attached; otherwise, you may be injured.
The “CE” mark certi es that this product satis es the requirements of the EU (European Union) regarding safety,
public health, environment and consumer protection.(“CE” is the abbreviation of Conformité Européenne.)
For customers in the USA:
FCC Statement
This device complies with part 15 of the FCC Rules. Operation is subject to the following two conditions: (1) This device may
not cause harmful interference, and (2) this device must accept any interference received, including interference that may
cause undesired operation.
CAUTION
This equipment has been tested and found to comply with the limits for a Class B digital device, pursuant to Part 15 of the FCC
Rules. These limits are designed to provide reasonable protection against harmful interference in a residential installation.
This equipment generates, uses, and can radiate radio frequency energy and, if not installed and used in accordance with the
instructions, may cause harmful interference to radio communications. However, there is no guarantee that interference will
not occur in a particular installation. If this equipment does cause harmful interference to radio or television, which can be
determined by turning the equipment off and on, the user is encouraged to try to correct the interference by one or more of
the following measures:
• Reorient or relocate the receiving antenna
• Increase the separation between the equipment and receiver
• Connect the equipment into an outlet on a circuit different from that to which the receiver id connected
• Consult the dealer or an experienced radio/TV technician for help
Changes or modifications not expressly approved by FUJIFILM responsible for compliance could void the user’s authority to
operate the equipment.

70
EN
For customers in Canada :
CAUTION: This Class B digital apparatus complies with Canadian ICES-003.
This symbol on the product, or in the manual and in the warranty, and/or on its packaging indicates that this product shall not
be treated as household waste.
Instead it should be taken to an applicable collection point for the recycling of electrical and electronic equipment.
By ensuring this product is disposed of correctly, you will help prevent potential negative consequences to the environment
and human health, which could otherwise be caused by inappropriate waste handling of this product.
If your equipment contains easy removable batteries or accumulators, please dispose these separately according to your local
requirements.
The recycling of materials will help to conserve natural resources. For more detailed information about recycling of this
product, please contact your local city office, your household waste disposal service or the shop where you have purchased
the product.
In Countries outside of EU: If you wish to discard this product, please contact your local authorities and ask for the correct way
of disposal.
COMMON SENSE CAMERA CARE
CAMERA CARE
1 Your camera is a precision instrument. Do not get it wet or drop it. Also, do not expose it to sand.
2 Do not use a strap made for cellular phones or other similar electronic products. These straps are usually too weak to
hold your camera securely. For safety, use only straps designed for your camera, and use only as speci cally intended and
instructed.
3 When using a tripod, check the strength of the tripod and then mount the camera by turning the tripod instead of the
camera body. When mounting the camera to a tripod, be sure not to turn the tripod screw excessively, apply unreasonable
force, etc. Also, do not carry the camera while it is mounted to the tripod. Personal injury or camera damage may result.
4 If you are not using your camera for a long period, unload the battery and keep it where it will be safe from heat, dust, and
moisture.
5 Do not use solvent such as thinner and alcohol to remove dirt.
6 Keep the lm chamber and camera interior clean to avoid damaging lms.
7 In hot weather, do not leave your camera in hot places such as in a car or on the beach. Do not leave it in damp places for
long periods.
8 Moth repellent gas such as naphthalene may a ect your camera and prints. Be careful to keep your camera or prints in a
chest or bureau.
9 Because your camera is software-controlled, there is the chance that on rare occasions it will malfunction.
If you experience incorrect operation, reset by removing the batteries and then reloading them after a while.
0 Note that the temperature range within which your camera can be used is +5°C to +40°C (+41°F to +104°F).
- Take great care to ensure that printed materials do not violate copyright, image rights, privacy or other personal rights
and do not o end public decency. Actions that violate the rights of others, are contrary to public decency or constitute a
nuisance may be punishable by law or otherwise legally actionable.
Disposal of Electric and Electronic Equipment in Private Households
Disposal of used Electrical & Electronic Equipment
(Applicable in the European Union and other European countries with separate collection systems)

71
EN
Cautions during printing
INSTAX SQUARE FILM AND PRINT CARE
See FUJIFILM Instant Film “instax SQUARE” for film use instructions. Follow all instructions for safe and proper use.
1Keep the film in a cool and dry place. Do not leave the film in a place where the temperature is extremely high (e.g., in a
closed car) for many hours.
2When you load a film pack, use the film as soon as possible.
3If the film has been kept in a place where the temperature is extremely high or low, bring it to room temperature before
starting to print pictures.
4Be sure to use the film before the expiration or “Use Before” date.
5Avoid airport checked luggage inspection and other strong X-ray illumination. The effect of fogging, etc. may appear on
unused film. We recommend that you carry the camera and/or the film onto the aircraft as carry-on luggage. (Check with
each airport for more information.)
6Avoid strong light, and keep the developed prints in a cool and dry place.
7Do not puncture, tear, or cut INSTAX SQUARE film. If film becomes damaged, do not use.
Cautions on handling the lm and prints
For details, refer to the instructions and warnings on FUJIFILM Instant Film “instax SQUARE”.
72
EN
Handling the Battery
• Make sure that you use your camera correctly. Read these safety notes and your User’s Guide carefully before use.
• After reading these safety notes, store them in a safe place.
WARNING
CAUTION
This symbol indicates danger, which could result in injury or
death. Please follow these instructions.
This symbol indicates possible damage, which could result in
injury to other people or damage to an object. Please follow
these instructions. Please handle the product properly.
WARNING
Prohibited
Do not use the battery except as speci ed. Load the battery as shown by the indicator.
Prohibited
Do not heat, change or take the battery apart. Do not drop or subject the battery to big impacts. Do not
short-circuit the battery. Do not store the battery with metallic products. Do not charge the battery using a
charger other than a speci ed one. Any of these actions can cause the battery to burst or leak and cause
re or injury as a result.
Prohibited
Do not use voltages other than the power supply voltage shown. The use of other power sources can cause
a re.
Prohibited
If the battery leaks and uid gets in contact with your eyes, skin or clothing, ush the a ected area with
clean water and seek medical attention or call an emergency number right away.
Required
Risk of explosion if battery is replaced by an incorrect type. Dispose of used batteries according to the
instructions.
Required
Dispose of used batteries according to the instructions. When discarding, cover the battery terminals with
insulation tape. Contact with other metallic objects or batteries could cause the battery to ignite or burst.
CAUTION
Required
When you are cleaning the camera or you do not plan to use the camera for an extended period, remove the
battery. Failure to do so can cause a re or electric shock.
Required
If a problem arises, turn the camera o and remove the battery. Continued use of the camera when it is
emitting smoke, is emitting any unusual odor, or is in any other abnormal state can cause a re or electric
shock. Contact your FUJIFILM dealer.
The Battery
The following describes the proper use of batteries and how to prolong their life. Incorrect use can shorten battery life or
cause leakage, overheating, fire, or explosion.
The battery is not charged at shipment. Charge the battery completely before use.

73
EN
■ Notes on the Battery
The battery gradually loses its charge when not in use. Charge the battery one or two days before use.
Battery life can be extended by turning the camera off when not in use.
Battery capacity decreases at low temperatures; a depleted battery may not function when cold. Keep a fully charged spare
battery in a warm place and exchange as necessary, or keep the battery in warm place and insert it in the camera only when
shooting. Do not place the battery in direct contact with hand warmers or other heating devices.
■ Charging the Battery
Charge the battery using the supplied USB cable. Charging times will increase at ambient temperatures below +10 °C (+50 °F)
or above +35 °C (+95 °F). Do not attempt to charge the battery at temperatures above 40 °C (+104 °F); at temperatures below
+5 °C (+41 °F), the battery will not charge.
Do not attempt to recharge a fully charged battery. The battery does not however need to be fully discharged before
charging.
The battery may be warm to the touch immediately after charging or use. This is normal.
■ Battery Life
At normal temperatures, the battery can be recharged about 300 times. A noticeable decrease in the length of time the battery
will hold a charge indicates that it has reached the end of its service life and should be replaced.
■ Storage
Performance may be impaired if the battery is left unused for an extended period of time when fully charged. Deplete the
battery fully before storing it.
If the camera will not be used for an extended period, remove the battery and store it in a dry place with an ambient
temperature of from +15 °C to +25 °C (+59 °F to +77 °F). Do not store in locations exposed to high extremes of temperature.
■ Cautions: Handling the Battery
• Do not affix stickers or other objects to the battery.
• Do not tear or peel off the external label.
• Keep the terminals clean.
• The battery and camera body may become warm to the touch after extended use. This is normal.
■ Disposal
Dispose of used batteries according to local regulations.
■ Certi cation marks acquired by the camera are located inside the lm chamber.
A lithium ion battery that is recyclable
powers the product you have purchased.
Please call 1-800-8-BATTERY for information
on how to recycle this battery.
This Symbol on the batteries or accumulators
indicates that those batteries shall not be
treated as Household waste.
In Countries Outside the European Union,
Norway, Iceland and Liechtenstein:
If you wish to discard this product including the batteries or
accumulators, please contact your local authorities and ask
for the correct way of disposal.
74
EN
Information for traceability in Europe
Manufacturer: FUJIFILM Corporation
Address, City: 7-3, Akasaka 9-Chome,
Minato-ku, Tokyo
Country: JAPAN
Authorized representative in Europe:
FUJIFILM EUROPE GMBH
Address, City: Dusseldorf Heesenstrasse 31,
40549
Country:Germany
Information for FUJIFILM in the United
States
FUJIFILM North America Corp.
200 Summit Lake Drive
Valhalla, New York 10595, USA
Information for FUJIFILM in Canada
FUJIFILM Canada Inc.
600 Suffolk Court, Mississauga, Ontario L5R
4G4
If you have any inquiries about this product, please contact a
FUJIFILM authorized distributor, or access the website below.

75
EN
MEMO
本製品のお問合せ/修理に関するお問い合わせ先
●富士フイルムフィルムカメラお客さま相談窓口
TEL050-3786-1640/FAX050-3786-2050
受付時間:月曜日〜金曜日 9:30〜17:30(土日祝日、年末年始を除く)
▶
各窓口の受付時間・サービス内容は、予告なく変更する場合があります。最新の情報は弊社ホームページでご確認ください。
▶
富士フイルムグループでは、お客さまからのお問い合わせ内容を正確に把握するために録音させていただくことがあります。
▶FAXでの受け付けは24時間行っておりますが、返信応答は電話の受付時間と同じです。
▶修理品を持参または送付される場合は、下記サイトをご覧ください。
http://fujifilm.jp/support/filmandcamera/repairservice/index.html
●本製品以外の富士フイルム製品のお問合せ先
富士フイルム株式会社
お客様コミュニケーションセンター
TEL050-3786-1711
受付時間:月曜日〜金曜日 9:30〜17:30(土日祝日、年末年始を除く)
*各窓口の受付時間、サービス内容は予告なく変更する場合があります。最新の情報は弊社ホームページでご確認
ください。
富士フイルムホームページ:http://fujifilm.jp/