Loading ...
Problem Possible Cause Solution
'Heating' is
displayed, but
floors do not feel
warm.
Set temperature is too low
to feel warm to the touch.
Increase the temperature setting in small increments.
Incorrect or faulty wiring.
Check the floor temperature displayed on the screen. If this temperature
does not increase while 'Heating' is displayed, the sensor and power lead
wiring will need to be checked by a certified electrician.
Increased the set
temperature but
'Heating' is not
displayed on the
screen.
Temperature may be limited
by another setting.
'Max' will display on the screen when you try to adjust a temperature that
is limited. Adjust the Floor Max or Room Max settings if they are too low.
Temperature at the floor or
room sensor is already at
the setting.
'Heating' only displays when the sensed temperature is lower than the set
temperature and heat is actively operating.
Display is not on.
Thermostat is in off mode. Touch the screen center. Touch the button to turn the thermostat on.
Power from the breaker
is off.
Check the breaker or fuse in the electrical panel supplying power to the
SunStat.
Incorrect or faulty wiring. Have the power lead wiring checked by a certified electrician.
Heat is on before
the scheduled
time.
The SmartStart feature is
enabled.
'Smart Start' will display on the screen. If preferred, turn off the SmartStart
feature in the Schedule menu.
Out of memory
error
The settings are not
readable by the thermostat.
Select 'Load Defaults' from the Toolbox menu.
Floor sensor error Wiring or sensor are faulty.
Have a certified electrician check the wiring and sensor resistance. Replace
the sensor if necessary.
Room sensor
error
Internal sensor error in
thermostat
Reload factory defaults. If error still exists, replace the product according to
the warranty instructions.
Watts Radiant warrants this control (the product) to be free from defect in material and workmanship for a period of (3) years from the date of original purchase from
authorized dealers. During this period, Watts Radiant will replace the product or refund the original cost of the product at Watts Radiant’s option, without charge, if the
product is proven defective in normal use. Please return the control to your distributor to begin the warranty process.
This limited warranty does not cover shipping costs. Nor does it cover a product subjected to misuse or accidental damage. This warranty does not cover the cost of
installation, diagnosis, removal or reinstallation, or any material costs or loss of use.
This limited warranty is in lieu of all other warranties, obligations, or liabilities expressed or implied by the company. In no event shall Watts Radiant be liable for consequential
or incidental damages resulting from installation of this product. Some states or provinces do not allow limitations on how long an implied warranty lasts, or the exclusion
or limitation of incidental or consequential damages, so the above exclusions or limitations may not apply to you. This warranty gives you specific legal rights and you
may also have other rights that vary from state to state.
It is strongly recommended that a qualified, licensed electrician install the heating cables and related electrical components.
If problems with the system arise, please consult the troubleshooting guide below.
Troubleshooting Guide
Limited 3 Year Warranty
Operation
Setup Menu
Schedule Menu
Display Menu
Toolbox Menu
Time Menu
Any electrical troubleshooting work should be performed with the power removed from the circuit, unless otherwise noted.
©2015 Watts Water Technologies
By default, the thermostat includes one weekday program, a
Saturday program and a Sunday program.
• Press to switch between programs.
• To edit the time or temperature for a wake, leave, return, or
sleep event, touch the displayed time or temperature. Choose
'Skip' to not use an event.
•
To divide the schedule by a different grouping of days, select
'New Program'. You will be prompted to OK deleting the
current set of programs.
• Select days to group together in the new programs.
•
Every day of the week requires selection on it's own or within
a group before exiting the program settings.
SmartStart
•
SmartStart anticipates the time required to provide a scheduled
temperature by the start of an event. When Smart Start is set
to Off, additional time is required to reach the set temperature.
Program
• Set to On to follow the schedule. Set to Off to use the same
temperature all of the time.
Floor or Room Maximum
• Select floor and room maximum temperatures in the Setup
menu. These maximum settings are used to to protect
temperature-sensitive flooring or prevent space overheating.
•
'Max' displays on the screen when the thermostat is limiting the
heat output in accordance with the Floor or Room Max setting.
Control
•
The 'control' setting determines whether the thermostat
will operate to maintain a floor temperature, or the room
temperature.
Away Settings
•
In the Setup menu, the Floor Away or Room Away temperature
can be selected, or set to Off (the default).
•
A home automation system can enable and disable the Away
temperature settings.
Power Up
• Switch on the circuit power supply at the breaker.
•
The SunStat Command will load stored settings into memory.
Heating Operation
By default, the SunStat Command controls the heating system
to maintain a selected floor temperature. This can be switched
to room temperature control in the Setup menu. Floor and Room
maximum settings are also available to limit temperatures
.
GFCI Testing and GFCI Light Operation
• Press the Test button on the GFCI monthly to verify that the
GFCI function is operational. The GFCI light will flash red after
pressing the Test button. To resume normal operation, press
the Reset button.
•
If pressing test does not display a flashing red GFCI light,
protection is lost and the unit will need replacement.
• If the GFCI light continues to flash after pressing the reset
button, protection is lost and the unit will need replacement.
•
If the GFCI trips during normal operation, press the Reset
button to resume operation. If it trips again, the electric
floor heating system should be inspected and tested by a
qualified technician.
•
If the GFCI light alternates between hi and low brightness
during normal operation, the unit has reached end of life and
needs to be replaced.
Power Off
•
To turn the thermostat off, press the button and select
from the screen displayed.
•
To restore operation, touch the screen and select the power
on button displayed.
Make sure the mortar has had time to fully cure before operating the system for more than a brief test.
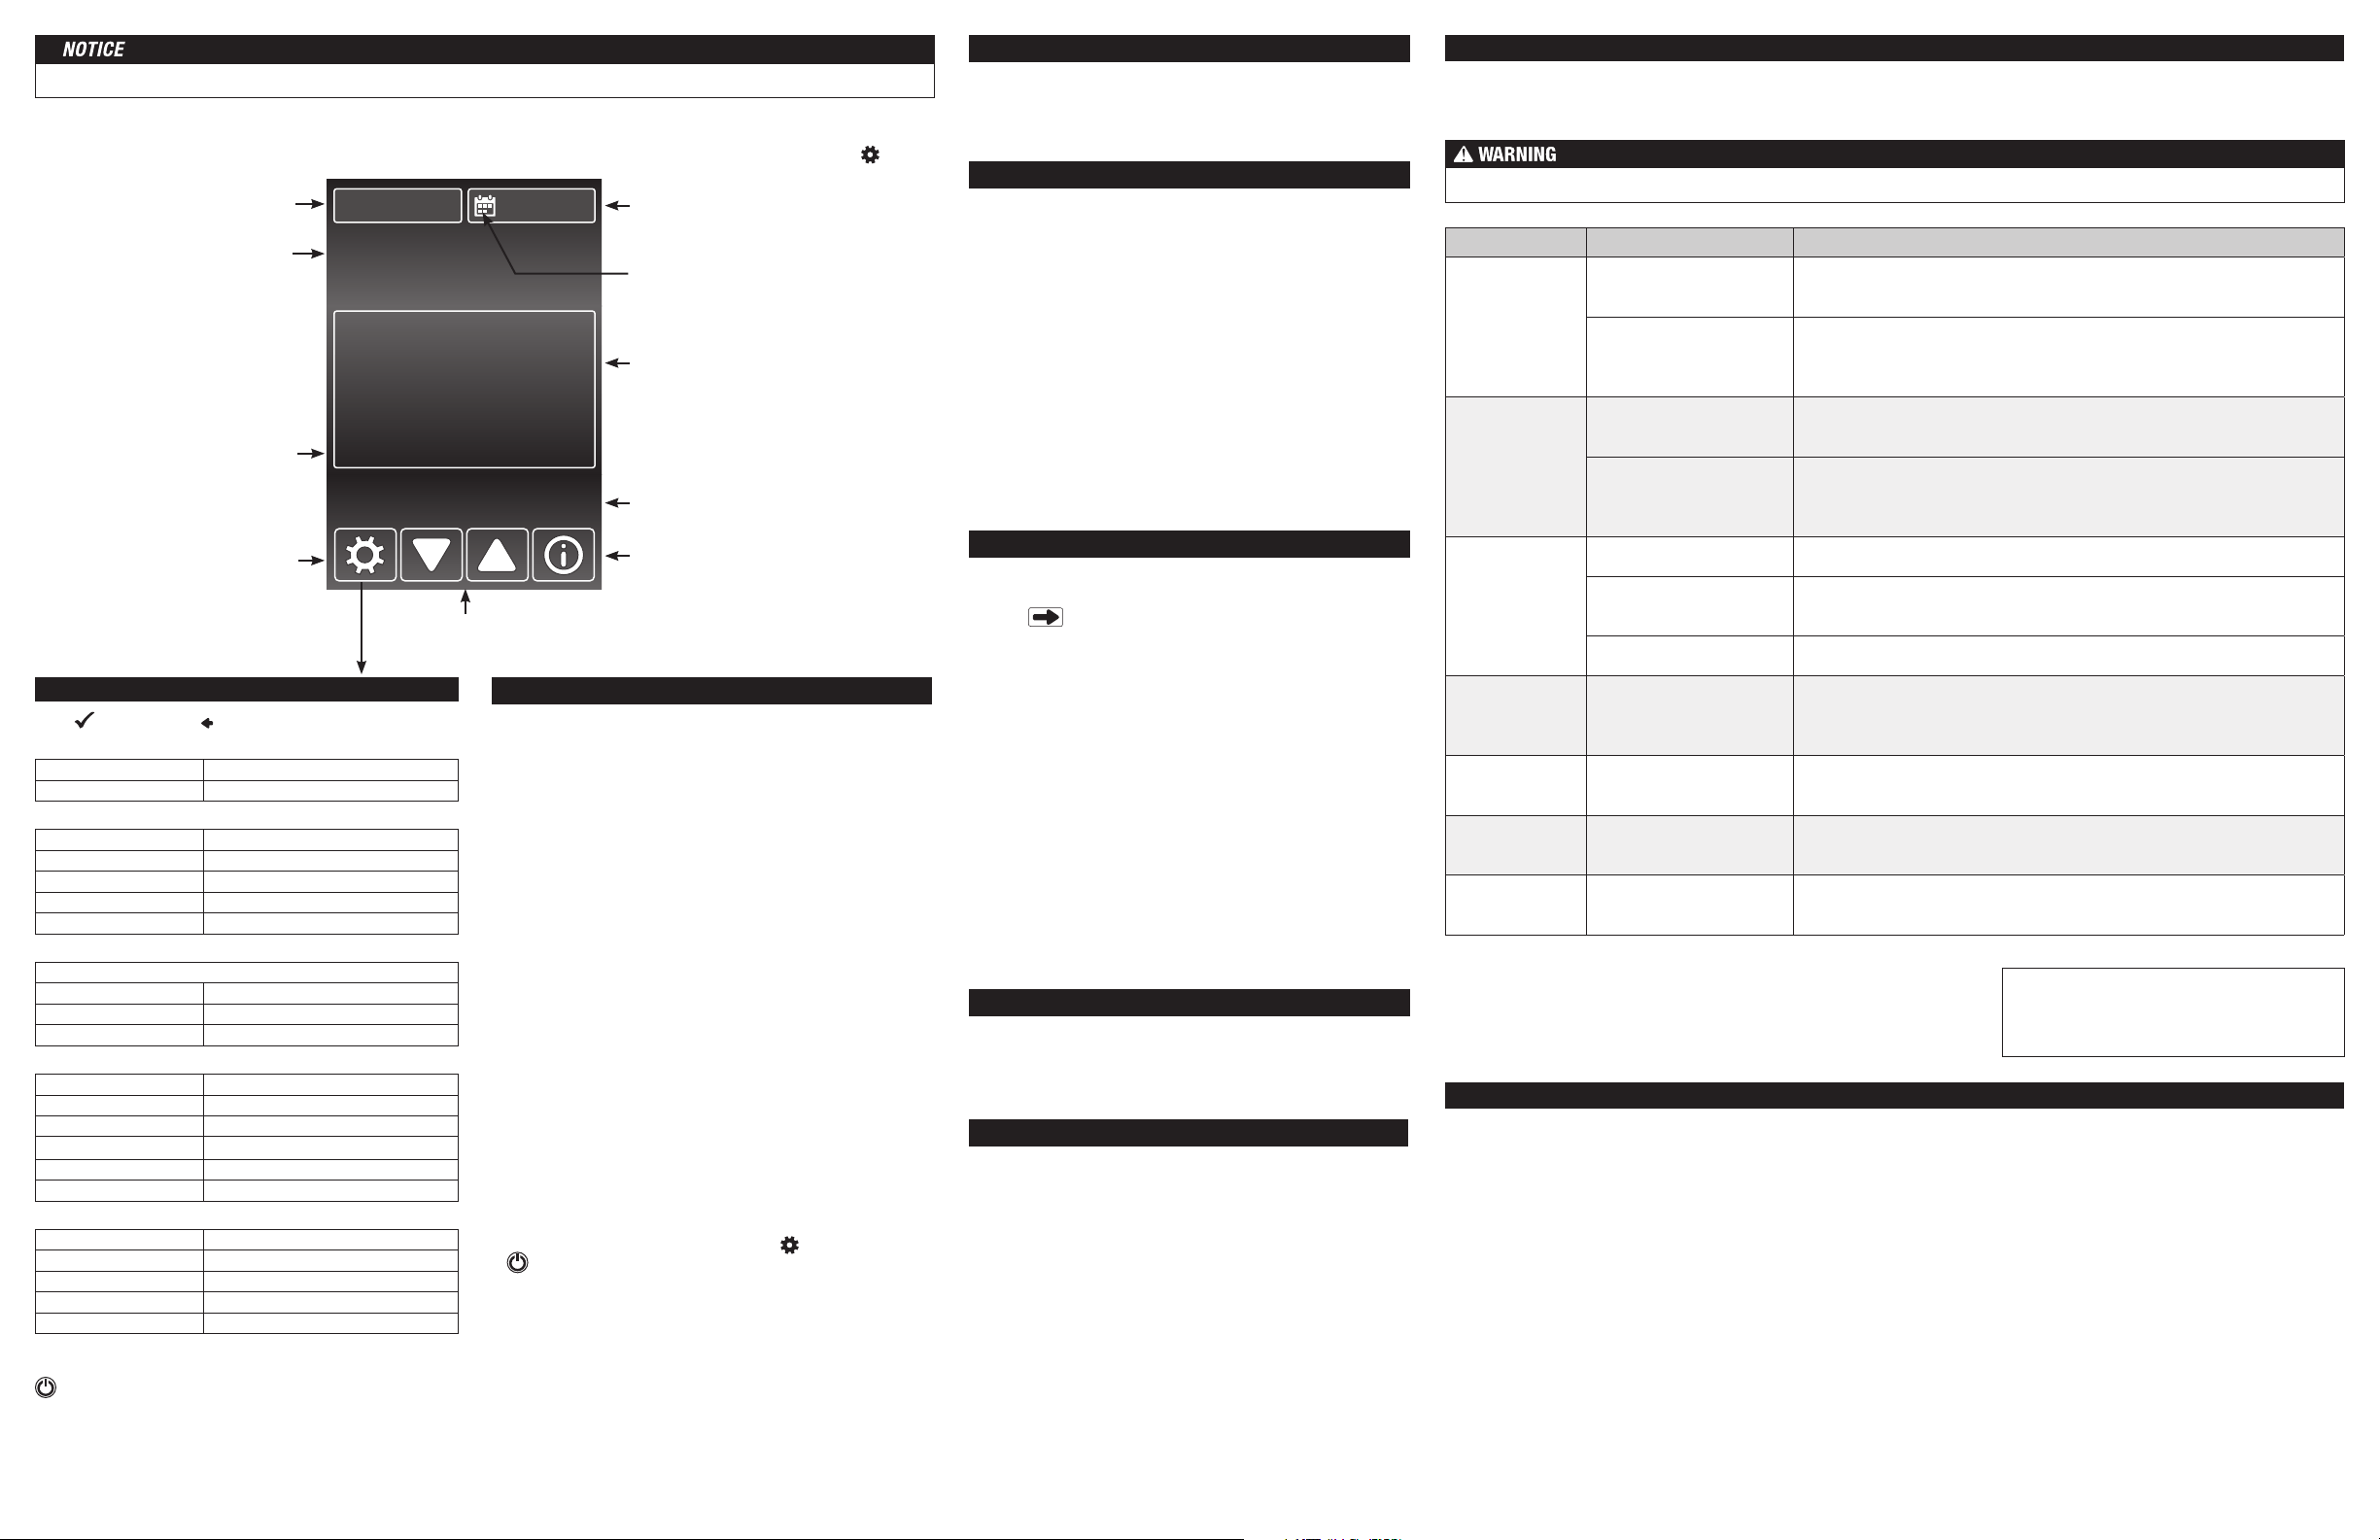
Touch the time, date or temperature to quickly access settings. Advanced settings are accessed by touching the Setting button.
Touch Screen Operation
74
°F
74
°F
Floor
Smart Start
Setpoint
6:27Fri, May 01
AM
HEATING
TESTRESET
GFCI / TEST MONTHLY
Current date
Touch to change date and time
Schedule is enabled
Touch to change schedule
Operational status
Help screens
Use this button to read more about the setting
currently displayed. The active view will remain
after closing the help screen.
Adjust setting up or down
Menu Selection
Touch to view menu items
Smart Start
Displays if heating is on prior to a
schedule event time.
Current oor or room temperature
The floor or room temperature 'Control' setting in
the 'Setup' menu determines which temperature
is displayed. 'Room Max' or 'Floor Max' appear
below if the target temperature is being limited
by another setting.
Current time
Touch to change date and time
Event status or setpoint
Touch to cycle between viewable items
Menus
TIME
Time & date Set the time and date
Options Time Format, Daylight Savings
SETUP
Floor Maximum 40 to 99 °F (4.5 to 37 °C)
Room Maximum 60 to 95 °F (15.5 to 35 °C)
Control Floor, Room
Set Floor Away OFF, 40 to 99 °F (4.5 to 37 °C)
Set Room Away OFF, 40 to 95 °F (15.5 to 35 °C)
SCHEDULE
Set Wake, Leave, Return, Sleep event times and temperatures
New Program Create new program schedule
Smart Start Off, On
Program Off, On
DISPL AY
Temperature Units °F, °C
Brightness Wake/Return Off, 30 to 100%
Brightness Leave/Sleep Off, 30 to 100%
Display Theme Light, Blue, Night, Latte, Espresso
Languages English, Spanish, French
Clean Screen No, Yes
TOOLBOX
Error Displays error message if one exists
Heat Hours Displays operating hours
Room Offset -5 to +5 °
Software Version Displays type and software version
Load Defaults Load factory defaults into memory
IOM-ST-Command 1525
Power off SunStat. Touch display for power on option.
HOME Exit menu system
Press
to accept. Press to return to the previous view.
The Display menu allows you to customize preferred display
units, brightness, color themes and language options. A Clean
Screen feature enables cleaning without affecting operation.
Set the time and date. Select 'Options' to access other settings.
Time format can be set to a 12- or 24-hr display. Automatic
daylight savings time can be set to Off or On.
WARNING: This product contains chemicals known to the
State of California to cause cancer and birth defects or
other reproductive harm.
For more information: Watts.com/prop65
Error
• If there is currently an error, it will display as the first item.
Heat Hours
• Displays the heating duration by day or month.
Room Offset
•
This feature can offset operation to account for over or under
heating present at the sensor location.
Software Version
• Displays product software version.
Load Defaults
• Select 'yes' to reload the factory default settings.
SunTouch Customer Support
USA Toll-free: (888) 432-8932
USA Fax: (417) 831-4067
Canada Toll-free: (888) 208-8927
Canada Fax: (905) 332-7068
Latin America Tel: (52) 81-1001-8600
Latin America Fax: (52) 81-8000-7091
SunTouch.com
Watts Radiant Customer Support
USA Toll-free: (800) 276-2419
USA Fax: (417) 864-8161
WattsRadiant.com
Canada Toll-free: (888) 208-8927
Canada Fax: (905) 332-7068
Watts.ca