Warnings
3
EN
1.1 Definition 1.2 State of California Proposition
65 Warning
1.3 Installation warnings
• Move the appliance into the
desired position with the help of a
second person.
• The appliance is heavy and must
be protected during transport and
installation.
1 IMPORTANT SAFETY INSTRUCTIONS
WARNING: If the instructions contained in this manual are not followed
precisely, fire or explosion may result causing property damage, personal
injury or loss of life.
READ AND SAVE THESE INSTRUCTIONS
DANGER
• not following instructions immediately
may result in loss of life or severe injuries.
WARNING
• not following instructions may result in
loss of life or severe injuries.
CAUTION
• indicates a potentially hazardous
situation which, if not avoided, may
result in minor to moderate injury.
NOTE:
Important information.
WARNING
• This product can expose you to
chemicals including vinyl chloride,
which is known to the State of
California to cause cancer and
birth defects or other reproductive
harm. For more information go to
www.P65Warnings.ca.gov.
WARNING

Warnings
4
• Do not use the open door as a
lever to move the appliance into
place.
• Do not install/use the appliance
outdoors.
• THIS APPLIANCE MUST NOT BE
INSTALLED ON BOATS OR
CARAVANS.
• DO NOT USE OR KEEP
FLAMMABLE MATERIALS NEAR
THE APPLIANCE.
• Depending on the climatic class to
which it belongs (indicated on the
identification plate applied inside
the compartment), the appliance
can be used in different
temperature conditions.
• Do not install in places where
there is a risk of freezing.
• Do not install in direct sunlight or
near heat sources.
• The appliance must be placed in a
dry place with sufficient air
circulation.
• Always disconnect the appliance
from the power supply in case of
malfunction, maintenance, or
during cleaning.
• Do not damage the power cord
while moving the appliance.
• Before any intervention on the
appliance (installation,
maintenance, positioning, or
movement), always wear
personal protective equipment.
• Before carrying out any work on
the appliance, switch off the
general power supply.
• Never disconnect the appliance
by pulling the power cord. Always
hold the plug firmly and pull it out
of the socket to avoid damaging
the power cord.
• Do not damage or perforate
refrigerant pipes.
• DO NOT MODIFY THE
APPLIANCE.
• Qualified personnel should carry
out the installation and servicing in
compliance with existing
regulations.
• Non-polluting, recyclable
materials are used for the
packaging of the appliance. Take
packaging materials to
appropriate recycling centers.
• Do not use sharp instruments,
rubbing alcohol, flammable
liquids, or abrasive cleaners to
remove tape glue. Clean only with
hot water.
Warnings
5
EN
1.4 Installation cautions
• Install the appliance on a level
surface.
• Avoid exerting too much pressure
on the door when it is open.
• Be careful not to scratch or
damage the floor during
installation of the appliance.
• Do not push or drag the appliance
when you try to move it, as it may
damage the floor.
• Never cover or block the
appliance's ventilation openings.
• The appliance must not be
installed on a stand.
• To avoid possible overheating,
the appliance must not be
installed behind a decorative
door or panel.
• Qualified personnel should carry
out the installation and servicing in
compliance with existing
regulations.
• A qualified technician must
complete the electrical
connection.
1.5 How to read the user manual
This user manual uses the following reading
conventions:
1. Sequential order of instructions.
• Standalone instruction for use.
SAVE THESE
INSTRUCTIONS
CAUTION
Instructions
General information on this user
manual, on safety and final
disposal.
Description
Description of the appliance and its
accessories.
Use
Information on the use of the
appliance and its accessories, food
storage advice.
Cleaning and maintenance
Information for proper cleaning and
maintenance of the appliance.
Installation
Information for the qualified
technician: Installation, operation
and inspection.
Installation
6
2 Fixing brackets
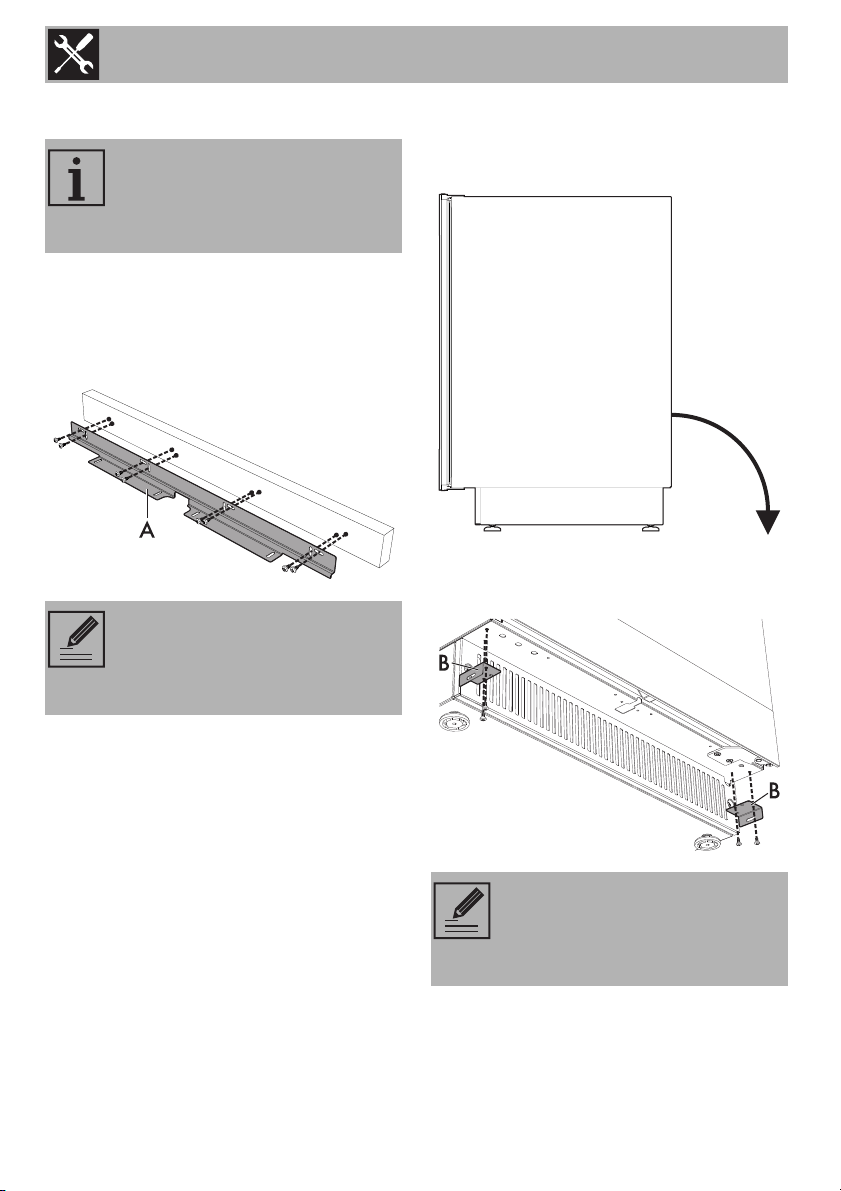
2.1 Cover panel
1. Fasten the panel (supplied by the
furniture vendor) to the bracket A using
the screws provided.
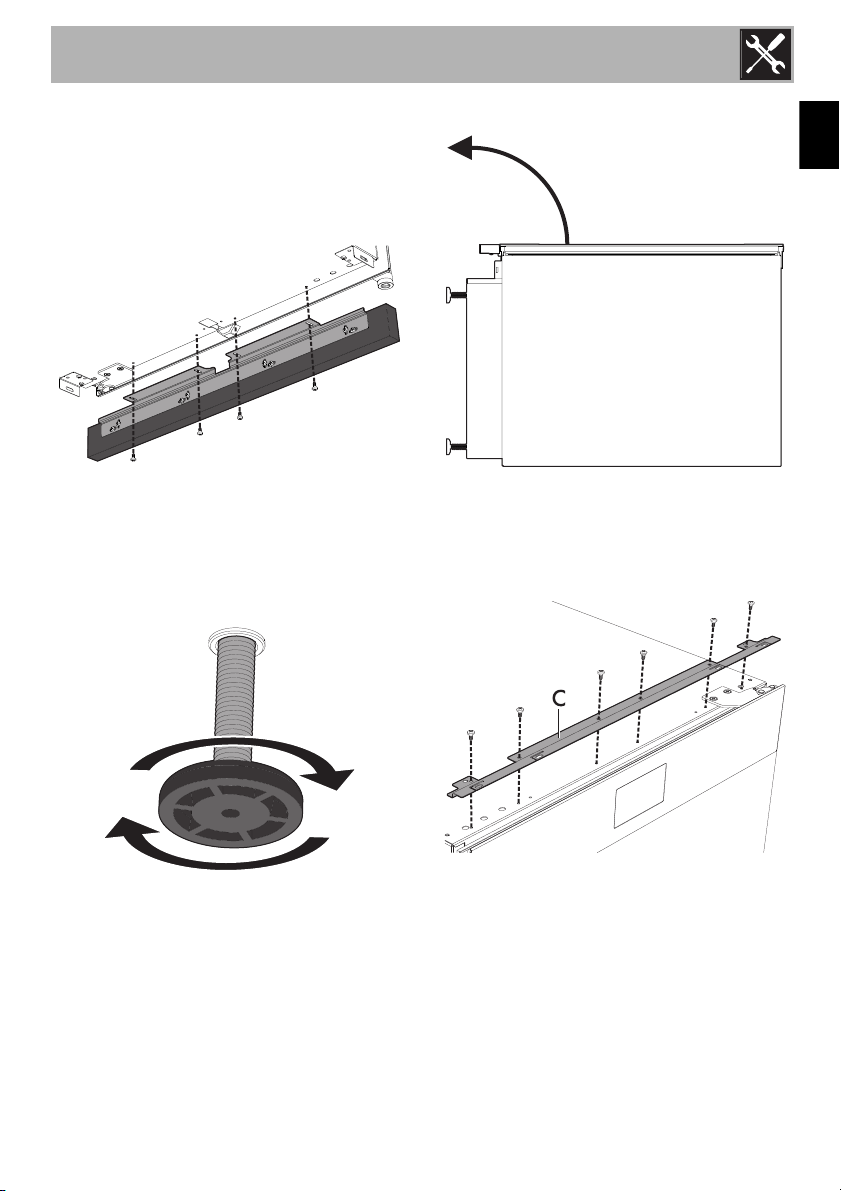
2.2 Lower fixing plates
2. Carefully lay the appliance over on its
back.
3. Screw in the lower fixing plates B as
shown in the figure below.
The supplied brackets are an
integral part of the product and
must be fastened to the appliance
before installing it.
NOTE:
The screws may be used as one
wishes thanks to the slots on the
bracket.
NOTE:
the side slots of the fixing plates
must be turned towards the side of
the appliance.
Installation
7
EN
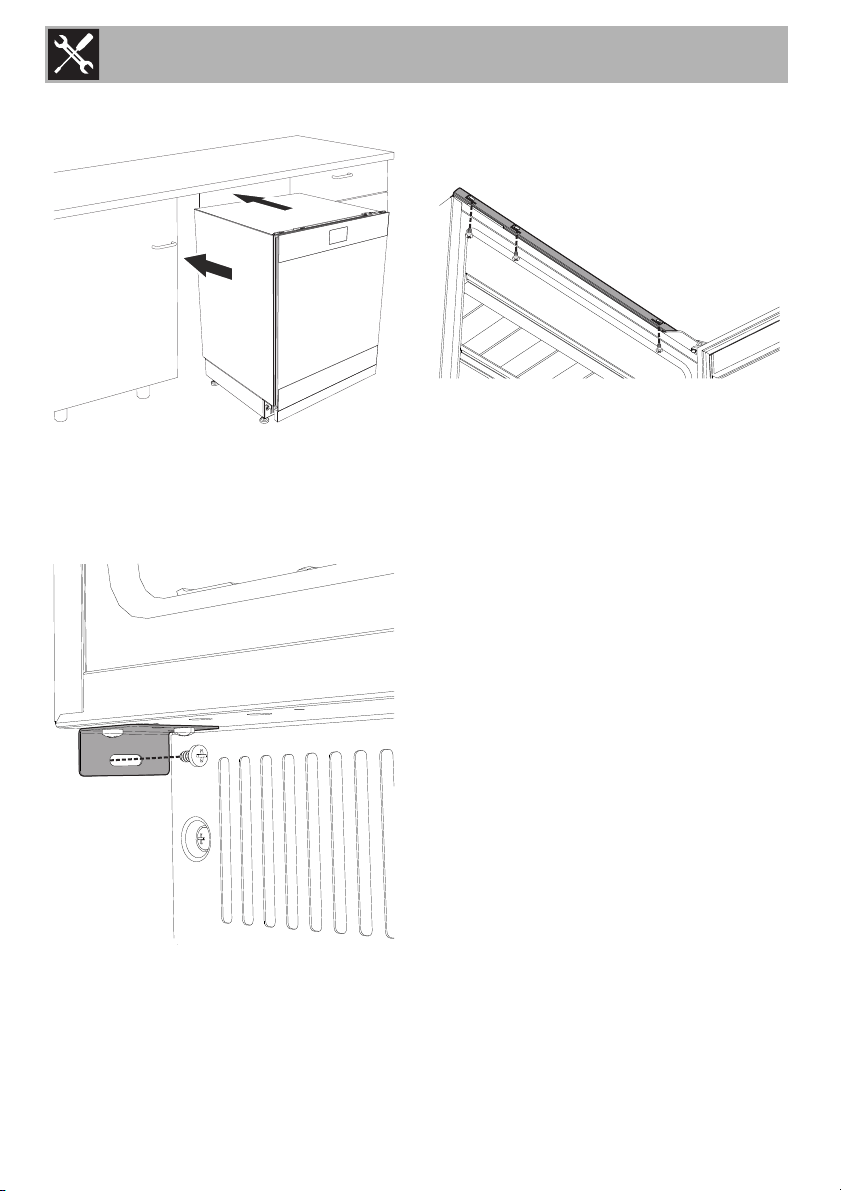
2.3 Option 1: Installation with panel
under the appliance
4. Fasten the panel (previously mounted on
the bracket) to the bottom of the
appliance.
5. Align the front of the panel with the
appliance door using the slots on the
bracket.
6. Adjust the lower feet to raise the
appliance considerably.
7. Raise the appliance vertically.
8. If it is not already mounted, fasten the
bracket C to the top of the appliance
using the screws supplied as shown in
the figure below.
Installation
8
9. Insert the appliance into the cabinet.
10.Open the door.
11.Fasten the appliance to the side walls of
the cabinet with the screws provided
using the lower fixing plates.
12.Fasten the appliance under the top of
the cabinet with the screws provided
using the upper bracket.
Installation
9
EN
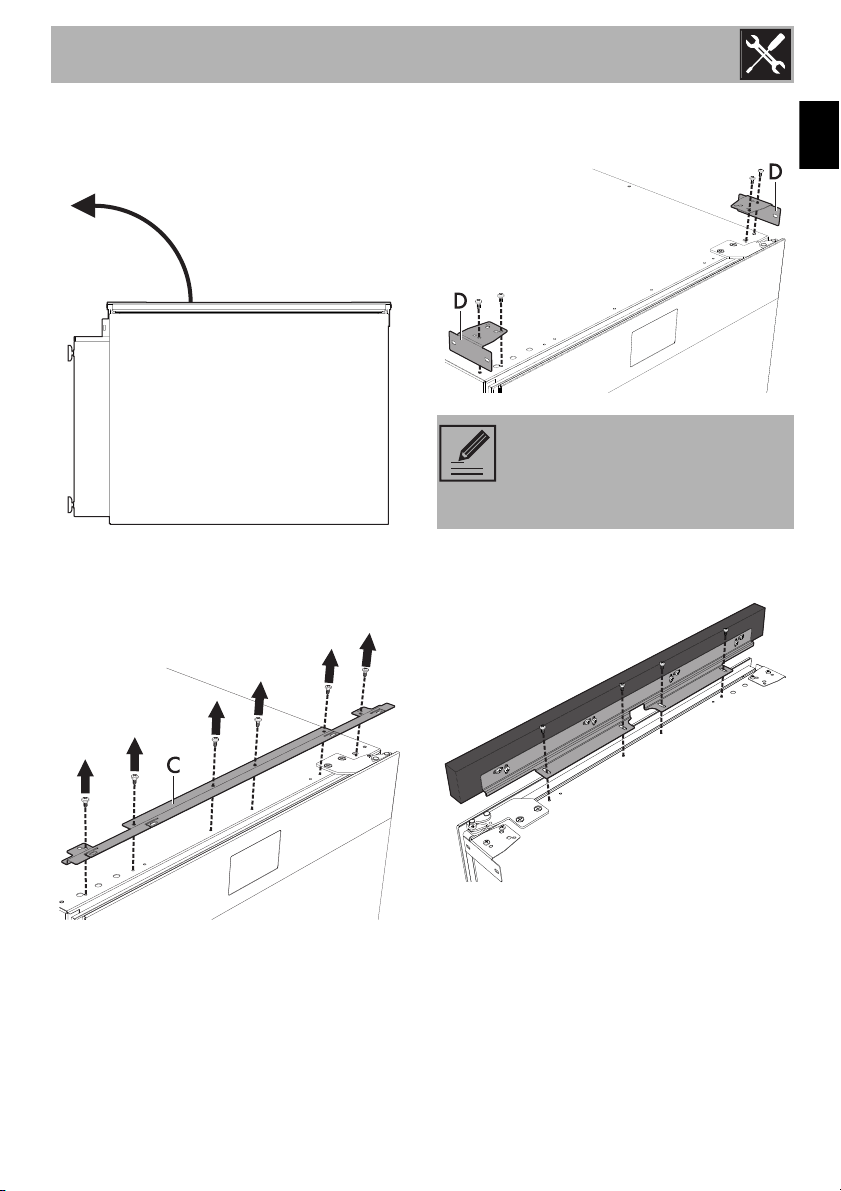
2.4 Option 2: Installation with panel
over the appliance
4. Raise the appliance vertically.
5. If it is already mounted, remove the
bracket C from the top of the appliance
as shown in the figure below.
6. Screw in the upper fixing plates D as
shown in the figure below.
7. Fasten the panel (previously mounted on
the bracket) to the top of the appliance.
8. Align the front of the panel with the
appliance door using the slots on the
bracket.
NOTE:
the side slots of the fixing plates
must be turned towards the side of
the appliance.
Installation
10
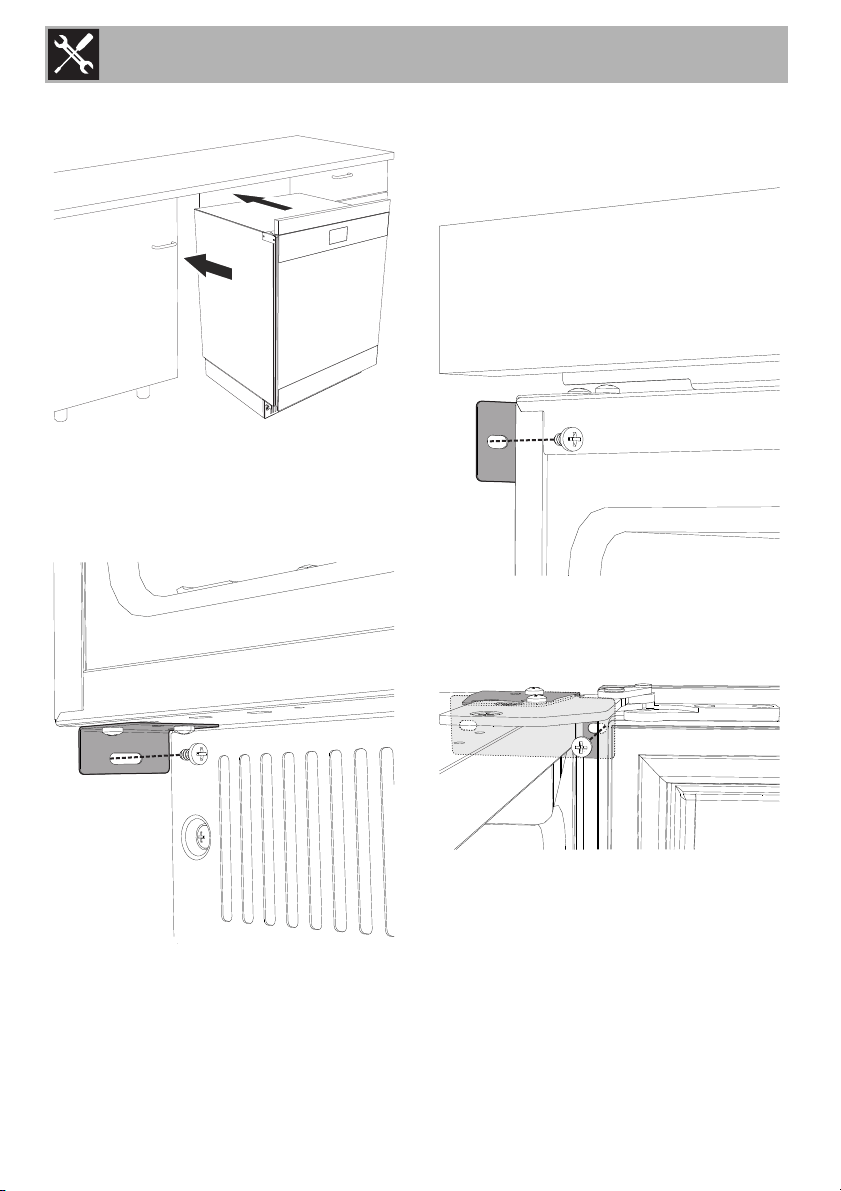
9. Insert the appliance into the cabinet.
10.Open the door.
11.Fasten the appliance to the side walls of
the cabinet with the screws provided
using the lower fixing plates.
12.Fasten the appliance also to the side
walls of the cabinet with the screws
provided using the upper fixing plates.
13.The upper fixing plate near the door
hinge must be fastened through the gap
between the door and the appliance.
