USER MANUAL Electric Shaver
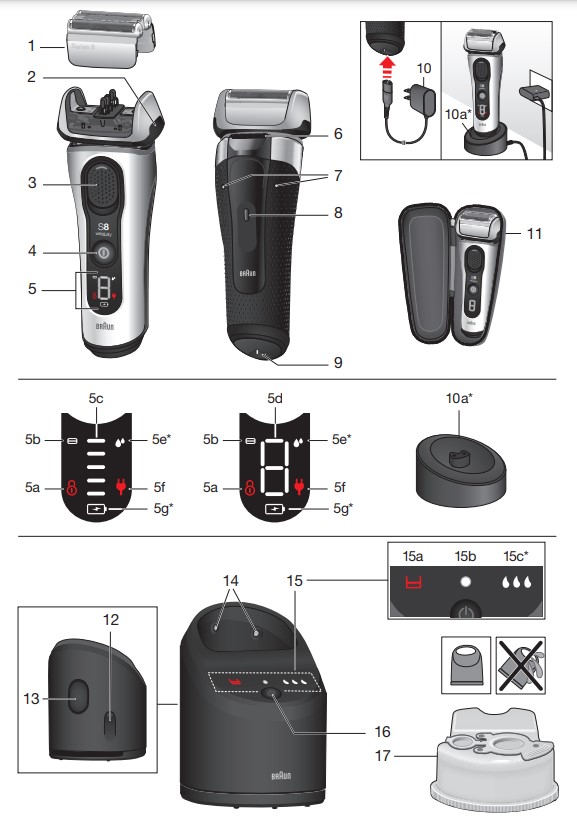
Shaver
1 Foil & Cutter cassette
2 Cassette release button
3 Multi Head Lock switch
4 On / off button
5 Shaver display**
5 a Travel lock
5 b Replacement indicator for Foil & Cutter cassette
5 c Status segments
5 d Minutes left display
5 e Cleaning indicator*
5 f Plug reminder
5 g Battery icon*
6 Precision trimmer
7 Shaver-to-station contacts
8 Release button for precision trimmer
9 Shaver power socket
10 Power supply**
10 a Charging stand*/**
11 Travel case
* not with all models (see display box)
** design can differ
For electric specifications, see printing on the power supply.
- A full charge takes 1 hour and provides up to 60 minutes of cordless shaving time. This may vary depending on your beard growth and ambient temperature.
- Recommended ambient temperature for charging is 41 °F to 95 °F / 5 °C to 35 °C. The battery may not charge properly or at all under extreme low or high temperatures.
- Recommended ambient temperature for shaving is 60 °F to 95 °F / 15 °C to 35 °C.
- Do not expose the shaver to temperatures higher than 122 °F / 50 °C for extended periods of time.
- When the shaver is connected to an electrical outlet, it may take some minutes until the display illuminates.
Charging
- Connect the shaver to an electrical outlet by snapping the power supply (10) into the power socket of the shaver (9) or the charging stand (10a). For cc models plug into the station power socket (see chapter «Clean & Charge Station»).
- For first-time charge, charge continuously for at least 1 hour.
- The actual charge status is shown on the display
Display
- The display information is dependent on the model.
- Some models only show icons during charging or operation. On other models a series of icons is also shown after the shaver has been turned off.
- The table below shows the icons that can appear on the shaver display
Battery status
The battery status is shown with segments and additionally in digits (for some models also with a battery icon).
- The status segments appear / disappear gradually with the status of the battery power.
- The digital number shows the remaining shaving time in minutes.
Plug reminder (low charge / cordless operation only)
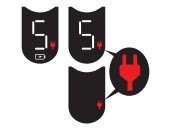
- Flashing: Battery is in low charge, i.e. 5 minutes shaving time are left.
- Fast flashing: This appliance can only be operated cordless. Disconnect the shaver from the power supply before turning it on.
Travel lock

- When the travel lock icon appears on the display, the shaver is locked.
Replacement indicator for Foil & Cutter cassette

- The replacement indicator shows the usage of the Foil & Cutter cassette. The status segments disappear gradually with the numbers of shaves.
Cleaning indicator (with Clean & Charge station usage only)

- The cleaning indicator lights up after each shave as a reminder that the shaver should be cleaned in the Clean & Charge Station.
Usage
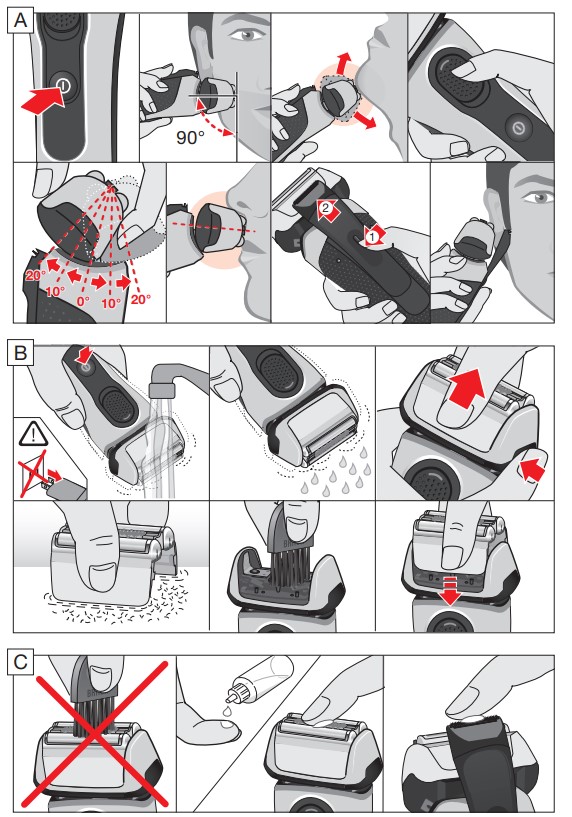
Make sure that the shaver is disconnected from the power supply. Press the on / off button (4) to operate the shaver.
Tips for a perfect shave
- Position the shaver at the right angle (90°) to your skin.
- Stretch your skin slightly with your hand.
- Shave against the direction of your beard growth.
MultiHeadLock switch (head lock)
The shaver head can be locked in five positions to shave hard-to-reach areas (e.g. under the nose).
- Slide the Multi Head Lock switch (3) down to lock the shaver head.
- Move the shaver head manually to your desired position.
- For automatic cleaning in the Clean & Charge Station the head lock needs to be released.
Precision trimmer
The trimmer can be used to trim sideburns, moustache or beard.
- Press the release button (8) and slide the trimmer (6) upwards.
Travel lock
The shaver can be locked to avoid unintended starting of the motor (e.g. for storing in a suitcase).
- Press the on / off button (4) for 3 seconds to lock / unlock the shaver. This is confirmed by a beep sound and the lock icon appearing / disappearing on the display.
Foil replacement
To maintain 100% shaving performance, replace the Foil & Cutter cassette (1), when the foil replacement indicator lights up and no status segments are visible.
- To remove the Foil & Cutter cassette press the release button (2).
- Press the on / off button for 8 seconds to reset the counter.
- Afterwards you need to unlock the shaver (see chapter «Travel lock»).
- On some shaver models the replacement indicator will reset automatically after 7 shaves.
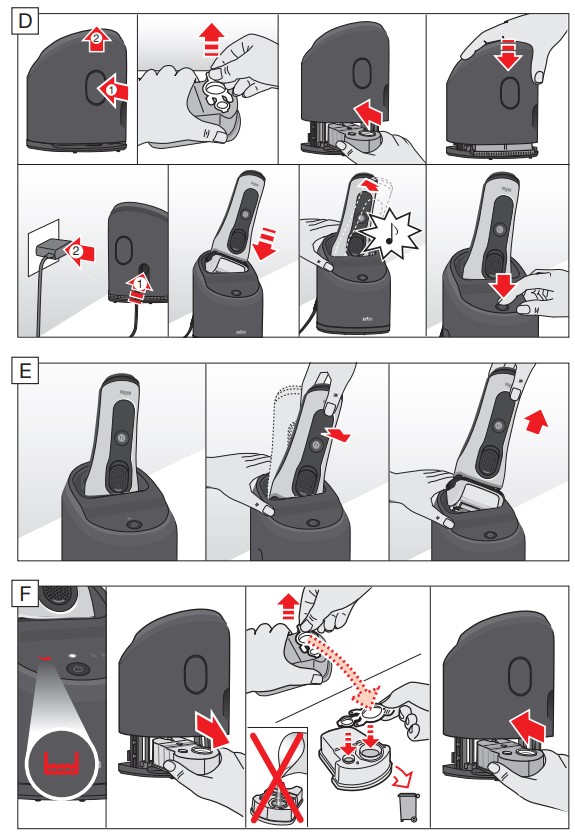
Cleaning
Cleaning under running water
Especially important after foam or gel usage
- Switch on the shaver cordless and rinse the shaver head under hot running water until all residues have been removed. You may use liquid soap without abrasive substances. Rinse off all foam and let the shaver run for a few more seconds.
- Next, switch off the shaver, press the release button (2) to remove the Foil & Cutter cassette (1) and let it dry.
- If you regularly clean the shaver under water, apply a drop of light machine oil on top of the Foil & Cutter cassette once a week.
The shaver needs to be cleaned under running water after each foam or gel usage!
Cleaning with a brush
- Switch off the shaver. Remove the Foil & Cutter cassette (1) and tap it out on a flat surface. Using the brush, clean the inner area of the pivoting head. Do not clean the cassette with the brush as this may damage it!
Clean & Charge Station (C & C)*
The Clean & Charge Station has been developed for cleaning, charging, lubricating and storing your Braun shaver.
Important
- Only use the special electric cord set supplied with the shaver as power supply.
- To prevent the cleaning fluid from leaking, ensure that the Clean & Charge Station is placed on a flat surface. When a cleaning cartridge is installed, do not tip, move suddenly or transport the station in any way as cleaning fluid might spill out of the cartridge.
- Do not place the station inside a mirror cabinet, nor place it on a polished or lacquered surface.
- The cleaning cartridge contains a highly flammable liquid so keep it away from sources of ignition. Do not expose to direct sunlight and cigarette smoking nor store it over a radiator.
- Do not refill the cartridge and use only original Braun refill cartridges.
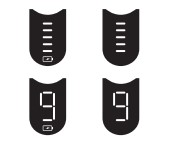
C & C Installation
- Remove the protection foil from the C & C display.
- Press the lift button (13) at the rear side of the C & C to lift the housing.
- Hold the cleaning cartridge (17) down on a flat, stable surface (e.g. table).
- Carefully remove the lid from the cartridge.
- Slide the cartridge from the rear side into the base of the station until it snaps in.
- Slowly close the housing by pushing it down until it locks.
- Using the power supply (10), connect the station power socket (12) to an electrical outlet.
C & C Usage
Important: The shaver needs to be dry and free from any foam, gel or soap residue!
- Insert the shaver in the C & C upside down, with the front showing and head lock (3) released.
- The contacts (7) on the back of the shaver need to align with the contacts (14) in the C & C. Push the shaver backwards in the correct position. A beep sound confirms that the shaver sits properly in the C & C.
- Only C & C with cleaning program selection: The C & C analyses the hygiene status. The status is shown by the cleaning program indicators (15c) in the C & C display (15)
Charging the shaver in the C & C
- Charging will start automatically when the shaver has been inserted properly.
Cleaning the shaver in the C & C
- When the cleaning indicator lights up on the shaver display, insert the shaver into the C & C, as described above.
Automatic cleaning
- Start the cleaning process by pressing the start button (16). If status light (15b) does not shine (C & C switches to stand-by after ca. 10 minutes), press start button twice. Otherwise, cleaning will not start.
- Depending on your model and / or program selected, the cleaning time takes up to 3 minutes. During this time the status light (15b) blinks.
- After cleaning and charging is completed, all indicators turn off.
- Leave the shaver in the C & C for drying. It takes several hours until remaining moisture evaporates depending on the climatic conditions.
Removing the shaver from the C & C
- Hold the C & C with one hand and tilt the shaver slightly to the front to release it.
Cleaning cartridge / replacement
- When the level indicator (15a) lights up permanently red, the remaining fluid in the cartridge is sufficient for about 3 more cycles. When the level indicator blinks red, the cartridge needs to be replaced – about every 4 weeks when used daily.
- After having pressed the lift button (13) to open the housing, wait for a few seconds before removing the used cartridge to avoid any dripping. Before discarding the used cartridge, make sure to close the openings using the lid of the new cartridge, since the used cartridge will contain contaminated cleaning solution
- The cleaning cartridge can be disposed of with regular household waste.
- The hygienic cleaning cartridge contains ethanol or isopropanol (specification see cartridge), which once opened will naturally evaporate slowly. Therefore, each cartridge, if not used daily, should be replaced after approximately 8 weeks. The cleaning cartridge also contains lubricants for the shaving system, which may leave residual marks on the outer foil frame and the cleaning chamber of the C & C. These marks can be removed easily by wiping gently with a damp cloth and do not impact the shaver and its performance in any way.
Accessories
Braun recommends changing your shaver’s Foil & Cutter cassette every 18 months to maintain your shaver’s maximum performance. Available at your dealer or Braun Service Centres:
- Foil & Cutter cassette: 83M
- Cleaning Cartridge: CCR
- Braun Shaver cleaner spray
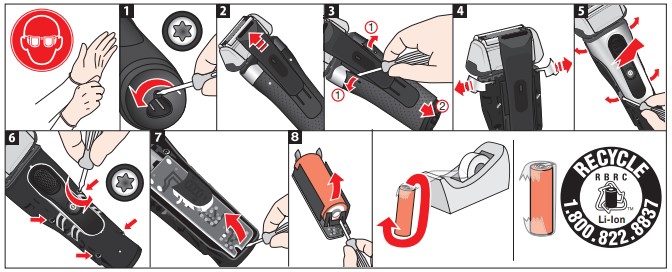
Battery removal
This appliance contains a rechargeable battery. Before disposing of the appliance, disassemble the housing as shown, remove the rechargeable battery and recycle or dispose of properly, according to local guidelines.
Caution: Disassembling the appliance will destroy it and invalidate the warranty
Trouble-Shooting
Shaver
Shaver does not start when pressing the on / off button.
- The shaver can only be operated cordless.
- Unplug the shaver
- Travel lock is activated.
- Press the on / off button for 3 seconds to unlock the shaver.
Charging does not start when connected to power socket or put in the Clean & Charge Station.
- Sometimes charging starts delayed (e.g. after long storage).
- Wait a few minutes. Charging will start automatically
- Ambient temperature is out of valid range.
- Recommended ambient temperature for charging is 41 °F to 95 °F / 5 °C to 35 °C.
- Power supply is not plugged into the shaver properly.
- Power supply needs to snap in.
- Shaver is not placed properly in the Clean & Charge Station.
- Contacts of the shaver need to align with contacts in the Clean & Charge Station.
Shaver does not charge completely and keeps blinking.
- Ambient temperature is out of valid range.
- Recommended ambient temperature for charging is 41 °F to 95 °F / 5 °C to 35 °C.
Unpleasant smell from the shaver head.
- Shaver head is cleaned with water.
- When cleaning the shaver head with water only use hot water and from time to time some liquid soap (without abrasive substances). Remove Foil & Cutter cassette to let it dry
- Cleaning cartridge is in use for more than 8 weeks.
- Change cleaning cartridge at least every 8 weeks.
Battery performance dropped significantly
- Foil and cutter are worn which requires more power for each shave.
- Renew Foil & Cutter cassette.
- Shaver head is regularly cleaned with water but not lubricated.
- If the shaver is regularly cleaned with water, apply a drop of light machine oil on top of the foil once a week for lubrication.
Shaving performance dropped significantly.
- Foil and cutter are worn.
- Renew Foil & Cutter cassette
- Shaving system is clogged.
- Soak the Foil & Cutter cassette into hot water with a drop of dish liquid. Afterwards rinse it properly and tap it out. Once dry apply a drop of light machine oil on the foil.
Shaver head is damp.
- Drying time after automatic cleaning was too short.
- Clean directly after shaving to allow enough time for drying.
- Drain of the Clean & Charge station is clogged.
- Clean the drain with a wooden toothpick
Clean & Charge Station
Cleaning does not start when pressing the start button.
- Shaver is not placed properly in the Clean & Charge Station.
- Insert shaver into the Clean & Charge Station and push it to the rear side of the station (contacts of the shaver need to align with contacts in the station).
- Cleaning cartridge does not contain sufficient cleaning fluid (display blinks red).
- Insert new cleaning cartridge. Press the start button again.
- Appliance is in stand-by mode.
- Press the start button again.
Increased consumption of cleaning fluid.
- Drain of the Clean & Charge station is clogged.
- Clean the drain with a wooden toothpick.
- Regularly wipe the tub clean.