The cord should not be used to pull the trimmer. Since freedom of movement needs to be maintained, care should be used to-keep the cord untwisted and unobstructed. When stored, the cord should be coiled and the unit placed in original box or storage pouch (if provided).
If your trimmer has a polarized plug: To reduce the risk of electric shock, this appliance has a polarized plug (one blade is wider than the other). This plug fits in a polarized outlet only one way. In the event the plug does not fit fully in the outlet, reverse the plug. In the event it still does not fit, contact a qualified electrician to install the proper outlet. Do not change the plug in any way.
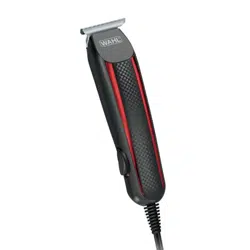
CARING FOR YOUR TRIMMER
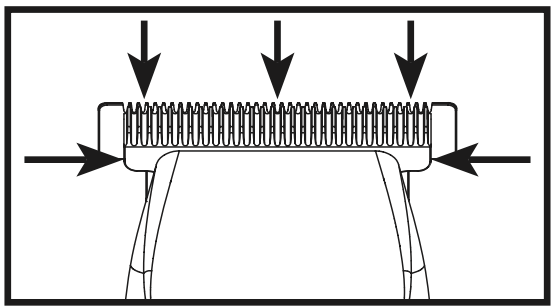
OILING BLADES
For best results, use Wahl Clipper Oil on the blades only when necessary, or approximately once a month. Motor bearings are permanently lubricated—do not attempt to oil.
When oiling your trimmer, turn the trimmer “ON - I,” hold the unit with the blades facing DOWN and squeeze three drops across the front of the blade and one drop on each side on the heel of the blade. Wipe off excess oil with soft cloth.
NOTICE—DO NOT OVER-OIL!
Excessive oiling or application of liquids will cause damage if allowed to seep back into motor.
BLADE CARE
Trimmer blades have precision-hardened, ground and lapped cutting teeth. Blades should be handled carefully and never bumped or used to cut dirty or abrasive material. Clean with the included brush.
CLEANING/STORAGE
Before storing your trimmer, use the cleaning brush to whisk any loose hairs from the unit and the blades. Store unit in such a manner so that blades are protected from damage. When the trimmer is not in use, the trimmer blade guard attachment should be in place to protect the blades. This appliance should be stored in a manner where it is not subjected to crushing, heating above 100°C (212°F), or incineration.
SHARPENING
Trimmer blades have precision-ground cutting teeth. Blades should be handled carefully and never bumped. To keep blades sharp, cut only clean hair and avoid cutting into dirt or abrasive particles. Blades should be sharpened or changed in sets only. To remove blades for sharpening or replacement, loosen and remove two screws on bottom blade. Replace same and tighten. To have blades sharpened, return blades (only) along with a check or money order for $6.95 (includes shipping back to you) to:
Wahl Clipper Corporation • Attn: Repair Department
3001 Locust Street • Sterling, IL 61081
Telephone: (800) 767-9245
New replacement blades may be acquired from a Wahl Authorized Service Center. For products purchased outside of the United States, please contact your distributor.
SPECIAL FEATURES:
Your trimmer has been designed with several advanced features to help you get perfect results every time you trim. Your trimmer may be used to neatly trim goatees, beards, mustaches, neckline, sideburns around the ears and eyebrows, or anywhere you may need grooming. It also makes a great all-around family trimmer for light haircuts and touch ups between trips to the barber or to clean up the shape of the neck.
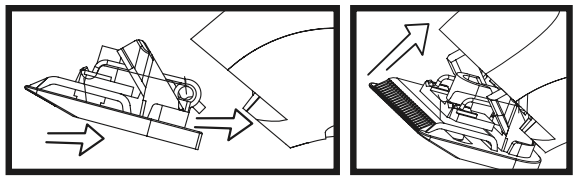
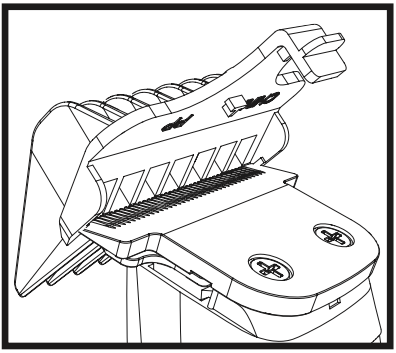
■ A Detachable Blade System enables you to quickly change from a standard-width blade for full grooming to a narrow-width blade for detail trimming around a mustache, goatee, or anywhere to define the hair line and clip any stray whiskers.
To remove attachment, simply pull top edge of blade away from body unit. To attach, align back tab of attachment head to cavity on the inner edge of trimmer unit and push down on top of blade.
Should blades become damaged or dull or if you want additional attachment heads for your trimmer, you may purchase them from Wahl. See the ACCESSORY SHEET in this kit for ordering information.
TRIMMING WITH ATTACHMENT COMBS
These attachments are ideal for blending, tapering and defining beards, as well as for achieving a “close trim” stubble look around the face. To use the attachments, go with the hair direction. To achieve closer looks, go against the hair direction.
To attach guide combs, hold comb with the teeth up. Snap guide comb attachment firmly to the bottom of the trimmer blade.
NOW YOU CAN KEEP ON SHAVING WHILE CLEANING UP INGROWN WHISKERS
Men with very curly facial hair have a special problem with shaving. Specifically, ingrown whiskers. Their whiskers curl back toward the skin — and grow in many different directions.
Electric razors can’t pick them up through their slotted or mesh heads. And safety razors slice them off at a sharp angle. Either way, the stubble is left in an ideal condition to cause ingrown hair problems. Continued shaving over the bumps and irritated skin, of course, makes the condition worse.
But you don’t have to stop shaving altogether. With this Wahl trimmer and its specially designed T-blade, you can maintain a neat, shaved appearance while getting help with ingrown whiskers. Its open-tooth comb action picks up and straightens curly whiskers for cutting — while its high-speed blades move across at a flat angle to the whiskers, clipping them off evenly.
SERVICE AND REPAIR
If you have problems with your trimmer, send it prepaid with a note explaining the problem to:
Wahl Clipper Corporation Attn: Repair Department 3001 Locust Street Sterling, IL 61081 Telephone (800) 767-9245
For products purchased outside the United States, contact your distributor.
60 Day Money Back Guarantee!
If for any reason within 60 days of purchase of your Wahl® trimmer you are not satisfied with your trimmer and would like a refund, just return your trimmer, together with the sales receipt, to the retailer from whom you purchased it. Wahl will reimburse all retailers who accept trimmers within 60 days of purchase. If you have any questions regarding this money-back guarantee, please call 1-800-767-9245 in the United States.
SHAVING
Wash Up
Make sure your hands and fingernails are scrubbed as clean as possible before touching your face. Irritated skin is very easily infected by germs.
Wash and dry your face thoroughly to unclog pores and whisker follicles. Use a rough towel to help remove dead skin and invigorate the skin. Also, consider using an antiseptic lotion.
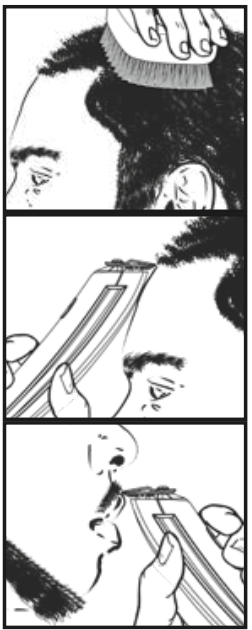
Brush Up - Use of Beard Brush
3. Brush your beard thoroughly every day with a good scrubbing action. This is important because it frees ingrown whiskers and moves the rest around so they don’t take hold and start growing in. Use the special beard brush provided or any other small, stiff-bristle brush that can be sanitized (a toothbrush is fine). Keep the brush clean.
4. Brush your face as often as possible to start training your beard to grow in one direction. This goes a long way to ensuring a clean, close shave without skin irritation (you may even want to stop shaving altogether long enough to establish a brushing pattern). Most people can expect good results following these brushing strokes:
• Brush down from each ear, across the cheek and along the jawbone toward the chin.
• Brush away from the point of the chin on each side, back along the lines just under the jawbone.
• Brush up from the lower hairline, all around the neck, up to the lines of the previous stroke.
• Brush from the lower lip down over the chin.
• Brush down from the nose to the upper lip.
5. Shave with Wahl trimmer following the SAME STROKES and going in the SAME DIRECTION you brushed. Stretch a section of skin with the fingers of one hand, while holding the shaver blade head flat against the face with the other hand. Push it forward with slight pressure in a stroking action across the skin.
You may want to go over the same area several times. Just be sure you always shave in the same direction each time.
6. Continue this program as long as ingrown hairs and bumps are a problem. Later, you may wish to switch back to a razor-close shaving method. But return to use of the Wahl trimmer at the first sign of the problem coming back. And never stop brushing.
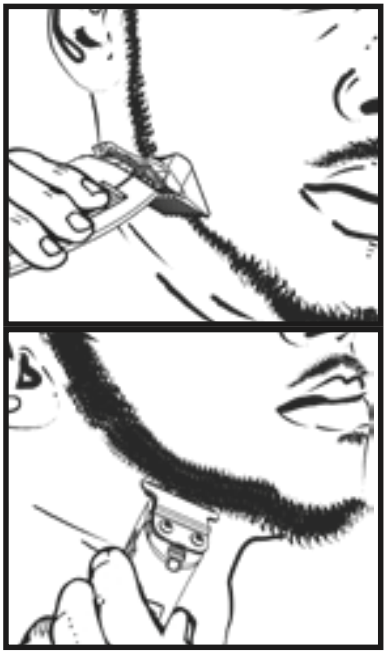
MUSTACHE TRIMMING
Comb your mustache. Looking into a well-lit mirror, comb your mustache in the direction that it grows. This will help reveal stray hairs and achieve an even, balanced trim.
Cut the outline of your mustache. Holding the trimmer in a vertical position, with the nameplate side facing you, define the line of your mustache. The extended tips on the blades let you achieve a clean, well-defined mustache line.
Defining. As a finishing step, hold the trimmer with the nameplate facing you. Using only the bare blades, make a definitive line at the bottom of your mustache.
Tapering. Hold the trimmer with the nameplate facing away from you. Again starting with the middle of your mustache, follow the lip line and taper out the mustache until a gentle shape is created on the bottom portion of your mustache.
Defining. As a finishing step, hold the trimmer with nameplate facing make a definitive line at the bottom of your mustache.
TRIMMING AND EDGING YOUR BEARD
The following are suggested trimming steps and trimmer positions. You may find different procedures work better for you.
1. Comb your beard in the direction that it grows to help reveal stray hairs that may be longer than the others.
2. Attach the longest trimming guard to trim and taper your beard. Start at each sideburn and stroke downward toward your neck. Trim toward your chin in smooth, overlapping strokes, following the lay of your beard. If you trim against the way your beard naturally lays, the trimmer will cut the hair much shorter and the result may be patchy.
Use to progressively shorter trimming guides until you reach the desired length of beard. You may wish to use the shortest trimming guard attachment to cut closer near the ear and down under the chin, changing to a longer trimming guide toward the front of the face and point of your chin. Always be sure the trimming guard is locked solidly into the desired position before you start to trim.
3. To cut the outline of your beard, remove the trimming guard. Starting under your chin and working back toward your jawbone and ears, cut the outer perimeter of your beard underneath the jawbone. Continue the line all the way up to the ears and hairline.
4. Accentuate your beard line by using the trimmer in a downward motion. Start at the line you’ve created and, working from the chin back toward the ears, trim the area right under your beard line.
5. Define the upper part of your beard using the same technique.
FADE CUT
Start at the temple and cut all the way around the head to establish the ultimate location of the fade line. Always cut against the grain for the shortest cut. Don’t force the blade through the hair. Let the trimmer do the work.
Next, cut around the head again and up the nape of the neck to the fade line, brushing away the cut hair as you go. Pull the scalp taut with the thumb for the closest cut. Turn the trimmer upside down when necessary to keep cutting against the grain. Make sure both sides of the head are even.
For the top of the head, cut with the grain using the individual guide comb attachments. The smaller the number of the comb, the shorter the cut. Comb or brush the hair as you cut for an even end result.
To complete the fade, blend the hair at the fade line by trimming up and out across the line and against the grain all the way around the head. Then, repeat all around, turning the trimmer upside down and cutting downward. The final objective is to blend the hair so there is no real line, just a perfect fade from bald to very short hair. You can achieve this by using the #1 guide comb attachment. Continue combing and cutting until you achieve the desired effect.
To create a part, pick a spot off-center. Pull the scalp tight and with the end of the blade perpendicular to the head, move the trimmer back and forth to cut a line. Comb through it and cut again to make sure the cut is precise.
CUTTING HAIR
The first time you cut the hair, cut only a small amount until you become accustomed to how long each guide comb leaves the hair. Always start by placing the largest guide comb on the trimmer, then use shorter combs if a shorter length is desired.
Remember, between professional haircuts, the hair grows evenly all over the head and a light trimming at the lower neck and sides may be all that is needed to bring back that neat, well-groomed look.
For uniform cutting, allow the trimmer to cut its way through the hair. Do not force it through at a faster rate.
Start by combing the hair so it falls into its natural direction.
Place the largest guide comb onto your trimmer and start by trimming the sides from the bottom upwards. Hold the trimmer lightly against the hair, with teeth of the guide comb pointing up but flat against the head. Slowly lift the trimmer up and outward through the hair, cutting only a small amount at a time.
Repeat around sides and back of head.
If you desire shorter hair, either change to a shorter guide comb or apply more pressure and less lift away from head with the present attachment.
This entire procedure requires practice, and it is always better to leave too much hair the first few haircuts.
For the top of the head, you will give a fairly short cut if you use the 1” blade guard. With the teeth flat against the head, slowly start trimming from the front to the back. Again, it is better to leave the hair longer the first few haircuts.
LINING UP
The term “lining up” can be used in many terms in the barbershop meaning shape up, edge up, or line up. It is when the hairline is cleaned free of any hair on the natural hairline on the forehead, sideburns, or neck line to give a visual of a tight, defined crisp line. It is usually done with a trimmer or straight razor. The hair outline defines the haircut. Below you will find Wahl Master Barber, Ben Phillips’s step-by-step instructions on how to create a crisp, tight lineup for all hair textures.
*This is a technique for consumers who are lining and detailing their own facial hair.
Cut hair to desired length. Brush hairline forward using a soft bristle brush to remove all loose hairs.
Make sure trimmer blade is angled correctly at a 90º angle. The bottom blade should be facing you, perpendicular on an horizontal plain. Touch or tap the edge of the hairline with the trimmer blade teeth to the forehead hairline edge to start a guide. The bottom blade must be facing you. Tap the hair line from left to right. The side burns can be blocked to your desired length.
The facial hairline up depends on the style you are trying to achieve. The trimmer may be held in multiple angles when trimming the face, but the blades must always be facing you.