Cotton Candy Maker
INSTRUCTION AND
RECIPE BOOKLET
CCM-10
For your safety and continued enjoyment of this product, always read the Instruction Book carefully before using.

IMPORTANT
SAFEGUARDS
When using electrical appliances, basic safety
precautions should always be taken, including
the following:
1. Read all instructions before operation.
2. Always unplug from outlet when not in
use, and prior to handling or cleaning.
3. DO NOT TOUCH hot surfaces; use
handles or knobs.
4. Avoid coming into contact with moving
parts.
5. To avoid electrical hazards, do not expose
cord or plug to water.
6. Stop using the appliance if the cord or
plug is damaged.
7. Keep appliance and cord away from heat.
8. To prevent electrical shock, do not
immerse cord, plug or the motor base in
water or other liquids.
9. Close supervision is necessary when any
appliance is used by or near children or
individuals with certain disabilities.
10. Do not touch the oss head when it is in
operation.
11. Do not use outdoors.
12. Always turn the appliance off before
assembling or cleaning.
13. Turn appliance to OFF position before
disconnecting power plug from wall outlet.
14. The motor base must be placed on a level
surface to work ef ciently.
15. Do not use appliance for other than its
intended use.
16. Do not operate any appliance with
a damaged cord or plug or after the
appliance has malfunctioned or has been
damaged in any manner. Return appliance
to the nearest authorized service facility
for examination, repair, or adjustments.
17. The use of accessory attachments
not recommended by the appliance
manufacturer may cause injuries.
18. Do not let cord hang over edge of table or
counter, or touch any hot surfaces.
19. Do not place on or near a hot gas or
electric burner, or in a heated oven.
20. Extreme caution must be used when
moving an appliance.
21. DO NOT leave unit unattended while in
use or when plugged into an outlet.
22. Check inside heating element
compartment for foreign objects before
switching to ON position.
23. Heating element will become extremely
hot. Avoid contact until cool.
24. Keep hands away from the machine when
it is in the ON position and is spinning.
25. Clean all removable parts with a hot, wet
towel before rst-time use.
26. This appliance has a polarized plug (one
blade is wider than the other). To reduce
the risk of electric shock, this plug is
intended to t into a polarized outlet only
one way. If the plug does not t fully into
the outlet, reverse the plug. If it still does
not t, contact a quali ed electrician. Do
not attempt to modify the plug in any way.
27. Do not operate your appliance in an
appliance garage or under a wall cabinet.
When storing in an appliance garage,
always unplug the unit from the
electrical outlet. Not doing so could
create a risk of re, especially if the
appliance touches the walls of the garage
or the door touches the unit as it closes.
SAVE THESE
INSTRUCTIONS
FOR HOUSEHOLD
USE ONLY
2

SPECIAL CORD SET
INSTRUCTIONS
A short power-supply cord is provided to reduce
the risks resulting from becoming entangled in or
tripping over a longer cord. Extension cords may
be used if care is exercised in their use.
If an extension cord is used, the marked electrical
rating of the extension cord must be at least as
great as the electrical rating of the appliance,
and the longer cord should be arranged so that
it will not drape over the countertop or table top
where it can be pulled on by children or tripped
over. If the appliance is of the grounded type,
the extension cord should be a grounding-type
3-wire cord. This appliance is for 120 volts only
and should not be used with a converter.
CONTENTS
Important Safeguards ........................................ 2
Parts and Features ........................................... 4
Assembly .......................................................... 4
Making A Paper Cone ........................................ 5
Before First Use ................................................. 6
Operating Instructions ....................................... 6
Cleaning and Maintenance ............................... 6
Recipes .............................................................. 7
Troubleshooting ................................................ 7
Warr an t y ............................................................. 8
3
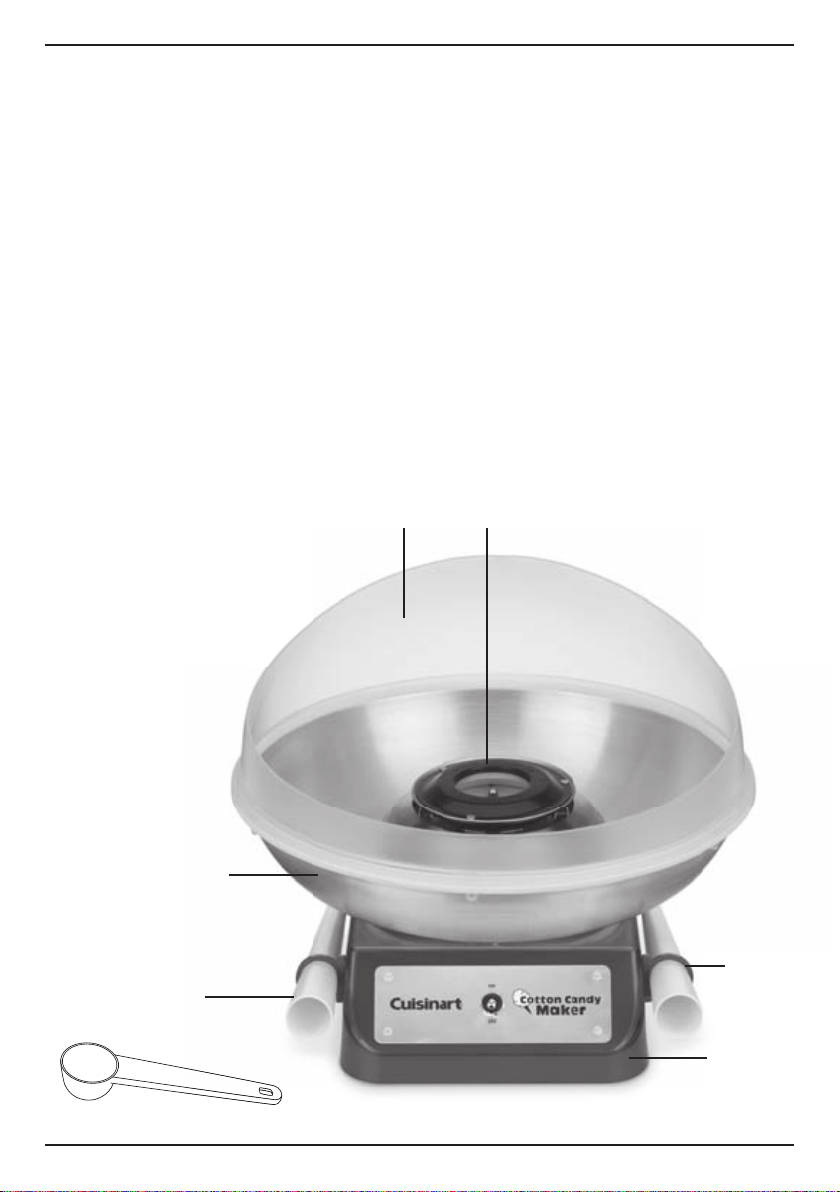
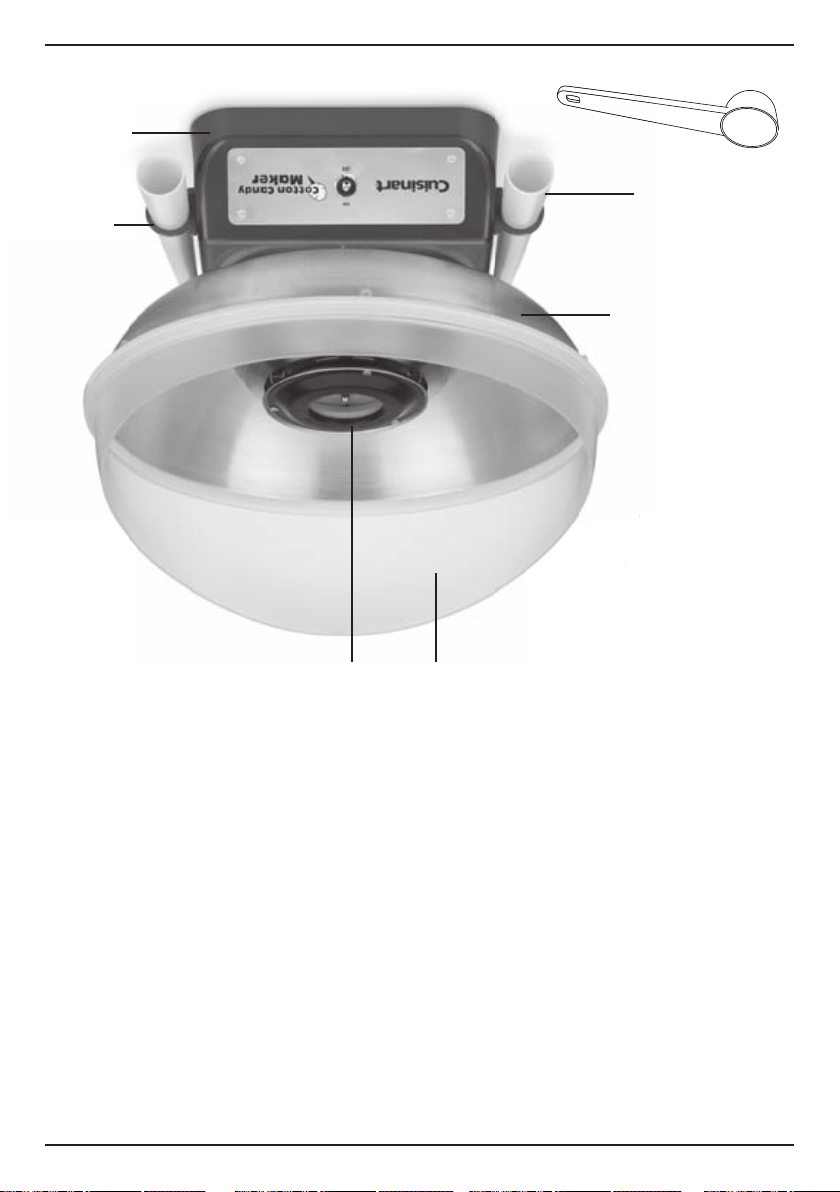
PARTS AND FEATURES
A. Splash Guard
B. Motor Base
C. Floss Head
D. Scoop
E. Plastic Cone
F. Bowl
G. Cone Holders
ASSEMBLY
STEP 1
Insert the splash guard onto the bowl (ensure all clips on the splash guard are fully inserted
into the holes on the bowl).
STEP 2
Insert the bowl and splash guard on the motor base. Make sure the bowl is pushed all the way
down to meet the base, then turn clockwise to lock the bowl on the motor base.
STEP 3
Insert the oss head on the motor base; ensure the shaft of the bowl is locked by the
perpendicular shaft on the motor axis.
A. C.
D.
E.
F.
G.
B.
4
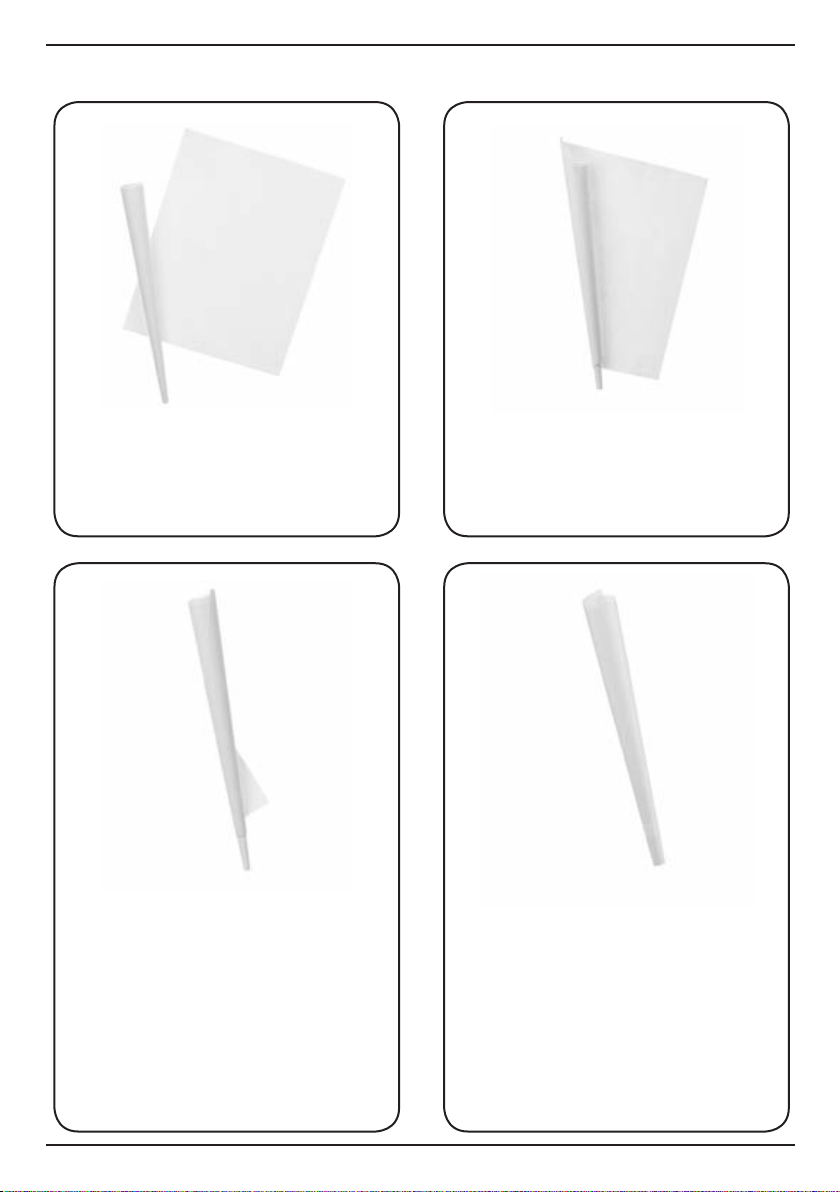
MAKING A PAPER CONE
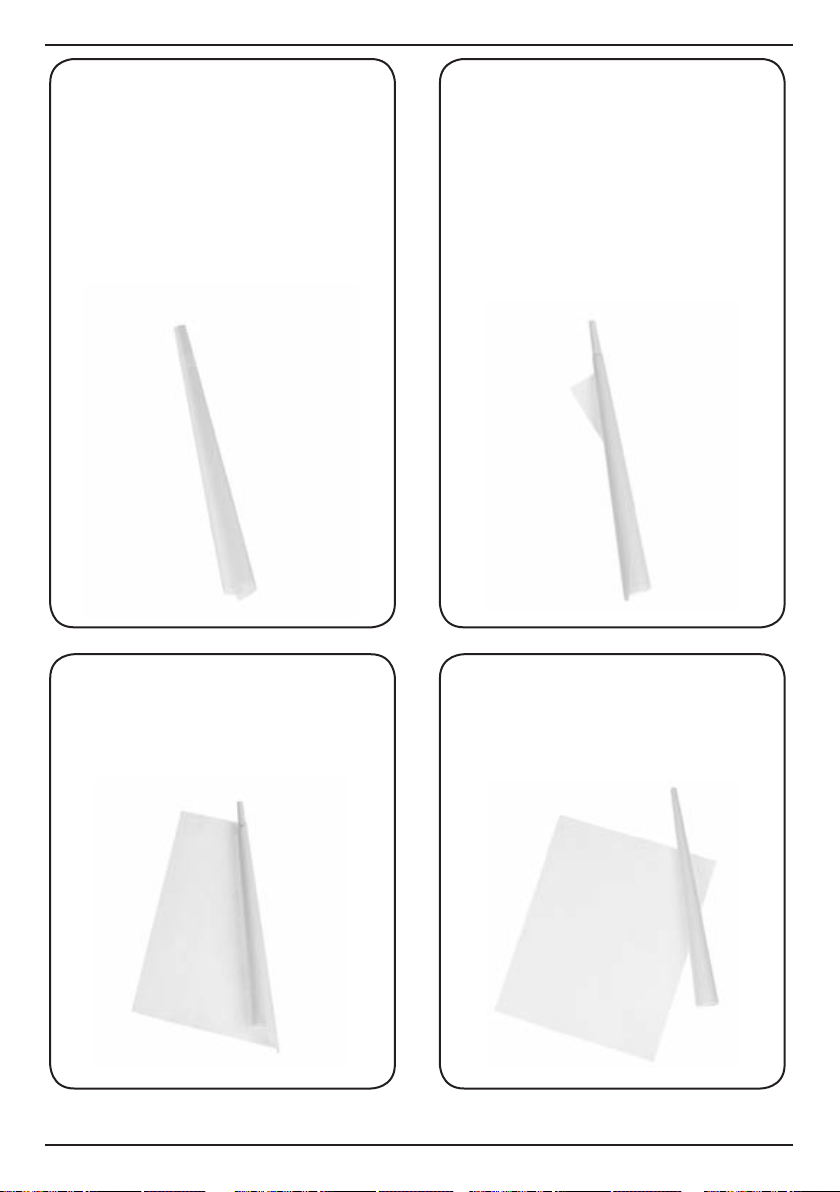
5. Finished paper cone.
1. Place a standard sheet of 8½" x 11"
paper on a at surface.
2. Lay the plastic cone supplied
with the unit on the 11" side of the
paper and begin rolling the plastic
cone until you reach the other side
of the paper.
3. With the paper totally wrapped
around the plastic cone, take a
piece of tape and tape the loose
paper edge down.
4. With your nger, push the small
end of the plastic cone up until
you can grab the large end of the
plastic cone and pull until it is
completely removed.
5

BEFORE THE FIRST USE
Remove all packaging and any promotional labels
or stickers from your Cotton Candy Maker. Be
sure that all parts (listed in Parts and Features) of
your new cotton candy maker have been included
before discarding any packaging materials. You
may want to keep the box and packing materials
for use at a later date.
Before using your Cuisinart
®
Cotton Candy Maker
for the rst time, wipe housing with a damp cloth to
remove any dust from the warehouse or shipping.
IMPORTANT NOTICE
When lifting cotton candy maker from table or
countertop, do not use cone holders located on
each side of unit. Cone holders are for storage only.
To lift safely, place one hand on each underside
of the cotton candy maker and lift upward to
release suction feet.
OPERATING INSTRUCTIONS
1. Set the fully assembled motor base on a
stable and level surface.
2. Connect plug to a power source.
3. Make sure oss head is in position.
4. Switch the cotton candy maker to ON and
preheat for 5 minutes.
NOTE: It is very important that you preheat the
cotton candy maker for the full 5 minutes.
5. Switch OFF the cotton candy maker.
Add 1 scoop of sugar mixture into the
oss head. CAUTION: Floss head will be
extremely hot. Never touch oss head while
unit is on. After use, allow oss head to cool
for 30 minutes before touching or removing.
6. Turn unit to ON position.
7. Use plastic cone to roll the cotton candy up.
Roll from right to left in a continuous motion.
Do not touch the oss head as you roll, as
the head is very hot and will cause oss to
burn. Continue rolling, evenly distributing
the cotton candy onto the cone.
8. Cotton candy may be made in consecutive
batches. If unit is turned off for an extended
time, it must be reheated for 5 minutes.
9. Do not use sugar cubes or liquid sugar
when making cotton candy.
CLEANING AND
MAINTENANCE
1. Make sure that the power is off and the
appliance is not connected to a power source.
2. Allow the Cuisinart
®
Cotton Candy Maker
to cool for a minimum of 30 minutes before
disassembling and cleaning.
3. Remove the splash guard and bowl, and
disassemble to wash separately.
NOTE: To remove splash guard from the
bowl, carefully grasp the splash guard from the
highest point and lift upward to release the
locking latches.
4. Remove the oss head, wash with warm water.
Any other servicing should be performed by
an authorized service representative.
6

RECIPES
Simple Cotton Candy
6 scoops pure cane sugar
(for a fuller cone of cotton candy,
we recommend using pure organic
cane sugar)
1–2 drops red food coloring
1–2 drops pure vanilla extract
Mix sugar, food coloring and vanilla extract
thoroughly before adding to the oss head. Use
one scoop of mixture per batch.
NOTE: You may substitute the vanilla extract with
your favorite extract avoring.
Flavored Cotton Candy
1 scoop of your favorite fl avor of
pre-sweetened drink mix
5 scoops of pure cane sugar (for a fuller
cone of cotton candy, we recommend
using pure organic cane sugar)
Mix sugar and drink mix thoroughly before
adding to oss head. Use one scoop of mixture
per batch.
Any of the following avors of pre-sweetened
drink mix can be mixed with pure cane sugar
to make cotton candy. Flavors include: Cherry,
Grape and Tropical Punch.
Hard-Candy Cotton Candy
Crush up your favorite hard candy in a food
processor; add to oss head. Use one scoop of
mixture per batch. Recommended hard candy:
NOTE: Do not use any hard candy containing
dairy ingredients. Traditional cotton candy oss
and paper cones can also be used with this
unit and can be found online or your local party
goods store.
TROUBLESHOOTING
Problems Reasons Solutions
Loud noise occurs
when operating.
The bowl is not secured on the
motor/heater housing, or the oss
head is not secured to the motor
base.
Reassemble or try to lock oss
head tightly.
Cotton candy blowing
unevenly in the bowl.
The machine is placed on an
uneven surface.
Place the machine on a
at surface.
7

Limited Three-Year Warranty
(U.S. and Canada ONLY)
This warranty is available to consumers only. You are
a consumer if you own a Cuisinart
®
Cotton Candy
Maker that was purchased at retail for personal, family
or household use. Except as otherwise required under
applicable law, this warranty is not available to retailers
or other commercial purchasers or owners.
We warrant that your Cuisinart
®
Cotton Candy Maker
will be free of defects in materials and workmanship
under normal home use for 3 years from the date of
original purchase. We recommend that you visit our
website, www.cuisinart.com for a fast, ef cient
way to complete your product registration. However,
product registration does not eliminate the need for the
consumer to maintain the original proof of purchase in
order to obtain the warranty bene ts. In the event that
you do not have proof of purchase date, the purchase
date for purposes of this warranty will be the date of
manufacture.
If your Cuisinart
®
Cotton Candy Maker should prove
to be defective within the warranty period, we will
repair it, or if we think necessary, replace it. To obtain
warranty service, simply call our toll-free number
1-800-726-0190 for additional information from our
Consumer Service Representatives, or send the
defective product to Consumer Service at Cuisinart,
7475 North Glen Harbor Blvd., Glendale, AZ 85307.
To facilitate the speed and accuracy of your return,
please enclose $10.00 for shipping and handling of the
product.
Please pay by check or money order made payable to
Cuisinart (California residents need only supply proof of
purchase and should call 1-800-726-0190 for shipping
instructions).
NOTE: For added protection and secure handling
of any Cuisinart product that is being returned, we
recommend you use a traceable, insured delivery
service. Cuisinart cannot be held responsible for in-
transit damage or for packages that are not delivered
to us. Lost and/or damaged products are not covered
under warranty. Please be sure to include your return
address, daytime phone number, description of the
product defect, product model number (located on
bottom of product), original date of purchase, and any
other information pertinent to the product’s return.
CALIFORNIA RESIDENTS ONLY:
California law provides that for In-Warranty Service,
California residents have the option of returning a
nonconforming product (A) to the store where it was
purchased or (B) to another retail store that sells
Cuisinart products of the same type.
The retail store shall then, at its discretion, either repair
the product, refer the consumer to an independent
repair facility, replace the product, or refund the
purchase price less the amount directly attributable to
the consumer’s prior usage of the product. If the above
two options do not result in the appropriate relief to the
consumer, the consumer may then take the product
to an independent repair facility if service or repair
can be economically accomplished. Cuisinart and not
the consumer will be responsible for the reasonable
cost of such service, repair, replacement, or refund for
nonconforming products under warranty.
California residents may also, according to their
preference, return nonconforming products directly to
Cuisinart for repair, or if necessary, replacement, by
calling our Consumer Service Center toll-free at 1-800-
726-0190. Cuisinart will be responsible for the cost of
the repair, replacement, and shipping and handling for
such products under warranty.
BEFORE RETURNING YOUR CUISINART
PRODUCT
If you are experiencing problems with your
Cuisinart product, we suggest that you call our
Cuisinart Service Center at 1-800-726-0190 before
returning the product for service. If servicing is
needed, a Representative can con rm whether the
product is under warranty and direct you to the
nearest service location.
Your
Cuisinart
®
Cotton Candy Maker
has been
manufactured to the strictest speci cations
and has been designed for use only in 120-volt
outlets and only with authorized accessories
and replacement parts. This warranty expressly
excludes any defects or damages caused by
attempted use of this unit with a converter, as
well as by use with accessories, replacement
parts or repair service other than those authorized
by Cuisinart. This warranty does not cover any
damage caused by accident, misuse, shipment or
other than ordinary household use. This warranty
excludes all incidental or consequential damages.
Some states do not allow the exclusion or limitation
of these damages, so these exclusions may not
apply to you. You may also have other rights, which
vary from state to state.
8

Important: If the nonconforming product is to be
serviced by someone other than Cuisinart’s Authorized
Service Center, please remind the servicer to call our
Consumer Service Center at 1-800-726-0190 to ensure
that the problem is properly diagnosed, the product is
serviced with the correct parts, and the product is still
under warranty.
9

NOTES:
10

NOTES:
11

F IB-14002-ESP
©2016 Cuisinart
150 Milford Road
East Windsor, NJ 08520
Printed in China
16CE017132
Trademarks or service marks of third parties used herein are
the trademarks or service marks of their respective owners.

F IB-14002-ESP
©2016 Cuisinart
150 Milford Road
East Windsor, NJ 08520
Impreso en China
16CE017132
Todas las marcas registradas o marcas de comercio mencionadas
aquí pertenecen a sus titulares respectivos.

NOTAS:
11

NOTAS:
10

Importante: si debe llevar el aparato defectuoso a un
centro de servicio no autorizado, por favor informe al
personal del centro de servicio que deberían llamar al
servicio posventa de Cuisinart al 1-800-726-0190 a fin
de diagnosticar el problema correctamente, usar las
piezas correctas para repararlo y asegurarse de que el
producto esté bajo garantía.
9

GARANTÍA LIMITADA DE
TRES AÑOS
(válida en los EE.UU. y en
Canadá solamente)
Esta garantía es para los consumidores solamente.
Usted es un consumidor si ha comprado su aparato
Cuisinart
®
en una tienda, para uso personal o casero. A
excepción de los estados donde la ley lo permita, esta
garantía no es para los detallistas u otros comerciantes.
Cuisinart garantiza este aparato contra todo defecto
de materiales o fabricación durante 3 años después
de la fecha de compra original, siempre que el aparato
haya sido utilizado para uso doméstico y según las
instrucciones. Le aconsejamos que llene el formulario
de registro disponible en www.cuisinart.com a fin de
facilitar la verificación de la fecha de compra original.
Sin embargo, no es necesario registrar el producto
para recibir servicio bajo esta garantía. En ausencia del
recibo de compra, el período de garantía será calculado
a partir de la fecha de fabricación.
Si este aparato presentara algún defecto de materiales
o fabricación durante el período de garantía, lo
reparemos o reemplazaremos (a nuestra opción). Para
obtener servicio bajo esta garantía, llame a nuestra línea
directa gratuita al 1-800-726-0190 o regrese el aparato
defectuoso a: Cuisinart, Service Department, 7475
North Glen Harbor Blvd., Glendale, AZ 85307.
Regrese el aparato defectuoso, junto con su recibo de
compra y un cheque o giro postal de US$10.00 por
gastos de manejo y envío.
Los residentes de California solo necesitan dar una
prueba de compra y deben llamar al 1-800-726-0190
para recibir instrucciones de envío.
NOTA: para mayor seguridad, le aconsejamos que
mande su paquete por un método de entrega con
seguro y seguimiento. Cuisinart no será responsable
por los daños ocurridos durante el transporte o por los
paquetes enviados a una dirección equivocada. Los
productos perdidos y/o lastimados durante el envío
no serán cubiertos bajo esta garantía. Recuerde incluir
su nombre, dirección y teléfono, la descripción del
problema, así como cualquier información pertinente.
RESIDENTES DE CALIFORNIA SOLAMENTE
La ley del estado de California ofrece dos opciones bajo
el período de garantía. Los residentes del estado de
California pueden (A) regresar el producto defectuoso
a la tienda donde lo compraron o (B) a otra tienda que
venda productos Cuisinart
®
de este tipo.
La tienda, a su opción, reparará el producto, referirá
al consumidor a un centro de servicio independiente,
cambiará el producto o le reembolsará al consumidor
el precio original del producto, menos la cantidad
imputable al uso del producto por el consumidor hasta
que este se dañó. Si estas dos opciones no satisfacen
al consumidor, podrá llevar el producto a un centro de
servicio independiente, siempre que se pueda ajustar
o reparar el producto de manera económica. Cuisinart
será responsable por los gastos de servicio, reparación,
reemplazo o reembolso de los productos defectuosos
durante el período de garantía.
Los residentes de California también pueden, si lo
desean, mandar el aparato defectuoso directamente a
Cuisinart para que lo reparen o lo cambien. Para esto,
se debe llamar a nuestro servicio posventa al 1-800-
726-0190. Cuisinart será responsable por los gastos de
reparación, reemplazo, manejo y envío de los productos
defectuosos durante el período de garantía.
ANTES DE HACER REPARAR SU
APARATO
Si su aparato tiene algún problema, le
recomendamos que llame a nuestro servicio
posventa al 1-800-726-0190 antes de regresar
el aparato a Cuisinart. Un representante le
confirmará si su aparato sigue bajo garantía y le
indicará la dirección del centro de servicio más
cercano.
Este aparato satisface las más altas exigencias
de fabricación y ha sido diseñado para uso sobre
corriente de 120V, usando accesorios y piezas de
repuesto autorizados solamente.
Esta garantía
excluye expresamente los daños causados por
accesorios, piezas o reparaciones no autorizados
por Cuisinart, así como los daños causados
por el uso de un convertidor de voltaje. Esta
garantía no cubre el uso institucional o comercial
del producto, y no es válida en caso de daños
causados por mal uso, negligencia o accidente.
Esta garantía excluye expresamente todos los
daños incidentales o consecuentes. Algunos
Estados no permiten la exclusión o limitación de
daños incidentales o consecuentes, de modo que
las limitaciones mencionadas pueden no regir
para usted. Usted puede tener otros derechos que
varían de un Estado a otro.
8

RECETAS
Algodón de azúcar básico
6 cucharadas (75 g) de azúcar de caña
puro (preferiblemente orgánico)
1–2 gotas de colorante alimentario rojo
1–2 gotas de extracto natural de vainilla
Mezclar el azúcar, el colorante y la vainilla.
Colocar la mezcla en el cabezal giratorio, una
cucharada a la vez.
NOTA: puede sustituir el extracto de vainilla por
su extracto favorito.
Algodón de azúcar
1 cucharada de su mezcla en polvo
favorita
5 cucharadas (60 g) de azúcar de caña
puro (preferiblemente orgánico)
Mezclar el azúcar y la mezcla en polvo. Colocar
la mezcla en el cabezal giratorio, una cucharada
a la vez.
Cualquier mezcla para bebidas puede mezclarse
con azúcar de caña puro para hacer algodón de
azúcar. Los sabores incluyen: cereza, uva y frutas
tropicales.
Algodón de azúcar de
caramelos duros
Pulverizar sus caramelos duros favoritos en una
procesadora de alimentos y colocar el polvo
obtenido en el cabezal giratorio, una cucharada
a la vez. Le aconsejamos que use los caramelos
duros siguientes:
NOTA: no utilice caramelos duros que contengan
productos lácteos. También puede usar conos de
papel tradicionales (disponibles en línea o en las
tiendas de productos para fiestas) para preparar
los algodones de azúcar.
RESOLUCIÓN DE PROBLEMAS
Problema Causas Soluciones
La máquina hace
mucho ruido durante el
funcionamiento.
El bol no está debidamente
instalado sobre la base, o el cabezal
giratorio no está debidamente
sujetado al árbol del motor.
Vuelva a ensamblar el bol y el
cabezal giratorio.
El cabezal giratorio sopla
el algodón de azúcar de
manera desigual.
La máquina está desnivelada. Coloque la máquina sobre una
superficie plana.
7

ANTES DEL PRIMER USO
Retire el aparato del material de embalaje y quite
las etiquetas promocionales pegadas en el cuerpo
del aparato. Asegúrese de que todas las piezas
descritas en la sección “Piezas y características”
estén incluidas. Le aconsejamos que guarde el
material de embalaje.
Antes de usar el aparato por primera vez, limpie
el cuerpo con un paño humedecido para quitar el
polvo acumulado durante el transporte.
AVISO IMPORTANTE
No agarre la unidad por los portaconos para moverla
o alzarla. Los portaconos han sido diseñados para
guardar los conos solamente.
Para mover el aparato de manera segura, coloque
una mano debajo de cada lado de la máquina y
álcela para despegar las ventosas.
INSTRUCCIONES DE
OPERACIÓN
1. Coloque el aparato sobre una superficie
plana y segura.
2. Conecte el cable a una toma de corriente.
3. Asegúrese de que el cabezal giratorio esté
debidamente instalado.
4. Encienda (ON) el aparato y permita que se
caliente por 5 minutos.
NOTA: es muy importante que la máquina se
precaliente por los 5 minutos completos.
5. Apague (OFF) el aparato. Coloque una
cucharada de azúcar en el cabezal giratorio.
PRECAUCIÓN: el cabezal giratorio se pone
extremadamente caliente durante el uso.
Nunca toque el cabezal giratorio mientras el
aparato esté encendido. Después del uso,
permita que el cabezal giratorio se enfríe por
30 minutos antes de tocarlo o retirarlo.
6. Encienda (ON) el aparato.
7. Forme el algodón de azúcar alrededor del
cono de plástico. Mueva constantemente
el cono de derecha a izquierda. No permita
que el algodón de azúcar toque el cabezal
giratorio; se quemaría. Siga moviendo y
girando el cono para distribuir el algodón de
azúcar uniformemente alrededor del cono.
8. Para preparar más algodones de azúcar,
añada más azúcar. Nota: si apaga el aparato
durante un período prolongado, deberá
precalentarlo otra vez por 5 minutos antes de
volverlo a usar.
9. No utilice terrón de azúcar ni azúcar líquido
para hacer algodón de azúcar.
LIMPIEZA Y
MANTENIMIENTO
1. Asegúrese de que el aparato esté apagado y
desconectado.
2. Permita que el aparato se enfríe por 30 minutos
o más antes de desarmarlo y de limpiarlo.
3. Retire el bol de la base y desarme la cubierta
antisalpicaduras para lavar las piezas por
separado.
NOTA: para retirar la cubierta antisalpicaduras,
agarre esta desde su punto más alto y álcela para
liberar las abrazaderas.
4. Retire el cabezal giratorio y lávelo en agua
jabonosa tibia.
Cualquier otro servicio debe ser realizado por
un técnico autorizado.
6
CÓMO HACER UN CONO DE PAPEL
5. Termine el cono de papel.
1. Colocar una hoja de papel de 8½ x
11 pulgadas (21.5 cm x 28cm) sobre
una superficie plana.
2. Coloque el cono de plástico
proporcionado del lado más largo del
papel y enrolle el papel alrededor del
cono hasta que llegue al otro lado.
3. Sujete el cono de papel con cinta
adhesiva mientras sigue puesto
alrededor del cono de plástico.
4. Empuje la punta del cono de
plástico hacia arriba con su dedo
hasta que pueda agarrar este por la
parte ancha y retirarlo.
5
PIEZAS Y CARACTERÍSTICAS
A. Cubierta antisalpicaduras
B. Base/Bloque-motor
C. Cabezal giratorio
D. Cuchara medidora
E. Cono de plástico
F. Bol
G. Portaconos
ENSAMBLAJE
PASO 1
Instale la cubierta antisalpicaduras sobre el bol, asegurándose de que todas las abrazaderas estén
firmemente insertadas en los orificios del bol.
PASO 2
Coloque el bol sobre la base. Presione el bol hacia abajo hasta que se encuentre contra la base,
y luego gírelo en sentido horario para sujetarlo.
PASO 3
Instale el cabezal giratorio sobre la base, asegurándose de que el eje del bol esté perpendicular al árbol
del motor.
r
io
d
or
a
c
o
A. C.
D.
E.
F.
G.
B.
4

GUARDE ESTAS
INSTRUCCIONES
PARA USO
DOMÉSTICO
SOLAMENTE
USO DE EXTENSIONES
El cable provisto con este aparato es corto, para
reducir el peligro de que alguien se enganche o
tropiece con un cable más largo. Puede usarse
una extensión eléctrica con cuidado.
La clasificación nominal de la extensión debe ser
por lo menos igual a la del aparato. Es importante
acomodar el cable más largo de manera que no
cuelgue de la encimera/mesa donde puede ser
jalado por niños o puede causar tropiezos. Si el
cable del aparato está dotado de un enchufe con
puesta a tierra, la extensión también debe serlo.
Conecte el cable a una toma de corriente de 120V
solamente; no utilice el aparato con un convertidor
de voltaje.
ÍNDICE
Medidas de seguridad importantes ................... 2
Piezas y características ..................................... 4
Ensamblaje ......................................................... 4
Cómo hacer un cono de papel ........................... 5
Antes del primer uso .......................................... 6
Instrucciones de operación ................................ 6
Limpieza y mantenimiento ................................ 6
Recetas ............................................................. 7
Resolución de problemas .................................. 7
Garantía .............................................................. 8
3

MEDIDAS DE
SEGURIDAD
IMPORTANTES
Al usar aparatos eléctricos, siempre debe
tomar precauciones básicas de seguridad,
incluso las siguientes:
1. Lea todas las instrucciones antes
de usarlo.
2. Siempre desconecte el aparato
cuando no esté en uso y antes de
moverlo o limpiarlo.
3. NO TOQUE las partes calientes de
este aparato; utilice los mangos/asas o
las perillas.
4. Evite el contacto con las piezas móviles.
5. Para reducir el riesgo de electrocución,
mantenga el cable y el enchufe alejados
del agua.
6. No utilice el aparato si el cable o la clavija
estuvieran dañados.
7. Mantenga el aparato y el cable alejados de
superficies calientes.
8. Para reducir el riesgo de electrocución,
no sumerja el cable, la clavija o el bloque-
motor en agua u otro líquido.
9. Supervise el uso de este aparato
cuidadosamente cuando sea usado por
o cerca de niños o personas con ciertas
discapacidades.
10. No toque el cabezal giratorio durante
el funcionamiento.
11. No lo utilice en exteriores.
12. Siempre desconecte el aparato antes
ensamblarlo o de limpiarlo.
13. Siempre apague (OFF) el aparato antes
de desconectarlo.
14. Coloque el aparato sobre una superficie
plana; de no ser así, no funcionará
debidamente.
15. No utilice el aparato para ningún otro fin
que no sea el indicado.
16. No utilice este aparato si el cable o la
clavija estuviesen dañados, después de
que hubiese funcionado mal o que se
hubiese caído o si estuviese dañado;
regréselo a un centro de servicio
autorizado para su revisión, reparación
o ajuste.
17. El uso de accesorios no recomendados
por el fabricante presenta un riesgo de
heridas.
18. No permita que el cable cuelgue del borde
de la encimera o de la mesa, ni que haga
contacto con superficies calientes.
19. No coloque el aparato sobre o cerca de
un quemador a gas o una hornilla eléctrica
caliente, ni en un horno caliente.
20. Tenga sumo cuidado al mover el aparato.
21. NO descuide ni abandone el aparato
mientras esté conectado o encendido.
22. Cerciórese de que no haya objetos
extraños dentro del cabezal giratorio antes
de encender el aparato.
23. El cabezal giratorio se pone
extremadamente caliente durante el uso;
no lo toque hasta que se haya enfriado.
24. Mantenga las manos alejadas de la
máquina cuando esté encendida (ON)
y mientras el cabezal esté girando.
25. Limpie todas las piezas removibles con
una toalla humedecida con agua caliente
antes del primer uso.
26. El cable de este aparato está dotado
de una clavija polarizada (una pata es
más ancha que la otra). Como medida
de seguridad, se podrá enchufar de una
sola manera en la toma de corriente
polarizada. Si no entrara en la toma de
corriente, inviértala. Si aún no entrara
completamente, comuníquese con un
electricista. No intente modificarla.
27. No haga funcionar el aparato debajo o
dentro de un armario/gabinete. Siempre
desconecte el aparato antes de
guardarlo en un armario/gabinete. Dejar
el aparato conectado presenta un riesgo
de incendio, especialmente si este toca las
paredes o la puerta del armario/gabinete
cuando se cierra.
2
Máquina para hacer algodón de azúcar
INSTRUCCIONES Y
LIBRO DE RECETAS
CCM-10
Para su seguridad y para disfrutar plenamente de este producto, siempre lea cuidadosamente las instrucciones
antes de usarlo.
B C M Y
100 95 90 85 80 75 70 65 60 55 50 45 40
100 95 90 85 80 75 70 65 60 55 50 45 40
100 95 90 85 80 75 70 65 60 55 50 45 40
100 95 90 85 80 75 70 65 60 55 50 45 40
50 45 4095 90 85 80 75 70 65 60 55
100
Tel: 0769-87720314 87886328 Fax: 0769-87720324
E-MAIL: [email protected]
liao
Version no.: CCM10 IB-14002-ESP
new
IB Size:
Die Cut:
Operator: Revise Ver:
Date:FEB/25/2016
Co-ordinator:
F
CCM10 IB-14002-ESP
(0.0)
Astor You / Andy WS Chan
148mm(W) x 210mm(H)
Material: 105gsm both side artpaper for whole book
Coating: gloss varnishing in cover
Colors(Cover): 4C+1C(BLACK)
(Inside): 1C+1C(BLACK)