User e Epson ET-3760 Printer
Product Basics
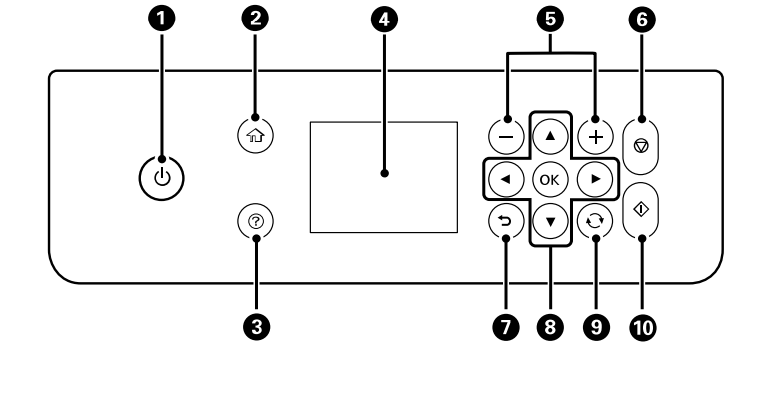
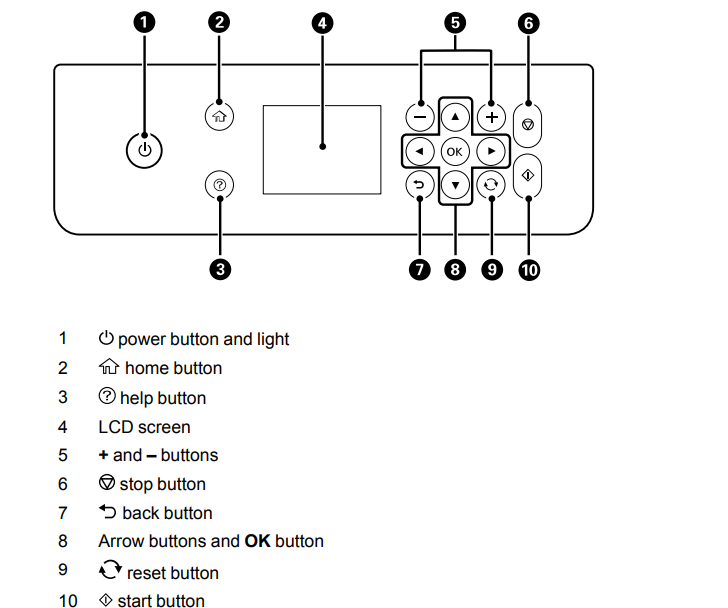
Control Panel Buttons and Lights
Turning Off the Operation Time Out Setting
- The Operation Time Out setting causes the LCD screen to return to the Home screen after a few minutes of inactivity. This feature is enabled by default, but you can turn it off.
- Press the home button, if necessary.
Select Settings.
- Using Power Saving Settings
- Your product enters sleep mode automatically and turns off the LCD screen if it is not used for a period of time. You can make the time period shorter and select other options to save energy and resources.
- Changing the Sleep Timer Settings
- Changing the Power Off Timer Settings
- Parent topic: Product Basics
- Changing the Sleep Timer Settings
- You can adjust the time period before your product enters sleep mode and turns off the LCD screen.
- Press the home button, if necessary.
Changing the Power Off Timer Settings
You can have the product turn off automatically if it is not used for a specified period of time.
- Press
 the home button, if necessary.
- Select Settings.
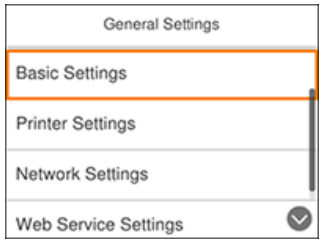
- Select General Settings. You see a screen like this:
- Select Basic Settings.
- Select Power Off Timer, then select a time period between 30 minutes and 12h (12 hours).
Setting Up Epson Connect Services
If you did not activate your product's email address for use with Epson Connect when you set up your product, you can activate it using the product control panel.
1. Press the home button, if necessary.
2. Select Settings.
3. Select General Settings. You see a screen like this
4. Select Web Service Settings.
5. Select Epson Connect Services. You see a screen like this: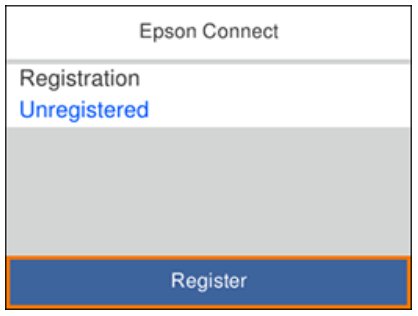
6. Select Register.
7. Follow the instructions on the screen to activate your product's email address.
Using Epson Email Print
With Epson Email Print, you can print from any device that can send email, such as your smartphone, tablet, or laptop. Just activate your product's unique email address. When you want to print, attach a PDF, Microsoft Office document, or photo to an email and send it to your product. Both the email and the attachments will print automatically.
- Connect your product to your network. See the link below.
- If you did not already set up Email Print when you installed your product software, see the link below to use your product control panel to activate your unique email address. Or visit epson.com/connect U.S), epson.ca/connect (Canada), or epsonconnect.com (Caribbean) to learn more about Email Print, create your Epson Connect account, and register your product to the Epson Connect service.
- Now you are ready to send and print emails to your product's Email Print address.
Note: Go to epsonconnect.com and log into your Epson Connect account to personalize your product's email, adjust print settings, and set up other Epson Connect services.
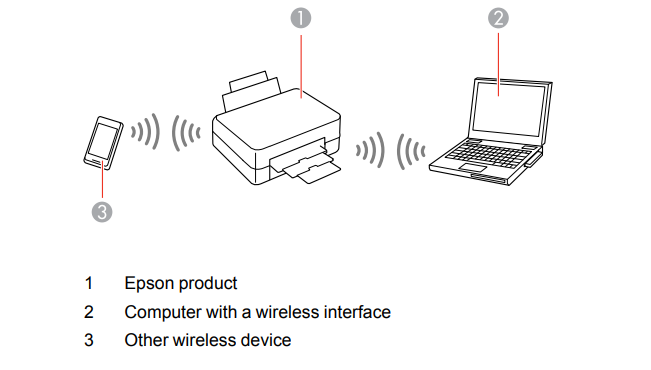
Using the Epson iPrint Mobile App
Use this free Apple and Android app to print and scan with networked Epson products. Epson iPrint lets you print PDFs, Microsoft Office documents, photos, and web pages over a wireless network. You can scan and save a file on your device, send it as an email, or upload it to an online service such as Box, Dropbox, Evernote, or Google Drive.
1. Connect your product to your wireless network. See the link below.
2. Visit epson.com/connect (U.S), epson.ca/connect (Canada), or epson.com.jm/connect (Caribbean)
to learn more about Epson iPrint and check the compatibility of your mobile device.
3. Download Epson iPrint from the Apple App Store or Google Play.
4. Connect your mobile device to the same wireless network as your product.
5. Open Epson iPrint and select your Epson product.
Now you are ready to print or scan with your mobile device and your Epson product.
Using Epson Remote Print
With Epson Remote Print software, you can print from your laptop or desktop computer to an Epson Email-enabled product anywhere in the world.
1. Connect your Epson product to your wireless network. See the link below.
2. If you did not already set up an Epson Connect account when you installed your product software, visit epsonconnect.com to create your account and register your product to the Epson Connect service.
Note: Make a note of your product's email address.
3. Visit epsonconnect.com to learn more about Remote Print and how to download the Remote Print Driver software.
4. Download and install the Remote Print software.
5. Enter the email address and optional access key of your Epson product during Remote Print setup.
6. Now you are ready to print remotely. Select the print command in your laptop or desktop computer application and choose the Remote Print option for your Epson product.
Using Windows 10 Mobile Printing
You can wirelessly print from Windows 10 Mobile tablets and phones to your nearby networked Epson product. There is no software to download, no drivers to install, and no cables to connect. Look for the print option in your Windows 10 application to send whatever is on the screen to an Epson product.
1. Connect your Epson product to your wireless network. See the link below.
2. Connect your Windows 10 Mobile device to the same wireless network as your product.
3. Now you are ready to print. From your Windows 10 application, tap the print option and select your product to print whatever is on the screen.
Wi-Fi or Wired Networking
Using the Epson iPrint Mobile App
Use this free Apple and Android app to print and scan with networked Epson products. Epson iPrint lets you print PDFs, Microsoft Office documents, photos, and web pages over a wireless network. You can scan and save a file on your device, send it as an email, or upload it to an online service such as Box, Dropbox, Evernote, or Google Drive.
- Connect your product to your wireless network. See the link below.
- Visit epson.com/connect (U.S), epson.ca/connect (Canada), or epson.com.jm/connect (Caribbean) to learn more about Epson iPrint and check the compatibility of your mobile device.
- Download Epson iPrint from the Apple App Store or Google Play.
- Connect your mobile device to the same wireless network as your product.
- Open Epson iPrint and select your Epson product.
Using Epson Remote Print
With Epson Remote Print software, you can print from your laptop or desktop computer to an Epson Email-enabled product anywhere in the world.
- Connect your Epson product to your wireless network. See the link below.
- If you did not already set up an Epson Connect account when you installed your product software, visit epsonconnect.com to create your account and register your product to the Epson Connect service.
- Note: Make a note of your product's email address.
- Visit epsonconnect.com to learn more about Remote Print and how to download the Remote Print Driver software.
- Download and install the Remote Print software.
- Enter the email address and optional access key of your Epson product during Remote Print setup.
- Now you are ready to print remotely. Select the print command in your laptop or desktop computer application and choose the Remote Print option for your Epson product.
Parent topic:
- Epson Connect Solutions for Smartphones, Tablets, and More
Using Windows 10 Mobile Printing
You can wirelessly print from Windows 10 Mobile tablets and phones to your nearby networked Epson
product. There is no software to download, no drivers to install, and no cables to connect. Look for the
print option in your Windows 10 application to send whatever is on the screen to an Epson product.
1. Connect your Epson product to your wireless network. See the link below.
2. Connect your Windows 10 Mobile device to the same wireless network as your product.
3. Now you are ready to print. From your Windows 10 application, tap the print option and select your
product to print whatever is on the screen.
Using Epson Print and Scan App with Windows Tablets
You can use this free app to print photos and scan from your Windows (Windows 8 or higher) Surface
RT or Pro tablet with networked Epson products. Epson Print and Scan App allows you to scan and
capture images right to your tablet or to Microsoft OneDrive.
Note: The Epson Print and Scan App does not support Windows 10 Mobile printing.
1. Connect your Epson product to your wireless network. See the link below.
2. Download Epson Print and Scan App from the Microsoft Windows Store.
3. Connect your Windows tablet to the same wireless network as your product.
4. Open Epson Print and Scan App and select your Epson product.
Now you are ready to print photos or scan.
Wi-Fi or Wired Networking
Using Epson Scan to Cloud
The Epson Scan to Cloud service allows you to scan and send a file as an email or upload it to an online service directly from your Epson product. Register an email address or online services such as Box, DropBox, Evernote, or Google Drive with your Epson Connect account.
- Connect your Epson product to your network. See the link below.
- If you did not already set up an Epson Connect account when you installed your product software, visit epsonconnect.com to create your account and register your product to the Epson Connect service.
- Note: Make a note of your product's email address and password.
- Visit epsonconnect.com to sign into your account with the email address and password you selected.
- Select your product, select Scan to Cloud, and select Destination List.
- Click Add, then follow the instructions on the screen to create your destination list.
- Now you are ready to use Scan to Cloud. Select the setting for scanning to Scan to Cloud on your Epson product control panel.
Using AirPrint
- AirPrint enables instant wireless printing from iPhone, iPad, and iPod touch with the latest version of iOS, and Mac with the latest version of OS X or macOS.
Note: If you disabled paper configuration messages on your product control panel, you cannot use AirPrint. See the link below to enable the messages, if necessary.
- Load paper in your product.
- Set up your product for wireless printing. See the link below.
- Connect your Apple device to the same wireless network that your product is using.
- Print from your device to your product.
Note: For details, see the AirPrint page on the Apple website.
Using Google Cloud Print
With a Google Account, you can print from your Apple or Android device to your Epson product. You can also print from Chromebooks and the Google Chrome browser without drivers or cables.
- Connect your Epson product to your wireless network. See the link below.
- Note your product's IP address by checking your network status. See the link below.
- Connect your computer or your mobile device to the same wireless network as your Epson product.
- Enter your product's IP address into the address bar of a web browser.
- Select the Google Cloud Print Services option.
- Note: If you don't see the Google Cloud Print Services option, turn your product off and back on. If the option still doesn't appear, select the Firmware Update option and follow the on-screen instructions to update your product.
- Click Register.
- Select the checkbox to agree to the Usage Advisory and click Next.
- Click OK to launch the sign-in page. A separate browser window opens.
- Enter your Google Account username and password and click Sign in, or, if you don't have an account, click Sign up for a new Google Account and follow the on-screen instructions.
- Click Finish printer registration to complete setup and print a test page.
Android Printing Using the Epson Print Enabler
You can wirelessly print your documents, emails, photos, and web pages right from your Android phone or tablet (Android v4.4 or later). With a few taps, your Android device will discover your nearby Epson product and print.
- Connect your Epson product to your wireless network. See the link below.
- On your Android device, daownload the Epson Print Enabler plug-in from Google Play.
- Go to Settings on your Android device, select Printing, and enable the Epson plug-in.
- Connect your Android device to the same wireless network as your product.
- Now you are ready to print. From an Android application such as Chrome or Gmail, tap the menu icon and print whatever is on the screen.
- Note: If you do not see your product, tap All Printers and select your product.
Using Fire OS Printing
You can wirelessly print from Amazon Fire tablets and phones to your nearby networked Epson product. There is no software to download, no drivers to install, and no cables to connect. With just a few taps in Email, Calendar, Contacts, and WPS Office, you can send whatever is on the screen to an Epson product.
- Connect your Epson product to your wireless network. See the link below.
- Connect your Amazon device to the same wireless network as your product.
- Now you are ready to print. From your Amazon application, tap the print option and select your product to print whatever is on the screen.
Note: If you see a message telling you that a plug-in is required, tap OK and tap Download. If your Amazon Fire product uses Fire OS 5 and above, your device automatically uses the built-in Mopria Print Service app to print.
Using Windows 10 Mobile Printing
You can wirelessly print from Windows 10 Mobile tablets and phones to your nearby networked Epson product. There is no software to download, no drivers to install, and no cables to connect. Look for the print option in your Windows 10 application to send whatever is on the screen to an Epson product.
- Connect your Epson product to your wireless network. See the link below.
- Connect your Windows 10 Mobile device to the same wireless network as your product.
- Now you are ready to print. From your Windows 10 application, tap the print option and select your product to print whatever is on the screen.
Network Security Recommendations
To help deter unauthorized access to your product over a network, you should protect your network environment using appropriate security measures.
Security measures such as these can help deter threats such as loss of user data, use of telephone and fax lines, and other intrusions:
Enable security on your wireless LAN
Enable the appropriate security on the wireless LAN you plan to use with your product. Network security such as a network password can deter interception of traffic over the wireless LAN. Your router may already have a default password enabled by your Internet service provider (ISP). See your ISP and router documentation for instructions on how to change the default password and better secure your network.
Connect your product only to a network protected by a firewall
- Connecting your product directly to the Internet may leave it vulnerable to security threats. Instead, connect it to a router or other network connection protected by a firewall. Your router may already have a firewall set up by your Internet service provider; check with your ISP for confirmation. For best results, set up and use a private IP address for your network connection.
Change the default administrator password on your product
- If your product has an option to set an administrator password, change the default administrator password to deter access by unauthorized users to personal data stored on your product, such as IDs, passwords, and contact lists.
Wi-Fi Infrastructure Mode Setup
Selecting Wireless Network Settings from the Control Panel
- You can select or change wireless network settings using your product control panel.
- To install your product on a wireless network, follow the instructions on the Start Here sheet and install the necessary software by downloading it from the Epson website. The installer program guides you through network setup.
Note:
- Breakdown or repair of this product may cause loss of network data and settings.
- Epson is not responsible for backing up or recovering data and settings during or after the warranty period. We recommend that you make your own backup or print out your network data and settings.
- Press the home button, if necessary.
- Select the icon and press the OK button.
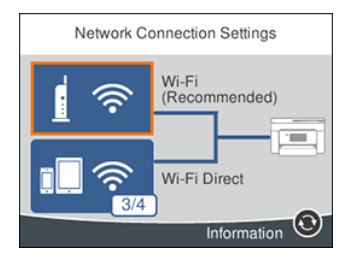
- You see a screen like this:
- Select Wi-Fi (Recommended).
- Select Start Setup or Change Settings.
Select Wi-Fi Setup Wizard.

Wi-Fi Direct Mode Setup
- You can set up your product to communicate directly with your computer or another device without requiring a wireless router or access point. In Wi-Fi Direct Mode, the product itself acts as a network access point for up to 4 devices.
Wi-Fi Protected Setup (WPS)
- If your network uses a WPS-enabled wireless router or access point, you can quickly connect your product to the network using Wi-Fi Protected Setup (WPS).
Note:
- To check if your router is WPS-enabled, look for a button labeled WPS on your router or access point. If there is no hardware button, there may be a virtual WPS button in the software for the device.
- Check your network product documentation for details.
Using WPS to Connect to a Network
- Parent topic: Wi-Fi or Wired Networking
- Using WPS to Connect to a Network
- If you have a WPS-enabled wireless router or access point, you can use Wi-Fi Protected Setup (WPS) to connect your product to the network.
- Press the home button, if necessary.
- Select the icon and press the OK button.
- Printing a Network Connection Report
- You can print a network connection report to view solutions to any problems you may have using your product on a network.
- Press the home button, if necessary.
- Select Settings.
- Select General Setting
Loading Paper
Loading Paper in the Cassette
- You can load paper up to this size in the paper cassette: Legal (8.5 × 14 inches [216 × 356 mm]).
Note:
- Before loading paper, make sure your product is not currently printing, scanning, or copying.
Open the front cover.
- Pull out the paper cassette until it stops.
- Slide the edge guides outward.
Do one of the following:
- Insert paper into the cassette with the glossy or printable side facedown and slide it in until it stops.
Note:
- Make sure the paper is loaded against the rear of the cassette.
- For legal-size paper, extend the legal paper guide and load paper using the guide line as shown.
- Slide the edge guides against the paper, but not too tightly.
- Note: Make sure the paper fits under the tabs on the edge guides.
- Slide the cassette back into the product until it stops.
- Select the size and type of the paper you loaded on the product LCD screen and select OK.
Note:
- If you are printing on letterhead, make sure you select Letterhead as the paper type. Make sure you select the correct paper size setting.
- Extend the output tray
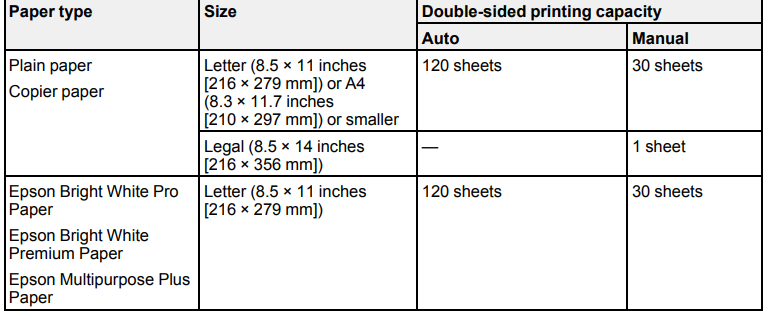
Paper Loading Capacity
Double-sided Printing Capacity

Selecting the Default Paper Source Settings
- You can change default paper source settings using the control panel on the product.
- Press the home button, if necessary.
- Select Settings > General Settings > Printer Settings.
- You see a screen like this:
- Select one of these Auto Error Solver options:
- Turn on this setting to display a warning and print single-sided when a 2-sided printing error occurs, or to print only what the printer could process when a memory full error occurs.
- Turn off this setting to display an error message and stop printing if an error occurs.
- Select the Paper Source Settings options you want to use.
- When you are finished, press the home button to exit.
Placing Originals on the Product
- Follow the instructions here to place your original documents or photos on the product.
Caution:
- Do not place anything on top of your product or use its cover as a writing surface to avoid damaging it.
- Placing Originals on the Scanner Glass
- Placing Originals in the Automatic Document Feeder
- ADF Original Document Specifications
- Placing Originals on the Scanner Glass
- You can place originals up to this size on the scanner glass: Letter (8.5 × 11 inches [216 × 279 mm])
Note:
- When originals are placed in the ADF and on the scanner glass, priority is given to the originals in the ADF
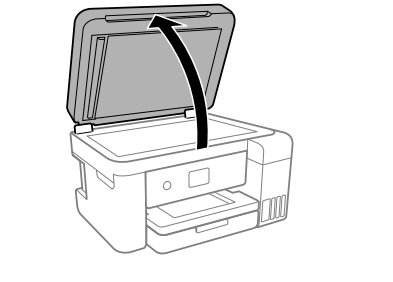
Open the document cover.
- Place your original facedown on the scanner glass with the top facing into the corner. Slide the original to the edges of the indicated corner.
Note:
- The edges of your original may be cropped by 0.06 inch (1.5 mm) from the edge of the scanner glass. Manually position your original away from the edges to prevent cropping.
- Close the document cover gently to keep your original in place.
Caution:
- Do not push down on the document cover or scanner glass or you may damage the product.
- Placing Originals in the Automatic Document Feeder
- You can place single- or multi-page original documents in the Automatic Document Feeder (ADF). Make sure the originals meet the Automatic Document Feeder specifications before loading them.
Caution:
- Make sure your originals are not creased or folded, and do not contain holes, staples, tape, or other materials that could obstruct the feeder.
Caution:
- Do not place photographs or valuable artwork in the ADF. Place fragile or valuable originals on the scanner glass to avoid wrinkling or damaging them.
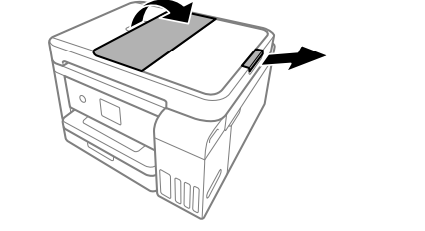
- Open the ADF document support and slide out the ADF output tray extension.
- Slide the ADF edge guide outward.
- Fan your stack of originals and tap them gently on a flat surface to even the edges.
Copying Documents or Photos
- You can copy documents or photos onto various sizes and types of paper, including Epson special papers.
- Place your original document or photo on the scanner glass, or place multi-page documents in the ADF.
- Load the paper you want to print on.
- Press the home button, if necessary.
Placing Originals on the Product
Placing Originals on the Scanner Glass
- You can place originals up to this size on the scanner glass: Letter (8.5 × 11 inches [216 × 279 mm]) or A4 (8.3 × 11.7 inches [210 × 297 mm]).
Note:
- When originals are placed in the ADF and on the scanner glass, priority is given to the originals in the ADF.
Open the document cover.
- Place your original facedown on the scanner glass with the top facing into the corner. Slide the original to the edges of the indicated corner.
Note:
- The edges of your original may be cropped by 0.06 inch (1.5 mm) from the edge of the scanner glass. Manually position your original away from the edges to prevent cropping.
- Close the document cover gently to keep your original in place.
Caution:
- Do not push down on the document cover or scanner glass or you may damage the product.
Placing Originals in the Automatic Document Feeder
- You can place single- or multi-page original documents in the Automatic Document Feeder (ADF). Make sure the originals meet the Automatic Document Feeder specifications before loading them.
Caution:
- Make sure your originals are not creased or folded, and do not contain holes, staples, tape, or other materials that could obstruct the feeder.
Caution:
- Do not place photographs or valuable artwork in the ADF. Place fragile or valuable originals on the scanner glass to avoid wrinkling or damaging them.
ADF Original Document Specifications
- Photos
- Thermal paper
- Fabric or other non-paper originals
- Originals with uneven surfaces, such as embossed documents
- Originals containing staples or paper clips
- Originals with carbon paper backing
- Originals with wet ink
- Originals that are bound
- Originals with labels, stickers, or sticky notes
- Ripped, curled, folded, deteriorated, or wrinkled originals
- Originals with holes
- Transparencies
- Carbon-less paper
- Originals that are cut in an irregular shape or with corners that are not right angles
Copying
Copying Documents or Photos
- You can copy documents or photos onto various sizes and types of paper, including Epson special papers.
- Place your original document or photo on the scanner glass, or place multi-page documents in the
- ADF.
- Load the paper you want to print on.
- Press the home button, if necessary.
- Select Copy.
Copying Options
Printing from a Computer
- Before printing from your computer, make sure you have set up your product and installed its software as described on the Start Here sheet.
Note:
- If you have an Internet connection, it is a good idea to check for updates to your product software on Epson's support website.
- If you see a Software Update screen, select Enable automatic checking and click OK. The update scans your system to see if you have the latest product software. Follow the on-screen instructions.
Printing with Windows
- You can print with your product using any Windows application, as described in these sections.
Note:
- If you are using your Epson product with the Windows 10 S operating system, you cannot use the software described in this section.
- You also cannot download and install any Epson product software from the Epson website for use with Windows 10 S; you must obtain software only from the Windows
Store.
- Selecting Basic Print Settings - Windows
- Select the basic settings for the document or photo you want to print.
- Open a photo or document for printing.
- Select the print command in your application.
Note:
- You may need to select a print icon on your screen, the Print option in the File menu, or another command. See your application's help utility for details.
- If necessary, select your product name as the printer you want to use.
Note:
- You may also need to select Properties or Preferences to view your print settings.
- Select the size of the paper you loaded as the Document Size setting.
Note:
- You can also select the User-Defined setting to create a custom paper size, but you cannot use the Borderless setting and the Quality setting will be set to Standard.
- If you are printing a borderless photo, select Borderless. You can click Settings to access additional options for borderless printing.
Note:
- You must select a compatible borderless paper type and size to print without borders. Check the borderless paper compatibility list for details.
- Select the orientation of your document.
Note:
- If you are printing an envelope, select Landscape.
- Select the type of paper you loaded as the Paper Type setting.
Print Quality Options - Windows
- You can select any of the available Quality options to fine-tune the quality of your print. Some settings may be unavailable, depending on the paper type and border setting you have chosen.
Draft
- For draft printing on plain paper.
Standard
- For everyday text and image printing.
Standard - Vivid
- For text and graphics with good quality and print speed.
High
- For photos and graphics with high print quality.
More Settings
- Opens a window that lets you choose among levels of speed and quality.
- Selecting Double-sided Printing Settings - Windows
- You can print on both sides of the paper by selecting one of the 2-Sided Printing options on the Main tab.
Note:
- Some options may be pre-selected or unavailable, depending on other settings you have chosen or if you are accessing the product over a network.
Select one of the following options for 2-Sided Printing:
- Auto (Long-edge binding) to print your double-sided print job by automatically flipping the paper on the long edge.
- Auto (Short-edge binding) to print your double-sided print job by automatically flipping the paper on the short edge.
- Manual (Long-edge binding) to print your double-sided print job by printing one side and prompting you to flip the paper over on the long edge to print the other side (recommended for paper types that do not support automatic duplexing).
- Manual (Short-edge binding) to print your double-sided print job by printing one side and prompting you to flip the paper over on the short edge to print the other side (recommended for paper types that do not support automatic duplexing).
- Click the Settings button.
Print Quality Options - Windows
- You can select any of the available Quality options to fine-tune the quality of your print. Some settings may be unavailable, depending on the paper type and border setting you have chosen.
More Settings
- Opens a window that lets you choose among levels of speed and quality.
- Selecting Double-sided Printing Settings - Windows
- You can print on both sides of the paper by selecting one of the 2-Sided Printing options on the Main tab.
Note:
- Some options may be pre-selected or unavailable, depending on other settings you have chosen or if you are accessing the product over a network.
Select one of the following options for 2-Sided Printing:
- Auto (Long-edge binding) to print your double-sided print job by automatically flipping the paper on the long edge.
- Auto (Short-edge binding) to print your double-sided print job by automatically flipping the paper on the short edge.
- Manual (Long-edge binding) to print your double-sided print job by printing one side and prompting you to flip the paper over on the long edge to print the other side (recommended for paper types that do not support automatic duplexing).
- Manual (Short-edge binding) to print your double-sided print job by printing one side and prompting you to flip the paper over on the short edge to print the other side (recommended for paper types that do not support automatic duplexing).
- Click the Settings button.
Color Controls
- Lets you select a Color Mode setting, individual settings for Brightness, Contrast, Saturation, and
- Density, and individual color tones. Depending on the selected color mode, you can also adjust the midtone density using the Gamma setting.
Fix Photo
- Improves the color, contrast, and sharpness of flawed photos.
- Fix Photo uses a sophisticated face recognition technology to optimize photos that include faces. For this to work, both eyes and the nose must be visible in the subject's face.
- If your photo includes a face with an intentional color cast, such as a statue, you may want to turn off Fix Photo to retain the special color effects.
Selecting Default Print Settings - Windows
- When you change your print settings in a program, the changes apply only while you are printing in that program session.
- If you want to change the print settings you use in all your Windows programs, you can select new default print settings.
- Access the Windows Desktop and right-click the icon for your product in the right side of the
- Windows taskbar, or click the up arrow and right-click .
Select Printer Settings.
- Changing the Language of the Printer Software Screens
- You can change the language used on the Windows printer software screens.
- Access the Windows Desktop and right-click the icon for your product in the right side of the
- Windows taskbar, or click the up arrow and right-click .
Scanning
- Starting a Scan Using the Product Control Panel
- You can scan an image to a variety of destinations uing your product's control panel.
- Make sure you installed the product software and connected the product to your computer or network.
Note:
- Restart your computer after installing the product software to enable scanning from the control panel.
- Place your original on the product for scanning.
- Press the home button, if necessary.
Select Scan.
- Select one of the following Scan to options:
- Computer lets you scan to a connected computer using your saved scan settings.
- Cloud sends your scanned files to a destination that you have registered with Epson Connect.
- Computer (WSD) lets you manage network scanning in Windows 10, Windows 8.x, Windows 7, or Windows Vista (English only). To use this feature, you must first set up a WSD (Web Services for Devices) port on your Windows 7 or Windows Vista computer (the port is set up automatically on Windows 10 and Windows 8.x).
- Follow the instructions in the links below to complete your scan.
Scanning to a Connected Computer
- You can scan an original and save it to a connected computer using your product's control panel. The computer must be connected using a USB cable or connected to the same network as your product.
- You can save the scanned file as a JPEG or PDF file, or attach it to an email. You can also set up custom scan settings using Event Manager and automatically scan using those settings on your product control panel.
Note:
- Be sure you have installed Epson Scan 2 and Event Manager on your computer before scanning to your computer.
- Place your original on the product for scanning.
- Press the home button, if necessary.
Select Scan.
- Select OK to close the information screen, if necessary.
- Select Select a computer and choose one of the following options:
- If your computer is connected to your product over a network, select a connected computer from the displayed list. (If the computer is not listed, select Search Again.)
- If your computer is connected to your product using a USB cable, select USB Connection.
- Select Save as PDF and choose one of the following options:
- Save as JPEG to save the scanned image as a JPEG file.
- Save as PDF to save the scanned document or image as a PDF file.
- Attach to email to open the default email software on your computer and save the scanned document or images as an email attachment.
- Follow custom setting to save the scanned document or image using custom settings you have selected using the Event Manager custom scan settings option.
Setting Up a WSD Port (Windows 7/Windows Vista)
- You can scan to a networked Windows computer using WSD (Web Services for Devices). You must first set up a WSD port on your Windows 7 or Windows Vista system (the port is set up automatically on
- Windows 10 and Windows 8.x).
- Before you set up a WSD port, make sure you installed your product software, and connected your product and computer to the same network.
Turn on your product.
- Print a network status sheet so you can identify the network name and model name for your product on the network.
- Click or Start and select Computer.
- On the left side of the window, select Network.
- Locate your product on the Network screen, right-click it, and select Install.
- When you see the User Account Control screen, click Continue.
- Note: If you see an Uninstall screen, click Uninstall and repeat these steps as necessary.
- When you see the message Your device is ready to use in the Windows taskbar, click the message.
- On the Driver Software Installation screen, make sure your product is listed as Ready to use. Then click Close.
Control Panel Scanning Options

Changing Default Scan Job Settings
- You can view or change the default scan job settings your product uses when you scan to your computer. You do this using the Event Manager program.
- Do one of the following to open Event Manager:
- Windows 10: Click and select EPSON Software > Event Manager.
- Windows 8.x: Navigate to the Apps screen and select Event Manager.
- Windows (other versions): Click or Start > All Programs or Programs > EPSON Software
Event Manager.
- Mac: Open the Applications folder, click Epson Software, and select Event Manager.
- Open the Scanner (Windows) or Select Scanner (Mac) drop-down list and select your product, if necessary.
- Click Make Job Settings.
- Open the Edit Job Settings drop-down list and select the scan job settings you want to view or change.
Change the settings as necessary.
- If you create a new job, you can only assign it to the Custom Action setting. You can change the settings of the other assigned jobs, but you cannot rename them or select a different job.
Starting a Scan Using the Epson Scan 2 Icon
- You can start the Epson Scan 2 program to select scan settings, scan, and save the scanned image to a file.
- If you are using your Epson product with the Windows 10 S operating system, you cannot use the software described in this section.
- You also cannot download and install any Epson product software from the Epson website for use with Windows 10 S; you must obtain software only from the Windows
- Starting a Scan from a Scanning Program You can start Epson Scan 2 from a TWAIN-compliant scanning program to select scan settings, scan, and open the scanned image in the program. 127
Note:
- If you are using your Epson product with the Windows 10 S operating system, you cannot use the software described in this section.
- You also cannot download and install any Epson product software from the Epson website for use with Windows 10 S; you must obtain software only from the Windows Store. 1. Open your scanning program and select its scanning option. (See your scanning program help for instructions.) 2. Select your product.
Note:
- In certain programs, you may need to select your product as the "source" first. If you see a Select Source option, choose it and select your produc
- With Windows, do not select a WIA option for your product; not all scan functions will be available.
Starting a Scan from a Smart Device
- You can start a scan from a smart device using the Epson iPrint app. You can save the scanned document to your device or a cloud service, e-mail it, or print it.
Note:
- If you are using your Epson product with the Windows 10 S operating system, you cannot use the software described in this section.
- You also cannot download and install any Epson product software from the Epson website for use with Windows 10 S; you must obtain software only from the Windows
Store.
- Your device must be connected to the same wireless network as your Epson product.
- Download the Epson iPrint app from your device's app store or from Epson's website.
- Place your original on the product for scanning.
- Open the Epson iPrint app and select your product.
- Select the scan settings and scan your original.
- Save your scanned image to a file or cloud location.
Additional Scanning Settings - Main Settings Tab
- You can select these additional scanning settings on the Epson Scan 2 Main Settings tab. Not all adjustment settings may be available, depending on other settings you have chosen.
- Correct Document Skew
- Corrects skewed originals, image contents, or both.
- Add or edit pages after scanning
- Lets you add, remove, or edit the pages in a scan, including rotating pages and changing the page order.
- Note: To save multiple pages in a single file, you must select a file format that supports multiple pages such as PDF or Multi-TIFF. If you select another file format, each scanned image or page is saved as a separate file.
- Parent topic: Scanning in Epson Scan 2
Additional Scanning Settings - Advanced Settings Tab
- You can select these additional scanning settings on the Epson Scan 2 Advanced Settings tab. Not all adjustment settings may be available, depending on other settings you have chosen.
- Remove Background
- Removes the background of the originals.
- Text Enhancement
- Sharpens the appearance of letters in text documents.
- Auto Area Segmentation
- Makes black and white images clearer and text recognition more accurate by separating the text from the graphics.
- Threshold Adjusts the level at which black areas in text and line art are delineated, improving text recognition in
- OCR (Optical Character Recognition) programs.
Cleaning and Transporting Your Product
Cleaning Your Product
- To keep your product working at its best, you should clean it several times a year.
Caution: Do not use a hard brush, alcohol, or paint thinner to clean the product or you may damage it.
- Do not use oil or other lubricants inside the product or let water get inside it.
- Turn off the product.
- Unplug the power cord.
- Disconnect any connected cables.
- Pull out the paper cassette and remove the paper.
- Open the document cover.
Cleaning the Paper Rollers
- If you encounter repeated paper feed issues from the cassette, clean the paper rollers inside the product.
- Turn off the product.
- Unplug the power cable.
- Disconnect any connected cables.
- Slide out the paper cassette and remove the paper.
- Make sure the ink tank caps are securely closed.
- Place the product on its side with the ink tank on the bottom.
Warning:
- Be careful not to trap your fingers under the product.
- Use a soft, moist cloth to clean the paper rollers, as shown. Rotate the rollers to clean them thoroughly.
- Return the product to its normal position.
Caution:
- Do not leave the printer on its side for an extended period of time.
- Replace the paper, slide in the paper cassette, and connect the power cord.
Transporting Your Product
- If you need to store your product or transport it some distance, prepare it for transportation as described here.
- During transportation and storage, follow these guidelines:
- Avoid tilting the product, placing it vertically, or turning it upside down; otherwise ink may leak.
- When storing or transporting an opened ink bottle, do not tilt the bottle and do not subject it to impacts or temperature changes. Otherwise, ink may leak even if the cap on the ink bottle is tightened securely. Keep the ink bottle upright when tightening the cap and keep the bottles level during transportation.
- Do not put opened ink bottles in the box with the product.
- Do not carry the product by its control panel; this may damage the product.
- Turn off the product.
- Remove all the paper from the product.
- Unplug the power cable.
- Disconnect any connected cables.
- Lift up the scanner unit and check to see if the print head is in the far right position (the home position). If not, turn on the product, wait for the print head to move to the far right, then turn the product off again.
- Secure the print head to the case with tape.
Caution:
- Do not place tape on the white flat cable inside the product; otherwise, you may damage your product.
- Make sure the ink tank caps are securely closed and close the ink tank cover.
- Lower the scanner unit
Solving Problems
Checking for Software Updates
It's a good idea to check Epson's support website occasionally for free updates to your product software.Visit epson.com/support (U.S.), epson.ca/support (Canada), or epson.com.jm/support (Caribbean) and select your product.
- Windows: Your printer software automatically checks for updates. You can also manually update the software by selecting Software Update here:
- Accessing the Windows Desktop and right-clicking the icon for your product in the right side of the Windows taskbar, or clicking the up arrow and right-clicking .
- On the Maintenance tab in the printer settings window
You can also update the software by selecting EPSON Software Updater in the EPSON or EPSON Software program group, accessible by the Start button, or on the Start or Apps screens, depending on your version of Windows.
- OS X: You can manually update the software by opening the Applications > Epson Software folder and selecting EPSON Software Updater.
- macOS 10.12.x or later: You can manually update the software by opening the App Store, selecting Updates, searching for a software update option for Epson Software, and selecting Update.
Product Status Messages
You can often diagnose problems with your product by checking the messages on its LCD screen. You can also see help information and how-to instructions on the screen. Press the home button, if necessary, and select the (?) help button.
| LCD screen message |
Condition/solution |
| Printer error. Turn on the printer again. See your documentation for details |
A fatal error has occurred. Turn the product off and then back on again. If the error continues, check for a paper jam. If there is no paper jam, contact Epson for support. |
| Paper out in XX. |
Load paper in the specified cassette |
| Paper Setup Auto Display is set to Off. Some features may not be available. For details, see your documentation. |
The Paper Setup Auto Display setting must be turned on to use AirPrint. |
| The printer's borderless printing ink pad is nearing the end of its service life. It is not a user-replaceable part. Please contact Epson support. |
The ink pad is near the end of its service life and the message will be displayed until the ink pad is replaced. Contact Epson for support. (To resume printing, select Dismiss.) |
| To use cloud services, update the root certificate from the Epson Web Config utility. |
Access your product's built-in Web Config utility and update the root certificate for your product. |
| The combination of the IP address and the subnet mask is invalid. See your documentation for more details. |
There is a problem with the network connection to your product. Check the solutions in this guide. |
| Check that the printer driver is installed on the computer and that the port settings for the printer are correct. |
Make sure the printer port is selected correctly on the Port tab of the Printer Properties screen (Windows) or the System Properties > USB list (Mac). Select USBXXX for a USB connection or EpsonNet Print Port for a network connection. |
| Check that the printer driver is installed on the computer and that the USB port settings for the printer are correct. |
| Recovery mode |
An error has occurred during firmware updating. Connect your product using a USB cable and try updating the firmware again. If you still receive this error message, contact Epson for support. |
Note: The ink pads in the printer collect, distribute, and contain the ink that is not used on printed pages. During the life of your product it may reach a condition where either satisfactory print quality cannot be maintained or the ink pads have reached the end of their usable life. The Epson Status Monitor, your LCD screen, or lights on the control panel will advise you when these parts need replacing. If this happens during the standard warranty of the product, the exchange of the product or replacement of the 183 pads is covered under the standard warranty. If the product is out of warranty, the pads can be replaced by any Epson authorized service provider. The waste ink pads are not a user-replaceable part.
Message Appears Prompting You to Reset Ink Levels
If you see a message on the LCD screen prompting you to reset the ink levels, do the following:
1. Refill all of the ink tanks or the ink tanks indicated on the LCD screen all the way to the top.
Note:
- Depending on the operating conditions, you may see the ink reset message even when there is still ink in the tanks.
2. Select the colors that you refilled on the LCD screen.
3. Follow the instructions on the LCD screen to reset the ink levels.
Note: The product has a low ink alert system. The accuracy of this system depends on the user refilling the ink tanks correctly. The product cannot directly measure the ink levels in the tanks; instead it estimates the amount of ink remaining by internally monitoring ink usage. The low ink alert system may generate inaccurate messages if the ink tanks are not refilled according to these instructions.
As a precaution, perform regular visual inspections of the ink tanks to ensure ink levels do not fall below the lower line. Continued use of the product when the ink level is below the lower line on the tank could damage the product.
Running a Product Check
Running a product check helps you determine if your product is operating properly.
- Disconnect any interface cables connected to your product.
- Load plain paper in the product.
- Press the home button, if necessary.
- Select Maintenance and press the OK button.
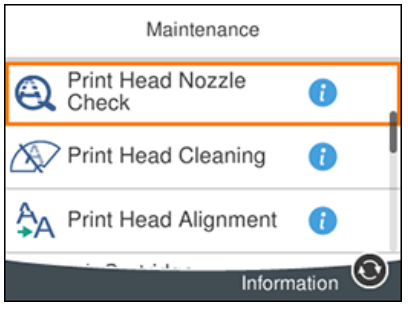
- Select Print Head Nozzle Check and press the OK button.
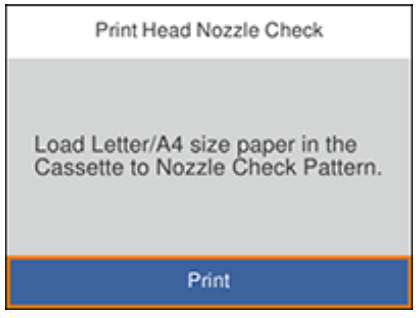
- Press the OK button.
The nozzle check pattern is printed.
7. Do one of the following, depending on the results of the product check:
- If the page prints and the nozzle check pattern is complete, the product is operating properly. Any operation problem you may have could be caused by your computer, cable, software, or selected settings. Check the other solutions in this book or try uninstalling and reinstalling your printer software.
- If the page prints but the nozzle check pattern has gaps, clean or align the print head.
- If the page does not print, the product may have a problem. Check the other solutions in this manual. If they do not work, contact Epson.
The nozzle check pattern is printed.
- Do one of the following, depending on the results of the product check:
- If the page prints and the nozzle check pattern is complete, the product is operating properly. Any operation problem you may have could be caused by your computer, cable, software, or selected settings. Check the other solutions in this book or try uninstalling and reinstalling your printer software.
- If the page prints but the nozzle check pattern has gaps, clean or align the print head.
- If the page does not print, the product may have a problem. Check the other solutions in this manual. If they do not work, contact Epson.
Resetting Control Panel Defaults
If you have a problem with settings on the product control panel, you can reset them to their factory defaults. You can choose which settings to reset or reset them all.
1. Press the home button, if necessary.
2. Press the arrow buttons to select Settings and press the OK button.
3. Select Restore Default Settings and press the OK button.
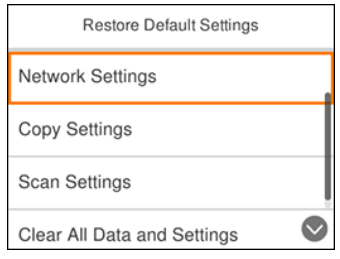
4. Select one of these options:
• Network Settings: Resets all network settings.
• Copy Settings: Resets all copy settings.
• Scan Settings: Resets all scan settings.
• Clear All Data and Settings: Resets all control panel settings and any stored information.
You see a confirmation screen.
5. Select Yes to reset the selected settings. (Select No if you want to cancel the operation.)
Parent topic: Solving Problems
Solving Setup Problems
Check these sections if you have problems while setting up your product.
Noise After Filling the Ink
If you hear noises from your product after filling the ink tanks with ink, check these explanations:
• The first time you fill the tanks with ink, the product must charge its print head. Wait until charging finishes before you turn off the product, or it may charge improperly and use excess ink the next time you turn it on. Your product is finished charging the print head when the power light stops flashing.
• If the product's print head stops moving or making noise, and the charging process has not finished after approximately 20 minutes, turn off your product. Turn it back on and check to see if charging is still in progress. If it is still in progress, contact Epson for help.
Software Installation Problems
If you have problems while installing your product software, try these solutions:
• Make sure your product is turned on and any necessary cables are securely connected at both ends. If you still have problems installing software, disconnect the cable and carefully follow the instructions on the Start Here sheet. Also make sure your system meets the requirements for your operating system.
• Close any other programs, including screen savers and virus protection software, and install your product software again.
• In Windows, make sure your product is selected as the default printer and the correct port is shown in the printer properties.
• If you see any error message or your software does not install correctly in Windows, you may not have software installation privileges. Contact your system administrator.
Control Panel Setup Problems
If you have problems setting up the control panel, try these solutions:
• To view LCD screen text in a different language, select a different language setting for the panel.
• To adjust the position of the control panel, carefully raise or lower it.
Solving Network Problems
Check these solutions if you have problems setting up or using your product on a network.
Note: Breakdown or repair of this product may cause loss of network data and settings. Epson is not responsible for backing up or recovering data and settings during or after the warranty period. We recommend that you make your own backup or print out your network data and settings.
Product Cannot Connect to a Wireless Router or Access Point
If your product has trouble finding or connecting to a wireless router or access point, try these solutions:
• If you are connecting the product via Wi-Fi Protected Setup (WPS) and the Wi-Fi icon on your product's LCD screen is not lit or does not appear, make sure you select one of the WPS options from the product control panel within 2 minutes of pressing the WPS button on your router.
• Make sure to place your product within contact range of your 2.4 GHz router or access point. Avoid placing your product near a microwave oven, 2.4 GHz cordless phone, or large metal object, such as a filing cabinet.
Note: If you are using a 5 GHz wireless router, set the router to operate in dual band (2.4 GHz and 5 GHz) mode. If your router uses a single network name (SSID) for both the 2.4 GHz and 5 GHz band, give each band its own network name (SSID) instead, such as Home Network 2.4 GHz and Home Network 5 GHz. See your router documentation or contact your internet service provider for instructions.
• Verify that your router or access point is operating correctly by connecting to it from your computer or another device.
• Print a network connection report and check the codes and messages on the report to help determine the cause of the problem.
• You may need to disable the firewall and any anti-virus software on your wireless router or access point.
• Try restarting your router following the instructions in your router documentation.
Note: If you are reading these instructions online, you will lose your Internet connection when you restart your router.
• Check to see if access restrictions, such as MAC address filtering, are set on the router or access point. If access restrictions are set, add your product's MAC address to your router's address list. To
obtain your product's MAC address, print a network status sheet. Then follow the instructions in your router or access point documentation to add the address to the list.
• If your router or access point does not broadcast its network name (SSID), follow the instructions that came with your product to enter your wireless network name manually.
• If your router or access point has security enabled, determine the kind of security it is using and any required password or passphrase for connection. Then make sure to enter the exact WEP key or WPA passphrase correctly.
• Check if your computer is restricting the available wireless channels. If so, verify that your wireless access point is using one of the usable channels and change to a usable channel, if necessary.
• If you are using a Wi-Fi Direct connection that suddenly disconnects, the Wi-Fi direct password on your device may have been changed. If necessary, delete the existing DIRECT-xxxxxxxx connection settings from your device and enter a new password. See your device documentation for instructions.
• If you connected your product to a Windows computer using Wi-Fi Direct and it automatically selected Access Point Mode, you may have trouble accessing a low-priority Internet connection. Check the network connection or adapter settings in the Windows Control Panel and set the Internet metric setting to 100 for your version of the Internet Protocol.
Network Software Cannot Find Product on a Network
If EpsonNet Setup cannot find your product on a network, try these solutions:
• Make sure your product is turned on and connected to your network. Verify the connection using your product control panel.
• Check if your network name (SSID) contains non-ASCII characters. Your product cannot display nonASCII characters.
• Print a network connection report and check the codes and messages on the report to help determine the cause of the problem.
• Make sure your product is not connected to a guest network.
• If necessary, reinstall your product software and try running EpsonNet Setup again:
1. Reset your product's network settings to their factory defaults.
2. Windows only: Uninstall your product software.
3. Restart your router following the instructions in your router documentation.
Note: If you are reading these instructions online, you will lose your Internet connection when you restart your router, so note the next step before restarting it.
4. Download your product software from the Epson website using the instructions on the Start Here sheet.
• If you have replaced your router, reinstall your product software to connect to the new router.
Note: If you are using a 5 GHz wireless router, set the router to operate in dual band (2.4 GHz and 5 GHz) mode. If your router uses a single network name (SSID) for both the 2.4 GHz and 5 GHz band,
give each band its own network name (SSID) instead, such as Home Network 2.4 GHz and Home Network 5 GHz. See your router documentation or contact your internet service provider for
instructions.
• Check to see if your wireless router or access point has an enabled Privacy Separator function that is preventing detection of your device over the network. See your router or access point documentation for instructions on disabling the Privacy Separator function.
Product Does Not Appear in Mac Printer Window
If your product does not appear in the Mac printer window, try these solutions:
• Turn your product off, wait 30 seconds, then turn it back on again.
• If you are connecting the product via Wi-Fi Protected Setup (WPS) and the Wi-Fi icon on your product's LCD screen is not lit, make sure you select one of the WPS options from the product control panel within 2 minutes of pressing the WPS button on your router.
• If you are connecting the product wirelessly via EpsonNet Setup and the Wi-Fi icon does not appear lit on your LCD screen, make sure your product software was installed correctly. If necessary, reinstall your software.
Note: If you are using a 5 GHz wireless router, set the router to operate in dual band (2.4 GHz and 5 GHz) mode. If your router uses a single network name (SSID) for both the 2.4 GHz and 5 GHz band, give each band its own network name (SSID) instead, such as Home Network 2.4 GHz and Home Network 5 GHz. See your router documentation or contact your internet service provider for instructions.
Wireless Network Connection is Unstable on a Mac
If you connected a device to a USB 3.0 port on your Mac, you may experience wireless network interference between your product and your Mac.
If you cannot connect to your product over the wireless network or the connection becomes unstable, move the device connected to your Mac USB 3.0 port further away from your Mac.
Cannot Print Over a Network
If you cannot print over a network, try these solutions:
• Make sure that your product is turned on.
• Make sure you install your product's network software as described in your product documentation.
• Print a network status sheet and verify that the network settings are correct. If the network status is
Disconnected, check any cable connections and turn your product off and then on again.
• Print a network connection report and check the codes and messages on the report to help determine the cause of the problem.
• If you are using TCP/IP, make sure the product's IP address is set correctly for your network. If your network does not assign IP addresses using DHCP, set the IP address manually.
• Make sure your computer and product are both using the same wireless network.
• If network printing is slow, print a network status sheet and check the signal strength. If it is poor, place your product closer to your router or access point. Avoid placing your product near a microwave oven, 2.4 GHz cordless phone, or large metal object, such as a filing cabinet.
Note: If you are using a 5 GHz wireless router, set the router to operate in dual band (2.4 GHz and 5 GHz) mode. If your router uses a single network name (SSID) for both the 2.4 GHz and 5 GHz band, give each band its own network name (SSID) instead, such as Home Network 2.4 GHz and Home Network 5 GHz. See your router documentation or contact your internet service provider for instructions.
• Try restarting your router following the instructions in your router documentation.
Note: If you are reading these instructions online, you will lose your Internet connection when you restart your router.
• Check to see if your wireless router or access point has an enabled Privacy Separator function that is preventing printing from a device over the network. See your router or access point documentation for instructions on disabling the Privacy Separator function.
• If you are connecting the product wirelessly via EpsonNet Setup and the Wi-Fi connection icon is not lit or does not appear on the product's LCD screen, make sure your product software was installed correctly. If necessary, reinstall your software.
Cannot Scan Over a Network
If you cannot start Epson Scan 2 for scanning over a network, try these solutions:
• If you cannot scan from your product control panel, make sure you restarted your computer after installing the product software. Make sure the Event Manager program is not being blocked by your firewall or security software.
Note: If you are using a 5 GHz wireless router, set the router to operate in dual band (2.4 GHz and 5 GHz) mode. If your router uses a single network name (SSID) for both the 2.4 GHz and 5 GHz band, give each band its own network name (SSID) instead, such as Home Network 2.4 GHz and Home Network 5 GHz. See your router documentation or contact your internet service provider for instructions.
• If you are scanning a large original at a high resolution, a network communication error may occur. Try scanning again at a lower resolution.
• If network communication was interrupted while starting Epson Scan 2, exit Epson Scan 2, wait a few seconds, and restart it. If Epson Scan 2 cannot restart, turn off your product, turn it back on, and try restarting Epson Scan 2 again.
• Check the scanner setting and reset the connection if necessary using Epson Scan 2 Utility:
Windows 10: Click and select EPSON > Epson Scan 2 Utility. Make sure your product is selected. If necessary, select the Other tab and click Reset.
Windows 8.x: Navigate to the Apps screen, select EPSON, and select Epson Scan 2 Utility. Make sure your product is selected. If necessary, select the Other tab and click Reset.
Windows (other versions): Click  or Start > All Programs or Programs > EPSON > Epson Scan 2 > Epson Scan 2 Utility. Make sure your product is selected. If necessary, select the Other
tab and click Reset.
Mac: Open the Applications folder, click Epson Software, and click Epson Scan 2 Utility. Make sure your product is selected. If necessary, select the Other tab and click Reset.
• You may need to disable the firewall and any anti-virus software on your wireless router or access point.

Product Makes Noise, But Nothing Copies
If your product makes a noise, but nothing copies, try these solutions:
• Run a nozzle check to see if any of the print head nozzles are clogged. Then clean the print head, if necessary.
• If the nozzle check page does not print, but the product's power is on, make sure your product software is installed correctly.
• Make sure your product is level (not tilted).
Paper Feeding Problems
If you have problems feeding paper, try these solutions:
• Make sure the paper cassette is inserted all the way in the printer.
• If paper does not feed correctly, remove and reload it in the cassette and adjust the edge guides.
Make sure the paper stack is not above the tab on the edge guides inside the cassette.
• If multiple pages feed at once, remove the paper, fan the edges to separate the sheets, and reload it.
• Do not load more than the recommended number of sheets.
• Make sure your paper meets the specifications for your product.
• If paper jams when you print on both sides of the paper, try loading fewer sheets.
• For best results, follow these guidelines:
• Use new, smooth, high-quality paper that is not curled, creased, old, too thin, or too thick.
• Load paper in the cassette printable side down.
• Follow any special loading instructions that came with the paper.
Paper Jams Inside the Product
If you see a message that paper has jammed in the product, follow the on-screen instructions to locate and remove the jammed paper.
Take the following precautions when removing jammed paper from the product:
• Remove the jammed paper carefully. Using too much force may damage the product.
• Unless specifically instructed, avoid tilting the product, placing it on its side, or turning it upside down, as ink may spill.
Warning: Never touch the buttons on the control panel while your hand is inside the product. If the product starts operating, it may cause an injury. Do not touch any protruding parts inside the product.
Paper Ejection Problems
If you have problems with paper ejecting properly, try these solutions:
• If paper does not eject fully, you may have set the wrong paper size. Cancel printing to eject the paper.
Select the correct paper size when you reprint.
• If paper is wrinkled when it ejects, it may be damp or too thin. Load new paper and be sure to select the correct paper type setting when you reprint.
Solving Problems Printing from a Computer
Check these sections if you have problems while printing from your computer.
Note: When printing using AirPrint, the available print settings are different from those covered in this
manual. See the Apple website for details.
Nothing Prints
If you have sent a print job and nothing prints, try these solutions:
• Make sure your product is turned on and connected to your computer.
• Make sure any interface cables are connected securely at both ends.
• If you connected your product to a USB hub, make sure it is a first-tier hub. If it still does not print, connect your product directly to your computer instead of the hub.
• Make sure the printer status is not offline or pending.
• Run a product check to see if a test page prints. If the test page prints, check to see if your product software is installed correctly.
• Make sure your system meets the requirements for your operating system. If you are printing a high resolution image, you may need more than the minimum requirements. Print the image at a lower resolution or if necessary, increase your system's memory.
• In Windows, make sure your product is selected as the default printer and the printer port setting matches the printer connection port.
• In Windows, delete all jobs from the Windows Spooler. Click Print Queue on the Maintenance tab in the printer settings window, and cancel any stalled print jobs.
• On a Mac, make sure the printer is added to the printer list and the printer is not paused.
Product Icon Does Not Appear in Windows Taskbar
If you do not see your product icon in the Windows taskbar, first try restarting your computer. If that does not work, try this solution:
1. Do one of the following:
• Windows 10: Click and select (Settings) > Devices > Printers & scanners. Select your product name and select Manage > Printing preferences.
• Windows 8.x: Navigate to the Apps screen and select Control Panel > Hardware and Sound > Devices and Printers. Right-click your product name, select Printing Preferences, and select your product name again if necessary.
• Windows 7: Click and select Devices and Printers. Right-click your product name, select Printing Preferences, and select your product name again if necessary.
• Windows Vista: Click , select Control Panel, and click Printer under Hardware and Sound. Right-click your product name, select Printing Preferences, and select your product name again if necessary.
2. Click the Maintenance tab.
3. Click the Extended Settings button.
4. Select Enable EPSON Status Monitor 3 and click OK.
5. Click the Monitoring Preferences button.
6. Click the checkbox for the option that adds the shortcut icon to the taskbar.
7. Click OK to close the open program windows.
Printing is Slow
If printing becomes slow, try these solutions:
• Make sure your system meets the requirements for your operating system. If you are printing a high resolution image, you may need more than the minimum requirements. If necessary, increase your system's memory.
• If you are using Windows 7, close the Devices and Printers window before you print.
• On a Mac, make sure you download and install the Epson printer driver.
• Make sure Quiet Mode is turned off.
• Clear space on your hard drive or run a defragmentation utility to free up existing space.
• Close any programs you are not using when you print.
• If your product is connected to a USB hub, connect it directly to your computer instead.
• If printing becomes slower after printing continuously for a long time, the product may have automatically slowed down to protect the print mechanism from overheating or becoming damaged.
Let the product rest with the power on for 30 minutes, then try printing again.
For the fastest printing, select the following settings in your product software:
• Turn on any high speed settings in your product software.
• Select a lower print quality setting.
• Windows: Click the Maintenance or Utility tab, select Extended Settings or Speed and Progress, and select the following settings:
• Always Spool RAW Datatype
• Page Rendering Mode
• Print as Bitmap
• Windows: Select Printer Properties, click the More Options tab, and make sure the High Speed setting is enabled.
• Mac: Select System Preferences, select Printers & Scanners, and select your product. Select Options & Supplies, select Options (or Driver), and enable the High-Speed Printing setting.
If printing is still slow and you are using Windows 7 or Windows Vista, try the following:
1. Click and select Computer or My Computer. Double-click the C: drive and open these folders: ProgramData > EPSON > PRINTER.
Note: If you do not see the ProgramData folder, open the Organize menu and select Folder and search options. In the window that appears, click the View tab, select Show hidden files, folders, and drives in the Advanced settings list, and click OK.
2. Right-click the EPAUDF01.AUD file and select Delete.
3. Restart your computer and try printing again.
Solving Page Layout and Content Problems
Check these sections if you have problems with the layout or content of your printed pages.
Note: When printing using AirPrint, the available print settings are different from those covered in this
manual. See the Apple website for details.
Inverted Image
If your printed image is inverted unexpectedly, try these solutions:
• Turn off any mirror or inversion settings in your printing application.
• Turn off the Mirror Image, Flip horizontally, or Reverse page orientation settings in your printer software. (This option has different names, depending on your operating system version.)
Too Many Copies Print
Make sure that the Copies setting in your printing program or printer software is not set for multiple
copies.
Blank Pages Print
If blank pages print unexpectedly, try these solutions:
• Make sure you selected the correct paper size settings in your printing program and printer software.
• If a blank page exists in a document you are printing and you want to skip printing it, select the Skip Blank Page setting in your printer software, if available.
• Run a print head nozzle check to see if any of the nozzles are clogged. Then clean the print head, if necessary.
• Make sure your product is selected as the printer in your printing program.
• You may need to refill the ink. Visually check the ink levels.
Incorrect Margins on Printout
If your printed page has incorrect margins, try these solutions:
• Make sure you selected the correct paper size settings in your printing program and printer software.
• Make sure you selected the correct margins for your paper size in your printing program.
• Make sure your paper is positioned correctly for feeding into the product.
You can use the preview option in your printer software to check your margins before you print.
Border Appears on Borderless Prints
If you see a border on borderless prints, try these solutions:
• Make sure you are printing on a compatible borderless paper type and size.
Note: For custom paper sizes, make sure you select a supported borderless page width.
• Windows: Make sure you selected the Borderless setting in your printer software.
• Mac: Make sure you selected the Borderless checkbox or a paper size with a Borderless option in your printer software.
• Adjust the Expansion setting to adjust the amount of image expansion on the edges of borderless prints.
• Make sure the image size and the paper size are set correctly; if the image is small, the enlargement may not be enough to cover the paper.
• Access the Extended Settings (Windows) or Printing Preferences (Mac) and select Remove White Borders.
Incorrect Characters Print
If incorrect characters appear in your prints, try these solutions before reprinting:
• Make sure any cables are securely connected at both ends.
• In Windows, delete all jobs from the Windows Spooler. Click Print Queue on the Maintenance tab in the printer settings window, and cancel any stalled print jobs.
• If your product is connected to a USB hub, connect it directly to your computer instead.
• If your computer entered sleep mode the last time you printed, the next print job after your computer exits sleep mode may contain garbled characters. Print your document again.
• If incorrect characters still appear in your prints, try connecting your product using a different cable.
Incorrect Image Size or Position
If your printed image is the wrong size or in the wrong position, try these solutions:
• Make sure you selected the correct paper size and layout settings in your printing program and printer software.
• Make sure you selected the correct paper size on the control panel.
• Make sure your paper is positioned correctly for feeding into the printer.
• Clean the scanner glass and document cover.
• If the edges of a copy are cropped, slightly move the original away from the edges of the scanner glass.
• Make sure you selected the correct margins for your paper size in your printing program.
• Be sure to select the correct Original Size setting for your original in the Copy settings.
You can use the preview option in your printer software to check your margins before you print.
Slanted Printout
If your printouts are slanted, try these solutions:
• Slide the edge guide against the edge of the paper.
• Select a higher print quality setting in your printer software.
• Turn off any high speed settings in your product software.
• Align the print head.
• Make sure the product is not printing while tilted or at an angle.
Solving Print Quality Problems
Check these sections if your printouts have problems with print quality, but your image looks fine on your computer screen.
Note: When printing using AirPrint, the available print settings are different from those covered in this manual. See the Apple website for details.
White or Dark Lines in Printout
If you notice white or dark lines in your prints (also called banding), try these solutions before you reprint:
• Run a nozzle check to see if any of the print head nozzles are clogged. Then clean the print head, if necessary.
• Make sure the paper type setting matches the type of paper you loaded.
• Make sure you loaded the printable side of the paper correctly for your product.
• Turn off any high speed settings in your product software.
• Adjust the print quality in the product software.
• You may need to refill the ink. Visually check the ink levels.
• If you have not used the product for a long time, run the Power Cleaning utility.
Note: Power Cleaning consumes a lot of ink, so run this utility only if you cannot improve print quality by cleaning the print head.
Blurry or Smeared Printout
If your printouts are blurry or smeared, try these solutions:
• Make sure your paper is not damp, curled, old, or loaded incorrectly in your product.
• Use a support sheet with special paper, or load special paper one sheet at a time.
• Make sure your paper meets the specifications for your product.
• Use Epson papers to ensure proper saturation and absorption of genuine Epson inks.
• Make sure the paper type setting in your product software matches the type of paper you loaded.
• Make sure you loaded the printable side of the paper correctly for your product.
• Remove each sheet from the output tray as it is printed.
• Avoid handling printouts on glossy paper right after printing to allow the ink to set.
• Turn off any high speed settings in your product software.
• If you print on both sides of a sheet of paper, smudges may appear on the reverse side of heavily saturated or dark images. If one side of a sheet will contain a lighter image or text, print that side first. Adjust the density and/or ink drying time settings.
• If printed copies are smeared, lower the copy density setting on the product control panel.
• The ink levels may be low and you may need to refill the ink. Visually check the ink levels.
• Run a nozzle check to see if any of the print head nozzles are clogged. Then clean the print head, if necessary.
• Align the print head.
• Adjust the print quality in the product software.
• Clean the paper path.
• If you printed when the ink levels were too low to be seen in the ink tank windows, refill the ink tanks to the upper lines and run the Power Cleaning utility. Then run a nozzle check to see if print quality has improved.
• If you have not used the product for a long time, run the Power Cleaning utility.
Note: Power Cleaning consumes a lot of ink, so run this utility only if you cannot improve print quality by cleaning the print head.
Note: Your product will not operate properly while tilted at an angle. Place it on a flat, stable surface that extends beyond the base of the product in all directions.
Faint Printout or Printout Has Gaps
If your printouts are faint or have gaps, try these solutions:
• Run a nozzle check to see if any of the print head nozzles are clogged. Then clean the print head, if
necessary.
• The ink levels may be low. Visually check the ink levels.
• Make sure the paper type setting matches the type of paper you loaded.
• Make sure your paper is not damp, curled, old, or loaded incorrectly in your product.
• Align the print head.
• Adjust the print quality in the product software.
• Clean the paper path.
• If you have not used the product for a long time, run the Power Cleaning utility.
Note: Power Cleaning consumes a lot of ink, so run this utility only if you cannot improve print quality by cleaning the print head.
Grainy Printout
If your printouts are grainy, try these solutions:
• Make sure you loaded the printable side of the paper correctly for your product.
• Select a higher print quality setting and turn off any high speed settings in your product software.
• Run a nozzle check to see if any of the print head nozzles are clogged. Then clean the print head, if necessary.
• Align the print head.
• Adjust the print quality in the product software.
• You may need to increase the image resolution or print a smaller size; see your software documentation.
Note: Images from the Internet may be low resolution and not result in a high quality printout.
• If you enlarged the image size in an image-editing program, you need to increase the image resolution setting to retain a high image quality. Increase the image resolution by the same amount you increase the image size. For example, if the image resolution is 300 dpi (dots per inch) and you will double the image size for printing, change the resolution setting to 600 dpi.
Note: Higher resolution settings result in larger file sizes, which take longer to process and print. Consider the limitations of your computer system when selecting a resolution, and select the lowest possible resolution that produces acceptable quality to keep file sizes manageable.
Incorrect Colors
If your printouts have incorrect colors, try these solutions:
• Make sure the paper type setting matches the paper you loaded.
• Make sure the Grayscale setting is not selected in your printer software.
• If you selected Standard-Vivid (Windows) or Normal-Vivid (Mac) as the quality setting in the printer software, try selecting Standard (Windows) or Normal (Mac) instead.
• Run a nozzle check to see if any of the print head nozzles are clogged. Then clean the print head, if necessary.
• The ink levels may be low and you may need to refill the ink. Visually check the ink levels. 209
• If you printed when the ink levels were too low to be seen in the ink tank windows, refill the ink tanks to the upper lines and run the Power Cleaning utility. Then run a nozzle check to see if print quality has improved.
• After you print, the colors in your printout need time to set as the ink dries. During this time, the colors may look different than you expect. To speed up drying time, do not stack your printouts on top of each other.
• Your printed colors can never exactly match your on-screen colors. However, you can use a color management system to get as close as possible. Try using the color management options in your printer software.
• For best results, use genuine Epson paper.
• If you have not used the product for a long time, run the Power Cleaning utility.
Note: Power Cleaning consumes a lot of ink, so run this utility only if you cannot improve print quality by cleaning the print head.
Scanning Software Does Not Operate Correctly
If your scanning software does not operate correctly, try these solutions:
• Make sure your computer has adequate memory and meets the system requirements for your operating system.
• Make sure your computer is not running in a power-saving mode, such as sleep or standby. If so, wake your system and restart your scanning software.
• If you upgraded your operating system but did not reinstall your scanning software, try reinstalling it.
• In Windows, make sure your product is listed as a valid device in the Scanners and Cameras control panel. Parent topic: Solving Scanning Problems Related concepts Uninstall Your Product Software Related references Windows System Requirements Mac System Requirements
Cannot Start Epson Scan 2
If you cannot start Epson Scan 2, try these solutions:
• Make sure your product is turned on and any interface cables are securely connected at both ends.
• Make sure Epson Scan 2 is selected as your scanning program.
• Make sure your computer is not running in a power-saving mode, such as sleep or standby. If so, wake your system and restart Epson Scan 2.
• Check the connection setting and test the connection using Epson Scan 2 Utility:
Windows 10: Click and select EPSON > Epson Scan 2 Utility. Make sure the correct product is selected. If necessary, select the Other tab and click Reset.
Windows 8.x: Navigate to the Apps screen and select Epson Scan 2 Utility. Make sure the correct product is selected. If necessary, select the Other tab and click Reset.
Windows (other versions): Click or Start > All Programs or Programs > EPSON > Epson Scan 2 > Epson Scan 2 Utility. Make sure the correct product is selected. If necessary, select the Other tab and click Reset.
Mac: Open the Applications folder, click Epson Software, and click Epson Scan 2 Utility. Make sure the correct product is selected. If necessary, select the Other tab and click Reset.
• Make sure you do not have multiple versions of Epson Scan 2 installed. If you do, uninstall both versions and install one version.
• If you upgraded your operating system but did not reinstall Epson Scan 2, try reinstalling it.
Image Consists of a Few Dots Only
If your scanned image consists only of a few dots, try these solutions:
• Make sure you placed your original for scanning facing the correct way.
• If the Image Type setting is Black & White, adjust the Threshold and scan again.
Line of Dots Appears in All Scanned Images
If a line of dots appears in all your scanned images, clean the scanner glass with a soft, dry, lint-free cloth or use a small amount of glass cleaner on the cloth, if necessary. Paper towels are not recommended.
Caution: Do not spray glass cleaner directly on the scanner glass.
If you are scanning from the ADF, try cleaning the ADF and scan again.
Straight Lines in an Image Appear Crooked
If straight lines in an original appear crooked in a scanned image, make sure to place your original straight when you scan it.
If you are scanning from the ADF, try cleaning the ADF and scan again.
Image is Distorted or Blurry
If a scanned image appears distorted or blurry, try these solutions:
• Do not move your original or your product during scanning.
• Your product will not operate properly while tilted at an angle. Place your product on a flat, stable surface that extends beyond its base in all directions.
• Adjust these Epson Scan 2 settings (if available) and try scanning again:
• Increase the Resolution setting.
• If the Image Type setting is Black & White, adjust the Threshold setting.
• If the Image Type setting is Color or Grayscale, select the Unsharp Mask setting.
• If the Image Type setting is Black & White, select Text Enhancement. If the Image Type setting is Color or Grayscale, change the Text Enhancement setting to High.
Image Colors are Patchy at the Edges
If you are scanning a thick or warped original, cover its edges with paper to block external light as you scan it.
Image is Too Dark
If your scanned image is too dark, try these solutions:
• If the Image Type is set to Color or Grayscale, adjust the Brightness setting.
• Check the brightness and contrast settings of your computer monitor.
Back of Original Image Appears in Scanned Image
If an image from the back of a thin original appears in your scanned image, try these solutions:
• Place a piece of black paper on the back of the original and scan it again.
• Adjust these Epson Scan 2 settings (if available) and try scanning again:
- Select the Advanced Settings tab and adjust the Brightness setting.
- If the Image Type is set to Black & White, select Text Enhancement. If the Image Type is set to Color or Grayscale, change the Text Enhancement setting to High.
Ripple Patterns Appear in an Image
You may see a ripple pattern (called a moiré) in scanned images of printed documents. This is caused by interference from differing pitches in the scanner's screen and your original's halftone screen. To reduce this effect, adjust these Epson Scan 2 settings (if available) and try scanning again:
• Select the Descreening setting.
• Select a lower Resolution setting.
Scanned Image Colors Do Not Match Original Colors
Printed colors can never exactly match the colors on your computer monitor because printers and monitors use different color systems: monitors use RGB (red, green, and blue) and printers typically use CMYK (cyan, magenta, yellow, and black).
Check the color matching and color management capabilities of your computer, display adapter, and the software you are using to see if they are affecting the palette of colors you see on your screen.
To adjust the colors in your scanned image, adjust these Epson Scan 2 settings (if available) and try scanning again:
- If the Image Type setting is Color or Grayscale, adjust the Contrast setting.
- If the Image Type setting is Black & White or Grayscale, adjust the Color Enhance setting.
Scanned Image Edges are Cropped
If the edges of a scanned image are cropped, make sure your original is placed correctly for scanning. If necessary, move your original away from the edges of the scanner glass slightly.
Uninstalling Product Software - Windows
You can uninstall and then re-install your product software to solve certain problems.
1. Turn off the product.
2. Disconnect any interface cables.
3. Do one of the following:
- Windows 10: Click and select (Settings) > Apps or System > Apps & features. Then select the program you want to uninstall and select Uninstall.
- Windows 8.x: Navigate to the Apps screen and select Control Panel > Programs > Programs and Features. Select the uninstall option for your Epson product, then select Uninstall/Change.
Note: If you see a User Account Control window, click Yes or Continue.
Select your product again, if necessary, then select OK, and click Yes to confirm the uninstallation.
- Windows (other versions): Click or Start, and select All Programs or Programs. Select EPSON, select your product, then click EPSON Printer Software Uninstall.
Note: If you see a User Account Control window, click Yes or Continue.
In the next window, select your product and click OK. Then follow any on-screen instructions.
4. Do one of the following to uninstall Epson Event Manager, then follow any on-screen instructions:
- Windows 10/8.x: Select Epson Event Manager and click Uninstall.
- Windows 7/Windows Vista: Open the Windows Control Panel utility. Select Programs and Features. (In Classic view, select Programs and click Uninstall a program.) Select Epson Event Manager and click Uninstall/Change.
5. Do one of the following to uninstall Epson Scan 2, then follow any on-screen instructions: Windows 10:
- Select Epson Scan 2 and click Uninstall.
- Windows 8.x/Windows 7/Windows Vista: Select Epson Scan 2 and click Uninstall/Change.
6. Restart your computer, then see the Start Here sheet to re-install your software. Note: If you find that re-installing your product software does not solve a problem, contact Epson.
Uninstalling Product Software - Mac
In most cases, you do not need to uninstall your product software before re-installing it. However, you can download the Uninstaller utility from the Epson support website to uninstall your product software as described here.
Note: If you find that re-installing your product software does not solve a problem, contact Epson.
1. To download the Uninstaller utility, visit epson.com/support (U.S.), epson.ca/support (Canada), or epson.com.jm/support (Caribbean) and select your product.
2. Click Downloads.
3. Select your operating system, click Utilities, locate the Uninstaller utility, and click Download.
4. Run the file you downloaded.
5. Double-click the Uninstaller icon.
6. In the Epson Uninstaller screen, select the checkbox for each software program you want to uninstall.
7. Click Uninstall.
8. Follow the on-screen instructions to uninstall the software.
9. Reinstall your product software.
Note: If you uninstall the printer driver and your product name remains in the Print & Fax, Print & Scan, or Printers & Scanners window, select your product name and click the – (remove) icon to remove it.
Parent topic: Uninstall Your Product Software
Where to Get Help
If you need to contact Epson for technical support services, use the following support options.
Internet Support
Visit Epson's support website at epson.com/support (U.S.), epson.ca/support (Canada), or epson.com.jm/support (Caribbean) and select your product for solutions to common problems. You can download drivers and documentation, get FAQs and troubleshooting advice, or e-mail Epson with your questions.
Speak to a Support Representative
Before you call Epson for support, please have the following information ready:
• Product name
• Product serial number (located on a label on the product)
• Proof of purchase (such as a store receipt) and date of purchase
• Computer configuration
• Description of the problem
Then call:
• U.S.: (562) 276-4382, 6 AM to 8 PM, Pacific Time, Monday through Friday, and 7 AM to 4 PM, Pacific Time, Saturday
• Canada: (905) 709-3839, 6 AM to 8 PM, Pacific Time, Monday through Friday, and 7 AM to 4 PM, Pacific Time, Saturday
Days and hours of support are subject to change without notice. Toll or long distance charges may apply.
Purchase Supplies and Accessories
You can purchase genuine Epson ink and paper at epson.com (U.S. sales), epson.ca (Canadian sales), or epson.com.jm (Caribbean sales). You can also purchase supplies from an Epson authorized reseller. To find the nearest one, call 800-GO-EPSON (800-463-7766) in the U.S. or 800-807-7766 in Canada.